
Integrate Zoho Inventory with Amazon
Amazon is a global e-commerce marketplace that allows businesses to sell products directly to customers through its online platform.
When integrated with an Inventory system, Amazon helps businesses automate and streamline operations. Orders placed on Amazon can automatically sync with the Inventory, updating inventory levels, generating invoices, tracking shipments, and managing financial records in real time. This reduces manual data entry, minimises errors, improves stock visibility, and ensures accurate reporting. Overall, the Amazon integration with Zoho Inventory, enables businesses to manage sales, inventory, and accounting more efficiently.
Benefits of Amazon Integration
Here are the key benefits of integrating Zoho Inventory with Amazon,
- Orders from Amazon are automatically synced with the Inventory system.
- Inventory levels are updated in real time.
- Sales and payment data are recorded accurately without manual work.
What is FBA?
Fulfilment by Amazon (FBA) facilitates sellers to rent Amazon’s storage space to keep their goods, while also fulfiling online orders and handling customer services.
How FBA works
- The seller ships goods to Amazon’s storage facility, where the products are sorted and stored.
- When a customer orders a product, Amazon picks and packs it from its nearest warehouse.
- Amazon will ship the package and share the tracking information with the seller.
- Post delivery, Amazon handles customer feedback and services.
- On a biweekly basis, Amazon deposits the seller’s share of profit into their bank account after deduction.
What is FBM?
- Fulfillment by Merchant (FBM) in Amazon means the seller is responsible for storing, packing, and shipping items directly to customers
- Unlike FBA, where Amazon handles logistics, in FBM you manage your own inventory, delivery process, returns, and customer service. Amazon provides the platform to list and sell products, but the fulfillment operations are handled entirely by the merchant.
Set Up Amazon Integration with Zoho Inventory
You can connect your Amazon seller account with your Zoho Inventory system to enable seamless data synchronisation between the two platforms. As a result, businesses can manage sales, stock, invoicing, and accounting from a single system without manual data entry, improving accuracy, efficiency, and overall operational control.
Prerequisite: Before setting up the integration, make sure that the base currency configured in Zoho Inventory matches the currency used in your sales channel account.
To integrate Zoho Inventory with Amazon,
- Click the Gear icon in the top right corner.
- Scroll down to Extensions and Developer Data.
- Select eCommerce under Integrations & Marketplace.
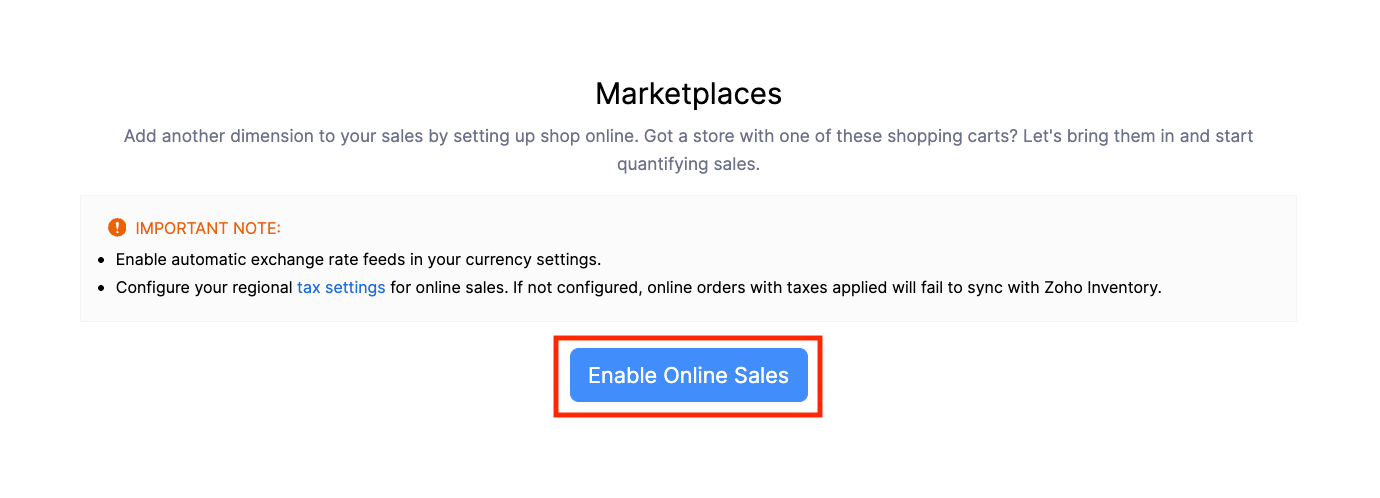
- Click Enable Online Sales in the Marketplace page. If you have already enabled, navigate to Amazon card.
- Click Set Up Now.
- You will be redirected to the Amazon website. Sign in by providing your email address and password.
- Fill in the required details in the Amazon Configuration page.
Products
| Field | Description |
|---|---|
| Map Items | You can map items to Zoho Inventory using SKU (Stock Keeping Unit) and Item Name by selecting any of the following options: SKU or Name: Map items if either the SKU or Name matches. SKU Only: Map items only when the SKU matches. Name Only: Map items only when the Name matches. SKU and Name: Map items only when both the SKU and Name match. |
| Inventory Valuation Method | You can choose either FIFO (First In, First Out) or WAC (Weighted Average Cost) as your inventory valuation method. |
| Tax Exemption | The selected exemption will be automatically applied to all the non-taxable items fetched from Amazon. |
| Sync Stock | By enabling this, any stock changes made in Zoho Inventory will automatically update in Amazon. |
| Fetch Stock Counts | By enabling this option, your Amazon stock counts will be updated with Zoho Inventory. This update happens only once during the initial sync. Items that are not available in Zoho Inventory will be fetched automatically, and their stock will be recorded as an inventory adjustment. |
Orders
| Field | Description |
|---|---|
| Import From | Select a date to start importing orders from Amazon. |
| Sync Frequency | Select the sync frequency in the dropdown |
| Choose which modules to Sync from Amazon | Enable Package and Shipments to sync package details and shipment information from Amazon to your Inventory system, allowing you to track delivery status and manage fulfilment updates seamlessly. |
Note: The initial sync can occur only once. Changing the date will take effect only if the initial sync fails.
Setup Locations
You can map locations in Zoho Inventory in two ways:
- Sync All Locations: All locations will be synced with Amazon.
- Custom Location Mapping: Only one specific location can be synced. Click the Zoho Inventory Location dropdown and select the location.
Enable FBA Location to send your items to Amazon’s fulfillment centers, where they will be stored, packed, and shipped directly to your customers.
Note:
- Map each FBA location to the corresponding Zoho Inventory location to ensure accurate stock tracking and order processing.
- Sales orders from FBA will be linked to the selected Zoho Inventory location based on the GSTIN. If a matching GSTIN is not found, the sales order will not be synced.
- The applicable tax type (IGST or SGST and CGST) will be determined based on the FBA location address and the customer’s shipping address.
| Fields | Description |
|---|---|
| Select FBA Location | Click the dropdown and select the locations you want to map with FBA. |
| FBA Items Sync | Click the dropdown and select the sales channel items, which should be automatically marked as FBA during synchronization. |
| Link FBA and FBM Products Automatically | Enable this option to automatically link your Fulfillment by Amazon (FBA) and Fulfillment by Merchant (FBM) products during synchronization. |
Other Actions
Edit Configuration
To edit the Amazon configuration, follow the steps below,
- Click the Gear icon in the top right corner.
- Scroll down to Extensions and Developer Data.
- Select eCommerce under Integrations & Marketplace.
- Navigate to Amazon card.
- Click Show Details for the online store you wish to edit in the Amazon card.
- Scroll down to Stock section.
- Click Configure.
- Edit the required changes and click Save.
Sync Manually
If you want to sync your transactions from Zoho Inventory to Amazon immediately, instead of waiting for the automatic sync, you can use the Sync Manually option.
To do this,
- Click the Gear icon in the top right corner.
- Scroll down to Extensions and Developer Data.
- Select eCommerce under Integrations & Marketplace.
- Click the Sync Manually dropdown in Amazon and choose the required option:
- Products: Syncs your items from Amazon to Zoho Inventory.
- Orders: Syncs your sales orders from Amazon to Zoho Inventory
- In the upcoming pop-up, choose when to fetch the records in the dropdown:
- Last Sync Time: Syncs all records from the last synced time for all sales channels you have configured with your organization.
- Specified Date: Enter a start and end date. Only the records within this selected period will be synced to Amazon.
- Click Initiate Sync.
Disable Integration
You can temporarily stop the integration between Zoho Inventory and Amazon. Once disabled, no records will be synced between the two apps until you enable it again.
To disable the Amazon integration,
- Click the Gear icon in the top right corner.
- Scroll down to Extensions and Developer Data.
- Select eCommerce under Integrations & Marketplace.
- Click Show Details in for the online shop you wish to disable in Amazon.
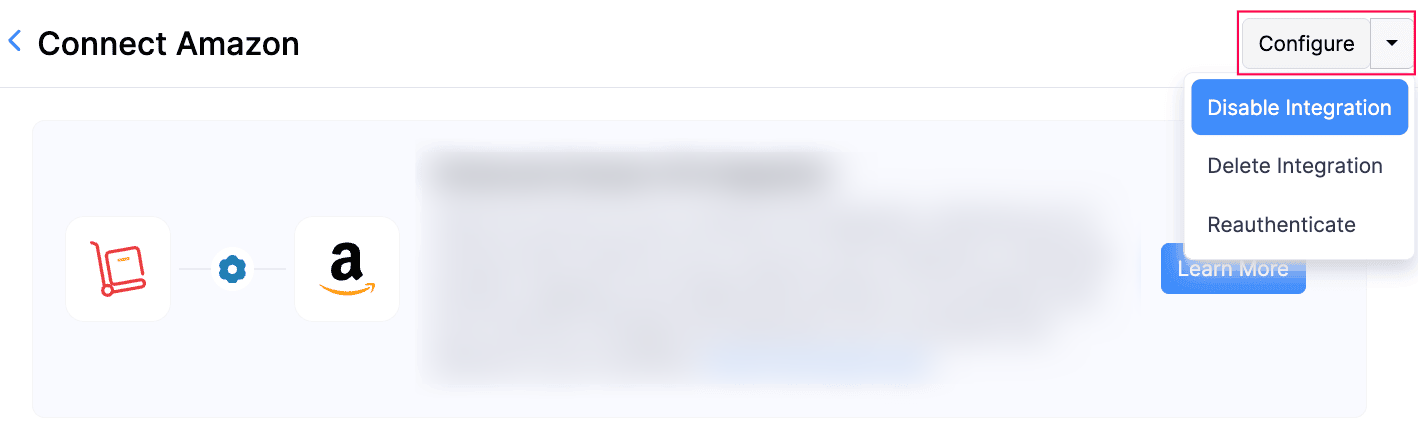
- Click the Configure dropdown in the top right corner.
- Select Disable Integration.
Warning: The integration will be paused temporarily, but your Amazon data will stay safe. While it’s paused, stock updates and shipment updates won’t be sent to Amazon. When you resume the integration, any items and sales orders created since the last sync will be brought into Zoho Inventory.
- Read the pop-up and click Yes, Proceed to agree and disable the integration.
Re-Enable Integration
Enable the integration again to restore the connection between Zoho Inventory and Amazon.
To re-enable Amazon for Zoho Inventory,
- Click the Gear icon in the top right corner.
- Scroll down to Extensions and Developer Data.
- Select eCommerce under Integrations & Marketplace.
- Click Show Details for the disabled online shop you wish to enable in Amazon.
- Click the Enable Integration dropdown in the top right corner.
Delete Integration
You can permanently delete the Zoho Inventory and Amazon integration. Once deleted, the integration can’t be restored, and no further data will sync between the two platforms.
To delete the Amazon integration,
- Click the Gear icon in the top right corner.
- Scroll down to Extensions and Developer Data.
- Select eCommerce under Integrations & Marketplace.
- Click Show Details for the online shop you wish to delete in Amazon.
- Click the Configure dropdown in the top right corner.
- Select Delete Integration.
Warning: The integration for the particular online shop will be permanently removed from Zoho Inventory. Your products will no longer be linked to Amazon, and actions like stock updates and shipment updates will stop completely.
Re-Authenticate
You can reconnect your Amazon account if the existing connection has expired or failed. This lets Zoho Inventorycontinue syncing your items and sales orders without issues.
To re-authenticate Amazon with Zoho Inventory,
- Click the Gear icon in the top right corner.
- Scroll down to Extensions and Developer Data.
- Select eCommerce under Integrations & Marketplace.
- Click Show Details for the online shop you wish to disable in Amazon.
- Click the Configure dropdown in the top right corner.
- Select Reauthenticate. You will be redirected to the Amazon website.
- Provide your credentials and sign in. Your Amazon account will be connected with Zoho Inventory.
Sync History
You can view the past sync activity for your items and sales orders.
To view the history of Items or Sales orders,
- Click the Gear icon in the top right corner.
- Scroll down to Extensions and Developer Data.
- Select eCommerce under Integrations & Marketplace.
- Click Show Details for the online shop you wish to view sync history in Amazon.
- Click the Sync History icon in the Items or Sales Orders section to view their sync logs.
Overall Sync History
You can also view the overall sync logs you made with Amazon.
To view the overall history,
- Click the Gear icon in the top right corner.
- Scroll down to Extensions and Developer Data.
- Select eCommerce under Integrations & Marketplace.
- Click Show Details for the online shop you wish to disable on Amazon.
- Click the Overall Sync History icon in the top right corner.
View By
You can apply filters such as Status and Sync Type to view the records in Overall Sync History.
To apply Status or Sync Type as filter,
- Click the Gear icon in the top right corner.
- Scroll down to the Extensions and Developer Data section.
- Select eCommerce under Integrations & Marketplace.
- Click Show Details for the online shop you wish to disable in Amazon.
- Click the Overall Sync History icon in the top right corner.
- Click the Status dropdown and select any of the filters:
- All – Shows every sync of the item with 0 syncs also
- Success and Failures – Shows both successful and failed syncs.
- Failures – Shows only the failed sync attempts.
- Success – Shows only the successful sync attempts.
- Click the Sync Type dropdown and select any of the filters:
- All Records – shows sync history for all types.
- Sales Orders – Shows only sales order syncs.
- Items – Shows only item syncs.
- Stock Adjusted – Shows stock adjustment syncs.
- Shipment Status – Shows shipment status syncs.
Export Sync History
Export the selected sync records (Items, Stock, Orders, and Shipments) related to your Amazon store.
To export your sync history,
- Click the Gear icon in the top right corner.
- Scroll down to Extensions and Developer Data.
- Select eCommerce under Integrations & Marketplace.
- Click Show Details in Amazon.
- Click the Sync History icon in the top right corner.
- Click the Export dropdown and select the sync history you wish to export.
Note:The successful sync records are automatically removed after one month, and the failed sync records are removed after two months. Since this involves a third-party integration, Zoho Inventory does not store these records permanently.