Bills
When your vendor supplies goods/services to you on credit, you’re sent an invoice that details the amount of money you owe him/her. You can record this as a bill in Zoho Inventory and track it until it’s paid.
Lets see an overview of all operations related to Bills.
Managing Bills
- Bills Workflow Diagram
- Bill Status
- Creating a bill
- Creating bills for items with serial numbers
- Creating bills for batch tracked items
- Raising a bill for multiple purchase orders
- Landed Costs
- Link Bills to Purchase Orders
- Import Bills
- Other options with Bills
- Multi-warehouse operations related to Bills
Recording Bill payments
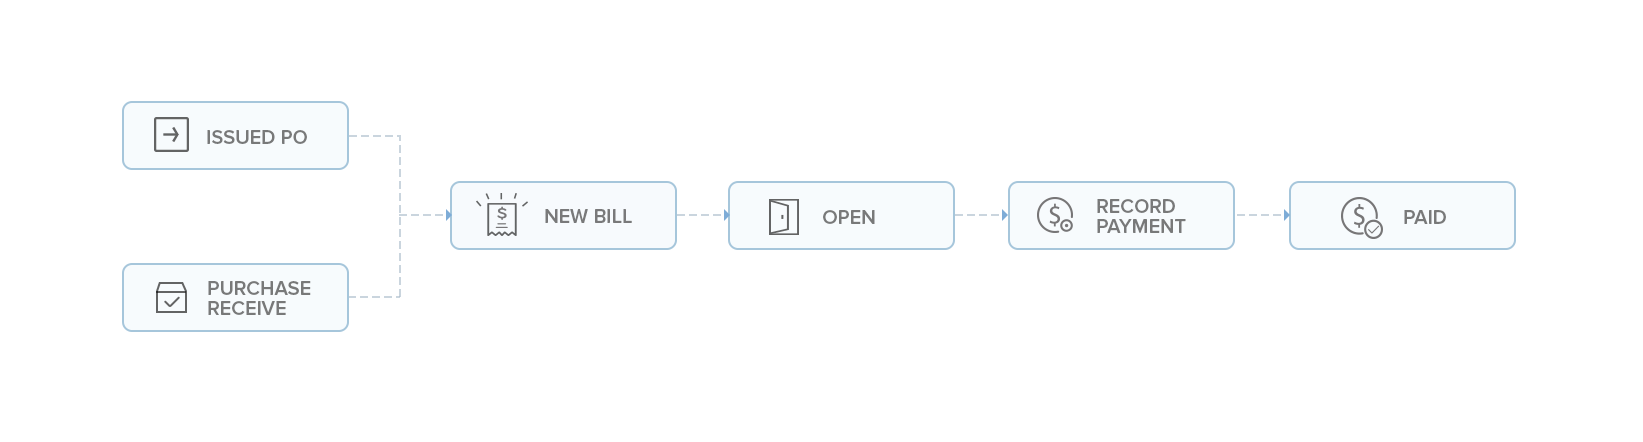
Bills Workflow Diagram
Bill Status
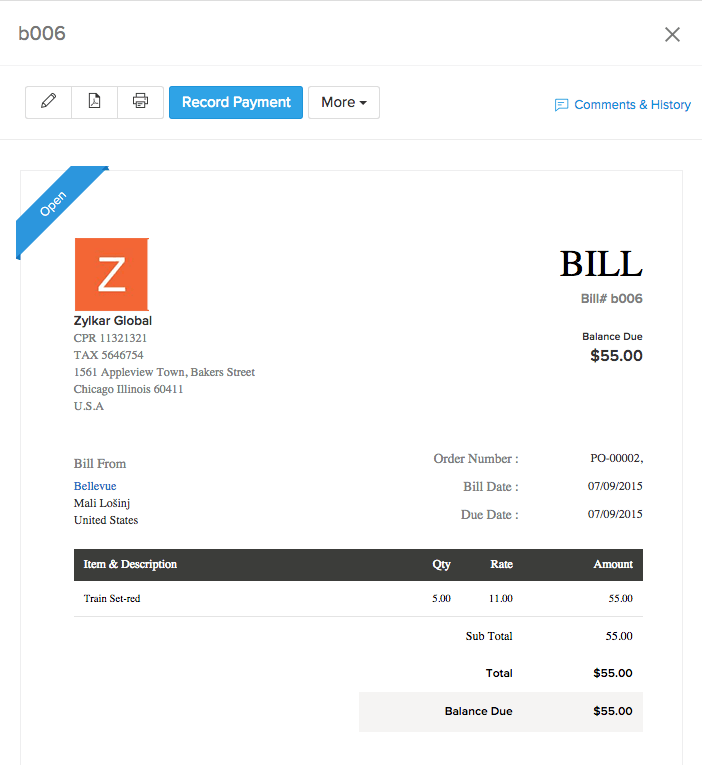
The status of your bills can be viewed from the Bills tab drop down as shown below,
- Draft - Bills when created will be in Draft status. It will not have any impact in accounts, inventory or reports.
- Open - The bills in your name that need to be paid.
- Overdue - The due date for these bills has passed and payment needs to be made promptly, probably with an overdue penalty if levied by the vendor.
- Partially Paid - A portion of these bills have been paid and the remaining amount is outstanding.
- Paid - These bills has been completely paid.
- Unpaid - All your outstanding bills, whether Open, Overdue or Partially Paid.
- Void - These bills have been made redundant.
Creating a bill
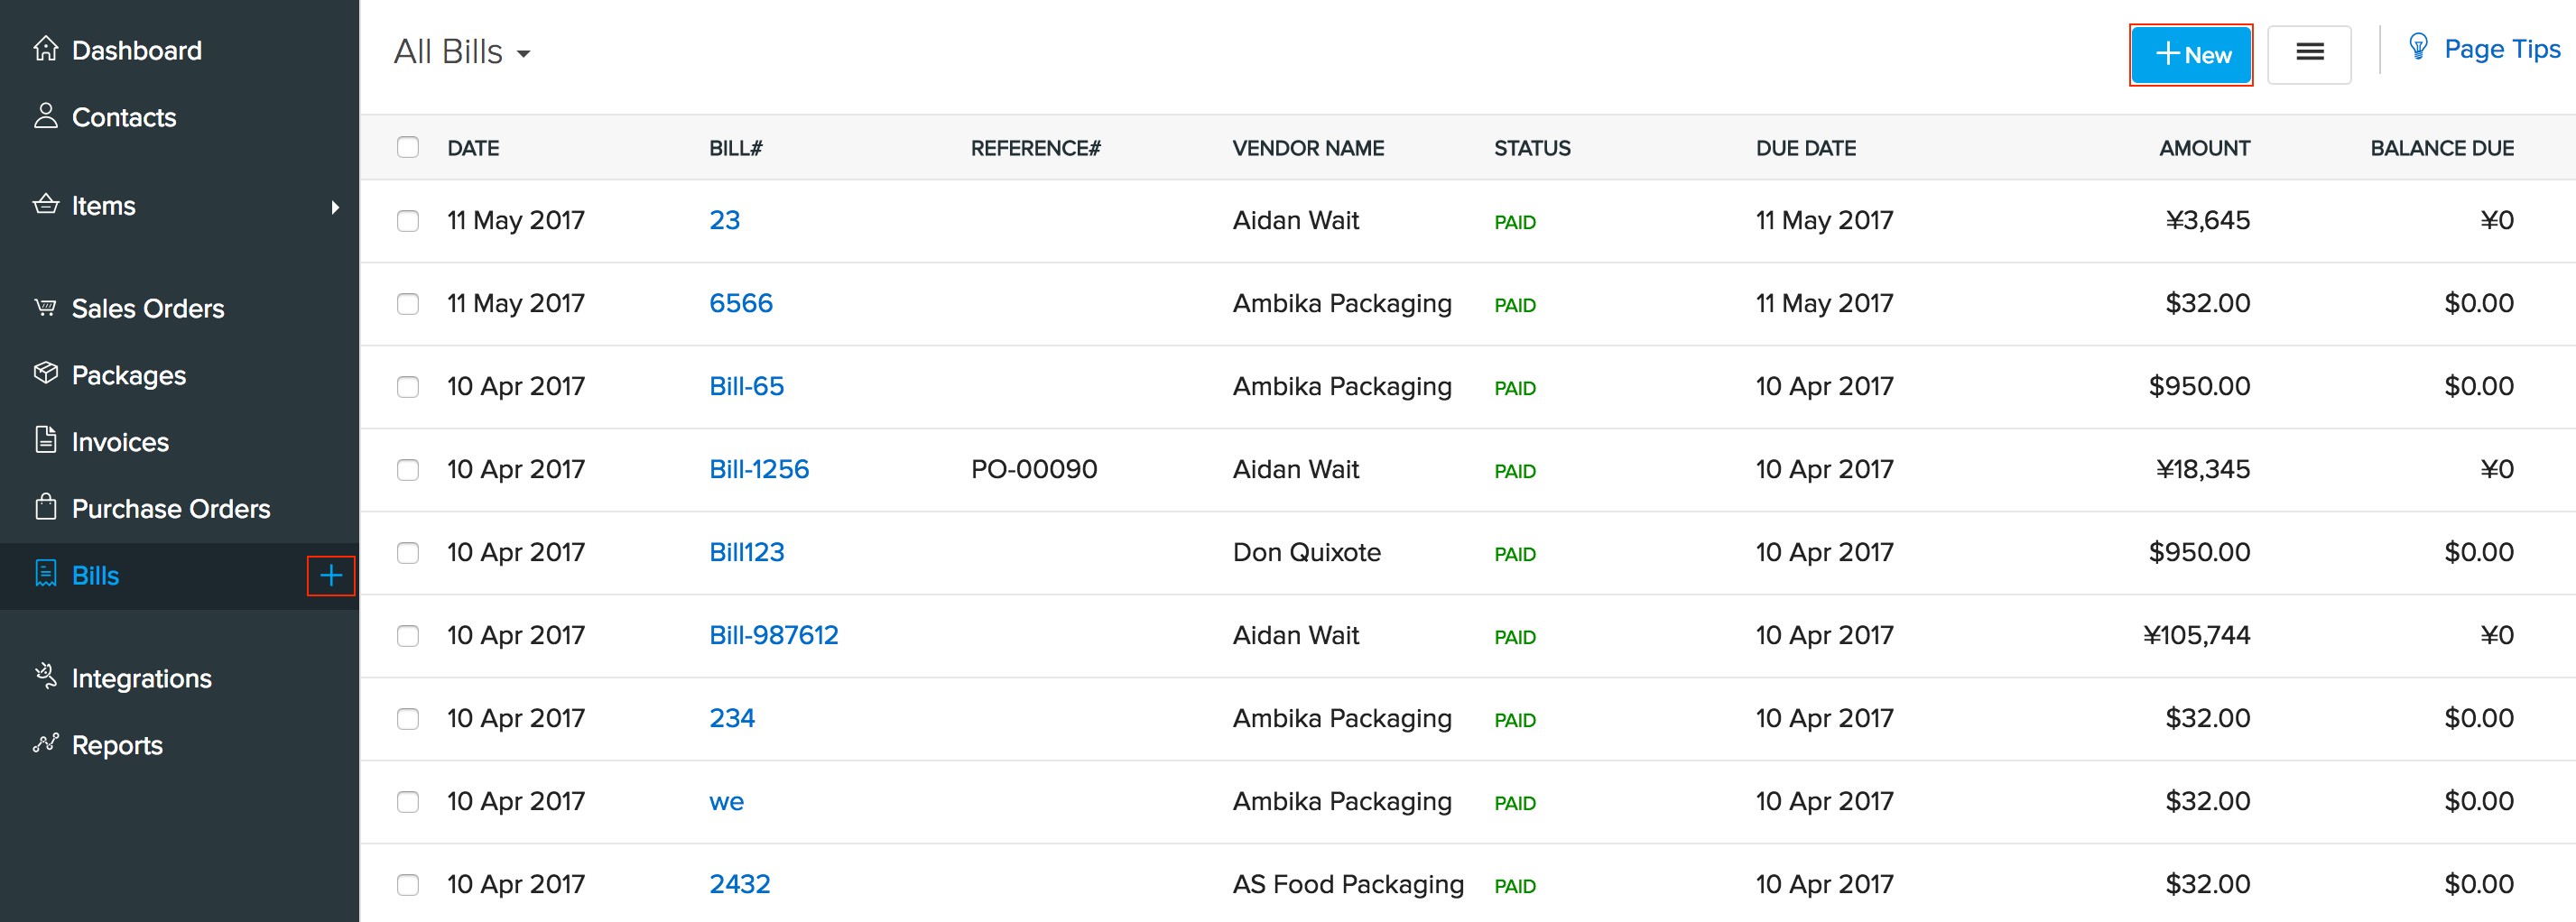
To create a bill in Zoho Inventory,
- Go to the Bills tab.
- Click on the quick create ‘(+)’ icon near Bills tab on the side bar or +New button on top of the Bills page.
- Enter the required information such as the bill number and vendor towards whom the bill is payable.
- Select the items and services from the dropdown for which you have been billed by your vendor.

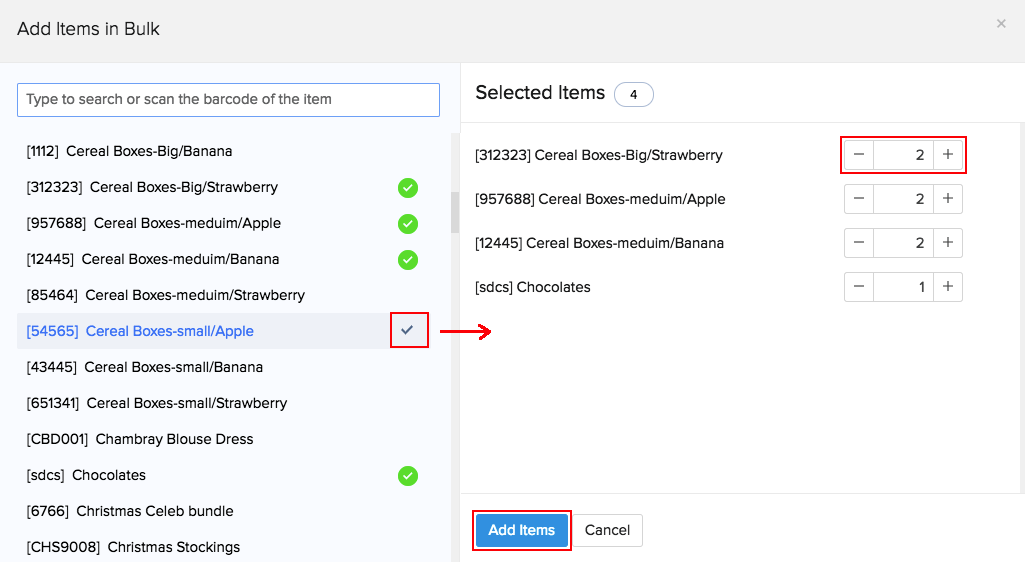
- Alternatively, you can also click the Add items in bulk option to add several items at once to your bill.
Pro Tip: Instead of searching for the items from the list, you can select an item by scanning its barcode. When you scan the same barcode more than once, the quantity of the item gets incremented automatically.
- Hit Save as Draft or Save as Open button.
Alternatively,
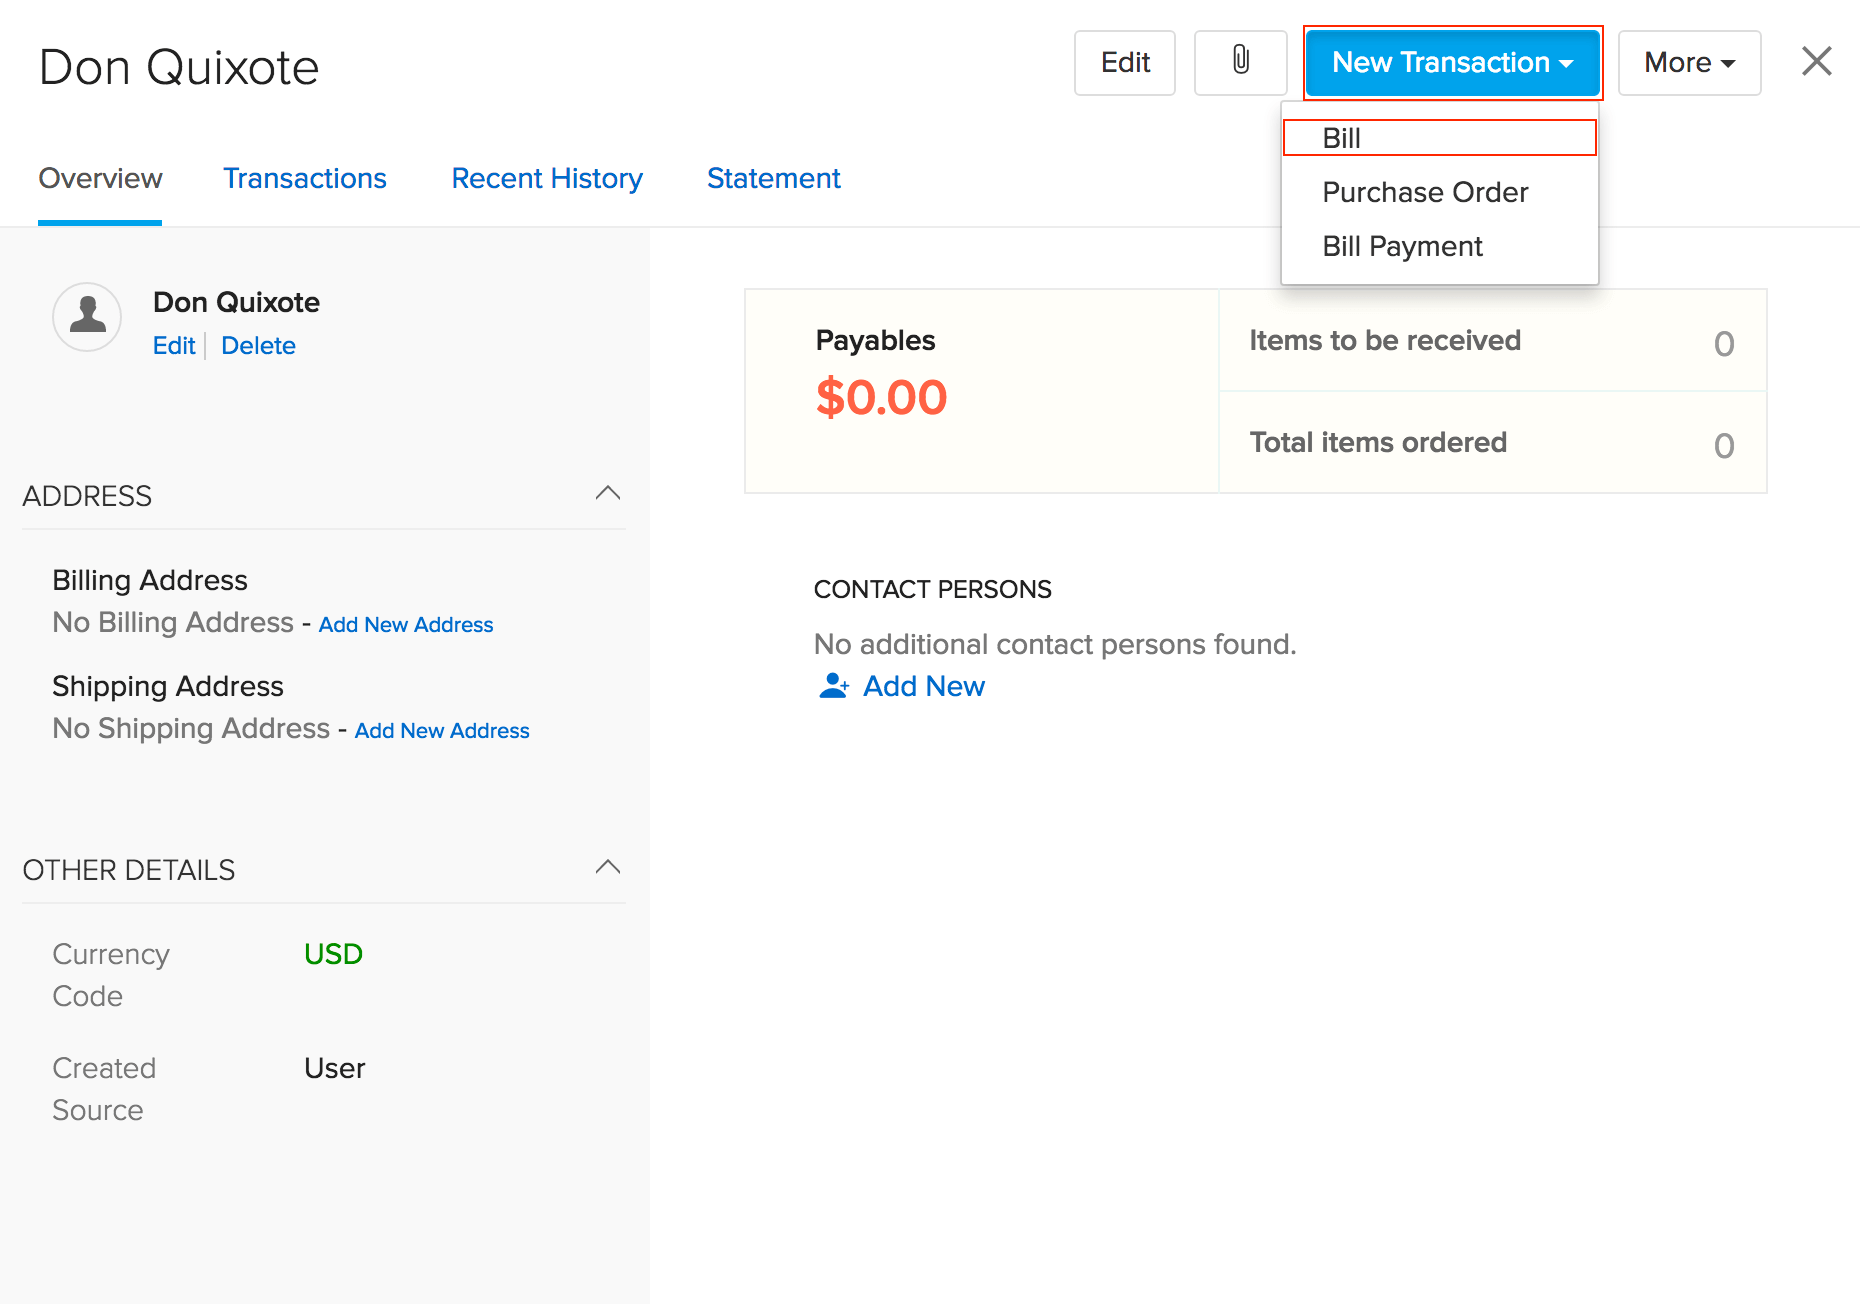
- Go to the Contacts tab and select the vendor to whom money is owed.
- Click on New Transaction.
- Choose the option Bill.
- Enter the required details and click Save as Draft or Save as Open to create the bill.
- Note: You can record Notes of up to 2000 characters and purchase Terms & Conditions of up to 5000 characters for the vendor bill.
Insight: When you create standalone bills, you can mark them as Received to reconcile the physical stock of the underlying items. Learn more.
From Purchase Order
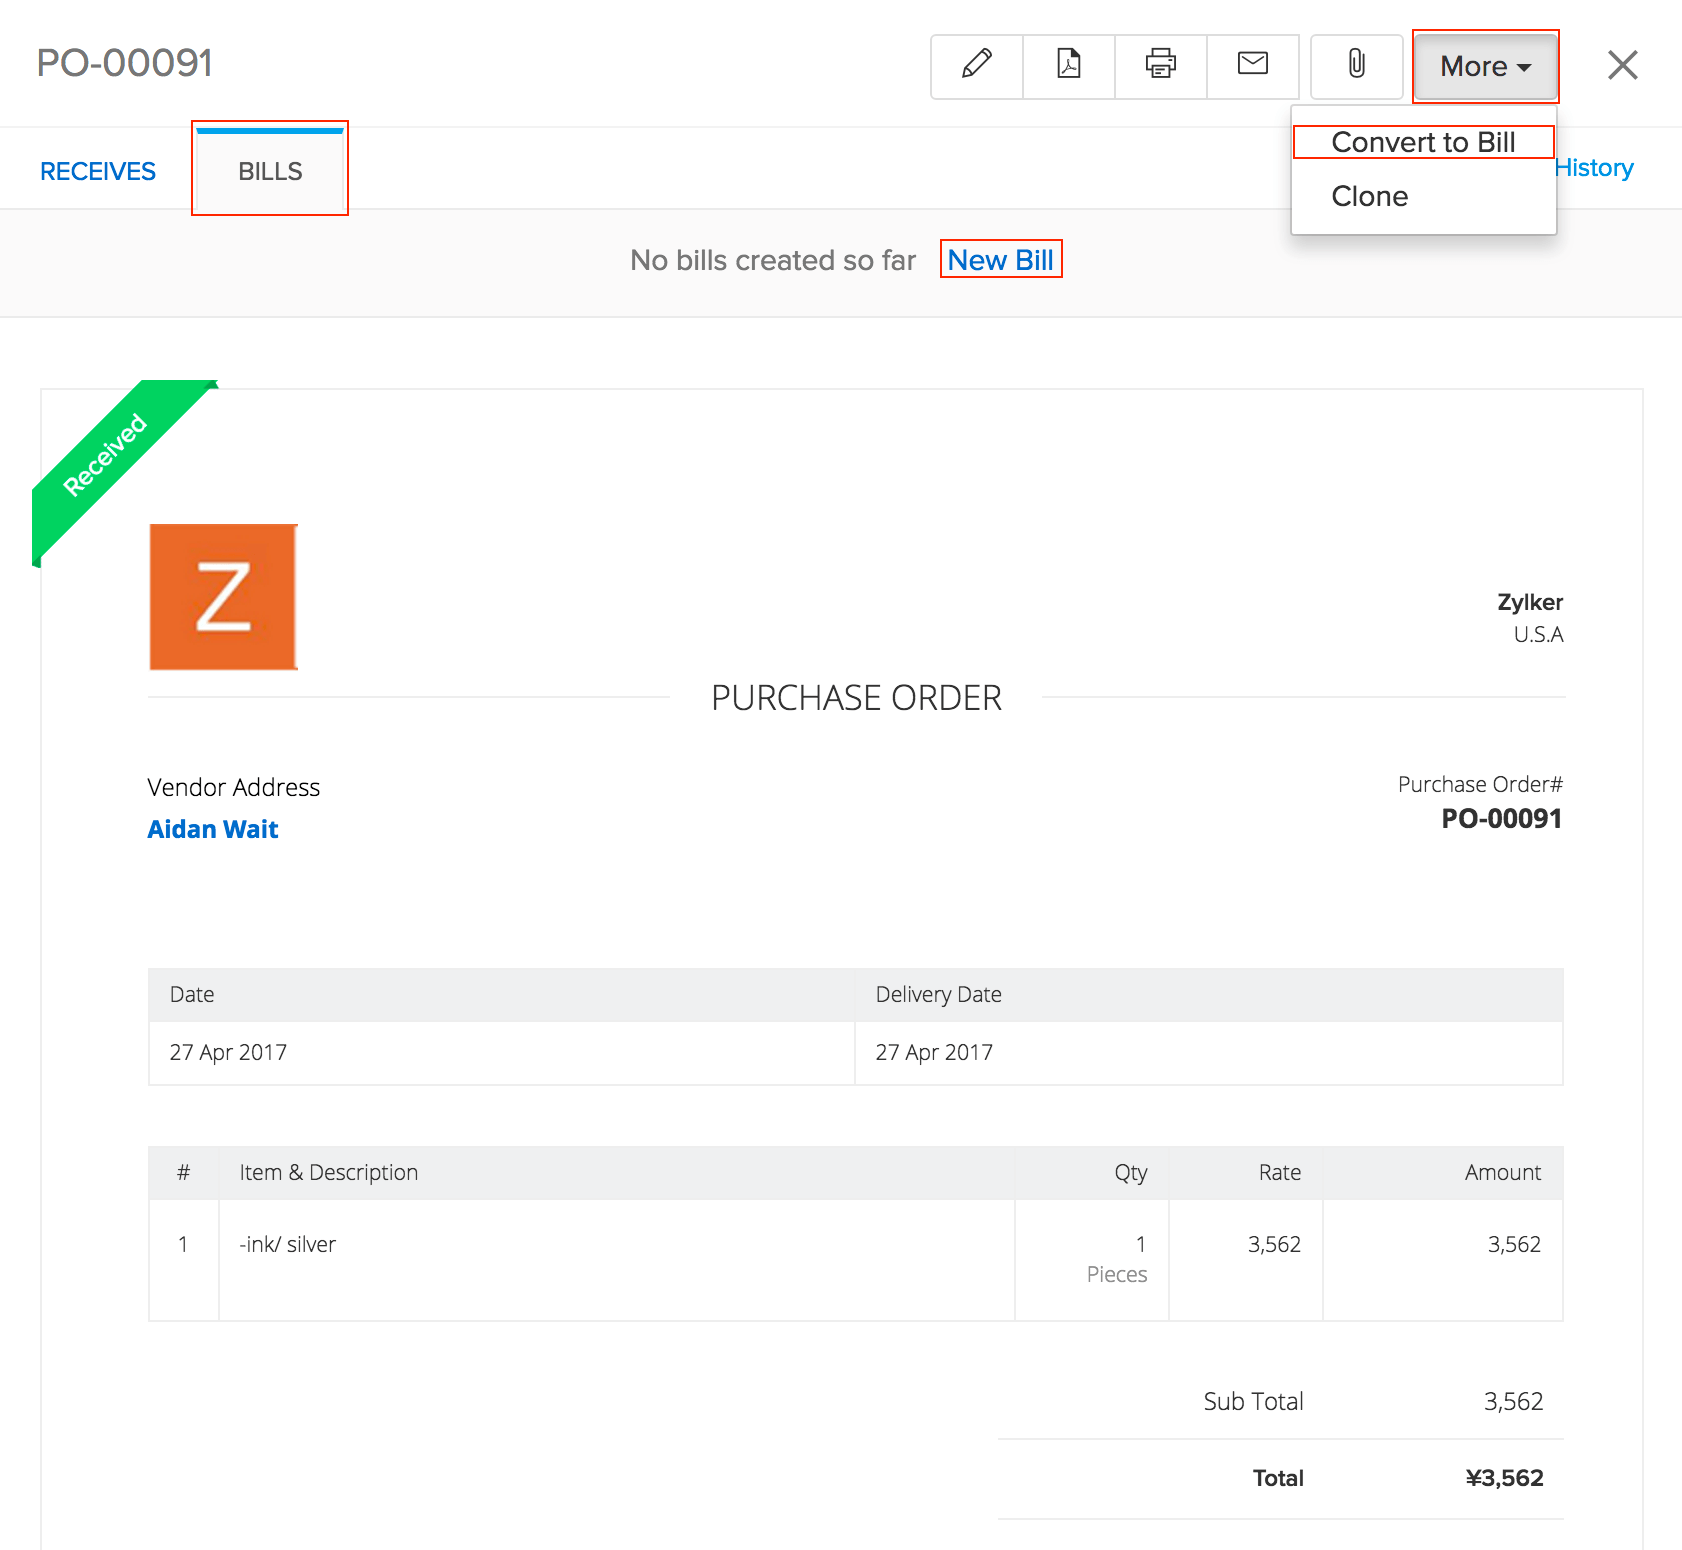
A purchase order that is in the Issued status can be converted to a bill. To do so:
- Navigate to the preferred purchase order.
- Click on the More button.
- Select the option Convert to Bill.
- You can also create a bill by clicking on the Bills tab inside the purchase order and choosing the New Bill option.
- All the details such as the vendor name and items list will be auto filled.
Creating bills for items with serial numbers
If you’re raising a bill for items which have serial numbers, there are few additional steps that need to be done.
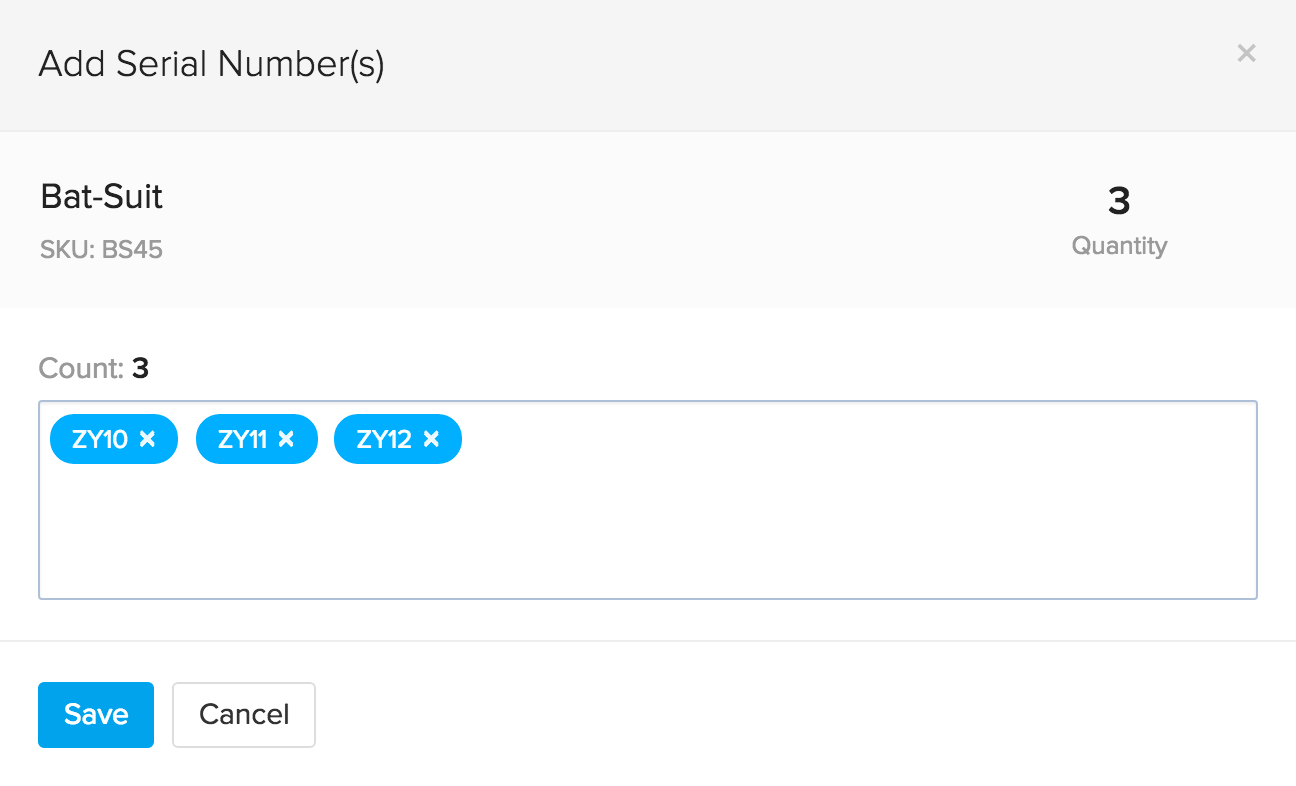
- The moment you add a line item with serial numbers enabled, you’ll be getting an option to add the new serial numbers for the units that are being added to your inventory.

- Selecting the option will open a dialog box where you can add the new serial numbers for the quantity specified in the Bill.
- You can either manually feed the serial numbers(comma separated) or place the cursor on the empty field and scan the serial number of the item.
Note: You can enter up to 1000 serial numbers in a transaction.
- After creating the Bill, you’ll be able to see the serial numbers associated with it at the bottom of the Bill details page.
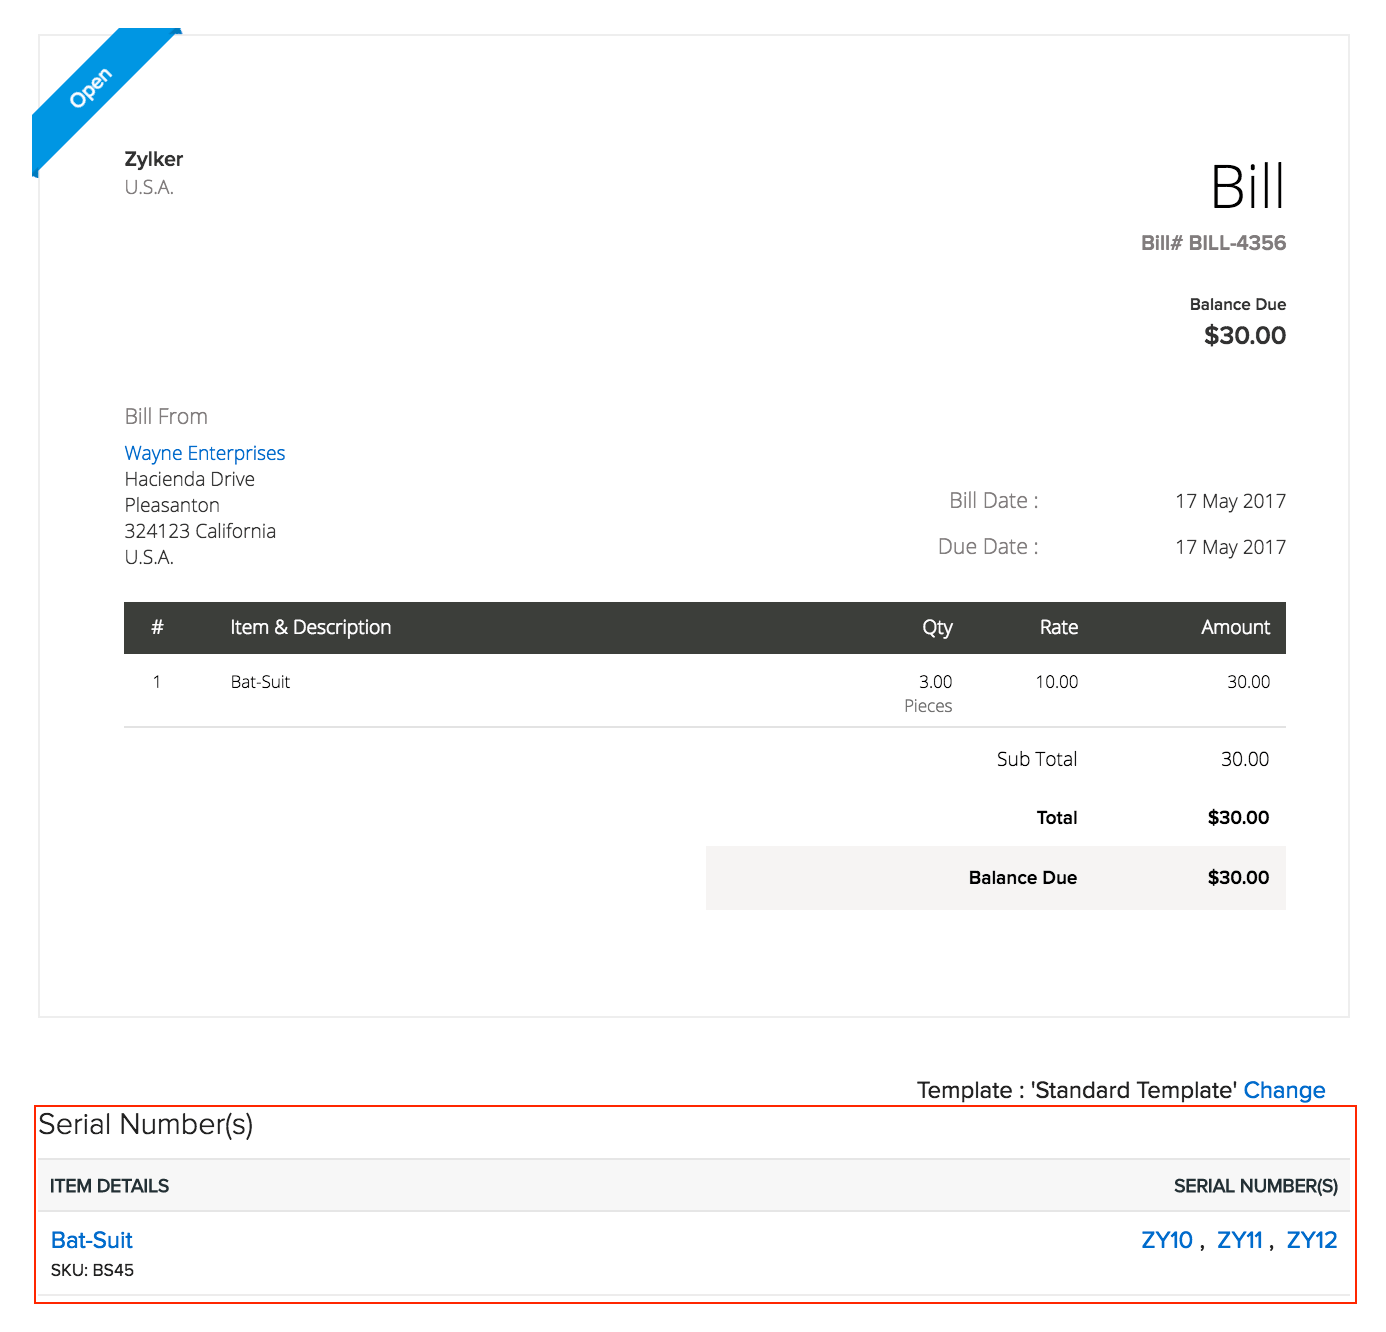
The End Result:
Note: Similarly, you’ll be able to record bills for composite items that are serial number tracked.
Insight: If you prefer to track serial/batch numbers in packages, purchase receives and sales return receipts, go to Settings > Preferences > Items. Under Advanced Inventory Tracking, choose Track in packages, purchase receives and return receipts option.
Recording bills for batch tracked items
- The moment you add a line item which is batch tracking enabled, you’ll be getting an option to add batches for the units that are being added to your inventory.
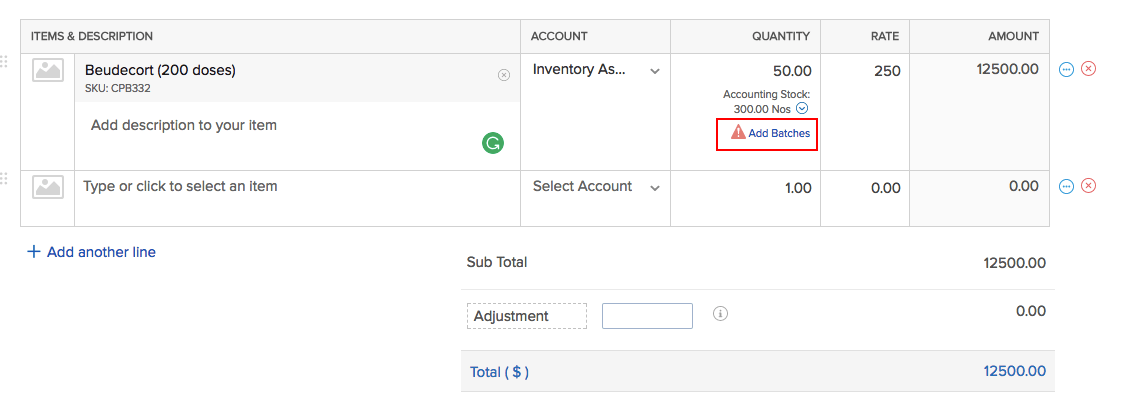
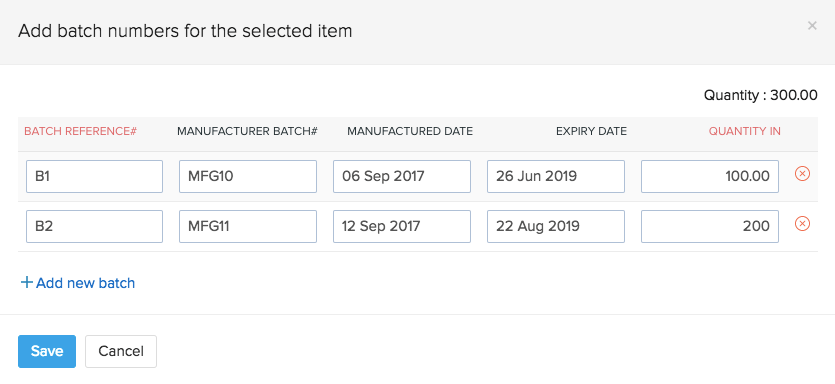
- You’ll be able to split the purchased quantity into several batches with its Batch Number, Manufactured Date and Expiry Date.
Example: Let’s say that you have purchased 20 packs of a disposable item, not necessarily from the same vendor, out of which a few packs expire in the next two days and the rest in a week. Here, you can split the 20 packs into two batches based on its expiration date. Thereby, tracking the number of packs belonging to different batches and determining the batch from which sales should be made.
Note: You can enter up to 100 batch numbers for each line item, and a total of 5000 batches per transaction.
| Field Name | Description |
|---|---|
| Batch Reference# | A unique number which will serve as a reference for you to save and track your batches in Zoho Inventory. This is not the manufacturer batch number. |
| Manufacturer Batch# | Batch number provided by your manufacturer. |
| Manufactured Date | The date on which the item was manufactured. |
| Expiry Date | The date until which the item is consumable. |
| Quantity in | Quantity of the item that you wish to add in each batch. |
Insight: You can enter decimal quantity (up to 6 decimal places) for batches. For instance, a certain quantity of milk has to be divided into batches. In Zoho Inventory, you will be able to add 1.91L in batch 1 and 3.560L in batch 2 and so on.
- Click Save as Draft or Save as Open button to successfully create bills with batch tracked items.
Note:
- The bill should be in any state between Open and Paid to be able to use the batches in invoices or item adjustments.
- If you have enabled the approval process for bills, then your bill must be in Approved state.
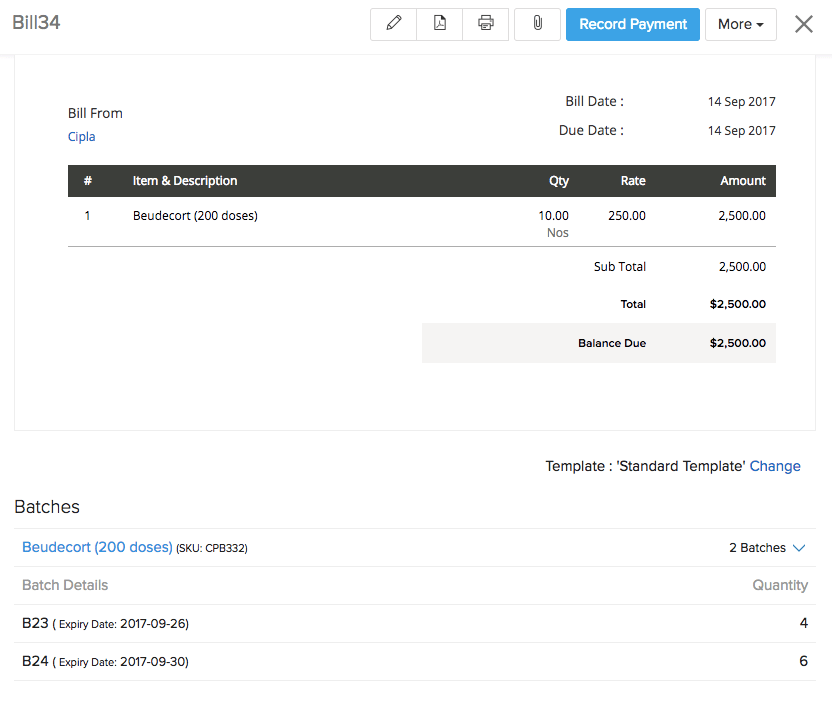
- After creating the Bill, you’ll be able to view the batches and the quantity added to each of those batches at the bottom of the Bill details page.
Insight: If you prefer to track serial/batch numbers in packages, purchase receives and sales return receipts, go to Settings > Preferences > Items. Under Advanced Inventory Tracking, choose Track in packages, purchase receives and return receipts option.
Raising a bill for multiple purchase orders
You can associate many purchase orders and create a single bill for them if the purchase orders are issued to the same vendor.
Important Note: Purchase orders that are billed together must be associated to the same vendor and all purchase orders that need to be billed must be in Issued status.
To do so:
- Click on the quick create icon (+) near Bills tab on the sidebar.
- The New Bill page opens up.
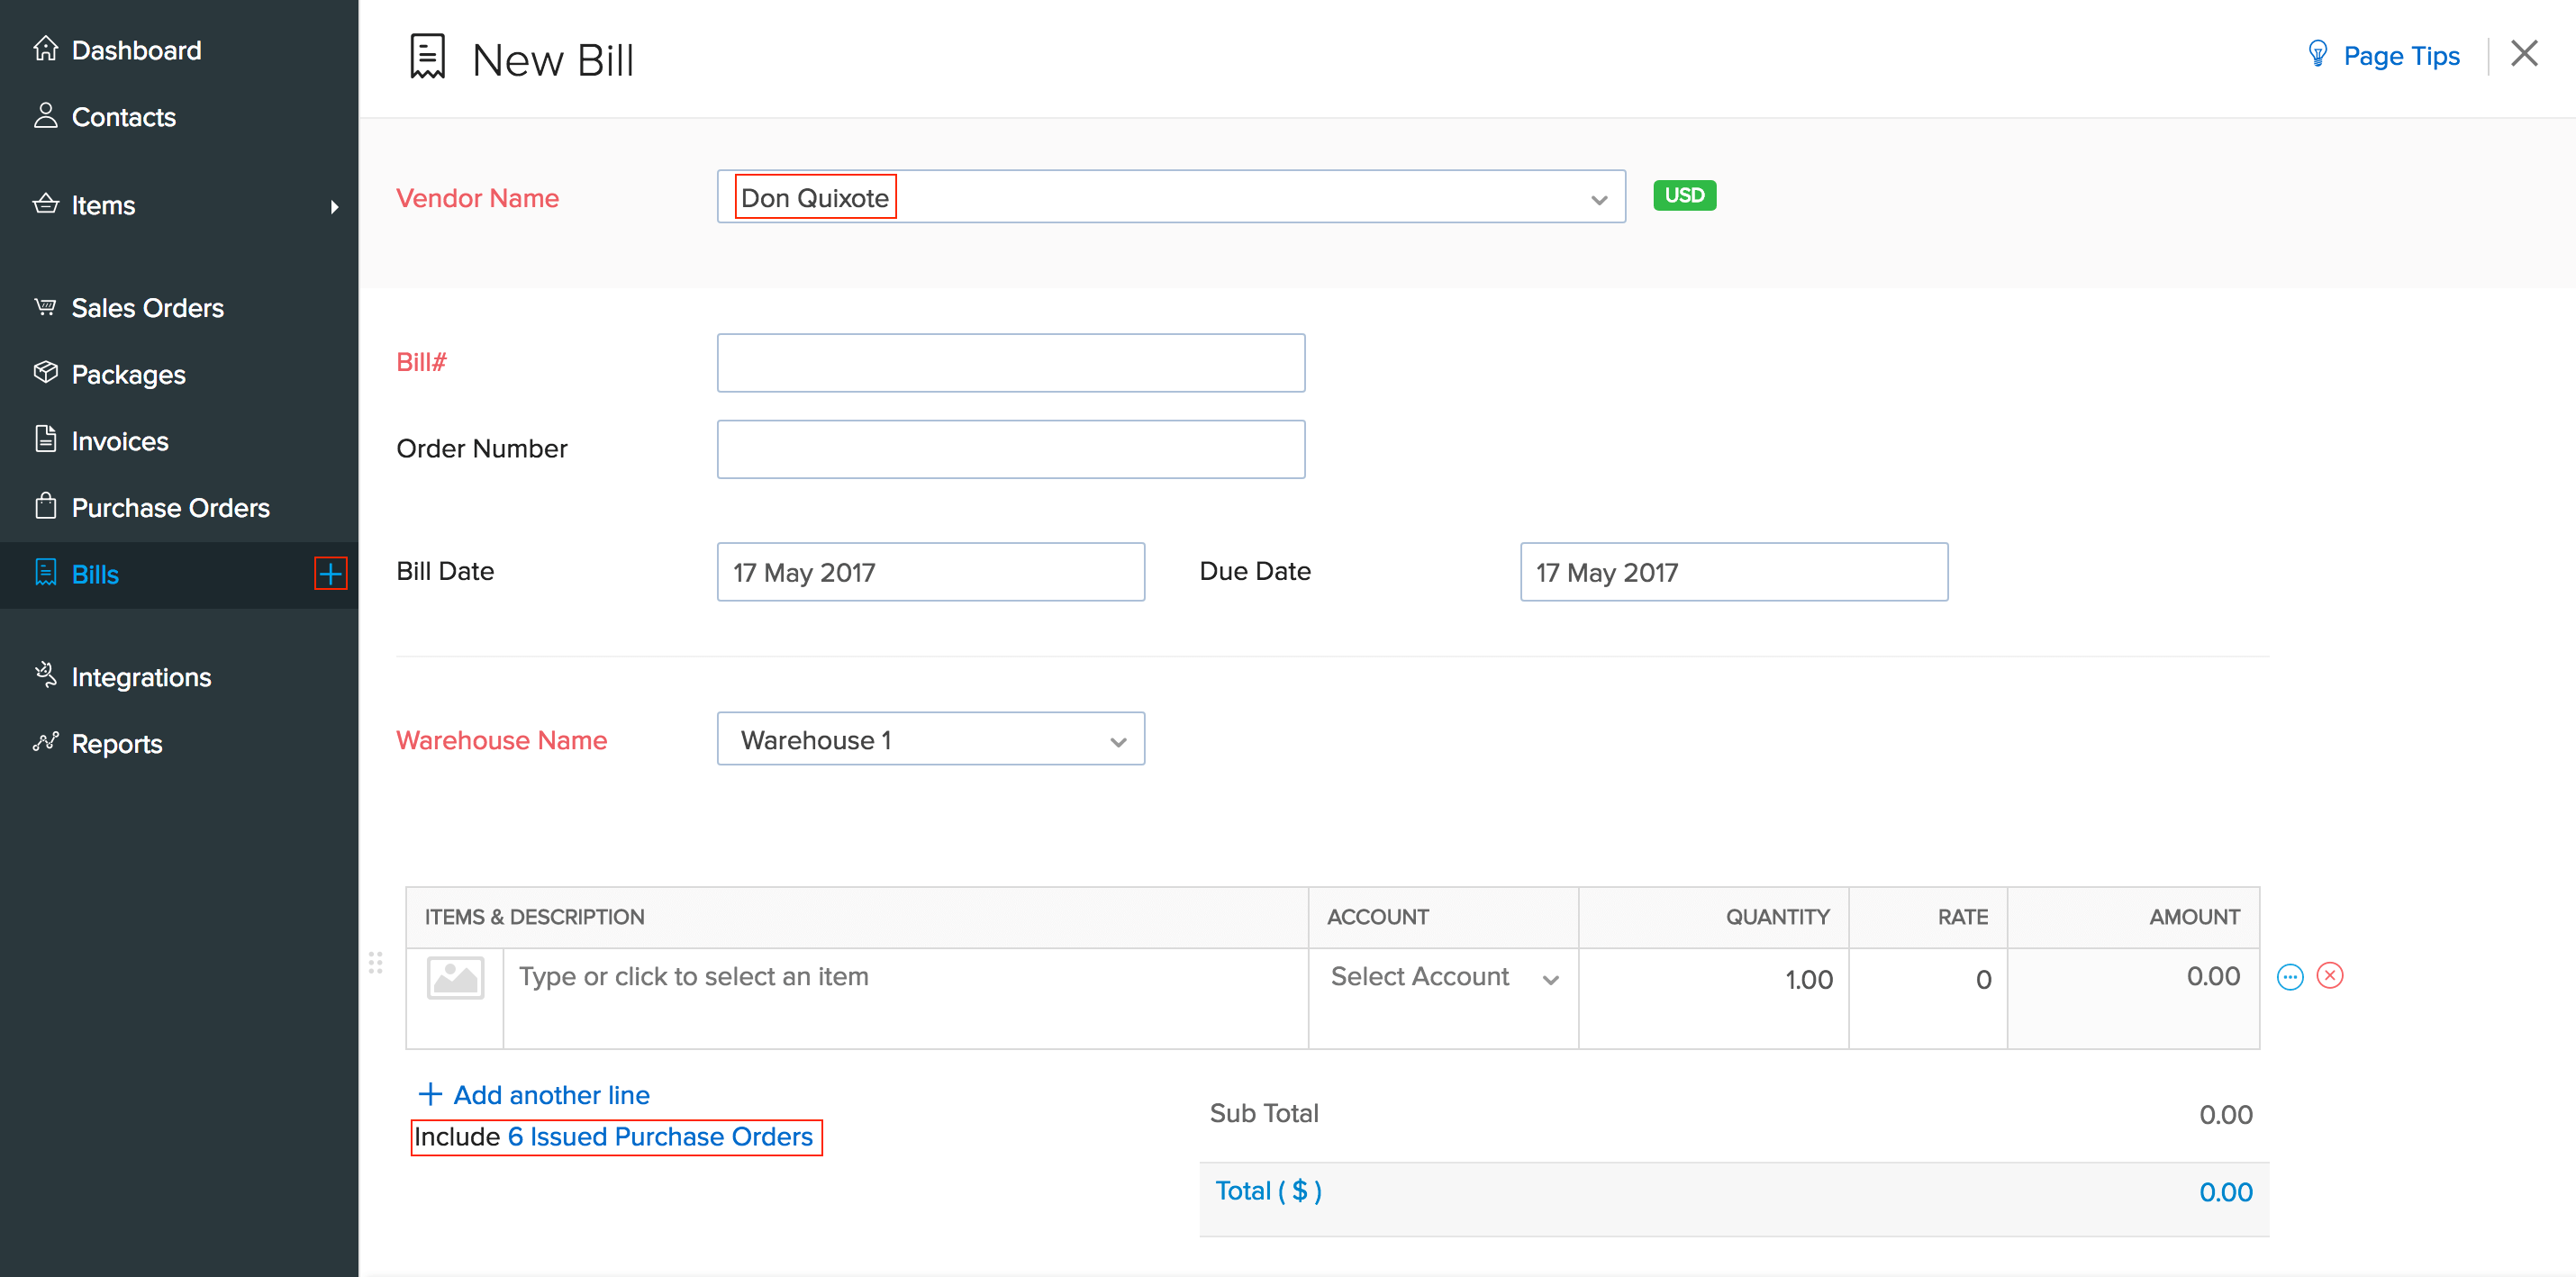
- Select the vendor for whom you wish to bill multiple purchase orders together(say n number of purchase orders).
- On doing so, an option called Include N Issued purchase orders becomes visible below the ITEMS & DESCRIPTIONS fields.
- Click on this option.
- A pop-up containing all the issued purchase orders associated with that vendor shows up.
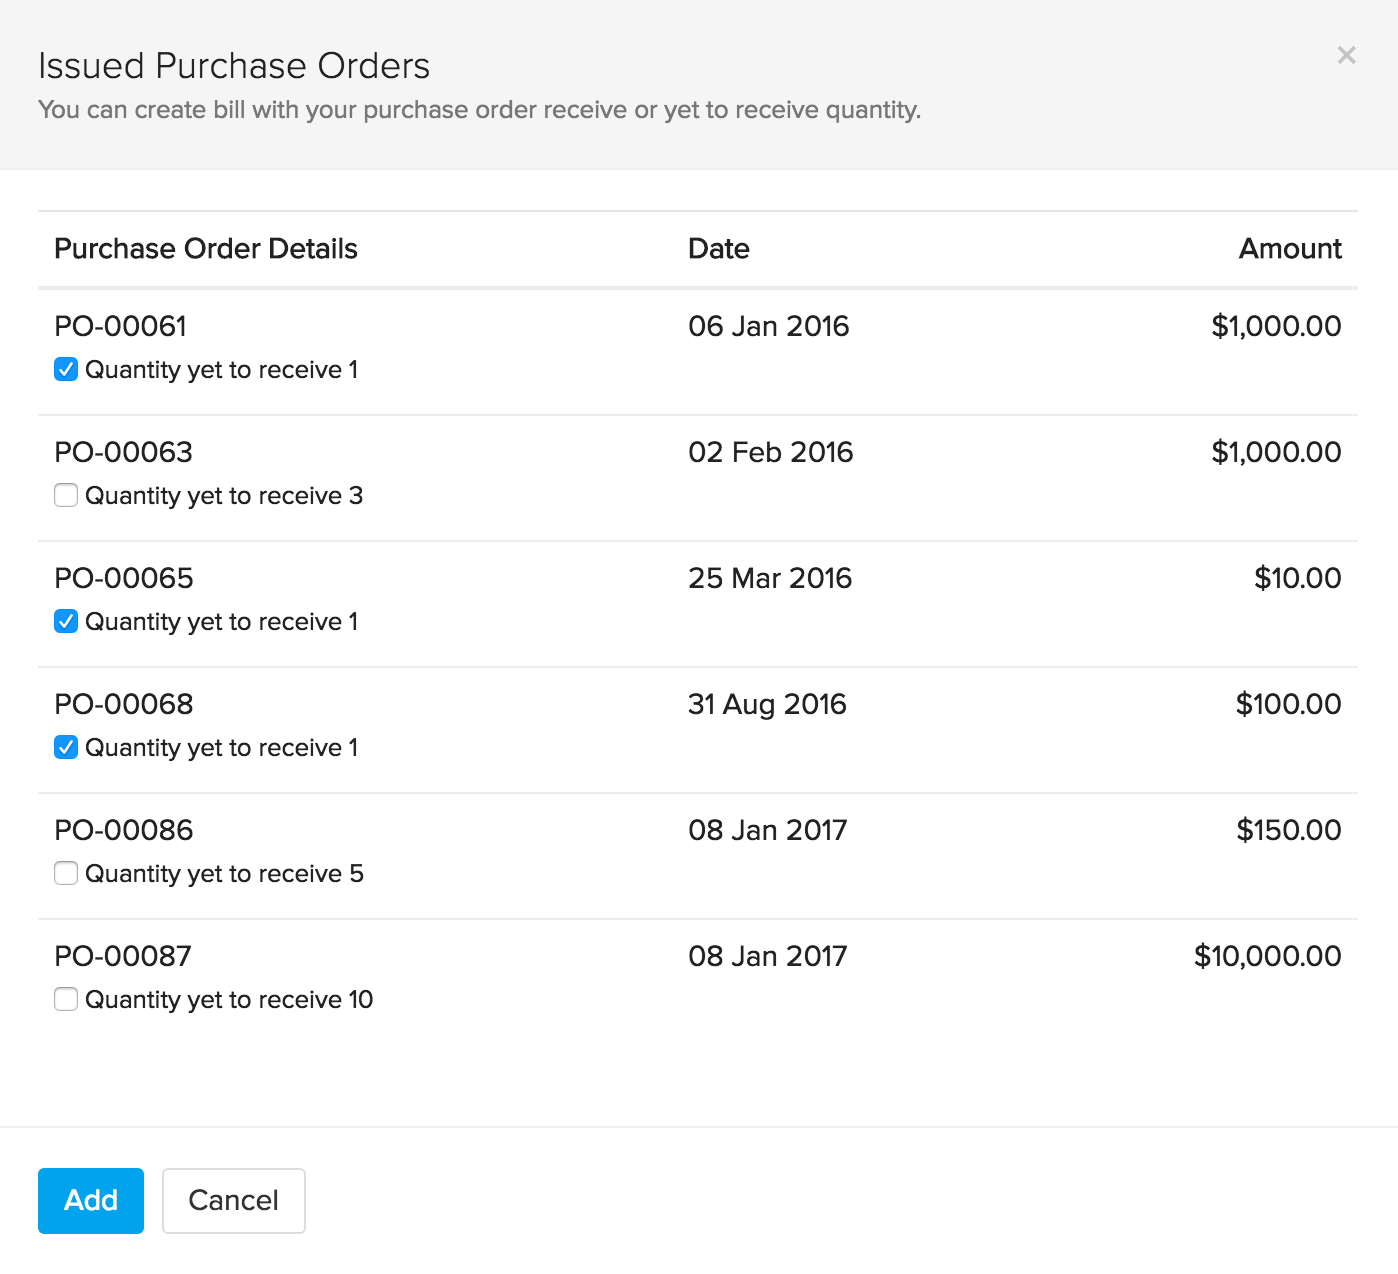
- Select the purchase orders that you wish to bill together.
- Click on the Add button.
- All the purchase orders you have selected, gets added to the bill.
- Fill up any additional details and then click Save as Draft or Save as Open to create a bill for multiple purchase orders.
Landed Costs
Landed cost of a product is the cost involved in bringing a product to the seller’s warehouse excluding the cost of goods. This usually includes freight, shipping charges, customs and other charges that the seller may incur till he procures the goods.
By tracking the landed costs, you can calculate the exact amount spent on receiving the product. This, in turn, helps you to decide the selling price for your stock without compromising your profits.
Enabling Landed Costs
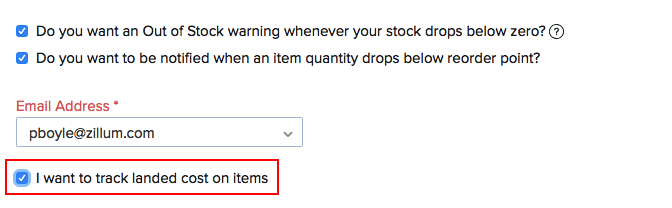
You must first enable landed costs for your organization. To do so:
- Click the Gear icon in the top right corner.
- Select Preferences » Items.
- Tick the checkbox for the option Track landed cost on items.
- Click Save to apply the changes.
Note: Ensure that you have enabled inventory tracking for the items for which you wish to allocate landed costs.
Allocating Landed Costs
Once you have enabled Landed Costs for your organization, you will be able to add and allocate them to the items in your bills.
Step 1: Adding Landed Costs to Bills
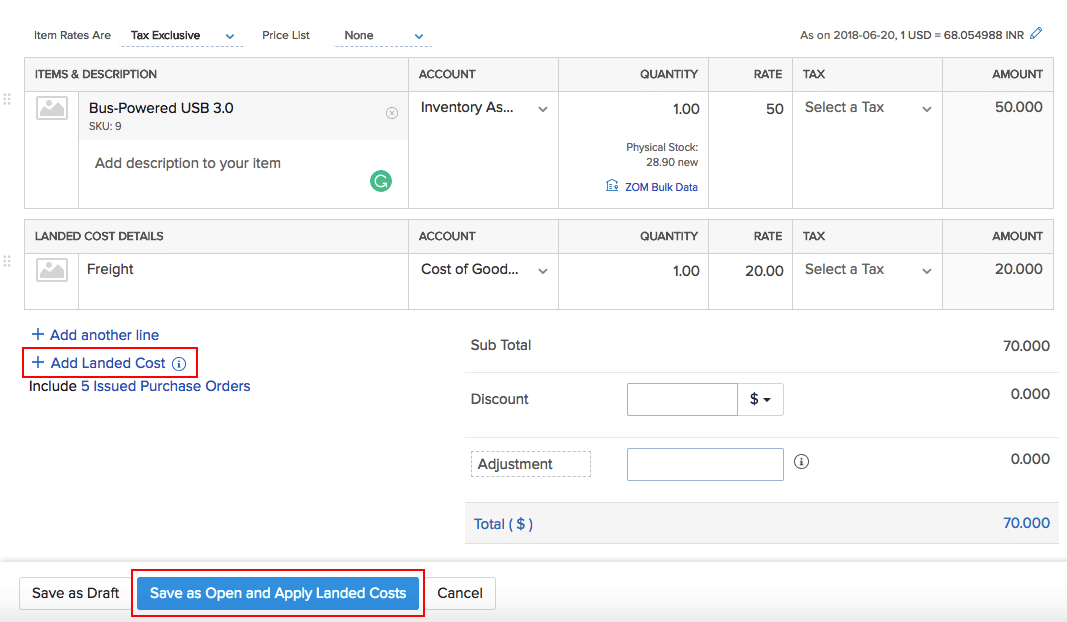
- Go to Bills.
- Create a new bill and enter the items.
- Click + Add Landed Cost and enter the additional cost incurred (Eg. Freight). You can create and add a new service item for it or choose an item that you might have created already.
- Click Save as Draft or click Save as Open and Apply Landed Costs to allocate the costs to items. Note: Landed Costs can be allocated only to the inventory-tracked items.
Step 2: Allocating Landed Costs to Items in the Bill
Once you have added the landed costs to a bill, you will be able to allocate them to the bill items proportionately. There are two ways to do this:
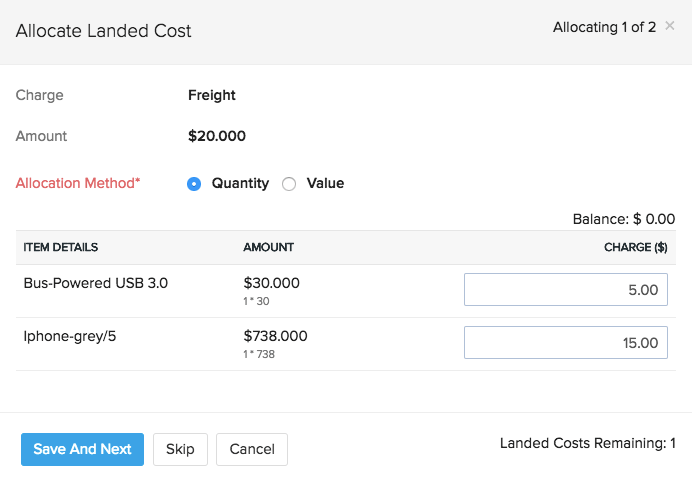
1) Allocating landed costs while creating a bill:
- Create a new bill with landed costs and click Save as Open and Apply Landed Costs.
- In the popup, you can allocate the landed costs to the bill proportionately based on the value or quantity of the items.
- Edit the Charge fields if you would like to make changes to the costs calculated.
- Click Save & Next if there are more than one landed costs to be allocated.
- Click Skip if you wish to allocate the landed cost later.
- Click Save.
Insight: You can also choose not to allocate any landed costs to that particular bill and allocate them to other bills.
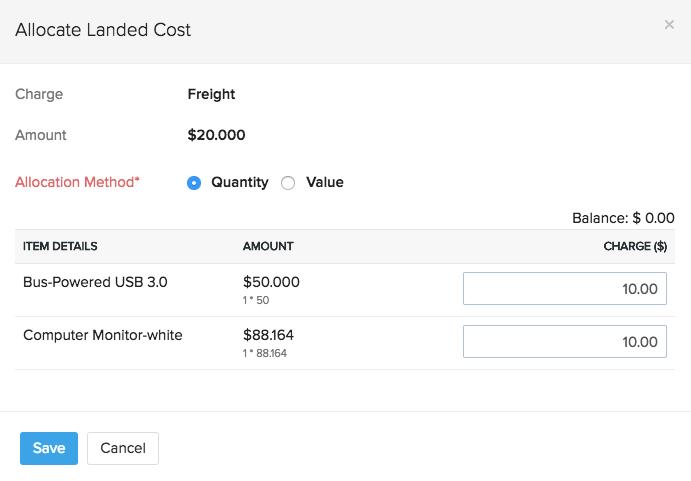
2) Allocating the landed costs to an existing bill:
- Click the Allocate Landed Costs button on your bill details page.
- Allocate the charges proportionately to each item and click Save.
Note: You can also edit bills created earlier to add landed costs to them and allocate it.
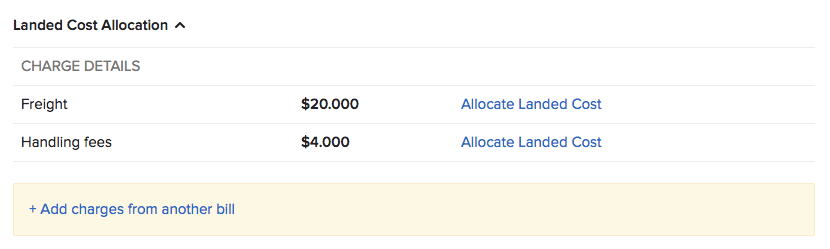
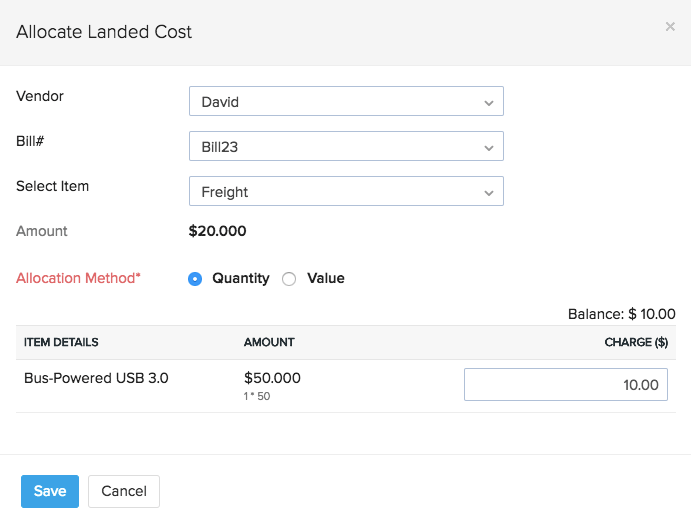
Allocating Landed Costs from One Bill to Another
There may be cases where your vendor does not offer any shipping for the product and you get it shipped by another shipping agency, in that case, you can create a separate bill with just the landed costs and apply them to another bill. You can also apply any unused landed costs from other bills. To do this:
- Go to the particular bill to which you want to allocate the landed cost.
- Click the More dropdown and click Add Landed Costs.
- Select the Vendor, the Bill number from which you would like to allocate the cost, and the landed cost.
- Allocate the landed costs proportionately and click Save.
Link Bills to Purchase Orders
You can associate bills with purchase orders that were created separately in Zoho Inventory.
To do so:
- Go to the Bills module in Zoho Inventory.
- Click on a bill to open it.
- Click the
 icon at the top to edit the invoice details.
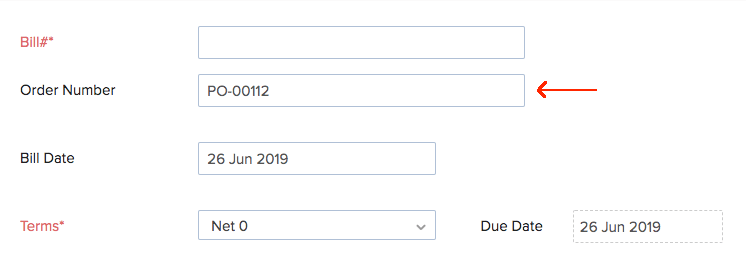
 - Enter the purchase order number that you wish to link it to in the Order Number field.
Warning:
- The vendor addressed to must be the same in both documents.
- The purchase order date cannot fall after the bill date.
- The bill must contain one or more of the items mentioned in the purchase order. They cannot be linked in case of items mismatch.
- The purchase order cannot be void, cancelled, closed, dropshipped or backordered.
- Click Save.
- In the bills list page, click the checkbox next to the bill for which you’ve provided the purchase order number. You can select more than one bill.
- Click the Link to existing purchase order button at the top.
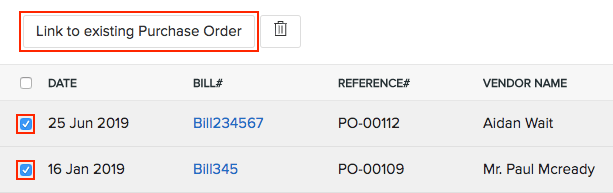
The selected bills will be linked to its respective purchase order. The linked purchase order will be moved to the ‘Issued’ status if it is still in draft.
Import Bills
To import bills into your Zoho Inventory account:
- Navigate to Bills module in the sidebar.
- Click on the
 icon at the top right corner.
 - Select Import Bills option in the drop down.
Learn in detail the steps to import a file in Zoho Inventory.
Link Bills to Purchase Orders During Import
You can link your bills in to its corresponding purchase orders in bulk while importing them. To do so,
- Go to the Bills module in the sidebar.
- Click on the Menu icon - Import Bills.
- Browse and upload the relevant file.
- Check the option - Link Bills to its corresponding Purchase Orders.
- Click Next.
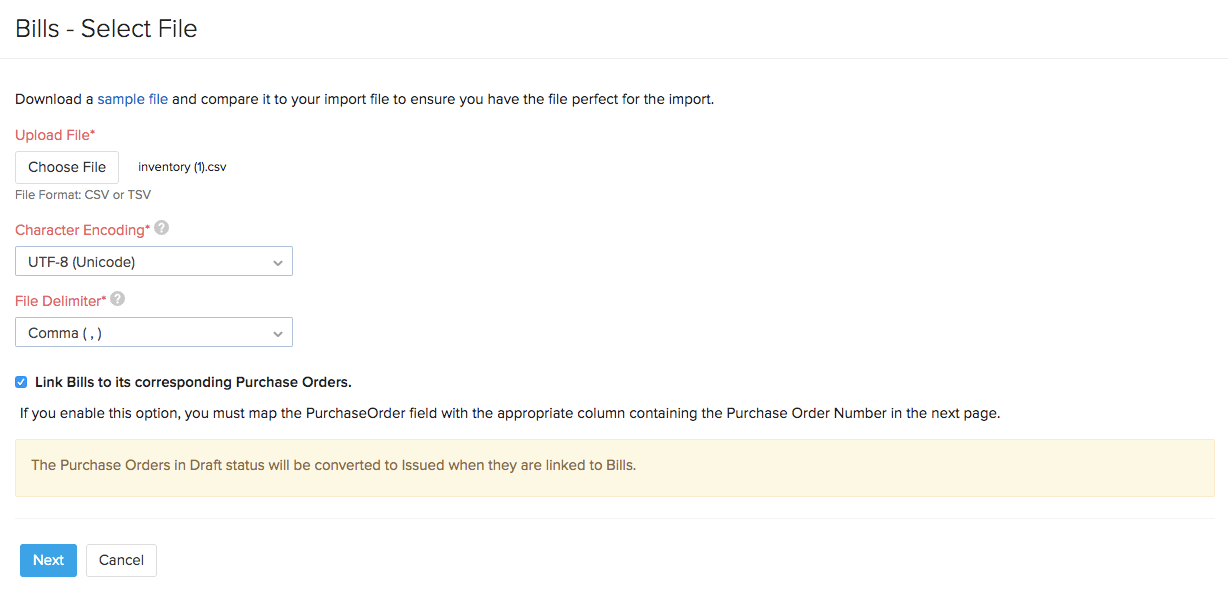
- Map the Purchase Order Number field from Zoho Inventory with the appropriate column in your import file. This step is mandatory to successfully link the underlying items in the bill to its respective purchase order number.
- You can also link purchase recieves with its bills by mapping the Purchase Receive Number field from Zoho Inventory with the appropriate field in the import file.

- Click Next, preview your changes and click Import if everything is ready.
The purchase orders in the Draft status will be moved to the Issued status automatically when they are linked to bills or purchase receives.
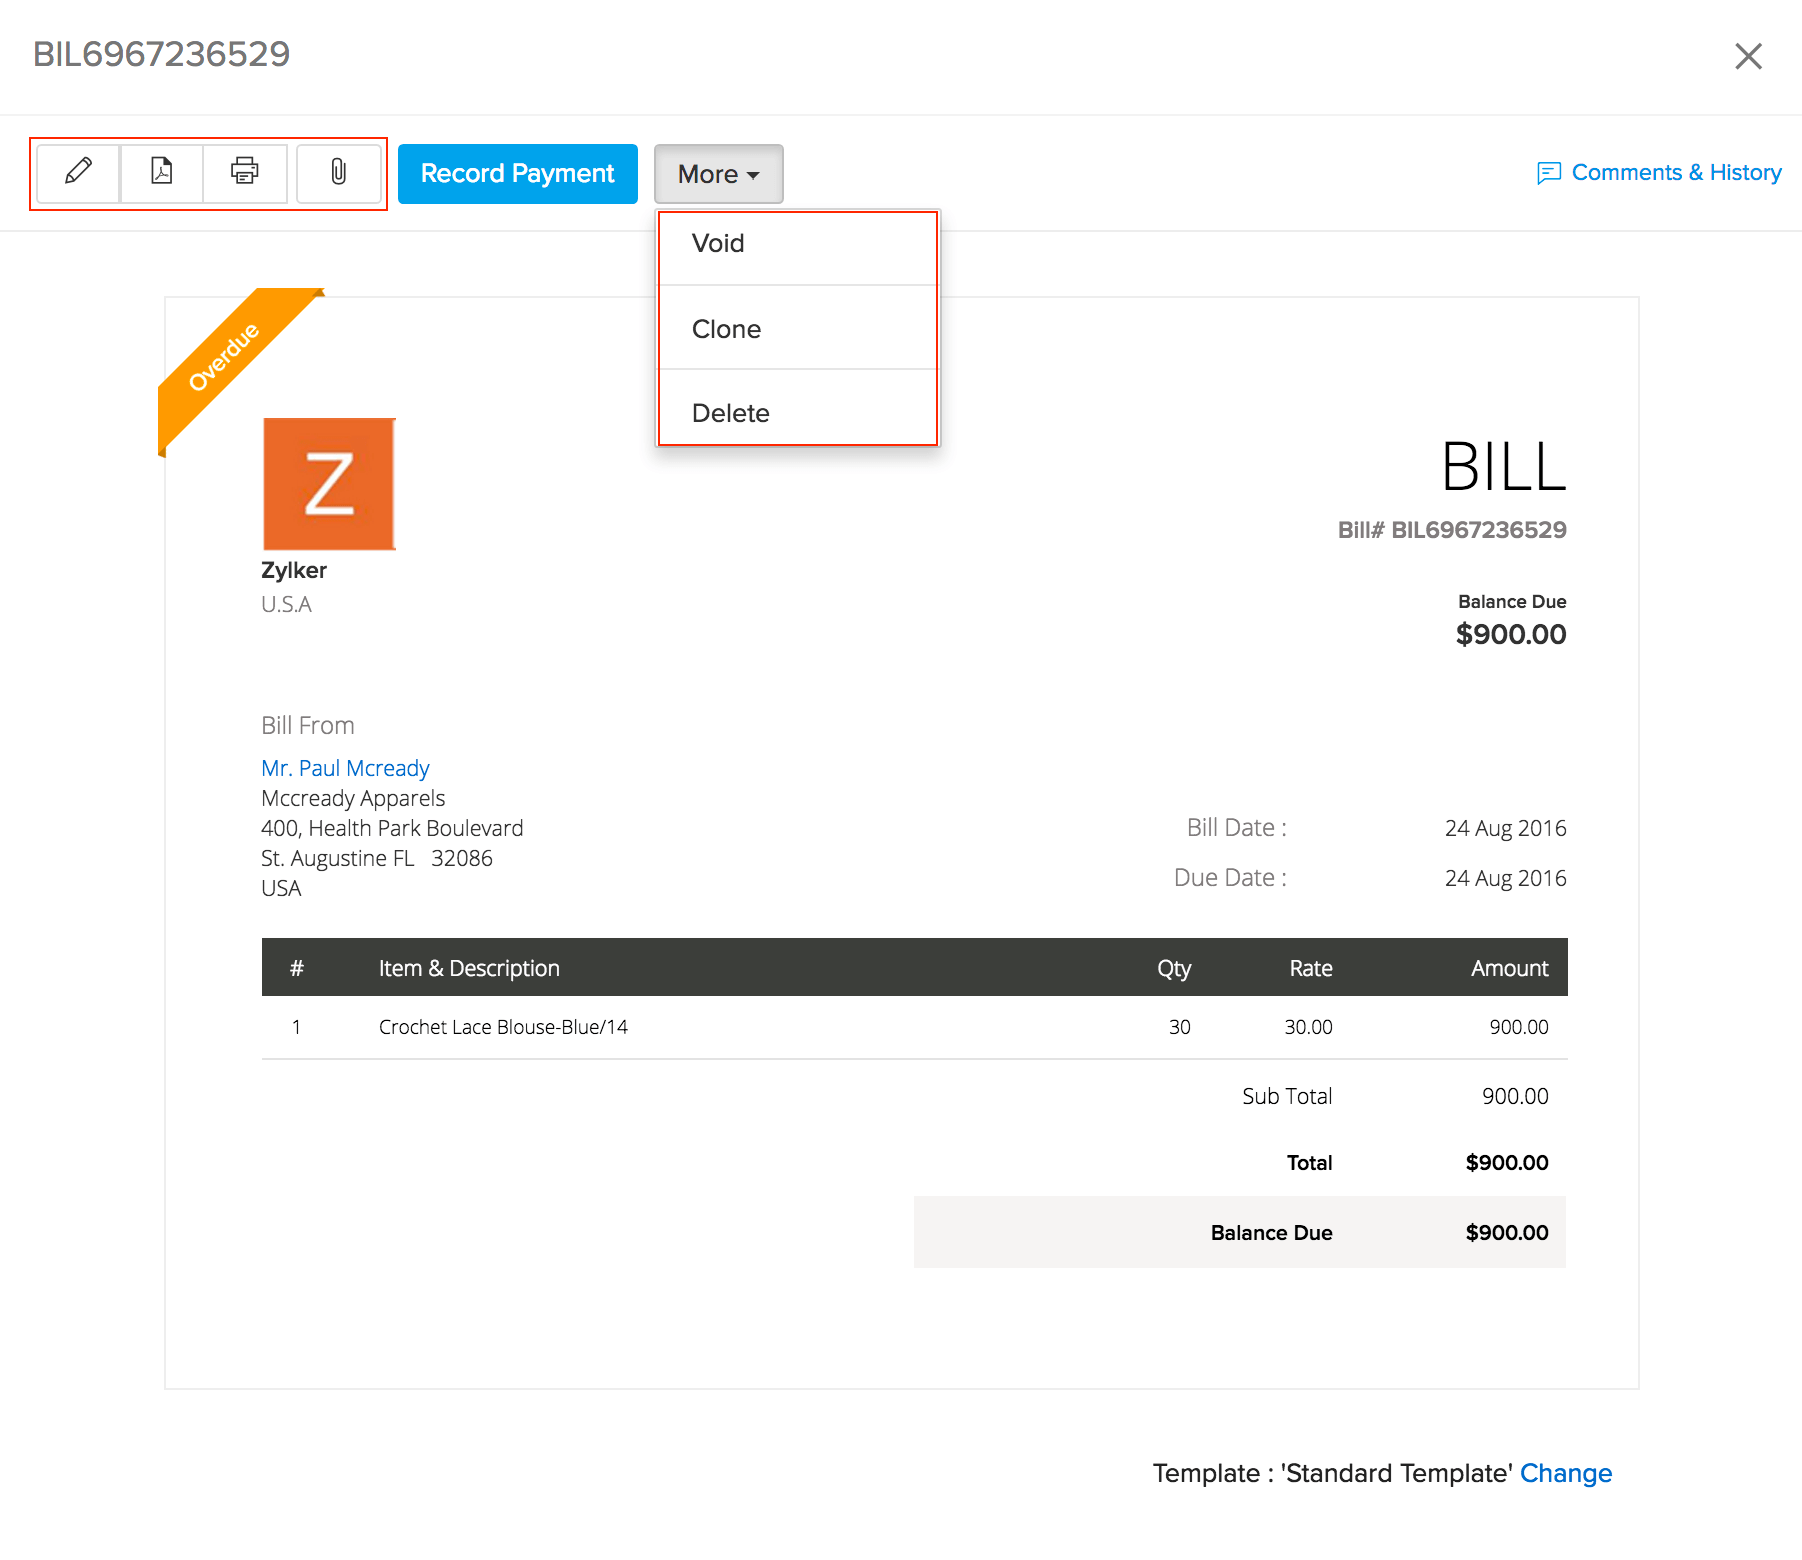
Other Options with Bills
- Void - To void a bill:
- Open the preferred bill.
- Select the More button.
- Select the Void option.
- The note will be rendered invalid.
- This action can be reverted by selecting the void bill and clicking on the Convert to Draft button.
- Delete - To delete a bill:
- Open the preferred bill.
- Select the More button.
- Choose the Delete option.
- A pop to reconfirm your deletion appears.
- Click the Delete button to confirm the operation. Important Note: Partially paid or paid bills cannot be deleted.
- Edit - To edit a bill:
- Open the preferred bill.
- Click on the edit icon in the top left corner.
- Change or update the necessary fields.
- Print - To print a copy of a bill:
- Open the preferred bill.
- Click on the print icon in the top left corner.
- PDF - To download the bill in portable form:
- Open the preferred bill.
- Select the PDF icon in the top left corner.
- Comments & History - Add your comments to your bills and view its history from the moment it was raised till its paid in full.
Important Note: Bills that are partially or fully paid cannot be edited.
Multi-warehouse Operations related to Bills
If you’ve enabled multiple warehouse management for your organization, you will have additional operations related to the Bills. To know more, click here.
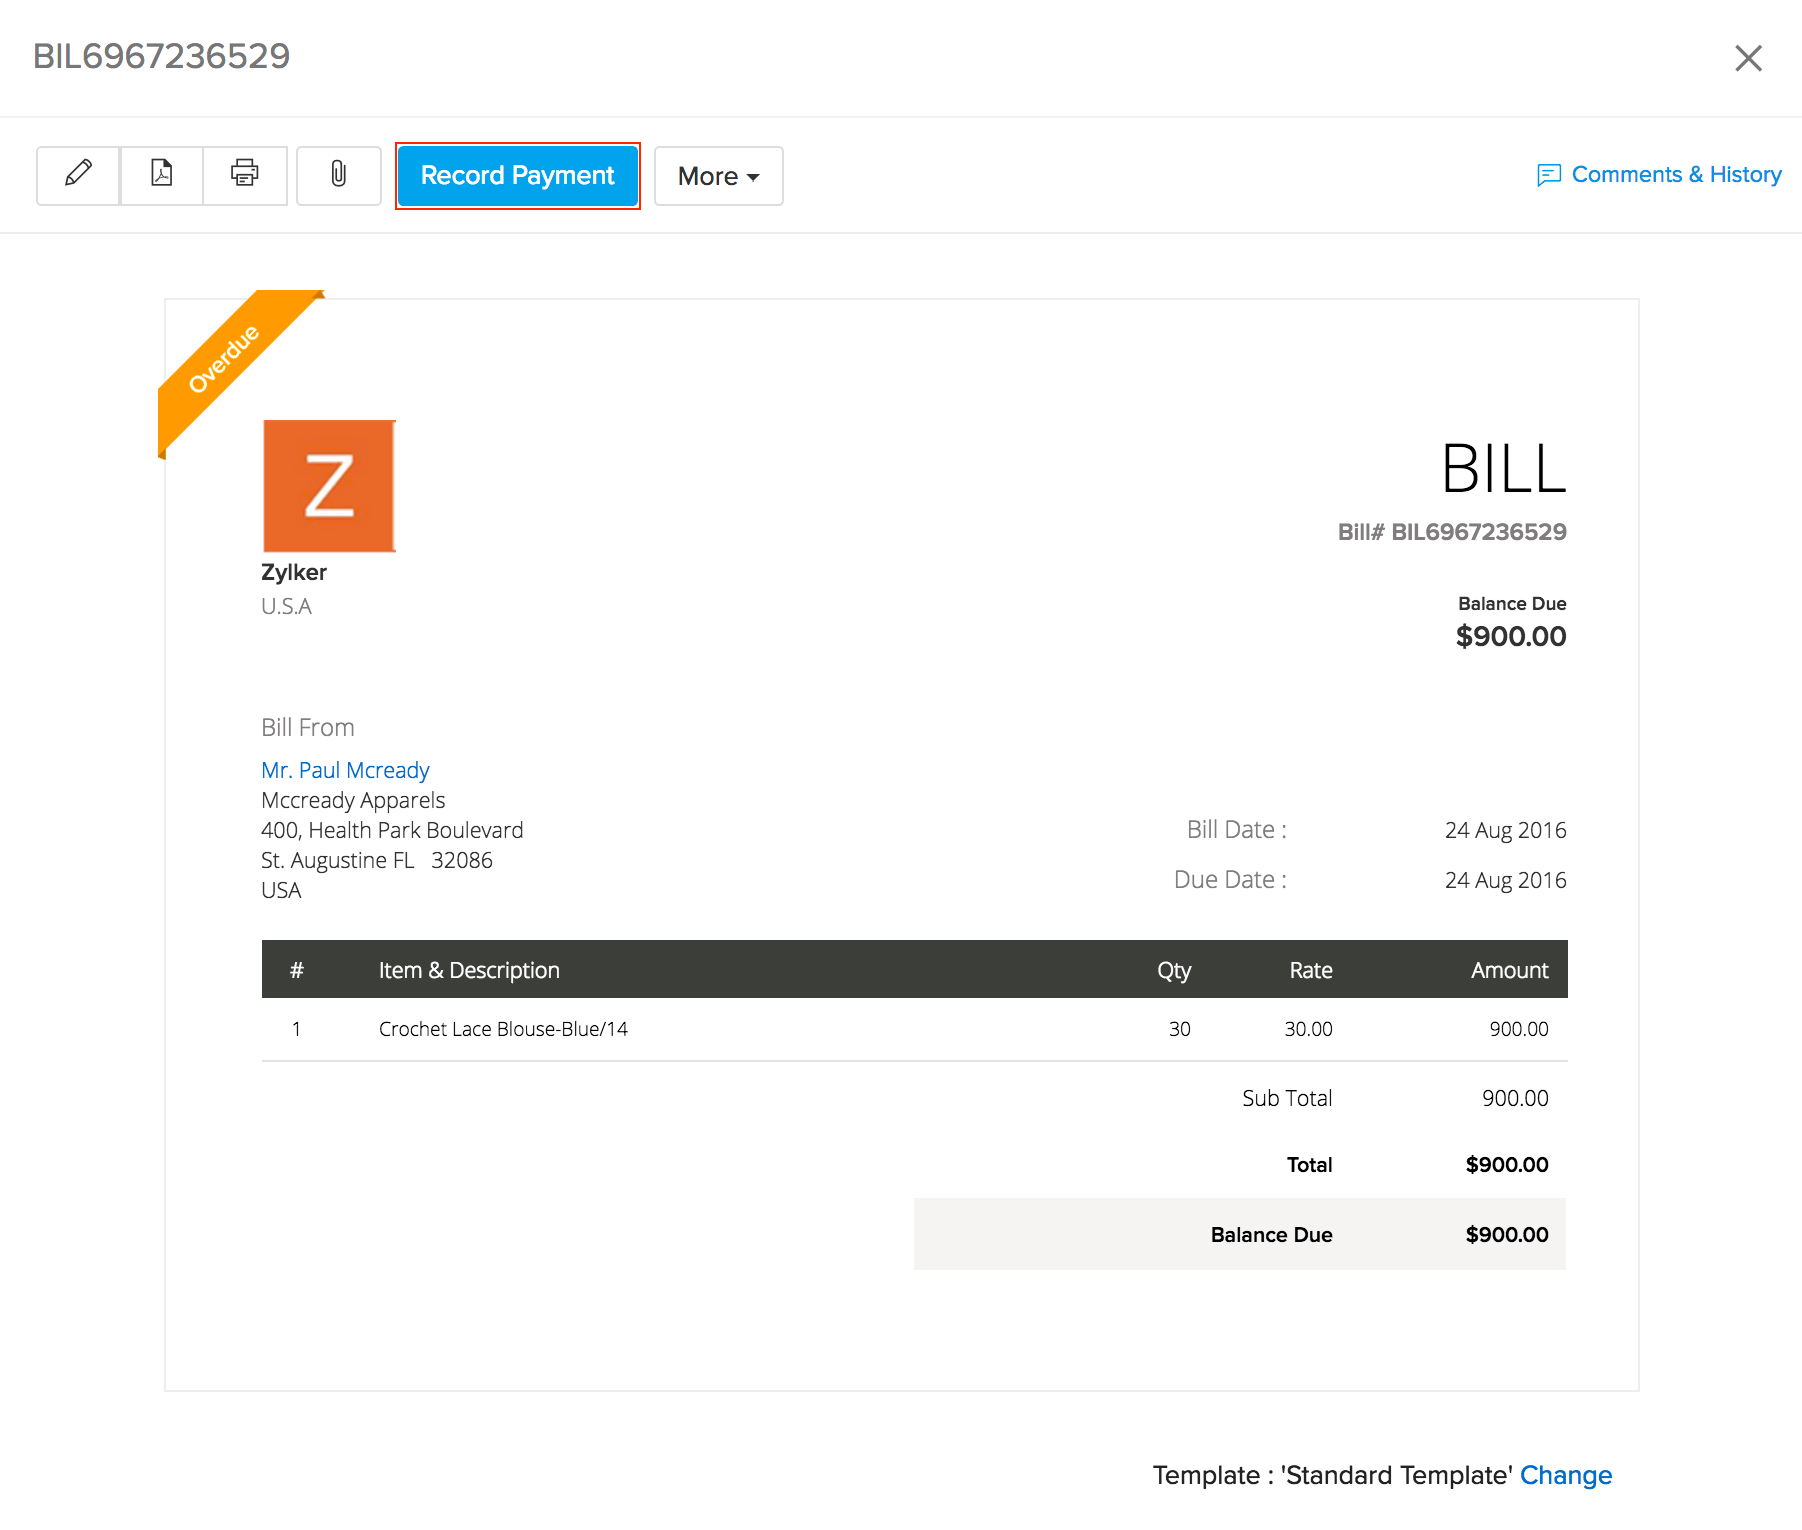
Bill Payments
Recording from bill
To record a bill payment:
- Opening the bill.
- Select the option Record Payment.
- Fill in the details of the payment, such as the amount, date, etc.
- Click on the Save button.
- Once you save the payment, the status of the bill changes to Paid or Partially Paid accordingly.
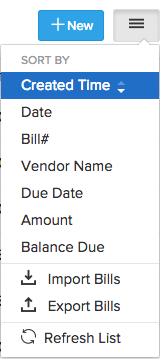
Sorting and Viewing Bills
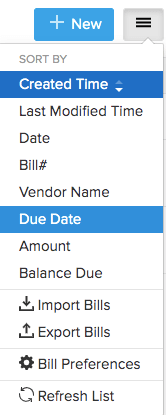
You can sort bills by created time, date, Bill#, vendor name, due date, amount and balance due. This can be done by clicking on the menu icon on the right top corner of the bills tab.
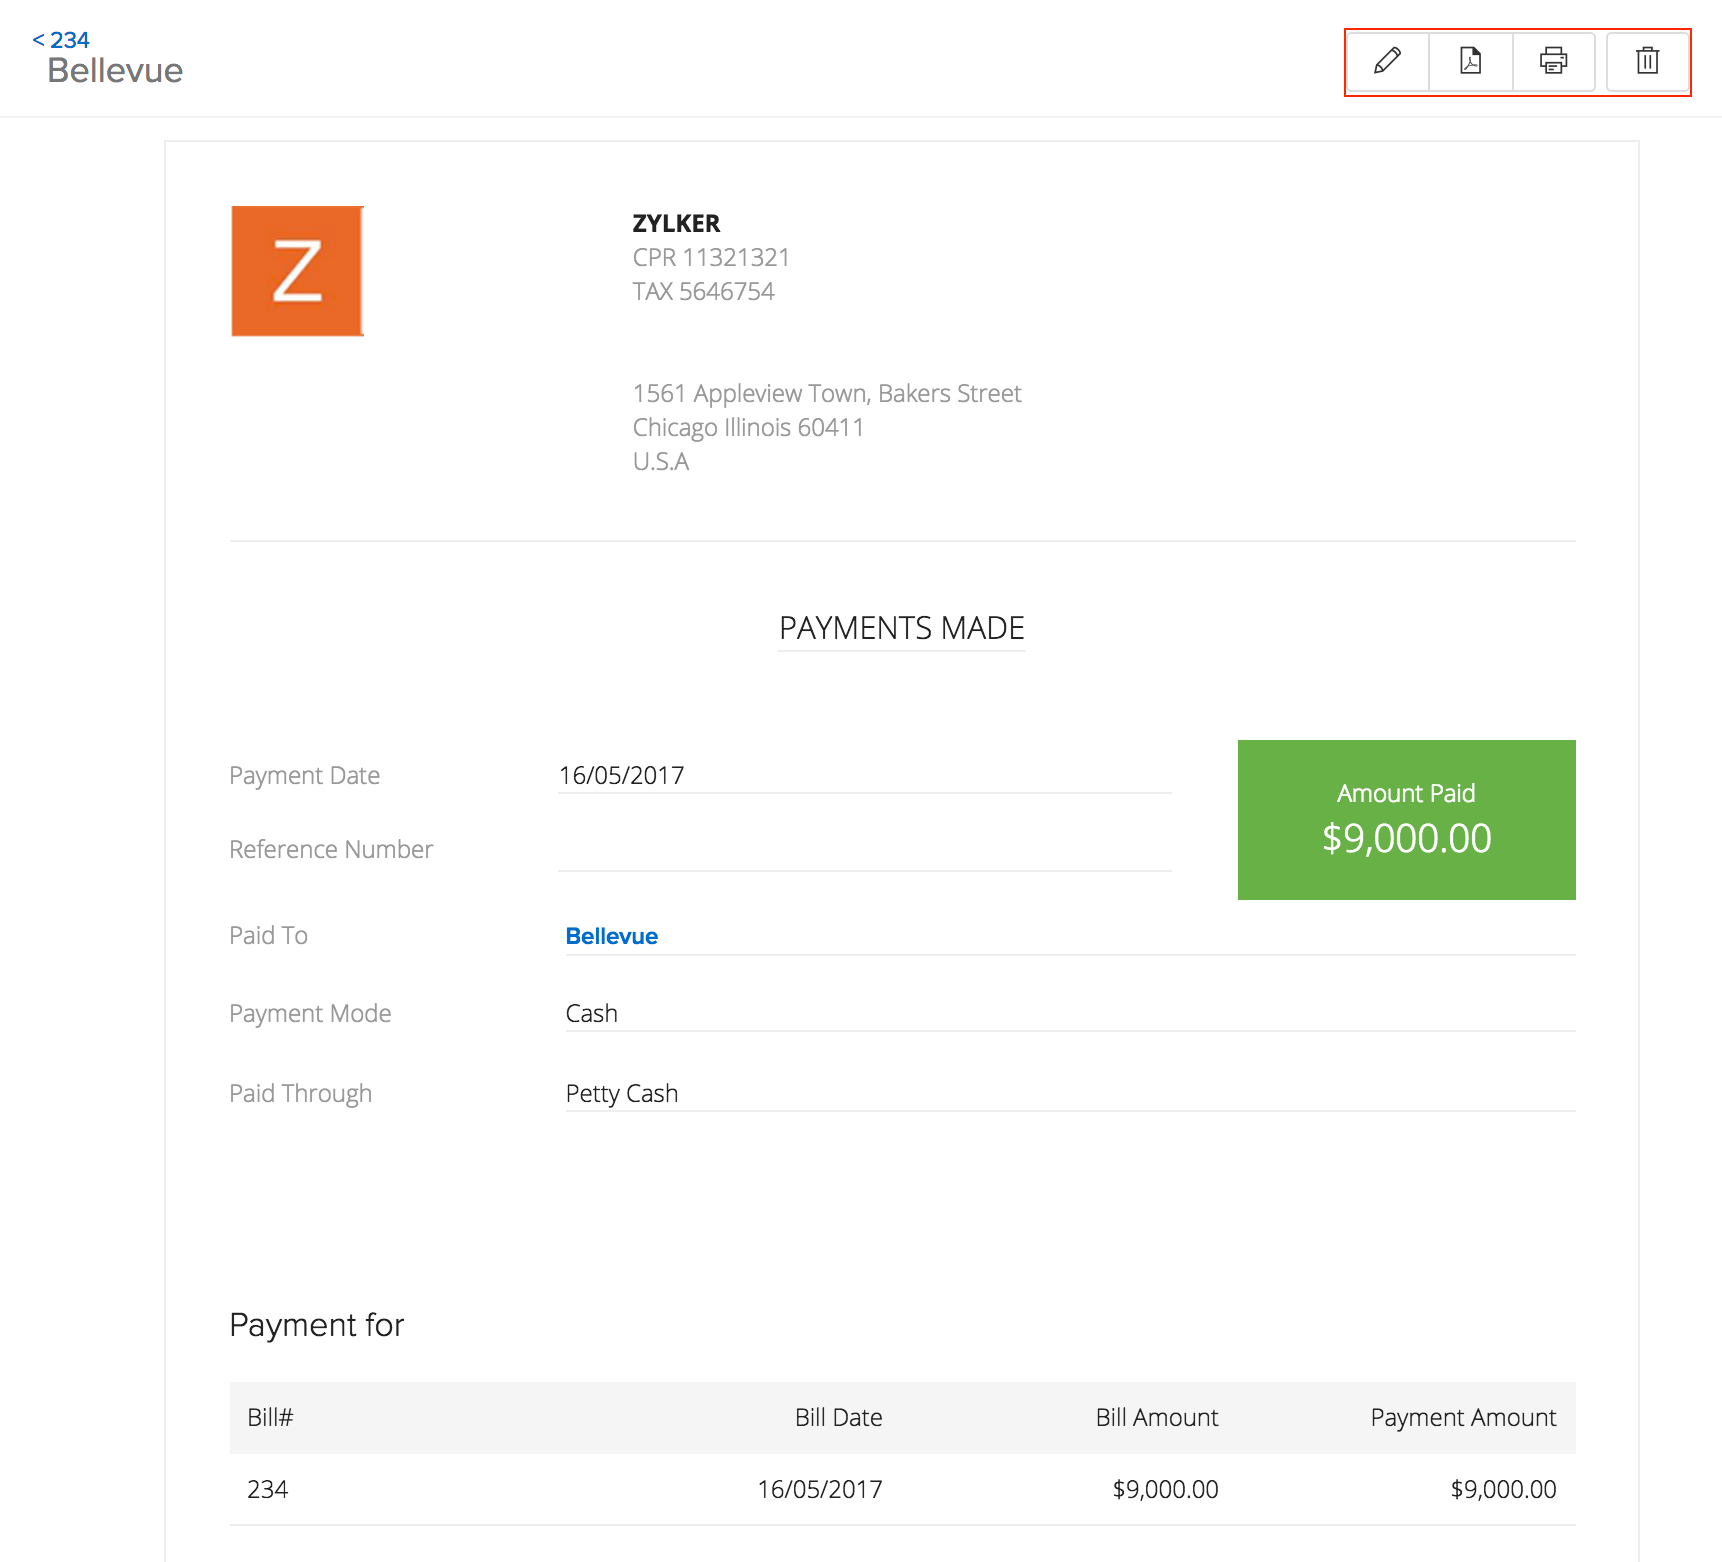
Payments Made
The payments you make on your bills in Zoho Inventory can be viewed by going to the Bills tab. To do so:
- Open a Paid bill.
- Scroll down to view the payment details.
Note: These can also be edited or deleted from here.
Clicking on Payment# directly opens the receipt in the Payments Made tab.

Details
Once you make an online payment or manually record one in Zoho Inventory, the corresponding receipt will be displayed in the Payments Made tab. The following details will be included:
- Date - The date on which the payment was recorded.
- Payment # - Unique payment ID number.
- Vendor Name - The vendor to whom the payment was made.
- Bill # - The reference ID of the bill on which the payment was recorded.
- Mode - The means through which the payment was made (Cash, check, online gateways etc).
- Amount - The amount paid.
Options Associated with Bill Payments
- Edit - You can edit a payment yet to be matched in Zoho Inventory by opening it and clicking on the pencil icon.
- Delete - A payment yet to be matched in Zoho Inventory can be deleted by opening it and clicking on the Delete button.
- Print - You can print a copy of the payment receipt by opening it and clicking on the print icon in the top left corner.
- PDF - Download a payment receipt in portable form by simply opening it and selecting the PDF icon in the top left corner.