Set Up Webhooks
Setting up Webhooks includes the following three steps:
- Create a webhook.
- Associate webhook to a workflow rule.
- Test webhook integration.
To create a webhook
- Go to Setup > Automation > Actions > Webhooks.
- In the Webhooks page, click Configure Webhook.
- In the New Webhook page, specify all necessary parameters.
- Click Save.
Recognize Unsupported Merge Field Values
Sometimes you may notice that the merge field values you have used in the Value Description editor of your webhook now get displayed as ${Unsupported_Field}. Following are some of the reasons why this happens.
Custom field deleted
The merge field whose value you have inserted has been deleted. If your webhook's Value Description editor continues to contain the merge field value of a deleted field, that value will be displayed as ${Unsupported_Field}.
Custom look-up field deleted
The custom look up field whose value you have inserted has been deleted. If your webhook's Value Description editor continues to contain the merge field value of a deleted look-up field, that value will be displayed as ${Unsupported_Field}.
Field not listed in the list of Available Merge Fields
If you have used the merge field value of a field that is not among the list of available merge fields for the selected module, then it will be displayed as ${Unsupported_Field}.
For example, if you insert the merge field value ${Leads.Lead Id} in the Value Description editor for the Deals module, it will get displayed as an unsupported field.
Integrations/Features disabled
When a feature or integration has been disabled for your account, the fields that were created as part of the integration will also not be available for the account post the deactivation. If a merge field value of such a field has been inserted in the Value Description editor, it will be displayed as ${Unsupported_Field}. This is applicable to the following features/integrations.
- Google Ads Integration - Google Ads fields that are no longer available will not be supported.
- Visitor Tracking (Zoho SalesIQ Integration): Visitor Tracking fields that are no longer available will not be supported.
- Territory Management - Fields that are no longer available will not be supported.
- Multicurrency - Currencies that have been deactivated will not be supported.
To associate webhook to a workflow rule
- Go to Setup > Automation > Workflow Rules
- In the Workflow Rules page, click the Create Rule.
- In the Create New Rule page, specify workflow rule parameters.
- Under Workflow Actions, select webhooks.
- In the Call Webhook popup, select the required webhook and click Associate.
- Click Save.
To test the webhook integration
- Add test data in CRM according to your workflow rule criteria.
- In your application check for the data received from Zoho CRM via webhook notification.
- If there is an error or data mismatch, modify your webhook settings in Zoho CRM.
- Continue this test until you obtain the required data from Zoho CRM to your Application.

Notes:
- You can associate up to 6 (1 Instant Action and 5 Time-Based Actions) webhooks per workflow rule.
- Data transfer limit:
Header: A webhook can accommodate up to 10 Header URL Parameters (including module and custom parameters).
Body:
- Form-data: 25 module parameters, 10 custom parameters, and a structured parameter with length up to 10000 characters.
- Raw data type: Up to 15000 characters can be passed. If you are using Raw data type parameters, you cannot use the Form-data type.
- You cannot retrieve data from other Apps to Zoho CRM using webhooks.
- You must update the API ticket regularly according to limits in third-party applications.
- You will not receive any email notification, if the Webhook integration stopped functioning due to any issue in a third-party API.
- If there is any failure in the process, Webhook will send a notification first, Zoho CRM system will send a second notification after 15 min. Thereafter, the system will not send any Webhook notifications for that particular workflow trigger.
- If you exceed the maximum count per day, the system will not send remaining Webhook notifications to third-party applications and will notify the failure to Administrator.
- In the URL to Notify field, if you want to specify a port number, please note that only 80 or 443 port numbers are supported.
- Zoho CRM gives an option to select the required Date/Date Time format and Time Zone during Webhook param configuration.
- Limits for Webhooks:
- Professional edition - 50,000 calls/day or 100 calls/user/day (whichever is lower).
- Enterprise edition - 500,000 calls/day or 500 calls/user/day (whichever is lower).
- Ultimate edition - 1,000,000 calls/day or 1000 calls/user/day (whichever is lower).
Business Scenario 1
Calculate Sales Commission in Zoho Creator App upon closing an Opportunity in Zoho CRM.
Purpose
Sales Managers and the Payroll team can use the Sales Commission app to calculate the compensation for your Sales Reps according to a pre-defined formula that is been set by your organization (for example, flat 2% of the closed contract or sales amount). This application helps you to reduce manual entries, minimize errors and save time while calculating the commission for your Sales Reps. Additionally, Sales Reps can track their monthly commissions in a central location.
Pre-requisite
- Account in Zoho Creator Application
- Permission to access Zoho API
- Familiarity with Zoho Creator
Procedure
- Create the Sales Commission App in Zoho Creator (Refer Zoho Creator Tutorial on Creating Apps)
- Configure webhook in Zoho CRM
- Set up Workflow Rule
- Test your webhook integration
Step 1: Create Sales Commissions App in Zoho Creator
In Zoho Creator, create the Sales Commission App with following fields:
- Sales Rep
- Deal Name
- Customer Name
- Opportunity Amount
- Type of Business: New Business or Existing Business
- Closing Date
- Sales Commission
To create an Application in Zoho Creator refer to the online help
Select the following Fields from the Deal module while setting up user-defined parameters:
- Deal Name
- Closing Date
- Type
- Record Owner
- Amount
In Webhook, specify the following details:
URL to Notify:
- https://creator.zoho.com/api/xml/write - POST method
Raw- Body type Parameters (XML, Text, JSON, or HTML)
- <ZohoCreator>
- <applicationlist>
- <application name='sales-commissions'>
- <formlist>
- <form name='Commissions'>
- <add>
- <field name='Name'>
- <value> ${Potentials.Potential Name} </value>
- </field>
- <field name='Closed_Amount'>
- <value> ${Potentials.Amount} </value>
- </field>
- <field name='Closing_Date'>
- <value> ${Potentials.Closing Date} </value>
- </field>
- <field name='Customer_Name'>
- <value> ${Accounts.Account Name} </value>
- </field>
- <field name='Type_of_Business'>
- <value> ${Potentials.Type} </value>
- </field>
- <field name='Sales_Rep'>
- <value> ${Potentials.Potential Owner} </value></field>
- </add>
- </form>
- </formlist>
- </application>
- </applicationlist>
- </ZohoCreator>
Note
- To retrieve data from other apps to Zoho Creator, you must specify the username and Authorisation typ. To generate Zoho API information, refer to the Online help
Step 3: Set up Workflow Rule
Follow these steps in the Workflow Rule page:
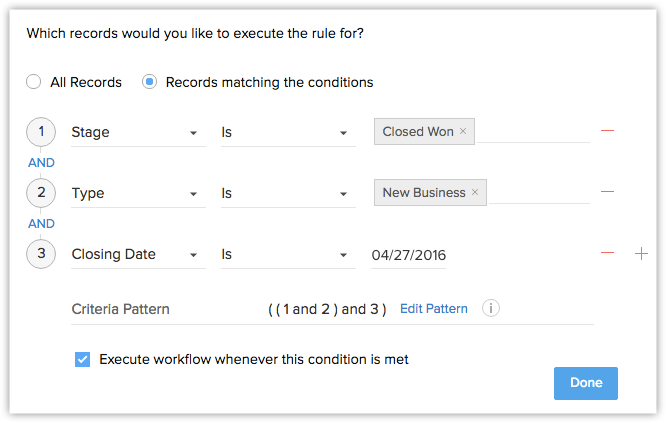
Set up workflow criteria as:
- Type is New Business
- Stage is Closed Won
- Click Next.

- Select webhook as instant action.
- In the Call Webhook popup, select the required webhook from the list and click Associate.
- Save the workflow rule.
Associate Webhook to Workflow Rule
Step 4: Test your Integration
- Add a test deal in CRM with Type and Stage fields as a New Business and Closed Won respectively. While entering test data, ensure that Amount, Closing Data, Record Owner, Account Name and Deal Name are also entered.
- Open your Sales Commission App in Zoho Creator and check for the CRM data.
If you've not received any data, modify the webhook configuration and continue testing. After successful testing, remove test entries and roll-out this integration to your CRM users.
Business Scenario 2
Send SMS alerts to customers and sales reps.
Purpose
A payment from a customer is due today. You can send an SMS with the payment due date, customer name, and amount details to your Sales Rep by associating webhook to time-based action in workflow rule.
Pre-requisite
- Account in SMS gateway service
- Permission to access Workflow Rules
Procedure
- Create an account in SMS gateway service
- Configure webhook in Zoho CRM
- Set up Workflow Rule
- Test your webhook integration
Step 1: Create an account in SMS gateway service
In your SMS gateway service, create an account and get these details to configure webhook:
- Sales Rep
- Deal Name
- Customer Name
- Opportunity Amount
- Type of Business: New Business
- Stage: Closed Won
- Payment Due Date (custom field)
Currently Zoho has partnered with the following SMS Gateway providers:
You can buy SMS credits and API details from the above vendors.
Select the following Fields from the Leads module while setting up user-defined parameters:
- Domain Name of SMS gateway
- Username
- Auth Token
In webhook, specify the following details:
URL to Notify:
- http://<Domain Name>/smsgateway/post - POST method
User-defined Parameters (XML or JSON)
- <?xml version="1.0"?>
- <m:Library xmlns:m="http://www.screen-magic.com/" xmlns="http://www.defns.com/">
- <username>xxxx@xxxxx.com</username>
- <senderid>SMS-Provider</senderid>
- <accountid>XXXXXXX</accountid>
- <authtoken>XXXXXXXXXXXXXXXXXXXXXXXXXXXXXXXXXXXXXX</authtoken>
- <message mobilenumber="${User.Mobile}">Hi ${User.Last Name}, Payment amount ${Potential.Amount} is due today from ${Account.Name}. Please contact ${Contact.Last Name} ASAP</message>
- </m:Library>