Managing List Views
A List View is grouping of records based on a defined set of criteria. List Views are beneficial for displaying customer specific data according to your business requirements. For example, you may be interested in following-up on the leads created during the last week or review overdue tasks or you may want to filter out big deals. The best way to handle these scenarios is to filter the records using the list views. You can also use the List Views for changing record owners, deleting records in bulk and sending mass emails.
Zoho CRM provides a set of Standard list views that are ready to be used by all the users in your organization. In addition, you can also create list views and share with colleagues in your organization.
- Standard List Views: You can modify the standard views and sort the order of the columns in the list. You cannot delete these list views.
- Custom List Views: You can create, modify and delete the custom views and you can also sort the order of the columns in the list.
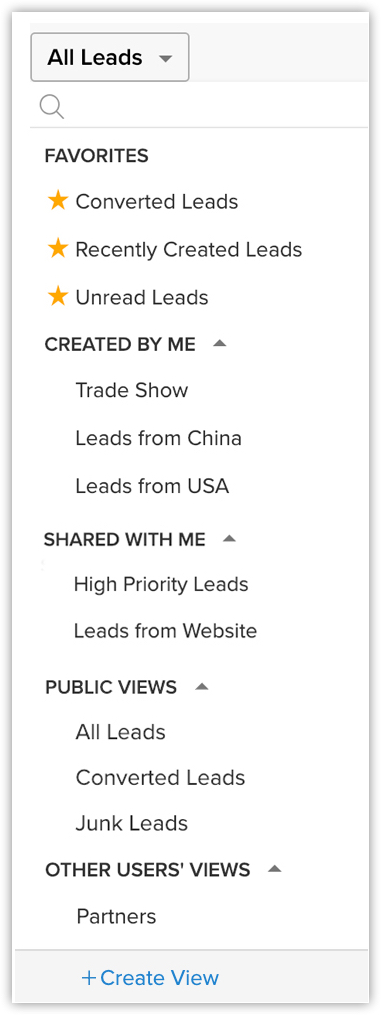
List views are categorized under the following:
- Favourites - Views that you have marked as favourites will be displayed.
- Created By Me - Custom views created by you (the user) will be displayed.
- Shared With Me - Custom views explicitly shared with you by any user in your CRM account, will be displayed.
- Public Views - Views that are accessible to everyone in your CRM account will be displayed.
- Other Users' Views - Custom views created by fellow users in your CRM account, which doesn't come under the above categories will be displayed. Only Administrators will be able to see the views created by other users.
Standard List Views
These are pre-defined sets of list views that are ready to be used by all the users in the organization. Depending on your requirements, you can modify the standard views and sort the order of the columns in the list. However, the standard list views cannot be deleted. You can select a list view from the module's home page by clicking on the View icon. Some standard list views are: All Records, My Records, Recently Created Records, Recently Modified Records, Recently Viewed Records, etc.
Create Custom List Views
You can define criteria and create your own list view, and the records will be filtered based on the criteria you set. You can modify, delete, and also sort the order of the columns in a custom list view. The list views created by the user are listed under Created By Me.
Users with the Manage Custom Views permission can access this feature.
To create custom views
- Click the [Module] Tab.( For e.g. Leads, Contacts, Accounts, etc.)
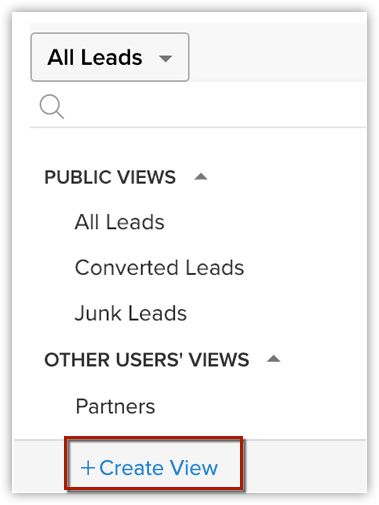
- In the [Module] Home page, move your mouse pointer to the list view's drop-down.
- Click the Create View link.
- In the New View page, do the following:
- Enter the custom View Name.
- Mark as Favorite, if required.
The custom list views marked as favorite will be listed first in the list view drop-down. - Specify Criteria to filter the records.
Tags can also be used as part of Criteria to filter records.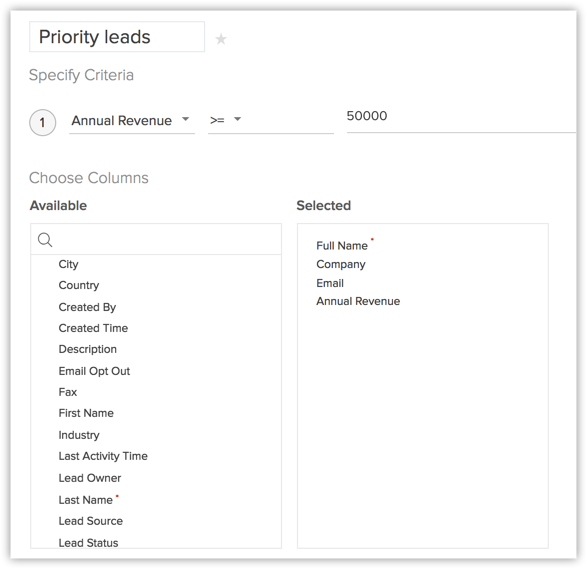
- Select the columns to be displayed in the module view.
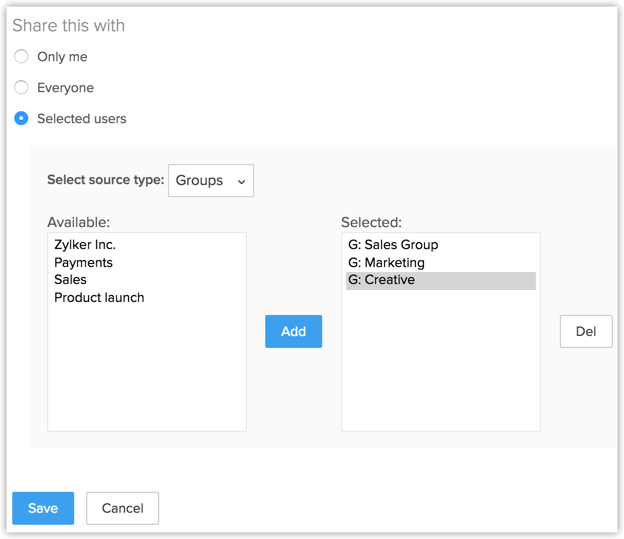
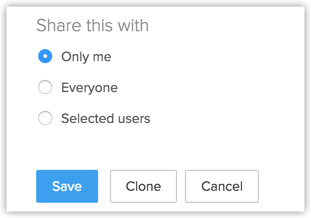
- Under the Share this with section, choose who can see this view.
- Enter the custom View Name.
- Click Save.
Specifying List View Criteria
The following table lists the criteria options for certain types of fields:
| Field Type | Criteria Options | ||
String fields like:
| |||
Numeric fields like:
| |||
Date & DateTime fields like:
| |||
Boolean fields like:
|
|

- You can add up to 25 criteria.
- Specify the numbers without commas. For example, specify 15,000 as 15000.
- If you select the None option, custom view will not be created.
- Age inDays option is very useful for the Date and DateTime fields. It can be used to filter records such as, leads that were created within the last 15 days, deals that were closed in the past 10 days, or users whose subscription was renewed in the lats 5 days.
- Due in Days is an option that lets you set criteria for Date and DateTime fields based on a specific number of due days. For example, if you want to filter deals that are due to be closed in 6 days, you can create a custom view in the deals module with the criteria "Closing Date" "Due in Days = 6".
- Full Name is a combination of the First Name and the Last Name. Full Name will be displayed in the Leads and Contacts module list views as Lead Name and Contact Name respectively.
- Selecting List View Columns
From the Choose Columns section in the Available Columns list box, you can select the columns that should be displayed in the List View. After selecting the columns from the Selected Columns list box, you can change the order or remove the unnecessary columns.
- It is better to select less than 10 columns to avoid horizontal scrolling in List View.
Setting up Permissions to the List View
In the Accessibility Details section, define the user's accessibility to view the custom lists. The following options are available:
- All users are allowed to view this custom view.
- Show this custom view only to me.
- Allow the following users to view this custom view.
Quick actions in list view
- Run macro
- Create task
- Add or remove tags
- Do mass record convert
- Send mass emails
- Set reminders
- Change record owners
- Bulk mail merge
- Perform mass updates
Select desired records
- Go to the desired module.
- Choose the desired custom list view.
- Select the checkbox present near the desired record.
Select All Records in a Custom List View
Zoho CRM allows you to select all records that belong to a particular custom view in one shot.
Consider this scenario. You wish to change the record owner of all leads in the custom view called Tradeshow leads. Say you have over 20000 leads in this custom view- it's a hassle to navigate to the "Next" page and select all leads on every page.
Rather, you can simply click the Select All [Records] in this View link and all the 20000 leads will be selected in one shot and you can change owner for all these records easily.
To select all records in a custom view
- Go to the desired module.
- Choose the desired custom list view.
- Click the Select All check box on the first page.
- Click the Select All [Records] in this View that appears.
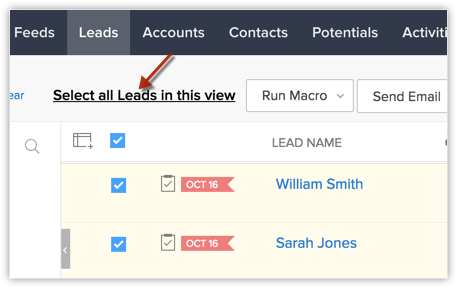
All the records in that list view will be selected.
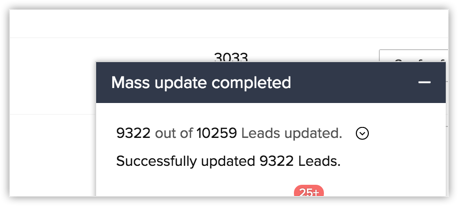
After you have applied a mass update/change owner/delete action, the progress bar at the bottom right corner of your screen will let you know about the status of the update.
- The Select All [Records] in this View link is available only in the Enterprise and Ultimate Edition of Zoho CRM.
- The Select All [Records] in this View link not appear in two cases:
- if there are more than 50000 records in the custom list view.
- if there is a mass list view update that is already in progress
- Assume you have a workflow rule for the selected module in which the Mass Update/Change Owner/Delete actions are associated as the trigger or action. Say you have rule that says whenever "Tradeshow leads are deleted, send email to sales manager". In such a case that workflow rule will be executed if the total records selected are less than 1000. If more than 1000 records are selected in the list view, the workflow rule will not be executed.
Contextual quick actions for individual records
- Edit of a record
- Send Email
- Create task
- Convert of a record
- Change owner
- Tags (Add/ remove)
- Delete
- More > (Create call/ meeting/ appointment)
- These contextual actions will vary for each module and are available based on user permission and accessibility.
Edit Criteria Patterns
Criteria Pattern Editor in the custom list views help you to define the advanced filters using simple logic like and / or.
Users who have the access to the Custom List view can use this option.
- You can specify a maximum of 25 criteria for a list view.
To edit criteria patterns
- Click Module tab.
- Select a List View from the drop-down list.
- Click on Edit.
- In Edit View page, review your existing criteria and click the Change Pattern link.
- In Pattern Editor box, modify filters and click the Save link.
- Save the modified custom view.
Example:
You would like to filter out the leads registered for a Website Visitor or Trade Show from California or Texas, and whose Industry is Large Enterprise.
Lead Source contains "Website Visitor or Trade Show" and State is "California or Texas" and Industry is "Large Enterprise"
You can create this criteria easily using the Criteria option given below:
The criteria pattern will be automatically set as:
Since the criteria pattern does not match the requirement, you can edit it as:
- Round brackets: ( )
- and / or operators
- Criteria Row Number
- When the Change Pattern box is open, you cannot add or delete a criteria row under the Specify Criteria section.
- The operator precedence will not be taken into account if you do not specify brackets. For example, if you specify the criteria as 1 or 2 and 3, it will be considered as ((1 or 2) and 3)
- You can change the and or or of the criteria rows and it will be updated in the Editor below.
- You can change the and or or condition in the pattern and it will be updated in the rows above.
- If you specify 1 and 2 and save it, on editing the view the pattern will be shown as (1 and 2). For (1 and 2) or 3 the pattern will be shown as ( (1 and 2) or 3 )
- If you add more rows in the editor and delete one by one there will be additional brackets displayed in the pattern. For example if there are 5 rows added and you delete the 4th row, it will be shown as ( ( ( ( 1 and 2 ) or 3) )or 4 ) and if the 3rd row is deleted again it will be shown as ( ( ( ( 1 and 2 ) ) ) or 3 ). If the first row is deleted then it will be shown as ( ( ( ( 1 ) ) ) or 2 ). However, upon saving the criteria, it will become ( 1 or 2 ). ( ( ( 1 and 2 ) and 3 ) ) will appear if the last criteria is deleted.
- Make sure that you do not use the following as they are invalid: (), (and), (or)
- If the brackets do not match it will be treated as invalid.
- You will get an error message, if the number of rows and the numbers given in the pattern do not match and also, if there are any missed numbers in the pattern specified.
- Save and Cancel buttons on the custom view will be hidden while editing the criteria pattern.
- In case the final brackets are missing, there will be a difference in the Criteria Patterns Editor and its view mode.Your Criteria Pattern in EditorYour Criteria Pattern in View Mode( 1 and 2 ) or ( 3 and 4 )(( 1 and 2 ) or ( 3 and 4 ))1 and 2 and 3 and 4(1 and 2 and 3 and 4 )( 1 or 2 ) and ( 3 or 4 )( ( 1 or 2 ) and ( 3 or 4 ) )
Use Last Activity Time in Criteria
Apart from editing a record, there are various other activities associated with records. For example, adding a note, closing a task, sending emails etc. The last updated time of such activities is captured in each record as Last Update: Time (only in the Leads, Accounts, Contacts and Deals modules). The information in this field can be used in the List View criteria, to filter out records that had no activity for a specific period of time or those records that had recent activities.
- This option is supported for the Leads, Accounts, Contacts, Deals and custom modules.
- The Last Activity Time under list view criteria and the Last Update time in the Record Details page are the same.
- You can use this criteria only for the custom list views.
Availability
Users who have the access to the Custom List view can use this option.
The activities and updates that will be recorded as Last Activity time:
- Editing fields in a record
- Adding & updating activities, i.e. Tasks, Events, Calls
- Sending emails to leads and contacts
- Adding & editing notes
- Adding deals & contacts under an account
- Changing the owner of the record
- Adding and deleting a record
(This does not include deleting a record associated to the parent record.) - Closing a task
(This does not apply for events as they are automatically moved under Closed Activities after the End DateTime.) - Deleting and restoring the records (individually or in bulk).
- Mass operations like Mass Update, Mass Transfer etc.
(Except for Mass Delete option.)
The activities and updates that will NOT be recorded as Last Activity time:
- Editing contacts or deals under an account will not be listed under the Account
- Deleting related lists under a record.
To use the Last Activity Time in criteria
- Click the Leads, Accounts, Contacts or Deals module.
- Select a List View from the drop-down list and click the Edit link.
You can specify criteria only for the custom list views. - In Edit View page, under Specify Criteria select the Last Activity Time from the drop-down list.
- Specify the criteria conditions.
- Click Save.
Clone Custom List View
The custom views that you create can be duplicated and a similar list view can be created. Please note that the default views cannot be cloned or deleted.
To clone custom list views
- Click the [Module] Tab.( For e.g.. Leads, Contacts, Accounts, etc.)
- In the [Module] Home page, select the list view that you want to duplicate.
- Click the Edit link.
- Then click on the Clone button.
- In the Clone View page, do the following:
- Enter the custom View Name.
- Select the columns to be displayed in the View mode.
- Choose the option as to who can see this view.
- Select the Specify Criteria check box and specify the criteria.
- Enter the custom View Name.
- Click Save.
Edit Standard List View
If you want to add or remove columns in the list view, you can edit the standard list views that are provided by default in Zoho CRM. Please note that you cannot edit the criteria or rename these pre-defined list views.
To edit standard list views
- Click the [Module] Tab. (For e.g. Leads, Contacts, Accounts, etc.)
- In the [Module] Home page, select the list view that you want to edit.
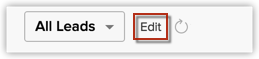
- Click the Edit link.
- In the Edit View page, select and move the fields to the Available Columns list box.
After selecting the columns you can change the order of the columns or remove unnecessary columns from the Selected Columns list box. - Click Save.
Sort Records in List View
Records in the list view can be sorted in ascending or descending order.
To sort records
- Click the [Module] Tab. (For e.g. Leads, Contacts, Accounts, etc.)
- In the [Module] Home page, select the list view that you want to see.
- Near the column header you can see the sort toggle. Click the toggle to sort your records in ascending or descending order.
Manage columns
- You can pin only one column from the list of columns.
- You can also pin/ unpin a column from the sort column menu and while creating custom views.
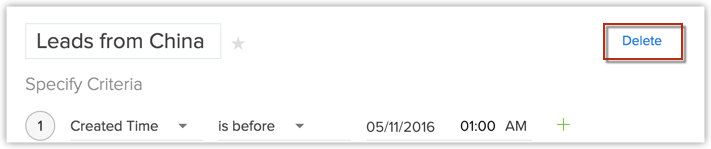
Delete Custom List View
The custom views that you create can be deleted if required. Please note that the pre-defined list views cannot be deleted.
To delete custom list views
- Click the [Module] Tab. (For e.g. Leads, Contacts, Accounts, etc.)
- In the [Module] Home page, select the list view that you want to delete.
- Click the Edit link.
- Click on Delete.
Zoho CRM Training Programs
Learn how to use the best tools for sales force automation and better customer engagement from Zoho's implementation specialists.
Zoho DataPrep Personalized Demo
If you'd like a personalized walk-through of our data preparation tool, please request a demo and we'll be happy to show you how to get the best out of Zoho DataPrep.
- Zoho Workerly Home
- Forums
- Connect With Us:


- Zoho Recruit Home
- Forums
- Connect With Us:
You are currently viewing the help pages of Qntrl’s earlier version. Click here to view our latest version—Qntrl 3.0's help articles.


Zoho Sheet Resources
Zoho Forms Resources
Zoho Sign Resources
Sign, Paperless!
Zoho TeamInbox Resources
Zoho DataPrep Resources
Design. Discuss. Deliver.
Related Articles
Module Views - An Overview
Introduction Businesses, irrespective of industry, all have one thing in common—an ever-growing database. From customer information to transactional records, product portfolio, or even communication bytes—your data of all types grows at the same pace ...Creating Kanban Views
Kanban view is a card-based view that displays the data in an organized manner for better comprehension. For example, you can segregate the leads based on their status or categorize the sales depending on different stages. This sort of information ...Managing Accounts
In a typical Business to Business (B2B) scenario, Account represents a Company or a Department within the company, with which your organization is currently doing business with or is planning to do business with in the future. An account stores the ...Email Views and Email Sentiment
Access Email Views in Zoho SalesInbox Zoho SalesInbox offers you a handful of Email Views in order to further help you manage your email communication efficiently. In order be able to access Email Views, you must have enabled Email Insights in Zoho ...Types of Custom Fields
In Zoho CRM, you can add different types of custom fields as per your requirements. These fields will be available to all the users added to your organization's CRM account. Customize Zoho Defined Fields : You can edit, delete and hide some of Zoho ...