
Migration from FreshBooks to Zoho Books.
This document will help you with migrating from FreshBooks to Zoho Books without historical transactions. Although, some data can be exported from FreshBooks and imported into Zoho Books, some have to be recreated.
What can be exported from FreshBooks
You will be able to export the following in a .csv file:
Client information
Basic Invoice information
Staff and Timesheet details
Journal Entries
How to export data from FreshBooks
Follow the instructions below to export data from your FreshBooks account:
Log into your FreshBooks account
Click on the My Account link on top of the screen and choose the Import & Export section.

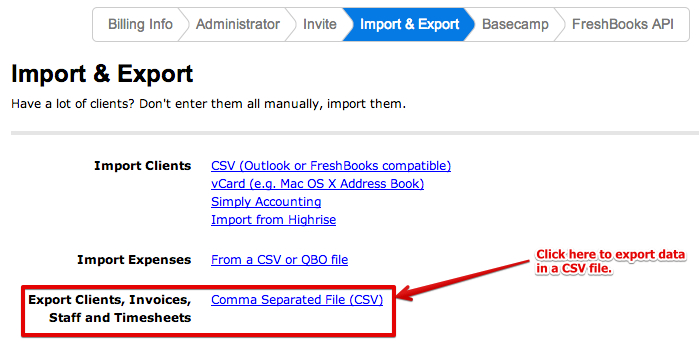
On the screen that appears next, select each entity to export the data into a .csv file, e.g. Clients
Reports that need to be generated in FreshBooks.
Not all data stored in FreshBooks can be exported. In order to overcome this limitation, we can generate a few reports to get the required information out of FreshBooks and enter them in Zoho Books. Here’s the list of Reports that you need to generate in FreshBooks:
Profit & Loss report
Balance Sheet
Expense Report
Revenue by Client
How to export these reports from FreshBooks.
You can go to the Reports tab in your FreshBooks account and generate each of the reports separately. Each of the report will have the option to export it. You can choose between Excel or CSV as the file format for the export.
Go to Reports tab.
Generate the report with the correct date range. (Beginning of fiscal year until today)
Click the Export button on top of the report and choose Excel from the drop down.
Note: When generating Revenue by Client report, make sure to set the filter to show “Total Outstanding”
Limitations in Migrating from FreshBooks to Zoho Books.
Now that we are discussing the entire migration process of exporting data from your FreshBooks account to importing it into Zoho Books and setting up your Zoho Books account. Let us also take a look at the limitations in the process.
You will not be able to export:
Quotes
Credits
Items
Recurring Invoices
Received Invoices
Expenses
Taxes
Payments
Quotes, Recurring Invoices, Received Invoices
Transactions under these entities in your FreshBooks account cannot be exported. FreshBooks does not provide you with the option to export this information. If you have any open quotes/received invoices in your FreshBooks account, you will have to create them manually in your Zoho Books account. You will have to recreate the recurring invoices in Zoho Books and deactivate them in FreshBooks.
Invoices
Even though FreshBooks allows you to export Invoice data as CSV file, the data/fields provided in the exported file is too limited to be imported into any other software. So, importing your historical invoices will be impossible.
Payments
In addition to the limited invoice data, FreshBooks does not have an option to export payment information. So, even if you import the invoice data into Zoho Books after making changes to the CSV file, you will have to record the payments manually.
Expenses
Expenses in FreshBooks cannot be exported directly. As a work-around, you can generate the Expense Report, make changes to the file and import it into Zoho Books. You will have to create the Expenses Categories in FreshBooks as expense accounts in Zoho Books to be able to import the expense report.
Journal Entries
Even though you would be able to export Journal Entries from FreshBooks, there is no option to import them in Zoho Books.
Staff
Staff members of your FreshBooks account have to be invited as Users to your Zoho Books account. You can provide them with Staff role or Staff - Timesheet only role to restrict the level of access given.
Now, you are all set to import your data into Zoho Books and simplify your accounting.
Set up your Zoho Books account
You can now sign up for Zoho Books and set up your organization. This will include setting up your basic preferences and other settings like reminders, templates, online payment gateways, taxes etc. On completion, you can set up other sections of your Zoho Books account. You can have a quick overview of Preferences under Settings section of Zoho Books from the document available in this link.
Customer Portal.
Like FreshBooks, Zoho Books also has Client Portal where your customers can view all their quotes and invoices. However, the process is a little different. In Zoho Books, you will have to enable the portal for all your customers and they will have to set up their password to access the portal. You can refer this link for more information.
Online Payments
Zoho Books, like FreshBooks, allows you to receive payments online from your customers. We are integrated with Stripe, Authorize.Net, PayPal, PayPal Payflow Pro, 2Checkout and Briantree at the moment to enable our users receive online payments. You can setup your payment gateway before you start invoicing your customers from Zoho Books.
Taxes
In the global edition of Zoho Books, you would be able to set up tax rates of your choice similar to how you do it in FreshBooks. Enter the name of the tax, enter the rate and click save to create a new tax rate. In addition to this, you would also be able to select if the tax is a compound tax or a simple one. You would also be able to create a tax group with multiple taxes part of one group. The document in this link will help you with more information.
In the US edition of Zoho Books, you would be able to handle tax requirements specific to the USA. You will be able to create tax rates specific to counties, states and associate them to specific tax authorities. You will be able to associate these to your customers and have the system apply the taxes automatically. The document in this link will give you complete information on US Sales tax in Zoho Books.
Items
Now, you can navigate out of the Settings section and set up other parts of your Zoho Books account. From the Home screen, you can access Items tab to set up your list of products or services that you invoice your clients. You can refer the instructions in this link to create new items.
You also checkout Pricelists and Inventory in Zoho Books. Please make sure to enable Inventory before you can create the list of Items.
Automatic Bank Feeds
Now, you can go to the Banking tab to set up your bank account. You can follow the instructions below to set up automatic bank feeds:
Click the Add Bank or Credit Card button on the top right corner of the Banking screen.
Enter the name of your bank in the wide text box available on the screen.
Choose the bank from the drop down.
Enter your online banking credentials to setup the automatic feeds.
If your bank is not available in the drop down, you do not have to worry. You can still set up your bank account and import your statements manually. You can refer the document in this link for instructions in this regard.
Chart of Accounts.
Chart of Accounts will be the next important thing for you to set up to manage your accounting efficiently. Zoho Books provides you with a list of accounts by default. You can edit, remove or add accounts to meet your requirement. The Expense Categories in FreshBooks have to created as Expense accounts in Zoho Books or existing expense accounts have to be renamed to match FreshBooks.
Import your data into Zoho Books.
You can import your data from FreshBooks to Zoho Books through individual feature tabs. The import option will be available in the menu button available under each entity.
Import Contacts
Before importing contacts from FreshBooks to Zoho Books, add additional fields/custom fields (if any) from the ‘Settings’ section in Zoho Books and then import contacts.
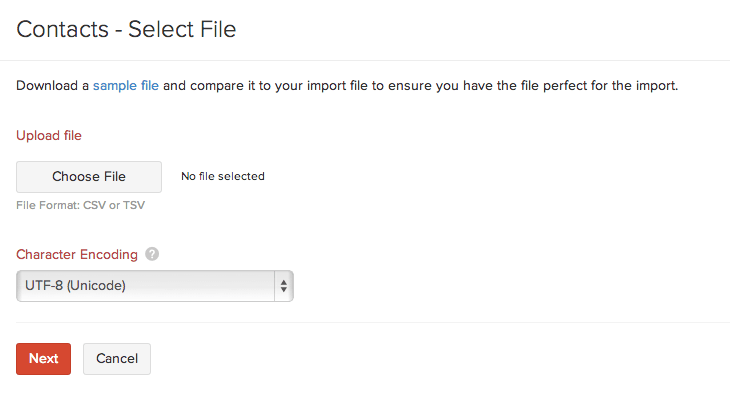
Once done, navigate to Contacts tab and click the Import Contacts link available in the page or click on the Menu button and choose Import Contacts from the drop down.
On the ‘Contacts- Select File’ screen, choose the file you wish to import and ensure the correct character coding is selected according to the import file. Click Next.
Map the field names that you would like to see in Zoho Books. From the Imported File Headers drop-down, choose appropriate entities to match the Zoho Books Field.
In the preview screen you can see the number of records that are ready to be imported, number of records skipped and unmapped fields. If there are some unmapped fields in your import file, this would not have been mapped to any Zoho Books field and these fields would be ignored during the import process. Click the Import button on the preview screen to move your Contacts data into Zoho Books.
Zoho Books would automatically identify contacts as ‘Customers’ when invoices or quotes are created and as ‘Vendors’ when bills are recorded for the contact.
Import Timesheet.
You would be able to track time spent on services that you provide to your clients in Zoho Books. You would be able to import Timesheet into Zoho Books after making some changes to the file exported from FreshBooks.
The mandatory fields required for the timesheet data to be imported into Zoho Books is given below:
- Project Name
- Task Name
- Time Spent
- Date
Before, you are ready to import the timesheet entries, you will have to create the Project, create tasks for the projects and associate staff to it. You can follow the instructions below to create a new project and tasks in Zoho Books:
Go to Timesheet tab in your Zoho Books account.
Click the Create New Project button.
Enter the Project Name.
Choose the Customer Name and Billing Method.
If you wish to enter a Budget for the projects, you can select the checkbox right below the Billing Method field.
- Choose the Billing type and enter the budget amount.
Add Users to your Projects if you want them to access Zoho Books to make time entries.
Add Task and enter the Task rate.
Click Save to create the Project.
After creating the project, you can go to Import & Export section under Settings to import your Timesheet entries. Make sure to have the values for the headers mentioned above to import timesheet easily.
Import Expense.
Expenses in FreshBooks can be imported into Zoho Books. You will have to generate the Expense Report in FreshBooks and export it as CSV file. Then, you will have to make changes to the CSV to meet the import requirements of Zoho Books. You can generate a sample expense file from the import expense screen. The mandatory fields required for importing Expenses into Zoho Books are as follows:
- Expense Date
- Expense Account
- Expense Amount
Before you import the expense file, the Expense Categories in FreshBooks have to be available as Expense Accounts in Zoho Books. You can use the existing expense accounts in Zoho Books to match the categories of FreshBooks. You just have to make sure that the Category name in the CSV matches with the Account Name in Zoho Books. You can go to Chart of Accounts under the Accountant tab to create new accounts or edit existing ones.
The final step for you would be to create invoices for your clients those have unpaid invoices in your FreshBooks account. You can create one invoice for a contact for the total outstanding amount. The Revenue by Client report from FreshBooks will help you identify the outstanding amount for each of your contact. You can go to Invoices under Sales tab to create them. Please make sure to create the transactions before the date on which you are entering the Opening Balances.
Once done, you can go to Opening Balances under the Settings section and enter your opening balances for each of the accounts used in your books. You will need to generate the Profit & Loss report and the Balance Sheet report in your FreshBooks account. You can enter the balances for the respective accounts in Zoho Books as per these reports. Please make sure to enter the opening balance on a date after all the transactions have been entered.
Verifying the Balance:
Once you have entered opening balance in Zoho Books, you can verify the balances with reports generated in your FreshBooks account to see if both the software have the same numbers for various accounts on the specific date. This will ensure you to start your accounting in Zoho Books from where you left off in FreshBooks.
You can compare the Profit/Loss and Balance Sheet reports generated in FreshBooks with the Trial Balance or Profit/Loss and Balance Sheet Report in Zoho Books to see if the balances of all the accounts are the same on the specific date.
Now, you are all set to begin using Zoho Books and continue your accounting from where you left off.
 Yes
No
Yes
No
Thank you for your feedback!