
PDF Templates
Templates are predefined formats or layouts that serve as a starting point for creating something, such as a document, website, or design. They provide a structure or framework that can be customised to create professional-looking PDFs without starting from scratch.
In Zoho Books, you can use templates to create standardized documents like invoices, estimates, purchase orders, sales orders, and similar transactions in PDF. Customise the template to reflect your brand identity and include essential information related to your transactions using one of the pre-loaded templates or creating a new one.
Customise PDF Templates
Zoho Books offers two ways to customise PDF templates: using the built-in template editor with pre-loaded layouts, or designing templates from scratch using HTML and CSS.
Default PDF Templates
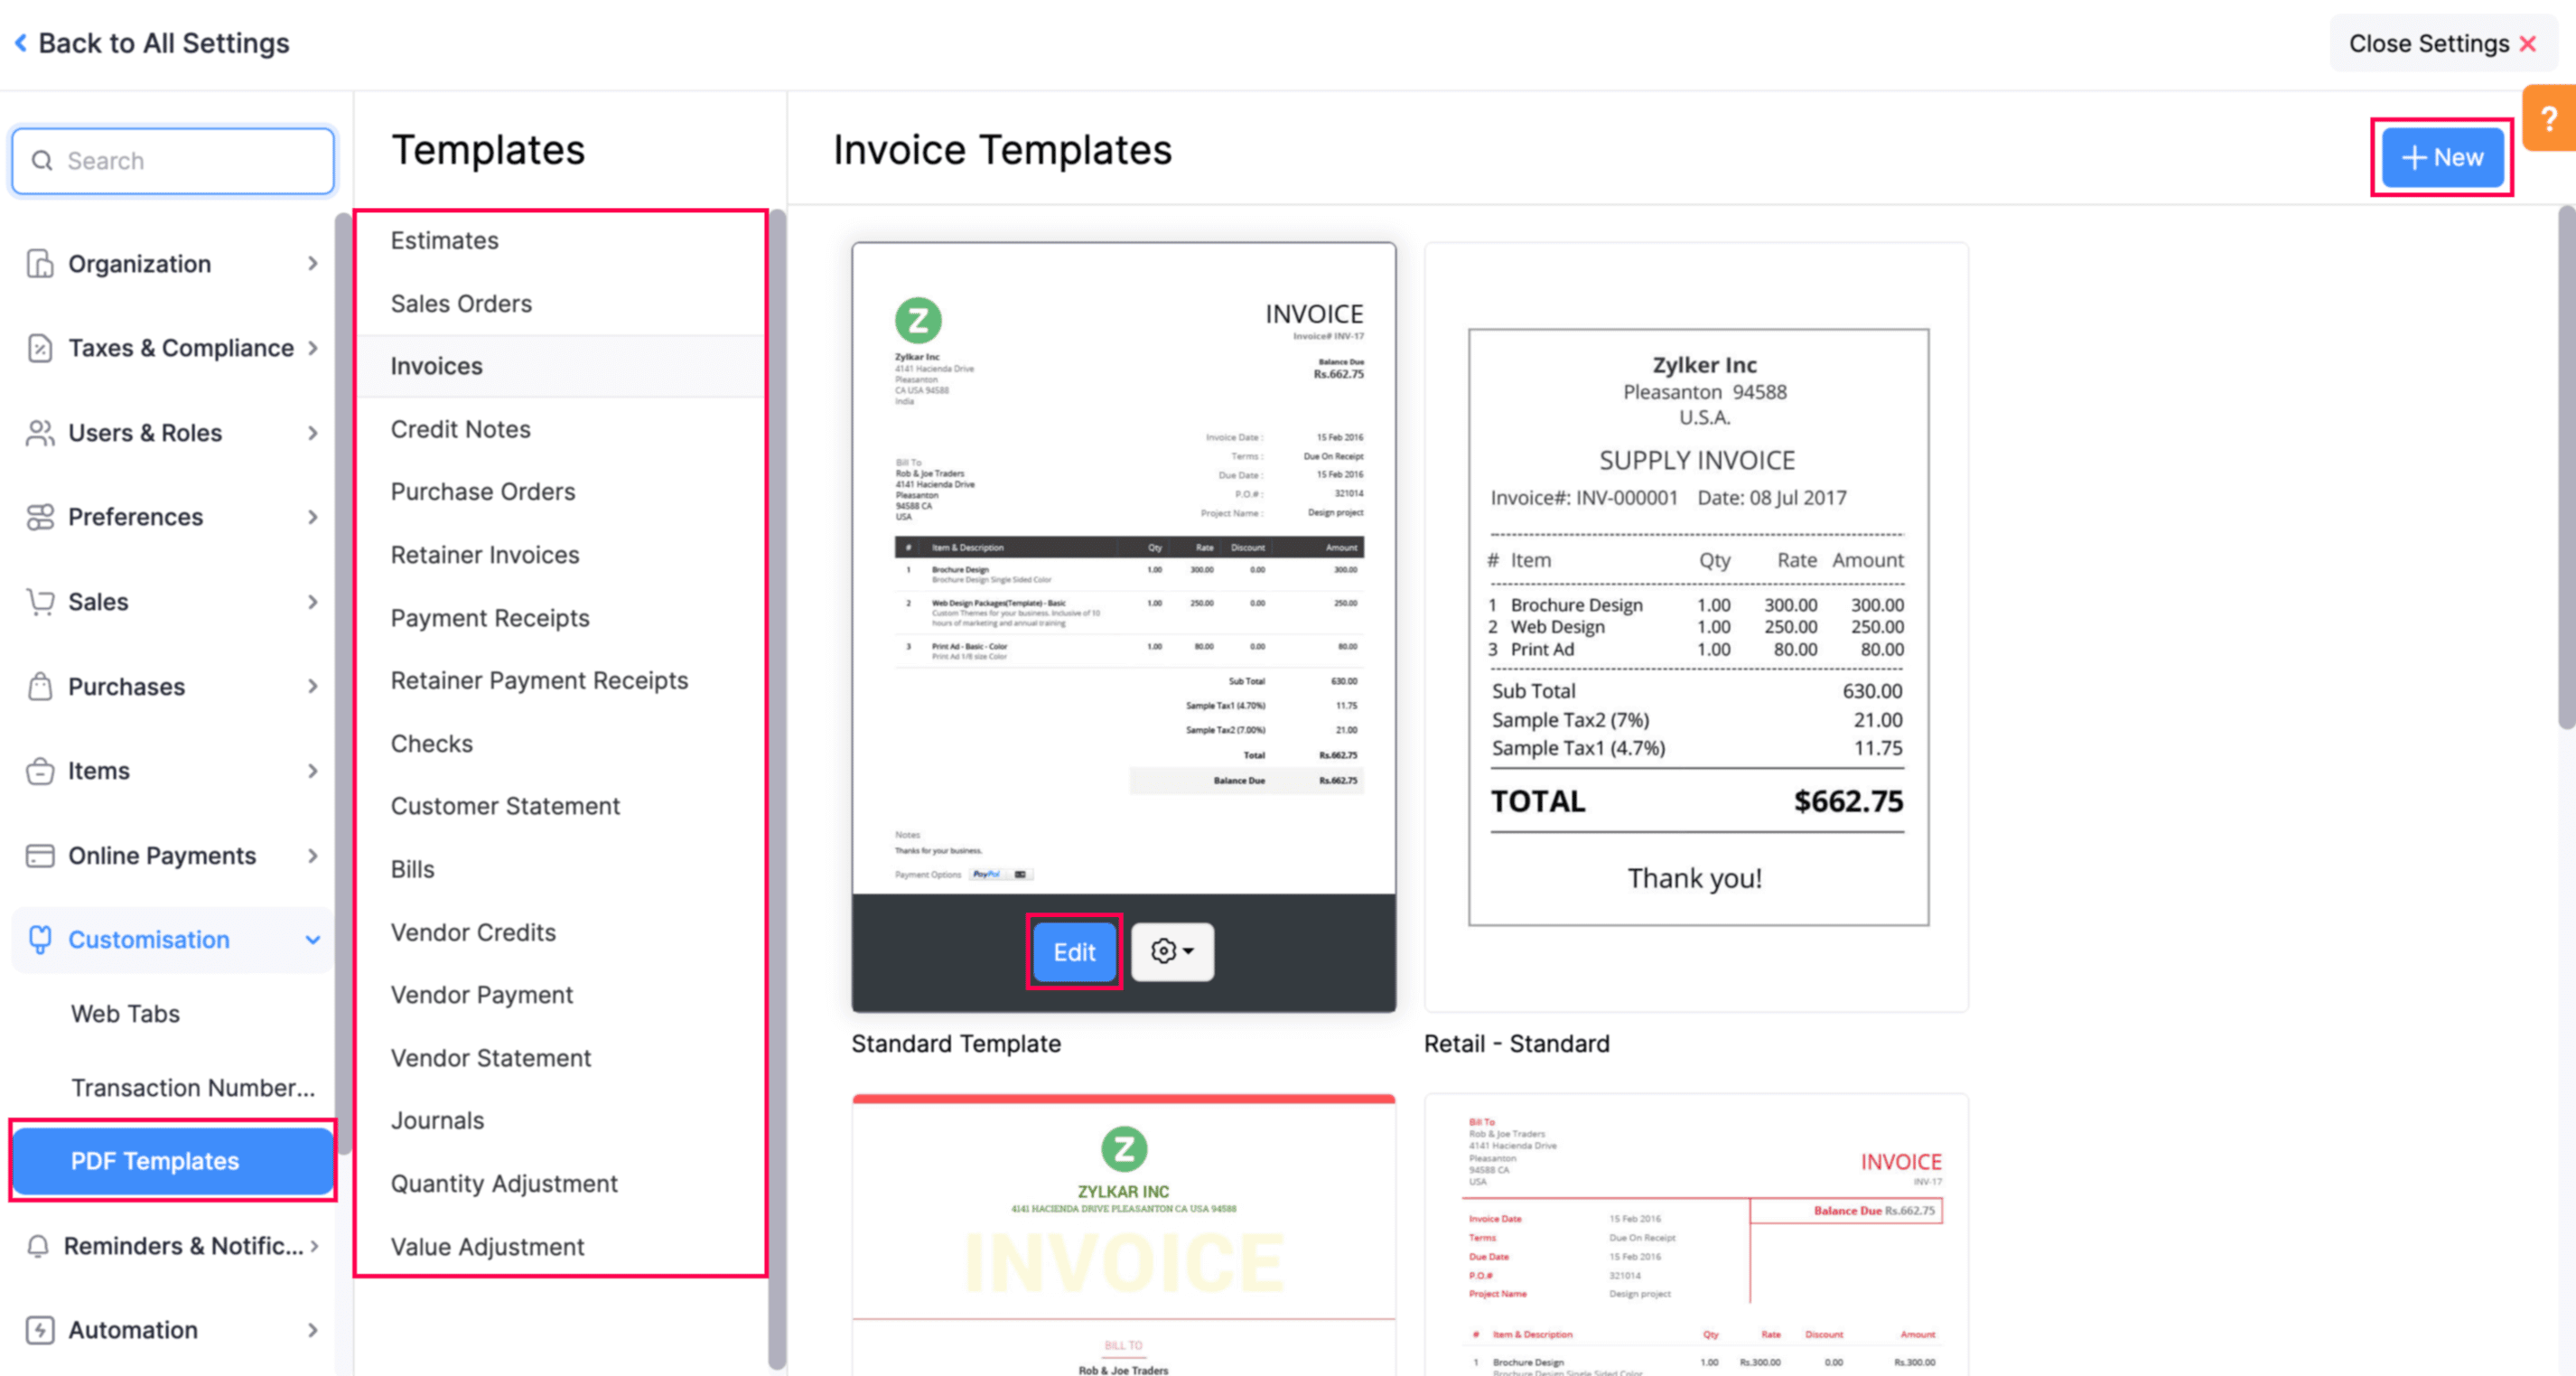
To customise a PDF template:
- Go to Settings.
- Select PDF Templates under Customisation.
- In the Templates pane, select the module you want to customise.
- Click + New in the top right corner to create a new template, or hover over an existing template and click Edit to customise the template.
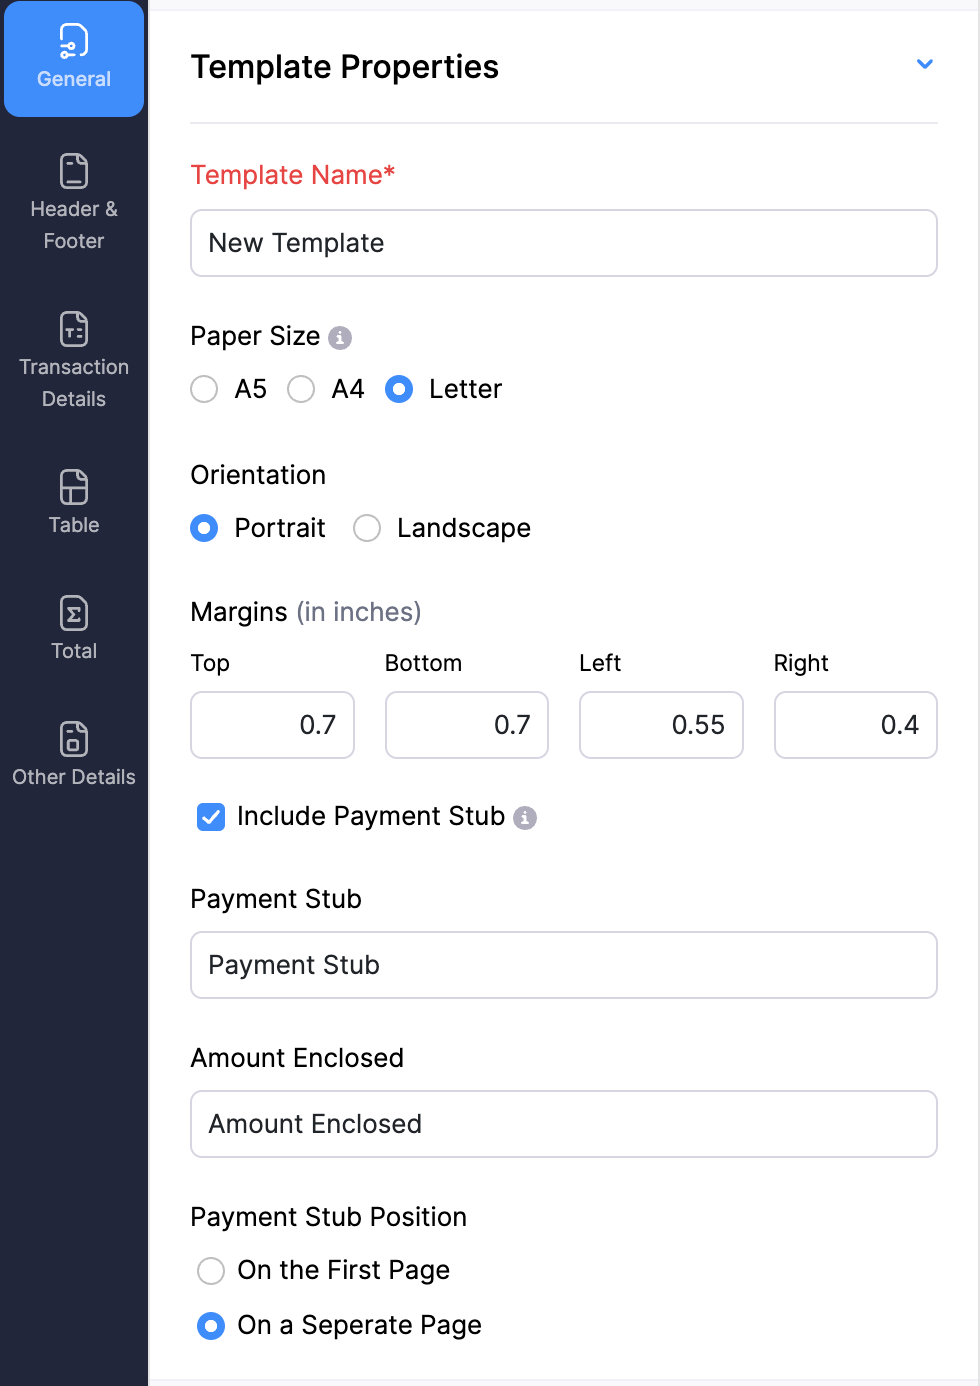
General Tab (Available for All Modules)
Template Properties
| Fields | Description |
|---|---|
| Template Name | Enter a name for your template. |
| Paper Size | You can select either A4 or Letter sizes based on your preference. |
| Orientation | Select either Portrait or Landscape as the orientation. |
| Margins (in inches) | The margins of the template determine how much distance there is between the template’s content and its edges. |
| Include Payment Stub | Payment Stub is a detachable section that is added to an invoice to collect cash payments, especially when you send invoices via postal services. This option is available only for Invoices. |
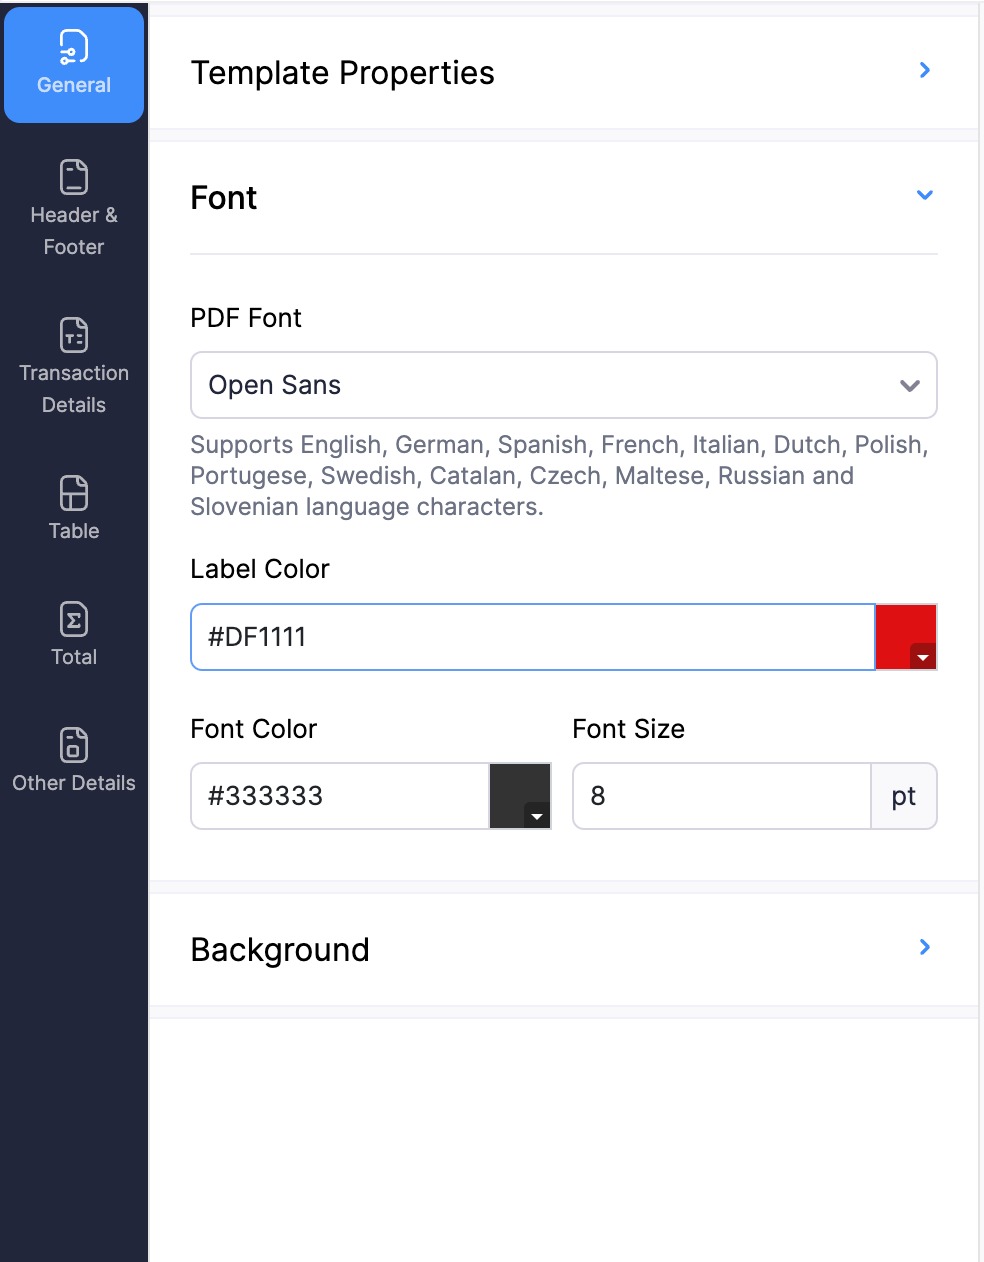
Font
| Fields | Description |
|---|---|
| PDF Font | This is the font that will be used to display content in this template. A note will appear under the selected font explaining the languages it’s best suited for. |
| Label Colour | Select a different font colour for each column being displayed. |
| Font Colour | Choose a font colour. |
| Font Size | Specify the font size for the displayed invoice. |
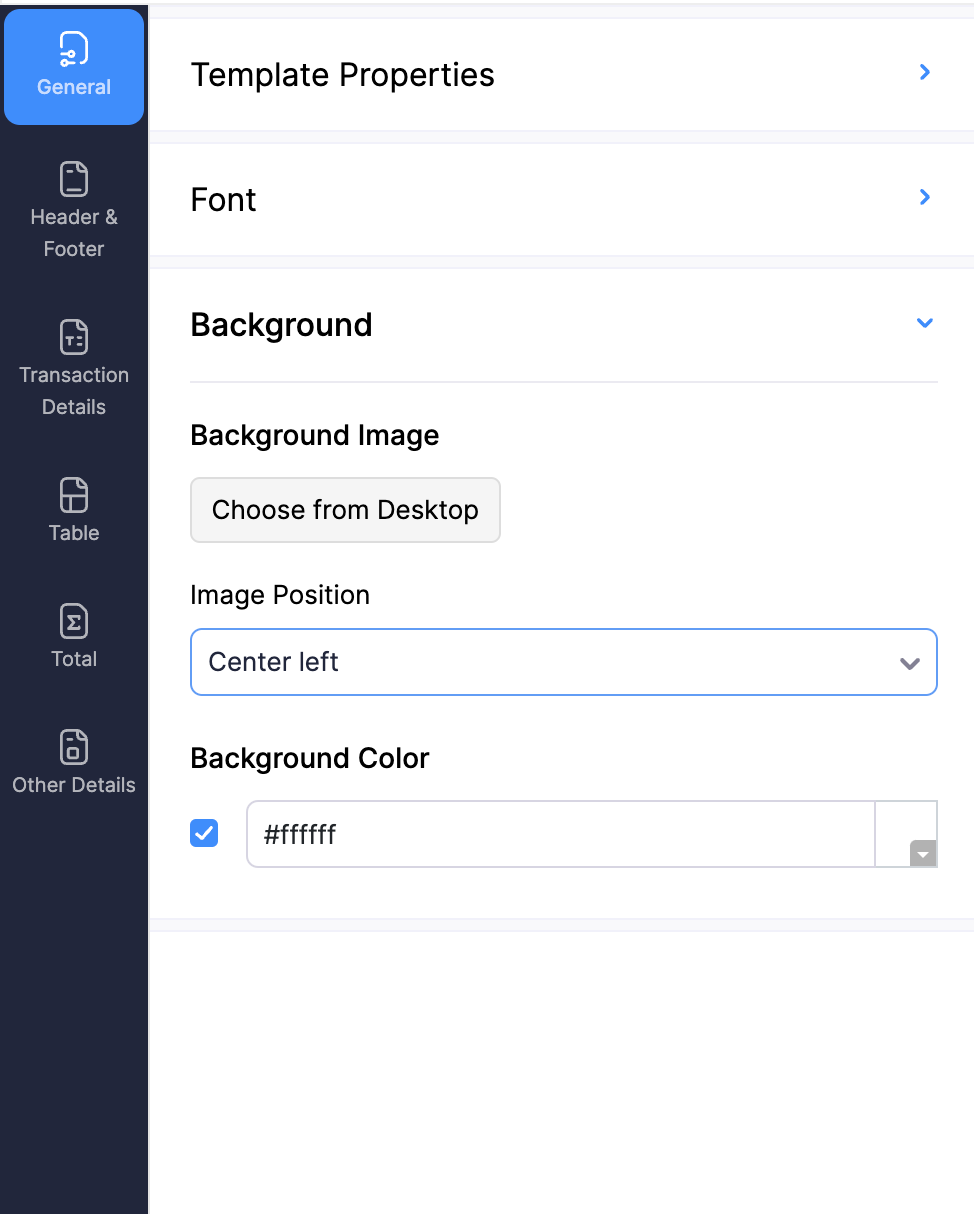
Background
| Fields | Description |
|---|---|
| Background Image | A background image can be added to fill the background of the template. |
| Image Position | The position of this image can be adjusted using the Image Position dropdown. |
| Background Colour | With this option, you can change the colour of the template’s background. |
Header and Footer Tab (Available for All Modules)
Note: In Zoho Books, certain modules have separate tabs for Header and Footer.
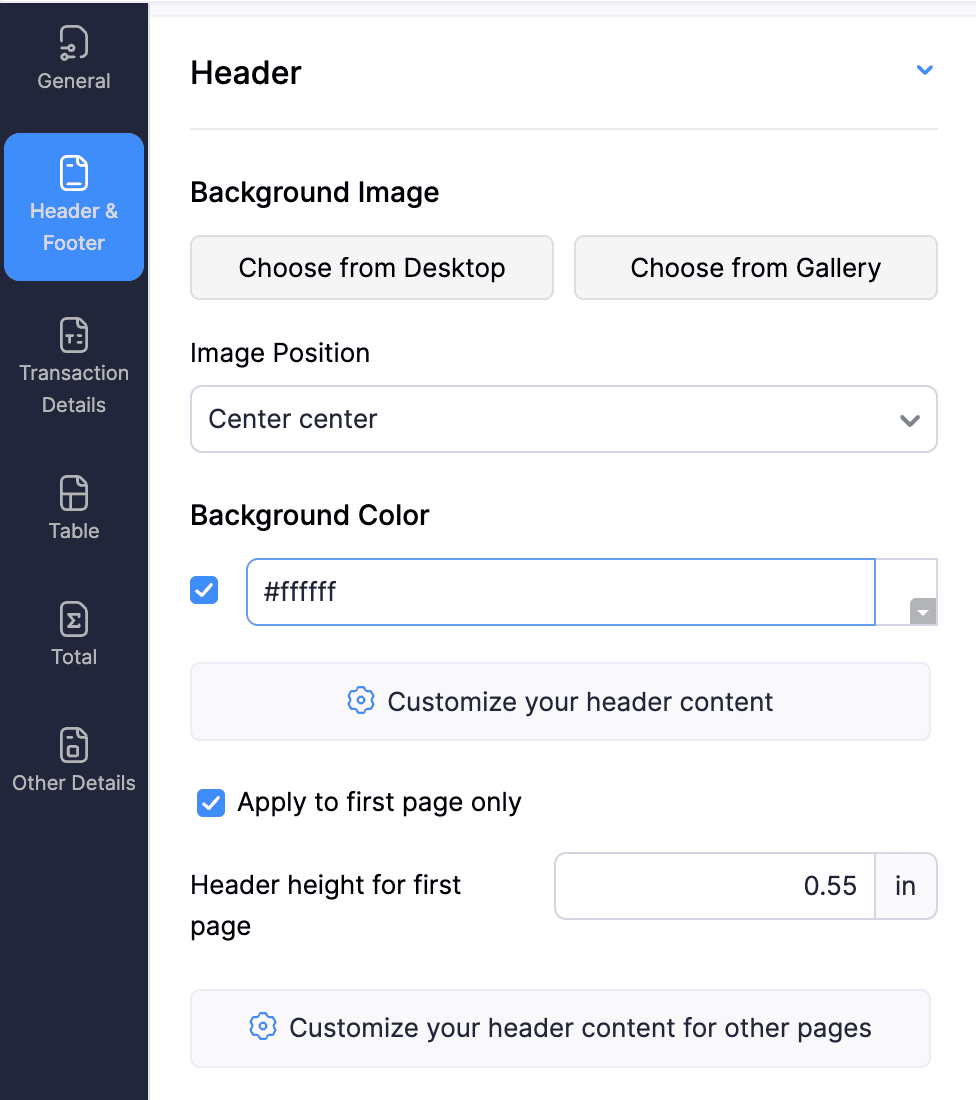
Header
| Fields | Description |
|---|---|
| Background Image | A background image can be added to fill the header section of the template. Note: The size of the background image cannot exceed 1 MB. |
| Background colour | The background colour of the header section can be changed either by entering a hex colour code or clicking the coloured sqaure to open the colour picker. |
| Customise your header content | Customise the header content of your template with placeholders and font options. |
| Apply to first page only | Enable this option to customise the header section differently for the first page. You can also provide separate header content for the other pages. |
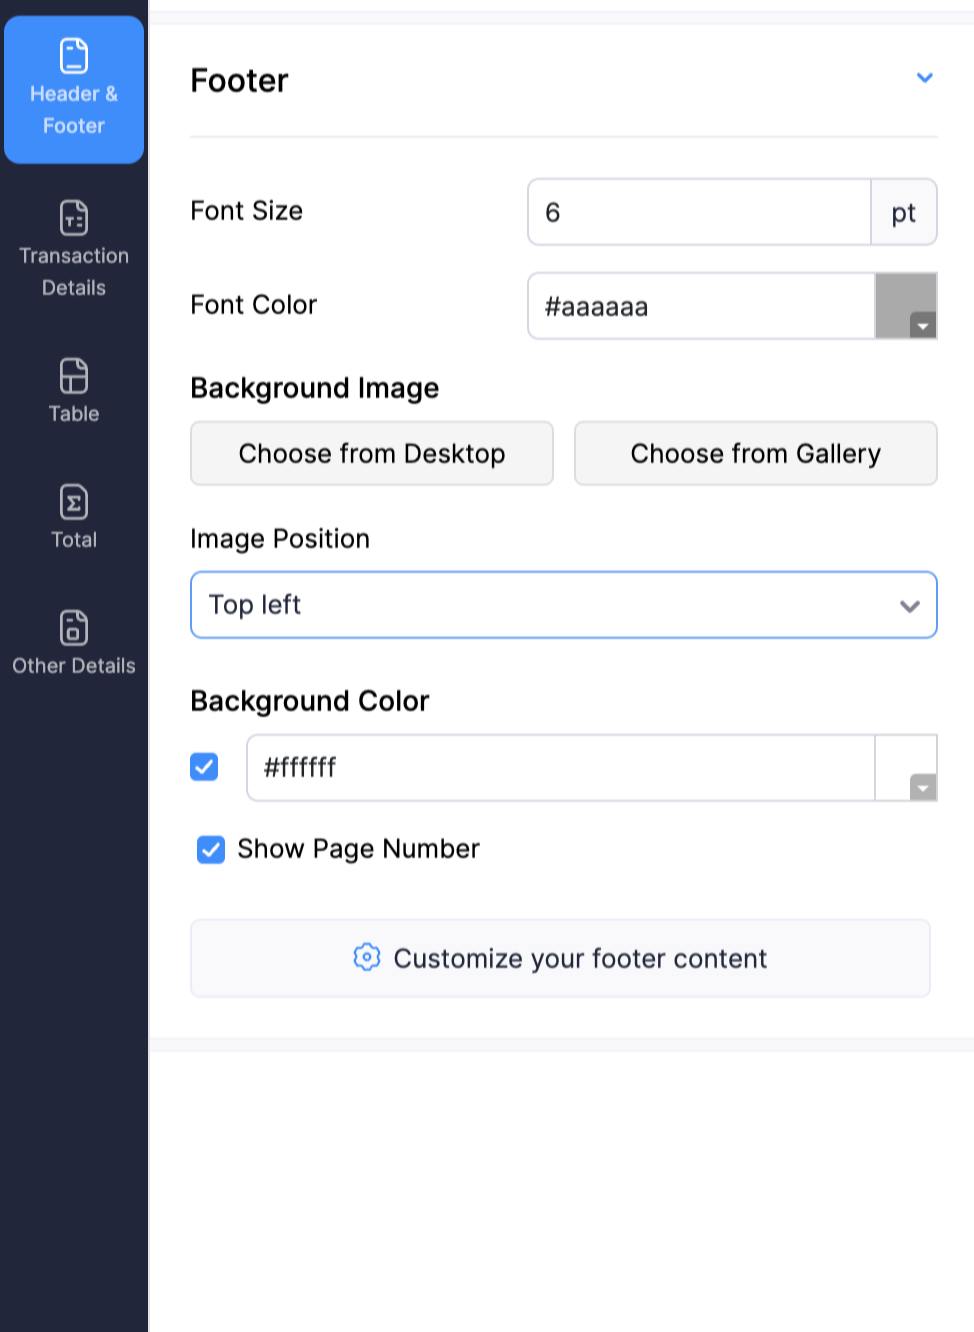
Footer
| Fields | Description |
|---|---|
| Font Size | Adjust the font size of the footer of the document. |
| Font colour | Select the text colour of the footer. |
| Background Image | A background image can be added to fill the footer section of the template. |
| Image Position | The position of this image can be adjusted using the Image Position dropdown. |
| Show Page Number | Tick this box to include page numbers in the document. |
| Customise your footer content | You can add information to be displayed on the lower portion of the document. This content can be completely customised with placeholders, tables, font options, and links to suit your needs. |
Transaction Details Tab (Available for All Sales and Purchase Modules)
Organisation Details
| Fields | Description |
|---|---|
| Show Organisation Logo | This option shows your business logo and let’s you adjust its size. |
| Resize Logo | Your organisation’s logo can be be resized to fit the template by dragging the slider to the left or right. Pro Tip: Click the Reset icon to switch to the image’s default aspect ratio. |
| Background Image | A background image can be added to fill the footer section of the template. |
| Show Organisation Name | Enable this option to show your organisation’s name in the template. |
| Show Organisation Address | Select if you wish to show your organisation’s address on the template. |
| Organisation Address Format | This option lets you change your organisation’s address format. You can also add or remove placeholders to customise it further. |
| Show Dispatch From Address | Enable this option to display the Dispatch From address in your invoice PDF. |
| Note that this field will be visible only if e-Invoicing is enabled for your organisation. | |
| Dispatch From Address Format | You can modify the Dispatch From address format displayed in your transaction PDFs. Note that this field will be visible only if e-Invoicing is enabled for your organisation. |
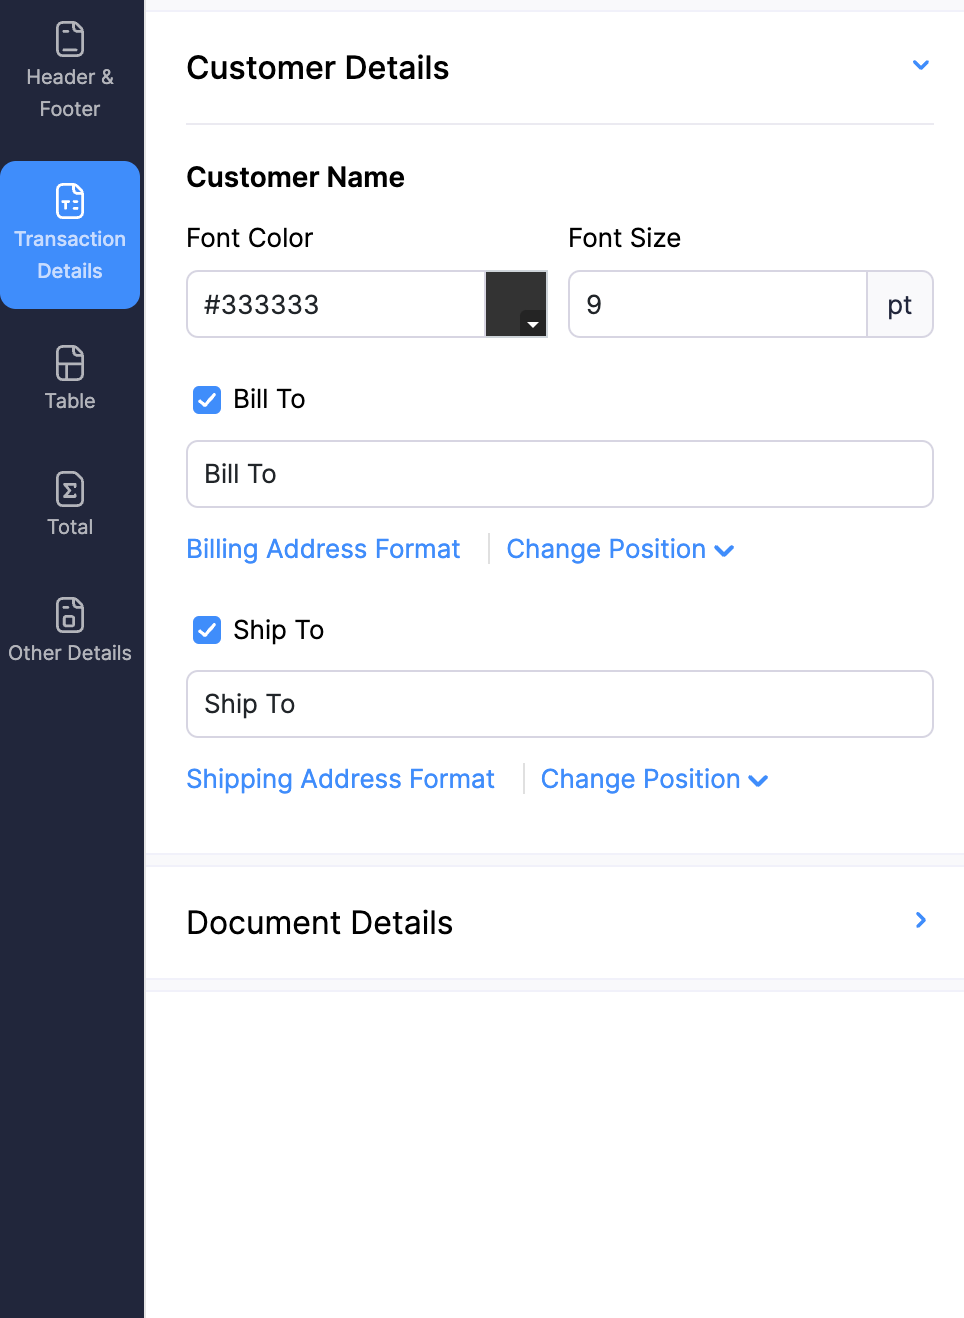
Customer Details (Available only for Sales Transactions)
| Fields | Description |
|---|---|
| Customer Name | Change the Font Colour and Font Size of your customer’s name in the document. |
| Font Colour | Choose the Font Colour for the customer’s name. |
| Bill To | Select this option to include the billing address in the template. |
| Billing Address Format | Click this option to customise the format of the billing address by inserting placeholders. |
| Ship To | Select this option to include the shipping address in the template. |
| Shipping Address Format | Select this option to customise the format of the shipping address by adding the required placeholders. |
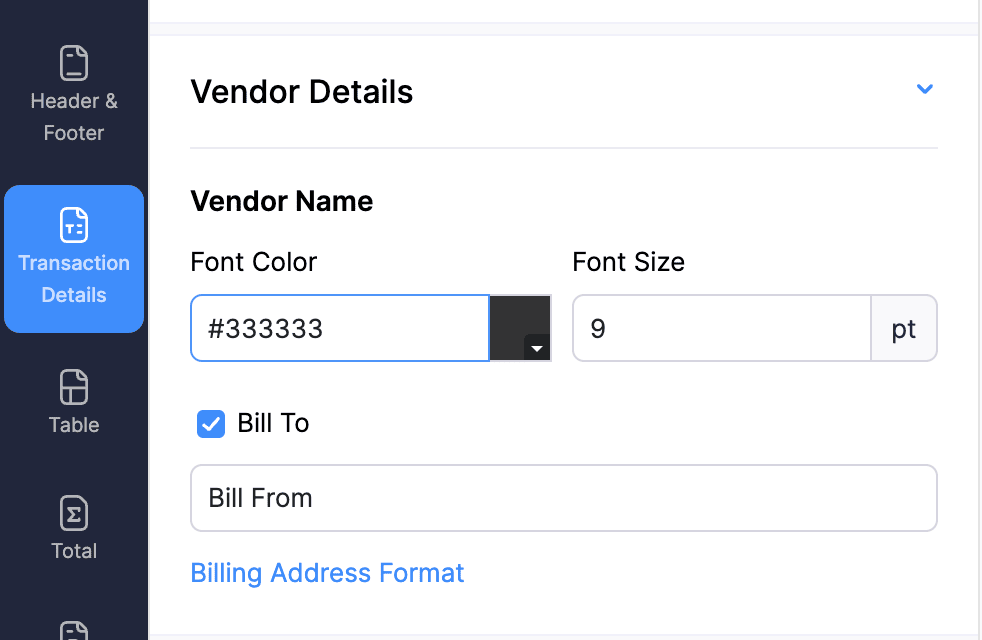
Vendor Details (Available only for Purchase Transactions)
| Fields | Description |
|---|---|
| Vendor Name | Change the Font colour and Font Size of your vendor’s name in the document. |
| Bill To | Select this option to include the billing address in the document. |
| Billing Address Format | Click this option to customise the format of the billing address by inserting placeholders. |
Document Details (Available for All Modules)
| Fields | Description |
|---|---|
| Show Document Title | Enable this option to display the document’s title in the template. |
| Font Size and Colour | Set the Font Size and Font Colour for the text in the document. |
| Document Information | Toggle the checkboxes to display or hide the listed fields. You can also edit the label names in the adjacent text boxes. |
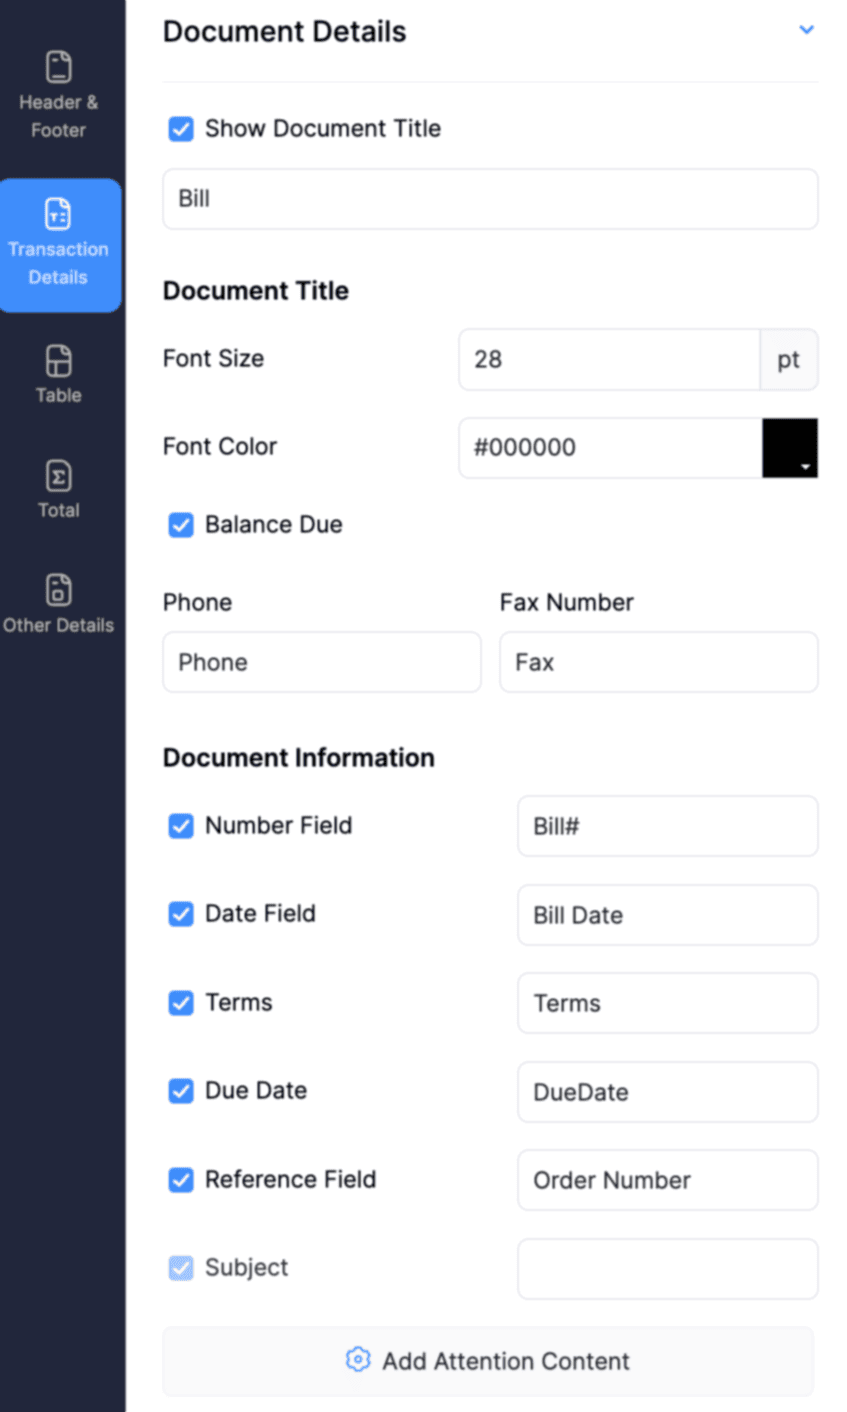
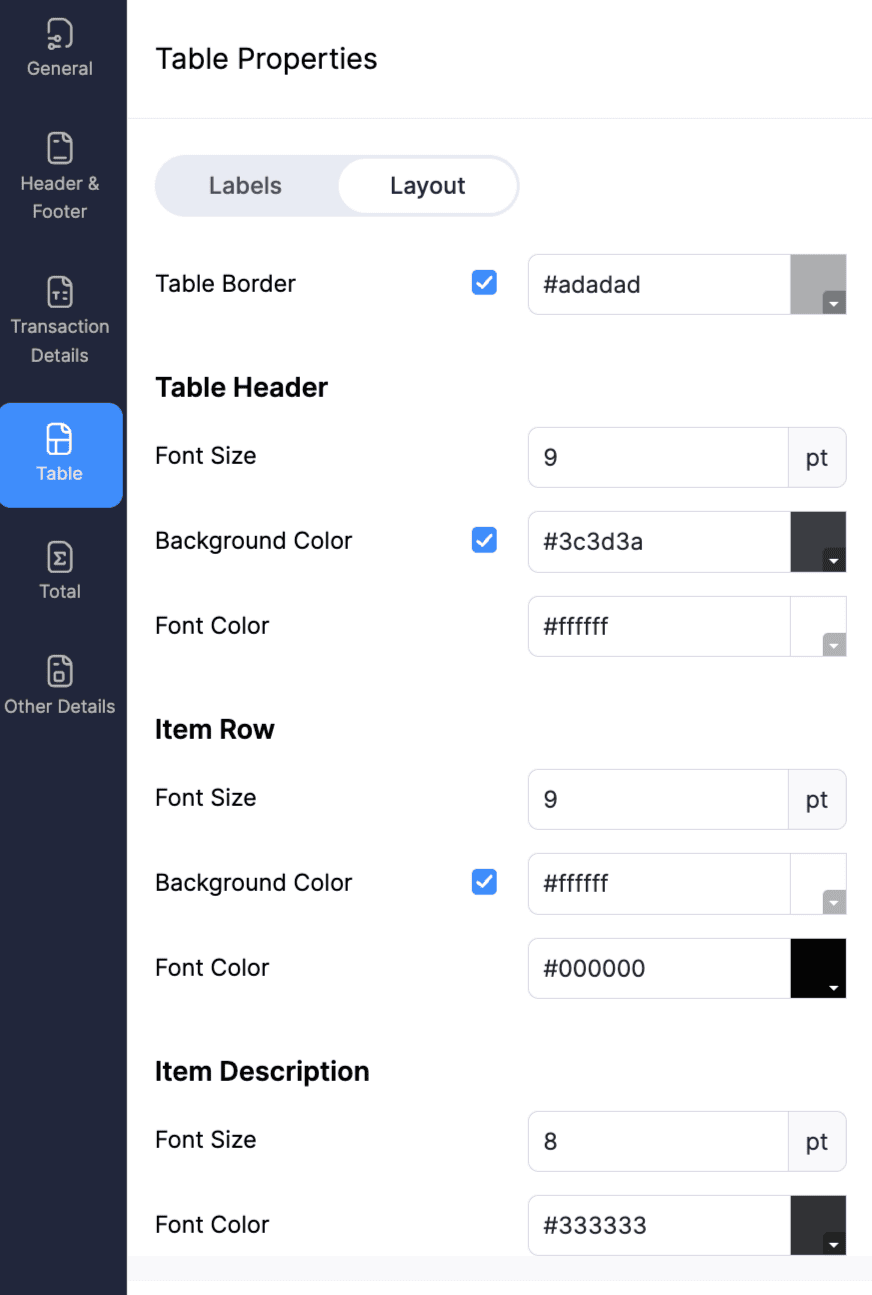
Table Tab
Labels
| Fields | Description | Supported Modules |
|---|---|---|
| Label Fields | Enable the fields to add them to PDF templates, noting that label fields vary across templates based on document purpose. | All Modules |
| Customise Item Name and Description | Customise the item name and description format in PDFs by inserting placeholders and adding custom content. | All Modules |
| Invoice Created From Projects | You can apply these labels to adjust the project details in the template. | Invoices |
| Customise table cell width | You can adjust the column width of your table. | All Modules |

Layout
| Fields | Description | Supported Modules |
|---|---|---|
| Table Header, Item Row, and Item Description | Adjust the Font Size, Background colour, and Font colour settings. | All Modules |
Total Tab
Total Section
Labels
| Fields | Description | Supported Modules |
|---|---|---|
| Show Total Section | Select this option to add fields like Sub Total, Shipping Charges, Discount, and Total Taxable Amount, Tax Details, Total, Currency Symbol and Quantity to the template | Quotes, Sales Orders, Invoices, Vendor Credits, Bills, Retainer Invoices |
| Show Payment Details | Choose this option to include fields such as Payments Made, Credits Applied, Amount Withheld, Write Off Amount and Balance Due to the template. | Quotes, Sales Orders, Invoices, Vendor Credits, Bills, Retainer Invoices |
| Show Amount in Words | Choose this option to display the amount in words on the template. | Quotes, Sales Orders, Invoices, Retainer Invoices |
Layout
| Fields | Description | Supported Modules |
|---|---|---|
| Total (Subtotal, Tax) | Adjust the Font Size, Font colour, and Background colour of these fields based on your preference. | All Modules |
| Balance Due | Adjust the Font Size, Font colour and Background colour of these fields based on your preference. | All Modules |
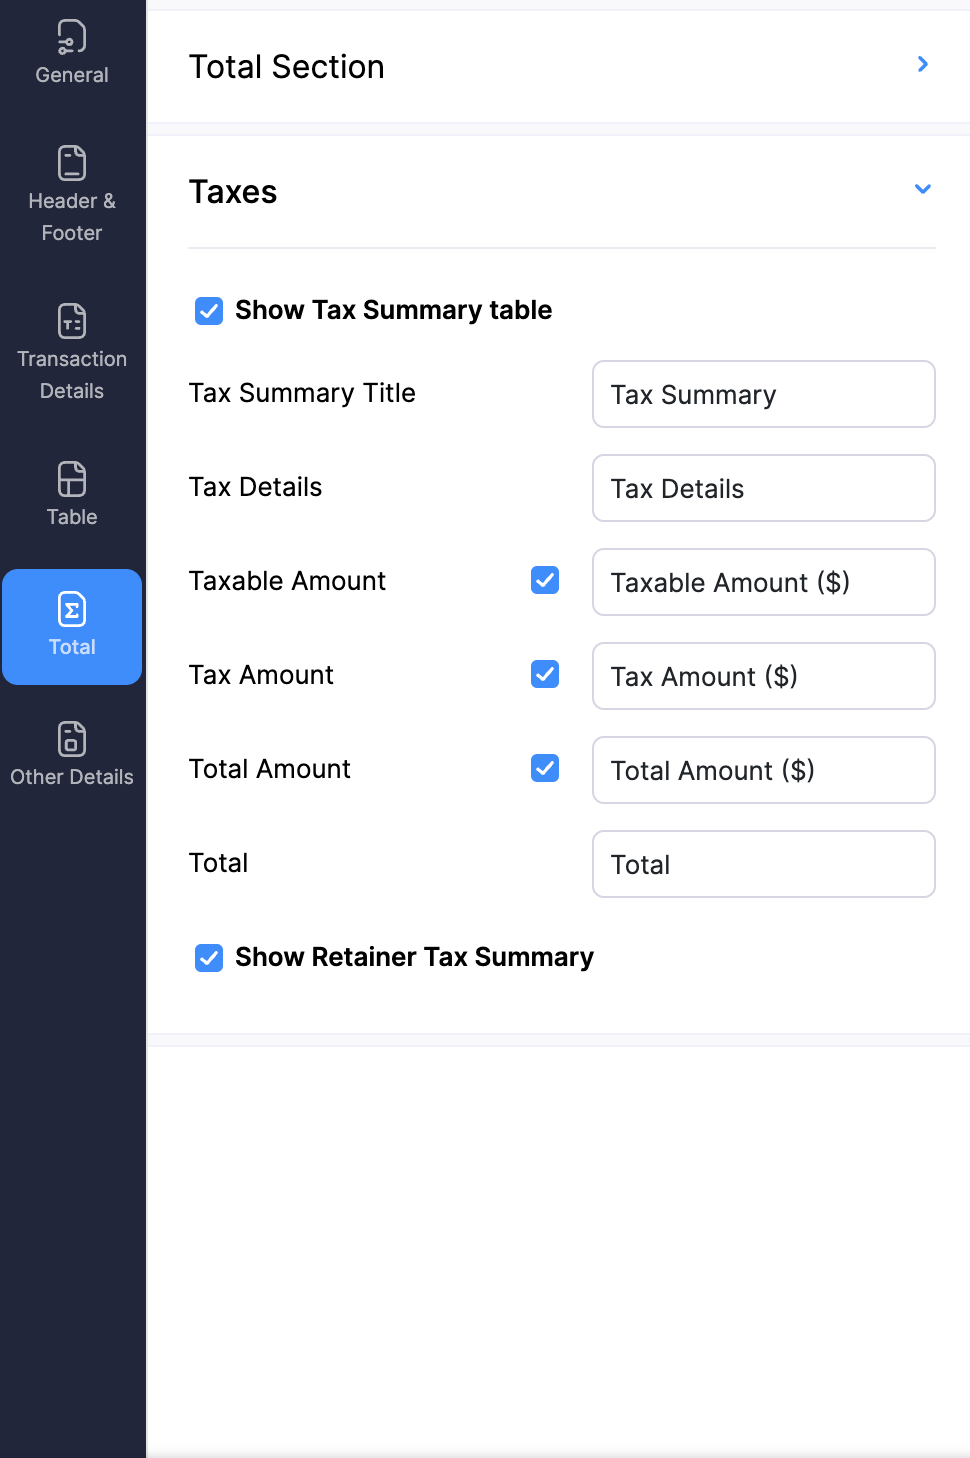
Taxes
| Fields | Description | Supported Modules |
|---|---|---|
| Show Tax Summary Table | Check this option if you want to display tax information. | Invoices, Sales Orders, Quotes, Credit Notes |
| Show Retainer Tax Summary | Check this option if you want to display retainer tax information. | Invoices, Sales Orders, Credit Notes |
Other Details Tab
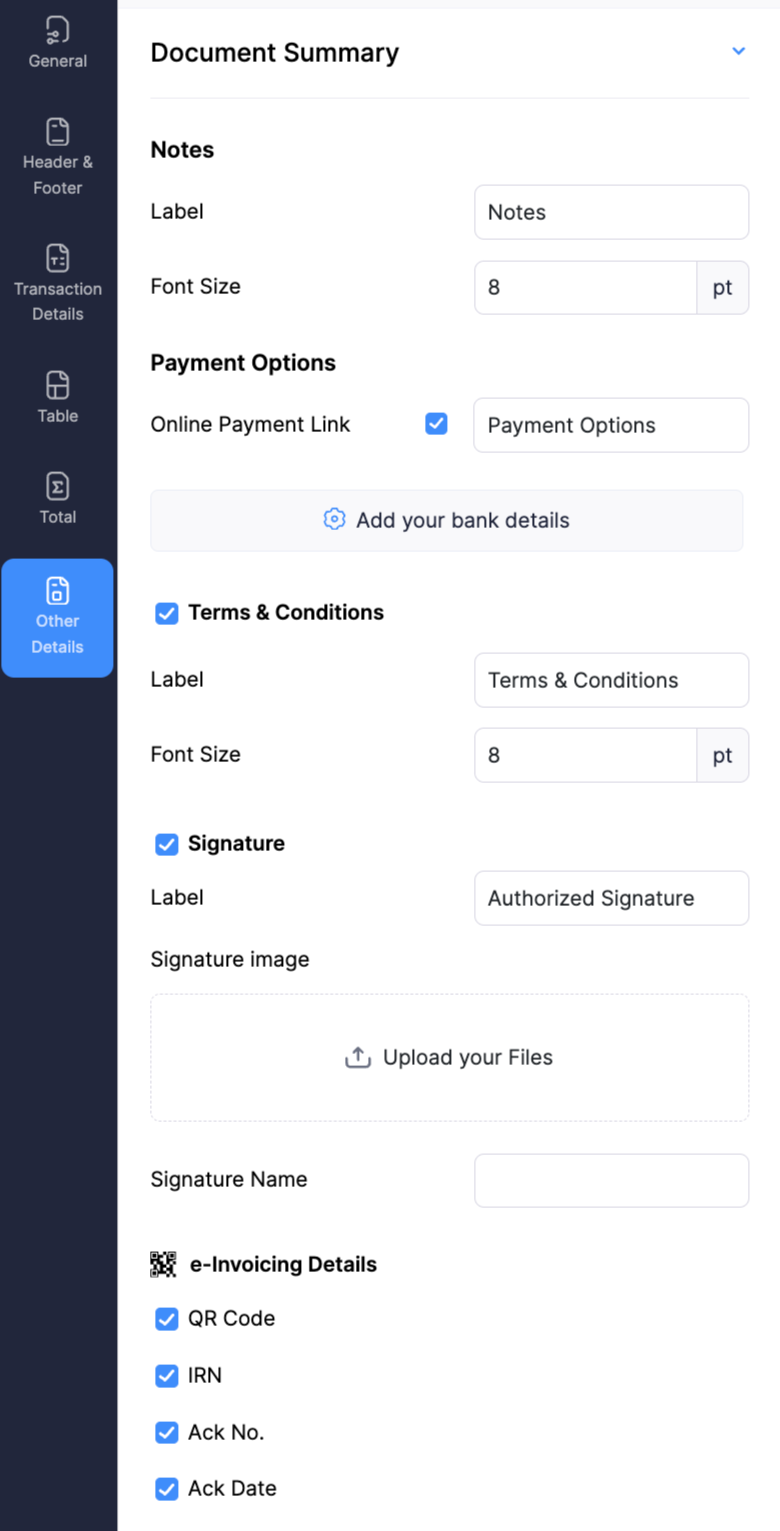
Document Summary
| Fields | Description | Supported Modules |
|---|---|---|
| Notes | Adjust the Label and Font Size for notes. | Invoices, Quotes, Sales Orders, Credit Notes, Retainer Invoices |
| Payment Options | Enable this option to include available online payment methods in the template. | Invoices, Quotes, Sales Orders, Credit Notes, Retainer Invoices |
| Add your bank details | Select this option to include your bank account details in the template so that your customers can initiate payments towards this bank account. | Invoices, Quotes, Sales Orders, Credit Notes, Retainer Invoices |
| Show Invoice QR Code | Select this option to view the invoice by scanning the QR Code. | Invoices |
| Terms and Conditions | Check this option if you want to add terms and conditions to your template. Also customise the Label and Font Size of this field. | All Sales and Purchase Modules |
| Signature | Enable this option if you want to add a signature to your template. You can upload an image of your signature and add a name for it. | All Sales and Purchase Modules |
| e-Invoicing Details | Check the options QR Code, IRN, Ack No., Ack Date to add these details in the bottom section of the invoice template. | Invoices |
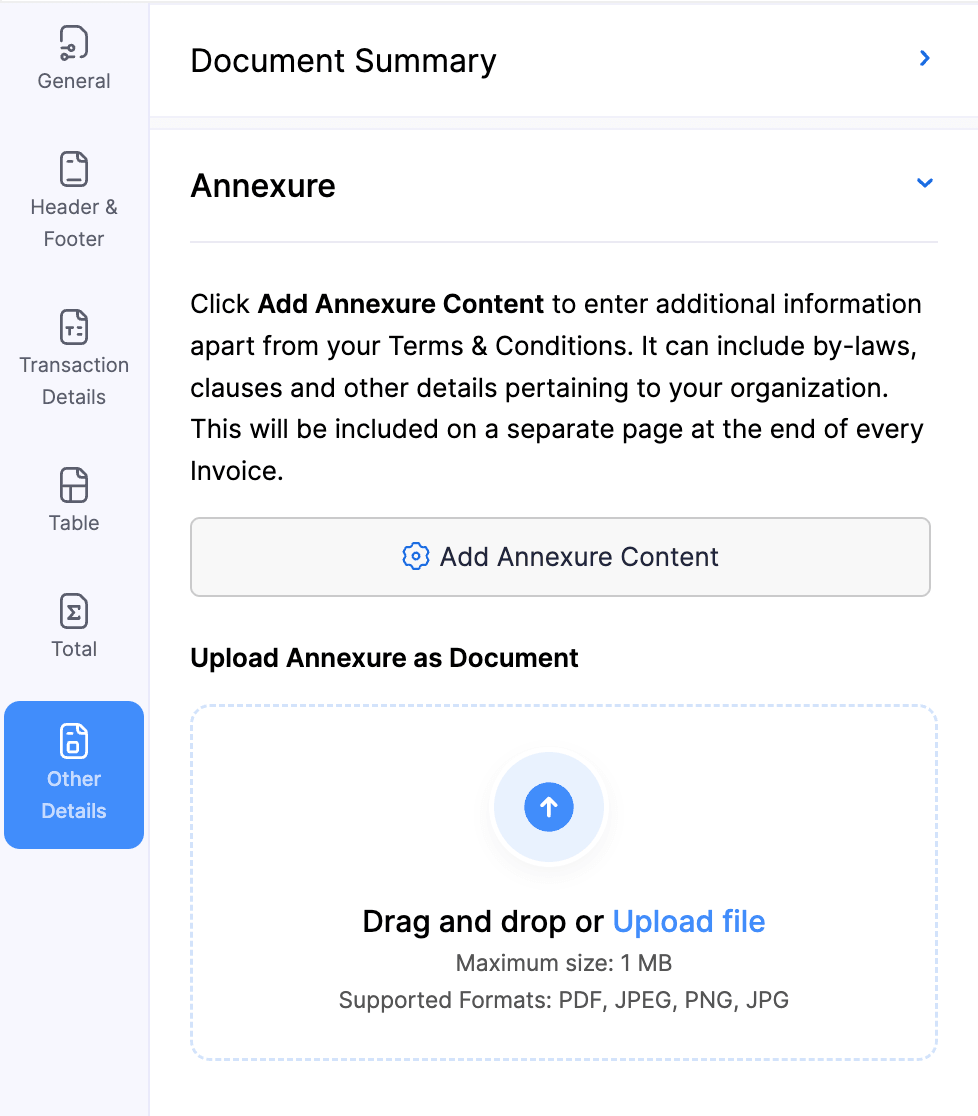
Annexure
| Fields | Description | Supported Modules |
|---|---|---|
| Add Annexure Content | Check this option if you want to display tax information. | Invoices, Sales Orders, Quotes, Credit Notes |
| Show Retainer Tax Summary | Click Add Annexure Content to enter additional information apart from your Terms and Conditions. It can include by-laws, clauses and other details pertaining to your organisation. This will be included at the end of every invoice. | All Sales and Purchase Modules |
| Attach Annexure Documents | Select supporting documents to attach to the template. When the PDF is generated, the selected annexure documents are appended as additional pages at the end of the PDF, so all related information is shared as a single consolidated file. | All Modules |
Note: Annexure is available as a separate tab for Payment Receipts and Retainer Payment Receipts.
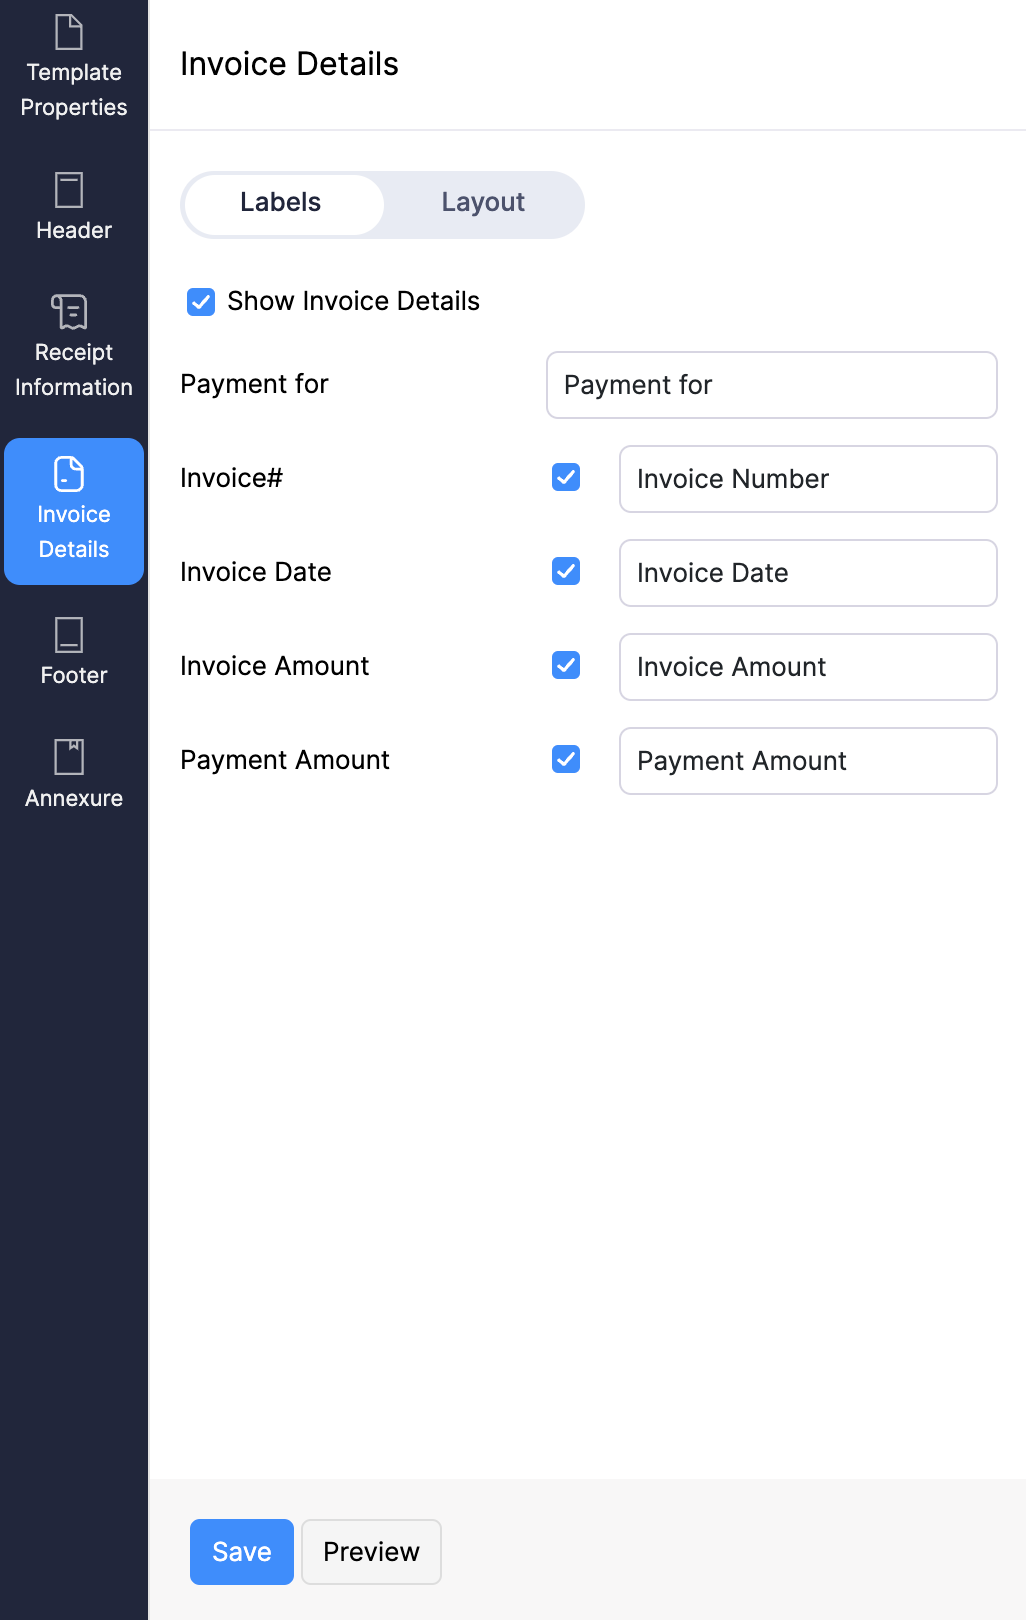
Invoice Details Tab (Available in Payment Receipts and Retainer Payment Receipts)
Labels
| Fields | Description |
|---|---|
| Show Invoice Details | Check this option if you want to add your invoice details to your payment receipts. |
| Label Fields | Choose the labels you prefer to display in the templates. |
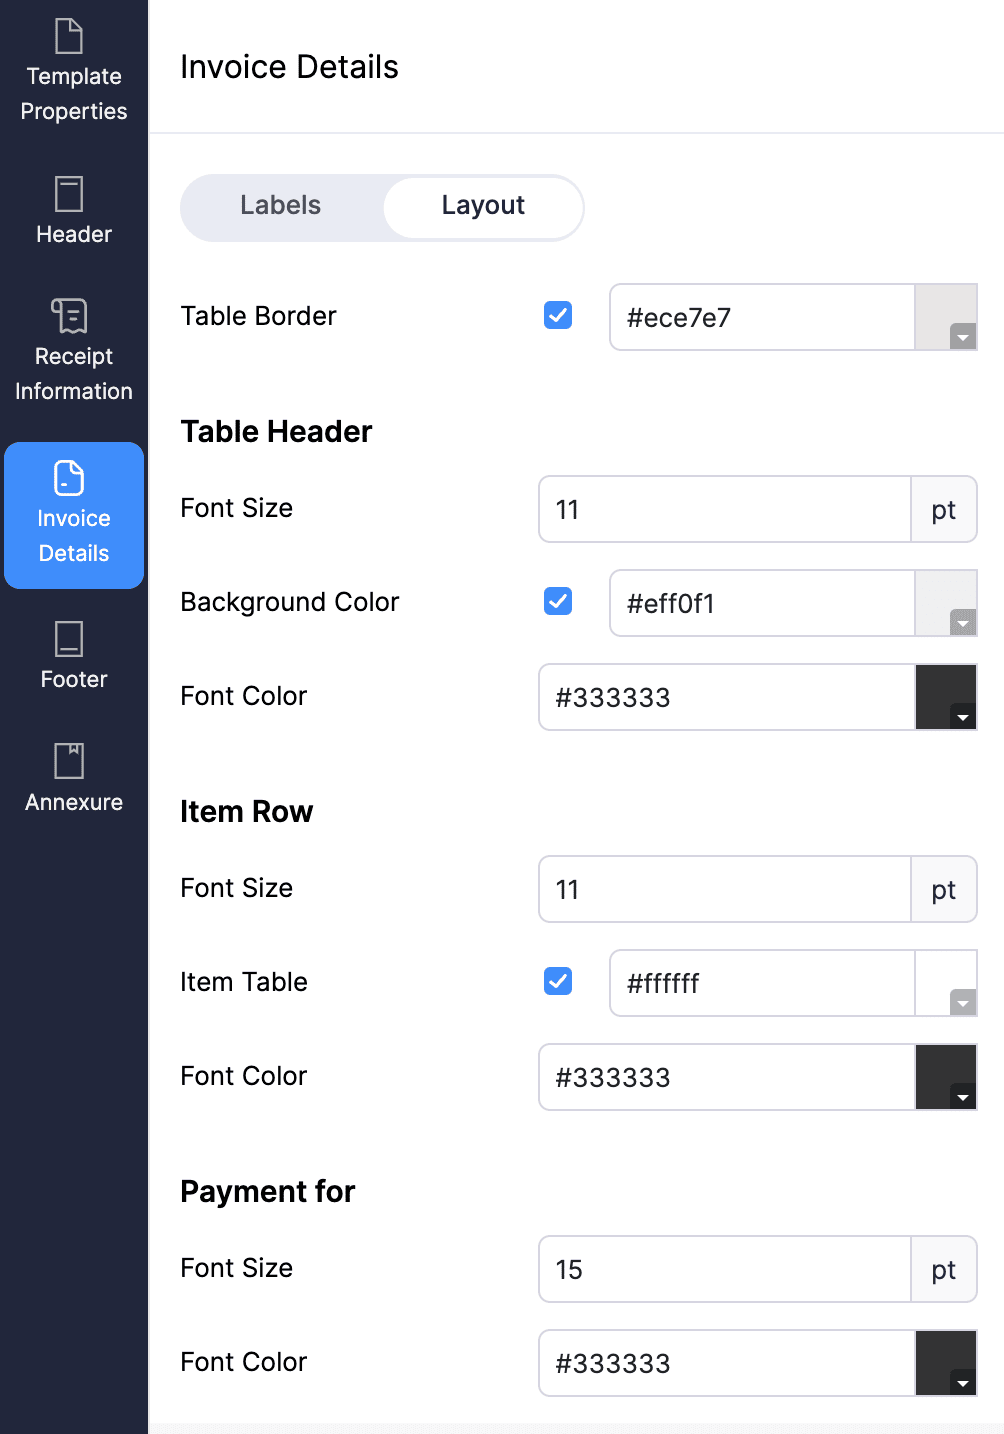
Layout
| Fields | Description |
|---|---|
| Table Header | Adjust the Font Size, Background colour, and Font colour for the header of the table. |
| Item Row | Customise the Font Size, Item Table colour, and Font colour. |
| Payment For | Adjust the Font Size and Font colour based on your preference. |
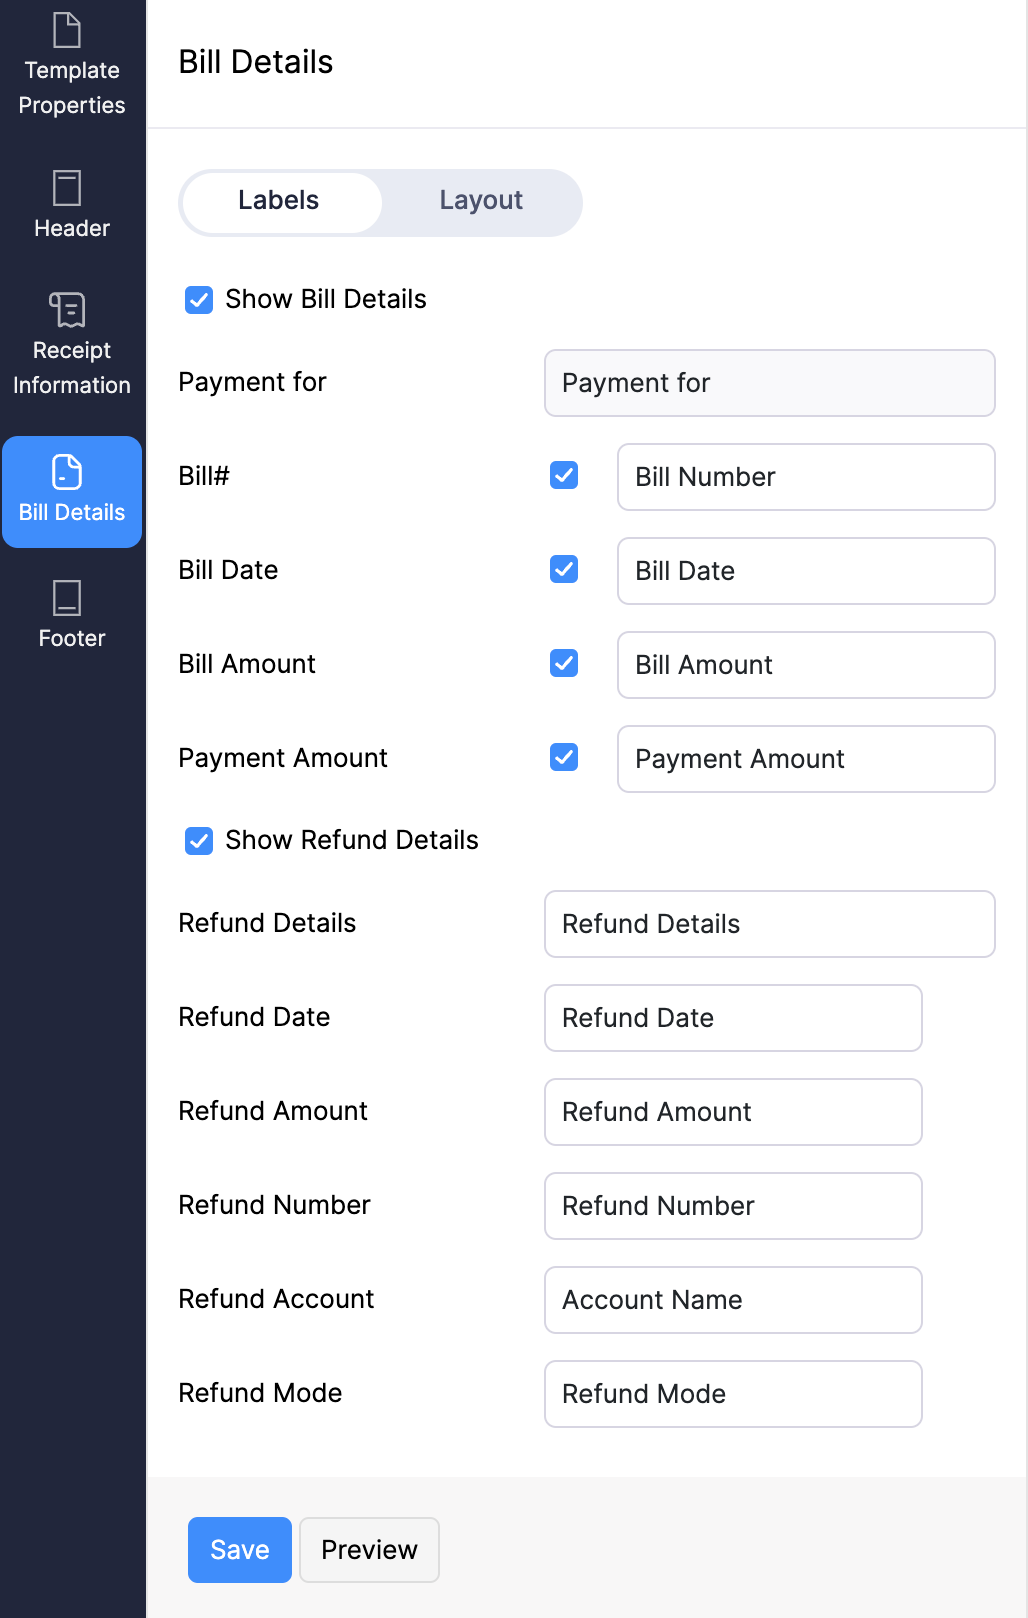
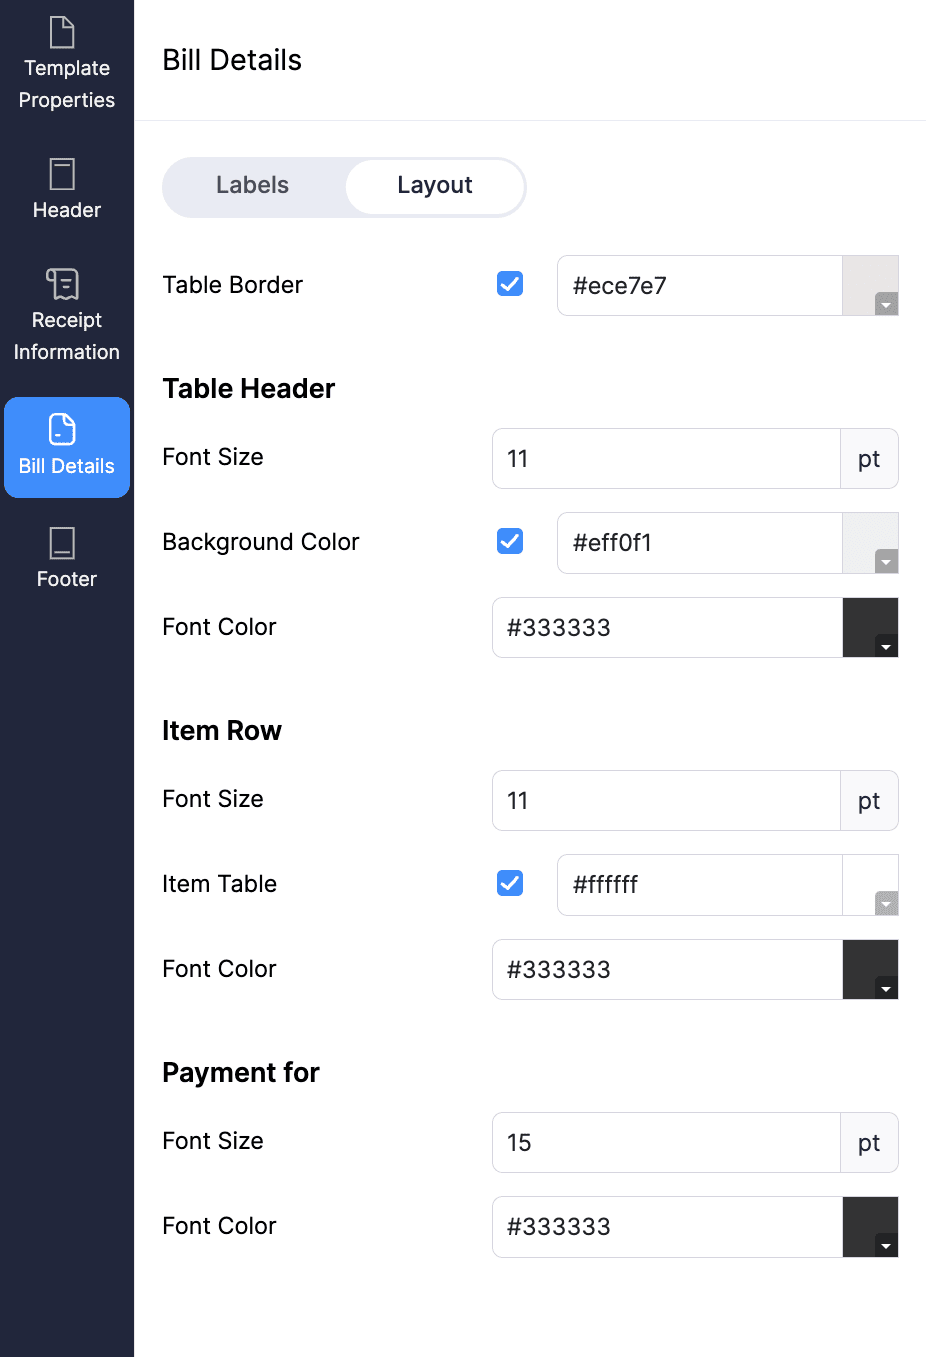
Bill Details Tab (Available in Vendor Payment)
Labels
| Fields | Description |
|---|---|
| Show Bill Details | Select this option to include invoice details in payment receipts. |
| Label Fields | Choose any of the labels to include it in payment receipts. |
Layout
| Fields | Description |
|---|---|
| Table Header | Customise the Font Size, Background colour, and Font colour for the table header. |
| Item Row | Customise the Font Size, Item Table colour and Font colour of the item row. |
| Payment For | Customise the Font Size and Font colour for this section. |
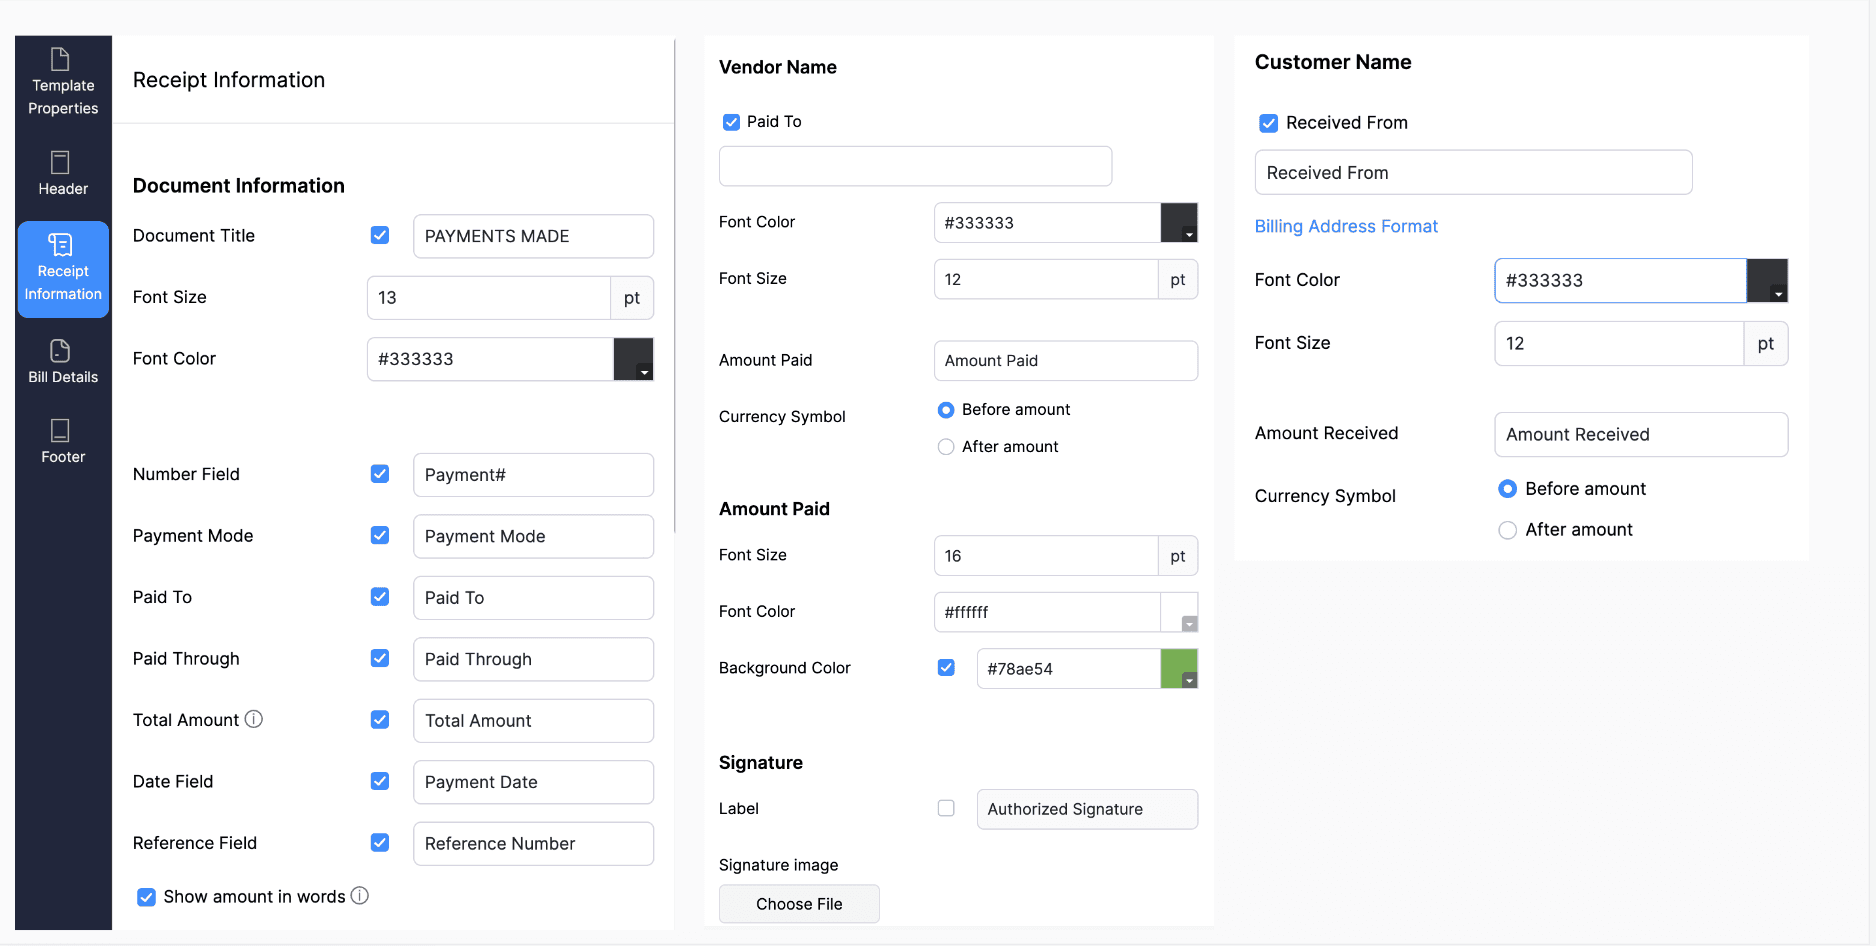
Receipt Information Tab (Available in Payment Receipts, Retainer Payment Receipts and Vendor Payment)
| Fields | Description |
|---|---|
| Document Information | Toggle fields to show/hide in the template and edit label names. |
| Customer Name | Configure the Received From address format, Font colour, Font Size, Amount Received and Currency Symbol. |
| Vendor Name | In this section, configure the Vendor Name format, its Font colour, Font Size, Amount Paid, and Currency Symbol. |
| Amount Received | Adjust the Font Size, Font colour and Background colour of this label. |
| Amount Paid | Adjust the Font Size, Font colour and Background colour of this label. |
| Signature | Enable this option to include signatures in your PDF Template, with the choice to upload an image for the signature. |
HTML PDF Templates
If the pre-loaded PDF templates don’t meet your needs, you can design your PDF templates from scratch using the built-in HTML and CSS editors for full control over layout and branding. Learn more about HTML PDF Templates.
Other Actions in Templates
Apart from the customisations that you can do in each tab, there are other actions that you can perform in the PDF Templates module in Zoho Books.
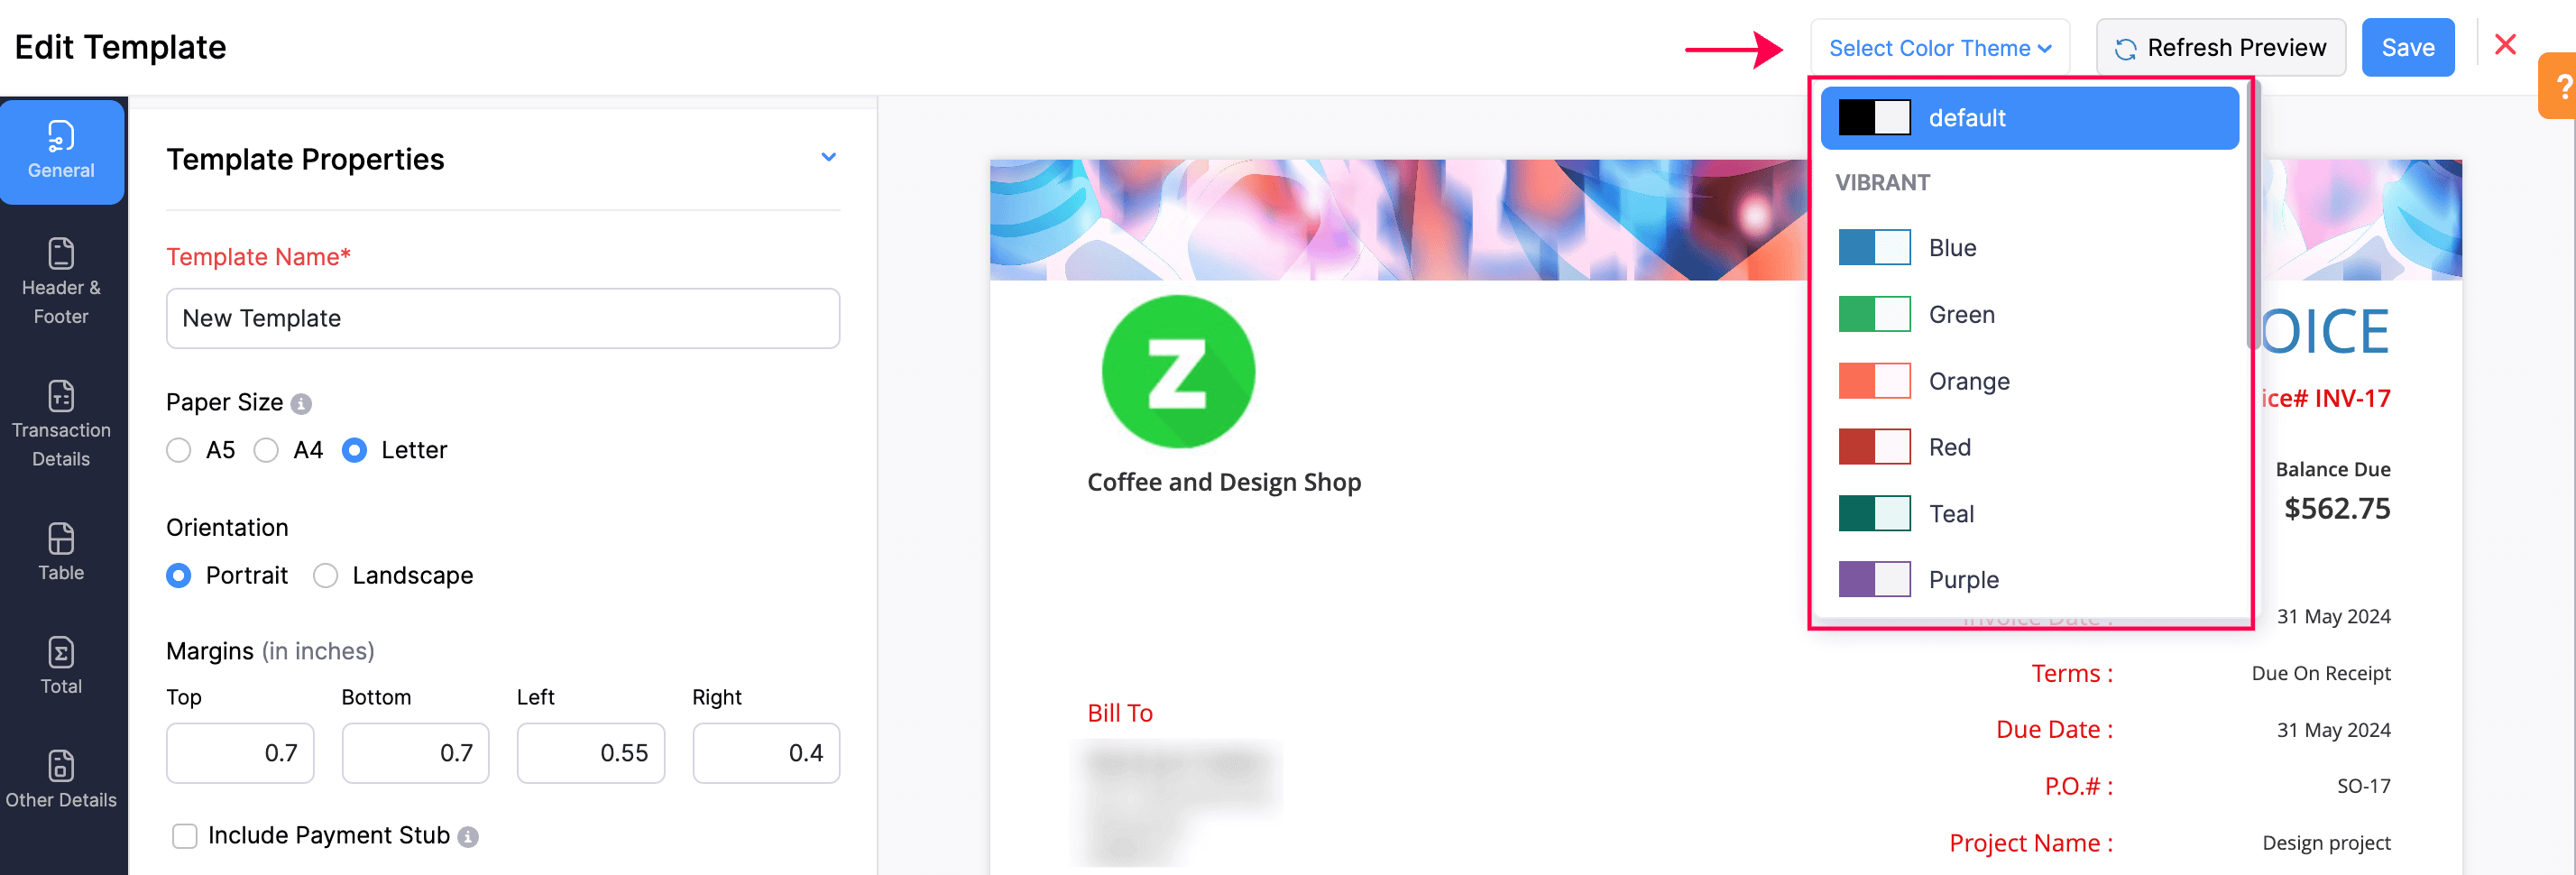
Choose a Colour Theme
In Zoho Books, users can personalize the colours in their document templates by selecting from a variety of available colour themes. To choose a colour theme for your template:
- Go to Settings.
- Select PDF Templates under Customisation.
- In the Templates pane, select the module you want to customise.
- Click + New in the top right corner to create a new template, or hover over an existing template and click Edit to customise the template.
- In the Edit page, click the Select Colour Theme dropdown at the top of the page, and select the colour theme for your template.
- Click Save.
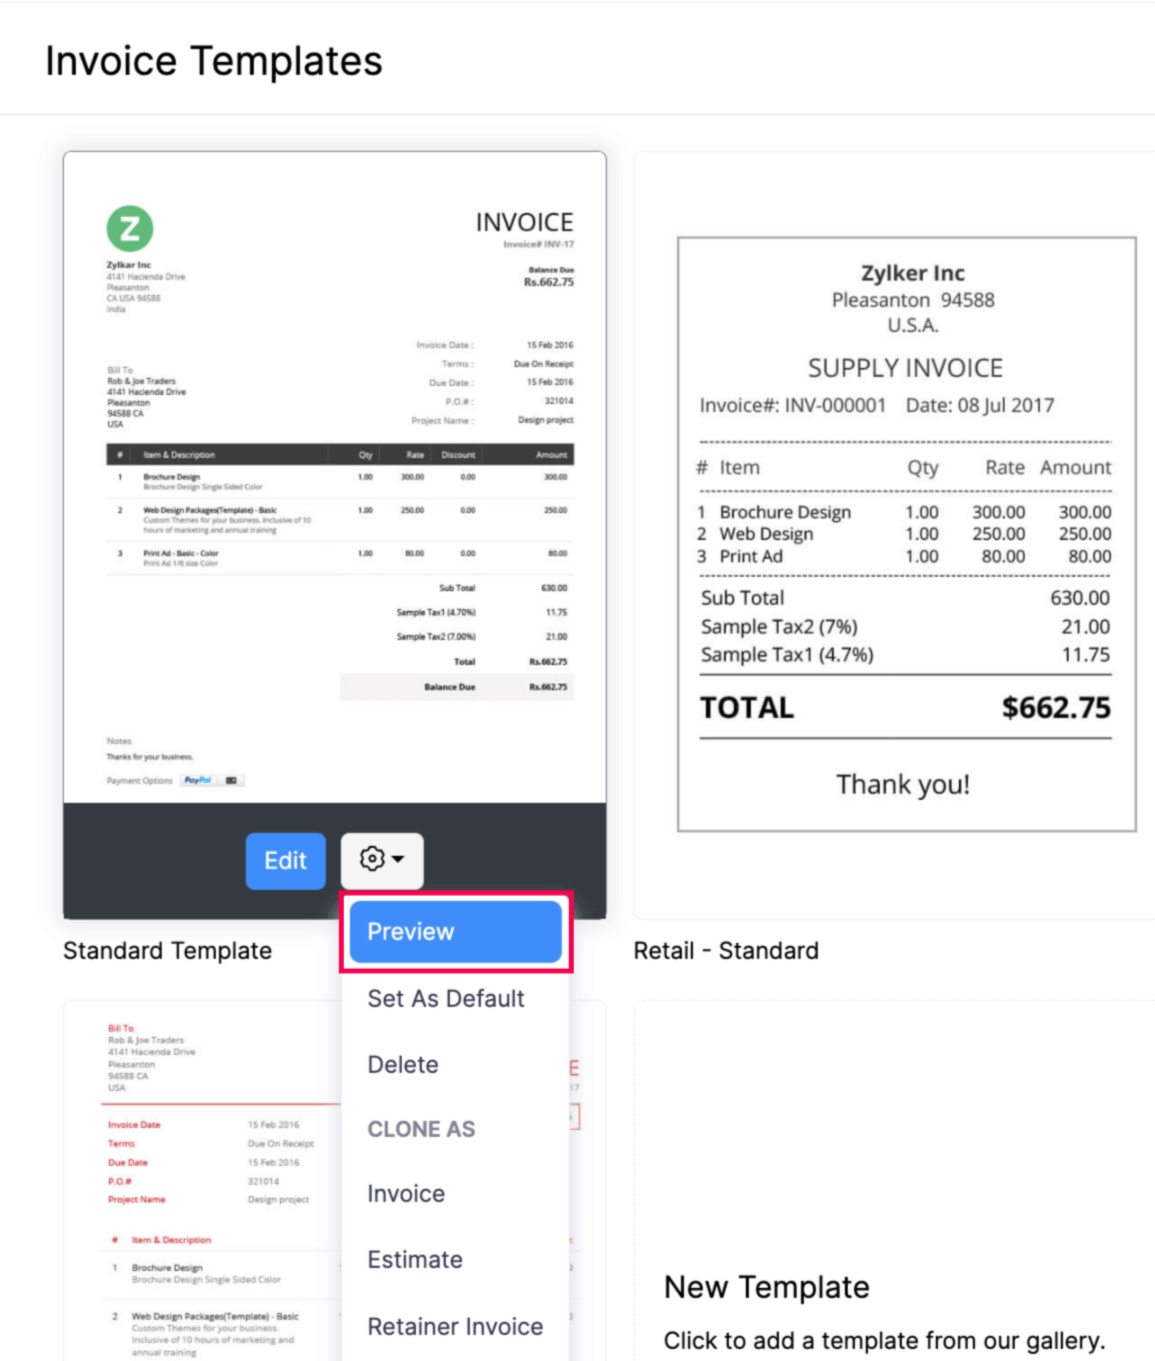
Preview Templates
The Preview Templates option in Zoho Books allows you to view how your templates (such as invoices, quotes, etc.) will appear before sending them. To preview templates:
- Go to Settings.
- Click PDF Templates under Customisation.
- Select the module in the Templates pane to preview the template you want.
- Hover over a template in the module, and click the Settings icon to see more options.
- Click Preview.
Change Default Template
By default, each module has a default template. If you’ve customised and created a new template, you can set that as the default template for that module’s PDFs. To change the default template:
- Go to Settings.
- Select PDF Templates under Customisation.
- In the Templates pane, select the module you want to customise.
- Hover over the existing template and click the Settings icon dropdown.
- Click Set as Default.
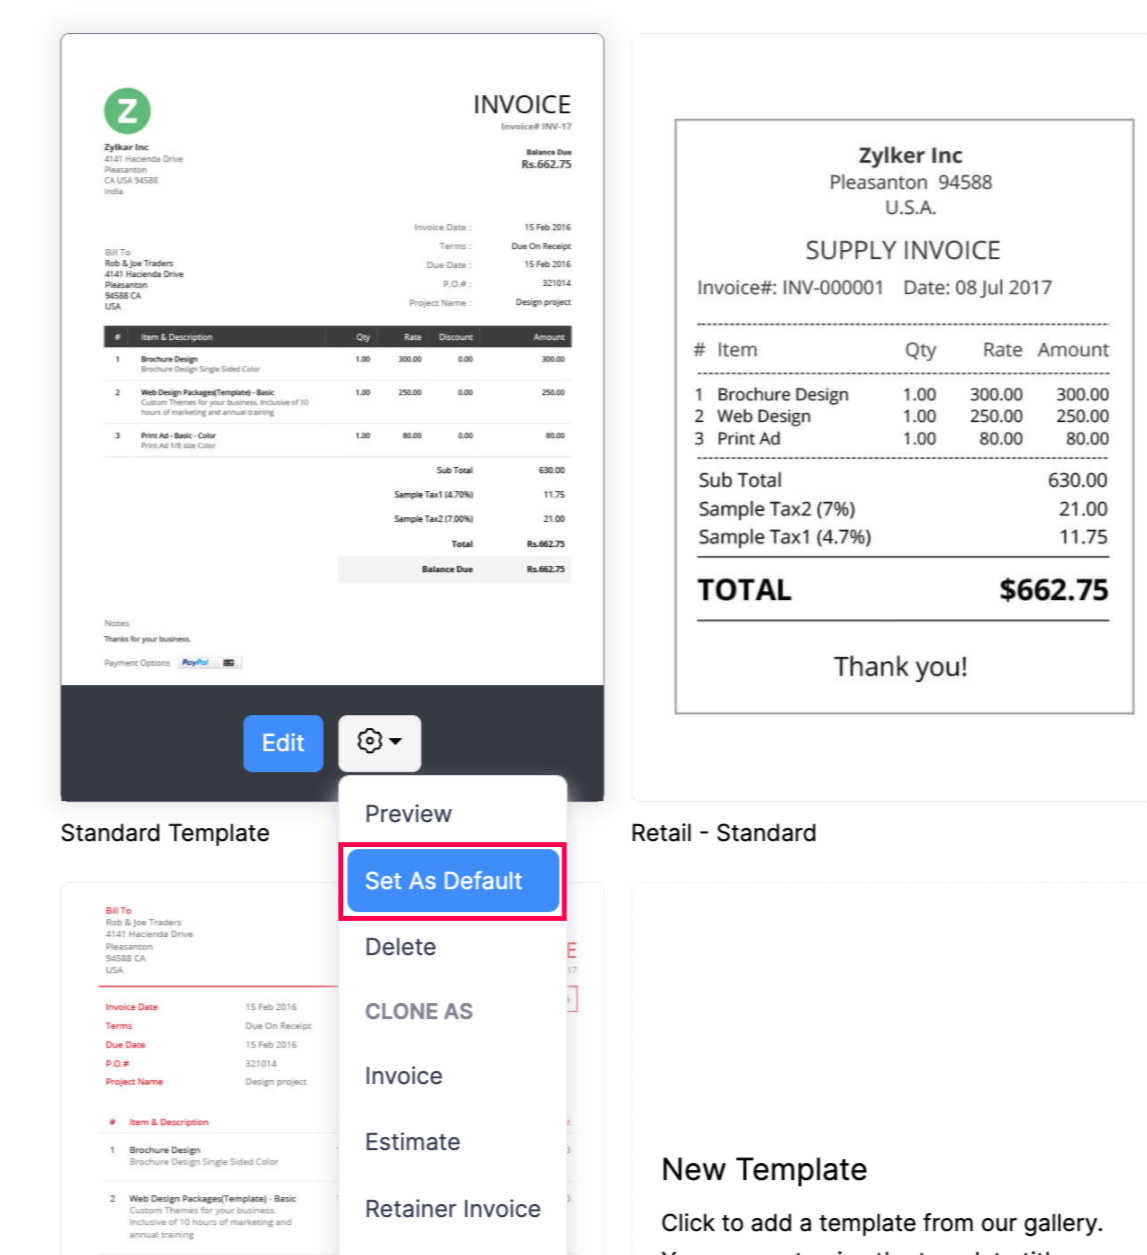
Now, the default template will be automatically applied to all transactions, ensuring a consistent format.
Pro Tip: You can also set a default template for each customer or vendor in Zoho Books. Learn how to associate templates to customers and vendors.
Clone Templates
Cloning templates simplifies the process of creating a new template, making it quicker and ensuring that all the basic customisations are present in the new template.
In Zoho Books, if you’ve customised a template for one module, you can clone that template for use in another module. To clone a template:
- Go to Settings.
- Select PDF Templates under Customisation.
- In the Templates pane, select the module you want to customise.
- Hover over the existing template and click the Settings icon dropdown.
- In the dropdown, under CLONE AS, select the module you want to clone the template into.
- In the next page, make the necessary changes and click Save.
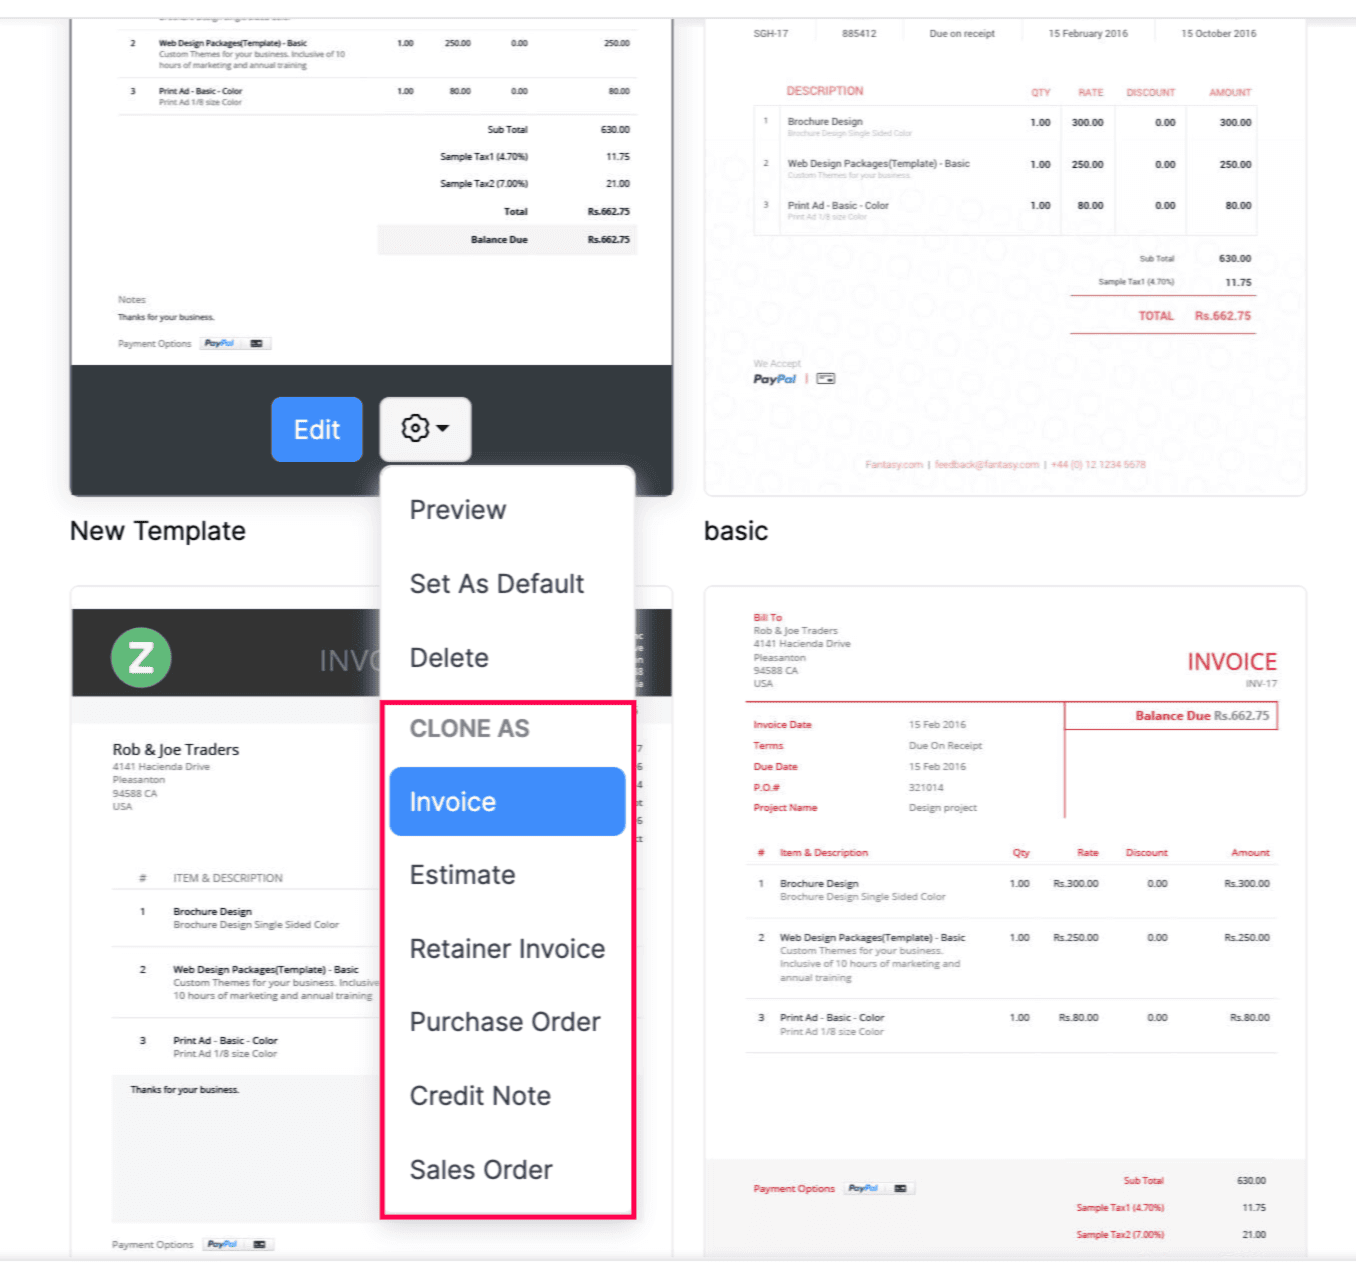
Now, by cloning, you can use different templates with the same properties for various modules.
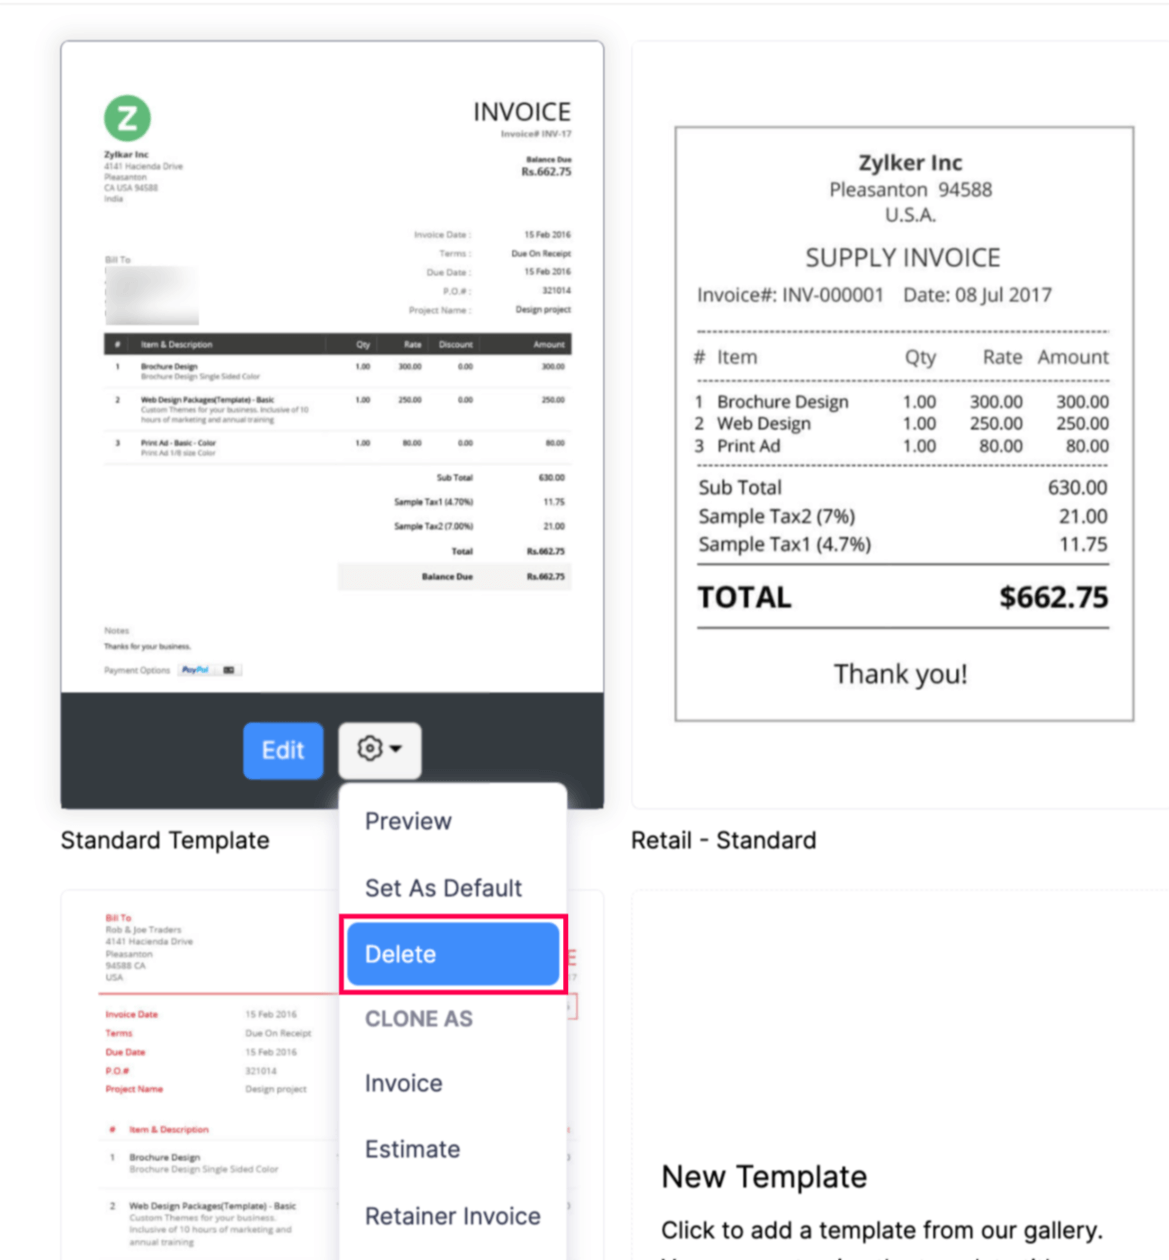
Delete Templates
Prerequisites:
- Make sure the template is not set as default or associated to any customer or vendor.
- If the template is associated with a customer or vendor, associate another template before deleting it.
To delete a template:
- Go to Settings.
- Select PDF Templates under Customisation.
- In the Templates pane, select the module you want to customise.
- Hover over the existing template and click the Settings icon dropdown.
- In the dropdown, click Delete.
- In the pop-up, click OK to confirm the deletion.
Force Delete Templates
If a template is still associated with transactions, customers, or customer groups, Zoho Books prevents you from deleting it through the standard delete option. In such cases, you can use Force Delete to remove the template without first reassigning each associated record manually.
Warning: Force deleting a template is a permanent action and cannot be reversed.
Also, the default template itself cannot be deleted.
When you force delete a template, all linked records are automatically reassigned to the default template for that module:
- Transactions previously associated with the deleted template are switched to the default template.
- Customers associated with the deleted template are switched to the default template.
- Customer groups associated with the deleted template are switched to the default template.
To force delete a template:
- Go to Settings.
- Select PDF Templates under Customisation.
- In the Templates pane, select the module that contains the template.
- Hover over the template you want to remove and click the Gear icon.
- In the dropdown, click Delete.
- In the force delete pop-up:
- Check I understand that this action is irreversible and all associated data will be permanently deleted.
- Click Force Delete.
 Yes
No
Yes
No
Thank you for your feedback!