
Preferences
The Preferences section will help you configure your Zoho Books organisation, and also settings for various sales and purchase modules, projects, accountant and other modules.
General
This section lets you in enable certain modules in your Zoho Books organisation and consists of other generic functions.
To access the general settings:
- Log in to your Zoho Books organisation.
- Go to Settings.
- Select General under Preferences.
Enable Modules
Select the modules you want to enable in Zoho Books. Once you enable them, they will be shown in the left sidebar. You’ll be able to access and configure these modules only when you enable them in this page.
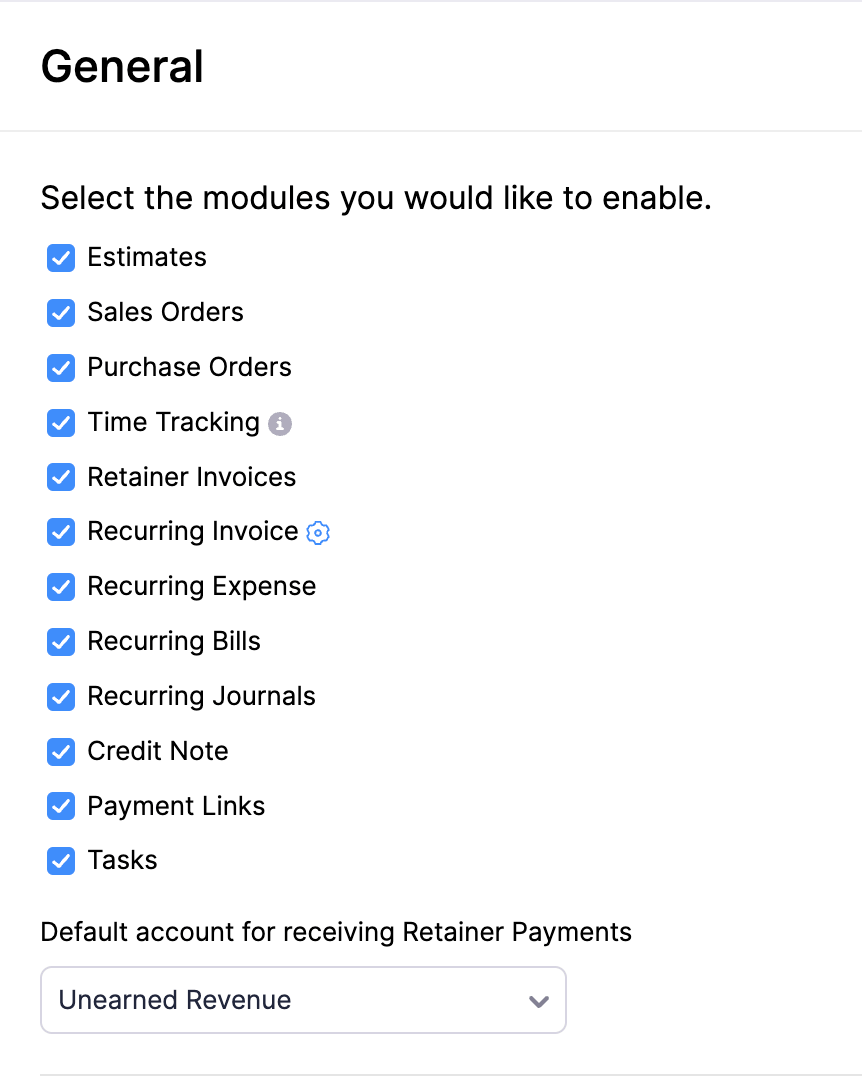
Note:You can access the modules via API even if they are disabled in the Zoho Books browser application.
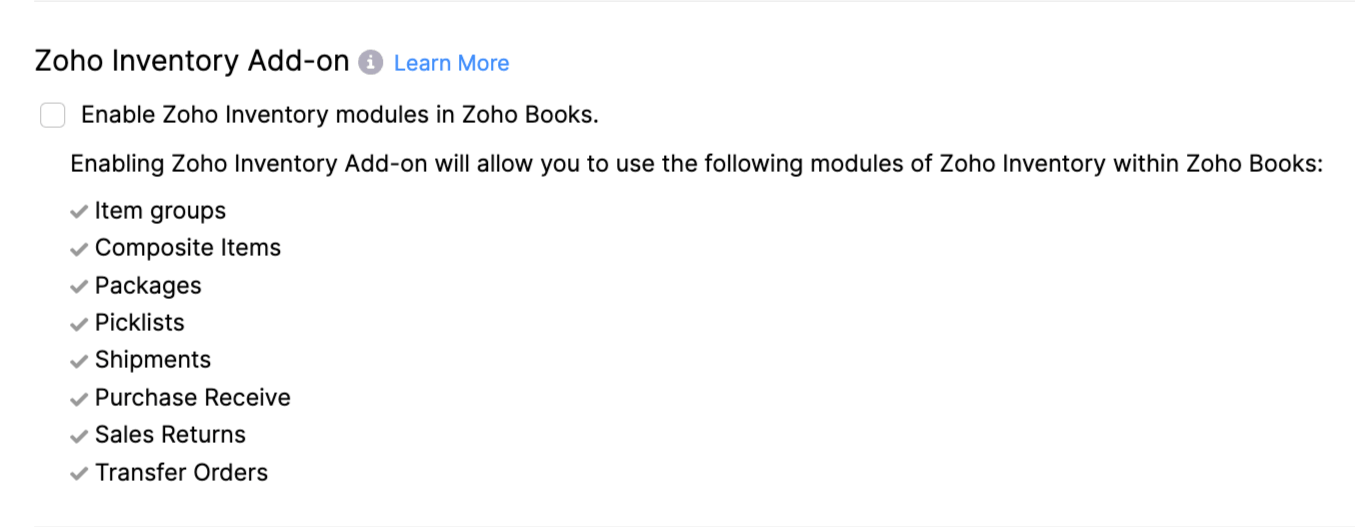
Zoho Inventory Add-ons
If you want to integrate with Zoho Inventory, you should have created an active organisation in Zoho Inventory either in the Standard or Professional plan. After you integrate with Zoho Inventory, you can enable the add-on here. Upon enabling this add-on, all the modules pertaining to the integration will be displayed in Zoho Books, from where you can access all the required features.
Learn more about the Zoho Inventory Add-on.
First Day of Your Work Week
By default, the first working day of the week is Sunday in Zoho Books. However, you can change the first day of your work week to Sunday, Monday or Saturday.
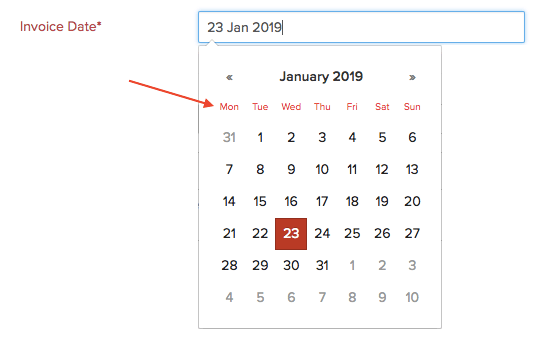
When you change the first day of your work week, the days and dates in the calendar will be updated accordingly. This will be useful when you are selecting dates for sales and purchase transactions, and other modules.
For example, let’s say you’ve set the first day of the week as Monday. When you create an invoice and select the invoice date, this is how the calendar will be displayed.
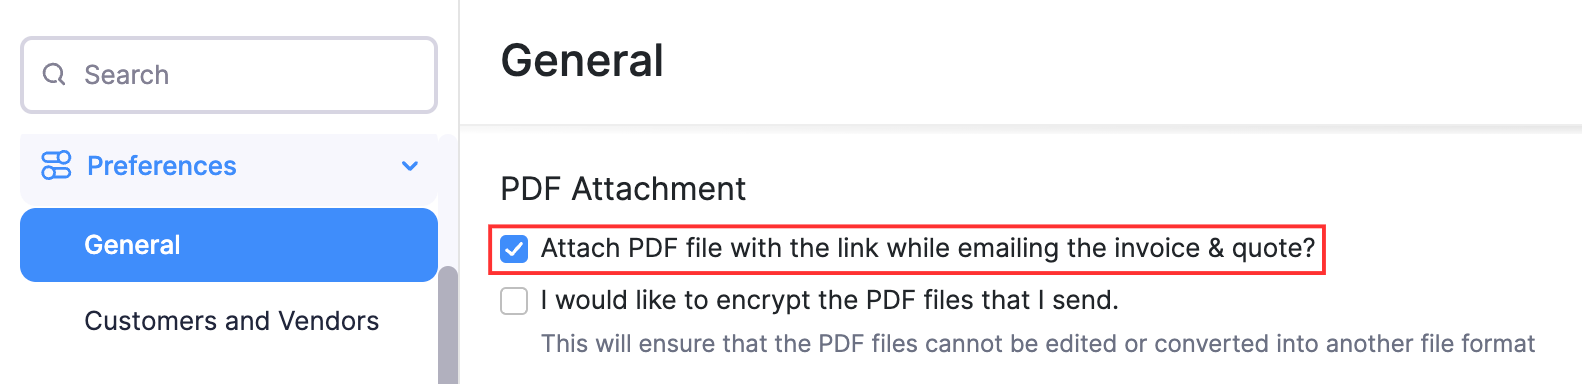
Attach Links of Quotes and Invoices
Attach the corresponding PDF of the quote or invoice in the email while sending it to your customer.
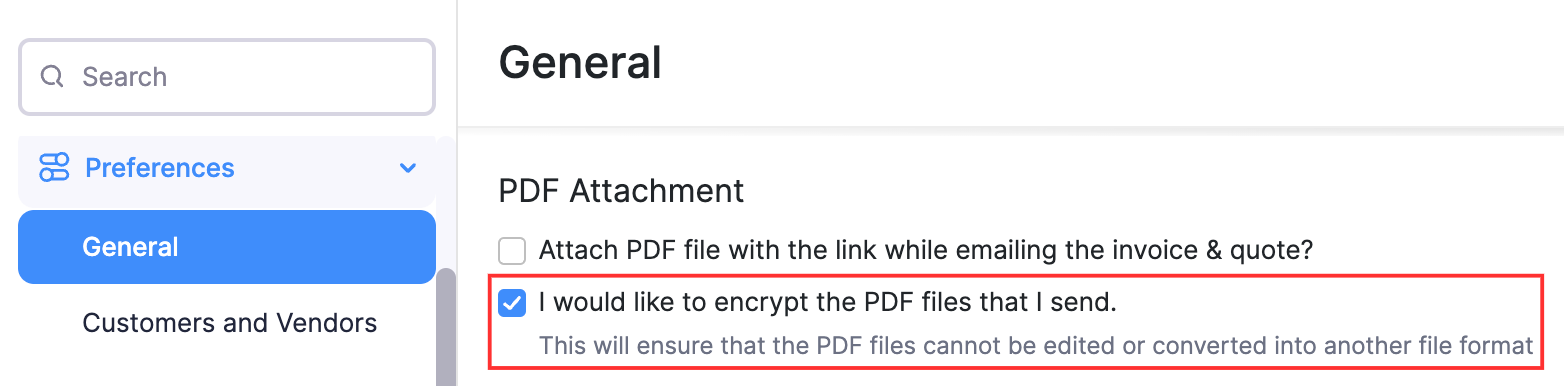
Encrypt PDF Files
Secure your PDF files by encrypting them while sending them to your customers. When you encrypt your PDF files, they cannot be:
- edited (or)
- converted into another file format.
Discounts
Note:
- This feature is applicable only for the Sales module of Zoho Books.
You can apply discounts at different levels in your sales transactions, either at the line-item level, transaction level, or both depending on how you want to offer discounts to your customers.
To enable discounts:
- Go to Settings.
- Select General under Preferences.
- Scroll down to Do you give discounts?, and choose one of the following options:
I don’t give discounts: Select this option if you don’t want to provide any discounts.
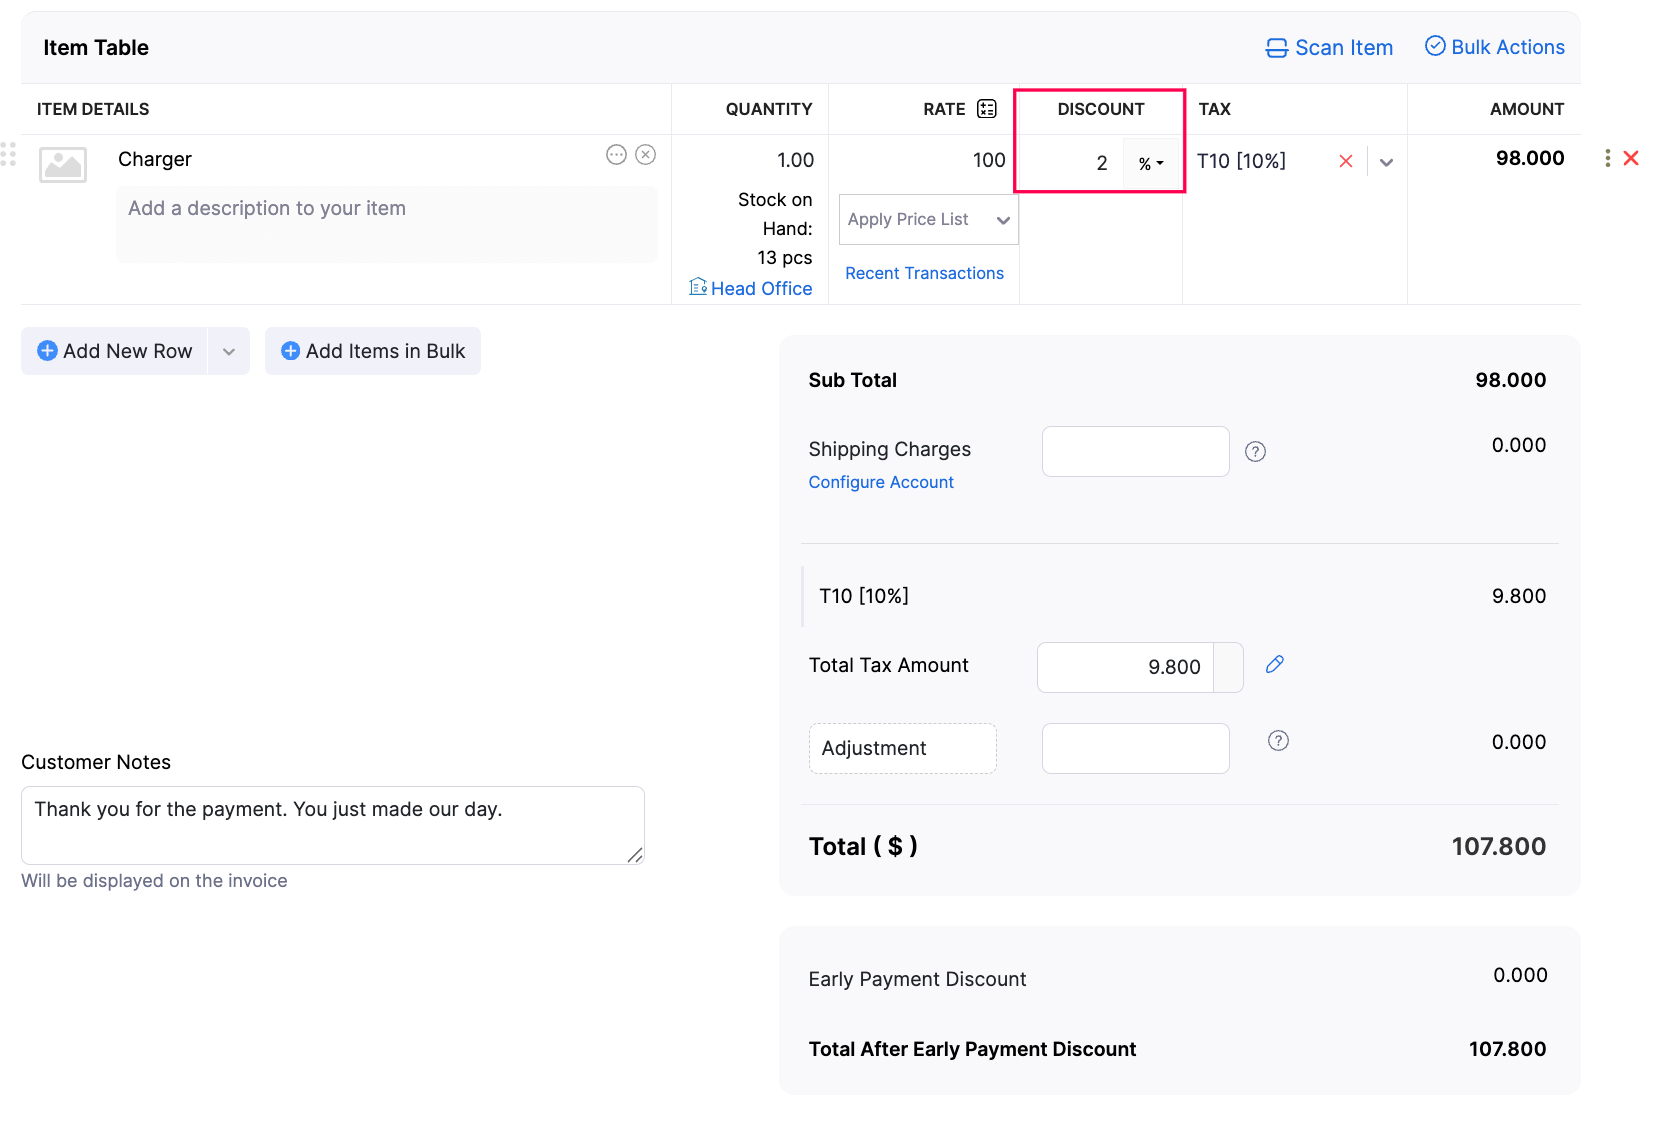
At Line Item Level: Select this option if you want to provide a discount for each line-item of a transaction. Then, choose your preference on how the discount must be applied:
- Discount inclusive of tax: Select this option to apply the discount on the item amount as well as its tax. For example, if an item is priced at $100 and a tax of $10 is applied on it, a 2% discount will be applied on both the item amount as well as the tax amount, i.e., $100 - 2% = $98 and $10 - 2% = $9.8 and the total amount would be $107.80.
- Discount exclusive of tax: Select this option to apply the discount only on the item amount excluding tax. For example, an item priced at $100 with $10 tax, a 2% discount will applied on the pre-tax amount, i.e., $100 - 2% = $98, to which the tax will be added: $98 + $10 = $108.
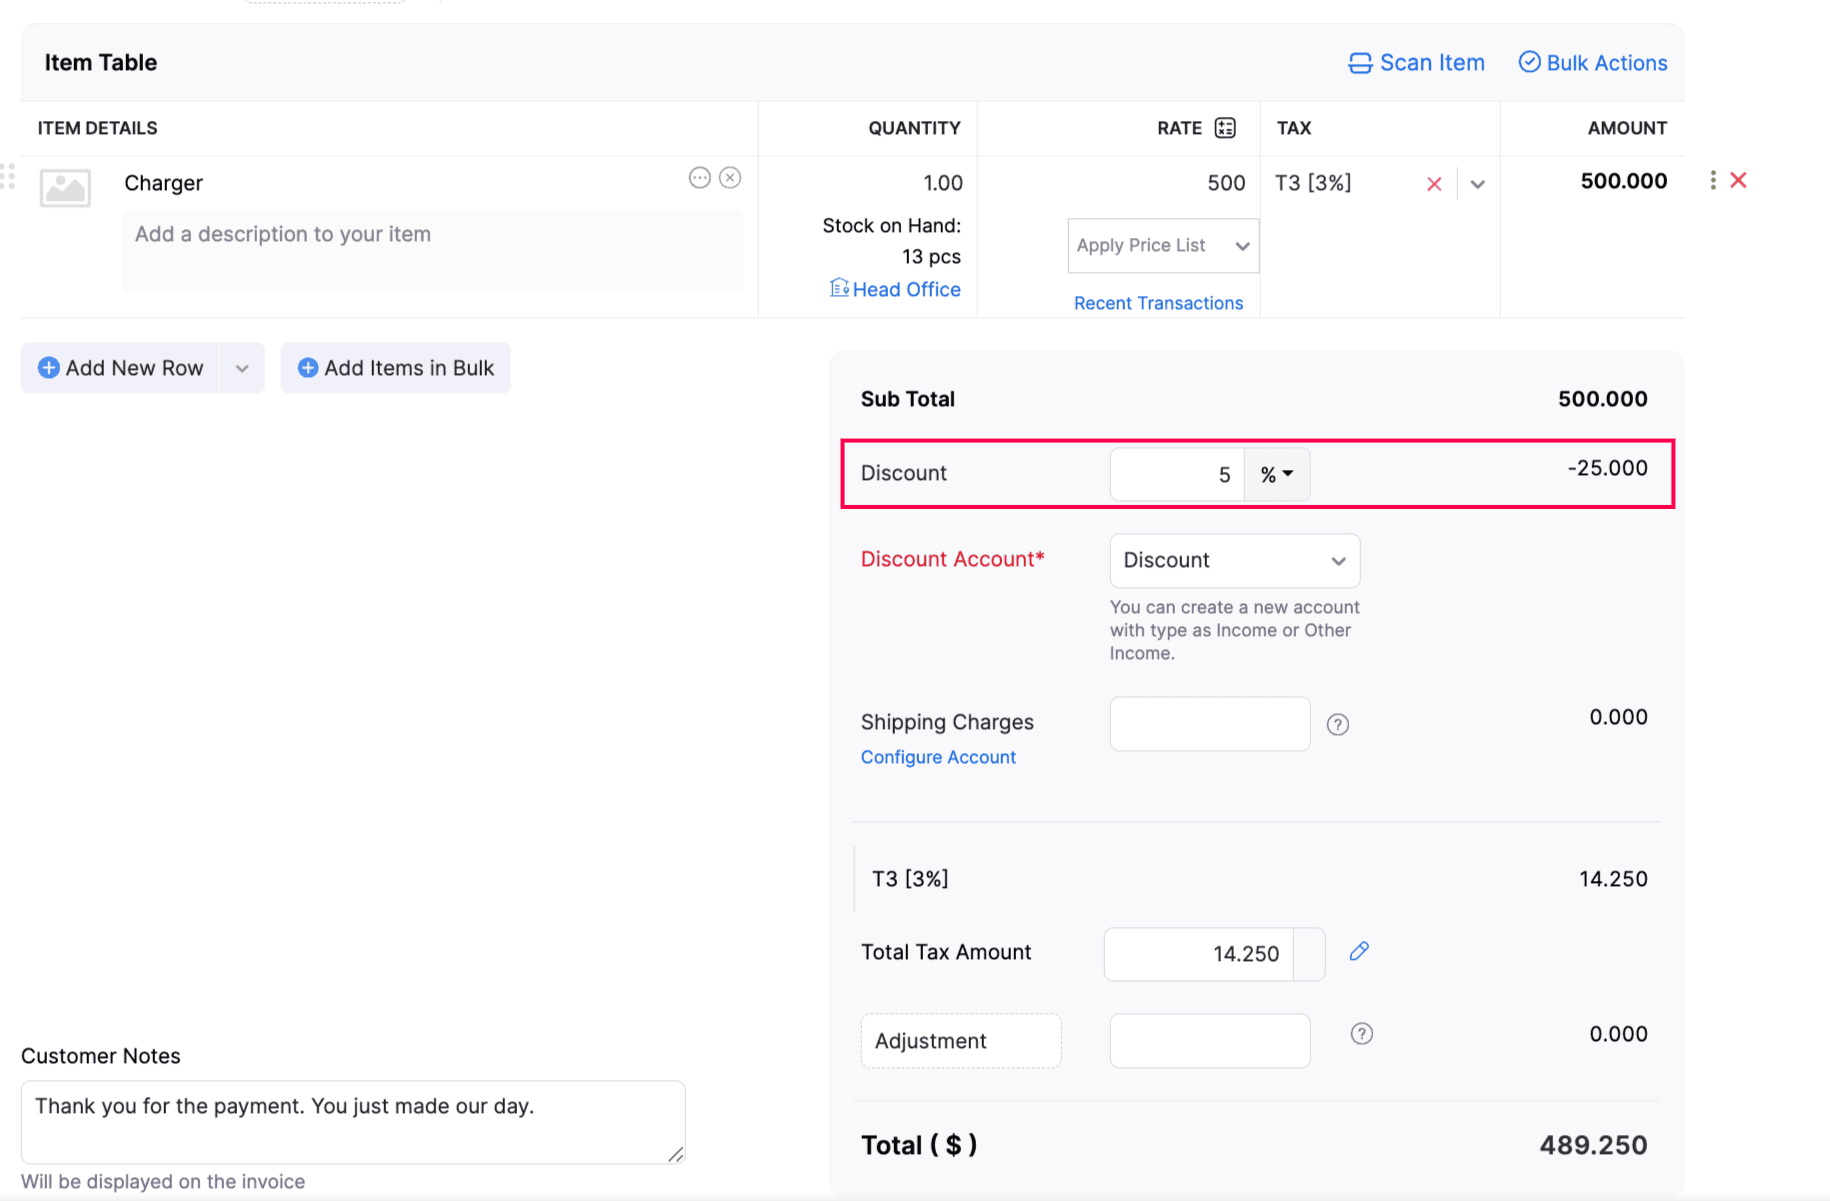
At Transaction Level: Select this option if you want to provide a discount to the entire transaction. Then, choose your preference on how the discount must be applied:
- Discount Before Tax: Select this option to apply the discount before tax is calculated and added. For example, a $500 transaction with $15 tax, a discount of 5% will be applied before tax is added to the total amount, i.e., $500 - 5% = $475, to which the tax will be added, $475 + $15 = $490.
- Discount After Tax: Select this option to apply the discount after the tax is calculated and added. For example, a $500 transaction with $15 tax, a 5% discount will be applied after tax, i.e., $500 + $15 = $515, then the discount amount is applied, $515 - 5% = $489.25.
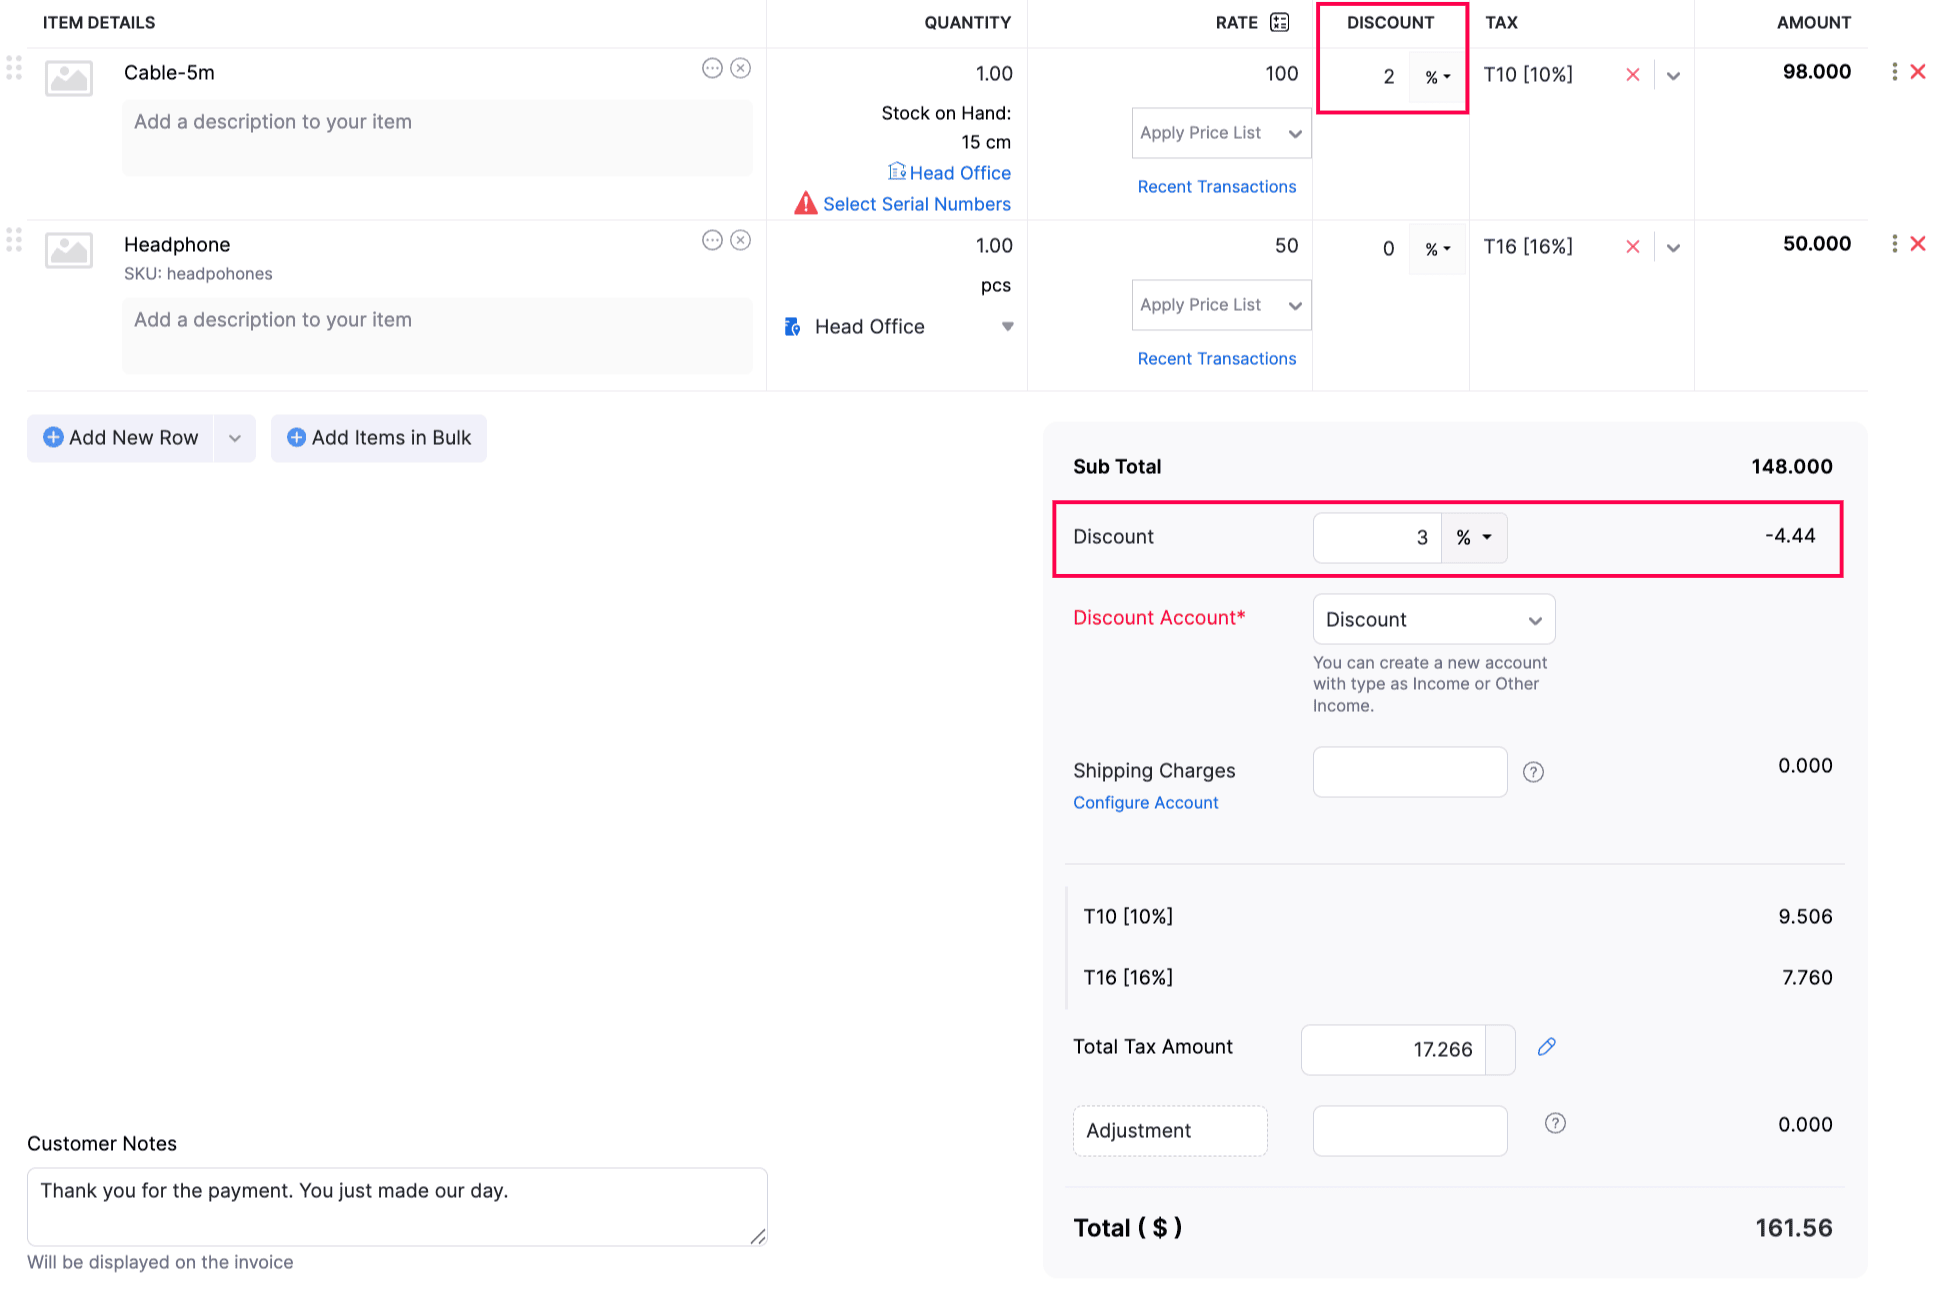
At Line Item Level and at Transaction Level: Select this if you want to apply discounts to both individual line items and the entire transaction. Please note that the discount will be applied to the prices at the line-item and transaction level before the tax is calculated.
Note:
- The At Line Item Level and at Transaction Level option is only available for the Global and India editions of Zoho Books.
- Visit the pricing page to check if it’s available in your current plan.
- Click Save.
Enable Additional Charges
To enable additional charges for your transactions:
- Log in to your Zoho Books organisation.
- Go to Settings.
- Select General under Preferences.
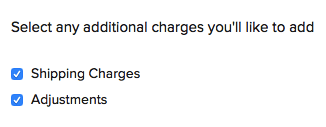
- Scroll down and under Select any additional charges you’ll like to add, enable the following options:
- Adjustments: Check this to allow adding adjustments to the total transaction amount.
- Shipping Charges: Check this to include shipping charges in your transaction.
- Click Save.
Once you enable the above options, you can start adding shipping charges to your transactions.

Salesperson
If you have salespersons in your organisation who manage different sales transactions, then you can associate them with the corresponding transactions (like an invoice) in Zoho Books.

To enable salespersons for your organisation, mark the box I want to add a field for salesperson.
Insight: Upon enabling this option, you can view the Salesperson field in your reports.
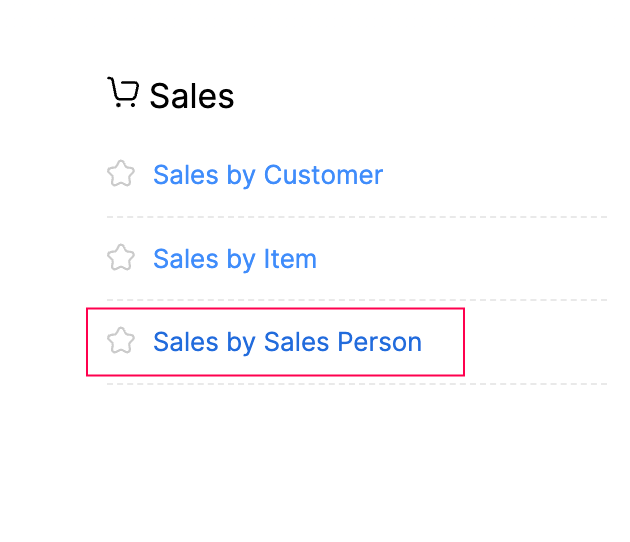
To view all the sales done by different salespersons in your organisation:
- Go to Reports on the left sidebar.
- Select Sales by Salesperson report under Sales.
Enable Profit Margin
Profit Margin is the difference between an item’s rate at which it is sold, and its cost price. In Zoho Books, it shows the estimated cost price and gross profit margin for each line item in sales transactions by comparing it with the line item’s rate. This way, it helps businesses to monitor margins, set rates optimally, and keep track of profits from every sales transaction.
Note: Visit the pricing page to check if this feature is available in your current plan.
To enable Profit Margin in Zoho Books:
Go to Settings.
Select General under Setup & Configurations.
Under Profit Margin, check the Enable Profit Margin estimation at line item and transaction level option.
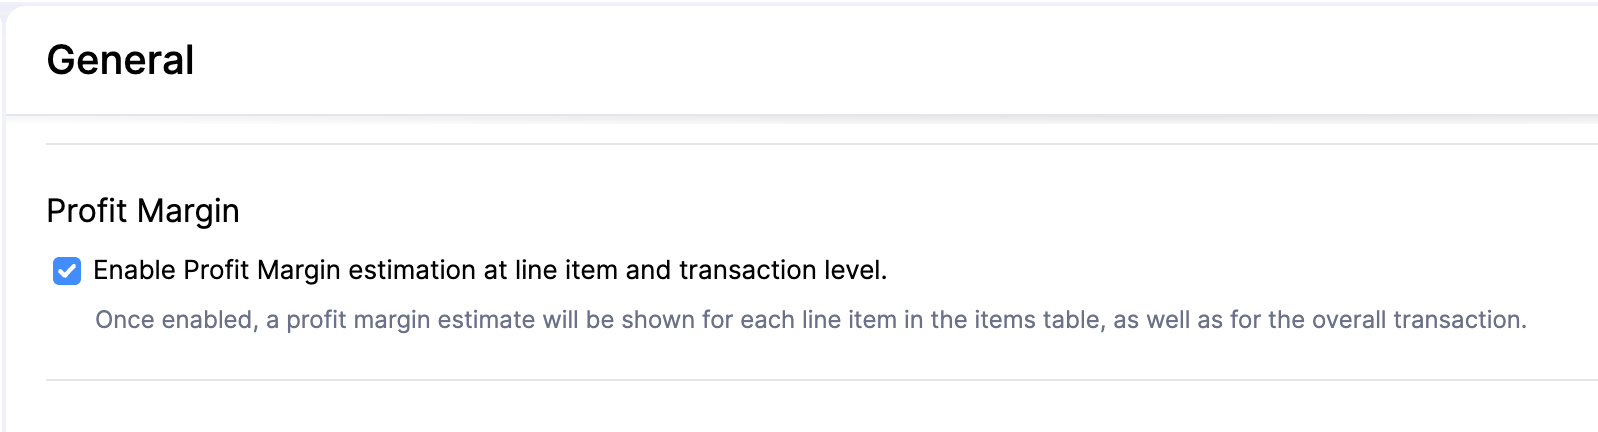
Click Save.
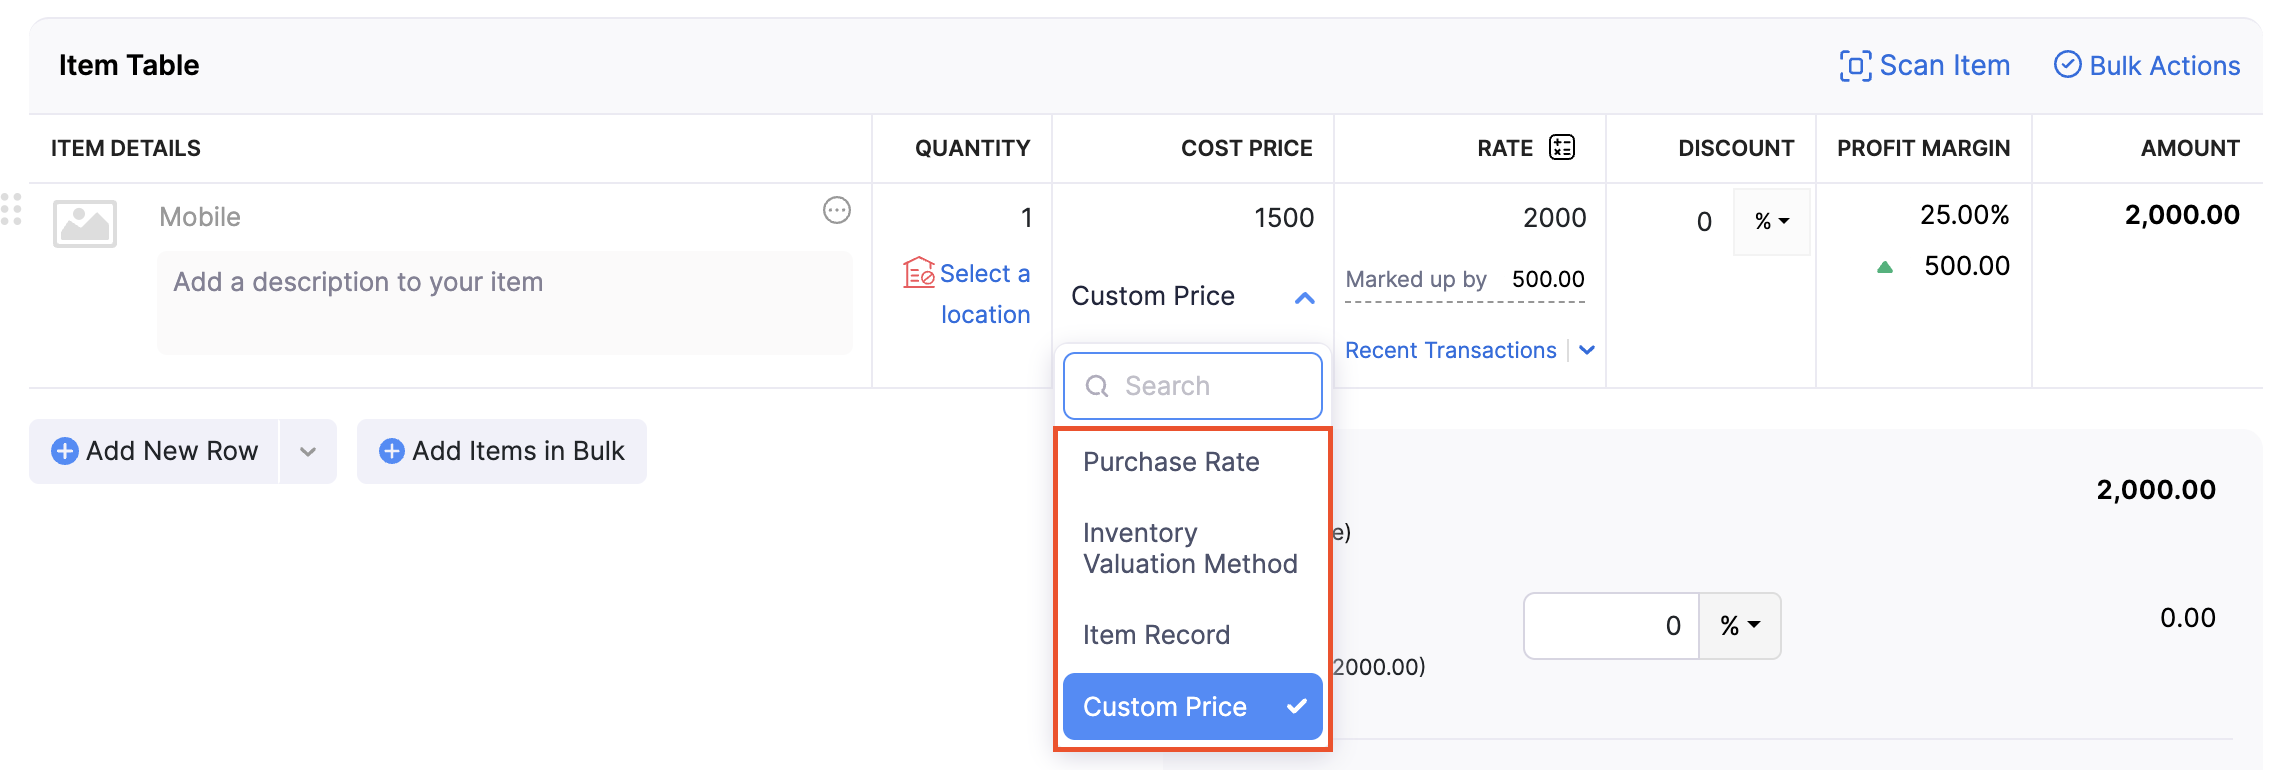
The Profit Margin will be enabled. Once done, new columns will appear in the Item Table of sales transactions such as Quotes, Sales Orders and Invoices. It includes:
Cost Price: It displays the estimated cost price for each line item. You can choose any one of the cost price estimation methods:
- Purchase Rate: This method is available only for transactions converted from a bill or an expense and displays the amount associated with the item.
- Inventory Valuation Method: It applies only to the items for which inventory-tracking is enabled. It estimates cost price for an item using the valuation methods like FIFO (First In First Out) or WAC (Weighted Average Costing) assigned when you create the item. For inventory items, the cost price will be estimated using the current available lots.
- Item Record: The cost price you provided when you created the item will appear here.
- Custom: It allows you to enter the cost price for the line item manually.
Profit Margin: It displays the estimated gross profit for each line item based on its rate and cost price.
- If you apply any discounts at the line item level, the profit margin for that line item decreases.
- The profit margin for a transaction will be displayed below its Total amount. It is calculated using the subtotal and the total estimated cost prices of all line items. Any transaction level discount you apply will reduce the profit margin.
- It does not include the other charges such as tax, shipping charges, adjustments, and more.
Configure Access for Fields
Once Profit Margin is enabled, new fields related to it are automatically created for Quotes, Sales Orders, and Invoices. You can configure role-based access for the Cost Price and Profit Margin fields to control which users can view or edit these fields.
To configure access for these fields:
Go to Settings.
Under Sales, select the module for which you want to configure access. For example, select Invoices under Sales.
Navigate to the Fields tab.
Hover over the Profit Margin or Cost Price field and click the More icon.
Select Configure Access.
In the pop-up, set the access level for each role:
- Read and Write: Users can view and edit the field.
- Read Only: Users can only view the field but cannot edit it.
- Hide Field: The field will be hidden from users with this role.
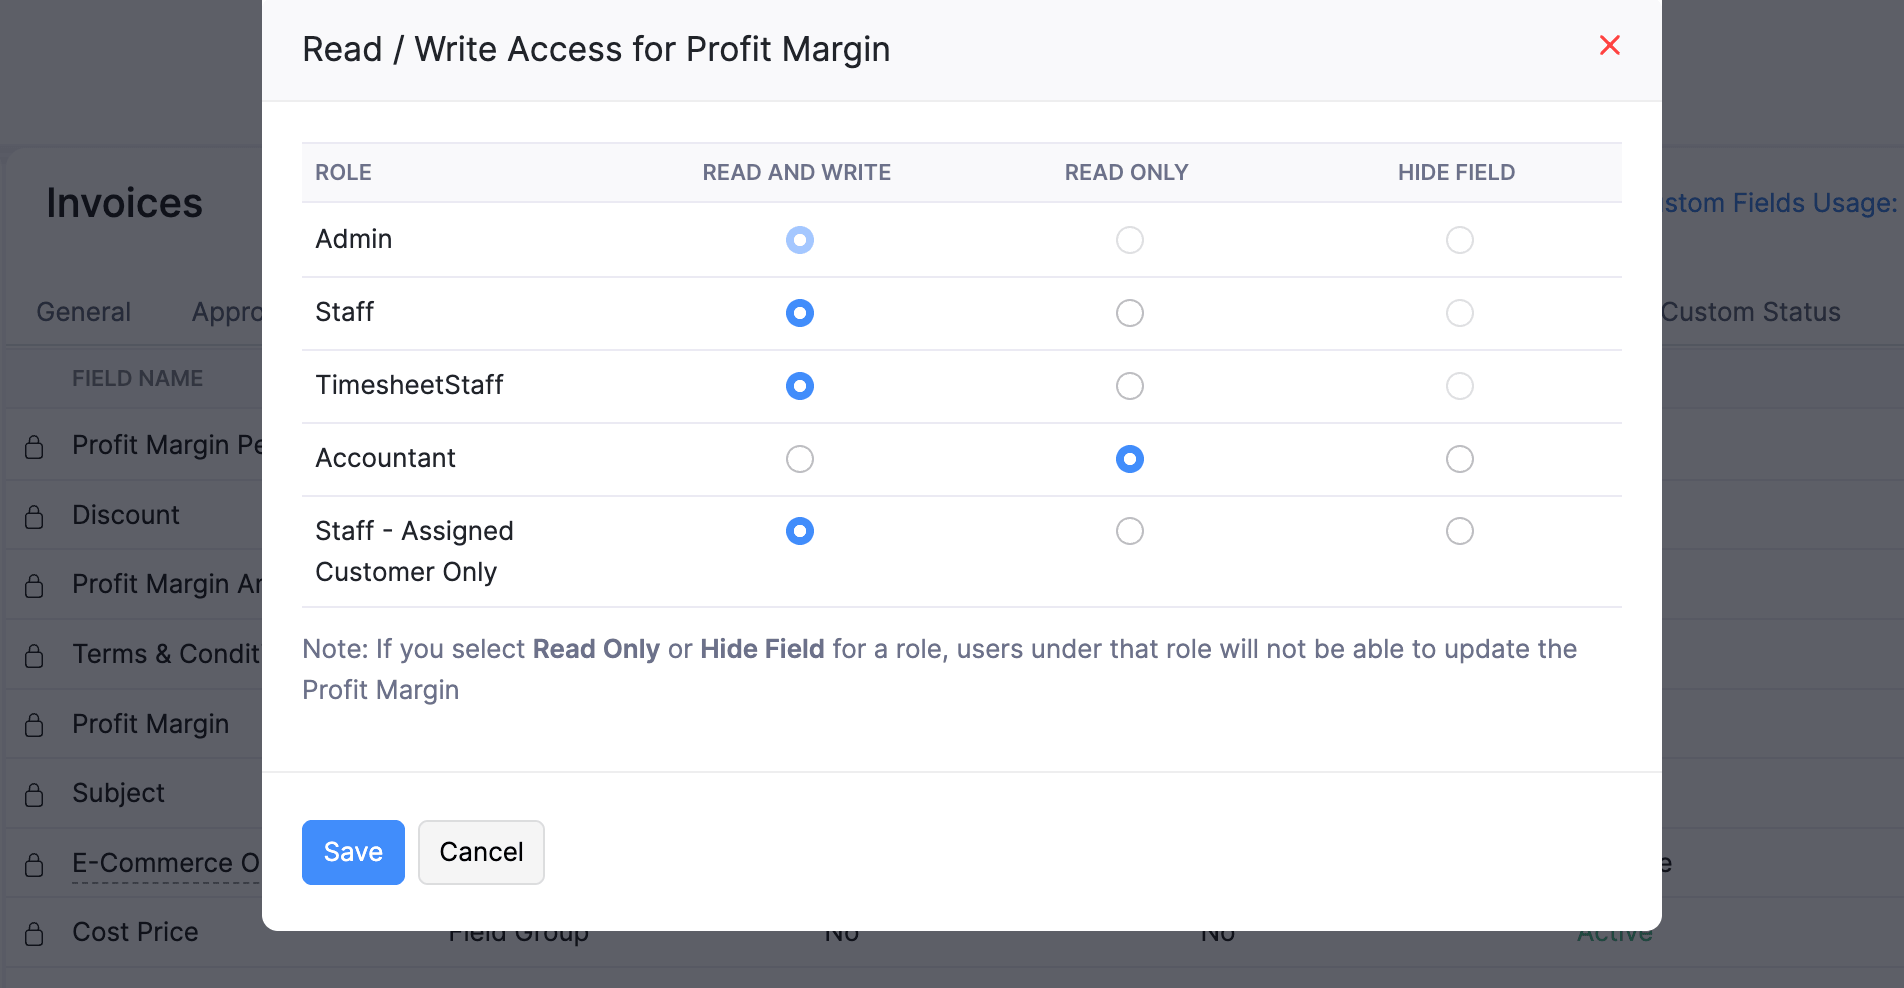
Click Save.
Note:
- All fields related to Profit Margin will be visible to admins by default.
- You can view the Profit Margin in the following reports: Quote Details, Invoice Details and Sales Order Details.
Default Account for Billable Bills and Expenses
Choose a default Income account to track the amount in billable bills and expenses, when they are invoiced. Once you select this account, the system will automatically associate the account when an expense or a bill is invoiced.
Note: The income account will be applied only for non-inventory items. For inventory items, the specified sales account will take the precedence.
- Select the Account for tracking billable bills and expenses while invoicing.
Let’s look at a scenario to understand how configuring this preference will affect the journal that’s recorded.
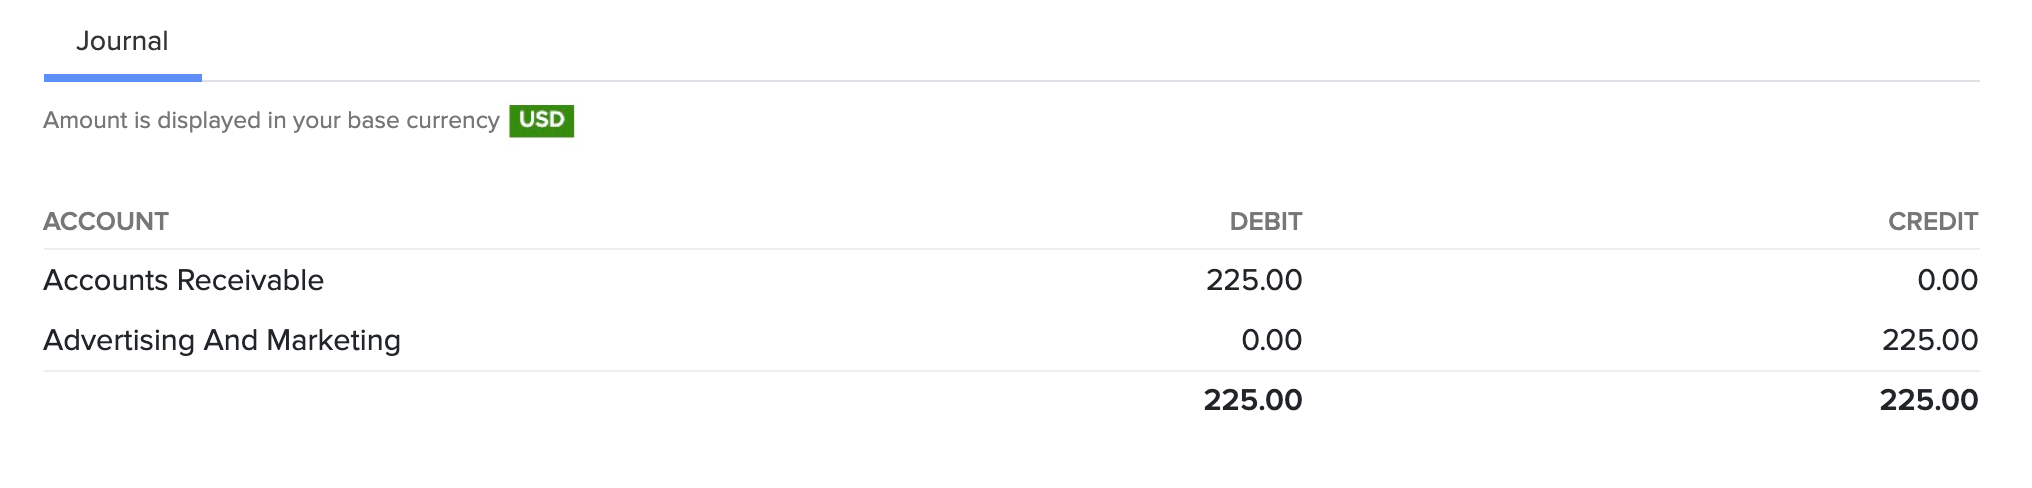
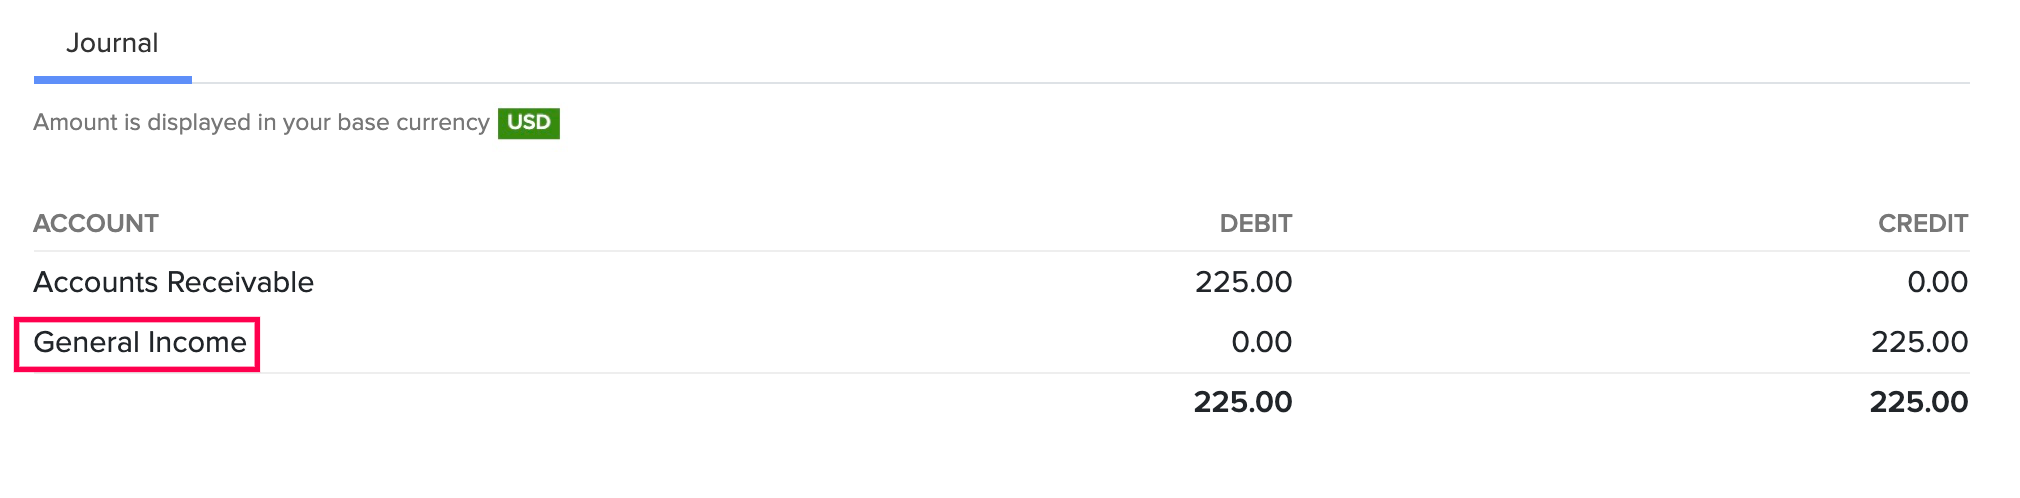
Scenario: Kumar is handling a project for his client Nita. During the project, Kumar incurs an expense of $225 in Advertising and Marketing expense. He invoices this expense to Nita and the following journal entry is created in Zoho Books.
Scenario (Contd.): If Kumar chooses an income account in the Preferences to track the amount in billable bills and expenses, the journal entry will be created as mentioned below.
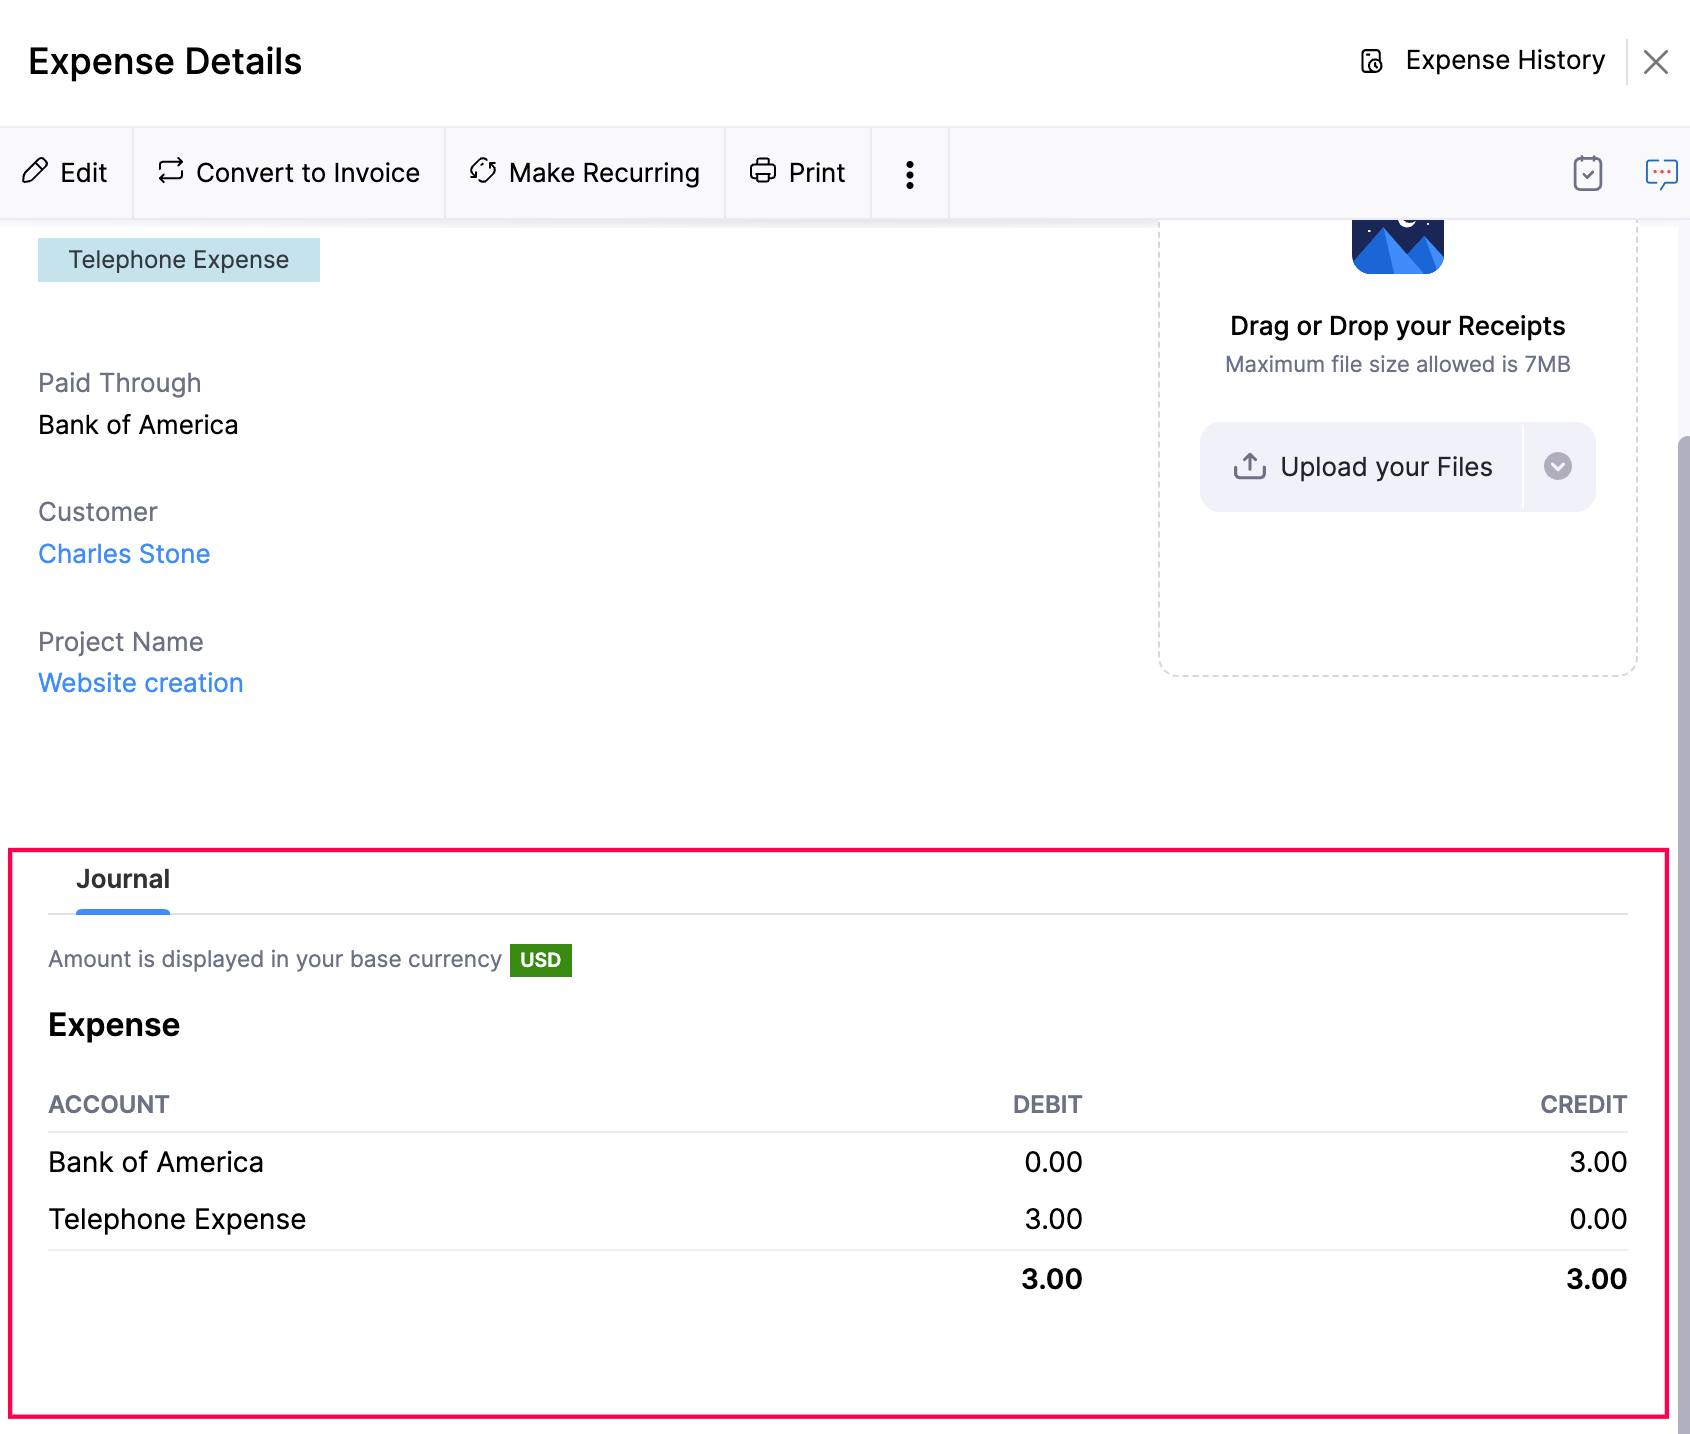
Scenario (Contd.): If Kumar does not choose an income account in the Preferences, the Expense account from billable bills or expenses will be used in the journal as shown below.
Markup for Billable Bills and Expenses
The bills and expenses that you incur on behalf of your customers, which you will invoice them later are billable bills and expenses. There are two common methods of invoicing customers:
- Invoicing the actual cost: If you incur an expense of $100, you will invoice the same amount to the customer for them to pay.
- Adding a markup: If you incur an expense of $100, you can mark up the expense amount and invoice $105 to the customer. This method will generate a 5% of extra revenue to your business.
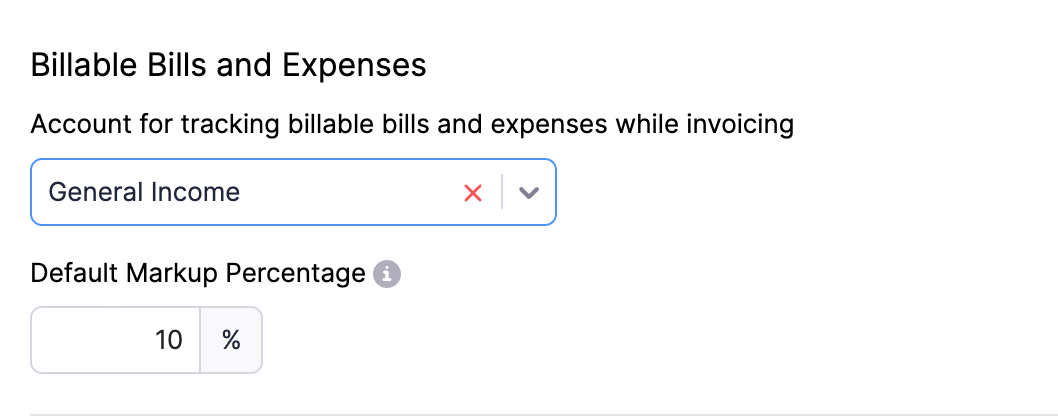
To set a default markup percentage for billable bills and expenses:
- Enter the markup percentage.
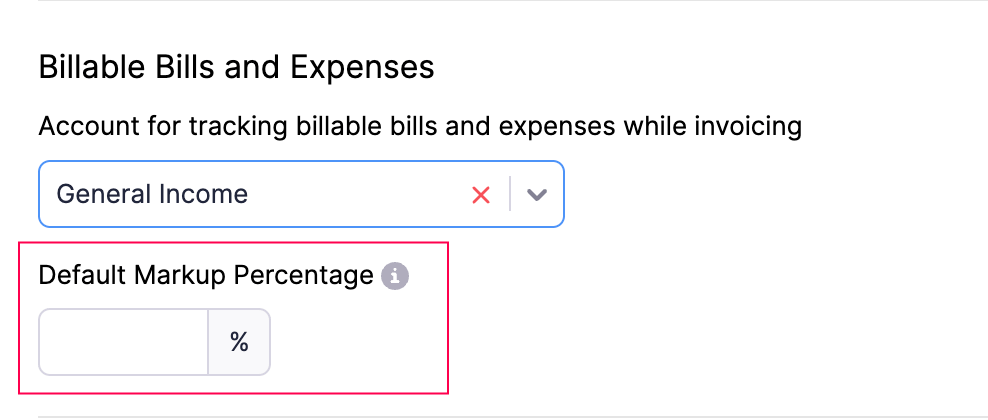
- Click Save.
Now, when you choose the billable option in a bill or an expense, the default markup percentage will be pre-filled in the Mark up by field.
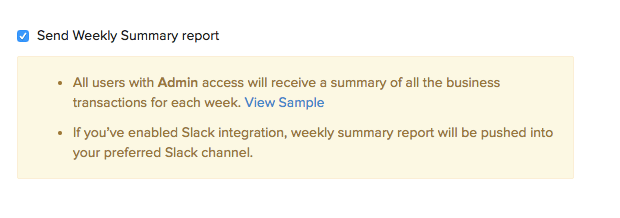
Weekly Summary Report
The weekly summary report provides an overview of all business transactions for the week. To enable it:
- Log in to your Zoho Books organisation.
- Go to Settings.
- Select General under Preferences.
- Scroll down and check Send weekly Summary report.
- Click Save.
Now, the weekly summary report will be sent only to users with Admin access in your organisation at the end of each week.
Note: If Slack Integration is enabled, the report will be sent to your preferred Slack channel.
Organization Address Format
You can change the way your organisation or business address appears on all your sales and purchase transactions.
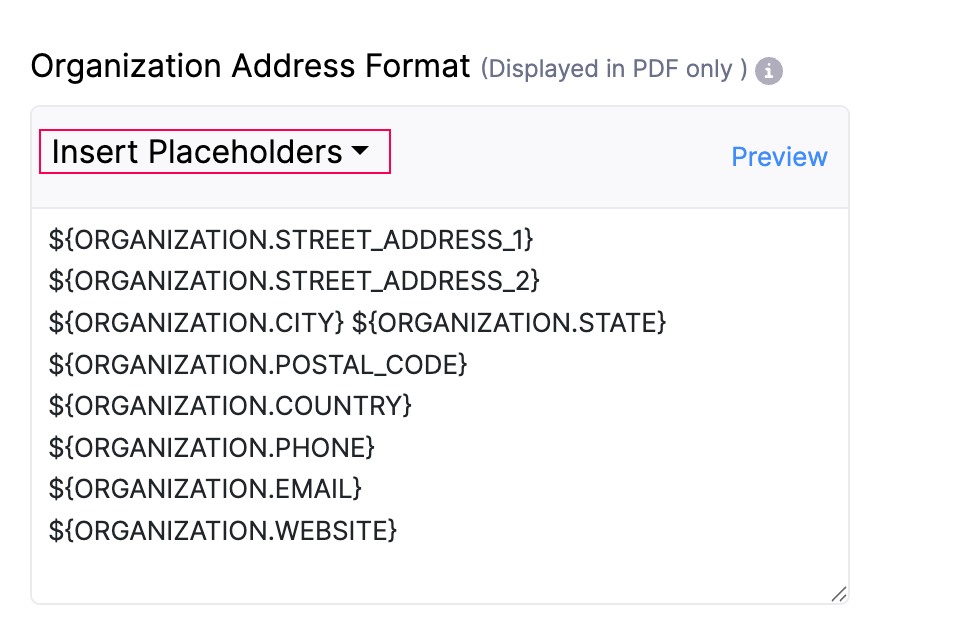
Rearrange the existing placeholders or to change the format add new placeholders by clicking the Insert Placeholders drop-down.
After making all the changes in the General section, click Save.
Customer Portal
In the Customer Portal Preferences page, you can:
- Upload or remove Your organisation Logo
- Change the theme of your Organisation
- Configure Portal settings
- Set up Custom Domains
Learn more about Customer Portal Preferences.
Vendor Portal
In the Vendor Portal Preferences page, you can:
- Configure vendor portal preferences
- Enable notifications
- Allow vendors to upload documents
- Allow vendors to accept/reject purchase orders
Learn more about Vendor Portal Preferences.
Customers and Vendors
In the Customers and Vendors Preferences page, you can:
- Allow duplicates for contact display name
- Set a customer credit limit
- Change the billing address format of the customer
- Change the shipping address format of the customer
Learn more about Customer and Vendor Preferences.
Projects
Configure different settings related to the Projects module in Zoho Books such as:
- Round off time
- Maximum hours/day for logging time
- Timesheet Approvals
Learn more about Project Preferences.
Accountant
Configure different settings related to the Accountant module in Zoho Books such as:
- Chart of Accounts
- Vendor Advances
- Journal Fields
Learn more about Accountant Preferences.
Transaction Number Series
The transactions you create in Zoho Books are numbered by the default transaction series. For instance, the first invoice you create will be numbered as INV-001, the second invoice as INV-002, followed by INV-003 and so on.
However, some businesses might require their transactions to be numbered and tracked by a different transaction series that is not the default series. Let’s take the help of a scenario to understand this better.
Scenario: Brandon runs a hardware store that sells various items. To track the sales of pipes, he decides to use the unique prefix PIPE. In Zoho Books, he configures a transaction number series with this prefix. Now, whenever Brandon creates an invoice for pipes, he can select the configured transaction series, and the invoice will automatically include the prefix PIPE in its number.
Similarly, you can create multiple transaction series in addition to the default transaction series. Each transaction series can be created with unique prefixes and series.
Insight: You can create transaction series for credit notes, journals, customer and vendor payments, purchase and sales orders, retainer invoices, vendor credits, bills of supply, debit notes, invoices, quotes, sales receipts, and delivery challans.
Once you’ve created a transaction series, you can select it while creating a transaction. Consequently, the transaction will be numbered based on the prefix and series that had been configured while creating the transaction series.
Note: This feature is available only for certain plans of Zoho Books. Visit the pricing page to check if it’s available in your current plan.
- Enable Transaction Series
- Add Transaction Series
- Configure Transaction Series
- Delete Transaction Series
Enable Multiple Transaction Series
To start configuring multiple transaction numbers series:
- Go to Settings.
- Select Transaction Number Series under Customisation.
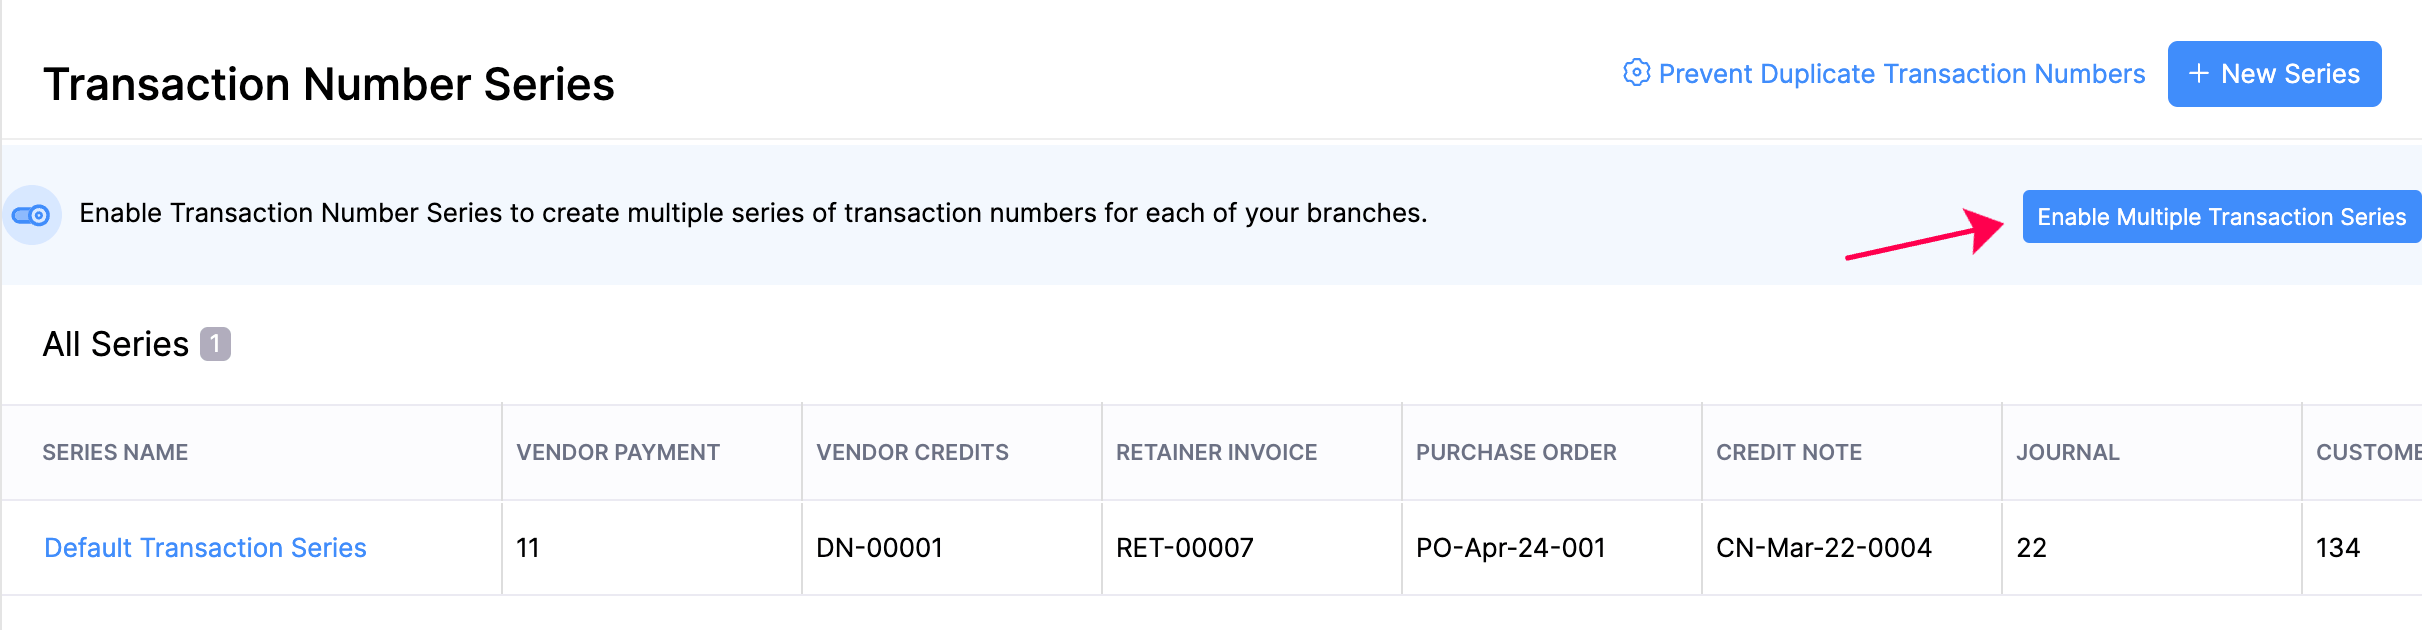
- Click Enable Multiple Transaction Series in the top right corner.
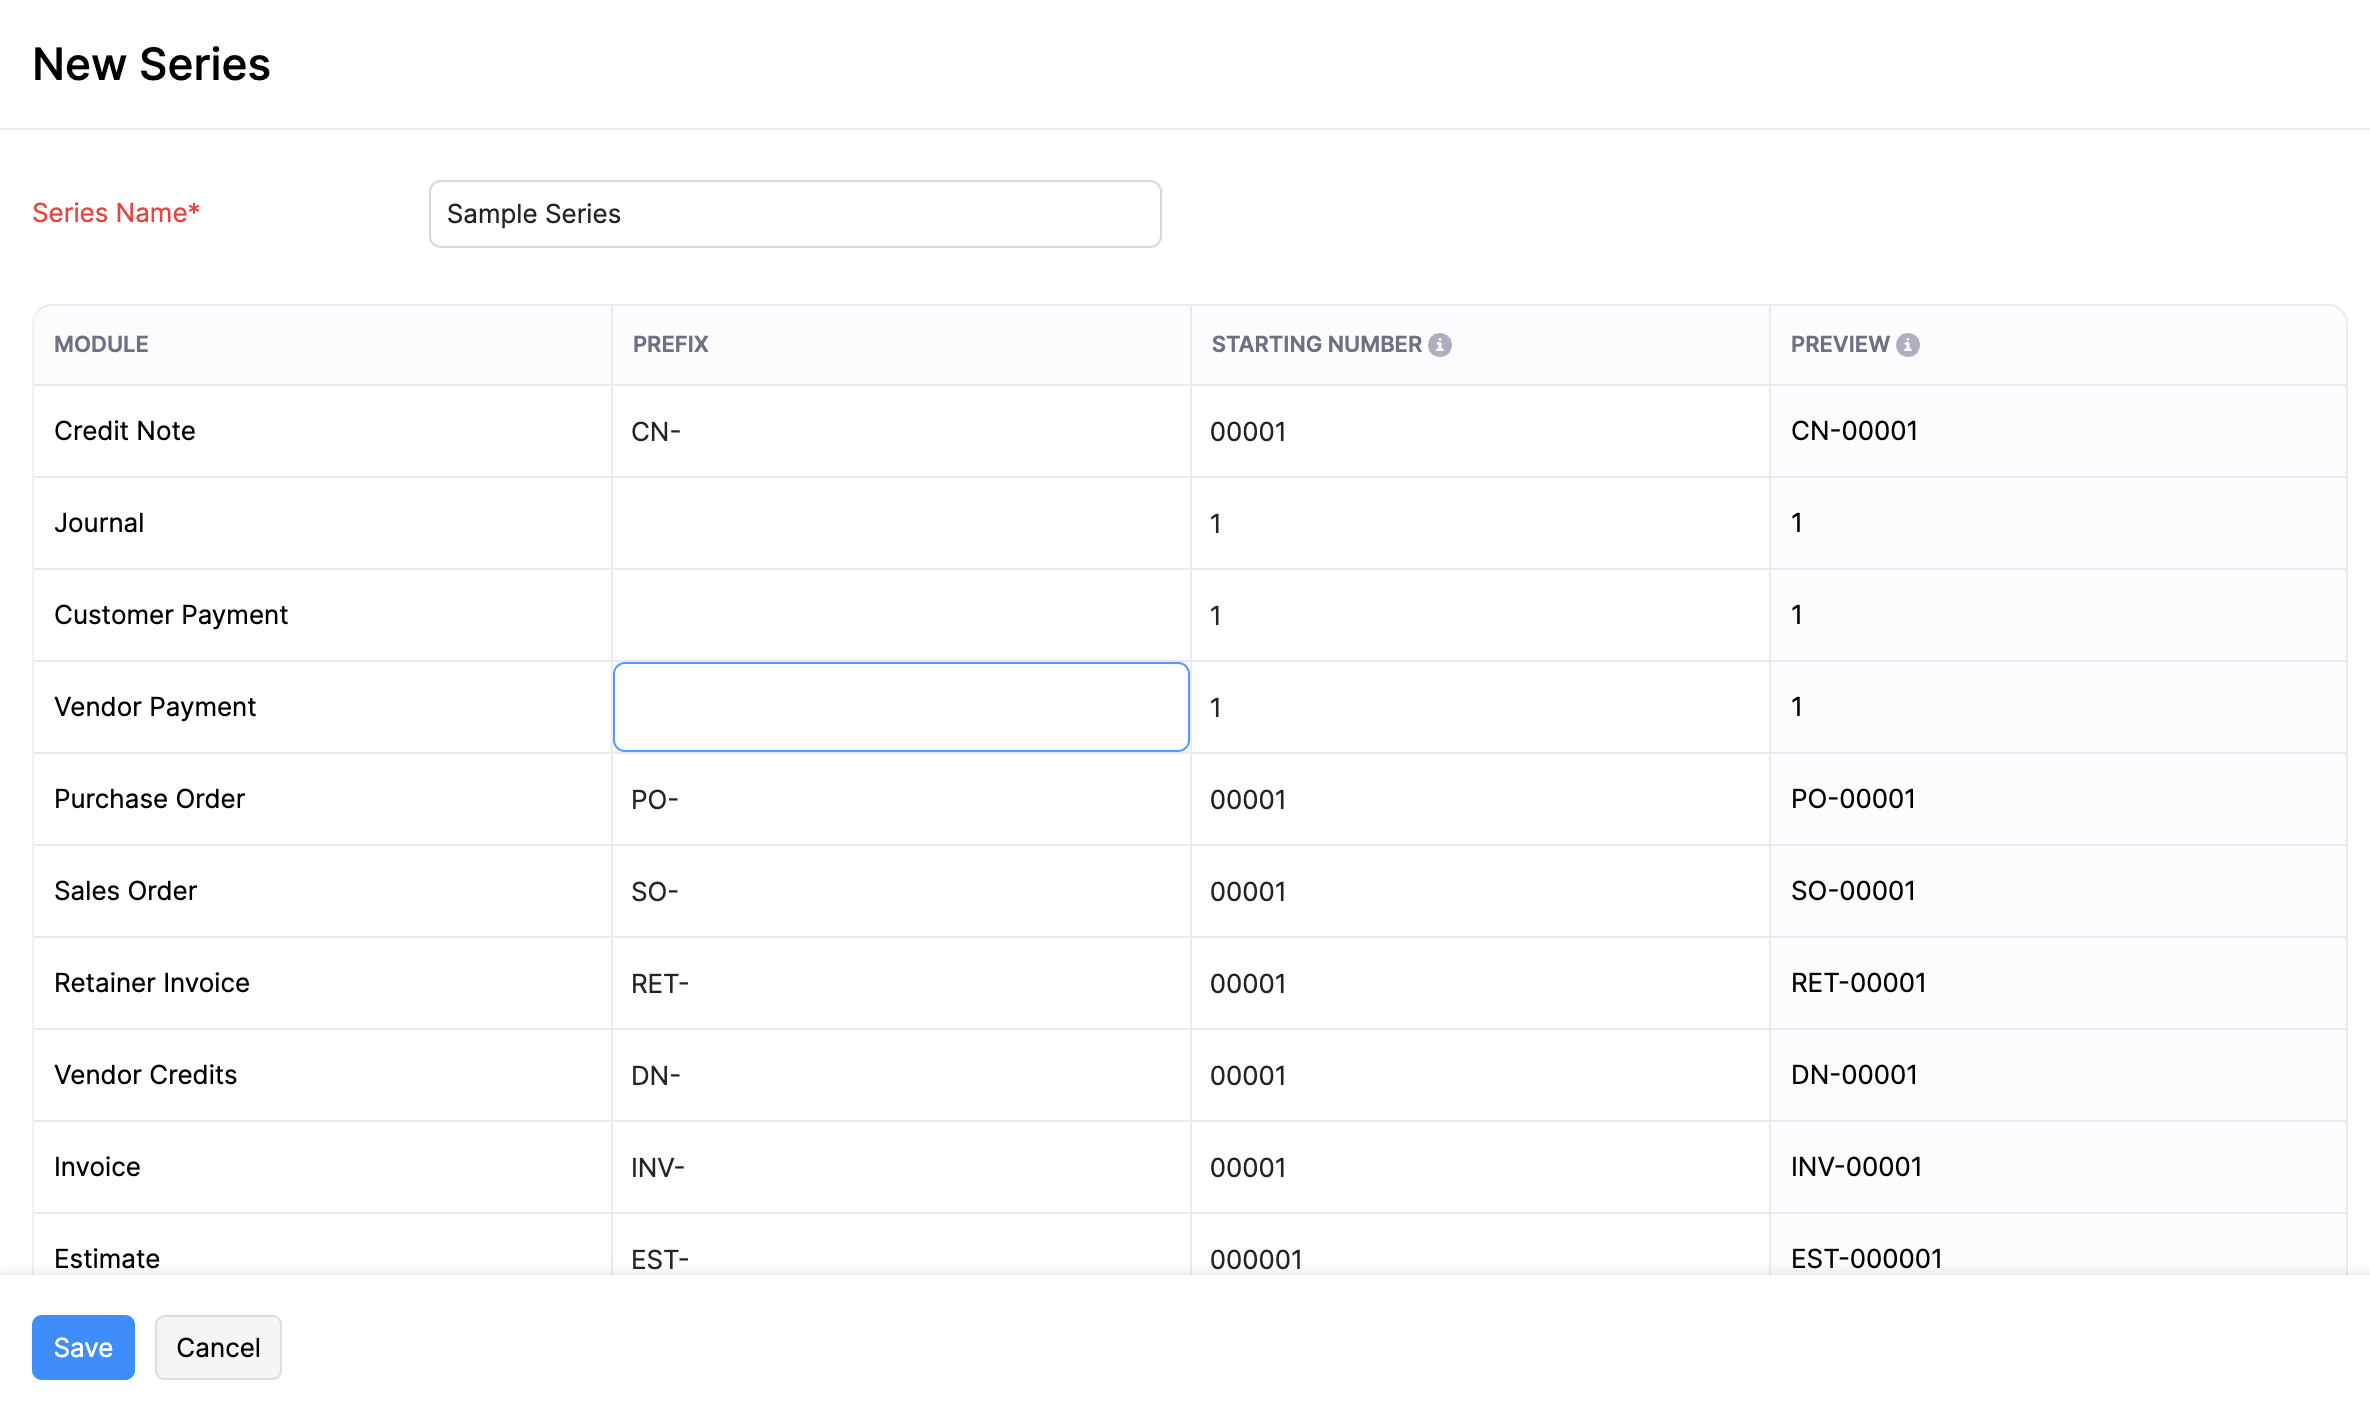
Add Transaction Series
You will be able to view the current transaction series for your transactions listed as the Default Transaction Series. In addition to the Default Transaction Series, you will be able to create new transaction series. To do this:
- Go to Settings.
- Select Transaction Number Series under Customisation.
- Click + New Series in the top right corner.
- Enter the name for the transaction series.
Pro Tip: If you’ve enabled the branches feature in your organisation, you can associate branches to multiple transaction series. This way, you can select two or more transaction series while creating a transaction for a specific branch.
- Enter the prefix and the series numbers for the transactions of your choice.
- Click Save.
Once you’ve created a transaction series, you will be able to select the transaction series while creating the respective transaction.
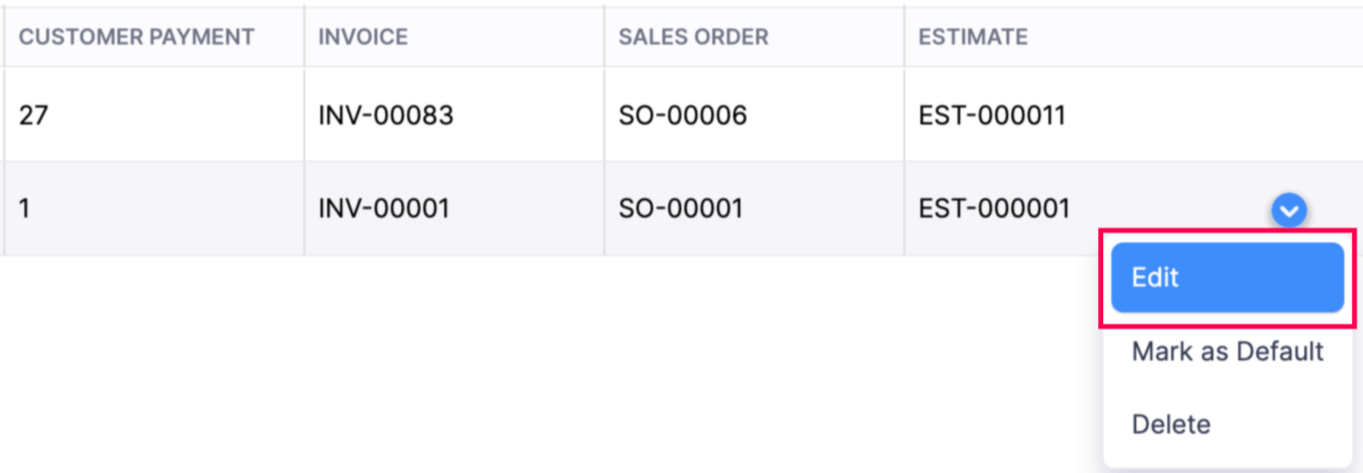
Edit Transaction Series
To edit the transaction series you’ve created:
- Go to Settings.
- Select Transaction Number Series under Customisation.
- Hover over the transaction number series and click Edit from the dropdown to the right of the transaction series.
- Make the necessary changes and click Save.
- Enter the prefix and the series numbers for the transactions of your choice.
- Click Save.
Pro Tip: You can also configure the default transaction series.
Once you configure the transaction series, the transactions you create will be numbered based on the new prefix and series.
Delete Transaction Series
To delete a transaction series you’ve created:
- Go to Settings.
- Select Transaction Series under Customisation.
- Hover over the transaction number series and click the dropdown to the right.
- Click Delete.

Once you delete the transaction series, you will no longer be able select the transaction. series while creating a transaction. Furthermore, the transaction series information of the deleted transaction series will not be available.
Note: Your transactions will be numbered based on the default series if your transactions are automatically generated, such as from a recurring invoice.
Transaction Posting Date
Transaction Posting Date is the date on which journal entries are posted for the transactions that you create in your Zoho Books organisation.
Note: This feature is only applicable to invoices, sales receipts, credit notes, payments received, bills, vendor credits and payments made.
Scenario: Sophia runs a flower shop and sends an invoice to a customer on February 5th for a bouquet. However, the delivery gets delayed, and she only delivers the flowers on February 8th. To keep her bookkeeping accurate, she sets the invoice date to February 5th and the transaction posting date to February 8th. This way, the journal entry will reflect the delivery date.
Points to Remember
Before enabling and using this feature, remember the important points below:
- If your organisation has enabled transaction locking, a transaction will be locked based on its Transaction Posting Date, not its transaction date.
- If you are recording the refund for a payment, the Refunded On date cannot fall before the Transaction Posting Date.
- You can bulk-update the Transaction Posting Date of transactions.
- You can create workflow rules with Transaction Posting Date as the criteria.
- You can create custom views and perform advanced searches with Transaction Posting Date as the filter criteria.
- The journal entry for a bill payment will use the most recent date between the bill’s transaction posting date and the payment date. This date will be reflected in the Journal Report.
Enable Transaction Posting Date
To use this field in your transactions, you need to enable it first. Here’s how:
- Go to Settings and select the module for which you want to enable the field.
- Navigate to the Fields tab.
By default, the Transaction Posting Date field will be inactive. Hover over the field, click the dropdown next to it, and select Mark as Active.
Once marked as active, you’ll be able to apply the Transaction Posting Date for your existing as well as future transactions.
Apply Transaction Posting Date to Transactions
After enabling the field, you can apply it to your transactions. For example, let’s see how it can be applied to your invoices:
- Go to Sales on the left sidebar and select Invoices.
- Click + New or Edit to make changes to an existing invoice.
- Enter or edit the necessary details.
- Select the Transaction Posting Date.
- Click Save as Draft or Save and Send.
Similarly, you can apply transaction posting date to other transactions.
Transaction Posting Date in Reports
You can filter your AR Aging Summary, AR Aging Details, AP Aging Summary and AP Aging Details reports based on the Transaction Posting Date. Here’s how:
- Go to Reports on the left sidebar.
- Select the report that you want to filter.
- Click the Aging By dropdown at the top and select Transaction Posting Date.
- Click Run Report.
Note: You can also filter your Invoice Details, Payments Received, Credit Note Details, Bill Details, Payments Made, and Vendor Credit Details reports based on the transaction posting date. To do this, go to Reports, select a report, select Transaction Posting Date in the Report By dropdown, and click Run Report.
 Yes
No
Yes
No
Thank you for your feedback!