
Tasks
Tasks are the to-dos that you and your users have to complete. In Zoho Books you can create, assign finance-related tasks to your users, mark them by priority, and send reminders.
Note: This feature is available only for certain plans of Zoho Books. Visit the pricing page to check if it’s available in your current plan.
Scenario: Patricia, the manager of Zylker wants one of her subordinates, Brandon, to follow-up on an invoice by calling the customer two days before the due date. So, she creates a task for that particular invoice and assigns it to Brandon, marks the due date as the date on which the invoice is due and sets a reminder two days before the due date. Brandon receives an email notifying him that this task has been assigned to him. He also gets a reminder two days before the due date reminding him to make the follow-up call.
Benefit of Tasks
With the Tasks feature, you can seamlessly communicate about various to-dos within the organisation. Some of the benefits are:
- Mark tasks based on priority like high, low, normal, etc.
- Set reminders to send notification about a task through email, in-app notification, or both.
- Notify users about the tasks via email.
- Create statuses and mark the tasks based on the status.
- Create tasks associated with transactions and view them in the transaction details page.
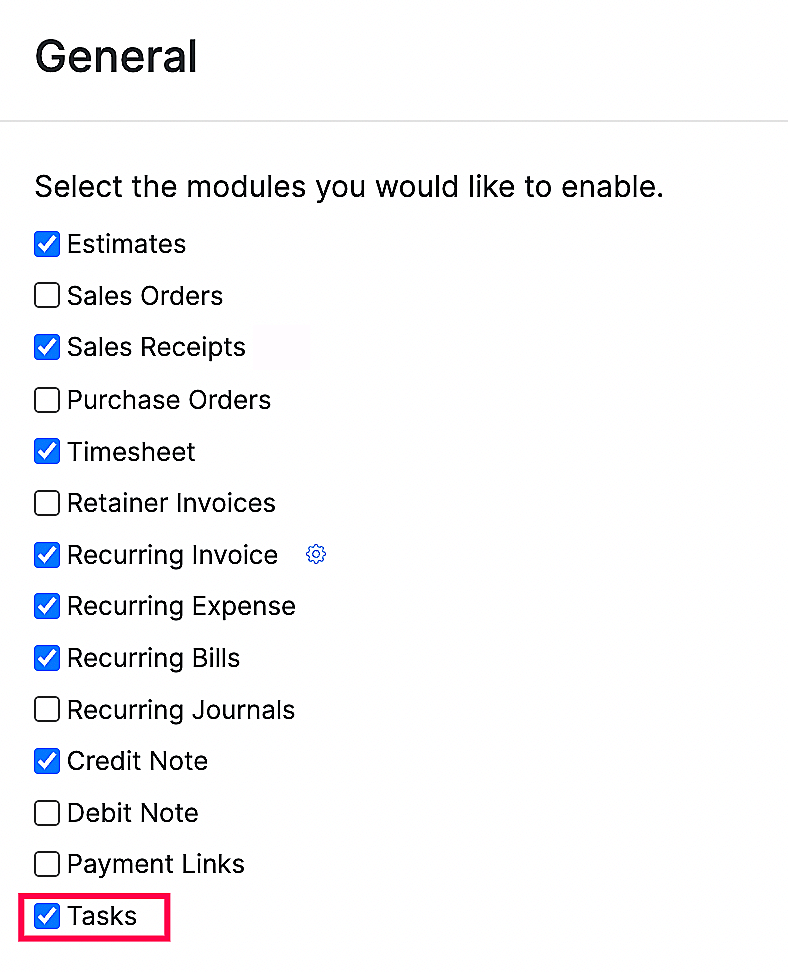
Enable Tasks
Tasks will not be available in Zoho Books by default. You will have to enable it for your organisation. Here’s how:
- Go to Settings on the top right corner of the page.
- Select General under Preferences.
- Check the Tasks option.
- Click Save.
Create Tasks
Prerequisite: Ensure that you’ve provided all your users with the required access in the users and roles section.
Once you have enabled tasks and given your users the required permissions in your organisation, you can start creating tasks and assign them to users.
There are two ways in which you can create a task.
- Top right corner of any page
- Menu bar of a specific transaction.
Top right corner of any page
You can create a task by clicking the Task icon on the top right corner of any page. A task created in this section will not be assigned to any specific transaction.

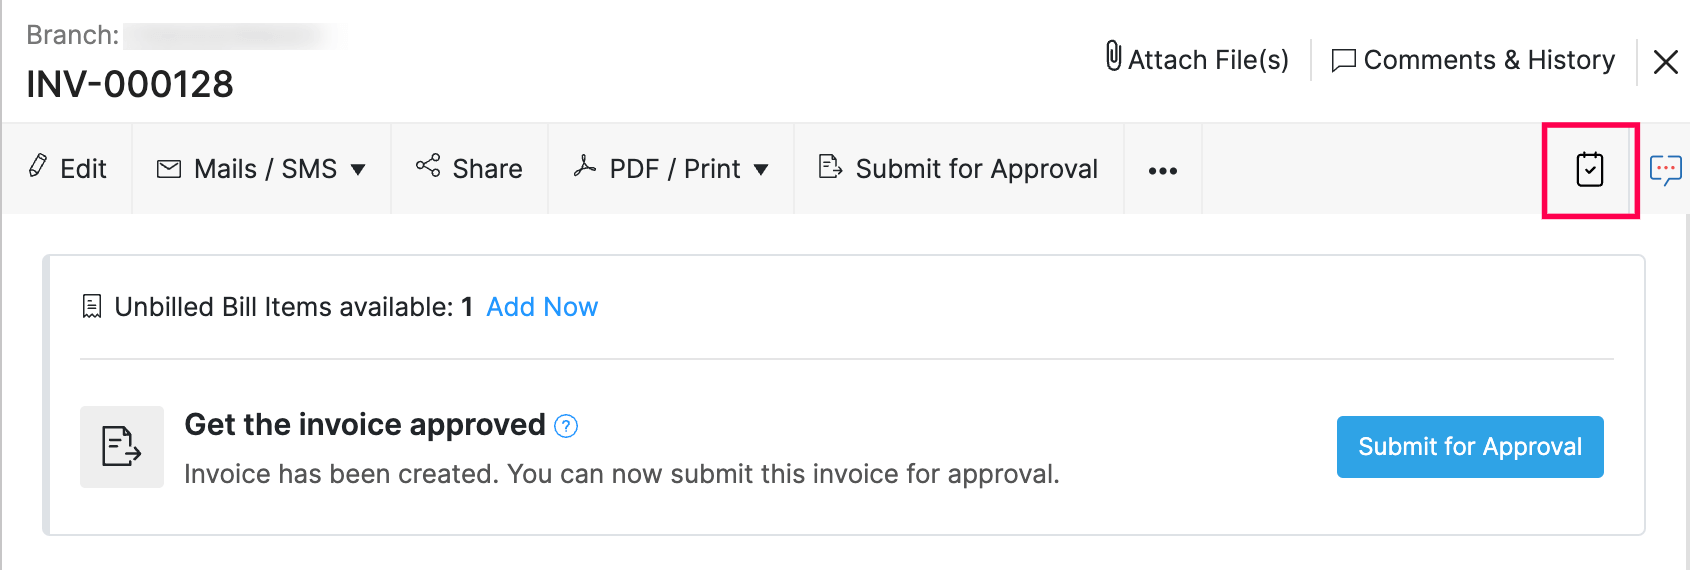
Menu bar of a specific transaction
If you want to associate a task to a particular transaction, you can do it by going to the transaction and clicking the Task icon in that menubar. You can view these tasks on the corresponding transaction page by clicking the Task icon.
You can create tasks contextually from modules such as:
- Items
- Customers
- Quotes
- Sales Orders
- Invoices
- Bank Accounts
- Credit Notes
- Vendors
- Expenses
- Purchase Orders
- Bills
- Vendor Credits
- Journals
- Projects
To create a Task:
- Click the Task icon and click the + New button on the top right corner of the page.
- Enter the necessary details.
| Field | Description |
|---|---|
| Title | Enter the title or name of the task. |
| Assign to | Select the user to whom you want to assign the task. |
| Notify user via email | Mark this option if you wish to notify the user about the task through email. |
| Related Contact | Add the contact you want to associate with this task. |
| Due Date | Select the date on which you expect the task to be completed. |
| Priority | Choose the priority of the task. You can choose if its very high, high, normal, low or very low priority task. |
| Set Reminder | Set reminders and choose to send the reminders via email, in-app notification or both to the assigned user. |
- Click Save.
On clicking save, the task will be created and if you had marked the Notify user via email option, the user will receive an email with the task details. You can view the task by clicking the tasks icon in the top right side of the page.
Once you or a user completes the task, it can be marked as Completed from the Change Status dropdown.
Task Preferences
Statuses
There are predefined statuses in tasks such as Yet to Start, In Progress and Completed. However, if you wish to create other statuses, you can do it by creating a custom status. These custom statuses will have to be created as a sub-status of a predefined status. Here’s how:
- Go to Settings on the top right corner of the page.
- Select Tasks under Preferences.
- Click the + New Status button in the top right corner of the page.
- Select the status under which you want to create this sub-status and enter the Status Name.
- Click Save.
If you create a sub-status under Completed, and if that status is applied on a task, no notifications will be sent for that task as it will be considered as completed.
Insight: Only the admins, the assigned user, or the user who created the task will have permission to change the status of a task.
Fields
You can create new fields for the Tasks module and assign different data types for each of them. Learn more about Fields.
Manage Permissions
You can choose the level of permission you wish to give your users. By default, only the admin will have full access. The admins will have to provide access to the other users, only after which they’ll be able to see the tasks assigned to them. To grant access:
- Go to Settings on the top right corner of the page.
- Select Roles under Users and Roles.
- Select the role that you want to set the permission for.
- You can give full access, view, create, delete or edit access.
- If you wish to give a user access to other users’ tasks, you can click More Permission and check the Manage other users’ tasks option.
Insight: If a user is given a permission, let’s say View permission, then they can only view the task assigned to them. However, if the user is given both View and Manage other users’ tasks, they can view other users tasks. This applies to all permissions such as View, Create, Edit and Delete under the tasks header in the Users and Roles section.
Other Actions
Delete Task
Notes: Only the Admins, the assigned user, the user who created the task, and anyone with Manage other users’ tasks permission will be able to delete tasks.
To delete a task:
- Go to the Tasks module.
- Click the down arrow next to the task that you want to delete.
- Click Delete.
- In the following pop-up, click Delete Task to confirm.
Edit Task
Notes: Only the Admins, the assigned user, the user who created the task, and anyone with Manage other users’ tasks permission will be able to edit tasks.
To edit a task:
- Go to the Tasks module.
- Click the down arrow next to the task that you want to edit.
- Click Edit.
- Make the necessary changes and click Save.
Manage Filters
If you want to view tasks based on their status, you can filter them. Here’s how:
- Go to the Tasks list page.
- Click All Tasks on the top of the page and select that status based on which you want to filter the tasks. The tasks will be listed based on the filter you’ve applied.
Bulk Actions
You can bulk-delete and bulk-update the tasks that you’ve created in Zoho Books. Here’s how:
- Go to the Tasks List page.
- Select the tasks in bulk that you want to update or delete.
- Click the Delete icon and then OK if you wish to delete the selected tasks or the Bulk Update icon and then Update to make changes to the selected task.