
Configuring Approvals
You can set up different types of approvals for the trips, reports, advances, and purchase requests that are submitted for approval in Zoho Expense. You can set up an hierarchical approval or custom approval based on the approval process in your organization.
| Approval Type | Applicable Records |
|---|---|
| Hierarchical Approval | Reports, Trips, Purchase Requests |
| Custom Approval | Reports, Trips, Advances, Purchase Requests |
| Simple Approval | Advances |
Hierarchical Approval
In hierarchical approval, any report, trip, or purchase request created by an user will be submitted to the default approver who was assigned to the user. The approval flow will be based on the approvers configured while creating or editing a user in Zoho Expense.
If your organization has a single or direct approval process, you can opt for the hierarchical approval option.
Configure Hierarchical Approval
To set up hierarchical approval for trips, reports, and purchase requests:
- Click Admin View on the left sidebar.
- Go to Settings on the left sidebar.
(OR)
Click Settings in the top right corner of the page. - Go to Modules under Customization.
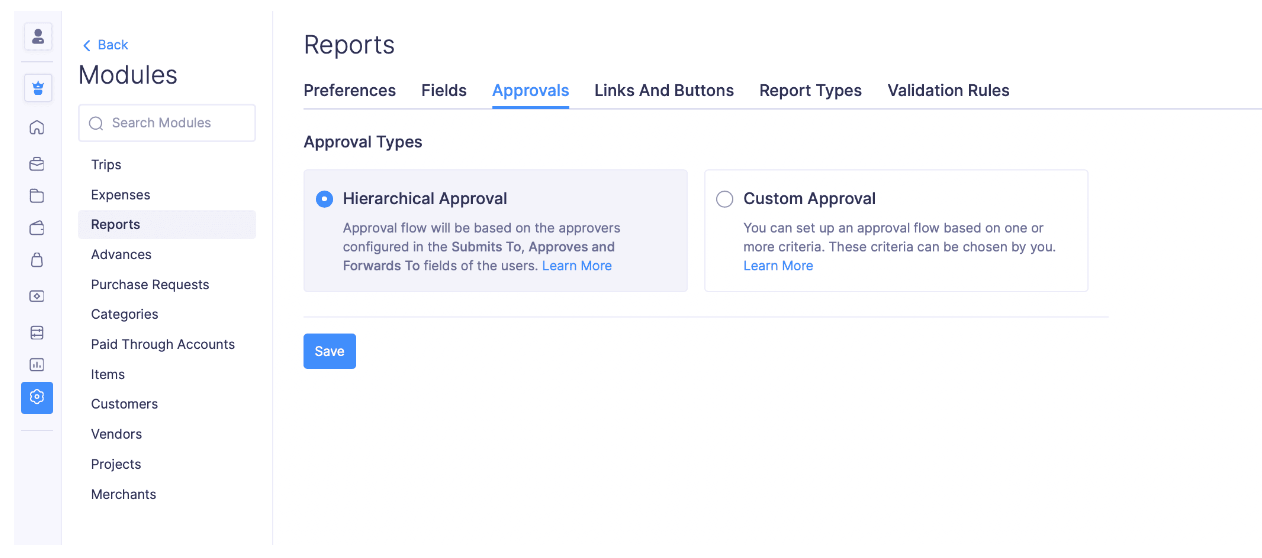
- Click the module for which you want to enable hierarchical approval and go to the Approvals tab.
- Select Hierarchical Approval and click Save.
Simple Approval Flow
Note: The simple approval flow will only be available for Advances.
If you want the advances that are submitted by your employees to be approved only by the admins of your organization in Zoho Expense, you can opt for the simple approval process.
Configure Simple Approval
To set up simple approval for advances:
- Click Admin View on the left sidebar.
- Go to Settings on the left sidebar.
(OR)
Click Settings in the top right corner of the page. - Go to Modules under Customization.
- Select Advances.
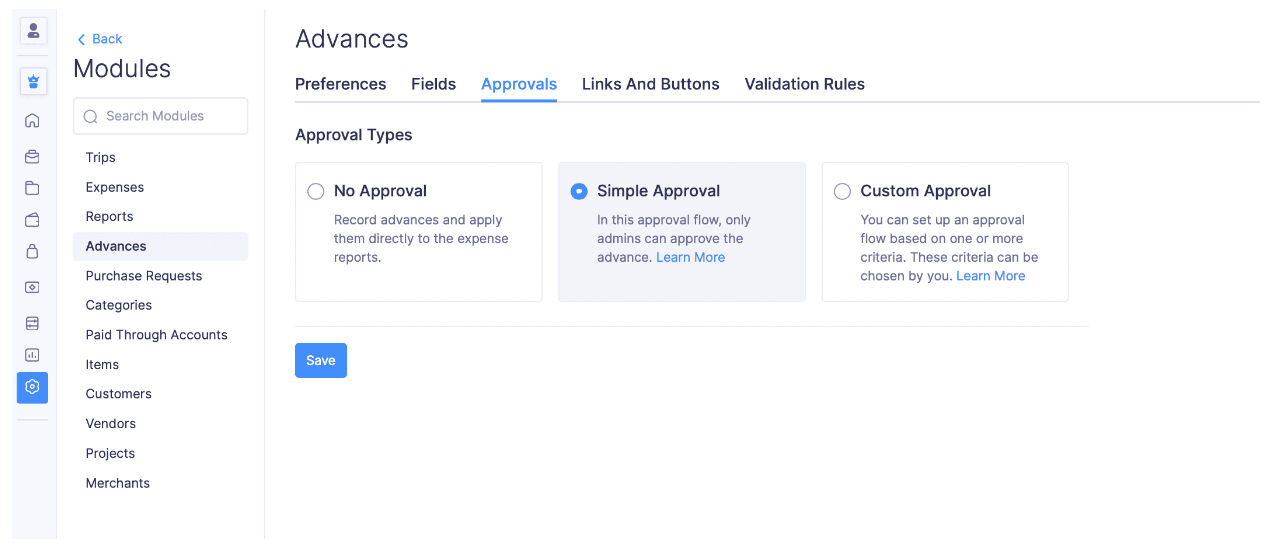
- Go to the Approvals tab and select Simple Approval.
- Click Save.
Custom Approval
Admins can set up custom approval for the reports, trips, advances, and purchase requests in Zoho Expense.
For instance, when a user is working on a project, any expense created by them during a project should be submitted to the project head, instead of the default approver. In this case, rather than changing the default approver, you can create a custom approval such that any expense the user creates for a project, is automatically submitted to the project head.
If a report, trip, advance, or purchase request satisfies the criteria of more than one approval flow, you can choose which approval flow should be executed by prioritizing it.
Enable and Create Custom Approval
To enable and create a new custom approval flow:
- Click Admin View on the left sidebar.
- Go to Settings on the left sidebar.
(OR)
Click Settings in the top right corner of the page. - Go to Modules under Customization.
- Click the module for which you want to enable custom approvals and go to the Approvals tab.
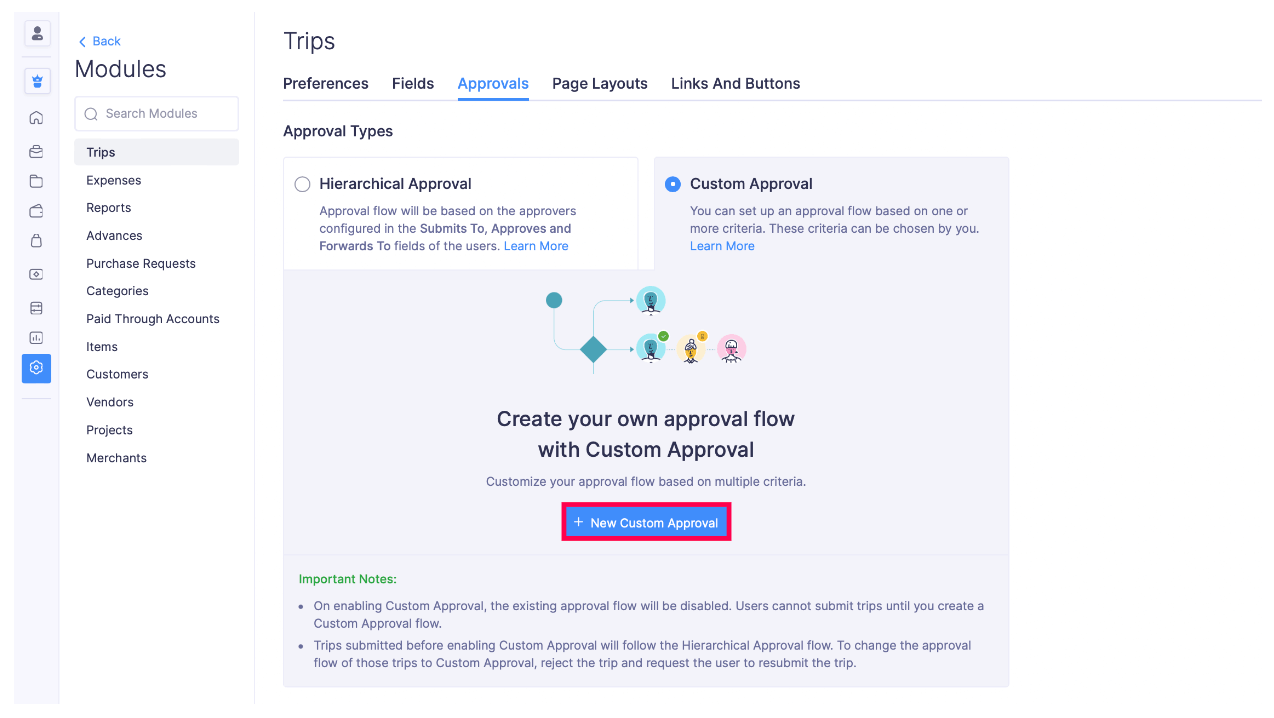
- Click Custom Approval.
- Click + New Custom Approval.
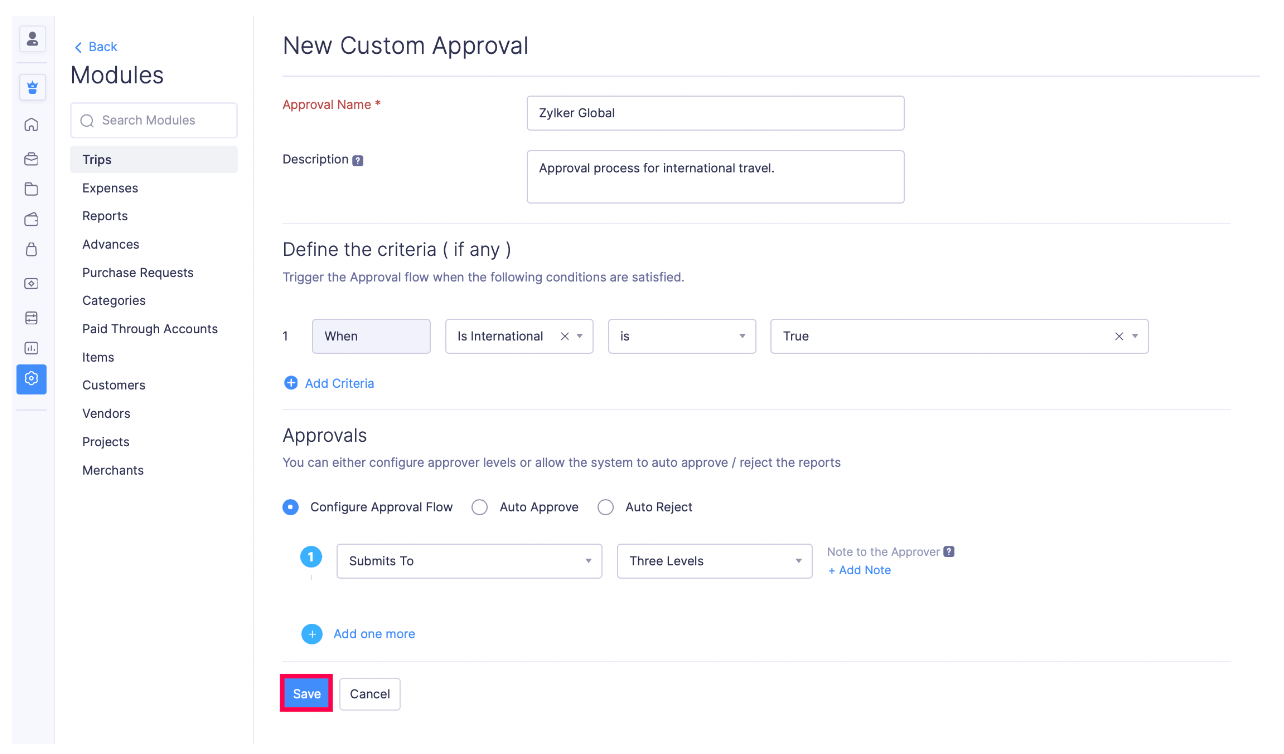
Choose the criteria
You can configure the criteria based on which, the approval flow will be triggered. Trigger criteria can be set using parameters such as Report Total, Reimbursable Total, Project, Policy Violation count or the Owner of the report. You can provide values for these parameters and on satisfying these criteria, the approval flow will be triggered.
Approval flow
Custom approval uses a level-based hierarchy, that is, you can set up multi-level approvals. The submitted report will first have to get approved by the Level one Approver, followed by the Level two Approver, and so on. You can select any of the following approvers to configure an approval flow:
Submits To: The default approver of the user. It follows the reporting hierarchy in your organization.
Choose an approver manually: Select an approver manually from the existing users.
Project Head: Select this option if a particular report is associated with a project and needs the approval of the project head.
Project Heads of Expenses: The Project Heads of all the expenses in a report or a trip.
Project Heads of Purchase Request Items: The Project Heads associated with the line items of the purchase request.
Department Head of the logged-in user: The head of the department to which the owner of the report belongs.
Department Head: The approver will be the department head of the department you choose.
Designation-Hierarchy: The approver will be the first user mapped in the Submits To field hierarchy of the report owner who is assigned in the mentioned designation.
Choose a Lookup Field: The approver will be the user selected in the lookup custom field you have chosen.
- You can remove any approval level by clicking the - icon in the right corner of the flow.
- Click Save.
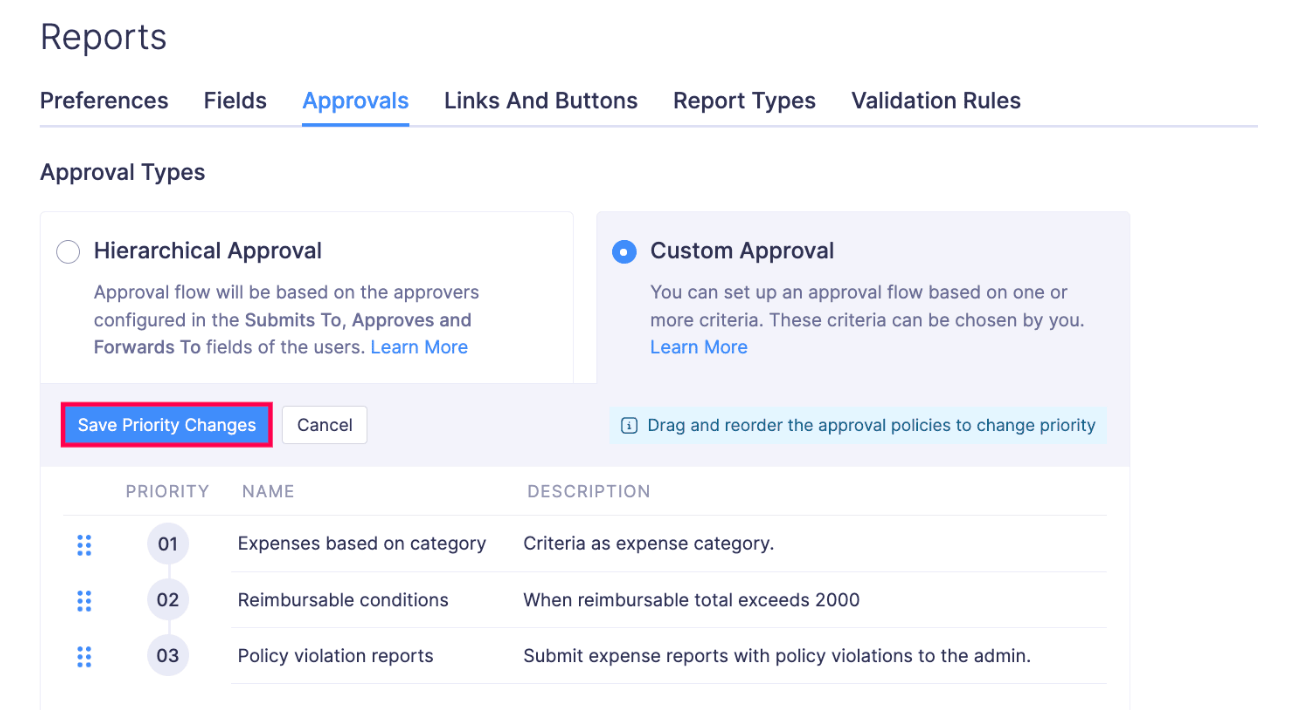
Prioritize an Approval Flow
In some cases, the reports might fulfil the criteria of more than one approval flow. In such cases, you can choose which approval flow should be triggered first by prioritizing the approval flows.
To prioritize an approval flow:
- Click Admin View on the left sidebar.
- Go to Settings on the left sidebar.
(OR)
Click Settings in the top right corner of the page. - Go to Modules under Customization.
- Click the module for which you want to prioritize the custom approval flows.
- Click Change Priority. Drag and reorder the approval flow such that it comes at a higher level than the rest. The approval flow with priority number 1 will be prioritized over the other approval flows.

- Click Save Priority Changes for the changes to take effect.
Set up Multiple Criteria
You can set up multiple criteria on an AND (or) OR basis. You can set up to 10 criteria based on several conditions and limits.
For example, let’s say the admin creates a custom approval where he sets the criteria based on AND (or) OR:
AND: When report total > ‘2000’ (AND) Customer is ‘Zylker Global’.
In this case, the custom approval will be triggered only if the report total is > 2000 AND if the customer is Zylker Global.
OR: When Project is ‘Web Design’ (OR) Owner of the Report is ‘Mark’.
In this case, the policy will be triggered if either the project is Web Design OR if the Owner of the report is Mark.
To set up multiple criteria:
- Click Admin View on the left sidebar.
- Go to Settings on the left sidebar.
(OR)
Click Settings in the top right corner of the page. - Go to Modules under Customization.
- Click the module for which you want to set up multiple criteria to trigger the custom approval flow.
- Click the custom approval flow for which you want to set up multiple criteria.
- Click + Add Criteria to add a new criteria. Configure the criteria.
- You can also manually edit the criteria by clicking Change Criteria. Type your preferred criteria pattern, for example, (1 AND 2), ((1 AND 2 ) OR 3), etc.
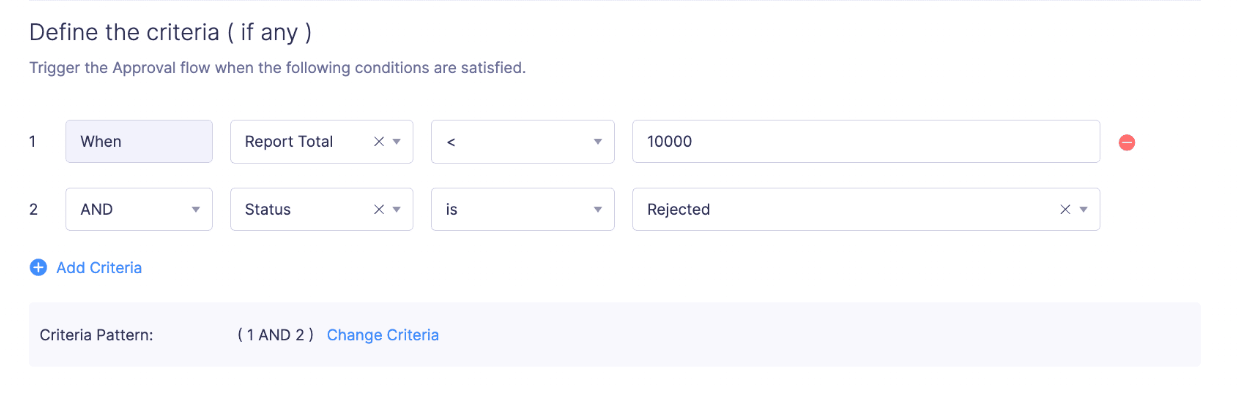
- You can remove a criteria by clicking the (-) icon at the right corner of the criteria.
- Click Save. The approval flow will be triggered on satisfying the multiple criteria you have set.
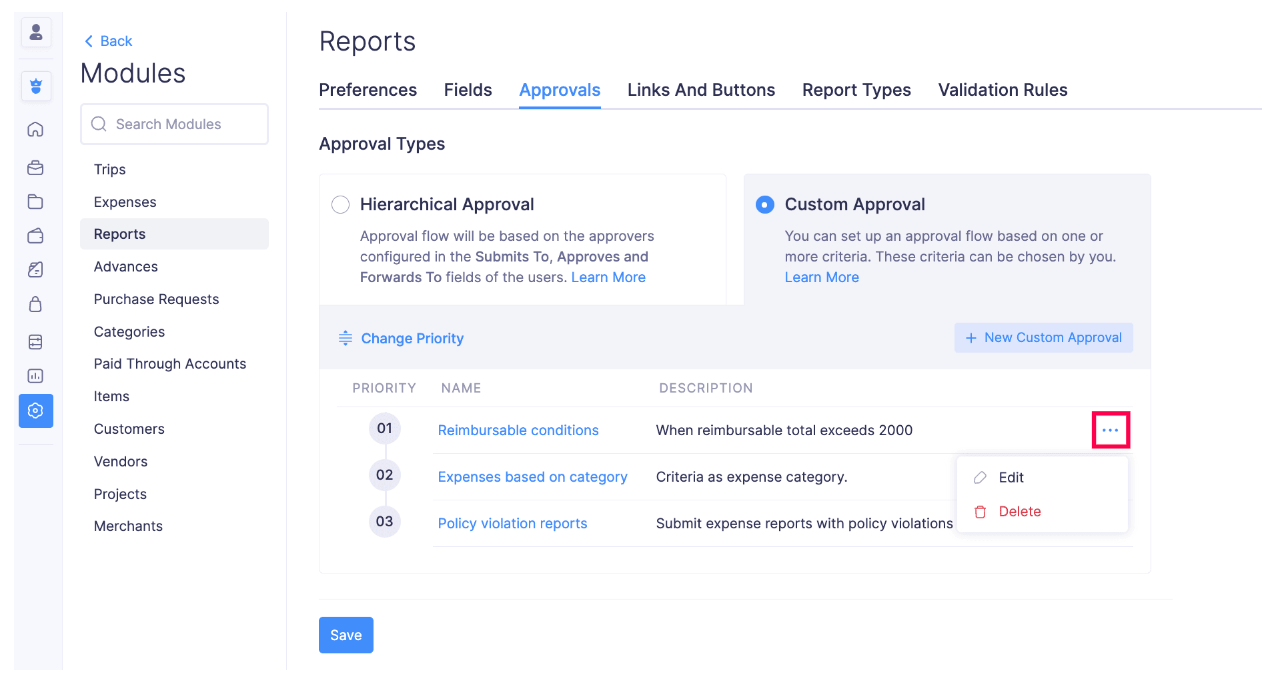
Edit or Delete an Approval Flow
You can edit or delete an existing custom approval flow. Here’s how:
- Click Admin View on the left sidebar.
- Go to Settings on the left sidebar.
(OR)
Click Settings in the top right corner of the page. - Go to Modules under Customization.
- Click the module for which you want to edit or delete a custom approval flow.
- Click the More icon at the right corner of the approval flow.
- If you want to edit the approval flow, select Edit and make the necessary changes.
- Click Save.
- If you want to delete the approval flow, click Delete.
- Confirm your action by clicking Delete again in the Delete Custom Approval Flow pop-up.
Scenarios
Let us now consider a few scenarios wherein an organization called Zylker., John, the manager, is the Admin; Mark, the employee, is the Submitter, and Susan and Cathy, the team leaders, are the Approvers. Here, Susan is assigned as the default approver for Mark, when Mark is invited to access the Zoho Expense organization.
Scenario 1: When reimbursable total exceeds 2000
John wants to set up a custom approval flow such that any reimbursable expense which exceeds USD 2000 should be directly submitted to him for approval.
In this case, John can set up a custom approval such that any report which has a reimbursable total exceeding USD 2000, automatically is submitted to him. So when Mark makes a reimbursable expense for USD 2500, the approval flow gets triggered and the report goes to John for approval, instead of Susan who is the default approver.
How can you set up this criteria ?
You can define the criteria as:
- " When the Reimbursable Total [ > ] 2000 "
Approval Flow:
- " Level 1 Approver as John (the Admin) "
So you can select the option:
Choose an approver manually to set the respective user as the Level 1 approver.
Note: Once you create an approval flow for a specific condition, you also need to create another flow which lets you specify what happens if that condition doesn’t exist. In the above example, we’ve made the policy to be triggered if the reimbursable total exceeds USD 2000. So we also need to create another policy based on the condition of the reimbursable total [ <= ] USD 2000.
Scenario 2: Expenses incurred for a particular project
Let’s consider a scenario where Mark is working on a website designing project which is led by Cathy.
While working on the project, Mark makes some expenses out of his pocket for which he creates an expense report. By default any report submitted by Mark goes to Susan for approval, but in this case we need the report to be submitted to the project head Cathy. So by selecting the criteria as “ When the project [ is ] Website Design “, the report must go to Cathy for approval and then to John for final approval. This is a case where custom approval is very useful.
How can you set up this criteria ?
You can define the criteria as:
- " When the Project [ is ] Web Design "
Approval Flow:
- " Level 1 Approver as Cathy (the Project Head) " &
- " Level 2 Approver as John "
So here, you can either select Choose an approver manually or Project Head.
Scenario 3: Submitting expenses based on category
Let’s consider another scenario where John, the admin, requires all the travel expenses to be approved by Susan, who’s in charge of all travel related expenses, before he does a final approval. In this case, we can select the criteria as Expense Category and choose the required category as Air Travel Expense.
How can you set up this criteria ?
You can define the criteria as:
- " When the Expense category [ is ] Air Travel Expense "
Approval Flow:
- " Level 1 Approver as Susan (Travel Head)" &
- " Level 2 Approver as John "
So, all the expenses under the category ‘Air Travel Expense’ would first go to Susan for approval and then to John, the admin.
Scenario 4: Submitting reports with policy violations to the admin
Let’s consider a scenario where any report containing more than 3 policy violated expenses should be directly submitted to John, the admin .
How can you set up this criteria ?
You can define the criteria as:
- " When the Total Policy Violation Count [ > ] 3 "
Approval Flow:
- " Level 1 Approver as John "
Similarly, you can set the criteria for policy violation based on:
- Receipt Policy Violation Count
- Amount Policy Violation Count
- Description Policy Violation Count
- Uncategorized Policy Violation Count
Scenario 5: When the expense report does not trigger any approval flow
In the previous scenarios, we created custom approval flow based on particular conditions. So what happens when an expense report does not satisfy any of the conditions? You can use the default approval flow for those expense reports.
For example, in the first scenario, we have created a policy for the reimbursable total exceeding USD 2000. On creating a default approval, if an expense report total is less than USD 2000, any reports [ <= ] USD 2000 would be submitted to the default approver.
How you can set up a similar criteria
You need not define a criteria. Hover over the blank criteria and click ( - ) at the right corner to remove the existing ‘When’ condition.
Approval Flow:
- Level 1 Approver as ‘Reporting to’.