
Migrar de QuickBooks a Zoho Books
Zoho Books es un potente software de contabilidad que le ayuda a gestionar su negocio de extremo a extremo. En esta guía, deseamos ayudarle a migrar sus datos de QuickBooks Online, incluidos sus clientes, cuentas, artículos y otros módulos a Zoho Books, utilizando nuestros Solución de migración de bricolaje .
Requisito previo: Usted debe tener una suscripción de pago/activa con QuickBooks Online.
Limitaciones para migrar sus datos de QuickBooks a Zoho Books
Antes de migrar sus datos QuickBooks Online a Zoho Books, itâ€TM es importante que ustedâ€TM sea consciente de las limitaciones de la migración. Entre ellas figuran las siguientes:
- No se importarán cuentas de su organización QuickBooks que tengan el mismo nombre que las cuentas predeterminadas en Zoho Books no serán importadas
- Paquete de artículos en QuickBooks se importará como Artículos compuestos solo si usted habilitar el complemento Zoho Inventory en Zoho Books.
Para leer todos los requisitos previos y limitaciones para migrar sus datos de QuickBooks a su organización Zoho Books, consulte nuestra documento de ayuda.
Pasos para migrar sus datos de QuickBooks a Zoho Books
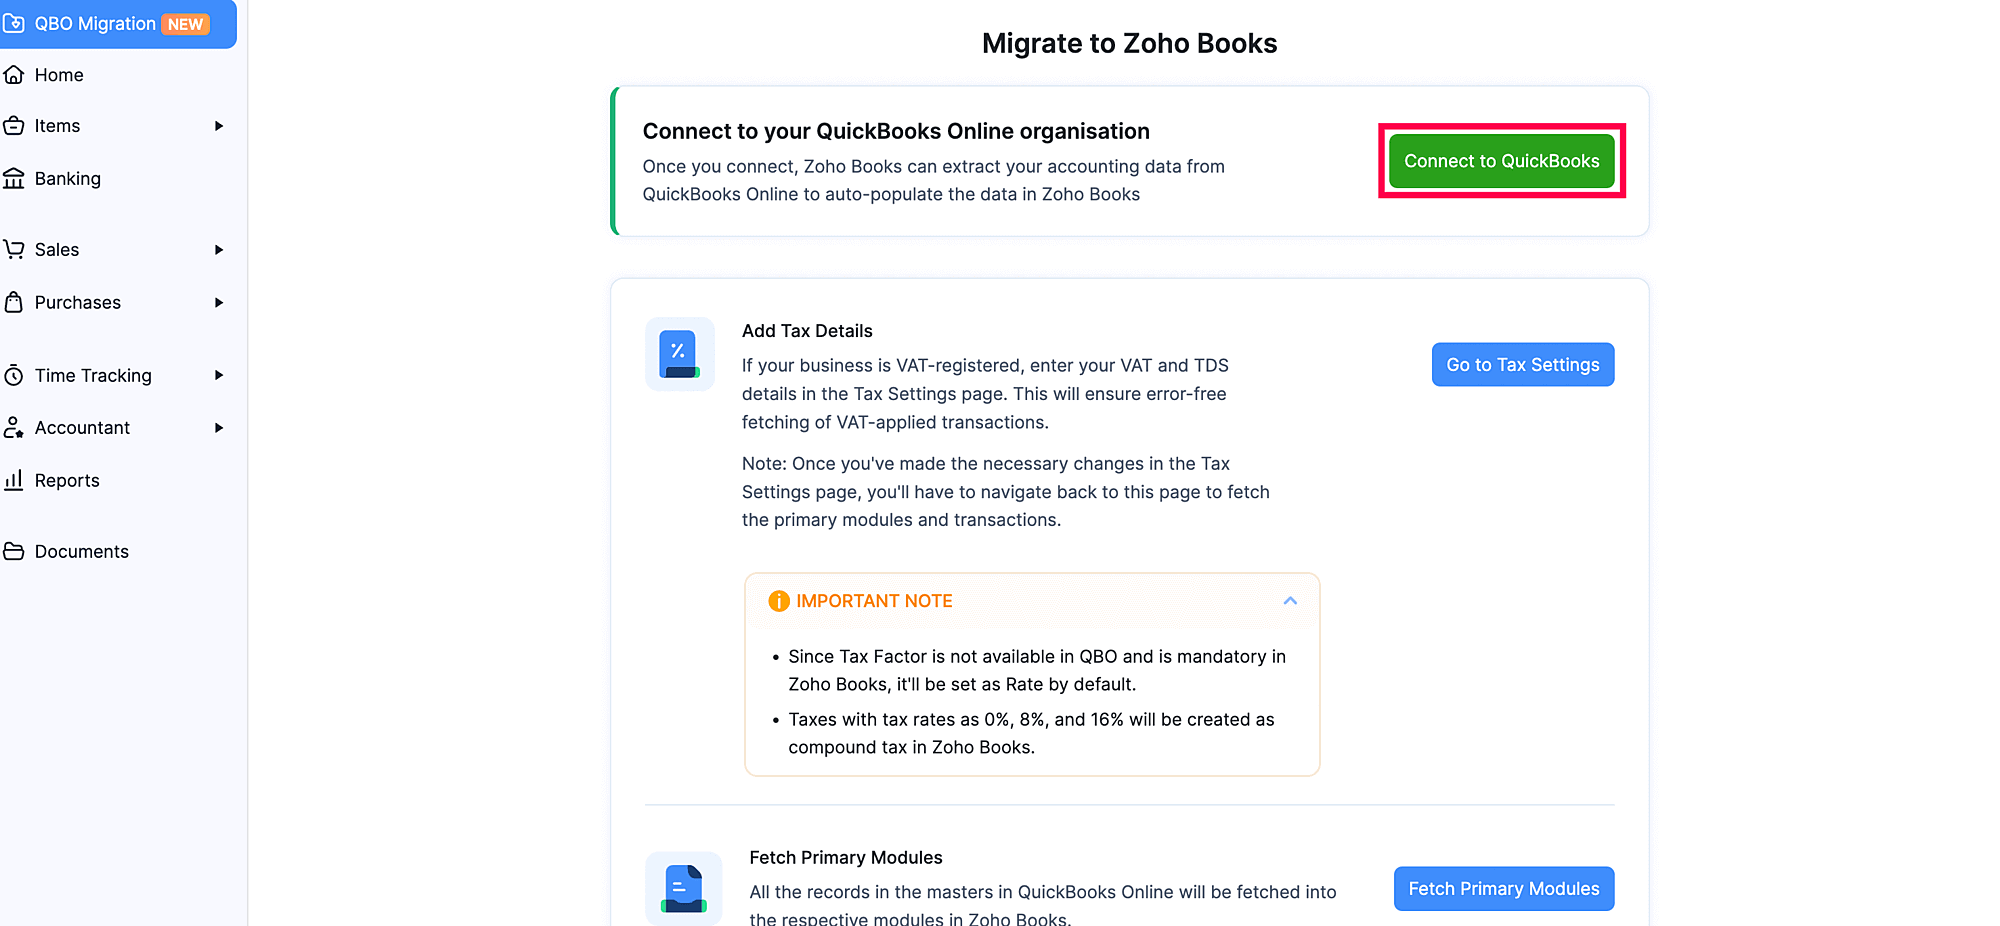
1. 1. 1. Conéctate a QuickBooks
Para migrar sus datos a Zoho Books, debe conectar su organización QuickBooks Online con su organización Zoho Books. Así es como:
- Inicie sesión en su organización Zoho Books.
- Ir a la página principal Migración QBO módulo desde la barra lateral izquierda y haga clic en Conéctate a QuickBooks .
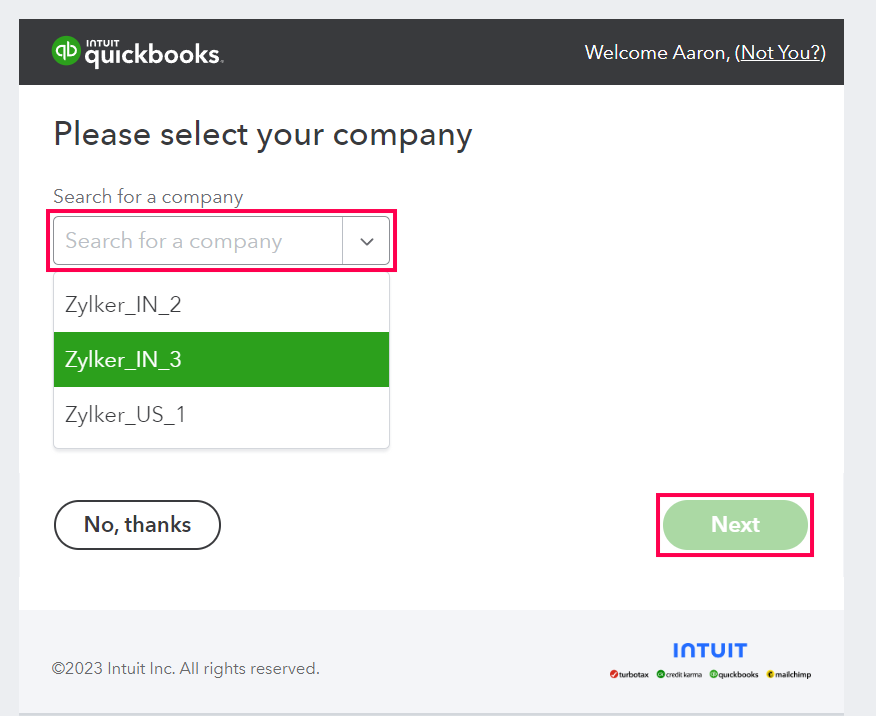
- Inicie sesión en tu cuenta de QuickBooks.
- En la siguiente página, haga clic en el Buscar una empresa desplegable y seleccione la organización QuickBooks desde la que desea migrar.
- Haga clic en Haz clic Siguiente Siguiente .
Ahora será redirigido al módulo de migración de QBO, y su organización QuickBooks estará conectada a su nueva organización Zoho Books.
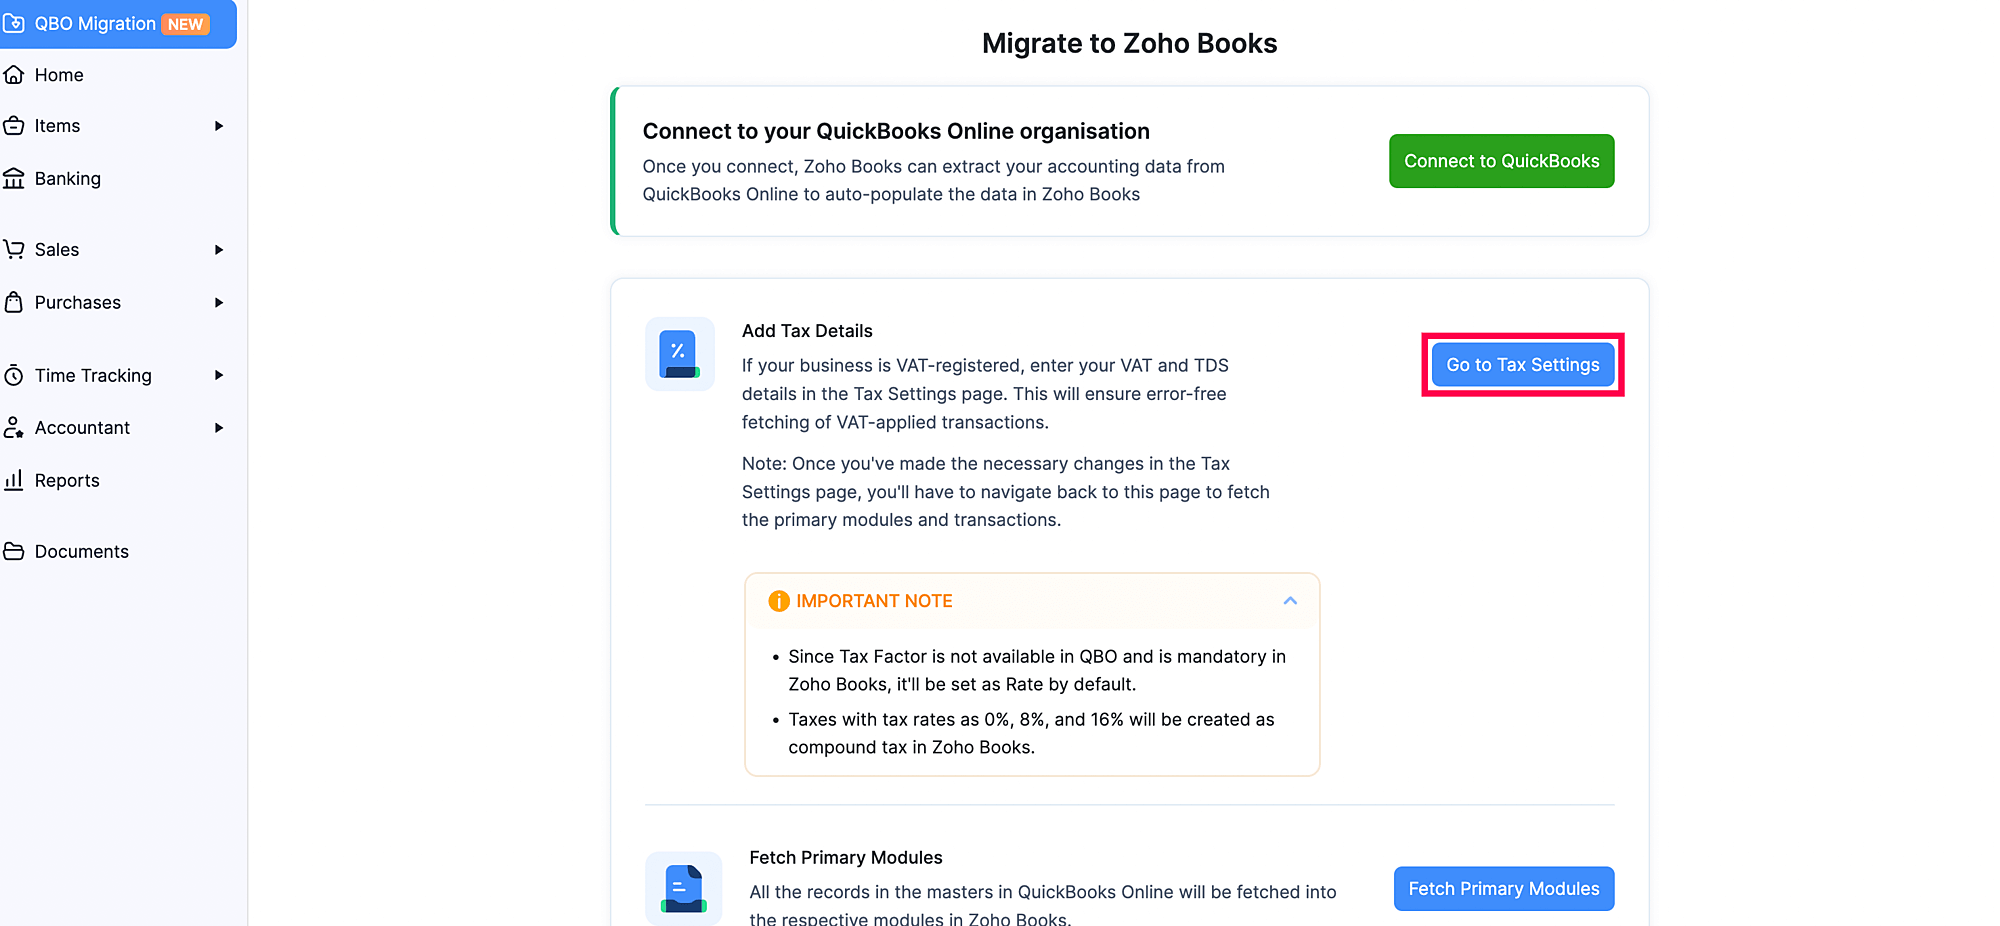
2. 2. 2. 2. Añadir detalles de impuestos
Nota: Si su negocio no está registrado para el IVA, puede omitir esta sección y proceder a la Módulos primarios Fetch sección.
Si su negocio está registrado para el IVA, puede agregar sus datos de IVA en Zoho Books. Así es como:
- Ir a la página principal Migración QBO módulo en la barra lateral izquierda.
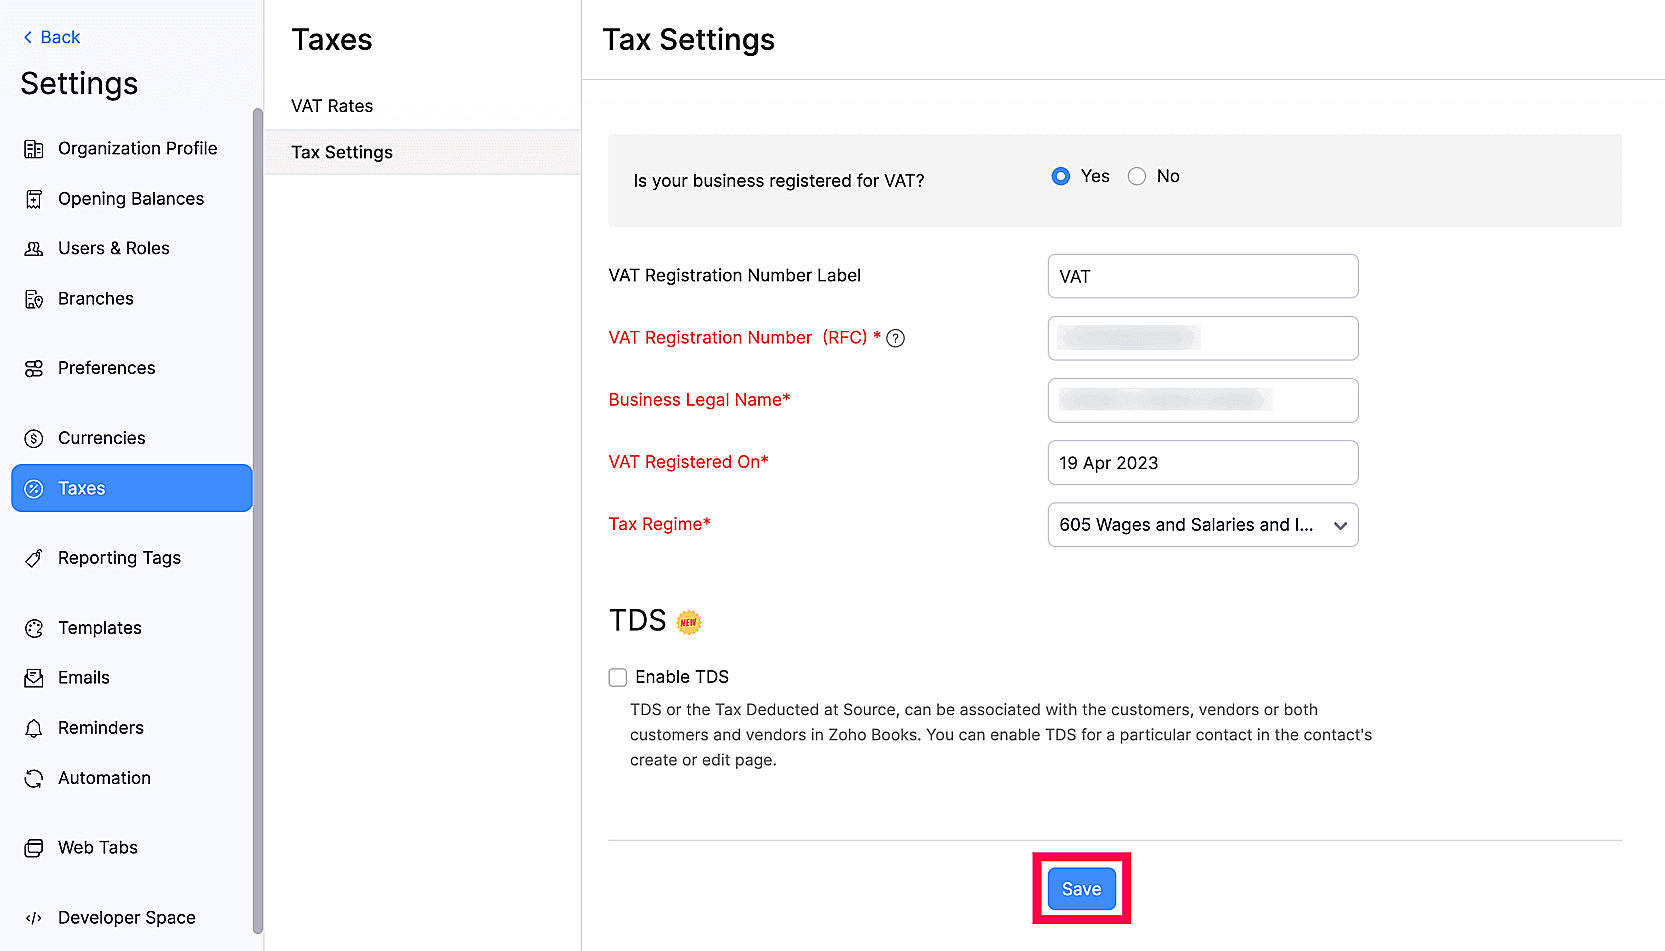
- En el Añadir detalles de impuestos sección, haga clic en Ir a Configuración de impuestos .
- En el Configuración de impuestos página, introduzca sus datos de IVA.
- Haga clic en Haz clic Guardar .
Una vez que haya configurado sus impuestos, vaya a la Módulo de migración QBO para obtener sus módulos primarios.
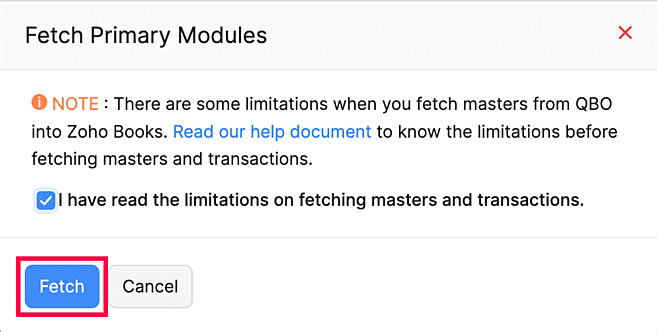
3. 3. 3. 3. Módulos primarios Fetch
Una vez que configure sus preferencias, debe obtener sus datos, incluidos sus elementos, contactos, proveedores y gráficos de cuentas, en Zoho Books. Así es como:
- Ir a la página principal Migración QBO módulo en la barra lateral izquierda.
- Haga clic en Haz clic Módulos primarios Fetch .
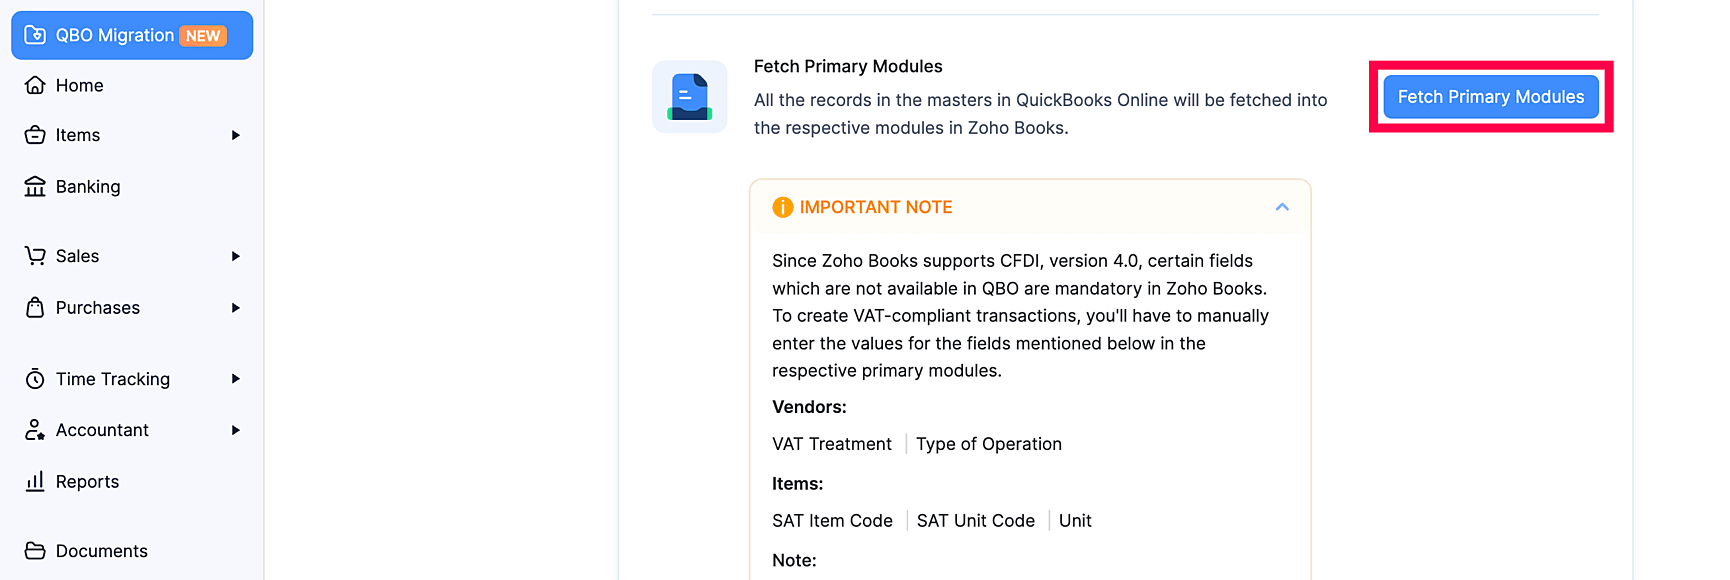
- En la ventana emergente, revisa el He leído las limitaciones para buscar maestros y transacciones caja.
- Haga clic en Haz clic Fetch .
Esto obtendrá todos sus módulos principales en su organización Zoho Books.
Una vez obtenidos sus módulos principales, recibirá una notificación de confirmación en la aplicación.
- Si se enfrenta a errores al buscar módulos primarios, descargue los registros fallidos como un archivo ZIP haciendo clic Descargar registros fallidos y resolver los errores.
- Una vez que haya resuelto todos los errores, haga clic en Cargar archivos importar los registros fallidos a Zoho Books.
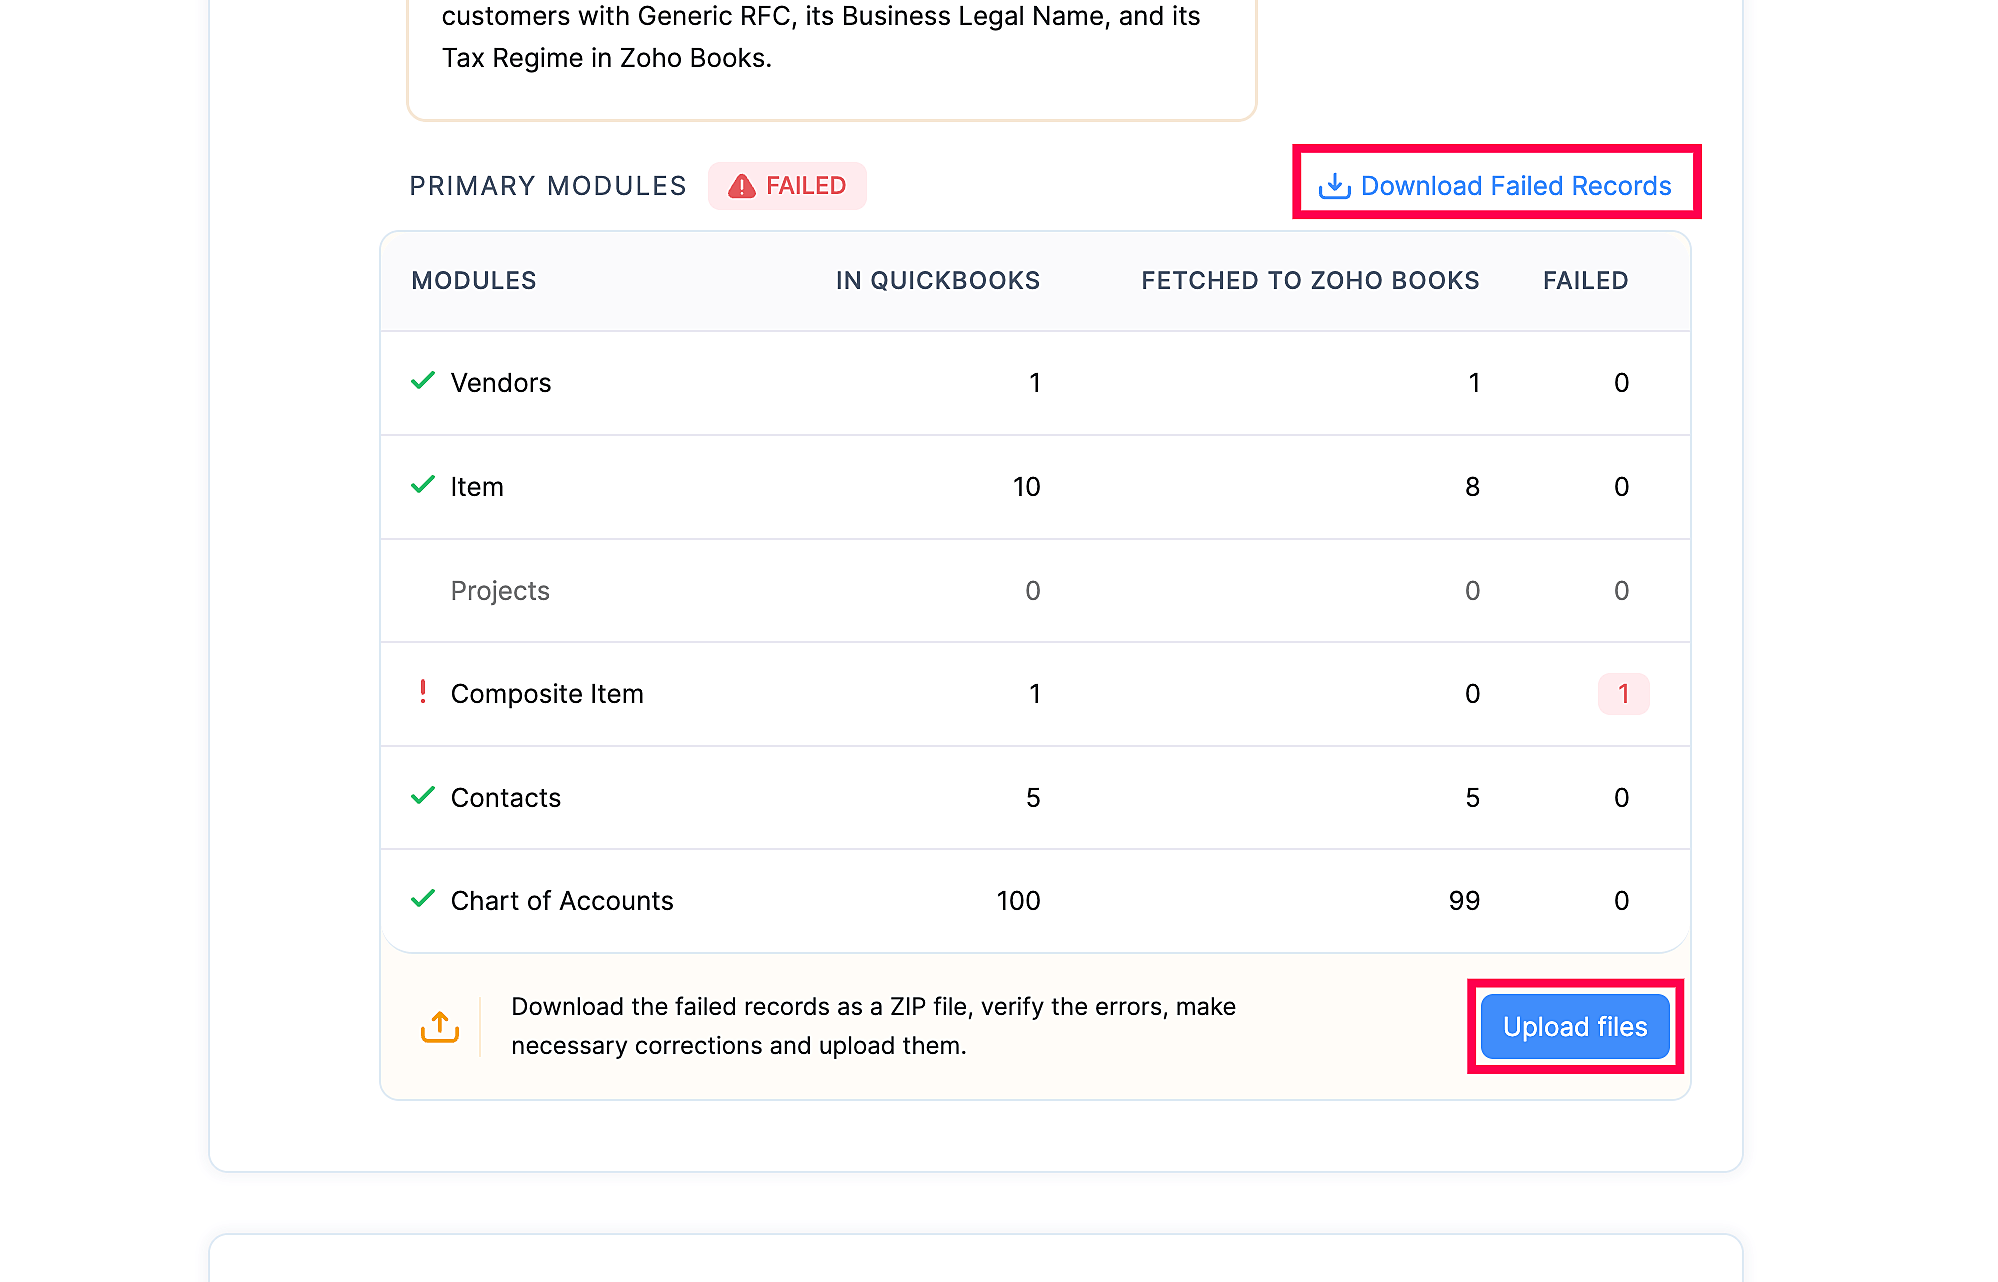
Los módulos obtenidos en esta sección son:
- Artículos
- Clientes
- Proveedores
- Gráfico de cuentas
4. 4. 4. 4. Fetch Transacciones
Después de obtener sus módulos principales, debe obtener sus transacciones de ventas y compra de su organización QuickBooks. Así es como:
- Ir a la página principal Migración QBO módulo en la barra lateral izquierda.
- Haga clic en Haz clic Fetch Transacciones .
- En la ventana emergente, seleccione la fecha desde la que desea importar sus transacciones a Zoho Books y haga clic en Fetch .
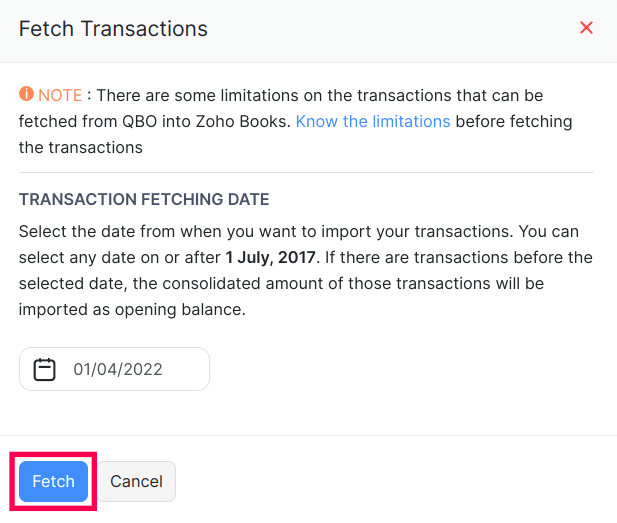
Esto obtendrá todas sus transacciones en su organización Zoho Books.
Una vez obtenidas sus transacciones, recibirá una notificación de confirmación en la aplicación.
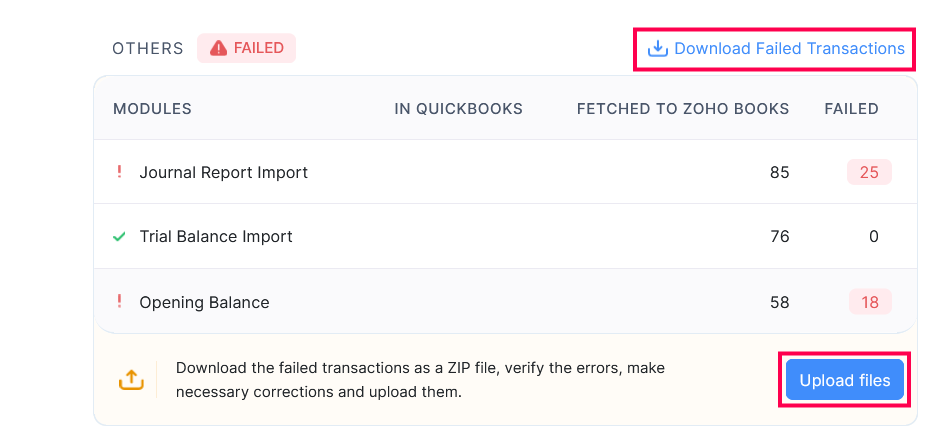
Nota: Puede obtener transacciones en Zoho Books solo después de resolver los errores y subir los archivos actualizados bajo Módulos primarios Fetch .
- Si se enfrenta a errores al buscar transacciones, descargue las transacciones fallidas como un archivo ZIP haciendo clic Descargar Transacciones fallidas y resolver los errores.
- Una vez que haya resuelto todos los errores, haga clic en Cargar archivos importar las transacciones fallidas a Zoho Books.
Los módulos obtenidos bajo Transacciones de compra son:
- Gastos
- Gastos recurrentes
- Órdenes de compra
- Facturas de facturas
- Pagos realizados
- Facturas recurrentes
- Créditos de proveedores
Los módulos obtenidos bajo Transacciones de ventas son:
- Cotizaciones
- Órdenes de venta
- Facturas
- Pagos recibidos
- Facturas recurrentes
- Notas de crédito
Los módulos obtenidos bajo Otros son:
- Importación de informe de diario
- Importación de saldo de prueba
- Saldo de apertura
5. 5. 5. 5. Obtenga los archivos adjuntos de su transacción {#5.-Fetch-your-Transaction’s-Attachments}
Después de obtener sus transacciones en Zoho Books, debe obtener los documentos adjuntos a diferentes transacciones de su organización QuickBooks. Así es como:
- Ir a la página principal Migración QBO módulo en la barra lateral izquierda.
- Haga clic en Haz clic Obtenga los archivos adjuntos de su transacción .
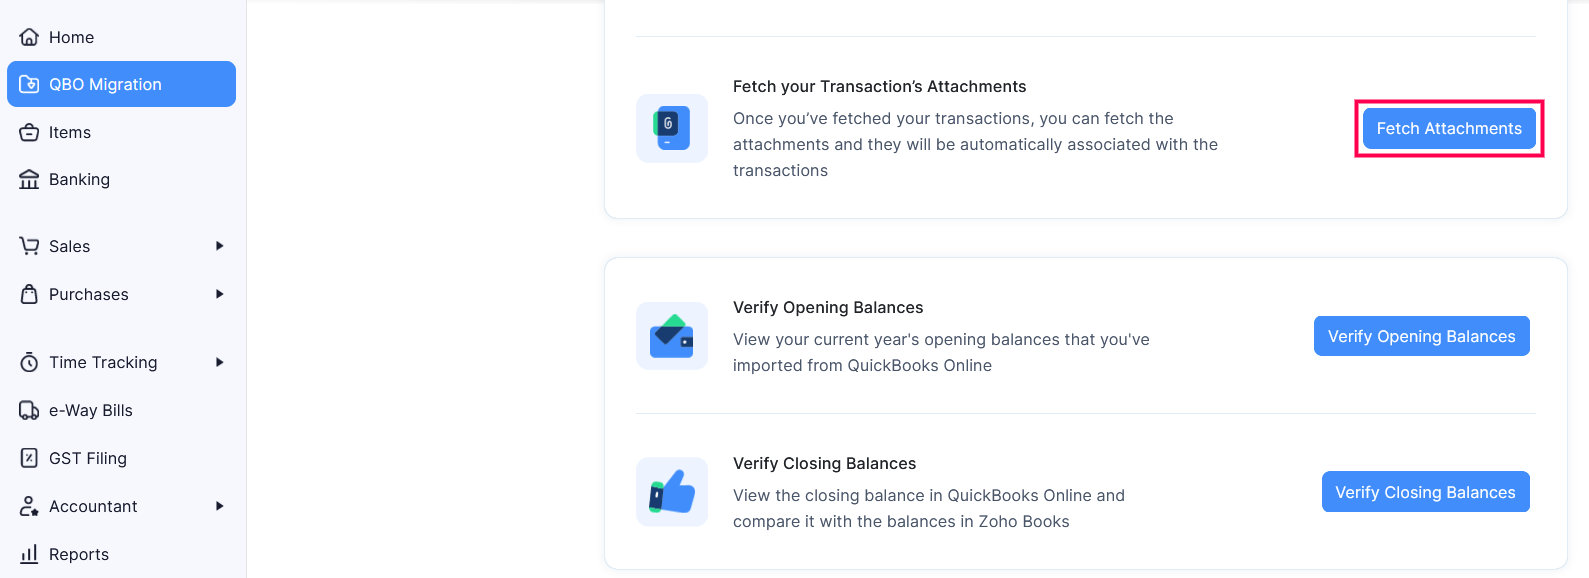
Esto obtendrá todos sus archivos adjuntos en Zoho Books.
Una vez obtenidos sus archivos adjuntos, recibirá una notificación de confirmación en la aplicación.
Nota: Puede obtener los archivos adjuntos de su transacción en Zoho Books solo después de resolver los errores y subir los archivos actualizados bajo Fetch Transacciones .
- Si sus archivos adjuntos tienen errores, descargue los archivos adjuntos fallidos haciendo clic Descargar detalles del archivo adjunto fallido y verificar los errores.
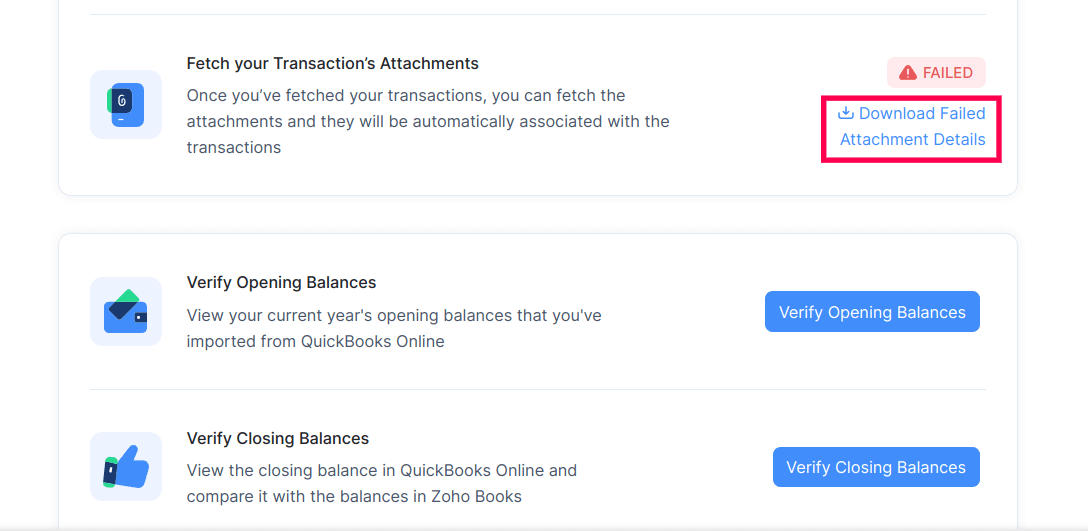
- Los archivos adjuntos con errores se almacenarán en el Documentos módulo y debe ser adjuntas a transacciones manualmente .
6. 6. 6. Verificar los saldos de apertura
Los saldos de apertura en Zoho Books son los saldos finales de diferentes cuentas de su organización QuickBooks Online.
Para verificar los saldos de apertura del año en curso que ha importado de su organización QuickBooks Online:
- Inicie sesión en su organización Zoho Books.
- Seleccione el Migración QBO módulo desde la barra lateral izquierda y haga clic en Verifique los saldos de apertura.
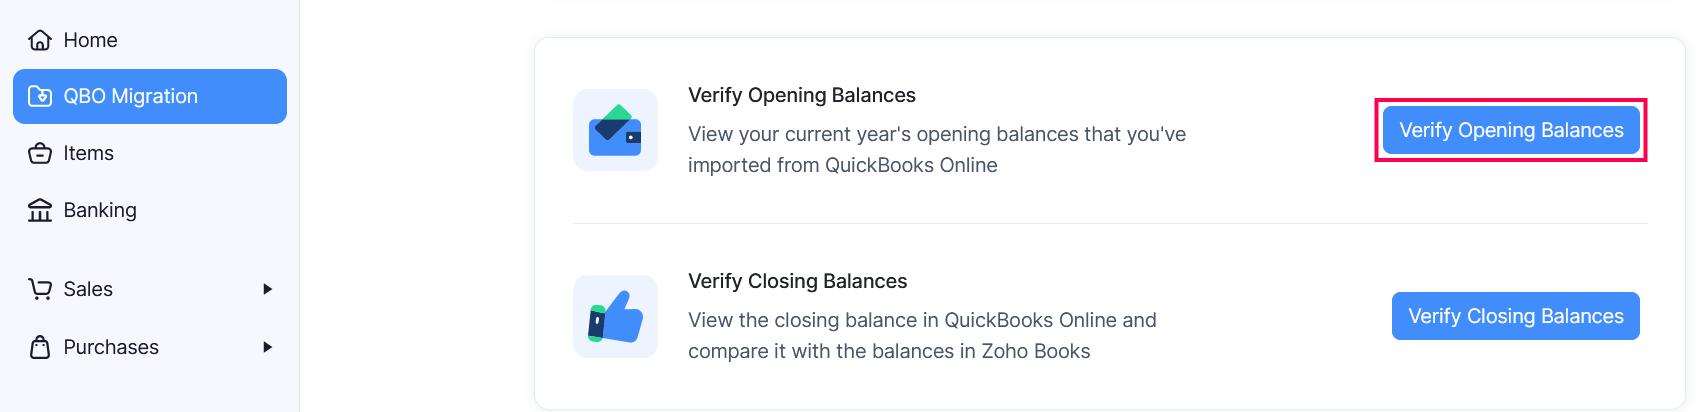
Serás redirigido a la Saldos de apertura módulo bajo Configuración donde los saldos de apertura de todas las cuentas predeterminadas se activarán automáticamente.
- Verifique los saldos de apertura de cada cuenta y haga clic en Continuar en la parte inferior de la página.
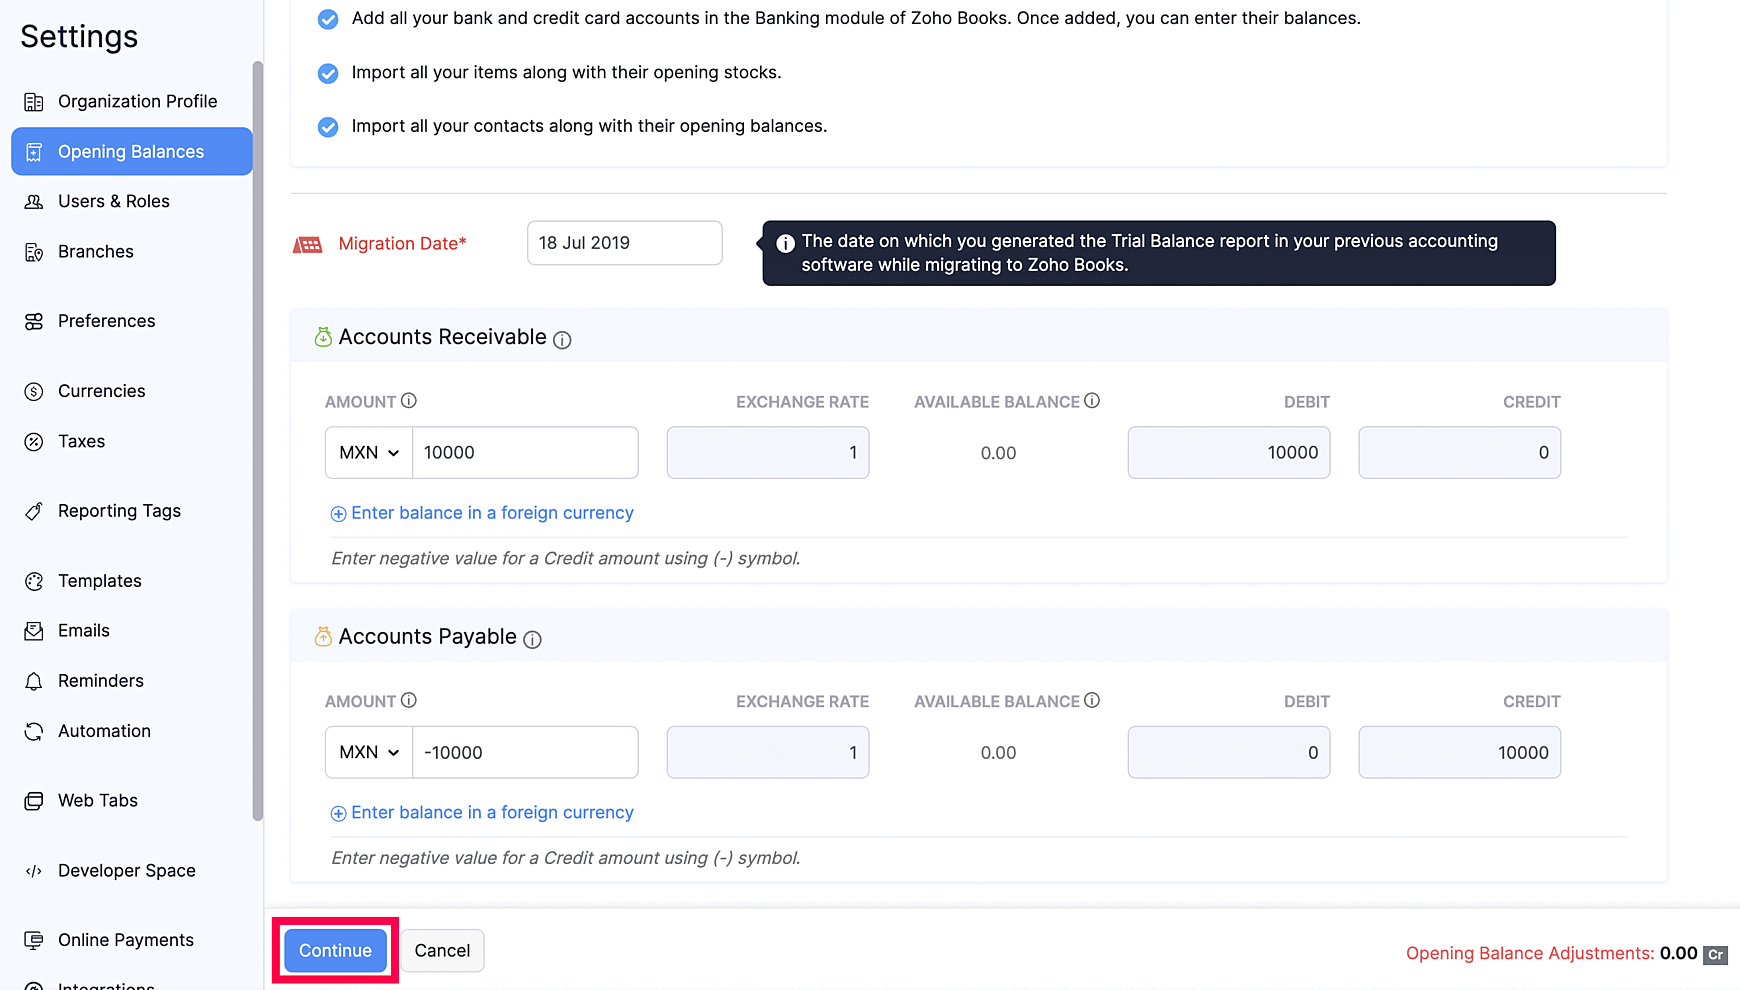
Nota: Los Fecha de migración será la fecha que seleccione como el Fecha de obtención de transacciones en la ventana emergente Fetch Transactions. Sus saldos de apertura se calcularán sobre la base de las transacciones registradas en su organización QuickBooks antes de la fecha de migración. Una vez que haga clic Continuar , no podrá modificar el saldo de apertura cambiando manualmente la fecha de migración.
Puede actualizar manualmente los saldos de apertura de una cuenta en Zoho Books en cualquier momento. Aprenda cómo .
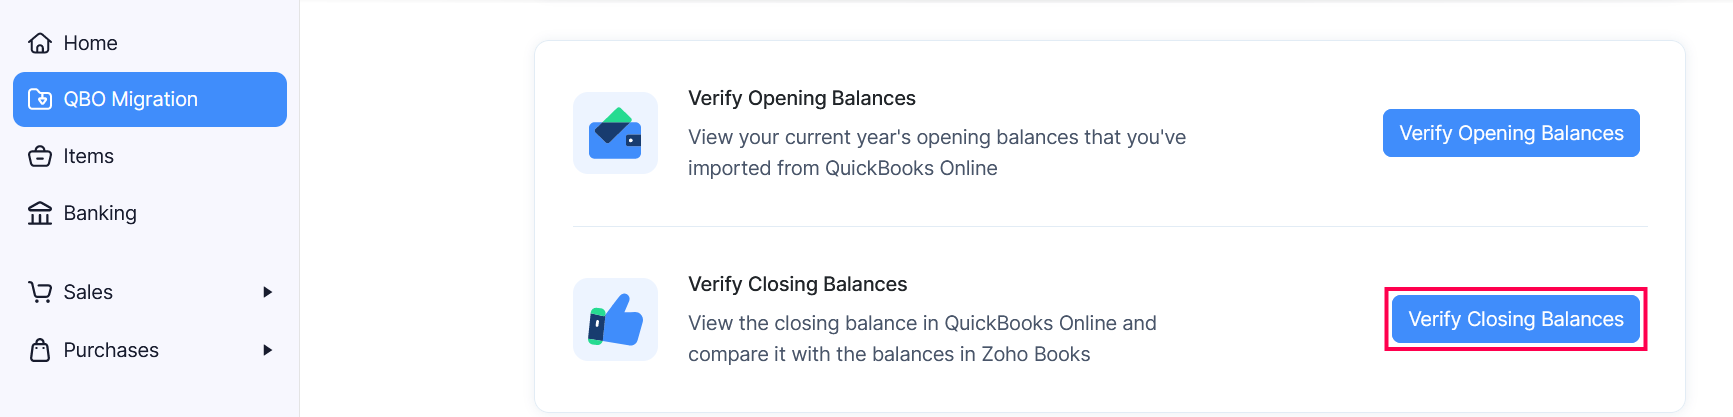
7. 7. 7. 7. Verificar saldos de cierre
Debe verificar sus saldos de cierre para comprobar si los saldos de cierre calculados por QuickBooks Online y Zoho Books son los mismos. Así es como:
- Inicie sesión en su organización Zoho Books.
- Seleccione el módulo de migración QBO en la barra lateral izquierda y haga clic en Verificar saldos de cierre .
En la siguiente página verá un resumen del saldo de cierre en Zoho Books, QuickBooks y la diferencia neta en los saldos de cierre.
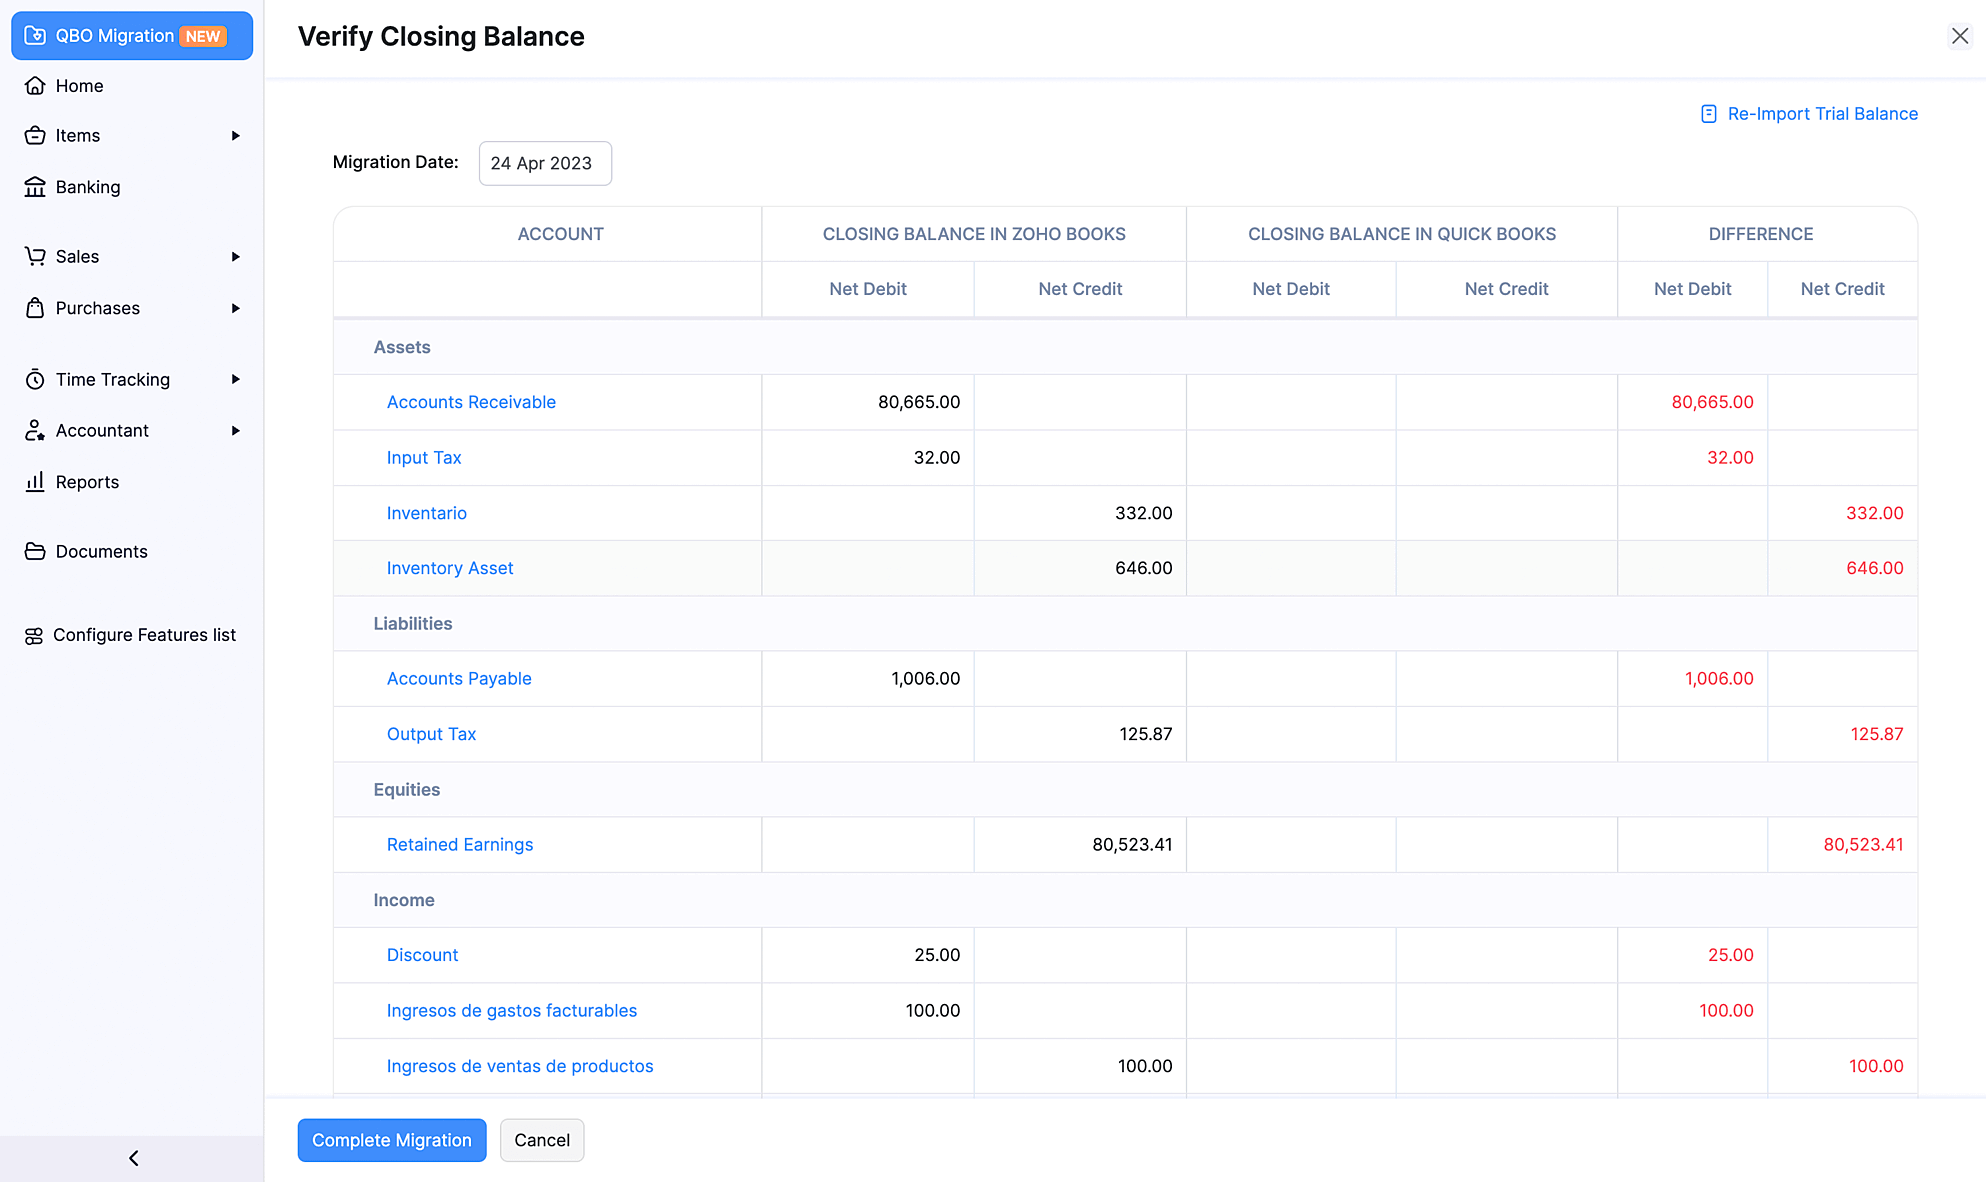
Al seleccionar una cuenta, puede ver todas las transacciones registradas en Zoho Books y las importadas de QuickBooks.
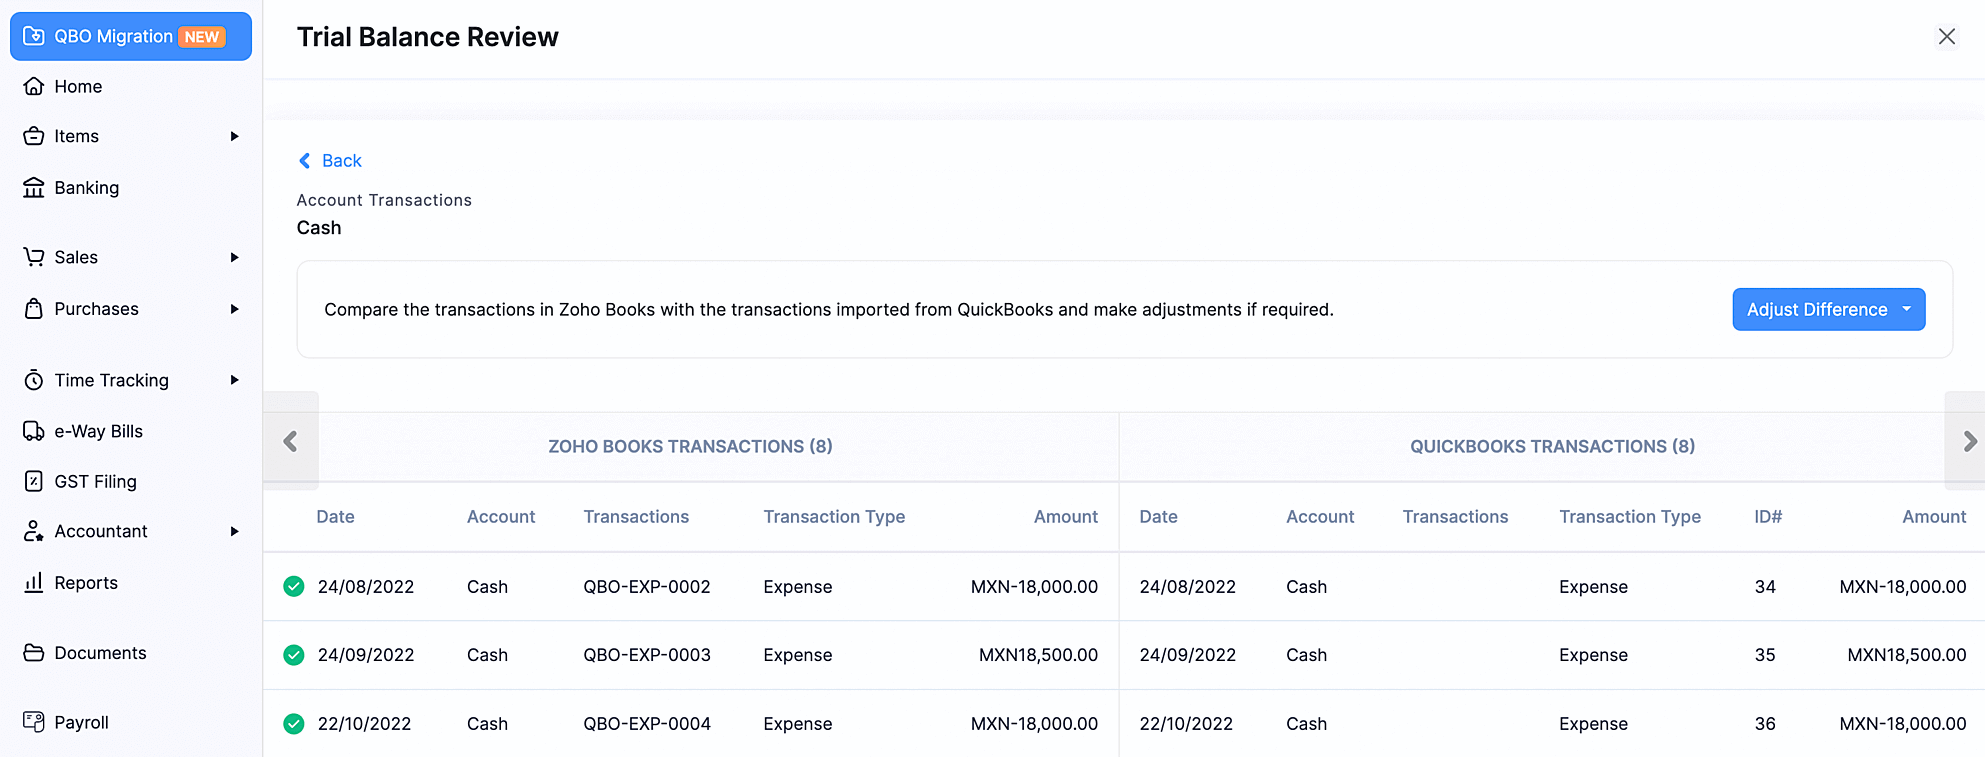
Asegúrese de que no haya desajuste entre las transacciones registradas en Zoho Books para esa cuenta y las transacciones importadas de QuickBooks Si hay un desajuste, haga clic en el Ajuste la diferencia desplegable en la esquina superior derecha de la página y:
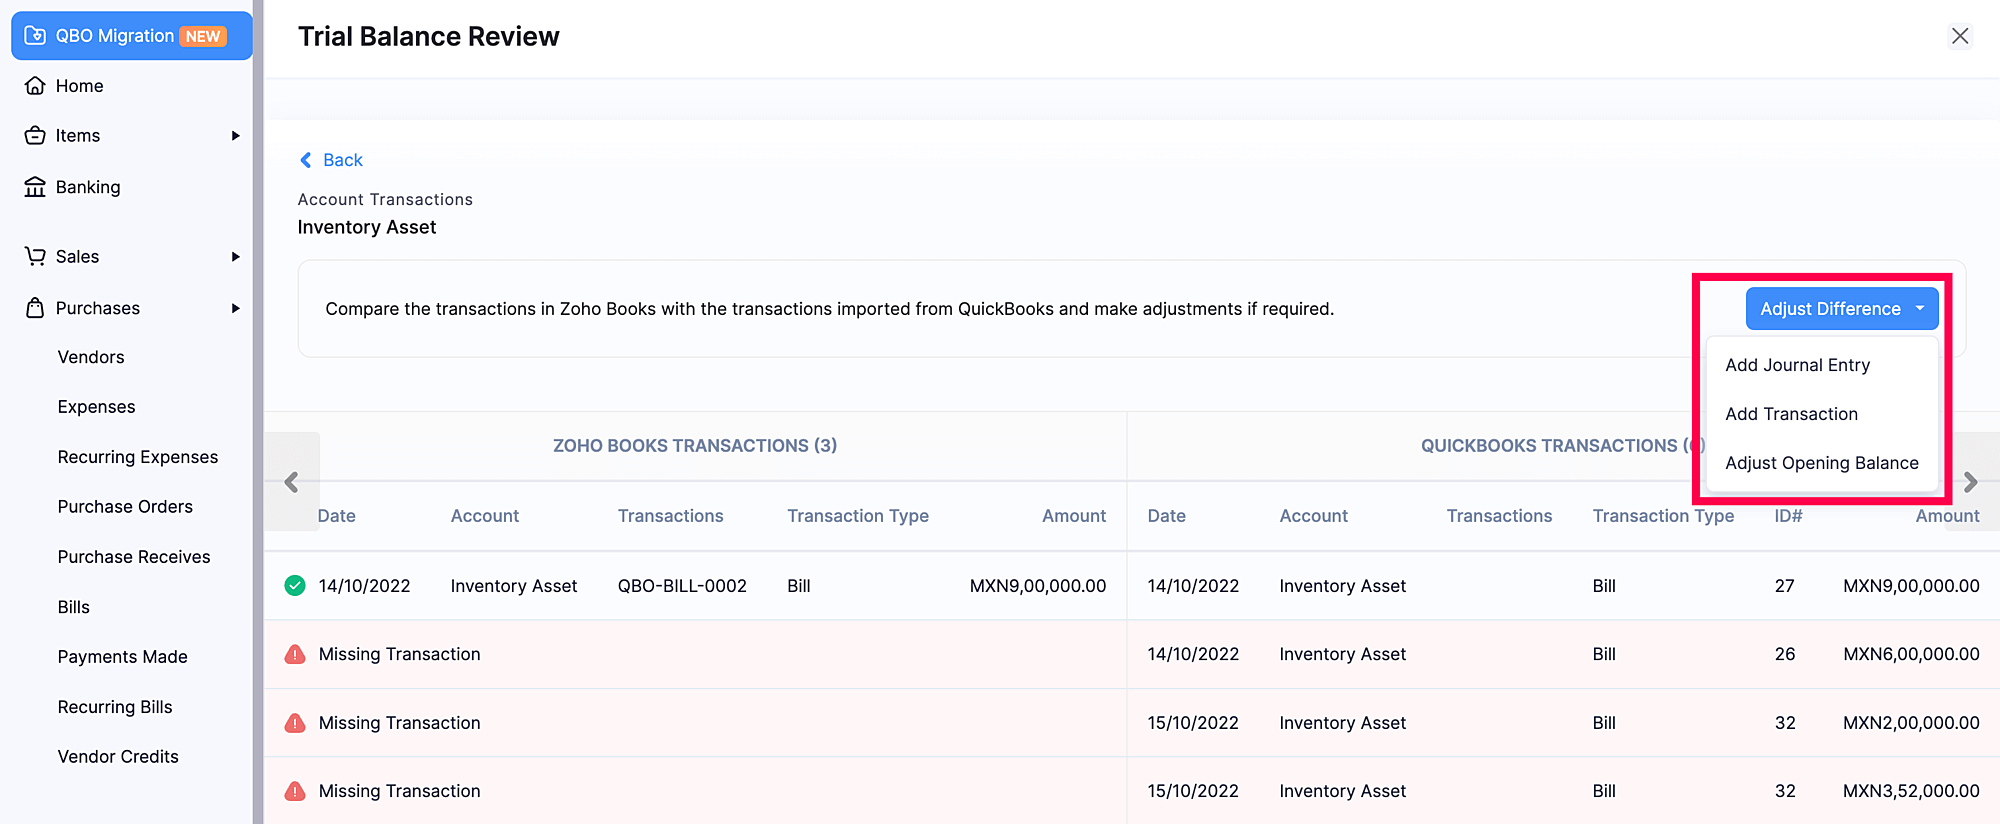
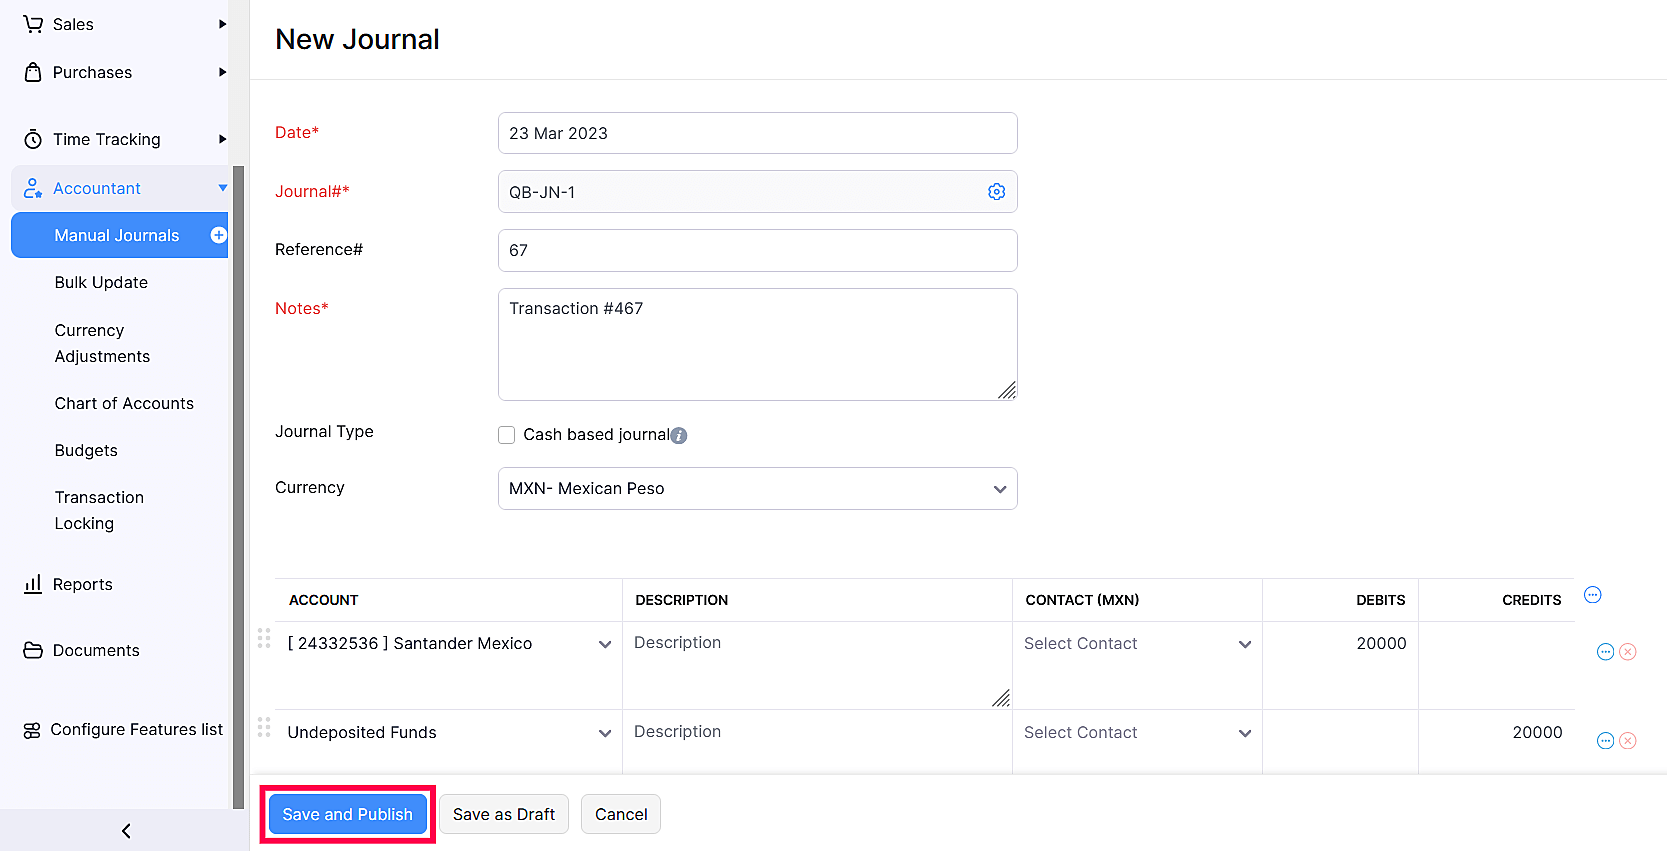
Seleccione Entrada del diario si quieres crear una revista manual en Zoho Books para ajustar la diferencia.
- En el Nueva revista página, ingrese el Fecha en el que creó la entrada de la revista en su organización QuickBooks.
- Introduzca el Número de referencia a la que se asociará la revista.
- En el Notas campo, ingrese la razón para crear la entrada de la revista.
- Comprobar el Tipo de diario como Diario basado en efectivo si ajustó la diferencia en efectivo.
- Seleccione la moneda en la que se realizó la entrada del diario desde el Moneda desplegable.
- Seleccione la cuenta desde la que se carga la cantidad y una cuenta a la que se acredita la cantidad.
- Elija el contacto al que desea asociar a la entrada del diario.
- Introduzca el Débito y Crédito cantidad que debe registrarse. Asegúrese de que la cantidad adeudada sea igual al monto acreditado.
- Haga clic en Haz clic Guardar y publicar .
Consulte nuestro documento de ayuda en Revistas manuales para más información.
Seleccione Añadir transacción si quieres crear una transacción en Zoho Books para ajustar la diferencia.
- Serás redirigido a la Nueva factura página donde puede crear una nueva factura para ajustar la diferencia.
- Haga clic en Haz clic Ventas en la barra lateral izquierda si desea crear un presupuesto, orden de venta, factura o nota de crédito.
- Haga clic en Haz clic Compras en la barra lateral izquierda si desea crear un gasto, factura, orden de compra o crédito del proveedor.
- Haga clic en el + + + + botón al lado del módulo. En la página de creación, introduzca los detalles requeridos.
- Introduzca la fecha de transacción como la fecha en que creó la transacción en su organización QuickBooks.
- Haga clic en Haz clic Guardar .

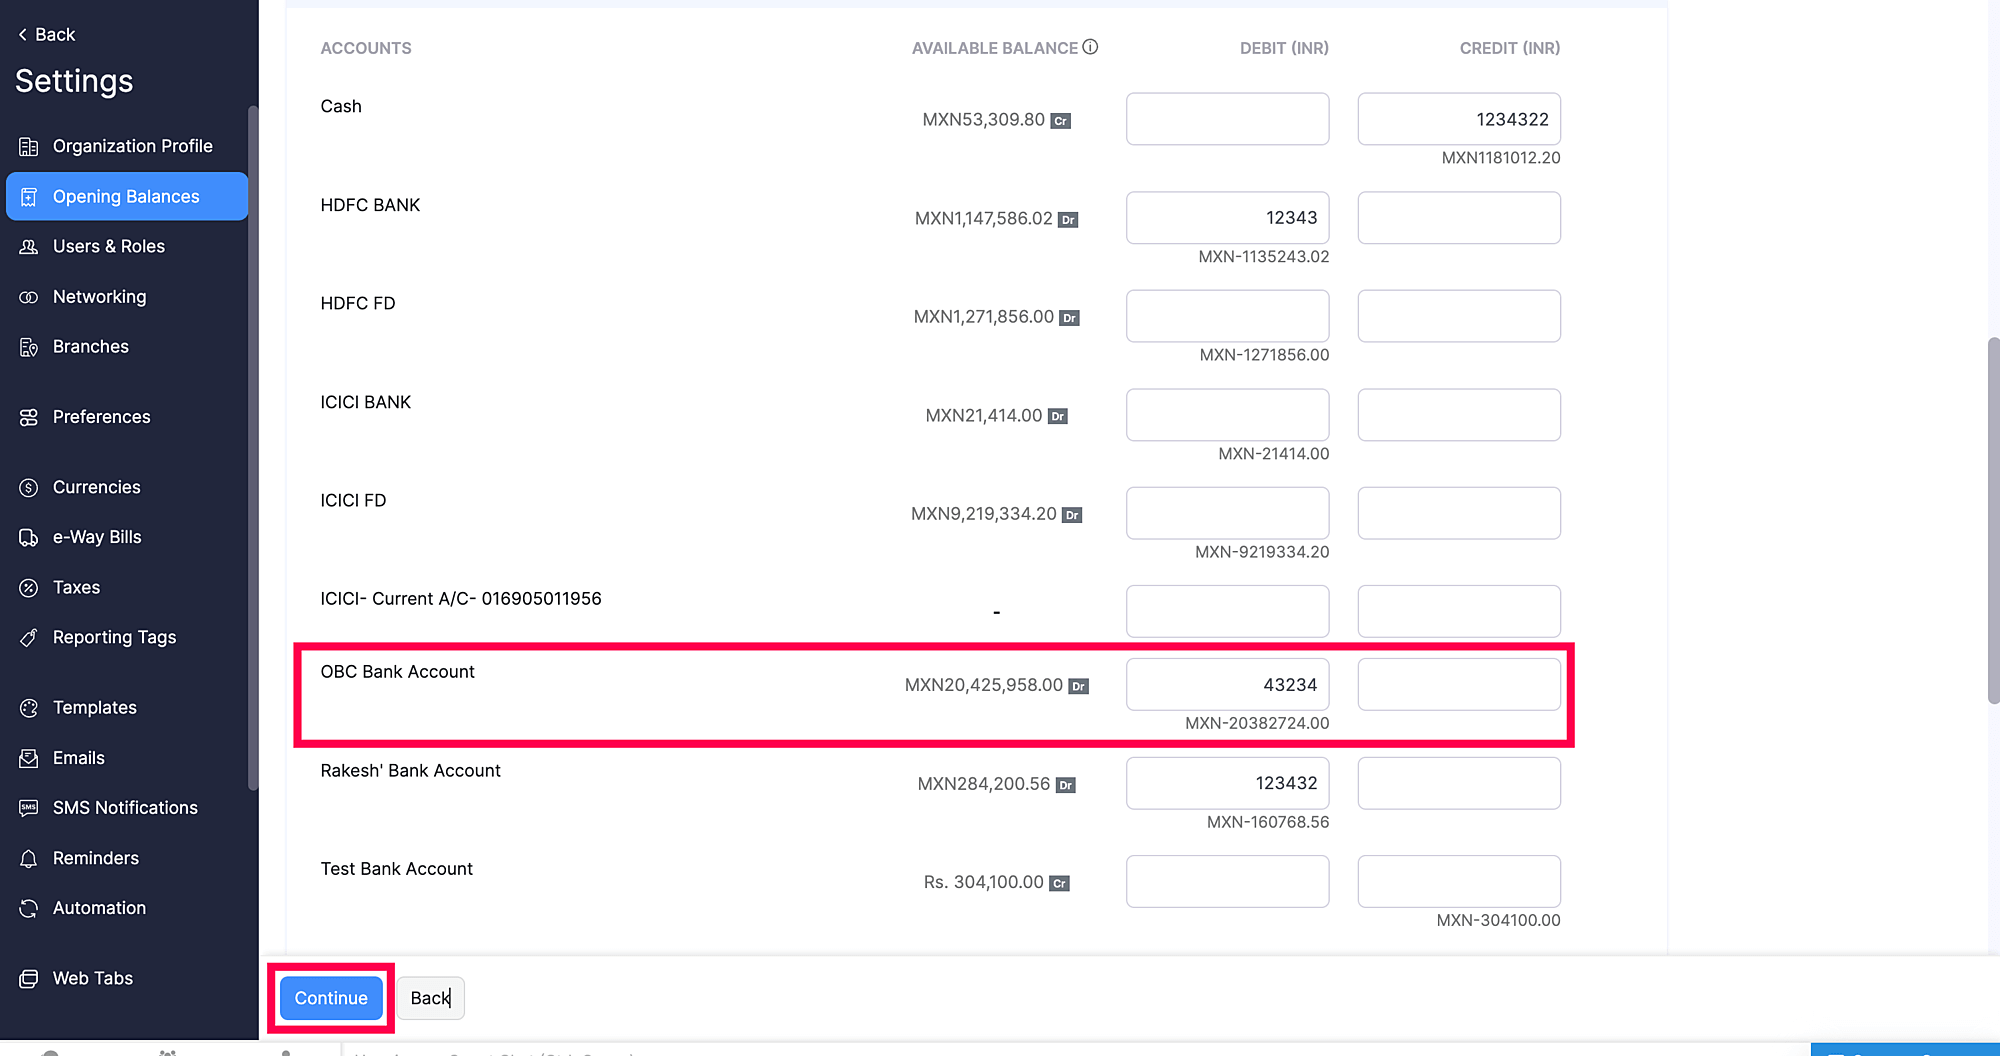
Seleccione Ajuste el saldo de apertura si desea ajustar el saldo inicial registrado en Zoho Books para ajustar la diferencia.
- En el Saldos de apertura página, seleccione la cuenta para la que desea ajustar el saldo de apertura.
- Introduzca el Débito y Crédito saldo para esa cuenta.
- Haga clic en Haz clic Continuar .
Consulte nuestro documento de ayuda en Saldos de apertura para más información.
Si el saldo de prueba que importó es incorrecto, puede cambiarlo. Así es como:
- Haga clic en Haz clic Reimportar el saldo de prueba en la esquina superior derecha de la Verificar el saldo de cierre página.
- Serás redirigido a la Importar Saldo de prueba e informe diario página donde puede importar el saldo de prueba correcto.
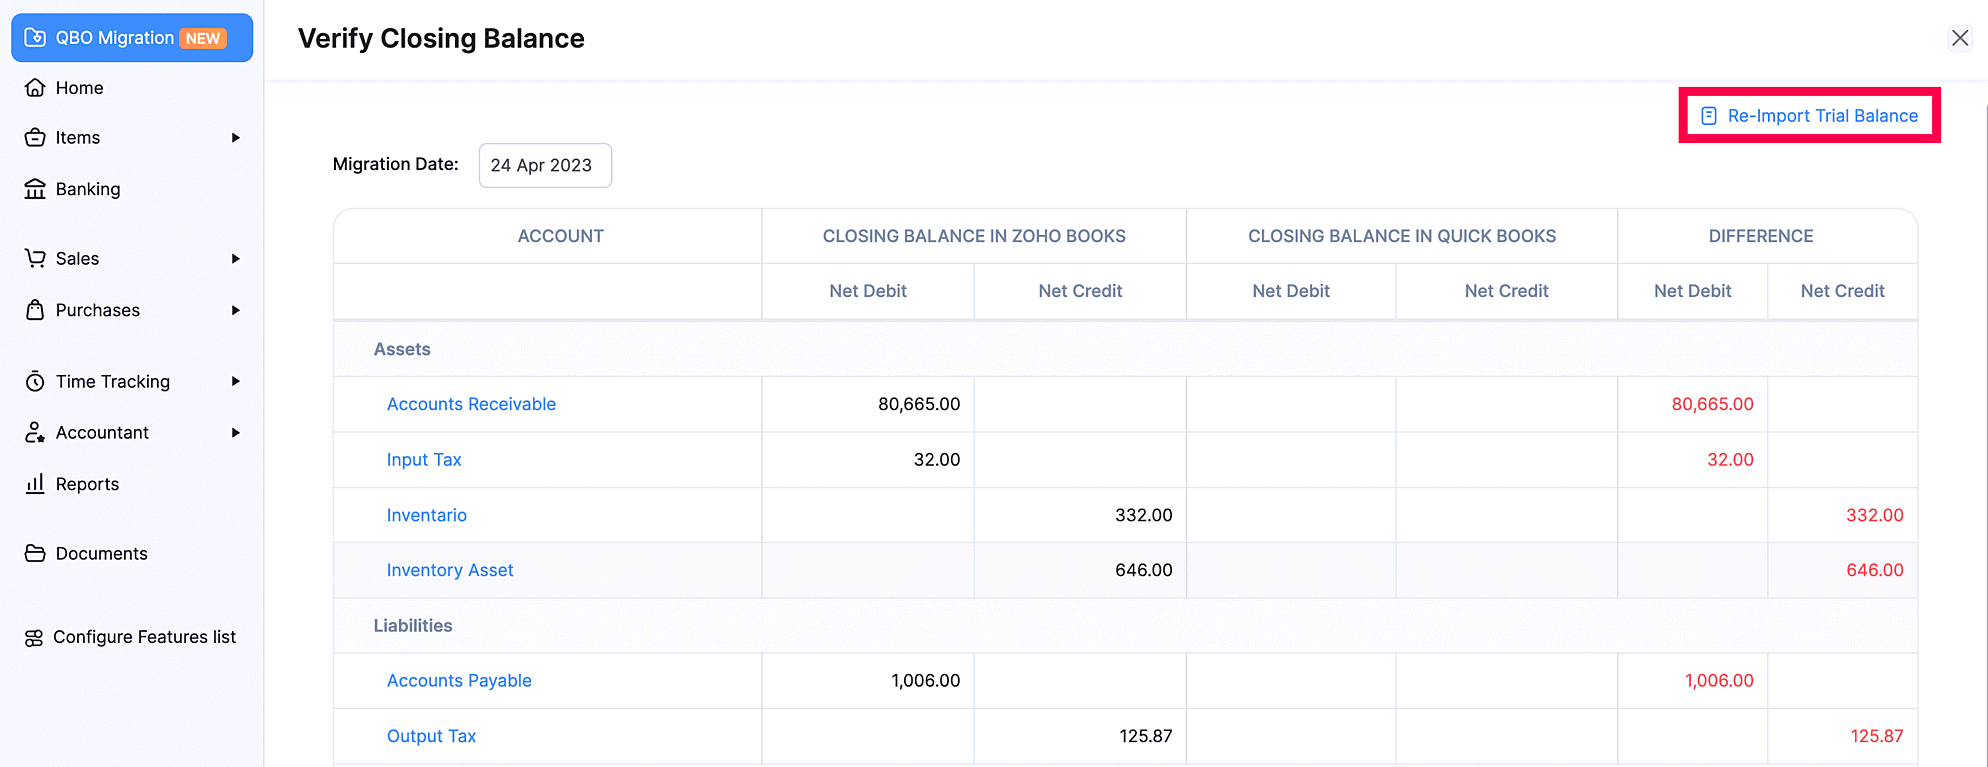
Después de importar el saldo de prueba y verificar los saldos de cierre, asegúrese de que la diferencia neta en el saldo de cierre en Zoho Books y el saldo de cierre en QuickBooks sea cero para todas las cuentas.
- Siguiente, haga clic en Migración completa en la parte inferior de la página.
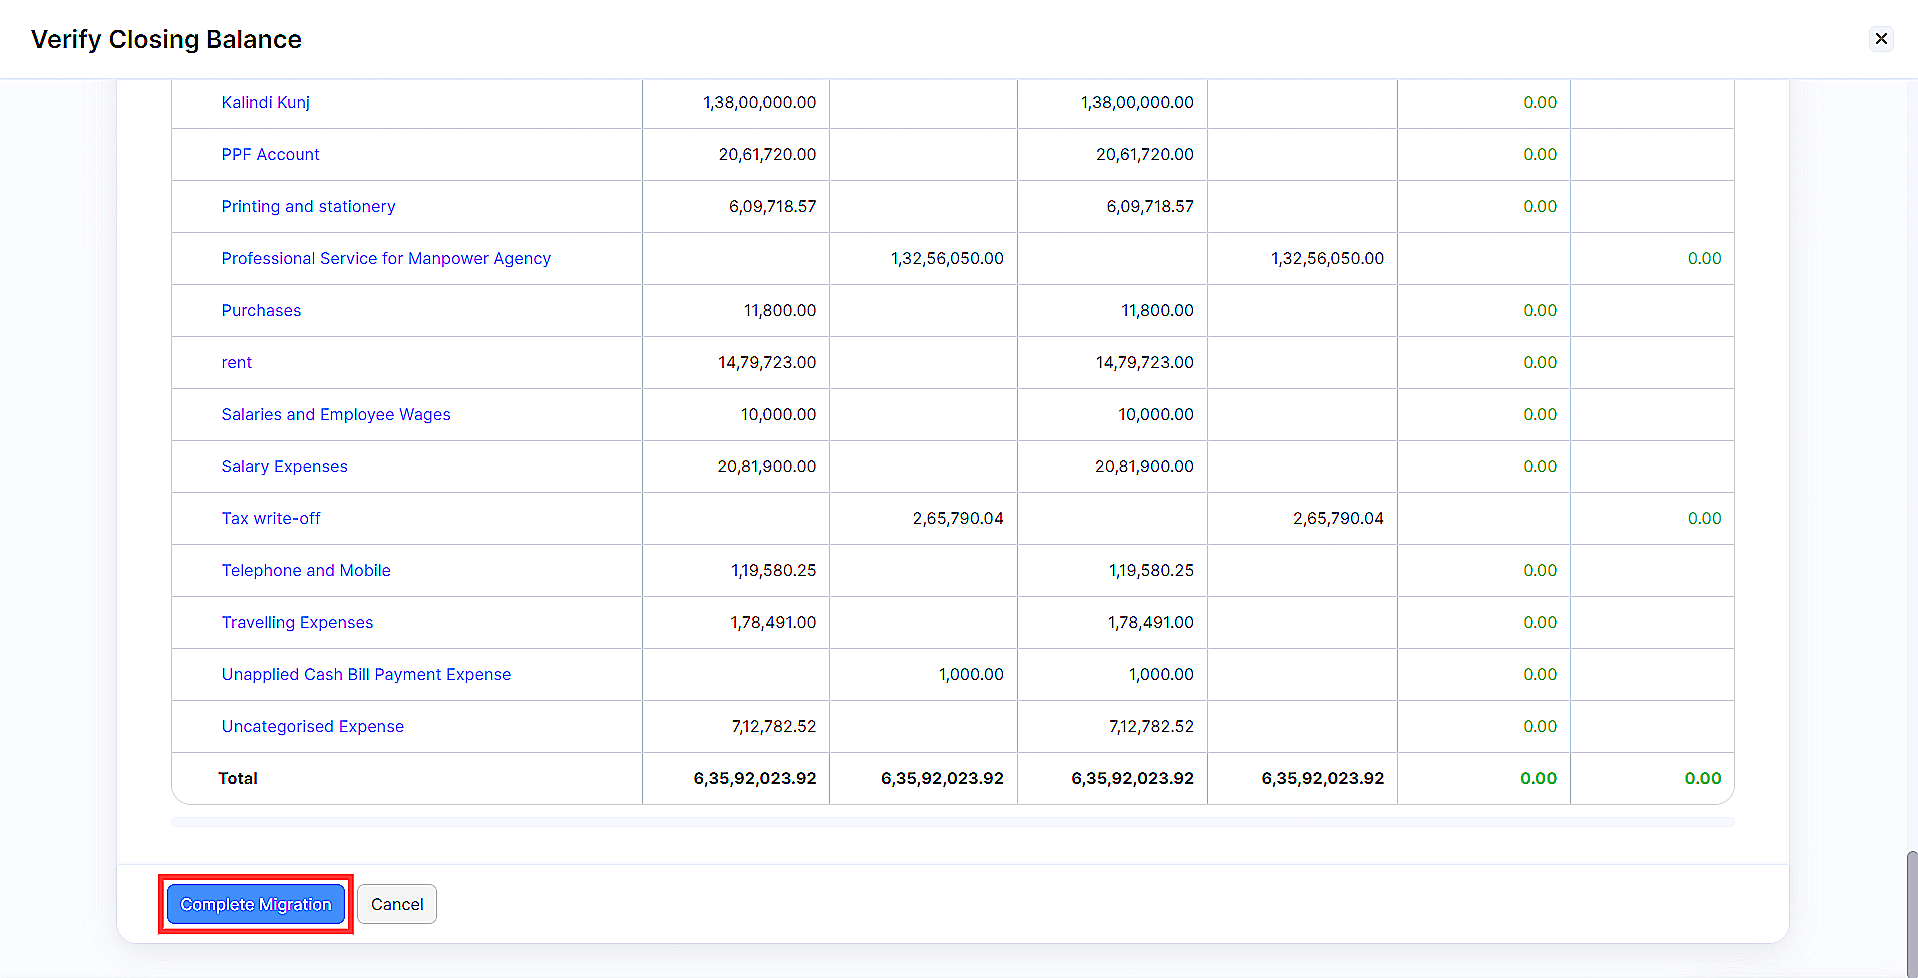
Esto completará el proceso de migración y puede comenzar a usar Zoho Books para gestionar la financiación de su negocio.
Solución de problemas Errores
Cuando migra sus datos de QuickBooks a Zoho Books, puede encontrar errores en ciertos casos. Para ayudar, hemos descrito errores comunes, lo que significan y cómo solucionarlos.
| Módulo | Error mostrado | ¿Qué salió mal? | ¿Qué puedes hacer? |
|---|---|---|---|
| Artículos | El seguimiento del inventario está desactivado. | Ha habilitado el seguimiento del inventario del elemento seleccionado en su organización QuickBooks, pero no en Zoho Books. | Para importar el artículo, debe habilitar el seguimiento de inventario en Zoho Books. Así es como: Ir a la página Configuración > Preferencias > Artículos > Habilitar el seguimiento de inventario y habilite el seguimiento del inventario de su artículo. |
| Artículos | Los artículos solo pueden asociarse con cuentas de ingresos. | Has seleccionado Ventas como el Tipo de artículo para el artículo pero han asociado a un Costo de los bienes vendidos (COGS) o gastos . | Seleccione Ingresos en el Cuenta columna e importar el artículo a Zoho Books. |
| Artículos | Los artículos comprados solo se pueden asociar con Costo de los bienes vendidos (Cogs). | Has seleccionado Comprar como el Tipo de artículo para el artículo pero han asociado una Ingresos . | Seleccione Costo de los bienes vendidos (COGS) en el Cuenta columna e importar el artículo a Zoho Books. |
| Facturas de facturas | Las facturas no deben estar presentes más de una vez en el pago | Usted ha asociado varios pagos de proveedores a la misma factura. | Retire los pagos adicionales de proveedores asociados con la factura en su archivo e importe la factura a Zoho Books. |
| Facturas/voz | La fecha de vencimiento debe ser después de la fecha de factura/factura | La fecha de vencimiento es la misma que la factura o la factura. | Modifique la fecha de vencimiento a una fecha posterior e importe la factura o factura a Zoho Books. |
| Facturas/voz | El importe introducido es superior al saldo adeudado por las facturas/factos seleccionados. | El importe total de la factura o factura es inferior al pago recibido. | Asegúrese de que el importe total de la factura o factura y el importe introducido en la columna Cantidad Aplicada a la columna sean los mismos. |
| Facturas/voz | Este error está relacionado con Fila 1,090 - Factura/Número de factura | El número de factura o el número de factura en una de las filas está en formato de texto. | Vuelva a importar el archivo de error para identificar qué fila contiene el error. Luego, cambie el formato de la factura o número de factura al número o general en su archivo de importación para importar la factura o factura a Zoho Books. |
| Transacciones | Fila no válida | La cuenta asociada a un elemento de su transacción no está disponible ni activa en Zoho Books. | Asegúrese de que la cuenta asociada con el elemento de la transacción que está importando esté disponible o activa en Zoho Books. Si no es así, crear una nueva cuenta e importar la transacción a Zoho Books. |
| Cuentas | fila duplicada encontrada en su archivo CSV/TSV | Intentó importar una cuenta con el mismo nombre que la de Zoho Books. | Cambie el nombre de la cuenta con el mismo nombre en su archivo e importe a Zoho Books. |
| Cuentas | Lo sentimos, no puede agregar ninguna cuenta de tipo Cuentas por cobrar o Cuentas por pagar. | Intentó importar cuentas del tipo Cuentas por cobrar o Cuentas por pagar . | No se puede importar cuentas del tipo Cuentas por cobrar o Cuentas por pagar ya que tenemos cuentas predeterminadas del mismo nombre en Zoho Books. Retire estas cuentas de su archivo e importe a Zoho Books. |
| Cuentas | No se admite la creación de subcuenta para esta cuenta | Intentó crear subcuentas para cuentas bancarias, compensación de pagos, tarjeta de crédito o cuentas de impuestos en el extranjero. | Eliminar la cuenta principal de la Cuenta de padres columna para esta cuenta e importar el archivo a Zoho Books. |
| Cuentas | El padre que has elegido no admite subcuentas | Intentó crear subcuentas para cuentas bancarias, compensación de pagos, tarjeta de crédito o cuentas de impuestos en el extranjero. | Eliminar la cuenta principal de la Cuenta de padres columna para esta cuenta e importar el archivo a Zoho Books. |
| Notas de crédito | Los créditos no pueden aplicarse a facturas en estado cerrado | Usted aplicó notas de crédito a facturas que están en estado Cerrado o Pagadas | Cambie el número de factura e importe la nota de crédito a Zoho Books. o Cree un reembolso por la nota de crédito. |
| Notas de crédito | Los créditos aplicados a la factura son más que el saldo de facturas | El importe aplicado con la nota de crédito es superior al saldo de facturas. | Asegúrese de que el importe total de la factura sea igual o inferior al valor de la columna Cantidad Aplicada a la columna de la nota de crédito del archivo de importación. |
| Notas de crédito | Los créditos aplicados son más que el saldo de la nota de crédito | El valor de los créditos aplicados es mayor que el importe total de la nota de crédito. | Asegúrese de que la cantidad aplicada de la nota de crédito sea igual o inferior al valor de la columna Cantidad A de la nota de crédito del archivo de importación. |
Qué puede hacer después de migrar
Ahora que has migrado a Zoho Books con éxito, puede personalizar aún más su organización. Puede configurar pasar pasarela de pago para aceptar pagos en línea o integrarse con otras aplicaciones como Zoho CRM y Zoho Analytics.
Zoho Books también tiene muchas características que puedes utilizar para optimizar tu proceso contable, aquí estos€TM algunas de ellas para comenzar:
- Aprobaciones de transacciones
- Cargo automático por transacciones recurrentes
- Personalización de plantillas
- Recordatorios de pago
- Portal del Cliente
Nota: Si tiene alguna pregunta, o si se enfrenta a algún problema con el proceso de migración, escríbanos a: support.mx@zohobooks.com y le ayudaremos a migrar de QuickBooks a Zoho Books.
 Yes
No
Yes
No
Thank you for your feedback!