Plan
A plan lets customers know the features you offer and their price. You can clearly mention how much and how often they’ll be charged for a plan. Multiple plans can be created with each one offering a different set of features. Corresponding prices can be set for each plan.
Customers have different needs. Some would require a professional plan with advanced features, while others might prefer a basic plan.
Below are some of the things that will help you better understand plans. You can use the Plan Operations section to find out how to create, edit, delete or make a plan inactive. The Plan Fields section describes in detail about all the plan fields.
Creating a plan
To create a new plan, please follow the below steps.
- Go to Subscription Items tab and select the subscription item for which a new plan needs to be created.
- Click the Add Plan button.

Free Plan- Setup
ENTERPRISE EDITIONThe Free Plans feature enables you to convert trial subscriptions automatically, or subscriptions for which dunning failed, to a free plan. This helps minimize churn, improving the likelihood of renewals and conversions.
Zylker Insights, an analytics platform, offers a 14-day free trial for its users. To retain user engagement after the trial, they configure the Free Plans feature in Zoho Billing. Now, once a trial ends, users are automatically moved to their free plan.
Enabling Free Plans
Here’s how to enable the Free Plan:
- Go to Settings.
- Choose General under Subscriptions.
- Toggle the switch to enable Free Plans.
Note: Subscriptions will be moved to the Free plan only when you have a free plan configured. If no free plan is configured, the subscription will be cancelled or will stay live based on the final retry action configured.
Configure Free Plans After Dunning Failure
You can configure subscriptions to be moved to the free plan after all payment retries fail. Here’s how:
- Go to Settings.
- Select Dunning Management under Subscriptions.
- Click the dropdown with If the final retry attempt fails, then and select Mark Subscription as Free/Cancelled.
Now, the following actions will be performed when the payment fails:
- Subscriptions will move to the free plan.
- Associated invoices will be marked as Void.
- If the corresponding Product doesn’t have a free plan configured, the subscription will be cancelled.
- The next renewal date will be removed, and no further renewal will happen for the subscription.
- The subscription will remain free until upgraded or cancelled.
Sharing a plan
To share a plan with your customers, follow the below steps:
Go to Subscription Items under Product Catalog.
Select the subscription item to which the plan belongs.
Click Share Hosted Payment Page under the respective plan.
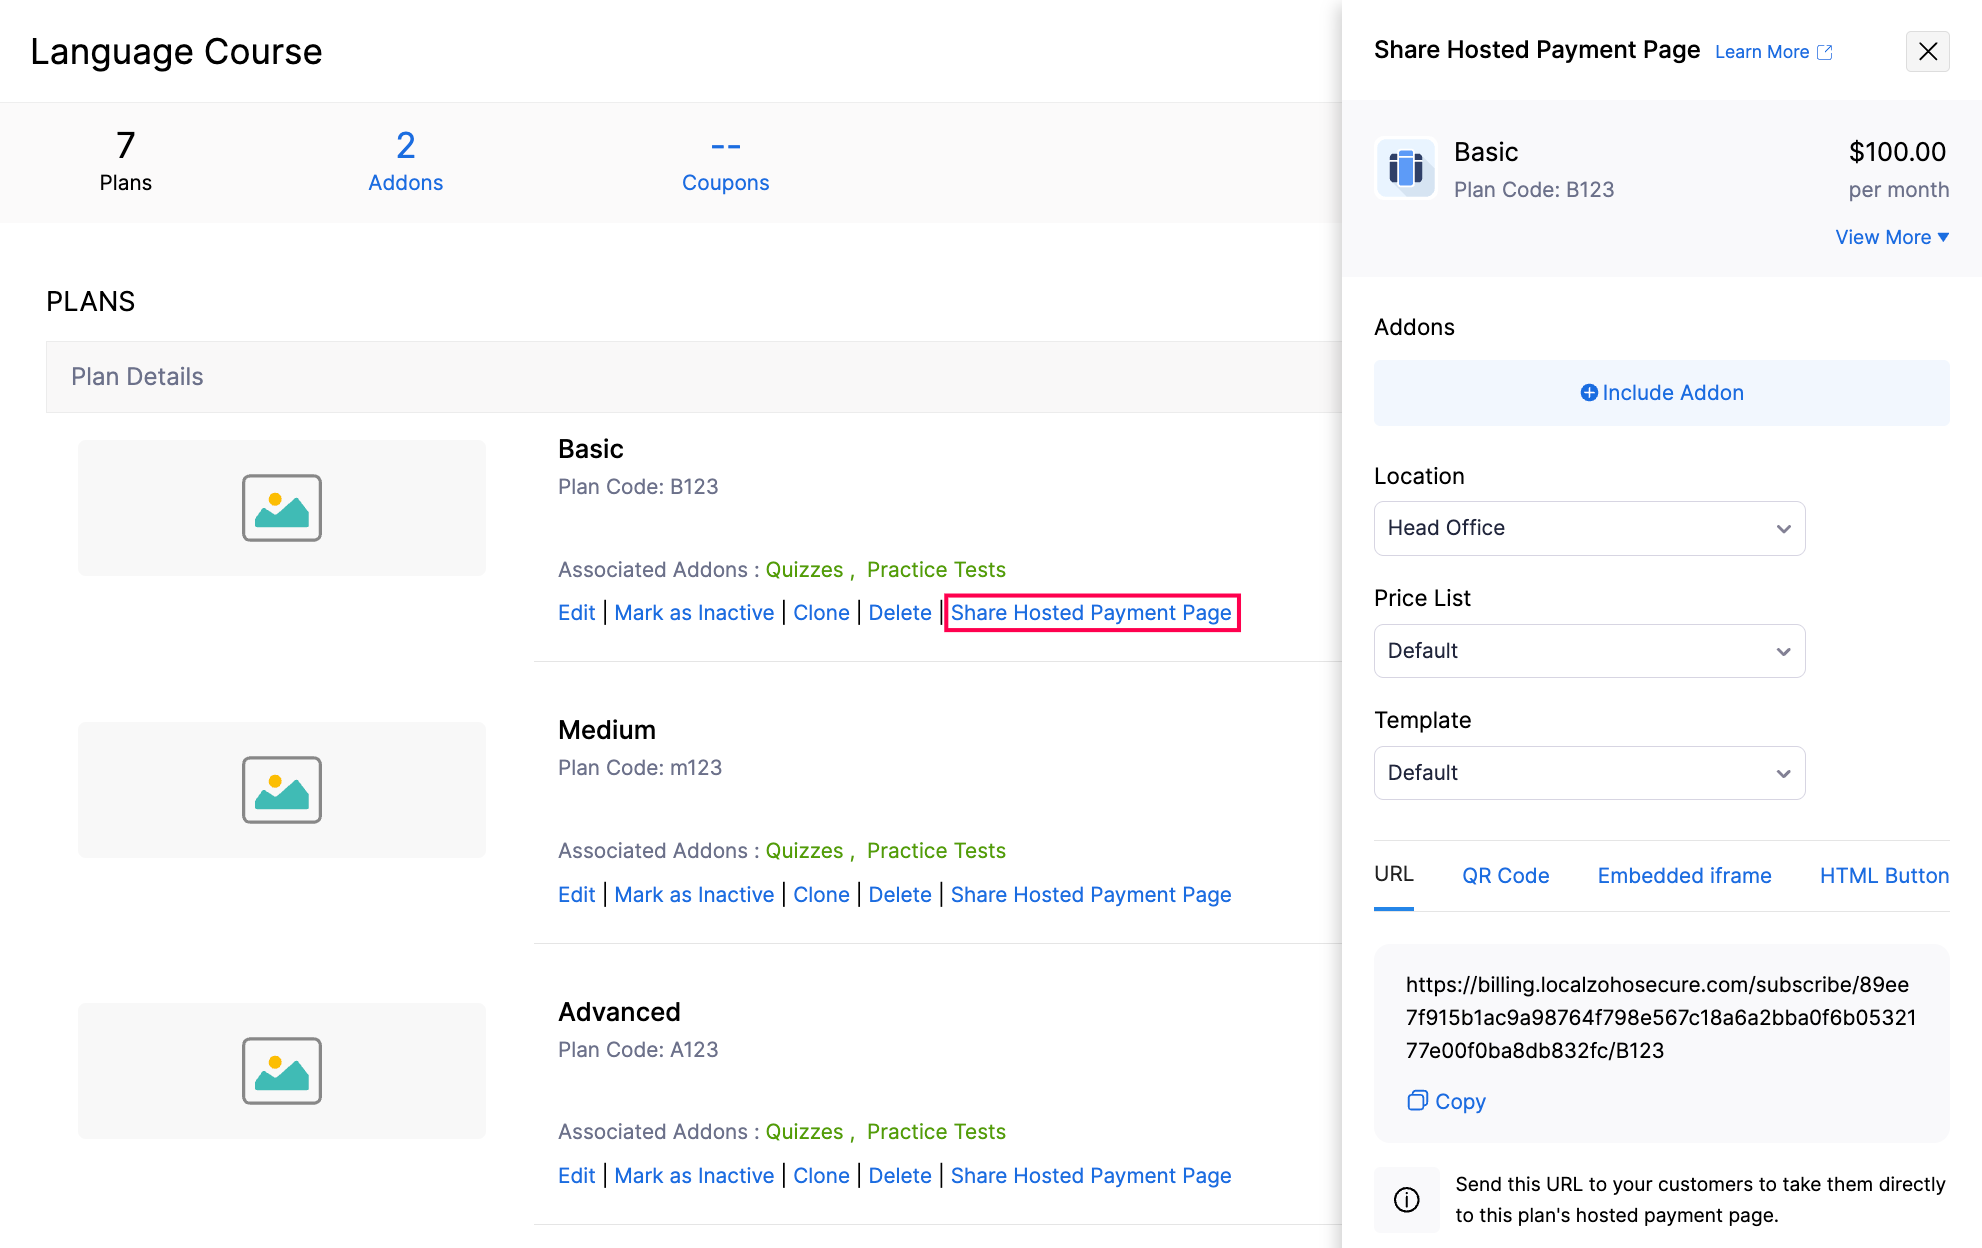
A slider appears through which you can share the hosted payment page of the plan.
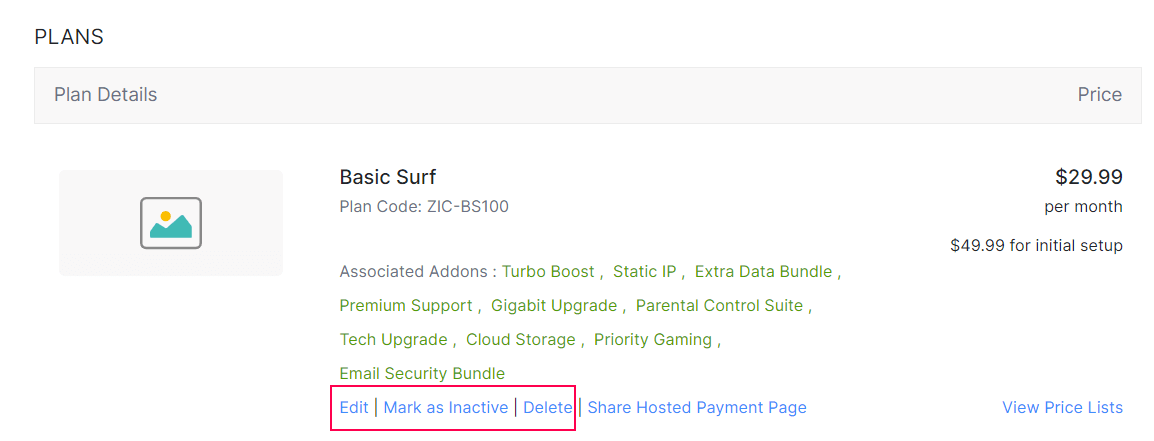
Editing a plan
To edit a plan, follow the below steps.
- Go to the Subscription Items tab and select the subscription item to which the plan belongs.
- Click Edit under the respective plan.
Changes made to a plan will take effect only for new subscriptions. The existing subscribers will not be affected.
Making a plan inactive
You can make a plan inactive if you decide to do away with a plan, but do not want to delete the plan for the sake of the existing subscribers.
To make a plan inactive, follow the below steps.
- Go to Subscription Items tab and select the subscription item to which the plan belongs.
- Click the Mark as Inactive button under the respective plan.
Once a plan is made inactive, it can no longer be subscribed to new customers. However, the customers already subscribed to the plan will not be affected in any way.
Deleting a plan
Deleting a plan would remove it completely from the system. You will not be able to delete a plan if customers are currently subscribed to it. Follow the below steps to delete a plan.
- Go to Subscription Items tab and select the subscription item to which the plan belongs.
- Click Delete under the respective plan.
Plan Fields
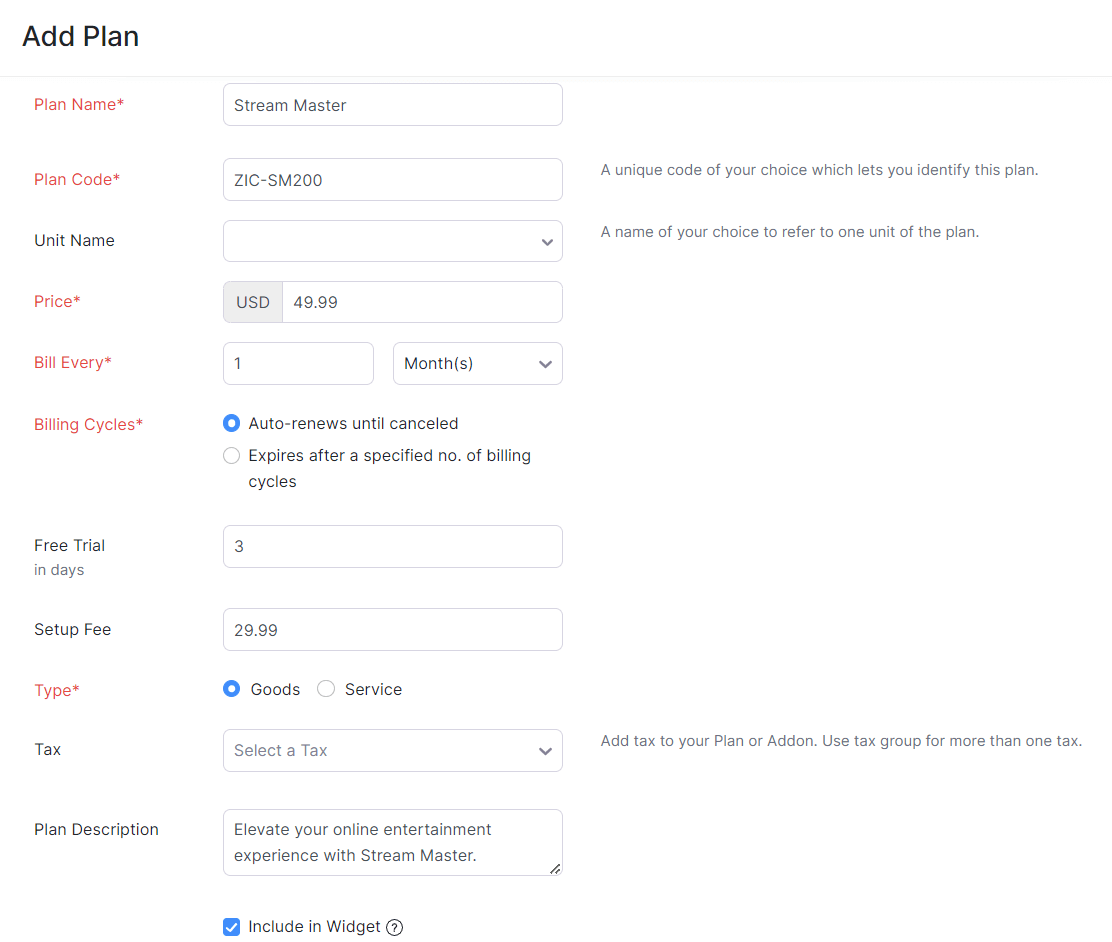
Here’s what the plan creation form will look like.
Naming a plan
The plan name you choose while creating a plan will be displayed in the invoices you send to customers as well. A plan should be named in a way that you can identify the features it offers without going into its details.
Basic monthly is better than Plan A.
Why do I need plan codes?
The Zoho Billing API uses plan codes instead of plan names to identify each of your plans. Plan code is a unique identifier used to refer to a plan when a subscription is created or updated via the API. The advantage here is you can set the plan code yourself rather than using an auto generated unique ID to identify the plan.
Billing Frequency
After setting the plan’s price, you can specify the billing frequency using the ‘Bill Every’ field.
| Frequency | Description |
|---|---|
| Year(s) | Your customers will be billed once every specified number of years you’ve chosen. |
| Week(s) | Your customers will be billed once every specified number of weeks you’ve chosen. |
| Month(s) | Your customers will be billed once every specified number of months you’ve chosen. |
| Day(s) | Your customers will be billed once every specified number of days you’ve chosen. Note: The minimum number of days for which you can create a subscription is 5. Scenario: Zylker is a mobile network provider, which provides data plans to their customers for 28 days. Patricia, the owner of Zylker can create a plan in Zoho Billing with the following Billing Frequency : Bill Every 28 Day(s). This ensures that her billing management is in sync with her business model. |
Billing Cycle
You can specify the number of times the customer needs to be charged.
- If you choose Auto renews until canceled, the customer will be charged until the subscription is cancelled by the customer or yourself.
- If you choose Expires after a specified no. of billing cycles, you can specify the number of billing cycles after which the plan will expire.
If you want to charge a customer 3 times for one year using a 4 month duration, billing cycle will be set to 3 and billing interval would be Bill Every 4 Month(s).
Billing interval: 4 months
Billing cycle: 3
No. of charges: 3
Free trial
You can choose to provide a free trial for any number of days.
Setup Fee
If you charge a setup fee for a plan, then this field can be used to enter the setup fee amount. This amount is a one-time charge that your customers will have to pay when they initially subscribe to your service.
You can also choose the account where the amount for the setup fee should reflect. To do this:
- Click More fields at the bottom of the page when creating or editing a plan.
- Select an account from the Setup Fee Account dropdown under Account Details.
Now, the amount received for the setup fee will reflect under the chosen account.
Charge setup fee upfront
Zoho Billing allows you to charge a setup fee at the beginning of your customer’s trial of your product or service. To charge a setup fee upfront, you need to enable the option for a plan and mark the option when creating a subscription.
Scenario: Patricia, the owner of Zylker Broadband, plans to offer a 1-month free trial of her internet broadband service to attract new customers. To enable this trial, she must install a Wi-Fi router at the customer’s location. Patricia decides to use Zoho Billing to charge a setup fee upfront for the Wi-Fi router installation, ensuring that customers are committed to the service from the outset.
Charging the setup fee at the beginning of the trial allows Patricia to cover the cost of equipment and improve customer retention. This strategy aligns with her goal of providing a seamless and financially sustainable service to her customers.
Here’s how you can enable charging setup fee upfront for a plan:
Enter the number of trial days.
Enter the setup fee.
Mark Charge setup fee when the trial period starts.

Note: When you charge a setup fee at the beginning of the trial period, an invoice will be created for the setup fee.
To charge the setup fee upfront for a subscription:
Navigate to the Subscriptions module under Sales.
Click + New at the top right corner.
Select a customer.
Select the plan, for which you have enabled charge setup fee at the beginning of the trial.
Mark Charge setup fee when the trial period starts under Subscription Terms.
Account
This is another portion where the seamless integration with Zoho Books comes into play. You can store a plan’s revenue in an Income account in Zoho Books.
Whenever a customer subscribes to a plan, the corresponding plan’s revenue will be mapped into the account that you choose from the drop down. The drop down displays the list of Income accounts in Zoho Books.
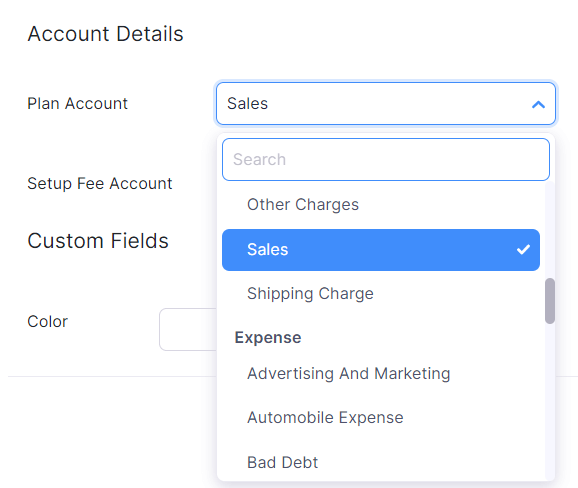
To get an account listed in the drop down, you’ll have to create an Income account (Income/Other Income) in Zoho Books.
- Sign in to your Zoho Books account.
- Go to Accountant tab and click Chart of Accounts sub-tab.
- Click the + New Account button on the top right corner.
- After naming the account, make sure to select an Income account type. Click Save.

Tax
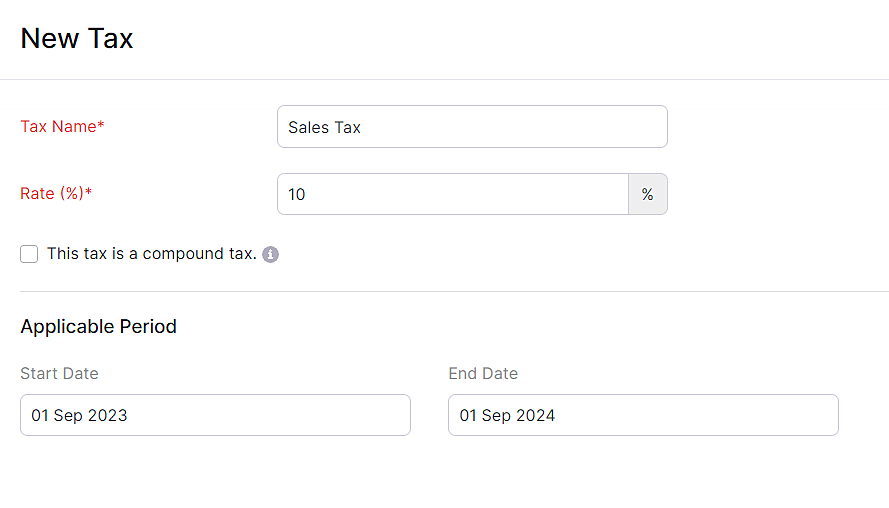
You can add tax to your addon. You can also use tax groups for more than one tax.
To get a tax listed in the drop down follow the below steps.
- Go to Settings > Taxes & Compliance > Taxes.
- Click the + New Tax button in the top right corner.
- Enter the required tax details and click Save.
Pricing Models
ENTERPRISE EDITIONA pricing model defines how you charge your customers for the products or services you offer. It determines the structure of your pricing whether it’s a fixed rate, based on volume, or bundled into packages. Pricing models also help you optimize for customer behaviour, encourage upselling, and adapt to changing market demands. By configuring these models, you can tailor your billing to match customer needs and market demands.
Zoho Billing supports a variety of pricing models including Flat, Per Unit, Volume, Tiered, and Package pricing. These models allow you to tailor your plans to suit different business needs, ensuring accurate billing and a smooth subscription experience for your customers. With Zoho Billing, you can easily configure and manage these models within your plans to match your revenue strategies.
Configure Pricing Models
Different businesses have different billing needs. For example, a SaaS company might prefer flat or tiered pricing for its subscription plans, while a telecom provider may rely on volume or per unit pricing. E-commerce platforms might bundle products into packages, offering fixed pricing for a set of items. Pricing models in Zoho Billing is designed to meet these billing needs.
Here’s how to configure pricing models:
- Go to Plans under Product Catalog.
- Under the Plans tab, click + New to create a new plan.
- Select the product and enter all the required details.
- Click the dropdown next to Pricing Model.
- Select your preferred pricing model.
Types of Pricing Models in Zoho Billing
Flat Pricing
Flat pricing is a pricing model where a fixed amount is charged at regular intervals, regardless of usage or quantity. Every customer on the plan pays the same amount. This model is commonly used for subscription based services that offer a consistent set of features to all customers. Example: SaaS platforms with standard features across all users, Media streaming services, Online tools offering flat rate memberships.
How it Works: Let’s say Zylker Inc, a SaaS company, offers a software service and charges $99/month for access to its full suite of features. All its customers are charged the same fixed amount regardless of how much their customers use their service.
Per Unit Pricing
Per unit pricing is a pricing model where customers are charged based on the number of units they consume, with a fixed rate per unit. The total price increases linearly with the number of units used. This model is commonly used for services where usage is measured in units like number of users, GB of storage, or messages sent. Example: B2B SaaS, Cloud storage services, Communication platforms.
How it Works: Let’s say Zylker Cloud, a cloud service company, charges $1 per GB per month. If a customer purchases 150 GB per month, he/she pays $150 per month for the service.
Volume Pricing
Volume pricing is a pricing model where the unit price changes as the total quantity purchased increases. All units are billed at one rate, based on the total volume. This model is commonly used in businesses with sales driven models or usage heavy services. Example: Wholesale and distribution businesses, Telecom providers, Software licensing for teams.
How it Works: Let’s say Zylker Inc charges based on the total number of API calls purchased per month following volume pricing.
| Usage | Price per 10000 calls |
|---|---|
| 1–100000 calls | $8 |
| 100001–500000 calls | $6 |
| 500001+ calls | $4 |
If a customer purchases 300000 API calls, the rate is $6 per 10000 calls for all 300000. So the total cost = (300000/10000) x $6 = $180.
Tiered Pricing
Tiered pricing is a pricing model in which different quantities of a good or service are charged at different rates, based on defined tiers. Each tier has its own unit price, and customers pay according to how much their usage falls within each tier. This model is ideal for services where value increases with usage, but you want to gradually reduce the per-unit cost to encourage scale. Example: API-based platforms like payment gateways and analytics tools, Utilities like internet bandwidth and electricity billing.
How it Works: Let’s say Zylker Connect, a internet service provider, charges based on a tiered pricing model for bandwidth usage.
| Usage | Price per Mbps | Cost of the tier |
|---|---|---|
| 1 – 50 Mbps | $2 | $100 |
| 51 – 100 Mbps | $1.5 | $150 |
| Over 101 Mbps | $1 | Variable |
If a customer uses 150 Mbps, the cost is:
First 50 Mbps: 50 x $2 = $100
Next 50 Mbps: 50 x $1.5 = $75
Next 50 Mbps: 50 x $1 = $50
So the total cost = $225
Package Pricing
Package pricing is a pricing model where a fixed price is charged for a predefined quantity of units or usage. The pricing is applied at the package level, not per unit, so there’s no unit price involved. This model is commonly used when services or products are sold in fixed bundles. Example: Prepaid telecom plans, SMS or email credit bundles, Learning platforms.
How it Works: Let’s say Zylker Learn, a edutech company offers video lessons in packages of 10, 15 and 20. It charges $50 for 10 video lessons, $100 for 15 video lessons, and $150 for 20 video lessons. If a customer purchases 15 video lessons, he/she pays $100.


 Yes
Yes