
Subscriptions
A subscription enables you to charge a customer for a plan of their choice. Below are the list of actions you can perform on subscriptions.
New Subscription
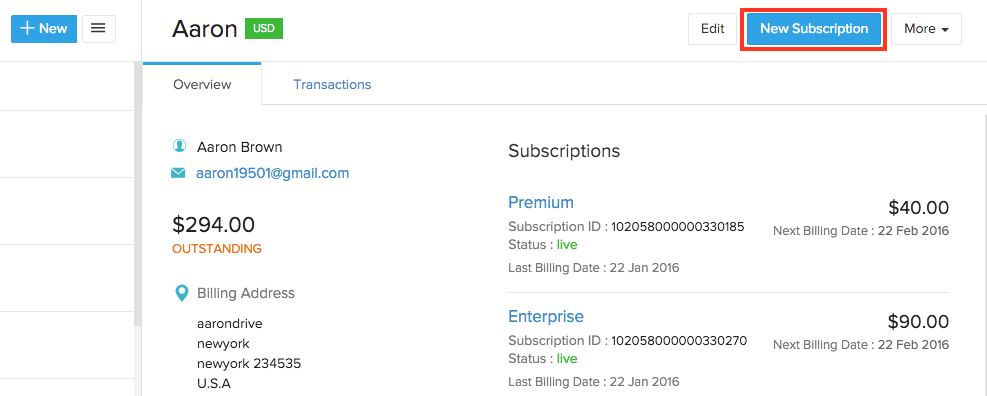
You can create a new subscription for a customer either directly from the customer’s Overview page or from the Subscriptions module.
Here’s how you create a new subscription from a customer’s Overview page:
Navigate to the Customers module and select a customer.
Click New Transaction on the top-right corner.
Select Subscription from the dropdown.

Select the desired Product, Plan, Addons and Coupons.
Fill the other necessary details.
Click Continue.
Click Create in the Subscription Preview page.
To create a new subscription from the Subscriptions module:
Navigate to the Subscriptions module under Sales.
Click + New on the top-right corner.
Select a customer from the Customer Name dropdown.
Select the desired Product or Items
Fill the other necessary details.
Click Continue.
Click Create in the Subscription Preview page.
Insight: Invoices for subscriptions will be automatically created at 6 AM in your organization’s time zone, based on the schedule you’ve configured.
Edit Subscription
You can edit your customers’ subscriptions to make necessary changes to their subscriptions. You can use the edit option to upgrade or downgrade your customers’ existing or canceled subscriptions.
To edit a subscription:
Navigate to the Subscriptions module.
Select a subscription.
Click Edit in the subscription’s Overview page.

Make the necessary changes.
Scroll down to the When to apply changes section and select when you want the changes to be applied.

Option Description Immediately The changes will be made to the subscription on the current date. Insight: When you upgrade or downgrade a subscription, a prorated invoice and credit note will be respectively generated.Note: If the billing frequency is changed, the billing cycle will also change and the current date will become the billing date.
End of Term The changes will be made to the subscription from the next billing cycle. Insight: If you upgrade or downgrade the subscription, a new invoice with the updated information will be generated at the beginning of the next billing cycle.Scheduled Update You can make changes to a customer’s subscription and schedule it to be applied on a specific date. If you schedule an upgrade or downgrade, a prorated invoice and credit note will be generated for the subscription on the scheduled date. Scenario: Zylker is an internet service provider. One of their customers, Aaron Brown is subscribed to their Basic plan and the current billing cycle is 5th May to 5th June. Aaron Brown decides to upgrade to the Professional plan from 20th May. Using Scheduled Updates in Zoho Billing, Zylker can schedule the upgrade for 20th May. Now, the subscription will be updated on 20th May and a prorated invoice and credit note will be generated accordingly.Note: If the billing frequency is changed, for example, upgrading from a monthly plan to a yearly plan, the scheduled date will be the new billing date and the billing cycle will change accordingly.Note:
- If you have scheduled an update for the End of the term or a Scheduled Date and you make an immediate update, the scheduled update will be canceled.
- If an update is scheduled on the subscription renewal date, it will be applied the day after the renewal.
Once you’ve selected when to apply the changes,
Click Continue.
Check the subscription’s charges in the next page and click Update.

The subscription will now be updated.
Create Subscriptions for Items
You can create subscriptions for individual items in your organization. This lets you provide customers with specific products or services and manage them as recurring deliveries. This will be useful when you sell physical goods, consumables, or repeat services on a fixed schedule.
Let’s understand this with the help of a scenario.
Create a Subscription for an Item
While creating a subscription, you can:
- Select Items in the Create Subscription For field.
- Select the items you want to include in the Item Table.
- Enter a name for the subscription.
- Set the billing frequency and term in the Bill Every field.
- Review the summary.
- Click Create.
The subscription is created and will appear under Subscriptions. Invoices will be generated automatically based on the billing frequency you set.
Manage Subscriptions for Items
You can perform the following actions:
Backdated Subscriptions
In Zoho Billing, you can create backdated subscriptions to record subscriptions that began in the past but weren’t entered into the system at the right time. This helps you maintain accurate records and generate invoices for the missed period, if required.
When you create a backdated subscription, it will be created with the chosen backdate as its start date. You can then choose if you want to generate an invoice for the current billing cycle.
When to Use Backdated Subscriptions
- If a customer’s subscription began earlier than the date you’re adding it.
- To ensure your invoices and revenue reports reflect the correct start date.
- To migrate existing subscriptions from another system into Zoho Billing.
How to Create a Backdated Subscription
- Go to Sales > Subscriptions in the left sidebar and click + New.
- Select the customer, and enter the other details.
- Choose the plan and addon.
- In the subscription’s Start Date field under Subscription Term, enter the desired date. For example, If the subscription started on June 1st but today is July 15th, set the start date as June 1st.
- Check the Create invoice for current billing cycle box, if required.
- Click Continue and review the subscription details.
- Click Create.
The subscription will now be created and future billing cycles will be aligned with the chosen start date.
Future Subscriptions
In a business scenario, you might sometimes want to create subscriptions in a future date and Zoho Billing exactly allows you to do that without any struggle.
Future subscriptions can be created like any other subscriptions in Zoho Billing. All you have to do is select the date (future date) in the Starts On field on which the subscription has to be activated. For subscriptions with a trial period, the subscription trial will start on the selected date.
If you’ve configured Use Latest Prices as the renewal pricing method, you can lock in the prices set at creation instead of using the latest prices with the Use prices set at creation when activating trial and future subscriptions option.
Subscription Term
Starts on - You can choose to charge a customer from the current date as well as any future date.
Expires After - If you want the subscription to expire only when it gets cancelled by either yourself or the customer, check Never Expires. If you want the subscription to expire after a certain duration, make sure Never Expires is unchecked and enter the number of cycles after which the subscription should expire.
Reference number - A reference number can be used
Renewal Pricing - You can decide how subscription prices should be applied during renewals. You can retain existing prices or use the latest prices. This helps you save time and reduce manual effort. Learn more about renewal pricing.
Sales Person - You can associate your subscription with a sales person.
The price of plans, addons and the number of cycles after which a subscription should expire can be exclusive for a subscription. In other words, these values can be changed while creating or editing a subscription and this will not affect the original values set during creation of plan or addon.
Tax Exclusive or Tax Inclusive Subscriptions
You can select the tax applied on subscriptions as Tax Inclusive or Tax Exclusive from the subscription’s creation page. By default, the subscription’s tax will be selected as Tax Exclusive. This option will be available only if you’ve chosen the tax preference for items and products as Tax Inclusive or Tax Exclusive under Settings > Preferences > General.

Note: This option is available only for organizations which were created after December 2023. To enable this feature for your organization, reach out to our support team at support@zohobilling.com.
Payment mode
There are two kinds of payment modes - offline and online.
Online - If payment is to be made through the customer’s card, make sure that Collect payment offline is unchecked.
Offline - If payment is to be made by customers through cheques, cash or other means wherein you do not store their card information, check Collect payment offline.
Note: At any point, you can change the subscription from Online mode to Offline mode and vice versa.
- Change from Online to Offline:
Navigate to the subscription and click on Change to Offline Mode under Payment Information.
- Change from Offline to Online:
For subscriptions to be changed from offline to online, you must first associate a payment method with the subscription by clicking Associate Payment Options. You can associate a card by selecting Associate Card and entering the card details. If your payment gateway supports UPI mandates, you can also associate a UPI mandate as the payment method. Once done, click Save and Change to Online.
Adding a one-time addon
A separate invoice will be raised for a one-time addon. Here’s how you can add a one-time addon to a subscription.
- Go to the Customers tab and select the customer for whom a one-time addon has to be added.
- Click the respective subscription in the Overview section.
- Click the gear icon and select Add One Time Addon. Do ensure the respective one-time addon is associated with the subscribed plan.
Adding a charge
You can associate one-time charges to your customers’ subscriptions. These charges will be raised in a separate invoice:
- Go to Sales > Subscriptions.
- Select the subscription for which you want to add the one-time charge.
- Click the More dropdown in the top right corner and select Add Charge.
- Enter the amount to be charged, along with the other necessary details.
- Click Charge.
Applying a coupon
A coupon can be applied for a subscription at any time.
But at any point of time, there can be only one coupon applied to a subscription.
To apply a coupon for a subscription, please follow the below steps.
- Go to the Customers tab and select the customer for whom a one-time charge has to be added.
- Click the respective subscription in the Overview section.
- Click the Add Coupon button. Select the coupon to be applied and click Save.
Discounts
Note: This feature is currently in early access. Reach out to our support team at support@zohobilling.com to enable this for your organization.
Discounts are an essential tool used in businesses to attract new customers and improve sales. Salespersons often offer customized discounts to new customers, which adds a personal touch to their sale. Zoho Billing allows you to offer flat and percentage discounts to your customers both at the item-level and transaction-level according to your business needs.
Insight:Discounts are different from coupons. Coupons are often used for promotions and to provide standard discounts to customers, while you can use discounts to give competitive and personalized pricing to different customers.
To give discounts to your customers while creating a subscription:
Select the Discount Preference.

Option Description No Discounts Select this option if you do not want to give discounts to your customers Item-Level You can apply different discounts for different items, plans, addons and coupons for the subscription. Transaction-Level You can apply an average discount for the entire subscription. Select the Discount Redemption.
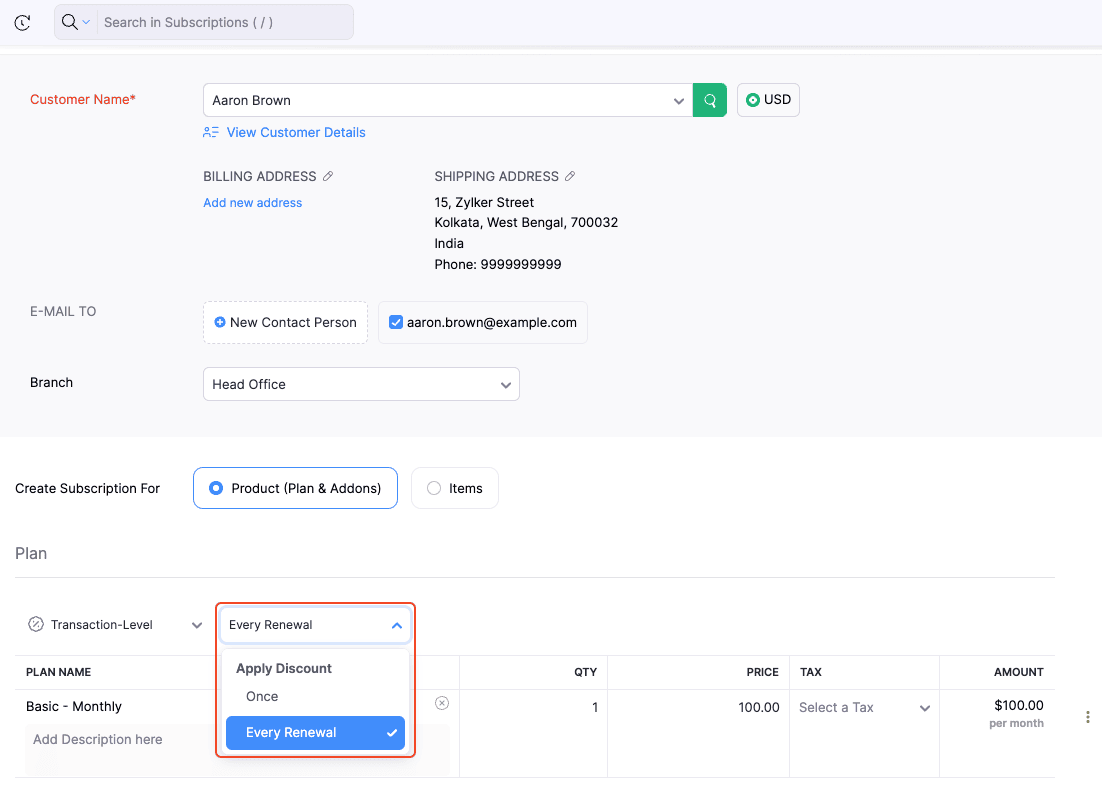
Option Description Once The discount will be applied only for the first billing cycle. The upcoming cycles will be billed for the original amount. Every Renewal The discount will be applied to the subscription for all billing cycles. Select Discount Type.
If you select Transaction-Level in the Discount Preference, the discount type will be applicable for all the items.

- Flat - The flat amount will be discounted from the total, irrespective of the total amount.
- Percentage - The discount will be applied as a percentage of the total.
If you select Item-Level in the Discount Preference, you can set different discount type for different items according to your needs.

- Percentage - The discount will be applied as a percentage of the item’s price.
- Flat - The flat amount will be discounted from the item’s price.
Note: If a discount is applied to a subscription, coupons cannot be applied to the subscription. If you want to apply a coupon to the subscription, you have to update the subscription and remove the discount.
Insight: You can also create custom API Hosted Payment Pages with associated discounts and share the personalised link with your customers for them to sign up.
Changing subscription details
You can change subscription details like billing information, contact person, reference numbers, card details, payment mode and notes.
- Go to the Customers tab and select the customer for whom subscription details need to be changed.
- Click the respective subscription in the Overview section.
Change next billing date
The next renewal date can be postponed. Here’s how:
- Click the Edit icon next to Next Billing Date.
- Select any future date and add a reason.
- Click Save.
- In the next page, select if you want to charge for the extension or just change the billing date.
The billing date will be changed. If the next billing date is changed from Jan 1st to Jan 10th, the subsequent billing date would be on Feb 10th.
Reference number You can add/update a reference number for the subscription at any time.
Manage customers When you click Manage Contacts, you can view the list of email IDs of customers and contact persons. Check the email IDs to which subscription related notifications need to be sent.
Notes Add a short note about the subscription.
Similarly, you can update subscription details as required before its next renewal.
Update Subscription Line Items on Its Renewal Day
You might sometimes need to update subscriptions on the day of its renewal due to last minute customer requests or other reasons. Zoho Billing allows you to process subscription updates on its renewal day. You can update certain subscription details such as plan, addons, prices and quantity.
When you update a subscription on its renewal day, it will be immediately renewed and the renewal invoice with the updated changes will be sent to your customer.
Extending a subscription
When a subscription is about to expire, you can extend the billing cycle(s) instead of creating a new subscription for the customer.
To extend a subscription for your customer, just change the number of billing cycle and the subscription will be updated. This can be done easily from the subscription’s overview page.
- Navigate to the Subscriptions module on the left sidebar.
- Open a Subscription.
- In the Overview tab, click the Edit icon below renewals remaining.
- Change the no. of billing cycles left (or) select Never Expires if you want the subscription to renew automatically until you cancel it manually.
- Click Save.
Note: You will not be able to extend the following types of subscriptions:
- cancelled
- cancelled at renewal
- dunning subscriptions
- expired subscriptions
- the subscriptions that renews forever.
For Offline Subscriptions
If you have already received the payment for extending a subscription, you can record the payment here.
- After entering the number of billing cycles, check Have you received payments for the renewal? and enter the details.
- Click Save.
This option is only applicable for offline subscriptions. Also, the payment will be recorded as Excess payments under that customer.
If you want to apply the excess amount to the invoices automatically upon its renewal, enable the Apply excess payments to offline Subscriptions under Billing preferences. After enabling, these excess payments will be applied automatically to invoices that are raised during the next renewal.
Generate Draft Invoices in Subscriptions
By default, when you create a subscription for a customer in Zoho Billing, an invoice will be created and sent to the customer when the subscription is Live, or when the subscription is renewed. However, there might be cases when you would like to review the invoices or make changes to the invoices according to your needs before sending them to your customers. Zoho Billing allows you to generate invoices in the Draft status when a subscription is created, updated, or renewed. You can review or edit them and then send them to your customers.
Note: You can enable this feature only for subscriptions that are autocharge-disabled.
Enable Draft Invoices for All Subscriptions
Note: This is an early access feature. If you want to enable this in your organization, write to our support team at support@zohobilling.com. Once enabled, the default preference for autocharge-disabled subscription invoices will be Generate invoices as drafts.
You can set all autocharge-disabled subscriptions to generate draft invoices in your organization. Here’s how:
Navigate to Settings and select Invoices under Sales.
Scroll down to the Invoice Preferences for Subscriptions Without Autocharge section.
Select Generate invoices as drafts.
- Select Receive an email notification when a draft invoice has been generated if you want to receive email notifications when draft invoices are generated.

Click Save.
Now, draft invoices will be generated for all autocharge-disabled subscriptions when they are live, updated, or renewed.
Note: Once you enable this feature for your organization, draft invoices will be generated for your existing autocharge-disabled subscriptions as well. If you want to generate invoices in the Draft status for specific subscriptions, you can enable or disable them individually or bulk-update them.
Generate Draft Invoices for Individual Subscriptions
If you want to generate draft invoices for specific subscriptions, you can choose the preference while creating or editing autocharge-disabled subscriptions. To create a subscription with draft invoices:
- Navigate to the Sales module and select Subscriptions.
- Click + New.
- Select a customer and fill all the other details.
- Scroll down to the Other Preferences section.
- Select Create Invoices as Drafts from the Invoicing Preferences dropdown.
- Click Continue.
- Click Create in the following screen.
Now, a draft invoice will be generated when the subscription is moved to the Live status, which can be edited and sent to the customer.
To generate draft invoices in existing subscriptions:
- Navigate to the Sales module and select Subscriptions.
- Select a subscription.
- Click Edit.
- Scroll down to the Other Preferences section.
- Select Create Invoices as Drafts from the Invoicing Preferences dropdown.
- Click Continue.
- Click Update in the following screen.
Now, draft invoices will be generated for the subscription at the beginning of the next billing cycle, which can be edited and sent to the customer.
Note: When you enable or disable generating draft invoices for individual subscriptions, the organization-wide preferences will be ignored for the subscriptions.
Bulk Update Invoice Preferences for Subscriptions
If you want to enable or disable generating draft invoices for multiple autocharge-disabled subscriptions, you can bulk update them. Here’s how:
Navigate to the Subscriptions module under Sales.
Select the subscriptions.
Click Bulk Actions.
Select Invoice Preferences from the dropdown.

- Select Generate invoices as drafts to enable draft invoices for the subscriptions.
- Select Create and Send Invoices to disable draft invoices for the subscriptions.
Click Save.
Disable Draft Invoices for All Subscriptions
If you want to disable generating draft invoices for all autocharge-disabled subscriptions in your organization, follow the steps mentioned below:
Navigate to Settings and select Invoices under Sales.
Scroll down to the Invoice Preferences for Subscriptions Without Autocharge section.
Select Create and send invoices.
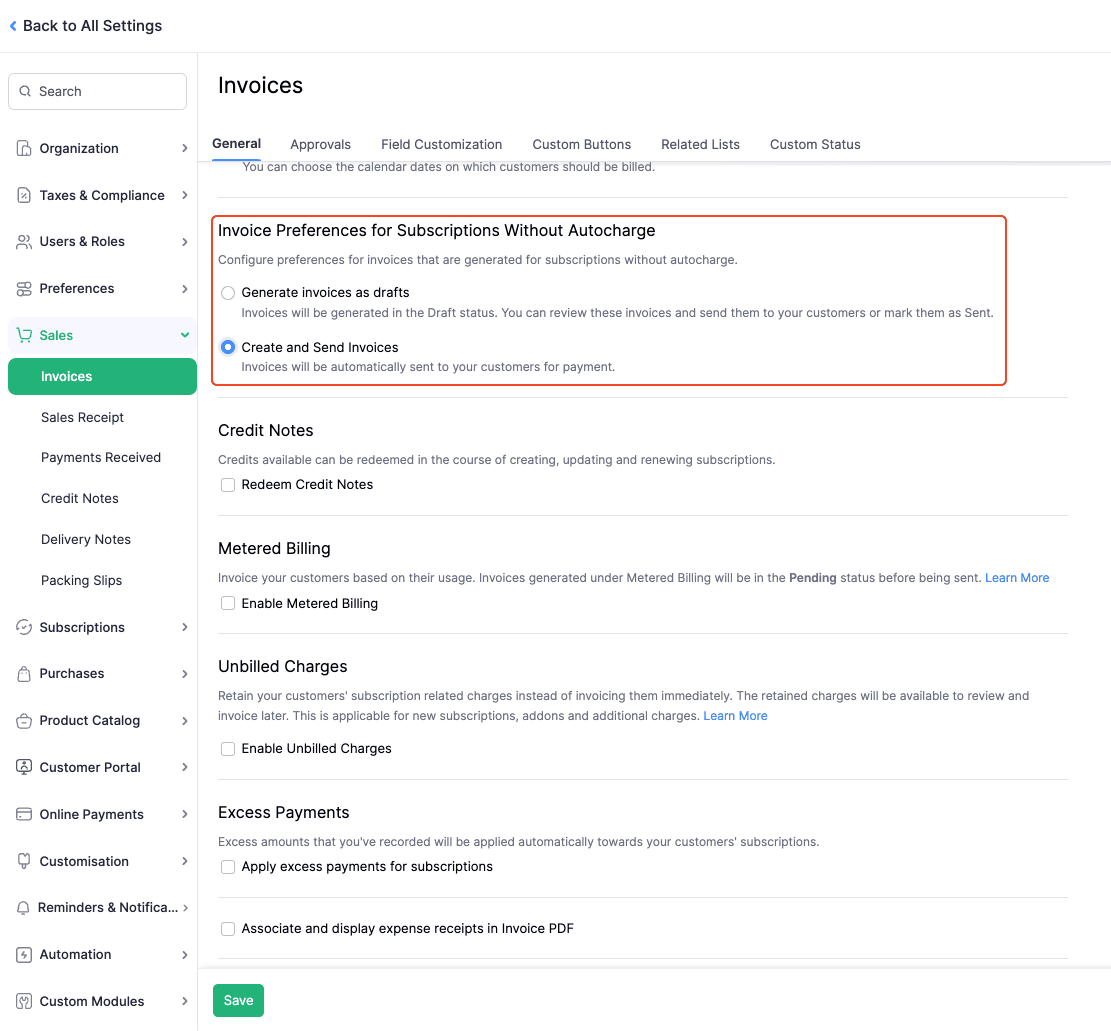
Click Save.
Now, invoices will be created and sent to your customers for payment whenever an autocharge-disabled subscription is Live, updated, or renewed.
Consolidated Billing
If you have customers who have multiple subscriptions with multiple billing dates, you can choose to combine all their invoices into a single invoice. The consolidated invoice’s billing date will be the same as the customer’s first subscription. This helps your customers pay for all their subscriptions at the same time every month.
You can consolidate up to 10 subscriptions into a single invoice. To extend this limit, contact our support team at support@zohobilling.com.
Scenario: Zylker offers high quality furniture for rent to their customers. Aaron Brown rented a cabinet on 5th April, a bed on 10th April and a table on 15th April. Instead of charging Aaron Brown separately on the 5th, 10th and 15th of every month, Zylker can enable consolidated billing, and send a single invoice for Aaron’s subscriptions. This enables Aaron to conveniently pay for all his subscriptions on the 5th of every month.
Note:
If autocharge is disabled for a subscription that is in dunning and included in consolidated billing, all consolidated subscriptions will be moved to live. The subscription with autocharge disabled will be removed from the consolidation.
Here’s how you can enable Consolidated Billing for your customers:
- Go to Settings from the top-right corner.
- Click Billing Preferences under Sales.
- Navigate to the Consolidated Billing section.
- Click Generate a consolidated invoice for multiple subscriptions.
- Click Save.
Now, Consolidated Billing will be applicable to all the customers in your Zoho Billing organization.
Customer Level Consolidated Billing
There might be cases when you would want to enable or disable Consolidated Billing only for certain customers. To enable or disable customer level consolidated billing:
Navigate to the Customers module.
Select a customer.
Scroll down to Consolidated Billing under Other Details in the customer’s Overview page.
Click the gear icon and select Enable or Disable as required.

Note:
If you enable or disable Consolidated Billing for a customer, it will override the existing organization preference configured from Settings > Subscriptions > Billing Preferences > Consolidated Billing.
Calendar Billing
Calendar Billing in Zoho Billing allows you to align your invoicing process with specific calendar dates, ensuring consistency and predictability in your billing cycle. Instead of tying billing strictly to the subscription start date, you can choose a fixed date of every month on which all the invoices are generated. This can help you standardize your billing operations and simplify financial planning.
You can choose to bill your customers according to their subscription activation date or choose to bill them on a specific date of each month. Here’s how to configure the billing date:
- Go to Settings from the top-right corner.
- Select Billing Preferences under Subscriptions.
- Select the required option under Billing Date.
| Options | Description |
|---|---|
| Same as a subscription’s activation date (Anniversary Billing) | Customers are billed on the same calendar day each billing cycle, based on the date their subscription was activated. How it Works: If a subscription starts on the 10th of the month, billing will recur on the 10th of each subsequent month. |
| Configure specific billing dates (Calendar Billing) | Customers are billed on fixed calendar dates that you choose, regardless of when their subscription was activated. You can select the specific dates on which you want to bill your customers. The nearest available billing date after a customer’s subscription is activated will be used for billing from the next cycle. This will be applied only to monthly and yearly subscriptions. How it Works: If billing is set to occur on the 1st and 15th of each month, customers will be billed on the next applicable date following their subscription start. |
You can configure calendar billing in the following ways:
| Option | Description |
|---|---|
| Billing Months | You can select the specific months in which you want to bill your customers. The nearest available billing month after a customer’s subscription is activated will be used for billing. This will be applied only to subscriptions with a billing cycle of more than 1 month. |
| Billing Days (Monthly & Yearly Subscriptions) | You can select the specific dates on which you want to bill your customers. The nearest available billing date after a customer’s subscription is activated will be used for billing from the next cycle. This will be applied only to monthly and yearly subscriptions. |
- Click Save.
Your customers will now be charged based on the billing date you have configured.
You can choose to bill your customers according to their subscription activation date or choose to bill them on a specific date of each month. Here’s how to configure the billing date:
- Go to Settings from the top-right corner.
- Select Billing Preferences under Sales.
- Select the required option under Billing Date.
Option Description Same as a subscription’s activation date (Anniversary Billing) Customers are billed on the same calendar day each billing cycle, based on the date their subscription was activated.
How it Works: If a subscription starts on the 10th of the month, billing will recur on the 10th of each subsequent month.Configure specific billing dates (Calendar Billing) Customers are billed on fixed calendar dates that you choose, regardless of when their subscription was activated.
How it Works: If billing is set to occur on the 1st and 15th of each month, customers will be billed on the next applicable date following their subscription start.
You can configure calendar billing in the following ways:
| Option | Description |
|---|---|
| Billing Months | You can select the specific months in which you want to bill your customers. The nearest available billing month after a customer’s subscription is activated will be used for billing. This will be applied only to subscriptions with a billing cycle of more than 1 month. |
| Billing Days (Monthly & Yearly Subscriptions) | You can select the specific dates on which you want to bill your customers. The nearest available billing date after a customer’s subscription is activated will be used for billing from the next cycle. This will be applied only to monthly and yearly subscriptions. |
| Billing Days (Weekly Subscriptions) | You can select the specific day of the week on which you want to bill your customers. This will be applied only to weekly subscriptions. |
- Click Save.
Your customers will now be charged based on the billing date you have configured.
Pause and Resume Subscriptions
If your customer wants to suspend their subscription temporarily, but doesn’t necessarily want to cancel it, pausing and resuming subscriptions is the way to go. This way, your customer will not be charged for their subscription while it is paused, and can pay for their subscription when they’re ready to resume it.
When should you pause subscriptions instead of canceling them?
Pausing subscriptions is recommended over temporarily canceling and re-activating them, because pausing subscriptions won’t affect your churn reports. However, it should not be seen as an alternative to actually canceling subscriptions when your customers ask you to do so.
To enable pause and resume subscriptions:
Navigate to Settings.
Select General under Subscriptions.
Enable the Pause and Resume option.
Note: The Bill Unbilled Charges and Pause Period Credits features is currently available only in the Enterprise editions and certain plans of Zoho Billing. Visit our pricing page to check whether your plan supports these features.
Select the Bill Unbilled Charges dropdown and select the desired option:
Option Description Later The associated unbilled charges will not be invoiced automatically when subscriptions are paused. You can invoice them manually if required. Immediately When pausing subscriptions, a consolidated invoice will be generated for the associated unbilled charges. Enable the Generate a credit note for subscriptions’ paused period option.
Insight: You can issue credits to your customers for the number of days their subscription remains paused during its billing cycle. This option can also be disabled at the subscription-level, if required.
Click Save.
Now, the feature has been enabled and you’re ready to pause subscriptions.
In this section:
- Pause Subscriptions
- Resume Subscriptions
- Change Pause and Resume Schedules
- Events for Paused and Resumed Subscriptions
Pause Subscriptions
Prerequisite: To pause subscriptions, you will have to enable the feature in your organization.
When a subscription is in the Paused status, it will not be renewed on its billing date and invoices will not be raised for it.
Points to note about pausing subscriptions:
- If a subscription has unbilled charges associated with it, the charges will not be invoiced automatically when the subscription has been paused. You will still be able to invoice them manually.
- End-of-term changes to subscriptions, if any, will be discarded if the subscription is paused before its billing date.
Pro Tip: You can view the end-of-term changes by going to a subscription’s details page and clicking View Changes.
- Paused subscriptions cannot be edited.
- You will not be able to add additional charges or one-time add-ons to paused subscriptions.
To pause a subscription:
Go to Sales > Subscriptions.
Select the subscription which you want to pause.
Click the More dropdown in the top right corner and select Pause Subscription.
Select one of the following options to pause your subscription:
- Immediately: The subscription will be paused immediately.
- On Scheduled Date: You will be able to set a date on which the subscription should be paused.
- On Next Renewal Date: The subscription will be paused on the next renewal date, however, it will not be renewed.
- Select the date on which you want the subscription to resume.
- Enter a reason for pausing your subscription. This reason will be displayed in the Recent Activities section.
- Click Save.
Now, the subscription will be paused according to the schedule that you’ve configured.
Warning: Subscriptions can only be paused if they are in the Live status. If a subscription’s status changes on the day that it’s scheduled to pause, the subscription will not be paused. For example, if a subscription’s status changes from Live to Non-renewing or Dunning, on its scheduled pause date, the subscription will not be paused.
Resume Subscriptions
Points to note about resuming subscriptions:
- If a subscription is resumed after its next billing date:
- An invoice will be raised for the current cycle’s subscription renewal charges, along with any unbilled charges that were supposed to be invoiced when the subscription was paused.
- The subscription’s billing date will be changed to the date on which you resume your subscription.
- If the subscription is auto-charge enabled, an invoice will be raised for the current cycle’s subscription renewal charges, along with any unbilled charges that were supposed to be invoiced when the subscription was paused and a payment attempt will be made. If the payment attempt is susccessful, the subscription will move to the Live status, if not, the subscription will move to the Past Due status and your Retry Settings will come into play.
- If a subscription is resumed before its next billing date, there will be no change to its billing date and invoices will be raised normally.
If you had set a resume date while pausing your subscription, your subscription will resume automatically on this date. However, if you did not do this, and your subscription is paused indefinitely, you will be able to resume the subscription manually. Here’s how:
- Go to Sales > Subscriptions.
Pro Tip: Select the Paused Subscriptions view filter from the view filter dropdown to easily identify your paused subscriptions.
Select the subscription which you want to resume.
Click the More dropdown in the top right corner and select Resume Subscription.
Configure when you want to resume your subscription. You can choose to resume it immediately or set a date on which it should resume.
Click Save.
Your subscription will resume according to the schedule that you’ve configured.
Change Pause and Resume Schedules
You can change the pause and resume schedules for your subscription at any time.
Go to Sales > Subscriptions and select a subscription.
Click Change Schedule in the subscription’s details page.
Here, you will be able to change your pause and resume schedules. You can also delete the schedule entirely by clicking Delete Schedule.
Events for Paused and Resumed Subscriptions
You can use automation workflows, such as webhooks, to let your business systems know that a subscription has been paused or resumed in Zoho Billing.
You can create webhooks that are triggered when a subscription has been paused or resumed, using the Subscription Paused and Subscription Resumed events, respectively.
These events can also be used to trigger email alerts, which can be useful to notify your customers when a subscription has been paused or resumed.
Cancelling a subscription
Churn is inevitable but knowing and tracking the reasons for the downgrades is a crucial measure. We have provided you with an additional key to track your churn. Now you can configure various possible reasons that your customer might have, to cancel your subscription. They can give you their valuable feedback when cancelling through the portal.
Where this helps ?
The churned subscriptions reports, non renewing profiles and much more lets you visualise the cancelled subscriptions and their details. Searching subscriptions with their date and filtering through for cancellations due to a particular reason, might give you insights on your business.
A subscription can be canceled either by you or by your customer.
By you:
- Navigate to the Subscriptions tab and select the subscription that you want to cancel.
- Once selected, click on More button at the top and click on Cancel Subscription from the drop-down.
- In the pop-up next, you can choose to cancel the subscription immediately or on the next renewal using Cancel immediately or Cancel on next renewal options respectively.
By your customers:
A subscription can only be cancelled from Customer Portal, if the cancel subscription option is enabled for them in the portal settings.
To enable the cancel subscription option for your customers,
- Navigate to Settings > Customer Portal > Subscription Management and enable the Cancel Subscription option using the checkboxes.
- You can choose to allow the customers to cancel the subscription either immediately or on the next renewal using the checkboxes provided.
For your customers to cancel a subscription from Customer Portal,
- Log into the Customer Portal and go to the Subscriptions tab.
- From the subscription list, Click on the subscriptions that has to be cancelled.
- In the subscription details page next, click on the Cancel button at the top-right corner to cancel the subscription.
Pro-Tip:-
Cancel immediately - This will cancel the subscription right away.
Cancel on next renewal - This will cancel the subscription at the end of the current term (i.e) the next billing date.
Reactivating a subscription
If the subscription was cancelled using Cancel on next renewal, here’s how you can reactivate the subscription before the term ends.
- Go to the Customers tab and choose the respective customer.
- Select the required subscription and click the Reactivate Subscription button.
If the subscription was cancelled using the Cancel immediately option, follow the below steps to reactivate the subscription.
- Go to the Customers tab and choose the respective customer.
- Select the required subscription and click the Change Subscription button.
- Make sure the required plan and addons are selected before charging the customer.
Reactivating an expired subscription
Reactivating an expired subscription allows you to create the same subscription for the same customer without having the need to add the plans, coupons and add-ons again. You can also choose to edit the plans, coupons and add-ons if you wish to.
To reactivate the expired subscription, follow the steps below:
- Navigate to the expired subscription which you would want to reactivate and click on the Edit button.
- In the Subscription details page, make the changes to the subscription if needed any, and click on Continue.
- Next, click on Update in the Subscription Preview page to reactivate the subscription.
Deleting a subscription
A subscription in any state can be deleted at any point of time. To delete a subscription,
- Navigate to the subscription details page of the subscription you want to delete.
- Click on More > Delete Subscription.
Custom View
Custom View can be used to display subscription information that you feel relevant by creating a set of rules. Let’s take a scenario for us to understand better.
Scenario 1:
When the default Active filter is used it displays information such as Date, Customer Name, Email, Status etc. Sometimes, you might not need the excess information for subscriptions that are in Active State. So, what you can do is, create a Custom View and display only the relevant information that you need. For instance, you can remove the Activated On information column or any other column that you feel irrelevant.
Similarly, you can create a custom view to list the subscriptions that involves one particular Sales Person. Or, list the subscriptions that were cancelled on a particular date.
So, now that you’ve understood how Custom View works, let’s learn how to,
Create a Custom View
To create a custom view,
- Go to the Subscriptions tab.
- Click on the drop-down button at the top of the subscription list and click on + New Custom View.
- In the following screen, enter a name for the Custom View. Checking Mark as Favorite will display the custom view in the top of the filter list.
- Specify the criteria and column preferences.
- You can choose to share this custom view with other organization users by clicking on Everyone under Share this with: section or select Only Me to keep it to yourself.
- Click Save.
Edit a Custom View
To edit a custom view,
- Go to the Subscriptions tab.
- Select the custom view that you’d want to edit from the filter list.
- Next, click on the Edit icon that appears next to the custom view title.
- Make the changes and click Save.
Delete a Custom View
To delete a Custom View,
- Go to the Subscriptions tab.
- Select the custom view that you’d want to edit from the filter list.
- Next, click on the Edit icon that appears next to the custom view title.
- In the following screen, click on Delete at the bottom-right corner.
 Yes
No
Yes
No
Thank you for your feedback!