
Pricing Widgets
IN THIS PAGE…
A pricing widget shows a list of different plans and addons available for a particular subscription item, highlighting the price and key features of each. In Zoho Billing, you can create a pricing widget for your plans and embed it in your website. This will help your customers learn about your plans, compare the features & prices, and subscribe to them easily. Let’s take a look at how you can create and manage pricing widgets in Zoho Billing.
Create Pricing Widget
Insight: You can create multiple pricing widgets for a product. This will help if you have separate pricing widgets for standard pricing and discounted pricing.
Here’s how to create a pricing widget:
- Go to Pricing Widgets under Product Catalog.
- Click + New in the top-right corner.
- Enter a name and select a product.
Click Proceed.

Now, a pricing widget will be created for the product.
Customize Pricing Widget
You can customise your pricing widgets in several ways. Here’s how:
Change Templates
You can change the template of your pricing widget. Here’s how:
Click Change next to the template name in the Pricing Widgets page.
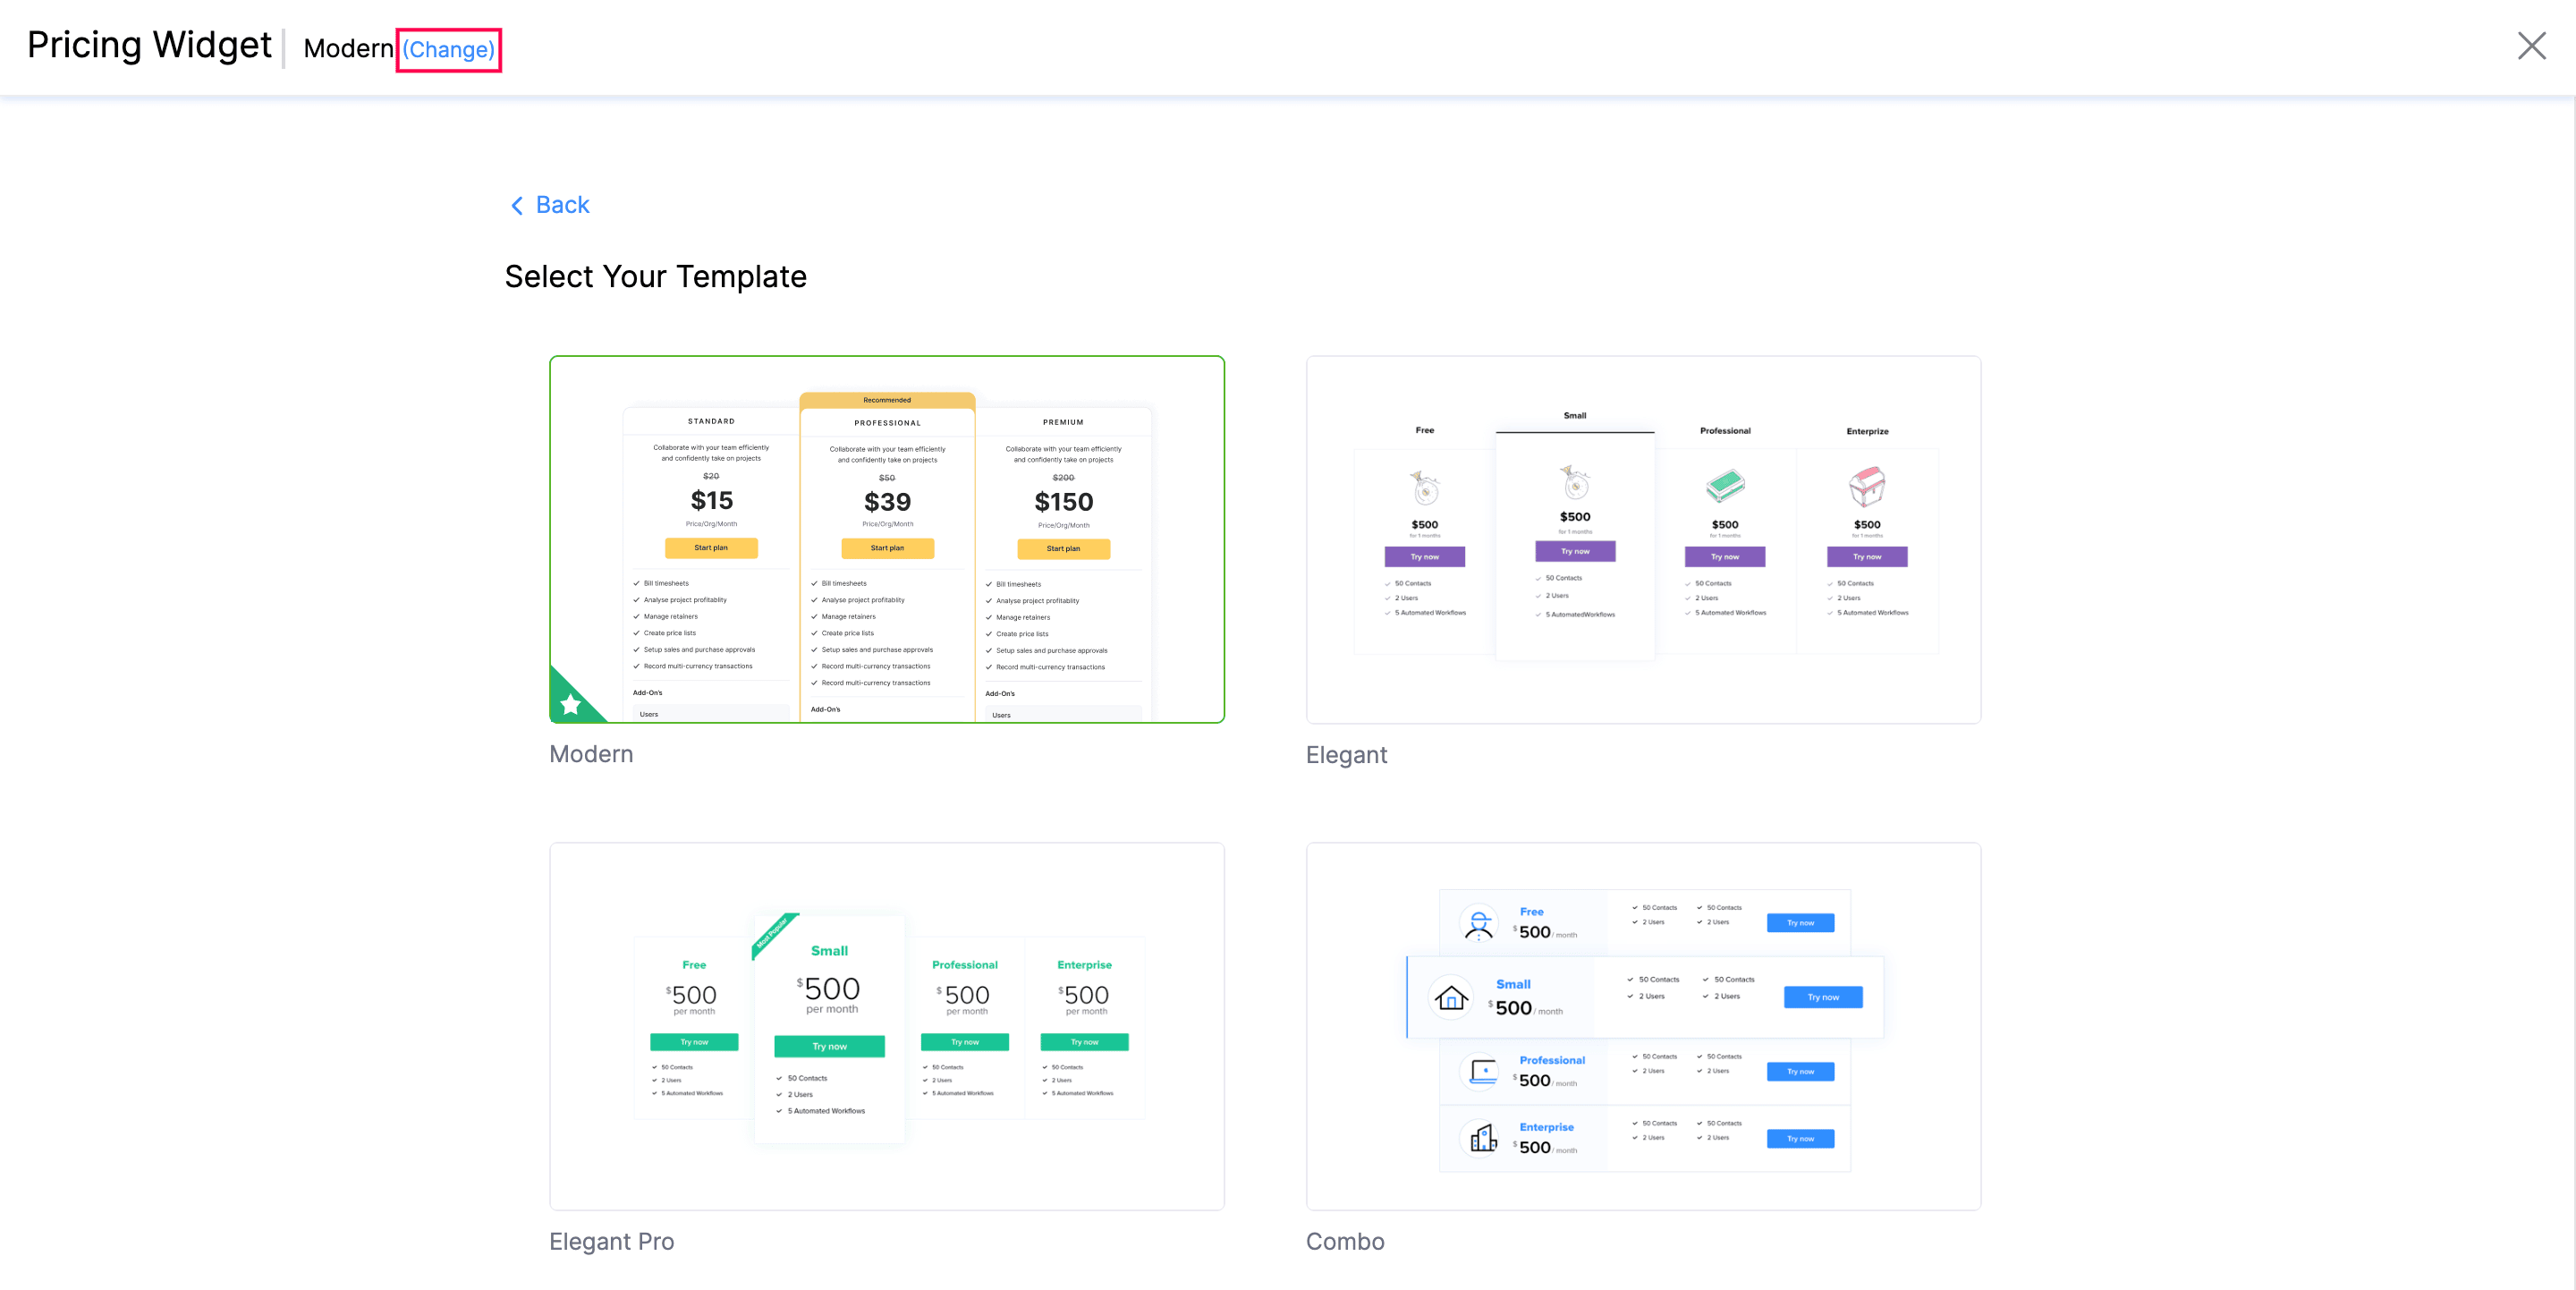
Select the desired template.
The theme of the template will be changed.
Select Plans
You can add, reorder, and create custom plans you want in the pricing widget.
Group Plans
Here’s how you can group plans in your pricing widget:
- Go to the Select Plans tab under Pricing Widgets.
| Field | Description |
|---|---|
| Group plans by frequency | Mark this option to group plans based on their frequency. For example, when the option is enabled, all the monthly plans for the subscription items will be grouped together under one tab. |
| Frequency Selector Style | Select the format (Tab or Dropdown) for displaying the frequency selector on the pricing page. |
| Default Frequency | Choose the default plan frequency you want to show when customers visit the pricing page. |
Select & Reorder Plans
Here’s how you can select and reorder plans in your pricing widget:
- Go to the Select Plans tab in the Pricing Widgets tab.
- You can change the plan frequency name in the textbox under Select & Reorder Plans.
- Choose which plans will be displayed on the pricing table by sliding the toggle next to the plans.
- Select and drag the plan to reorder them on the pricing page.
Click the Star icon next to the plan to highlight the most popular plan.

Custom Plan
Here’s how you can create a custom plan for your pricing widget:
- Go to the Select Plans tab in the Pricing Widgets page.
- Click + Add a custom plan to create a custom plan.
- Enter the Plan Name, Plan Description, Button Name, and Button Action.
- Enter the Plan Features which you want to provide in your custom plan. Use the bar symbol( | ) to separate multiple points.
Click Save.

Configure Plans
You can add currencies, addons, and button action for each plan in your pricing widget.
Strike Amount
Scenario: Charles offers a 30% discount on a clothing line during the end-of-season sale. The strike amount is ₹1,000, and the sale price is ₹700. This makes it clear to his customer that the original price was ₹1,000, and they are saving ₹300. Showing the discount like this makes the deal more appealing and encourages customers to buy.
Here’s how to do this:
- Go to the Configure Plans tab under Pricing Widgets.
- Select the plan which you want to configure.
You can indicate the price change or discount by entering the old amount in the Strike Amount field.

Button Action
Here’s how to add a button action in the pricing widgets:
- Go to the Configure Plans tab under Pricing Widgets.
- Select the plan which you want to configure.
- Click the dropdown next to the Button Action and select the action which you want the button to perform.
The button actions include:
| Button Action | Description |
|---|---|
| Hosted Payment Page | Your customers will be redirected to the plan’s Hosted Payment Page when you select this as a button action. |
| Custom Link | Your customers will be redirected to the link that you enter in the field. You can enter your checkout page or any specific page to which you want to redirect your customers. |
| Email Address | Your customers will be redirected to a mail app with the email address that you entered in the field automatically set as the recipient email. |
| Phone Number | Your customers will be redirected to call the phone number that you entered in the field. Insight: Here’s where your customer will be redirected once they click the button: |

Addons
Here’s how to include addons in the pricing widgets:
- Go to the Configure Plans tab under Pricing Widgets.
- Select the plan which you want to configure.
- Select + Click to associate addons under Addons.
- Mark the addons that you want to associate with the plan.
Click Save.

Currencies
Here’s how to add multiple currencies to the pricing widgets:
- Go to the Configure Plans tab under Pricing Widgets.
- Select the plan which you want to configure.
- Hover over the Currencies field and click Configure.
- Mark the currencies that you want to associate with the plan.
Click + Add Currency to add a price list with a new currency.

Click Save.
Note: You cannot associate more than one price list with the same currency.
To delete an associated currency:
- Hover over the Currencies field and click Configure.
Click the Trash icon next to the currency that you want to delete.

Your customers can switch between the associated currencies from the currency selector.

Here’s how you can configure the currency selector:
| Field | Description |
|---|---|
| Currency Selector Style | Select the format (Tab or Dropdown) for displaying the currency selector on the pricing page. |
| Default Currency | Choose the default currency you want to show when customers visit the pricing page. |

Customize Widget
You can add a caption, change the name of the highlight label and button label for each plan in your pricing widget. Here’s how:
- Go to the Customise Widgets tab under Pricing Widgets.
| Field | Description |
|---|---|
| Highlight Label | Customise the name of the highlight label in the textbox. |
| Caption | Enter a caption for the plans, which will be common to all plans, and will be displayed right above the checkout button.
Note: If your plans include a setup fee, you can use the %setupfee% placeholder to display it.

|
| Button Label | Customise the name of the checkout button in the textbox. |
| Button Colour | Customise the colour of the checkout button. |
| Show Plan Frequency | Mark this option to show the plan frequency inside the pricing table. 
|
| Include previous plan’s features in the next plan | Mark this option to include the features of the previous plan in the next plan. |
| Show monthly prices for yearly plans | Mark this option to display monthly prices for yearly plans. This can help your customers see a breakdown of monthly prices for the plans and for you to promote yearly plans as more cost-effective options for long-term users, compared to monthly subscriptions. |
You can preview changes you made and click Save at the top to save all the changes.

Then, a popup with the code appears. Click Copy Code to copy and paste it in your website’s code to embed the widget.

Edit Pricing Widget
Here’s how you can edit a pricing widget:
- Go to Pricing Widgets under Product Catalog.
- Hover over the pricing widget that you want to edit.
Click the dropdown and select Edit.

Make the necessary changes.
Click Update at the top.

Delete Pricing Widget
You can delete the pricing widget if you want. Here’s how:
- Go to Pricing Widgets under Product Catalog on the left sidebar.
- Hover over the pricing widget that you want to delete.
Click the dropdown and select Delete.

Click Delete in the popup that appears.
Now, the pricing widget will be deleted.
 Thank you for your feedback!