Integrate MailChimp with Zoho SalesIQ

Integrating MailChimp with SalesIQ


What is MailChimp?

Mailchimp is an all-in-one marketing platform that helps you manage and talk to your clients, customers, and other interested parties. It gives you the ability to create and manage mailing lists, newsletters, automated marketing campaigns and more.

MailChimp in SalesIQ

  1. Integrating your MailChimp account with SalesIQ will help you identify the visitors visiting your website through marketing emails and targeted campaigns.
  2. You can also grow your newsletter subscriber list by allowing them to sign up for your newsletters while filling out the pre-chat survey.
  3. The Marketing campaigns sent via MailChimp Campaigns can be tracked, and all the activities of the visitor will be reported in your SalesIQ dashboard.
  4. Also, your users can gain knowledge about the email campaigns sent to the particular visitor when they visit your website which makes the sales/support process even more easier. You can add chat signatures to your email campaign and get live chat into your SalesIQ dashboard. 
Note:
To use Zoho SalesIQ integrated with MailChimp, you will need to be a customer of the Enterprise/Professional/Basic plans of Zoho SalesIQ and have a MailChimp account. You can also try this feature during your 14 days free trial. 

How to integrate MailChimp Campaigns with your SalesIQ?

To integrate MailChimp campaigns with SalesIQ,
  1. On the SalesIQ Settings page, navigate to Developers > Integrations > Email Marketing > MailChimp.
  2. Click on the Enable button on the top right of the MailChimp page.

  1. The MailChimp - SalesIQ integration page appears in a new window.
  2. Enter your MailChimp Username and password, and click Log In.
  3. Your MailChimp account is now integrated with SalesIQ.

Who can view the MailChimp Campaign details in the SalesIQ dashboard?

  1.  If you wish to show the campaign details to all the users irrespective of departments, then you can choose the "All Departments" option. Then, the MailChimp Campaign details can be viewed by section.
  1. You also have the option to select the departments who can view the Campaign details in the Zoho SalesIQ dashboard. To allow only selected departments to view the campaign details, choose the "Selected Departments" option.
  2. A search option will appear, click on the search bar.  The departments available will be auto-populated and you can choose departments from the list. Now, only the users of the chosen department can view the MailChimp Campaign Details in Zoho SalesIQ dashboard.
  1. You can delete the chosen departments by clicking on the "x" button next to each chosen department.

How to enable the newsletter subscription option in the chat window?

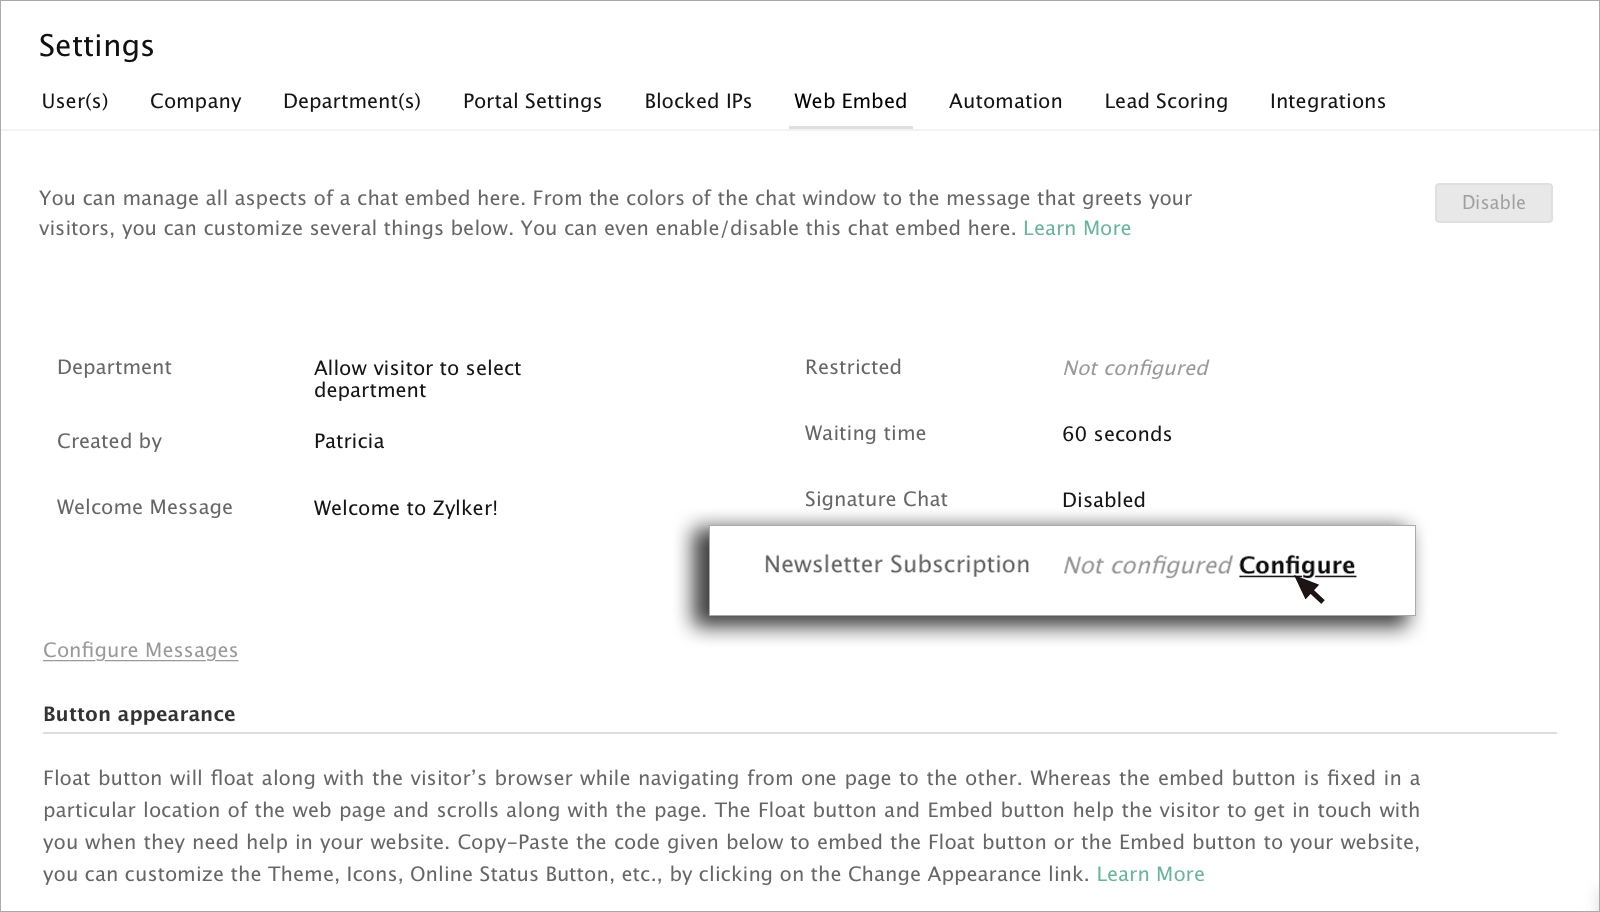
SalesIQ now allows you to configure the "Newsletter Subscription" option in the pre-chat survey window, which allows your visitors to subscribe to your newsletters sent from MailChimp Campaigns. 
  1. Navigate to Settings > Personalize > Brands > Brand name > Flow Controls.
  1. In the Fields section, click on Add Field.
  1. Drag and drop the Newsletter Subscription field.
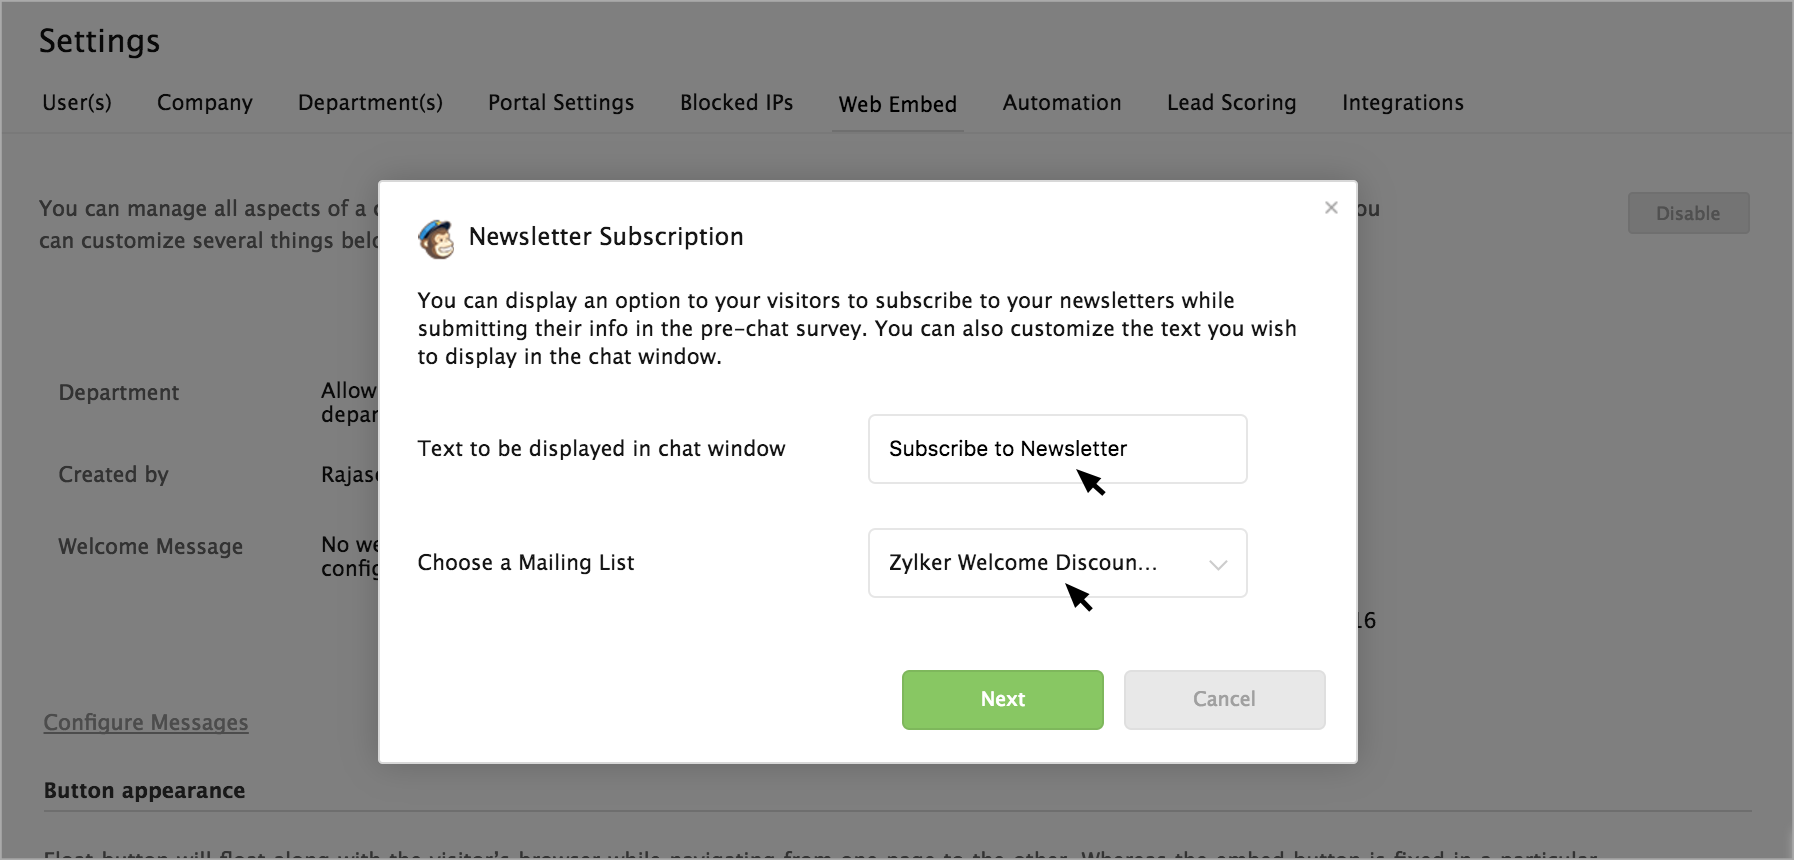
  1. A dialog box will appear, enter the text you would like to display to your website visitors in the chat window. Then, choose a mailing list from the drop down and click Save. 
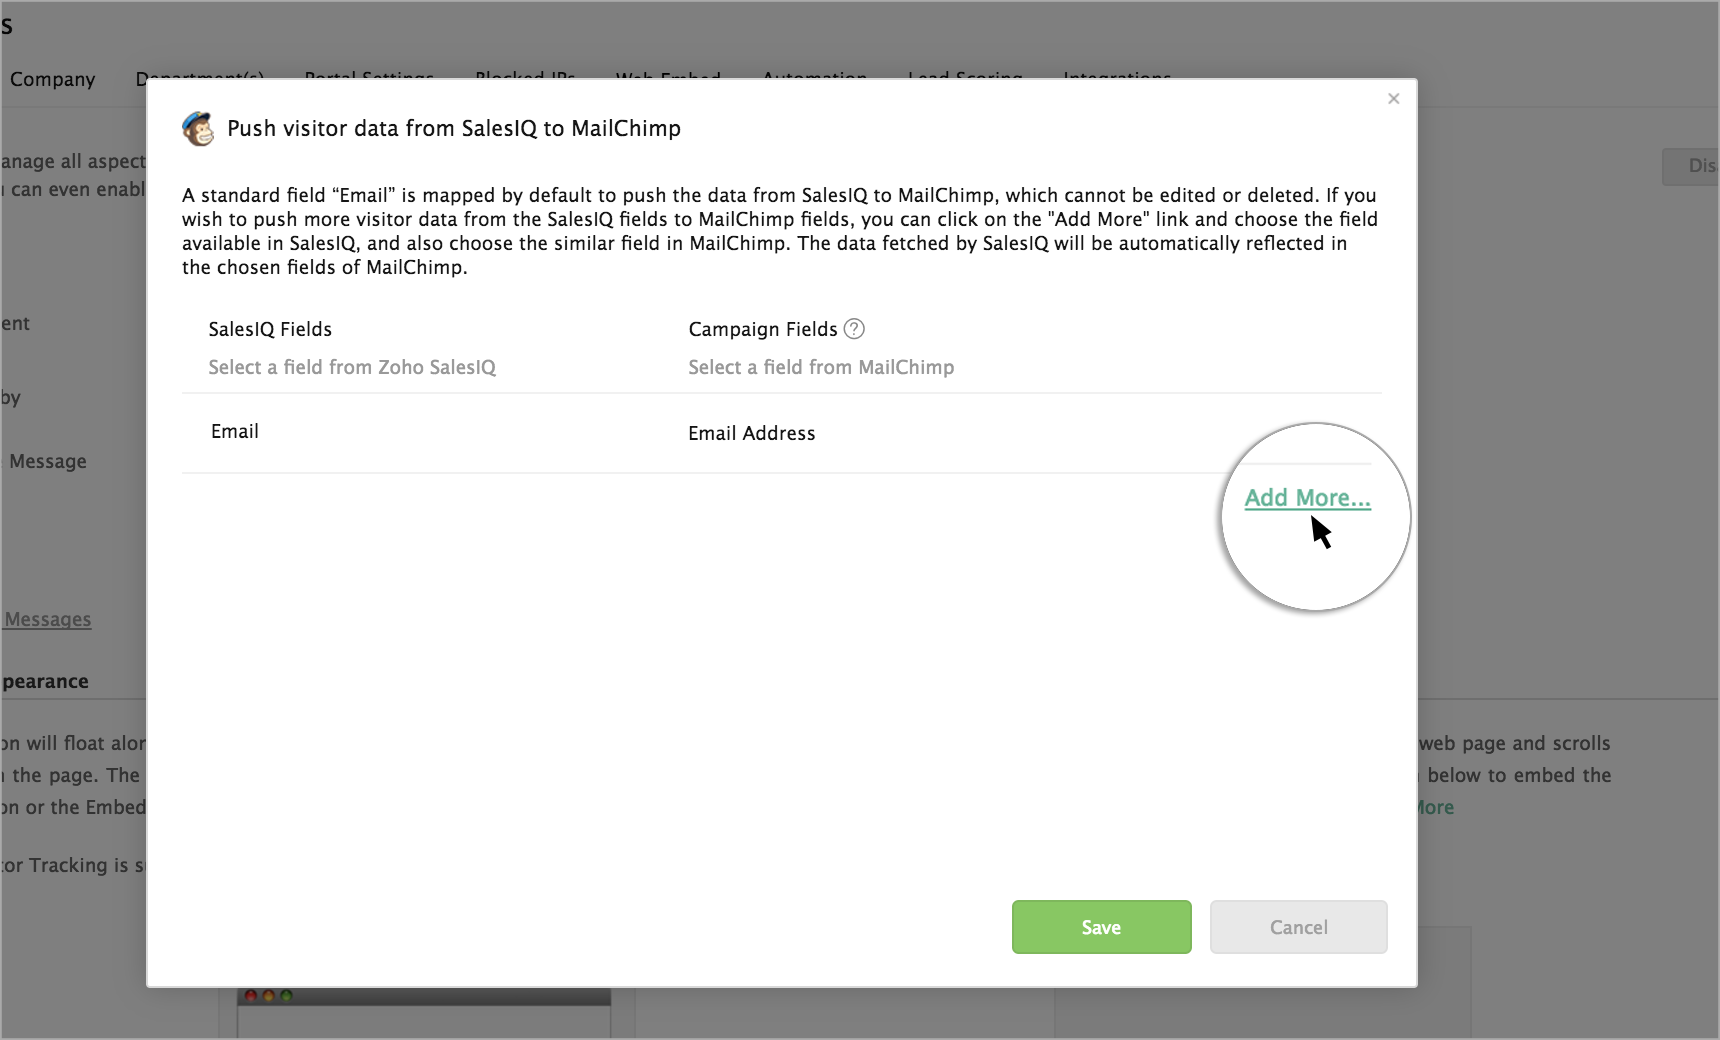
You can choose the fields to push the data automatically from SalesIQ to MailChimp Campaigns. By default, the Email field in SalesIQ and Email Address field in MailChimp Campaigns will be mapped.
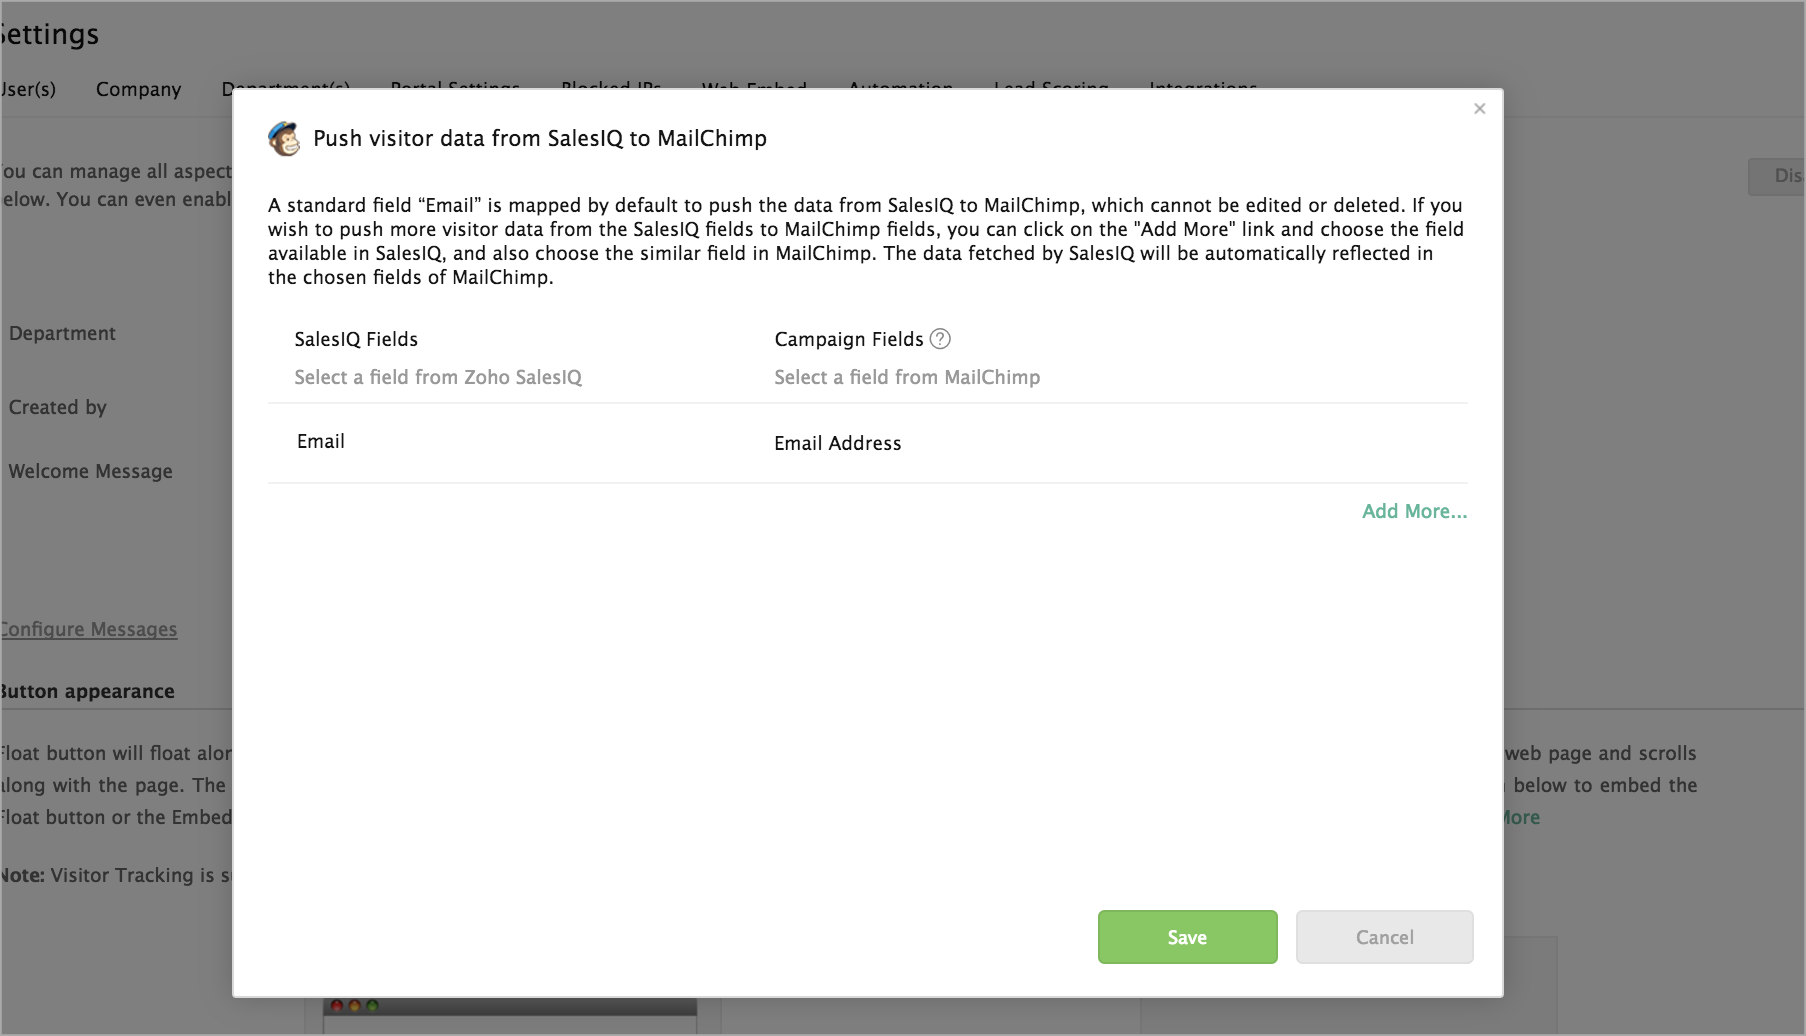
  1. Other than the email field, you can choose four more fields to be mapped. Click on "Add Field" to map other fields.
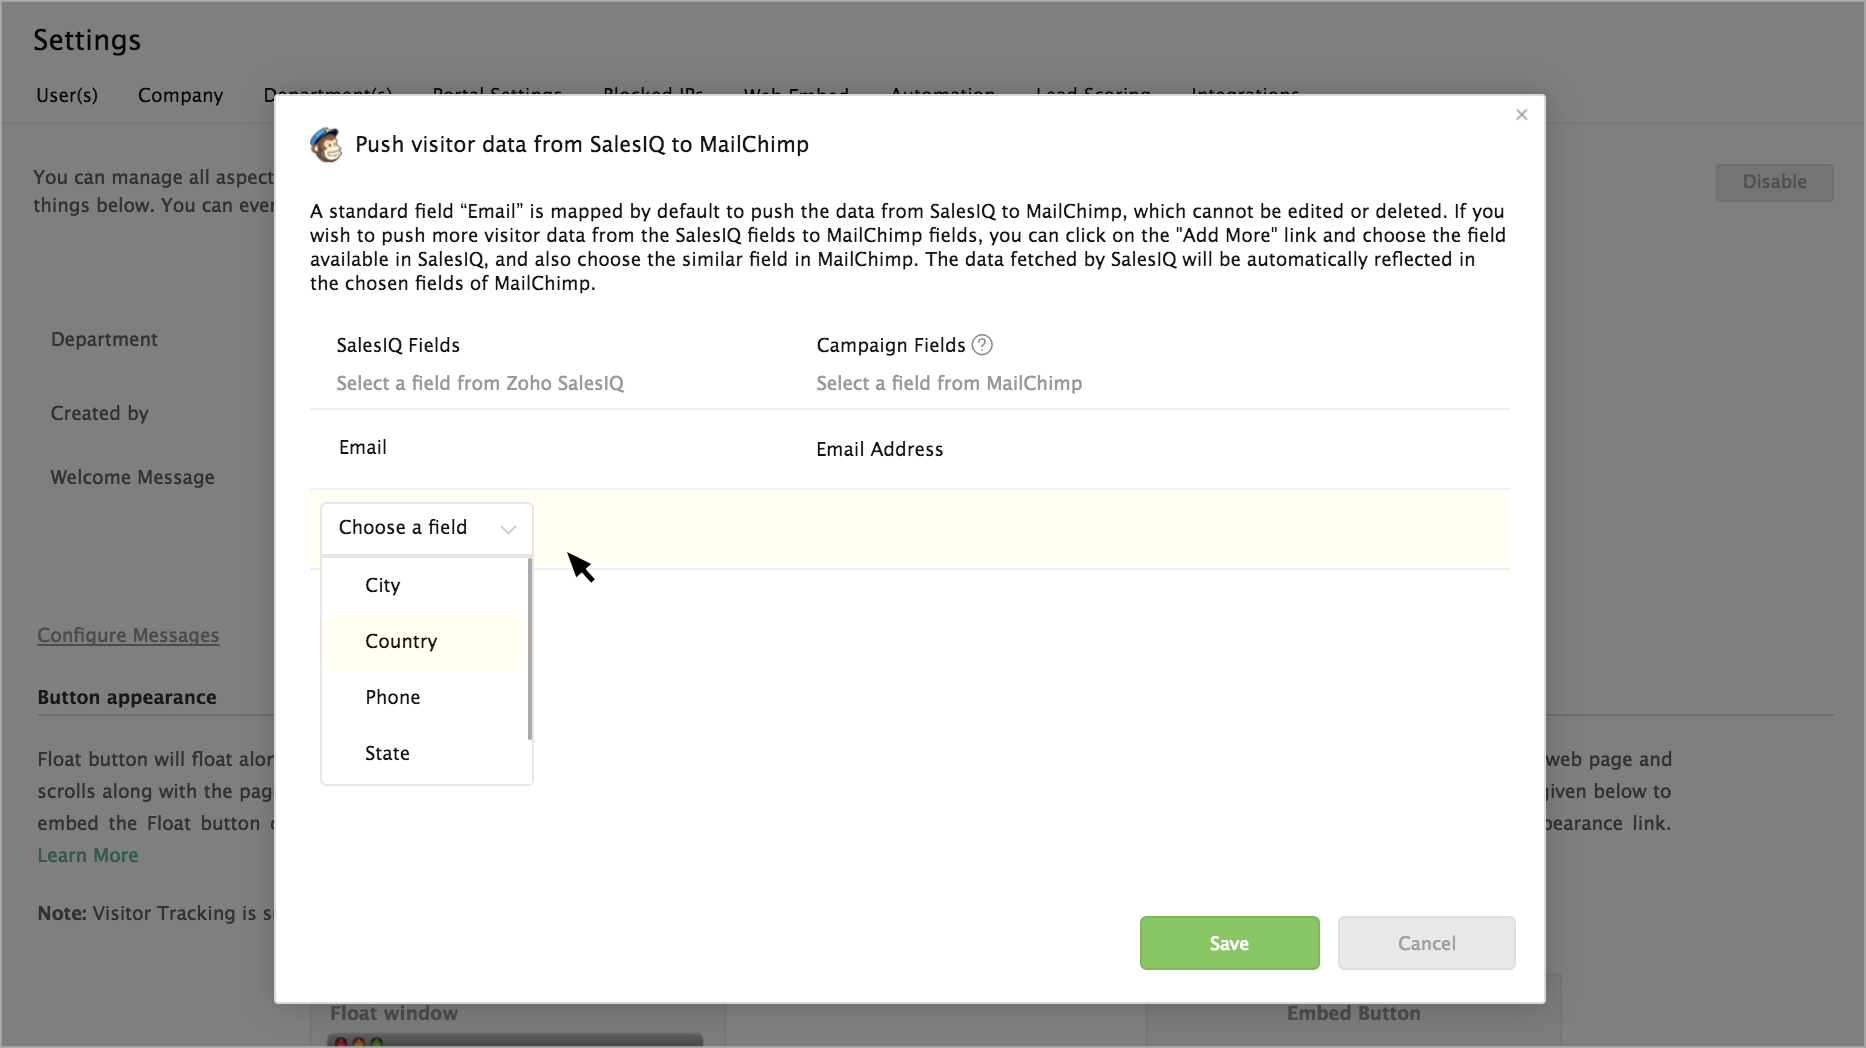
  2. Choose the field you would like to map in SalesIQ from the drop-down under "SalesIQ Fields." 
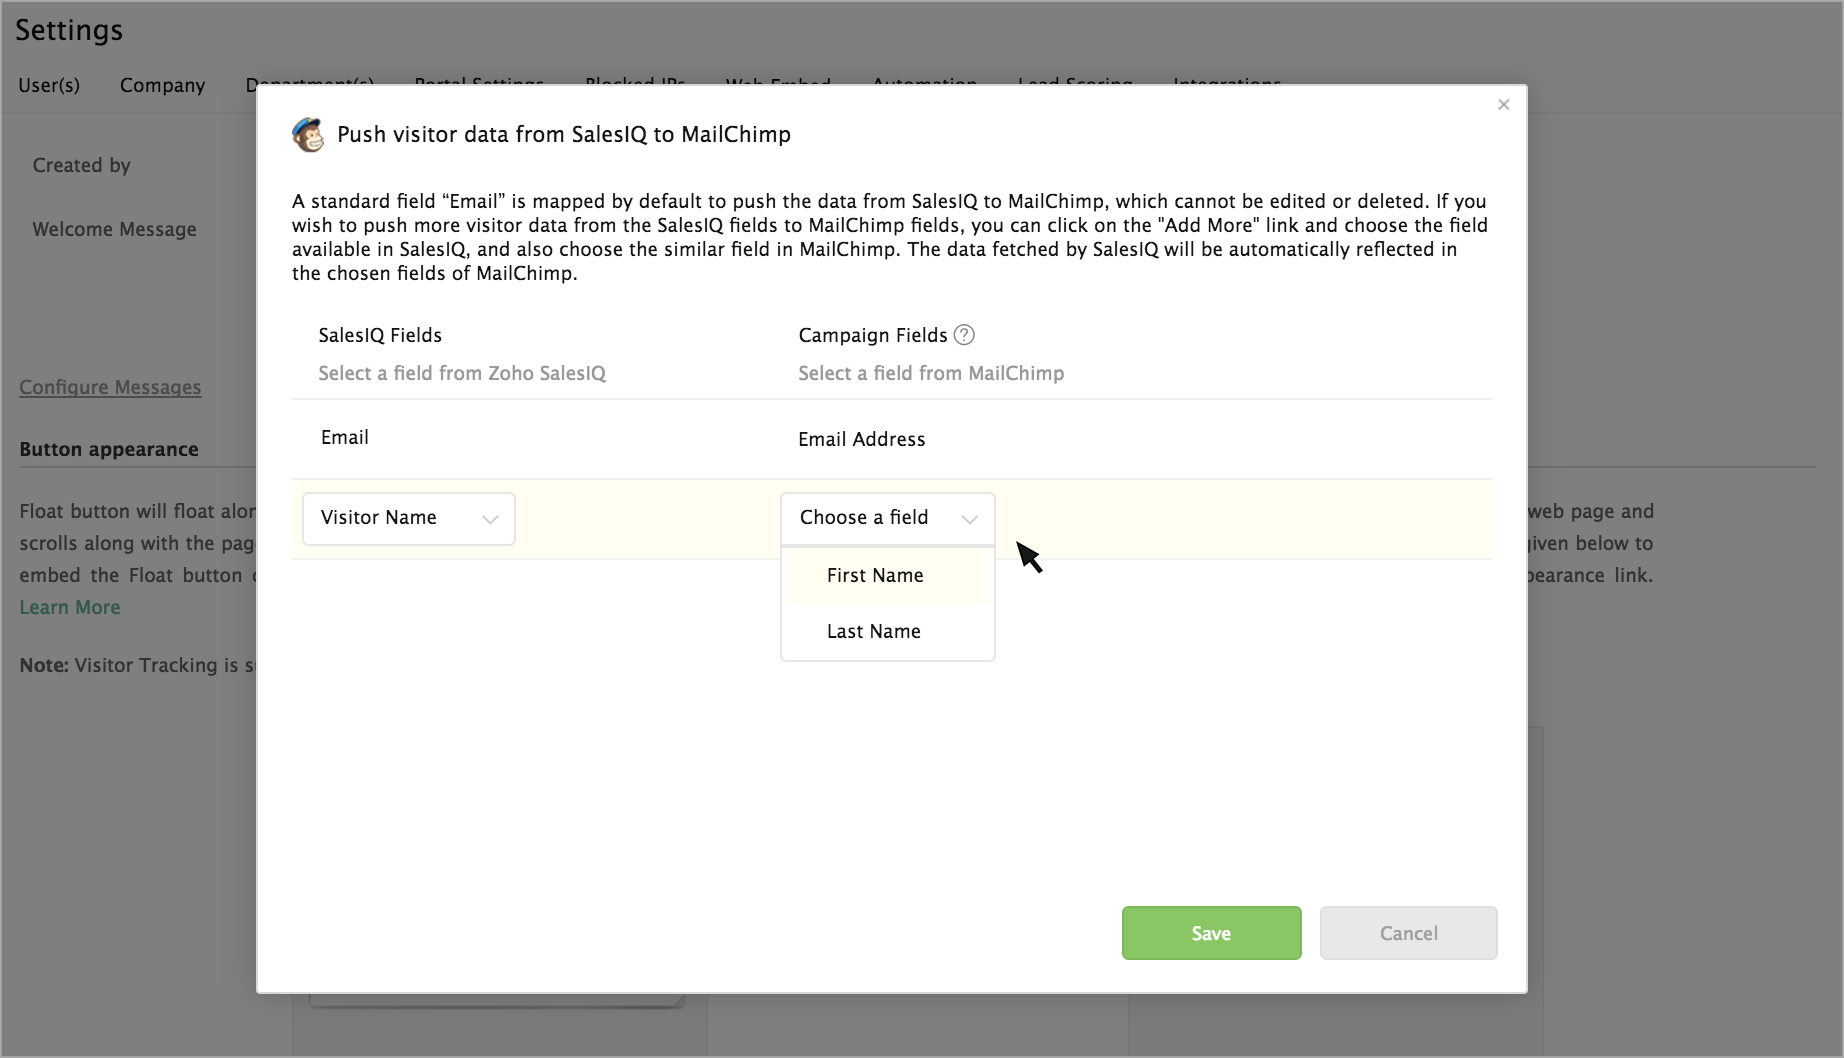
Then, choose the parallel field in MailChimp Campaigns from the drop-down under "Campaign Fields."
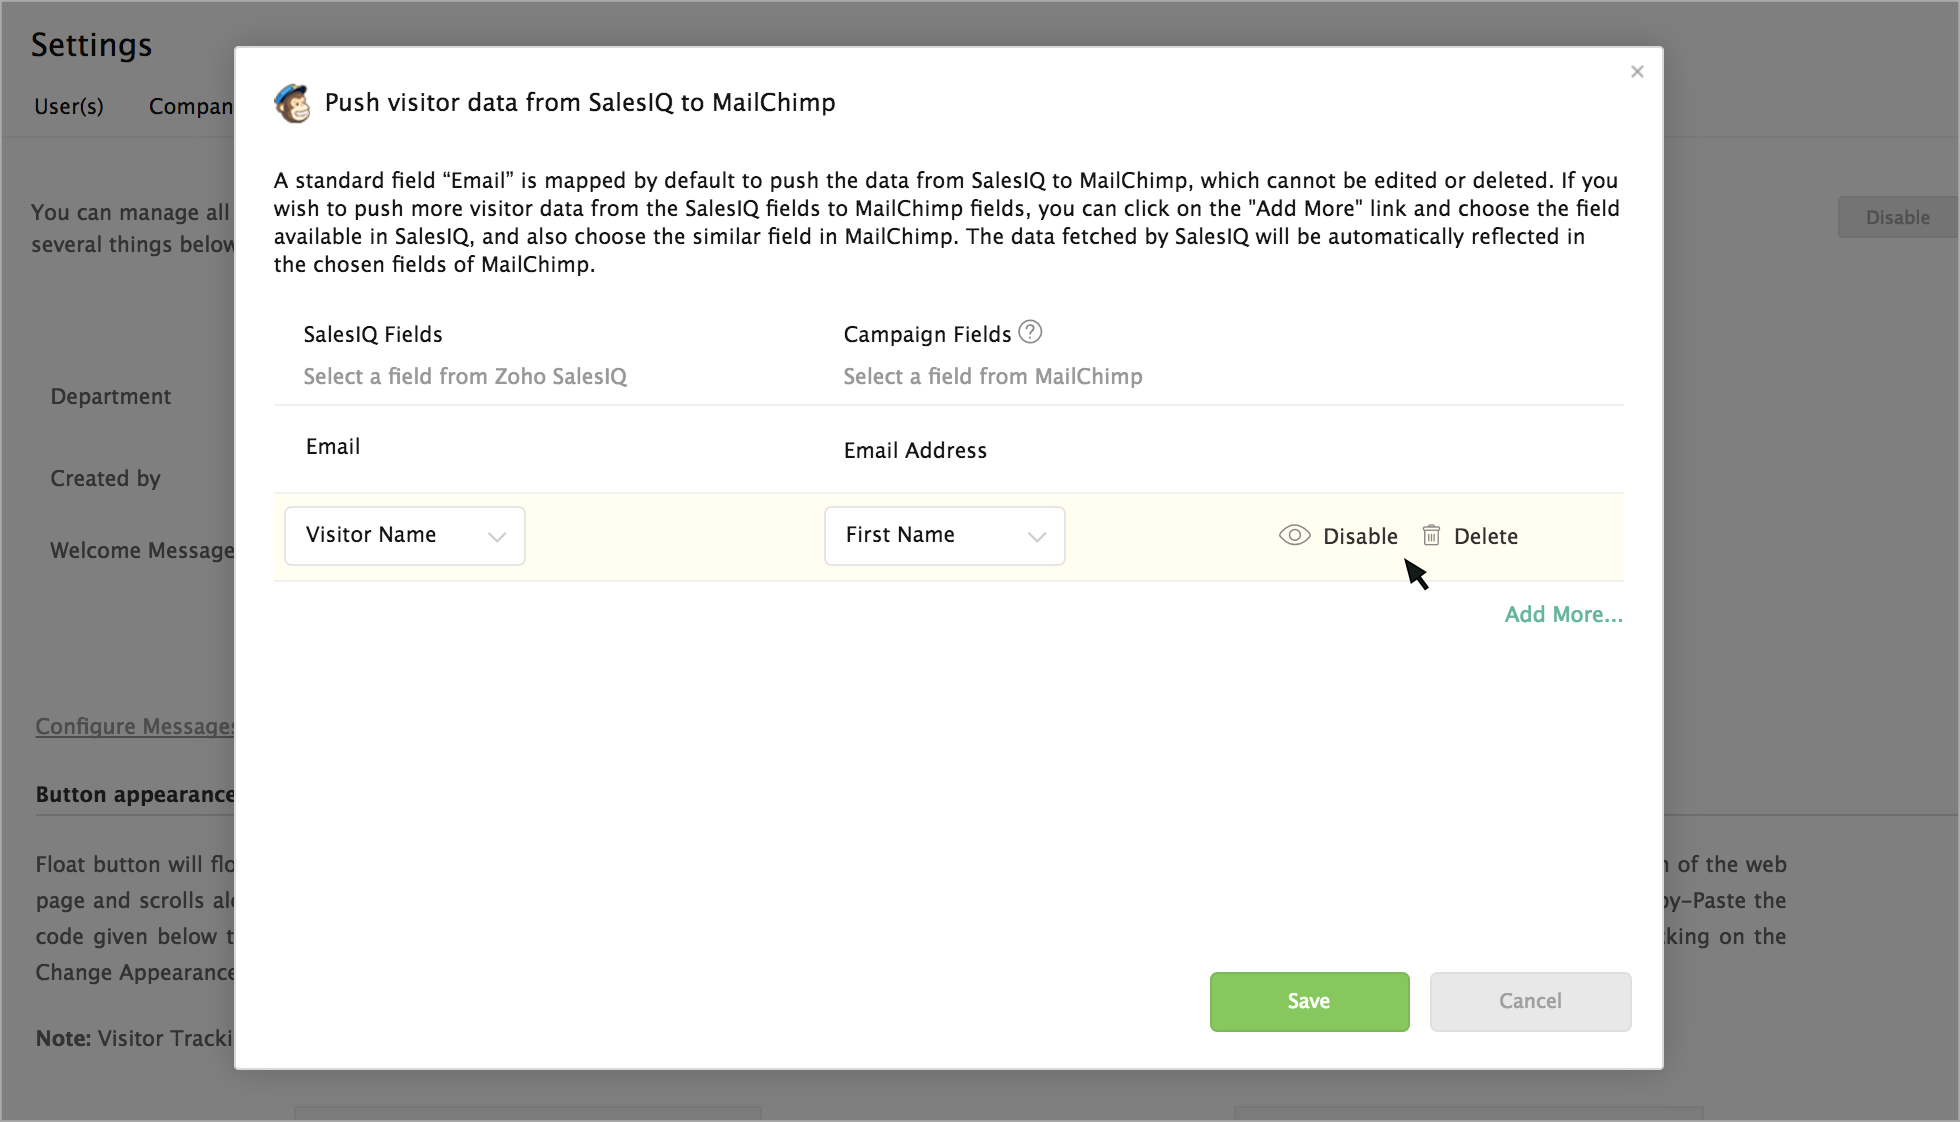
  3. The data fetched by SalesIQ will be pushed to the selected fields in MailChimp Campaigns. You can also remove the added fields using the "Delete" button.
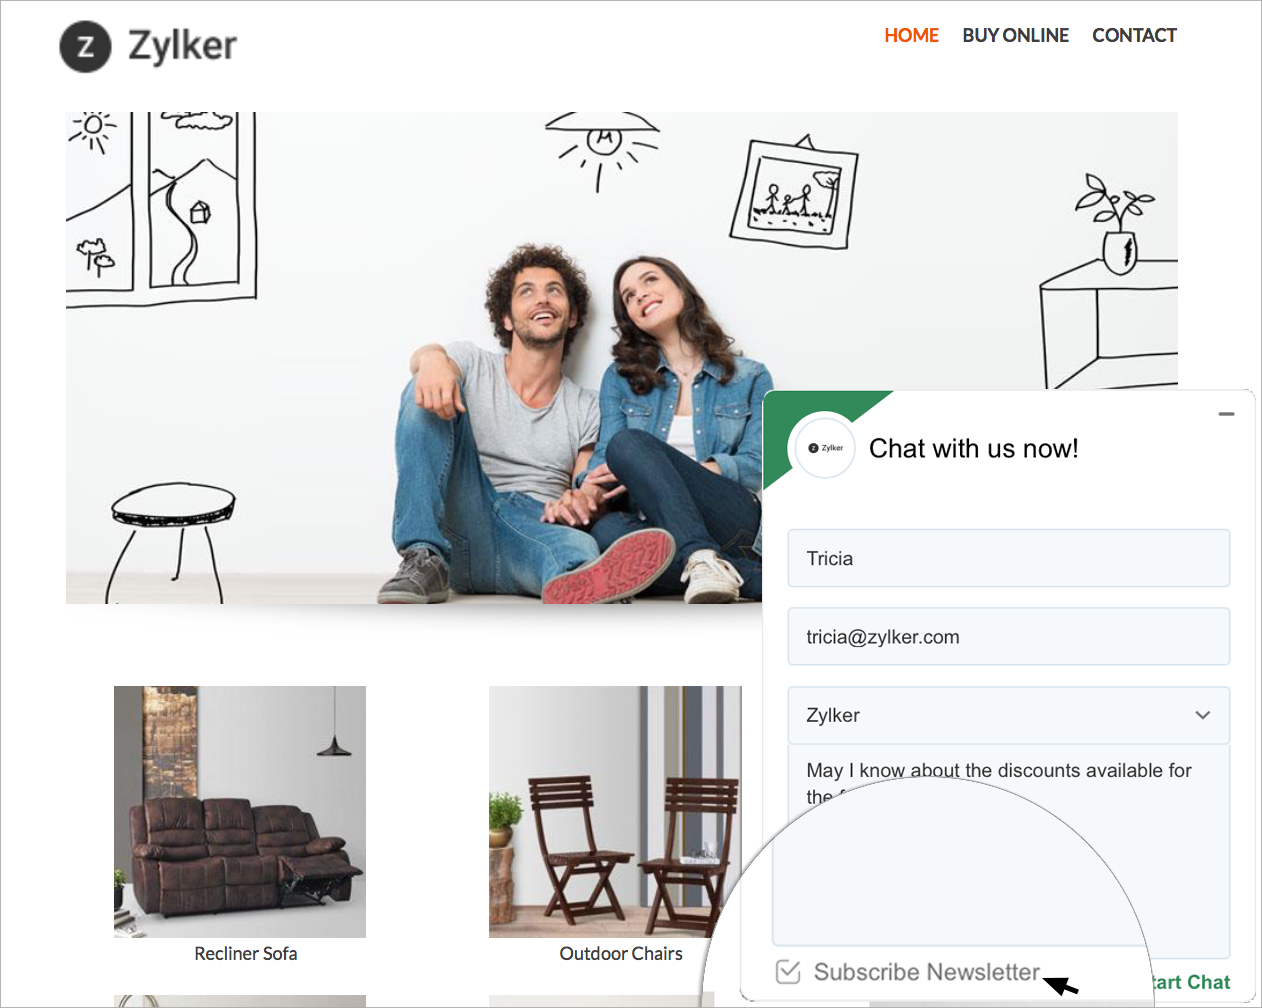
  1. Now, the visitors who access the chat widget on your website will be able to view the Newsletter subscription option in the pre-chat survey window.

Where are the Campaign details displayed in the SalesIQ dashboard?

Campaign info displayed in visitor history

You can view the Last campaign sent to the visitor in the visitor history section. You can click on the Campaign name to see the campaign content.

How to score the website visitors based on the email campaigns sent via MailChimp?

You can now score the visitors visiting your website from the specific email campaigns sent via Zoho Campaigns. 
  1. Go to Settings > Automate > Lead Scoring  and click Add.
  2. Select MailChimp campaigns in the condition drop-down.
  3. The emails campaigns sent from your MailChimp Campaigns will be listed in the next drop-down. Choose an email campaign and then, choose an action based on which you would like to score the visitor.
  1. Now select the points you would like to award for the specific action and then, click the Done button.


Now when each time the visitor visits your website from the specified email campaign, points will be added/reduced to the visitor's score based on the rule that was set.

How to prioritize the website visitors in the tracking rings based on the email campaigns sent via MailChimp?

You can prioritize the website visitors on your live ring view based on their email campaign. To customize the ring view,
  1. Click on the Customize button on the top right corner of the SalesIQ Home Page. 
  1. Click on 'Add' in the Custom section.
  1. Under Audience criteria, choose 'Mailchimp Campaign' in the Current Page Title section. The emails campaigns sent from your MailChimp Campaigns will be listed in the next drop-down. Choose an email campaign.
  2. Then choose an action based on which you would like to prioritize the visitor in the tracking rings. Then click on Next.
  3. Define the criteria for all four rings based on your requirement.
  4. Finally, click on "Save".


Now, the visitors visiting your website from the email campaign will be prioritized in the specified rings of the ring view.

How to filter the website visitors in visitor history based on the email campaigns sent via MailChimp?

You can apply a filter to list the visitor visited your website from a specific email campaign.
  1. In the SalesIQ dashboard, navigate to People > Visitors and click on the Add symbol (+) > 
  2. The Create a visitor view window will open.
  3. Now select "MailChimp Campaigns" in the conditions section.
  4. The emails campaigns sent from your MailChimp Campaigns will be listed in the next drop-down. Choose an email campaign.
  5. Then, select an action based on which you would like to get the visitor list.
  6. Then, provide a name for your list and click the Save button. Then, the visitors visiting the website via the specified email campaign will be listed in a separate column.

How to set chat triggers to the website visitors from a specific email campaign?

You can set a special trigger to the visitors visiting your website from the email campaigns you have sent.
  1. Navigate to Settings > Automate > Triggers > Add.
  1. Choose the brand for which you want to set the rule.
  2. Now select "MailChimp Campaigns" in the Audience Criteria conditions list. The emails campaigns sent from your MailChimp Campaigns will be listed in the next drop-down. Choose an email campaign.
  3. Then choose an action based on which you would like to get the visitor list. Then, click on 'Next'.
  1. In the “When would you like to initiate the trigger?” section, select an option, either 'Lands on my website' or 'Accesses any page on my website'. 
  1. Choose the type of action you would like to perform in the "Trigger type" section.
  1. Finally, set the time after which you would like to perform the action in the “after” text box.


Now when the visitor visits your website from the specified email campaign, then the action you have set (open chat window) will be triggered.

How to automate the process of adding the leaving website visitors to the email campaign list?

With the "Add to mailing list" option, you can add the visitors directly to the campaign email list when they leave your website.
  1. Navigate to Settings > Automate > Triggers and click Add.
  2. Choose the brand for which you want to set the rule.
  3. Now select "MailChimp Campaigns" in the Audience Criteria conditions list. The emails campaigns sent from your MailChimp Campaigns will be listed in the next drop-down. Choose an email campaign.
  4. Then choose an action based on which you would like to get the visitor list. Then, click on 'Next'.
  1. In the “When would you like to initiate the trigger?” section, Choose Leaves my website. Then click on Next.
  1. In the Trigger type section, choose Add to Campaigns mailing list.
  1. Then, you need to select your channel. You can either :
      • Add visitors to an existing list or

      • Create new list.

  2. You can select from the existing campaigns drop-down if you want to add visitors to an existing list.
  1. If you want to create a new list, you can click the Create new list option to generate a new list, then enter a name for the new mailing list in the text box.
  2. In the "Default From Email Address" and "Default Name," enter the default email address and Name of your MailChimp Campaigns account.
  3. You can add a short reminder about how the recipient joined your list.
  4. Set a periodic interval - weekly or monthly, to update the mailing list. Click Next.
  5. Give your rule a name and click Launch. If the condition and criteria of the visitor match then the visitor will be added to the email campaign list when they leave your website.

How to identify the website visitors name and email address referred from campaign emails sent through MailChimp?

You can identify the website visitors from the Mail Chimp campaign by adding the SalesIQ parameter mentioned below after the backlinks (which directs the customer to your website) in the campaign emails.
  1. ?siq_name=*|FNAME|* *|LNAME|*&siq_email=*|EMAIL|*
Example:
  1. https://www.yourlink.com/?siq_name=*|FNAME|* *|LNAME|*&siq_email=*|EMAIL|*

Note:
In case the URL contains the question mark (?) at its suffix then include the backlink preceded by an ampersand (&) symbol.

Example:
  1. http://www.yourlink.com/ /index.php?module=Products&siq_name=*|FNAME|* *|LNAME|*&siq_email=*|EMAIL|*
If not, then include the backlink preceded by the question mark (?) as shown below.

Example:
  1. https://www.yourlink.com/?siq_name=*|FNAME|* *|LNAME|*&siq_email=*|EMAIL|*
Also, ensure that you have embedded the SalesIQ code into your website source file to start tracking. Click here to know more about embedding the SalesIQ code.

How to categorize website visitors based on Campaign UTM variables?

SalesIQ allows users to modify and set their conditions based on campaign UTM variables for prioritizing the visitors in their dashboard.
  1. In the Live Visitor's view, click on Customize on the top right. 
  1. Inside this section, choose Add to pick the conditions and criteria to categorize visitors by Campaign UTM variables.
  1. Under Audience Criteria, select a condition relating to campaigns. These could be Campaign Content, Campaign Medium, Campaign Source, Campaign Term and Campaign Name.
  1. Define a "criteria" for your conditions and click on Next. Specify conditions and criteria for all four rings.
  1. Next, give a name to this rule and choose this Custom view for your SalesIQ dashboard. Now, the visitors visiting your website from the email campaign will be prioritized in the specified tracking rings.

How to initiate chat triggers based on Campaign UTM variables?

To automate proactive chat triggers, or to set up an action for your chat widget in the website conditions based on campaign UTM variables, do the following:
  1. Navigate to  Settings > Automate > Triggers and then click on 'Add' to create a new trigger with required Campaign UTM filters.
  1. Next, if you have multiple brands within your portal, choose the brand for which you want to set up you want to set up your trigger.
  1. Choose the audience - select a condition relating to campaigns. These could be Campaign Content, Campaign Medium, Campaign Source, Campaign Term and Campaign NameThen, define a criteria for your trigger and click on Next.
  1. In the “When would you like to initiate the trigger?” section, select an option.(on the landing page or while accessing any page on the website).
  1. Choose the type of action you would like your trigger to perform in the “Custom Trigger” section.
  1. Finally, set the time after which you would like to perform the action in the “after” text box.

How to route visitors to the required users based on the Campaign UTM variables?

To route the tracked visitor to the specific agent and to personalize the visitor tracking according to your business needs, do the following:
  1. Navigate to Settings > Automate > Visitor Routing.
  2. Click on the "Add" to set your required filters.
  1. Choose the audience - select a condition relating to campaigns. These could be Campaign Content, Campaign Medium, Campaign Source, Campaign Term and Campaign NameThen, define a criteria for your condition.
  1. Add the agents name in the “Route to Operators” section, select "Route to Selected Operators".
  1. Add your preferred operators using the search bar or simply select the operators from the list. Then, click on Next.
  1. To remove the added agents, hover over the agents and click " " symbol.
  1. Give a name to your Routing Rule and then click on "Launch".

Is it possible to add click on chat button in my campaign emails?

Zoho SalesIQ is well equipped that you can add a chat button in your campaign emails and get chats directed into your SalesIQ. To know more about Email Signature Chat, click here.


    Zoho CRM Training Programs

    Learn how to use the best tools for sales force automation and better customer engagement from Zoho's implementation specialists.

    Zoho CRM Training
      Redefine the way you work
      with Zoho Workplace

        Zoho DataPrep Personalized Demo

        If you'd like a personalized walk-through of our data preparation tool, please request a demo and we'll be happy to show you how to get the best out of Zoho DataPrep.

        Zoho CRM Training

          Create, share, and deliver

          beautiful slides from anywhere.

          Get Started Now


            Zoho Sign now offers specialized one-on-one training for both administrators and developers.

            BOOK A SESSION


                                You are currently viewing the help pages of Qntrl’s earlier version. Click here to view our latest version—Qntrl 3.0's help articles.


                                    Manage your brands on social media

                                      Zoho Desk Resources

                                      • Desk Community Learning Series


                                      • Digest


                                      • Functions


                                      • Meetups


                                      • Kbase


                                      • Resources


                                      • Glossary


                                      • Desk Marketplace


                                      • MVP Corner


                                      • Word of the Day


                                        Zoho Marketing Automation

                                          Zoho Sheet Resources


                                              Zoho Forms Resources


                                                Secure your business
                                                communication with Zoho Mail


                                                Mail on the move with
                                                Zoho Mail mobile application

                                                  Stay on top of your schedule
                                                  at all times


                                                  Carry your calendar with you
                                                  Anytime, anywhere


                                                        Zoho Sign Resources

                                                          Sign, Paperless!

                                                          Sign and send business documents on the go!

                                                          Get Started Now


                                                                  Zoho TeamInbox Resources


                                                                          Zoho DataPrep Resources


                                                                            Zoho DataPrep Demo

                                                                            Get a personalized demo or POC

                                                                            REGISTER NOW


                                                                              Design. Discuss. Deliver.

                                                                              Create visually engaging stories with Zoho Show.

                                                                              Get Started Now


                                                                                            You are currently viewing the help articles of Sprints 1.0. If you are a user of 2.0, please refer here.

                                                                                            You are currently viewing the help articles of Sprints 2.0. If you are a user of 1.0, please refer here.


                                                                                                  • Related Articles

                                                                                                  • Integrating Zoho Bookings with Zoho SalesIQ

                                                                                                    Zoho Bookings in SalesIQ Zoho Bookings is an online tool that your customers can use to book appointments with your experts and specialists to avail your services. When you publish your services on Zoho Bookings, your customers can access this ...
                                                                                                  • Integrating Whatsapp Channel with SalesIQ

                                                                                                    Integrating WhatsApp business with your SalesIQ helps you handle your business' WhatsApp chat conversations on your SalesIQ dashboard. Let your visitors contact you from the convenient channel, and your operators can handle the chat from their ...
                                                                                                  • Integrating WooCommerce with SalesIQ

                                                                                                    WooCommerce is the best way to turn your WordPress website into a fully functional e-commerce store. Technically speaking, WooCommerce is a WordPress plugin. It needs to be installed and activated inside the Wordpress to function. Zoho SalesIQ serves ...
                                                                                                  • Integrating Vision with SalesIQ

                                                                                                    You can set up your predefined smart rules in Vision for the chat transcript sent from Zoho SalesIQ on Chats and Missed chats. All the attended chat transcript will be addressed with the subject line “Chats :” followed by the visitor question. All ...
                                                                                                  • Integrating Teamsupport with SalesIQ

                                                                                                    You can set up your predefined smart rules in Teamsupport for the chat transcript sent from Zoho SalesIQ on Chats and Missed chats. All attended chat transcript will be addressed with the subject line “Chats :” followed by the visitor question. All ...
                                                                                                    Wherever you are is as good as
                                                                                                    your workplace

                                                                                                      Resources

                                                                                                      Videos

                                                                                                      Watch comprehensive videos on features and other important topics that will help you master Zoho CRM.


                                                                                                      eBooks

                                                                                                      Download free eBooks and access a range of topics to get deeper insight on successfully using Zoho CRM.


                                                                                                      Webinars

                                                                                                      Sign up for our webinars and learn the Zoho CRM basics, from customization to sales force automation and more.


                                                                                                      CRM Tips

                                                                                                      Make the most of Zoho CRM with these useful tips.


                                                                                                        Zoho Show Resources