Intelligent Triggers
Trigger an action to your website visitors at different instances and grab the attention of your website visitors using the intelligent triggers. Perform predefined actions when the visitor lands on your website or is accessing your web page. You also have an option to set custom triggers for your website.
Table of Contents
- Intelligent Triggers
How to Add an Intelligent Trigger Rule?
- Navigate to Settings > Automation > Intelligent Triggers.
- Click on the Add button to set an intelligent trigger rule.

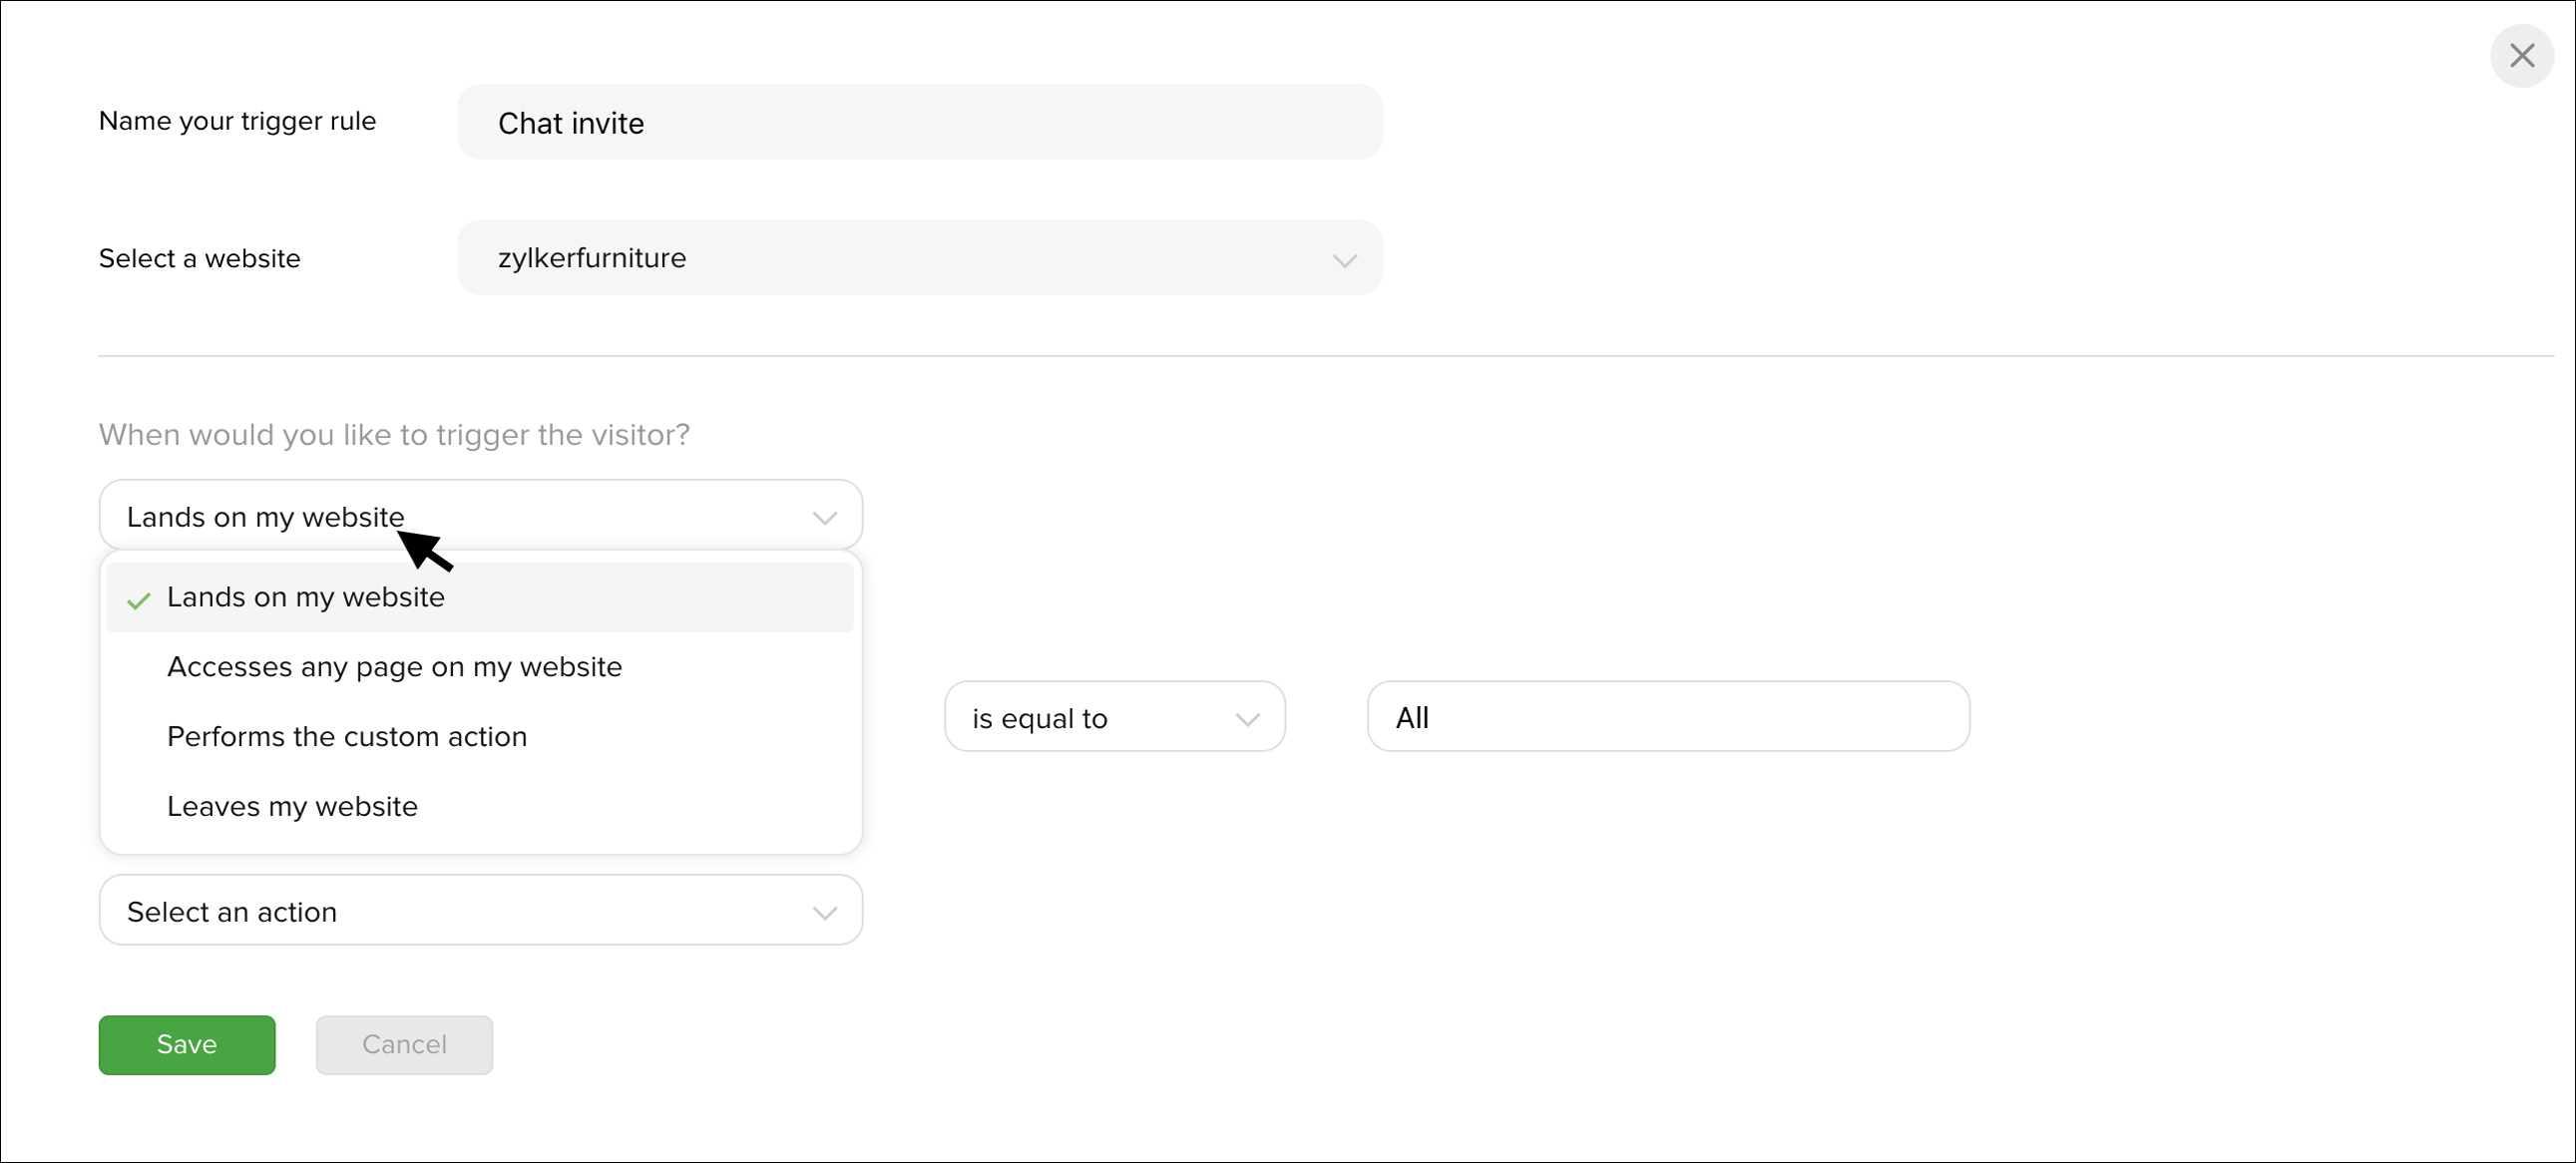
- Specify a name for the rule.

- Map the rule to a particular website.

Now, select the option when you would like to trigger the visitors on your website.
- Lands on my website: Trigger an action only when the visitor hits the exact landing page of the website for the first time.
- Accesses any page on my website: Trigger an action when the visitor accesses any chosen page on your website, where the rule is set.
- Performs a custom action: You can set your custom action and can trigger your visitors, when they perform the action on your website.
- Leaves my website: Trigger an action once the visitor leaves your website.
Select a pre-defined condition from the drop down to define the type of visitor you would like to trigger an action while visiting your website.
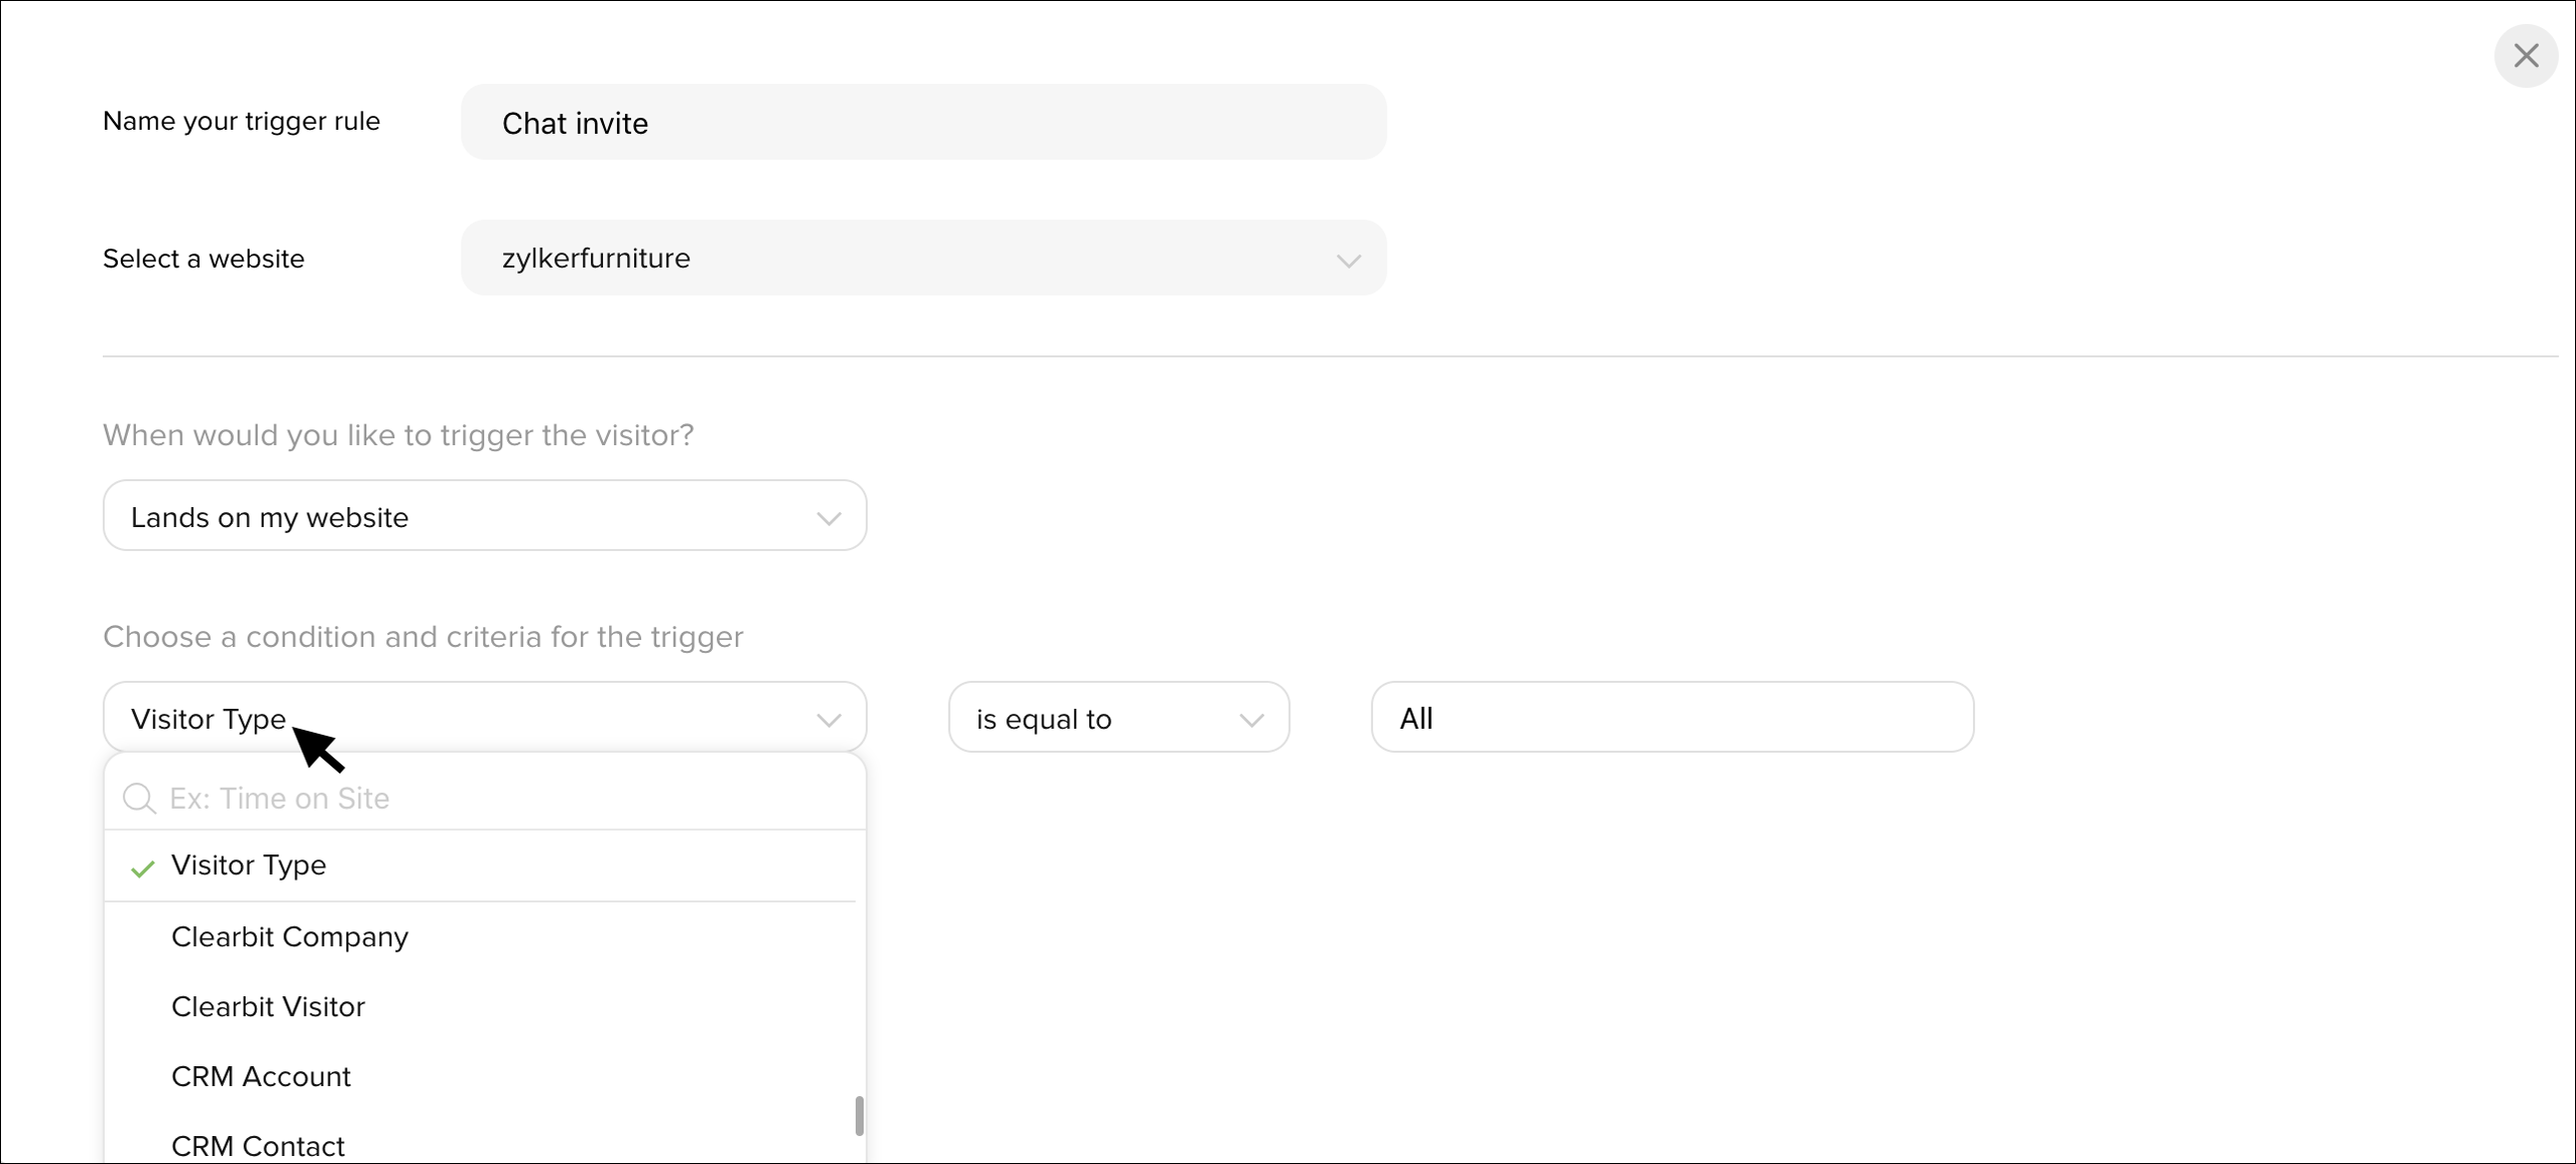
Pre-defined Conditions For Intelligent Triggers
The available Predefined Conditions and its descriptions as follows:
| Condition | Description |
| Browser | Browser used by the visitor in the website. (Values : Apple Safari, Google Chrome, Microsoft Internet Explorer, Mozilla Firefox, Opera, Unknown) |
| Country | Country of the visitor accessing the website. |
| Current page | URL of the page where the visitor is accessing. |
| Current page title | Title of the page where the visitor is accessing. |
| CRM Contact | Contact information of your website visitors in Zoho CRM, Click to know more. |
| CRM Lead | Lead information of your website visitors in Zoho CRM. Click to know more. |
| CRM Account | Account information of your website visitors in Zoho CRM. |
| CRM Potential | Potential value of your website visitors in Zoho CRM. Click to know more. |
| Campaign Source | UTM used to identify a search engine, newsletter name, or other source. |
| Campaign Medium | UTM used to identify a medium such as email or cost-per- click. |
| Campaign Term | UTM used for paid search eg: keywords for the ad. |
| Campaign Content | UTM used for testing and content-targeted ads. |
| Campaign Name | UTM used for keyword analysis to identify a specific product promotion or strategic campaign. |
| IP address | IP address of the visitor visiting the website. |
| Landing page | URL of the page where the visitor have landed in the website. |
| Landing page title | Title of the page where the visitor landed in the website. |
| Number of past chats | Count on number of past chats with the visitor. |
| Number of visits | Count on number of visit by the visitor in the website. |
| Operating System | Operating system used by the visitor. (Values : Android, Apple iPhone, Apple iPod, Apple Macintosh, Blackberry, Kindle, Linux, Microsoft Windows, Motorola, Nintendo, Nokia, PlayStation, Sun Solaris, Symbian, Web OS) |
| Referrer | Source from where the visitor is referred from. |
| Region | Region of the visitor in the website. (Values : Asia Pacific, Canada, Europe the Middle East and Africa, North America, South America, United Kingdom) |
| Search engine | Search engine used by the visitor. (Values : Baidu, Bing, Google, Inktomi, Teoma, WebCrawler) |
| State | State of the visitor accessing the website. |
| Visitor Type | The type of visitor in your website. (Values : All, New, Returning) |
| Visitor Info | Use our JavaScript APIs to set the values. |
| Web Embed | Embed in the website where he visitor is accessing. |
| Advanced | To set two or more conditions. |
| City | City from where the visitor is accessing the website. |
| Visitor Type in CRM | Category of the visitor in CRM. (Values: Contact, Customer, Lead, Not Available, Prospect) |
| Triggered Status | Set criteria based on the trigger status, whether the trigger is invoked or not. (Values: Invoked, Not Invoked) |
| Previous Page | URL of an important page, where you like to be intimated if the visitor leaves that page and moves to another page. |
Then, select a criteria type and enter a value based on the condition in the text box.

Types of Actions to Trigger
Select an Action from the drop-down list.

Invoke JSAPI
Invoke your own custom trigger in the website and grab the attention of the visitor visiting your website. Before setting this option, implement the customized JSAPI in your website and add the trigger name in the "with trigger name" text box.
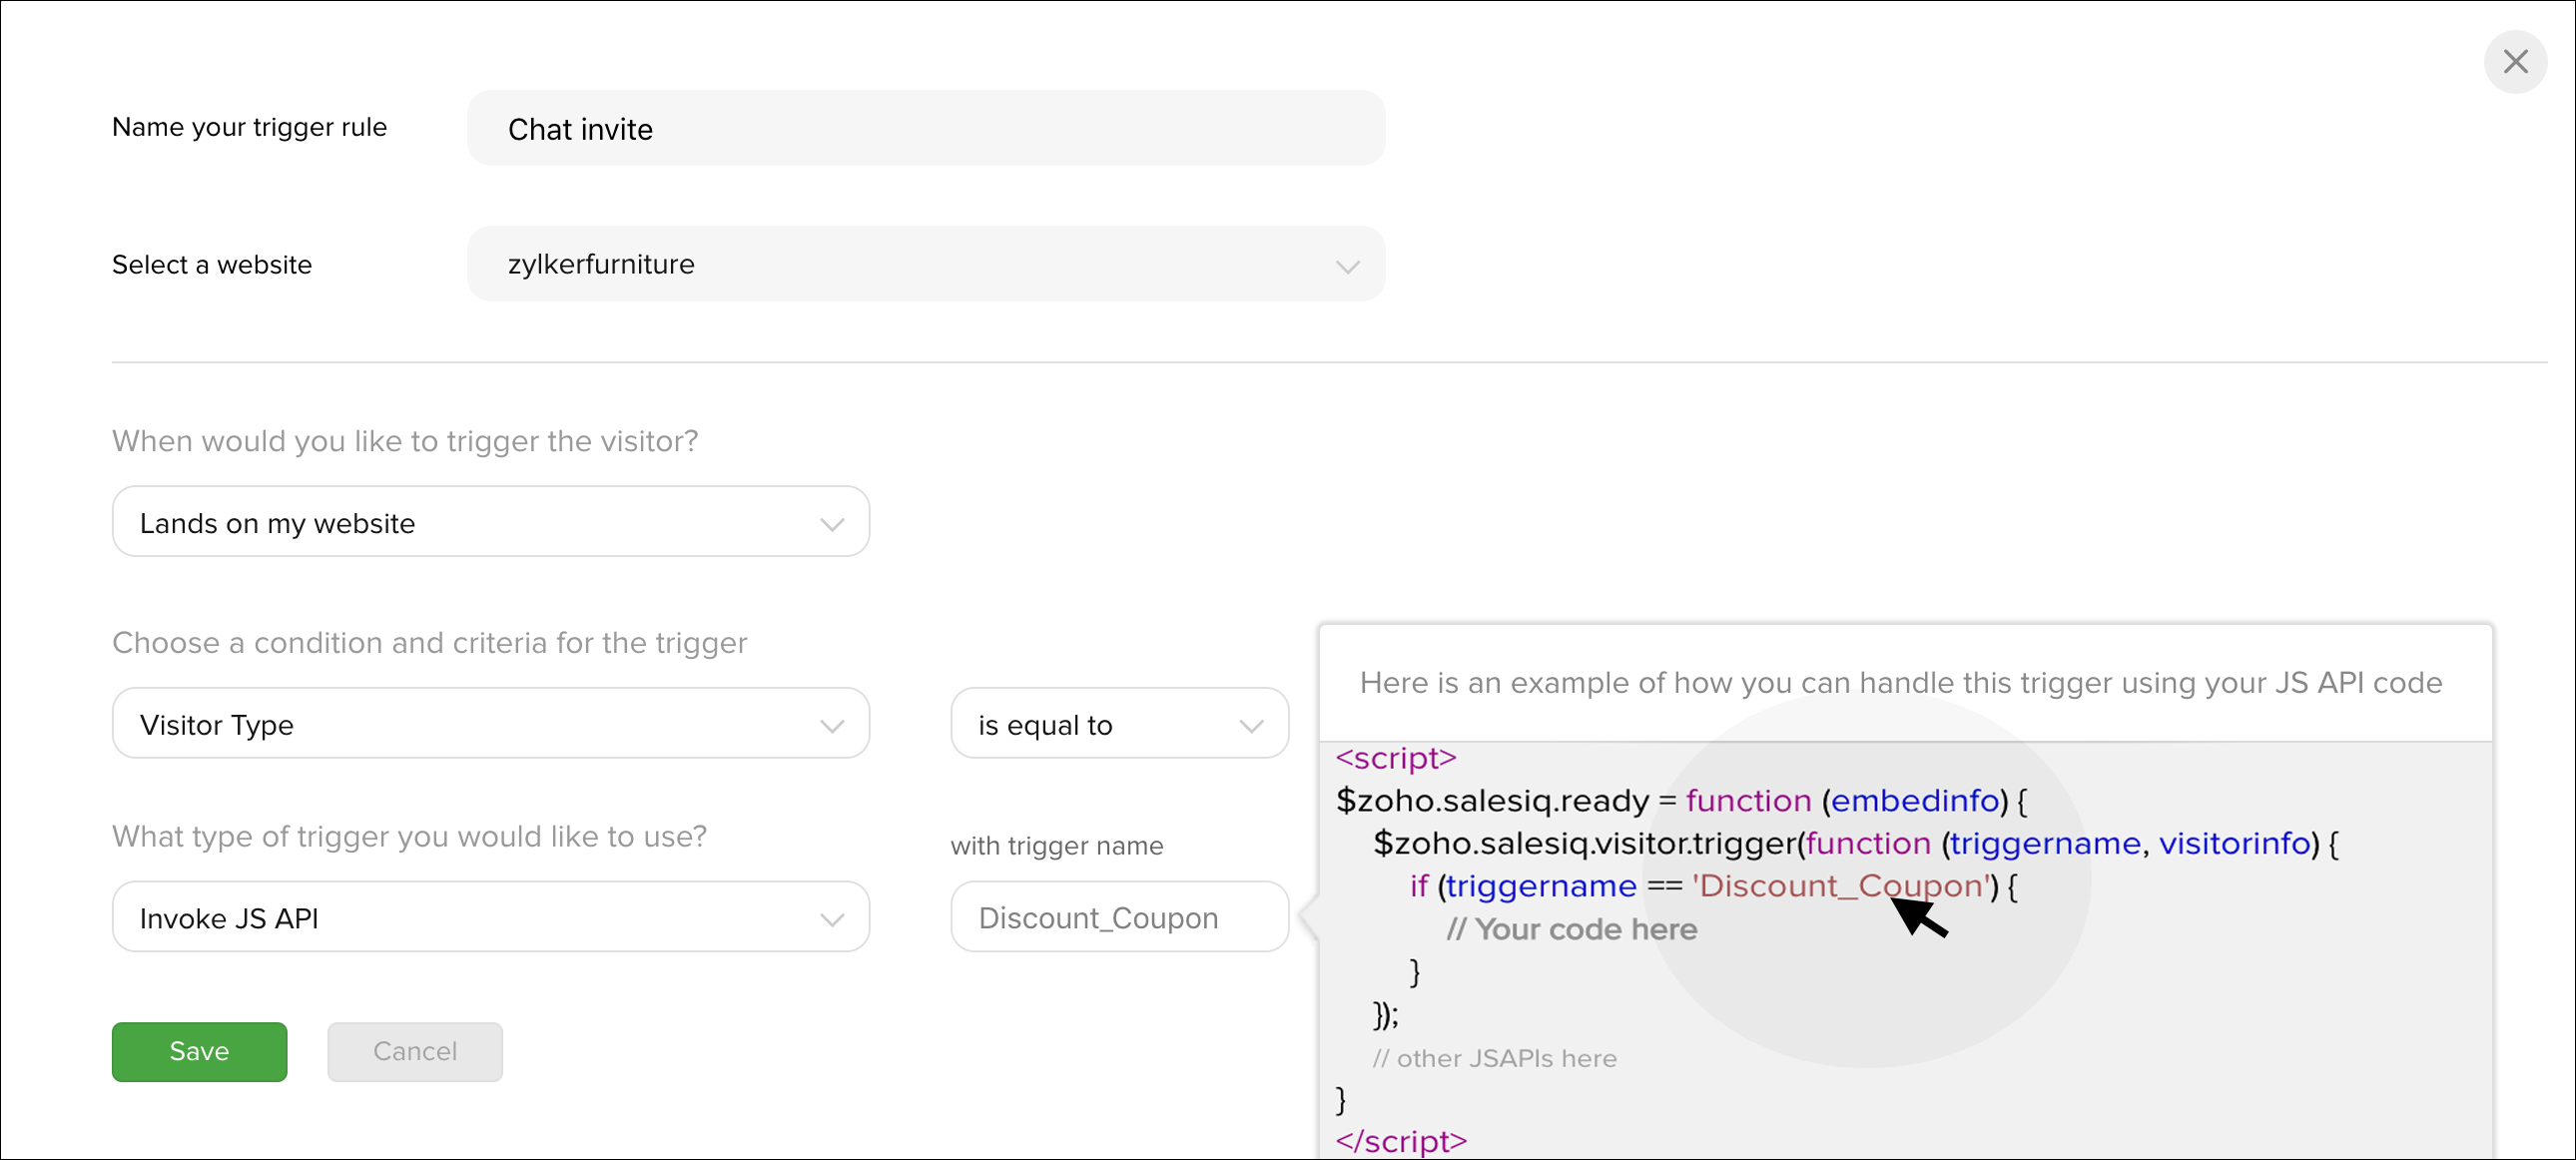
Steps to implement your own custom trigger
- Set a rule for which the API should be triggered in the Settings -> Automation -> Intelligent Triggers and choose the Invoke JS API option in the Then drop down.
- Enter the trigger name in the “with trigger name” text box. Hovering the text box will display the skeleton code, using which you can build your JS API code.
- Implement the JS API in your website.
- The API will be invoked when the visitor matches the rule. If trigger name is mentioned in the text box then it will be passed as a parameter to the method. The second parameter will contain the available visitor information.
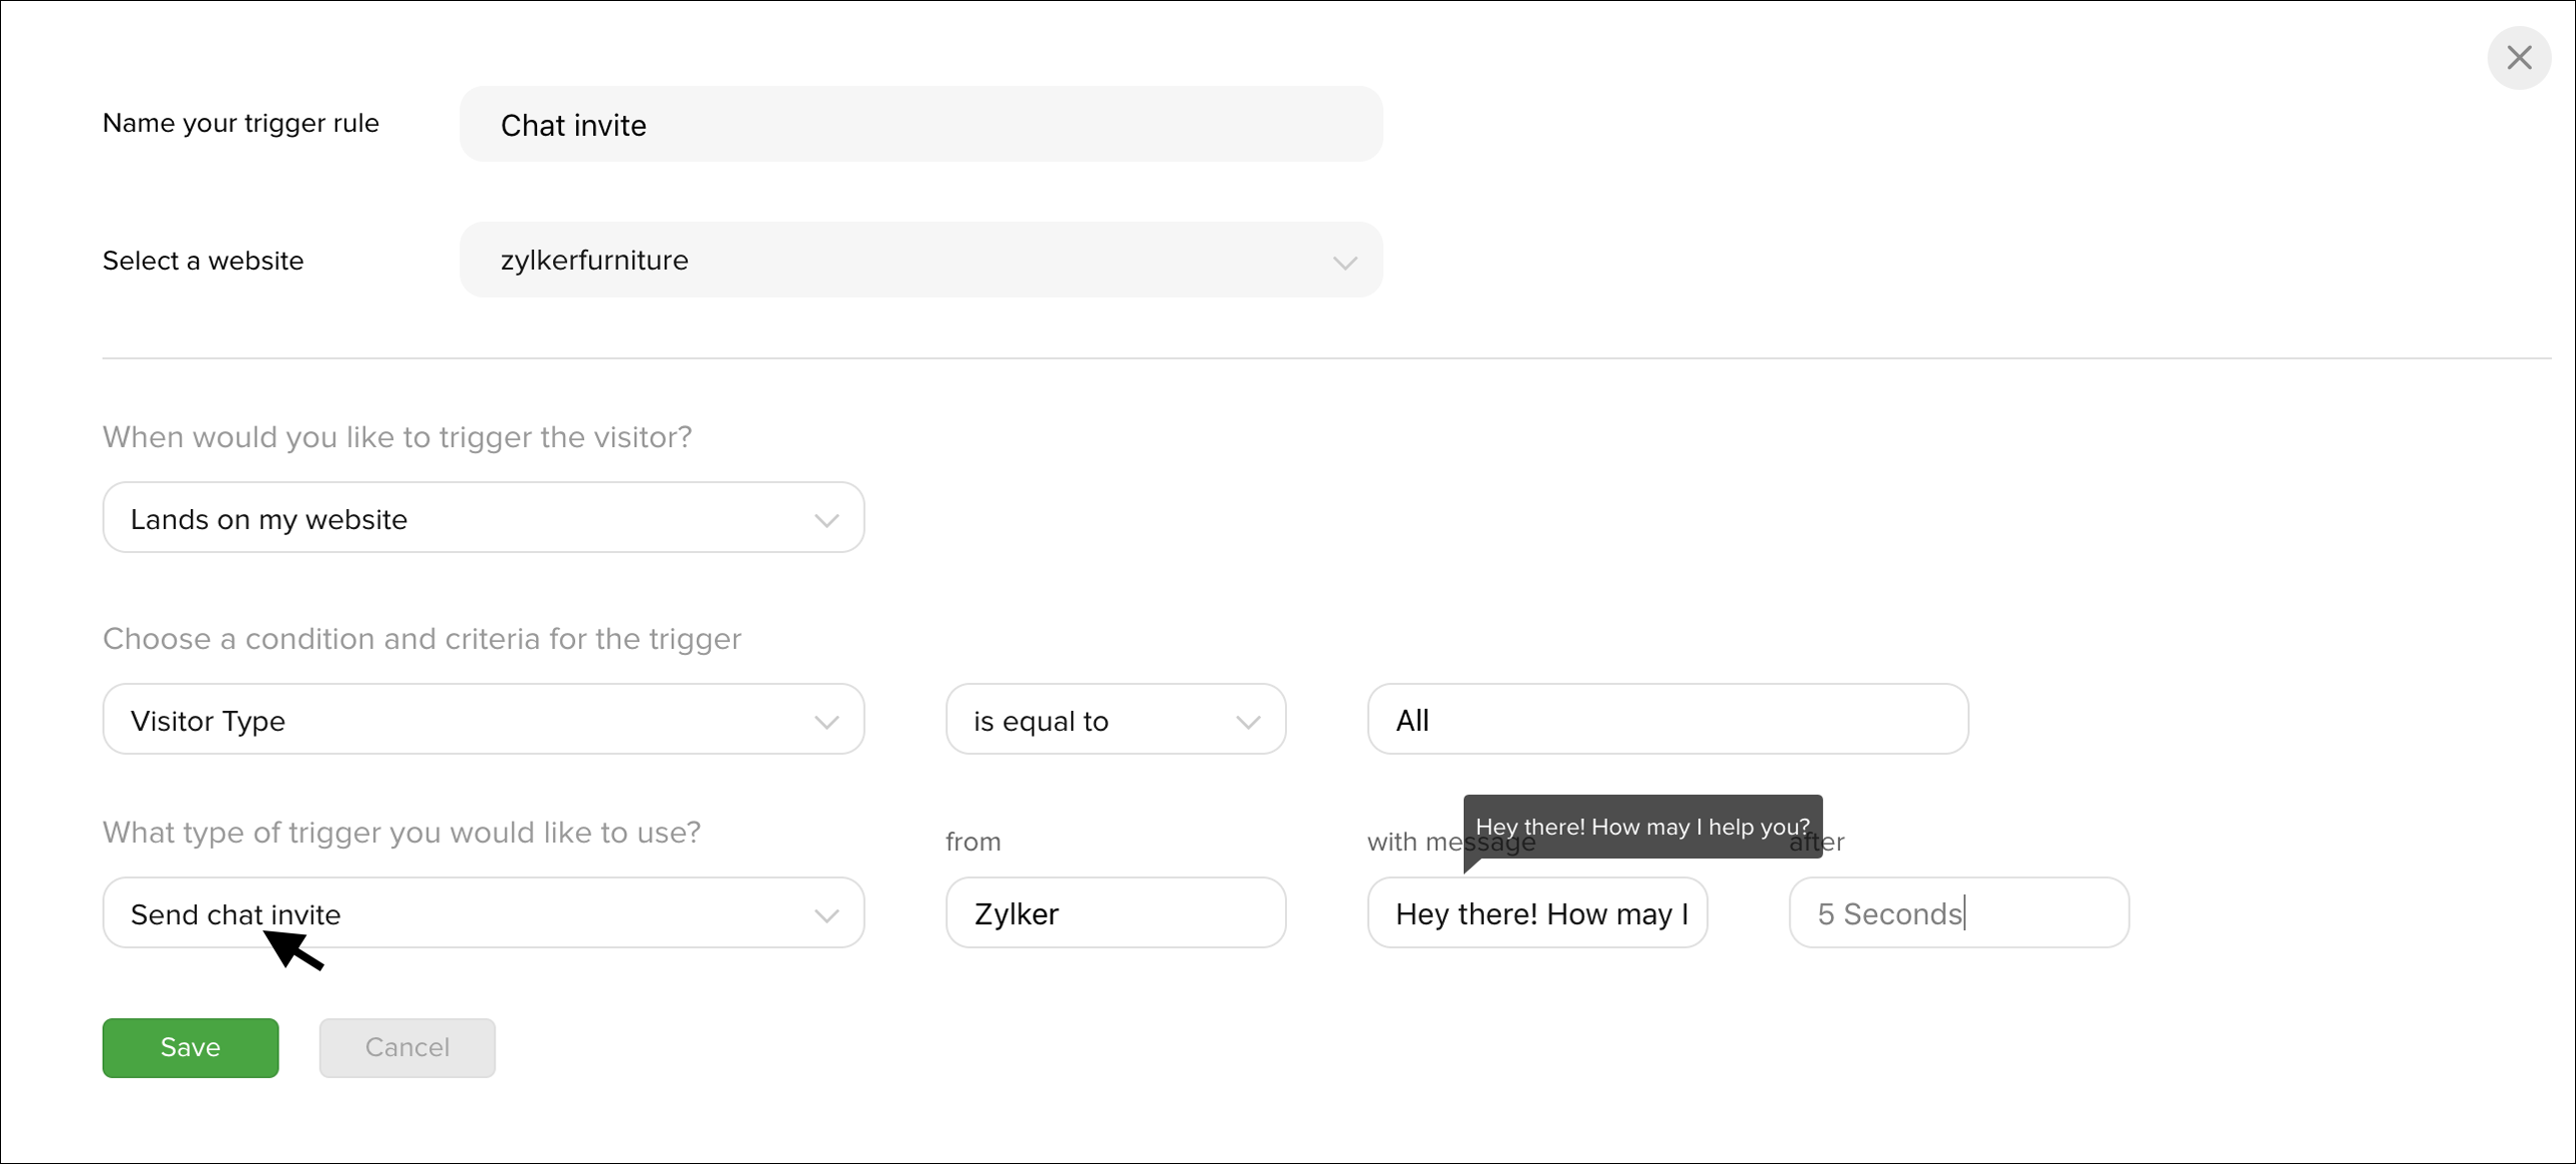
Send Chat Invite
You can send a chat invite to your website visitors with your name and an invite message.
How to trigger an action when the visitor leaves your website?
You can find an option in the 'when the visitor' field as 'Leaves my website' which will trigger an action when the visitor leaves your website. With this trigger, you can update a field in CRM and add the visitor to a mailing list in Zoho Campaigns with the visitor data based on the activities performed by the visitor in that particular visit.
1.Go to Settings -> Automation -> Intelligent triggers.

2.In "When the visitor" drop-down, select "Leaves my website."
3.Then, choose your criteria and condition in "And if" section.
4.In the "Select an action" drop down, you will find two sections "Update to CRM" and "Add to Mailing list." Choose an action.

Now, when the visitor leaves your website and matches the condition and criteria, then the chosen action will be triggered.
How to automate the process of updating the leaving website visitor info into Zoho CRM?
You can update the CRM Lead/Contact module's field when the visitor leaves your website. The CRM module available in the drop down to map where you can update the info are as follows:
- Update to CRM Lead - This option will help you to push the info to the chosen field in the Leads module.
- Update to CRM Contact - This option will help you to push the info to the chosen field in the Contacts module.
- Update to CRM Lead/Contact - This option will help you to push the info to a common field either in Leads or in Contacts module (i.e., Whether the visitor is a lead or converted as a contact in your CRM, the info of the visitor will be updated to the common field in either of the modules.)
- In "When the visitor" drop-down, select "Leaves my website."
- Then, choose your criteria and condition in "And if" section.
- In the "Select an action" drop down, choose an action from the CRM section.
- Then, the fields available on your CRM for the module will appear. Choose a relevant field and enter a value for the field.
- Now the info will be captured in CRM when the visitor leaves your website.

Then, choose a field in the CRM module. In the value text box enter the name you would like to mention in the CRM field. Now, when the website visitor matches the mentioned condition and criteria, then the value will be registered in the particular field of your CRM module.
How to automate the process of adding the leaving website visitors to the email campaign list?
With the "Add to mailing list" option, you can add the visitors directly to the campaign email list when they leave your website.
- Choose the add to mailing list option in the select an action drop-down.

- The "Add visitors to the campaign mailing list" window will appear, which has two options:
- Add to the existing list
- Create new list
- Choose the "Add to existing list" option to view the list of campaigns available. You can select existing campaign from the "In which existing campaign you would like to add the visitors" drop-down.
- Choose the "Create new list" option to generate a new list, then enter a name for the new mailing list in the text box. And, if you wish to accumulate and update the visitors at a periodic interval, choose between weekly and monthly.
- Click on the Save button.
- If the condition and criteria of the visitor match then the visitor will be added to the email campaign list when they leave your website.

- Learn how to convert your website visitors into hot leads with the help of this automation.
How to trigger the visitors when they perform a custom action?
You now have an option in the "Intelligent Triggers" section to trigger your visitors when they perform a custom action on your website.
First, you have to add the custom action code to your website, and then you can add the "Custom action" to automate the process of triggering an action when the visitor performs the action on your website.
- Go to Settings -> Intelligent trigger - >Automation section. In the "When the visitor" drop down, select "Performs a custom action."

- A text box appears, the custom actions available on your website will be listed. Choose a custom action from the drop-down, or manually enter the name of the custom action you wish to add (Earlier, if the custom action performed on the website, then you will not locate the drop-down, you will have to enter the name manually.)

- Now choose a condition and criteria in the "And if" section.
- Then, select an action you would like to trigger in the "Then" section.
- Now, when the visitor performs the custom action, the chosen trigger will be initiated.
How to delete a trigger?
To delete a trigger rule, hover over the particular trigger rule and click on the Delete icon.

How to Disable a trigger rule?
To disable a trigger rule, hover over the particular trigger rule and click Disable.
