
Integrate Zoho Books with Authorize.Net
Authorize.Net provides secure online payment processing and management services for businesses. Integrating it with Zoho Books lets you easily accept one-time and recurring payments from customers via cards or bank accounts.
Insight: You can also collect payments from customers via eCheck through the ACH network.
Note: This integration is available only for users in the United States, Canada, Australia, and Global editions of Zoho Books.
Set up Authorize.Net
To get started, connect your Authorize.Net account with Zoho Books. If you don’t have an account, you can create one and proceed with the integration.
To set up:
Go to Settings and then select Customer Payments under Online Payments.
Click Set up Now next to Authorize.net.
Enter the required details:
Field Description API Login ID The unique identifier to authenticate API requests. You can access this from Authorize.Net > Settings > Security Settings > API Key & Credentials. Transaction Key A secure key used alongside the API Login ID to authorize payments through Authorize.Net. You can access this from Authorize.Net > Settings > Security Settings > API Key & Credentials. Public Key A key to securely encrypt and send payment information from your website or app. You can access this from Authorize.Net > Settings > Security Settings > Manage Public Client Key. Currency The currency in which you want to accept payments. Authorize.Net supports US Dollars (USD), Canadian Dollars (CAD), Australian Dollars (AUD), British Pounds (GBP), Euros (EUR), and New Zealand Dollars (NZD). Bank Account The bank account to track where funds will be deposited after a successful transaction. Payment Options The payment methods your customers can use to pay you, such as cards or bank accounts (ACH). Click Save.

Note: Transaction charges are applicable as per Authorize.net’s pricing policy Zoho does not charge any additional fees.
Collect Customer Payments
Enable Payment Options
Once the integration is set up, your customers can make payments via Authorize.Net for the invoices you send.
To enable this:
Go to the Invoices module.
Create a new invoice or edit an existing one.
Scroll to the bottom of the page and check Authorize.Net as a payment option.
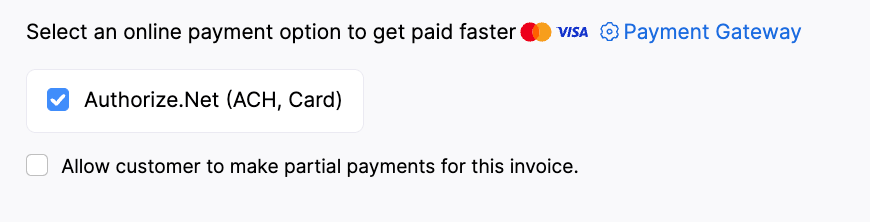
Click Save.
Authorize.Net will be chosen as the payment option to collect payments.
Note: If you select multiple payment gateways, the last configured payment gateway will be used by default to receive payments.
Insight: Enable the Pay via Bank option in the customer’s Overview page to collect ACH payments.
Receive Payments from Customers
Once you’ve enabled payment options, your customers can pay through their customer portal or the invoice link sent via email.
Here’s what they need to do:
View the invoice from the customer portal or email.
Click Pay Now to be redirected to the payment page.
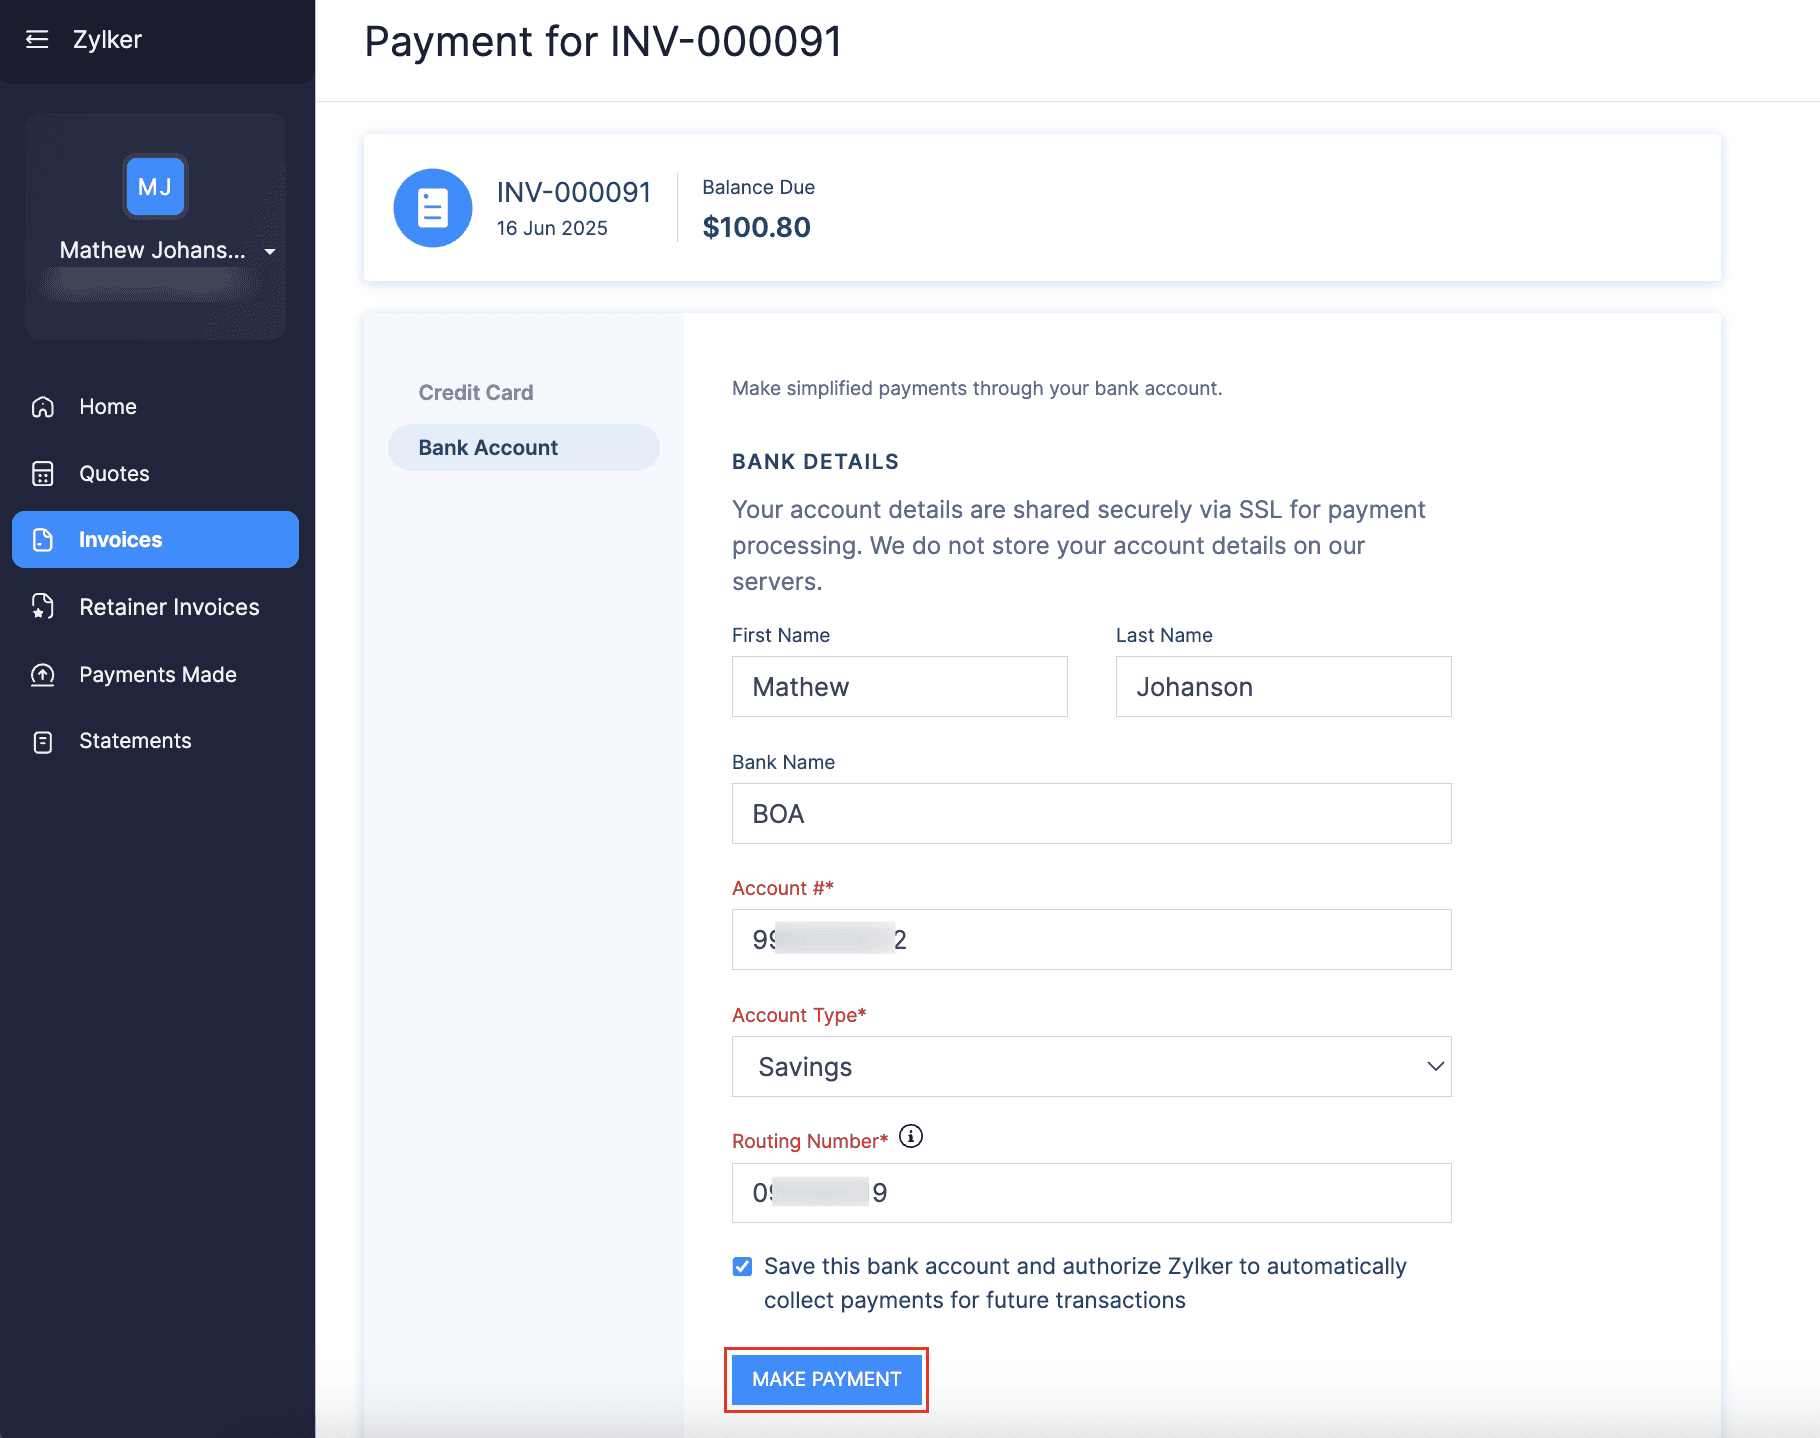
Choose any payment method enter the required details.
Click Make Payment to complete the transaction.
You will receive an email regarding the online payment made by your customer, and the invoice status will be marked as paid.
Insight: ACH payments received via Authorize.Net for an invoice will be updated to Paid status only after 15 days. This is to ensure the payment doesn’t fail. Until then, the invoice will remain in Sent or Overdue status based on your payment terms.
Charge Customers
You can charge your customers manually or automatically for the invoices using the saved cards or bank accounts. Learn how to associate a card or bank account with your customer.
Manual Charge
To charge your customers for their invoices manually:
Go to the particular invoice from the Invoices module.
Go to the Record Payment dropdown and select Charge Customer.

Choose the customer’s card or bank account to charge them.
Insight: If you have not saved your customer’s card or bank details, you can request payment information (recommended) or add them now.
- Click Proceed.
You will have charged your customer for the invoice.
Autocharge
You can autocharge your customers when you associate a card or bank account to your customer’s recurring invoice. This enables faster and secure checkouts without storing sensitive data on your own servers.
Prerequisites:
- Your account must be created with the Card Not Present option.
- Enable CIM in your Authorize.Net account to securely store customer payment details for future or recurring payments. To do this, go to Tools > Customer Information Manager (CIM) > Enable CIM. It may take 24–48 hours for CIM to become active.
- Disable the Automated Recurring Billing (ARB) option.
- Disable the Transaction Velocity Filter under the Fraud Detection Suite in your Authorize.Net account to avoid recurring payment failures. Learn more.
- Enable the Create, Charge, and Send Invoices option in Zoho Books to autocharge recurring invoices.
To associate and autocharge a card:
Go to the recurring invoice you want to associate with a card or bank account.
Click the Associate Payment Options dropdown and select Associate Card or Associate Bank Account. If no card details or bank account details are saved, you can add them in the pop-up, or select a payment method.
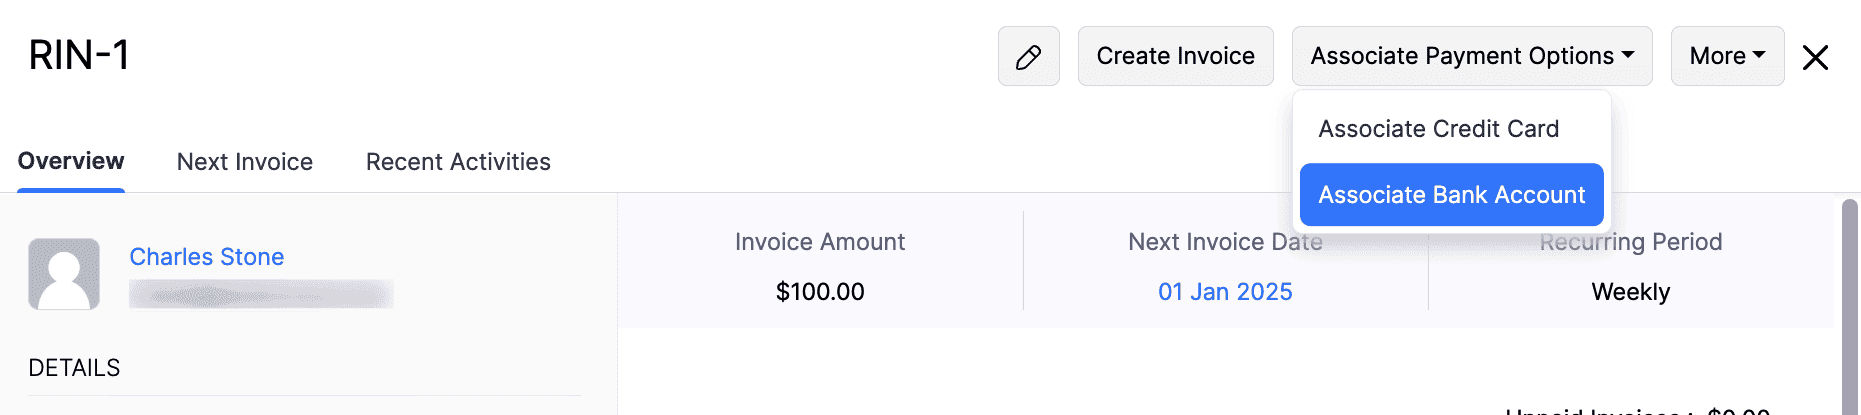
Your customer’s card or bank account will be automatically charged when their invoice is due.
Insight: If a customer doesn’t want to be autocharged, go to the recurring invoice, click More, and select Disable Autocharge.
Track Authorize.Net Transactions in Zoho Books
When you enable Authorize.Net in Zoho Books, you can track all the related transactions and activities using reports.
Here’s how to do it:
- Use the Account Transactions report to filter and view detailed records of Authorize.Net transactions in Zoho Books.
- Track user actions and modifications within the integration through the Activity Logs & Audit Trail report.
Edit the Integration
If you would like to change the bank account, enable or disable payment methods, or update your credentials, you can edit the settings.
Note: If you generate a new public client key in Authorize.Net, make sure to update it here to avoid one-time payment failures.
To edit:
Go to Settings and then select Customer Payments under Online Payments.
Click Edit Settings next to Authorize.Net and make the necessary changes.
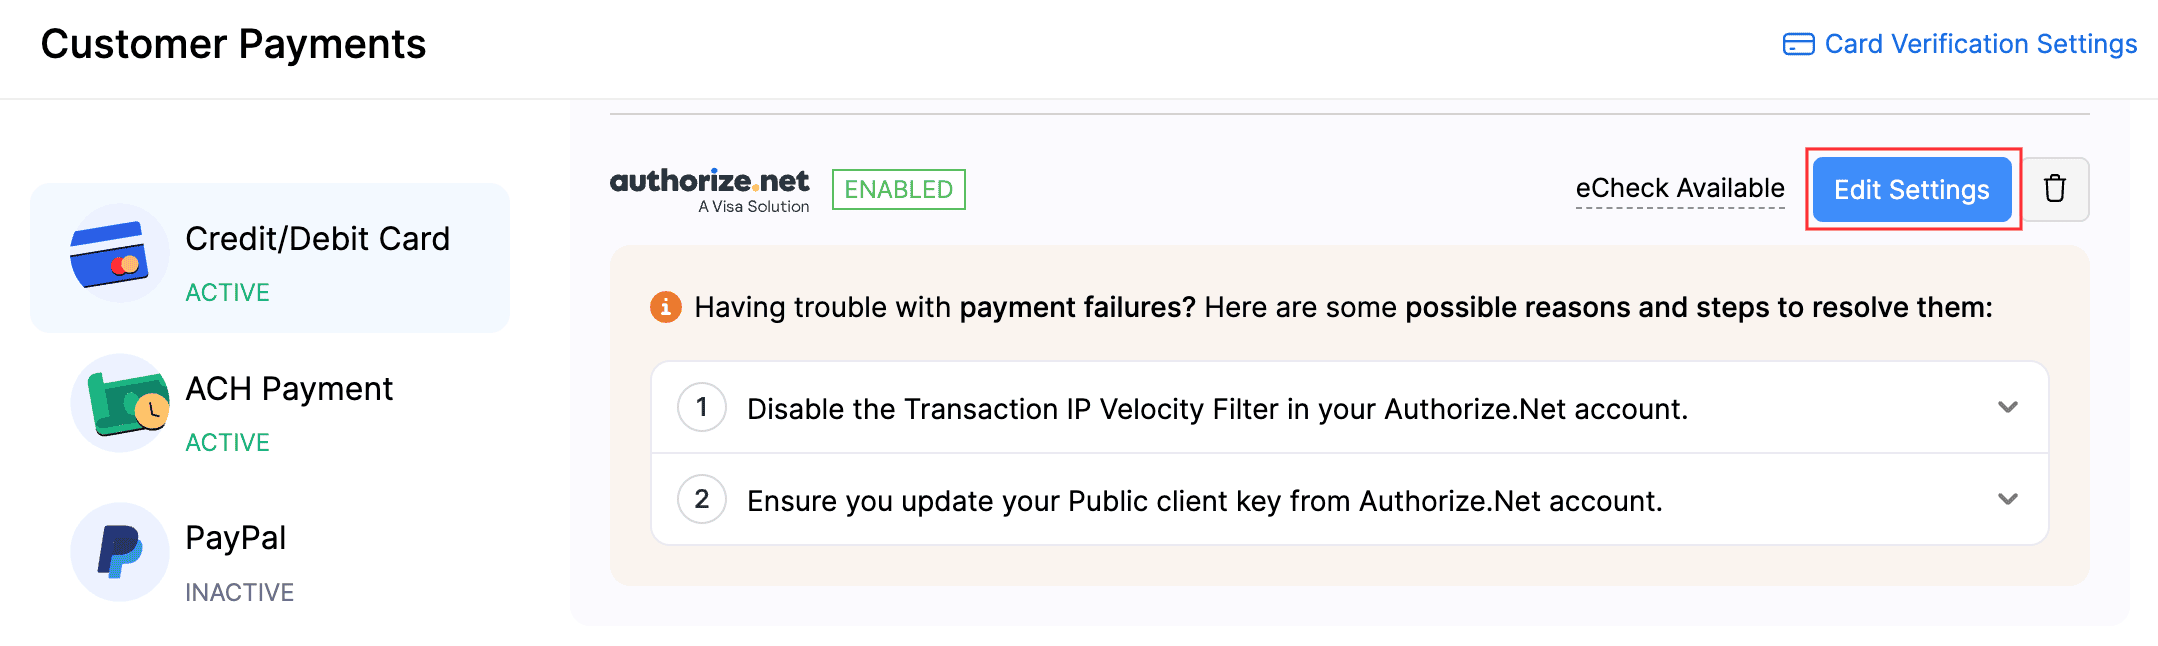
Click Save.
Your integration settings will be updated.
Delete the Integration
If you no longer want to use Authorize.Net integration, you can delete it. Before deleting, uncheck Authorize.Net as a payment option in unpaid invoices and delete any associated cards or bank accounts.
Warning: Authorize.Net is automatically enabled across all your Zoho Finance apps, so disabling it in one app will disable it in all other Zoho Finance apps.
To delete:
- Go to Settings and then select Customer Payments under Online Payments.
- Click the Delete icon next to Authorize.Net.
- Click OK to confirm.
The Authorize.Net integration will be deleted from your Zoho Books account.
 Yes
No
Yes
No
Thank you for your feedback!