Sign-up
To create a Zoho Voice account:
- Go to the Home page of Zoho Voice


- Enter your email, password, and phone number.
- Review and agree to the Terms of Services and Privacy Policy.
- Click Sign up.
- Click Create a New Account.

Once you've signed up, you'll be directed to your new Zoho Voice account dashboard.

Note: An email invitation will be sent to your registered email address. Please verify your email to activate and proceed with your account setup.

Trial period and free credits
Your 15-day trial period begins once you sign up for Zoho Voice. Credit balances are required to place outgoing calls, and during trial, you will not be able to purchase credits. However, you can request for free credits to test the outgoing call quality.
To request free credits:
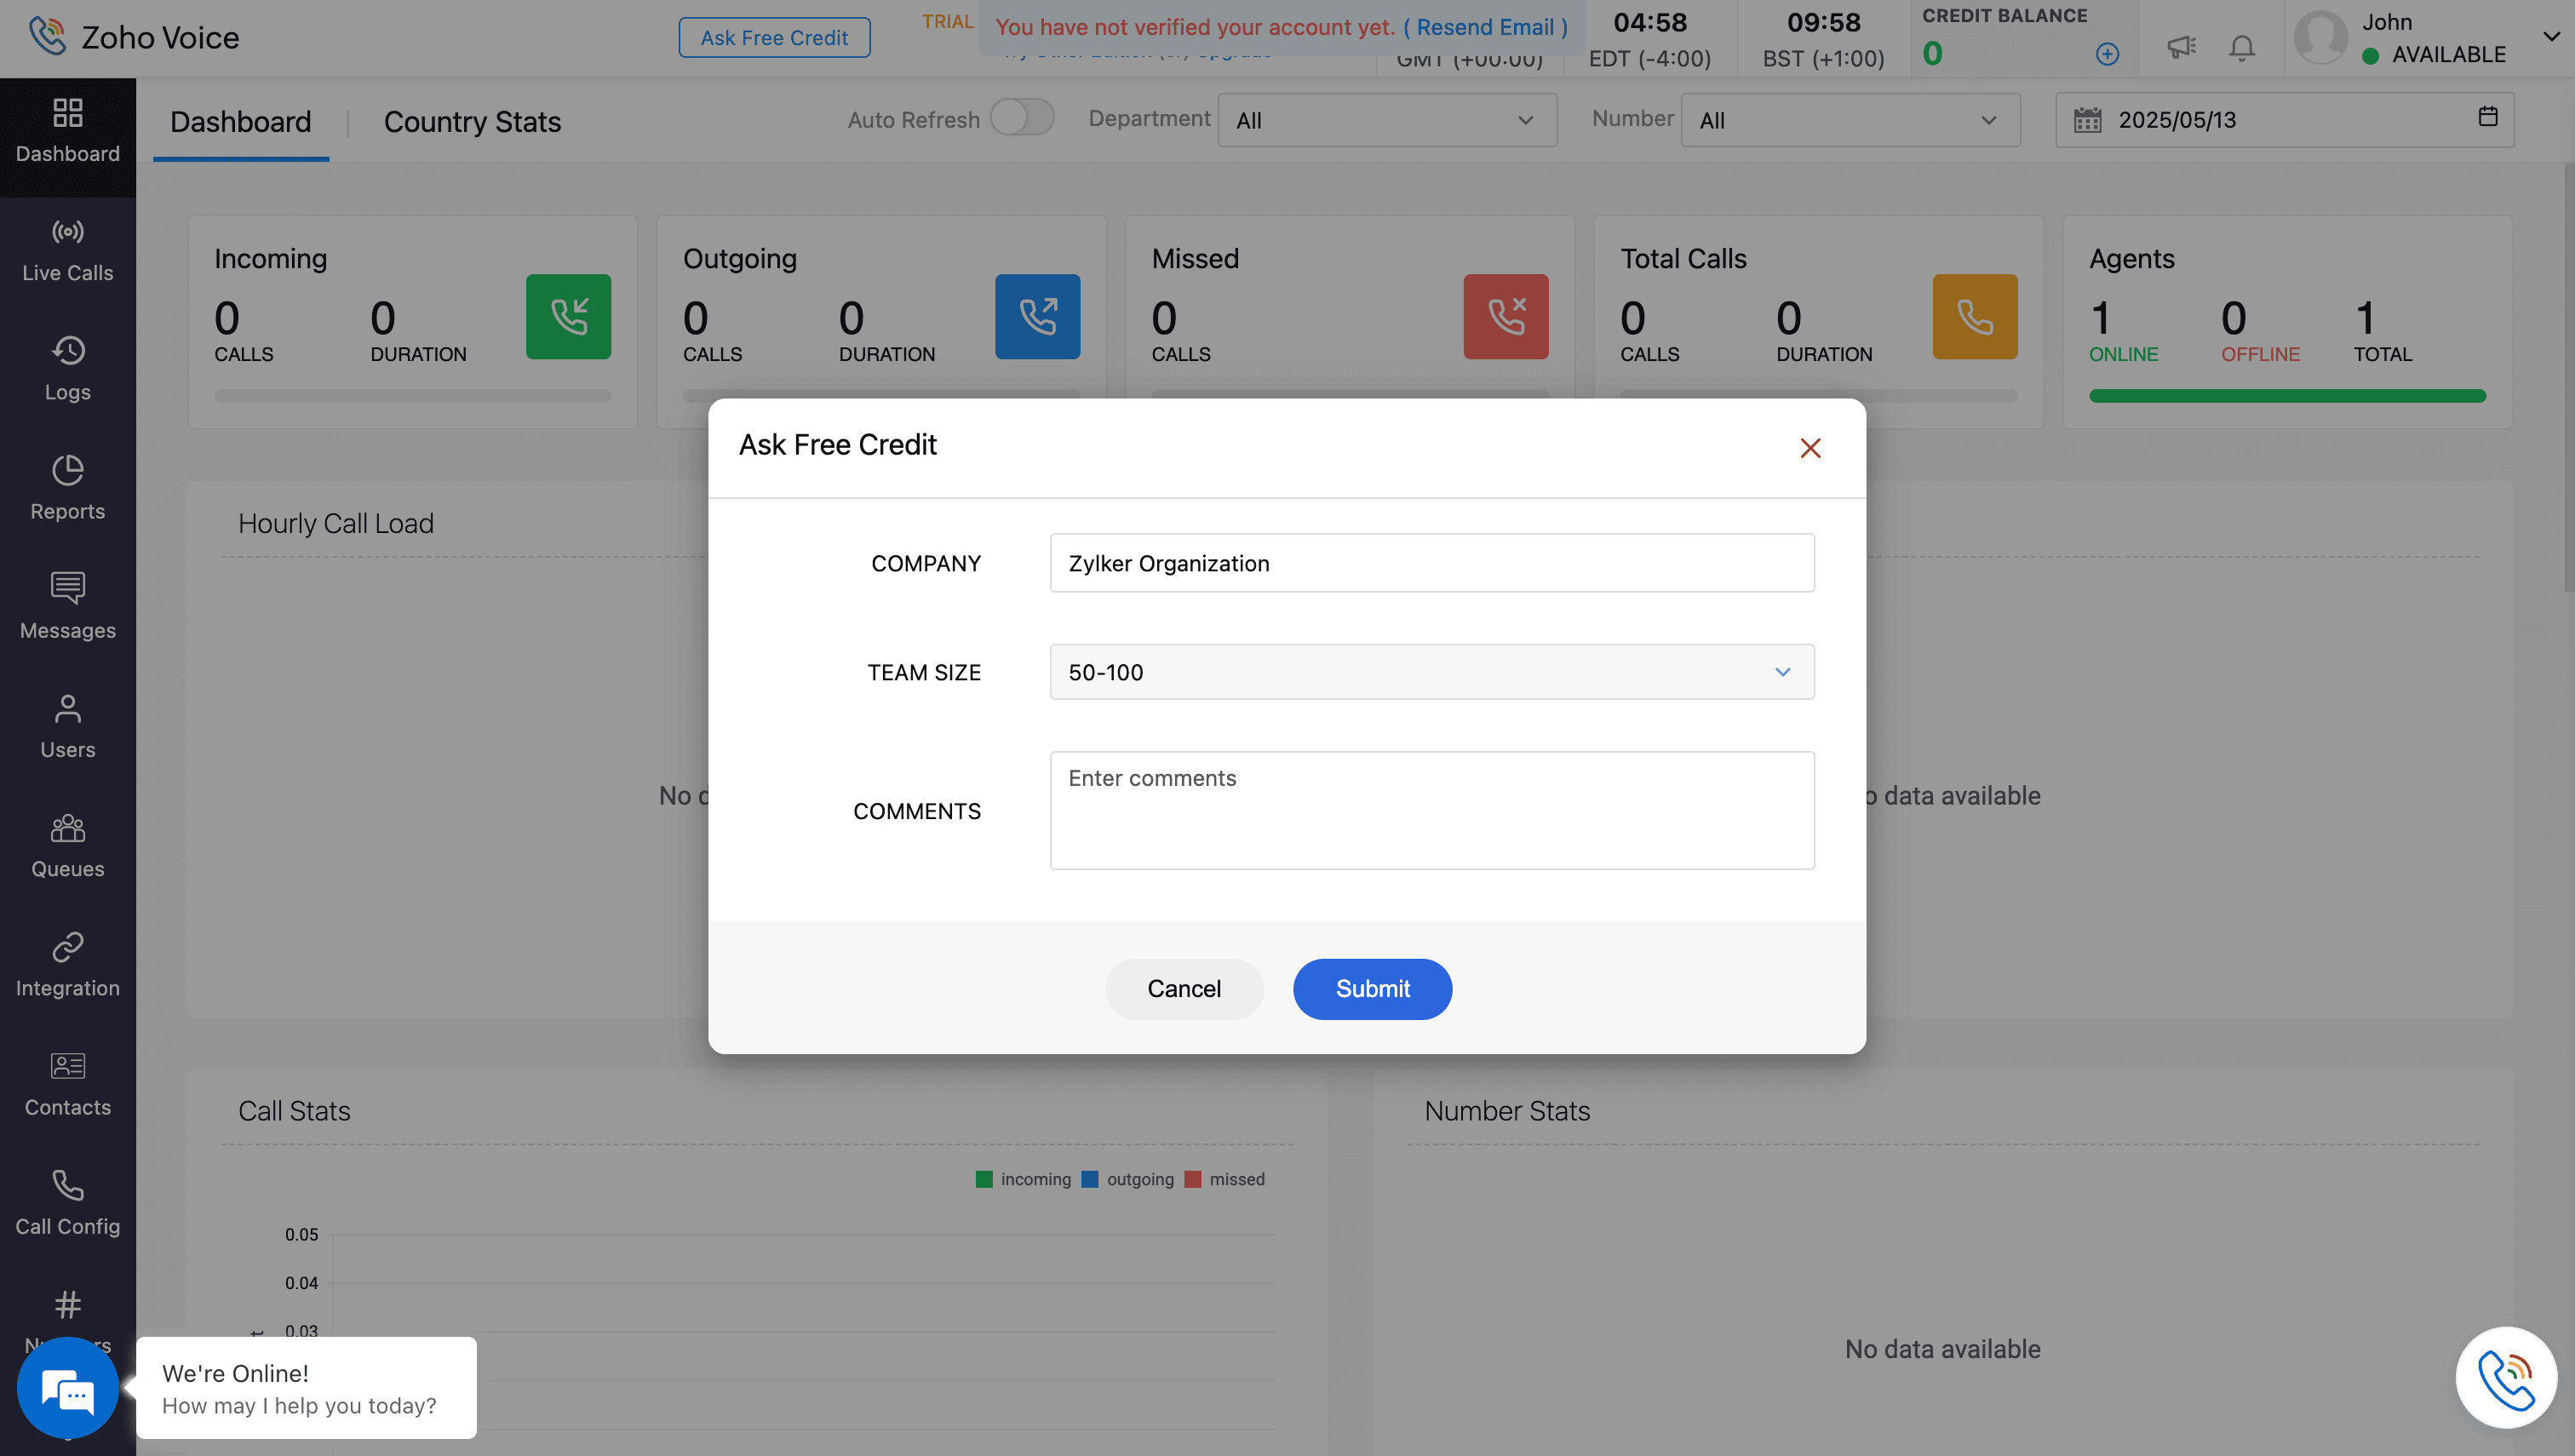
- Click the Ask Free Credit button at the top of the screen.
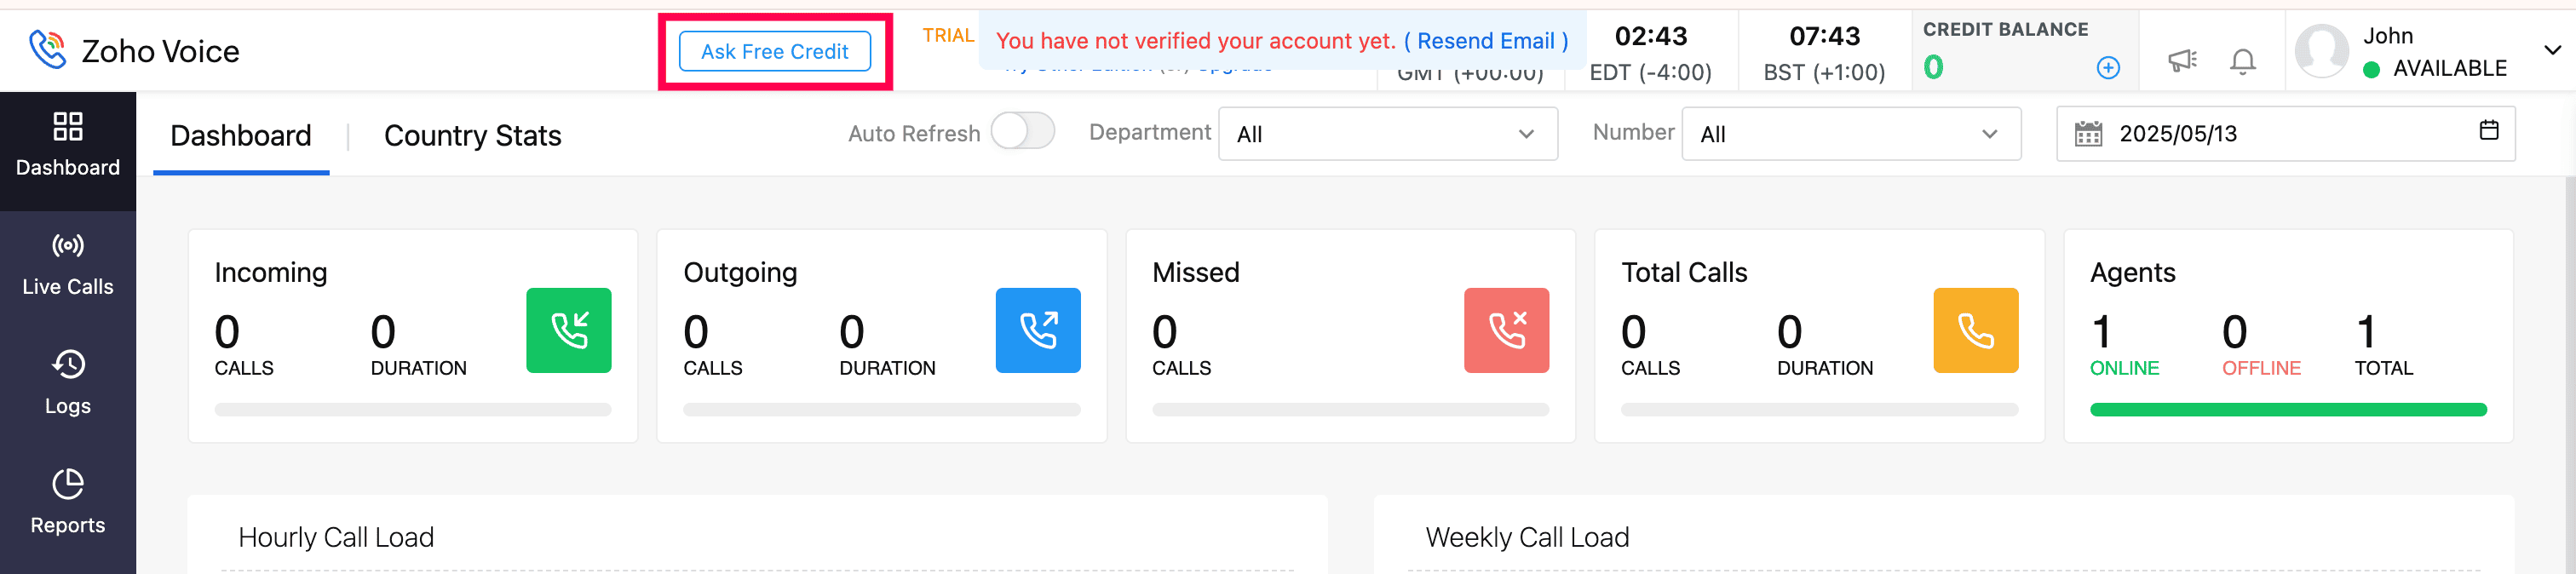

- Enter your company name, select your company size from the dropdown, add any necessary comments, and click Submit.

Once your request is verified by our support team, two free credits will be added to your account. You can then use these credits to make outgoing calls and check call quality.
- Only outgoing calls can be placed with free credits. Incoming calls are disabled during the free trial period.
- You cannot purchase phone numbers with free credits during the free trial period.
- To access features such as number purchase, full call functionality (incoming and outgoing), number configuration, queue set-up, and other advanced features, you must purchase a plan.
- After the trial period ends, your account will be moved to the Solo (free) plan, which provides limited yet useful features.
You can choose to upgrade to a paid plan during or after the trial. The plans are available on a monthly or yearly subscription basis.
Try different edition during trial period
By default, your trial begins with the Enterprise Telephony edition. However, you have the option to explore other available edition during your trial.
To switch to a different edition:
- Click Try Other Edition at the top of the screen.


- Select either the Business Phone or Enterprise Telephony edition.
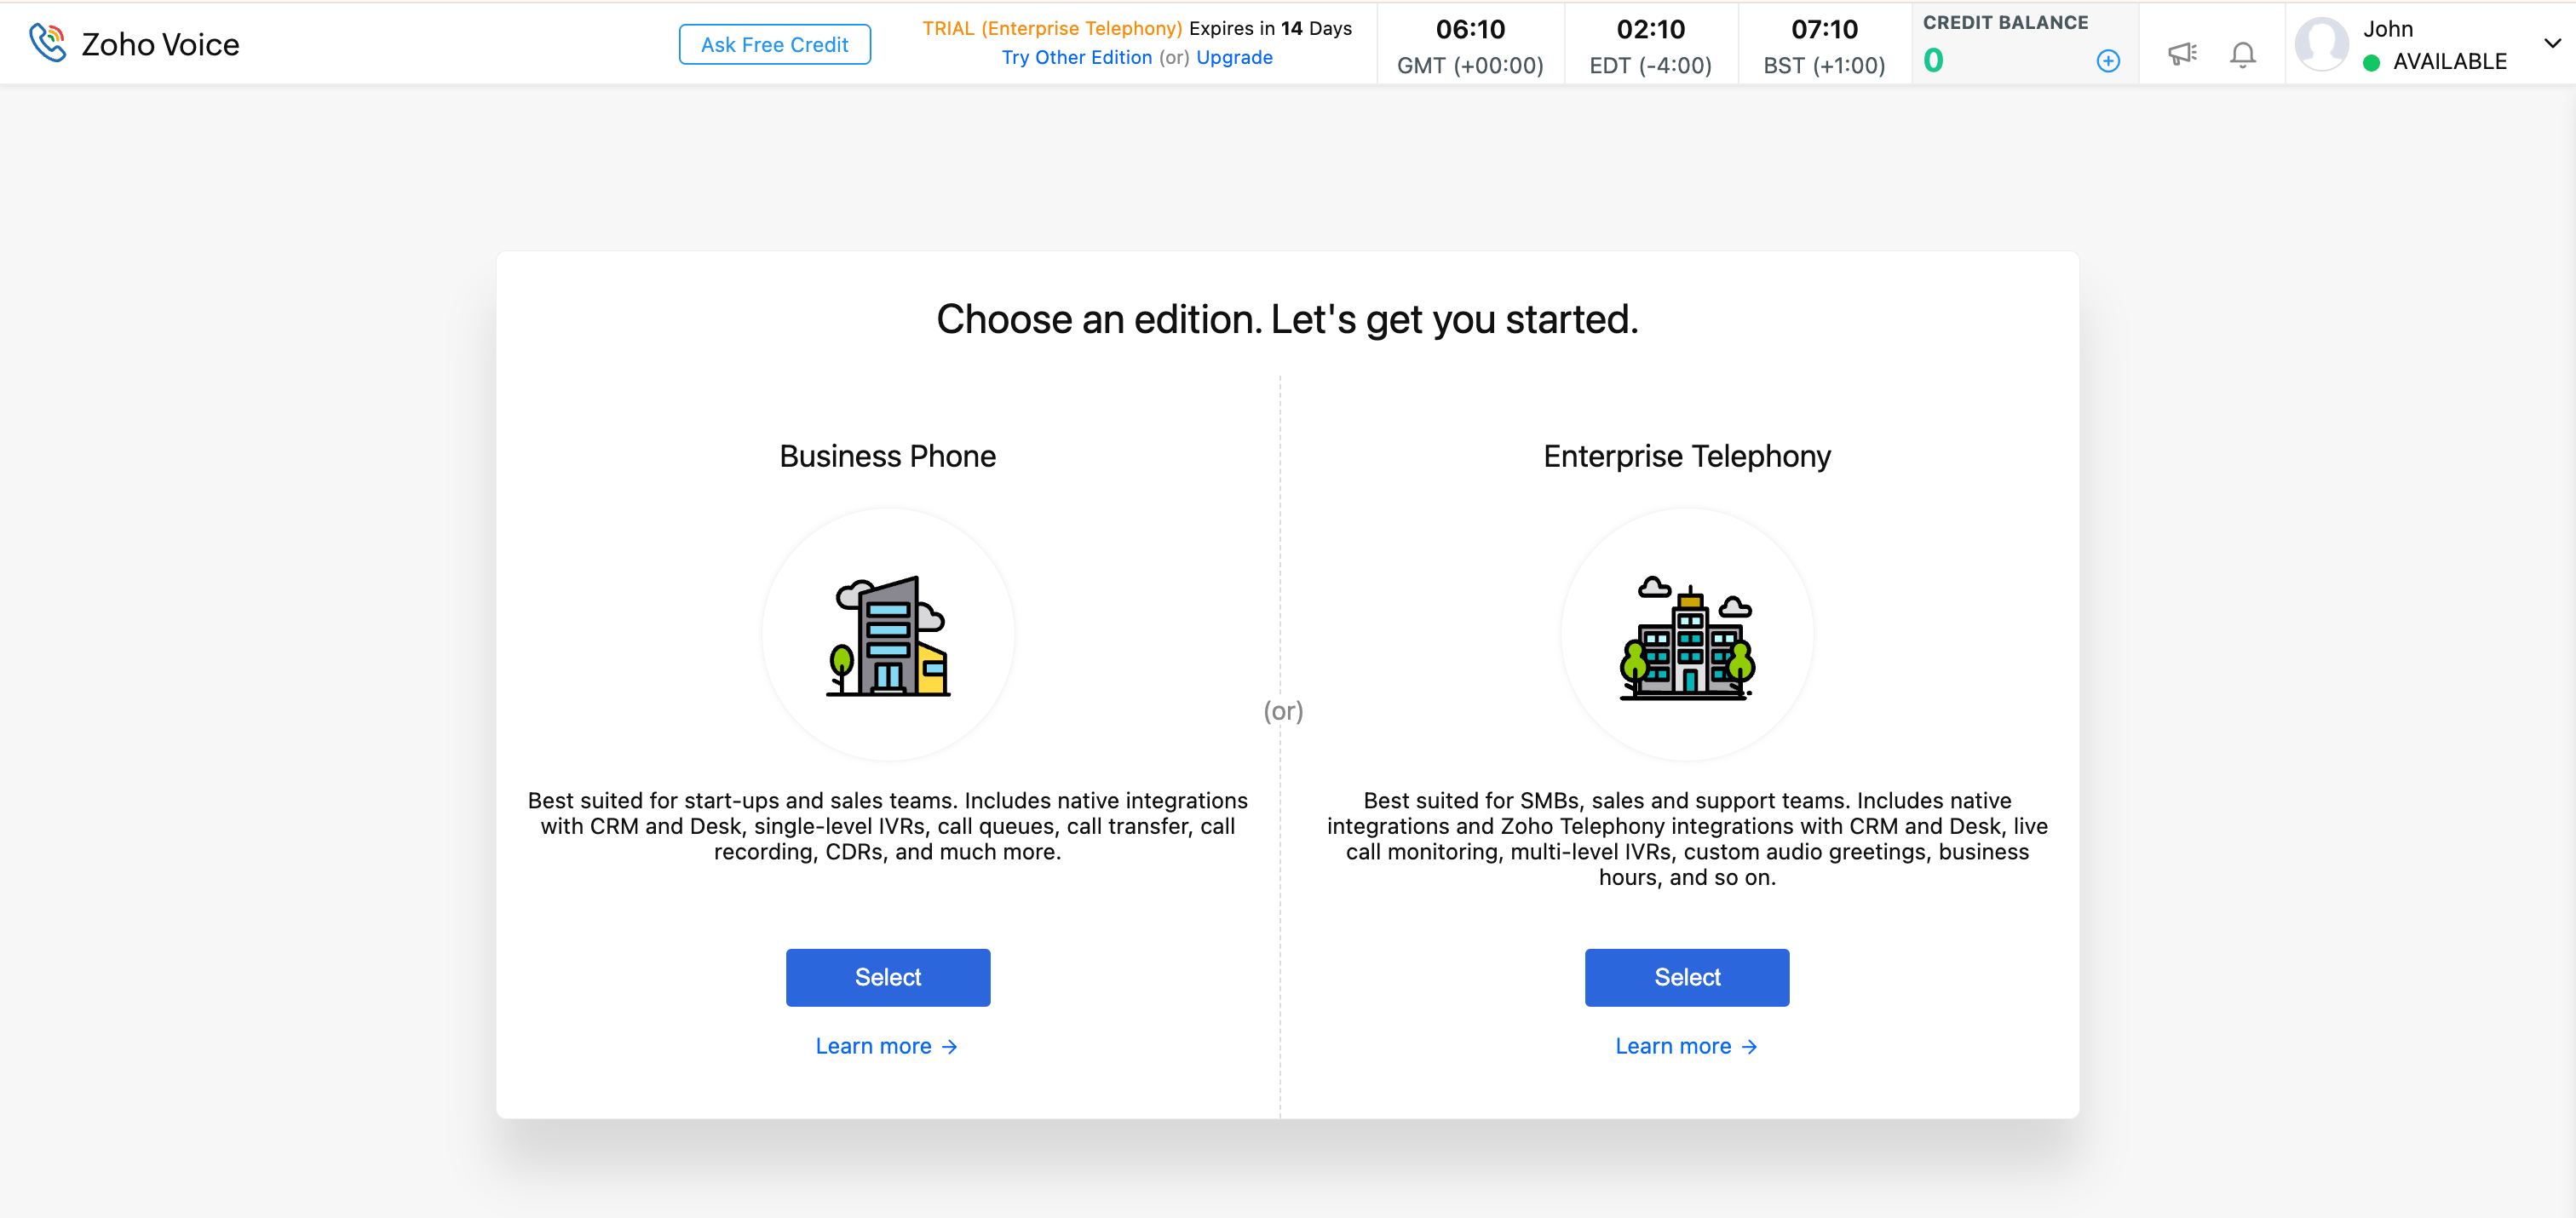

This allows you to evaluate the features of each edition and decide which best suits your business needs.
Plan purchase
During the trial period, you can click Upgrade at the top of the screen to be redirected to the Zoho Store.

Alternatively,
- Go to Settings , then choose Subscription.
- Click Upgrade plan under the Subscription tab. You will be redirected to the Zoho Store
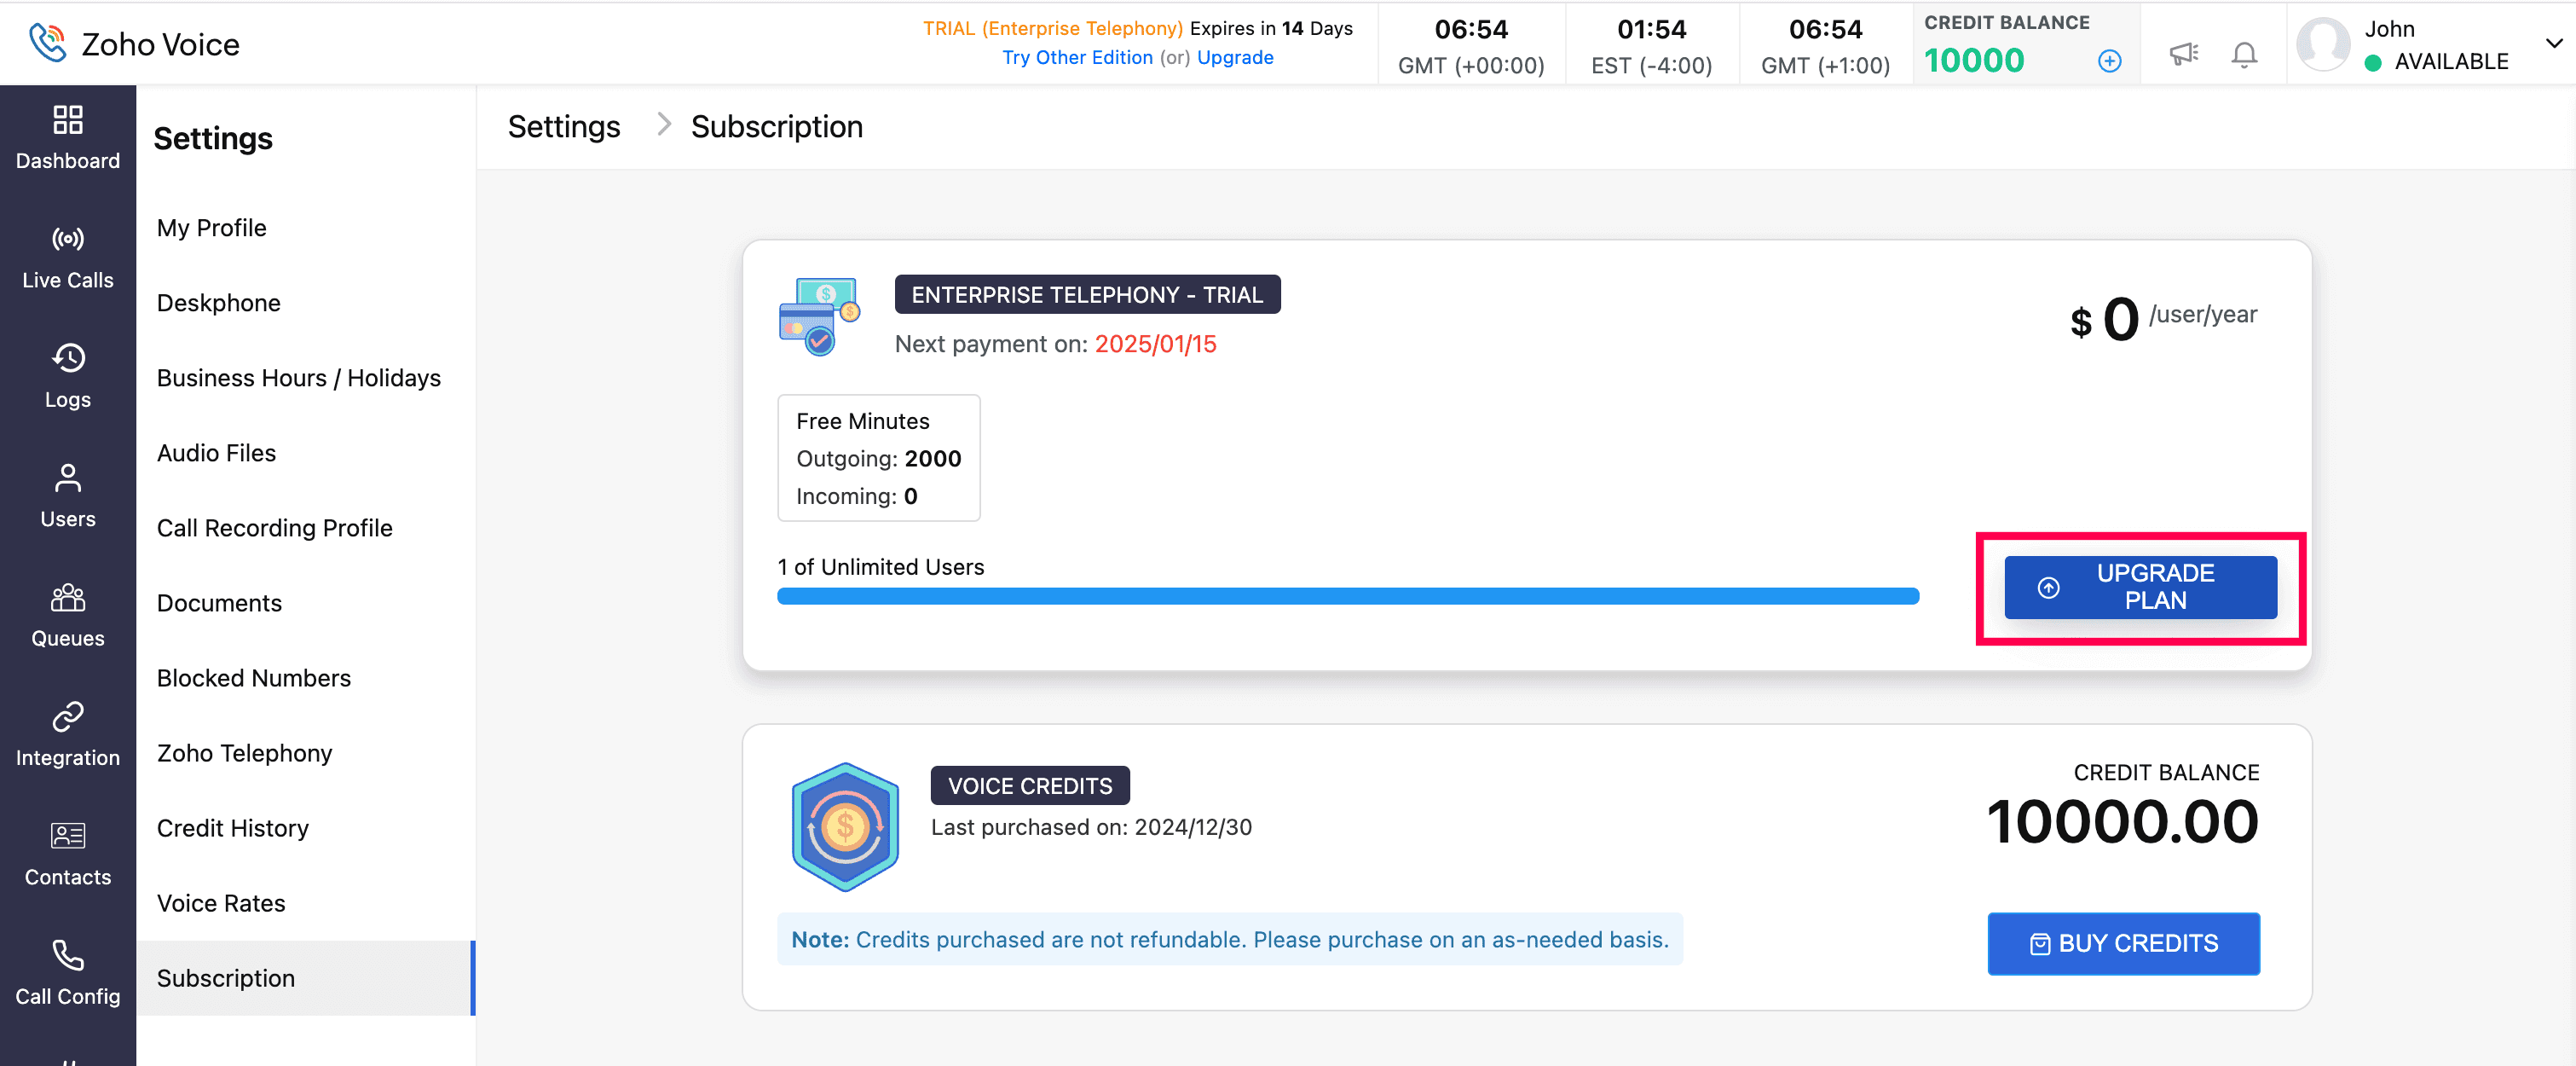

- Click Upgrade under your preferred plan.
For the Enterprise Telephony edition:
- Enter the number of licences/users. Verify the total amount, then click Proceed. You can purchase voice credits under Add-ons here, if needed
- Enter your billing and payment details in the Pay section and click Make Payment.
For the Business Phone edition:
- The fixed standard users/subscription will be displayed. Verify it and click Proceed. You can purchase user add-ons here, if needed. For example, your Business Phone edition plan allows you to invite up to 10 users to your organization. If you need to add five more users, you can purchase those additional users as an add-on.
- Enter add-ons that you like to purchase, then click Proceed. You can purchase voice credits, if needed
- Enter your billing and payment details in the Pay section, then click Make Payment.
Once the payment is successful, your Zoho Voice organization will be upgraded to the selected subscription plan.
Purchase add-on
In Zoho Voice, feature add-ons provide extra features that are not part of your current plan, but can be purchased based on your specific needs.
Note: The availability of add-ons varies based on your edition. To learn more about the add-ons available for your edition, visit our pricing plan page.
To purchase feature Add-ons:
- Go to Settings → Subscription and click the Add-ons tab.
- Choose the required add-on from the available list and click Buy.
- Enable the Status.
- Enter the number of users to whom you want to enable this add-on in the User Count field.
Note: User count must be less than or equal to the total number of licensed users in your account.
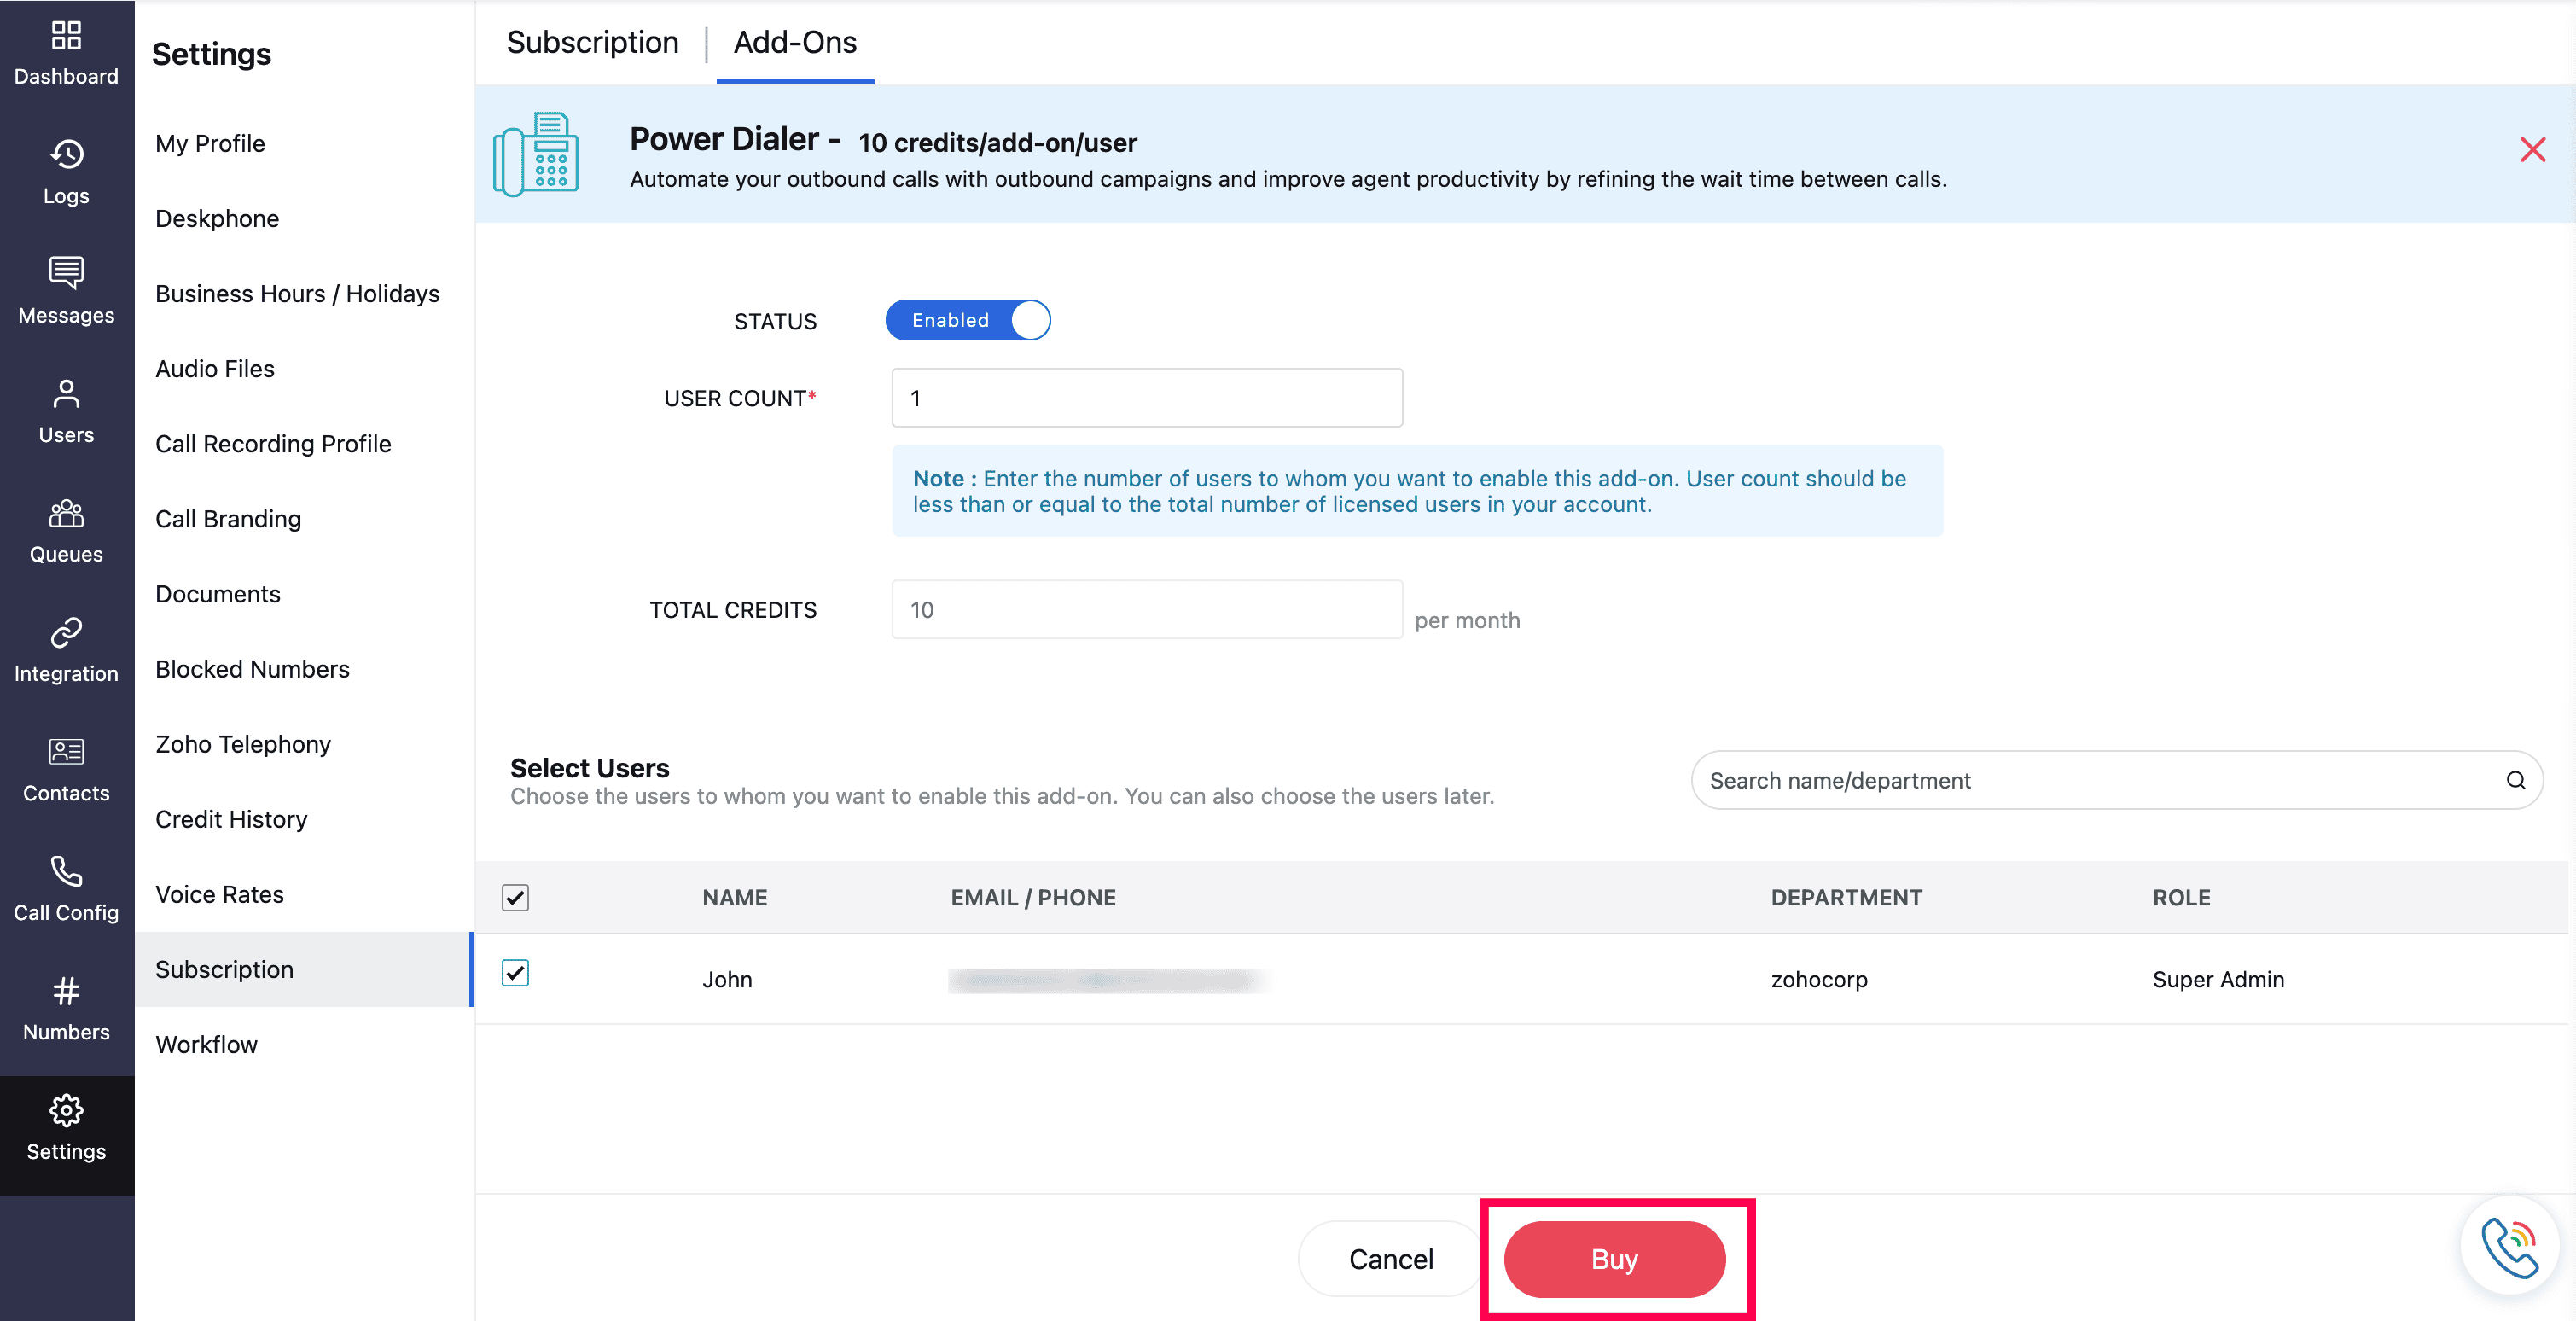

- Select the respective users and click Buy.
Note: Feature add-on subscription cost will be deducted from your credit balance.
Number purchase
What you need for number purchase?
You'll need to provide any of the following documents:
- Business Registration Certificate - A copy of your valid Business Registration Certificate is required.
- Local Address Proof - You might need to submit proof of address for the region where you're purchasing the number. Acceptable documents include an internet bill, water bill, or electricity bill.
- Valid Business website - Your business website details must match the submitted documents.
Note: In some regions, additional documents may be required, such as a government-issued ID or a passport copy. Requirements may vary, so please check with our support (support@zohovoice.com), before proceeding with number purchase.
Steps to purchase a number
- Go to the Numbers module from the left sidebar menu.
- Filter by the type of number or the country the number is associated with and click Search. A list of available numbers will be displayed.
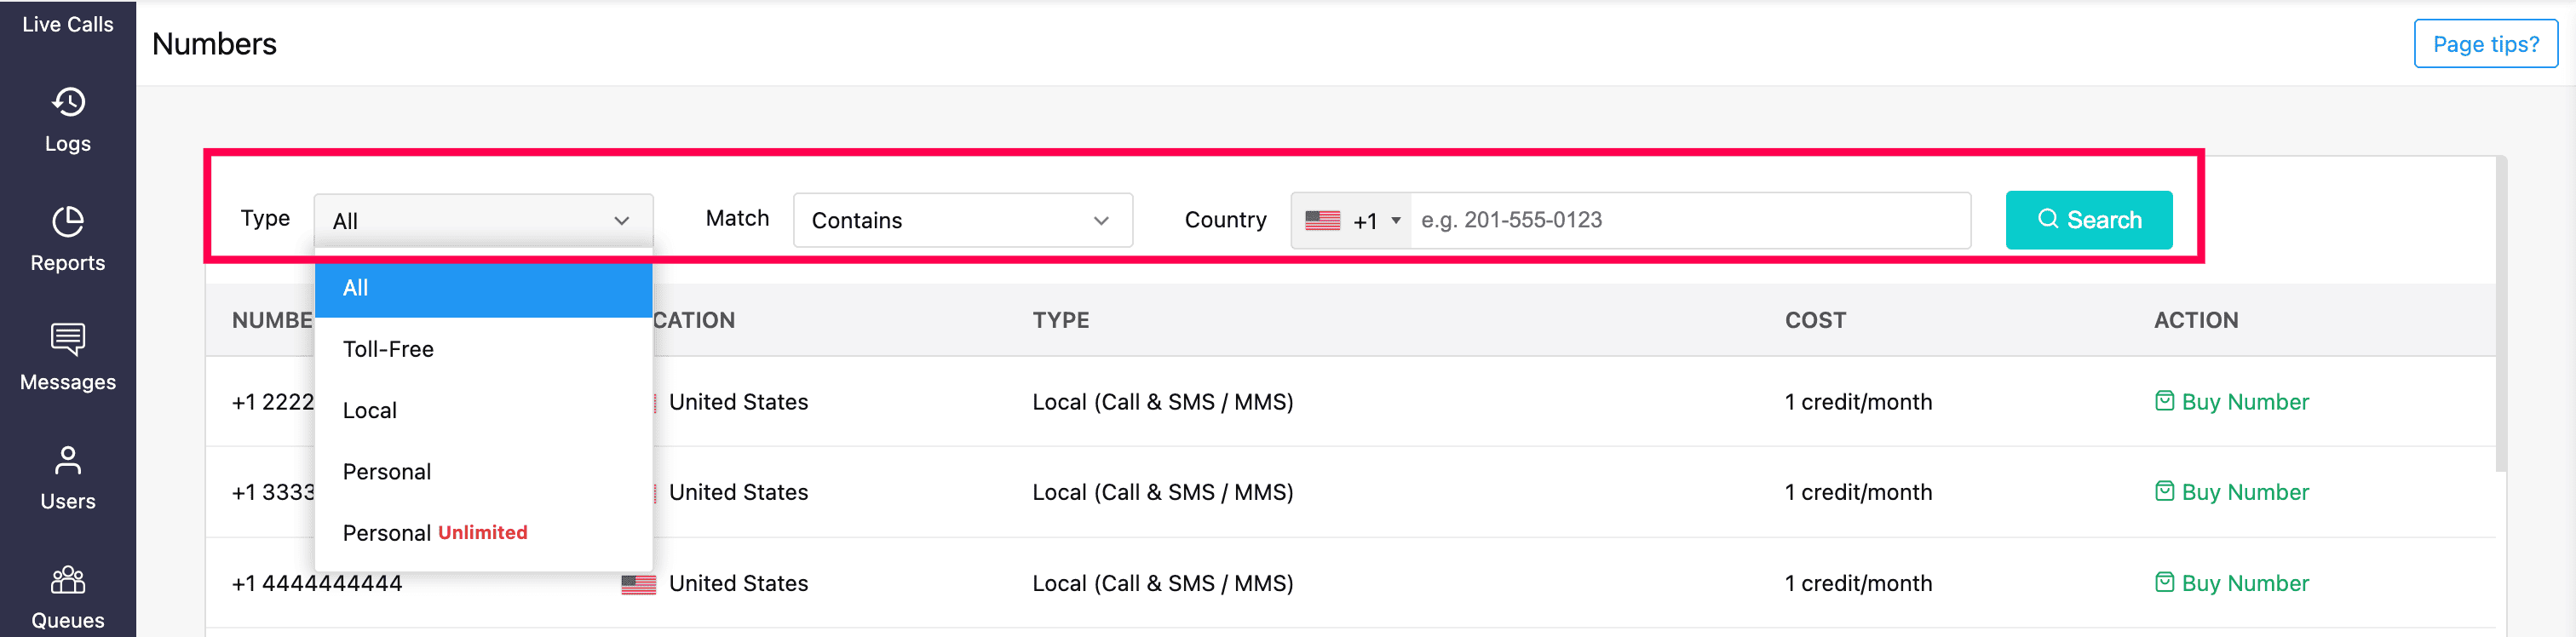

- Click Buy Number next to the desired number of your choice.
- A dialog box will display the details of the selected number type. Review the details and click Continue.
- On the Purchase Number using Credit page, enter a Display Name for the number.
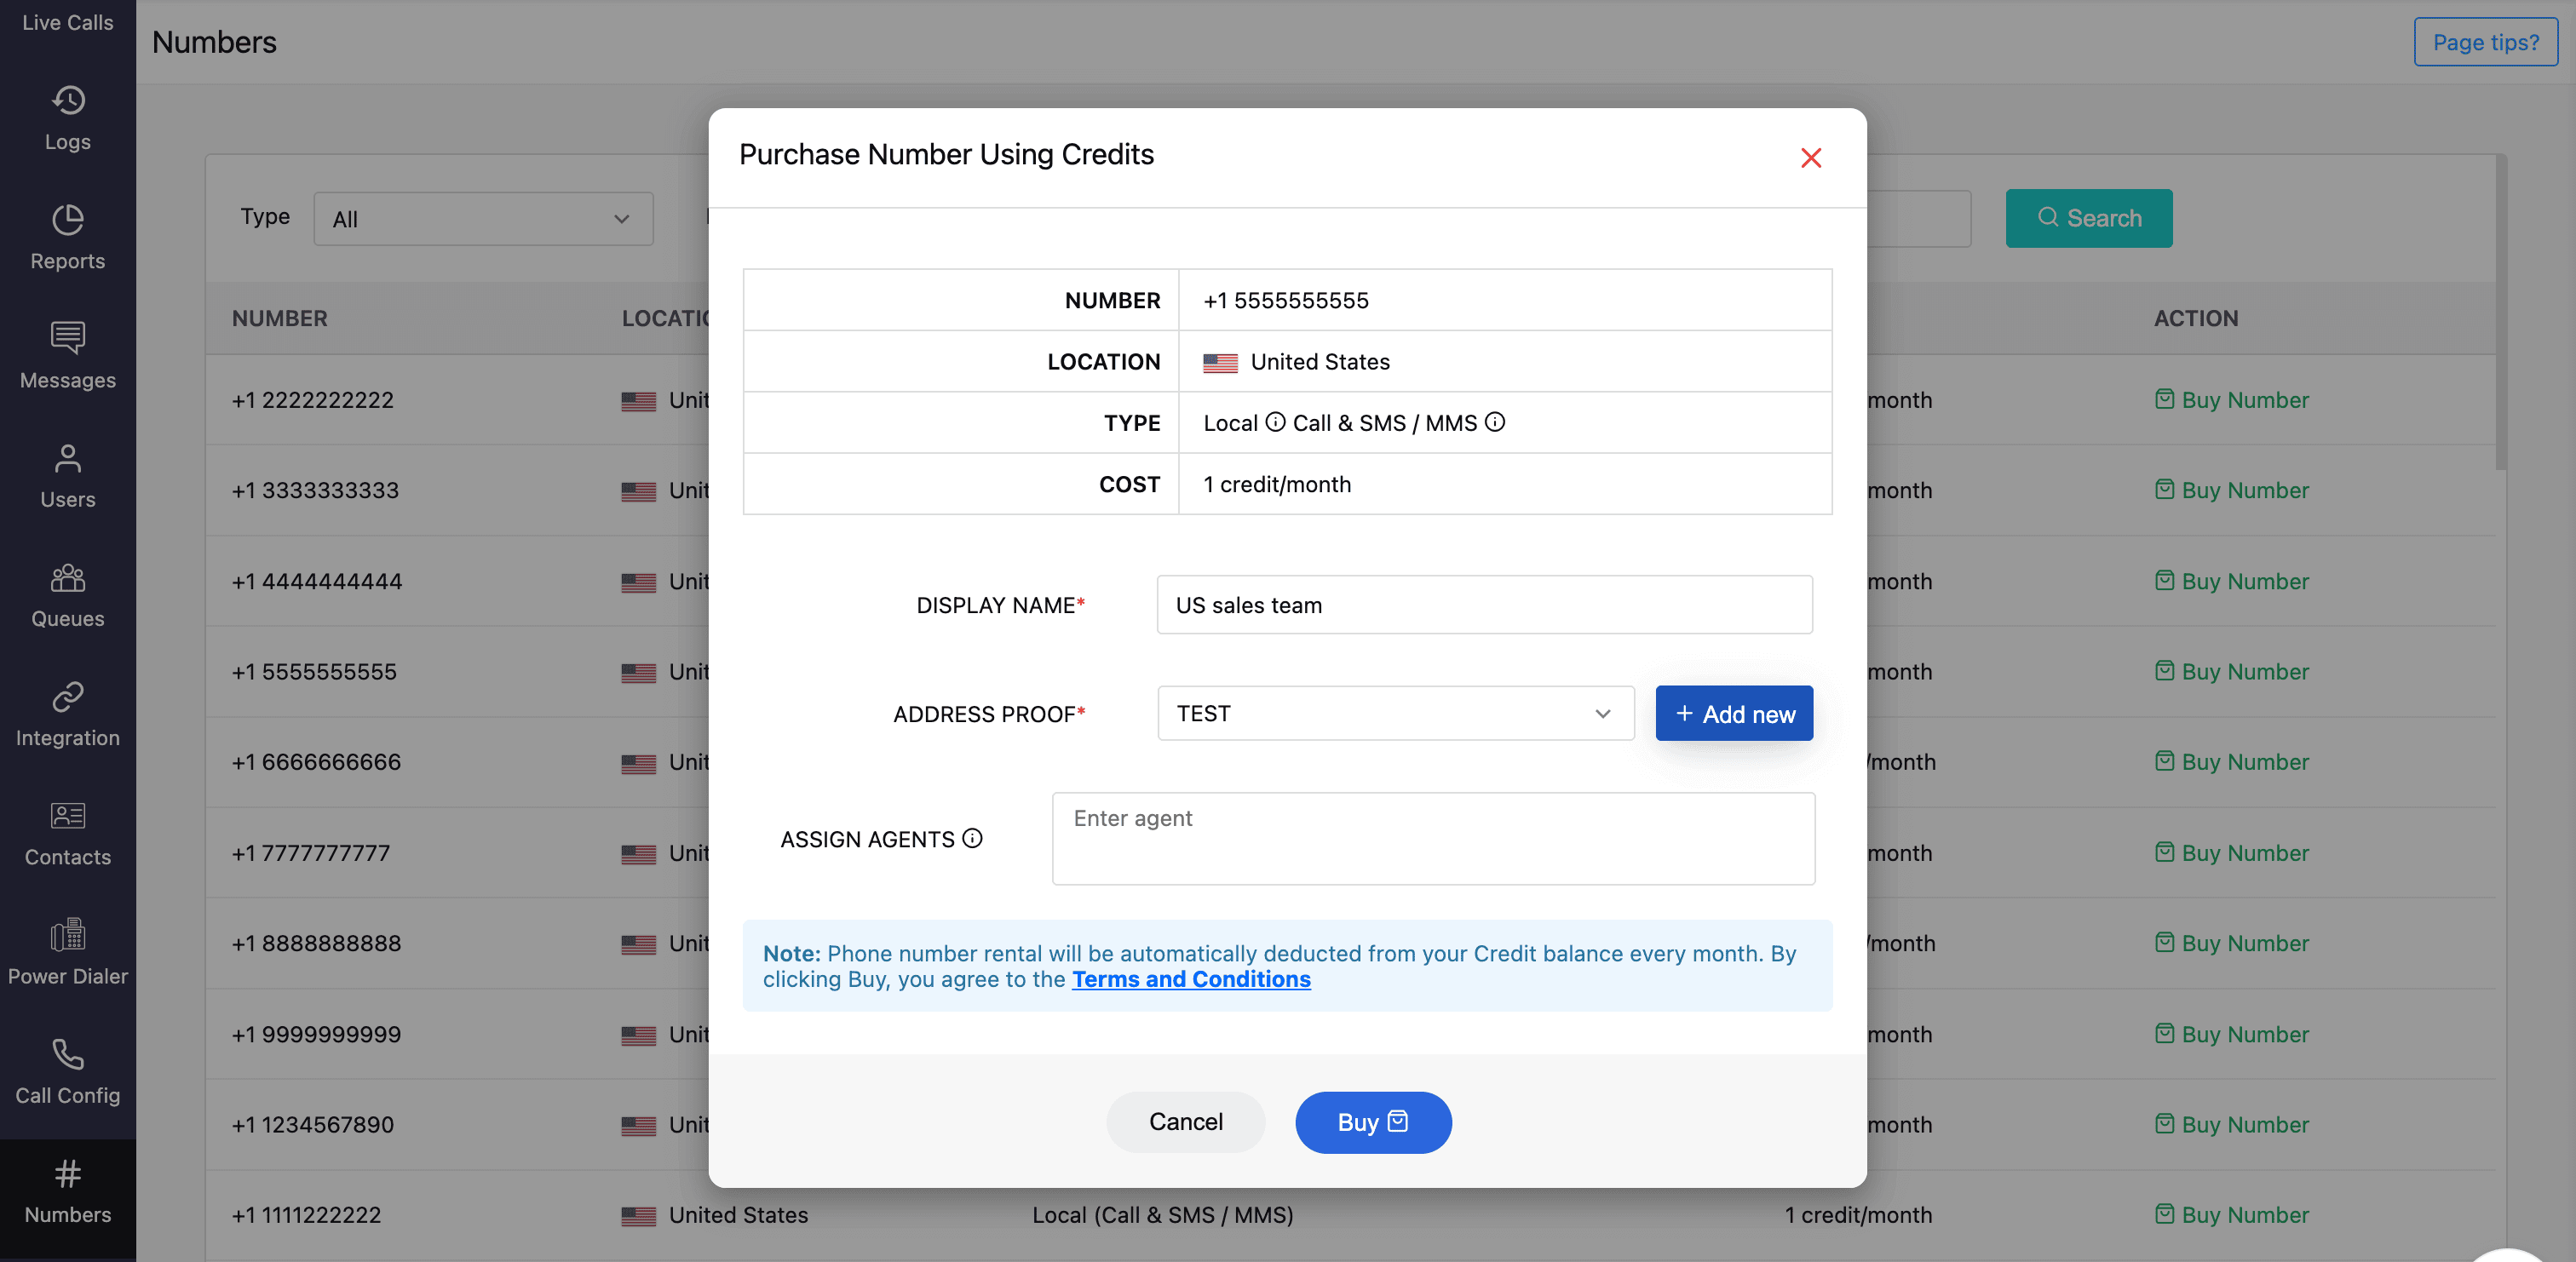

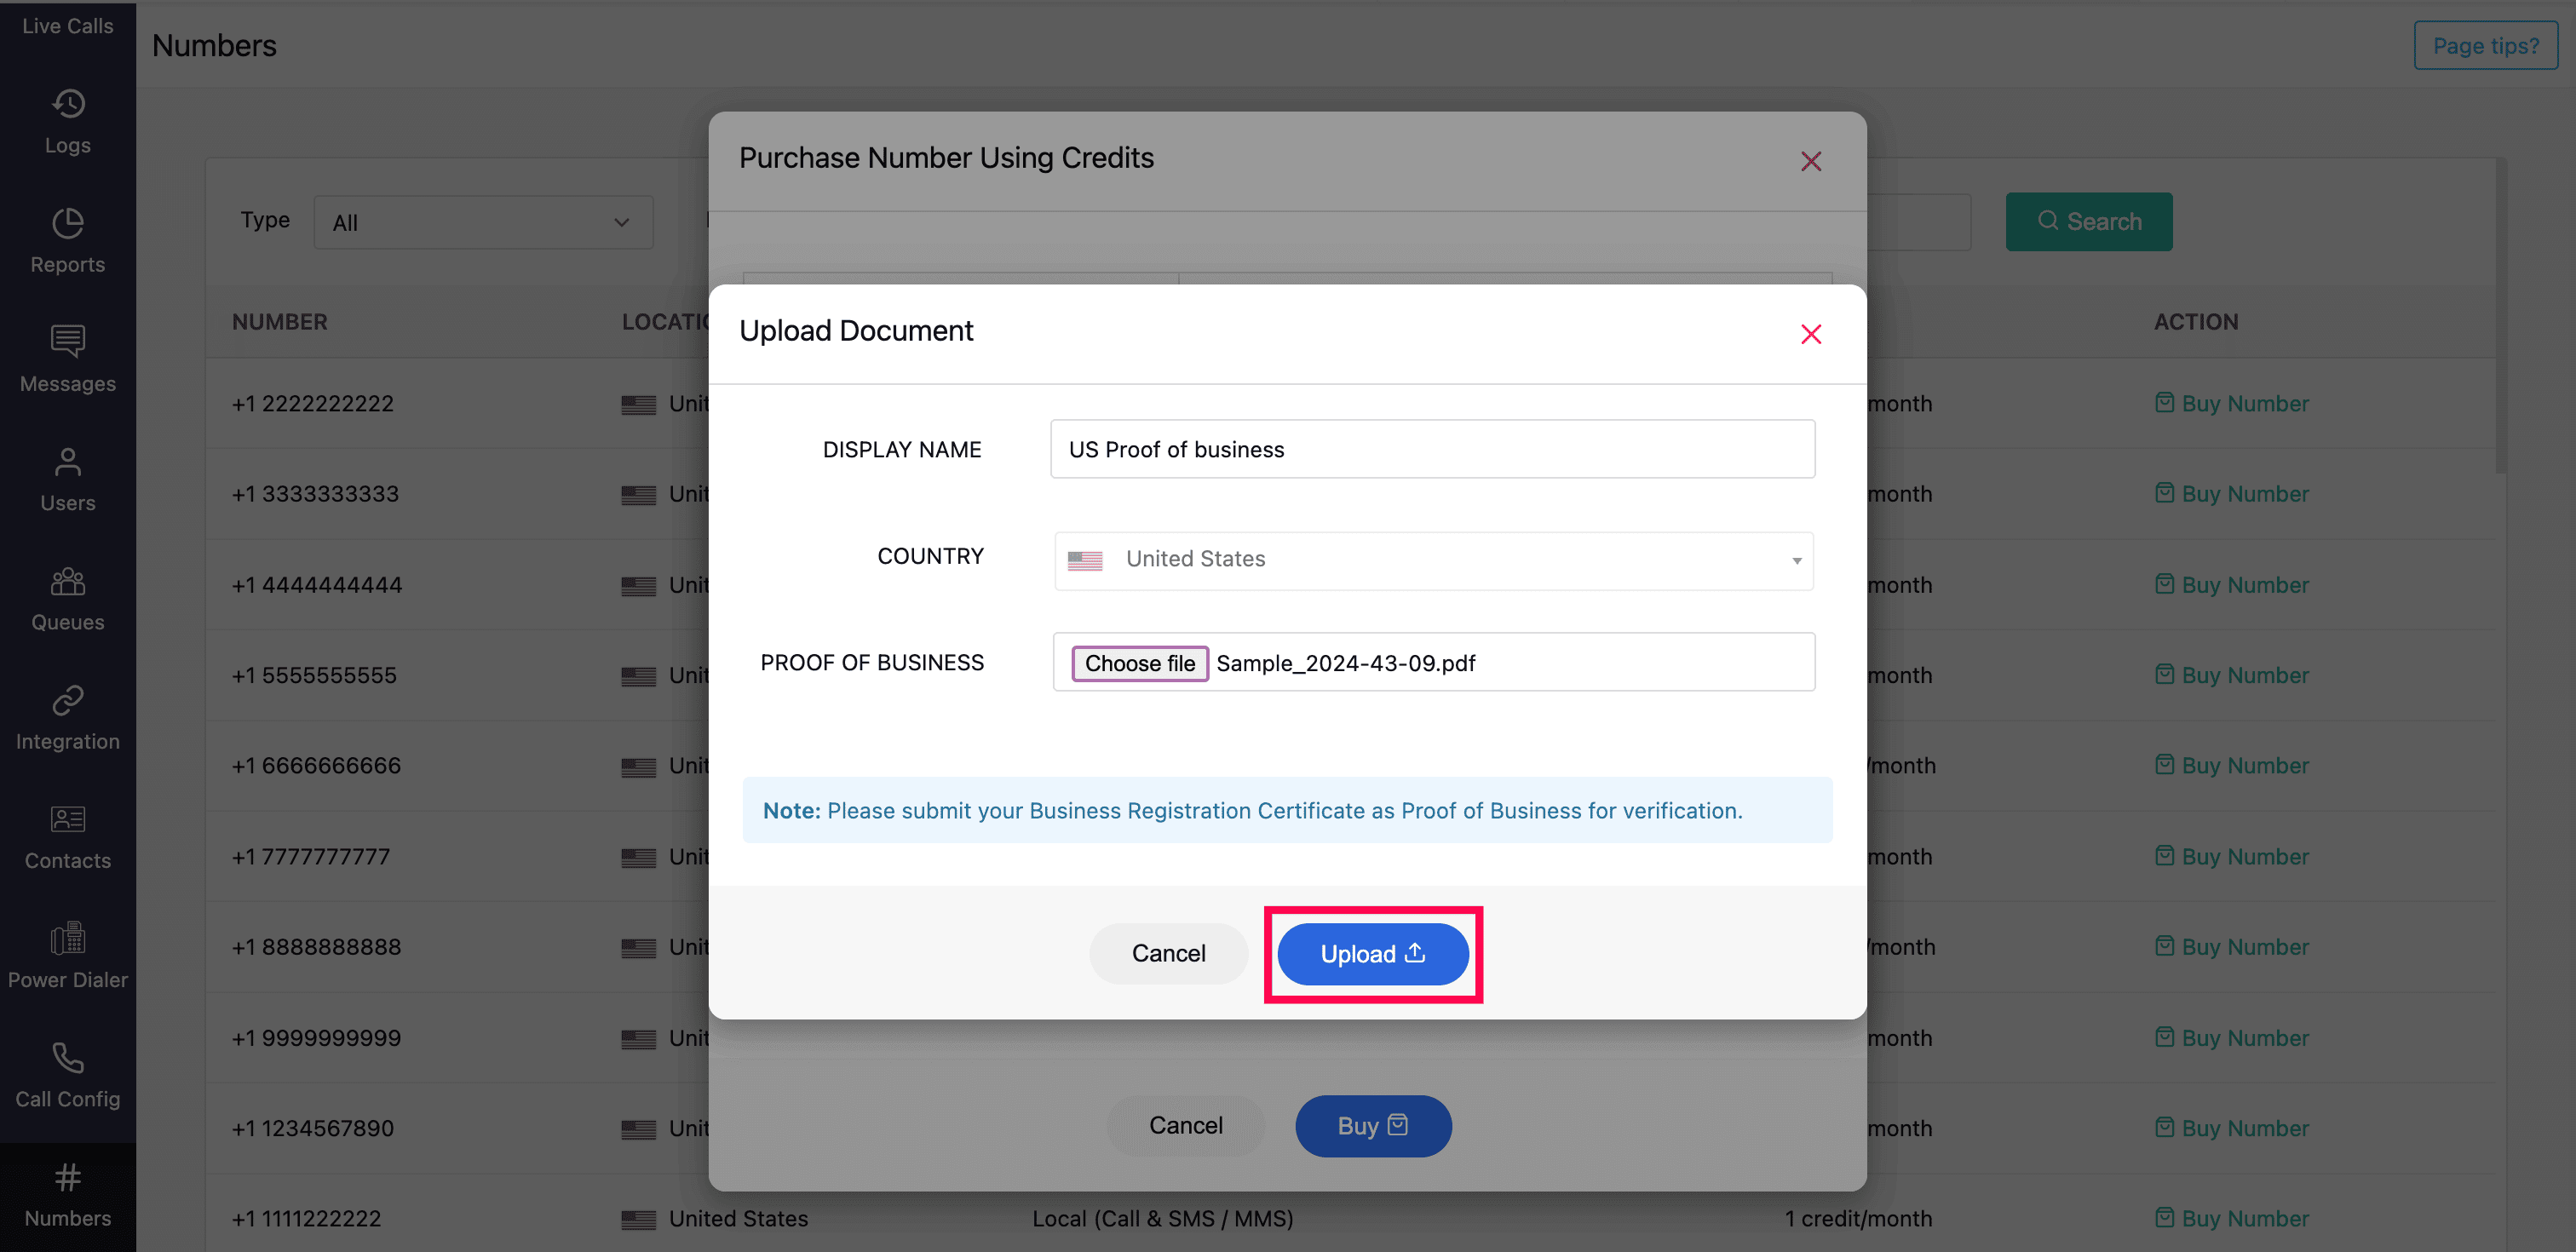
- Attach your address proof under the Address Proof field. You can either select a previously uploaded business document from the drop-down (sourced from the Document module) or directly upload a new one by clicking Add New.
Note: Submit your Business Registration Certificate as proof of business for verification.

- Select the agents to assign this number as their default outgoing number.Note:
- For personal and personal unlimited numbers, only one agent/user can be assigned.
- If you prefer, skip this step and assign the number later in the Call Config module.
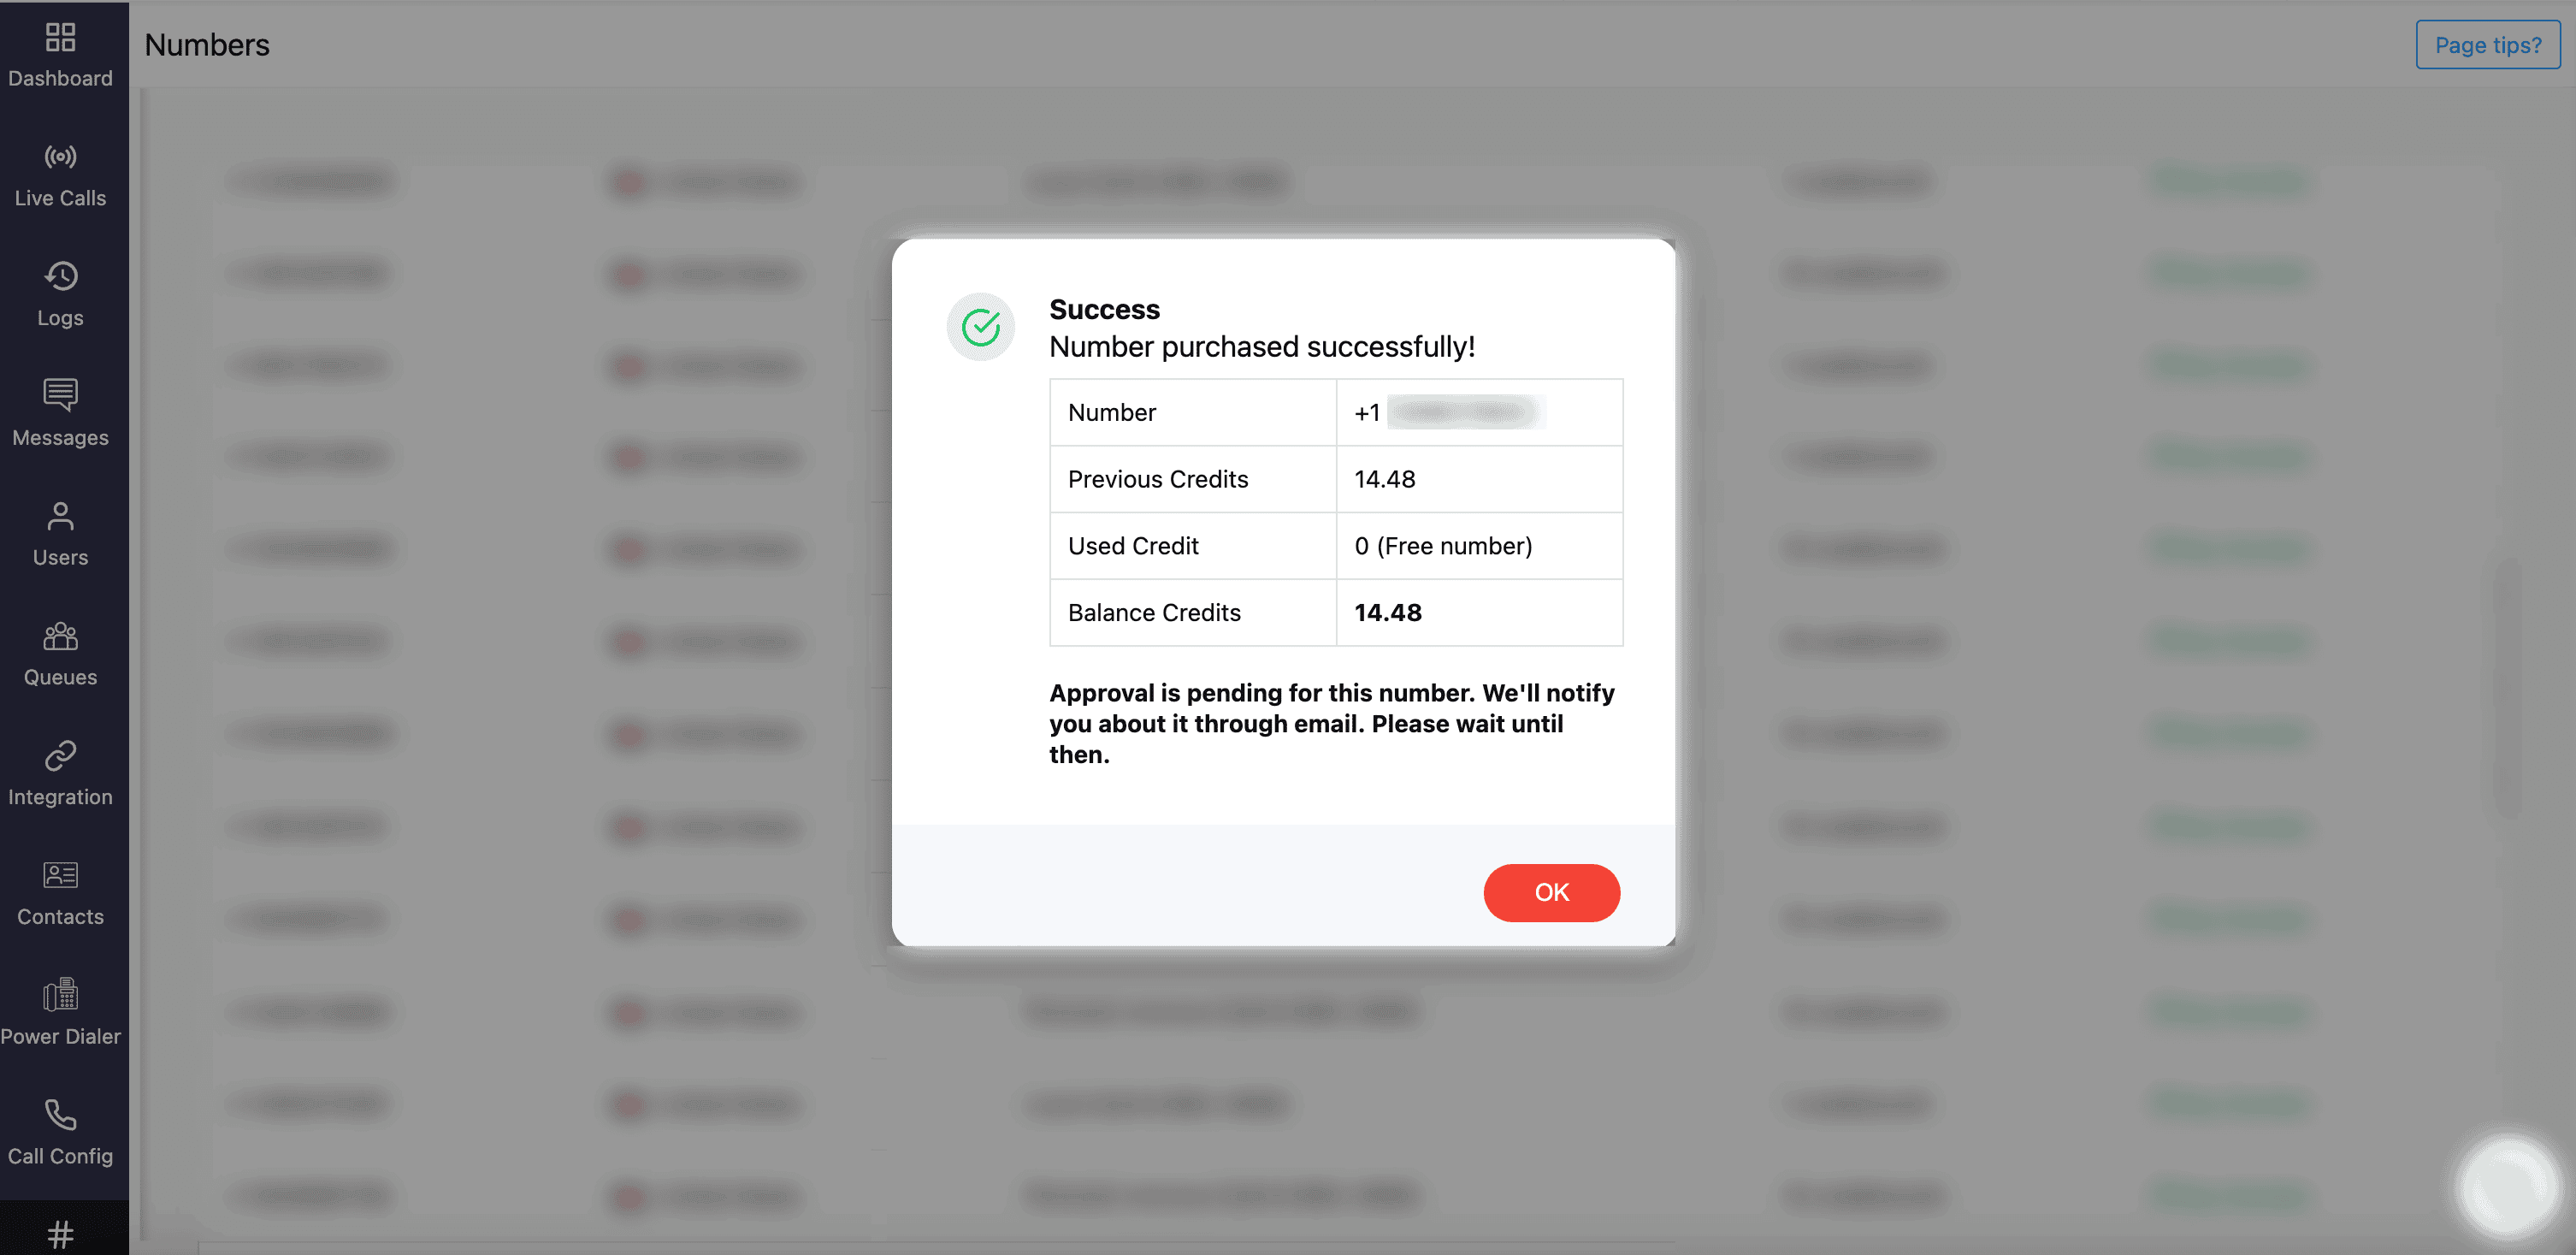
- Click Buy and finalize the payment using credits.
Note: Number rental will be automatically deducted from your Credit balance every month. By clicking Buy, you agree to the Terms and Conditions.
Zoho Voice support will verify your submission and approve the number upon successful completion of the number purchase.
 Learn more about numbers.
Note: Numbers cannot be purchased while on a trial period using free credits.

Number Flexibility: Porting & BYOC
Number porting
Number porting is the process of transferring an existing phone number from one telecom provider to another, so you can continue using the same numbers without disruption.
Zoho Voice supports porting for various types of numbers, including local, personal, and toll-free. Please note that porting is only allowed within the same number type.
What you need for number porting?
To complete your number porting, the following documents/details are used:
- LOA (Letter of Authorization): LOA is a legal document that gives a new service provider or carrier permission to transfer a phone number.
- Invoice: Invoice of your number purchase from your previous provider. This verifies your ownership of the number.
- PIN: You might need to submit the PIN for the number that is to be ported.
Note: LOA and Invoice are mandatory documents. Additional documents may be required depending on the country that you are trying to port.
Steps involved in number porting
To transfer number from your existing provider to Zoho Voice :
- Submit the Request Form: Fill out the porting request form and submit it.
Note: This request form is only for US DC.
- Feasibility Test: Once you submit the form, our support team will review the details and send them to our provider to check the feasibility of porting your number.
Note: Do not cancel your subscription with your current provider until it is completely ported. You need to keep ownership of that number until the transfer is completed.
- LOA (Letter of Authorization): If your number can be ported to Zoho Voice, we’ll send you a LOA. Fill it out and send it back to us. This confirms your request, at which point we’ll initiate the porting process with our carrier.
Note: LOA template might vary by region and some countries require a local address proof document.
- Porting Confirmation & Configuration: Once the porting date is scheduled, we will inform you. The phone numbers will be added prior to this in Zoho Voice. You can configure the settings such as IVR, Incoming and outgoing call in advance.Learn more about number porting
Note: The estimated time for porting may vary by region.
BYOC
Bring Your Own Carrier (BYOC) service configuration optimizes your business telephony infrastructure by leveraging the Zoho Voice features without having to port the numbers. You can use your business phone numbers by plugging in your existing carrier to Zoho Voice's cloud platform.
What are the prerequisites to use the BYOC solution?
For Zoho Voice to work with your current carrier, ensure your current carrier:
- Is SIP compliant.
- Extends support for the TCP, UDP, or TLS trunk transport protocols. Only TCP, UDP, and TLS over IPv4 are supported. IPv6 is not supported.
- Possesses one or more publicly routable IP addresses or domain names.
How to set up BYOC in Zoho Voice?
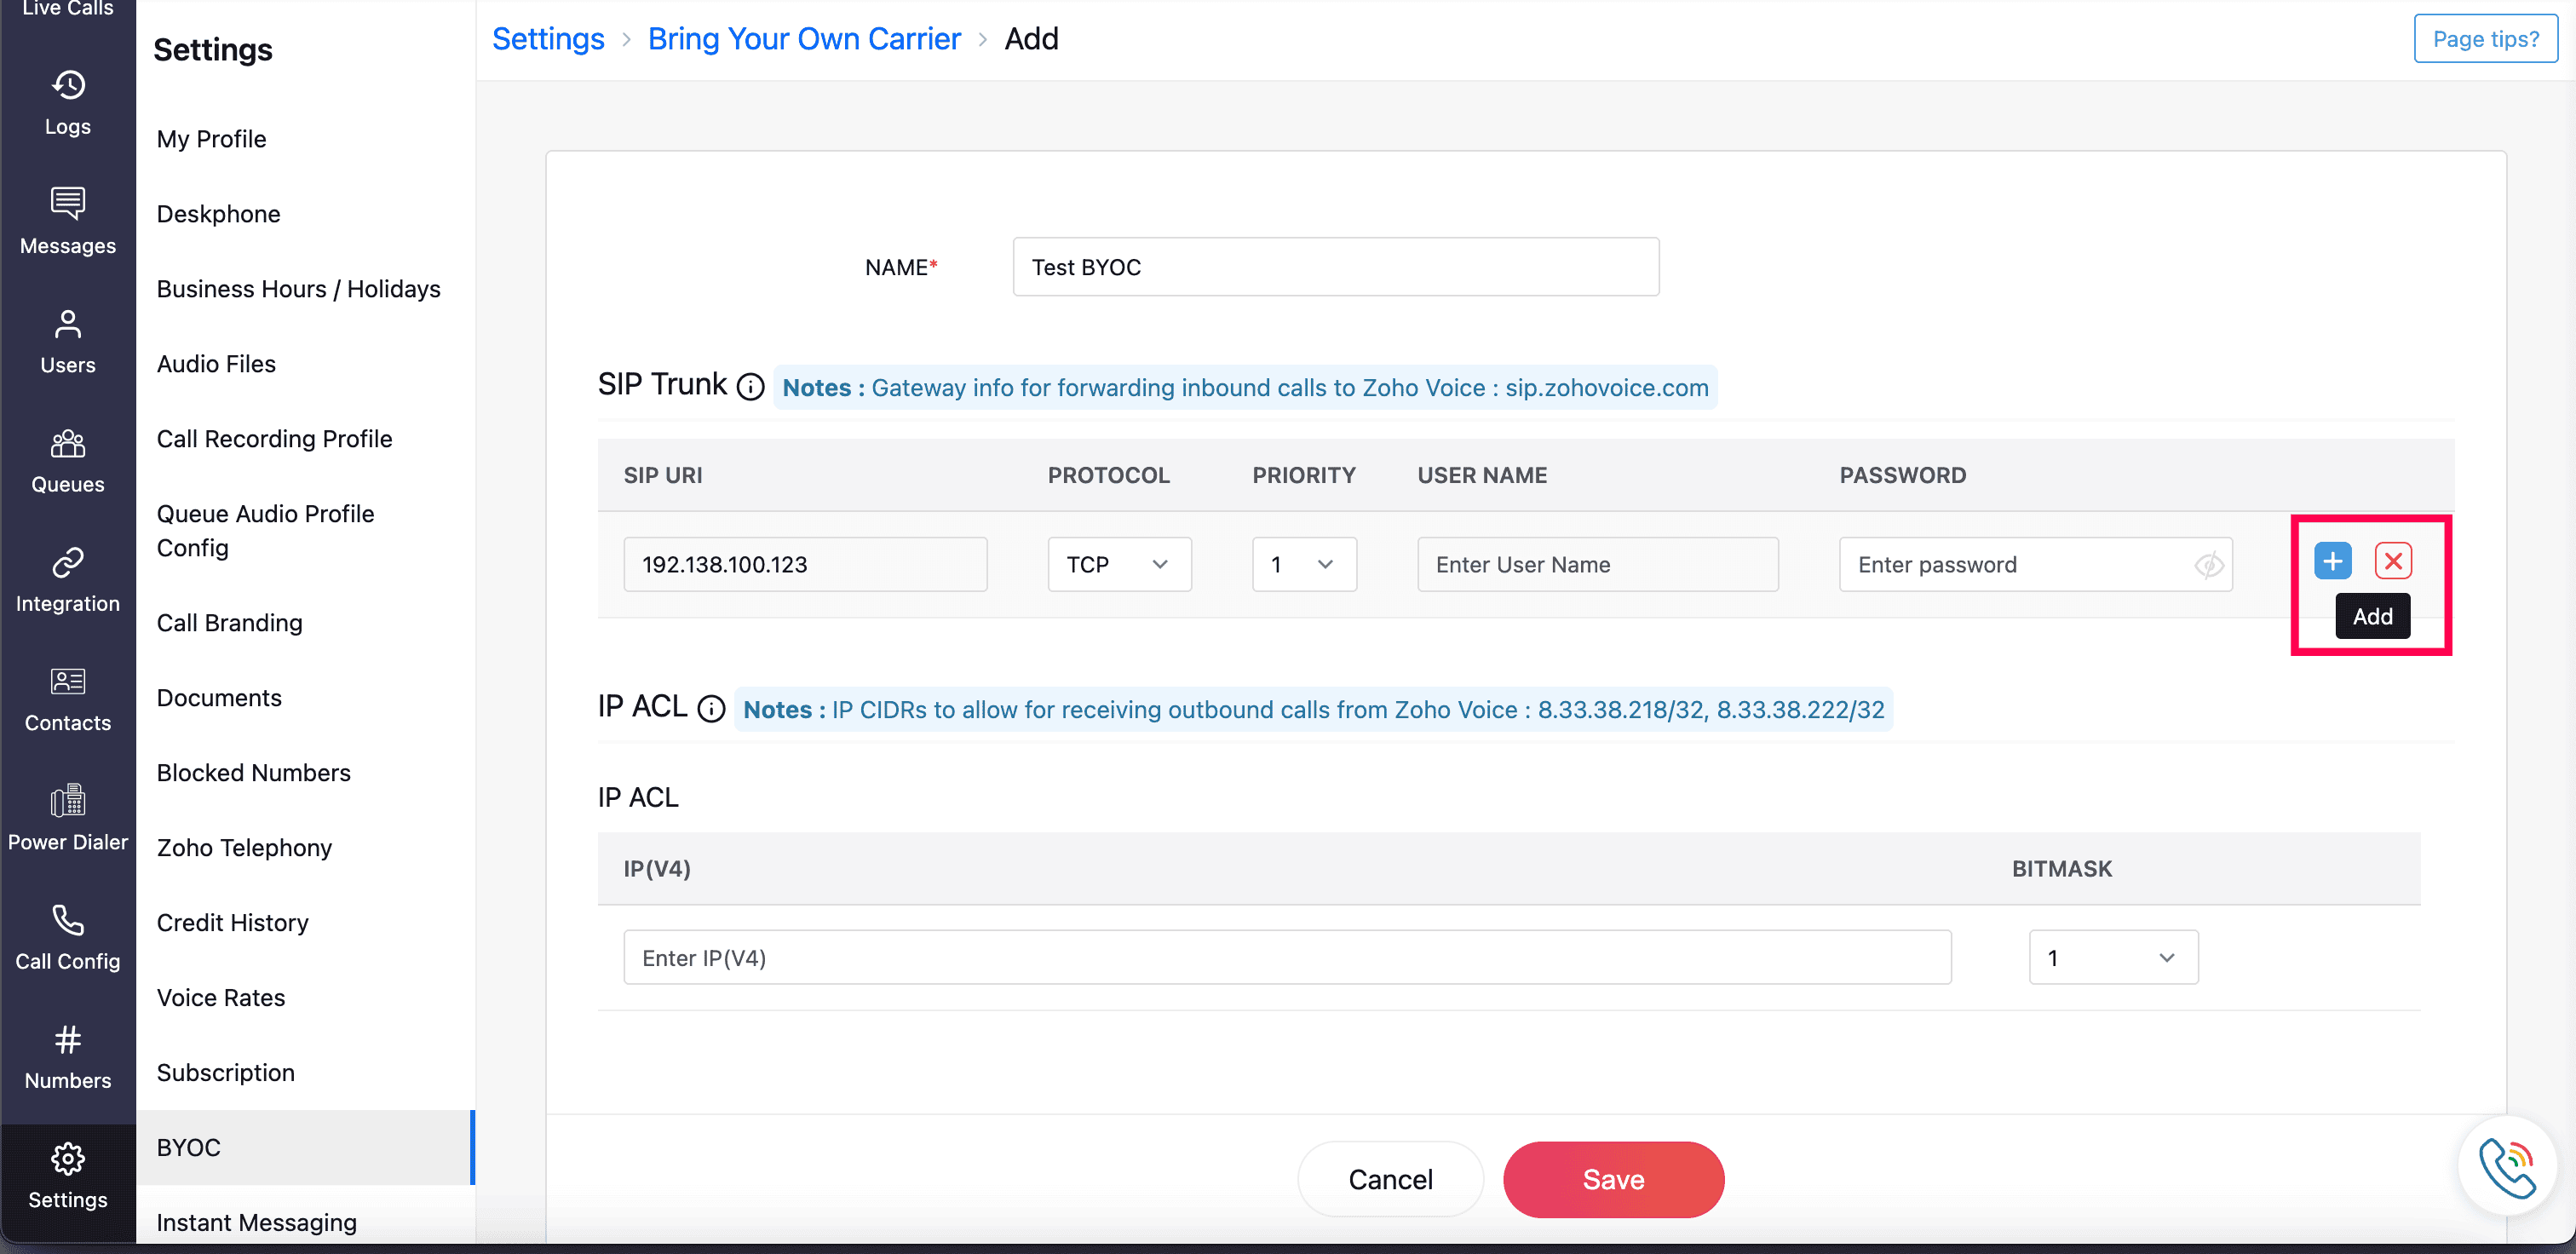
- Configure and define SIP trunks and IP Access Control List for a new BYOC trunk.
Note: Only the super admin and admins can create and configure BYOC.
- Each BYOC trunk defined is subject to further verification by Zoho Voice. Upon successful approval, the status of the trunk becomes active and enabled to transfer and receive calls.

Note: The Config Approval status of the newly saved BYOC trunk will be displayed as "Pending" and the Trunk PBX status will be "Inactive". This indicates that the trunk is under review by Zoho Voice for verification.
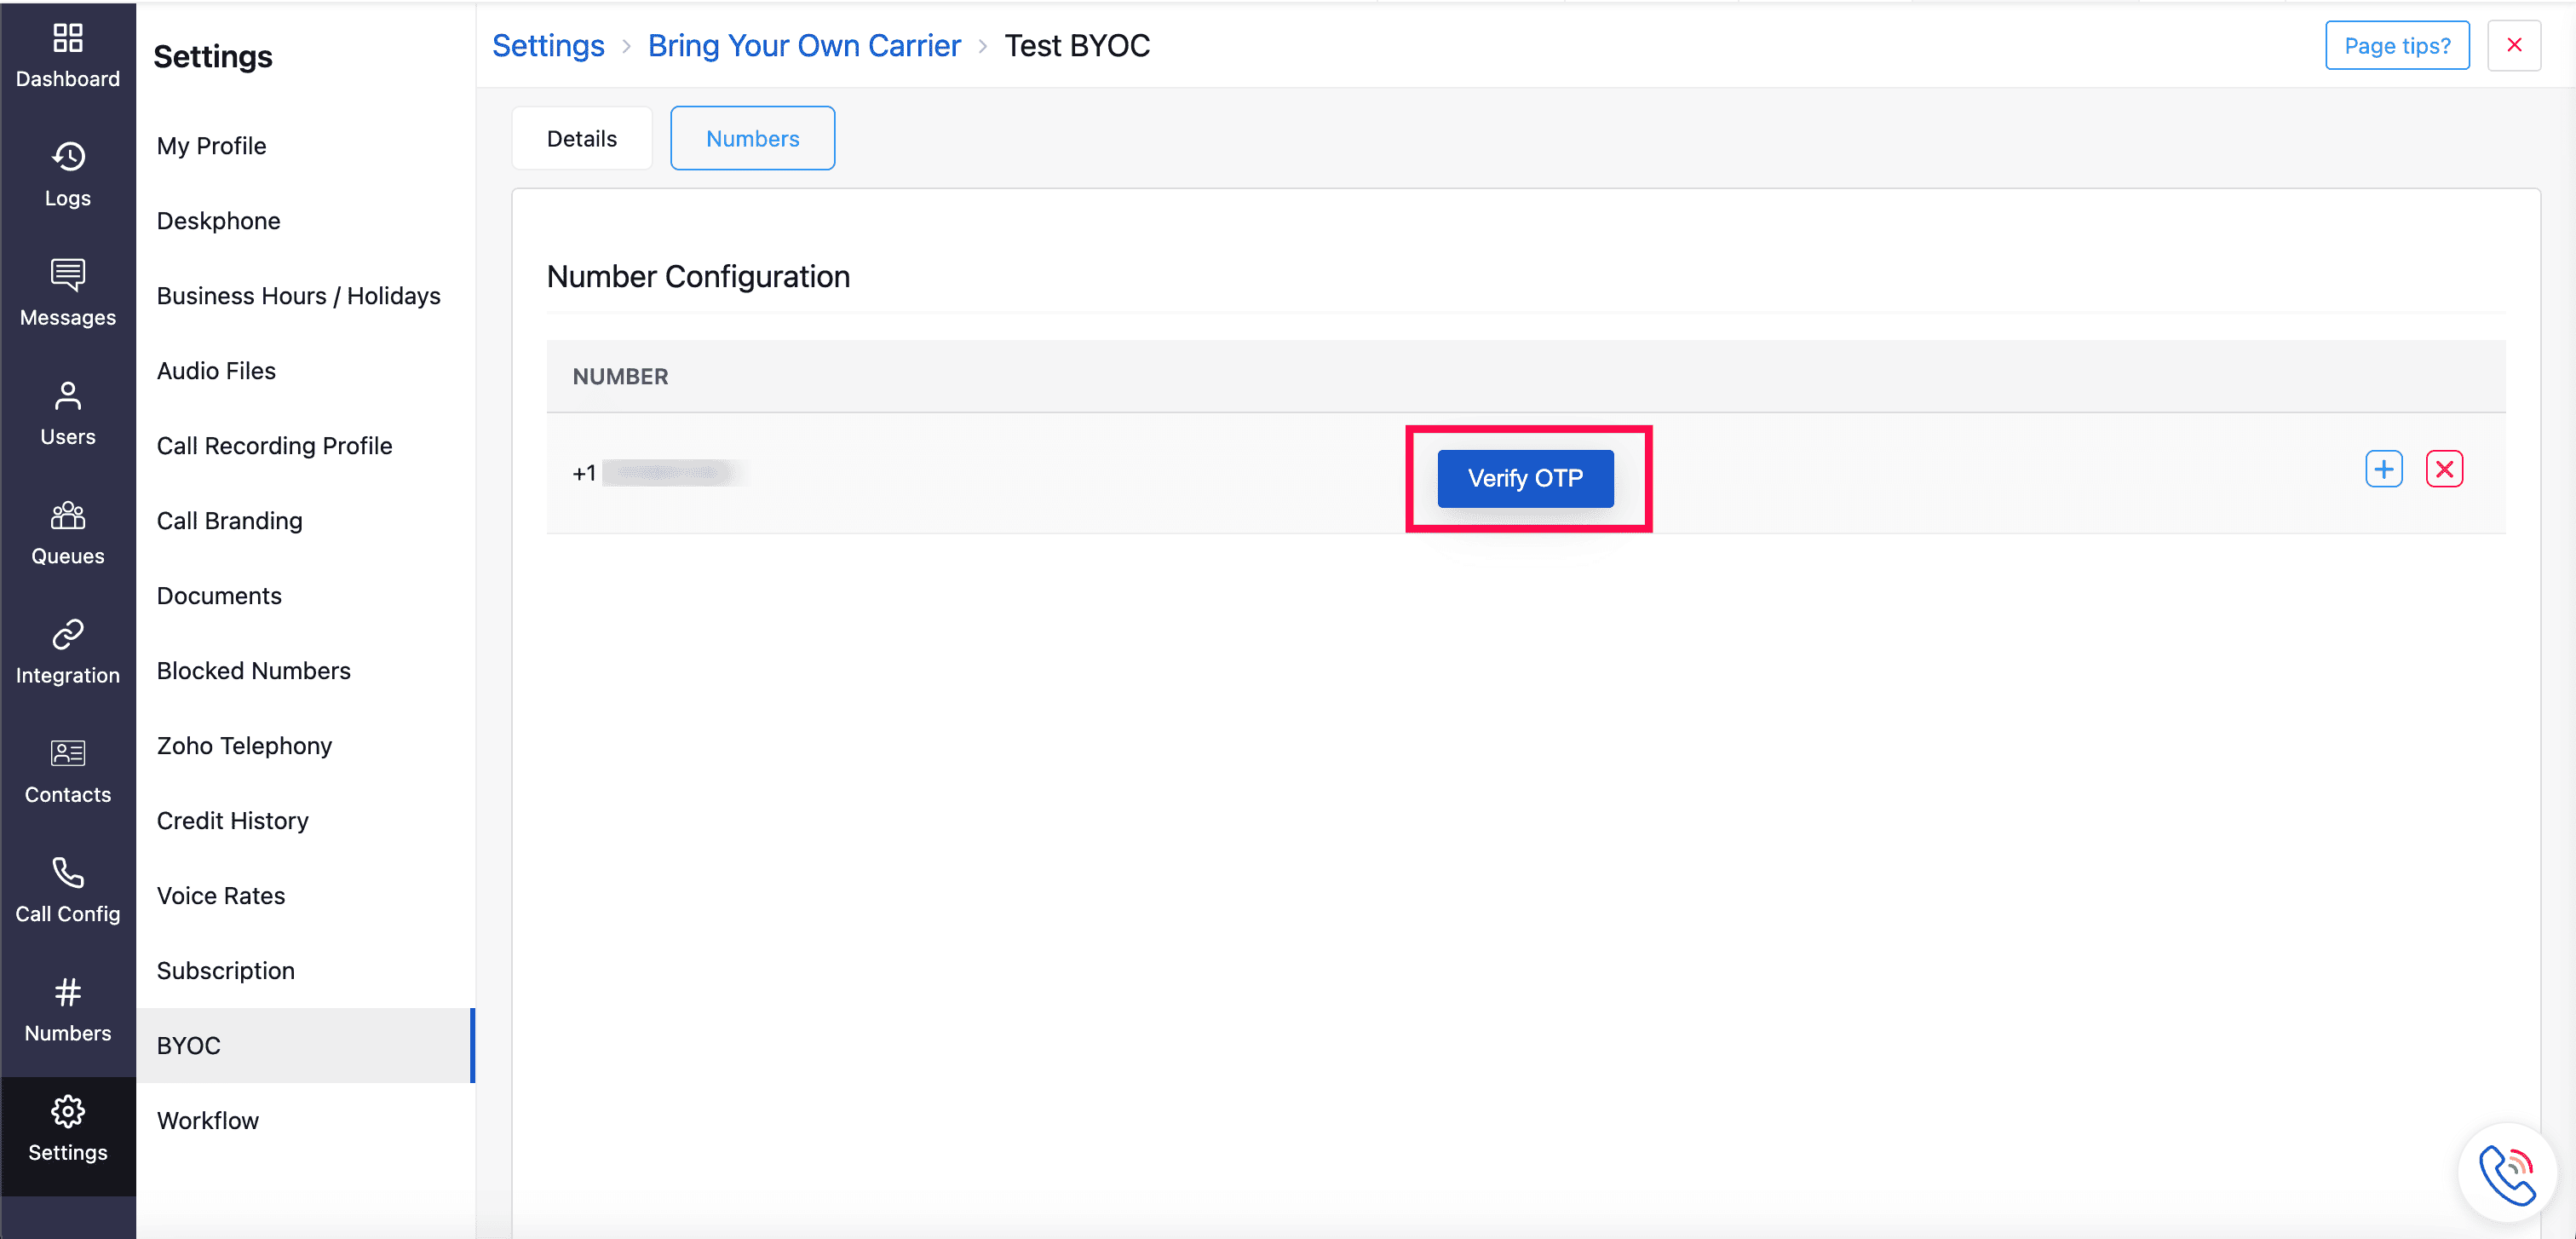
- After the approval of BYOC trunk, add your existing numbers to the newly approved BYOC trunk. Zoho Voice will verify it via Call OTP and approve the numbers.
- Configure all the call settings for the numbers added under the Call Config module.
- Send and receive calls from your existing carrier utilizing Zoho Voice. Learn more on creating and configuring BYOC.


Organization Setup
Create users for your organization
After the successful creation of your account, you can start adding users. These users must accept the email invitation and can log in to Zoho Voice, configure and view different settings according to the privileges they have.
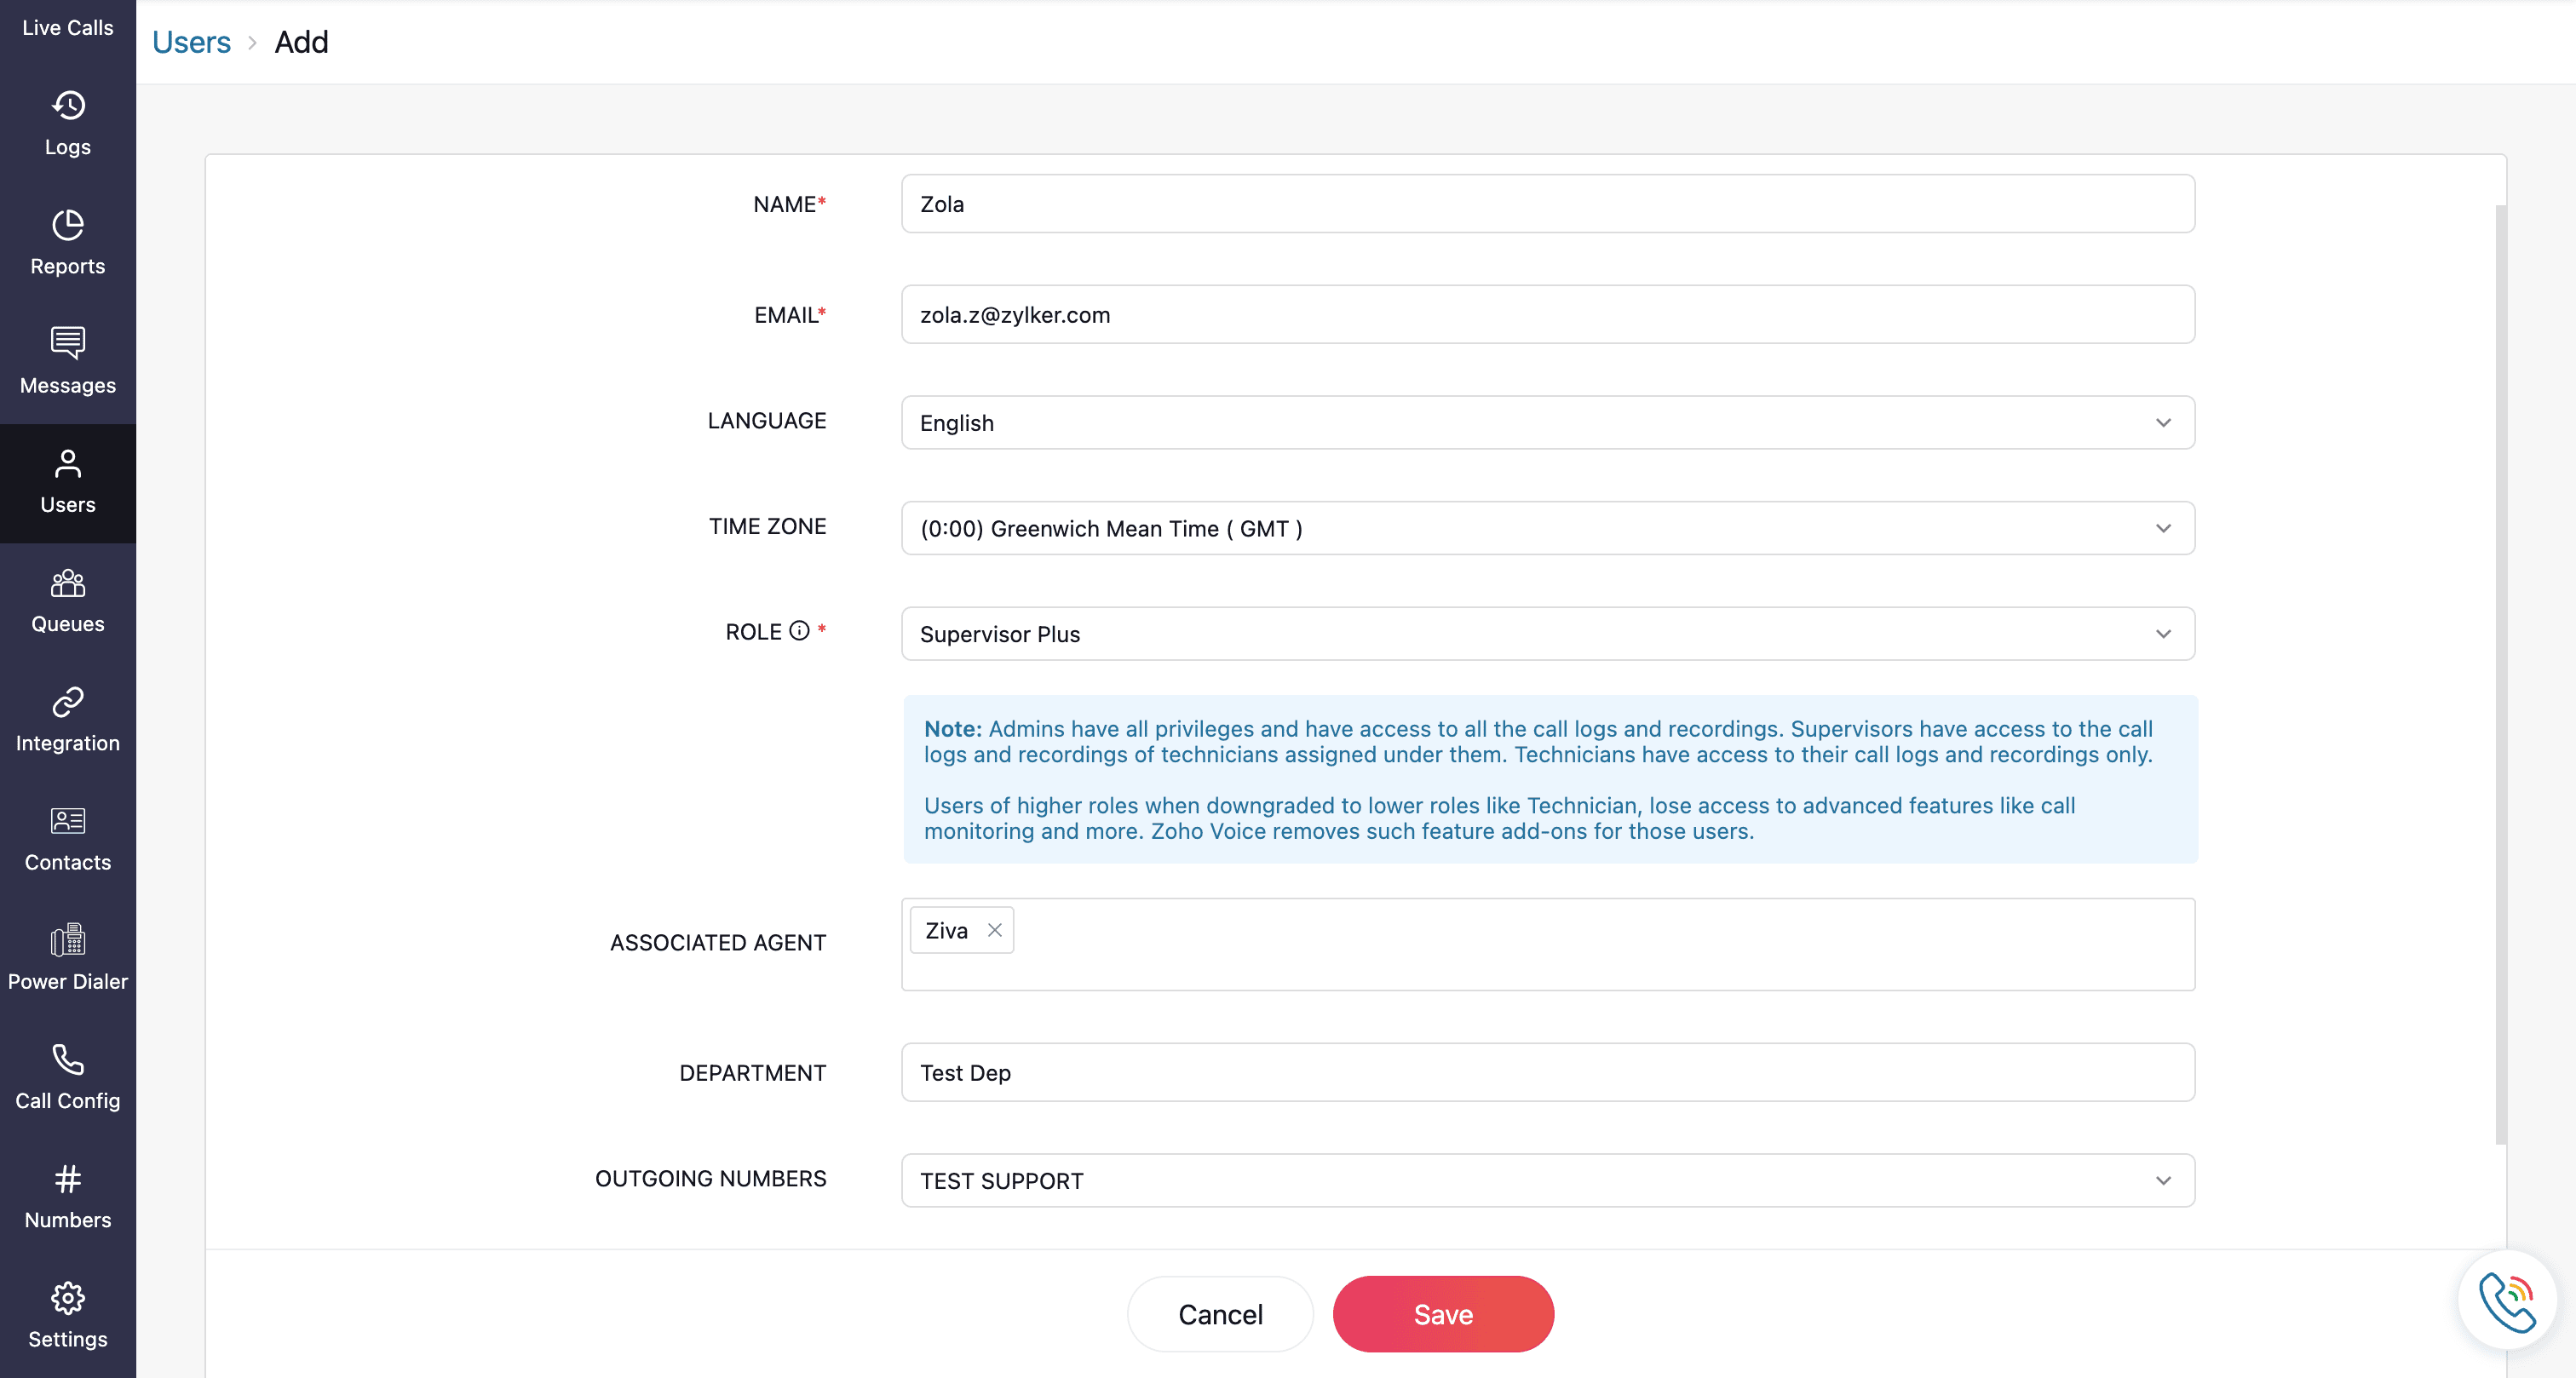
To add a user :
- Go to the Users module on the left sidebar menu.
- Click Add Users at the top-right corner.
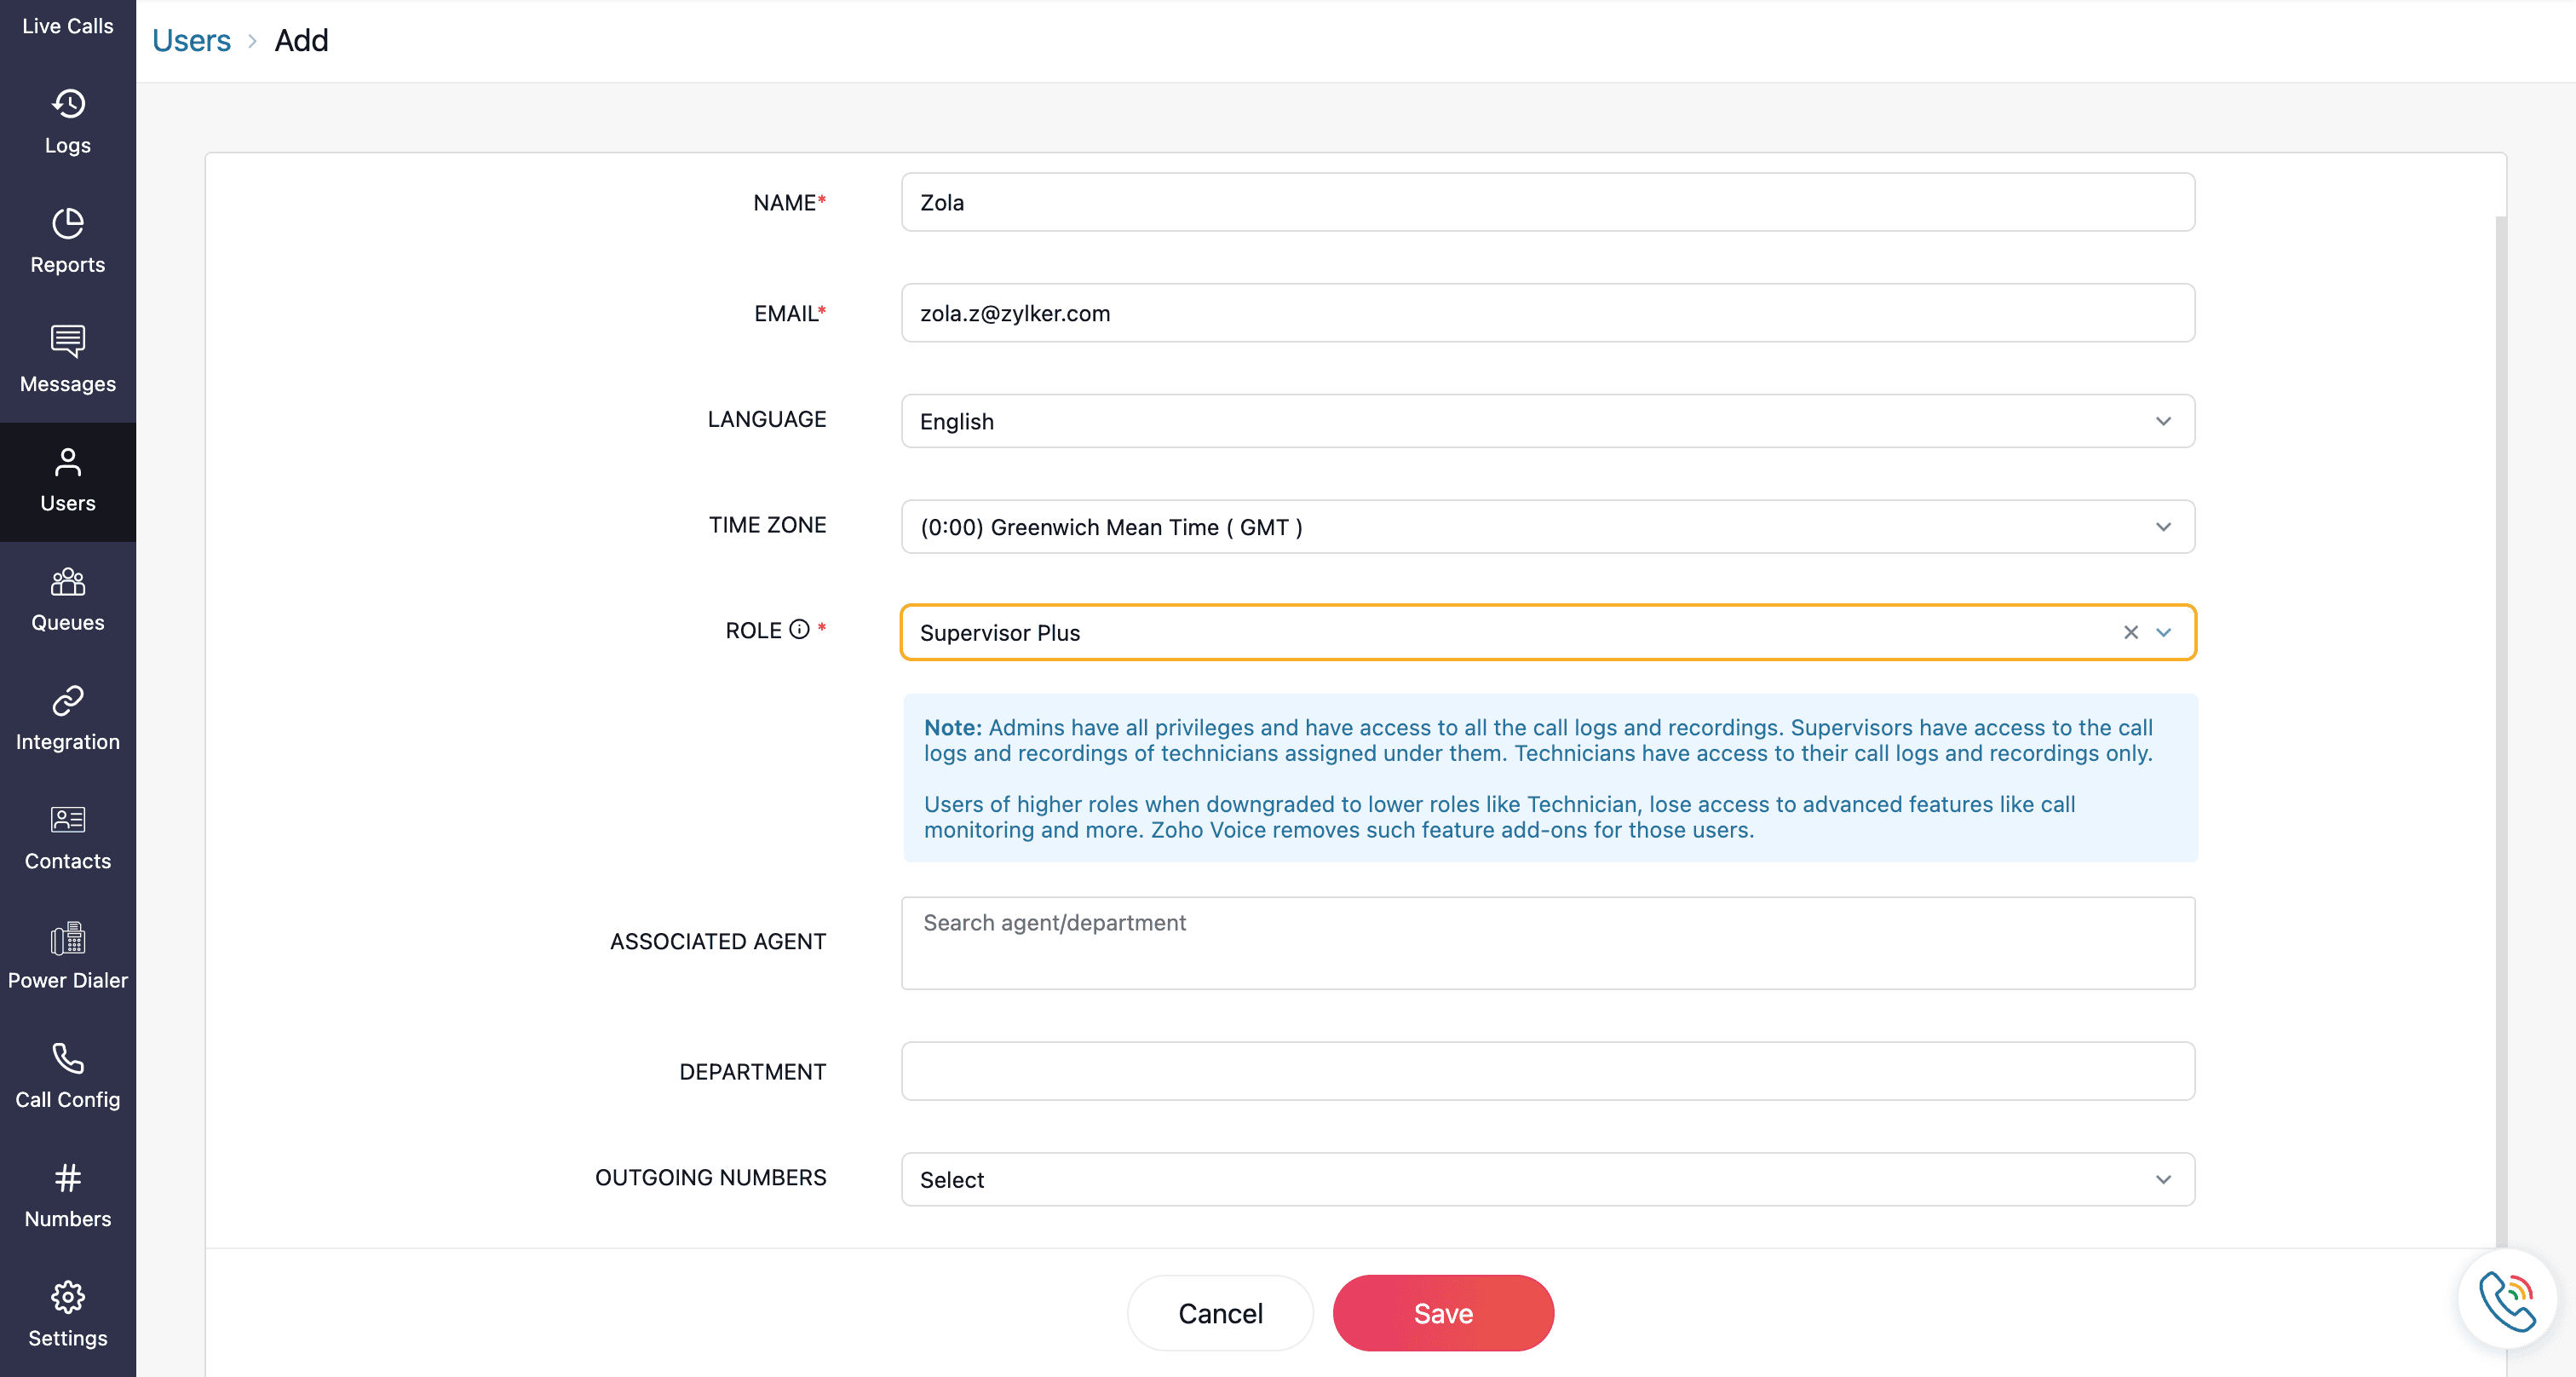

Now, fill in the following details:
- Name and Email Address of the user.
- Choose the Zoho Voice UI Language and Time Zone from the respective drop-down.
- Select the Role you want to assign.
Additional settings:
- For the roles supervisor plus and supervisor, you can map the associated technicians.
- For technicians, you can map them to their associated supervisor/supervisor plus.
- For all roles except admin and super admin, you can assign outgoing numbers. If numbers haven't been purchased yet, you can assign them later.
Department assignment:
- You can map the user to a Department.
- To create a new department, enter the name and click Create New.

- Now, click Yes.
- Once the required fields are mentioned, click Save.
 Learn more about the roles and privileges.
- Name, email address, and role are mandatory fields.
- Admins have all privileges and have access to all the call logs and recordings. Supervisors have access to the call logs and recordings of technicians assigned under them. Technicians have access to their call logs and recordings only. Users of higher roles, when downgraded to lower roles like technician, lose access to advanced features like call monitoring and more. Zoho Voice removes such feature add-ons for those users.
Note:


User invitation process
Once saved, the user will receive an invitation at the provided email address.

- The user needs to click View Invitation.
- Review and click Sign up & Accept.
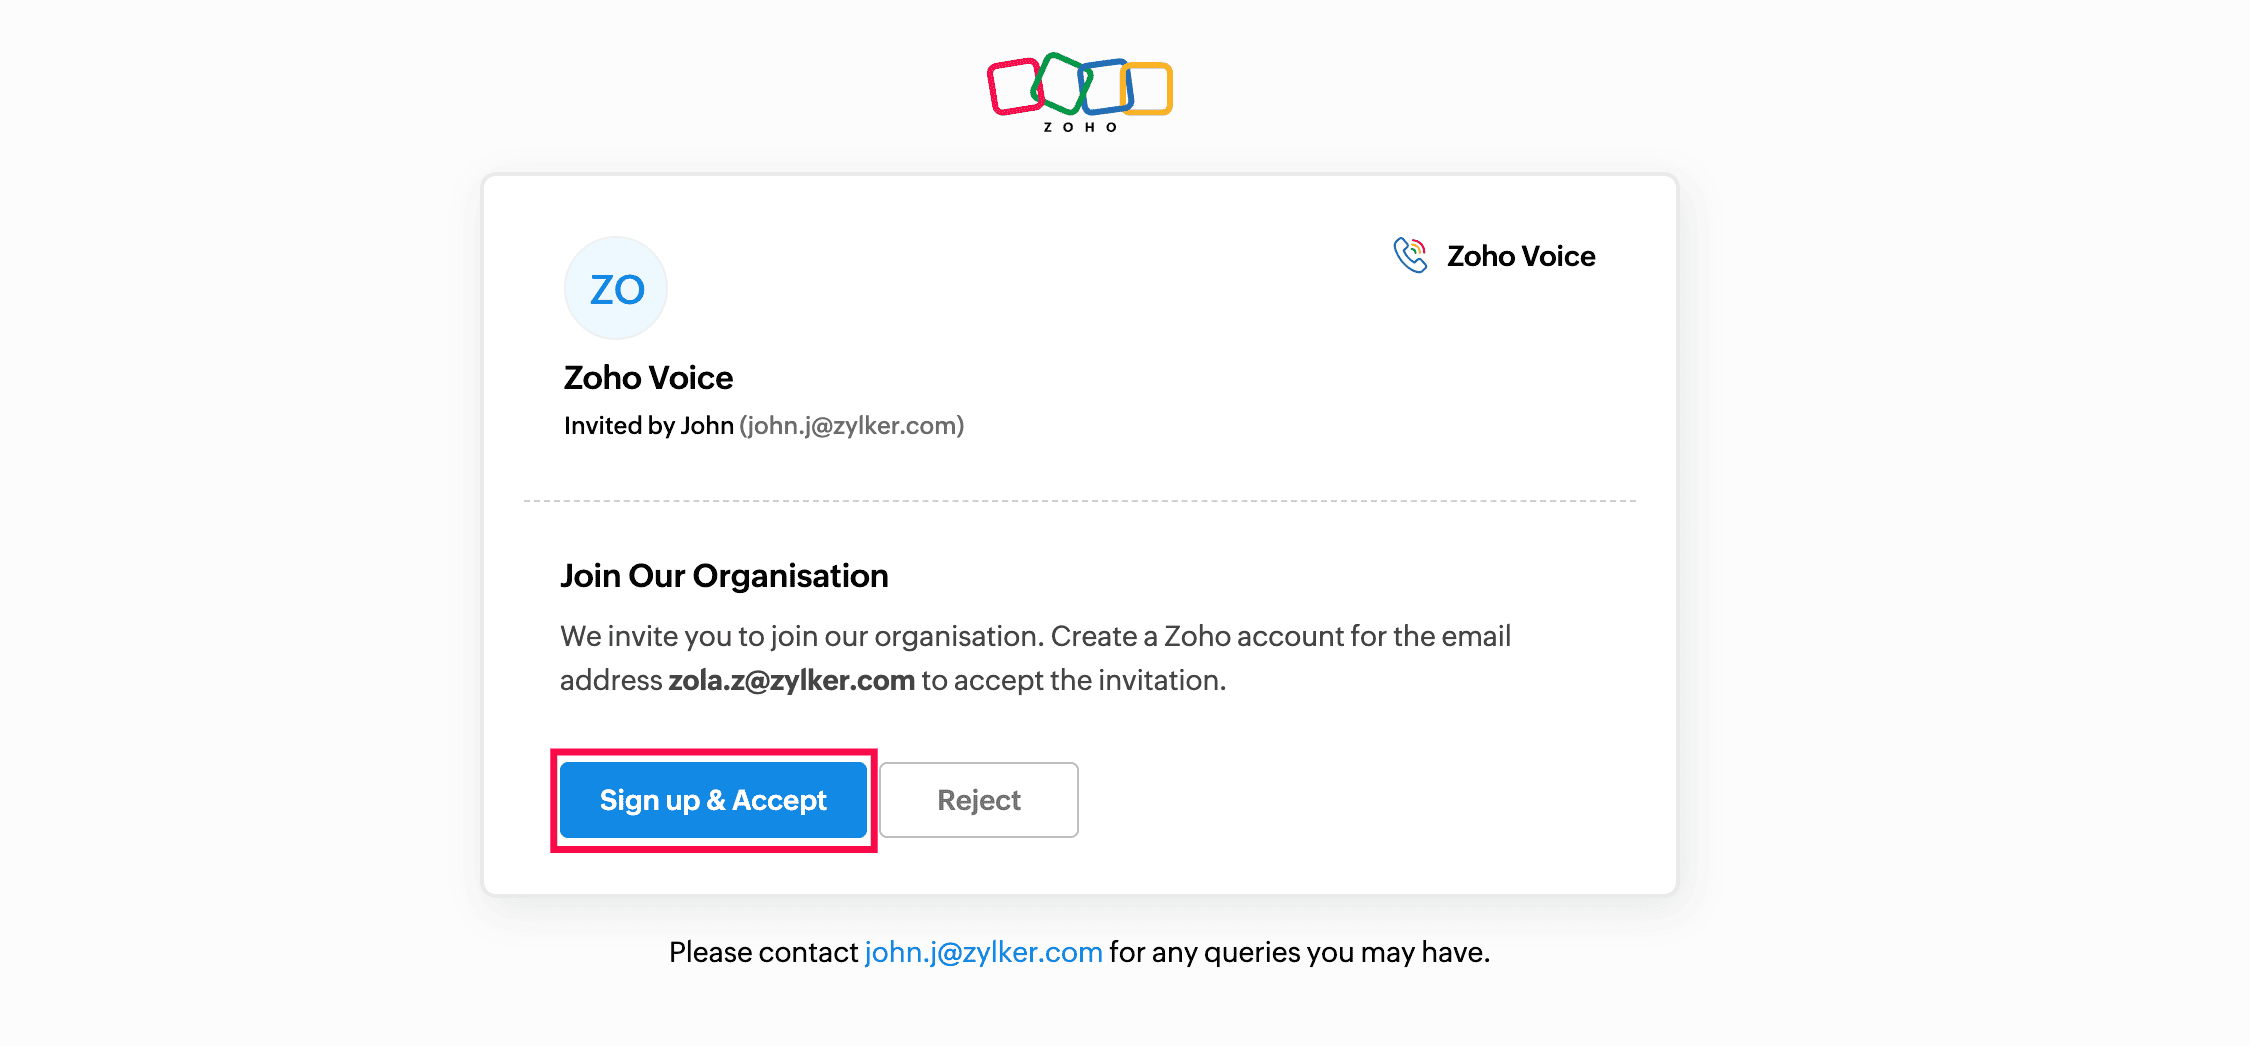
- Enter your First name and Last name, and create a secure password.
- Read and agree to the Terms of service and Privacy policies.
- Click Sign up & Accept.
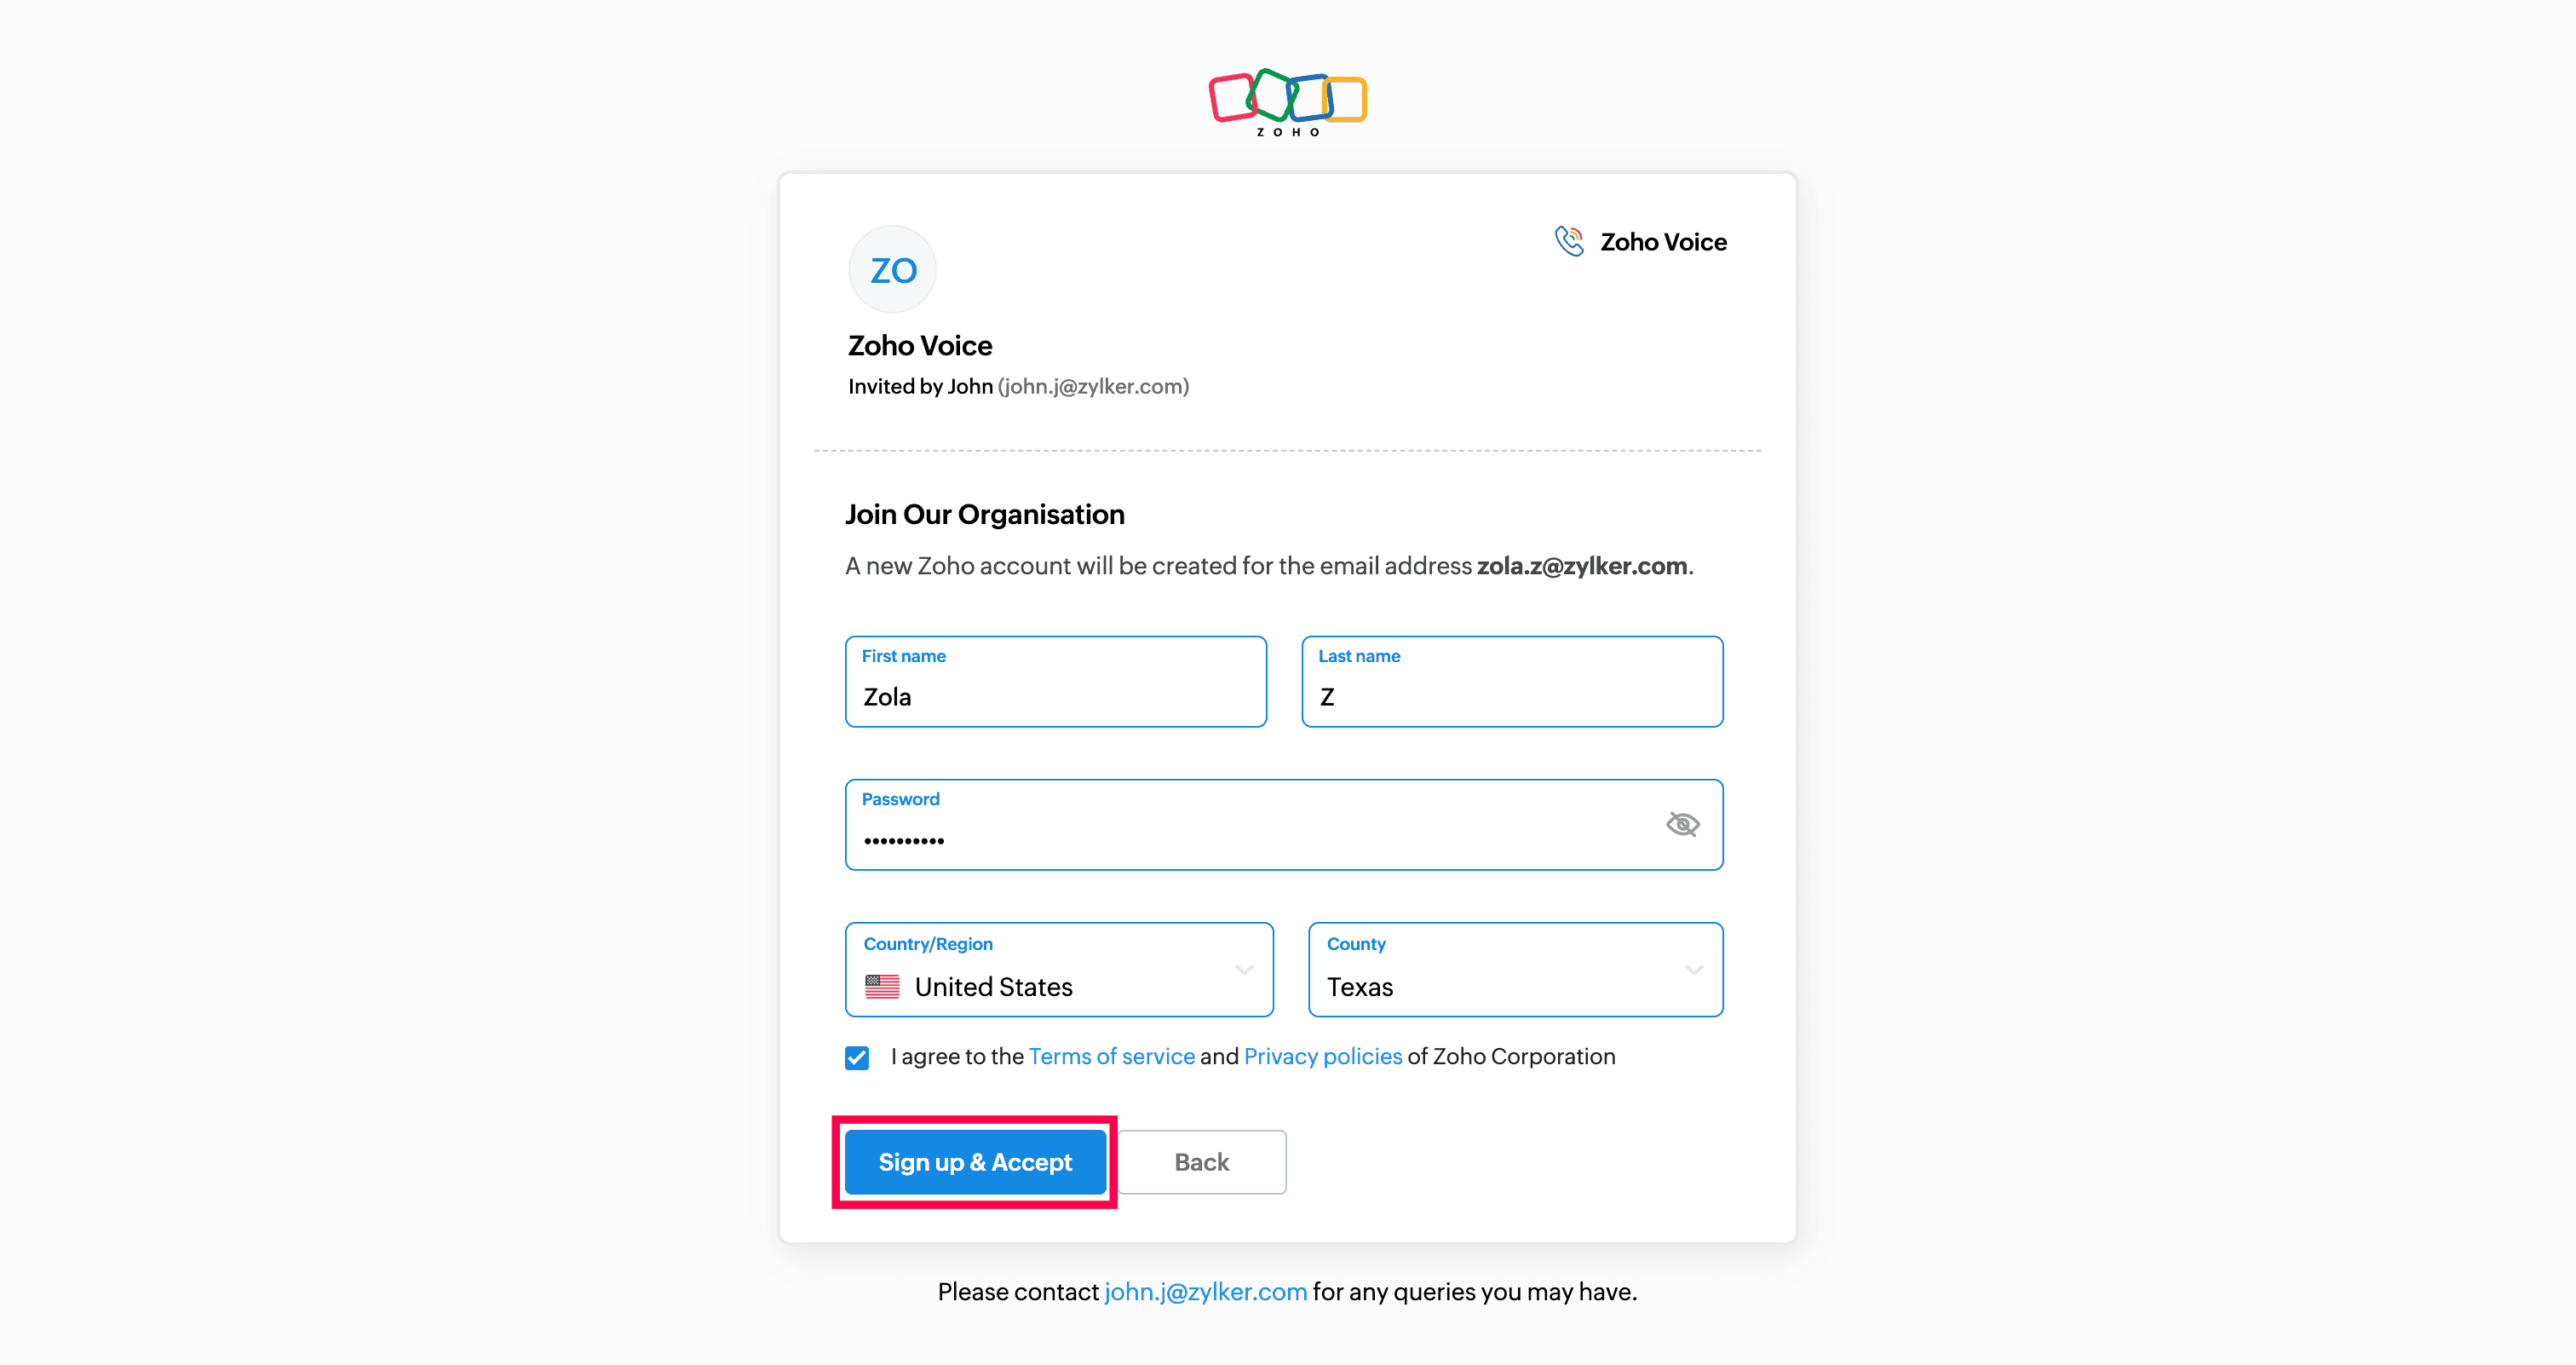
Upon successful sign-in, the user will be redirected to their Zoho Voice account.
Note: In the users module, a user will be active only after the successful signing in. Until then, they will remain in the In-active user category.


Import Agents
When integrating Zoho Voice with other Zoho products like Zoho One, Zoho CRM, Zoho Recruit, Desk, Bigin or ServiceDesk Plus On-Demand, you can import already existing agents from those application into Zoho Voice.
The process for importing agents varies based on the Zoho in-house product that you are integrating with and the type of integration.
Importing agents in native integration
- With native integration, you can import agents from other Zoho applications and map them to any user role in Zoho Voice. For example, an admin in Zoho CRM can be imported and assigned the role of supervisor in Zoho Voice. This flexible role-mapping ensures users are aligned with your team structure in Zoho Voice.Learn more about native integration and import agents during native integration.
Note: The super admin must be the same user in both Zoho Voice and the integrated application.
Importing agents in telephony integration
- In Telephony integration, users are imported as telephony agents.
- You can add Zoho Voice as your cloud PBX service in Zoho Telephony, import your Zoho agents into Zoho Voice depending on the service you use (One, CRM, Desk, Recruit, Bigin, or ServiceDesk Plus On Demand).
- This feature is available only for the enterprise edition(Standard and Contact Centre plans).
Number Configuration
Once you've successfully added a number to Zoho Voice, whether by purchasing, porting, or using BYOC (Bring Your Own Carrier), the next step is to configure it to suit your business requirements.
Zoho Voice provides incoming and outgoing calling as separate services, giving you the flexibility to manage them independently. Outgoing calls are enabled by default, but you can choose to enable or disable each service as needed from the Call Config module.
Note: Only super admin and admins have permission to configure the number settings.
Incoming call configuration
For incoming calls, you can customize a variety of settings such as welcome messages, call action handlers, call recording profiles, voicemail transcription, and other features.
- Go to the Call Config module in the left sidebar menu.
- Under the Active tab, click the Edit Config icon next to the desired number.

- In the Incoming Calls tab, toggle the Enabled field from No to Yes to active the number for incoming calls.
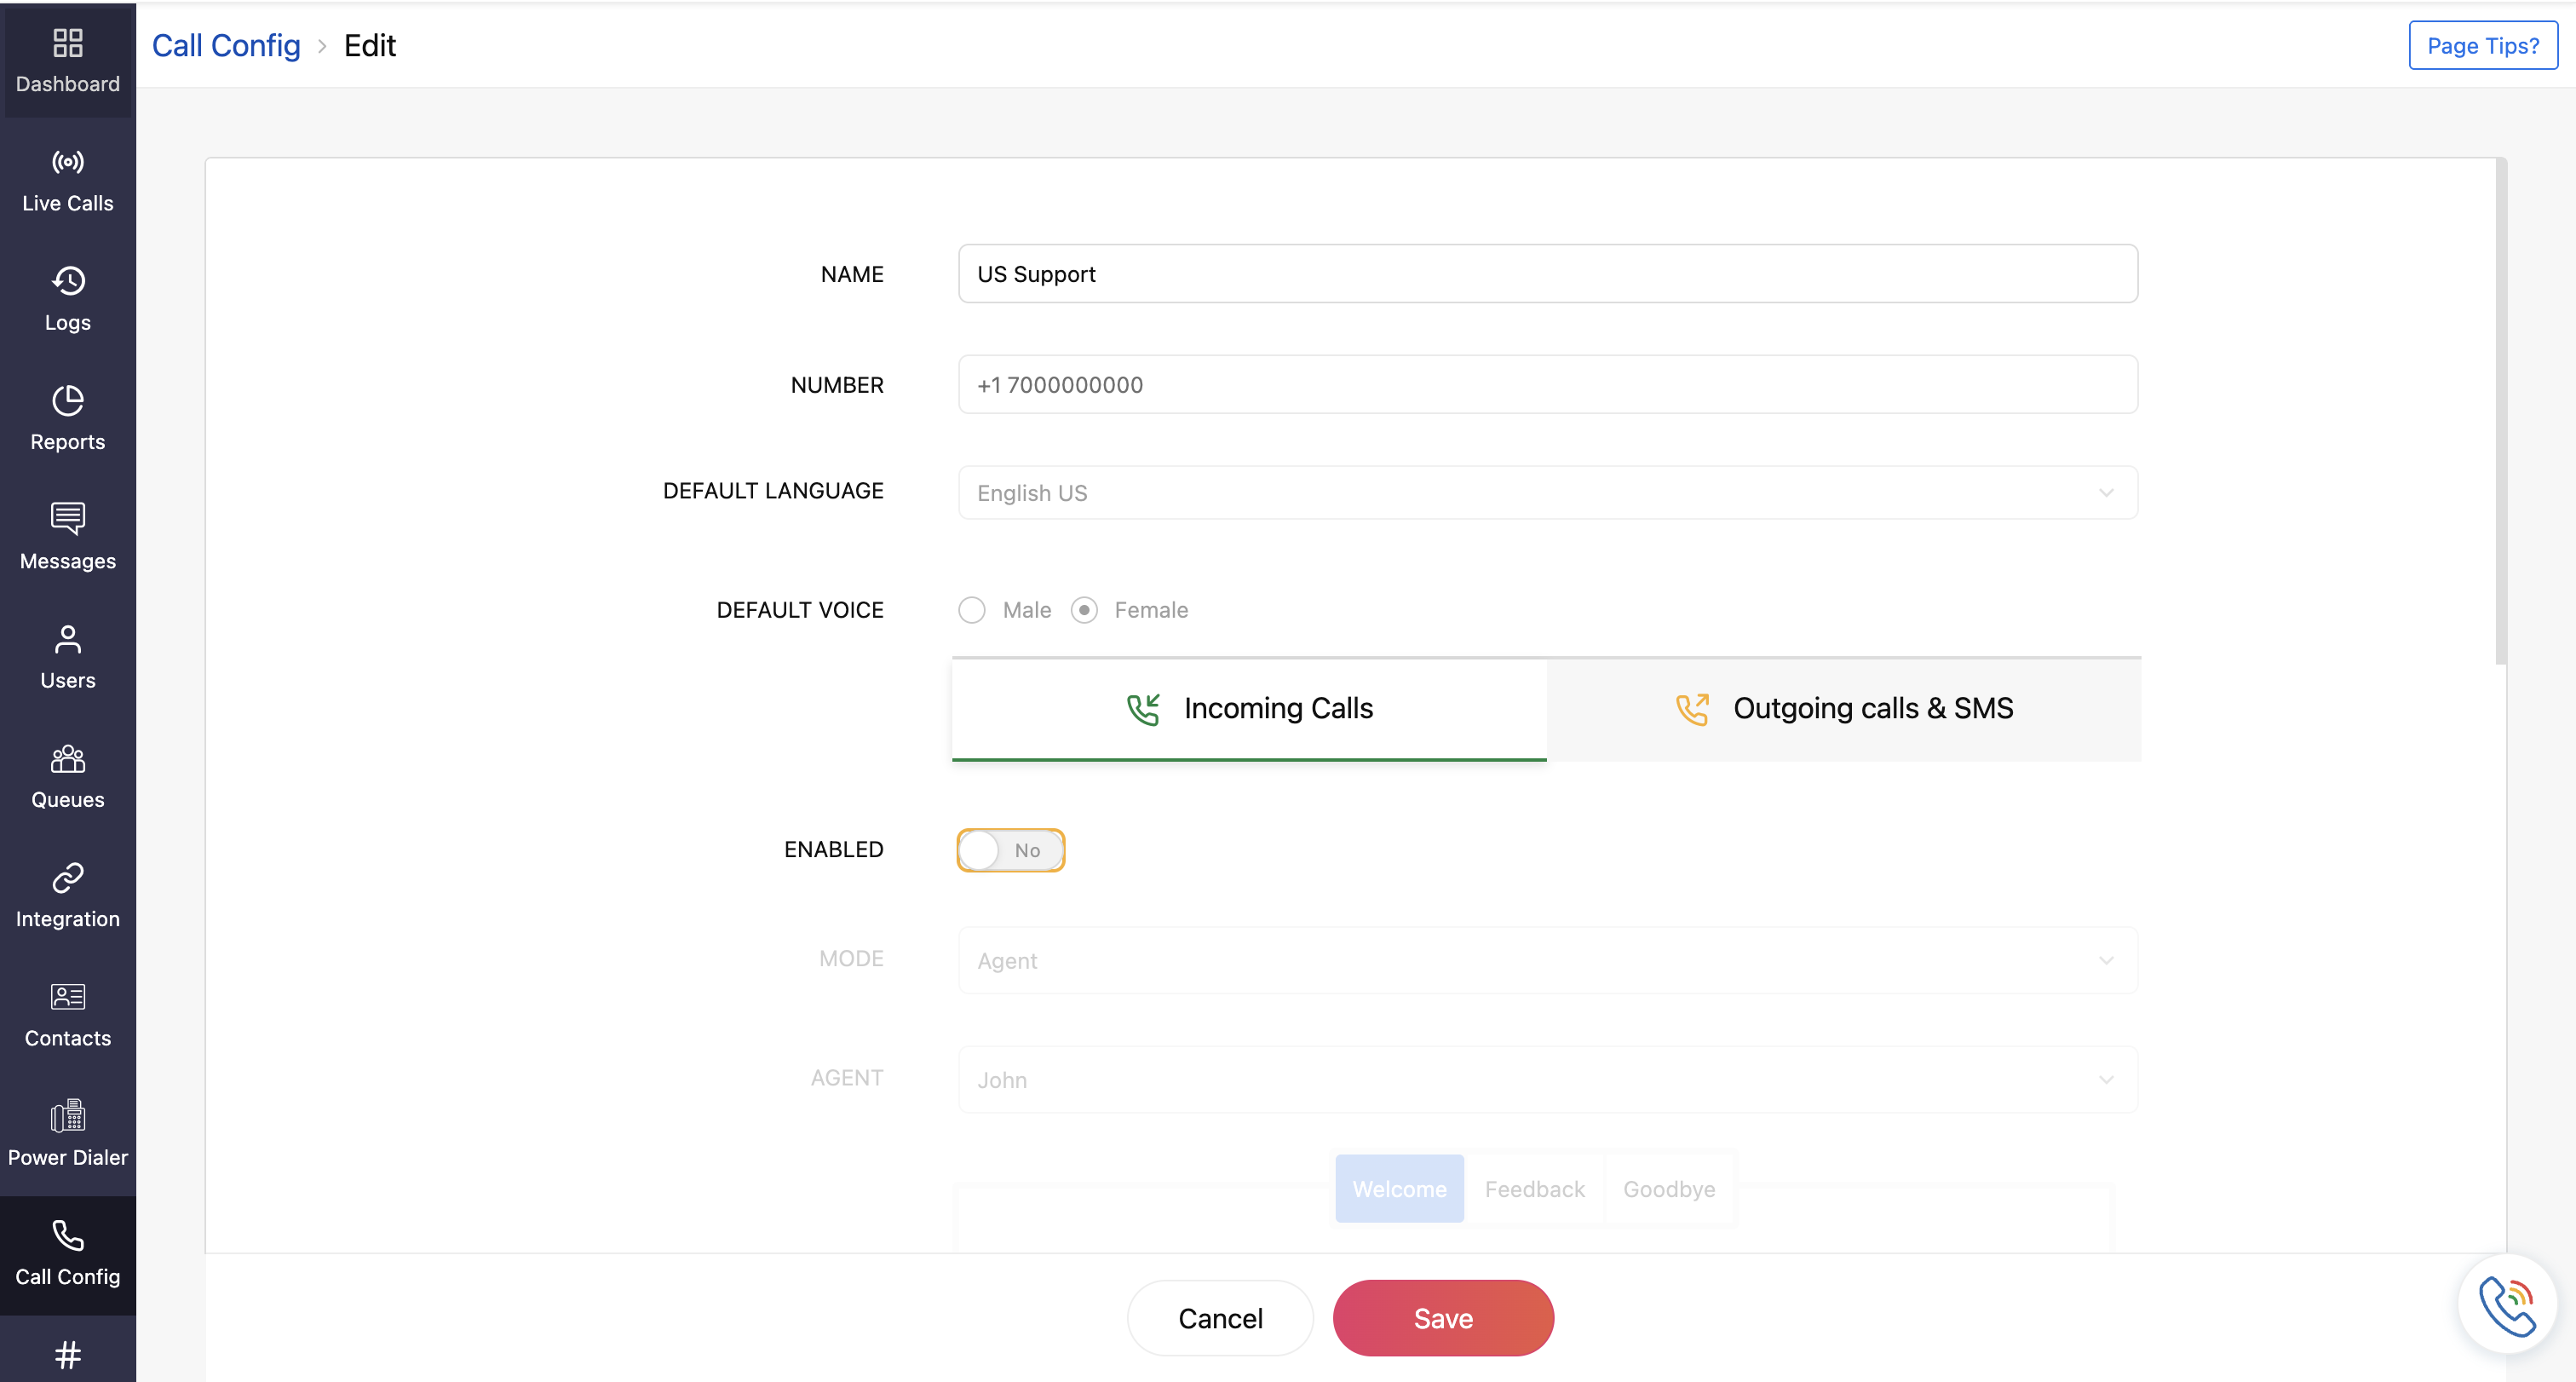
- Configure the following fields:
- Name: Display name for this number.
- Default Language: Language for the welcome, feedback, and goodbye messages in both incoming and outgoing services.
- Default Voice: Select Male or Female as the default voice for the welcome, feedback, and goodbye messages.
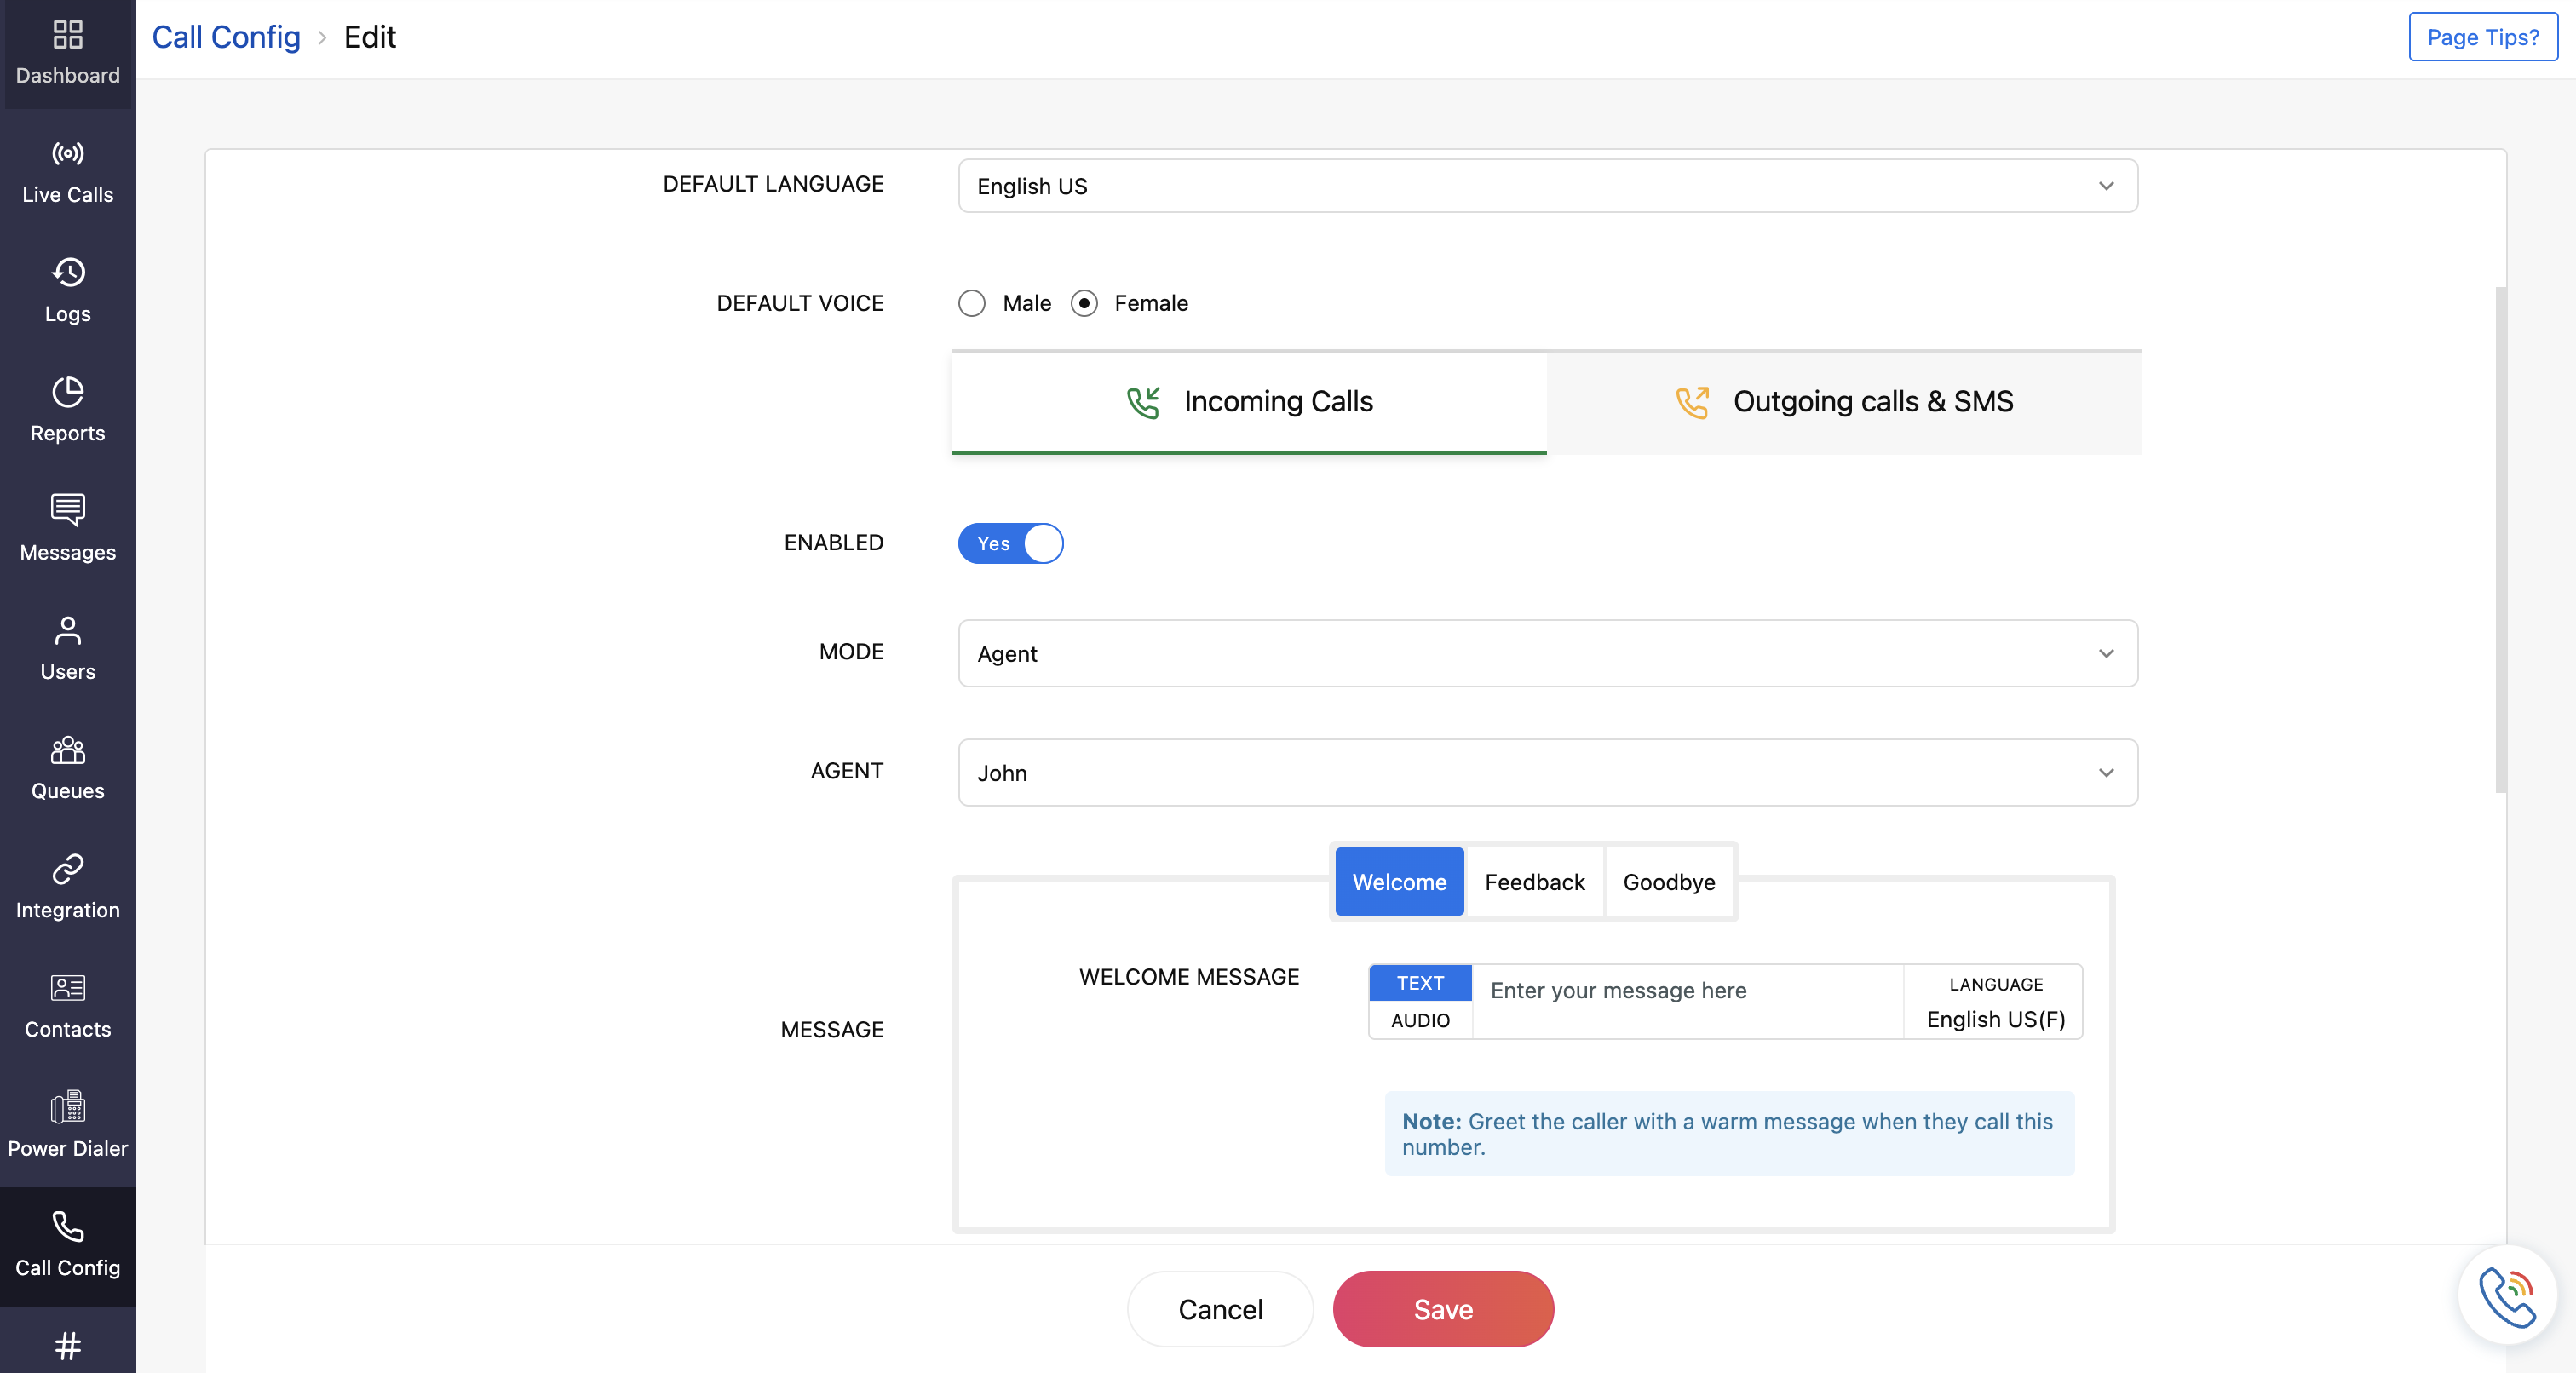
- Mode: Select in which mode you want to assign the incoming calls for the number from the dropdown.
- Agent: Assign the number to a designated agent.
- IVR: Choose to create a new IVR or clone an existing one. Learn more about creating a new IVR
- Queue: Assign the number to a designated queue. Learn more about queue creation
- Dial Extension: Upon connecting to this number, the caller will be asked to type in an extension, and they will be connected to the respective agent/queue.
- Forward to: Mention the mobile/landline number to which the call needs to be forwarded.
- Message: Configure your welcoming, feedback, and goodbye messages for incoming calls.
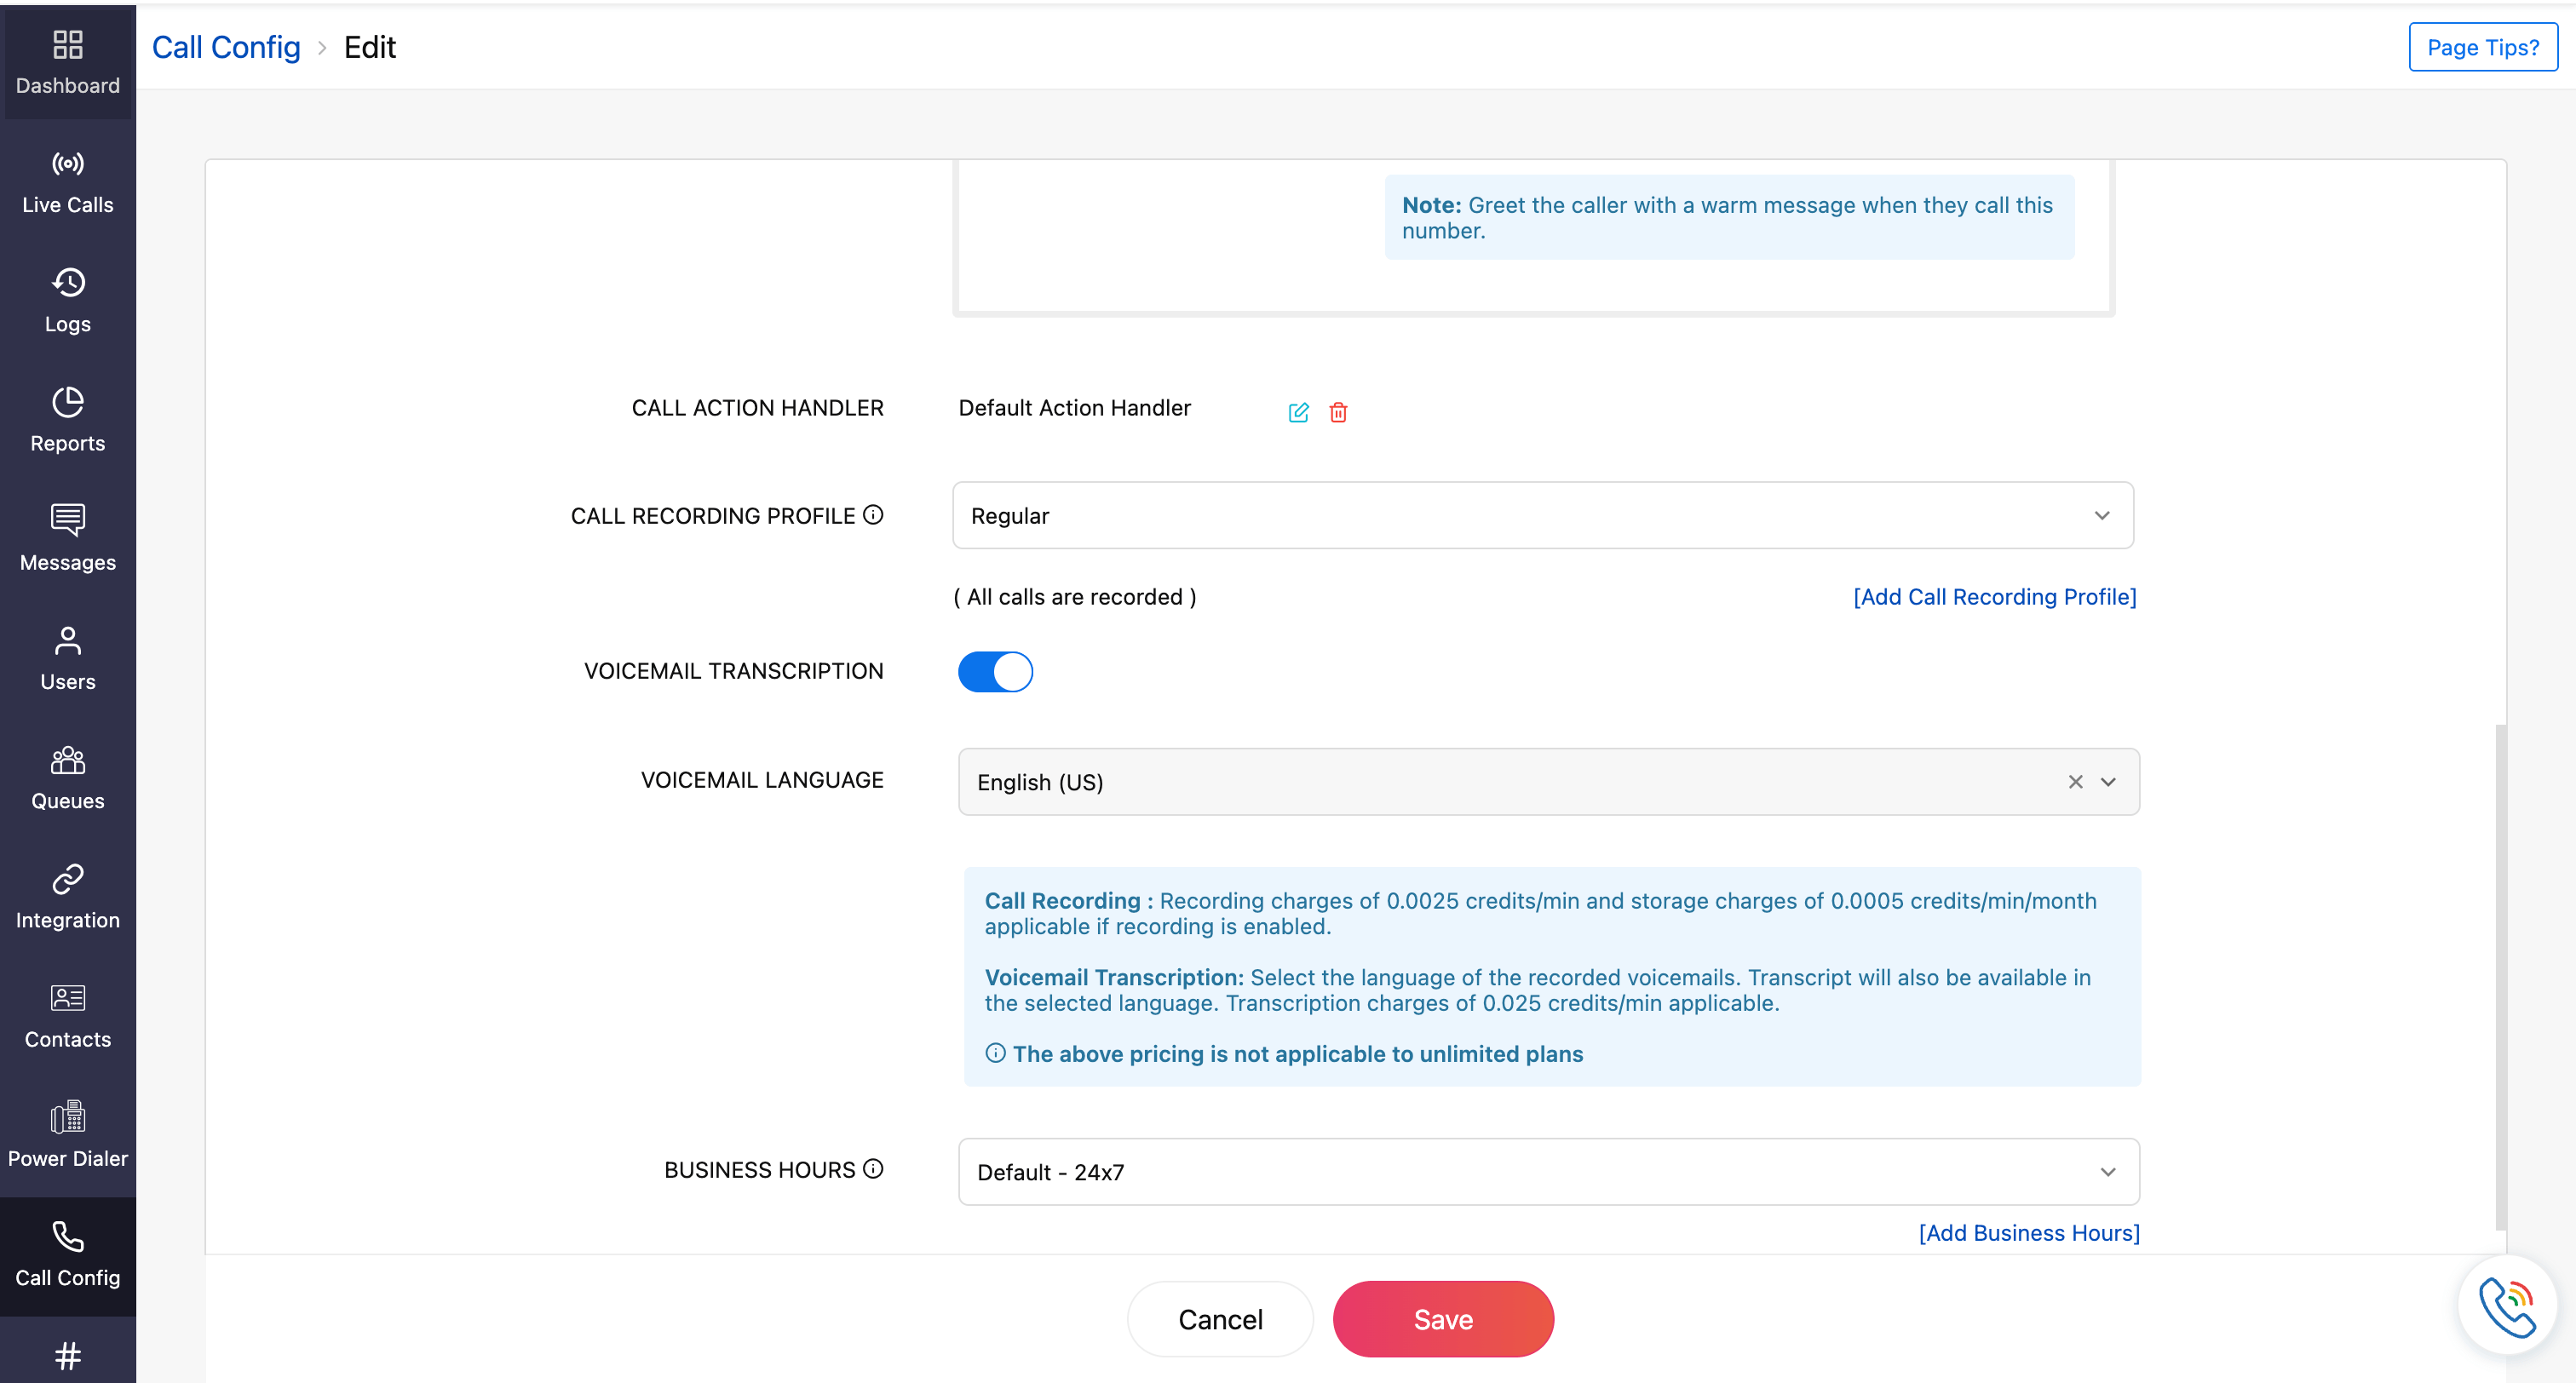
- Call Action Handler: Define actions when the agent is busy, offline, during holidays, or outside the business hours.
- Call Recording Profile: Configure when the call recording must be performed. You can disable or choose an existing profile or create a new one by clicking Add Call Recording Profile. For details on creating a profile, refer to the document.
Note: Call recording charges of 0.0025 credits/min and storage charges of 0.0005 credits/min/month applicable if recording is enabled.This charge is not applicable for unlimited plans.
- Business Hours: Choose an existing profile or create a new one by clicking Add Business Hours. Learn more about creating a profile. The created profile will be available in the dropdown for future use.
- Click Save once all the required incoming call configuration is completed.


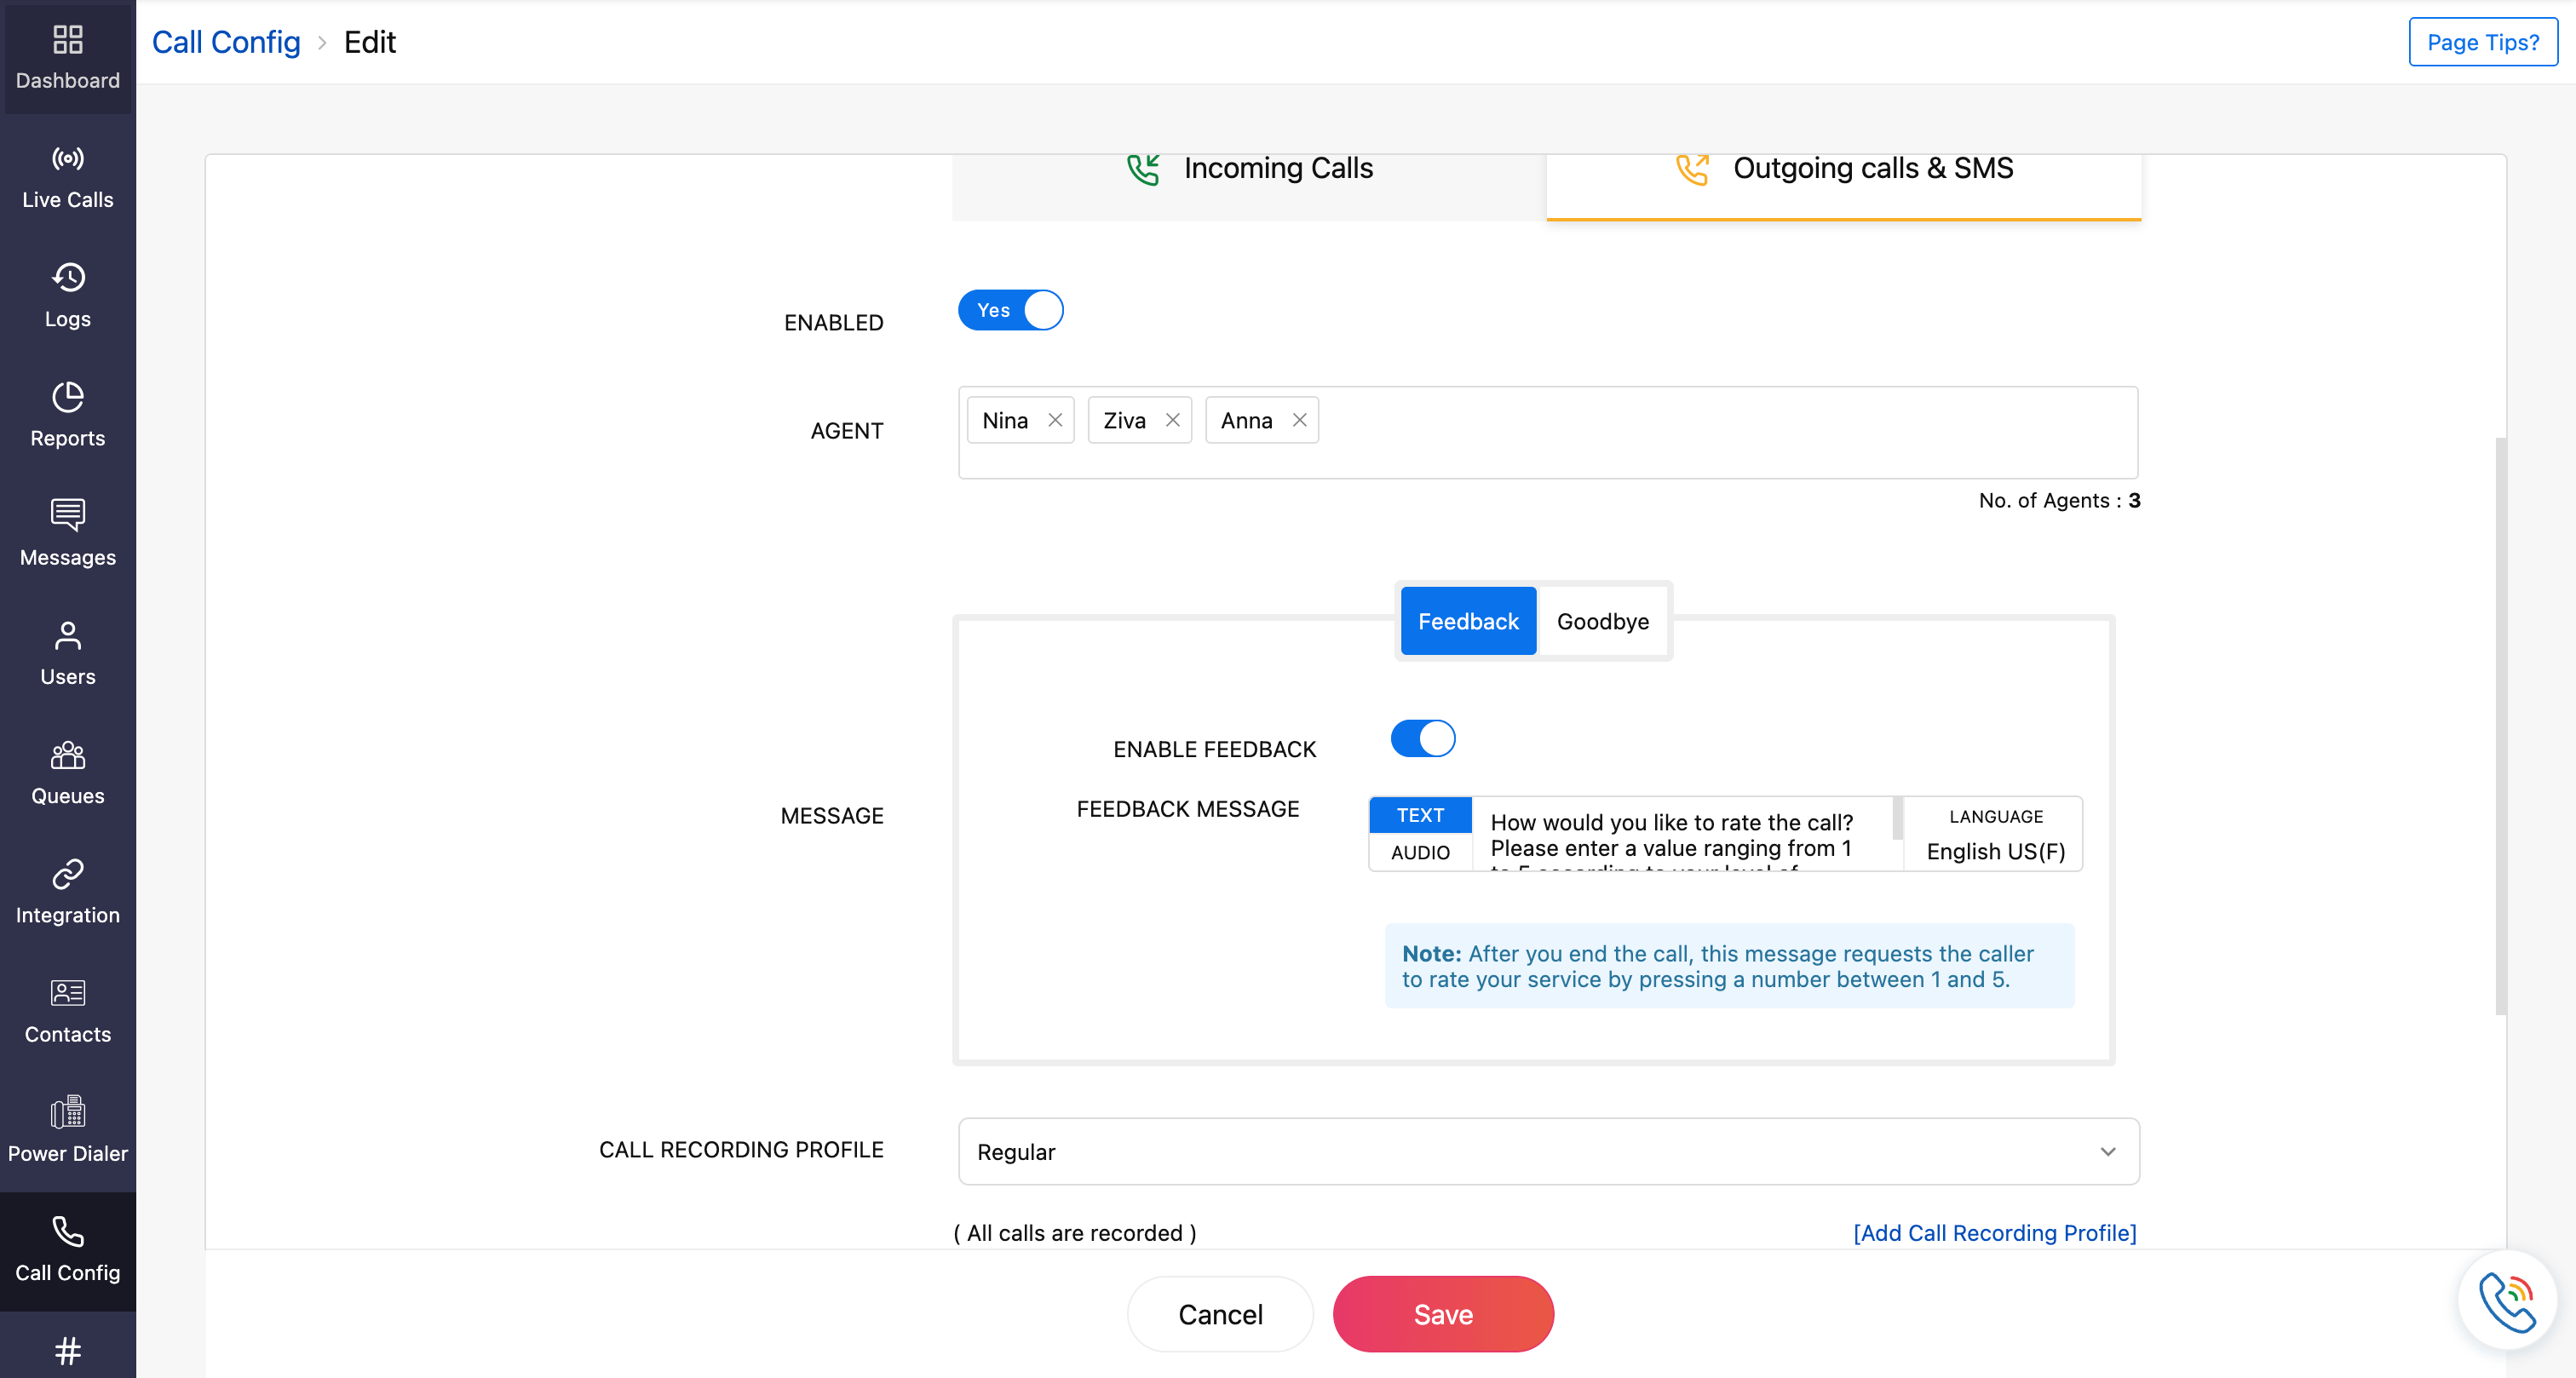
Outgoing call configuration
For outgoing calls, you can customize a variety of settings such as welcome messages, call action handlers, call recording profiles, voicemail transcription, and other features.
- Go to the Call Config module.
- Under the Active tab, click the Edit Config icon next to the number.

- In the Outgoing Calls tab, configure the following fields:
- Agent: Mention the agents to whom the outgoing calls are being assigned. Here, you can assign multiple agents based on your number type.
Note: For personal and personal unlimited, only one agent can be assigned.
- Message : Configure your feedback and goodbye messages for outgoing calls.
- Call Recording Profile : Configure when the call recording must be performed. You can disable or choose an existing profile or create a new one by clicking Add Call Recording Profile. Learn more about creating a profile.
Note: Call recording charges of 0.0025 credits/min and storage charges of 0.0005 credits/min/month applicable if recording is enabled.This charge is not applicable for unlimited plans.
- Call Brand Name: Here, you can view the call branding name.
Note: This service is applicable only to US customers.
- Agent: Mention the agents to whom the outgoing calls are being assigned. Here, you can assign multiple agents based on your number type.
- Click Save, once all the required outgoing calls configuration is completed.


Desk phone Configuration
With Zoho Voice, you can connect your IP-enabled desk phones like Poly, Yealink, or Grandstream directly to your account. By connecting your Zoho Voice account with your SIP-supported desk-phones, you get a stable, professional calling experience that’s ideal for busy, high-volume work environments.
Headset Configuration
With Zoho Voice, you can connect with two renowned premium audio Human Interface Device(HID) vendors, Jabra. With this connection, you can gain interoperability and enjoy greater control over your calls right from your headphones.
Both the Zoho Voice web and desktop app can integrate with a wide range models, both corded and wireless, offered by Jabra. By installing the appropriate desktop host applications, you can easily connect and utilize various models from these vendors for all the calls handled via Zoho Voice.