How to Create and Configure BYOC?
With Zoho Voice you can create and configure BYOC (Bring Your Own Carrier) setup by connecting your existing telecom carrier to Zoho’s cloud telephony platform using SIP trunks. This setup enables easy call routing without changing your current phone numbers.
Note
Only the super admin and admins can create and configure BYOC.
What are the prerequisites to use BYOC solution?
For Zoho Voice to work with your current carrier, ensure your current carrier:
Is SIP compliant
Extends support for the TCP, UDP, or TLS trunk transport protocols. Only TCP, UDP, and TLS over IPv4 are supported. IPv6 is not supported.
Possesses one or more publicly routable IP addresses or domain names
How to setup BYOC in Zoho Voice?
Getting started
Configure and define SIP trunks and IP Access Control List for a new BYOC trunk.
Each BYOC trunk defined is subject to further verification by Zoho Voice. Upon successful approval, the status of the trunk becomes active and enabled to transfer and receive calls.
Upon approval of BYOC trunk, add your existing numbers to the newly approved BYOC trunk. Zoho Voice will verify it via call OTP and approve the numbers.
Configure all the call settings for the numbers added under the Call Config page.
Send and receive calls from your existing carrier utilizing Zoho Voice.
Below are the detailed steps for creating and configuring a new BYOC trunk in Zoho Voice:
Creating a BYOC Trunk
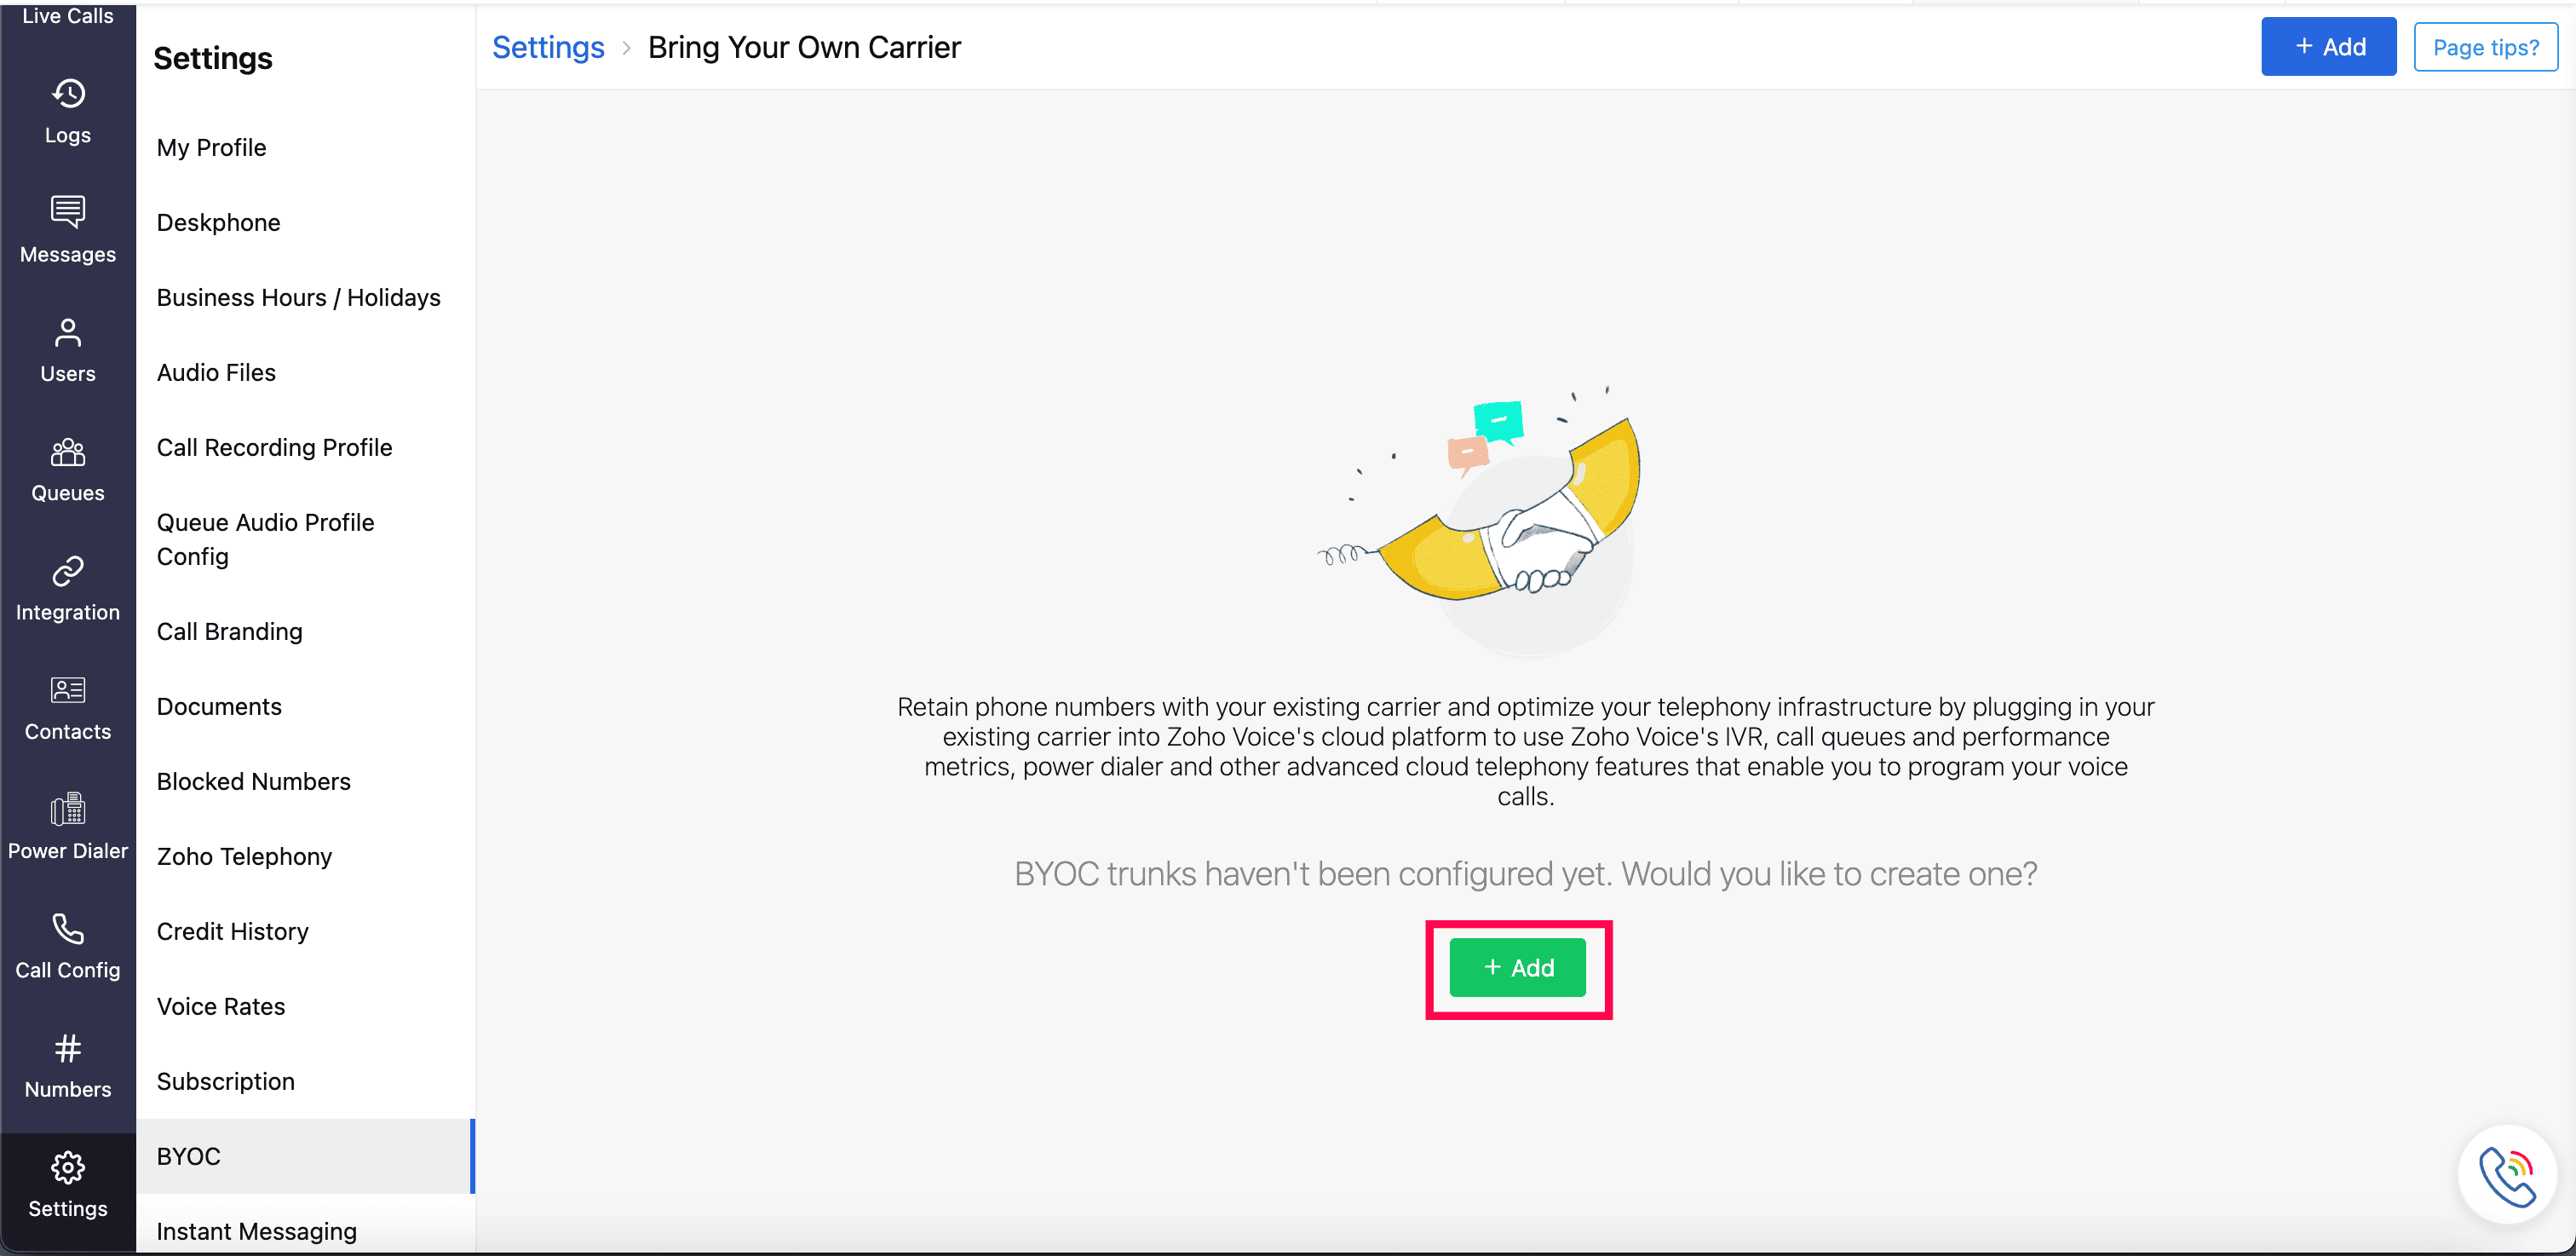
Go to Settings and select the BYOC from the left sidebar menu.
On the BYOC homepage, click the Add button.
You'll be taken to the Add BYOC form, where you can add configurations for the new BYOC trunk and define how the calls are handled between Zoho Voice and your current carrier.
Add a suitable name under the Name field to identify the new BYOC trunk.
Mention the SIP Trunk and IP ACL details.

Defining SIP Trunk
Under SIP Trunk section, configure multiple publicly routable Fully Qualified Domain Names(FQDNs) or hostnames or IP addresses belonging to your current carrier, along with their associated priority levels, so that Zoho Voice can use them to send calls.
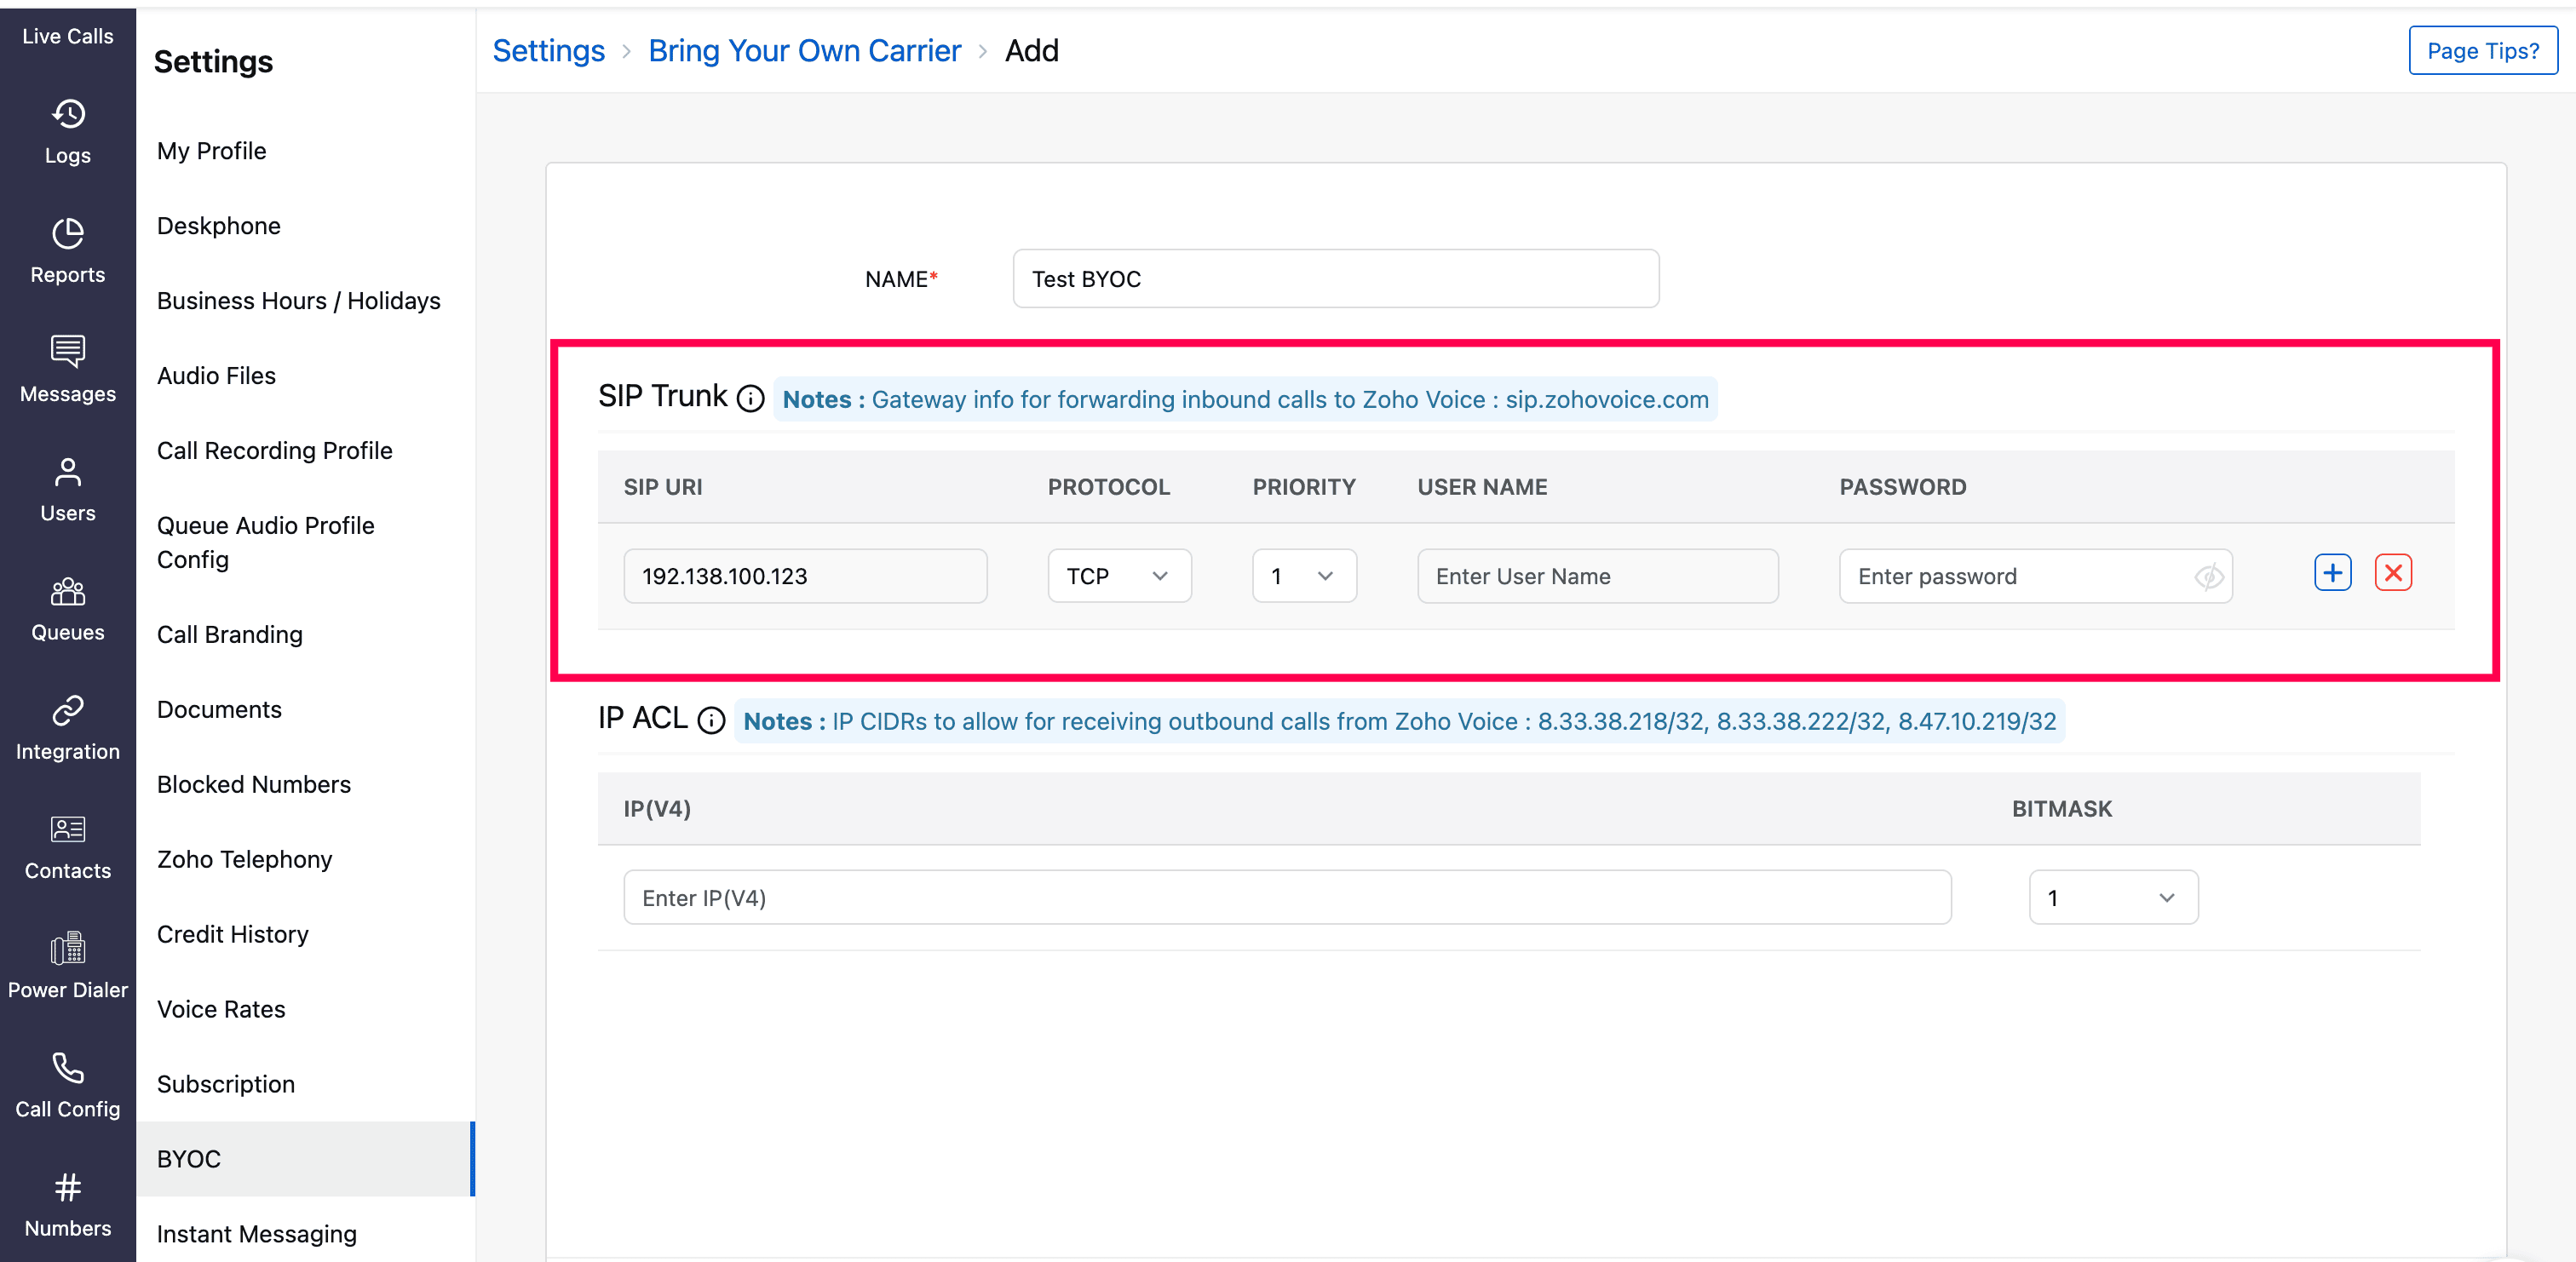
SIP URI field: Add the list of publicly routable SIP domains or hostnames or IP addresses procured from your current carrier.
Protocol field: Specify the appropriate trunk transport protocol supported by your current carrier for establishing connections.
Note
Only UDP, TLS, and TCP over IPv4 are supported. IPv6 is not supported.
Priority field: You can assign priority numbers from 1 to 10 to each of your current carrier's SIP domains. Zoho Voice routes the SIP traffic while handling calls based on priority levels, with the lowest number having the highest priority. If the trunk with the highest priority experiences an outage and becomes unavailable, the SIP traffic will be rerouted through the trunk with the next highest priority level.
The User Name and Password fields are optional, which lets you configure the credentials to connect to your SIP Trunks in case you need them.
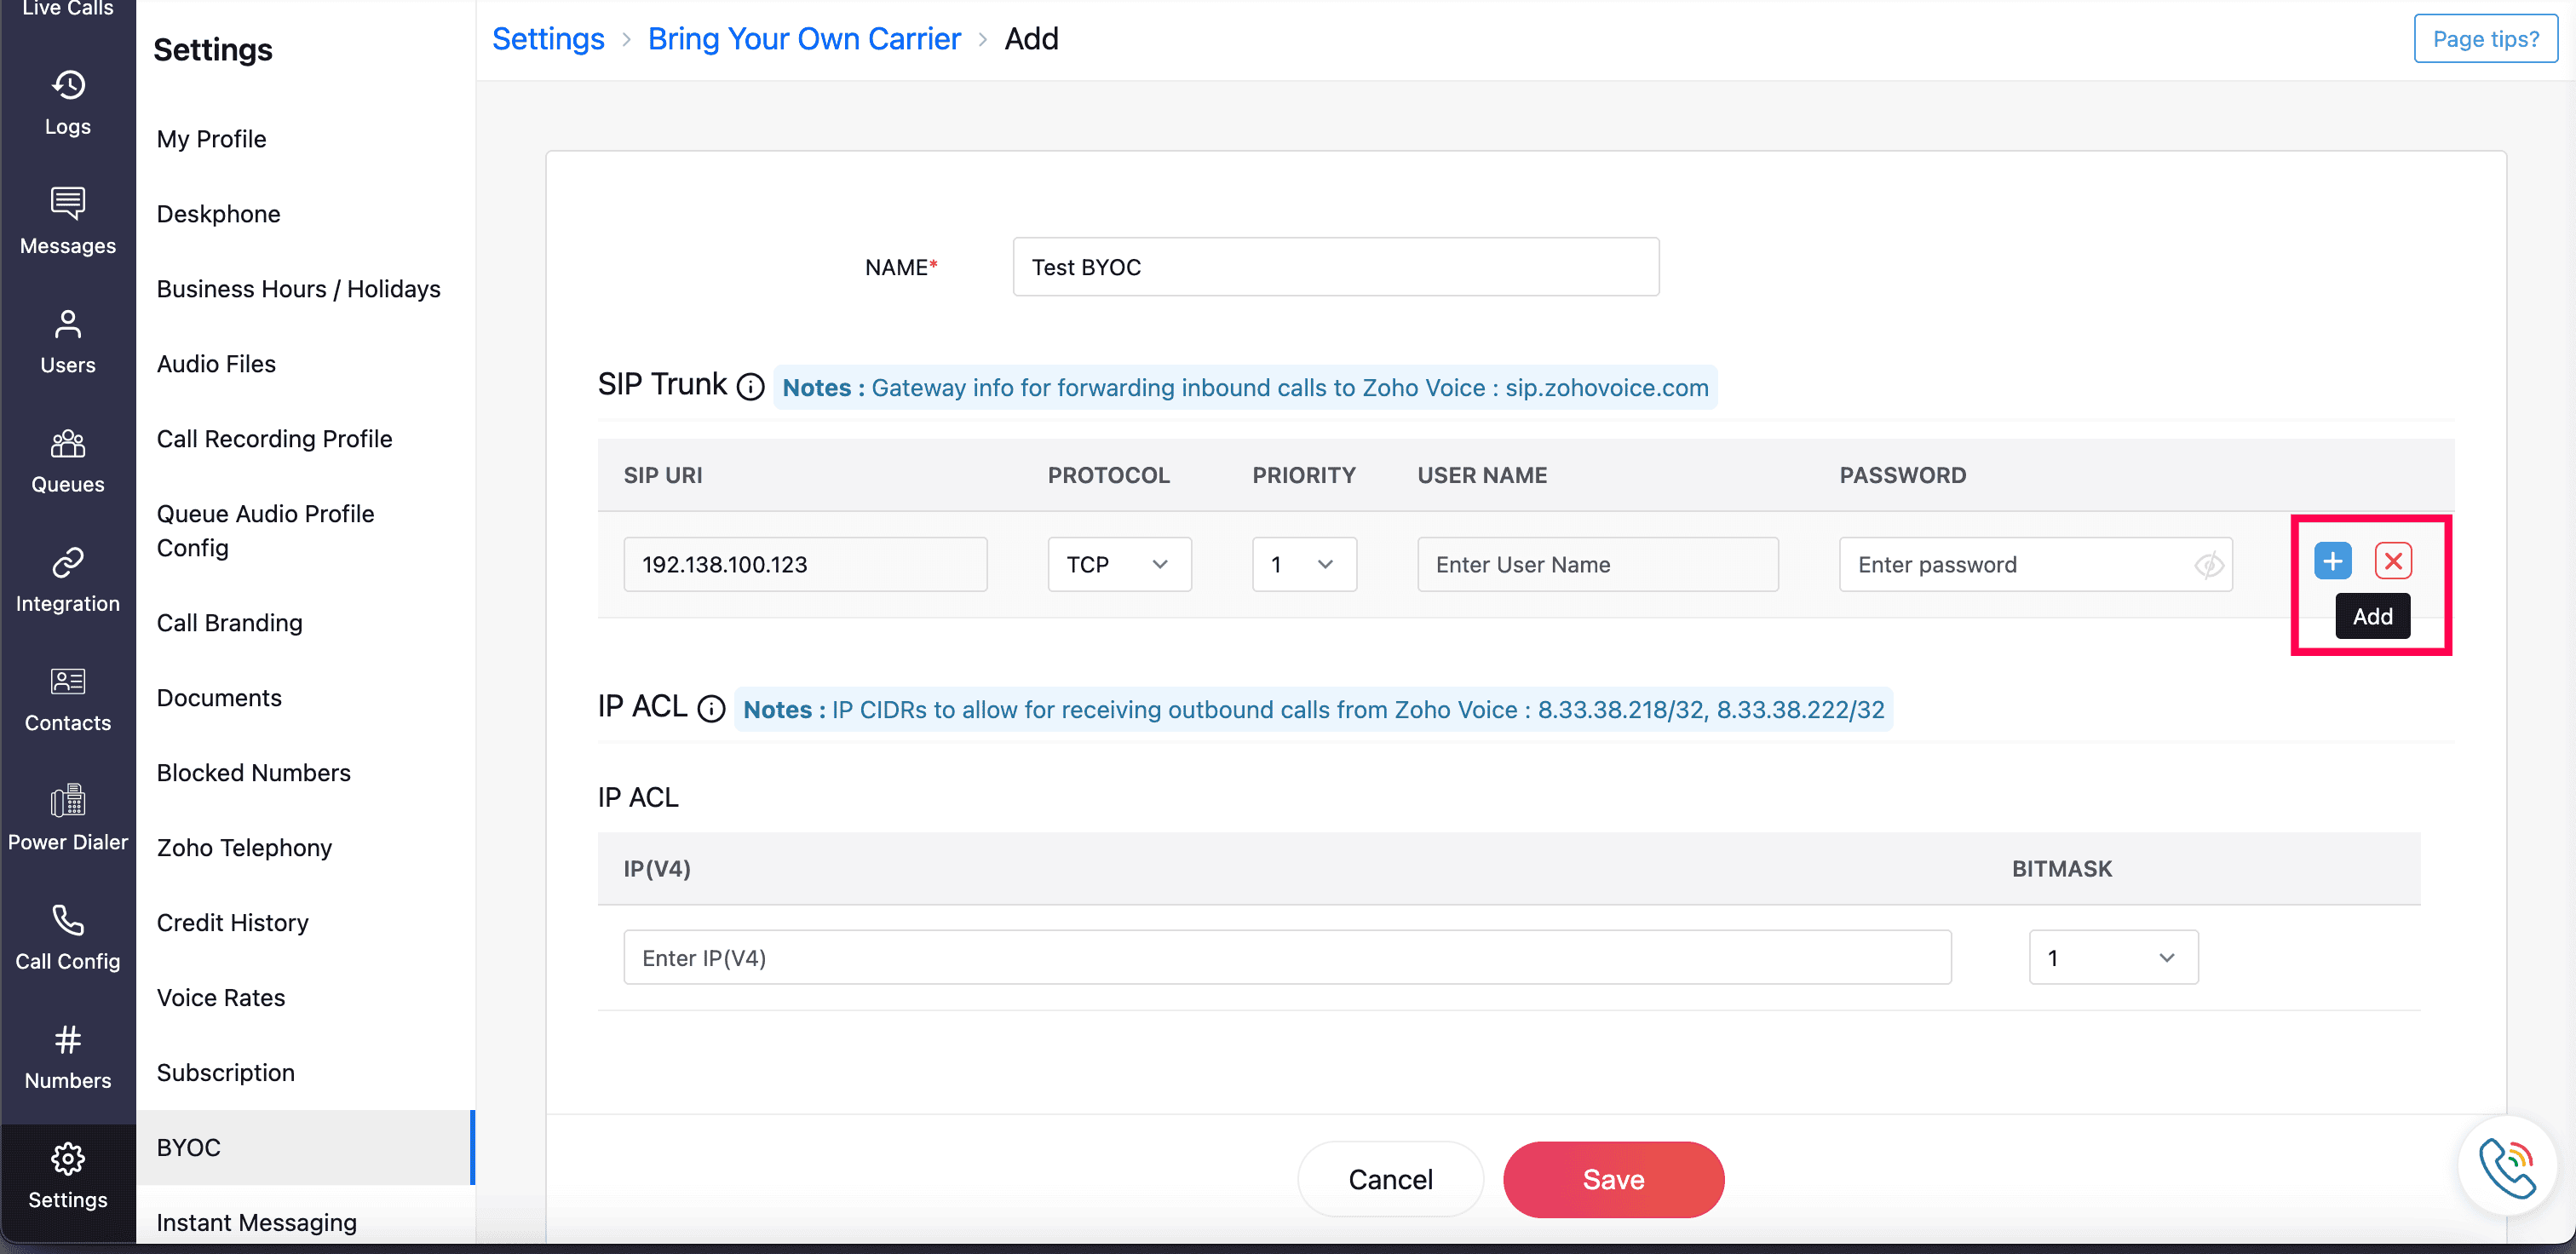
To add multiple entries, hover over an existing entry and click the add(+) icon. Similarly, to delete an entry, click the delete(x) icon.


Defining IP ACL
Under the IP ACL section, define the IP addresses of your current carrier through which the inbound traffics are originated. Only the mentioned IPs are permitted access for inbound traffics.
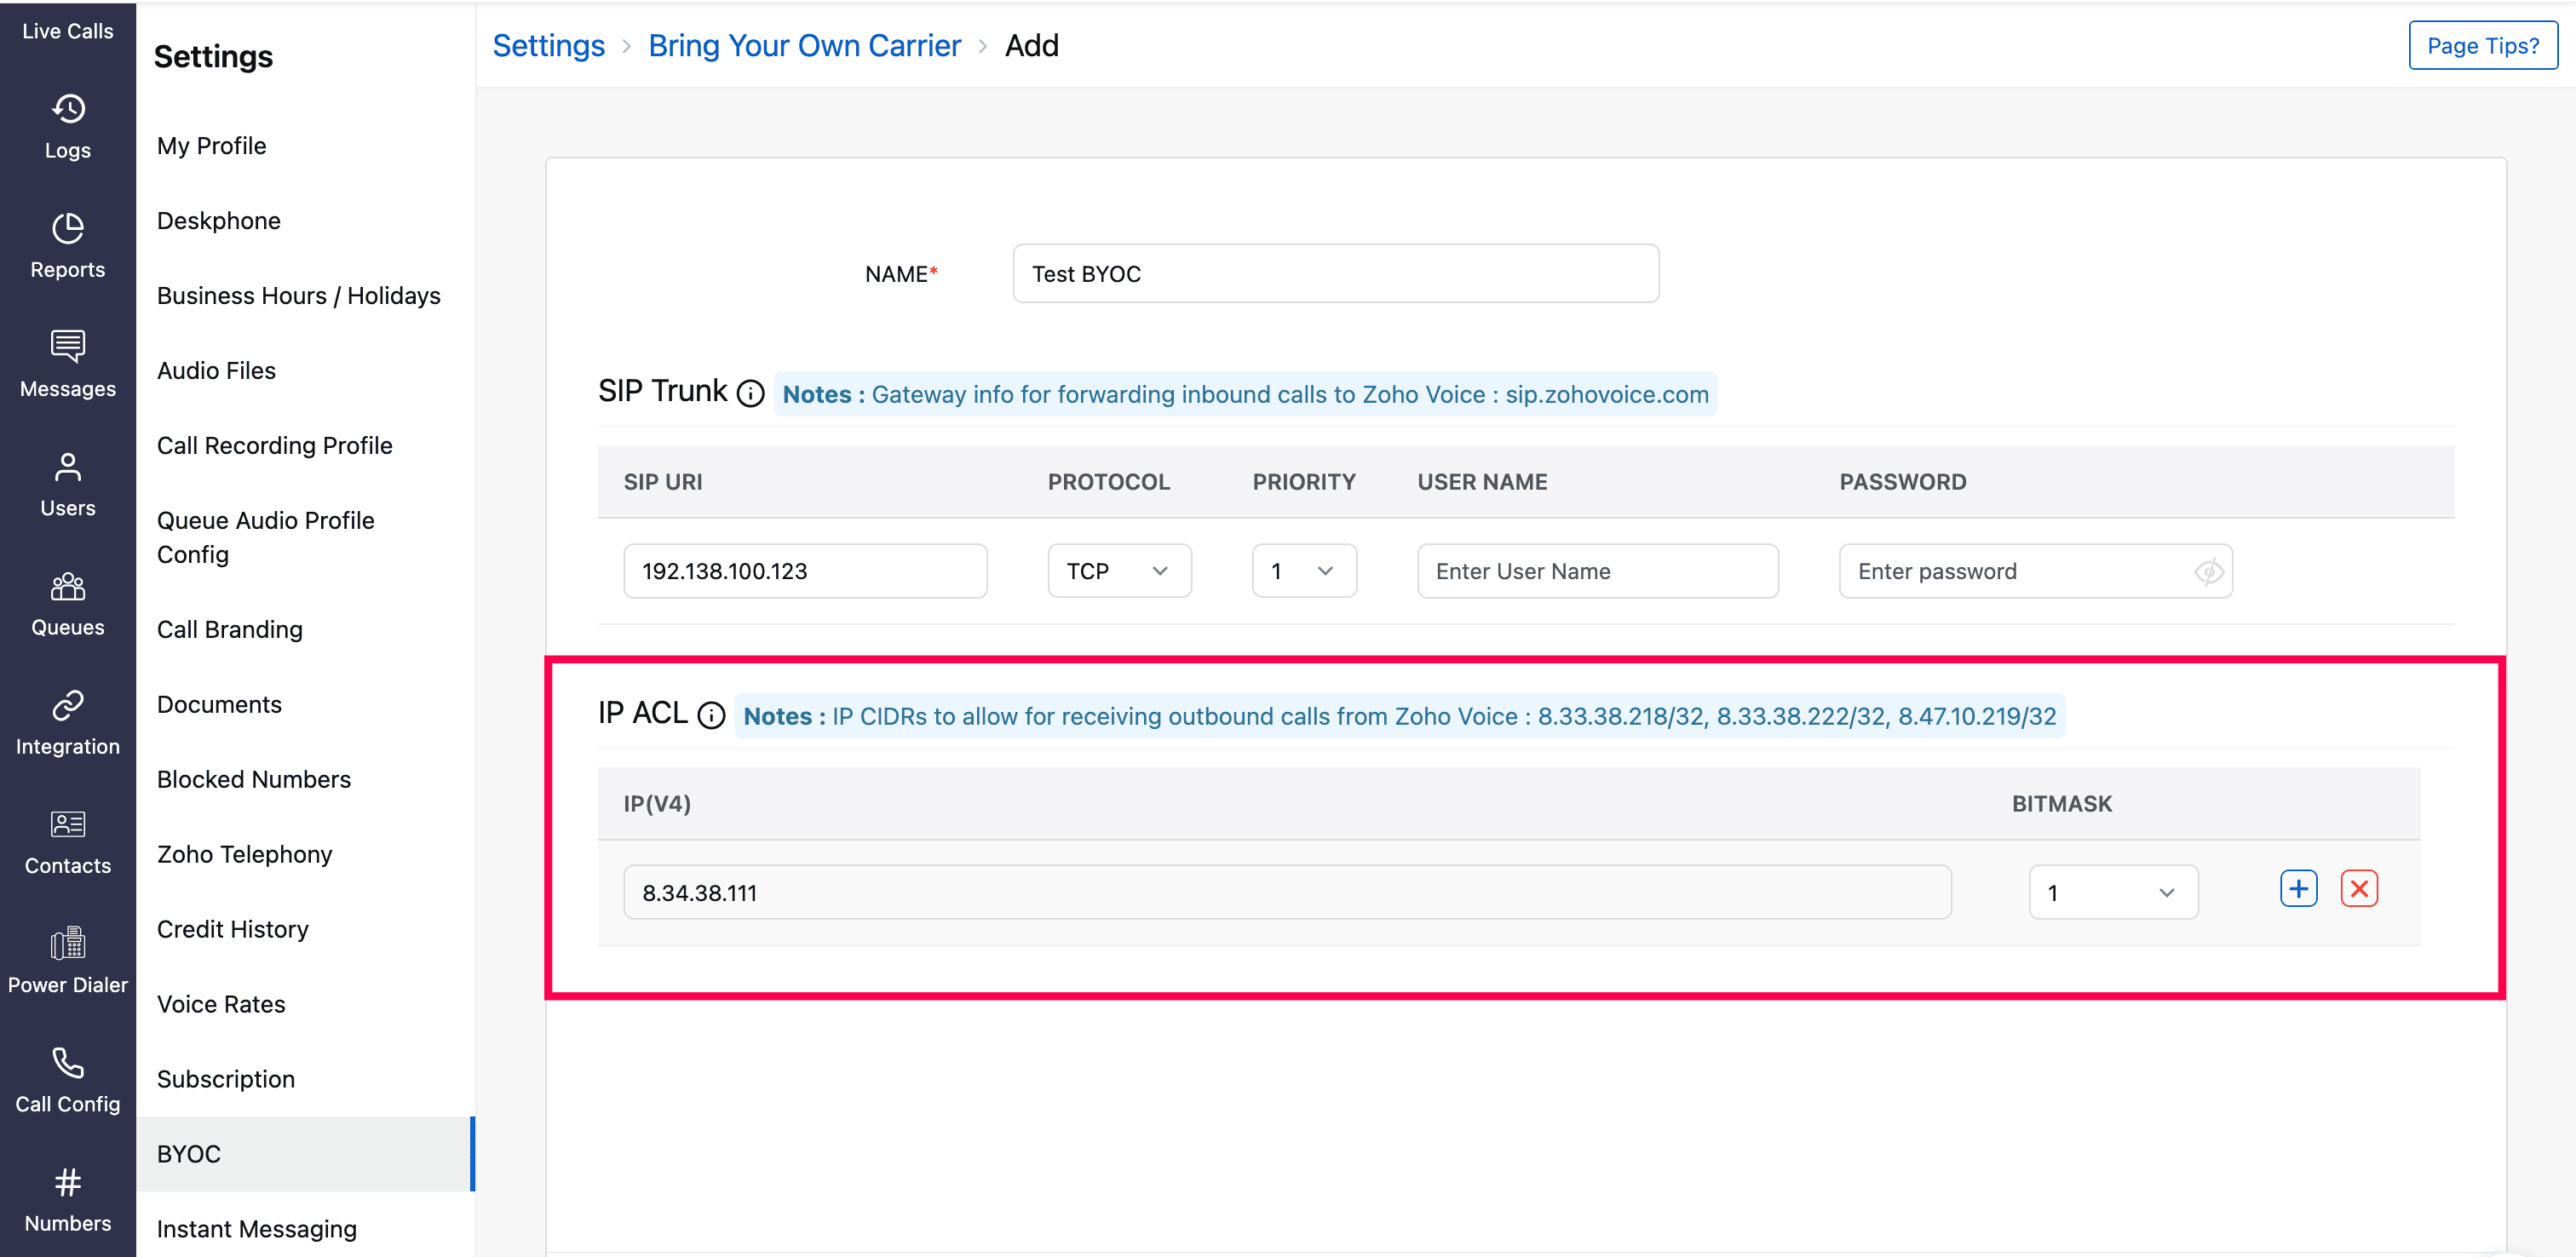
IPv4 and Bitmask field: Add multiple public SIP signaling IP addresses provided by your existing carrier that enables Zoho Voice to verify and allow inbound SIP traffic.
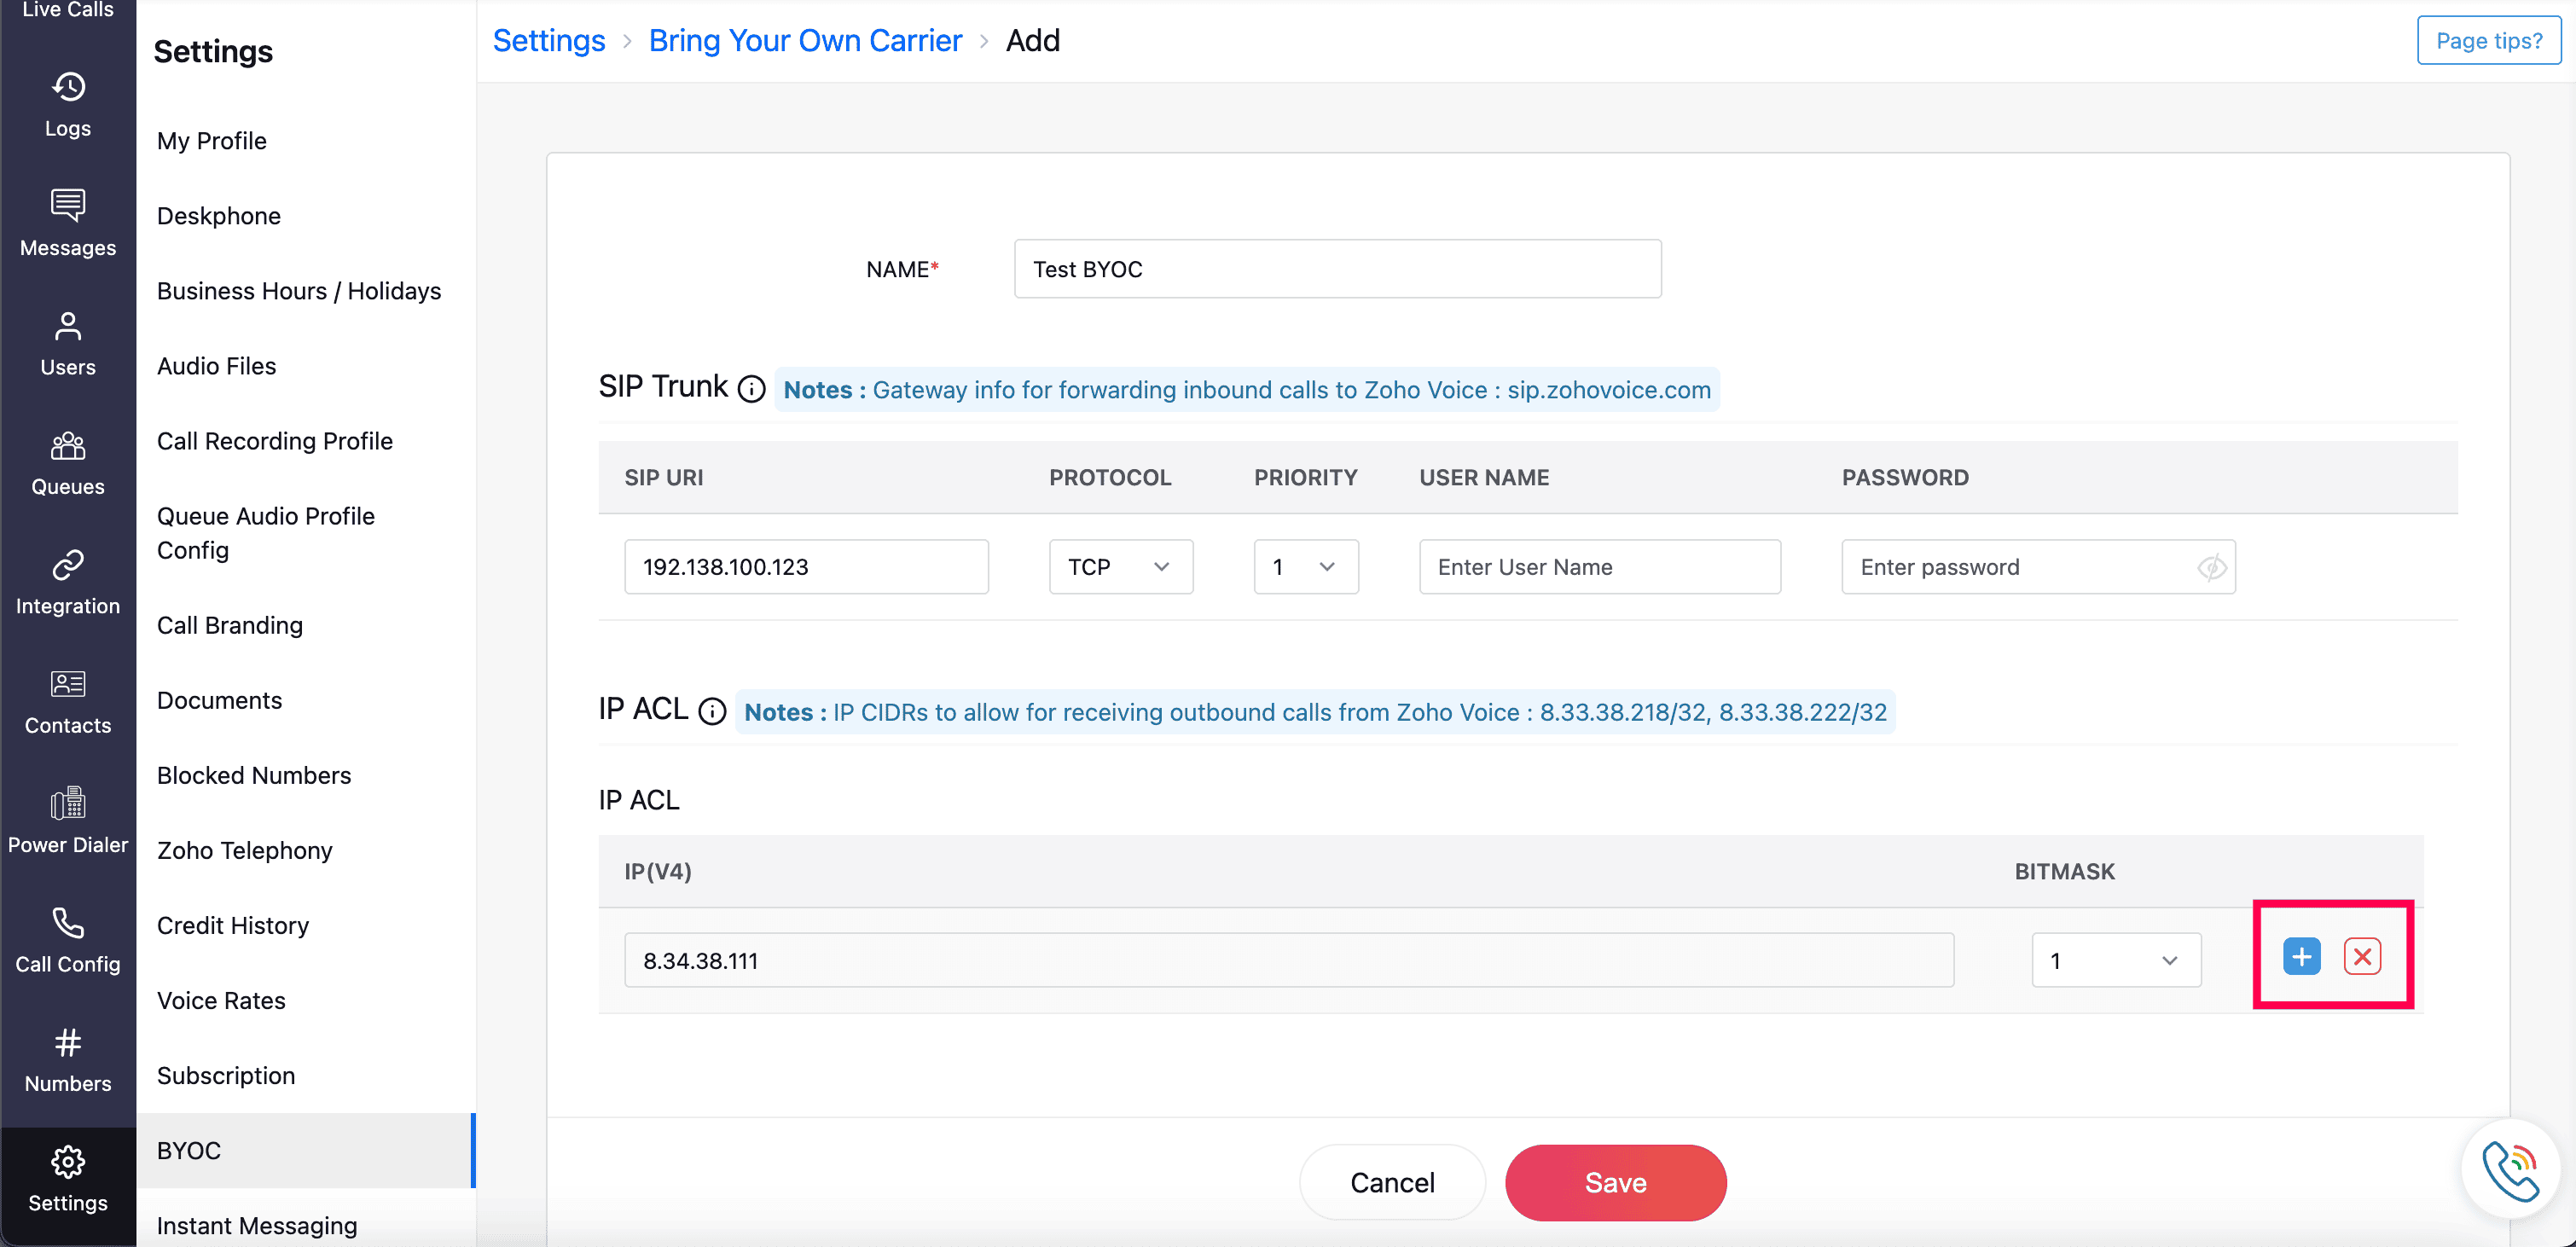
You can add multiple entries by clicking the add(+) icon. Similarly, to delete an entry, click the delete(x) icon.


Click Save to save the SIP trunks and IP ACL configurations for the new BYOC trunk.
Once saved, you’ll be redirected to the BYOC homepage, where the newly created trunk will be listed along with its current status.
BYOC status
Config Approval Status displays the approval status from Zoho Voice. Available status - Pending, Approved, Rejected.
Trunk PBX Status displays the deployment status of the approved configuration in the Zoho Voice PBX system. Available status - Active, Inactive.
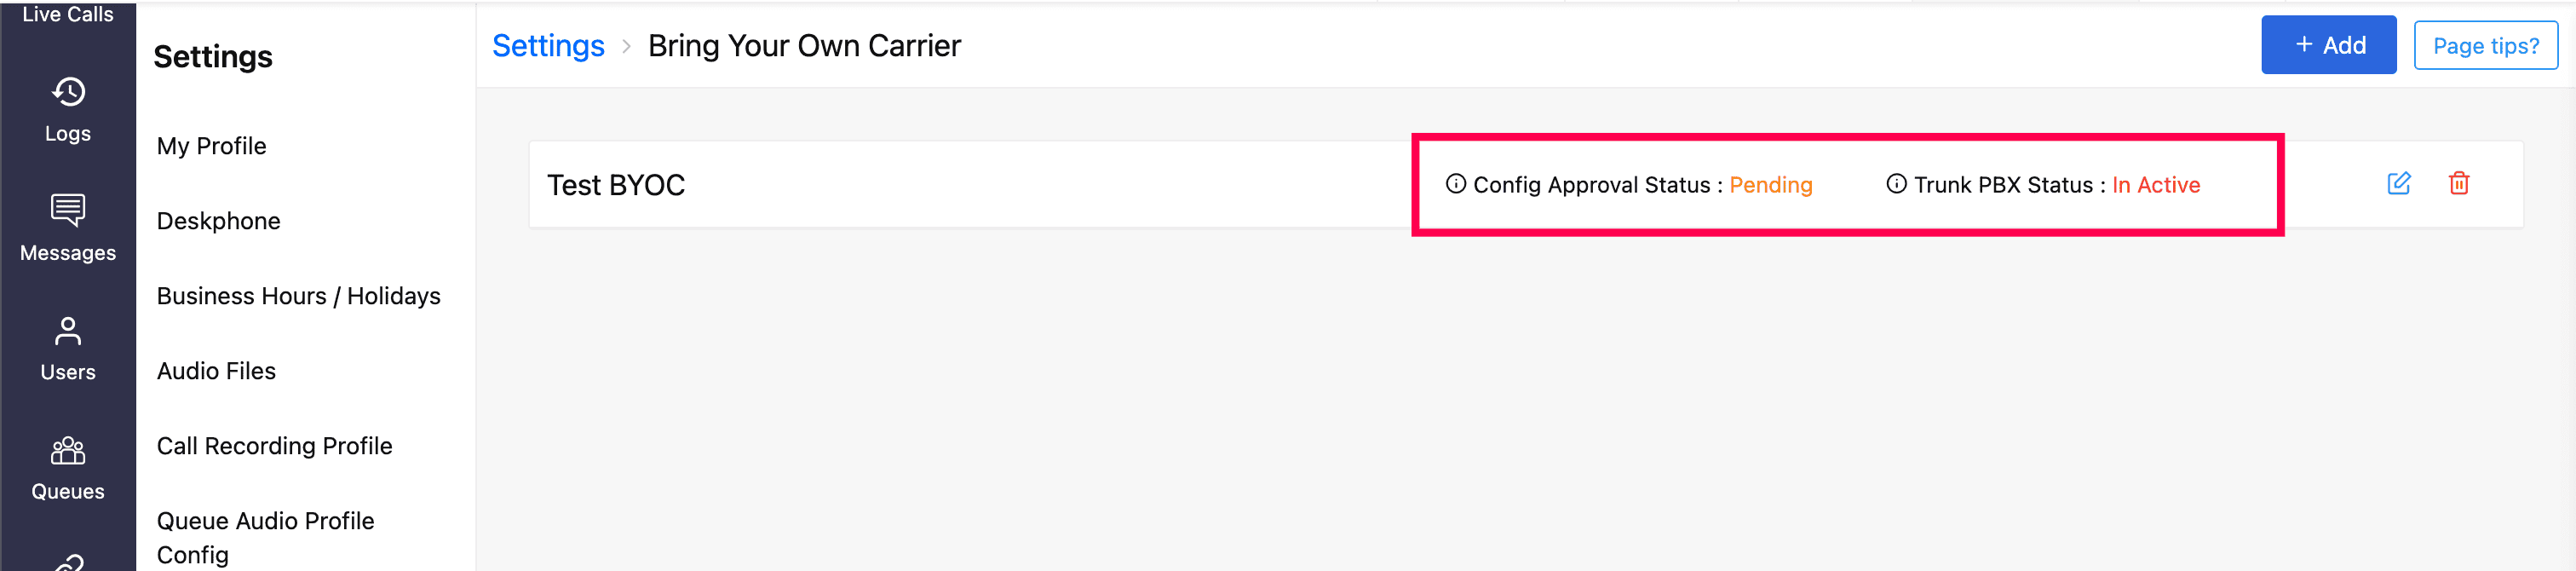
Note
The Config Approval status of the newly saved BYOC trunk will be displayed as Pending and the Trunk PBX status will be Inactive. This indicates that the trunk is under review by Zoho Voice for verification.
You can edit the trunk configuration by clicking the Edit icon. To remove the submitted trunk, click the Delete icon.
Note
If you edit an already approved trunk (with Config Approval status: Verified and Trunk PBX status: Active), it will be re-submitted for verification by Zoho Voice.


How to add your BYOC numbers?
Upon successful approval, the status of the trunk becomes active and is enabled to send and receive calls.
In the BYOC homepage, click the approved BYOC trunk. You will view the Details and Numbers tabs.
Click the Details tab to review and edit the configurations if needed.
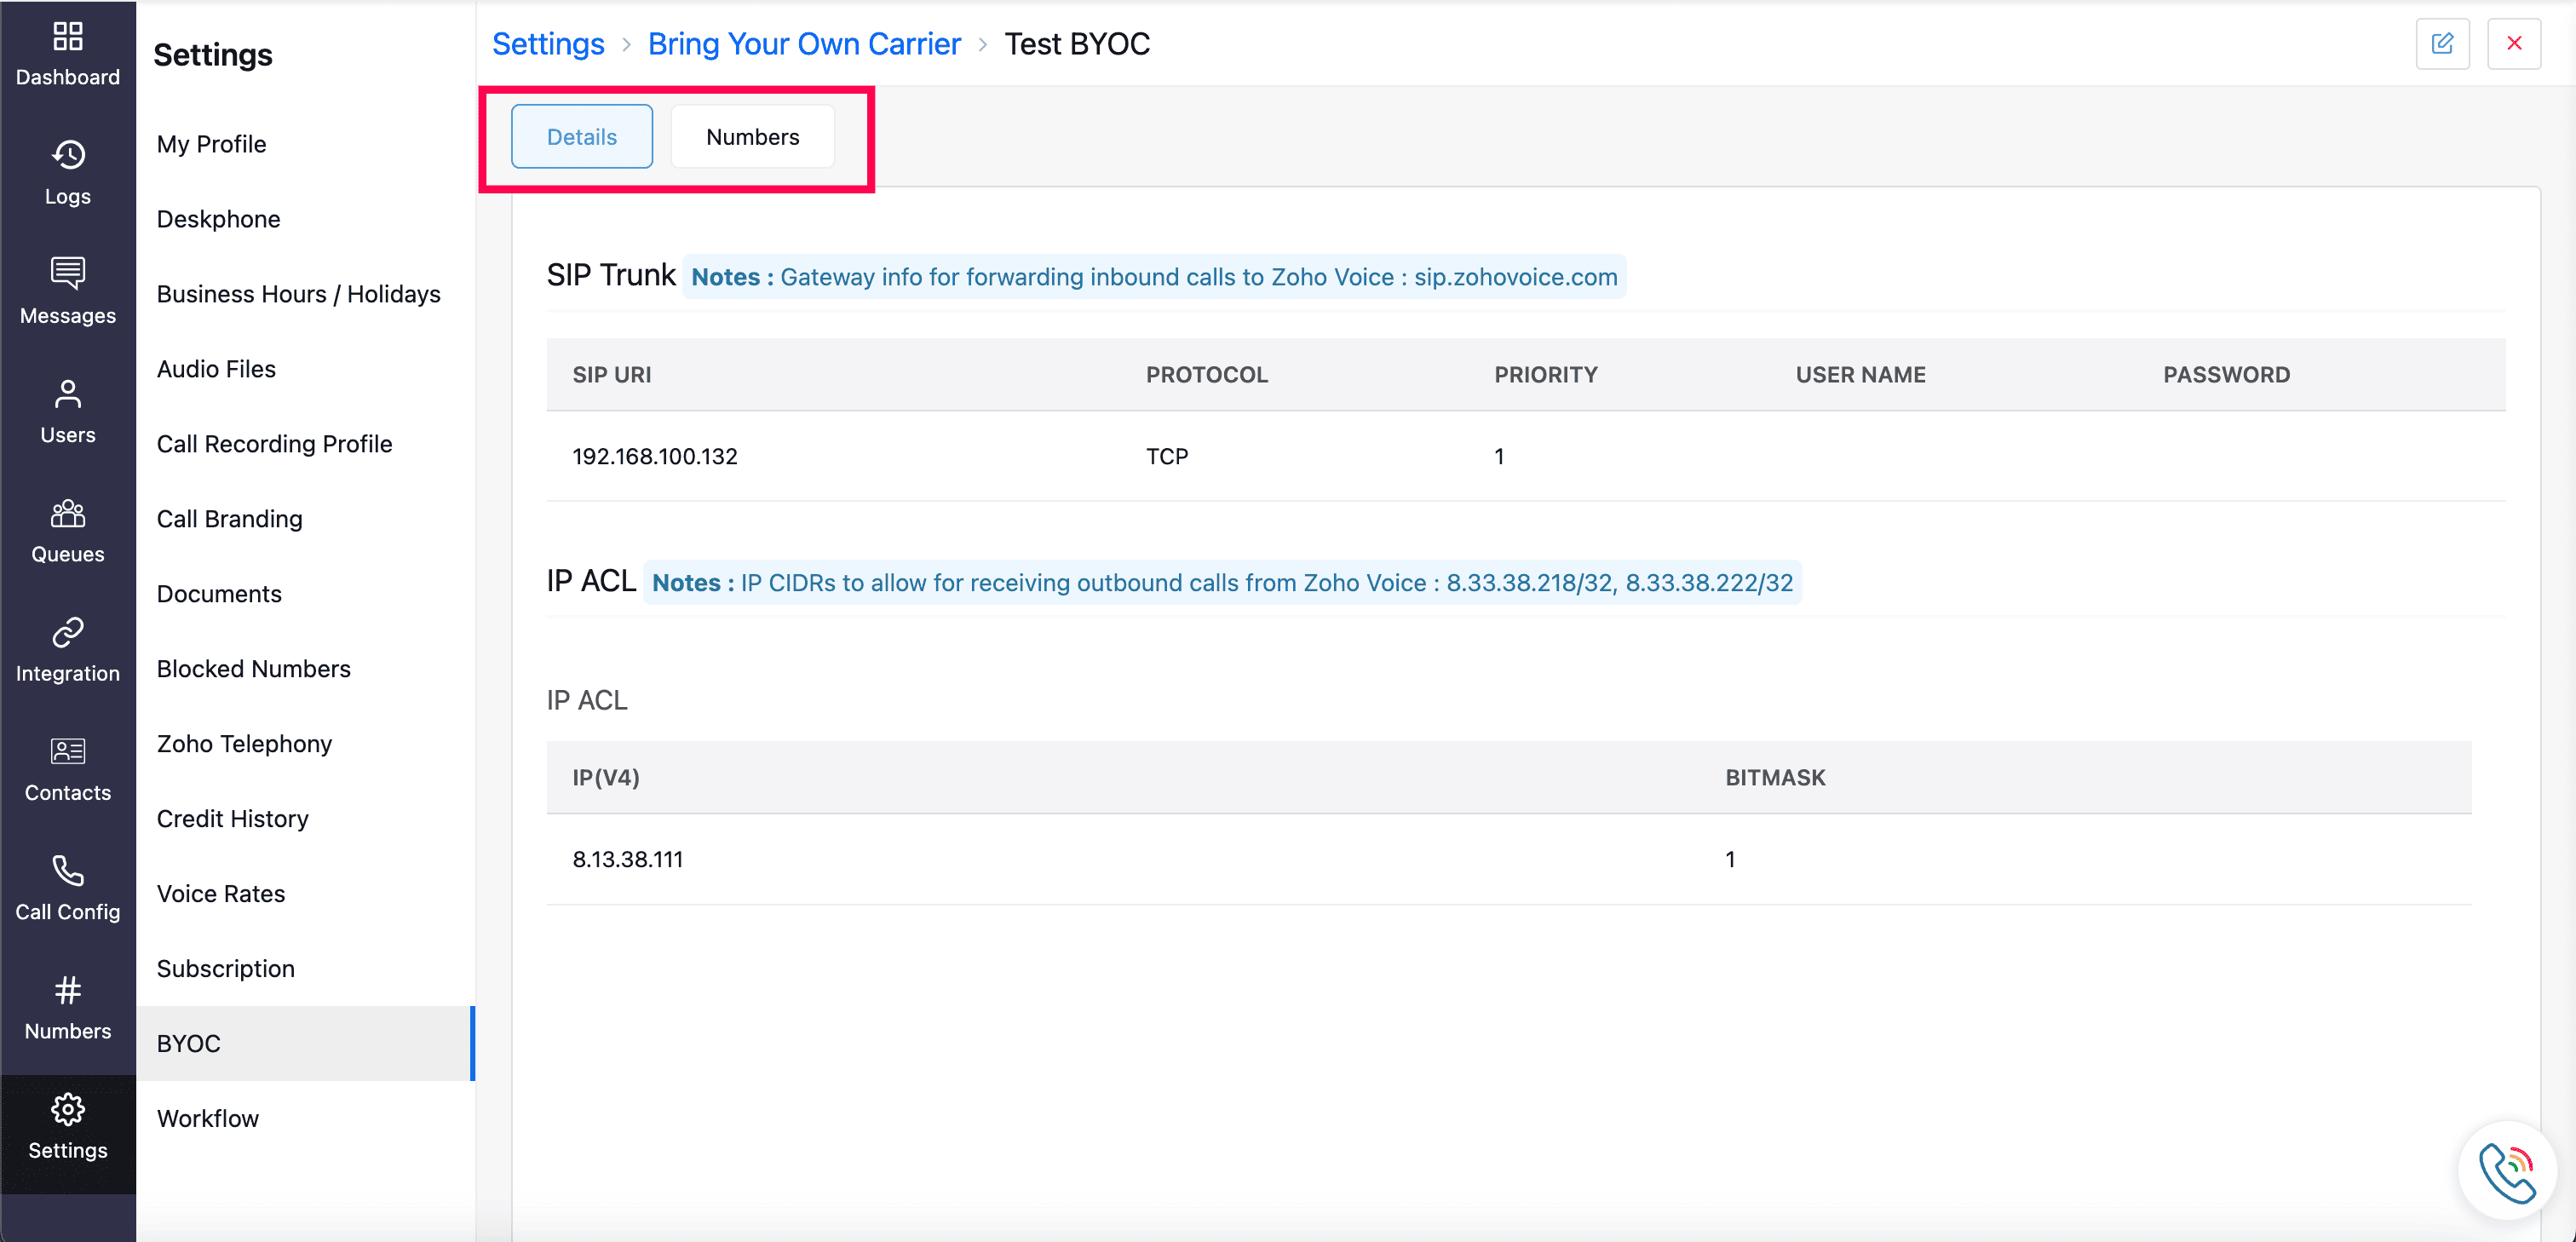
Navigate to the Numbers tab to add your numbers (from your current carrier) into Zoho Voice.
Note
You can only add BYOC numbers and their configurations after the BYOC trunk configurations are successfully verified by Zoho Voice.
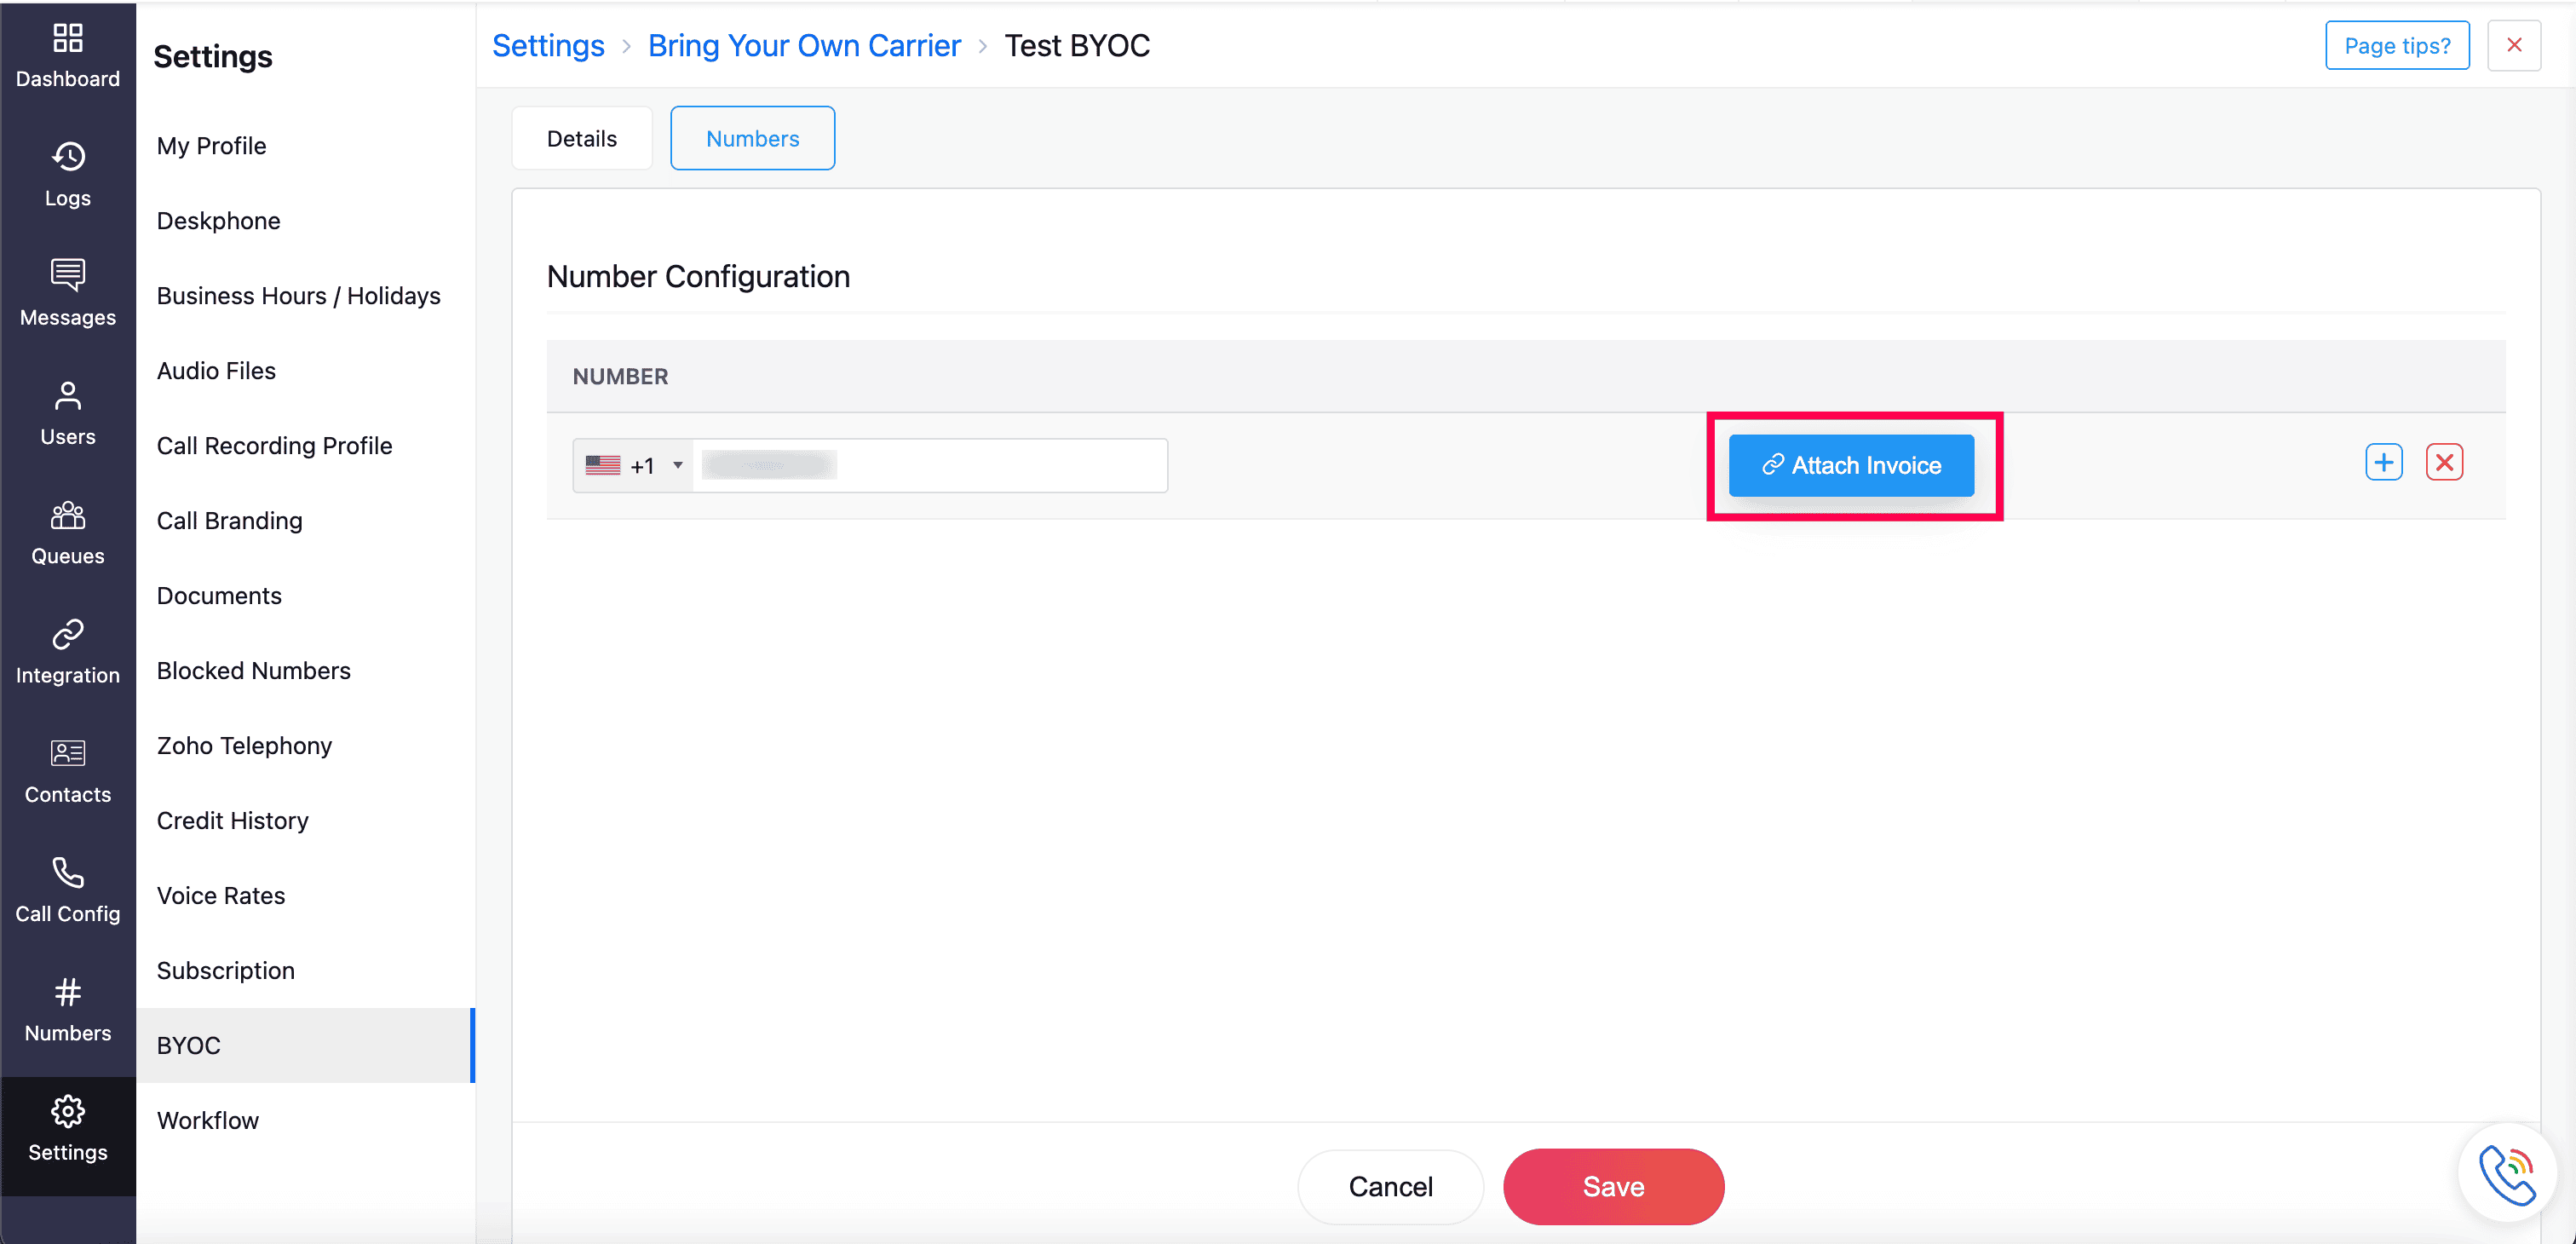
To add numbers, click the Add button.
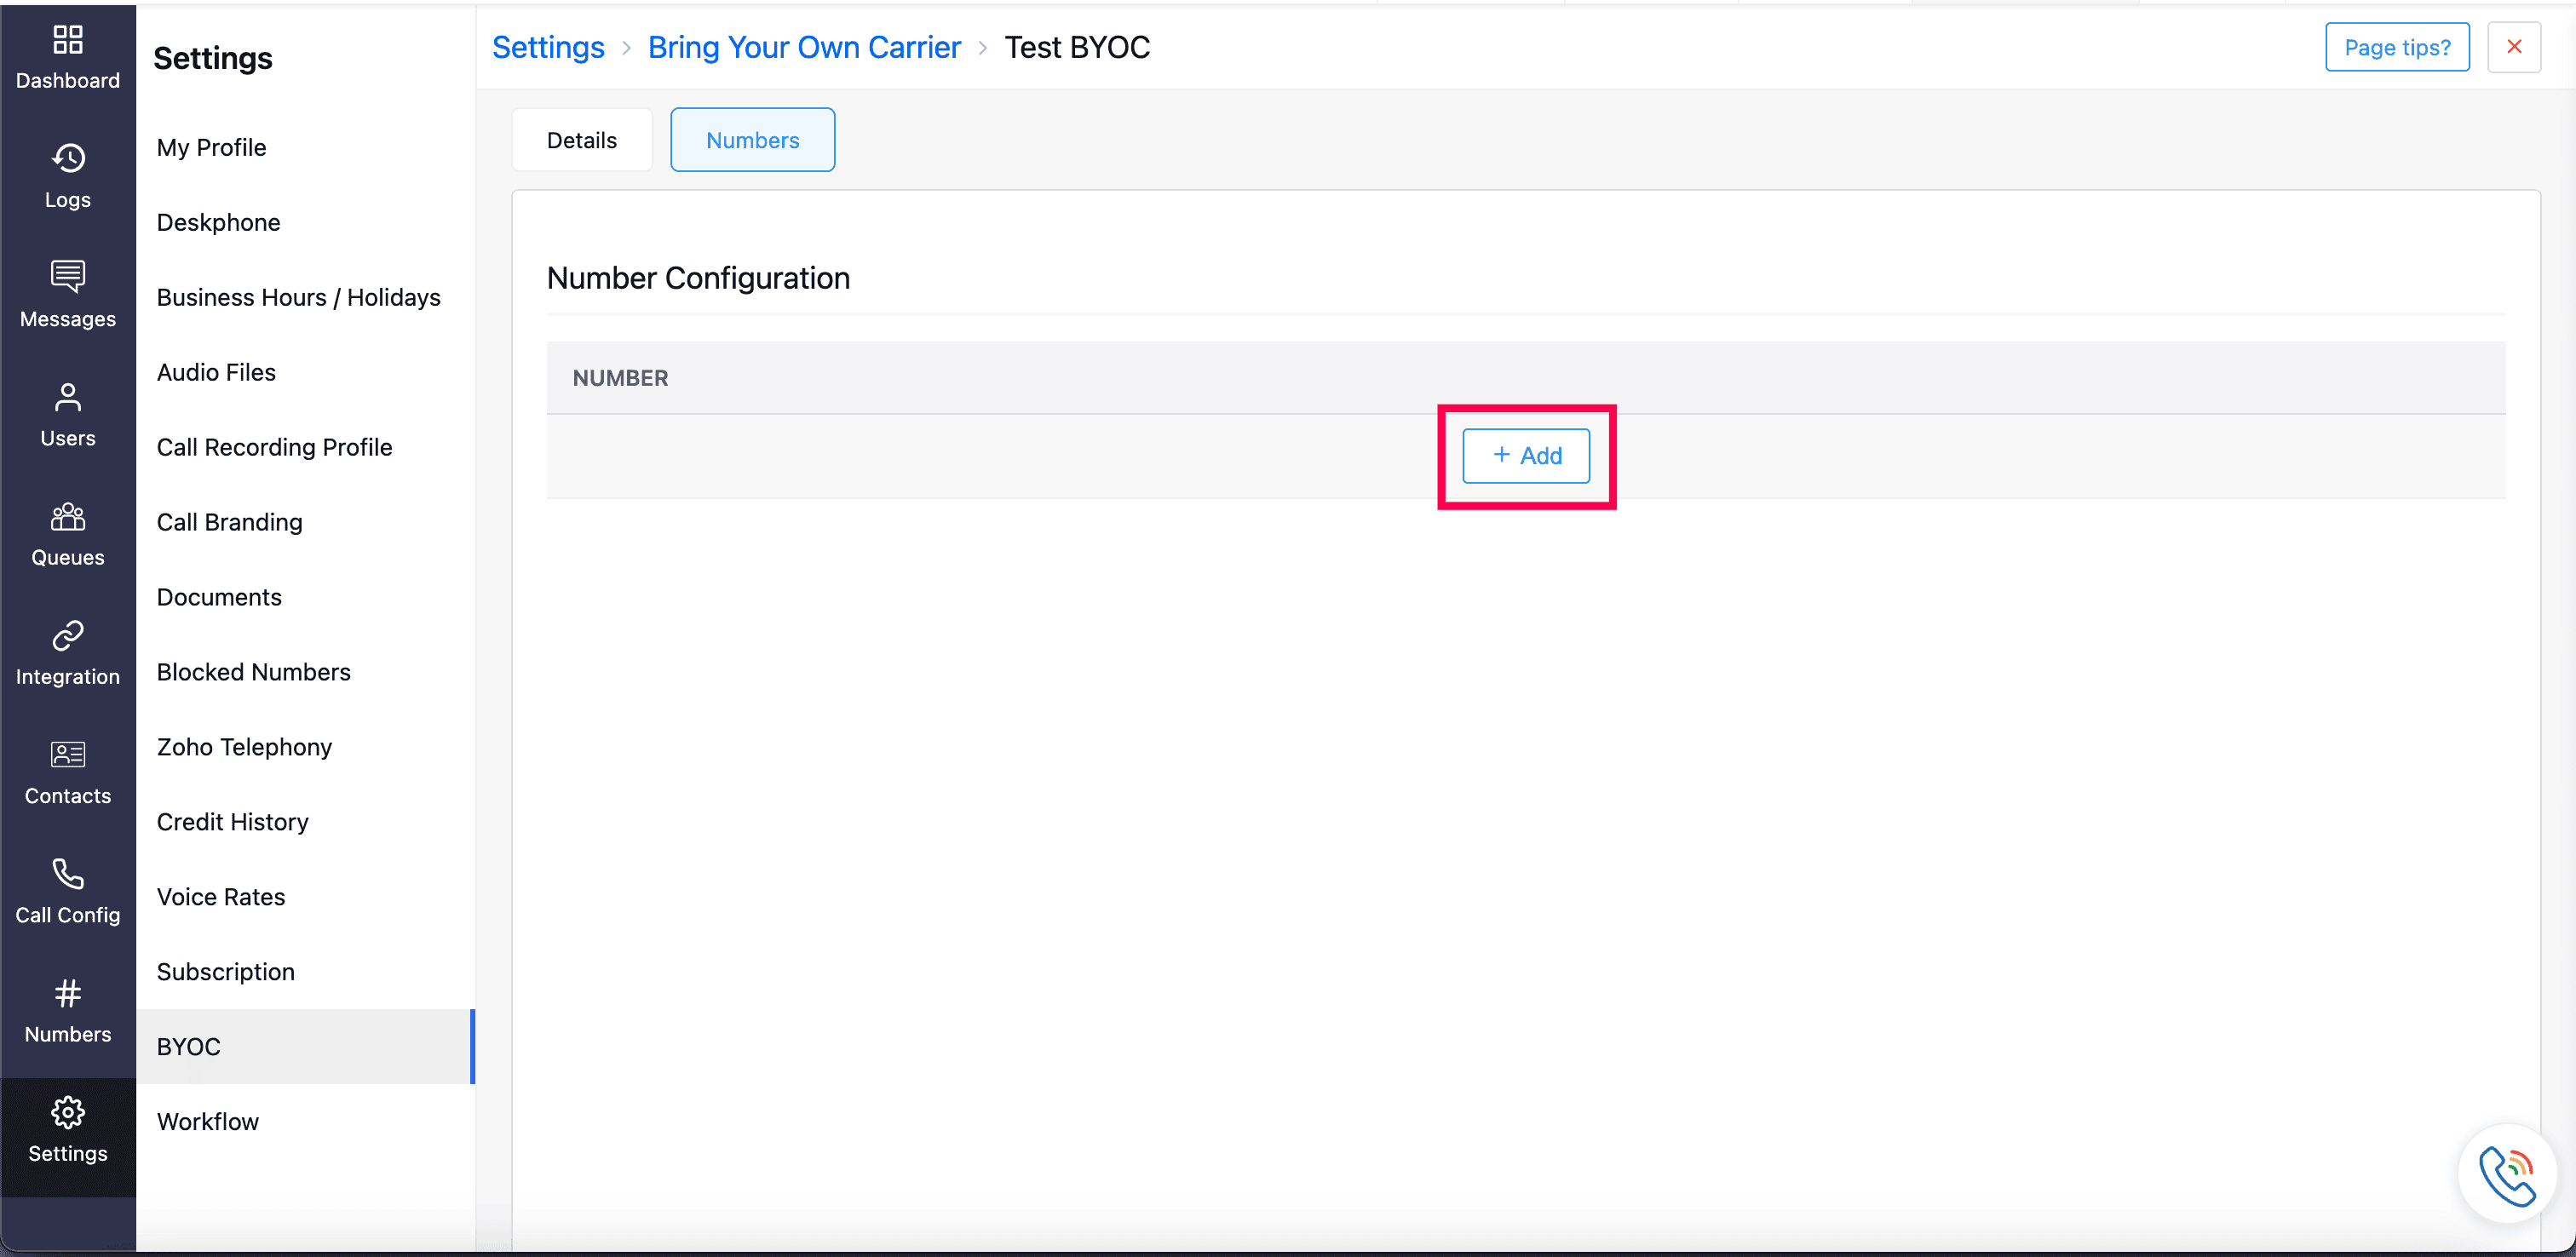
Add your numbers one by one under the Number field.
For each number, attach a valid document as proof of ownership.
Note
The valid document should be the number purchase invoice from your existing carrier.
To add more numbers, hover over the number field and click the add(+) icon on the right.
Once all the required numbers and supported invoice documents are added, click Save.
Next, verify each number by clicking the Verify OTP button and entering the OTP received via call to the respective number.
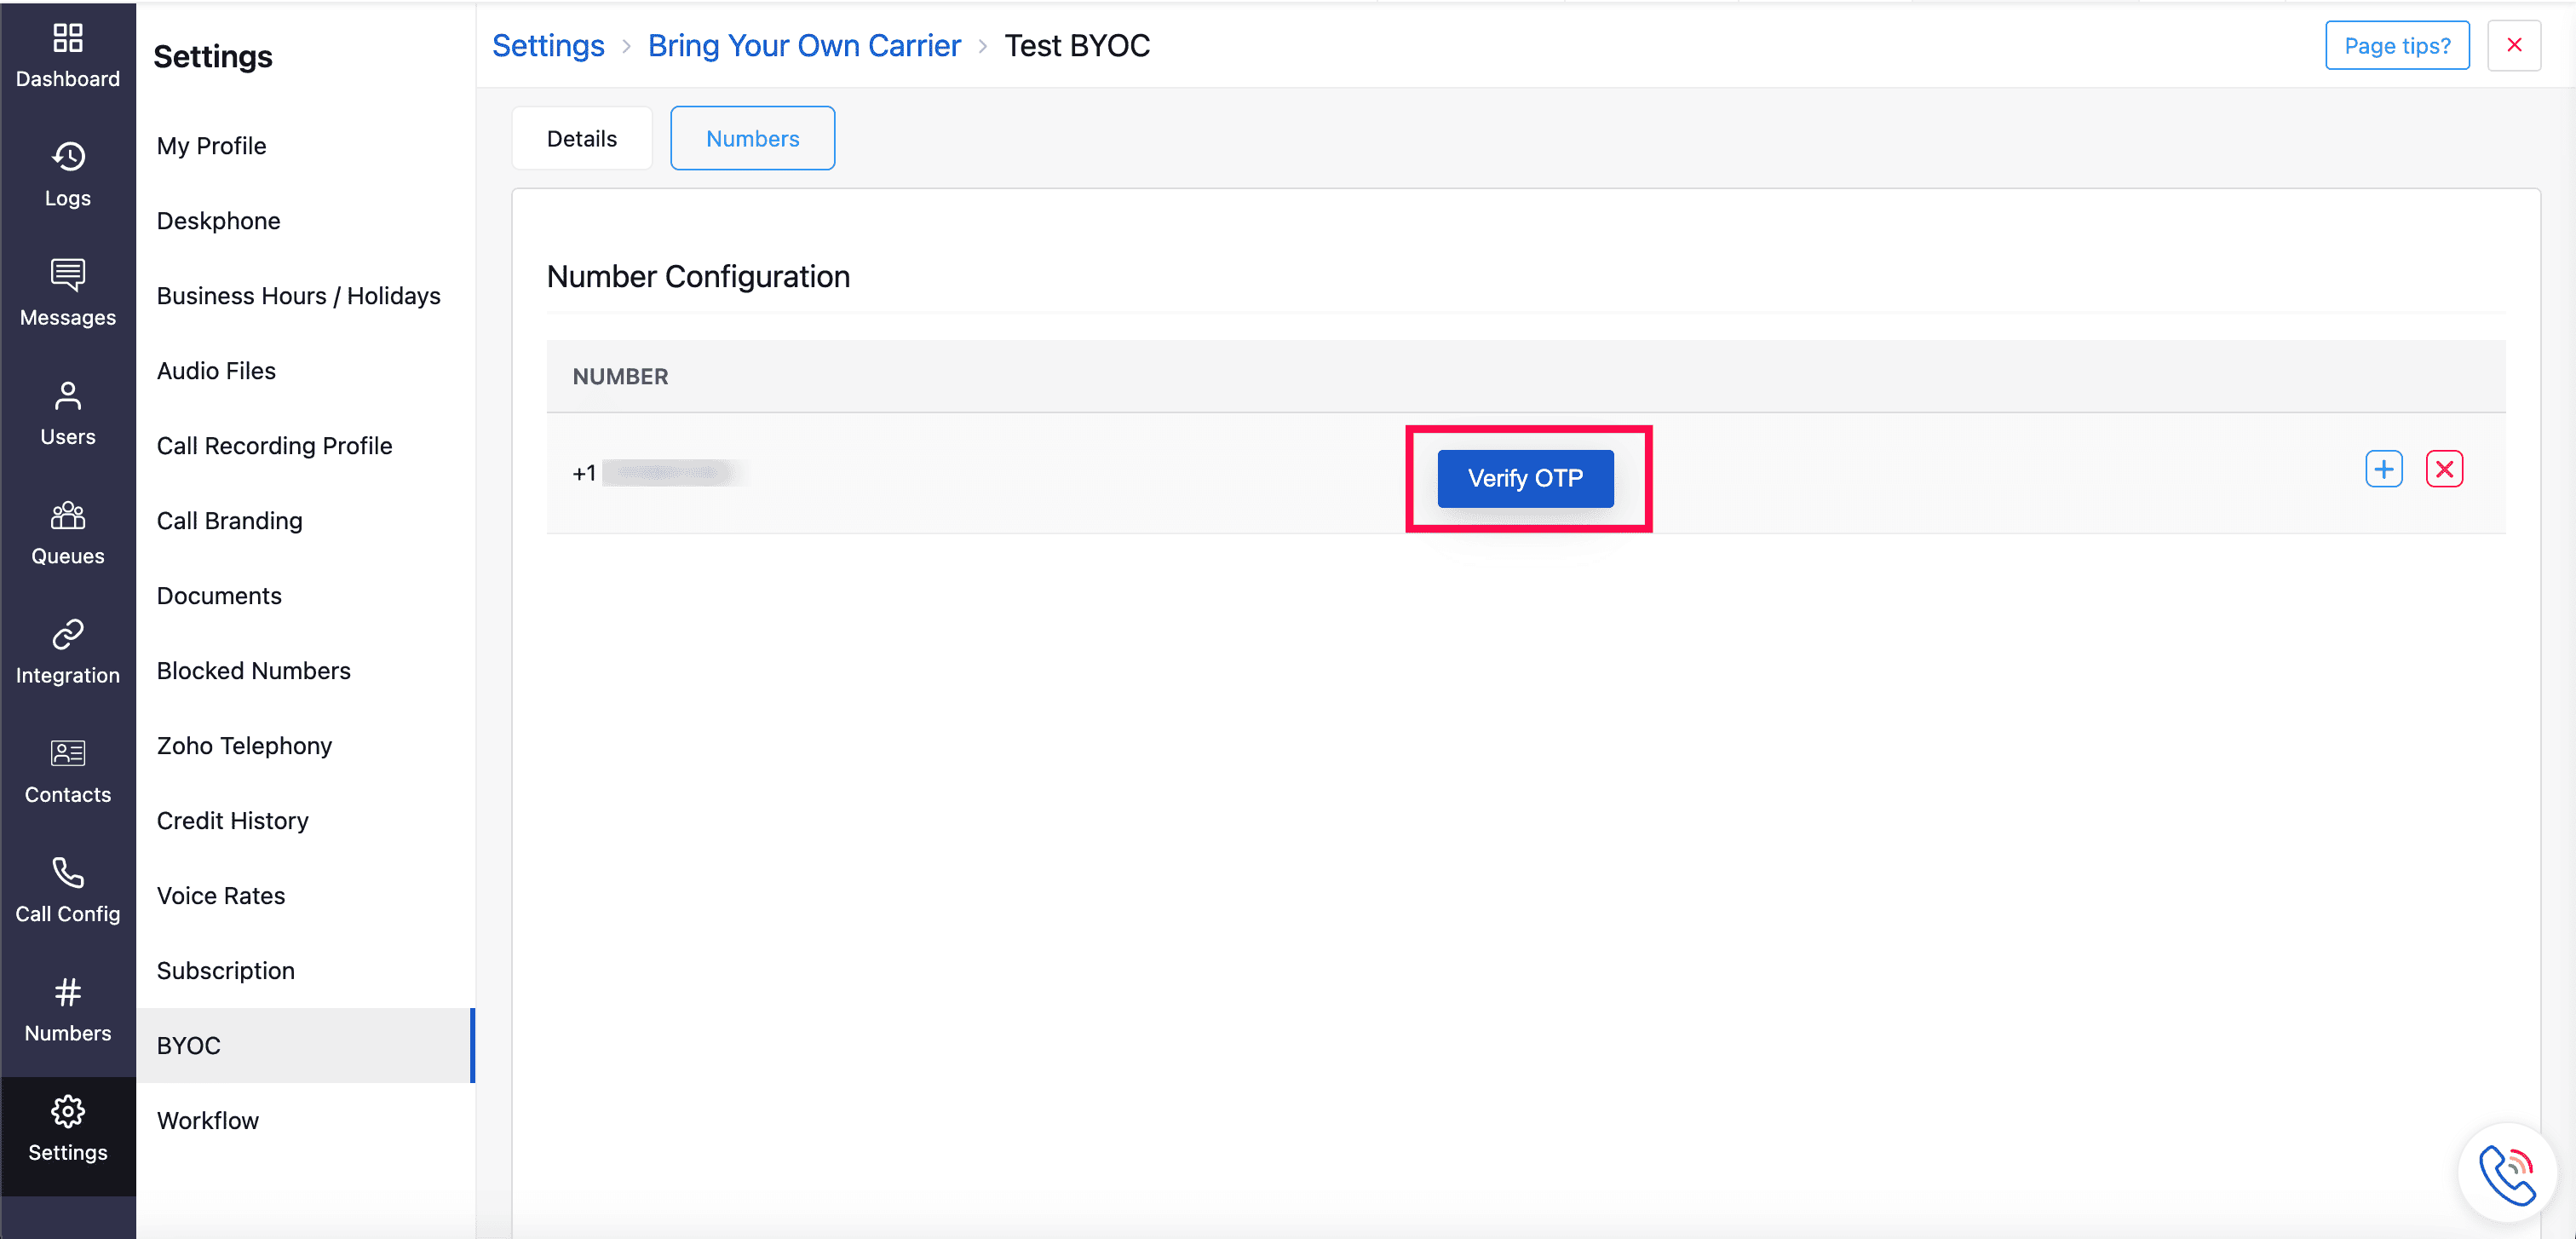
Each number added to your active BYOC trunk is subjected to further approval by Zoho Voice.
Once approved, all inbound and outbound calls will be managed through Zoho Voice.
To remove a number from your BYOC trunk, click the delete(x) icon next to it and save your changes.


Zoho Voice Trunk details
Below are the details that have to be configured at your carrier side as you do in Zoho Voice.
Zoho Voice's SIP Trunk URI
Trunk URI to which calls have to be forwarded from your carrier side,
For US DC:
sip.zohovoice.com:5060 - TCP/UDP
sip.zohovoice.com:5061 - TLS
For EU DC:
eu-sip.zohovoice.com:5060 - TCP/UDP
eu-sip.zohovoice.com:5061 - TLS
Note
If your carrier provides SIP connectivity over a private IP address, deploy a Session Border Controller (SBC) or an equivalent intermediary device that connects to your carrier network. Check, configure and verify the SIP trunk between your carrier and the SBC before setting up BYOC in Zoho Voice. Once the SBC is publicly reachable, use its public IP address when configuring the SIP trunk in Zoho Voice.
Zoho Voice's call origination IPs
IP(s) to be allow-list at your carrier's side to get calls from Zoho Voice,
For US DC:
8.33.38.218
8.33.38.222
8.47.10.219
For EU DC:
139.162.137.101
139.162.165.201
Charges involved in the BYOC setup
BYOC Trunk setup charges
BYOC is available for users under all plans except the Trial and Solo plan without add-ons. On successful setup of a BYOC trunk 20 USD will be charged as one time cost.
Description | Charges |
BYOC Trunk Setup Cost | 20 USD/Trunk |
Call charges
Billing for all the inbound and outbound calls will be in accordance with your current carrier processing the calls.
In addition to the call charges billed by your carrier, Zoho Voice will also charge 0.003 USD/min for each call you make or receive using the Zoho Voice after deducting from the free minutes.
For subscribers of both Business Phone and Enterprise Telephony edition plans:
Description | Charges |
Inbound call handling charges | 0.003 USD/min |
Outbound call handling charges | 0.003 USD/min |