ON THIS PAGE
Customer Portal - Functions
This page gives you an overview of all the features that are available in the Customer Portal.
Note: Some features may not be enabled for your organization by default. Visit the Customer Portal Preferences document to learn how to configure them.
Home Dashboard
The Home screen is similar to the Dashboard in Zoho Subscriptions and is the first screen that your customers see when they log in to the Customer Portal. It gives them an overview of the transactions that have taken place between you and your customers, and will display the following details:
Outstanding Invoices: The total number of outstanding invoices along with the total amount that your customer owes you for all their outstanding invoices. A Pay Now link will be displayed as well, which your customer can use to pay the entire outstanding amount in one go.
Available Credits: The total amount that you owe your customer. This amount is based on a customer’s credit notes and any refunds that you may have initiated.
Last Payment Made: The amount and date of the most recent payment made by your customer. A link to the corresponding invoice will be present as well.
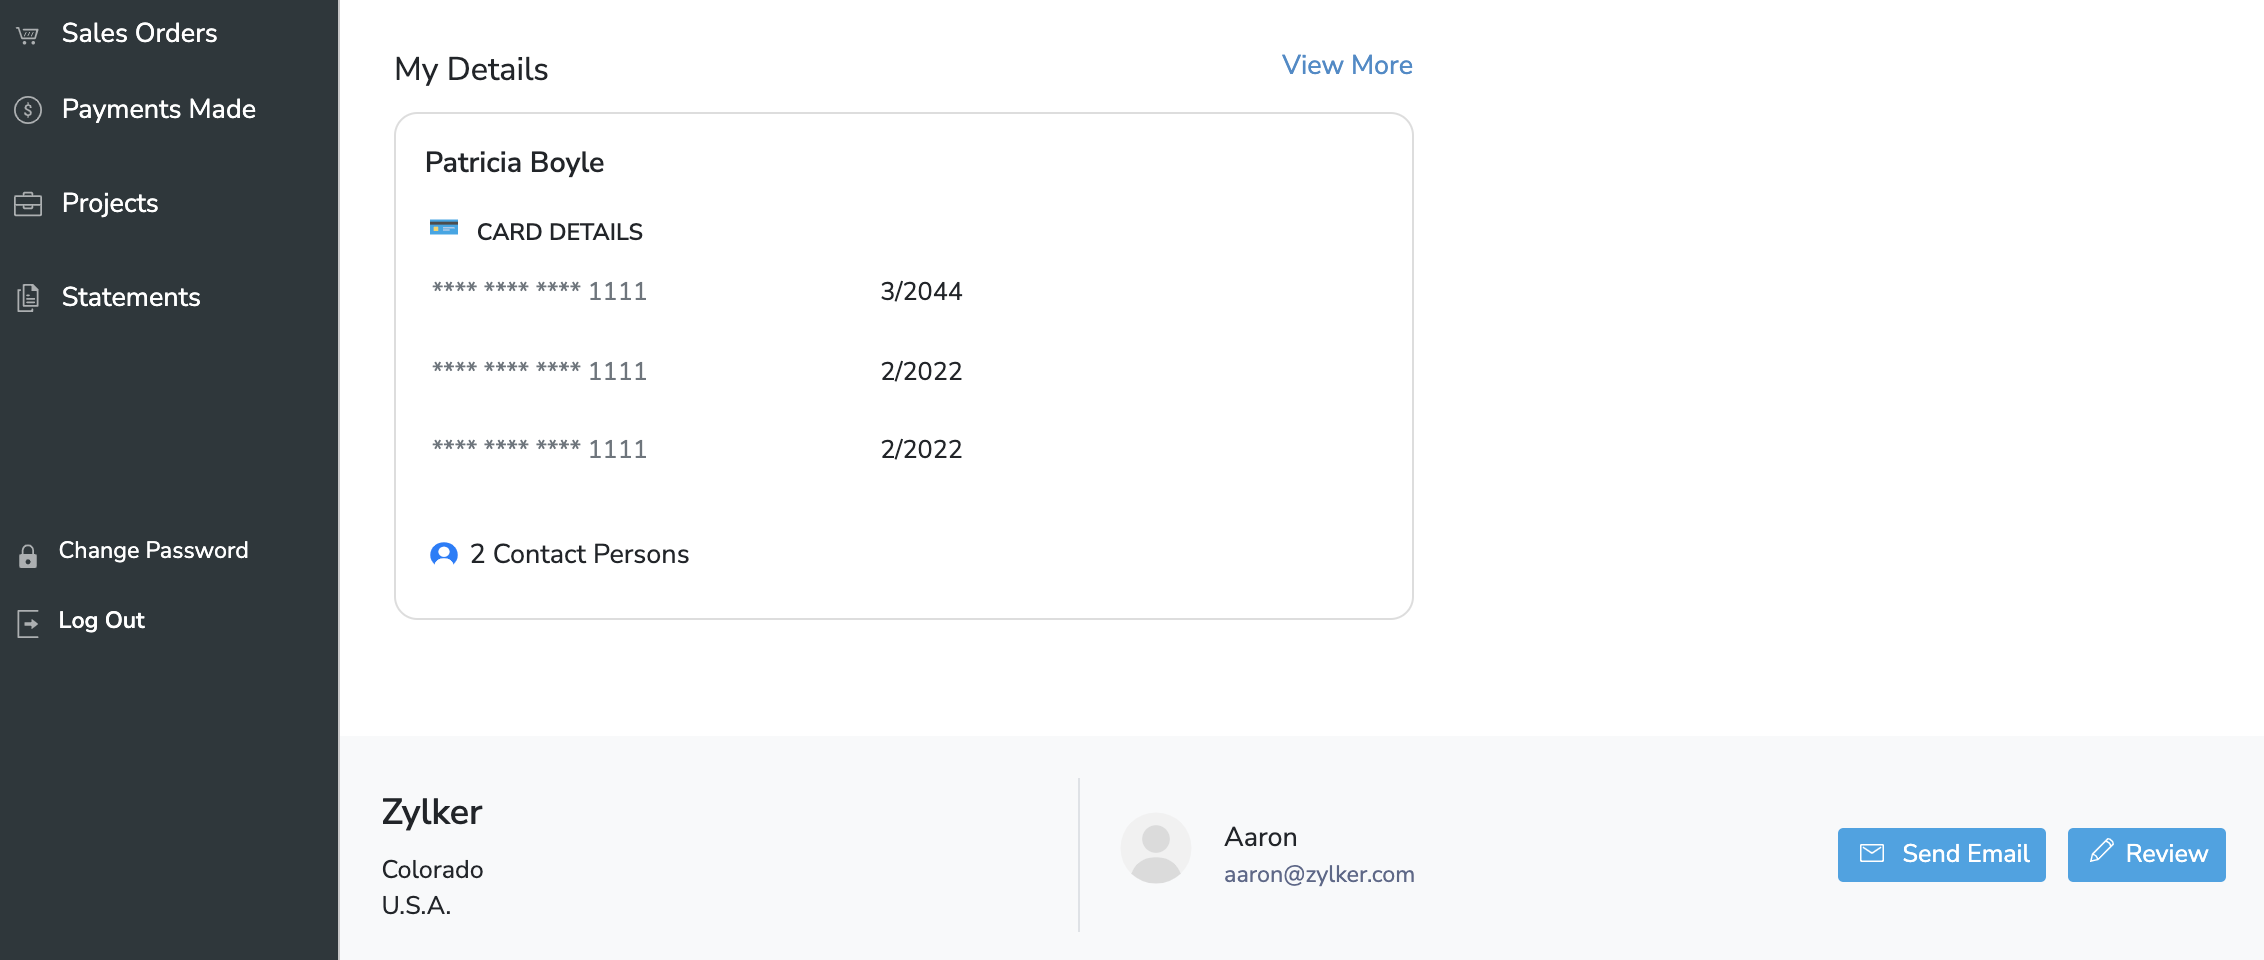
My Details: Your customers can view and update their contact, address, and payment information that’s stored in Zoho Subscriptions.
Pending Approvals: The number of estimates & the number of timesheets that your customer has to approve. Clicking on either of these numbers will open a list of the respective transactions that are pending approval. (This will be shown in the Home screen if you’ve integrated with Zoho Books.)
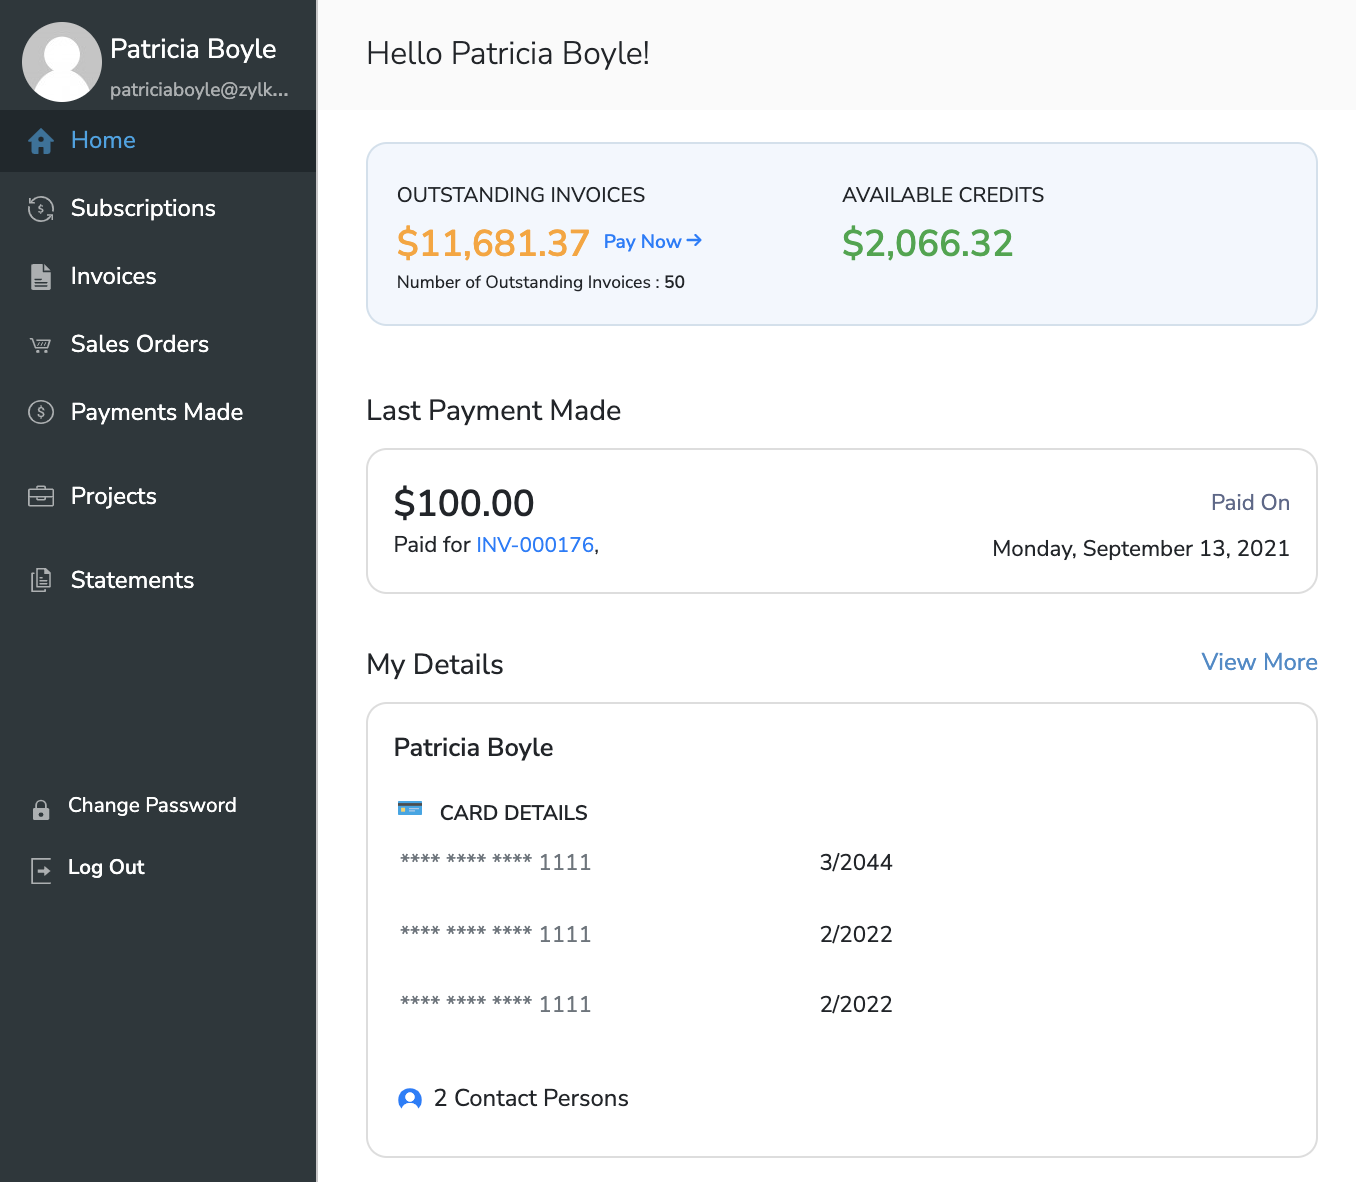
Apart from the details above, your customers will also be able to view your organization’s basic contact details, write reviews and send emails directly to your organization’s email address.
Manage Subscriptions
The Customer Portal offers comprehensive subscription management for your customers, thereby putting more control in their hands and saving you time from making their requested changes manually in Zoho Subscriptions.
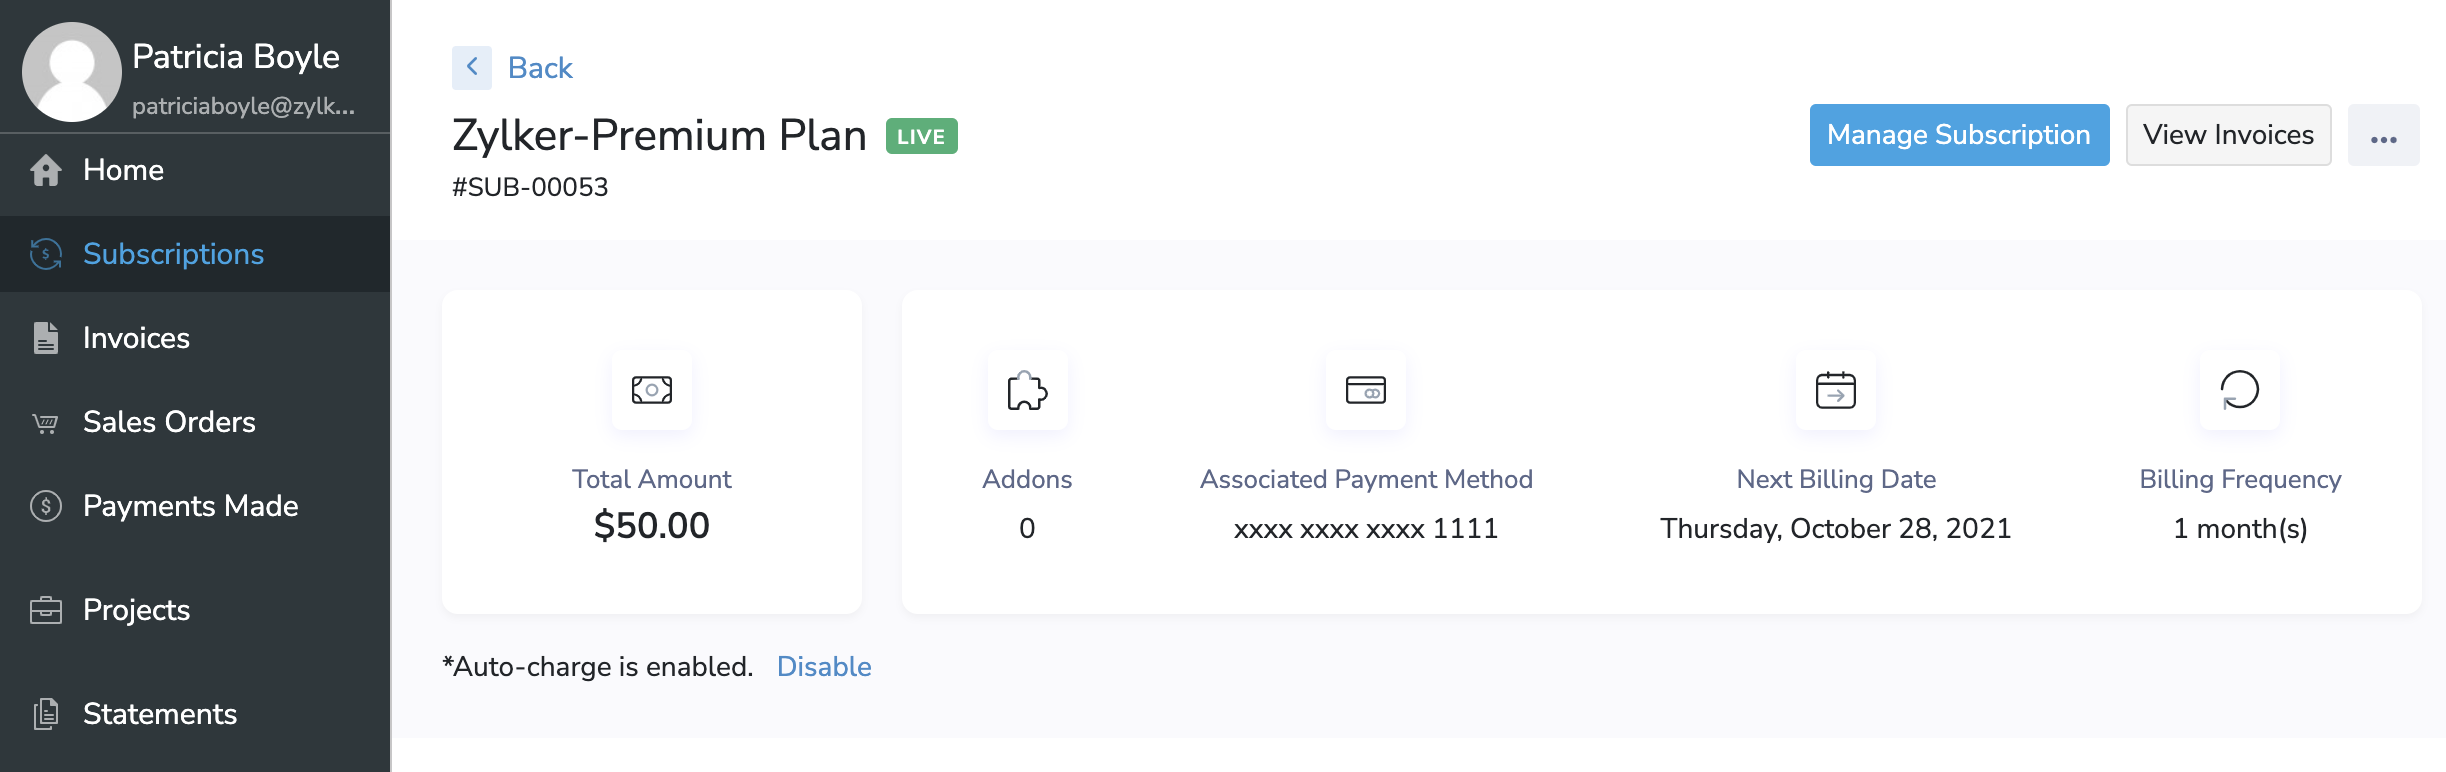
View Subscriptions
The Subscriptions module from the left sidebar displays a list of all the subscriptions that exist for your customer in Zoho Subscriptions.
Note: This module is enabled by default, but you can choose to disable it if necessary from Customer Portal Preferences.
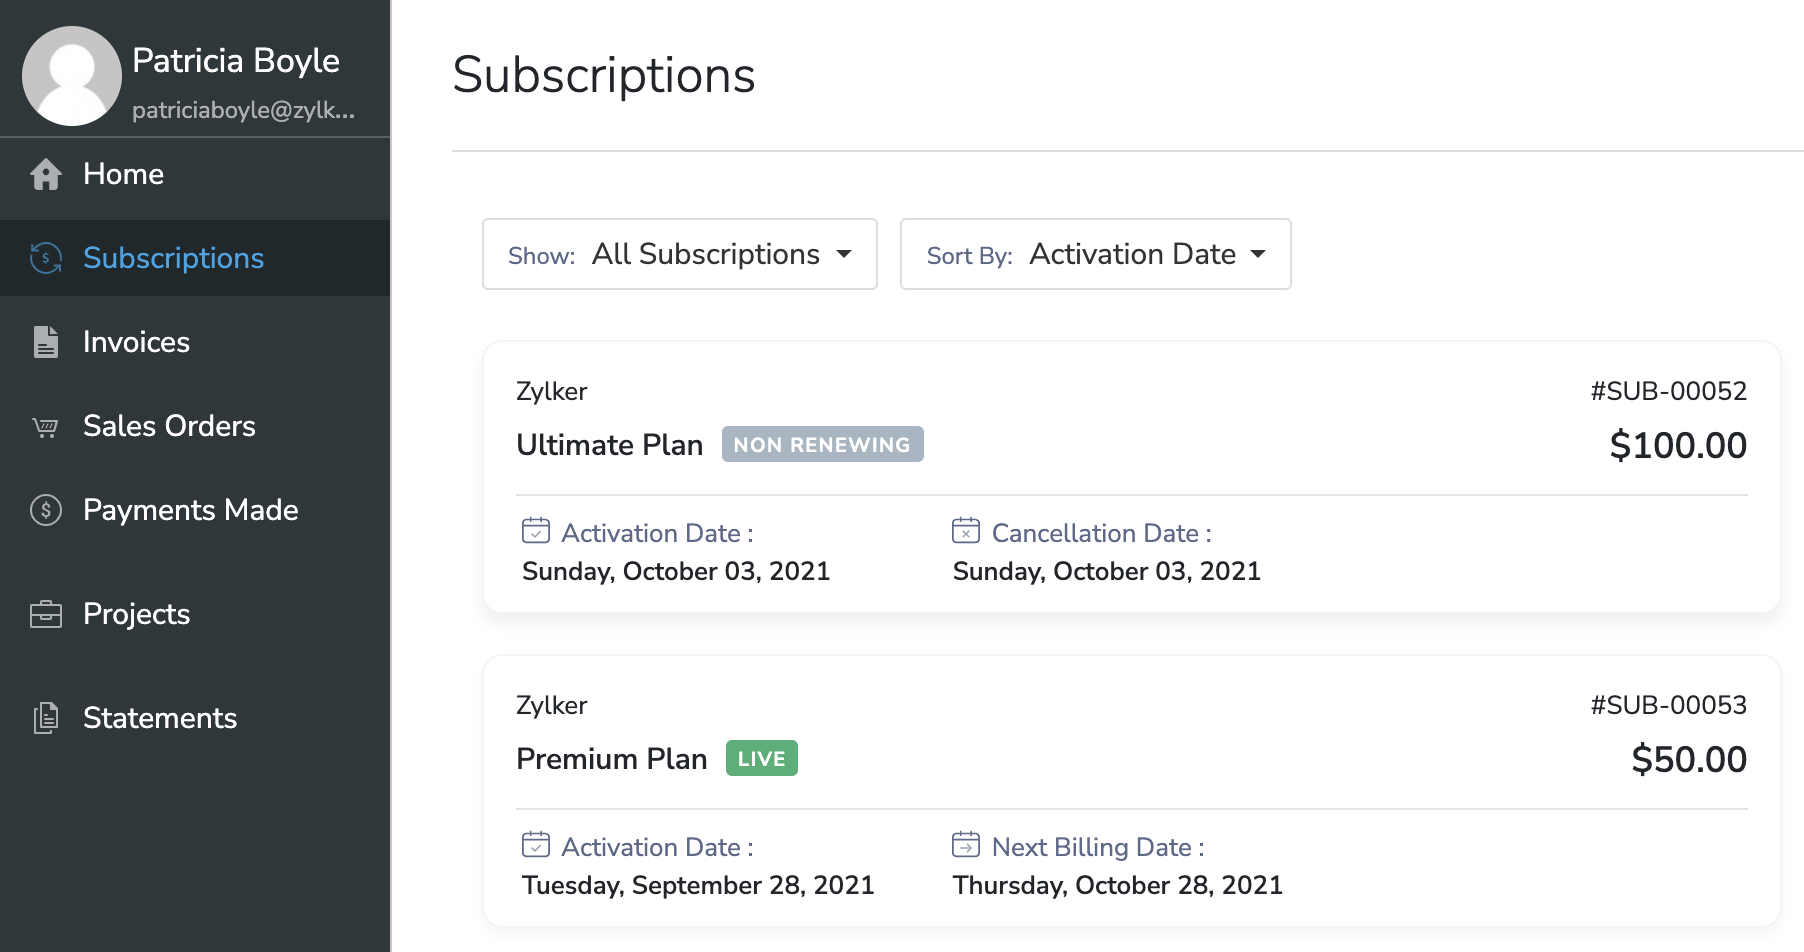
Your customer can use the filters at the top of the list to sort through their subscriptions quickly and find the one they’re looking for.
Clicking on any subscription from the list will open an overview screen with additional details of the subscription.
Manage Trials
Your customers can perform the following actions to manage their trial subscriptions from the Customer Portal:
Note: All of these trial management features will be disabled by default. You can learn more about these features and how to enable them from Customer Portal Preferences.
Convert Trials to Live
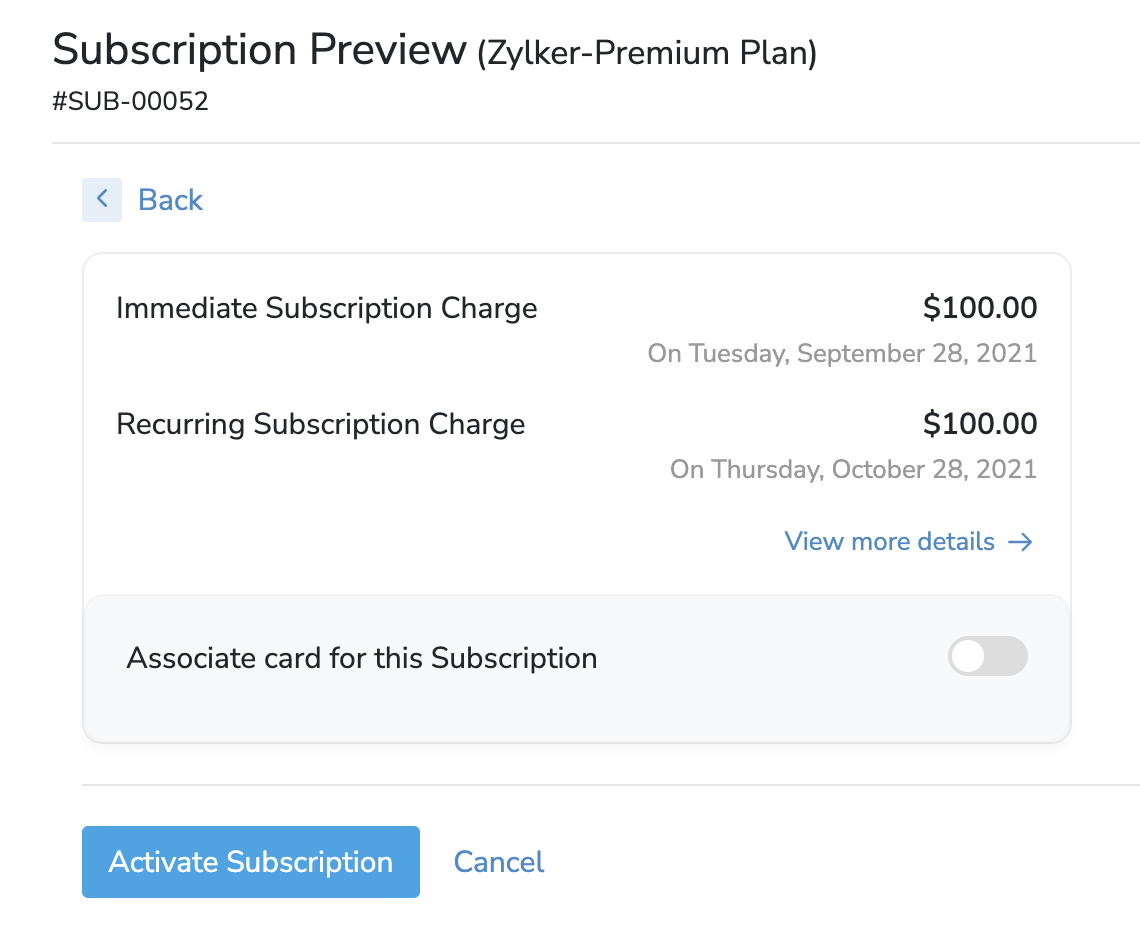
Your customers can end their trial at any point during a subscription’s trial period, and immediately convert the subscription to the Live status. They can do this by going to the Subscriptions module, selecting a subscription, and then clicking Activate Subscription.
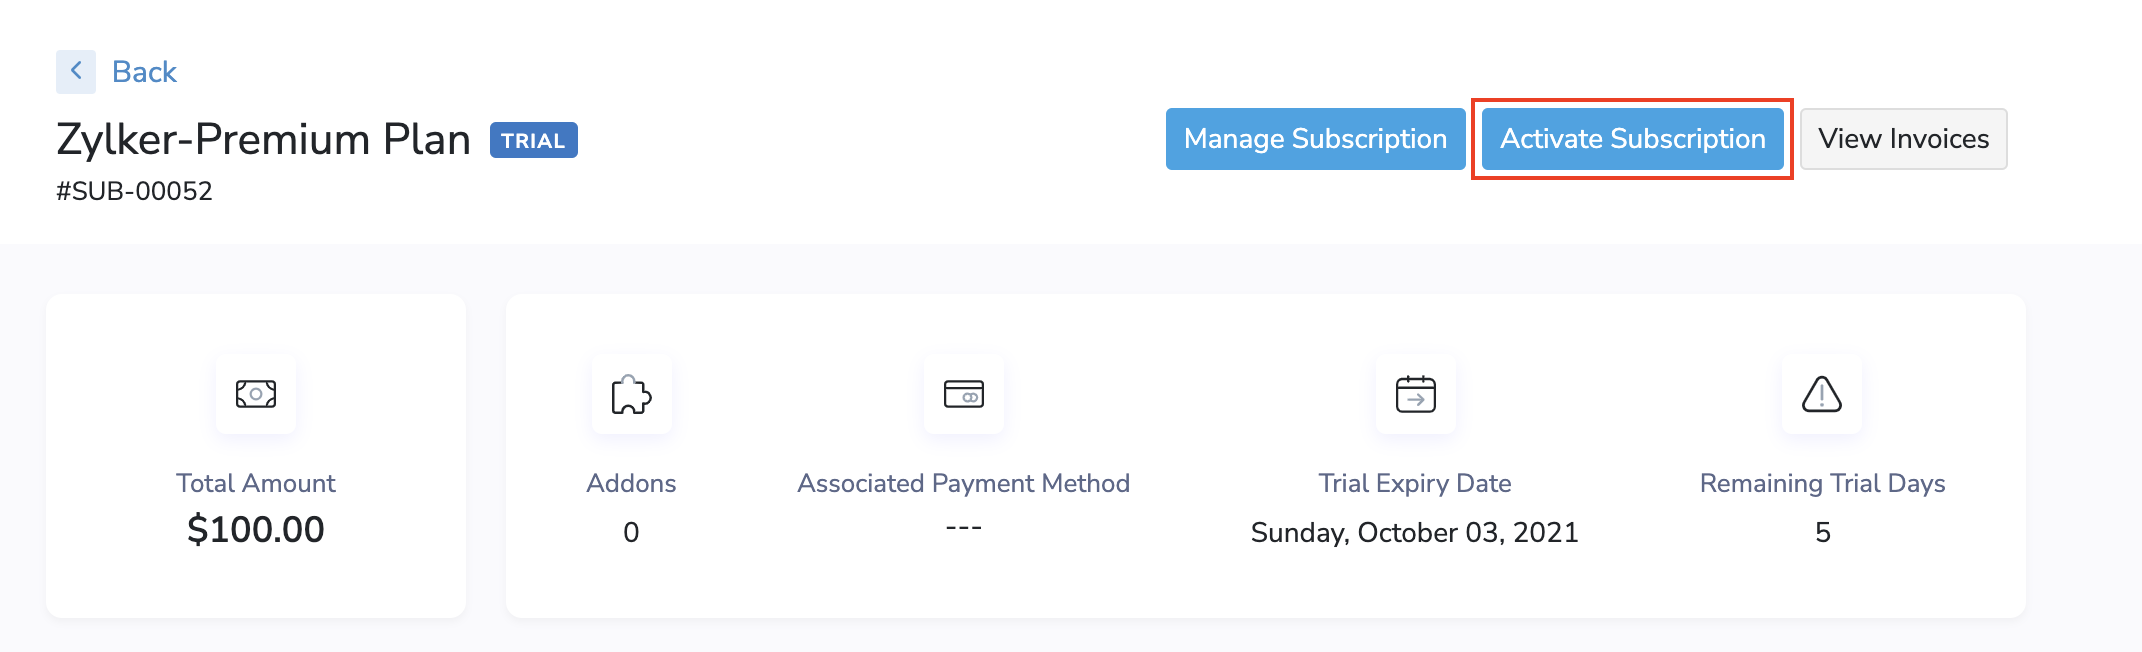
A summary of the various subscription related charges will be displayed. If your customer chooses to proceed and activate the subscription, their trial period will end and the subscription’s status will become Live. An invoice will be created as well.
Extend Trials
If your customers need more time to evaluate your product or service, they can extend certain trial subscriptions when the trial period ends.
Insight: This feature is applicable only to subscriptions that go into the Expired status when the trial period ends (this happens when an Auto-charge enabled subscription cannot be charged at the end of the trial period).
After the trial has expired, a popup will be displayed to your customers, letting them know about the available trial extension. The duration of the extension will depend on the trial period, which you’ve configured for that particular plan.
You can configure how many trial extensions should be allowed from Customer Portal Preferences.
Cancel Trials
Trial subscriptions can be cancelled either immediately, or scheduled to be cancelled at the end of the current term from the Customer Portal. To do this, your customers should:
Go to the Subscriptions module.
Select a subscription.
Click the ellipsis (3-dot) menu in the top right corner.
Select Cancel Subscription.
Choose when the subscription has to be cancelled.

Now, the subscription will be cancelled either immediately, or at the end of the current term, based on your selection.
Insight: If a subscription has been scheduled to be cancelled at the end of the current term, your customers can prevent this from happening by going to the Subscriptions module, selecting a subscription, and then clicking Remove Scheduled Cancellation.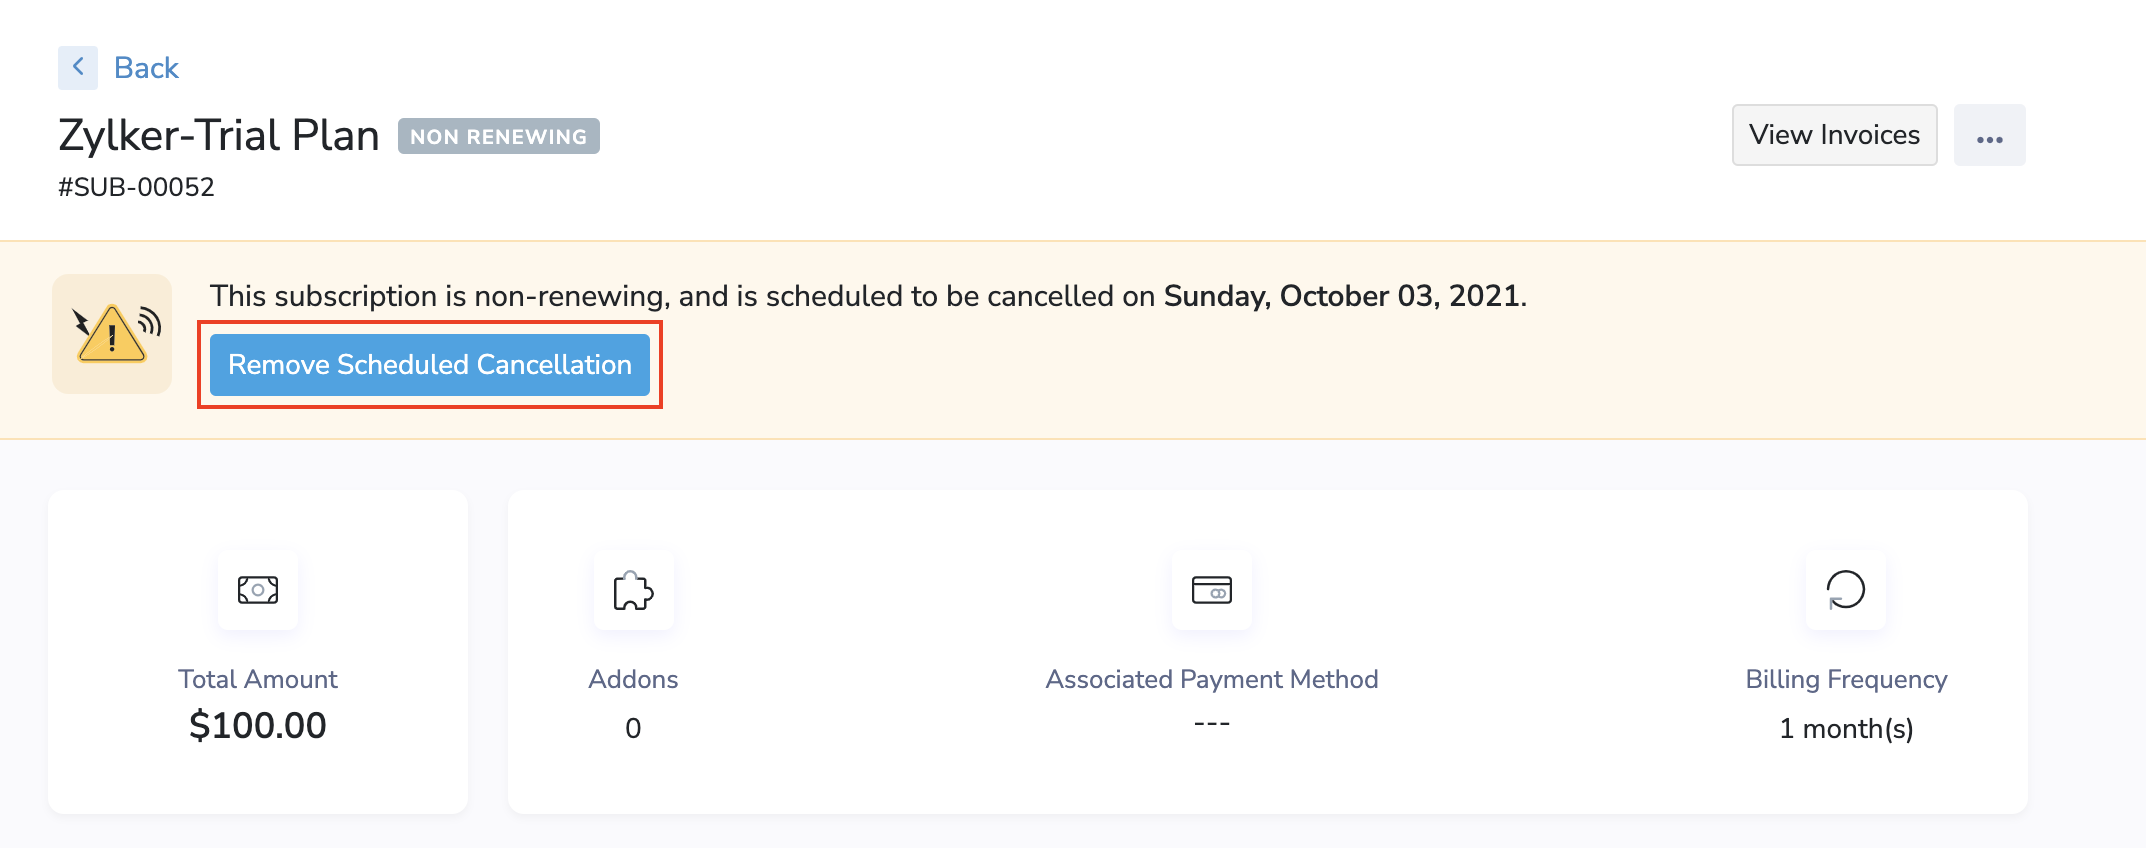
Edit Subscriptions
Note: This feature is disabled by default. You can configure and enable it from Customer Portal Preferences.
Your customers can perform subscription updates, such as changing plans, addons, and coupons right from the Customer Portal. To do this, they must go to the Subscriptions module, select a subscription, and click Manage Subscription.
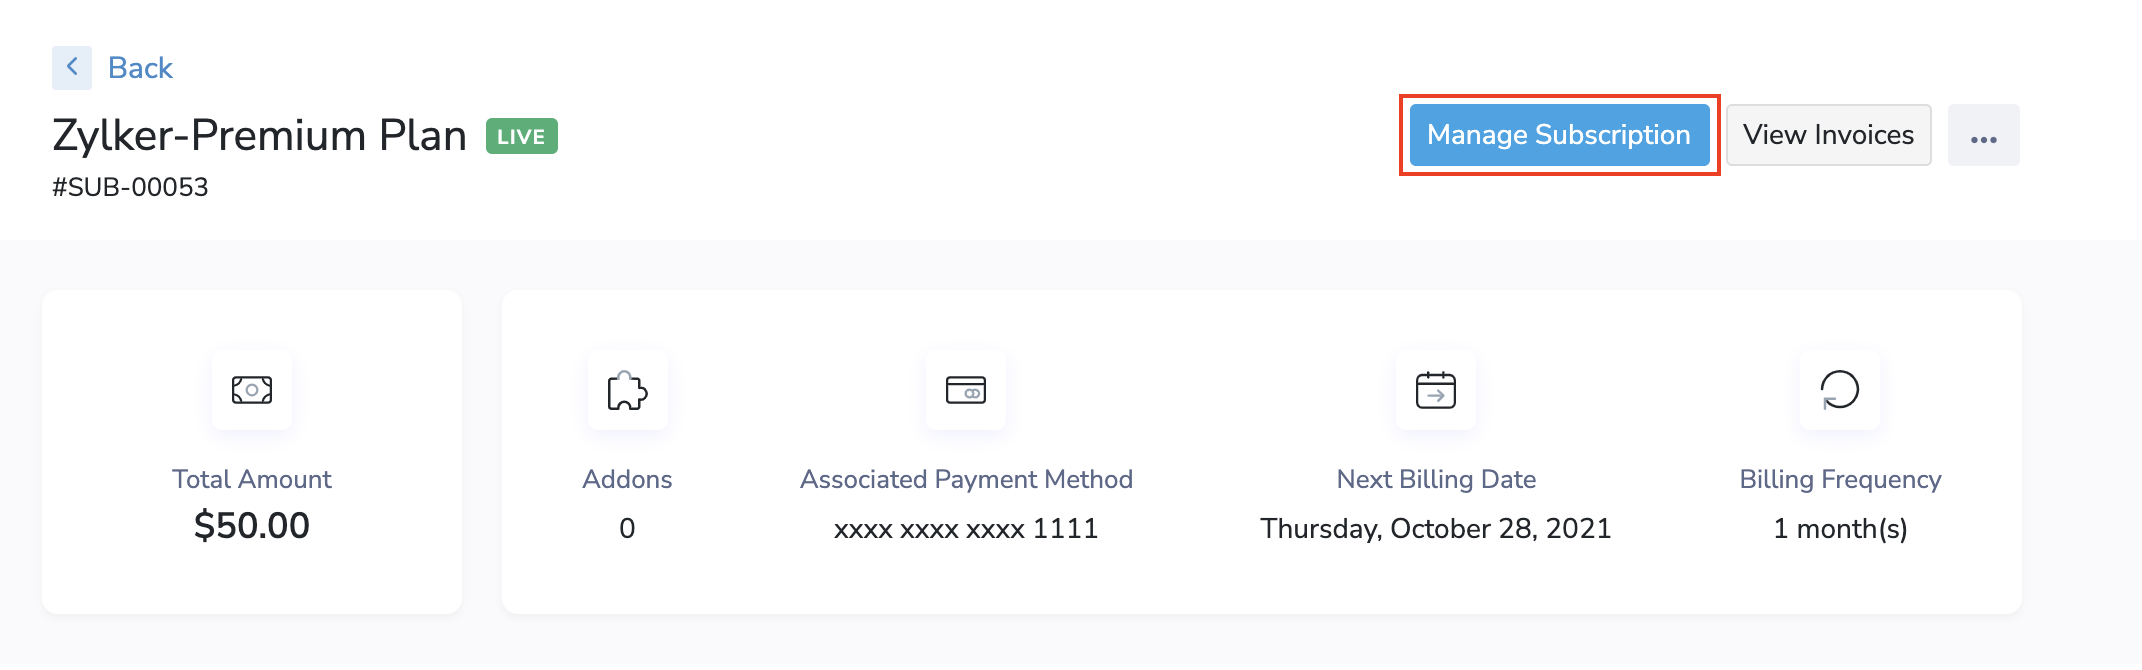
Now, they will be able to edit their subscription and apply their changes to reflect immediately, or at the end of the current term.
Pro Tip: This feature has an exhaustive range of configurations available in Preferences, which you can use to fine-tune exactly what actions your customers are allowed to perform while editing subscriptions.
Change Auto-charge Status
Note: This feature is disabled by default. You can configure and enable it from Customer Portal Preferences.
Auto-charge can be enabled or disabled from the Customer Portal for subscriptions that have a payment method associated with them.
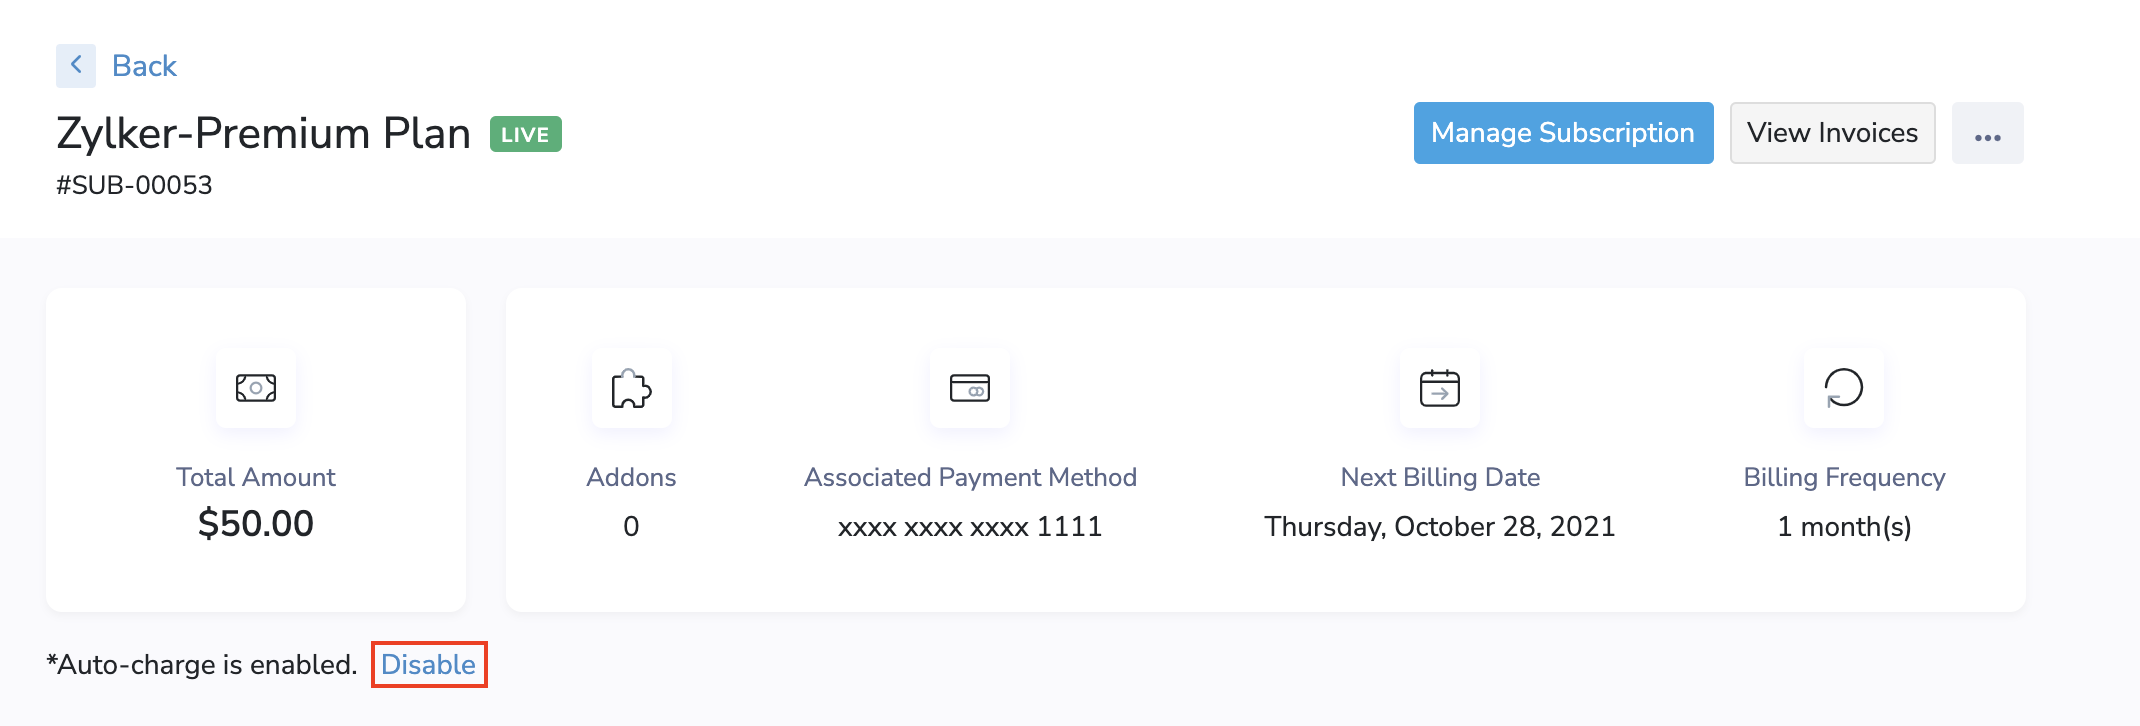
A few points to note about toggling Auto-charge:
- When your customers disable Auto-charge for a Dunning subscription, the subscription’s status will change from Dunning to Live, since automatic payment retries will not be possible.
- Enabling auto-charge from the Customer Portal will not collect the pending amount (if any) for invoices that have been generated already. For these invoices, your customers must make the payment manually.
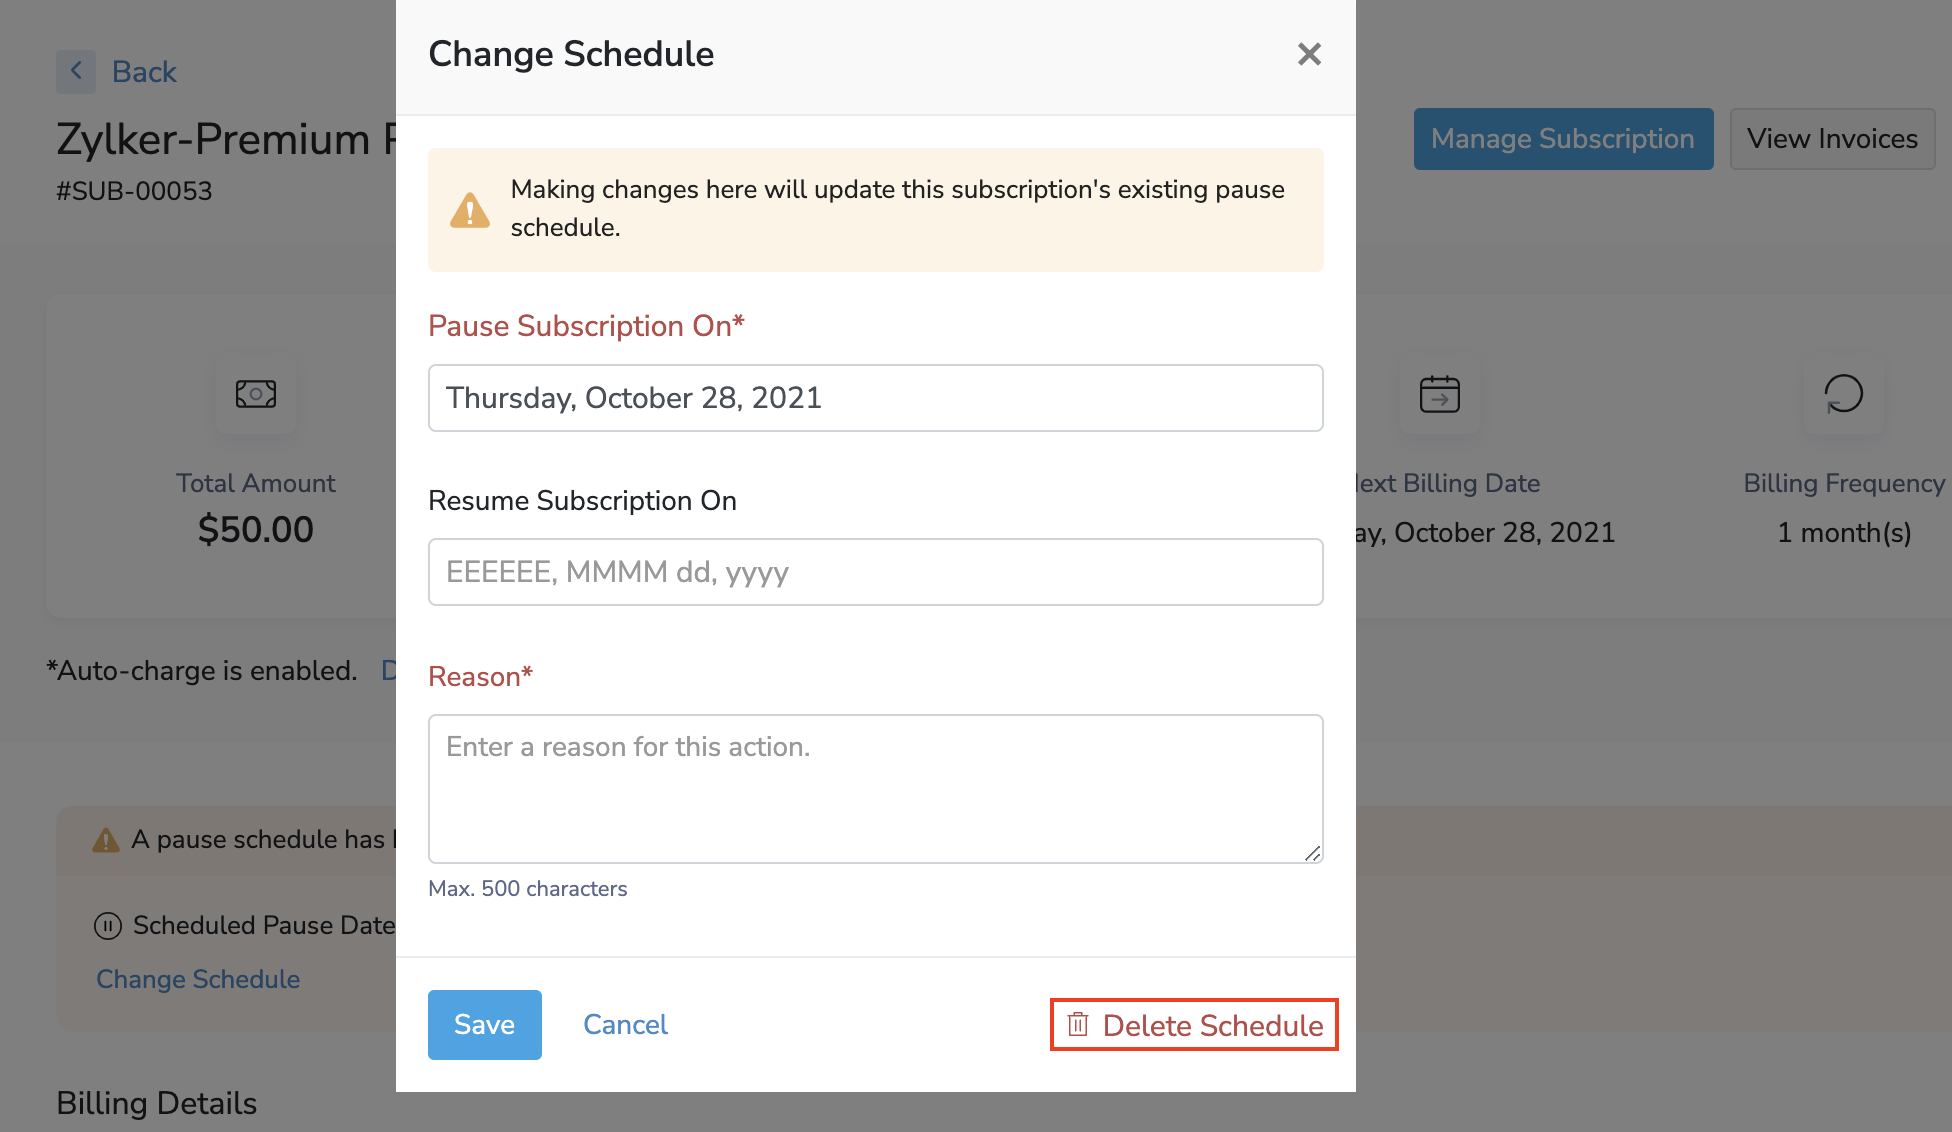
Pause & Resume Subscriptions
Note: This feature is disabled by default. You can configure and enable it from Customer Portal Preferences.
Your customers can Pause and Resume their subscriptions from the Customer Portal, similar to how you would configure Pause and Resume schedules from Zoho Subscriptions.
To configure a Pause and Resume schedule, your customers should:
- Go to the Subscriptions module.
- Select a subscription.
- Click the ellipsis (3-dot) menu in the top right corner.
- Select Pause Subscription.
Insight: If a subscription is already paused, then your customers will have to select Resume Subscription here instead.
- Configure their Pause and Resume (optional) schedule as required.
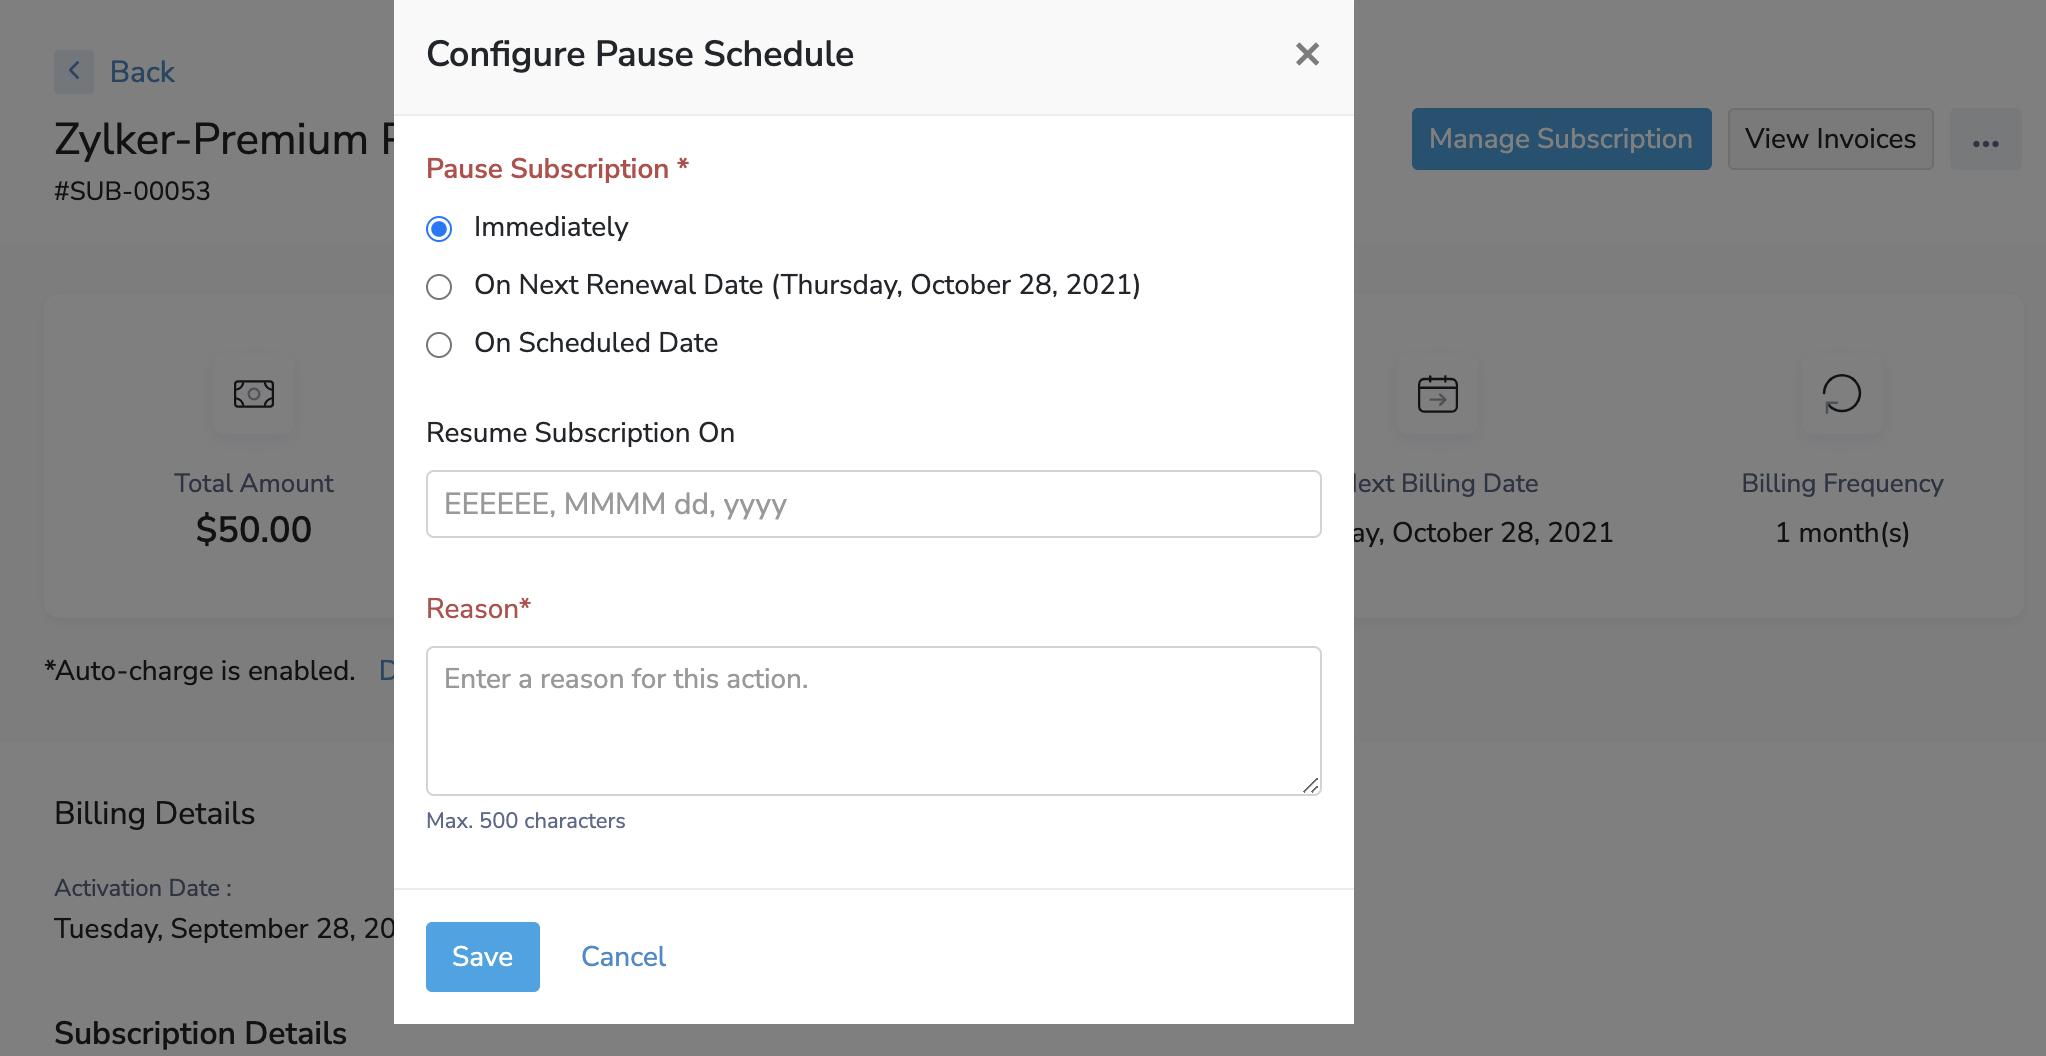
Insight: Your customers will not be able to configure a Resume schedule in this popup if you haven’t provided them with permission to resume subscriptions in Preferences.
- Click Save.
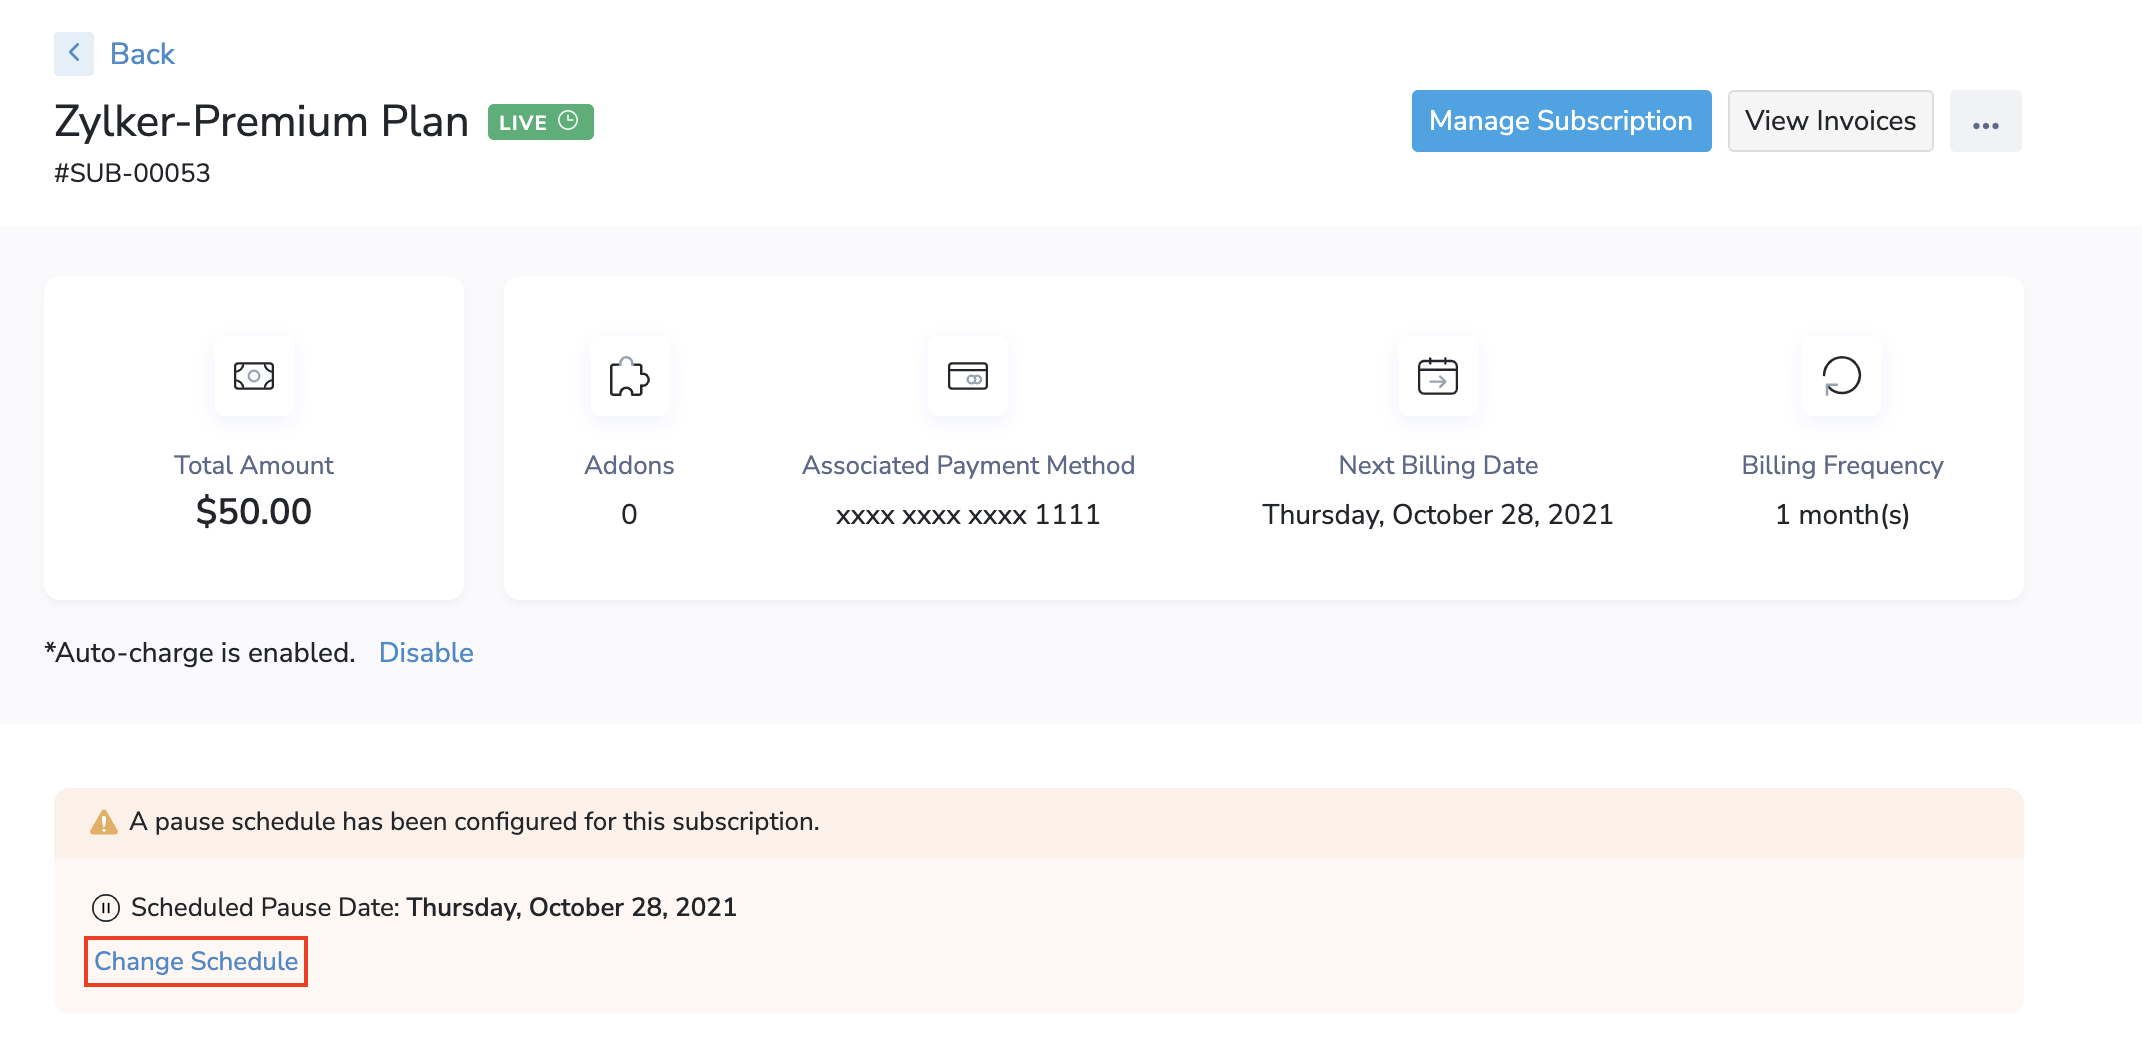
Now the Pause and Resume schedule, which your customers have configured, will be in effect. They can delete or change the configured pause and resume schedules at any time by repeating the steps above or by clicking Change Schedule from a subscription’s details screen.
Clicking Delete Schedule will remove the currently applied Pause and Resume schedules.
Cancel Subscriptions
Note: This feature is disabled by default. You can configure and enable it from Customer Portal Preferences.
Subscriptions can be cancelled either immediately, or scheduled to be cancelled at the end of the current term, from the Customer Portal. To do this, your customers should:
Go to the Subscriptions module.
Select a subscription.
Click the ellipsis (3-dot) menu in the top right corner.
Select Cancel Subscription.
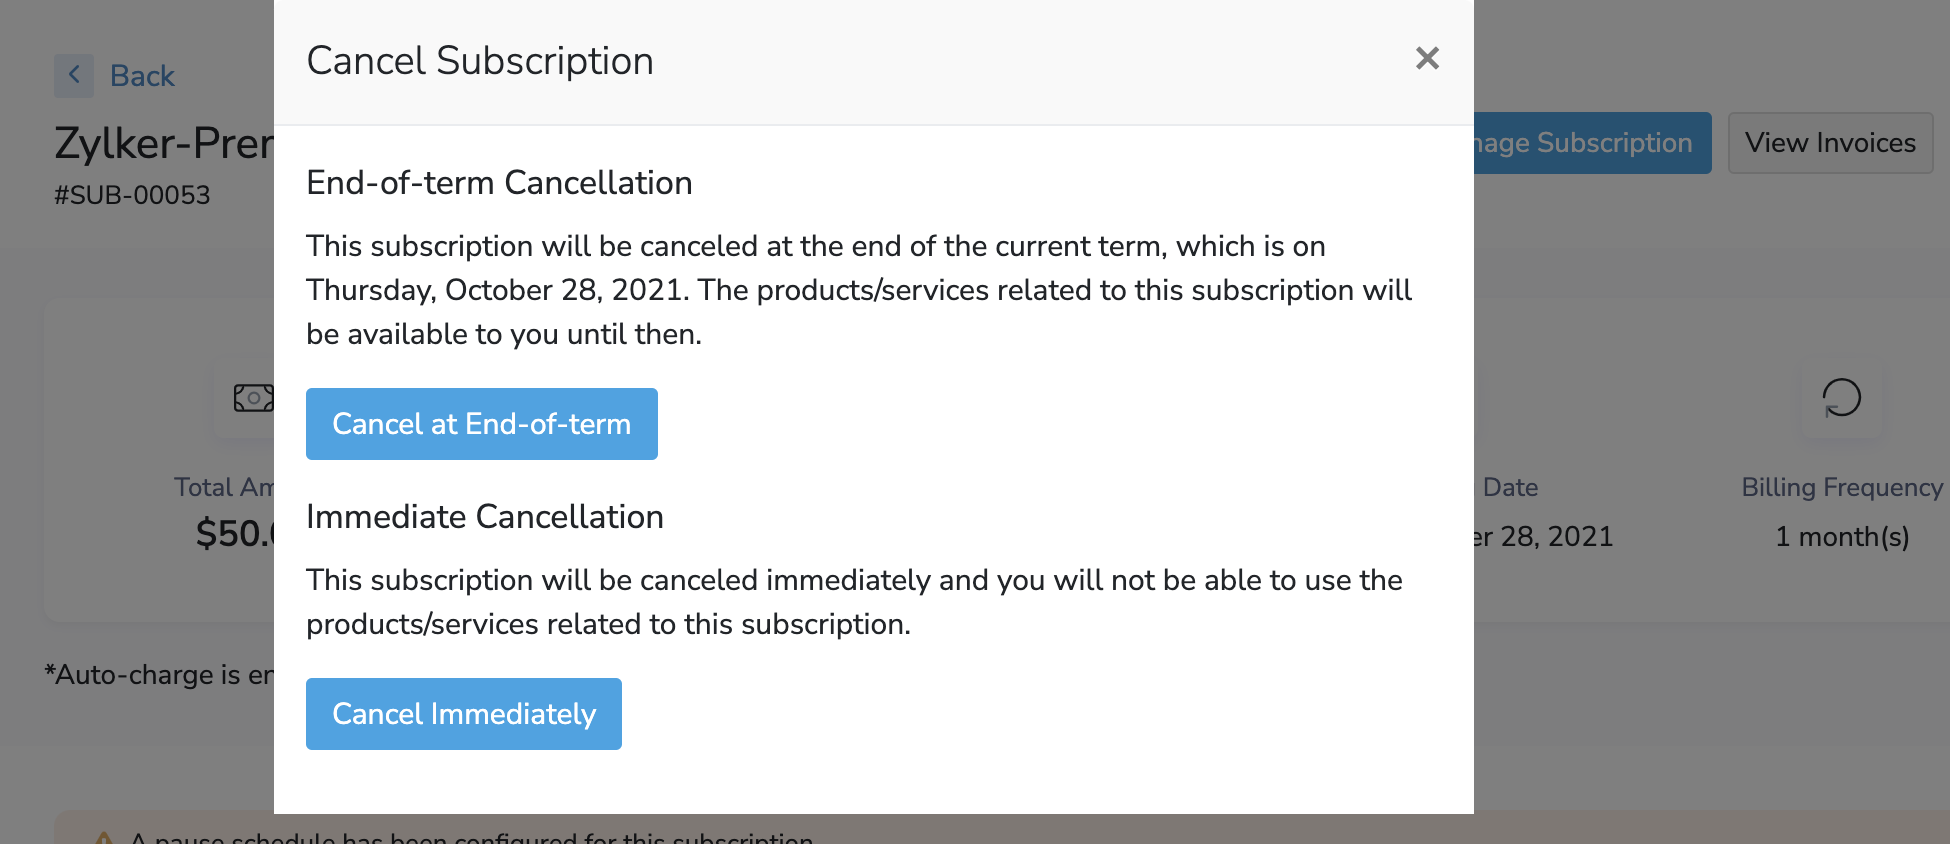
Choose when the subscription has to be cancelled.
Insight: If a subscription has been scheduled to be cancelled at the end of the current term, your customers can prevent this from happening by going to the Subscriptions module, selecting a subscription, and then clicking Remove Scheduled Cancellation.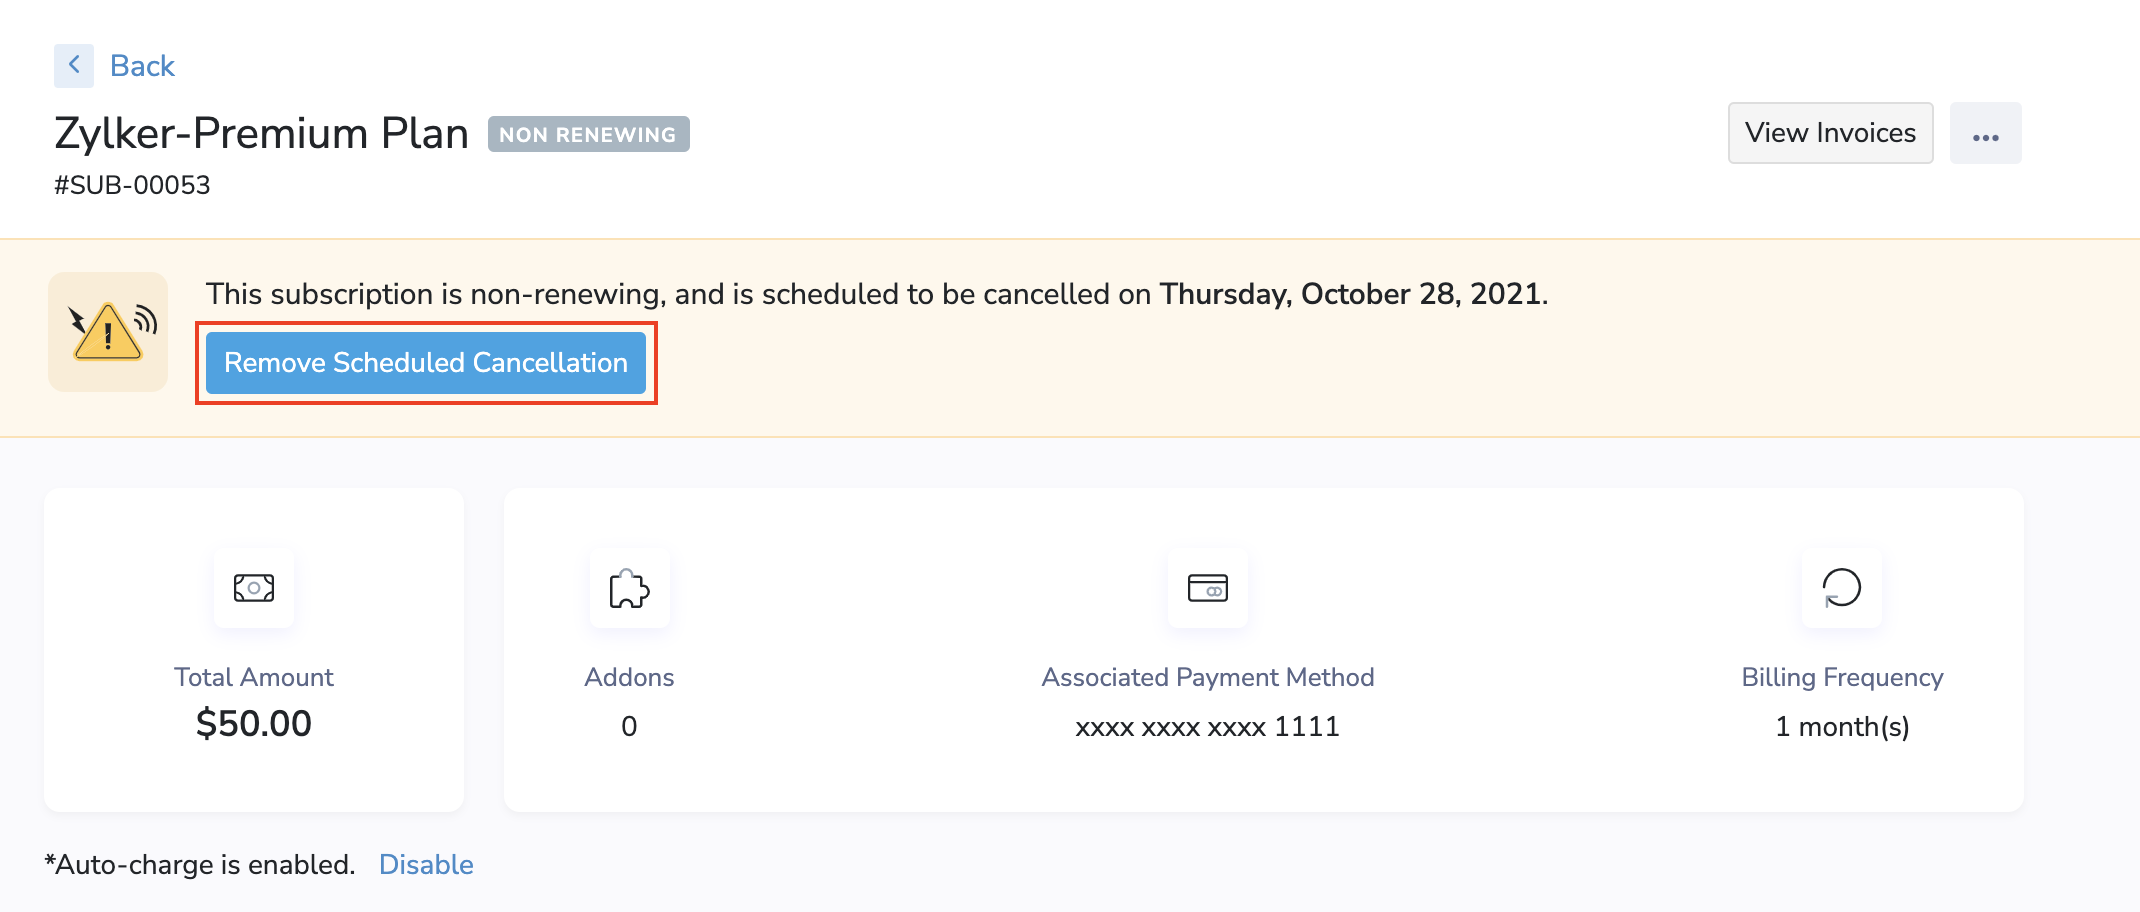
Reactivate Subscriptions
Note: This feature is disabled by default. You can configure and enable it from Customer Portal Preferences.
Your customers can reactivate subscriptions that are in the Cancelled or Expired status, from the Customer Portal. They can do this by going to the Subscriptions module, and then selecting an expired or cancelled subscription.
Now, a banner message will be visible at the top, stating that the subscription has either expired or has been cancelled.
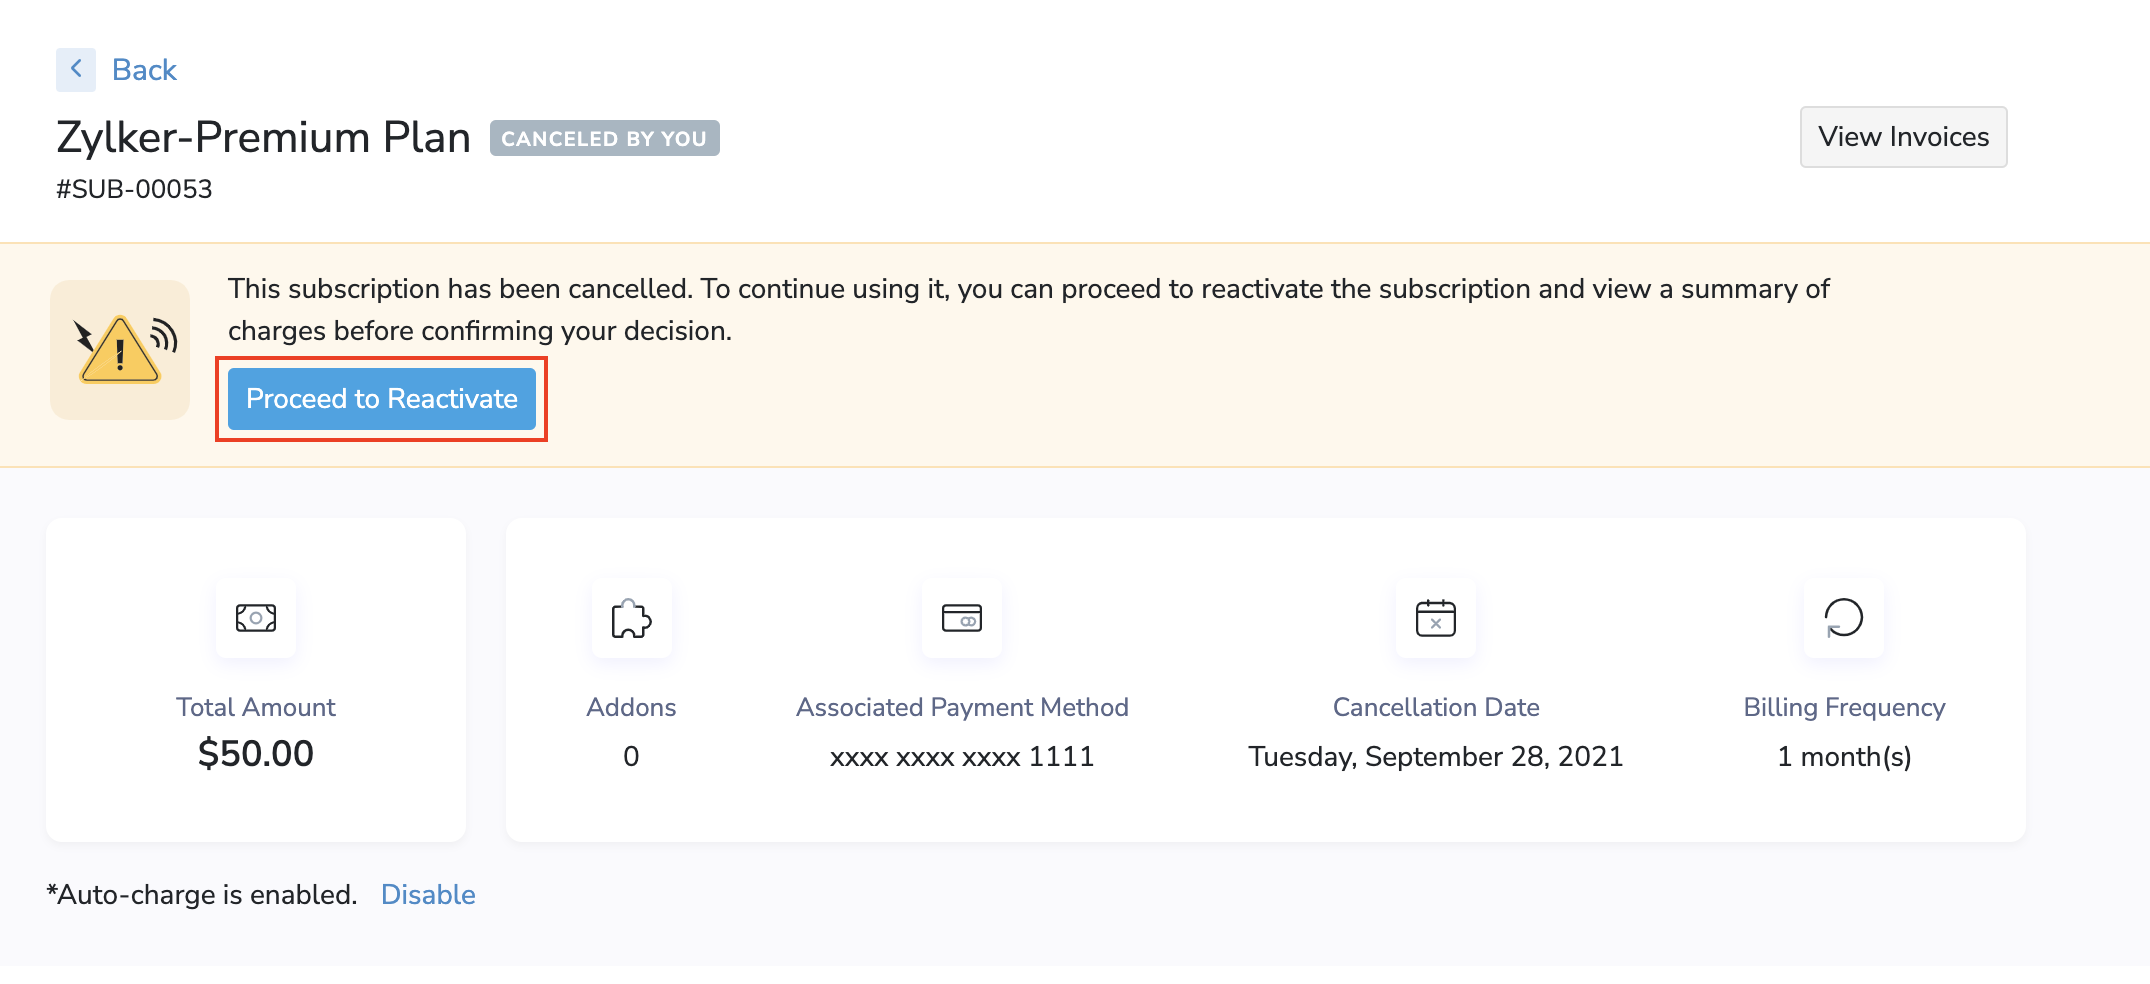
In this banner, your customers can click Proceed to Reactivate to start reactivating their subscription. A summary of the reactivation charges will be shown to your customer, along with a Reactivate Subscription button, which your customers can click to confirm the reactivation.
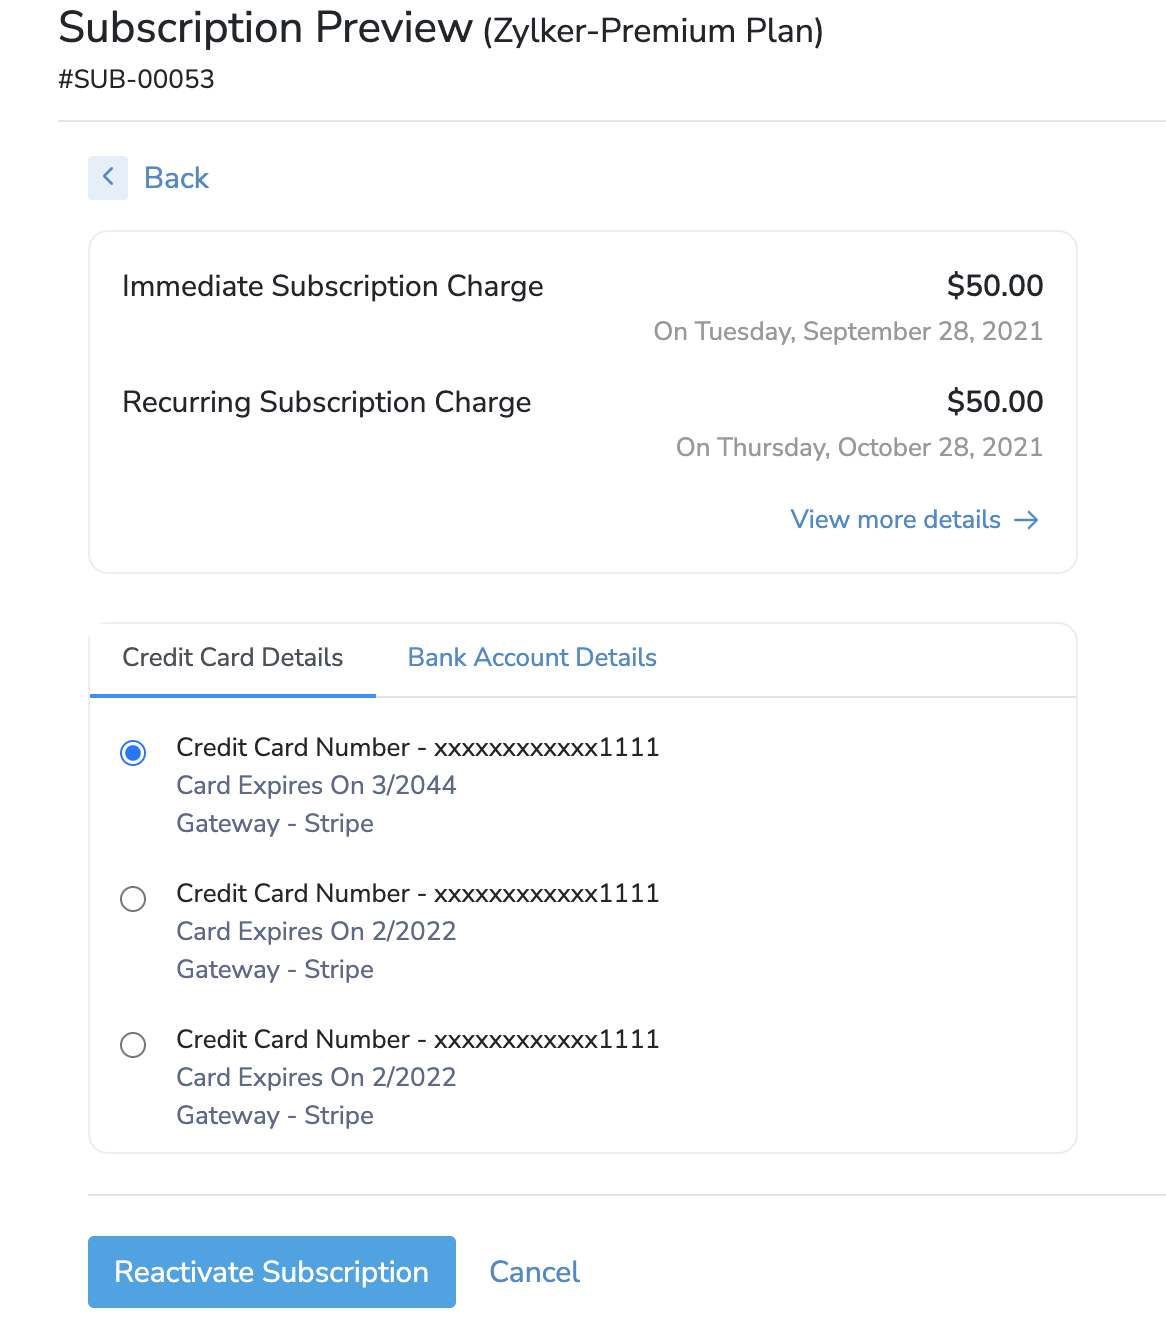
Insight: If you’ve provided your customers with the permission to edit their subscriptions from the Customer Portal, then they will be able to customize their subscription before proceeding to the final summary screen.
View & Pay Invoices
Your customers can view invoices and make payments for them from the Customer Portal.
Viewing Invoices
The Invoices module from the left sidebar displays a list of all the invoices that exist for your customer in Zoho Subscriptions.
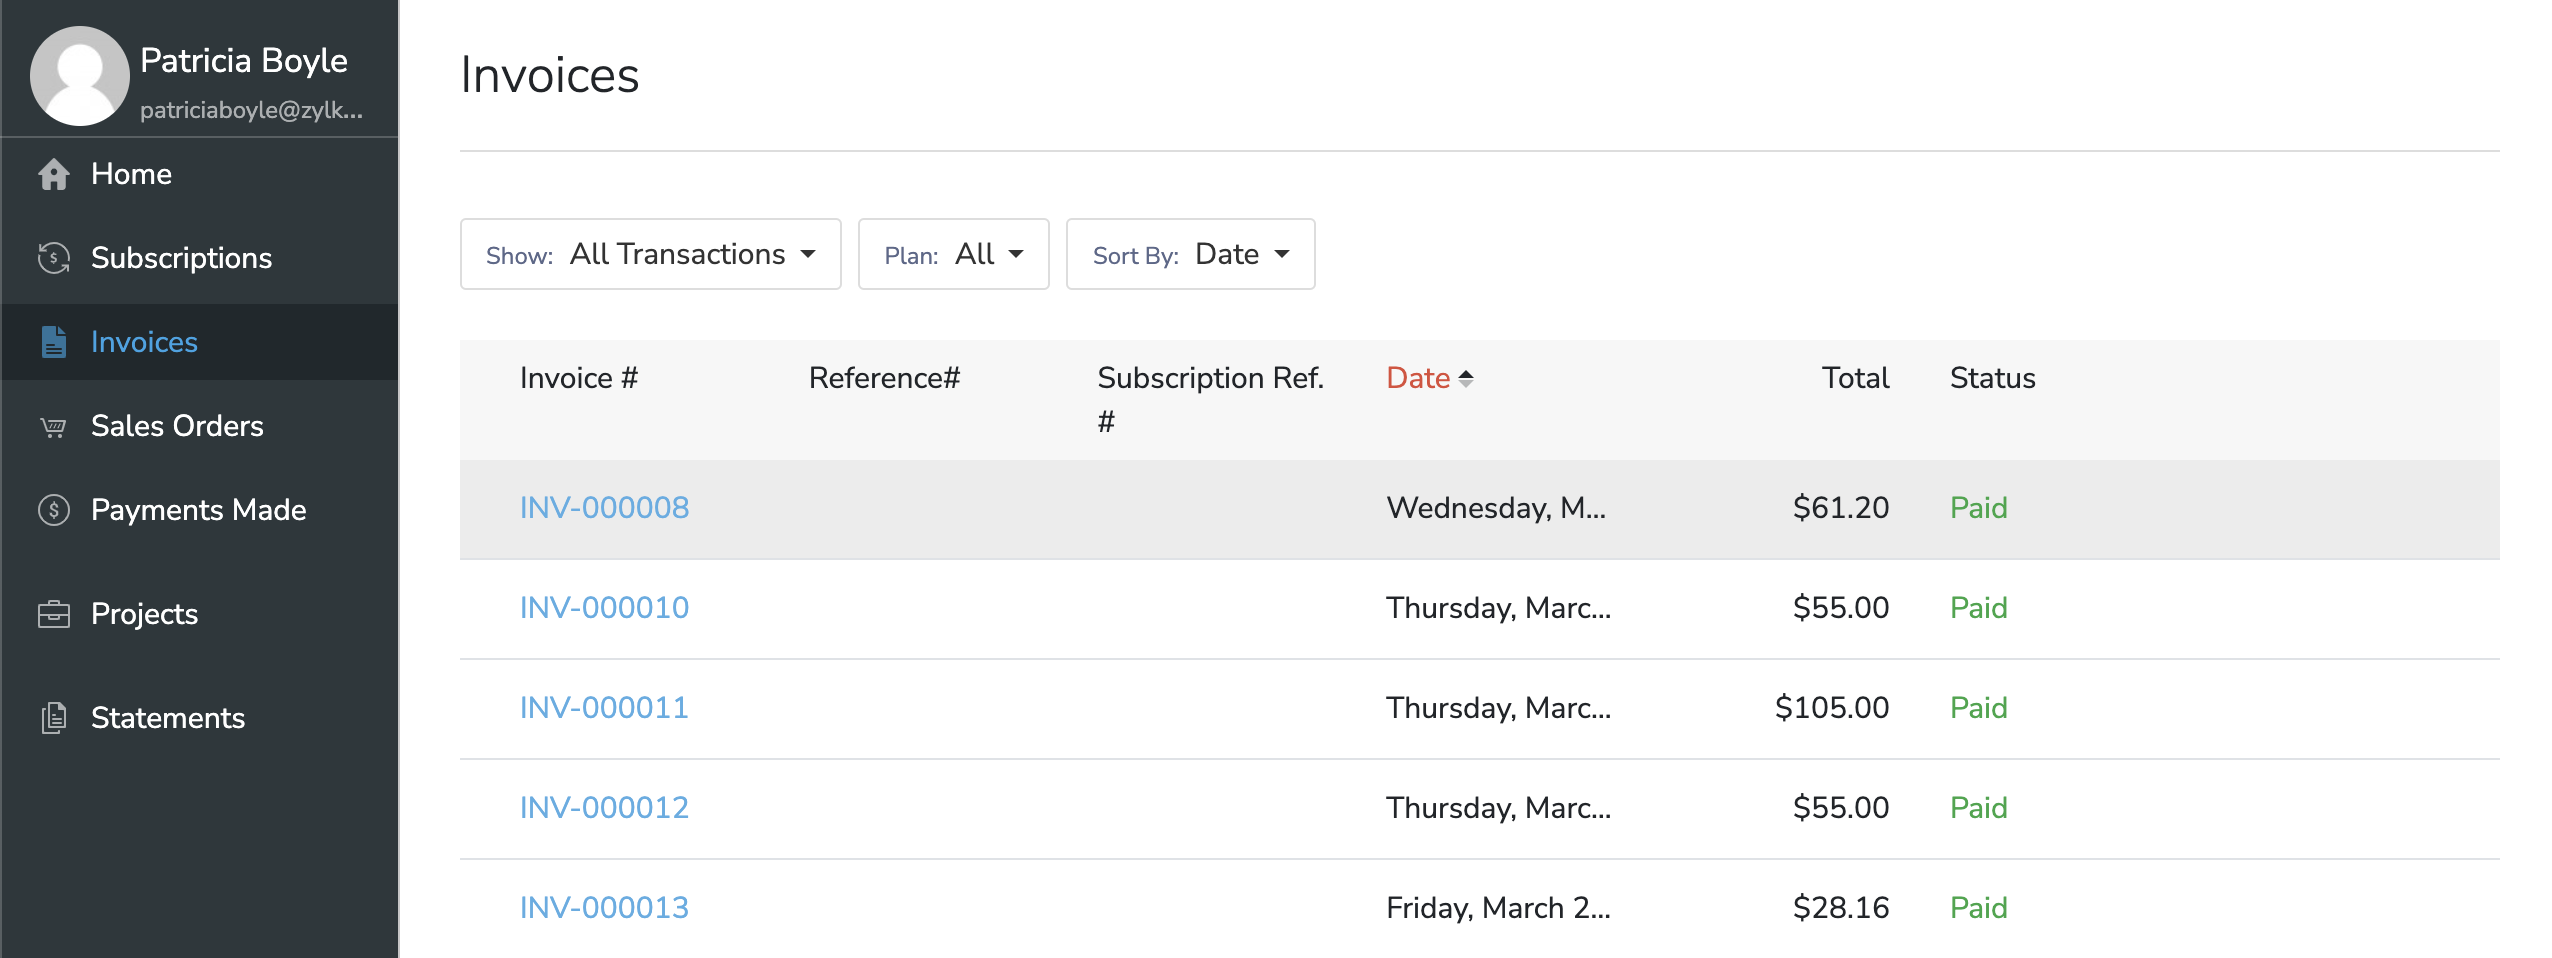
Your customer can use the filters at the top of the list to sort through their invoices quickly and find the one they’re looking for.
Clicking on any invoice from the list will show additional details of the invoice.
Pro Tip: For faster access to a particular subscription’s invoices, your customers can go to the Subscriptions module, select a subscription, and click View Invoices. This will display a list of all the invoices that have been created for that subscription.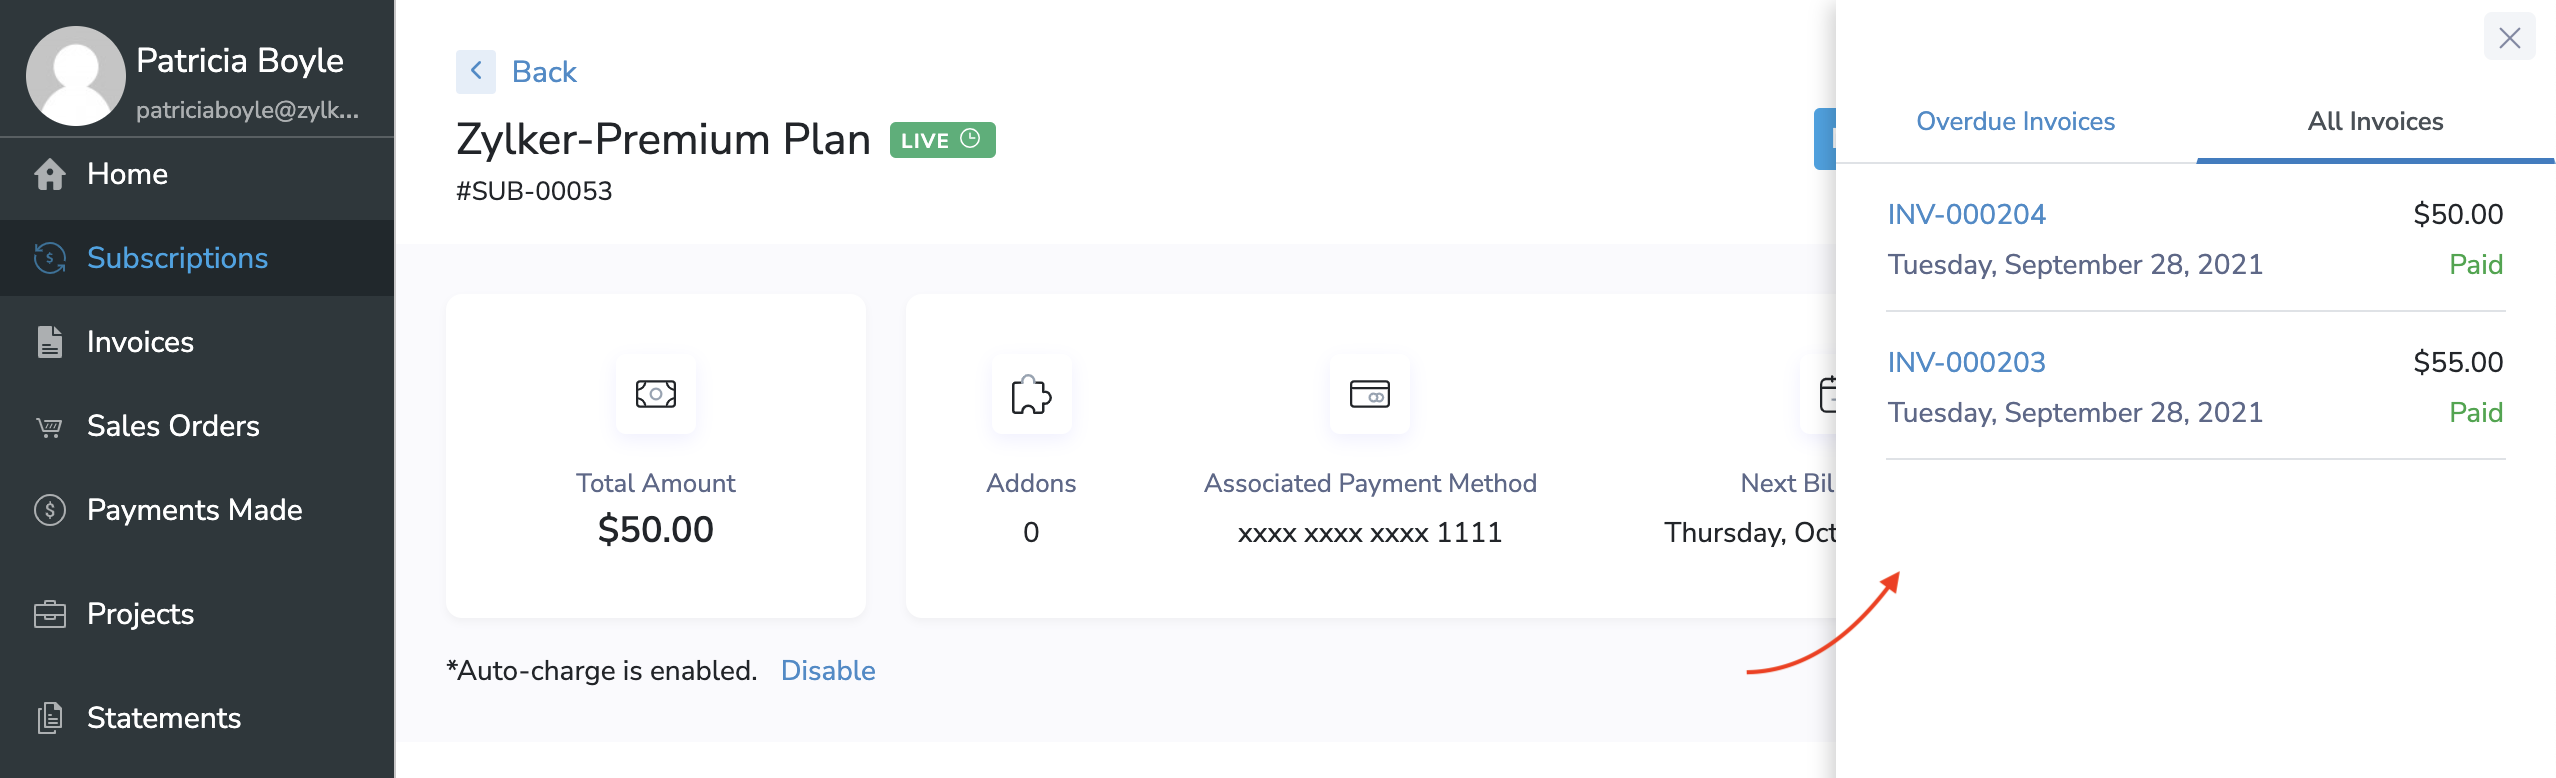
Making Invoice Payments
Your customers can proceed to make invoice payments from 3 places in the Customer Portal:
1. Subscriptions Module
Making payments from the Subscriptions module is an easy way for your customers to quickly find a particular subscription’s invoices. To do this, your customers should:
Go to the Subscriptions module.
Select a subscription and click View Invoices.
Click the Pay Now link present near unpaid invoices.

2. Invoices Module
The Invoices module lets your customers initiate invoice payments either from the list view or from an invoice’s details screen. Your customers should:
Go to the Invoices module from the left sidebar.
Click Pay Now next to an unpaid invoice. Your customers can also click on a particular invoice from the list to open its details screen. Here, your customers can click Make Payment.
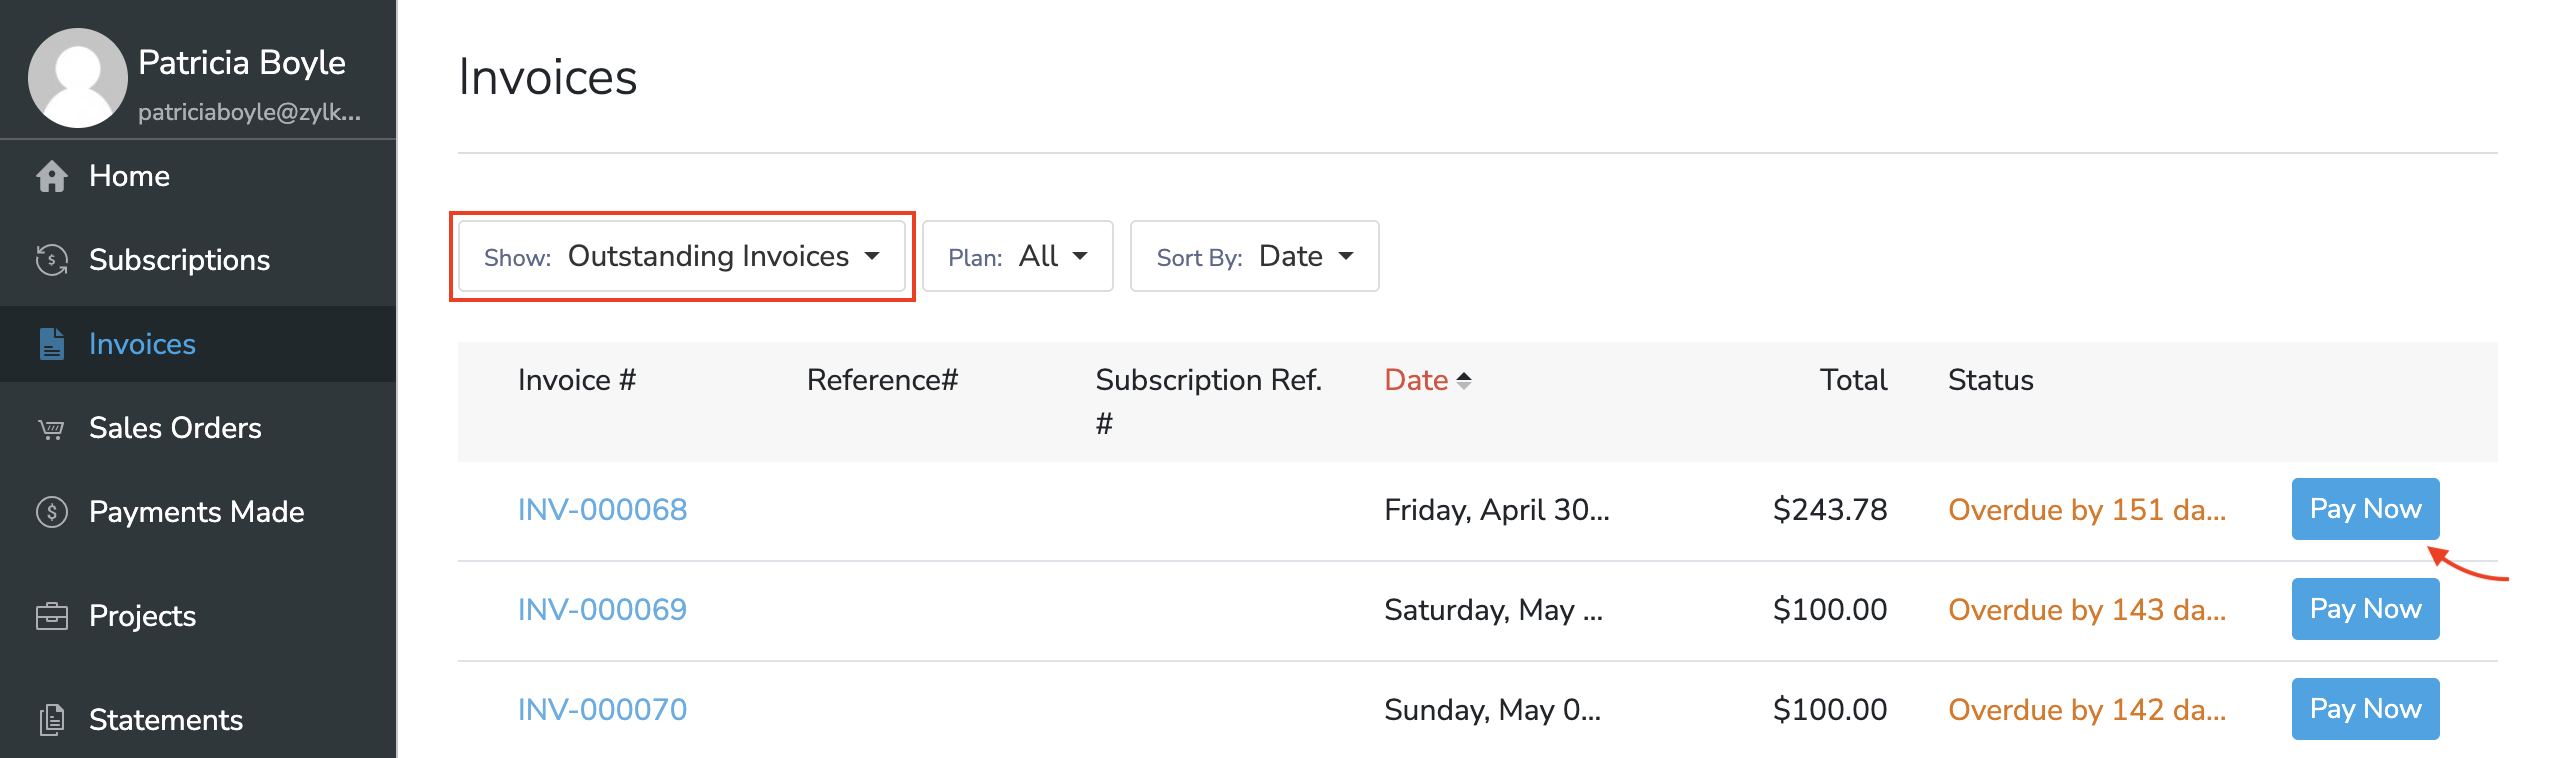
Pro Tip: The Outstanding Invoices filter at the top of the list can make it easy for your customers to view all of their unpaid invoices quickly.
3. Home Dashboard
If your customers have multiple unpaid invoices, they can pay the total outstanding amount for all of these invoices in one go. To do this, they must:
Go to the Home dashboard.
Click Pay Now in the Outstanding Invoices section.

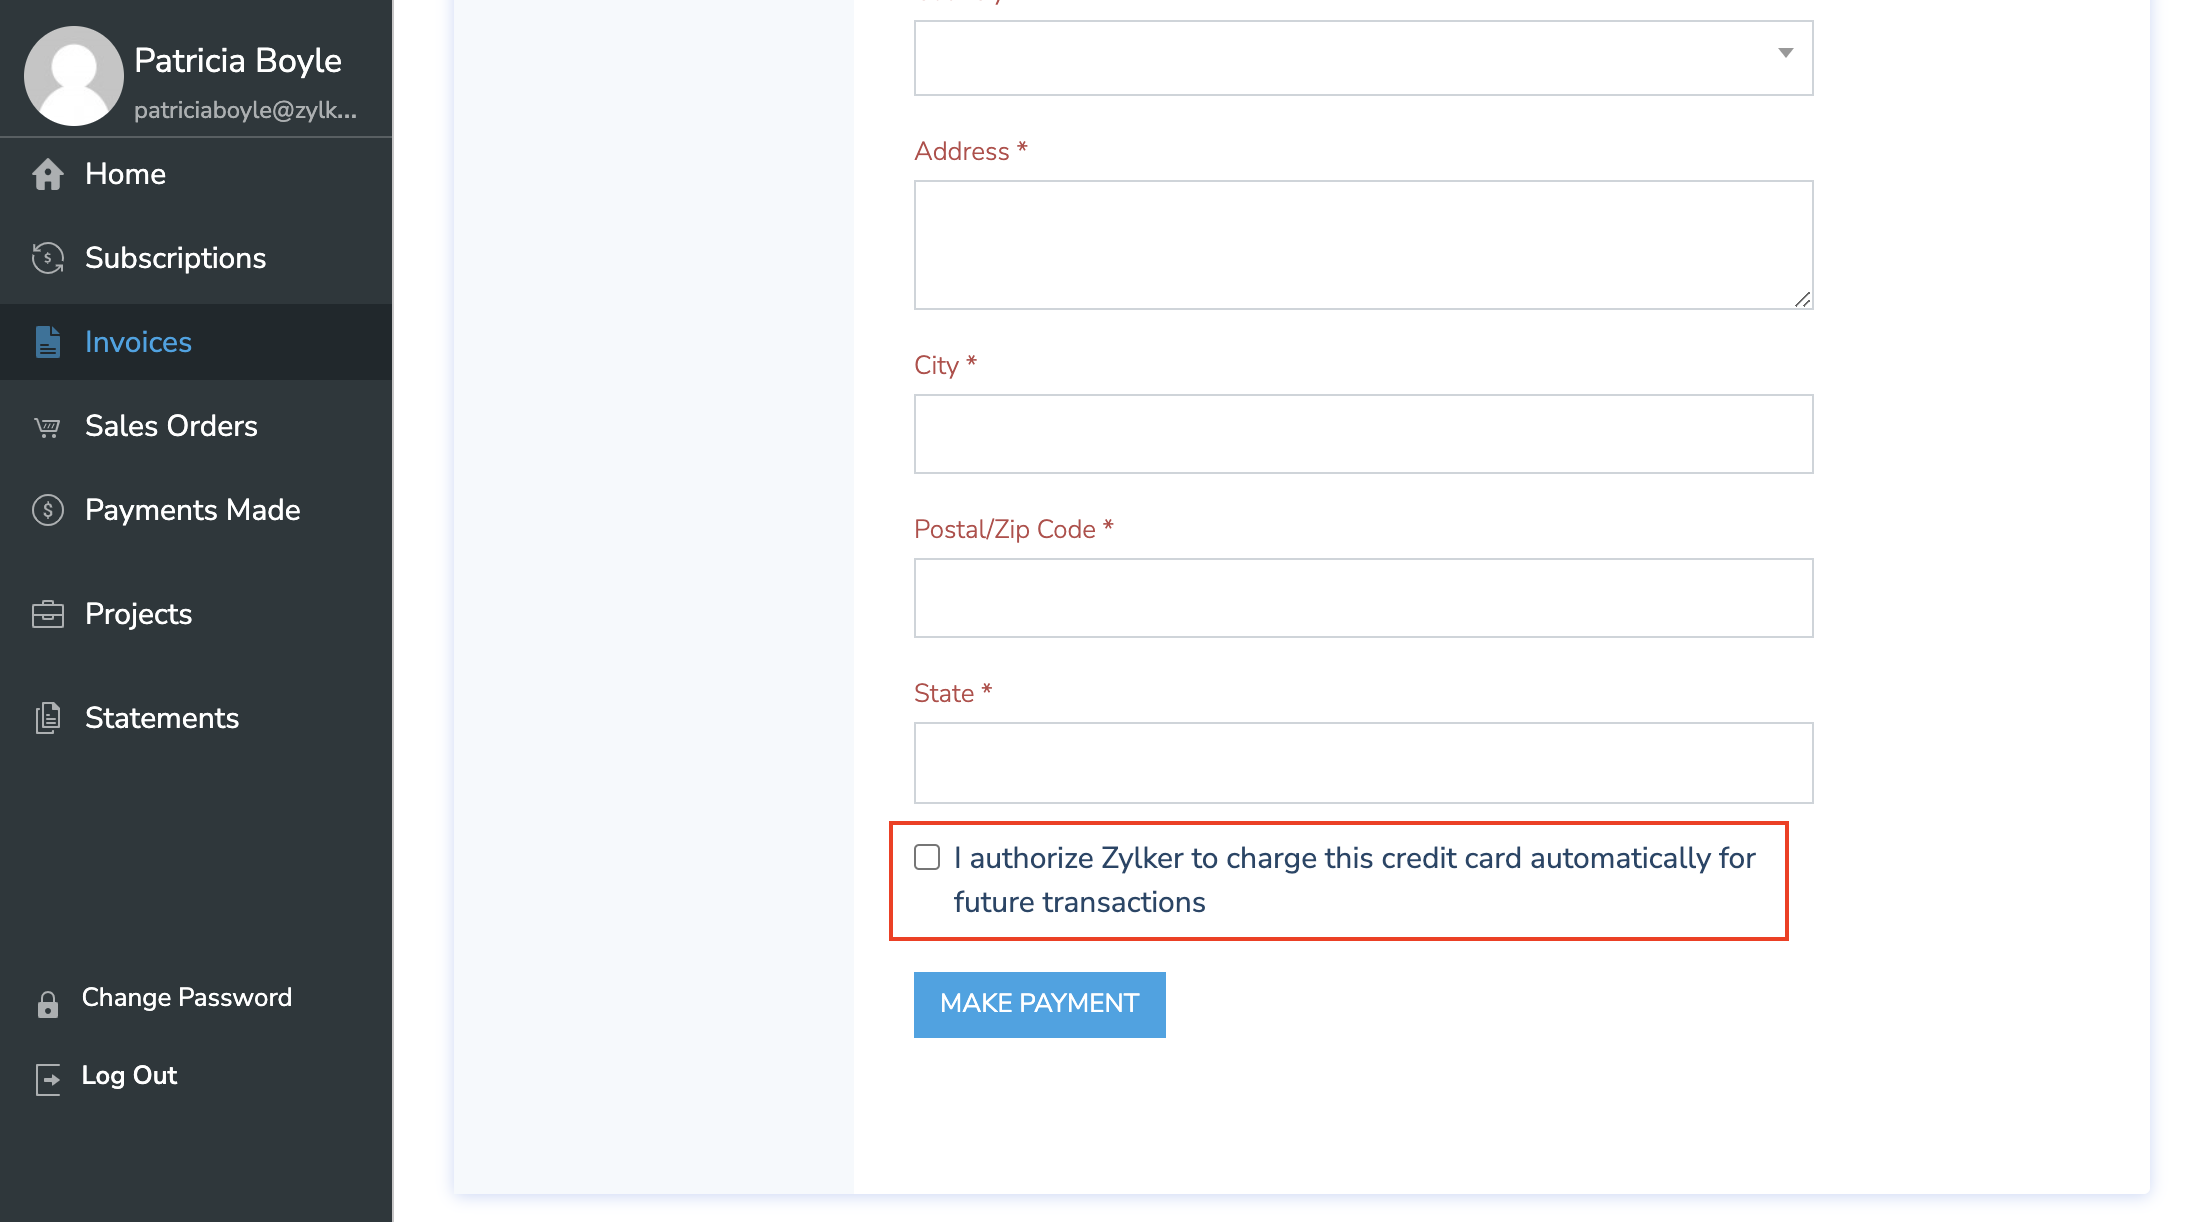
No matter which of these 3 ways your customers choose to make payments, the process will be the same. After clicking the Pay Now button, your customers will be able to select their payment method of choice. If they already have a payment method associated with them, they can select it and click Make Payment to complete the payment with a single click.
Insight: The payment methods available for your customers will depend on the payment gateways that you’ve configured in Zoho Subscriptions.
They can also add new payment information, such as card details to complete the payment. When adding new payment information, your customers will have the option to allow that payment method to be used for future transactions. If enabled, this payment method will be the associated payment method for that subscription, and will be used for Auto-charge in the future.
Once your customers have completed their payment, you will be notified about it and the status of the invoice will turn to Paid.
Track Payments Made
The Payments Made module from the left side bar displays a list of all the invoice payments that your customers have made. Your customers can use the view filters at the top of the list to sort through invoices.
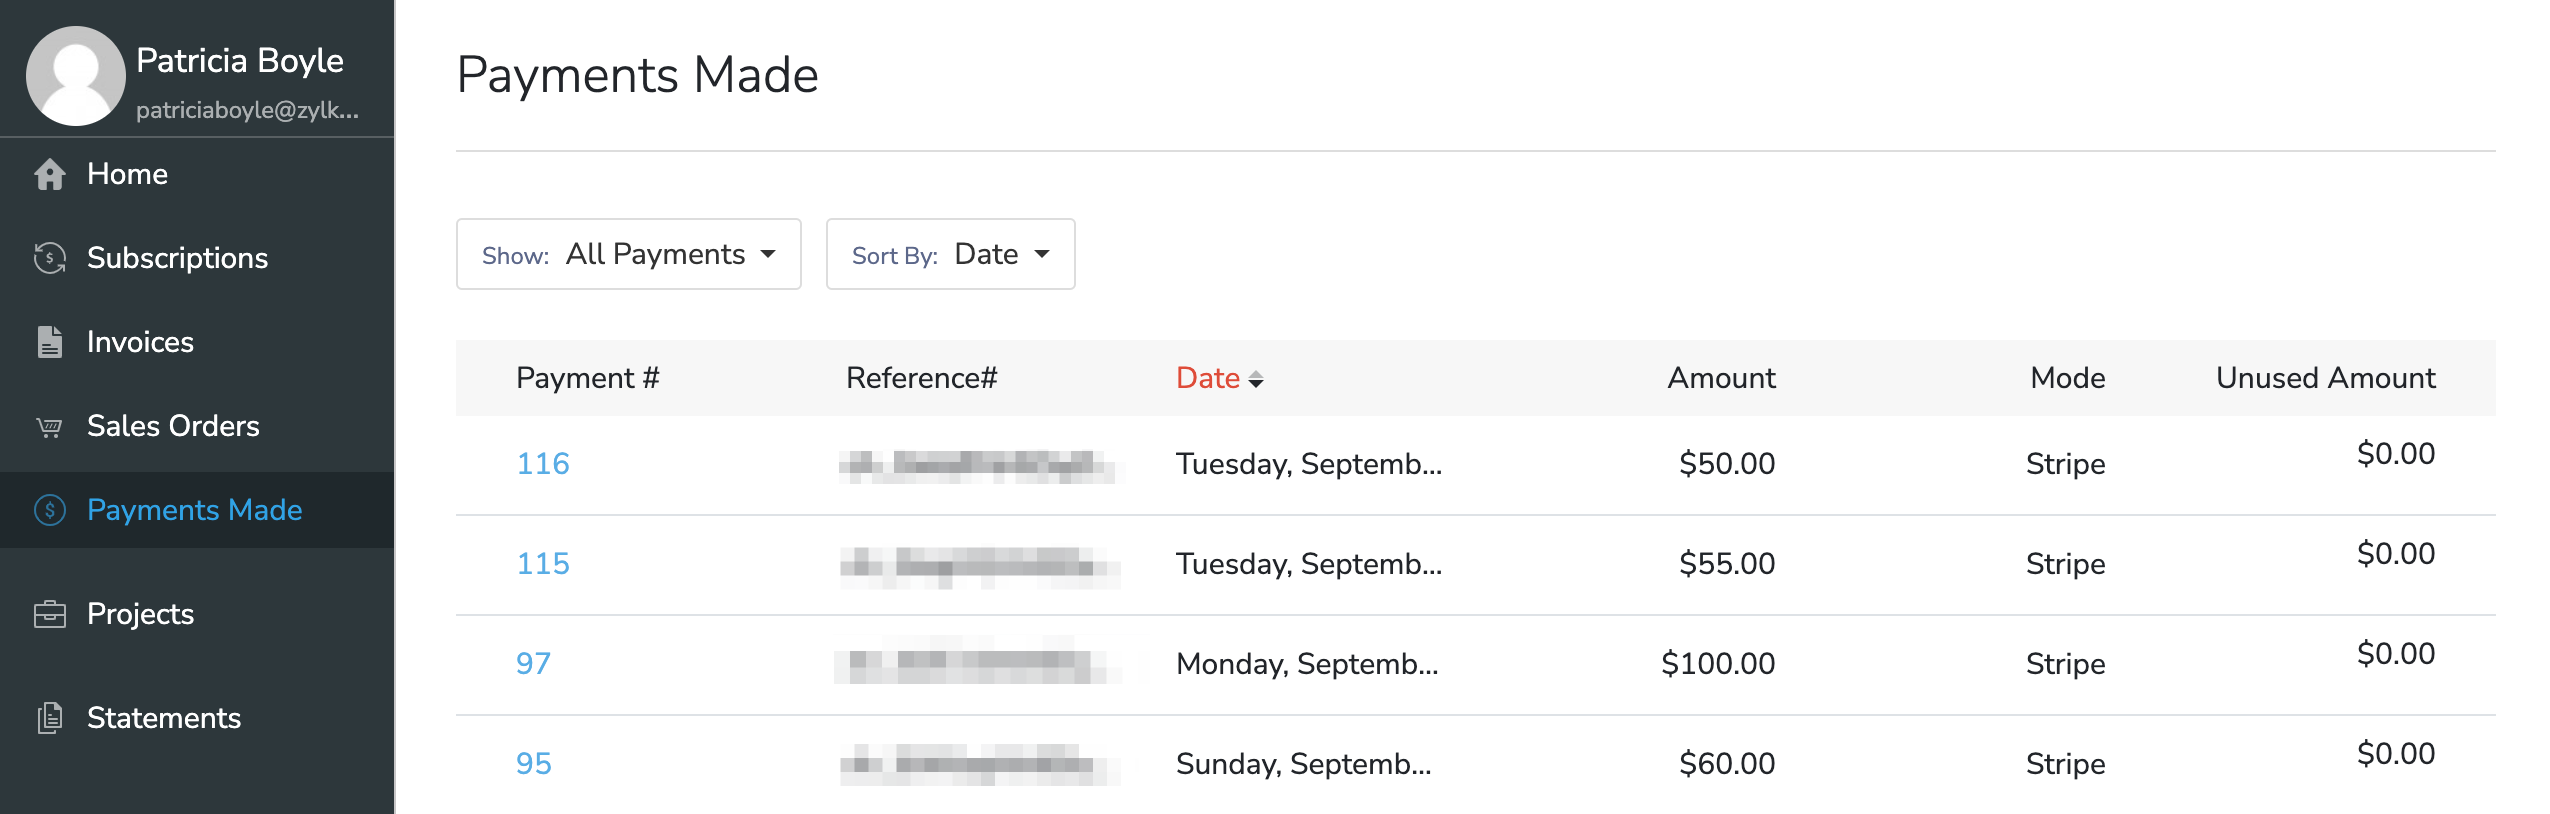
Clicking any payment in the list will display the payment’s receipt. Your customers can download or print this receipt for their reference.
Generate Statement of Accounts
The statement of accounts is a document that lists out all the transactions that have taken place between you and your customer over a particular period. It lets your customer know the total amount that they owe you for the sales that took place during that period.
To generate a statement of accounts from the Customer Portal, your customers should:
- Go to the Statements module from the left sidebar.
- Select the Date Range in the top-left corner.
- Click Go to generate the statement.
Now, the statement will be generated based on the date range that was selected.
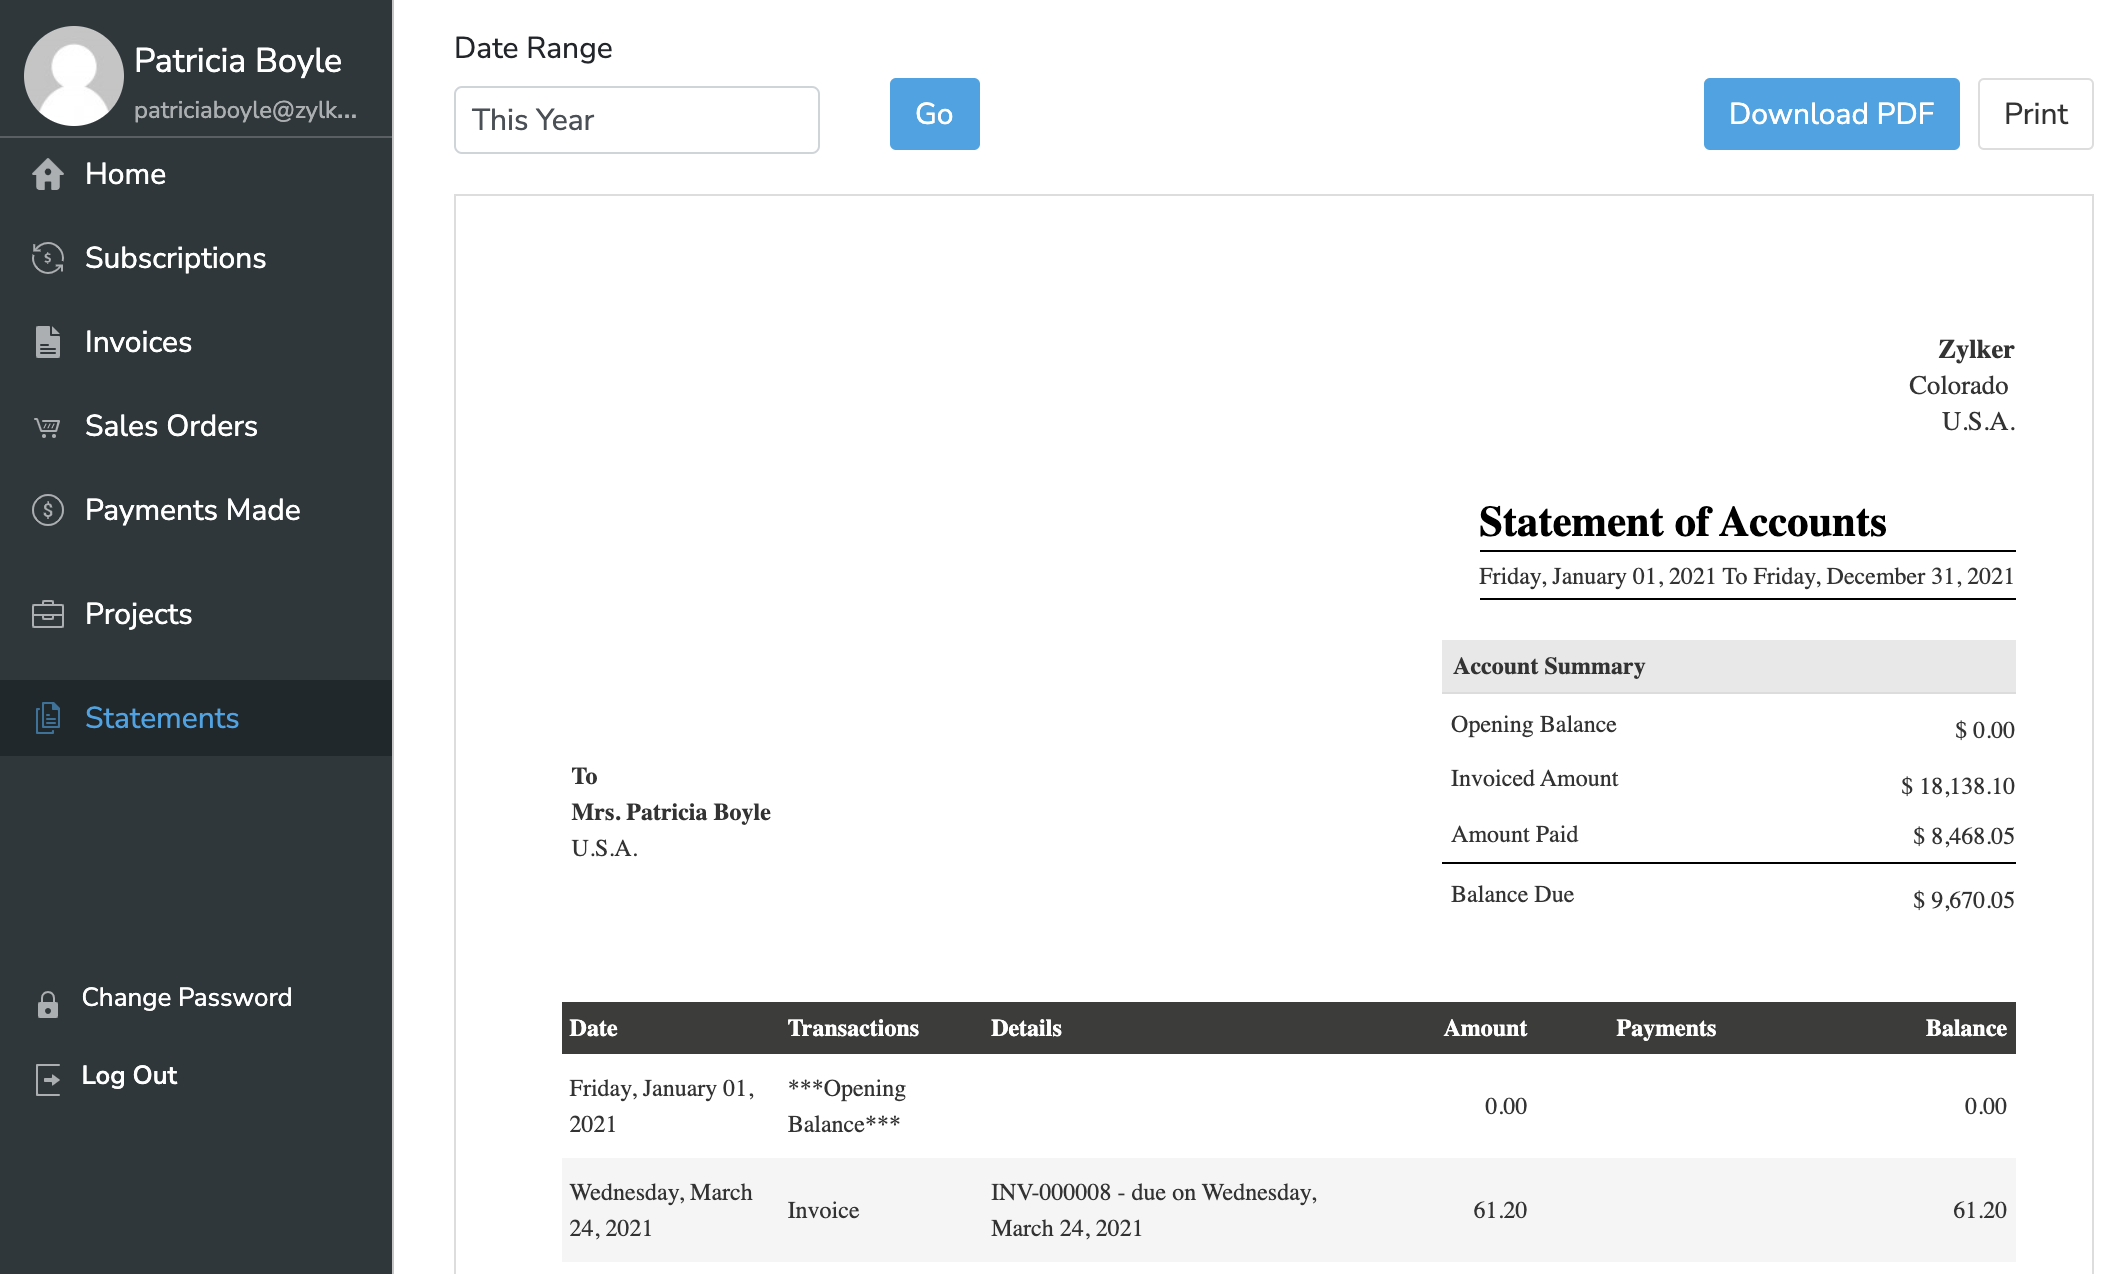
Your customers can also download or print the statement for their reference.
Forward Documents
Note: This feature is enabled by default. However, you can disable it if necessary from Customer Portal Preferences.
Your customers can share invoices with their contact persons via the Customer Portal. If you’ve integrated with Zoho Books, this option will be available for estimates as well.
To forwards documents, your customers should:
Go to the Invoices module from the left sidebar.
Select an invoice.
Click Forward.
Insight: Only the Primary Contact of a customer will be able to forward documents from the Customer Portal.
Select the contact persons with whom you want to share the invoice.
Edit the subject and body of the email if required.
Click Send.
Now an email, which contains an attachment of the invoice PDF, will be sent to your contact persons.
Integration-specific Functions
If you’ve integrated with Zoho Books, the following modules will be available additionally in the left sidebar of the Customer Portal.
Estimates
The estimates that you’ve created for your customers in Zoho Books will be displayed here. Your customer can use the Estimates module to Accept/Decline estimates. They can also add comments on the estimates, which you can view and reply to from Zoho Books.
Projects
The Projects module displays a list of all the active projects of your customers.
Clicking on a project from the list will display the following additional details:
- Tasks: All the billable tasks you have created for the project will be listed here along with its corresponding Logged Hours, Billed Hours, and Unbilled Hours.
- Time Entries: All the billable timesheet entries that you have recorded for the project will be listed here along with the Logged Hours and the billing status.
- Comments: Customers can use this space to collaborate with you regarding this project. The comments added here will be displayed in the Comments section of the project in your Zoho Books organization.
Timesheet
The timesheets that you’ve created for your customer in Zoho Books will be displayed here. If you’ve enabled Client Approval for timesheets in Zoho Books, then your customer will be able to Approve/Disapprove time entries from the Customer Portal. They can also add comments on the time entries, which you can view and reply to from Zoho Books.
View & Update Payment Information
Your customers can view and update their existing payment information from the Customer Portal. To do this, they should:
- Go to the Home dashboard.
- Click View More near the My Details section.
- Click the edit (Pencil) icon next to the payment information that they want to update.
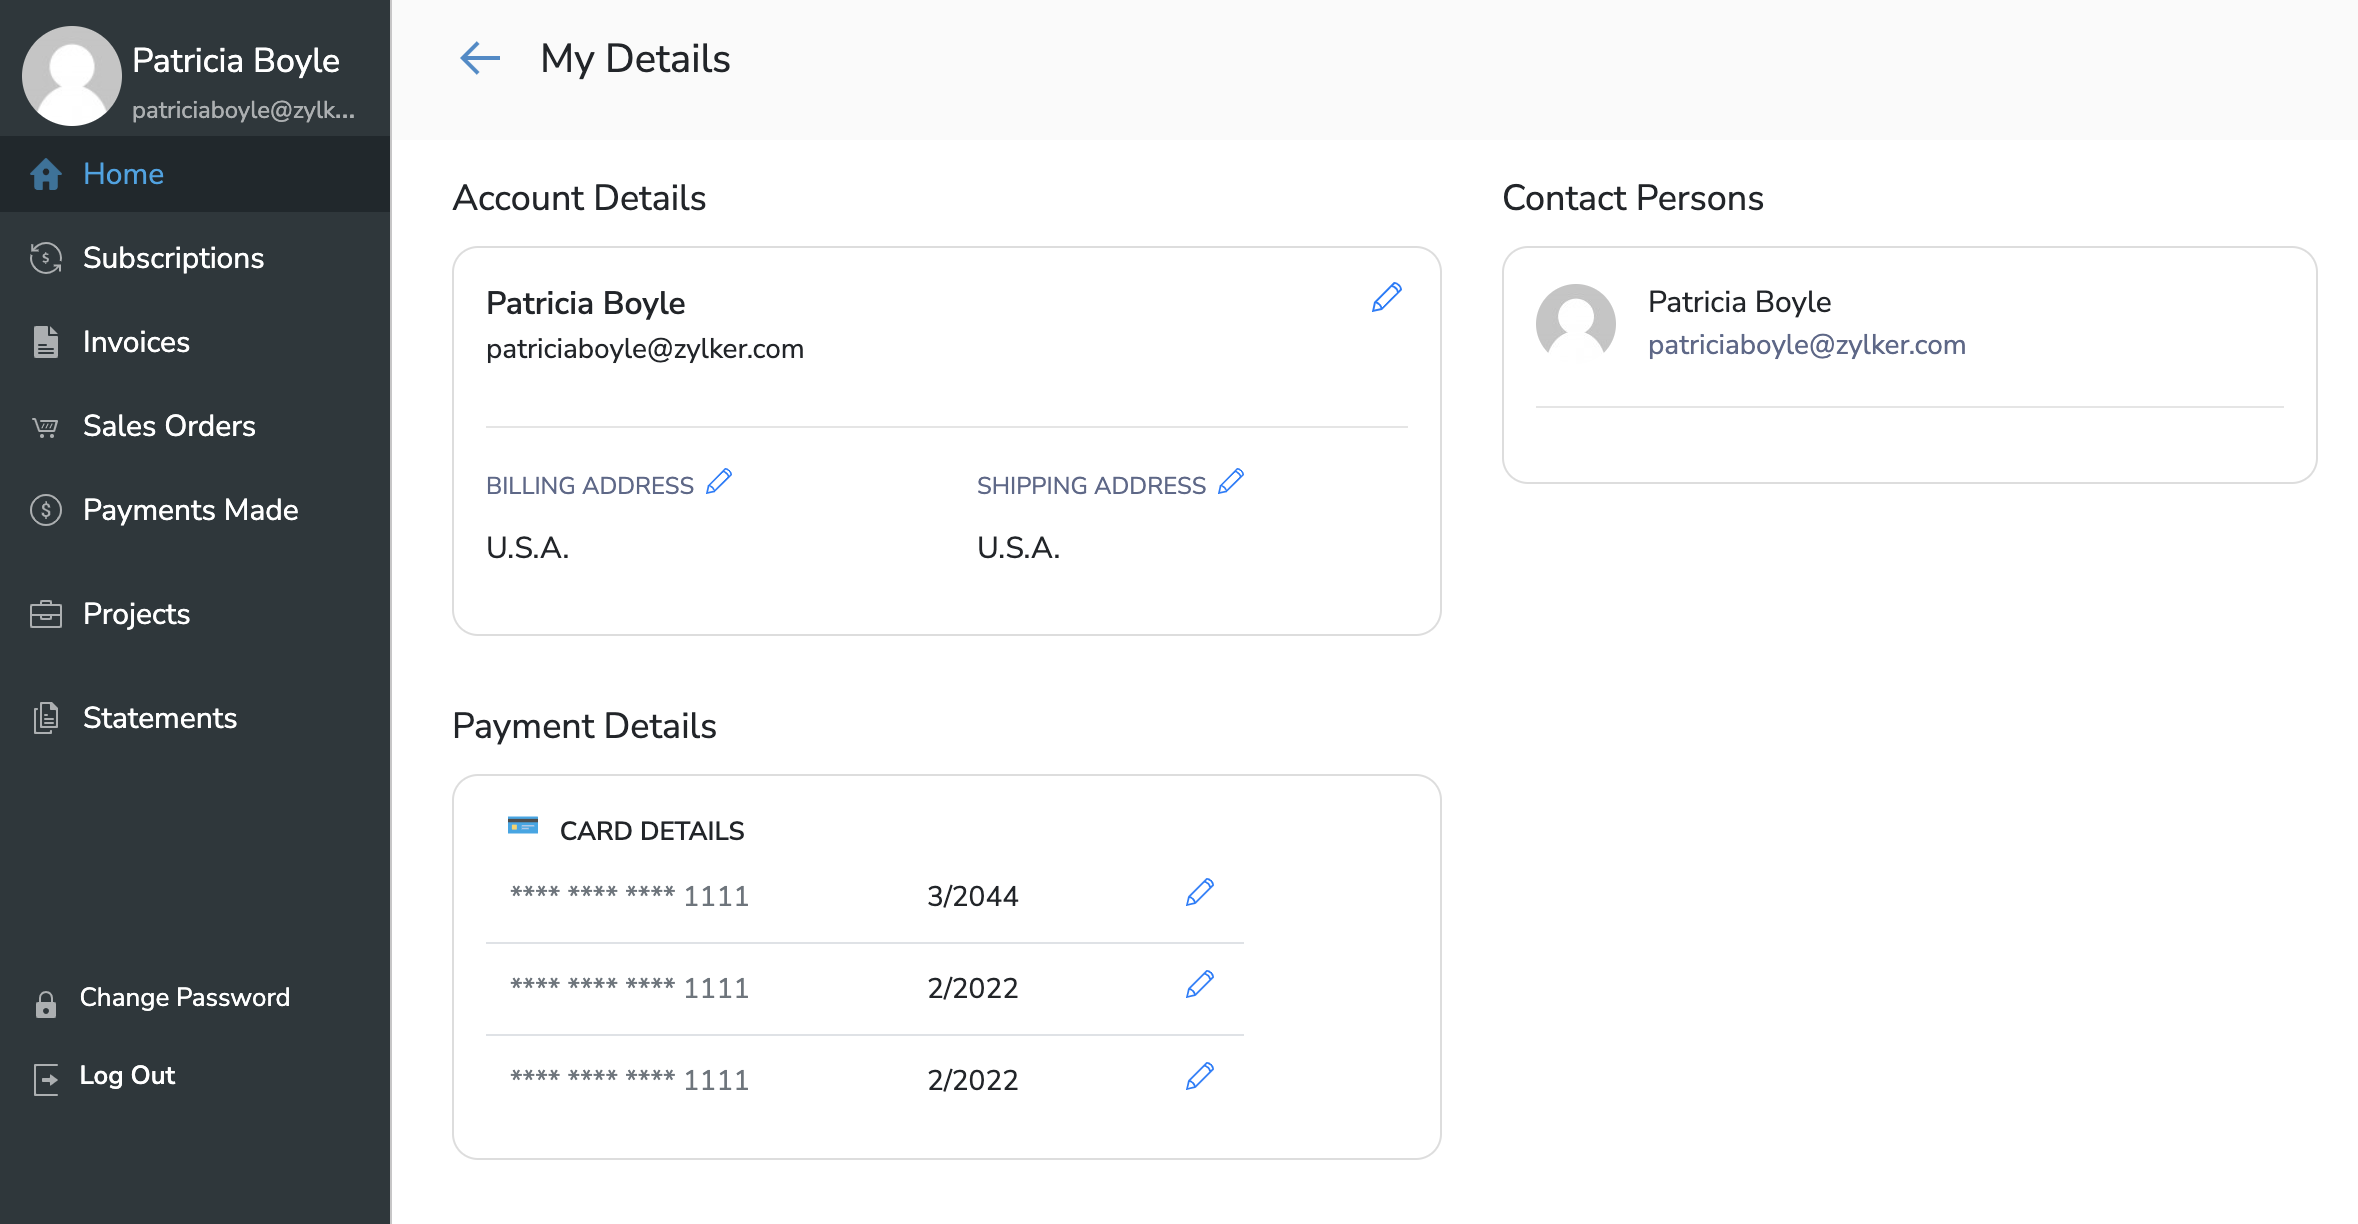
- Enter the details of the new payment method.
- Click Save.
If the old payment method was associated with any subscriptions for Auto-charge, now the updated payment method will be used instead.
View & Update Customer Details
Note: This feature is enabled by default. However, you can disable it if necessary from Customer Portal Preferences.
Your customers can update some of their basic contact information that’s stored in Zoho Subscriptions. To do this, they should:
Go to the Home dashboard.
Click View More near the My Details section.
Click the edit (Pencil) icon that’s next to either the Customer Details, Billing Address or Shipping Address section.
Insight: If you’ve enabled the Show in portal option for any Customer custom fields, those fields will be available to view and update from here as well.
Update the necessary details.
Click Save.
Other Actions
There are a few other actions that your customers can perform from the Customer Portal.
Send Emails
Your customers can send emails to you directly from the Customer Portal. To do this, they should:
- Go to the Home dashboard.
- Click Send Email at the bottom of the dashboard.
- Enter a Subject and Message.
- Click Send.
Now, the email will be sent to your organization’s Primary Contact.
Share Reviews
Note: This option is enabled by default. However, you can disable it if necessary from Customer Portal Preferences.
Your customers can review your business from the Customer Portal, which can give you an idea of what customers think of your business, as well as a space to hear constructive criticism and improve customer relations.
Insight: The reviews that your customers share from the Customer Portal are not public, and can be viewed only by the users in your Zoho Subscriptions organization.
To write reviews, your customers should:
- Go to the Home dashboard.
- Click Review at the bottom of the dashboard.
- Select 1-5 stars and write a Comment.
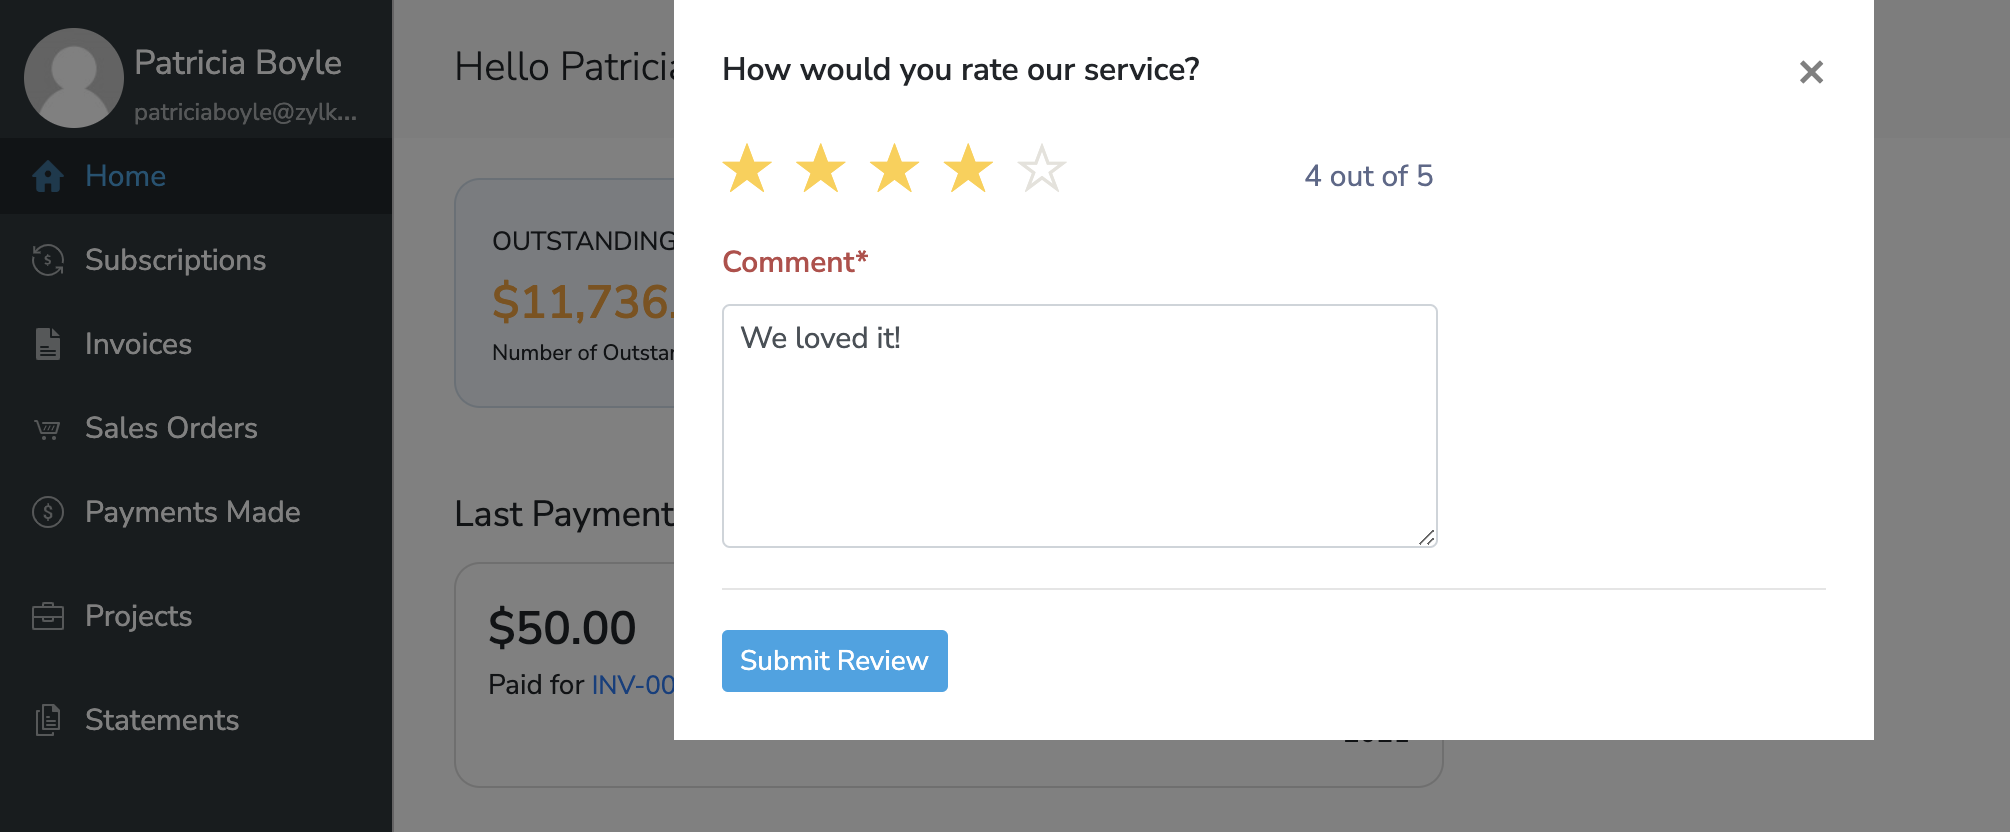
- Click Submit Review.
Now, you will receive a notification in Zoho Subscriptions about the review, which can be clicked to view it. You can also view all of a customer’s reviews from the Overview screen in the Customers module of Zoho Subscriptions.
Pro Tip: You can request reviews from your customers by clicking Request Review from a customers' Overview screen in the Customers module of Zoho Subscriptions.
Change Password
To change the password used for the Customer Portal, your customers should:
- Click Change Password in the left sidebar.
- Enter their existing and new passwords.
- Click Confirm.
Now, your customers can use the new password to log in to the Customer Portal.
 Yes No
 Thank you for your feedback!