Automation
Automation allows you to create a set of rules for modules of Zoho Invoice based on which appropriate actions would be performed. A good example would be the case where a congratulatory e-mail is sent automatically to the team members when an estimate for goods worth over $1000 gets accepted by a client. In the next few steps, you will be learning about:
- Creating and describing a Workflow.
- Deciding on when to execute a workflow.
- Setting the conditions for executing a workflow.
- Associating actions such as email alerts, field updates and webhooks with a workflow.
- Connecting to an external web service provider using Webhooks.
To get started with workflows:
- Click the
 in the top-right corner and select Automation.
IN THIS PAGE…
Workflow Scenarios
Workflows can come in handy if you wish to get things done automatically in Zoho Invoice. Following are some of the scenarios where workflows come into play.
- Scenarios for Email Alerts
- Scenarios for Field Updates
- Scenarios for Webhooks
- Scenarios for Custom Functions
- Scenarios for In-App Notifications
Scenarios for Email Alerts
Scenario 1:
Dillion Inc. is a garment export company. The VP of sales wants to receive email alerts when an employee raises a estimate for an amount greater than $10,000 for one of their top customers. This will help them offer their best services. In that case, a workflow can be designed to automatically trigger email alerts when the following conditions are met.
Execute When: Created Rule Criteria: Total amount due is greater than $10,000. Immediate Action: Email alert to the VP of the Sales/ Finance team. Time Based Action: —
Scenario 2:
Joseph, the CTO of Bookworm.com, an online bookstore wants to implement a system wherein an alert message should be triggered to the packing section, upon raising an invoice for an order placed by the customer. The Email Alerts feature allows him to accomplish this by creating a workflow rule with the following parameters.
Execute When: Created or Edited Rule Criteria: Contact Name is XYZ Immediate Action: — Time Based Action: Email alert to the packing section upon raising an invoice.
Scenarios for Field Updates
Scenario 1:
Andrew is the Head of Marketing of SolarSync, a solar panel manufacturing company. According to his newly issued directive, the sales person should be changed to “XYZ” as soon as the sales person “ABC” has landed the sale i.e when an invoice for a total amount greater than $10,000 has been created or edited. A workflow automates the process of re-assigning the task to another person by setting up the following parameters to execute the directive.
Execute When: Created or Edited Rule Criteria: When Sales Person is “ABC” and Total Amount is greater than $10,000. Immediate Action: Update Sales person field to “XYZ” Time Based Action: —
Scenario 2:
Andy is the owner of Phoenix Rent-a-Car, a car rental company in Chicago. One of his regular customers has rented a car for a month. Andrew sends him an invoice for $1500 for a period of 30 days i.e $50/day i.e $1500/month. He has also offered his customer a discount of $500. However, he wishes to update the Customer Notes 10 days past the Estimate Date by offering him a few freebies as well. He can automate this task by setting up the following parameters.
Execute When: Created or Edited Rule Criteria: When Total=1000 and Discount > 500. Immediate Action: — Time Based Action: Update the field Customer Notes 10 days after Estimate Date.
Scenarios for Webhooks
Scenario 1:
Greg is the Public Relations manager for a Home & Office Security company. A first time customer had asked for a quotation for setting up security systems for his office in Boston. Greg wants to make a good impression by promptly sending a ‘Thank You’ SMS as soon as he accepts the estimate. The webhooks feature in automation can do that by setting the following parameters and connecting to a SMS gateway.
Execute When: Created or Edited Rule Criteria: When Contact Name is “XYZ” and Contact Type is “Customer”. Immediate Action: SMS alert using a webhook with SMS gateway. Time Based Action: —
Scenario 2:
Frank is the financial controller of a Stock Brokerage firm. Most of the company’s revenue is credited into the company’s official Stripe account. He wants to be notified of any high value deposits or withdrawals towards invoices or expenses from that account via Email or SMS, on a weekly basis. He can achieve that by setting up a webhook using the following parameters.
Execute When: Created or Edited Rule Criteria: When Total Amount>=$10,000 Immediate Action: — Time Based Action: Trigger Email Alert 7 days after Rule Trigger Date
Scenarios for Custom Functions
Scenario 1:
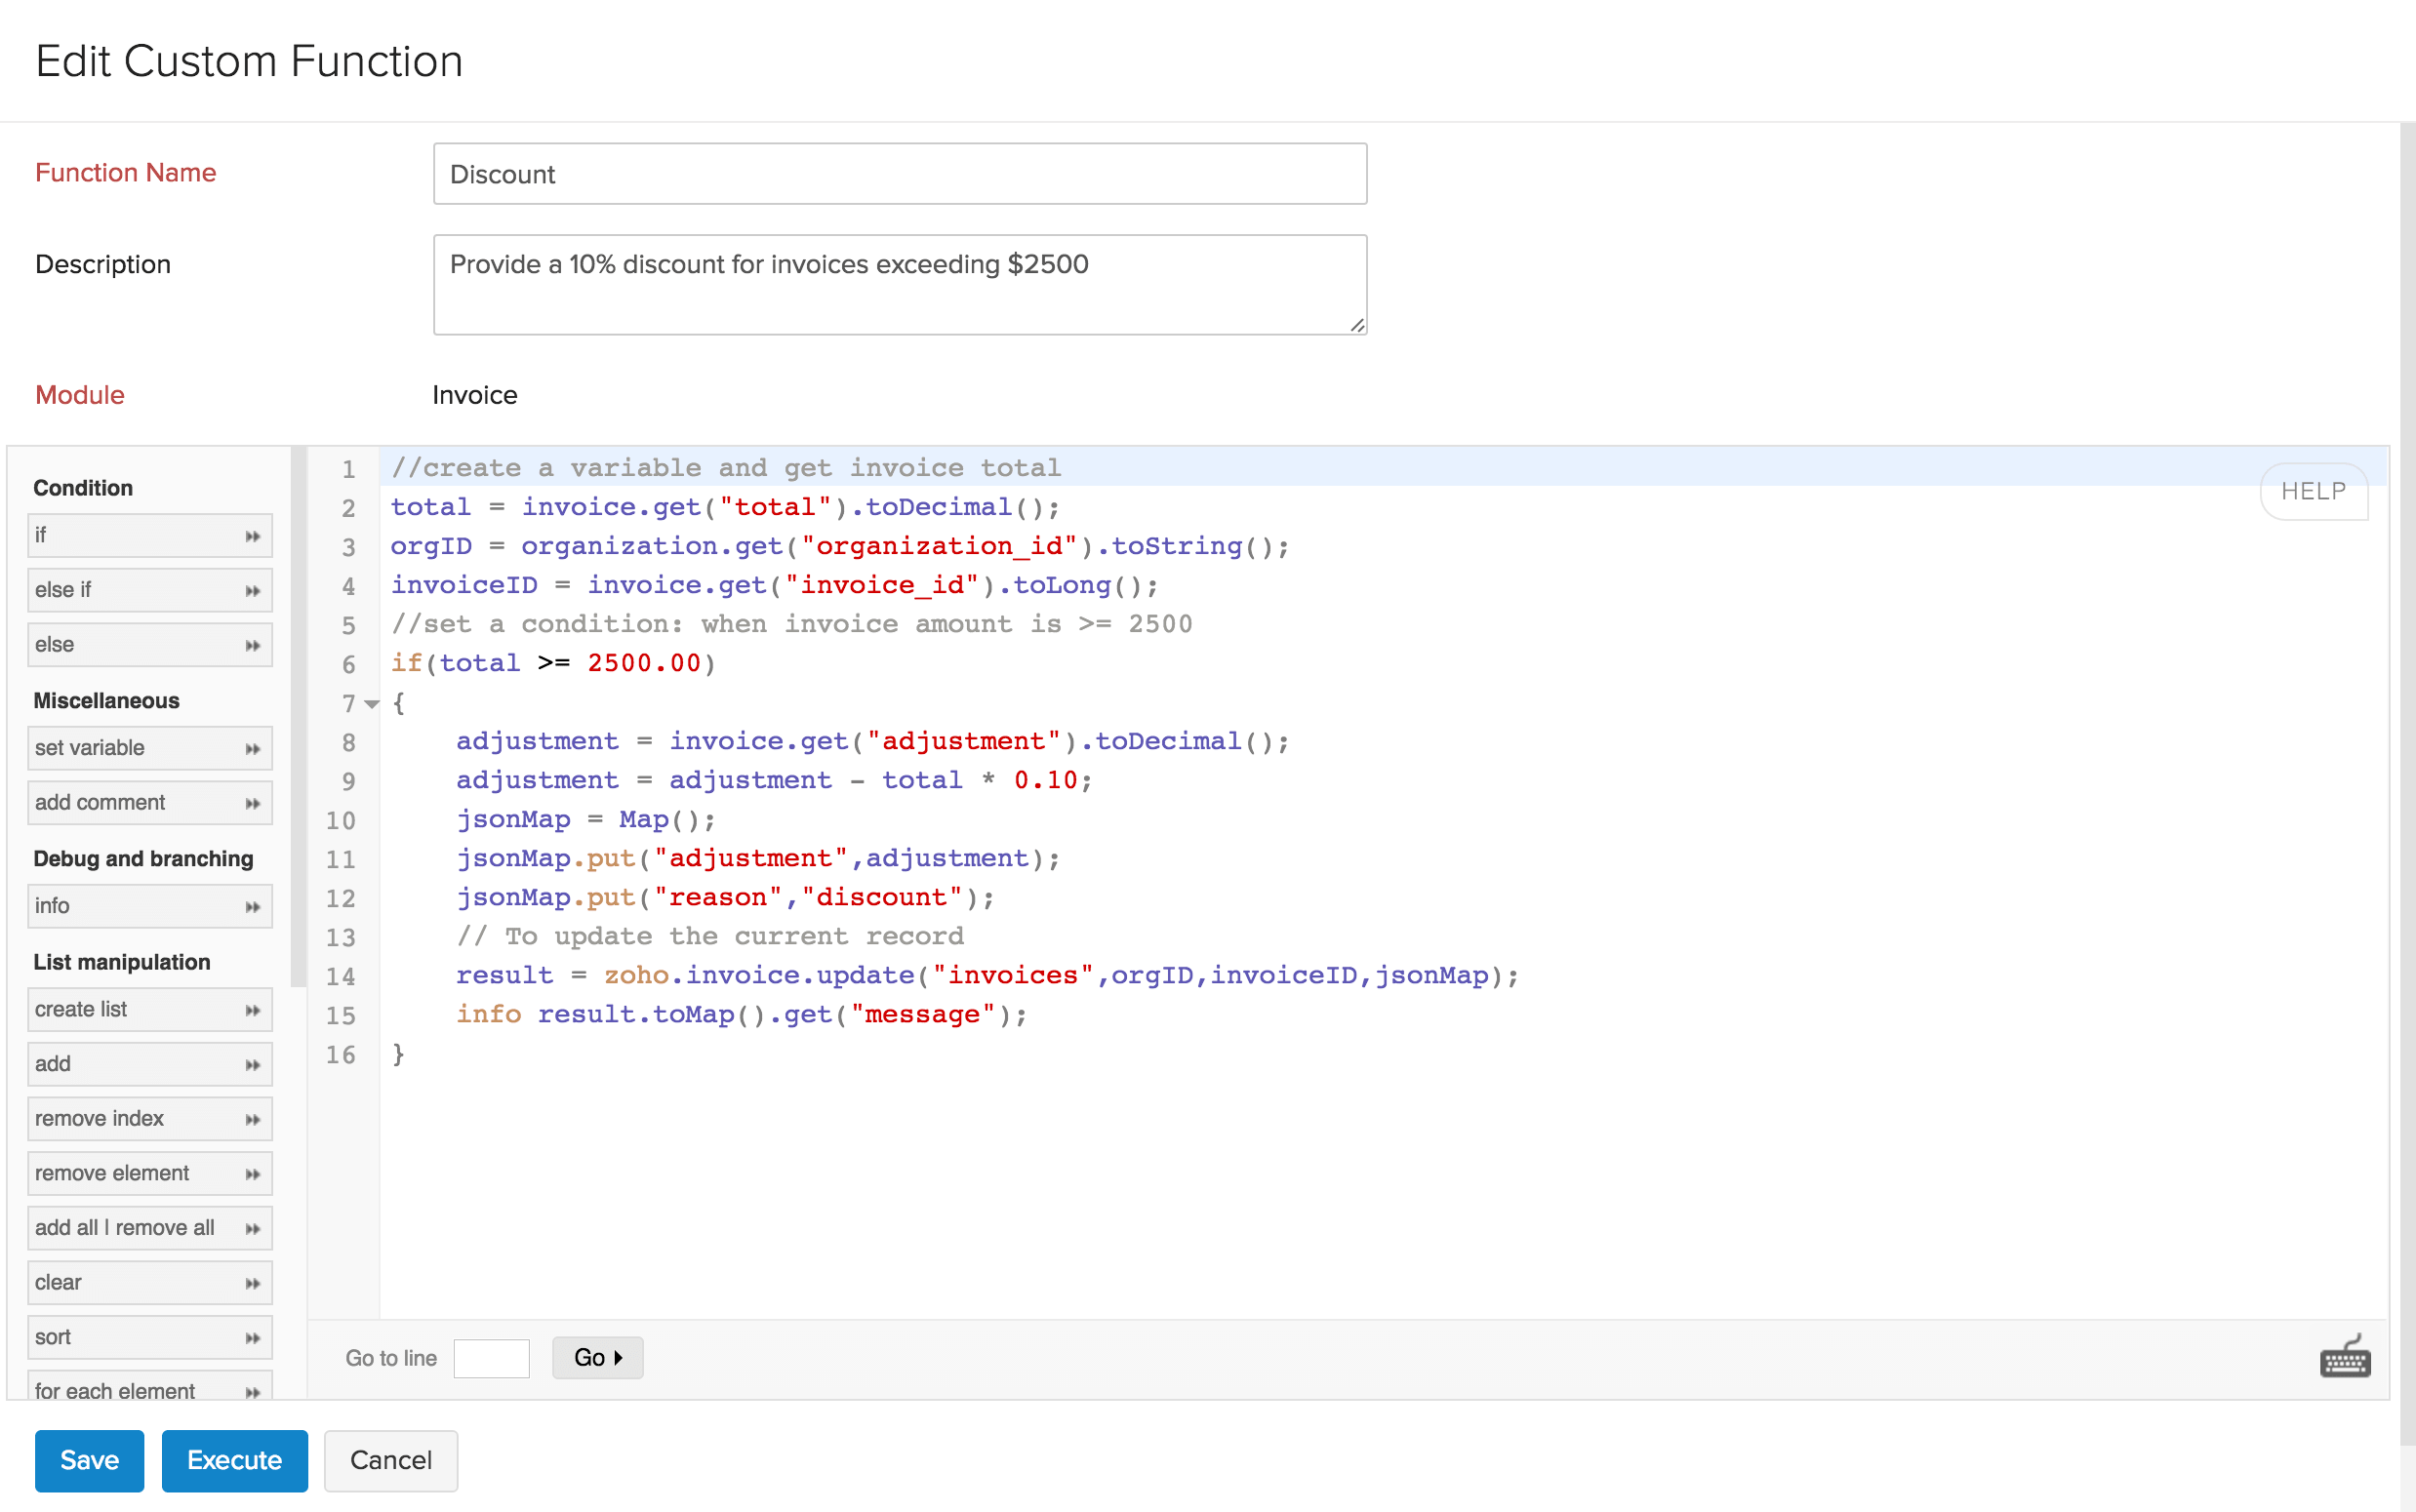
Applying a 10% discount if your invoice total exceeds $2500
Sarah runs a supermarket and she wishes to provide discounts to celebrate her store’s 10th Anniversary. She decides to give a 10% discount for anybody who makes a purchase for $2500 or more. It would be a painful task to include discount everytime she creates an invoice.
With the help of custom functions, she can write a small piece of code to execute this action.
Sarah can set a condition where if the total of the invoice exceeds $2500, the function will be executed and a 10% discount will be applied.
Now, let’s look at how the custom function would look for this scenario.
Custom function name: Discount
Description: Apply a 10% discount when the invoice total exceeds $2500
Module: Invoice
Script:
//create a variable and get invoice total
total = invoice.get("total").toDecimal();
orgID = organization.get("organization_id").toString();
invoiceID = invoice.get("invoice_id").toLong();
//set a condition: when invoice amount is >= 2500
if ( total >= 2500.00 )
{
	adjustment = invoice.get("adjustment").toDecimal();
	adjustment = adjustment - total * 0.10;
	jsonMap = Map();
	jsonMap.put("adjustment", adjustment);
	jsonMap.put("reason", "discount");
	// To update the current record
	result = zoho.invoice.update("invoices", orgID, invoiceID, jsonMap);
	info result.toMap().get("message") ;
}
She then creates a workflow rule with the following parameters.
Workflow Rule Name: Anniversary discount
Module: Invoice
Workflow type: Event based
When an invoice is: created
Triggers: When total >= 2500
Actions: Custom functions - Discount
Now, when the invoice total is greater than or equal to $2500, the workflow will be triggered and the custom function will be executed.
Scenario 2:
Adding a 5% latefee when an invoice becomes overdue
Dennis runs a self-storage facility in Manhattan where customers can store anything in a box, small enough to safely store documents and, big enough to store an expensive car. He charges his clients the option to pay on a daily, weekly, monthly or even a yearly basis. He offers them a 10-day grace period from the invoice date to make the payment after which, he charges an additional 5% of the invoiced amount as late fees.
Using Zoho Invoice, he writes a small code using Custom Functions to automatically calculate the late fees and add it as adjustments in the invoices when the invoices become Overdue.
Now, let’s look at how the custom function would look for this scenario.
Custom function name: Latefee
Description: Apply a 5% late fees on the invoice amount
Module: Invoice
Script:
//create a variable to get invoice total and add a 5% discount
latefee = invoice.get("total").toDecimal() * 0.05;
orgID = organization.get("organization_id").toString();
invoiceID = invoice.get("invoice_id").toLong();
//display the value stored in the latefee variable
info latefee;
//add late fee and adjustment and store the total amount in the variable 'adjustment'
adjustment = invoice.get("adjustment").toDecimal() + latefee;
jsonMap = Map();
jsonMap.put("adjustment",adjustment);
jsonMap.put("reason","Late fee");
// To update the current record
result = zoho.invoice.update("invoices",orgID,invoiceID,jsonMap);
info result.toMap().get("message");
He then creates a workflow rule with the following parameters.
Workflow Rule Name: Late fee
Module: Invoice
Workflow type: Date based
Date of Execution: 0 day(s) after Due Date
Execution time: Enter the time of execution
Execution cycle: Once
Triggers: When > Status > isn’t > Paid > AND > Status > isn’t > Partially Paid
Actions: Custom functions - Latefee
Now, when the invoice due date exceeds the set date (in the workflow rule), the workflow will be triggered and the custom function will be executed.
Scenario 3:
Provide discount if payment for the invoice is made before the due date
Donna runs a design firm that creates promotional materials for websites on a monthly basis. This involves designing brochures, banner ads, and other promotional materials. Donna sends invoices at the end of each month and often receives payment only after the credit period, which is 30 days. To receive funds immediately, she decides to offer a discount if the invoice amount was paid before the invoice due date.
In order to implement this, she adds a discount of 5% to her invoices and in the customer notes section she mentions that the discount would be applicable only if the payment is made before the due date.
To make this work, Donna writes the following custom function.
//if payment for the invoice is received after the invoice due date then discount won't be applied
orgID = organization.get("organization_id").toString();
invoiceID = invoice.get("invoice_id").toLong();
jsonMap = Map();
jsonMap.put("discount", 0);
jsonMap.put("reason", "reached due date.");
result = zoho.invoice.update("invoices", orgID, invoiceID, jsonMap);
info result.toMap().get("message") ;
Once done, she creates a workflow to execute ths custom function. The parameters of the workflow rule is mentioned below:
Workflow rule name: Discount for early payment
Module: Invoice
Workflow type: Date based
Date of Execution: 0 day(s) after Due Date
Execution time: Enter the time of execution
Execution cycle: Once
Trigger: When > Status > isn’t > Paid
Actions
Type: Custom function and Name: Name of your custom function
So, if an invoice reaches the due date, the workflow will be triggered and the custom function will add 0% discount instead of the actual 5%
Scenario 4:
Automatically set due date for an invoice as 30 days before the event date (that is entered via a custom field)
Tom is a creative wedding photographer. His client book for his services 2-3 months prior to the wedding date (event date.) And, Tom would confirm the date only if the client pays the full amount 30 days before the wedding date. In order to streamline this process, Jake, one of the members of Tom’s studio writes a small custom function.
To start with, Jake creates a custom field named “Wedding Date” with the date datatype and writes the following custom function
orgID = organization.get("organization_id").toString();
invoiceID = invoice.get("invoice_id").toLong();
customFieldList = invoice.get("custom_fields").toList();
cfDate = null;
for each  customField in customFieldList
{
	customFieldMap = customField.toMap();
	if(customFieldMap.get("label") == "Date")
	{
		cfDate = customFieldMap.get("value");
		break;
	}
}
duedate = cfDate.toTime().subMonth(1);
info duedate;
duedate = duedate.year() + "-" + text(duedate.month(),"00") + "-" + text(duedate.day(),"00");
jsonMap = Map();
jsonMap.put("due_date", duedate);
jsonMap.put("reason", "Auto due date.");
result = zoho.invoice.update("invoices", orgID, invoiceID, jsonMap);
info result.toMap().get("message");
After creating the custom function, Jake creates a workflow rule to trigger it. The parameters of the workflow rule are as follows:
Workflow name: Payment 30 days before the wedding
Module: Invoice
Workflow type: Event based
When invoice is: Created
Actions
Type: Custom function and Name: Name of your custom function
While creating an invoice, if Tom mentions the wedding date in the custom field, the workflow will be triggered and the custom function will set the due date of the invoice to 30 days before the wedding date.
Scenario 5:
Automatically cancel an estimate if its not accepted within 10 days from the date of creation.
Katherine owns a company that supplies automotive spare parts to several automobile service stations. Several customers ask her for a quote, but a portion of them fail to communicate their decision by neither accepting nor rejecting the quote. To avoid this, Katherine decides to decline the estimate if she doesn’t hear back from the client within 10 days from the receipt of the estimate. To implement this, she writes a custom function.
//get estimate and organization ID
estimateid = estimate.get("estimate_id");
orgid = organization.get("organization_id");

//convert the status of the estimate to 'declined'
result = invokeUrl
[
url: "https://invoice.zoho.com/api/v3/estimates/" + estimateid + "/status/declined?organization_id=" + orgid
type: POST
connection: "invoice_api_connection"
];
Learn more from the Connections help document.
Now, to trigger the execution of this custom function, she creates a workflow rule with the following parameters.
Workflow Name: Decline estimate after 10 days of receipt
Module: Estimate
Workflow type: Date Based
Date of Execution: 10 day(s) after Created Time
Execution time: Enter the time of execution
Execution cycle: Once
Criteria: When > Estimate Status > is > Sent > AND > Estimate Status > is > not approved
Actions
Type: Custom function and Name: Name of your custom function
Now, when the estimate exceeds 10 days from its created time, the workflow will be triggered and the custom function will be executed to change the status of the estimate to declined.
Scenario 6:
Extend due date by 7 days if the customer pays 50% of the invoice amount on or before the initial due date
Diane owns a store that supplies printing paper and office stationery for offices in her area. She wants to extend the due date of the invoice by a week if customers pay 50% of the invoice amount on or before the initial due date.
In order to do that, she writes the following custom function:
//Getting invoice total, balance after the partial payment, and due date
inv_total = invoice.get("total").toDecimal();
inv_balance = invoice.get("balance").toDecimal();
inv_duedate = invoice.get("due_date").toDate();
orgid = organization.get("organization_id").toString();
invid = invoice.get("invoice_id").toLong();
//Condition to check if the amount paid is 50% of the invoice amount
if(inv_balance == inv_total / 2)
{
	inv_duedate = inv_duedate.addDay(7);
	inv_duedate = inv_duedate.year() + "-" + text(inv_duedate.month(),"00") + "-" + text(inv_duedate.day(),"00");
	//Update the due date by 7 days
	jsonMap = Map();
	jsonMap.put("due_date", inv_duedate);
	jsonMap.put("reason", "Increased due date");
	result = zoho.invoice.update("invoices", orgid, invid, jsonMap);
	info result.toMap().get("message") ;
}
Once done, Diane creates a workflow rule to execute the custom function.
Workflow name: Extend due date
Module: Invoice
Workflow type: Event based
When invoice is: Edited
Execute the workflow When any field is updated
Just once or Everytime? Just once
Triggers When > Status > is > Partially paid
Type: Custom function and Name: Name of your custom function
Now, when a customer pays 50% of the invoice amount by the initial due date, a grace period of 7 days will be given for him to pay the balance amount.
Scenarios for In-App Notifications
Scenario 1:
KYZ shoe company decides to offer freebies to all the customers who purchase from them. The finance team should be notified each time an invoice is paid, so that they can send out the freebies. They created a workflow that would internally notify the finance team whenever an invoice moves to the paid status.
- Execute When: Created or Edited
- Rule Criteria: Status changes to Paid
- Immediate Action: In-app notification to the Finance team.
- Time Based Action: —
Scenario 2:
Peter is the head of ABC organization. Whenever a credit note is raised, Peter would like to notify the head of the production department. This will help the production team to work on their shortcomings and improve their service. For this, they will need to create a workflow to notify the production department.
- Execute When: Created
- Rule Criteria: —-
- Immediate Action: Notification to the Production Team’s Head.
- Time Based Action: —
Setting up a new workflow rule
A workflow rule consists of actions that comprises of emails alerts, Field updates, and Webhooks that play an essential role in executing a task. A workflow rule may employ one or more actions to accomplish the task. To set up a workflow rule in Zoho Invoice, navigate to ![]() > More Settings> Automation> Workflow Rules.
> More Settings> Automation> Workflow Rules.
- Name your workflow
- Choose when to trigger the workflow
- Workflow types
- Filter the triggers
- Actions
- Other Actions
- Email Alerts
Name your workflow
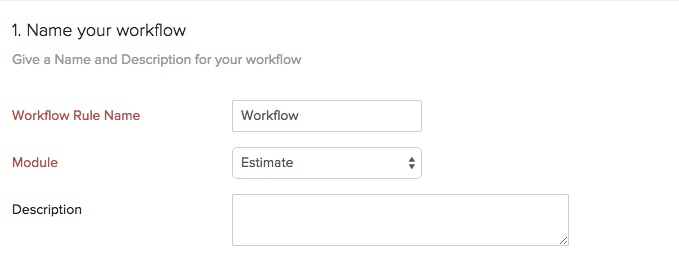
| Field | Description |
|---|---|
| Workflow Rule Name | Give a unique name for the workflow rule. |
| Module | Select the module for which you wish to create a workflow. |
| Description | Give a small description for your workflow rule. |
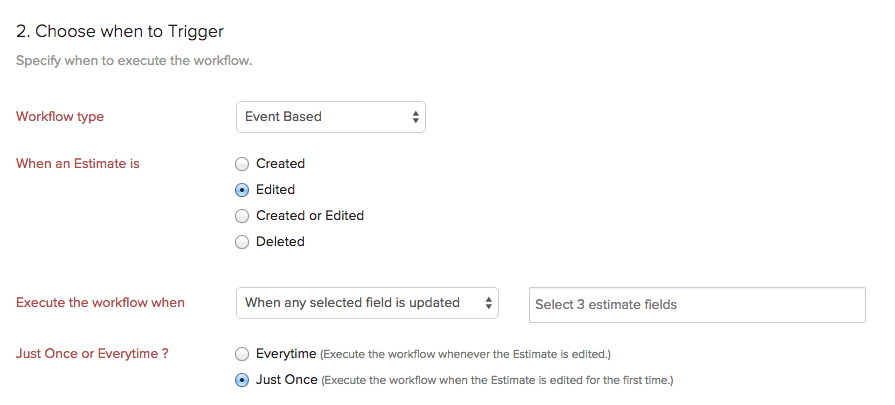
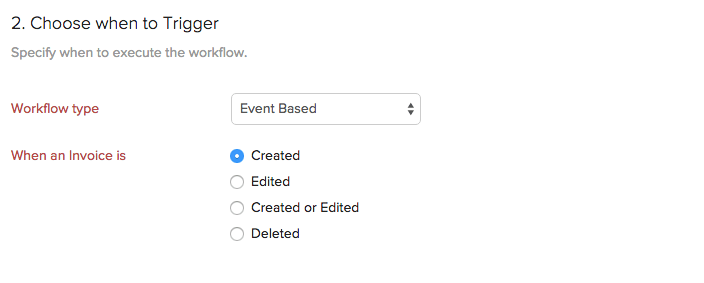
Choose when to trigger a workflow
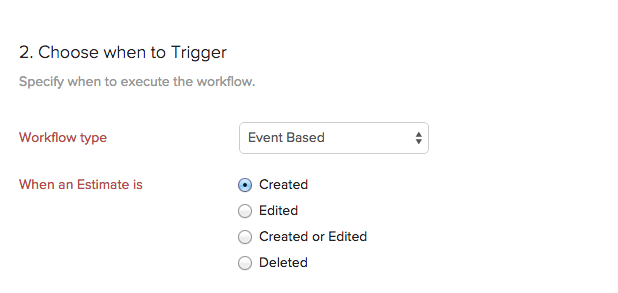
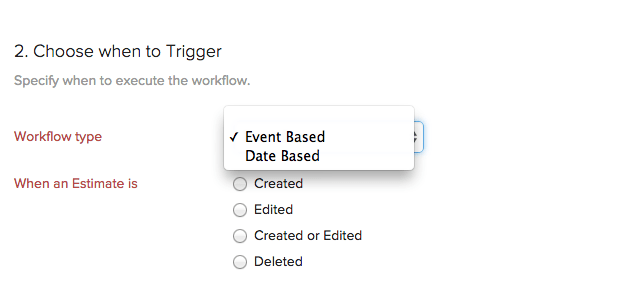
You can choose when to trigger the workflow based on the parameters you select in the following fields.
Workflow Type
There are two types of workflows:
- Event Based
- Date Based
Event Based: If the workflow is Event Based, then the workflow is triggered when a module is:
- Created
- Edited
- Created or Edited
- Deleted
When a module is Edited or Created or Edited, additional fields appear,
| Field | Description |
|---|---|
| Execute the workflow when | There are 3 options to choose from -When any field is updated. -When any selected field is updated. -When all selected field are updated. If you select When any selected field is updated or When all selected fields are updated in the drop-down, an additional box will appear where you can select any 3 fields of the module. |
| Just Once or Overtime? | Just Once- The workflow would be executed when the criteria is met for the first time. Everytime- The workflow would be executed everytime the criteria is met. |
Date Based: If the workflow is Date Based, the following fields appear,
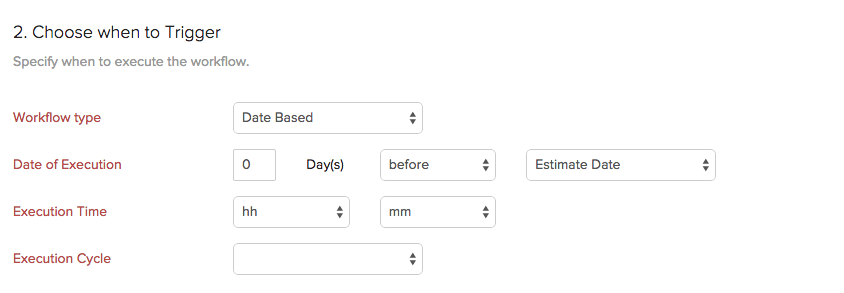
| Field | Description |
|---|---|
| Date of Execution | Select the workflow to be triggered on any number of days before or after Module Date, Expiry Date or Created Time from the drop down.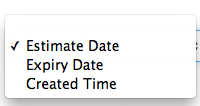 |
| Execution Time | You may choose the exact time of execution by selecting the corresponding hh or mm of your organisation’s time zone. |
| Execution Cycle | You may choose the frequency of triggering a workflow by choosing Once, Monthly or Yearly from the drop down. |
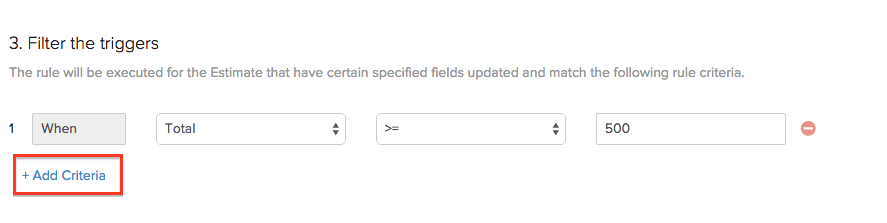
Filter the triggers
Filter the triggers section allows you to set one or more conditions based on which the action will be executed.
| Field | Description |
|---|---|
| Condition | The filter will be triggered based on the criteria you set. You can also add multiple criteria by clicking on + Add Criteria based on which the workflow rule will be executed.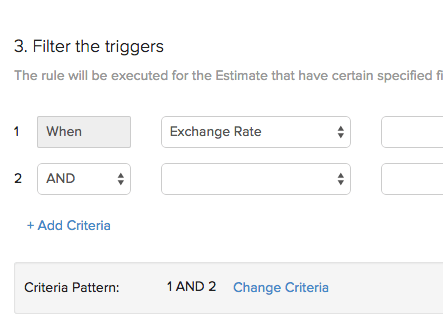 The condition for the next criteria may be AND or OR depending on whether you wish to include both or either one of the criteria. Also, you can change the criteria pattern as you want by selecting Change Criteria. |
| Field Attributes | The field is used to select an attribute from the list that broadly covers the terms that are related to the module.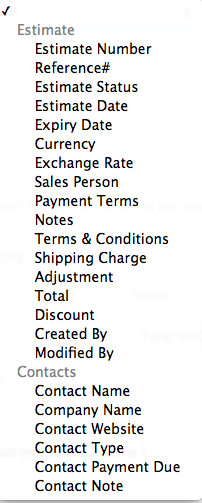 |
| Rules | Select the rules based on which the system should filter the trigger. If the field has alphanumeric values, the rules are,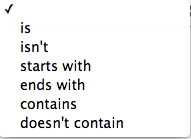 If the field has only numerical values, then the rules are, 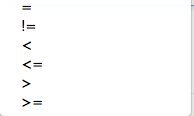 |
| Value Field | Enter the value of the attribute for which the filter must be applied. |
Editing Criteria Pattern:
You can edit the criteria pattern to suit your requirements by selecting Change Criteria. The editor allows you to define a pattern of your choice using simple AND/OR logic. For example, if you wish to trigger the workflow rule When Estimate Number is 1 AND either Estimate Status isn’t Invoiced OR Total is equal to 500,
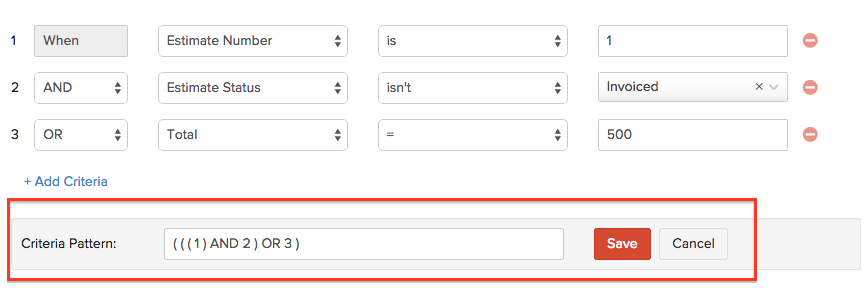
The pattern is (((1)AND 2) OR 3). If you feel the criteria pattern does not match your requirement, you can edit it to be (1AND (2 OR 3)).

Click Save to continue.
Note: You can have a maximum of 10 criteria for each Workflow Rule.
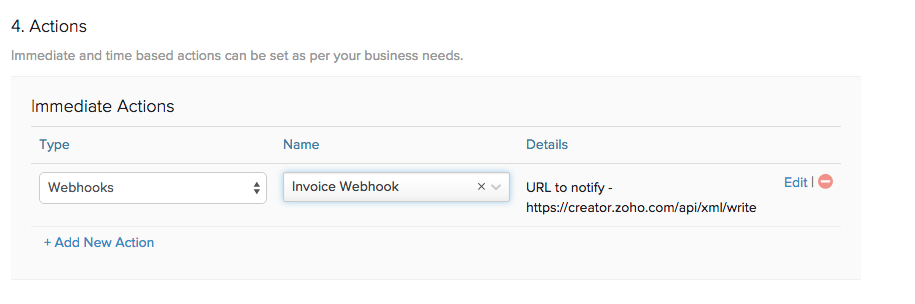
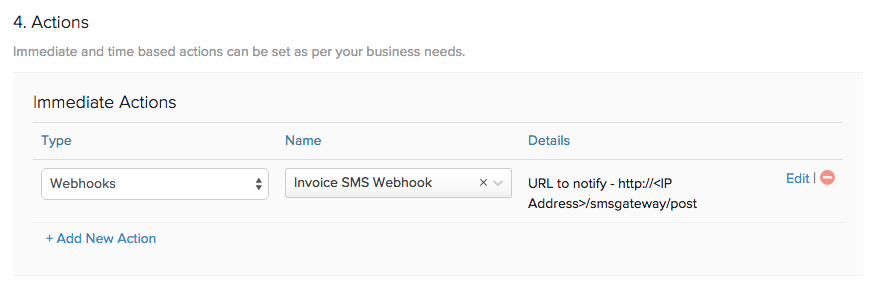
Actions
Once the rules have been set, the actions to be taken upon encountering the conditions has to be decided. You can customize the actions to suit your business needs and program it to act immediately or at a particular time.
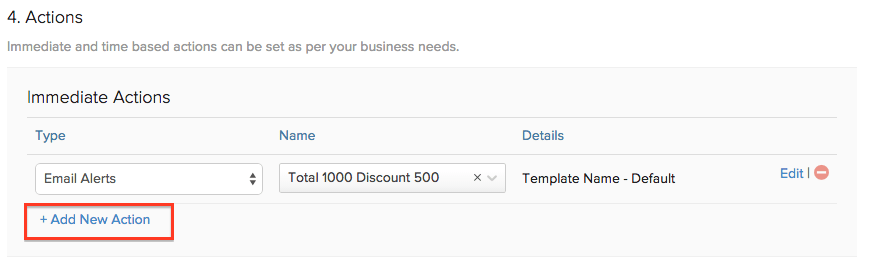
Immediate Actions:
| Field | Description |
|---|---|
| Type | Select one of the three types of actions, -Email Alerts -Field Updates -Webhooks You can also add multiple actions by clicking on +Add New Actions. |
| Name | The field should contain the name of the Email Alert, Field Updates or Webhooks. For example, in the case of an email alert, you can either pick the ones from the list you have already created or you can add a new one by selecting + Add New Email Alert.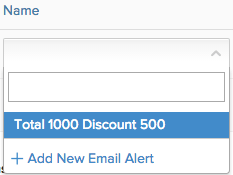 Follow the same steps for Field Updates and Webhooks. |
| Details | The details of the action is displayed here. |
Time Based Actions: If you wish to schedule actions for a particular time, select the check box next to Would you like to add time based actions?. This will display additional fields to enter the desired time.
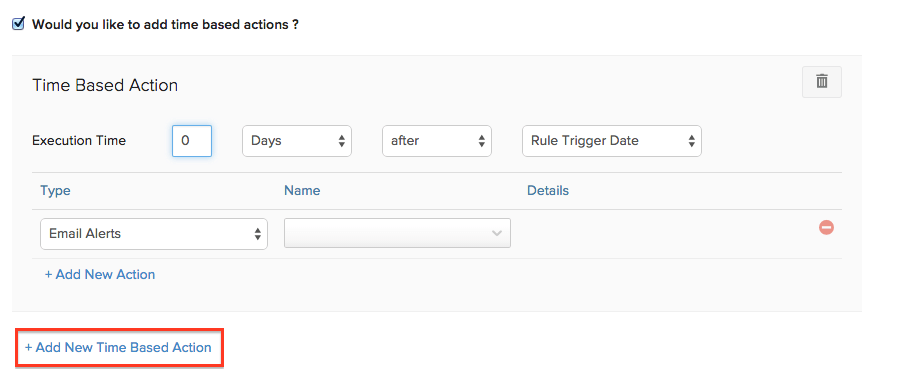
| Field | Description |
|---|---|
| Execution Time | Enter the desired number of days before or after, -Rule Trigger Date -Module Date -Expiry Date -Created Time -Modified Time |
Next,select the type of action that you wish to take. It can be an Email Alert, Field Update or a Webhook. You can also add multiple time based actions by selecting +Add New Time Based Action.
Note: You can add a maximum of 5 time based actions. Also, each time based action can have a maximum of 5 actions.
Finally, click Save to create the workflow rule to implement it for the modules in Zoho Invoice.
Other Actions
You can also mark your workflow rules as Active or Inactive. To do so, hover the cursor and select mark as active or mark as inactive. To delete the workflow rule, click on the Trash icon.

Edit a workflow rule: You can edit a workflow rule by simply clicking on one of the workflow rules from the list or by hovering over a workflow rule and select edit.

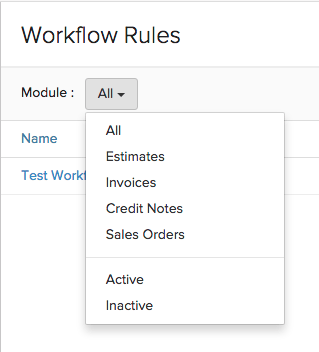
Filter workflow rules: To filter the workflow rules list, follow these steps:
- Navigate to > More Settings > Automation > Workflow Rules.
- Under Module, select one from the drop down to filter the workflows based on the module for which the workflow has been created.
You can also filter workflow rules based on whether they are active or inactive. Based on your selection, the corresponding workflow rules will be displayed as a list.
Note:
- You can create a maximum of 10 Workflow Rules for each module.
- Workflow Rules cannot be applied on invoices that have been imported into Zoho Invoice.
Field Updates
The option of Field Updates allows you to automatically make changes to a field of a particular module for which the workflow has been triggered. For example, you can choose to automatically extend the expiry date to 30th June 2015 of an estimate if the total amount is greater than or equal to $500. In this case, the Expiry Date field is changed to the above date if the Total field is “>=“500.
To set up a field update, navigate to ![]() > More Settings > Automation > Field Updates and click on + New Field Update.
> More Settings > Automation > Field Updates and click on + New Field Update.
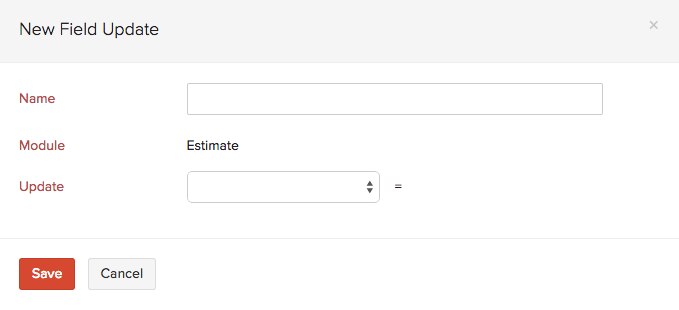
| Field | Description |
|---|---|
| Name | Give a unique name for the field update. |
| Module | Select a module for which you wish to create a field update. |
| Update | Select the field in which you wish to make changes upon triggering a workflow from the drop down. -Reference # -Expiry Date -Sales Person -Notes -Terms & Conditions -Adjustment Description Enter the value of the field in the corresponding box. If you wish to update the field with an empty value, check the box Update with empty value?. 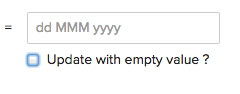 |
Click on Save to create a new field update. You can now select one of the many field updates created to implement changes when the workflow is triggered.
Other Actions
Delete a field update: To delete a field update, hover the cursor next to a field update on the list and click on the Trash icon.

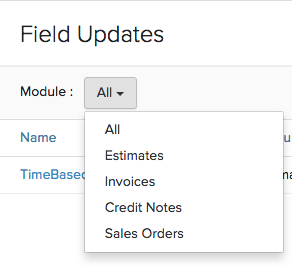
Filter field updates: To filter the field updates list, follow these steps:
- Navigate to > More Settings > Automation > Field Updates.
- Under Module, select a module from the drop down for which the field update has been created.
Based on your selection, the corresponding field updates will be displayed as a list.
Note: You can create a maximum of 3 field updates for each workflow rule.
Webhooks
Webhooks facilitates communication with third-party applications by sending instant web notifications every time an event occurs in Zoho Invoice. With Webhooks, you can configure both HTTP & HTTPS URLs and associate them in workflow rules to automate the entire notification process.
For example, you can associate your Zoho Invoice account with a SMS provider with a webhook to thank your customer by sending a message automatically if the total amount paid exceeds $1000. For general information about webhooks, please refer to webhooks.org
To set up a webhook, navigate to ![]() > More Settings > Automation > Webhooks and click on + New Webhook.
> More Settings > Automation > Webhooks and click on + New Webhook.

| Field | Description |
|---|---|
| Name | Give a unique name for the webhook. |
| Module | Select the module for which you wish to create a webhook. |
| Description | Give a small description of the webhook. |
| URL to notify | Enter the URL of the external service provider’s API. For example, if you want Zoho Invoice to add or change data in Zoho CRM, the URL would be https://crm.zoho.com/crm. |
| Method | Specify the function you want to call at the external service: POST: Requests that data centrist be considered as new. PUT: Requests that data sent should be considered as a modified version of the one already present. DELETE: Requests that the data must be deleted. |
| Custom Parameters | You can add custom parameters. in the webhook such as Auth Token, Security Token, API Key etc. based on which the URL will be appended. Enter the required parameter under Parameter Name and the corresponding value under Parameter Value. If you wish to add multiple parameters, select + Add Custom Parameters. |
| Entity Parameters | Append All Parameters- Select this option to send all parameters from Zoho Invoice to the external service. Append Selected Parameters- Select this option to send selected parameters from Zoho Invoice to the external service. |
| URL Preview | The URL generated for this web hook will be displayed here. |
Entity Parameters
There are two options available while communicating data with a third party application, namely,
- Append All Parameters- Select this option to communicate all data as and when it is created.
- Append Selected Parameters- Select this option to transfer only the data you want to send. If you choose this option, additional fields appear.
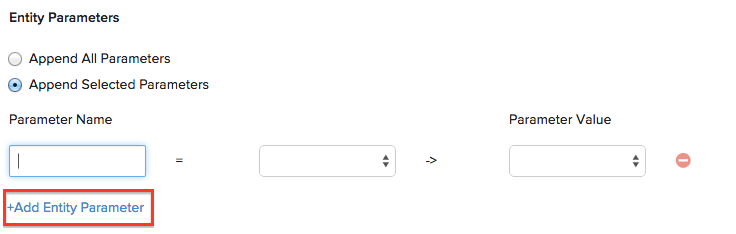
| Field | Description |
|---|---|
| Parameter Name | Enter the name of the parameter that you wish to append and select the module in the corresponding box. |
| Parameter Value | Select the desired parameter from the drop down. |
Note: You can add multiple entity parameters by selecting +Add Entity Parameter. You can add a maximum of 10 entity parameters.
User Defined Parameters
If you wish to add user defined parameters while accessing an external service, select the box Add User Defined Parameters.
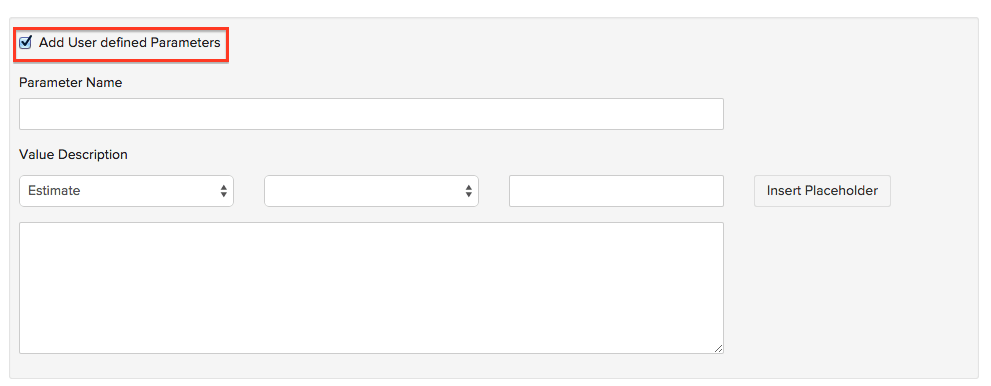
| Field | Description |
|---|---|
| Parameter Name | Enter the name of the parameter which you wish to update. |
| Value Description | Select a module of Zoho Invoice from the first drop down and select the corresponding parameter from the drop down of the adjacent box. This will generate the placeholder string for that parameter. You can enter the custom code in different formats. For example, if you wish to send a JSON or XML string with parameter values from an estimate, you can use the user defined parameters and placeholders format. If you wish to include the placeholder in the string, select Insert Placeholder. |
Click on Save to create a webhook. You can now select one of the many webhooks created to connect with an external service provider when a workflow rule is triggered.
Other Actions
Delete a webhook: To delete a webhook, hover the cursor next to a field update on the list and click on the Trash icon.

Filter webhooks: To filer the Webhooks list, follow these steps:
- Navigate to > More Settings > Automation > Webhooks.
- Under Module, select a module from the drop down for which the webhook been created.
Based on your selection, the corresponding webhook will be displayed as a list.

Note:
- You can create only 1 web hook for each workflow rule.
- A maximum of 500 webhooks can be triggered per day.
Webhook Examples
Purpose: Calculating Sales Commission
Calculate Sales Commission in Zoho Creator App upon creating a new invoice in Zoho Invoice.
Scenario:
Homes4Us is a company that helps people find homes for buying real estate. They have a dedicated sales team to handle multiple customers at a time. The sales person gets paid 3.5% of the property value as a commission. Donald, the Head of Sales at Homes4Us wishes to automatically enter the details of the customer, sales person and the sales commission in a form as soon as an invoice has been raised for their services.
Pre-requisites:
- Account in Zoho Creator Application
- Permission to access Zoho API
- Familiarity with Zoho Creator
Procedure:
- Create the Sales Commission App in Zoho Creator (Refer Zoho Creator Tutorial on Creating Apps).
- Configure webhook in Zoho Invoice.
- Set up Workflow Rule.
- Test your webhook integration.
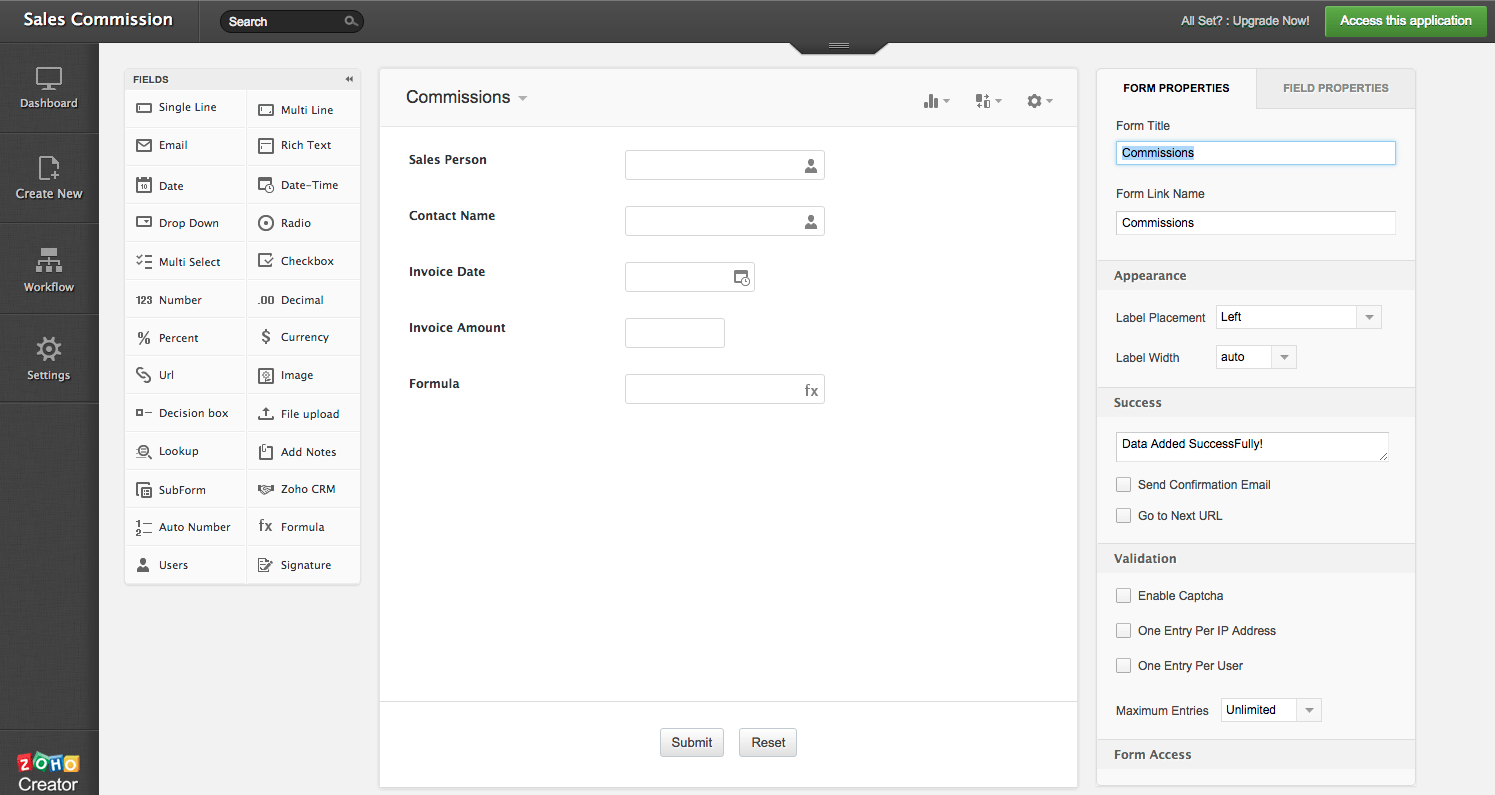
Step 1: Create Sales Commission App in Zoho Creator
In Zoho Creator, create a Sales Commission application with the following fields,
- Sales Person
- Contact Name
- Invoice Date
- Invoice Amount
Note:Enter “(0.035 * Invoice_Amount)” as the syntax for the formula to calculate the sales commission.
Step 2: Configure Webhook
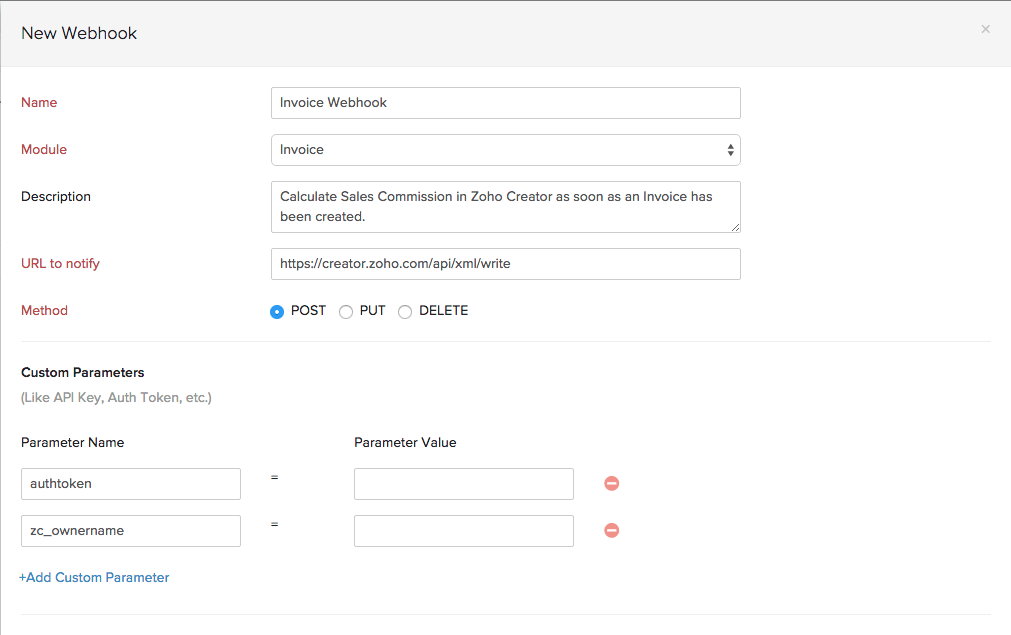
While setting up the webhook, specify the following details:
URL to Notify: https://creator.zoho.com/api/xml/write
Method: POST
Custom Parameters:
- authtoken: Specify authtoken from your creator account. Refer to the Creator Help Documentation for more details.
- zc_ownername: Specify the application owner’s name of your creator account.
User Defined Parameters:
Select the following Fields from the Invoice and Contacts module while setting up user-defined parameters:
- Sales Person
- Contact Name
- Invoice Date
- Invoice Amount
XMLString
<ZohoCreator><applicationlist><application name="sales-commission"><formlist>
<form name="Commissions">
<add>
<field name="Sales_Person">
<value>${INVOICE.SALES_PERSON}</value>
</field>
<field name="Contact_Name">
<value>${INVOICE.CONTACT_NAME}</value>
</field>
<field name="Invoice_Date">
<value>${INVOICE.INVOICE_DATE}</value>
</field>
<field name="Invoice_Amount">
<value>${INVOICE.INVOICE_TOTAL}</value>
</field>
</add>
</form>
</formlist>
</application>
</applicationlist>
</ZohoCreator>
Note:
- In the above XML string, name represents the field in Zoho Creator App and the value for data is to be pushed from Zoho Invoice/Invoice using a valid placeholder.
- ‘application name’ is the name of the application that contains the form in Zoho Creator. Get your application name from the Application Settings tab of Zoho Creator.
- ‘form name’ is the name of the form where you edit records in Zoho Creator. Get your form name from the Form Settings of your Zoho Creator account.
- Ensure that the date format in the Creator app is in yyyy-MM-dd format. You can change the date format from the Application Settings of your Zoho Creator account.
Step 3: Setup Workflow Rule
Follow the steps below to create a Workflow Rule,
- Choose when to Trigger: When an invoice is Created.
- Immediate Action: Select the Type as Webhook from the drop-down and select any webhook from the adjacent box.
Finally, click on Save to save the Workflow Rule.
Step 4: Test your workflow
Test your workflow by creating a new invoice. Make sure that the Sales Person, Contact Name, Invoice Date and Invoice Amount fields are filled with correct information.
Therefore, when an invoice is created, a workflow will be triggered which will calculate the sales commission and have it saved in a form in Zoho Creator.
P.S: You can improve upon this functionality by automatically creating an expense towards sales commission in your Zoho Invoice account. Depending on the needs of the organization, you can either create an expense towards ‘Sales Commission’ every time an invoice is created. You could also set up a Custom Schedule for your form, which will, say, calculate the Grand Total of the Sales Commission for one Sales Person and create an expense by for the same in Zoho Invoice. Click here to know more about how to create records in Zoho Invoice using Zoho Creator.
Purpose: Send a ‘Thank You’ and Order Confirmation SMS to customers
Send a ‘Thank You’ and Order Confirmation SMS to the customers upon creating a new invoice in Zoho Invoice.
Scenario:
Intelly Inc. is a company that makes customized coffee mugs, T-Shirts, umbrellas and various gift items. Customers can browse the website and place an order on their website and can pay for their purchase upon delivery of their product. Tony, one of the person handling orders creates an invoice as soon as he receives an order. Once the invoice has been created, an SMS goes out to the customer thanking them for the order along with a reference number.
Pre-requisites:
- Account in SMS gateway service
- Permission to access Workflow Rules
Procedure:
- Create an account in SMS gateway service.
- Configure webhook in Zoho Invoice.
- Set up the Workflow Rule.
- Test your webhook integration.
Step 1: Create an account in SMS gateway service
Create an account with an SMS gateway service of your choice. Selecting a SMS gateway may depend on a lot of factors including country, time zone, cost etc.
Once you create the account with the SMS gateway, provide the following details to configure the webhook,
- Invoice Number
- Invoice Date
- Invoice Amount
- Phone Number
You can purchase SMS credits and get the API details from the SMS provider.
Step 2: Configure webhook in Zoho Invoice

While setting up the webhook, specify the following details,
URL to Notify: Mention the URL of your SMS gateway service.
Method: POST
Custom Parameters:
Select the following Fields while setting up user-defined parameters
- Username
- Password
- Auth Token/API ID
User Defined Parameters: Under the Entity Parameters section, select Append Selected Parameters; Enter the parameter name and select Mobile Phone after selecting Contacts from the drop-down.
Click on the check-box Add User defined Parameters, enter the Parameter Name(This field may vary depending on the service provider). Enter the message in the space provided and finally click Save.
Note: The code may vary based on the parameters required by the service provider.
Step 3: Setup Workflow Rule
Follow the steps below to create a Workflow Rule,
- Choose when to Trigger: When an invoice is Created.
- Immediate Action: Select the Type as Webhook from the drop-down and select any webhook from the adjacent box.
Finally, click on Save to save the Workflow Rule.
Step 4: Test your workflow
Test your workflow by creating a new invoice. Make sure that the Contact Name, Phone Number , Invoice Date and Invoice Amount fields are filled with correct information. Therefore, when an invoice is created, a workflow will be triggered to send an SMS thanking the customer and confirming the order.
Purpose: Creating a Potential in Zoho CRM upon raising an Estimate
A Potential must be created for a contact in Zoho CRM when an Estimate is raised for him/her in Zoho Invoice.
Scenario:
Jonathan runs a company, ‘Connect-O’ that supplies computers and computer peripherals in large numbers to multinational corporations. One such organization has requested a quote for 50 high-end computers and 25 wireless printers. Jonathan uses Zoho CRM to manage customer data and engage with them while he uses Zoho Invoice to take care of his invoicing needs. He wishes to automatically create a potential in Zoho CRM as soon as an Estimate is raised in Zoho Invoice.
Pre-requisites:
- Account in Zoho CRM and Zoho Invoice
Procedure:
- Configure Webhook in Zoho Invoice.
- Create an Estimate.
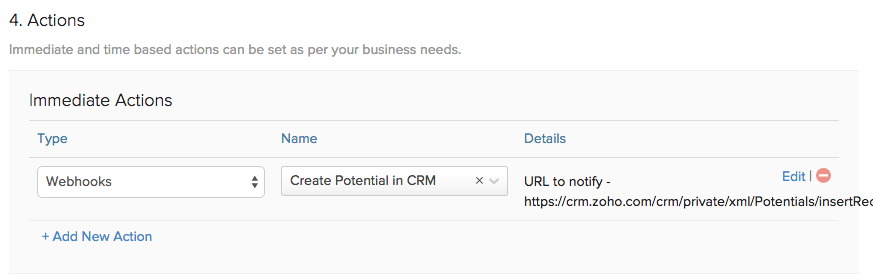
- Set up Workflow Rule.
- Test your webhook integration.
Step 1: Configure Webhook
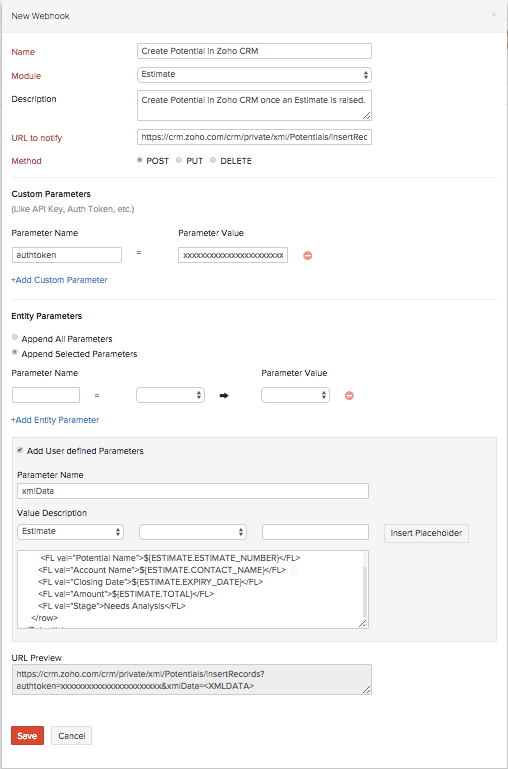
While setting up the webhook, specify the following details:
URL to Notify: https://crm.zoho.com/crm/private/xml/Potentials/insertRecords
Method: POST
Custom Parameters:
- authtoken: Specify authtoken from your Zoho CRM account. Login to Zoho Accounts to know your authtoken.
User Defined Parameters:
Specify the following fields from Zoho Invoice and Zoho CRM while setting up user-defined parameters:
Zoho Invoice:
- Estimate Number
- Contact Name
- Expiry Date
- Estimate Amount
Zoho CRM:
- Potential Name
- Account Name
- Closing Date
- Amount
<Potentials>
     <row no="1">
        <FL val="Potential Name">${ESTIMATE.ESTIMATE_NUMBER}</FL>
       <FL val="Account Name">${ESTIMATE.CONTACT_NAME}</FL>
       <FL val="Closing Date">${ESTIMATE.EXPIRY_DATE}</FL>
       <FL val="Amount">${ESTIMATE.TOTAL}</FL>
       <FL val="Stage">Needs Analysis</FL>
    </row>
</Potentials>
Note:
- Ensure that the date format in your Zoho Invoice organization is in MM/dd/yyyy format. You can change the date format from the Organization Settings of your Zoho Invoice account.
- The list of fields mentioned above is not exhaustive. You may also use other fields pertaining to the Zoho Invoice and Zoho CRM modules. Remember to include a line in the XML string for every additional field.
Step 2: Create an Estimate
Click here to learn how to create and send an estimate in Zoho Invoice.
Step 3: Setup Workflow Rule
Follow the steps below to create a Workflow Rule,
- Choose when to Trigger: When an estimate is Created.
- Immediate Action: Select the Type as Webhook from the drop-down and select any webhook from the adjacent box.
Finally, click on Save to save the Workflow Rule.
Step 4: Test your workflow
Test your workflow by creating a new estimate. Make sure that the Zoho Invoice and Zoho CRM fields are filled with correct information.
Therefore, when an estimate is created, a workflow will be triggered to create a Potential in Zoho CRM.
Events
The Events section in Zoho Invoice enables you resend/check the status of your webhooks.
To check the status of your webhook,
- Use the filter to sort your webhooks based on their status.
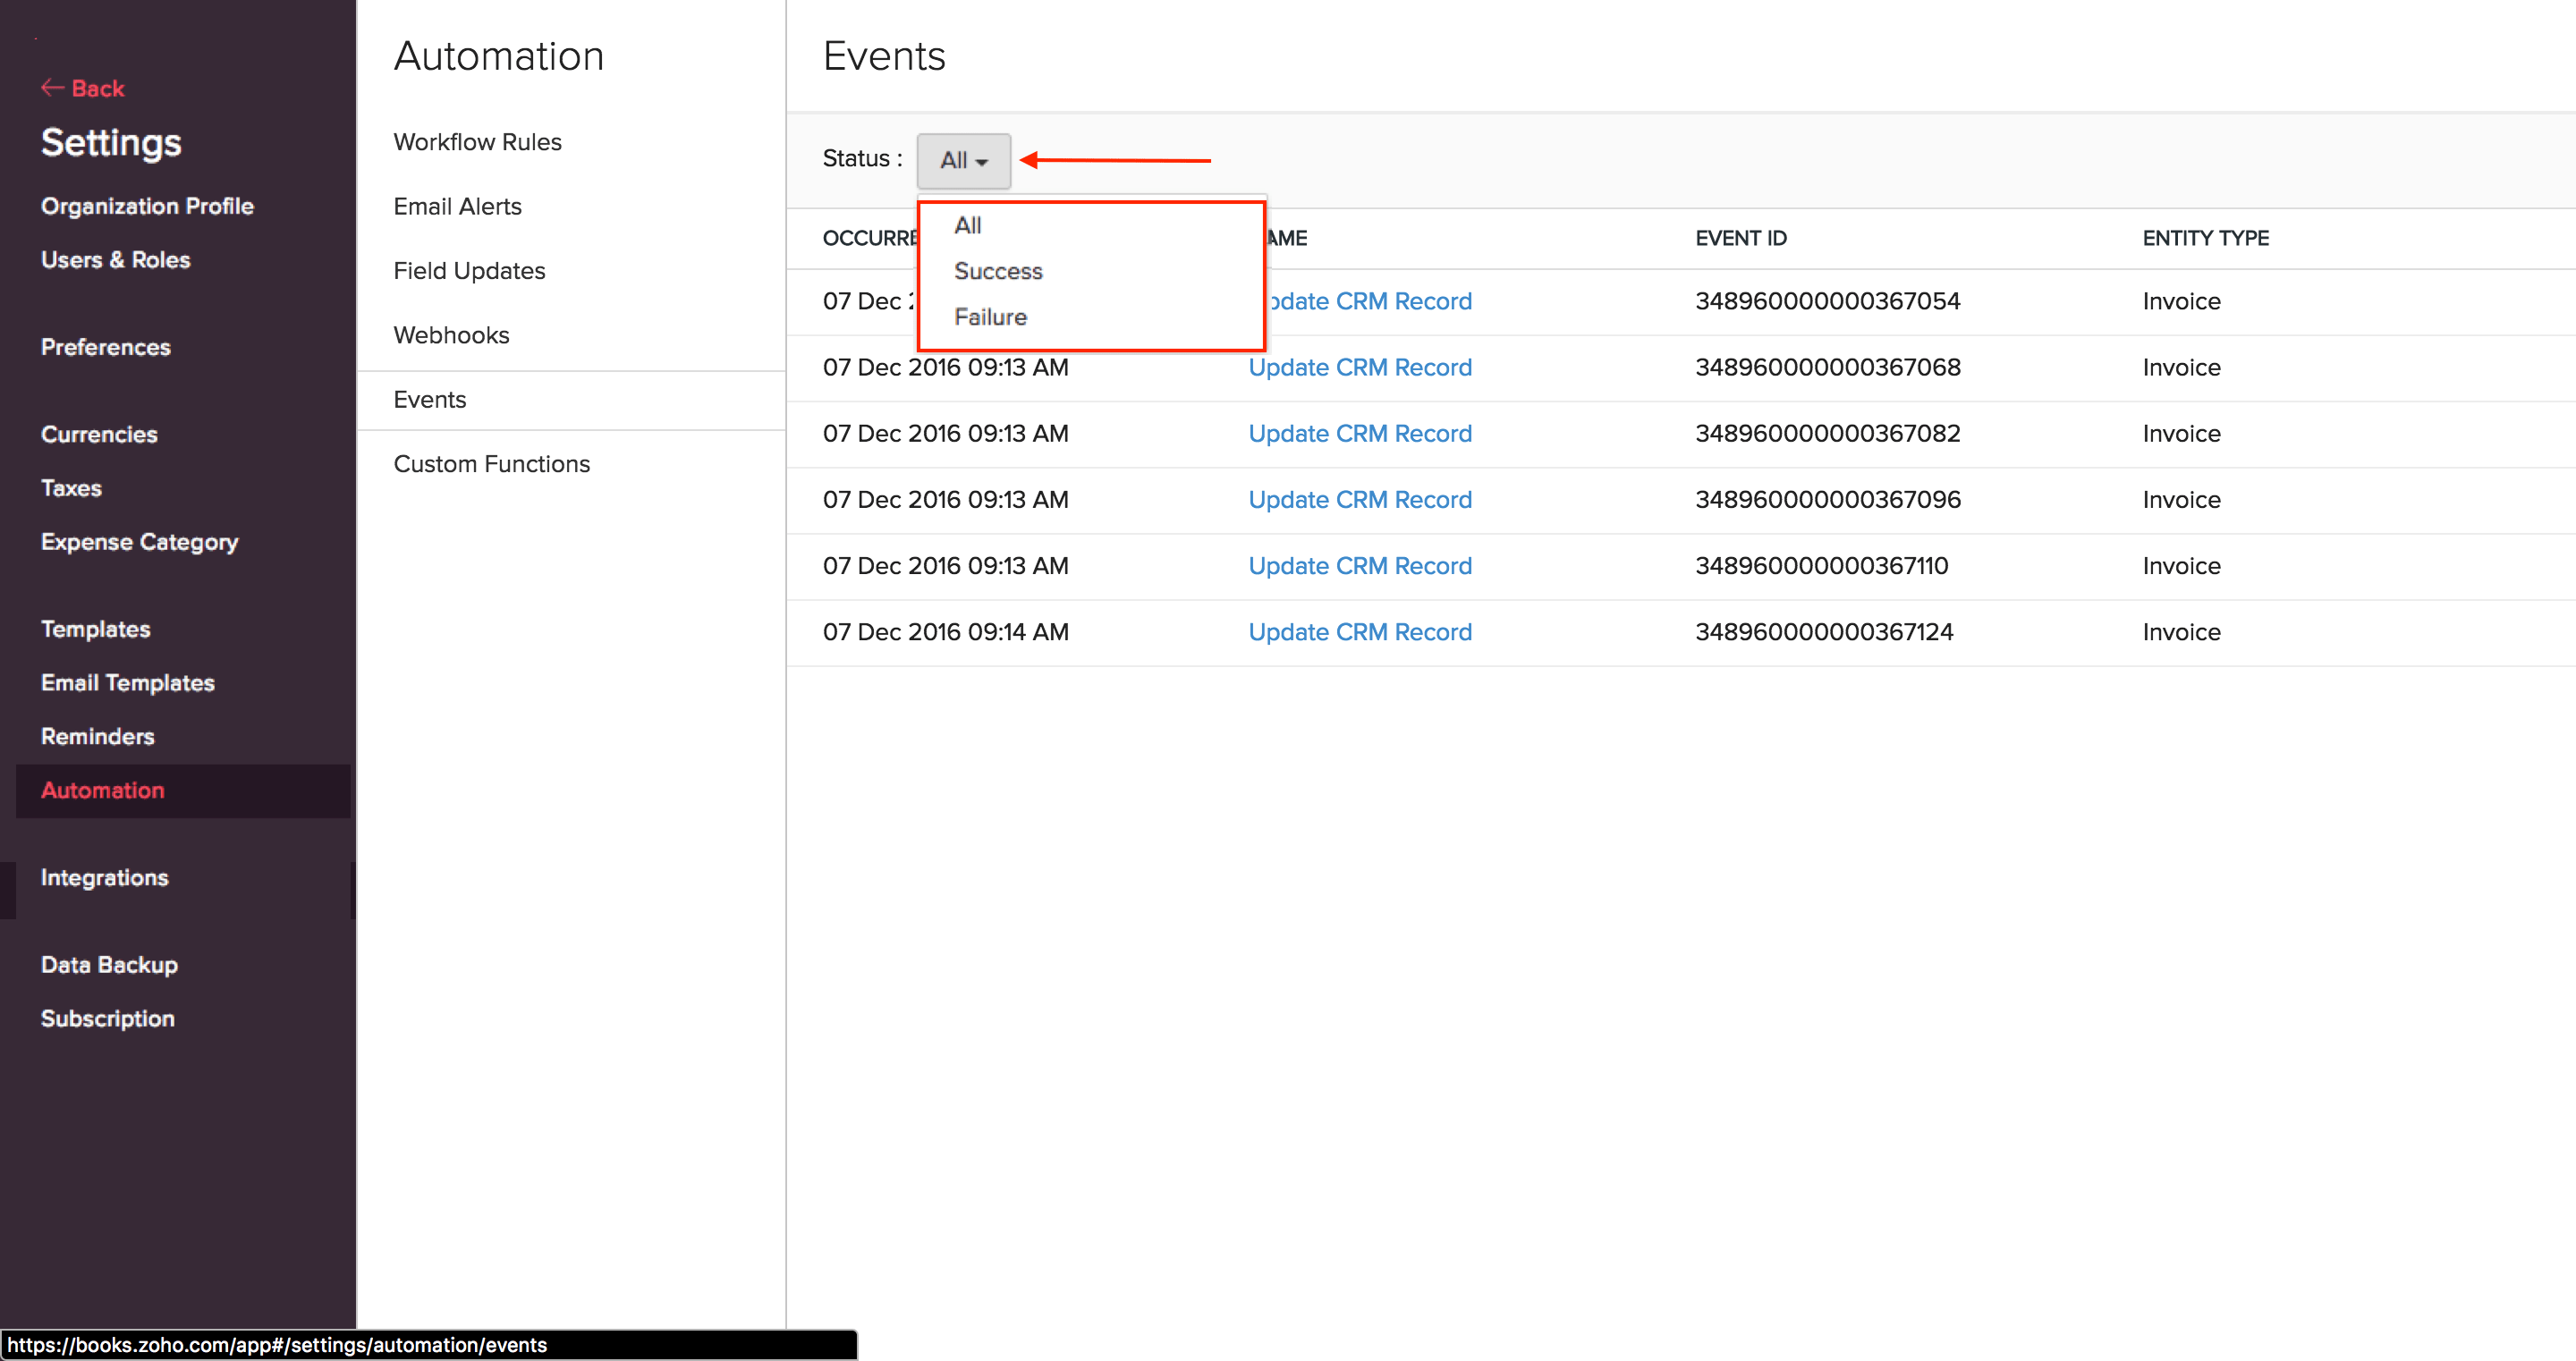
To resend a webhook,
Navigate to Events tab and click the event for which the webhook has to be sent again.
Click Resend to resend the webhook.

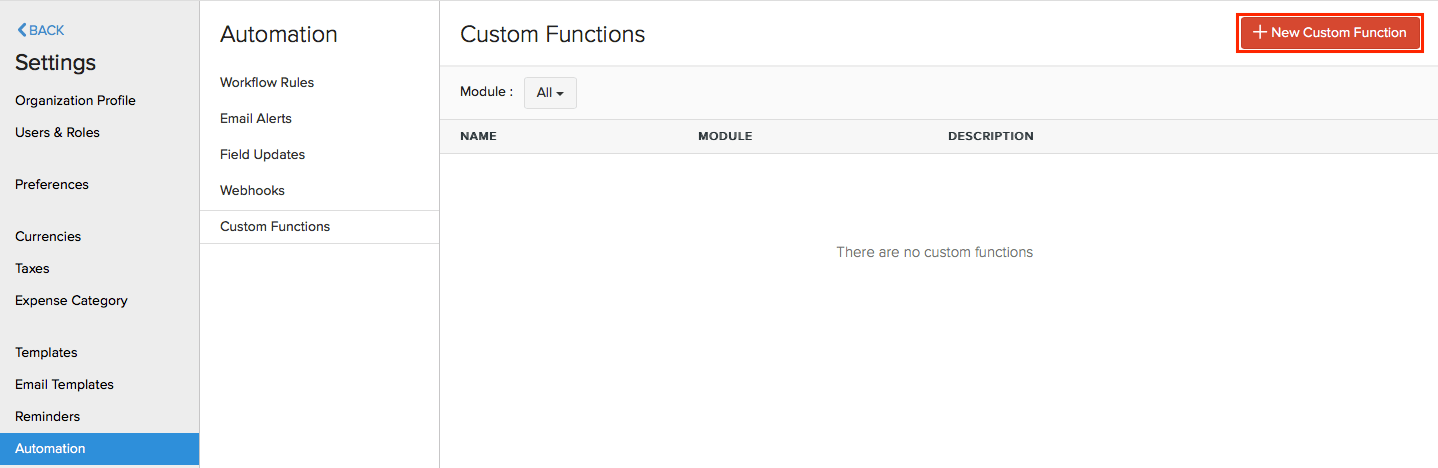
Custom Functions
Custom functions in Zoho Invoice allows you to write small pieces of code to automate your business processes. Be it providing a special discount on your customers’ invoice, or adding a late fee when an invoice becomes overdue, all you have to do is write a piece of code using Deluge script and link it to a workflow rule and automation of the process will be taken care of.
What is Deluge?
Deluge(Data Enriched Language for the Universal Grid Environment) is an online scripting language integrated with Zoho Creator. It enables users to add logic to the application, incrementally, making it more powerful and robust.
To know about Deluge, refer the Deluge Reference Guide.
If you wish to learn Deluge by writing code samples, click here.
Creating and Executing a Custom function
To setup a custom function,
- Navigate to Gear icon > More Settings > Automation > Custom Functions and click on + New Custom Function.
- Enter a name for your custom function and provide a small description.
- Choose the module for which you wish to create the custom function.
- Now, type in or drag the parameters that are mentioned on the left side of the script-box.
- Choose the parameters of your choice and set the conditions for your custom function.
- Once done, click Save for the changes to take effect.
Now, the next step is to create a workflow rule using the newly created custom function.
- Head back to the Automation section and click on Workflow Rules.
- Create a new workflow and set the triggers.
- Now, under the Actions tab, choose Custom functions and select your newly created custom function.
- Click Save.
Now, whenever the criteria is met, the workflow rule will be triggered, which in turn will trigger the custom function.
Default fields
As of now, custom functions support User, Organization, Estimate, Invoice, Customer, Recurring Invoice, Expense and Item modules.
These modules will have the following fields from which you can get the necessary paramters for your custom function.
User
The user field supports the following parameters:
| Key Fields | Description |
|---|---|
| name | Name of the user |
| zuid | ZUID of the user |
Organization
The organization map supports the following fields:
| Key Fields | Description |
|---|---|
| organization_id | Your organization ID |
| name | Organization name |
| time_zone | Time zone of your organization |
| language_code | Organization’s language |
| date_format | Your organization’s date format |
| currency_id | Currency ID |
| currency_code | Currency code |
| currency_symbol | Currency symbol |
| address | Organization address |
| phone | Organization’s contact number |
| fax | Fax number |
| website | Organization URL |
| Email address | |
| portal_name | Portal name of your organization |
Sample map:
{
	"time_zone": "Asia/Calcutta",
	"language_code": "en",
	"currency_id": "7605000000000099",
	"phone": "99999999999",
	"fax": "check",
	"website": "",
	"email": "charles@zylker.com",
	"address": {
		"zip": "624001",
		"country": "India",
		"city": "New Delhi",
		"street_address2": "Block 15",
		"street_address1": "6/35 Garden Lane,",
		"state": "Delhi"
	},
	"organization_id": "12345678",
	"name": "Zlyker Industries",
	"date_format": "dd MMM yyyy",
	"currency_symbol": "Rs.",
	"portal_name": "zylkerindustry",
	"currency_code": "INR"
}
Estimate
The estimate map supports the following fields:
| Key Fields | Description |
|---|---|
| estimate_id | Estimate ID |
| estimate_number | Your estimate number |
| date | Estimate date |
| reference_number | Reference number of your Estimate |
| status | Status of your estimate |
| customer_id | ID of the customer who is assigned to the estimate |
| customer_name | Your customer name |
| currency_id | Currency ID |
| currency_code | Currency code |
| currency_symbol | Currency symbol |
| exchange_rate | Exchange rate involved in the estimate |
| expiry_date | Expiry date of the estimate |
| discount_amount | Discount amount |
| discount | Discount |
| shipping_charge | Shipping charge entered in the estimate |
| adjustment | Adjustments |
| sub_total | Sub total of the estimate |
| total | Estimate total |
| tax_total | Total tax amount in the estimate |
| billing_address | Billing address of the customer |
| shipping_address | Shipping address of the customer |
| notes | Notes |
| terms | Terms and conditions |
| custom_fields | Estimate custom fields |
| salesperson_id | ID of the salesperson |
| salesperson_name | Name of the salesperson |
Sample map:
{
	"total": "12000.0",
	"terms": “checking",
	"estimate_id": "7605000000320001",
	"date": "2016-06-03",
	"estimate_number": "EST-000026",
	"shipping_address": {
		"zip": "94588",
		"country": "USA",
		"address": "4910 Hopyard Rd",
		"city": "Pleasanton",
		"state": "CA",
		"fax": “Fax Number”
	},
	"salesperson_name": “Salesperson”,
	"adjustment": "0.0",
	"currency_symbol": "Rs.",
	"salesperson_id": "7605000000336089",
	"currency_code": "INR",
	"shipping_charge": "0.0",
	"custom_fields": [
		{
			"customfield_id": "7605000000190011",
			"is_active": true,
			"show_in_all_pdf": false,
			"value_formatted": "Check-6",
			"data_type": "autonumber",
			"index": 1,
			"label": "auto number",
			"show_on_pdf": false,
			"value": "Check-6"
		}
	],
	"currency_id": "7605000000000099",
	"exchange_rate": "1.0",
	"status": "invoiced",
	"sub_total": "12000.0",
	"customer_name": “Customer”,
	"discount_amount": "0.0",
	"discount": "0.0",
	"tax_total": "0.0",
	"reference_number": “Ref number”,
	"notes": "Looking forward for your business.",
	"expiry_date": "2016-06-03",
	"customer_id": "7605000000258011",
	"billing_address": {
		"zip": "94588",
		"country": "USA",
		"address": "4910 Hopyard Rd",
		"city": "Pleasanton",
		"state": "CA",
		"fax": "Fax Number"
	}
}
Invoice
The invoice map supports the following fields:
| Key Fields | Description |
|---|---|
| due_date | Invoice due date |
| payment_expected_date | Expected payment date for the invoice |
| reference_number | Reference number of the invoice |
| customer_id | Customer ID |
| customer_name | Name of the customer who is assigned to the invoice |
| currency_id | Currency ID |
| currency_code | Currency code |
| currency_symbol | Currency symbol |
| exchange_rate | Exchange rate involved in the invoice |
| discount_amount | Discount amount involved in the invoice |
| discount | Discount involved in the invoice |
| shipping_charge | Shipping charge entered in the invoice |
| adjustment | Adjustments |
| sub_total | Sub total of the invoice |
| tax_total | Total tax amount in the invoice |
| total | Total amount |
| balance | Balance |
| price_precision | Number of Decimal places |
| billing_address | Billing address of the customer |
| shipping_address | Shipping address of the customer |
| notes | Notes |
| terms | Terms and conditions |
| custom_fields | Invoice custom fields |
| salesperson_id | ID of the salesperson |
Sample map:
{
	"total": "0.0",
	"payment_terms": "0",
	"terms": “Checking”,
	"price_precision": "2",
	"payment_expected_date": "2016-06-31”,
	"date": "2016-06-30",
	"shipping_address": {
		"zip": "94588",
		"country": "USA",
		"address": "4910 Hopyard Rd",
		"city": "Pleasanton",
		"state": "CA",
		"fax": "Fax Number"
	},
	"balance": "0.0",
	"adjustment": "0.0",
	"currency_symbol": "Rs.",
	"salesperson_id": “7605000000336089”,
	"currency_code": "INR",
	"shipping_charge": "0.0",
	"custom_fields": [
		{
			"customfield_id": "7605000000336081",
			"is_active": true,
			"show_in_all_pdf": false,
			"value_formatted": "INV-8",
			"data_type": "autonumber",
			"index": 1,
			"label": "AutoNumber",
			"show_on_pdf": false,
			"value": "INV-8"
		},
		{
			"customfield_id": "7605000000351027",
			"is_active": true,
			"show_in_all_pdf": true,
			"value_formatted": "01 Aug 2016",
			"data_type": "date",
			"index": 2,
			"label": "Date",
			"show_on_pdf": true,
			"value": "2016-08-01"
		}
	],
	"currency_id": "7605000000000099",
	"exchange_rate": "1.0",
	"status": "draft",
	"sub_total": "12000.0",
	"customer_name": “Customer”,
	"invoice_number": "INV-000087",
	"discount_amount": "12000.0",
	"discount": "100.00%",
	"tax_total": "0.0",
	"reference_number": “checking”,
	"due_date": "2016-06-30",
	"invoice_id": "7605000000369043",
	"notes": "Thanks for your business.",
	"customer_id": "7605000000258011",
	"billing_address": {
		"zip": "94588",
		"country": "USA",
		"address": "4910 Hopyard Rd",
		"city": "Pleasanton",
		"state": "CA",
		"fax": "Fax Number"
	}
}
Customer
The customer map supports the following fields:
| Key Fields | Description |
|---|---|
| owner_id | ID of associated owner |
| billing_address | Billing address associated to customer |
| source | Source of the customer |
| contact_id | Contact ID |
| payment_terms | Payments terms associated to customer |
| currency_code | Currency code |
| language_code | Language code |
| contact_type | Type of the contact |
| Twitter info | |
| zcrm_contact_id | ID of the contact in Zoho CRM |
| shipping_address | Shipping address associated to customer |
| pricebook_id | ID of pricebook associated |
| contact_name | Name of contact |
| website | Website of contact |
| owner_name | Name of contact owner |
| currency_symbol | Currency symbol |
| zcrm_account_id | ID of Zoho CRM account |
| custom_fields | Custom fields associated with customer |
| Facebook info | |
| pricebook_name | Name of pricebook associated |
| primary_contact_id | ID of orimary contact |
| company_name | Name of the company |
| contact_salutation | Contact salutation |
| crm_owner_id | ID of CRM owner |
| currency_id | Currency ID |
| payment_terms_label | Payment terms label |
| status | Status |
Sample map:
{
	"owner_id": "",
	"shipping_address": {
		"zip": "94588",
		"country": "USA",
		"address": "4910 Hopyard Rd",
		"city": "Pleasanton",
		"state": "CA",
		"fax": "Fax Number"
	},
	"source": "user",
	"contact_id": "7605000000197147",
	"payment_terms": "0",
	"currency_code": "INR",
	"language_code": "en",
	"contact_type": "customer",
	"twitter": "",
	"zcrm_contact_id": "",
	"billing_address": {
		"zip": "94588",
		"country": "USA",
		"address": "4910 Hopyard Rd",
		"city": "Pleasanton",
		"state": "CA",
		"fax": "Fax Number"
	},
	"pricebook_id": "",
	"contact_name": "Arun",
	"website": "www.zoho.com",
	"owner_name": "",
	"currency_symbol": "Rs.",
	"zcrm_account_id": "418070000000135001",
	"custom_fields": [
		{
			"customfield_id": "7605000000063049",
			"is_active": true,
			"show_in_all_pdf": false,
			"value_formatted": "1234",
			"data_type": "number",
			"index": 1,
			"label": "Unpaid Invoices",
			"show_on_pdf": false,
			"value": "1234"
		}
	],
	"facebook": "",
	"pricebook_name": "",
	"primary_contact_id": "7605000000197149",
	"company_name": "Zoho",
	"contact_salutation": "",
	"crm_owner_id": "",
	"currency_id": "7605000000000099",
	"payment_terms_label": "Due on Receipt",
	"status": "active"
}
Recurring Invoice
The recurring invoice map supports the following fields:
| Key Fields | Description |
|---|---|
| end_date | End date of the recurring invoice profile |
| tax_total | Total tax amount in the recurring invoice |
| discount_amount | Discount amount involved in the recurring invoice |
| repeat_every | Repetition period of recurring invoice profile |
| discount | Discount involved in the recurring invoice |
| taxes | Taxes associated with the recurring invoice |
| billing_address | Billing address of the customer |
| line_items | Line items in the recurring invoice |
| payment_terms | Payments terms associated to customer |
| currency_code | Currency code |
| last_sent_date | Date of the last sent invoice |
| total | Total amount |
| recurrence_name | Name of the recurring invoice profile |
| shipping_address | Shipping address of the customer |
| next_invoice_date | Date of the next invoice to be sent |
| recurrence_frequency | Frequency of the recurring invoice profile |
| recurring_invoice_id | ID of the recurring invoice profile |
| contact_persons | Contact persons involved in recurring invoice |
| start_date | Starting date of the recurring invoice profile |
| exchange_rate | Exchange rate involved in the recurring invoice |
| currency_symbol | Currency symbol |
| custom_fields | Recurring invoice custom fields |
| salesperson_name | Name of the sales person involved |
| salesperson_id | ID of the sales person involved |
| shipping_charge | Shipping charge entered in the recurring invoice |
| sub_total | Sub-total of the recurring invoice |
| adjustment | Adjustments made |
| customer_name | Name of the customer involved |
| customer_id | ID of the customer involved |
| status | Status of the recurring invoice profile |
Sample map:
{
	"end_date": "2016-10-15",
	"tax_total": "0.0",
	"discount_amount": "1.0",
	"repeat_every": "2",
	"discount": "1.00%",
	"taxes": "[]",
	"billing_address": {"zip":"","fax":"","address":"","state":"","country":"","city":""},
	"line_items": [{"tags":[],"tax_name":"","tax_type":"tax","item_custom_fields":[],"product_type":"service","line_item_id":"348960000000103013","discount":0,"unit":"","item_order":0,"rate":100,"item_id":"","description":"%(d)%-%(m-2)%-%(y)%","name":"","quantity":1,"tax_id":"","tax_percentage":0,"item_total":100}],
	"payment_terms": "0",
	"currency_code": "GBP",
	"last_sent_date": "",
	"total": "200.0",
	"recurrence_name": "1",
	"shipping_address": {"zip":"","fax":"","address":"","state":"","country":"","city":""},
	"next_invoice_date": "",
	"recurrence_frequency": "months",
	"recurring_invoice_id": "348960000000103005",
	"contact_persons": "[]",
	"start_date": "2016-01-07",
	"exchange_rate": "1.0",
	"currency_symbol": "£",
	"custom_fields": [{"value_formatted":"EST-001","index":1,"is_active":true,"data_type":"string","show_on_pdf":false,"value":"EST-001","show_in_all_pdf":false,"label":"Estimate Number","customfield_id":"348960000000056001"},{"value_formatted":"15 Oct 2016","index":2,"is_active":true,"data_type":"date","show_on_pdf":false,"value":"2016-10-15","show_in_all_pdf":false,"label":"Date","customfield_id":"348960000000056003"},{"value_formatted":"true","index":3,"is_active":true,"data_type":"check_box","show_on_pdf":false,"value":true,"show_in_all_pdf":false,"label":"Invoice Factoring","customfield_id":"348960000000056079"},{"value_formatted":"£100.00","index":4,"is_active":true,"data_type":"amount","show_on_pdf":true,"value":100,"show_in_all_pdf":true,"label":"Amount","customfield_id":"348960000000060003"},{"value_formatted":"10%","index":5,"is_active":true,"data_type":"percent","show_on_pdf":true,"value":10,"show_in_all_pdf":true,"label":"Percentage","customfield_id":"348960000000060005"}],
	"salesperson_name": "Arun N",
	"salesperson_id": "348960000000111001",
	"shipping_charge": "100.0",
	"sub_total": "100.0",
	"adjustment": "1.0",
	"customer_name": "iArun",
	"customer_id": "348960000000051041",
	"status": "expired"
}
Expense
The expense map supports the following fields:
| Key Fields | Description |
|---|---|
| date | Date |
| payment_mode | Mode of payment |
| custom_fields | Expense custom fields |
| is_billable | Billability of the expense |
| line_items | Line items in the expense |
| project_name | Name of the project involved |
| reference_number | Reference number of the expense |
| currency_code | Currency code |
| total | Total |
| project_id | ID of the project involved |
| sub_total | Sub-total on the expense |
| customer_name | Name if the customer involved |
| customer_id | ID of the customer involved |
| expense_id | Expense ID |
| currency_id | Currency ID |
Sample map:
{
	"date": "2016-10-08",
	"payment_mode": "Cash",
	"custom_fields": "[]",
	"is_billable": "true",
	"line_items": [{"tags":[],"tax_name":"Standard Rate","item_order":1,"tax_type":"tax","account_id":"348960000000000400","description":"Notes","tax_amount":16.67,"product_type":"goods","tax_id":"348960000000044037","line_item_id":"348960000000184015","tax_percentage":20,"item_total":83.33,"account_name":"Office Supplies"}],
	"project_name": "",
	"reference_number": "12345",
	"currency_code": "GBP",
	"total": "100.0",
	"project_id": "",
	"sub_total": "83.33",
	"customer_name": "Accounts",
	"customer_id": "348960000000111017",
	"expense_id": "348960000000184003",
	"currency_id": "348960000000000103"
}
Item
The item map supports the following fields:
| Key Fields | Description |
|---|---|
| item_id | Item ID |
| custom_fields | Item custom fields |
| tax_name | Name of the tax involved |
| zcrm_product_id | ID of the product in Zoho CRM |
| tax_id | ID of the tax involved |
| unit | Unit of the item |
| account_id | Sales account ID |
| tax_type | Type of the tax involved |
| rate | Sales rate of the item |
| account_name | Name of the sales account involved |
| name | Name of the item |
| tax_percentage | Percentage of tax involved |
| pricebook_rate | Pricebook rate |
| sku | SKU of the item |
| status | Status of the item |
Sample map:
{
	"item_id": "348960000000051011",
	"custom_fields": [{"value_formatted":"100","index":1,"is_active":true,"data_type":"decimal","show_on_pdf":true,"value":100,"show_in_all_pdf":true,"label":"Profit","customfield_id":"348960000000134003"}],
	"tax_name": "",
	"zcrm_product_id": "1665395000000205001",
	"tax_id": "",
	"unit": "1",
	"account_id": "348960000000000388",
	"tax_type": "",
	"rate": "1000.0",
	"account_name": "Sales",
	"name": "Item",
	"tax_percentage": "0",
	"pricebook_rate": "1000.0",
	"sku": "SKU",
	"status": "active"
}
A few example explaining how these fields would help in fetching the necessary paramters:
Example 1:
To fetch estimate id, use:
estimateid = estimate.get("estimate_id");
Example 2:
To fetch your organization name, use:
orgid = organization.get("name");
Example 3:
To fetch a user’s name and ZUID, use:
username = user.get("name");
zuid = user.get("zuid");
To know more about how to use Deluge scripts for writing custom functions, refer the Deluge Reference Guide.
To know more about different scenarios where custom functions could be useful, refer our Custom Function Scenarios page.
In-App Notifications
The In-app Notification feature allows you to automatically send notifications to the users within your organization regarding a specific action. The notification can be sent either once or every time an action is carried out.
You can create an in-app notification and set up the workflow in such a way that, every time a particular action occurs, the workflow gets carried out and the in-app notification flashes within the product.
To create an in-app notification,
- Click the gear icon on the top right corner.
- Select Automation > In-app Notifications.
- Click the + New In-app Notification button on the top right corner.
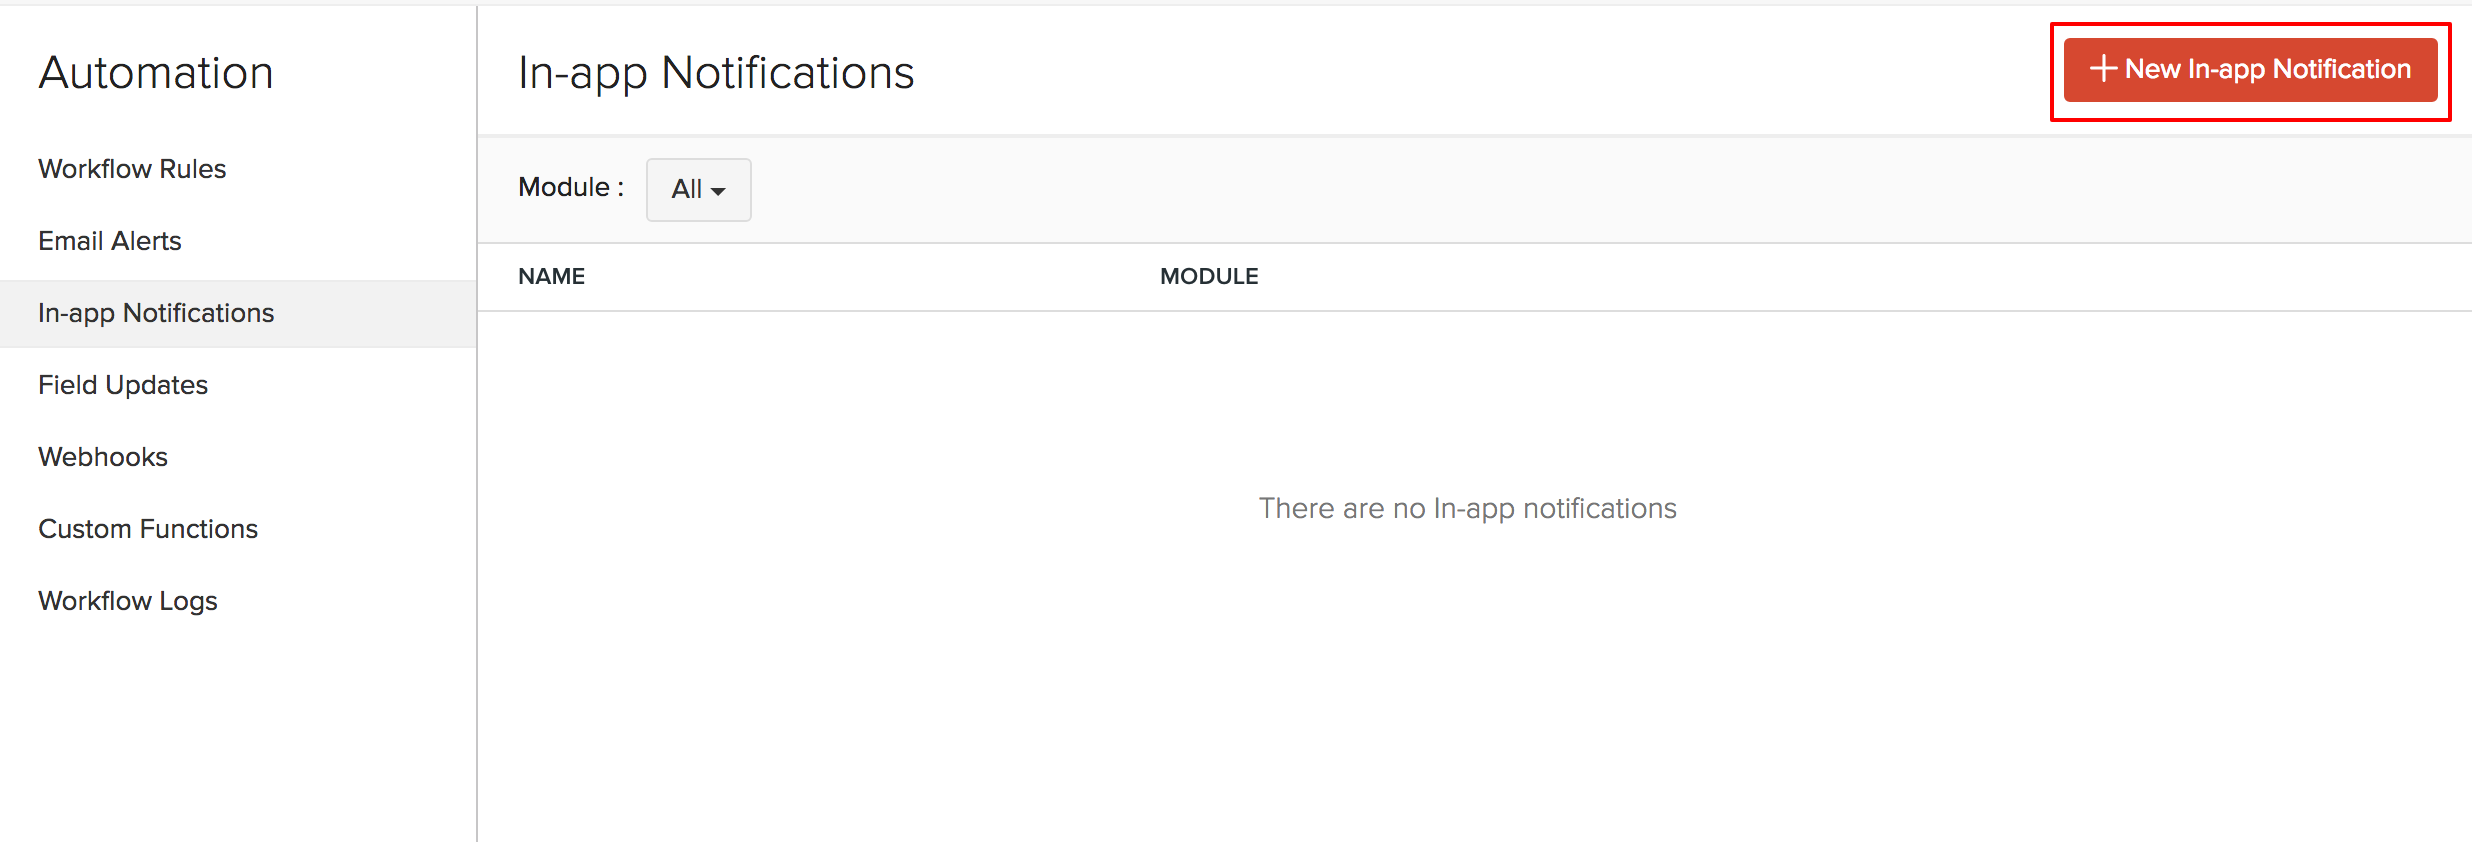
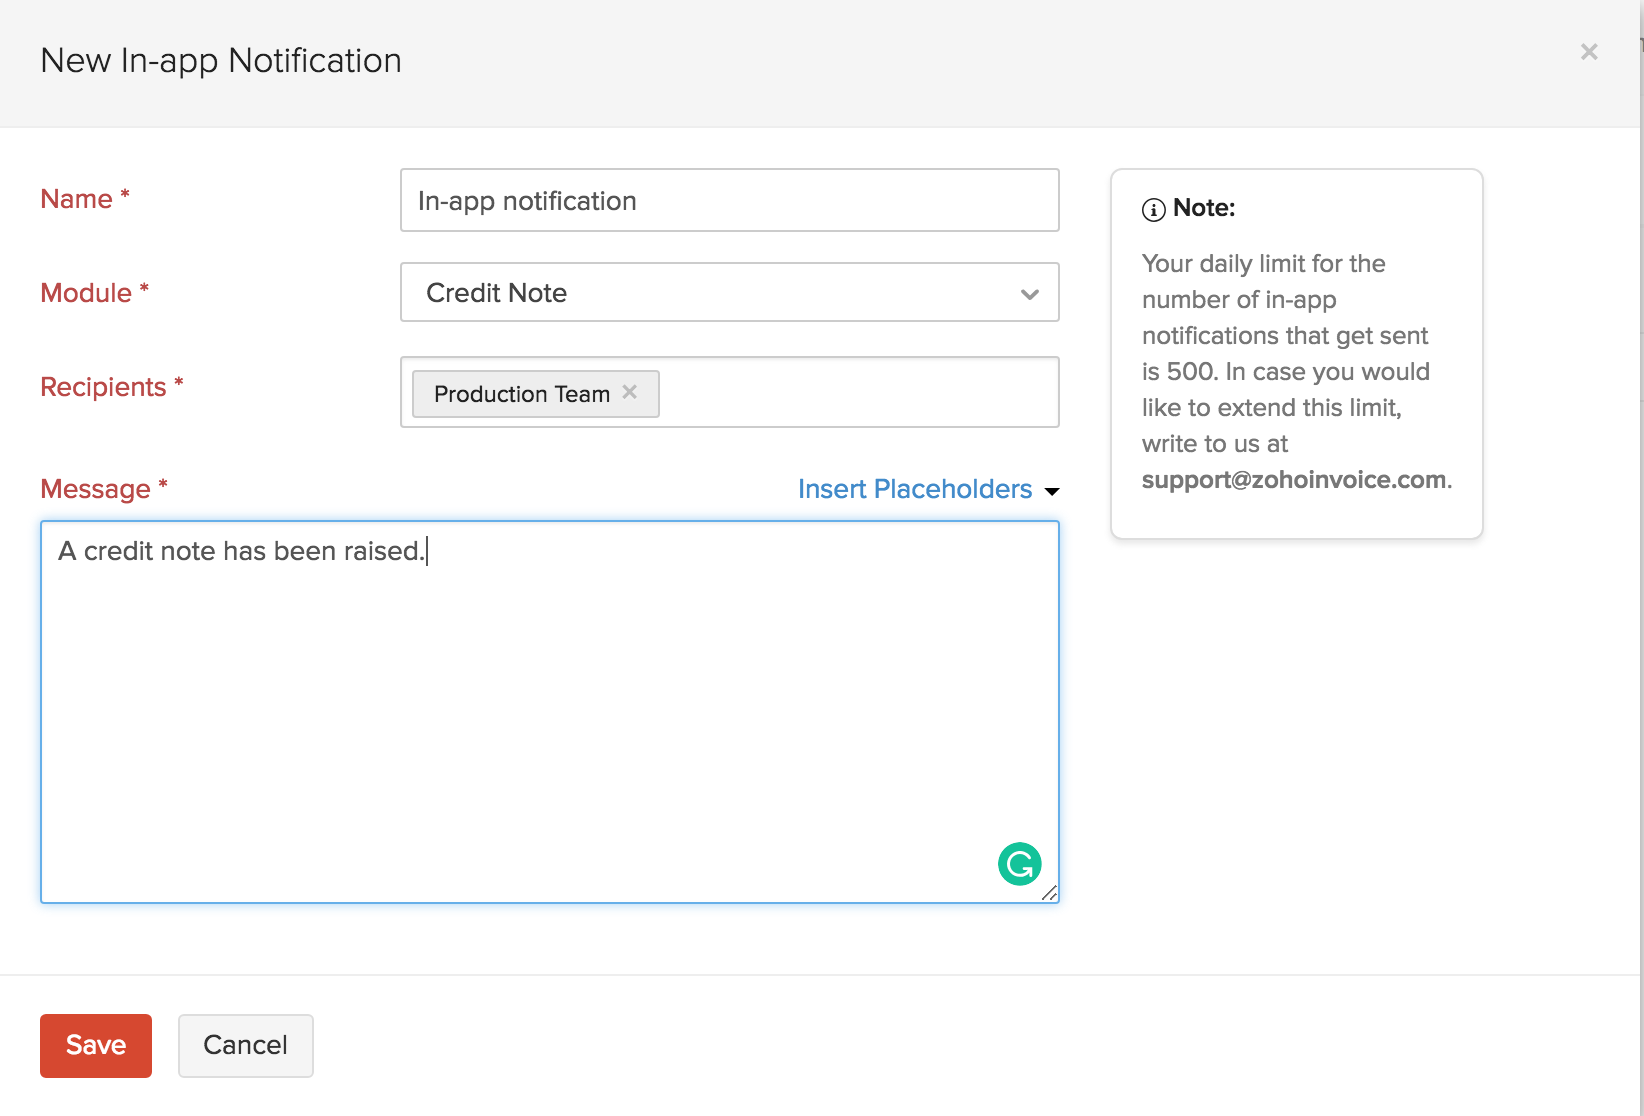
- Provide a name for your In-app notification in the Name field.
- Choose the target module from the Module drop-down. The in-app notification will be triggered when the defined action gets carried out here.
- Choose the users who need to be notified from the Recipients field.
- Enter the message that needs to be to appear as a notification. You can add placeholders to your messages by choosing them from Insert Placeholders drop down.
- Click the Save button.
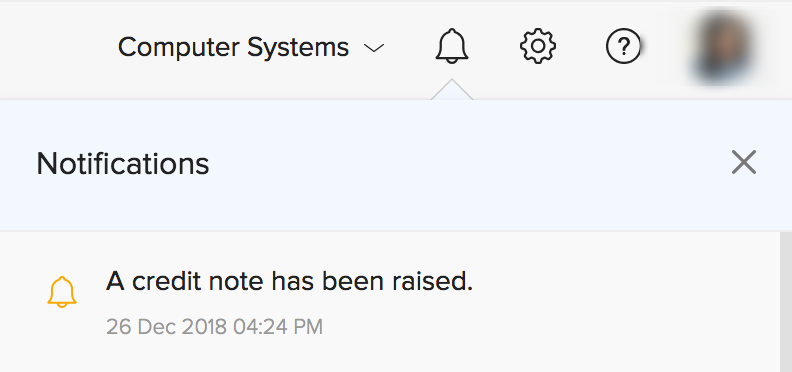
This is how the notification appears within the product.
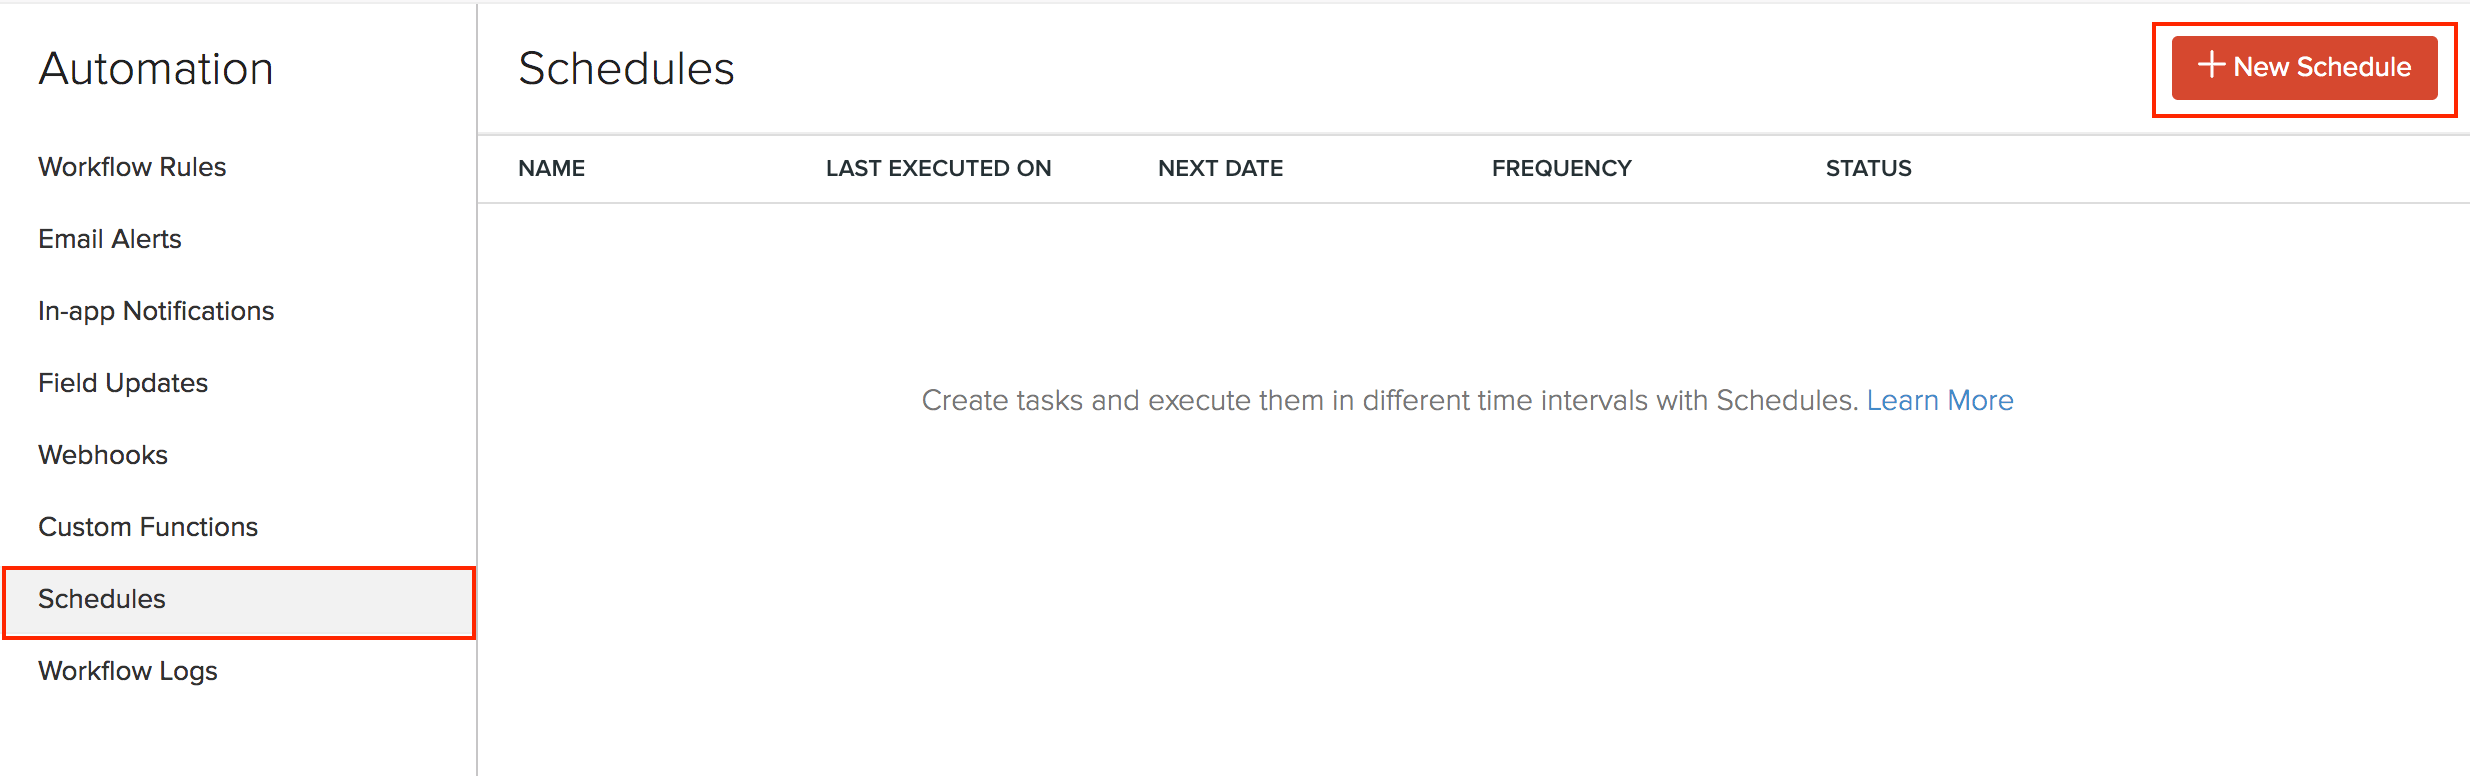
Schedules
Zoho Invoice lets you create and run predefined tasks at the specified time intervals using Schedules. You can create your tasks using a deluge script and schedule this task to be executed at a particular time or on a recurring basis.
Note: This feature is available only for the users in the Premium Plan (India) and Professional Plan (all other editions) of Zoho Invoice.
Scenarios
Here are a few scenarios where schedules can be created to execute custom actions. However, you can create schedules based on your firm’s requirements.
Scenario 1: Peter runs a supermarket. At the end of every month, he wants to give a 10% off on the Next Purchase to customers whose total purchase for the month exceeds a certain amount, let’s say 1000. Peter creates a schedule to email this to selective customers on the last day of the month.
Scenario 2: Peter uses a third party application for maintaining customer and employee database internally. He would like to sync all data from Zoho Invoice to the other application periodically. To do so, he creates a custom schedule to sync the data at 6 pm every day.
Scenario 3: Peter sets a quarterly sales target for his territorial managers. Every four months, he has to send them their Profit and Loss reports and a congratulatory email when they have achieved their target or a motivating email for them to perform better. He writes a function and schedules it to be sent to his staff once every 4 months.
Creating New Schedules
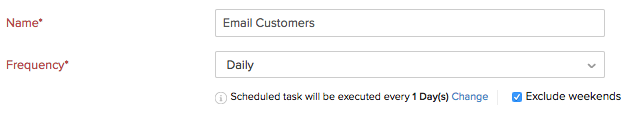
To create a new schedule:
- Go to Settings > Automation > Schedules > + New Schedule.
- Enter a Name for your schedule.
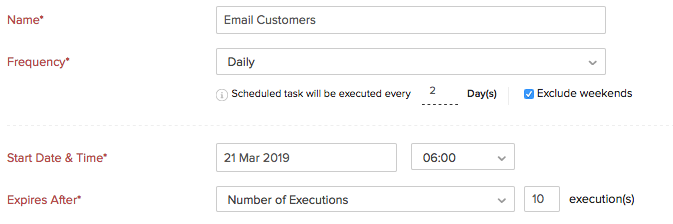
- Set the Frequency and recurrence pattern for the schedule to be executed. This can be daily, weekly, monthly or yearly.
Insight: The recurrence pattern lets you decide when the schedule should be executed. You can choose to execute it on the set frequency.
Select how frequently the task should be executed.
Daily: The task will be executed every day (or based on your recurrence pattern). You can choose to exclude the weekends.
Weekly: The task will be executed once a week. Select the day of the week on which the task should be executed.

Monthly: Task will be executed once a month. This can be a specific date or a day in a month. For example, you can choose to execute it on the 5th of every month or the Second Saturday of every month.

Yearly: Task will be executed once a year. You can select the month and specify the date of execution or specify the day. For example, the task can be executed on the first Sunday in January or just January 5.

Set the Start Date and Time.
Warning: The start date of a schedule cannot be more than one year from the creation date.
- Select when the schedule should expire. It can expire after a number of executions or on a set date or not expire at all.
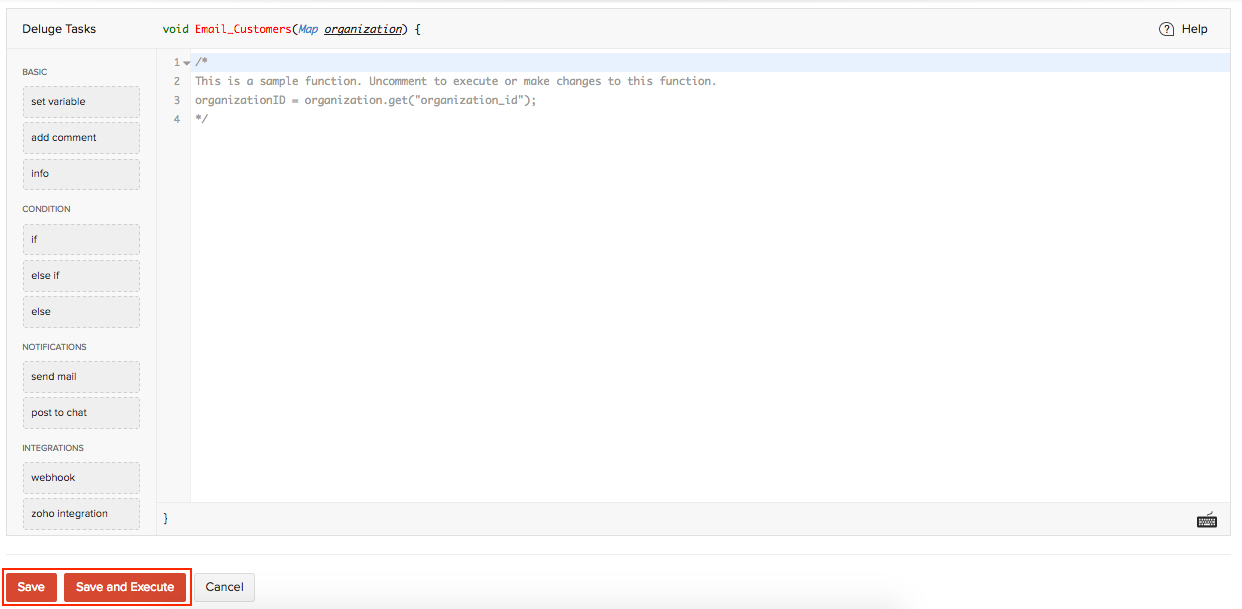
- Drag and drop options to create a Deluge function that will help to create your function.
Insight: Deluge (Data Enriched Language for the Universal Grid Environment) is an online scripting language integrated with Zoho Services. It enables you to write your own functions that lets you modify the application to suit your needs, incrementally, making it more powerful and robust.
- Click Save or Save and Execute to run it.
Insight: You can create a maximum of 10 schedules.
Sample Function:
Here’s a sample function for Scenario 1:
organizationID = organization.get("organization_id");
name = organization.get("name");
orgEmail = organization.get("email");
salesResponse = invokeUrl
[
url: "https://invoice.zoho.com/api/v3/reports/salesbycustomer?organization_id=" + organizationID + "&from_date=" + toStartOfMonth(today).toString("YYYY-MM-dd") + "&to_date=" + eomonth(today,0).toString("YYYY-MM-dd")
type: GET
connection: "invoice_api_connection"
];
salesDetails = salesResponse.get("sales").toList();
for each sales in salesDetails
{
amount = sales.get("sales_with_tax");
if(amount > "<ENTER AMOUNT>")
{
customerName = sales.get("customer_name");
customerResponse = invokeUrl
[
url: "https://invoice.zoho.com/api/v3/contacts/" + sales.get("customer_id") + "?organization_id=" + organizationID
type: GET
connection: "invoice_api_connection"
];
customerDetails = customerResponse.get("contact");
customerEmail = customerDetails.get("email");
sendmail
[
from :zoho.adminuserid
to :customerEmail
subject :"Thank you for shopping! Here's a 10% discount!"
message :"<div>Dear " + customerName + ",<br></div><div><br></div><div>We just wanted to take a moment of our time to thank you for your continuous support.<br></div><div><br></div><div> Based on your recent purchases, we'd like to offer you a 10% off on your next purchase with us. <br></div><div><br></div><div>Please show this email during billing to avail this discount!<br></div><div><br></div><div>Regards,<br></div><div>" + name + "<br></div><div><br></div><div><br></div><div><br></div><div><br></div>"
]
}
}
Learn more from the Connections help document.
 Yes
No
Yes
No
 Thank you for your feedback!