- HOME
- Ecommerce
- The Ecommerce Product Photography Guidebook
- How to Take Product Photographs that Score Conversions
How to Take Product Photographs that Score Conversions
- 13 Mins Read
- Posted on May 4, 2019
- Last Updated on October 8, 2024
- By Lauren
When we left you at the end of the last section, we recommended that you spend some time looking around—and getting inspired by—the product images on some of your favorite ecommerce websites: the competitors in your industry you look up to, the Apples and Warby Parkers and Williams Sonomas of the world. (Or whichever retailers you’re delighting in right now.) Hopefully, you’ve taken us up on that recommendation, you’ve got an assortment of image ideas you’ve gathered, and you’re feeling ready and excited to begin this phase of your ecommerce journey.
Of course, it’s one thing to be a passive observer of someone else’s product images, and another to put yourself in the position of image-creator. While you might know what you like in another company’s product images, creating those conditions in a photograph is another story. That’s why, in this section, we’re going to help you set up your own DIY “studio” and lead you, as much as possible, through the image-making process.
If you haven’t been following along with us, we suggest you take a look at our section on getting your product photography toolbox together. The last thing you’ll want is to realize, mid-shoot, that you’re missing precisely the tool that would make your good product images stellar. Plus, we covered quite a few things on that page that’ll be useful to you on shoot day—from working with manual settings on your DSLR, to pro tips on backdrops and lighting.
Once you’ve got a working knowledge of best practices, it’s time to apply them to your own products.
Planning Out Your Product Photographs
You’ve begun to pay (closer) attention to product images in general: what angles they’re shot from, what backgrounds they contain, what standards seem to hold for product photos in your industry or niche. But what do your product images need to look like if they’re going to align with your brand position? What features are you most proud of in your products, and what’s the best way to highlight them? Who is your customer persona? Where will they be using the item, and what mood do you want to evoke in them when they think about your business? You may not “use” the answers to all of these questions in a studio product shoot; but that doesn’t mean the answers won’t affect your choice of lighting, playfulness, and more. After all, you want to create images that will be meaningful to your target market.
As you reflect on these questions, make a spreadsheet of the products you need to capture in your shoot. Planning the order will be especially important if you’re working with a range of product sizes: You don’t want to be switching lenses in and out or readjusting the studio setup because you didn’t group your large and small products together. And making a list of every angle you want to capture—and every compartment and accessory you want to show—means you won’t have to set everything up all over again later to capture those shots you forgot about.
It might help to take a look at what you’ve written in your product descriptions to ensure you’re showing everything you promise in your copy. Indeed, re-reading your descriptions might spur your creative juices. If your description highlights your product’s lightweight quality, maybe you’ll take a picture of someone balancing it on a finger. If it highlights durability, maybe you prop it on a pile of rocks—because what better metaphor is there for durability?
You get the idea. Take a look at your language, and see if there aren’t ways to make that language come to life in an image.
Setting Up Your Product Shoot
Whether you’re using a lightbox, studio lights, or natural light from a window, set up your lighting situation such that the product is uniformly lit from the sides and above… and remember, “lights” can include “reflectors.” You might even connect the end of your sweep to the bottom of your camera so that light gets reflected back onto the product from the front.
If you’re using natural light, set your table or sweep up as close to the window as possible: The window should be at a 45° angle from the product—not behind it or facing it—and make sure the sunlight is indirect. If the light is too intense, diffuse it by covering the window with a white sheet or curtain, or taping over it with white paper. (Notice the insistence on “whiteness” there!) If you notice shadows falling on the product or backdrop from anything outside, readjust the setup. (It might help to have a second set of eyes in the studio throughout the shoot to look for these things.) All other light sources should get turned off. With natural light, it’ll be especially important to plan every detail of the shoot in advance. You’ll need to get through the shoot as quickly as possible if you want consistent images: The intensity and color of the light will change as the day wears on.
If you’re using studio lights, tape up the windows if it’s day. (Remember: Don’t mix light types!)
Figure in time to adequately prep your products; you may even want to do this the night before—or, if you’re using natural lighting, before the sun rises. Shine, dust, iron, wet-wipe, and lint-roll until your products are spotless: Even small specks of dust look like big imperfections in HD photography. And while you can certainly edit things out in post-production, it takes much less time to dust a physical product than it takes to “dust” an image. Line your products up in the order they’ll be shot—likely by size or complexity. As you place each product in front of the camera, observe its relationship to the sweep: If it’s too close to the backdrop, you may get some shadows. Note: Not all shadows are bad! But these are things you’ll want to pay attention to as you go.
Camera preparation will depend upon whether you’re using a DSLR, a smartphone, or another type of camera altogether. If you’re in manual mode, start with a high f-stop (f-11 or higher), a slow shutter speed (1/200 or lower), and a low ISO (100, if possible). This is typically a good exposure triangle for product photography. Check your white balance—either by setting it to “auto” and letting the camera decide, or by manually setting it according to the light source you’re using. (You’ll want to know what degrees Kelvin your bulbs are.) Take some test shots, and adjust from there.
Turn your flash off no matter what camera you’re using: It’s harsh and unflattering. Your studio setup should provide plenty of light. And set the image quality on your camera to the highest resolution possible—whether HDR (smartphone), RAW, or “superfine” (DSLR). High-quality images mean you can offer site visitors a “zoom” option on your product pages. And while you won’t lose quality shrinking a photo to fit your commerce platform’s requirements, you’ll certainly lose it trying to stretch the image out. So start large… then resize, crop, and compress your way down to the desired resolution and size.
If you’re using your smartphone for product photography, turn off all filters! Product shots aren’t about what’s “trending”; they’re meant to offer an accurate representation of your product. Don’t put yourself in a position to have to accept returned items because they don’t look like the images on your product pages.
Finally, of course, focus… whether that means tapping your smartphone screen, letting autofocus do its work, or turning the focus ring on your camera lens. On a smartphone, you might want to lock your settings in place once they’re exactly where you want them to be. This way the camera won’t auto-adjust while you’re shooting.
Product Shoot Best Practices
Let the shooting begin! Here are some tips to follow as you go:
Avoid zoom
We’ve mentioned flash already; but digital zoom is another function you should steer clear of. All a digital zoom does is crop the image as you shoot, which lowers the quality of the image and results in a grainy picture. (Note: If you’re using a DSLR, you can use an optical zoom—where the camera’s lens physically extends when you rotate it. Otherwise, just move your tripod closer to the product.)
Use delay
When you press the shutter or the capture button on your smartphone’s touchscreen, the slightest pressure can destabilize the camera. A delay—whether with the timer on your smartphone or the remote shutter release on your DSLR—allows it to restabilize before the photo is taken.
Take many images—at many angles
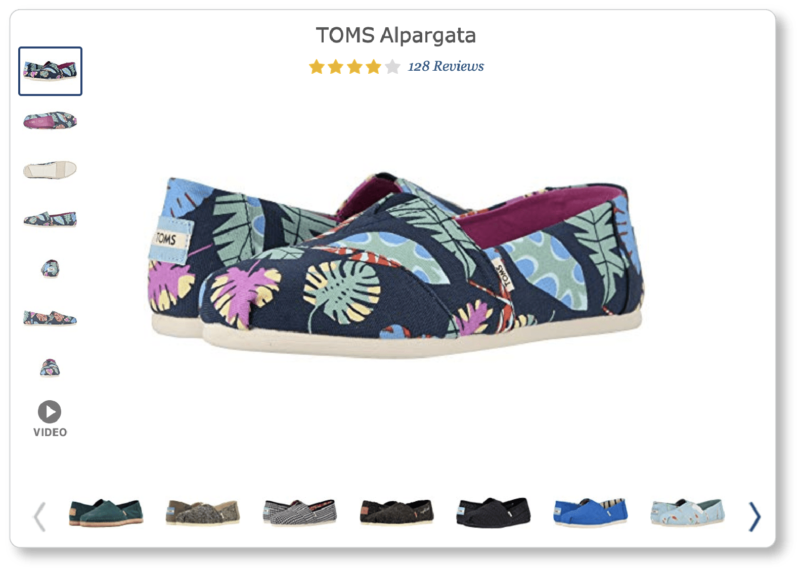
The more angles, the better. Put yourself in your customers’ shoes here: What would you want to see if you were on the verge of buying from your business? Every color and style you carry? Yes. The insides of those drawers? Yes. Show every compartment in that purse. Take photos of accessories. Remember: You’re presenting a 3-dimensional product in a 2-dimensional format. Make up for it as best you can: This will affect trust, which will influence sales. Take a tip from Zappos; they show their shoes from every angle—including the bottom!—and in every color… and they include a product video for the full 360. (You could get the same effect with a 360° product spin):
 Go for detail
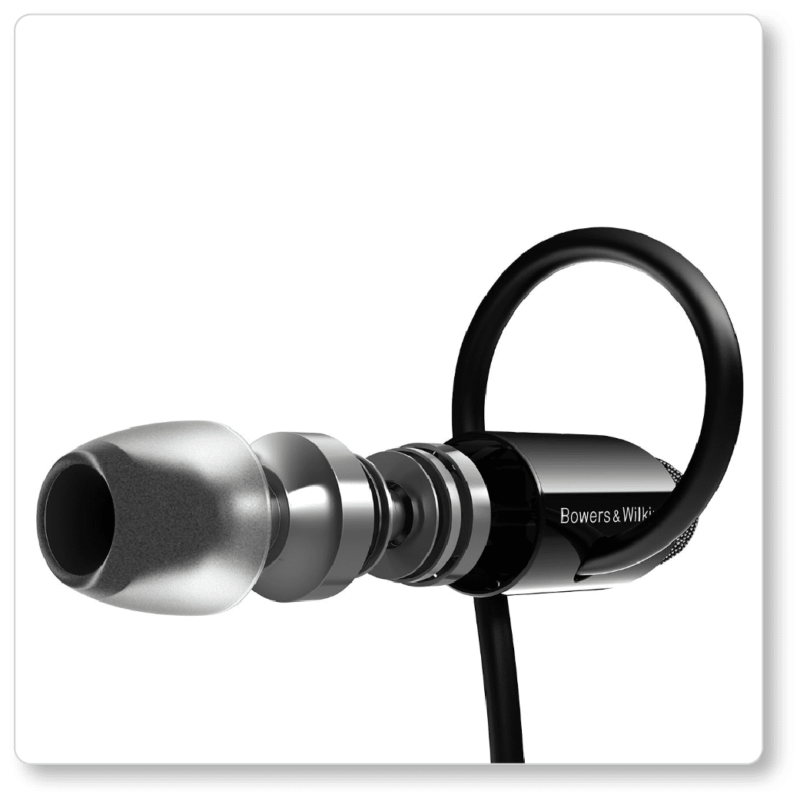
Consider offering macro shots (either with a macro lens or a built-in “macro mode”) among your product photos—to show wood grain, fabric patterns, and your product’s other intricacies. Again, pick up your product as though you were a prospect. What details would you inspect? Textures? Zippers? Buttons? Offer close-ups of these things to give them as “tactile” an experience as possible. (Note: Most macro shots require a shallow depth of field. If you’re using a smartphone camera, this may mean using portrait mode. With a DSLR, it means shooting at low aperture.) Here’s how Bowers & Wilkins does it:
Leave enough space around your product for cropping
This sounds obvious; but it’s worth saying. If your product fills the entire frame, you won’t be able to straighten your image or crop where necessary. (And since we’ve mentioned it, consider using the grid function on your camera. It’ll help you line up your shot properly and center your product, so you’re less likely to need to straighten and crop.)
Pause to review
While you’re shooting, there are some things you’ll want to pay exquisite attention to:
- Shadows. Slight shadows will give the product depth, but too much or too many are distracting.
- Product colors. Are they true to life in the images? Are they clear and vibrant? You may need to manually adjust your white balance if your camera isn’t interpreting the colors as close to reality as possible.
- Product edges. Pay particular attention to where your product “meets” its background. Do the edges contrast with the background, or do they wash out? Play with your exposure triangle if the latter is the case.
- Product cleanliness. We know! You just dusted! But as you surely know through life experience, dust doesn’t take a break. To be sure you catch it, view your images at 100% when you pause to review during the shoot. Reviewing a low-resolution photo puts you at risk of missing small imperfections. Zoom in and scroll around—and check your product sharpness, while you’re at it. Make sure you see what the camera sees.
Take notes as you go
Literally. Write down everything: location, time of day, weather conditions, lighting conditions, light and camera placement, tripod placement and angles, exposure triangle, and so on. You’ll want to replicate these conditions as closely as possible in future product shoots in the interest of uniformity. Which brings us to…
Aim for consistency
Whatever aesthetic decisions you arrive at—background, camera angle, and so on—apply them across the board. When prospects are met with consistent imagery on your ecommerce site, they’ll be more likely to presume that your choices were intentional, lending credence—and a sense of professionalism—to your business. It also makes it easier for prospects to compare products at a glance, which makes for quicker purchasing decisions.
Shoot like editing tools don’t exist
If your mantra during your product shoot is “That can be fixed in Photoshop,” you’re simply going to end up with less-than-stellar photos. Don’t give yourself that out. Editing takes time and money; you’ll save both by shooting as closely as possible to your desired final images.
Artificial Light v. Natural Light
At this point, we don’t have to remind you about the importance of light to your product shoot: It’s what makes photography possible in the first place. But if you’re looking for a quick answer to “Which kind of light is better?” the jury is out on this one. Much will depend on your product, your budget, your weather, and your schedule. That said, here are the pros and cons of each:
Pros of using natural light:
- It’s budget-friendly (and you can still get effects that people spend big money on artificial lighting to achieve)
- It’s less tedious to set up
- It gives your products… well, a more “natural” look
- It’s great for lifestyle shots or images with people in them (human subjects tend to look better in natural light)
Cons of using natural light:
- It’s more difficult to maintain consistency across shots and sessions
- (Therefore) It requires more time in post-processing
- It limits the times of day you can shoot
Pros of using artificial light:
- It allows you to shoot at any time of day or night—without feeling rushed
- It allows for greater consistency across shots and sessions (and less time in post-processing)
- It gives you significantly more control over conditions
- It’s great for products that have physical details you want to highlight
Cons of using artificial light:
- It can be more tedious to set up (if you’re using studio lights rather than a lightbox, that is)
- It can be expensive
- It comes with a learning curve
- It can (depending on your bulbs) produce blue or yellow tints that won’t represent your product as accurately as possible
Types of Ecommerce Studio Product Images
As you’ve noted, product shots can be slotted into two main categories:
1) Product-only images—also called “studio images”—which are the kind we’ve been discussing so far. These are the clean, white-background images that feature only your product, in its best light. They’re best suited for your product pages; and their role is to “describe” your product at a glance and lead visitors toward purchase.
2) Lifestyle images, which show your products in their “natural habitat” being used by their target market. While these shots are often used for blog posts, social media posts, and email campaigns, you’ll want them on your homepage and category pages too—after all, they spur emotional engagement and prompt prospects to self-identify as your audience. While studio images are the “bread and butter” of your product photography, lifestyle images will evoke a mood, clarify your market, and help them visualize how your product will enrich their lives.
We won’t dive into lifestyle shots here; they’re their own genre and require different techniques than studio images do. But since we’ve got you in the studio, it’s worth mentioning a few other shots you might want to get while you’re here. After all, while your product team may need images with white backdrops, your marketing team may want the product’s packaging in the image or the component parts photographed separately. You get the idea:
Scale shots
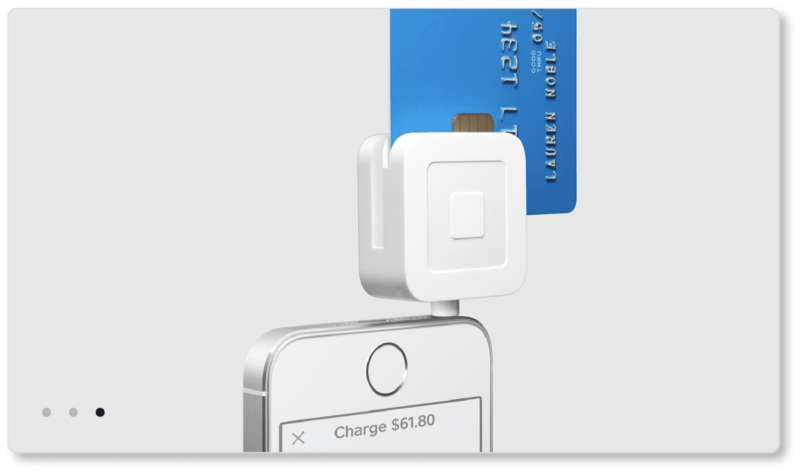
Scale shots introduce a second item into the photograph that helps prospects get a better sense of your product’s size and dimensions. (You’ll be giving dimensions in your product descriptions; but visitors may want a visual sense of scale.) Obviously, the item/s you introduce into a scale shot should be items whose sizes visitors will be familiar with. Less obviously, they should be as consistent as possible with your brand… or at least consistent with the product in question. Don’t just grab a pencil, a coin, or a ruler because it’s within reach. Put a flower—or a whole bouquet—in that vase so that prospects can see how wide its opening is. Place your travel case beside a passport for comparison, and so on. Here’s how Square does it with their chip reader:
 Group shots
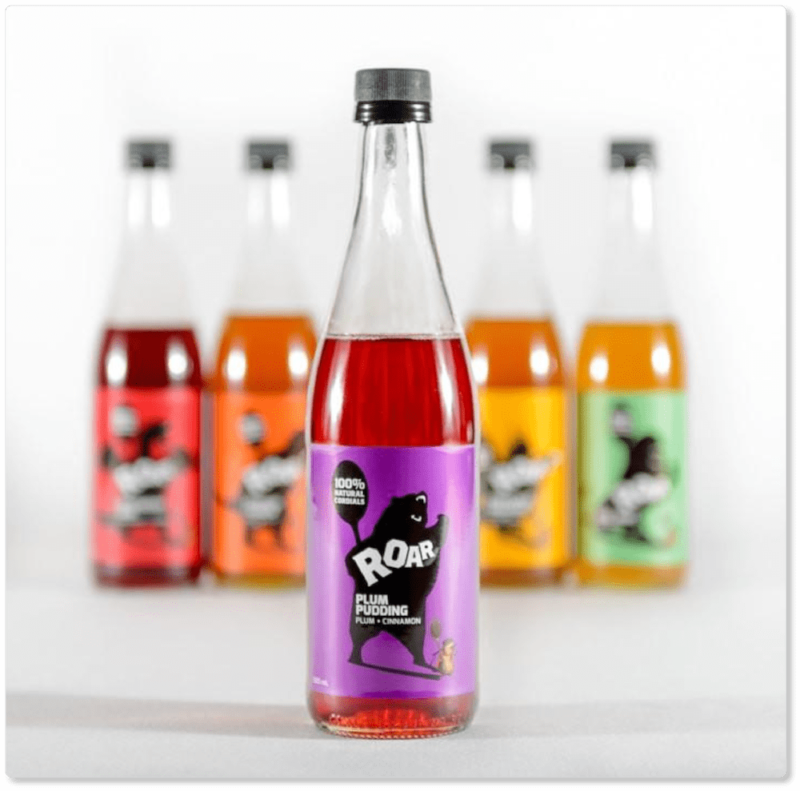
This kind of product shot is great for products that get sold together—whether in bundles or kits, or simply because consumers tend to buy them together. Granted, you’ll want to take individual shots of the items in these groups; but displaying an assemblage will remind users of the breadth of your offering, or the array of options that they have; and it works as a subtle up-sell. Here are two examples from Old World Kitchen (notice the garlic for scale) and Roar Cordials, which uses the group shot to showcase variety:

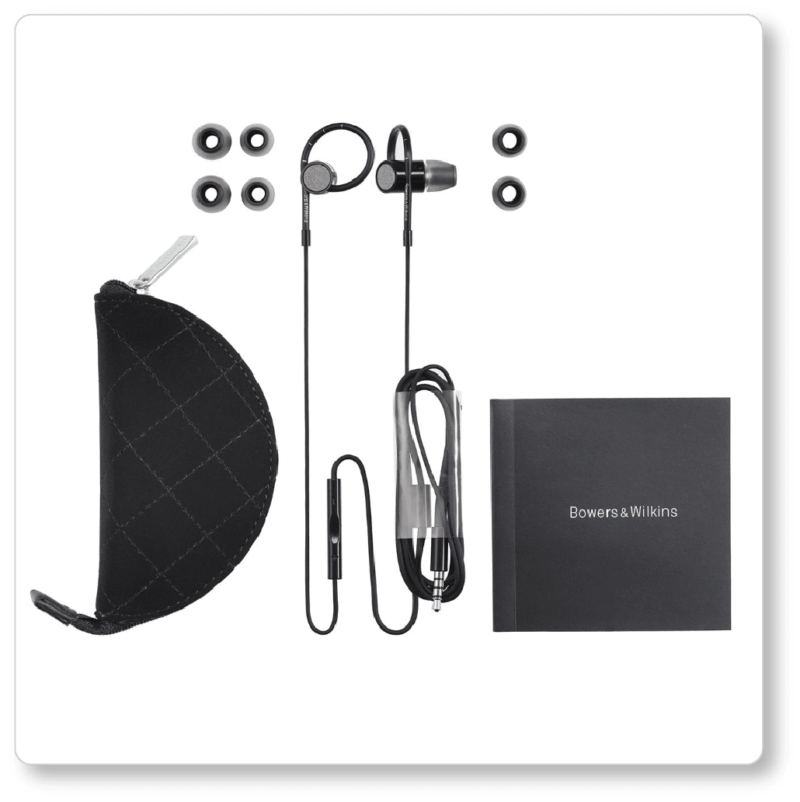
Component shots
Again, take a look at your product description. If it mentions additional components, accessories, or add-ons, prospects should be offered images of those parts—whether separately or together. Here’s Bowers & Wilkins again:
 Packaging shots
These are exactly what they sound like… and if you’re trying to grow brand awareness (which you should be!), you’ll want to include them. It’s a lot more difficult to win customer loyalty if your target market can’t look at a logo and know it’s yours. Notice how Bowers & Wilkins included their packaging—logo and all—in the shot above.
Staged shots
These are sometimes called “in-context” shots; they help prospects visualize your product in the context of a “natural” or “real-world” setting: Think linen napkins beside that set of dishes, or lavender sprigs arranged around the oils you’re selling. (Staged shots have the double advantage of showing scale.) As is the case with lifestyle photography, be sure that whatever items you include in this shot don’t distract from the product at hand: You don’t want prospects to be unclear about which items in the photograph you’re actually selling.
Model shots
Of course, you see this image type most often for clothing stores, and it can be a great alternative to using a mannequin. With human subjects, you’ll need to play around a bit with your exposure triangle—especially if you’re asking models to move or make gestures so that prospects can see how your material falls, drapes, or hugs. For your product pages, we’d continue to recommend a white background—though when it’s time to play with models in your category pages, you can let your imagination run as wild as it wants.
These image types all fall under the category of “studio photography,” but they give you a little more room for creativity than your product-only shots.
Now: Get playing!
Hopefully you’ll have taken the most “publishable” product photos possible during your shoot… and yet editing is virtually inevitable. In the next section, we’ll discuss best practices in post-production—including what tools to use and what elements to add and eliminate in your product photos.