- HOME
- Ecommerce
- The Ecommerce Product Photography Guidebook
- Editing Product Images for Your Ecommerce Site
Editing Product Images for Your Ecommerce Site
- 14 Mins Read
- Posted on May 3, 2019
- Last Updated on October 8, 2024
- By Lauren
As a general business practice, we wouldn’t advise staunchly maintaining “perfection” as a goal: Otherwise, you’ll never bring your product to market, launch your site, or put yourself in a position to experiment. But when it comes to product photography on your ecommerce site? We give you permission to strive for perfection. Remember, almost half your prospects believe that high-quality product images are the most important factor in deciding whether or not they’ll make a purchase from you. And putting in the work to create stellar product images now means you’ll not only be able to offer prospects an outstanding site experience when you open your virtual doors; you’ll also have images ready to use in social and email campaigns to drive traffic to your store.
In other words, your off-site marketing will be half done.
Indeed, editing product images (“post-production processing”) is virtually inevitable when it comes to product photography. If you’ve been following along with us, you’ve taken the time in the studio to get your images as nearly perfect as possible—the right backdrop, the right studio lighting, the right exposure triangle—but now it’s time to “professionalize” your results. Photo editing won’t turn bad product photographs into great marketing materials; but it will turn good results into remarkable ones.
Again, if you’ve followed our best practices for your shoot, the editing process should be rather simple. In fact, better to think of it as “polishing” or “tweaking” than “editing.” You’ll just be doing a few basic touch-ups—background removal, cropping, color correction, possibly adding shadows—for a crisper, cleaner, more professional aesthetic. Keep that mantra—”crisp, clean, professional”—in mind as you work. And remember, the goal is to create a set of images that represent your product as truthfully and accurately as possible. Post-production editing is not about making your product seem like something it’s not. Misrepresenting your offering will only lead to dissatisfied customers, negative reviews, complaints on social media, high return rates… you get the idea. All the things you don’t want.
Below, we cover those common product photo edits. We offer a shortlist of tools for your DIY product photography edits. And if you decide you’d prefer to outsource this part of the journey? We have suggestions for that as well.
Either way, read this first. You may discover that the process is much simpler than you’d imagined. After all, no one’s asking you to master every imaginable Photoshop feature. You’ll only need a firm grasp of a few processes. As we’ll discuss below, there are tools out there that’ll streamline your editing workflow and maximize your productivity. And if post-production feels intimidating, remember that whatever software you choose has plenty of tutorials (on YouTube, Vimeo, or their own websites) that walk you through each of the below processes step-by-step.
Product Photography Editing 101
Admittedly, editing product images can be rather time-consuming—especially initially. Whatever software or apps you choose will demand a bit of a learning curve, some trial-and-error… and of course, the more powerful the tool, the greater the curve. But with some persistence, you can certainly do it all yourself. And once you get the hang of your tool of choice, you’ll be churning out site-ready images with increasing speed.
Before you dive in, you’ll want to decide on your editing software and take some time to play around so that you’re comfortable with it when it’s time to do The Real Thing. If you’re not sure what software to use yet, we’ve got some suggestions for you further down the page. (You’ll notice we mention Photoshop quite a bit here, because it’s the standard program for post-production—not to mention it’s become more affordable since Adobe shifted to a subscription model. You can get the the Creative Cloud Photography Plan, which combines Photoshop and Lightroom, for $9.99 a month. But you don’t have to use Photoshop! Just make sure you use a tool that allows you to follow the best practices below.)
Once you’ve chosen your software, take some time to review all the images you captured during your product shoot. Choose the strongest ones—the ones that are most ready to be published—transfer them to your computer, and either delete the others or move them to a separate folder so they don’t get in the way. Note: Even if you’ve taken the photos on your smartphone, your best bet is to upload the images to a computer. A bigger screen means you can see the images in greater detail, and more quickly spot any imperfections in the photograph.
Be sure you only delete the images that you’re absolutely not going to use! And before you start editing, make duplicate copies of that batch you’ve just uploaded. You’ll want access to the originals in case something goes awry in editing.
Once that’s done, come along with us, as we take you through the fundamentals of product image editing.
Background Removal
We know… we spent all that time having you set up a white sweep for your product shoot; and now we’re telling you to removethe background? Well… yes. But remember: The sweep wasn’t there to be a backdrop; it was there to prevent color spills and to ensure that the “true color” of your product was represented as accurately as possible—in other words, to keep you from having to do much color correction now. (Indeed, if your photos were properly taken, you’ll probably notice that your “white backdrop” looks more light grey than it does white.) What’s more, photographing your product in sharp contrast with a white background makes it easier to keep a clean line when you’re removing the background. Cleaner, crisper images? Check.
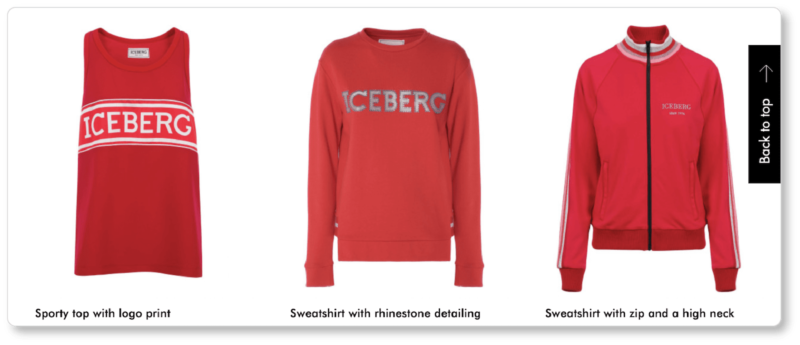
This process will be especially important if you used a mannequin for your shoot. This is something you should do if you sell clothing; it helps prospects understand how the material falls and how the item fits so they can better picture themselves wearing it. But you’ll ultimately want to remove the mannequin, leaving only the article of clothing, as Iceberg does:
Of course, you don’t have to remove the background; but the fact that white backgrounds are an industry standard (76% of product images are filled in with white backgrounds and another 15.7% are given transparent backgrounds) should tell you something. Indeed, there are a world of reasons to do so: It decreases file sizes, eliminates shadows and other distractions, and makes your images consistent with the standards on third-party marketplaces such as Amazon or eBay. As for transparent backgrounds, they’re useful for repurposing in promotional materials that have darker backgrounds.
The best tool for background removal is the pen tool in Adobe Photoshop. You can learn how to use Adobe’s pen tool for this purpose at Clipping Path King; or if you learn better through video, try CreativeSalak’s YouTube video. A quick Google search—or Adobe’s user forum for Photoshop—should help with any lingering questions. Photoshop also offers a quick selection tool (“Select and Mask”); but it leaves Photoshop to determine the product’s outline rather than giving you full control. As such, you run the risk of the platform cutting into your product. If you’d like to play with a slightly less expensive option, Clipping Magic is a strong online tool.
If you’d prefer to outsource this part, on the other hand, Pixelz offers both background removal and the invisible (or “ghost”) mannequin effect—an effect you can get with Photoshop as well. Other options include Pixc (which offers both a service and a tool for DIY editing) and Tucia… though these are hardly the only options. Do some research or ask around and see what’s getting great reviews now. And remember: If your products are detailed and intricate, you’ll want to outsource to a service that edits by hand rather than with automated software.
Spot Retouching
If you were following along with us for your product shoot, you cleaned your products (and cleaned them again!) before photographing them. But dust will be dust, and fingerprints will be fingerprints. Whatever blemishes you notice, attend to them. In Photoshop, for instance, you have a few options, including the Clone Stamp tool and the Healing Brush tool. But you may not need an “advanced” editor for minor touchups. In fact, if you must edit on your smartphone, there are plenty of photo retouching apps out there.
Color Correction
Once backgrounds are removed and blemishes are fixed, it’s time to make those minor adjustments that ensure your photographs are as truly reflective of your products as possible… and to make them “pop” a bit more on the screen. The most important of these processes is color correction. Now, hopefully you were as careful as possible with the white balance on your camera during your shoot… but maybe the bulbs you used left a slightly blue tinge on your product; or the light changed while you shot, or you switched cameras between sessions—and different cameras capture color just a bit differently. Color correction allows for consistency across images—even when you change your camera out or the sun won’t stand still in the sky. What’s more, some colors (neons, for example) are simply more difficult to “capture” in a photograph, and so will likely need to be tweaked in post-production regardless.
Whatever software you’re using, adjust the color balance of your photographs until its colors match the colors of your product in real life. (Photoshop alone has a number of color correction tools, the Curves adjustment is one of them). But remember: It’s called “color correction,” not “color embellishment.” You want your customers to make informed purchases based on genuine visual information. Prospects are relying on your images in their decisions about whether to buy, so keep them at the forefront of your mind. Your mantra at this moment? “No surprises.”
While you’re at it, there are a few other elements you can look at in your editing tool. Increasing contrast will make the light areas of the photograph lighter and the dark areas darker, creating a starker difference between the two. Increasing exposure will make the wholeimage brighter. (Conversely, decreasing it will make the image darker.) Highlights or shadows will give you an effect similar to contrast, but preserve more detail. Clarity or sharpness will make the images’ details pop, giving them back any dimension they lost in the capture. If you’re using the camera app on your smartphone to edit—which, again, we don’t necessarily recommend—you’ll probably use sliders to adjust these. If you’re using editing software on your computer, the tools to make these adjustments should be easy to access.
Again: If you’re pushing each of these tools to its limit, you may be better off returning to the studio to retake your photographs with better exposure and balance. The more you mess with them, the more likely you are to diminish the quality of the image, its resemblance to your product… or both.
Batch Process Your Corrections
We’ve spoken at length about how important image consistency is to users’ experience of your ecommerce site. It helps them compare your offerings and make buying decisions more quickly; it demonstrates your professionalism (which signals trust); and there’s a psychological comfort that’s evoked in that visual uniformity. Now: What if we told you there are editing tools you can include in your workflow that automate that consistency for you?
Color, white balance, exposure, warmth, contrast, and more can be adjusted across images with software such as the Adobe Creative Cloud. After all, once you’ve struck the perfect balance, the last thing you want is to repeat the same series of adjustments on every single image: Not only is this time-consuming, but you also run the risk of manual errors and inconsistencies. Photoshop’s “Actions,” for example, virtually records the steps you take to edit an image, then re-applies those steps to the other images you feed it. And there are a variety of ways to batch edit in Lightroom, replicating adjustments across an entire library or selection. Batch processing drastically speeds up the editing process, while creating a standard you can “hold” all your images to.
Shadow Manipulation
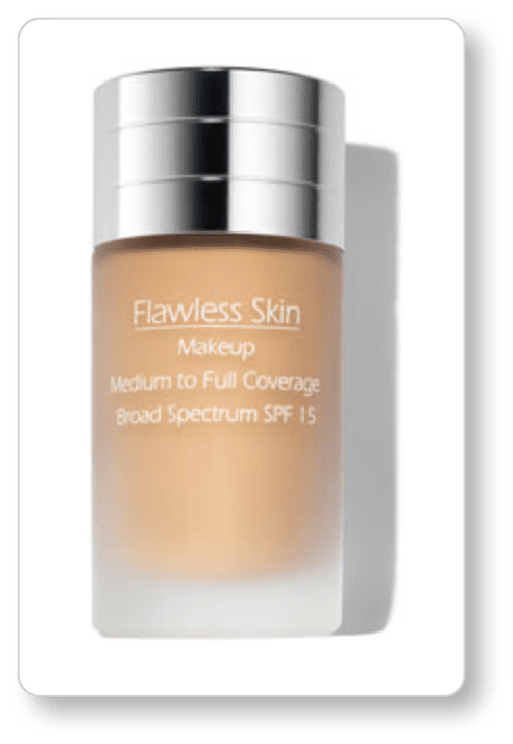
Remember, there’s a difference between the shadows that fall on your product (the ones that obscure its details or distract visitors from the object at hand) and the shadows your product casts (the ones that give it depth and dimension). You don’t want the former… but you may want the latter. Indeed, subtle details like the skillful use of shadows can make your product images appear more professional, ultimately increasing your sales. The beauty product industry tends to pay exquisite attention to shadows; here’s an example from Prescriptives:
There are two basic rules when it comes to adding shadows to your product images. The first (consistency!) you already know: All products that fall into the same category should cast the same kinds of shadows. The second? Your shadows must look realistic. Of course, you may have gotten those natural-looking shadows… well, naturally, thanks to the position of your light source during your photo shoot. And if all your products are of similar sizes and shapes, this might work for you. But if they’re not, you might achieve more consistent “natural” shadows with your photo editing software.
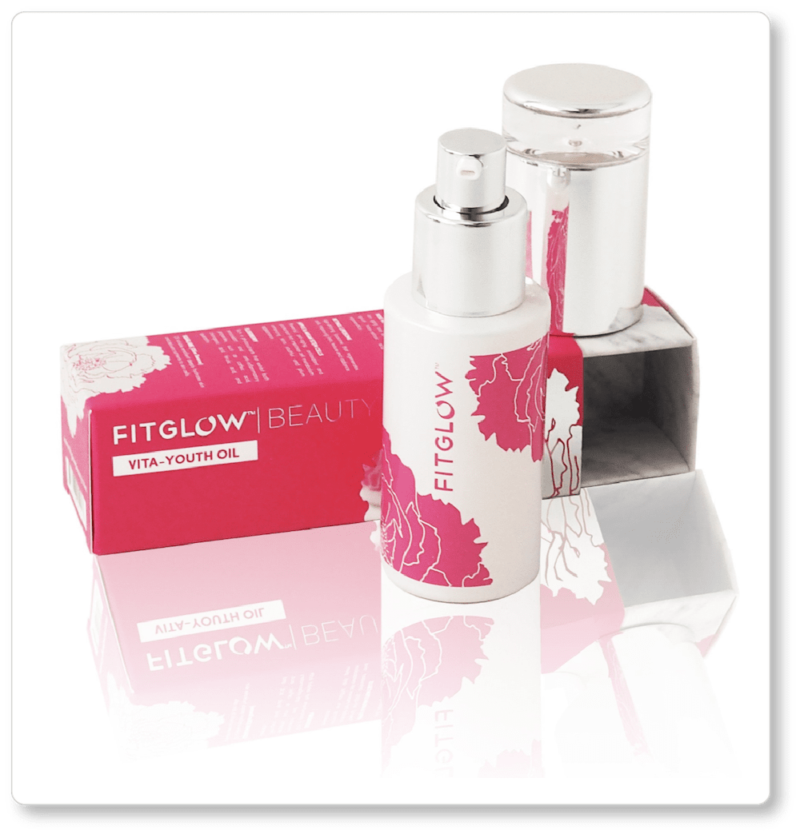
Two shadow options worth playing with are reflection shadows and drop shadows. Reflection shadows make your products appear to be sitting on top of a reflective surface like glass; in the image, the product is mirrored upside-down. These shadow types are rather dramatic; and they’re great for social media, category pages, and homepages… though some companies, like Fitglow Beauty, use them on their product pages as well:
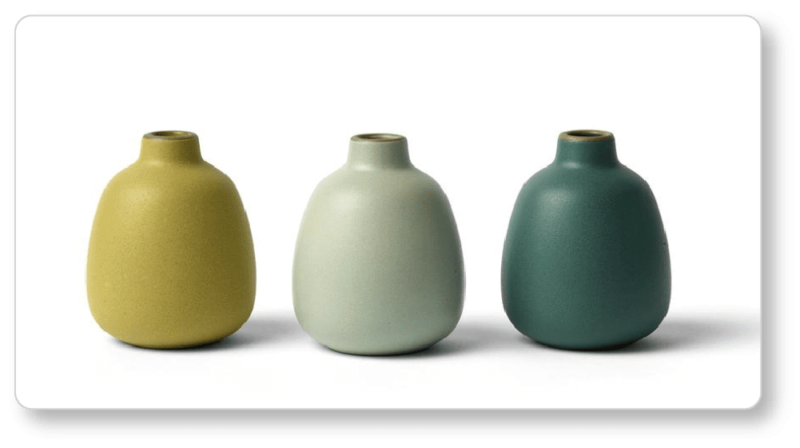
Drop shadows, on the other hand, replicate the look of direct sunlight beaming down on your product. Here’s how Heath Ceramics does it:
 Both shadow types provide a sense of depth and “grounding” to your products, helping prospects visualize them as three-dimensional objects rather than objects floating in space without any context. For details on creating a reflection shadow in Photoshop, you might take a look at the tutorials at Cutoutcow and Pixelz. For tutorials on drop shadows, check out Clipping Path and Photoshop Essentials.
Cropping and Straightening
Finally—and for the sake of consistency—make sure your images are all of the same size and dimension, and that they have identical margins (in other words, that the space between the edges of your products and the edges of the photographs are uniform). Of course, you’ve paid attention to this during the shoot by using the grid function on your phone or camera; but now’s the time to “perfect.” If you’re using Photoshop, use Smart Guides or a grid. You can then create a template, according to your own guidelines, to ensure uniformity and consistency across images.
Photo Editing Tools
We’ve pointed to Adobe’s Photoshop and Lightroom because they’re the most powerful and well-known photo editing applications out there, and they’re the standard platform when it comes to product photo edits for ecommerce businesses. They require a willingness to undergo a learning curve; but once you’ve gotten comfortable them, you’ve got a powerful tool in your ecommerce tool belt. Adobe has also been moving into the mobile space in recent years; so if you are editing on your smartphone, you can check out their free Photoshop Express app for Android and iPhone, or their mobile version of Lightroom for iPhone and iPad. Other photo editing tools for desktop include:
- GIMP, a free, open-source alternative to Photoshop that nearly equals Photoshop’s capacities… but that also has a steep learning curve because of its wide range of advanced features
- Pixelmator, a user-friendly alternative to Photoshop and GIMP. It has all the basic tools you’ll need to perform the edits we discussed above. Pixelmator also has a “pro” version (here are the differences between Pixelmator and Pixelmator Pro), though you likely won’t need pro features for your product photos.
- Pixlr, which is simultaneously user-friendly and offers many of the advanced features Photoshop does. It’s also free. One reviewer called Pixlr “the closest thing to Photoshop in your browser.” Like many of these platforms, Pixlr also has a mobile option.
Canva and PicMonkey are two other online photo editors that get strong reviews; both companies offer mobile apps as well. Other app options (again, only if you must edit on your smartphone) include Google’s Snapseed, Darkroom, Fotor, and VSCO. Fotor and VSCO also have options for desktop.
Or just take a look at “best-of” lists or ask colleagues or friends in your industry. It shouldn’t surprise you to hear that new tools are being created all the time—though we’d be surprised if you couldn’t find a tool you were happy with in the list above. Do your research, dive into a few free trials (we’d suggest you try editing the same 2 or 3 photographs in each platform for comparative purposes), and familiarize yourself with a few options before choosing the one that feels right for your business… not to mention for your skill set and your patience levels!
Finding a Professional Product Photo Editor
Possibly you’ve read through the above, taking time to consider if DIY photo editing is an endeavor worth undertaking. Possibly you’ve determined that it makes more sense to outsource the retouching phase. After all, you have plenty of other things to worry about as your ecommerce project gets off the ground; and these are ultimately repetitive tasks—and possibly complex tasks (depending on your images) better done by professionals. Professional retouchers can do everything from removing that dust you didn’t notice on your product to editing out the loose threads on those sweaters you photographed. They’re also well-versed in marketplace image guidelines, and can ensure they’re properly applied.
It’s neither difficult nor expensive to hire a talented professional to do the post-production for you. Indeed, editing is the simplest step in the product photography process to outsource; and the cost savings may be well worth it to you. Pixelz offers one such service, designed specifically for product image editing; they promise a 24-hour-or-less turnaround time, starting at 95 cents an image. (Shadows and ghost mannequins carry an additional cost.) You also get three free trial images. Cutoutcow offers a similar service, for $1.25 per image—as well as a free trial. Background Be Gone—which offers more editing features than its name implies—has both per-image and monthly plans. Like Pixelz, you get three trial images. Or if you’re willing to do the research, you can hop on a freelancer site like Fiverr or Upwork and find a professional photo editor there.
If you do decide to outsource, do your due diligence. Look at portfolios or ask for work samples. Read customer testimonials—or if the editor is willing to put you in touch with former clients, call them and ask what it was like to work together. Hire someone who actually specializes in photo editing—don’t hire a generalist. Communicate your expectations clearly, and make sure they’re written down in a contract or a brief, so that everyone is on the same page in terms of what’s expected. In a matter of days, you should have your product photos back, and ready to go up on your site.
In the next section, we’ll turn to one last set of questions about product photography, all of which center around optimizing your product images. Learn how to properly size and name your files, what file types to use, how to create guidelines for future product shoots… and how to determine which of your site-ready photos will go on your homepage and product pages.