- HOME
- Ecommerce
- The Ecommerce Product Photography Guidebook
- DIY Product Photography: Getting Your Equipment Together
DIY Product Photography: Getting Your Equipment Together
- 14 Mins Read
- Posted on May 5, 2019
- Last Updated on October 8, 2024
- By Lauren
If you’ve read our introduction to product photography, you’re probably clear by now about whether you’re going to outsource your product images or take photographs yourself. As we’ve said, it’s absolutely possible to create stellar product images with minimal—and fairly inexpensive—equipment. Often, more will hinge on your knowledge and intuition about how to play withlight than it will on the number of megapixels in your camera. (And by “knowledge and intuition,” we mean practice.) Here’s the equipment you’ll need to create awesome, high-converting product photos for your ecommerce store:
Camera
There are a lot of camera options out there—from compact “point and shoot” cameras, to mirrorless cameras, to DSLRs, to smartphone cameras. We won’t go into depth about the differences between these types; your priority is getting your online shop up and this isn’t the time for analysis paralysis. Instead, we’ll focus on DSLRs and smartphones, since they’re the two most popular options for product photography.
DSLRs for product photography
DSLR stands for “digital single lens reflex.” This is the kind of camera that professional product photographer you almost hired would’ve showed up with—the kind with interchangeable lenses and a bevy of manual settings that make them great for a range of situations (including low light). Because DSLRs capture more light, you’ve got a bigger margin of error to work with, since you can make more “fixes” in processing. If you’re planning on doing product photography for awhile, they’re a great investment: You can shoot in multiple modes (including video mode for interactive 360° photos), swap lenses, accommodate larger file sizes, and sync with lighting setups. The only hitch? There’s a significant learning curve involved… especially if you want to wean yourself from automatic mode and learn everything the camera is capable of.
Once you’ve got the hang of them, DSLRs take incredible photos. And thankfully, the price points on these cameras have dropped over time. Canon and Nikon—the two best DSLR brands—offer cheaper options in the $400-$500 range; you could certainly find a good used model for half that price. So if you’ve already invested in a DSLR—or if you have a friend who’s willing to lend you one—make the most if it and learn to shoot manual! You’ll want to get familiar with what’s known as the “exposure triangle”: aperture, shutter speed, and ISO:
- The aperture is the opening in the lens that dictates how much light the camera lets in. It’s measured in f-stops—from f/1 to f/22. The larger the opening, the more light passes through, and the brighter the image will be. The most confusing part is remembering that as the f-stop number increases, the aperture decreases (larger f-stop numbers mean smaller apertures). The aperture also determines “depth of field,” or how much of the image is in focus. Small apertures (high f-stops) will clearly capture everything in the frame, while large apertures (low f-stops) will isolate foreground from background, sharply capturing your product but leaving the background blurry. Low f-stops are great for product-in-context images: They make viewers focus on the details of your product, rather than compete with the scene behind it. For standard product shots, you’ll start with a higher f-stop number to capture the product in full focus.
- While the aperture determines the size of the hole, shutter speed determines how quickly the hole opens and closes—and therefore how long the camera’s sensor is exposed to light. Shutter speed is measured in fractions of a second. Faster shutter speeds are better for motion shots, as they decrease the risk of image blur. When it comes to standard product photographs, however, a combination of small aperture and slow shutter speed will likely produce the strongest images. (After all, the smaller the aperture, the longer you’ll have to keep the shutter open if you want a well-lit image.)
- The ISO determines how sensitive your camera is to light. The higher the ISO, the more sensitive your camera, and the lower the quality of the photo. (High ISO is what causes that grainy quality you sometimes see in images; this is called “noise.”) You’ll need to increase ISO when lighting conditions aren’t ideal… but we’re going to show you how to set up your shoot so that lighting conditions are always ideal! The ISO on DSLRs typically ranges from 200 to 1600; ideally you’ll never exceed 400 for your product photos. If you can’t take a well-lit photograph with an ISO of 200, you’ve got three options: multiply your light sources, slow the shutter speed, or widen the aperture. It’s probably better do to any of these things than to increase ISO.
To summarize: While the perfect combination of the exposure triangle will depend on your product, smaller aperture (high f-stop), slower shutter speed, and lower ISO will likely be a winning combination for standard product images. Start there. You’ll also want to read up on “white balance” (how the camera interprets the colors in the image), but we’ll have more to say about that shortly. Remember: You’re building a relationship with your camera. Calibrating these things will feel like second nature soon enough, so be patient. As with so many things, one becomes a better photographer by practicing photography.
When you buy a DSLR, you buy the body and then build out your lens “family” for additional capabilities and effects—though the kit lens that comes with your camera will absolutely suffice for getting started. Zoom lenses let you choose between a range of focal lengths, meaning you won’t have to move your tripod forward and back for different-sized products. Macro lenses are great for capturing and highlighting sharp detail on small or intricate products. Wide-angle lenses—which capture a wider field of vision—are great for lifestyle images. And so on. Talk to the professionals at your local camera store; they’ll be able to guide you based on your products and your needs. They may also offer rental lenses, so you can play before deciding what you want to invest in.
Smartphones for product photography
Despite everything we just said about DSLRs, we’d suggest you experiment with what you have before buying something you think you need. After all, investing in a brand-new camera might not be on your plate right now… and the camera you probably already have may be a great one. You may not get the full range of control you’ll have with a DSLR; but smartphone cameras are certainly closing the gap when it comes to image quality. You can find your camera’s specs online. (Here are the specs for iPhone 7, iPhone 8, iPhone X, and Samsung Galaxy S7, S8, and S9).
You’ll note that—unlike DSLRs—they have set apertures; but they offer features such as autofocus, tap-to-focus, HDR, lighting options, exposure control, timer mode, optical image stabilization for reducing blur… and they’re all 12-megapixel lenses, which is plenty for in-studio product photography. (Megapixels are about size, after all, not quality.) Samsung cameras even have a pro mode, which lets you manually adjust aperture, shutter speed, ISO, and white balance as you would with a DSLR. And of course, you can edit product photos on your phone and publish them directly to your website.
With these features, high-quality imagery is at your fingertips. As long as you set your background and lighting up brilliantly—which we’ll show you how to do in the next section—your smartphone camera will adjust to the lighting conditions and focus for you. (And if you need proof that stellar smartphone photography is possible, check out this product shot by Andrew Griswold using an iPhone 4S, made possible thanks to a brilliant “studio” set-up.)
So spend some time learning what your phone camera can and can’t to. Set it up so that it’s free of filters, zooms, frames, and flash (don’t use a built-in flash on product photos; set up more sufficient lighting instead), and see what kinds of images you can get with creative lighting and backdrops. Filters won’t get you an honest “show” of your product, and zoom will diminish image quality. Any small adjustments you need to make you can do in post-production.
Start with the default camera app that’s already on your phone. If, after reading about lighting and setup, and scouring YouTube for product photography tips and tricks, you’re not getting the results you want, you can consider additional apps—Camera+ for iPhone, Camera MX for Android, and so on. (These ones are popular as of this writing, but consult professional app reviews for what’s out there now.) There are also plenty of specialized lenses to try out—like macro and fisheye lenses—but if your focus is on studio product photography, you won’t need these.
One truth is that, when it comes to cameras, you’ll get what you pay for… but unless you know how to use a DSLR to its fullest potential, there won’t be much of a difference in the results. The best possible camera for your product photography is the one you know best and feel the most comfortable using. Over time, you’ll learn how to “play with light.”
Backdrop
Of course, if you’re taking lifestyle photographs, you’ll have a lot of background options; but we’re talking studio setups here. Most product photos (those intended for product pages, anyway) are taken against white backdrops. A white backdrop ensures that viewers “see” only the product, removing even the subtlest distractions—like that line where the table meets the wall. It ensures that the product is presented “as-is.”
Moreover, white backdrops reflect white light back onto the product, bringing out its color and preventing what are known as “color spills.” It ensures your camera’s white balance is calibrated correctly, which means a more accurate color representation. (If there’s a “true white” in the image, the camera has a reference point to work with.) It ensures consistency across product photos, which means an easier browsing experience for site visitors. Not to mention that white backgrounds are a requirement on comparison shopping engines like Amazon or Google Shopping. So if you hope to sell or be found on these platforms, you’ll have to comply.
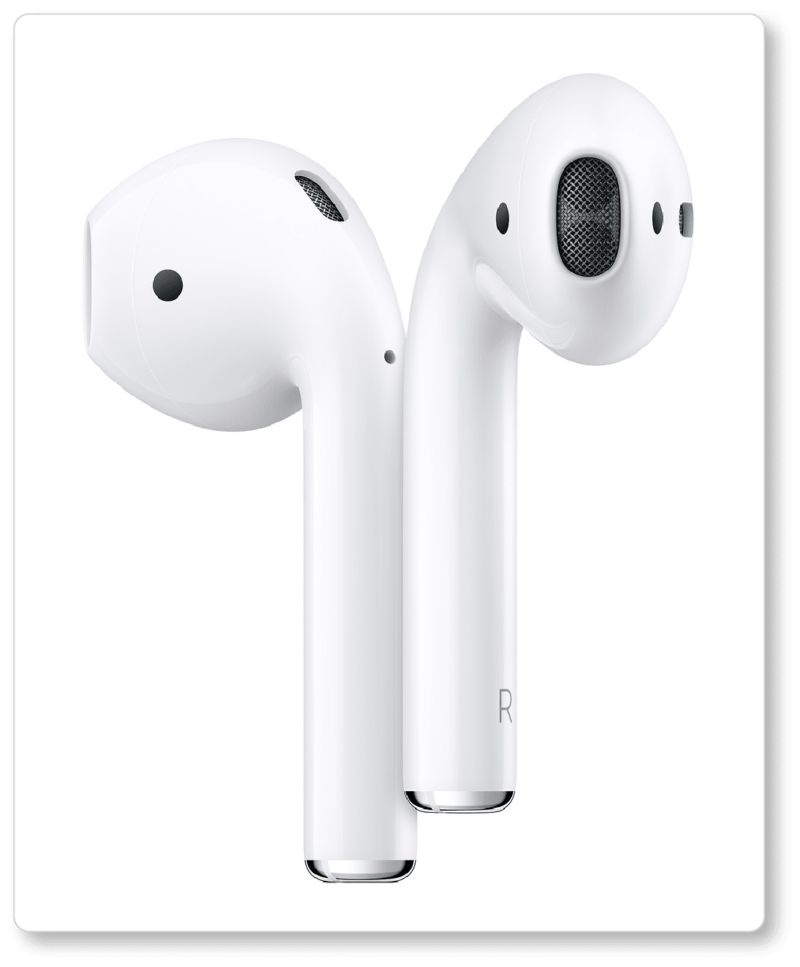
Pro tip: One situation you might consider a darker backdrop for is if you’re selling white items. Then again, Apple manages to make the white-on-white work to great effect:
You’ll want what’s known as a “sweep” or an “infinity curve”: a backdrop that seamlessly transitions from its vertical to its horizontal surface. This will give the appearance of the product floating (read: “popping”) in space. It also makes the background easier to edit out in post-production. You can use a sheet of white wrapping paper, a poster board, a white (wrinkle-free!) sheet, or a background sweep from a photography store. Your mantra should be: “Curves not creases“: After all, creases cause the light to bounce:

For smaller products, you can set up your sweep by pushing a table against a wall, taping posterboard to the wall, and letting gravity do its work. (You can also skip all of that and purchase a shooting table.) Larger products simply require a bigger backdrop: You can find a large sweep to hang on a wall, or invest in a stand-mounted sweep for greater flexibility with positioning. To state the obvious, the sweep needs to be wider than your products. Ideally, it fills the entire frame when you’re looking through your camera lens.
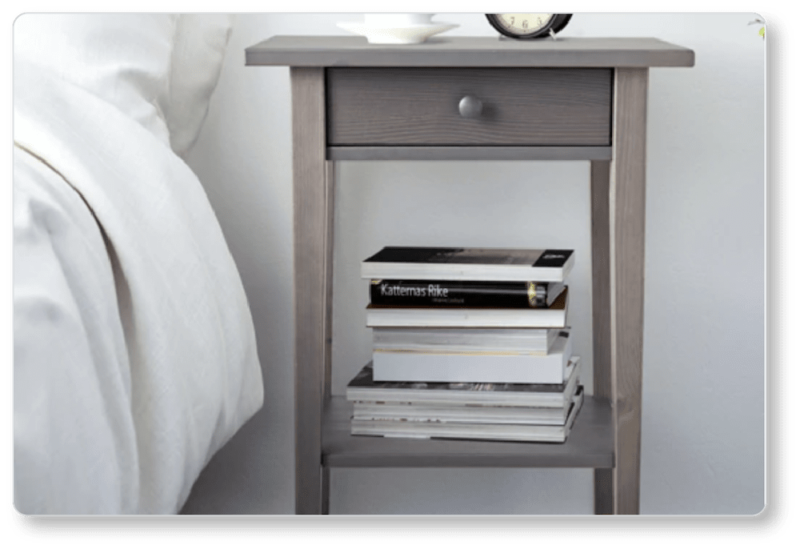
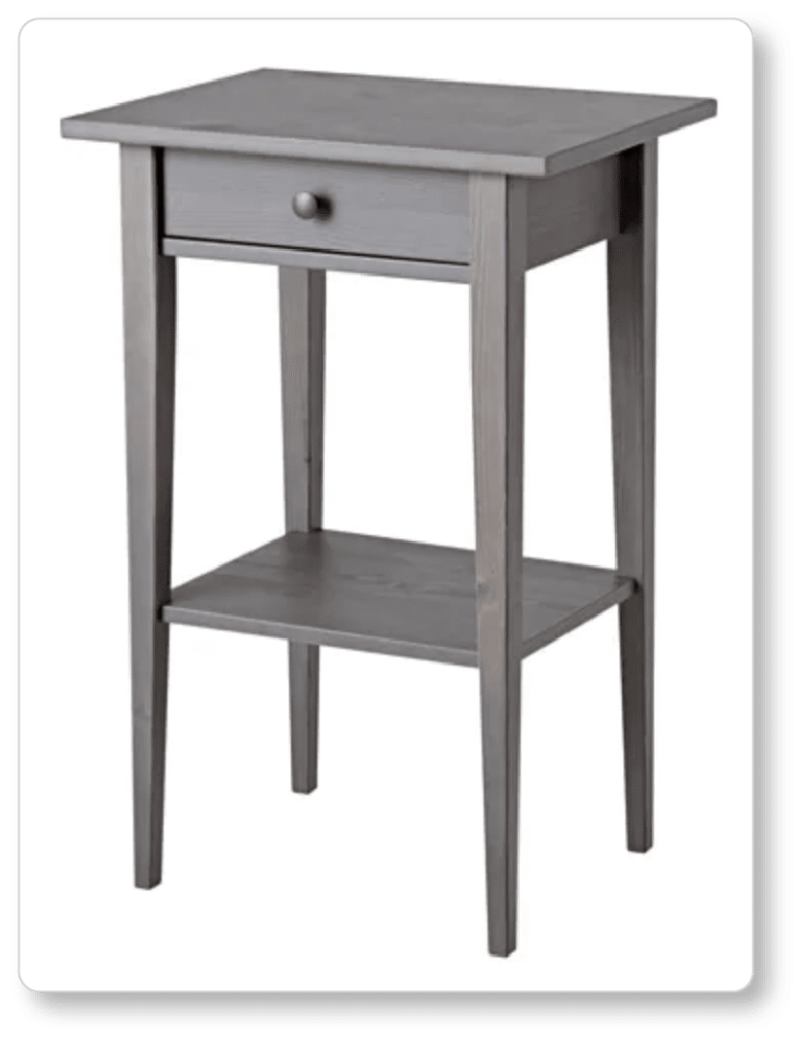
Of course, no one’s forcing you to use a white background—indeed, there are plenty of beautiful product photographs out there with colorful backgrounds—but there’s a reason the white sweep is the norm when it comes to product page images. Note how Ikea edits the background out when visitors move from its category pages to its product pages:
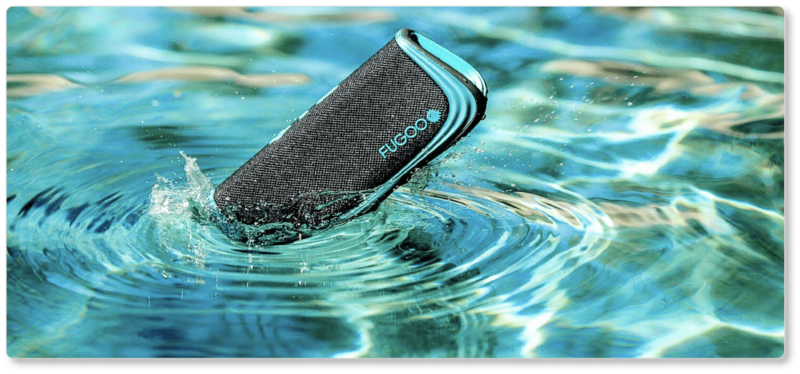
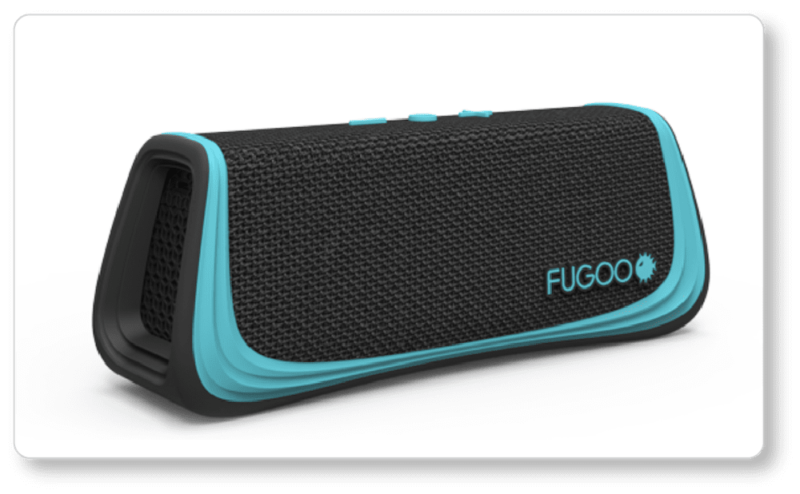
 So does FUGOO:
So do all the experimenting you want when it comes to product photography on your homepage, landing pages, and category pages! But on your product pages? Give visitors nothing but the product. That’s what they clicked in for.
Tripod
Whether you’re using a DSLR or your smartphone, a tripod (or smartphone mount) will do wonders for image stabilization. We know: Smartphone cameras come equipped with image stabilization software; but there’ll still be some shake (and tired arms!) if you’re holding the camera by hand—particularly at slower shutter speeds. Tripods also ensure that the camera stays in the exact same position—at the exact same angle—giving you consistency across shots. (Just mark the locations of your tripod’s legs and write down height and angle settings between sessions.) And of course, they free up your hands so you can reposition your products for shots at different angles.
A quick search for tripods and mounts on Amazon will display an abundance of options for whichever camera or smartphone you have. For smartphones, Xenvo is getting stellar reviews right now; Joby is also a favorite, as is Vanguard for DSLRs. In general, tripods get more stable the more you pay for them; but for in-studio product shots, most tripods will do. (If you plan on shooting outside often, you’ll want to do more research.)
Lighting
There’s no way around this one: “Photography” literally means “to paint with light”; and understanding how light works will be vital to stellar product photos. You could procure the world’s best camera; but if your lighting’s no good, neither will your pictures be. On the other hand, a less-than-perfect camera but an incredible lighting setup means your products will pop.
As we’ll discuss in the next section, you may find that using natural light for product shots is your best bet—perhaps because studio lights just aren’t in your budget right now; perhaps simply because you can do some astounding things with natural light. Then again, you might find you have certain limitations. Perhaps your schedule is such that you can only shoot at night, for example; or the light where you live is just too fickle to take consistent images—whether you’re shooting multiple products over several hours or several years. In such cases, you’ll need some of the lighting options below:
Lightbox
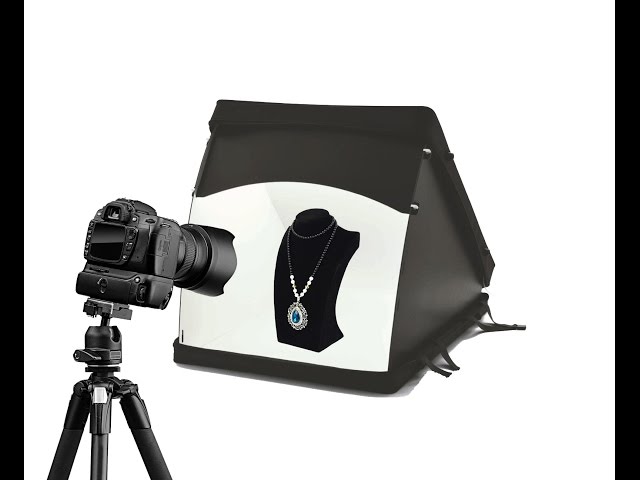
Let’s start with options for smaller products. A lightbox (also called a “light tent”) is exactly what it sounds like: a portable box with white or translucent sides that fully enclose the product, diffusing light evenly, minimizing shadows, and illuminating your products’ most important features. (In some lightboxes, the light source—typically a set of flourescent bulbs—is inside the unit, bathing the product in uniform light. There’s an opening where you can place your camera lens.) Lightboxes fold up briefcase-size when not in use and can be set up in a matter of minutes. Here’s an example from Simp-Q, though there are plenty of lightbox brands out there. What we like about this one is that it comes with a few different panels that let you take product photos at different angles:
Of course, with a bit of creativity and cleverness, you can make your own DIY lightbox (courtesy of YouTube) with a storage container or cardboard box tilted on its side. Tape white poster board on all inside sides, ensuring the board curves from the back of the container to the bottom. (This is your “sweep.”) You’ll then need 2-3 lamps—ideally 3 so you can play around with angles. You’ll position the first two lamps on each side of the storage container—try them at 45° angles—so they shine on either side of the product; the third light will shine onto your product from above. This will give you the effect of studio lighting, which we’ll discuss in a moment.
Pro tip: Regardless of how many lamps you use for your product photos, make sure the bulbs in each lamp are identical. Different bulbs give off different colors (color temperatures are measured in degrees Kelvin), and will make your lighting uneven.
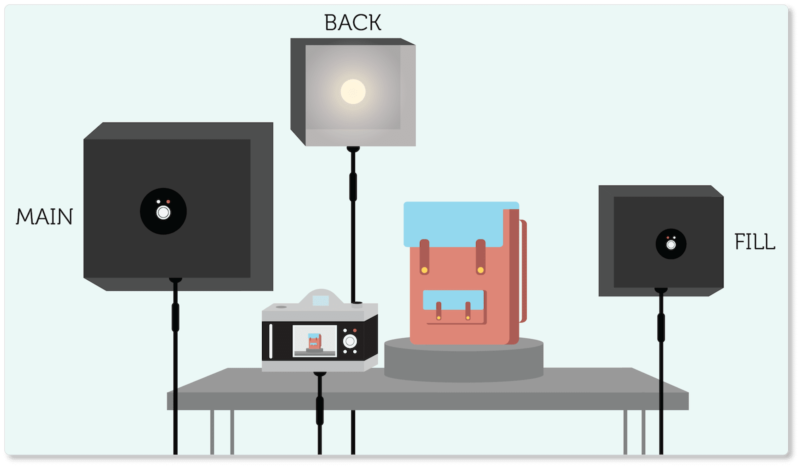
Studio lights
Then again, you may be working with larger products—in which case, you’ll want to replicate what the lightbox does as closely as possible in a studio setting. Again, an ideal setup has at least three lights: two sources that let light fall on your product from either side and a third that shines down on the product from above, so that the entire product is lit. This is a typical lighting setup—main light, fill light, and back light—called “three-point lighting.” You’ll play around with height (light sources that are too high, for example, might get you harsh shadows at the bottom of the product), or with adding another set of lights (backlight works great for glass products, for example):
Again, don’t mix light temperatures by mixing lightbulbs; it’ll throw off your camera’s white balance calibration. And cover the windows! Choose natural or artificial light; but don’t mix the two: You’ll likely never find that combination again in future shoots. Remember, too, that the goal in product photography is to cast the most even—and softest—light on the entire surface of your product. If your light sources appear harsh (they’re casting shadows or product details are being flattened in the photographs), diffuse the light with a softbox. You can find lighting kits with softbox lights on Amazon; or you can place tissue paper, a t-shirt, or a white sheet over your light source to diffuse the light.
Remember, this is your time to experiment with how light falls and reflects; and much will depend on the reflective qualities of your products. Be prepared for a period of trial-and-error. Move lights around; try different bulbs. You’ll get your desired effect in time.
Bounce cards and reflectors
We’ve mentioned three-point lighting, in which the “fill light” (one of the lights on either side of your product) functions to counterbalance your “main light” and soften the natural shadow that light produces.
But there are other ways to minimize the shadows cast on one side of your product; and they’re particularly useful if you’re using natural light for your product photography, or if you simply don’t have the budget for more than one studio light. When positioned opposite your main light source, a bounce card will reflect that main light back onto your product, reducing shadows, lighting the object from the other side… and effectively replacing your fill light. You can find bounce cards and professional lighting reflectors on Amazon or any photography website. You can also get foam board or white poster board at your local craft store; this may work just as well—particularly for smaller products. Play around with angles; cover the card with aluminum foil for added reflection, and so on.
Other Tools in the Product Photography Toolbox
What falls into the “other” category may be product-dependent. If you’re shooting clothing, you’ll want a mannequin to show the full shape of your apparel and an iron for any wrinkles. If you’re shooting jewelry, you’ll want fishing wire to suspend your items. (Of course, you’ll edit out the mannequin and the fishing wire in post-processing.) No matter what you’re shooting, have tape (strong, clear, and double-sided options) and clamps on hand for securing backdrops and lights. Have scissors and safety pins. Have cleaning supplies on hand—sanitizing wipes or compressed gas dusters—to ensure your products are spotless. You don’t want to edit dust or fingerprints off your products after the shots are taken. And always have spare batteries (or a charger) and a pencil and paper nearby. As we’ll discuss later, you’ll be keeping detailed notes about your setup to ensure your shots are consistent across time.
Now: Go take a look at what you’ve got on hand for your toolbox, spend some time with your smartphone camera and learn what it’s capable of, or give yourself some time to see what other camera options are out there. Just as importantly, start getting inspired by product photography! Take a look at the websites in your industry and discover what product images compel you. As you look, try to imagine where the light sources were placed. Have they made good use of shadows? How are the photographs on their product pages different from those on their category pages? What other elements are in the photographs? (Is packaging included in the images?) And so on. Pinterest can also be a great source of inspiration. The point is to get your creative juices flowing before it’s your turn to jump in.
In the next section, we’ll discuss how to take product images that will score you conversions: from planning your shoot, to setting it up, to best practices to follow while shooting. We’ll also have a little more to say about the pros and cons of natural and artificial lighting, and the variety of image types you should consider.