- HOME
- Ecommerce
- The Ecommerce Product Photography Guidebook
- Best Practices for Optimizing Your Product Images
Best Practices for Optimizing Your Product Images
- 14 Mins Read
- Posted on May 2, 2019
- Last Updated on October 8, 2024
- By Lauren
Over the last few sections, we’ve offered you a primer on ecommerce product photography—from the equipment you’ll need to take strong product photographs, to best practices for capturing high-converting images on the day of your product shoot, to the steps you should to take to polish your images before they go up on your site as your “product ambassadors.” We’ve got one final topic to cover when it comes to ecommerce product photography: how to optimize your images for your website.
“Optimizing your website” may be a phrase you’ve come across as you’ve begun your research on how to set up a great online shop. Optimization is the formal process of experimenting with, and making intelligent changes to, your website so that it ranks as high as possible in search engine results (SERPs). That sounds great… but what does it mean?
Well, when it comes to product photography, we mean two primary things when we use the term: 1) ensuring your product images load quickly enough for good user experience, and 2) ensuring your store’s keywords align with your prospects’ searches and that you can reasonably compete for them. The latter boosts your shop’s brand visibility and brings in organic traffic. But the former will help keep those visitors on your site. After all, stunning product images and killer product descriptions won’t mean anything if prospects aren’t willing to wait for them to load on your web pages.
Below, we’ll walk you through best practices for optimizing your ecommerce product images so you can increase traffic, offer stellar user experience, and ultimately, boost sales.
Choose the Right File Type
As we’ll discuss in more detail below, your ecommerce site speed is an enormous indicator of how well your website will perform. The first two hurdles we’ll clear—choosing the right file type and reducing your images’ file sizes—will be part of an ongoing effort to offer the speediest site possible for users. Believe it or not, the type of file you use for your images makes a difference.
The three most commonly-used file types on the web are JPG (or JPEG), PNG, and GIF. (TIFF and BMP, which you’ll also often see as extensions, tend to produce file sizes that are impractical… so for optimization’s sake, don’t use these.) JPG offers a smaller file size that’s easy to compress, yet it can handle all the colors in your photographs and will display them vividly online. In other words, JPGs get you a great balance between file size and image quality—which is why they’re so frequently used. GIFs are typically used for animations, 360° shots, and simpler images such as icons and logos. But as GIFs tend to result in higher file sizes—and as the images tend to degenerate after repeated saving—they’re being slowly replaced by PNG. PNG files support transparent backgrounds, and you can compress them without losing quality. However, this quality compression comes at the cost of a larger file size. And as you know by now, that’s precisely what you’re trying to avoid.
So as a general rule, we recommend you use PNG files for things like infographics, designs, and images that contain a lot of text. You should also opt for PNG if you need transparent backgrounds. But when it comes to your ecommerce product images, stick with JPG as your file format. They’ll give you significantly smaller files without an alteration in image quality. For you, this means a speedy site and strong imagery.
Reduce the File Sizes of Your Images
We don’t have to tell you that the bigger the image, the longer it takes to load. You’ve certainly been on the user side, and have experienced those seconds of annoyance when you click on a link or a CTA and the web page doesn’t pop up immediately. And you’re hardly alone in that response. According to Kissmetrics, 47% of consumers expect a web page to load in 2 seconds or less. What’s more, 40% will abandon a site that takes more than 3 seconds to load… and even a 1-second delay in page response can result in a 7% decrease in conversions.
In other words, literally every second counts. So if you want to keep visitors on your site—and if you want them moving through your conversion funnel, which will require that they move through a series of pages—you simply can’t request their patience as each new page loads. According to Maile Ohye, former Developer Programs Tech Lead at Google, “2 seconds is the threshold for ecommerce website acceptability.” This goes for mobile too, by the way. Don’t choose an ecommerce platform that isn’t mobile responsive!)
Of course, you just spent all that time making the clearest, cleanest, highest-resolution photos possible; and you do want to offer product photos large enough that prospects can zoom in for more detail. Thankfully, smaller file sizes don’t have to mean lower image quality… you just have to ensure you’re using the right tools.
It’s worth noting that “size” can mean three things:
- Optimal file size. This tells you the number of bytes a given file takes up on your computer, and it’s probably the most important factor when considering website speed. As a general rule, ecommerce websites should aim for file sizes below 100 kilobytes (KB): 70 KB or less is ideal. Don’t move into megabytes (MB)!
- Image size. Image size is measured in pixels (px) and tells you the dimensions of your image: It’s the equivalent of talking about a “4×6 photograph.” It’s worth observing that, according to Amazon’s product image requirements, images must be at least 1000px on the longest side. Etsy requires that product photos be at least 1500px wide. Both requirements ensure that zoom functionality works (for zoom, the image has to be more than 800 x 800px). With Commerce Plus, we recommend around 1200px at the images’ longest side, though the platform supports up to 1600px. After all, Amazon and Etsy are among the leaders in ecommerce; they know what sells. So start with something close to their guidelines.
- Resolution. Resolution refers to the density (and therefore the quality) of an image; it’s measured in pixels per inch (ppi). You may also see resolutions measured in dots per inch (dpi). These two measurements often get confused: ppi refers to the number of pixels per inch in an image on a visual screen; dpi refers to the number of dots per inch in an image on a printed document. Obviously, you’re concerned with the former. Until the advent of retina displays, 72 ppi was standard screen resolution; we’d suggest you play with anything between 72 and 150.
It’s worth noting that some commerce platforms (including Commerce Plus) will automatically resize your images for you as separate thumbnails, collections, and display sizes: The same product image will display at a large size for your primary product photo, a medium size as a thumbnail image (on a category page, for instance), and a small size as a shopping cart image. Some will also use the full image to display a zoom view when a user hovers over the photo on a product page. So look into what your platform offers before you make any adjustments: There’s no sense doing the work if your platform is already doing it. Even if they don’t automatically resize, look for platform-specific recommendations.
Of course, maintain consistency between product image sizes! The easiest way to do this is to create a template in whatever photo editing software you’re using (Pixc shows you how to create image templates in Photoshop) and drop or copy-and-paste your images into the template, then save them as new files. If you can—though of course, this will depend on your product—aim for square images rather than rectangular ones. After all, you need to keep your mobile users in mind. Remember that mobile screens are not only different in size than desktop screens, they’re also different in orientation. Square images are easier for the platform to reposition when the screen orientation changes on a smartphone.
If you’ve been using Photoshop for image editing, you can either use the “Export As” function or the “Legacy” function (formerly “Save for Web”). Both actions will further compress the image without significantly reducing image quality. If you don’t have access to Photoshop, there are plenty of minifying tools that’ll further optimize your images, shaving off additional kilobytes. WeCompress and Optimizilla are two of many apps that allow you to simply drag-and-drop your files to compress them. At Zoho Academy, we drop our images into ImageOptim after we resize them.
Once your ecommerce site is up and running, you’ll be checking your page loading speeds regularly (on both desktop and mobile, and across browsers!)—either by clicking through your site yourself, or by entering your product pages into a platform such as Google’s PageSpeed Insights, which both “grades” your page speed and offers suggestions for further optimizing. Of course, there are plenty of other platforms that test load time. Here’s the interface of Pingdom, where we entered the URL for a product page for a pair of shorts from Chubbies: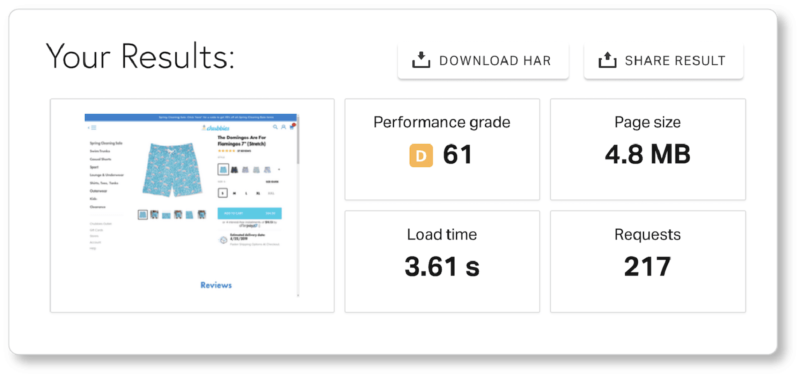 Pingdom also gives recommendations for optimizing later down the page. Play around with the tool that feels best for you, and follow its optimization suggestions. (Note: These recommendations will concern more than your images! We’ll talk about some of those other SEO elements later on.)
Once your photos have been properly sized, name them, save them, catalog them, and back them up! We can’t stress the importance of organizing your images—both the photographs and the files associated with them—enough. Sort them into folders based on product category, make and model, shoot date and location… whatever set of criteria will make it easiest for you to find them down the road. (Depending on your photo editing platform, you might even have an image cataloging program at your fingertips.) Differentiate between regular and thumbnail versions in your file names if you had to make two versions for your commerce platform. And store your images in more than one place—whether on an external hard drive or in could storage, such as Dropbox, Google Drive, or Zoho WorkDrive.
Use Keyword-Rich File Names and Alt Text
Once you’ve got your site speed handled, it’s time to move on to part 2 of the optimization process: making your website SEO-friendly. We’ve written about the importance of search engine optimization elsewhere, so have a look at that content if you’re new to the practice. You’ll learn where to search for keywords, how to learn what your prospects search for, why you should prioritize long-tail keywords, and more. And when it comes to ecommerce SEO in particular (using Amazon for your keyword research, for example), we’ll have more on that shortly.
Long-tail keywords are of singular importance when it comes to image names and alt tags. Of course, as we mentioned above, you’ll want a practical file naming system: That’s just common sense. Using titles that describe the details of the image—rather than a generic file name like “IMG_76598.jpg”—will make it infinitely easier for you to find the image again, especially as your product catalog grows. But beyond that, strong image titles simply improve your SEO. That’s because the language in your file name helps Google’s crawler’s “understand” what’s in the image. (Remember, bots can “interpret” text, but they don’t know how to “read” an image). Describing what’s in the image gives the bots more clarity about what your product page is about.
The four things to remember when naming your image files are:
- keep it short, descriptive, and clear
- use one or more keywords… but don’t keyword stuff!
- avoid using articles (“the,” “a,” “an”)
- insert dashes between words (this improves readability for the crawlers)
It helps to imagine what a prospect would type into a search engine to find your item: Think color, material, shape, size, make, model, brand name, product name, and so on. For example, “red-leather-iphone-x-case.jpg” or “gray-blue-two-toned-boots.jpg.” This is something we’ll talk about again a bit later, but it’s worth remembering that you don’t want just any organic traffic on your website; you want qualified organic traffic—that is, prospects who are ready to buy. Consumers who enter search queries with that level of detail (“red leather iphone x cases”) are more likely on the verge of making a purchase than those who are just looking for “phone cases”… and they certainly know exactly what they want. So give your site a boost in traffic from the right demographic.
Alt text (short for “alternative text”) is read aloud by screen readers so that visually impaired visitors know what the images on your site are depicting. What’s more, if your images aren’t loading for some reason, the alt text will be displayed instead. More importantly for our purposes, alt text plays the same role image titles do when it comes to search engine visibility: It gives Google’s crawlers more information about what your page is about so they can better categorize your product, rank it accordingly… and hopefully display it in image searches down the road. As is the case with your file names, keep your alt text descriptive and use keywords. Use natural language, as though you were describing your product to a friend in conversation. The one difference between the two is that you don’t need to use hyphens in your alt text. (You can read more about how Google treats alt text here.)
Between the image title and the alt text, you’ve got two great opportunities to add valuable keywords to your product pages. Our recommendation is to not to replicate your image title and alt text exactly. After all, using different descriptions will help prospects who enter slightly different search queries into Google (“red leather iphone x cases,” “red leather case for iphone x,” “iphone x case with red leather,” and so on) find you.
Create Product Photography Guidelines
By now, you’ve begun to enter your product images into your commerce platform. We’ll discuss product descriptions in the next ebook… but before we dive into that topic, it’s worth pausing to create an important document: your product photography style guide.
Remember we recommended during your product shoot that you take note of all the details of your setup and camera settings to ensure consistency in future shoots. (After all, hopefully your business will grow and thrive, and you’ll continue to add products to your line that you’ll need photographs of.) The same goes for post-production. The more consistent your product photography is, the stronger your branding will be. And the stronger your branding is, the more likely you are to impress your prospects and customers, and ultimately win their trust.
Having a guide will also save you the time it would otherwise take to remember everything you did the first time around—and in some cases, to re-train yourself on your editing software. You’ll also have something to hand off to employees as your business grows, or to hand over to freelancers if you decide to outsource certain elements of production the next time around. In other words, we’re talking not only every detail about your shoot, but also every detail about your methods and your workflow.
Your product photography style guide should include (but need not be limited to!):
- your camera settings (shutter speed, aperture, ISO, focal length, white balance)
- the distance between the camera and your products, the distance from the floor to the bottom of your camera, the distance from the floor to the top of the surface your product sat on, and the distance from your product to its background
- the details of your background, including the material of the sweep, and whatever (if any) objects were placed around it
- the location and angles of every light that shone on your product
- the angle of your camera in relation to the product
- the bulbs used in your lighting setup (both brand and degrees Kelvin)
- if you used natural light, take note of external conditions: where was the sun in the sky; what time of day (and year) was it; at what angle did the light enter the window; how overcast was the day; and so on. (This “data” is tougher to document; you might consider taking a picture of the window during the shoot if it helps jog your memory.)
- the details of your workflow in post-production—including templates, resizing processes, saturation, contrast, color correction, color palettes, and whatever tools and process you may have used to add shadows
- anything you’ve discovered while doing keyword research for your ecommerce store, including any standards you may have arrived at when it comes to file names and alt tags. (That’s not to say you won’t want to undertake a new set of keyword research with new products! The way consumers search is ever-changing. Nonetheless, this is worth recording.)
If you outsourced any of the work of image production, ask your photographer or editor if they’d be willing to send the above details to you. Of course, in an ideal world, you’d use the same photographer for the next round of product images to ensure greater consistency (keep your photographer’s contact details!); but you can’t necessarily count on that prospect. An in-house guide will allow you to share those processes and standards with future employees and freelancers. Post a copy in your in-house studio or upload it to your company’s file-sharing system so employees have easy access to it in the future.
Creating this guide may feel like it’s taking you out of your workflow; but it’ll make all the difference in the long run.
Test Your Product Images
After all that, you may be sitting and staring at an enormous library of images, wondering which ones to feature above the fold of your product pages, or which ones to use as hero images for your homepage or category pages. These may seem like important decisions… and you’re not wrong. They are.
Of course, once your commerce site is up, you’ll have all the time in the world to test and experiment with your product images: Which ones to use, where to place them, how big to make them, what copy to place nearest them, and so on. A/B testing software allows you to show two different versions of a web page to visitors and discover which converts better over time… and indeed, this is something you’ll want to do with some regularity. After all, your images—as well as your design, your messaging, your navigation, and your CTAs—can always be “just a little bit better.”
But maybe you want to gather consumer feedback before you even upload those first product photos. And believe it or not, you can do this, in real time… or at least in a matter of minutes rather than a matter of months.
There are plenty of services out there that will give you quick feedback from live, unbiased humans for a fee. Outgrow and PickFu are two such examples of instant market feedback polls. Just upload two (or more) images into the poll, along with a question such as: “Which image makes the product more appealing?” or “Which of these two images would make you more likely to buy?” (Remember: Pose the question with an eye to conversions.) Then select a demographic as close to your customer persona as possible, hit the CTA… and the results will start coming in. With PickFu, respondents will also leave feedback that may offer valuable insights about your other product images.
Congratulations! Your images are finally site-ready, and you’ve got a structure in place for all your future product photography efforts! In the next section, we offer some examples of some of the best product images we’ve seen. After all, there’s nothing like a little inspiration to get you thinking about your next batch of product photos…