Advanced Invoice Customizations
Zoho Invoice offers extra features to enable you to do a lot more with invoices. In this page, we’ll look into how you can make an invoice recurring, create a credit note, write off an invoice and more others that you can do with invoices.
You can customize invoices, filter invoices, create custom views and sort invoices on a particular order. In this page, we’ll look at how to use these features.
Customizing Invoices
The invoices you create use a template to display its information. You can customize the way invoice information is displayed by customizing the templates. Learn more about customizing invoices.
Filtering Invoices
You can filter invoices to view a list of invoices based on a specific criterion. Let’s look at Charles to understand how he uses the filters available in Zoho Invoice in his business.
Scenario: Charles notices that his Accounts Receivable account has been stagnant for a while and he wants to view all the invoices that are overdue. Quickly, he opens the Invoices module and clicks the filter and chooses Overdue. Immediately, Zoho Invoice lists all the overdue invoices. Charles sends a reminder to his customers and asks them to make the payment.
Zoho Invoice contains a default set of filters based on a certain criteria which allows you to filter the invoices. If you want to filter the invoices based on specific criteria, you can create custom views.
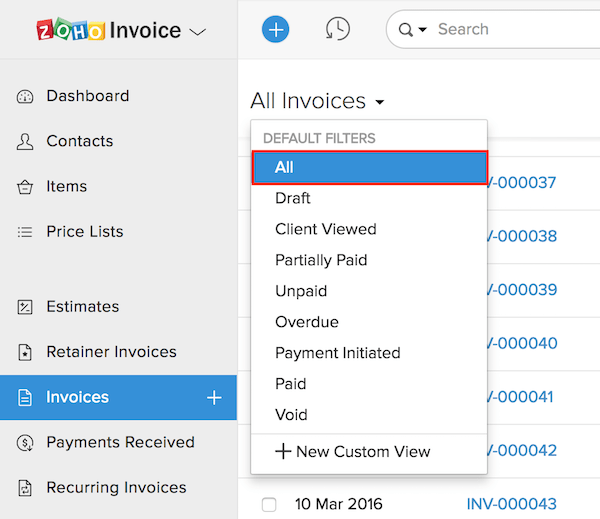
Default Filters
The default filters that are available for invoices in Zoho Invoice is listed below with its descriptions.
| Filter Name | Description |
|---|---|
| All Invoices | All the invoices in Zoho Invoice will be displayed. By default, the Invoices module displays the invoices using this filter. |
| Draft | All the invoices that are in the draft status are displayed when you use this filter. |
| Client Viewed | All the invoices that your customer has viewed in the customer portal is displayed when you use this filter. Only customers to whom you’ve enabled customer portal can view their invoices in the customer portal. Learn more about Customer Portal. |
| Partially Paid | Invoices for which the customer has partially paid will be listed when you use this filter. |
| Unpaid | All the invoices which are within the payment due date and are yet to be paid by the customer will be listed. |
| Overdue | All the invoices for which are beyond the payment due date and are yet to be paid by the customer will be displayed. |
| Payment Initiated | All invoices for which payment has been initiated by the customer through customer portal or payment via ACH or when you charge the customer for payments through card association. |
| Paid | All the invoices for which full payment has been recorded is displayed when you use this filter. |
| Void | All the invoices that you’ve marked as void are listed when you use this filter. |
Creating Custom Views
You can create a new custom view to filter the invoices based on the specific criteria you mention. Also, you’ll be able to specify the columns you want to see when you apply the custom view. Let’s look at Charles to understand how this helps him in his everyday business.
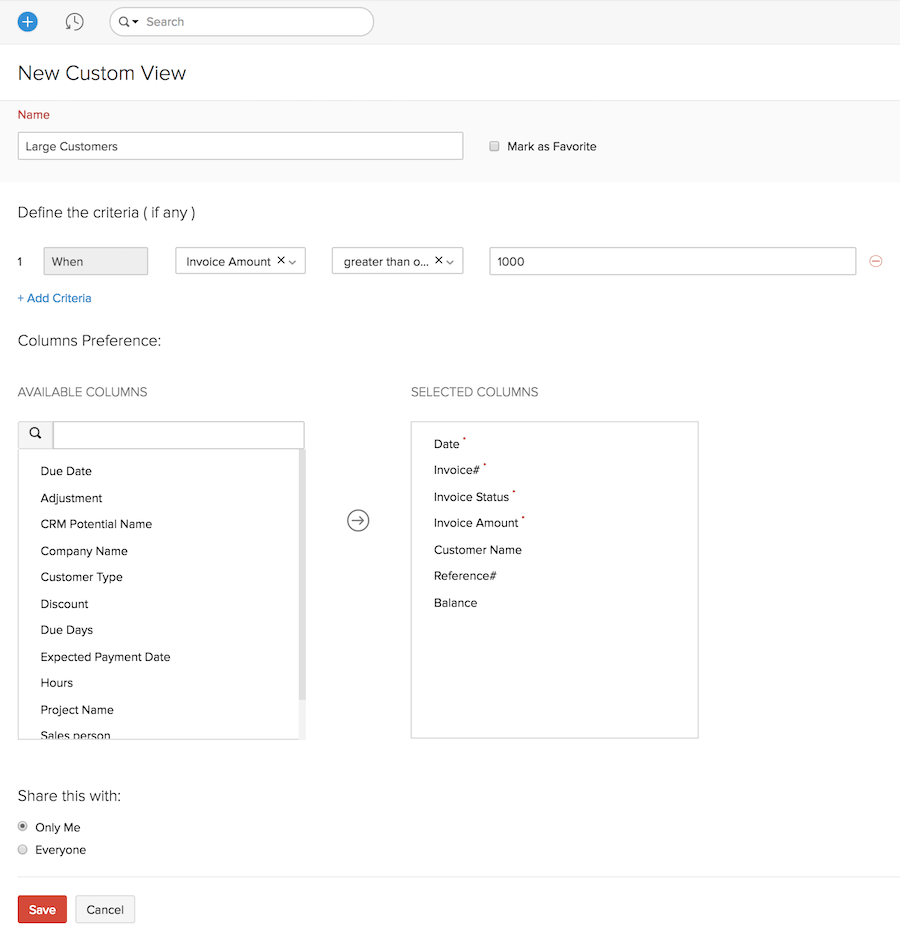
Scenario: Charles wants to view all the invoices whose total is above 1000. He creates a custom view and specifies the criteria to filter the invoices whose value is above 1000. He applies the filter and views the invoices with its total value above 1000.
Similarly, you too can create different custom views based on your needs and filter the invoices.
To create a new custom view:
- Go to the Invoices module in the left sidebar ore press shift + i to instantly navigate to the Invoices module.
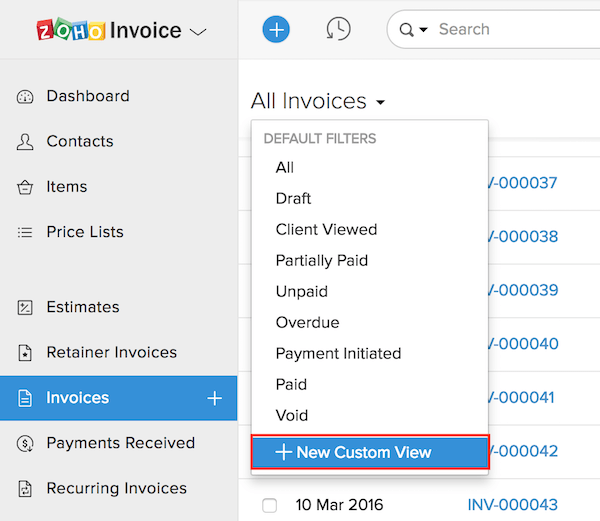
- Click the filter dropdown and select + New Custom View from the bottom of the list.
- Enter a Name for the custom view.
- Click the dropdown under Define the criteria section and select one of the fields from the dropdown.
- Click the next dropdown and select the appropriate condition.
- Enter or select an appropriate value in the next field.
- Click + Add Criteria to add another criterion and repeat the previous 3 steps.
- Click the + on each field in the listed in the Available Columns table to add them under the Selected Columns table.
Insight: The filtered invoices will be displayed with the fields that you’ve added to the Selected Columns table.
- Choose if you want this filter to be displayed to every user in your organization or only to you.
- Click Save.
Now, the filter will be displayed under the default filters and you can filter the invoices based on the new criteria.
Editing Custom Views
To edit the custom view that you’ve created:
- Go to the Invoices module in the left sidebar or press shift + i to instantly navigate to the Invoices module.
- Click the filter dropdown and select the custom view you want to edit.
- Hover your mouse cursor next to the filter name and click the Edit icon.
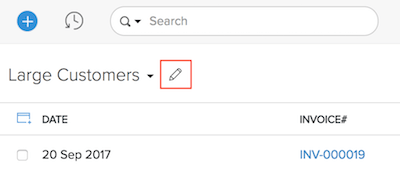
- Edit the custom view.
- Click Save.
Sorting Invoices
You can sort the invoices to display them in a particular order based on a particular value. All the sorting options that are available in the Invoices module is listed below:
| Sort By | Description |
|---|---|
| Created Time | Sorting by Created Time allows you to view the invoices in the order of latest to oldest or vice versa based on the created time. |
| Last Modified Time | Sorting by Las Modified Time sorts the invoices by listing the last edited invoices at the top or vice versa. |
| Date | Sorting by Date allows you to sort the invoices in the order of latest to oldest or vice versa. By default, the latest is displayed on top. |
| Invoice Number | Sorting by Invoice Number allows you to list the invoices in the ascending order or in the descending order of the invoice number. |
| Customer Name | Sorting by Name allows you to list the invoices in the alphabetical order or in the reverse alphabetical order of the customer names. By default, the invoices are listed in the alphabetical order. |
| Due Date | Sorting by Due Date allows you to sort the invoices in the order of latest to oldest or vice versa. By default, the latest is displayed on top. |
| Amount | Sorting by Amount allows you to list the invoices in the ascending order of the rate or in the descending order of the rate. |
| Balance Due | Sorting by Balance Due allows you to list the invoices in the ascending order of the balance due or in the descending order of the balance due. |
To sort the invoices:
- Go to the Invoices module in the left sidebar or press shift + i to instantly navigate to the Invoices module.
- Click the Hamburger icon in the top right corner of the window.
- Select one of the Sort By options to sort the invoices in that particular order.
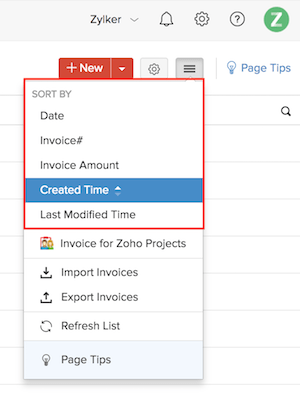
- Select the same option again to reverse the order in which the invoices are sorted. You can change the alphabetical to reverse alphabetical and ascending to descending.
Pro Tip: Alternatively, you can sort the invoices directly by clicking the field names. You can click them again to reverse the order.


 Yes
Yes
 Thank you for your feedback!