


Set up and Manage Health Insurance with SimplyInsured

SimplyInsured is a US online health insurance broker for small businesses. It helps you find, buy, and manage medical, dental, and vision insurance from a range of carriers.
You can integrate with SimplyInsured to shop for, set up, and manage this insurance for your employees, without leaving Zoho Payroll.
If you do not have a plan yet, you can compare plans from the carriers SimplyInsured offers for your location and buy one. If you already have a plan, you can connect it so the plan and its payroll deductions stay current when the plan changes or you add employees.
Once a plan is active, it appears in Zoho Payroll as a benefit, and its contributions and deductions sync automatically, so you do not have to set up deduction components by hand.
Availability and Limitations
Before you start, check that SimplyInsured can offer plans to your business. This depends on your state, your business size, and who you want to insure.
| Limitation | What it means |
|---|---|
| State availability | SimplyInsured is not sold in every state. Confirm your state is supported before you begin. |
| Business size | SimplyInsured is for small businesses, broadly from 1 to about 150 employees. The carriers available through SimplyInsured may set their own minimums on top of this. |
| Who is eligible | Coverage is for W-2 employees and owners. In most states, 1099 contractors are not eligible, with limited exceptions for full-time contractors. |
| Coverage timing | Carriers start coverage on the 1st of the month, and your application steps in SimplyInsured must be completed before a deadline ahead of that date. |
| Out-of-state employees | Because carrier networks are regional, covering employees in other states is not always possible. Check plan details if your team is spread across states. |
This guide walks an admin through the whole flow, from connecting the integration to seeing the finished benefit in payroll. It documents setting up a new plan in full. If you already have a plan, the Connect existing plan path is noted where it differs.
Before You Begin
Prerequisite: To connect SimplyInsured and complete the application, you must be an Admin, or your role in Zoho Payroll must have access to Settings.
You will also need:
| Requirement | Why it is needed |
|---|---|
| Your employees added in Zoho Payroll | SimplyInsured syncs its employee list from Zoho Payroll. |
| Company documents ready for the application | Typical documents include your Articles of Organization or LLC Agreement, a recent payroll journal, your IRS FEIN letter, and your state Statement of Information. |
Step 1: Connect SimplyInsured to Zoho Payroll
- Go to Settings on the left sidebar.
- In the left sidebar, click Other Apps under Integrations.
- On the Integrations - Benefits page, find SimplyInsured and click Connect.
A consent window opens. You can read SimplyInsured’s Terms of Service and Privacy Policy to see how your data is processed and protected.
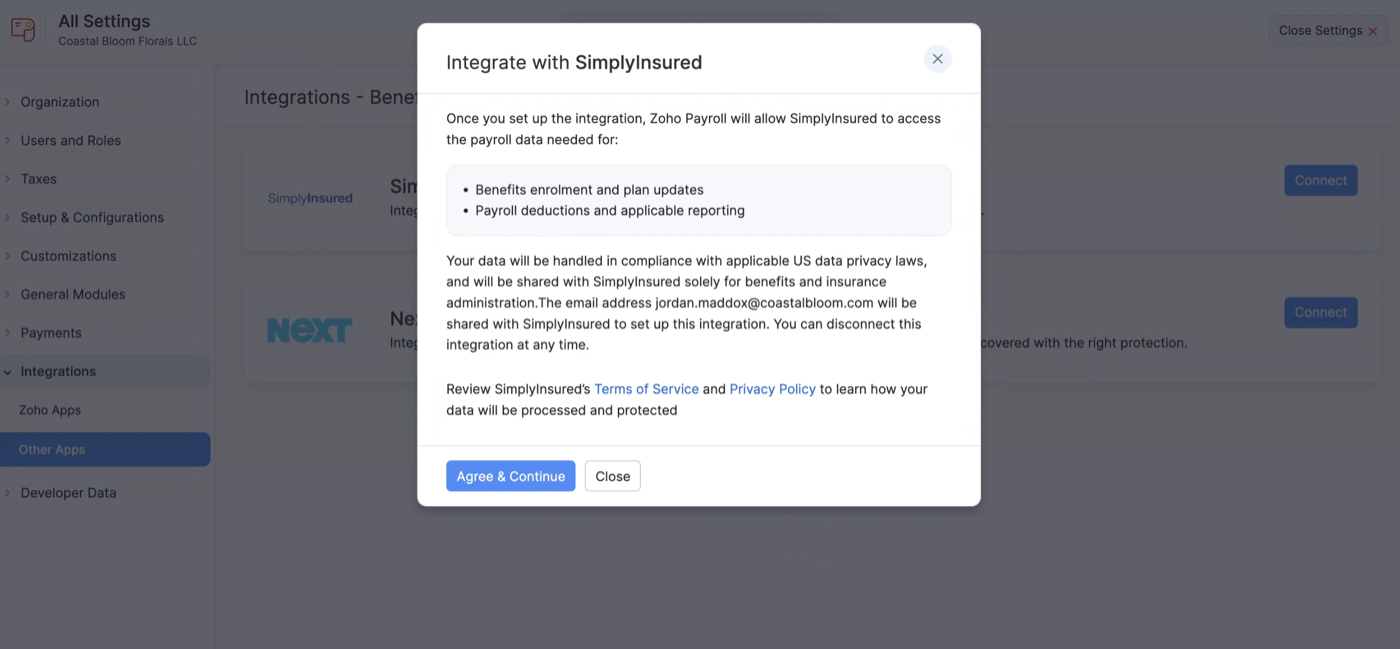
- Click Agree & Continue to proceed, or Close to cancel.
Step 2: Choose How You Want to Set up Coverage
After you agree, choose how to set up your insurance, depending on whether you already have a plan:
| Option | Use it when |
|---|---|
| Connect existing plan | You already have a plan and want payroll deductions to stay current when the plan changes or you add employees. |
| Find a plan | You want to browse small business medical, dental, and vision plans from carriers in your area and build a new policy. (This is the path the rest of this guide follows.) |
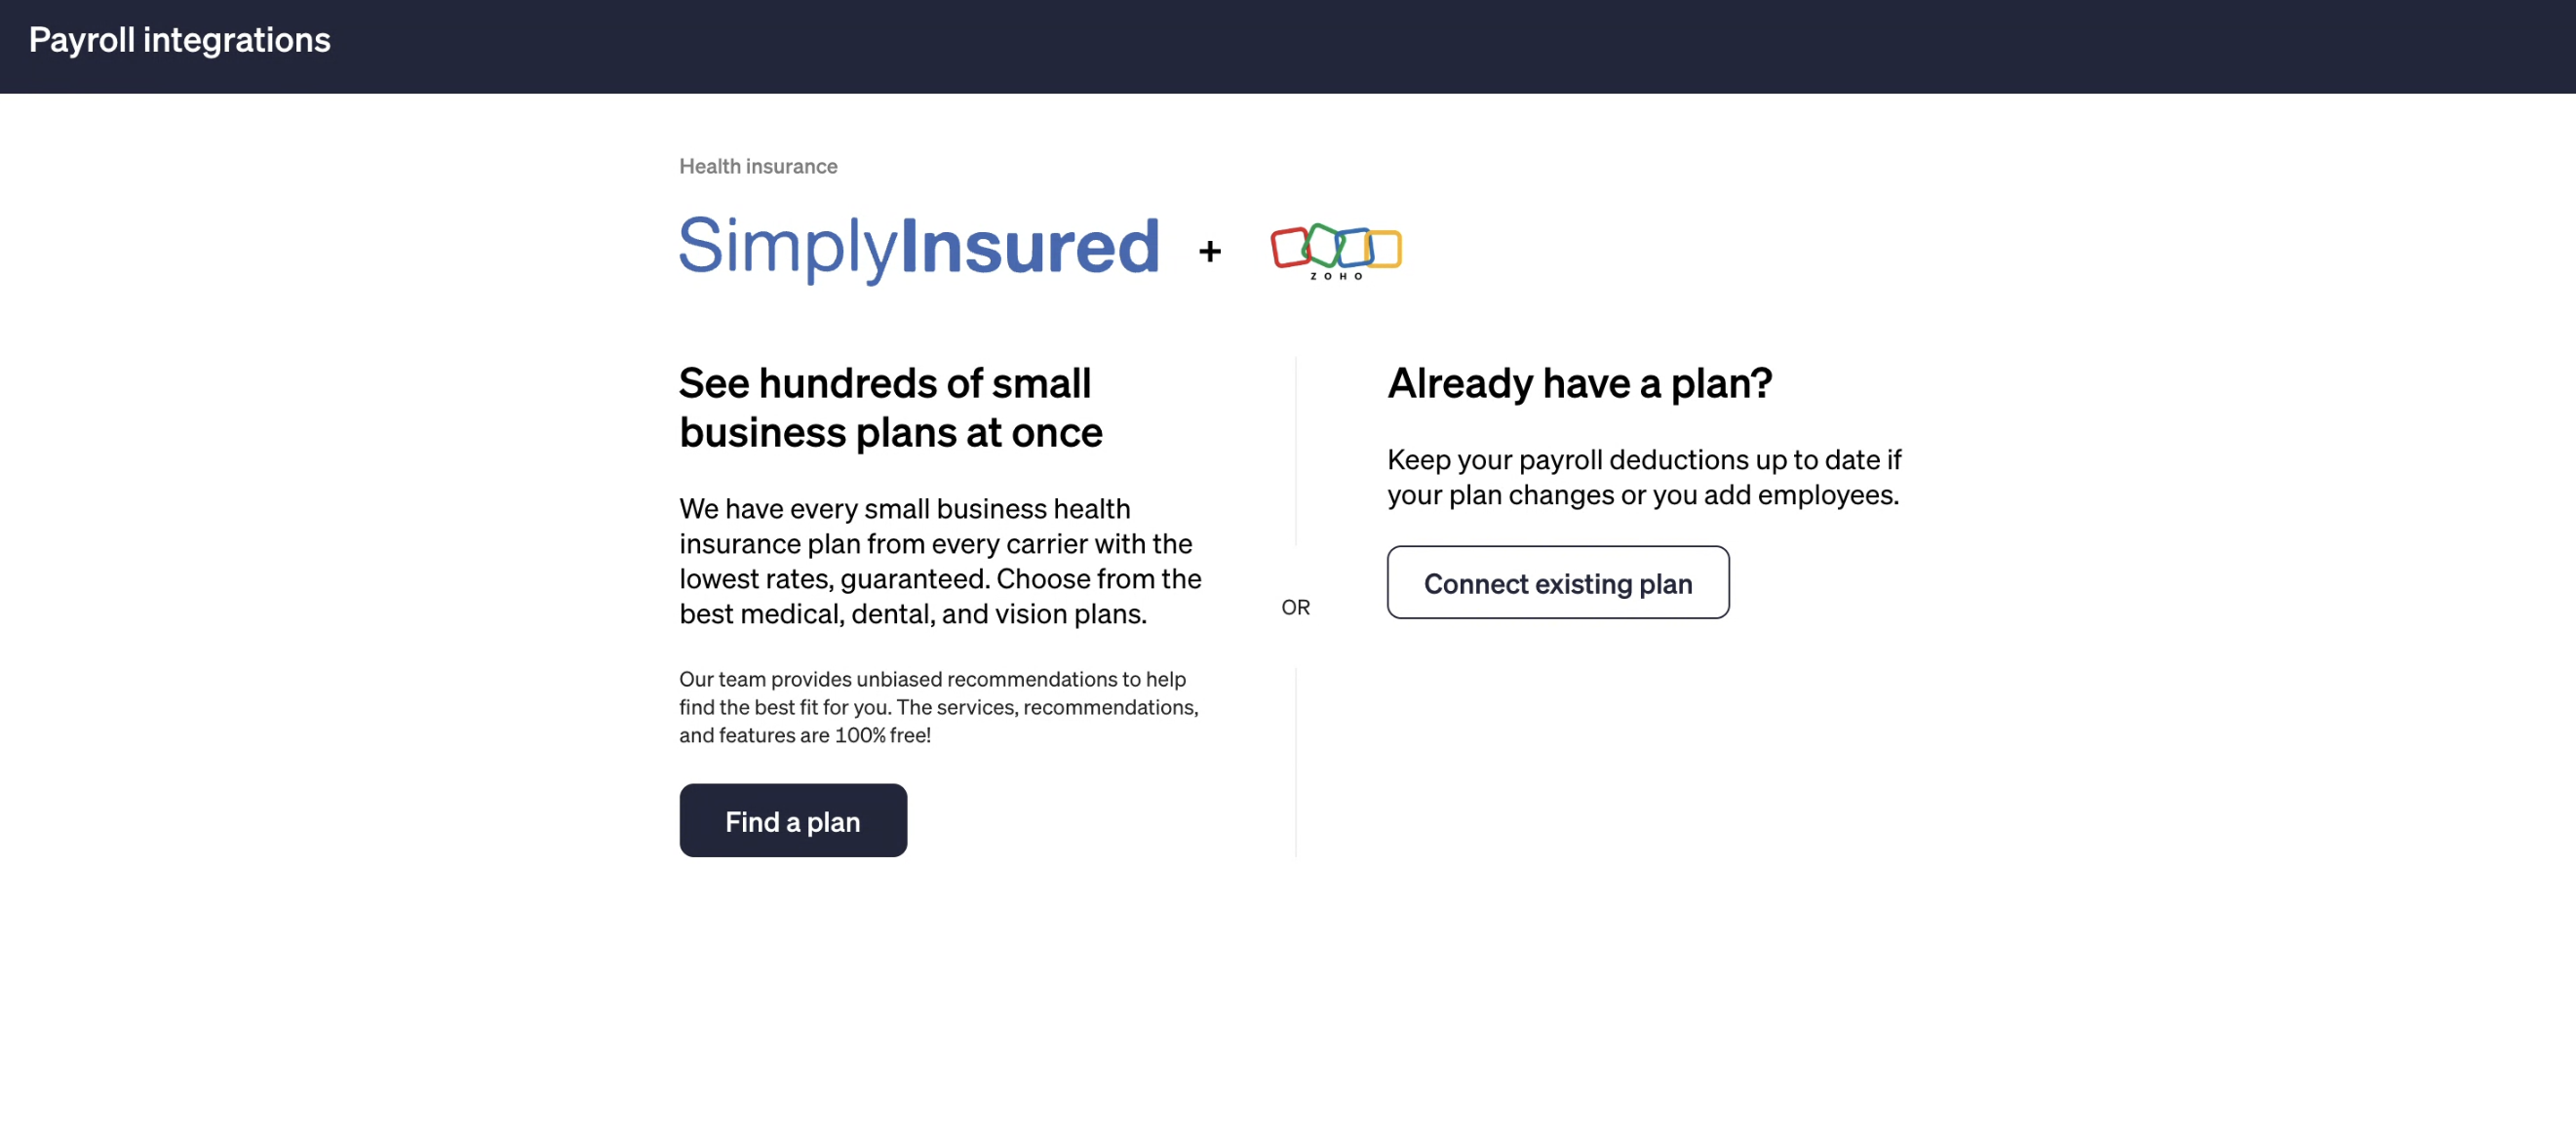
Note: If you already have an existing plan, contact SimplyInsured by the email or phone number shown on screen. They will help you connect it.
The rest of this guide follows the Find a plan path for setting up new coverage.
- Click Find a plan to continue.
Step 3: Authorize Data Access
Before SimplyInsured shows your plans, confirm the data it will access from your payroll on an ongoing basis. SimplyInsured uses this to give you an insurance quote and, if you buy a plan, to maintain your policy.
SimplyInsured will access:
- Company
- Company tax documents
- Employees
- Payrolls
- Payroll items
- Benefits
- Post tax deductions
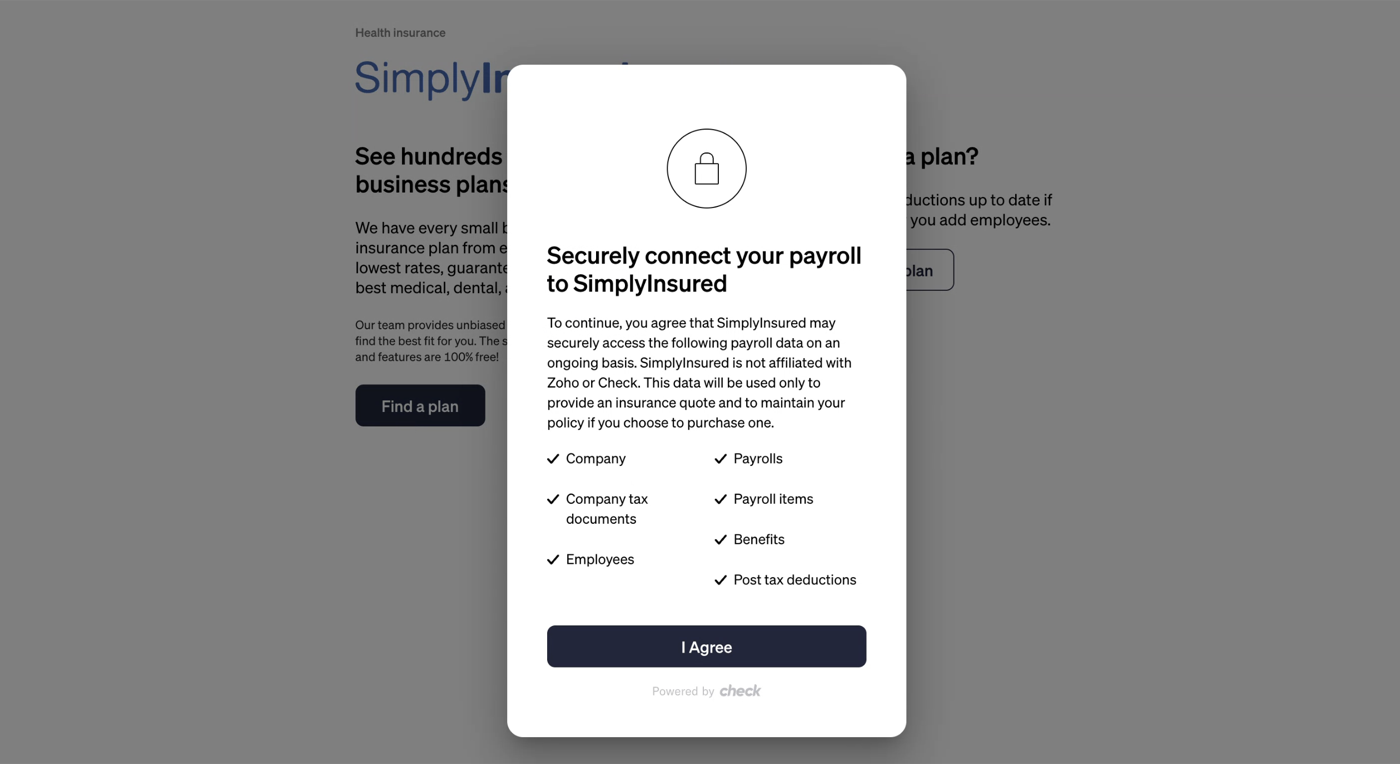
- Click I Agree to continue.
Step 4: Browse Plans
In this step, you choose the medical, dental, or vision plans you want to offer. SimplyInsured prices every plan from your synced employees and your business location, so the quotes you see are specific to your team.
Review Your Synced Employees
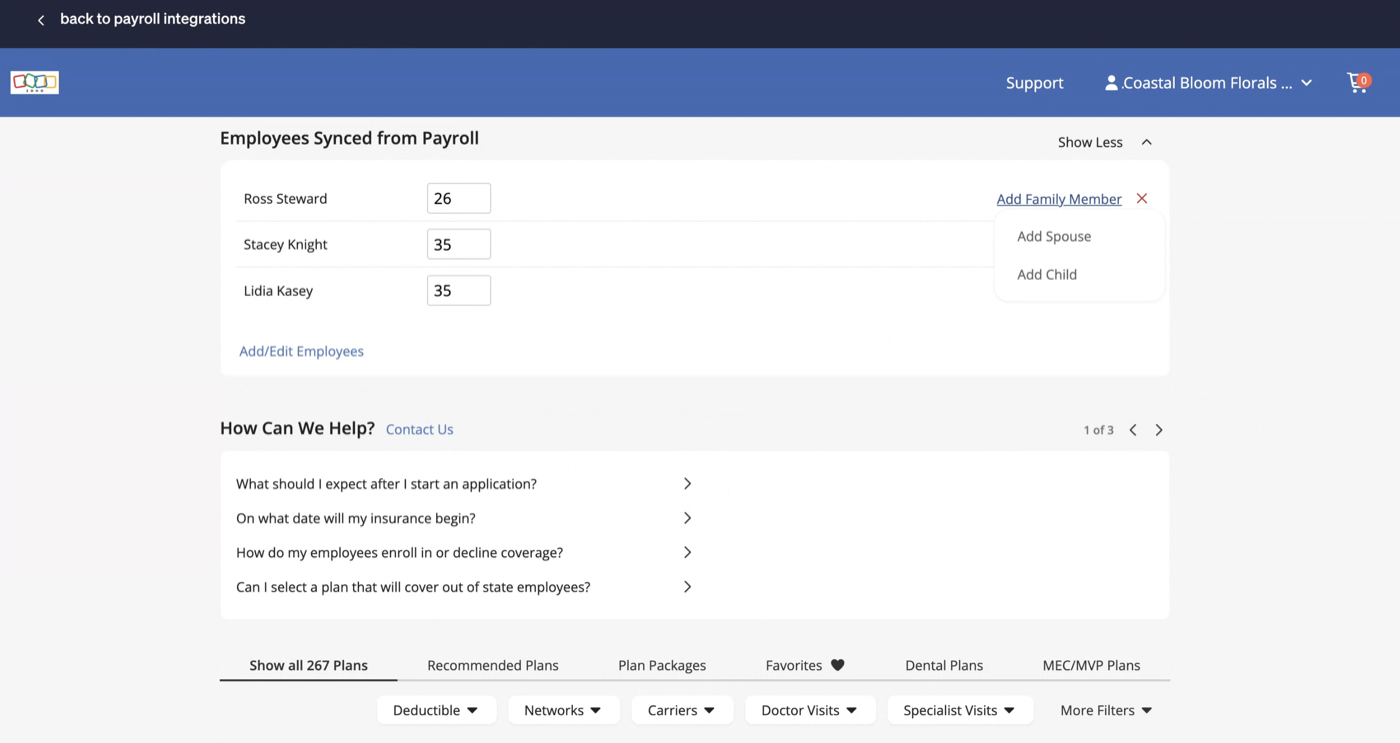
Your quote is priced from this list, so check it is accurate before you shop. The Employees Synced from Payroll panel shows each employee with their age, which affects premiums.
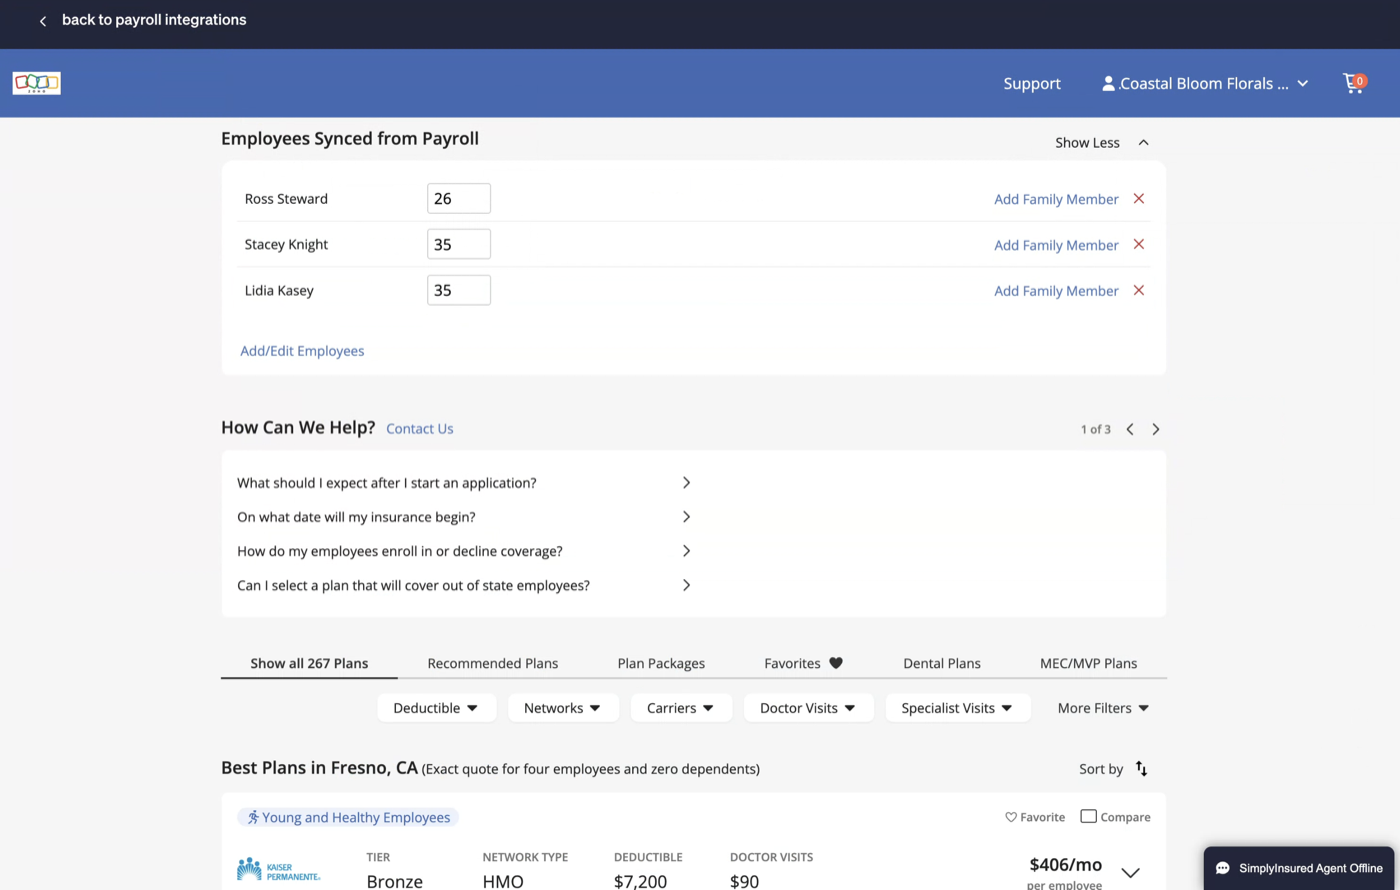
From this panel you can:
- Click Add Family Member for an employee, then choose Add Spouse or Add Child. Adding dependents changes the quote, since premiums depend on who is covered.
- Click Add/Edit Employees to adjust the list. If an employee is missing, add them in Zoho Payroll first, then sync.
Find a Plan
Quotes are based on your company location and your employee census, so the plans and prices you see are specific to your business. Use the tabs to browse plans by category:
- Show all plans lists every available plan.
- Recommended Plans, Plan Packages, Favorites, Dental Plans, and MEC/MVP Plans group plans by type or fit.
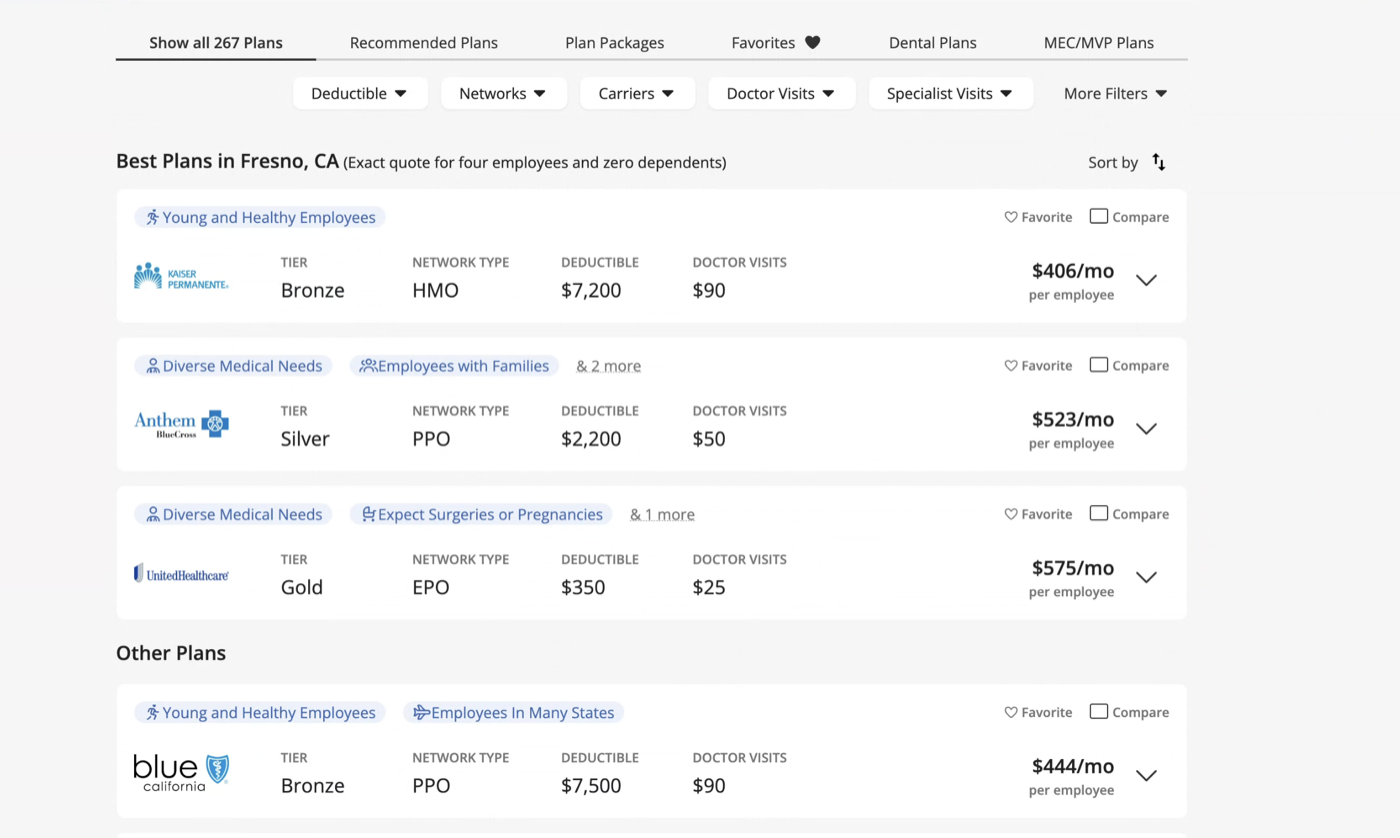
Each plan card helps you compare options at a glance. The tier (Bronze, Silver, or Gold) signals the trade-off between the monthly premium and what employees pay out of pocket: lower tiers cost less each month but carry higher deductibles, while higher tiers cost more but cover more up front.
The network type (HMO, PPO, or EPO) determines which doctors employees can see and whether they need referrals. The deductible and doctor visit cost show what employees pay before and during care, and the monthly cost per employee is the figure to weigh against your budget.
Insight: Some cards also carry persona tags like “Young and Healthy Employees” or “Employees with Families.” Use these as a shortcut to surface plans that suit your team’s profile, then confirm the details still fit before you decide.
For each plan you can:
- Click Favorite to save it for later.
- Click Compare to line plans up side by side.
When you find a plan you want, open it to move into Configure Policy.
Step 5: Configure Your Policy
In this step, you confirm the plans you are offering, decide how much of the premium your company covers, and set when coverage starts. A running cost breakdown updates as you go, so you can see the effect of each choice before you commit.
Confirm and Add Coverage Lines
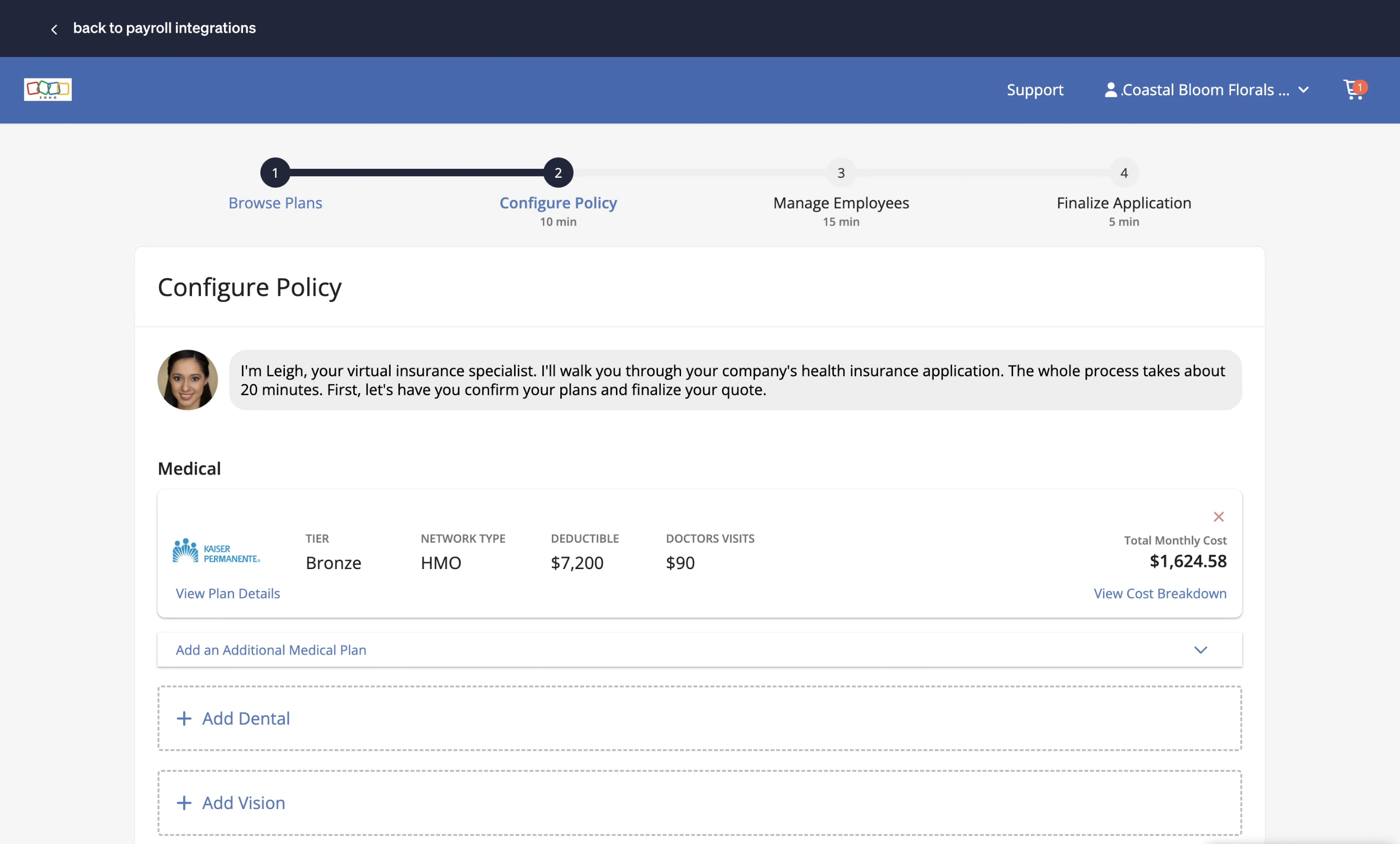
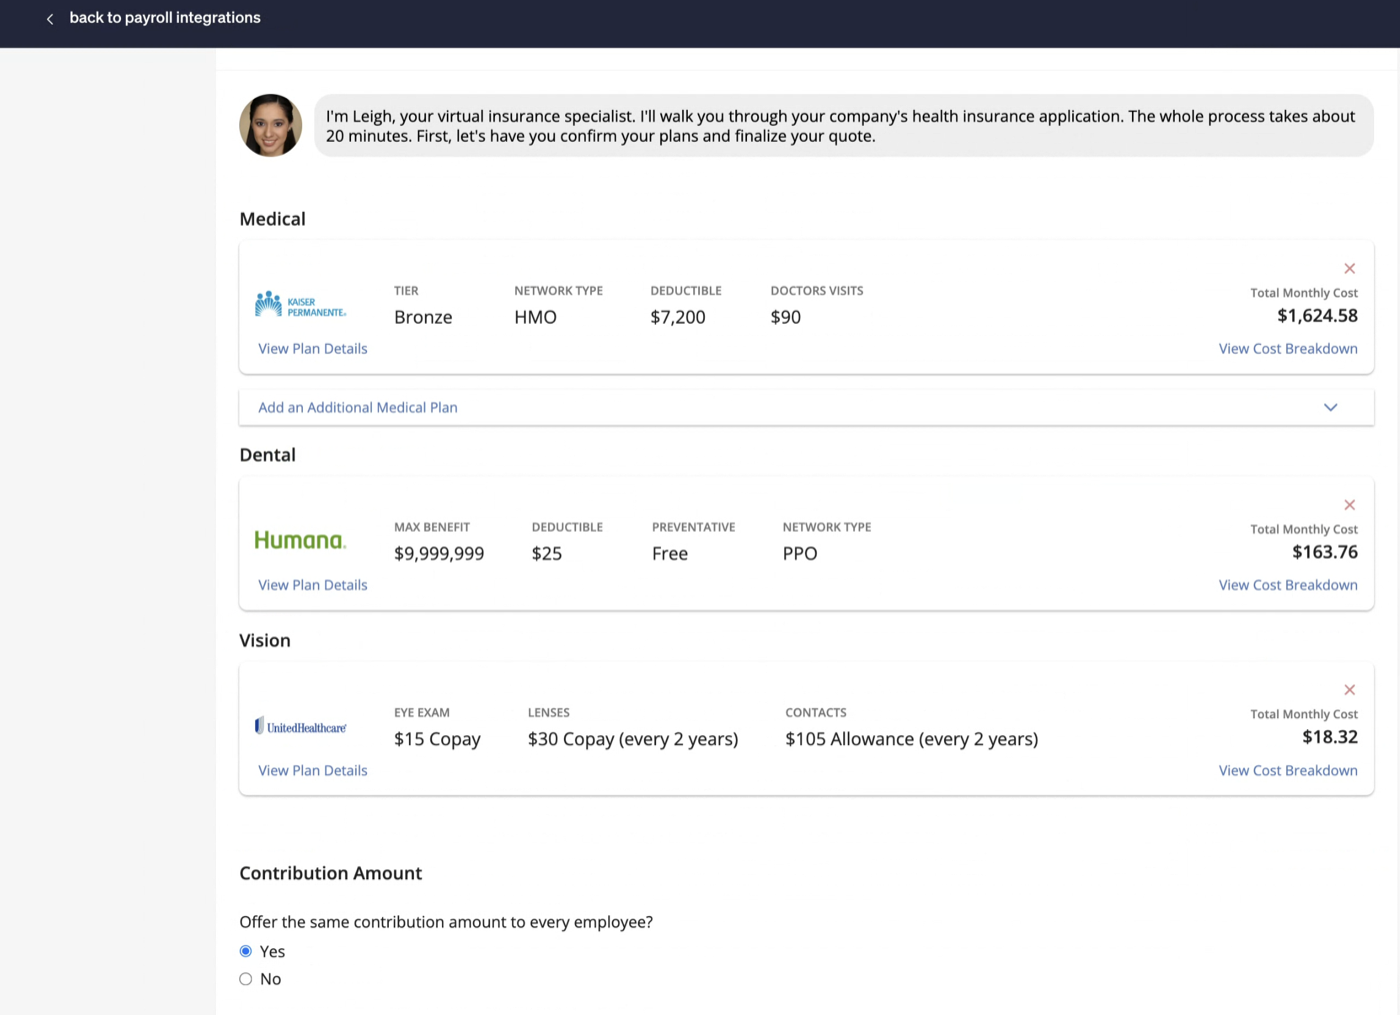
Your selected Medical plan appears with its tier, network type, deductible, doctor visit cost, and total monthly cost. You can:
- Click View Plan Details to see the full plan.
- Click View Cost Breakdown to see how the cost is split.
- Click Add an Additional Medical Plan if you want to offer more than one.
- Click Add Dental and Add Vision plans.
Set Your Contribution
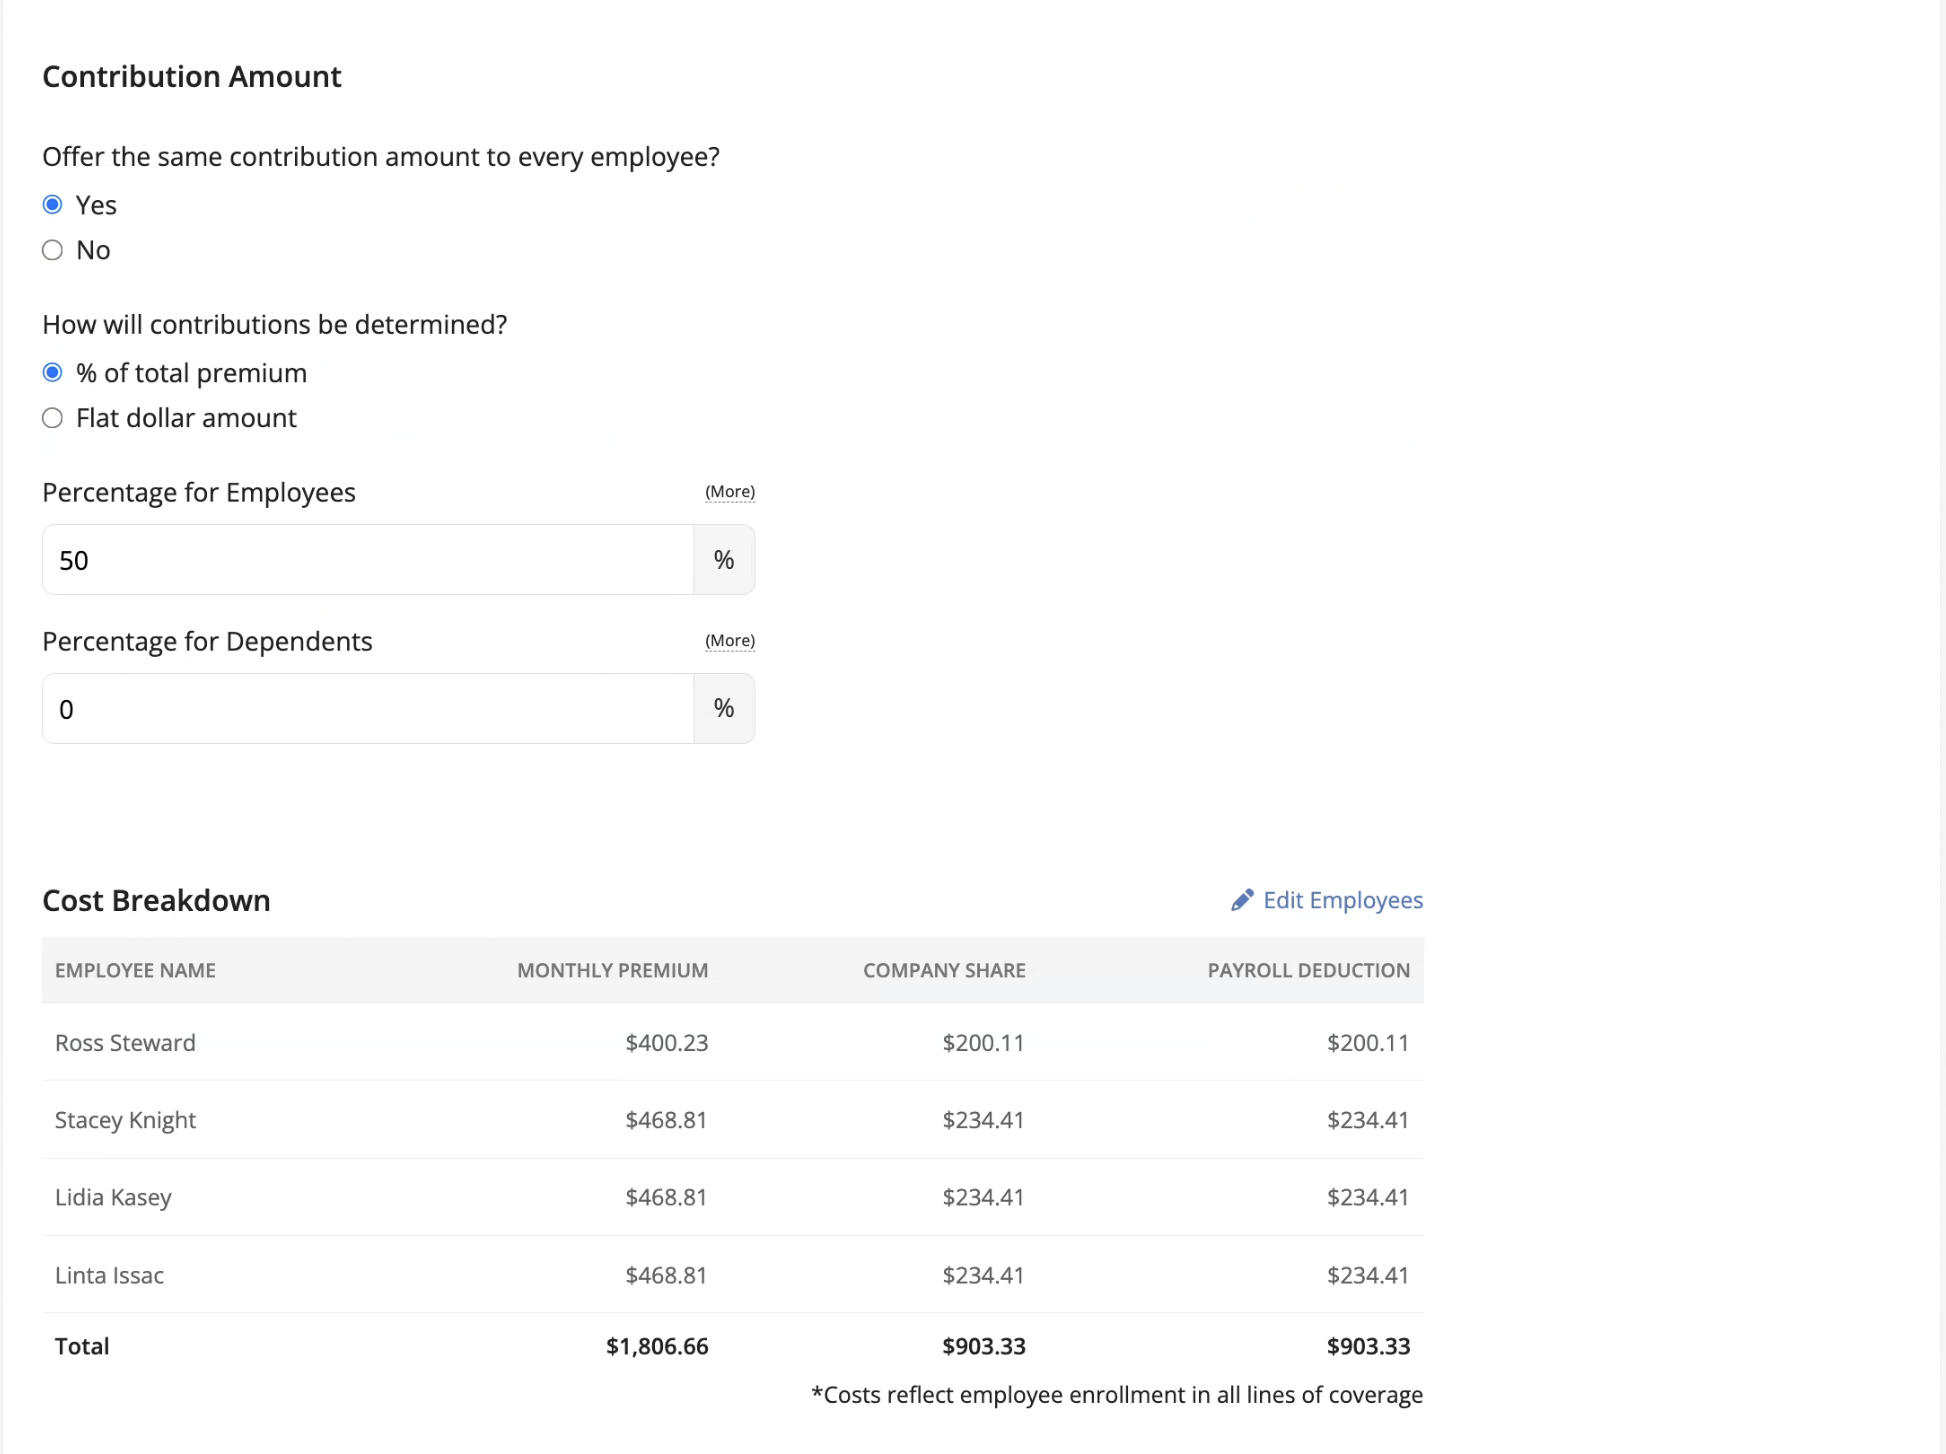
Under Contribution Amount, decide how much of the premium your company pays.
- Choose whether to offer the same contribution amount to every employee.
- Set either a % of total premium or a Flat dollar amount.
- A percentage keeps your contribution proportional to each plan’s cost, so your share rises and falls with the plan an employee picks.
- A flat dollar amount gives every employee the same fixed contribution whatever plan they choose. This caps and steadies your company’s cost while employees cover any difference on pricier plans.
- Enter the Percentage for Employees and the Percentage for Dependents. For example, you might cover 50% for employees and 0% for dependents.
The Cost Breakdown table then shows, for each employee, the monthly premium, the company share, and the payroll deduction.
Set Your Coverage Start Date
Under Coverage Start Date, choose when you want coverage to start, like the first of the coming month. SimplyInsured shows a deadline by which all application steps must be done so coverage can start on time.
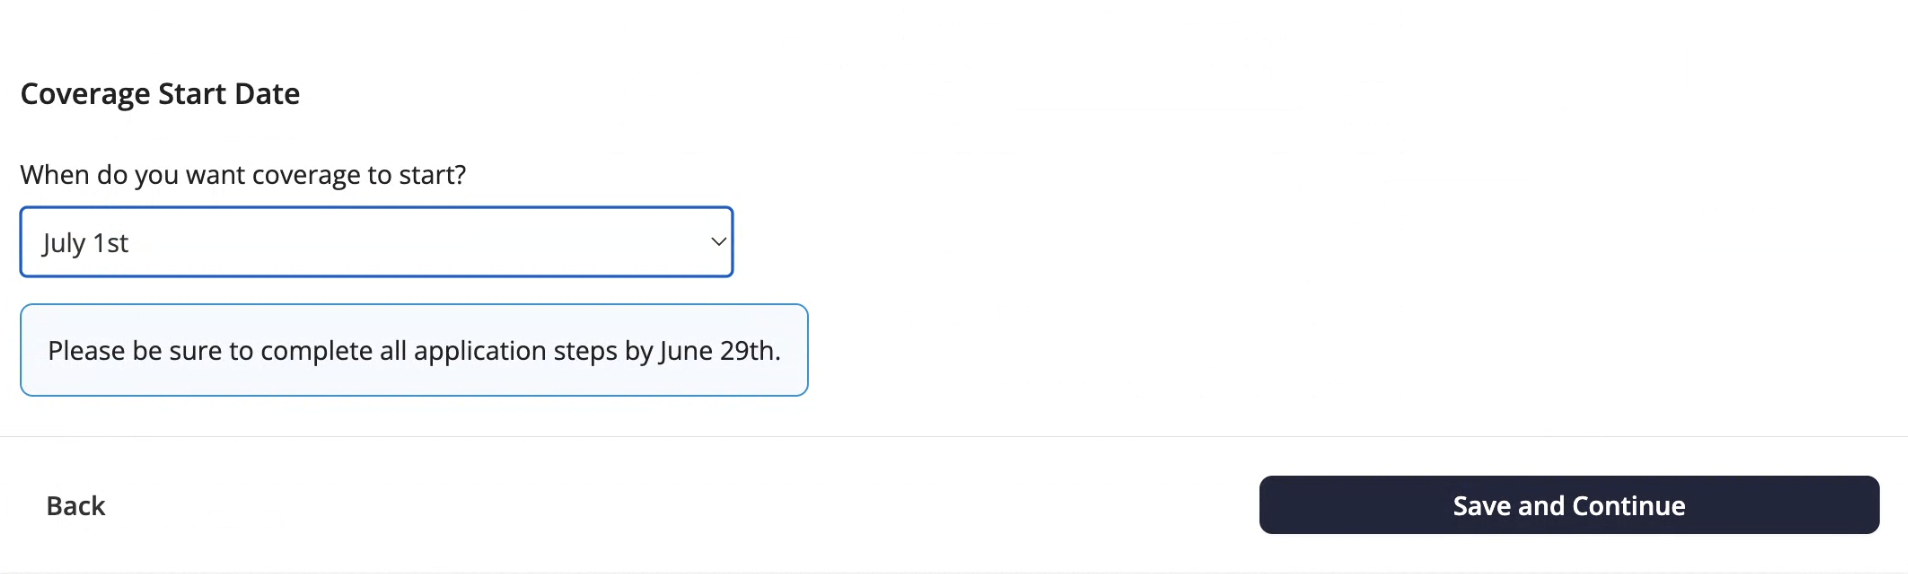
- Click Save and Continue.
Step 6: Enter Your Company Information
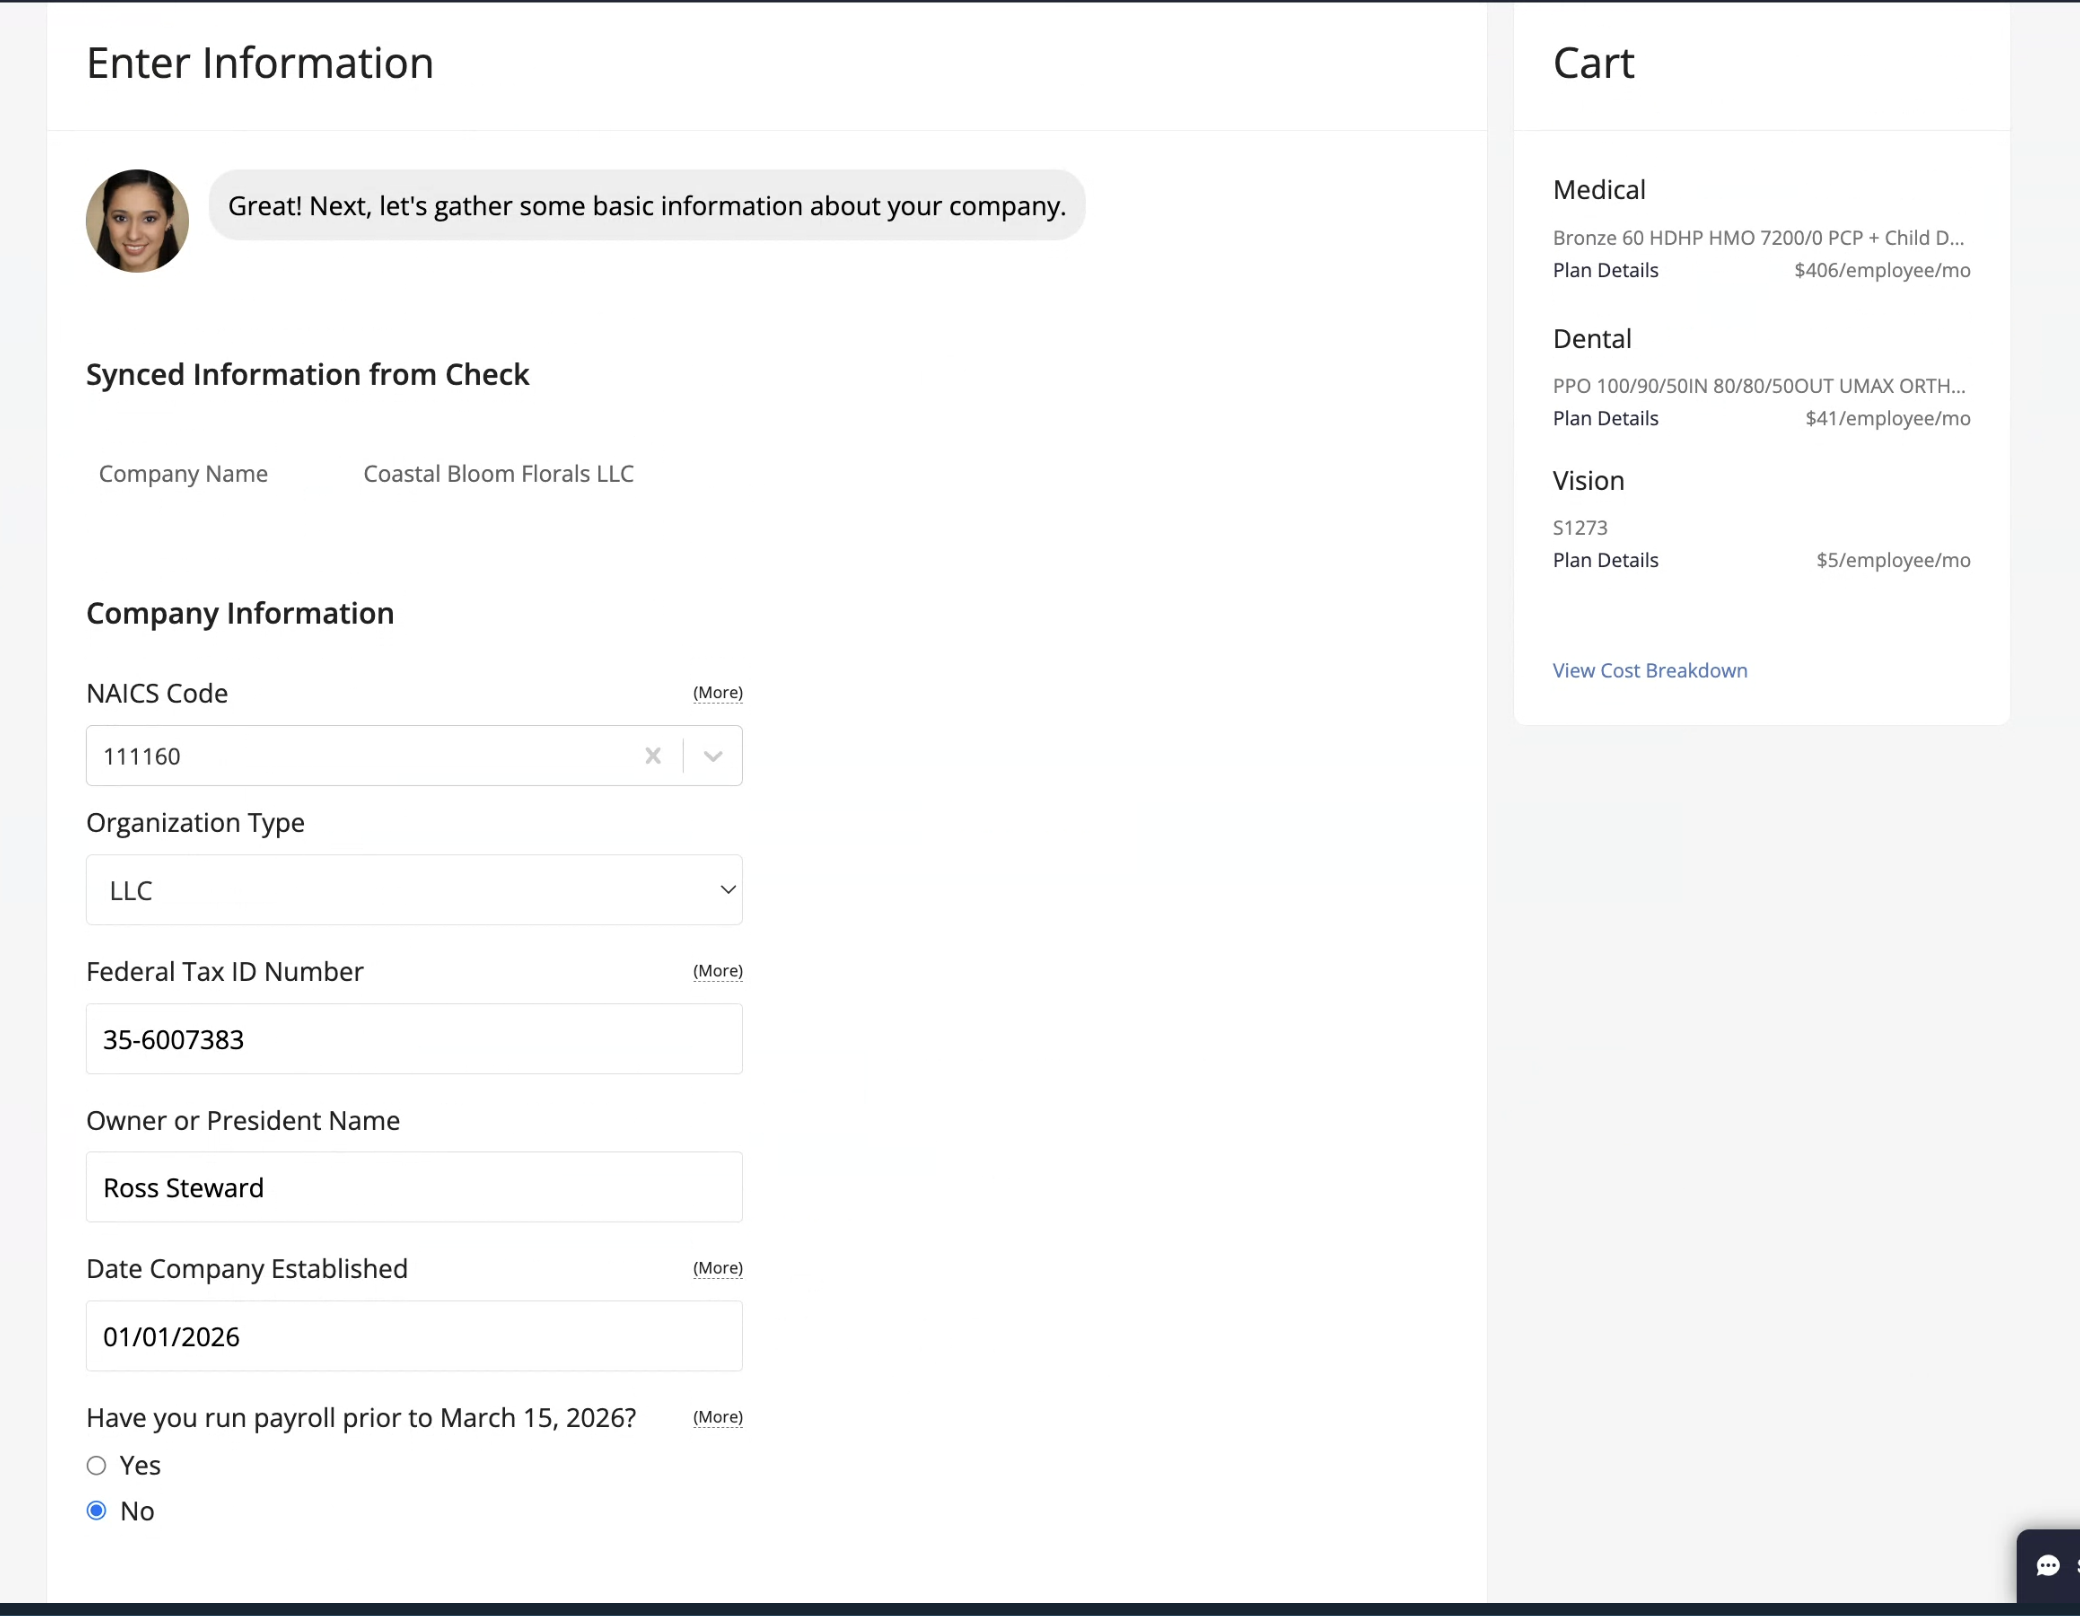
SimplyInsured collects the company details the insurance carrier needs. Some fields are synced from Zoho Payroll and shown for you to confirm.
Company Information
| Field | What to enter |
|---|---|
| NAICS Code | Your industry classification code. |
| Organization Type | For example, LLC, corporation, or sole proprietorship. |
| Federal Tax ID Number | Your FEIN. |
| Owner or President Name | The name of the owner or president. |
| Date Company Established | When your company was established. |
| Have you run payroll prior to [date]? | Choose Yes or No. |
Contact Information
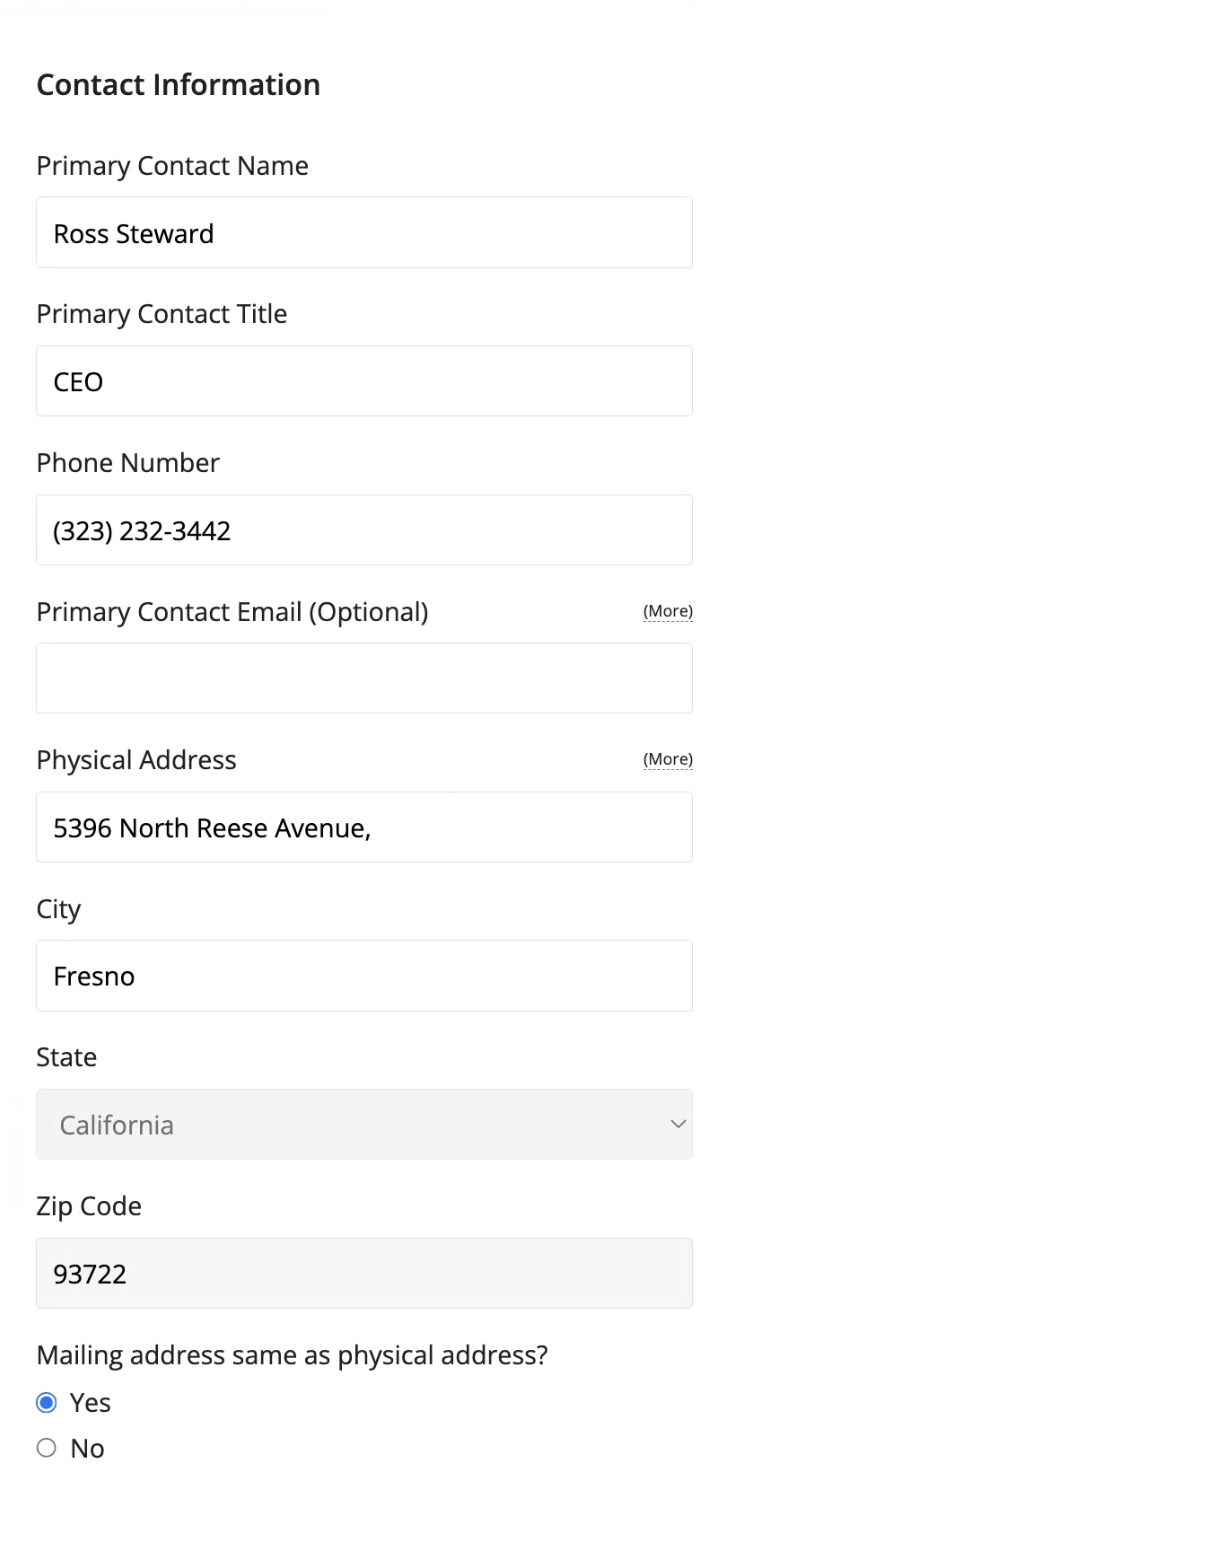
| Field | What to enter |
|---|---|
| Primary Contact Name | The main contact for the application. |
| Primary Contact Title | That person’s title. |
| Phone Number | A contact number for the business. |
| Primary Contact Email (Optional) | Optional. |
| Physical Address, City, State, and Zip Code | Your business address. |
| Mailing address same as physical address? | Choose Yes or No. Choosing No opens fields for a separate mailing address. |
Worker’s Compensation Details
| Field | What to enter |
|---|---|
| Does your company have workers’ compensation insurance? | Choose Yes or No. |
| Current Carrier | Enter your carrier if you have one. |
Coverage Preferences
| Field | What to enter |
|---|---|
| Waiting Period For New Employees | For example, “1st of month after hire date.” This sets when new hires become eligible. |
| Offer insurance to domestic partners? | Choose Yes or No. |
| Offer insurance to part-time employees? | Choose Yes or No. |
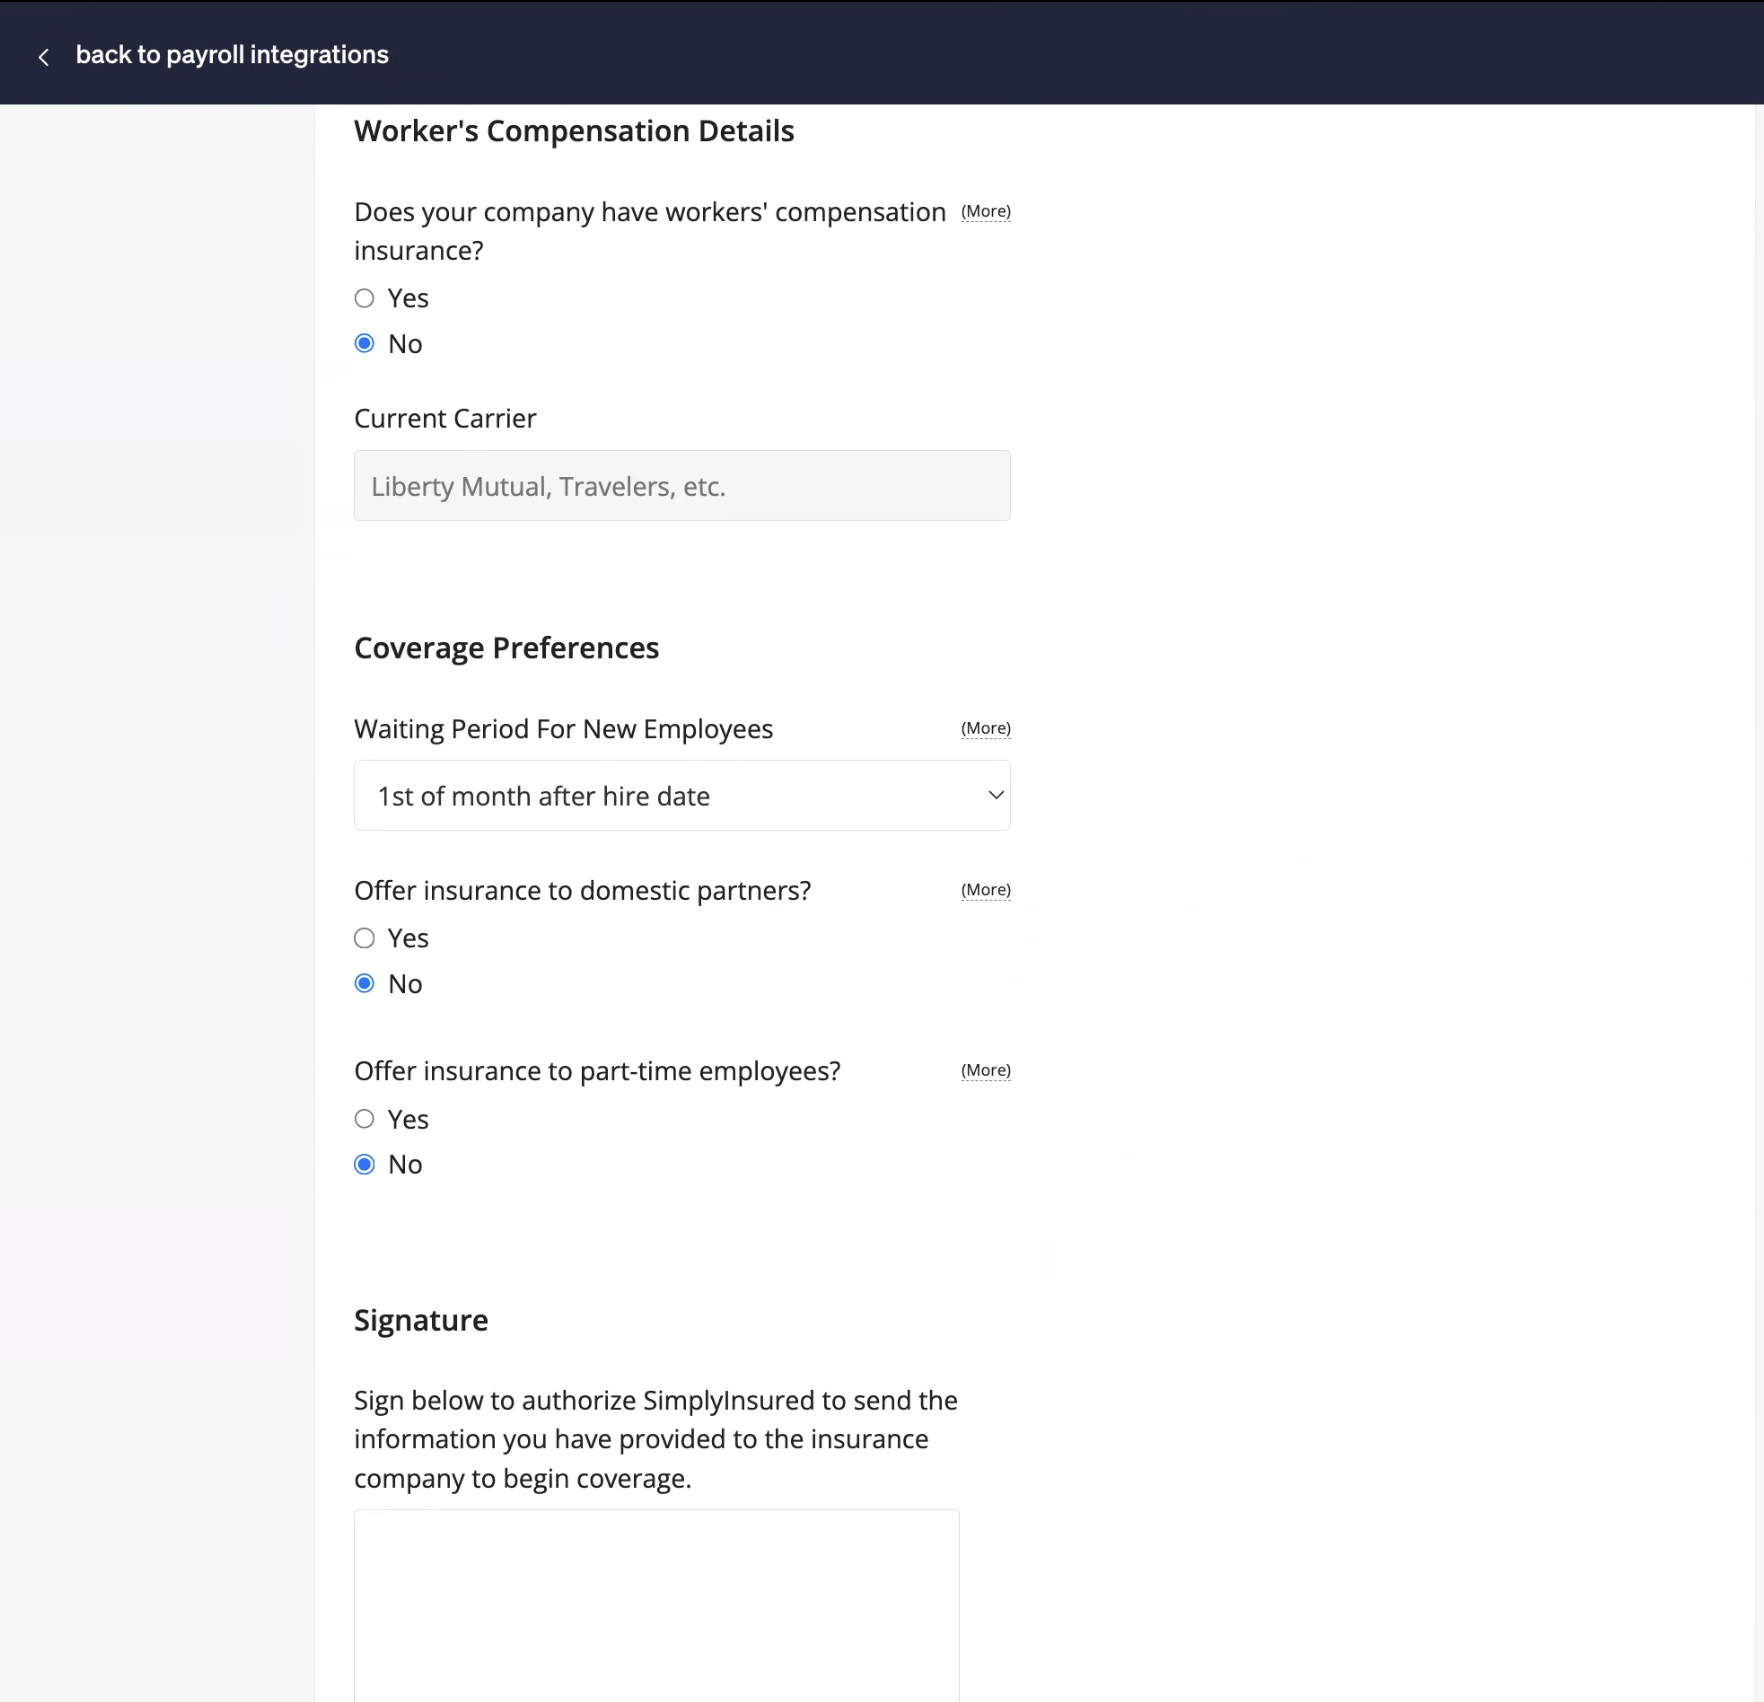
Signature
Sign in the signature box to authorize SimplyInsured to send the information you have provided to the insurance company so coverage can begin.
Step 7: Manage Employees
In this step, you choose which employees to offer benefits to. Every eligible employee then has to either enroll or decline before you can submit your application, so this is also where SimplyInsured emails them to do that.
Set Who Is Eligible
Here you choose which of your employees to offer benefits to. Only the people you include are invited to enroll, so this is where you decide exactly who is covered before invitations go out.
If an employee is missing, add them in Zoho Payroll. New hires are invited to enroll in benefits when they are added.
Answer the ownership questions:
- Is any person in the list above an owner of the company?
- Do all owners in the list above receive wages as employees on payroll?
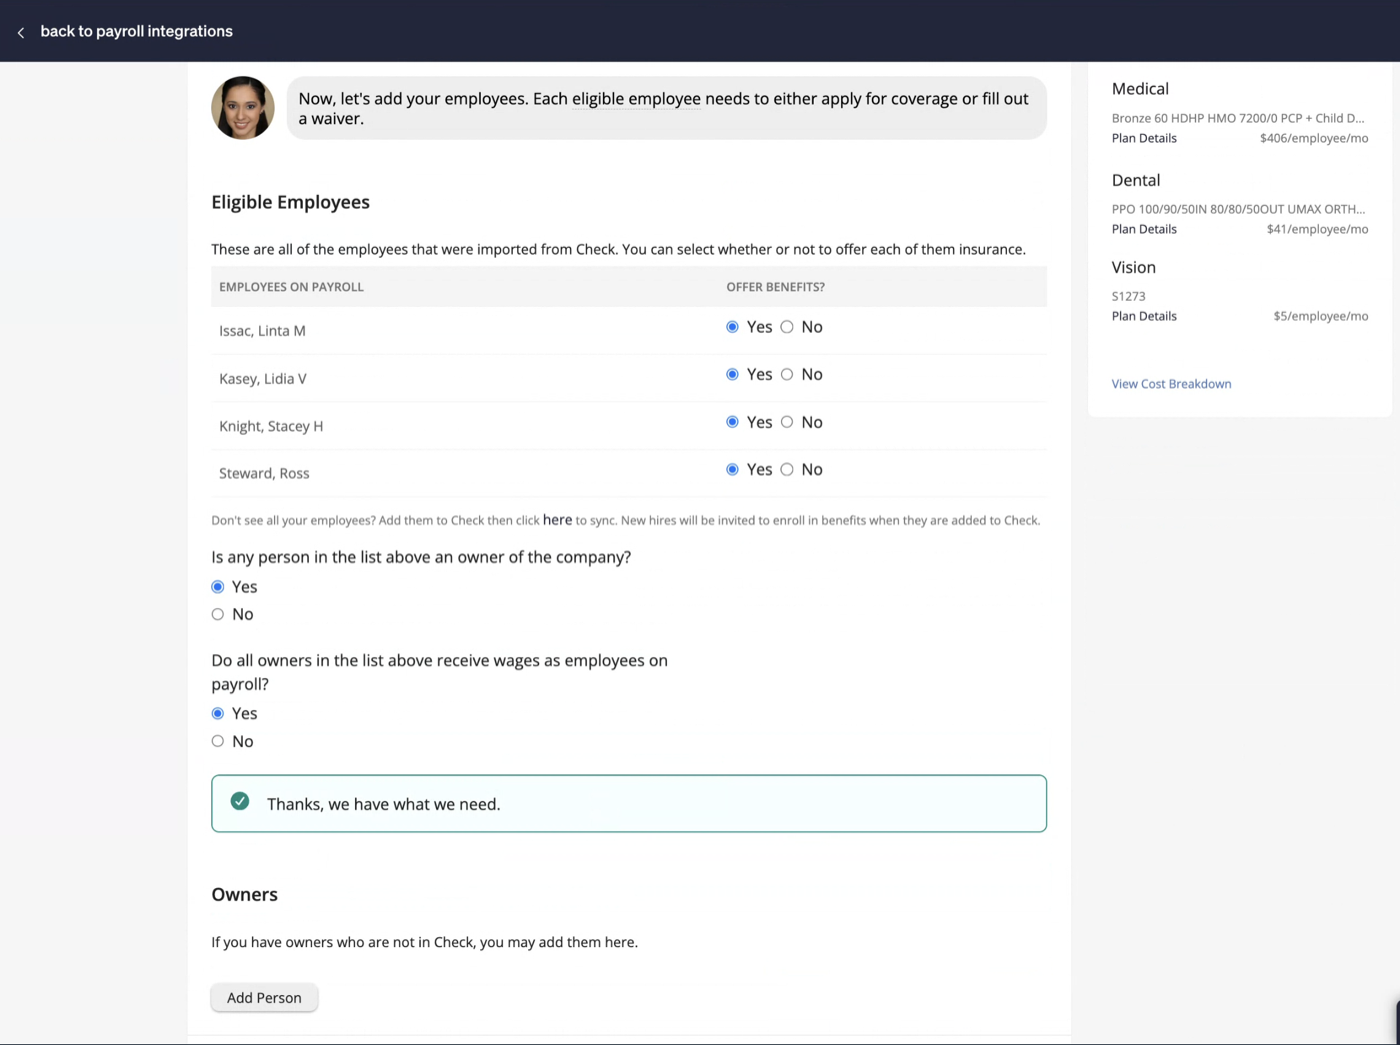
Add Owners Not on Payroll
Under Owners, use Add Person to add any owners who are not in your payroll list.
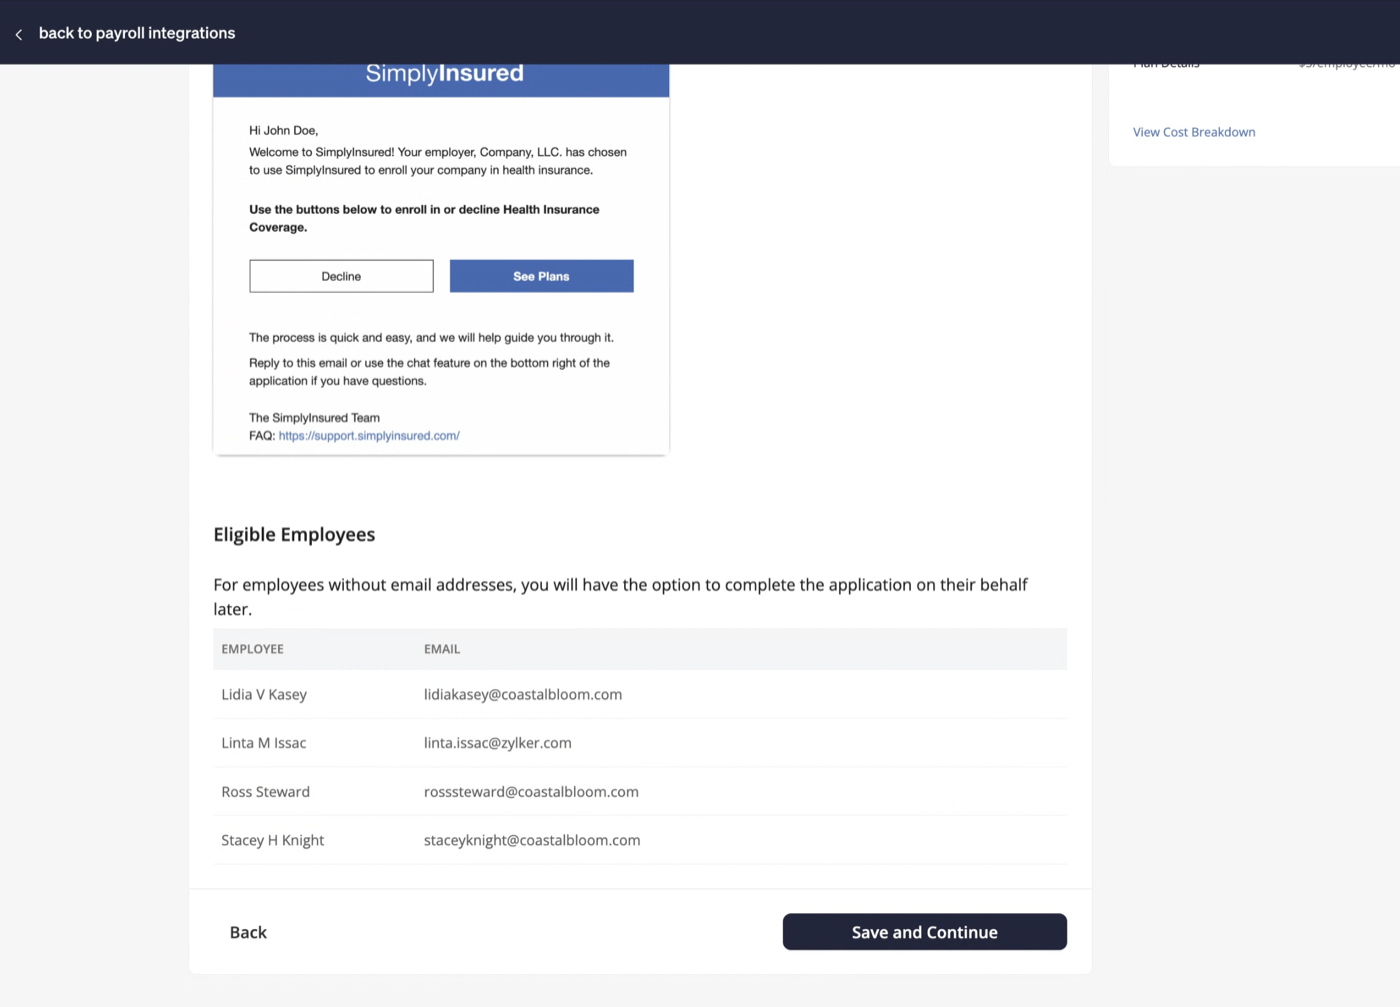
Send Applications to Employees
SimplyInsured emails an application to each eligible employee who has an email address, inviting them to see plans and enroll, or to decline. You can preview this email before it goes out.
The Eligible Employees table shows each employee and their email. For employees without an email address, you will have the option to complete the application on their behalf later.
- Click Save and Continue.
Step 8: Finalize the Application
In this last step, you provide the documents the insurance company requires, review the full price, and set up payment for the first month.
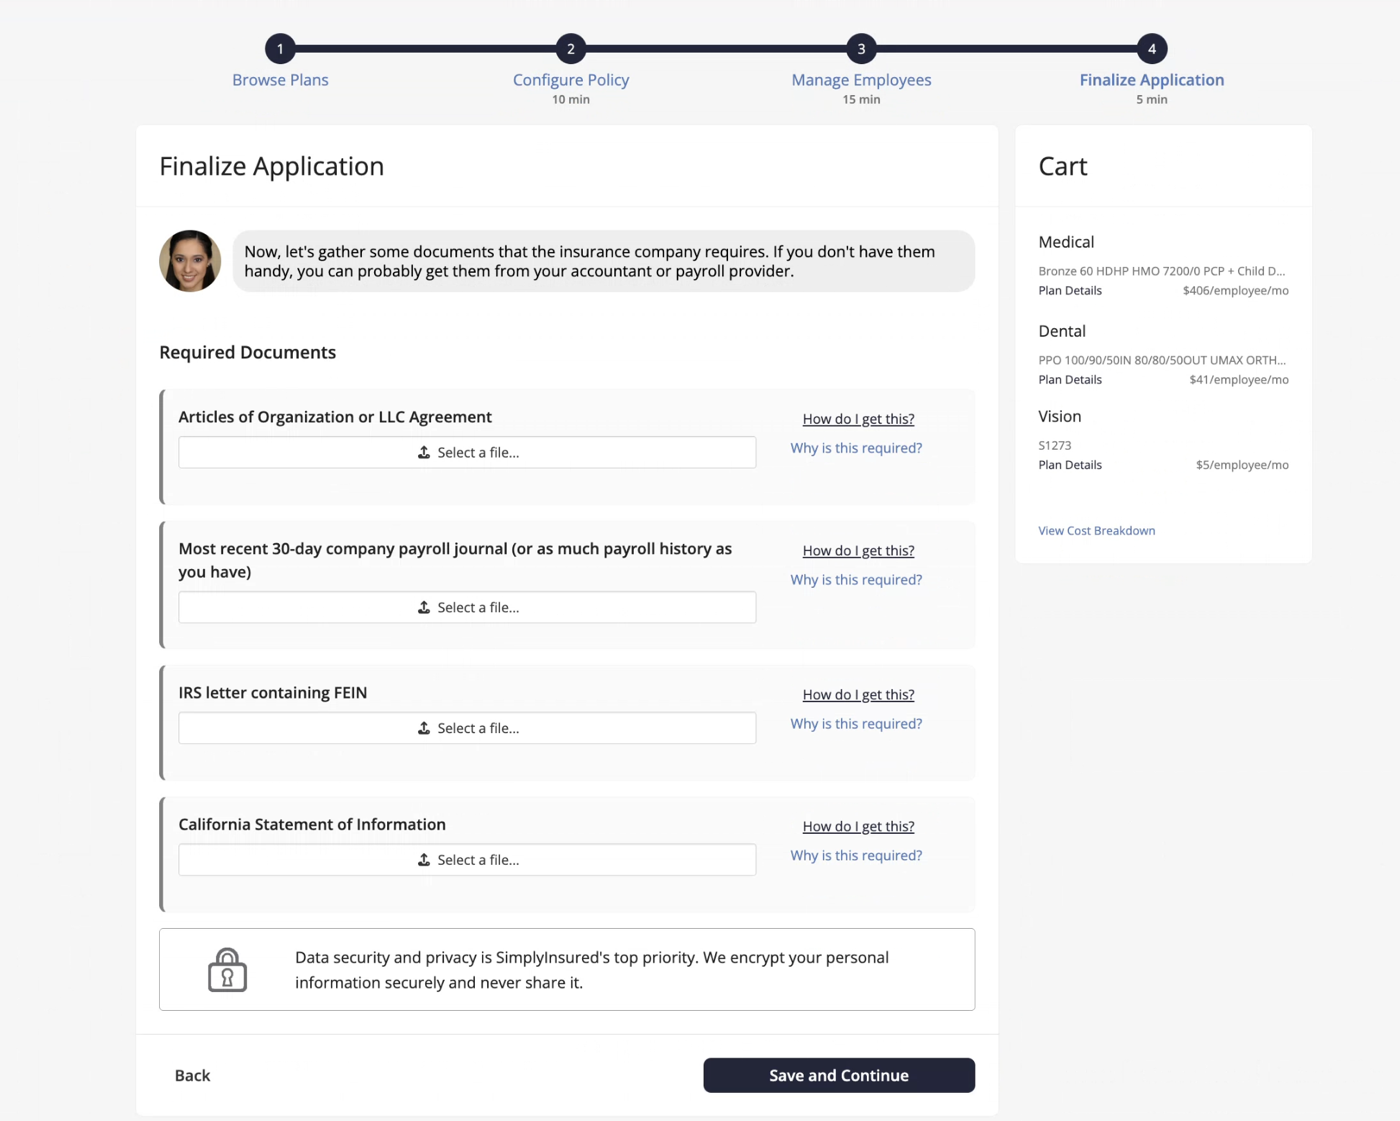
Upload Required Documents
For each required document, you can click How do I get this? for guidance and Why is this required? for the reason. Typical documents include:
Articles of Organization or LLC Agreement
Most recent 30-day company payroll journal, or as much payroll history as you have
IRS letter containing your FEIN
Your state Statement of Information
Use Select a file to upload each one.
Review the Price
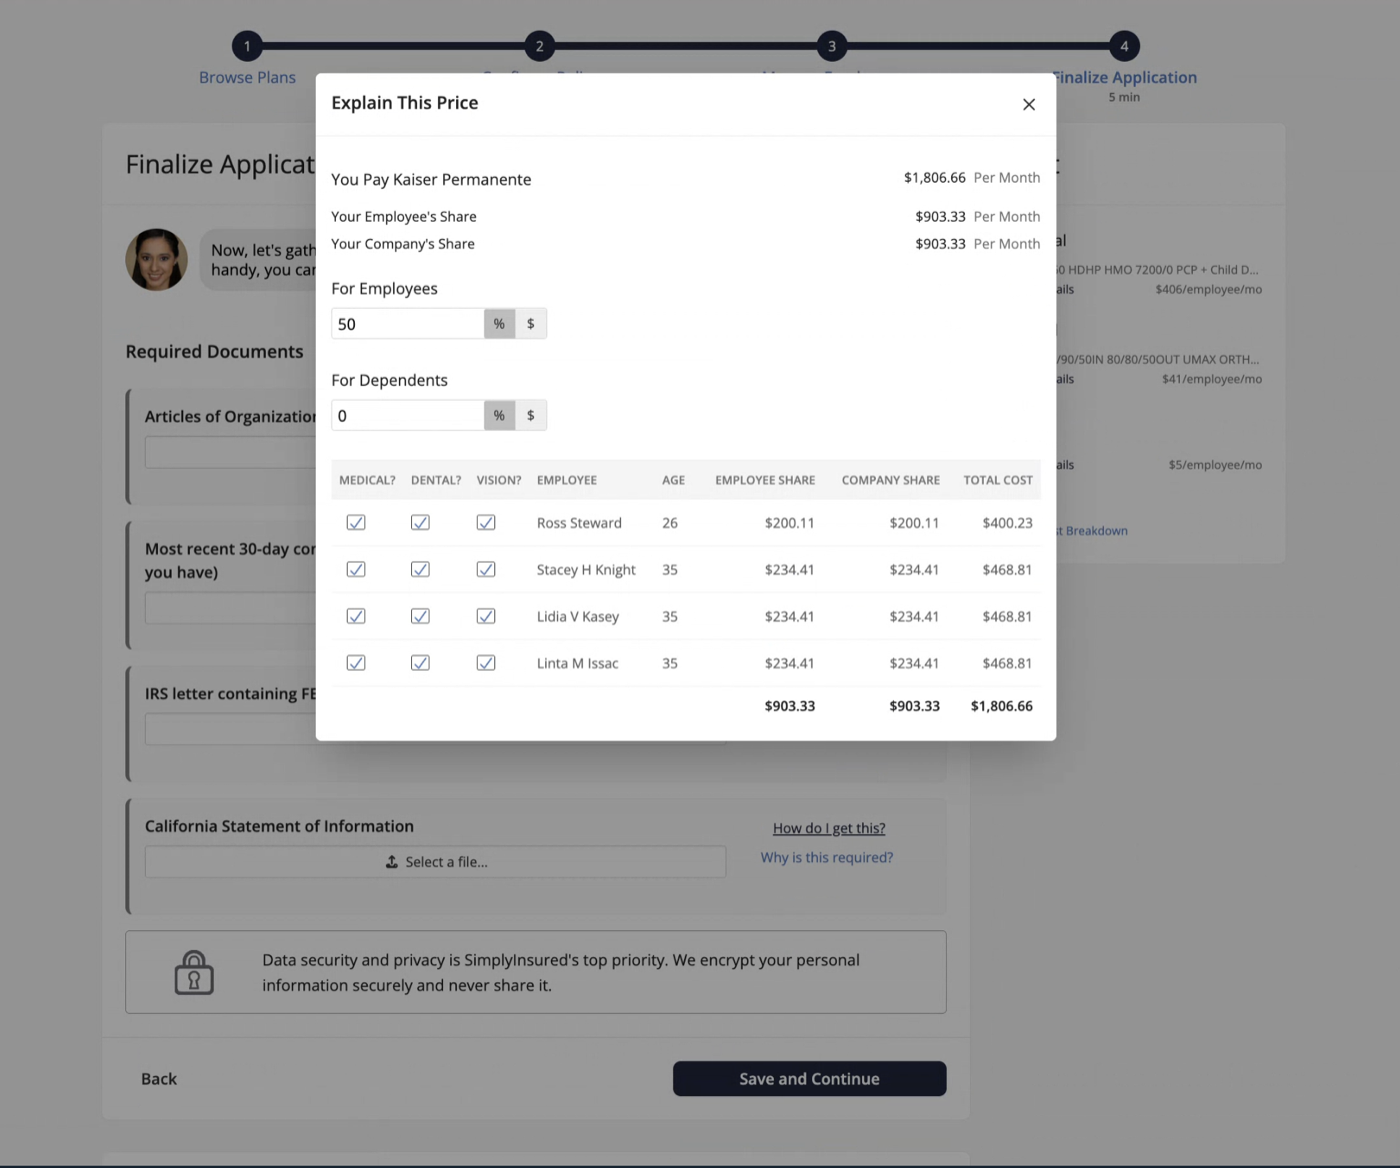
Click View Cost Breakdown or Explain This Price to see a full split: the total you pay the carrier per month, your employees’ total share, and your company’s total share.
Enter Payment Information
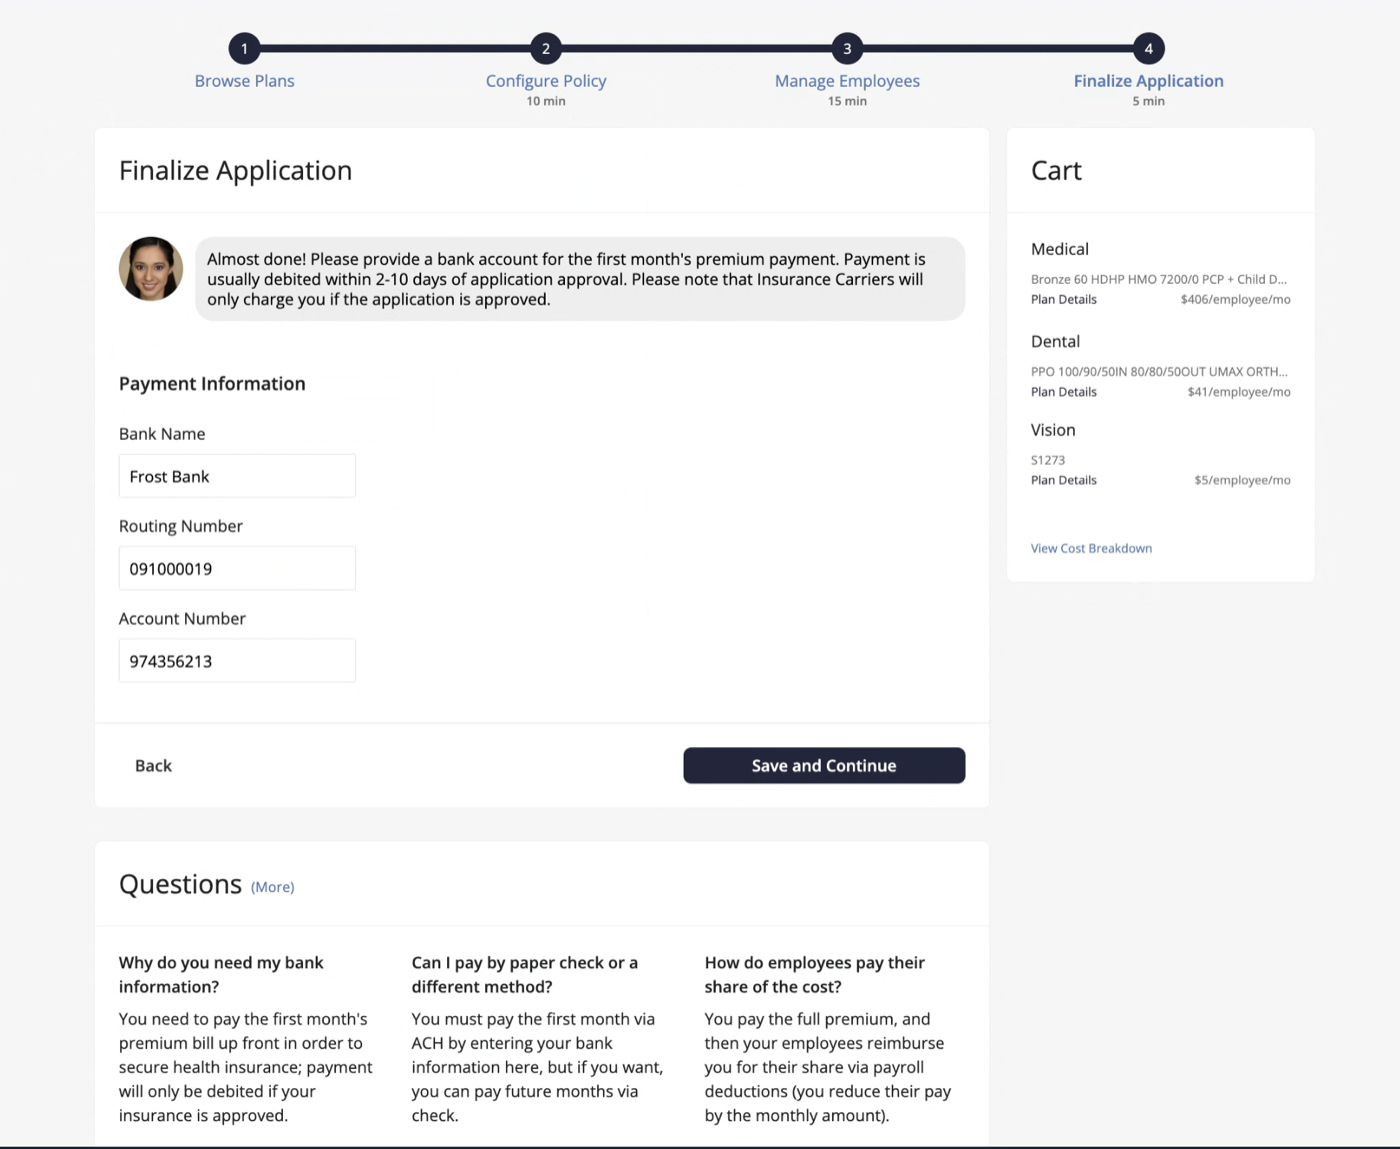
Provide a bank account for the first month’s premium. Payment is usually debited within 2 to 10 days of application approval, and the carrier only charges you if the application is approved.
| Field | What to enter |
|---|---|
| Bank Name | Your bank’s name. |
| Routing Number | Your bank routing number. |
| Account Number | Your bank account number. |
Track an Incomplete Application
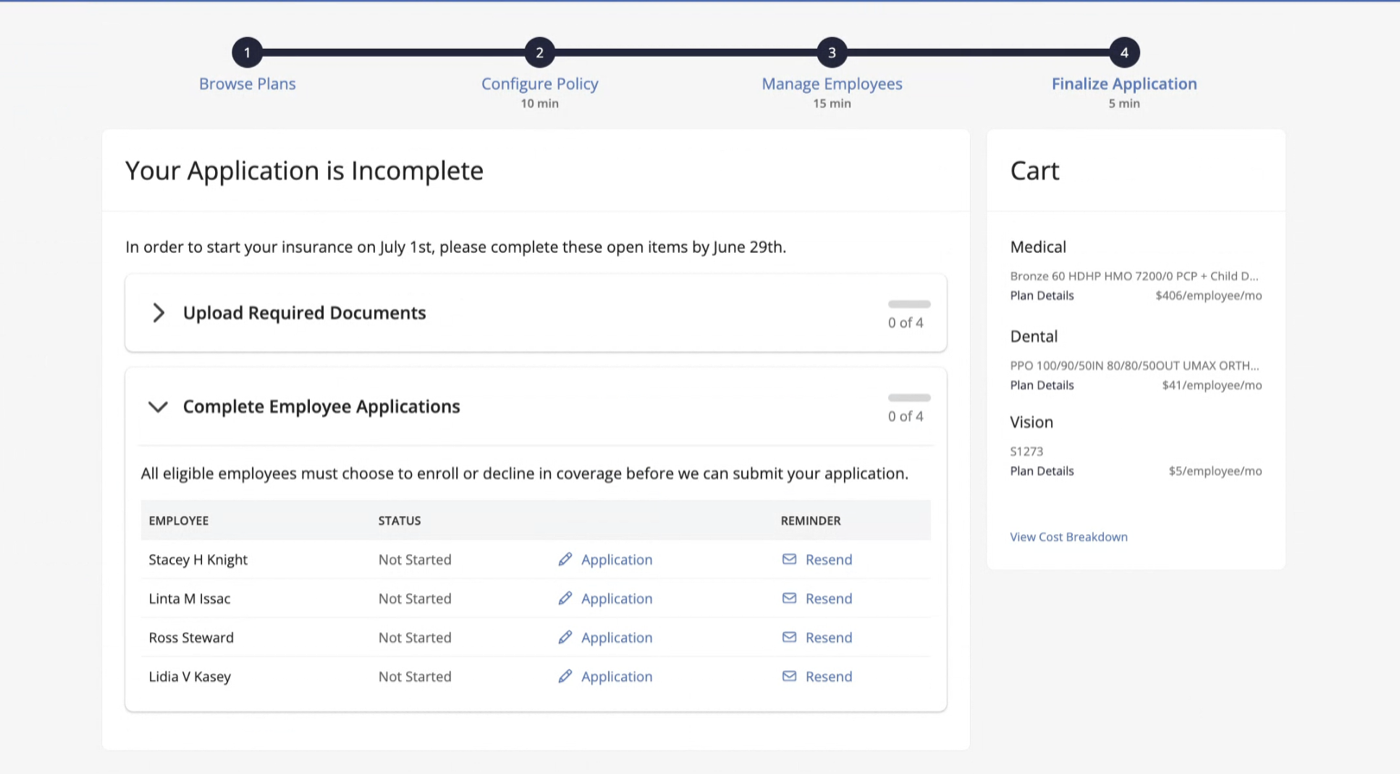
If you leave before everything is done, SimplyInsured shows an Application is Incomplete view with the open items and the deadline to finish them so coverage can start on time.
Note: All eligible employees must choose to enroll or decline before the application can be submitted.
Complete an Application for an Employee
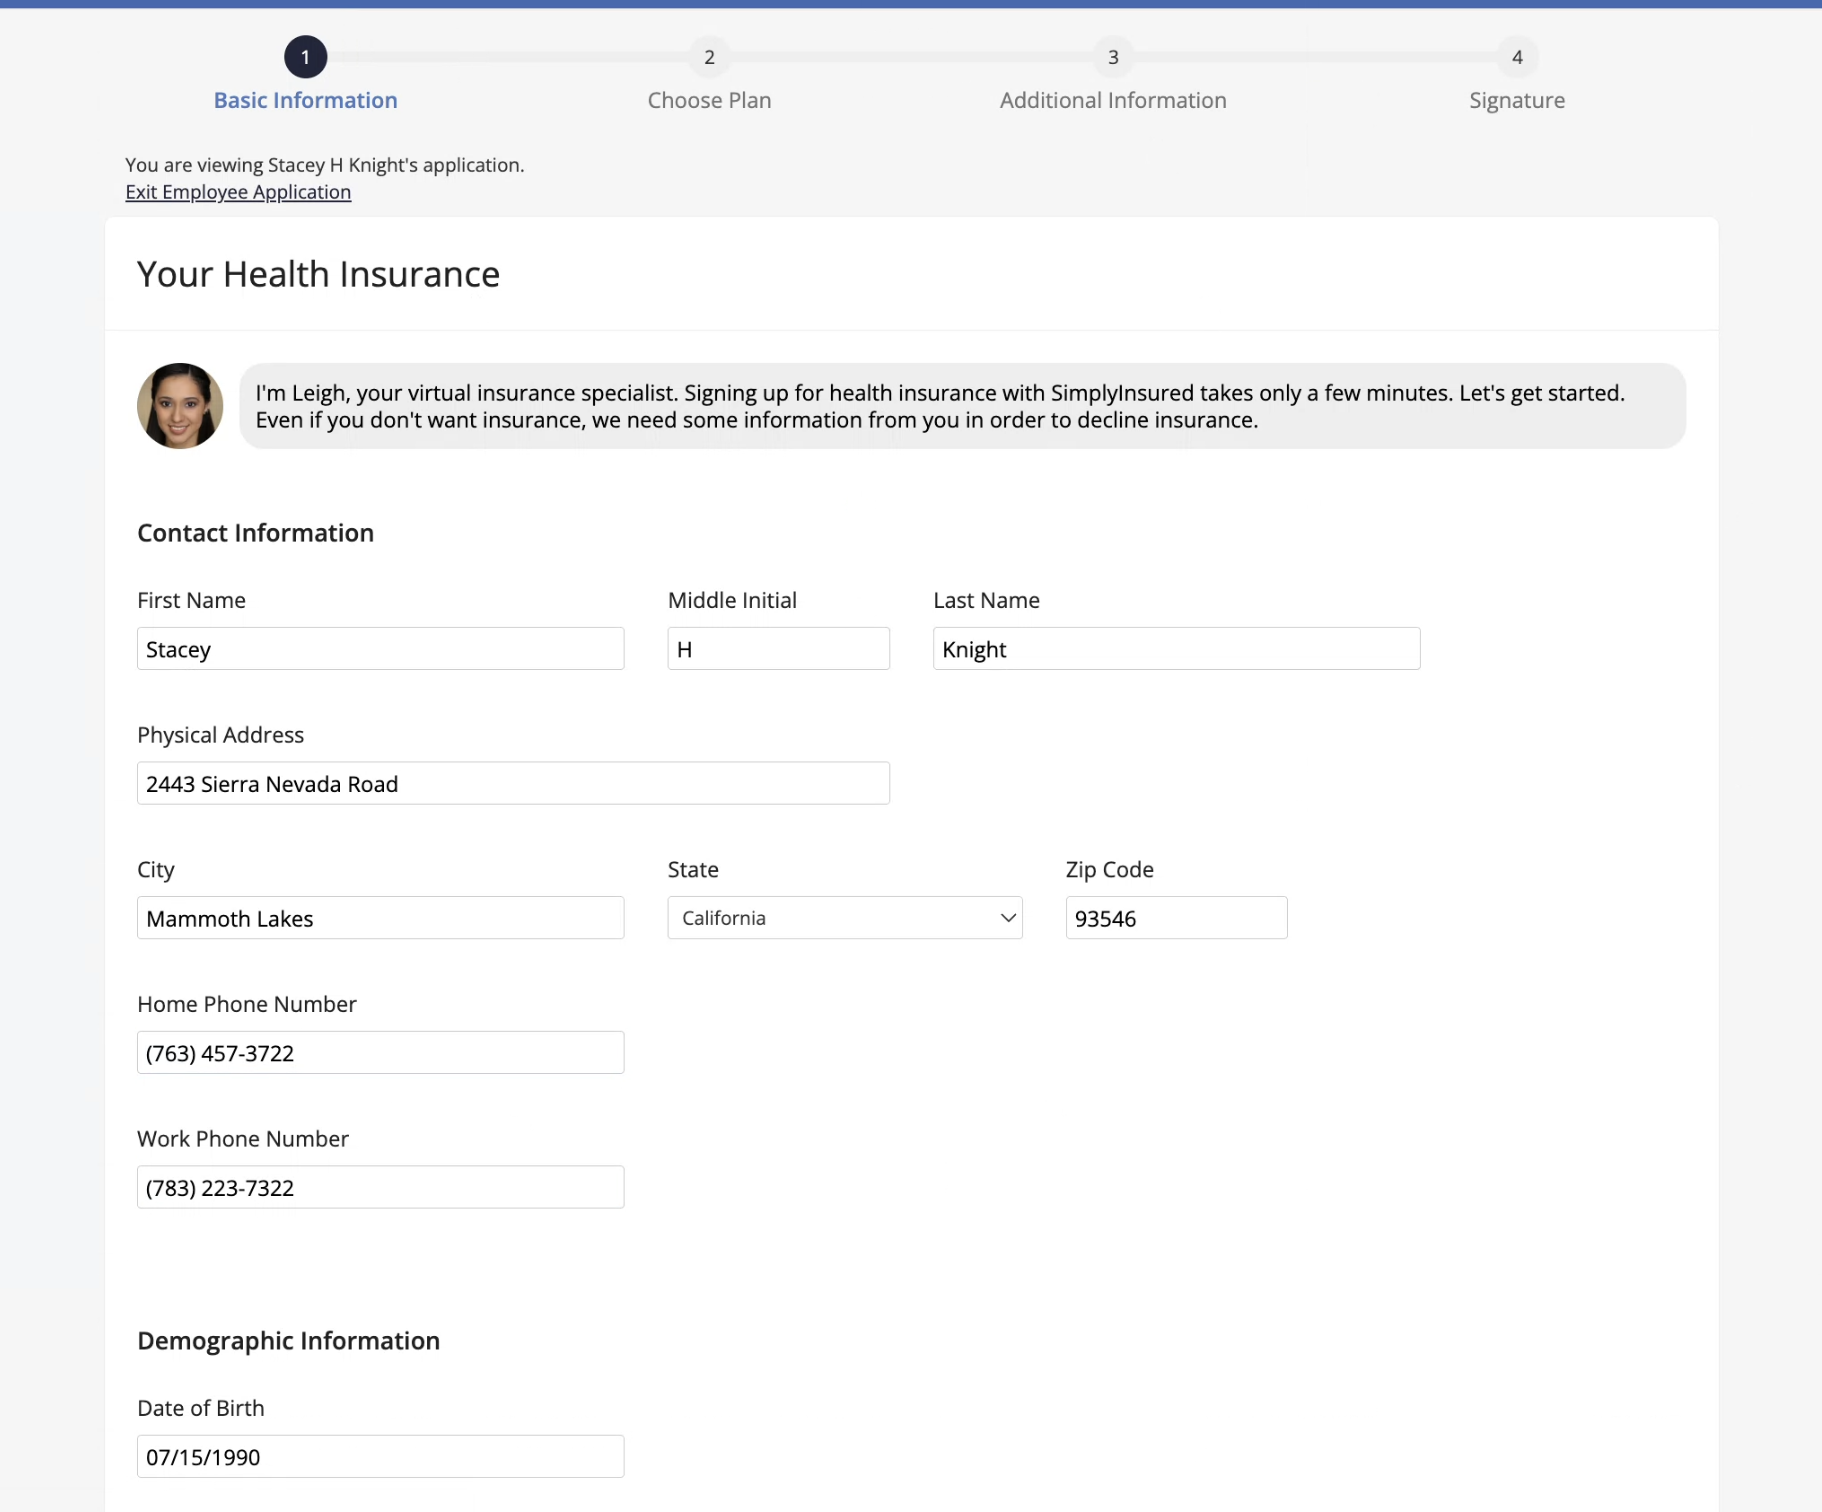
If an employee has no email address, or has not finished their application, you can complete it for them. Open their Application from the incomplete view.
You fill in the same details the employee would and choose their plans or record a waiver, then submit on their behalf.
How SimplyInsured Benefits Appear in Zoho Payroll
Once a plan is active, the benefit and its contributions sync into Zoho Payroll, so you do not have to add them manually.
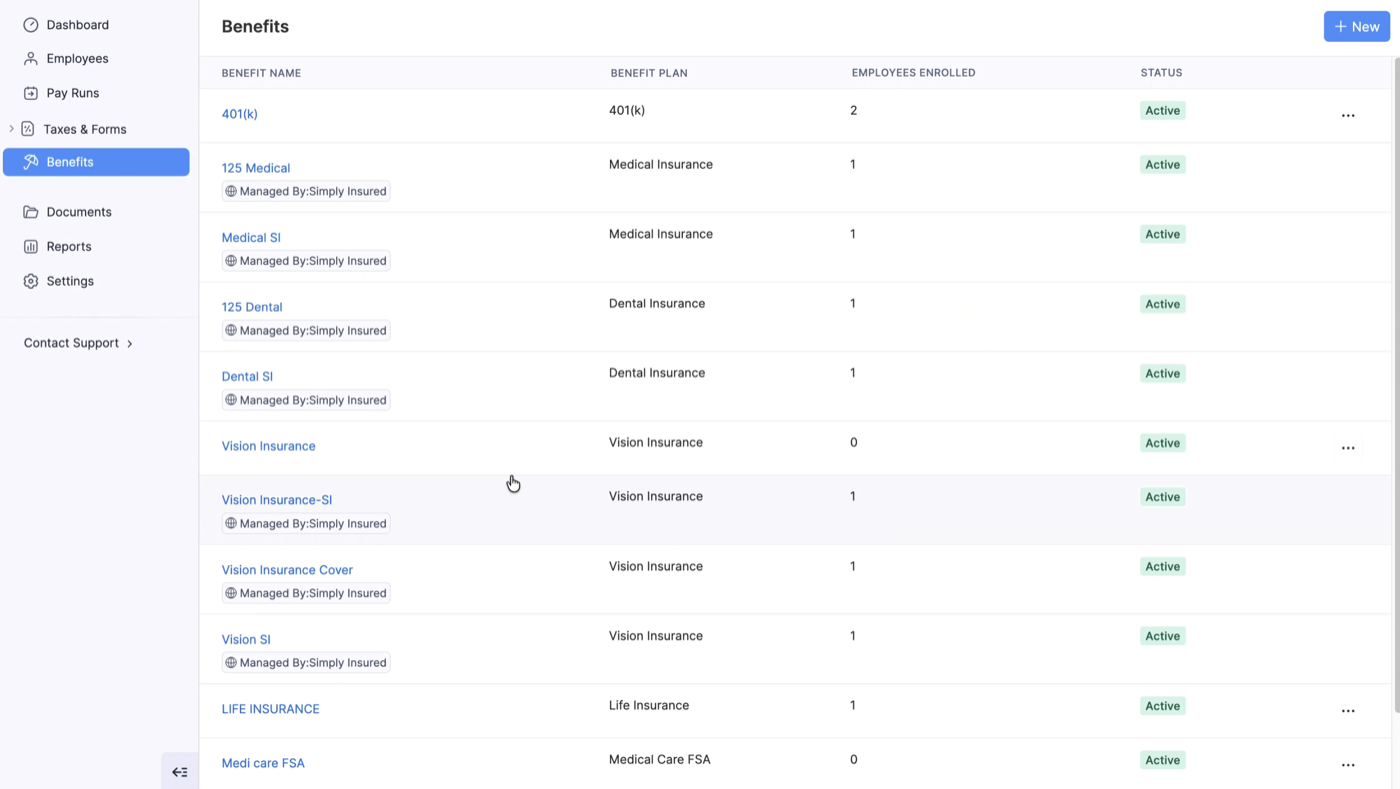
- In the Benefits list, each synced benefit appears tagged Managed By: Simply Insured, with its plan (like Medical, Dental, or Vision Insurance), the number of employees enrolled, and its status.
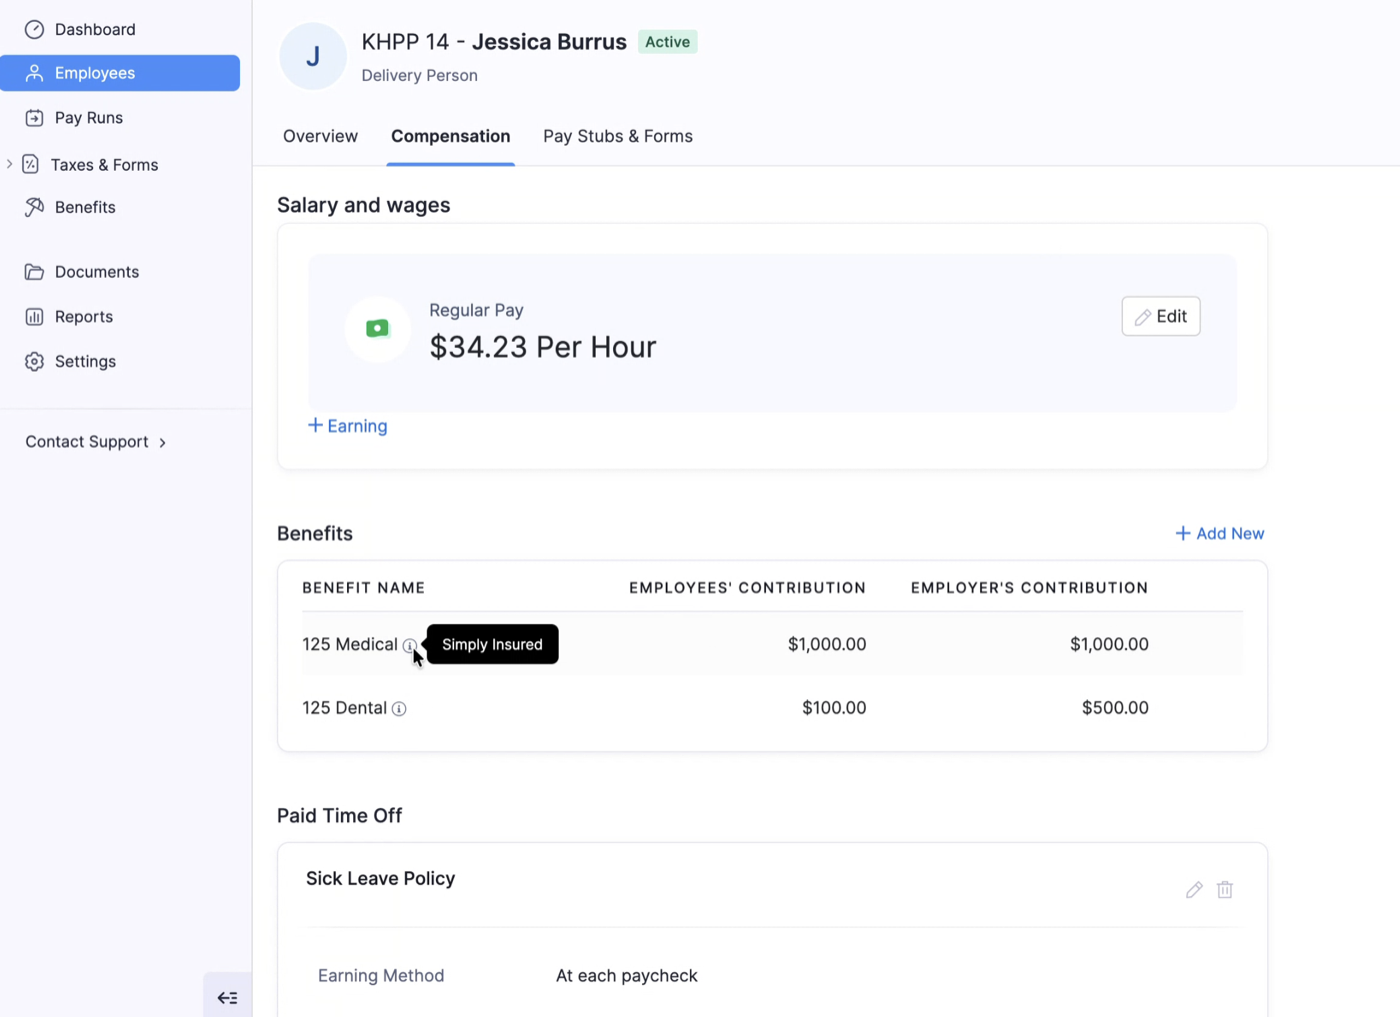
- In the Compensation tab of an employee’s details page, the linked benefits show the employee’s contribution and the employer’s contribution.
- Employees can also view these benefits in their Employee Portal.
Disconnect the Integration
You cannot disconnect SimplyInsured from the integration page yourself. Contact support.usa@zohopayroll.com, and we’ll assist you.