

Preferences
The Preferences section allows you to configure your Zoho Invoice organization settings, including module specific options, general preferences, and field customizations.
General Preferences
To configure General Settings:
- Go to Settings and select General Preferences.
Through the General Settings, you can customize your Zoho Invoice account by selecting your preferences for the various options provided below.
Enable modules
Check the modules you want to enable in Zoho Invoice. Once you enable a module, that module will be available in the left sidebar of your Zoho Invoice account for you to use them. You’ll be able to access and configure these modules only when you enable them in this page.
First day of work week
By default, the first working day of the week is Sunday in Zoho Invoice. However, you can change the first day of your work week to Sunday, Monday, or Saturday.
When you change the first day of your work week, the days and dates in the calendar will be updated accordingly. This will be useful when you are selecting dates for sales and purchase transactions, and other modules.
For example, let’s say you’ve set the first day of the week as Monday. When you create an invoice and select the invoice date, this is how the calendar will be displayed.
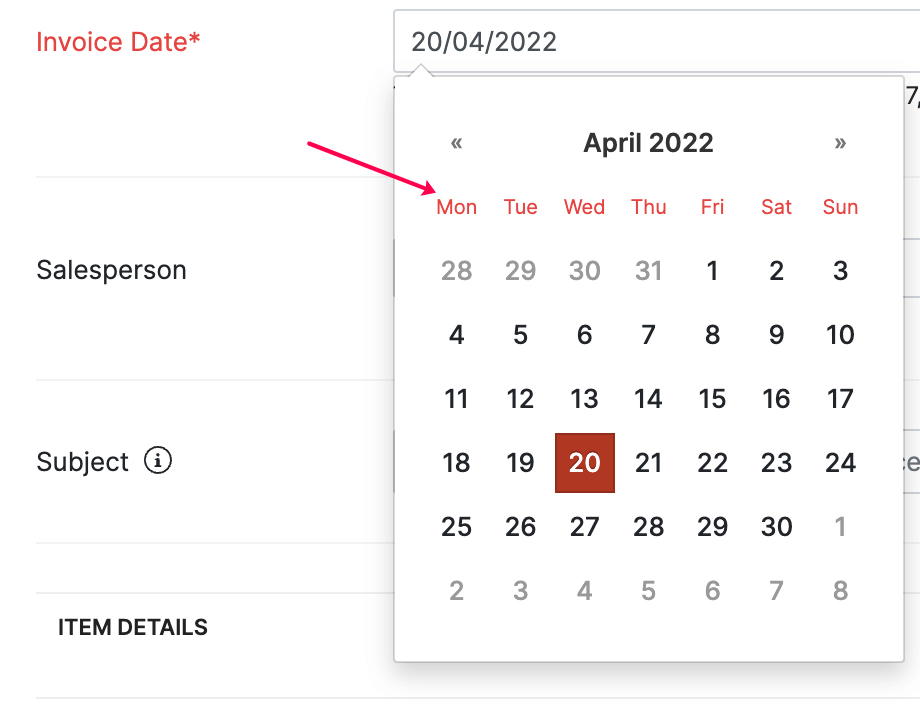
The day you choose here will also affect the reports you generate in Zoho Invoice.
PDF attachment
Attach PDF file with the link while emailing the invoice & quote?: Check this option if you want to attach a PDF of your invoice & quote while emailing them to your customer. Leave it unchecked if you do not want to include the PDF file.
I would like to encrypt the PDF files that I send: Checking this option will prevent the user from editing the PDF files or converting them into another file formats.
Discounts
If you give discounts to your customers, you can select the level of discounts applicable on the transactions. Choose how discounts are applied in transactions:
I don’t give discounts:
If you don’t give discounts to your customers, then select this option.
At line item level
Discount is provided for every item individually in a transaction (like an invoice).
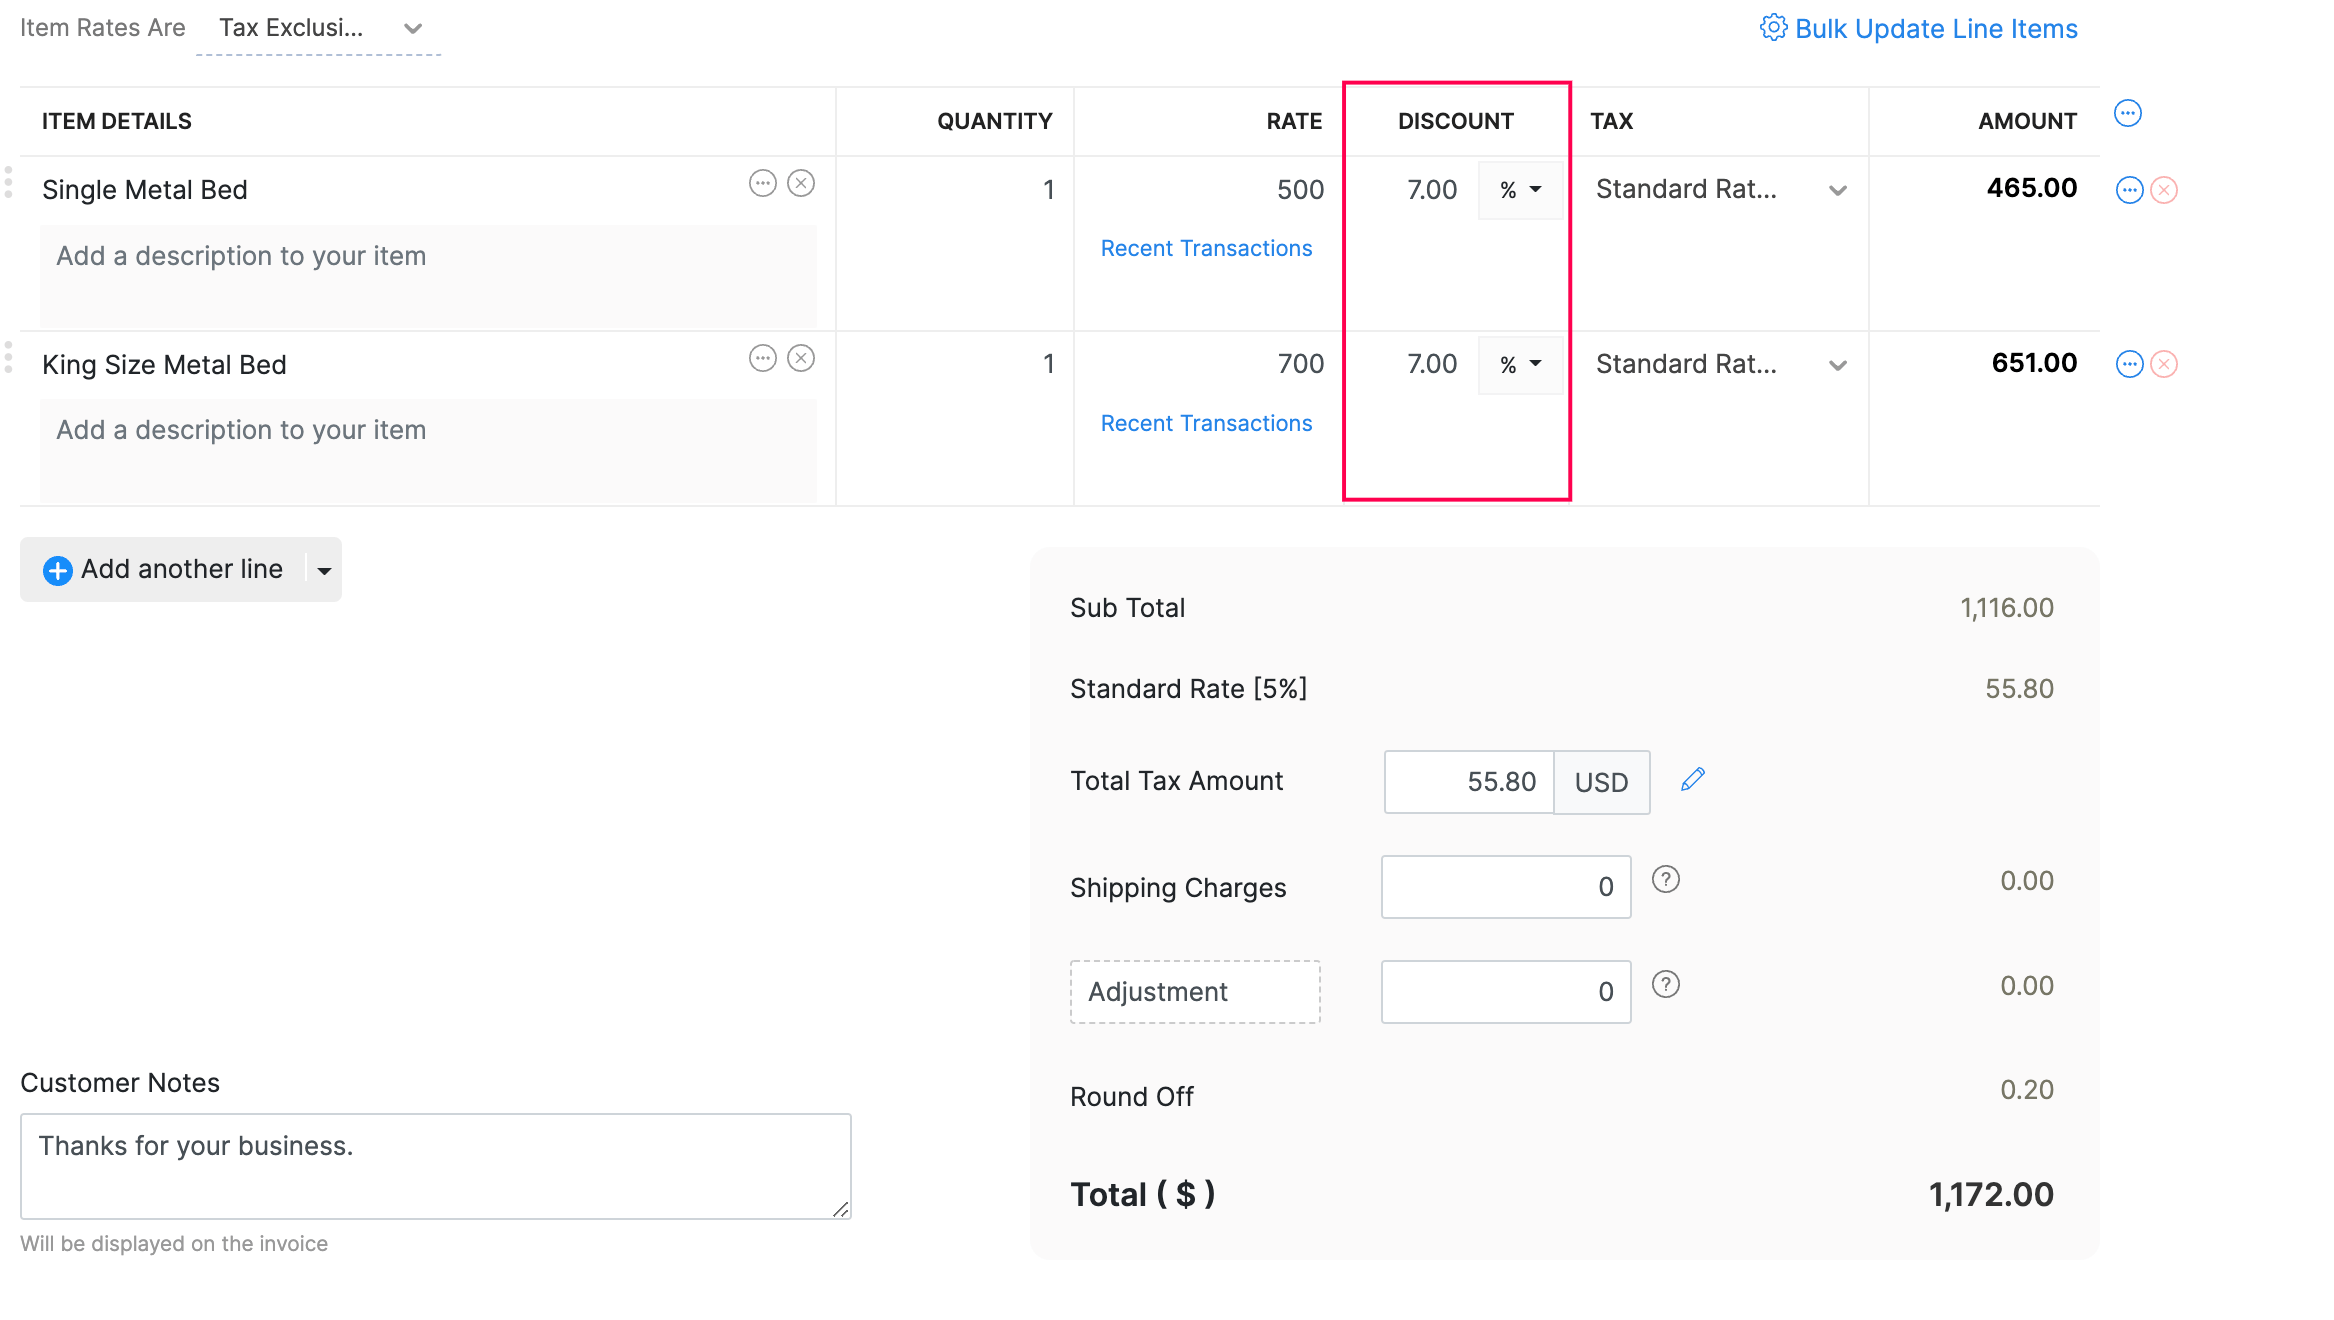
If you have applied taxes on the line item(s), you can choose whether the discount should be inclusive or exclusive of tax.
At transaction level
Discount is provided on the whole amount in the transaction.
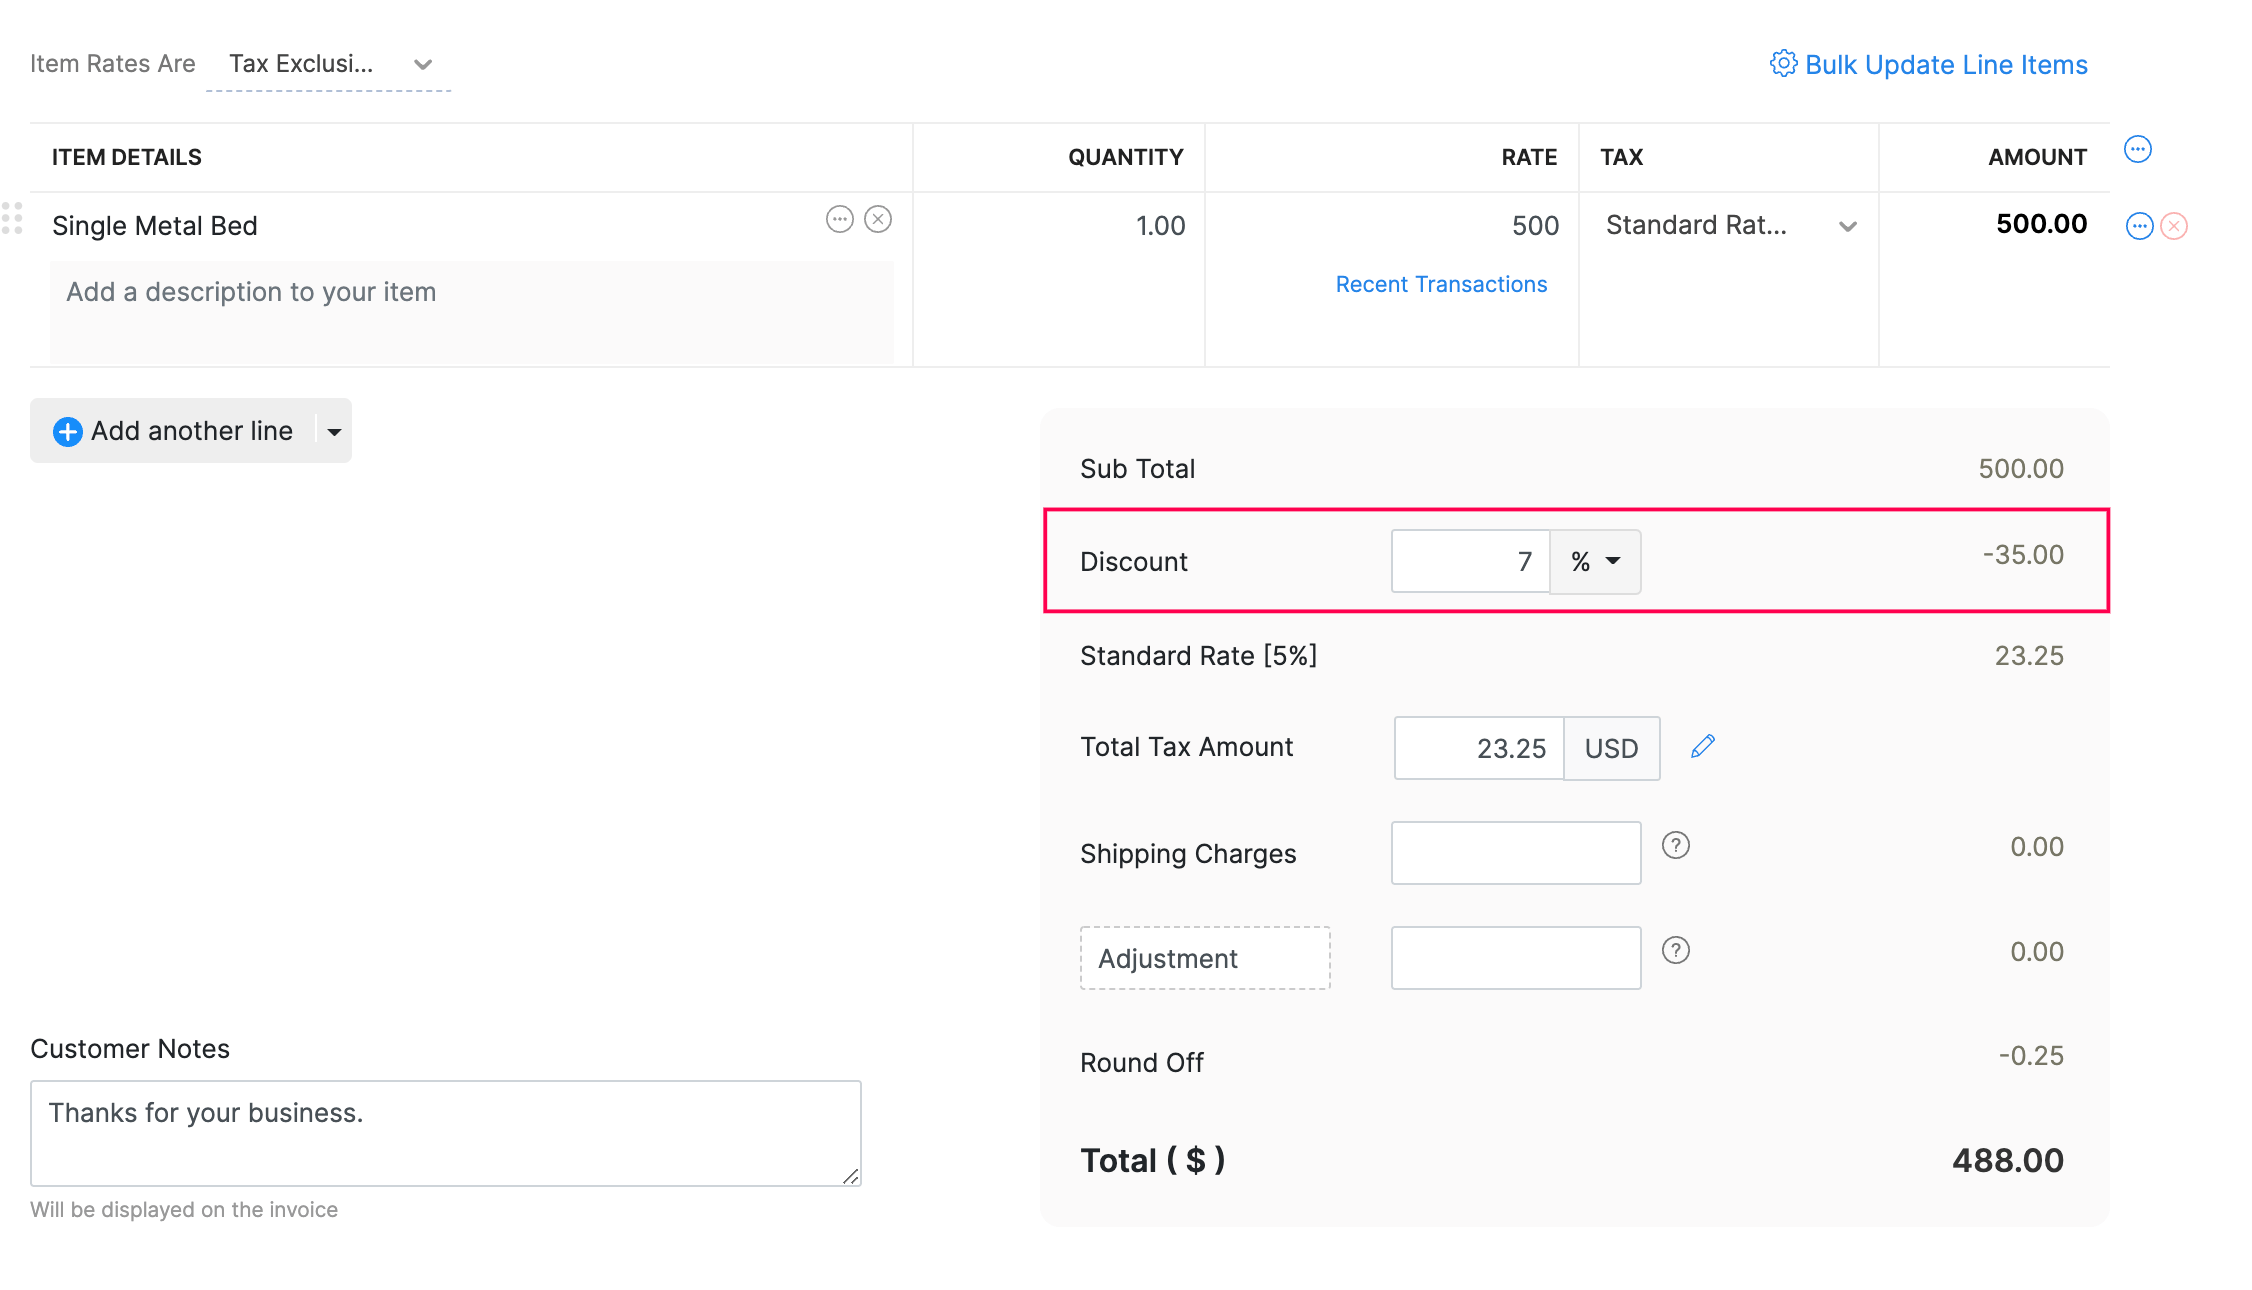
If you select a discount to be applied at transaction level, you can also choose to apply the Discount Before Tax or Discount After Tax.
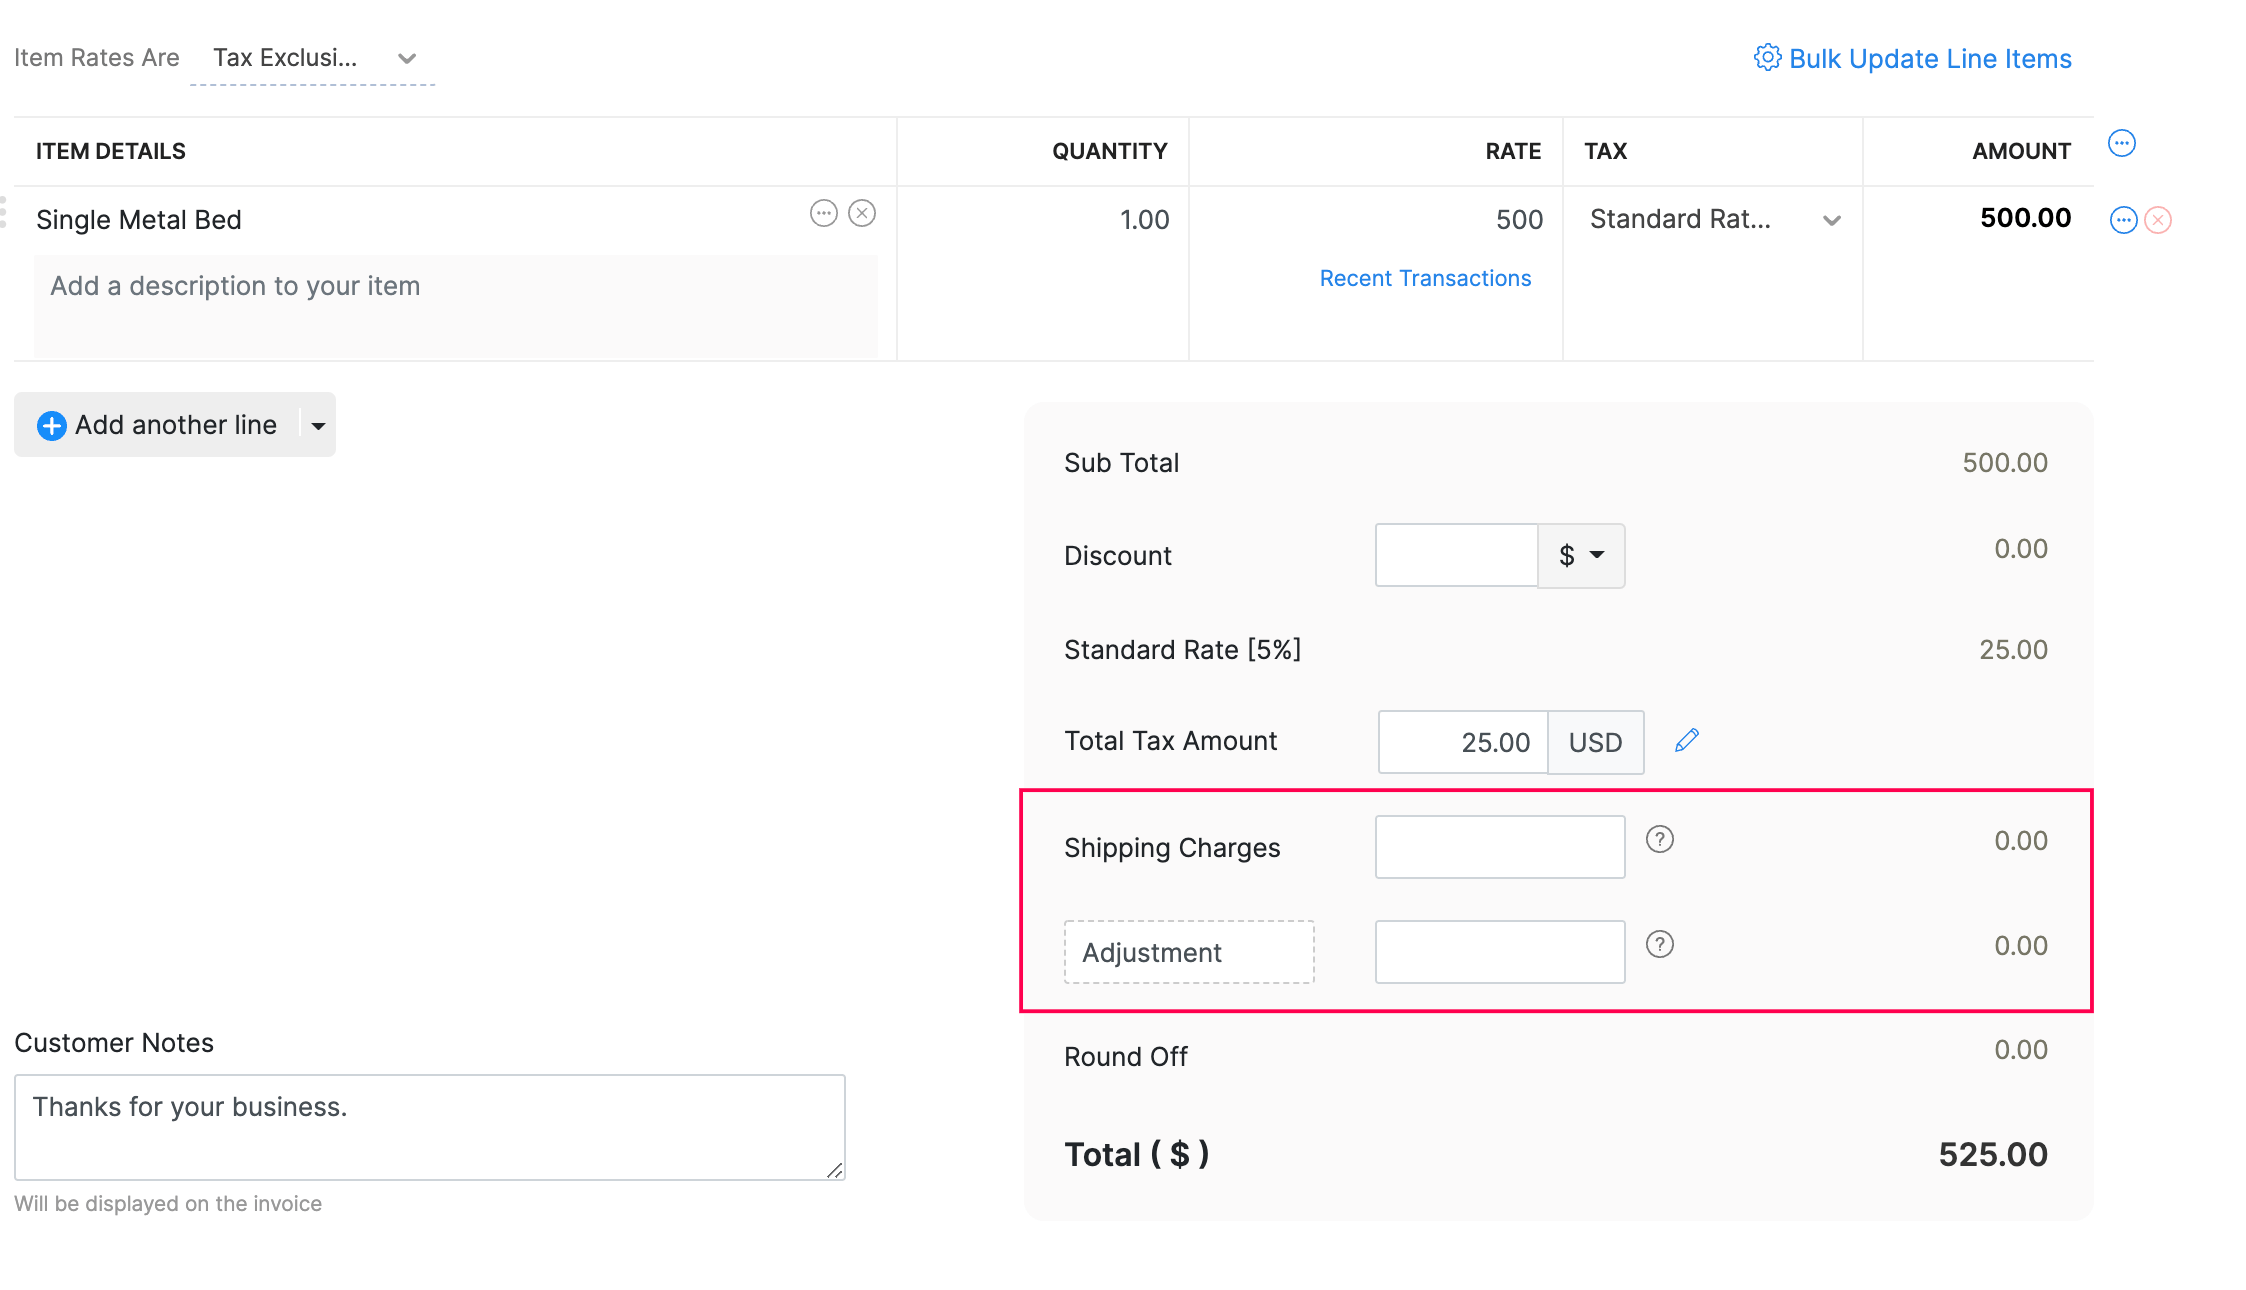
Additional charges
You can add shipping charges and adjustments for your invoices by enabling them here. These additional charges will show up when you are creating transactions like an invoice.
Tax on item rates
Choose if your item rates are inclusive of tax or exclusive of it.
If you choose the Tax Inclusive or Tax Exclusive option, then you can choose if you want your item rates to be tax inclusive or not while creating a transaction.
Round off the sales amount
You can check the option Round off the total to the nearest whole number, if you want your sales transaction’s total amount to be a whole number. If this option is enabled, your transaction amount will be rounded off to the nearest whole number. If you do not wish to round off the sales amount, you can check the No Rounding option.
Salesperson
If you have sales persons in your organization who manage different sales transactions, then you can associate them with the corresponding transactions (like an invoice) in Zoho Invoice.
To enable sales persons for your organization, check the I want to add a field for salesperson option.
To view all the sales done by different sales persons in your organization, go to Reports > Sales > Sales by Sales Person.
Billable Expenses
The expenses that you incur on behalf of your customers, which you will invoice them later are billable expenses. There are two common methods of invoicing customers:
- Invoicing the actual cost: If you incur an expense of $100, you will invoice the same amount to the customer for them to pay.
- Adding a markup: If you incur an expense of $100, you can mark up the expense amount and invoice $105 to the customer. This method will generate a 5% of extra revenue to your business.
To set a default markup percentage for billable expenses, enter the markup percentage and click Save.
Now, when you choose the billable option in an expense, the default markup percentage will be pre-filled in the Mark up by field.
Weekly summary report
All the admins of your organization can receive the summary of business transactions done in a week in their email. You can also receive the report through your Slack channel if you have integrated your Zoho Invoice organization with Slack.
To enable weekly summary reports, check the Send Weekly Summary report option.
Organization address format
You can change the way your organization or business address appears on all your sales and purchase transactions.
Rearrange the existing placeholders to change the format or add new placeholders by clicking the Insert Placeholders dropdown. The format you configure here will be displayed only in that transaction’s PDF.
After making all the changes in the General section, click Save.
Branding
Personalize your Zoho Invoice account to go with your brand.
Organization Logo
If your company has a brand logo, you can upload it under Organization Logo. All the transactions that you send out to your customers from Zoho Invoice will be branded with this logo.
Theme
To change the organization’s theme:
- Go to Settings and select Branding.
- In the Branding page, customize the following options:
- Appearance: Choose between Dark Pane and Light Pane.
- Accent Color: The default color is Blue. You can change it to Green, Red, or Yellow. To choose a custom color, click the Custom Color icon, select your preferred color or enter a hexadecimal code, and click Apply.
Note: The color you select here will also be applied to other Zoho Finance applications integrated with your Zoho Invoice organization, as well as the customer portal.
Portal
Configure preferences related to Customer Portal. Learn more.
Customers
Configure preferences related to the Customers module. Learn more.
Items
Configure preferences related to the Items module. Learn more.
Quotes
Configure preferences related to the Quotes module. Learn more.
Invoices
Configure preferences related to the Invoices module. Learn more.
Recurring Invoices
Configure preferences related to the Recurring Invoices module. Learn more.
Credit Notes
Configure preferences related to the Credit Notes module. Learn more.
Delivery Note Settings
If you ship or deliver the products you sell to your customers, then you can configure your Delivery Note settings here. A Delivery Note lists the contents of the package, what the recipient has ordered and what has been sent to them. Typically, a Delivery Note includes description and quantity of the items delivered. In some cases, a copy of the Delivery Note is signed by the recipient and then returned to the seller or consignor as a proof that the items have been delivered.
To configure Delivery Note settings, go to Settings and select Delivery Notes.
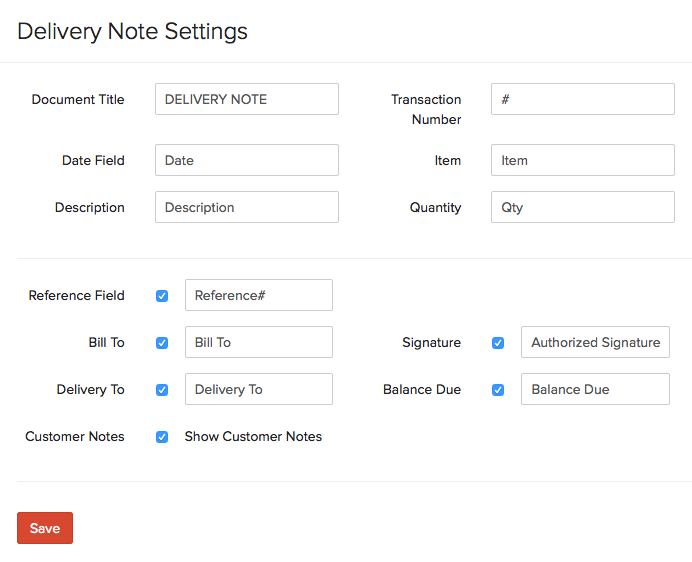
Document Title: By default, the document title will be given as Delivery Note. You can change the name of this field as per your preference.
Transaction Number: This field displays the Transaction Number related to a specific delivery. You can change the name of the field as per your preference.
Date Field: By default, the field where the date is displayed will be shown as Date Field. You may customize it as per your preference.
Item: The field which shows the items which are being delivered will be displayed as Item. You can customize the name of this field as per your preference.
Description: The description of the items being delivered will be provided in this field. You can change the name of this field, as per your preference.
Quantity: The quantity field will display the quantity of the items being delivered. You can change the name of the field as per your preference.
Reference Field: This field displays the reference number or code for the Delivery Note. By default the preference to display this field in the Delivery Note will be selected. Enter the name under which this field should be displayed. Uncheck the check box next to this field, to exclude it from the Delivery Note.
Bill To: This field will display the name of the person to whom the items are billed. By default this field will be selected and you can change the name of this field. If you wish to exclude this from the Delivery Note, you can uncheck the check box next to this field.
Delivery To: You can enter the name of the person to whom the items will be delivered, in this field. By default this field will be selected and you can change the name of this field. You can exclude this field from the Delivery Note, if you wish, by unchecking the check box next to this field.
Signature: In case you require a signature from the customer on the Delivery Note, as a proof of receipt of the items, you can include this field. You can change the name of this signature field, if you prefer. If you wish to exclude this field in the Delivery Note, uncheck the check box next to this field.
Balance Due: This field displays the balance due from the customer. You can change the name of this field as per your preference. If you wish to exclude this from the Delivery Note, uncheck this field.
Show Customer Notes: If you wish to display the customer notes from the invoice, which is related to a specific Delivery Note, you can select this option.
Click Save once you are done configuring.
Packing Slip Settings
A packing slip will include details of the contents in a package you deliver. The purpose of a packing slip is to inform all the parties, i.e. transport agencies, government authorities and customers, about the contents of the package which is being delivered.
To configure Package Slip settings, go to Settings and select Packing Slips.
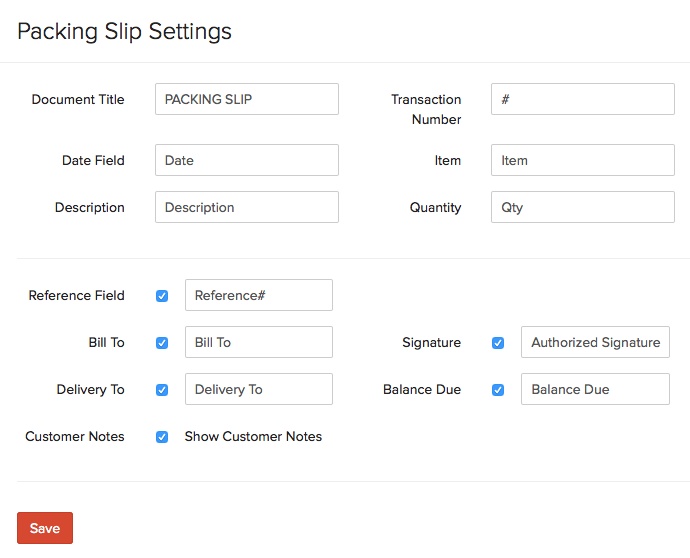
Document Title: By default, the document title will be given as Packing Slip, you can change this as per your preference.
Transaction Number: This field displays the Transaction Number related to a specific delivery. You can change the name of the field as per your preference.
Date Field: By default, the field where the date is displayed will be shown as Date Field. You may customize the name of this field as per your preference, if you wish.
Item: This field shows the items which are in the package and will be displayed as Item. You can customize the name of this field as per your preference, if you wish.
Description: The description of the items will be under this field. You can change this as per your preference.
Quantity: This field will display the quantity of the items. You may change the name of this field as per your preference.
Reference Field: This field displays the reference number or code. By default the preference to display this field in the Packing Slip will be selected. Enter the name under which this field should be displayed. Uncheck the check box next to this field to exclude it from the Packing Slip.
Bill To: This field will display the name of the person to whom the items are billed. By default this field will be selected and you can change the name of this field. If you wish to exclude this from the Packing Slip, you can uncheck the check box next to this field.
Delivery To: You can enter the name of the person to whom the items will be delivered, in this field. By default this field will be selected and you can change the name of this field. You can exclude this field from the Packing Slip, if you wish, by unchecking the check box next to this field.
Signature: In case you require a signature from the customer on the Packing Slip, as a proof of receiving the items ordered, you can include a signature field. You can change the name of this signature field, if you prefer. If you wish to exclude this field in the Packing Slip, uncheck the check box next to this field.
Balance Due: This field displays the balance due from the customer. You can change the name of this field as per your preference. If you wish to exclude this from the Packing Slip, uncheck this field.
Show Customer Notes: If you wish to display the customer notes from the invoice, which is related to a specific Packing Slip, you can select this option.
Click Save once you are done configuring.
Field Customization
All Zoho Invoice modules have a set of default fields that captures information common to all businesses. Custom Fields lets you store additional information that is unique to your business. These fields can be used to save more details about your customers, items, invoices, or all other transactions.
When will custom fields be used?
Let’s say you run a business that sells clothing for kids. In such a case, you might want to record more product details such as colour and size of the dress. To do this, you can create custom fields in the Items module with the appropriate label.
Now, let’s see how you can create and manage custom fields in Zoho Invoice.
Create Custom Field
To create a new custom field:
- Go to Settings.
- Select the module for which you want to add a custom field.
- Select the Field Customization tab.
- Click the + New Custom Field button in the top-right corner of the page.
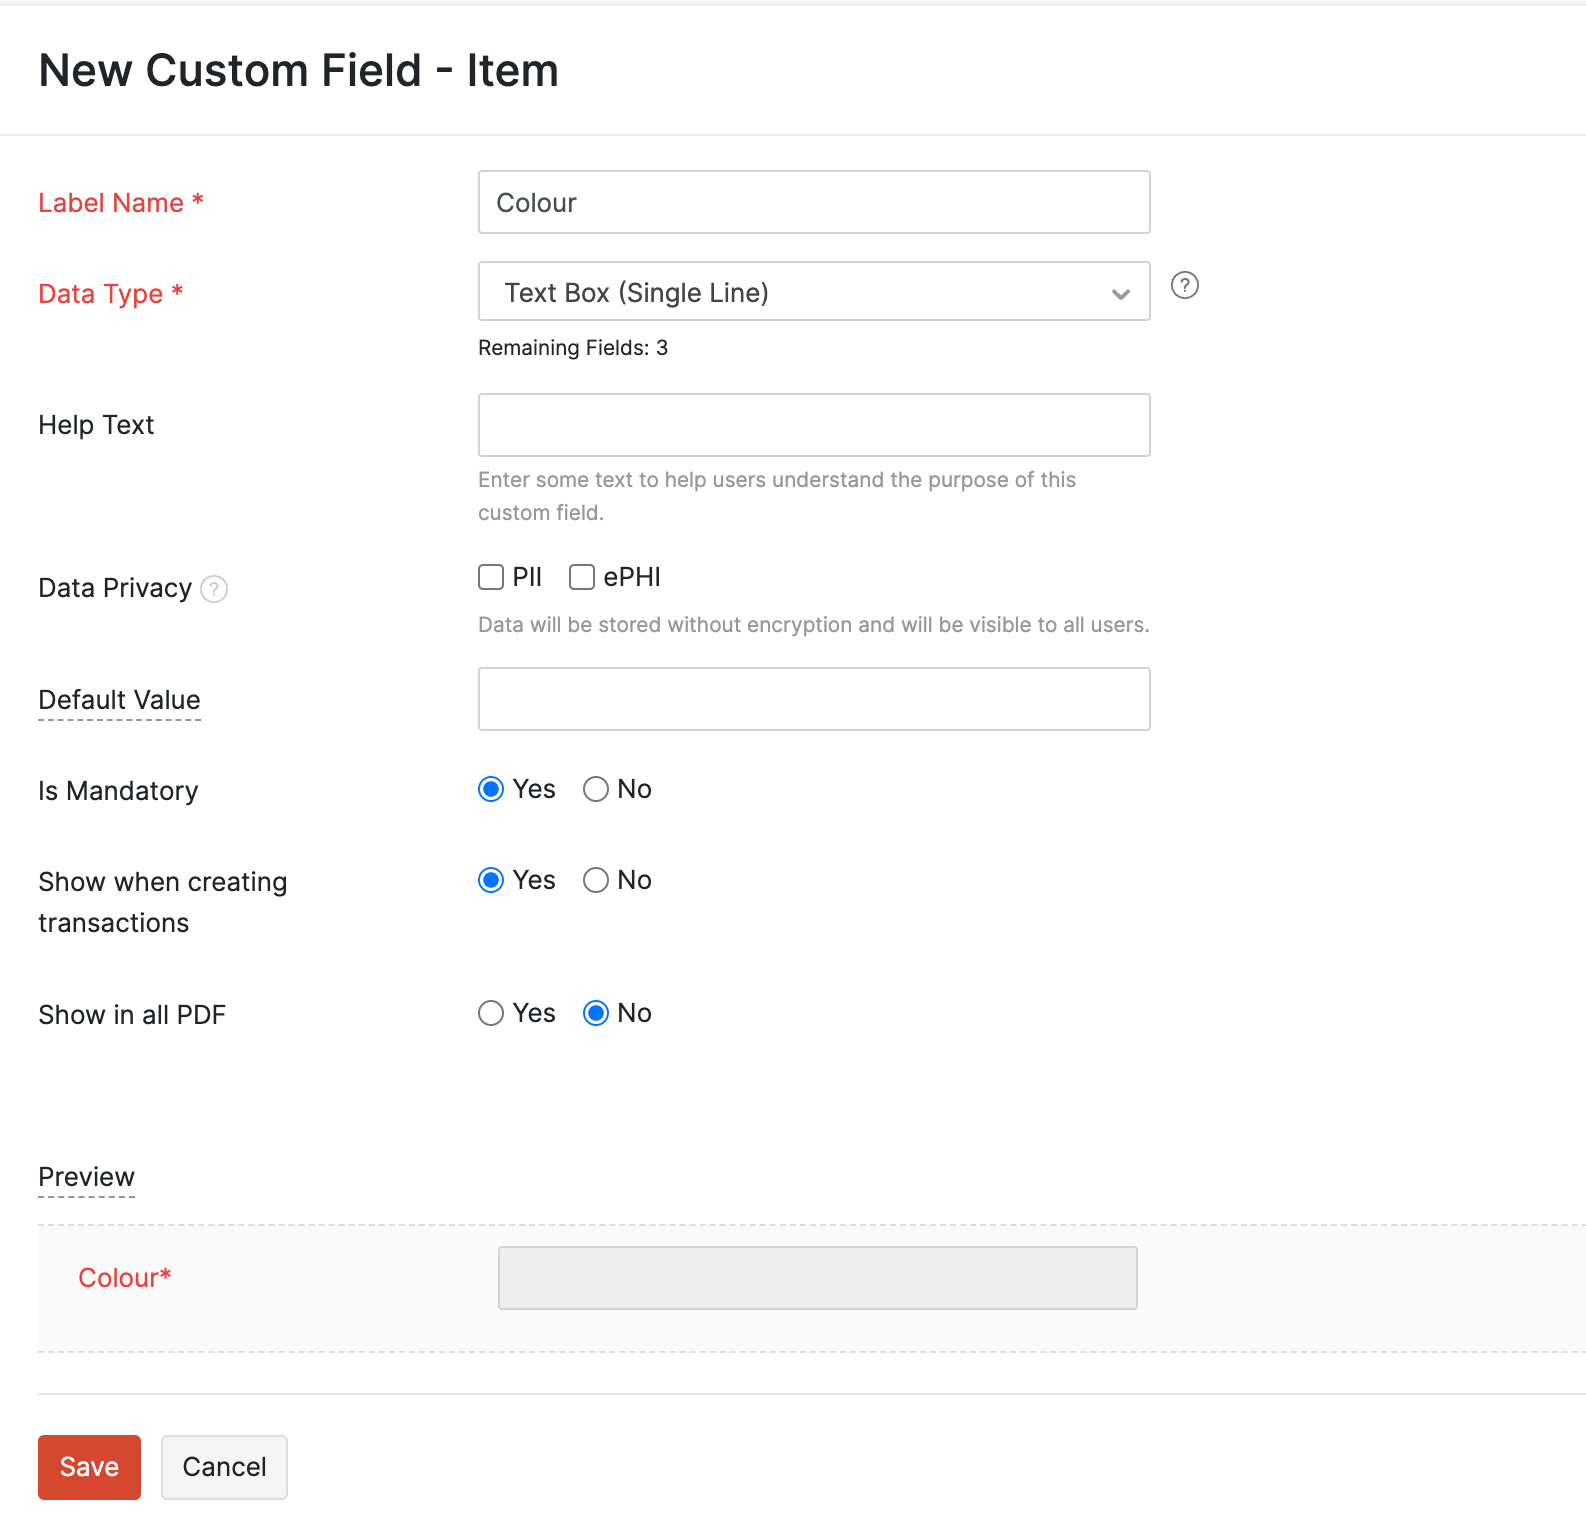
Fill in the following fields:
- Label Name: Enter a name for your custom field. This field will be displayed when you are entering data in the respective module.
- Data Type: The data type supported in Zoho Invoice is Text Box (Single Line) where you can enter a maximum of 100 characters.
- Help Text: Enter a short text describing the purpose of this custom field. This will be displayed as a help text when this custom field is used in the corresponding module.
- Data Privacy: Select PII or ePHI based on the information that you will be entering in this field.
- Select PII (Personally Identifiable Information) if the information that you will enter is confidential and can be used to identify a person. You can choose to encrypt and store it if the data is sensitive or store it without encryption if the data is non-sensitive. Choose if the information you enter will be sensitive or not sensitive:
- Sensitive data. Encrypt and store it. This data can be viewed only by Admin users.
- Not sensitive data. Store it without encryption. Only Admin users can view the details. However, other users can use this field to perform advanced searches.
- Select ePHI (Electronic Protected Health Information) if the information that you enter is any sensitive medical data that can be used to identify a patient. For example, the medical insurance number of your customer will be ePHI. The data will be considered as sensitive; it will be encrypted and stored. Only Admin users can access this field and other users will not be able to use this field to perform advanced searches.
- Select PII (Personally Identifiable Information) if the information that you will enter is confidential and can be used to identify a person. You can choose to encrypt and store it if the data is sensitive or store it without encryption if the data is non-sensitive. Choose if the information you enter will be sensitive or not sensitive:
- Default Value: For fields that don’t contain PII or ePHI, you can provide a default value. The value you enter here will be displayed by default for this field. You can always change it while creating the transaction.
- Is Mandatory: Mark this option as Yes, if you want the custom field to be a mandatory one, i.e, it shouldn’t be left blank.
- Show when creating transactions: Mark this option as Yes, if you want this custom field to be displayed while creating transactions.
- Show in all PDF: Mark this option as Yes, if you want the custom field to be displayed in the transaction’s PDF.
- Preview: You will be able to see what the custom field will look like, when creating a transaction.
After entering all the details, click Save. From now on, when you enter data in the respective module, this custom field will be displayed.
Note: Currently, only the Text Box (Single Line) data type is supported in Zoho Invoice, and you can create up to three custom fields of this type in each module.
Edit Custom Field
You can change the details of a custom field at any time. Here’s how:
- Go to Settings.
- Select the module for which you want to edit the custom field.
- Select the Field Customization tab.
- Hover over the custom field that you want to edit.
- Click the dropdown and select Edit.
- Make the required changes.
- Click Save.
Mark Field as Inactive/Active
If you’d like to stop using a custom field temporarily, you can choose to mark it as inactive.
To mark a custom field as inactive:
- Go to Settings.
- Select the module for which you want to mark a custom field as inactive.
- Select the Field Customization tab.
- Hover over the custom field you want to mark as Inactive.
- Click the dropdown and select Mark as Inactive.
If you have marked a custom field as inactive, you can make it active again by following the same steps as above and selecting Mark as Active.
Delete Custom Field
You can delete a custom field you have created in Zoho Invoice. Here’s how:
- Go to Settings.
- Select the module for which you want to delete the custom field.
- Select the Field Customization tab.
- Hover over the custom field you want to mark as Active.
- Click the dropdown and select Delete.
If you have added data in a custom field which is associated with a transaction, you cannot delete the custom field. If you want to delete the custom field, you would have to delete the corresponding transaction.
Alternatively, you can mark the custom field as inactive.
 Yes
No
Yes
No
Thank you for your feedback!