How to set up my domain with Zoho Mail
Organizations that already have a domain can set up their domain with Zoho Mail. If you do not have a domain you can buy one through Zoho. Below is a summary of the domain set up procedure if you already have a domain.

Add and Verify Domain
Add domain
The first step in setting up a domain is to add the domain and verify it. Do these steps to add an existing domain:
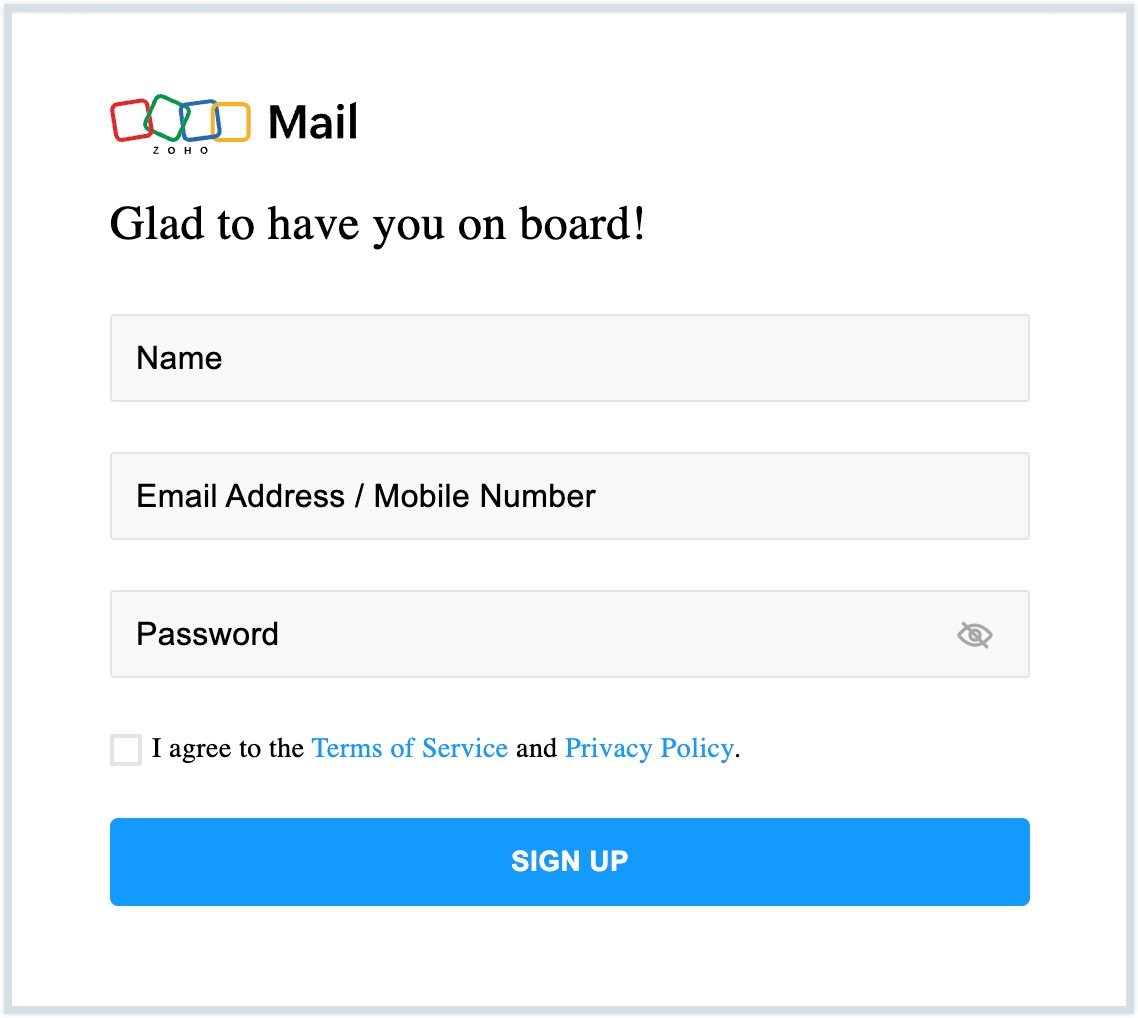
- Visit Zoho's pricing page, select a preferred plan and click SIGN UP.
- Enter your Name, Email ID/mobile number and Password to create a new account.
- Select the I agree to the Terms of Service and Privacy Policy and click SIGN UP.
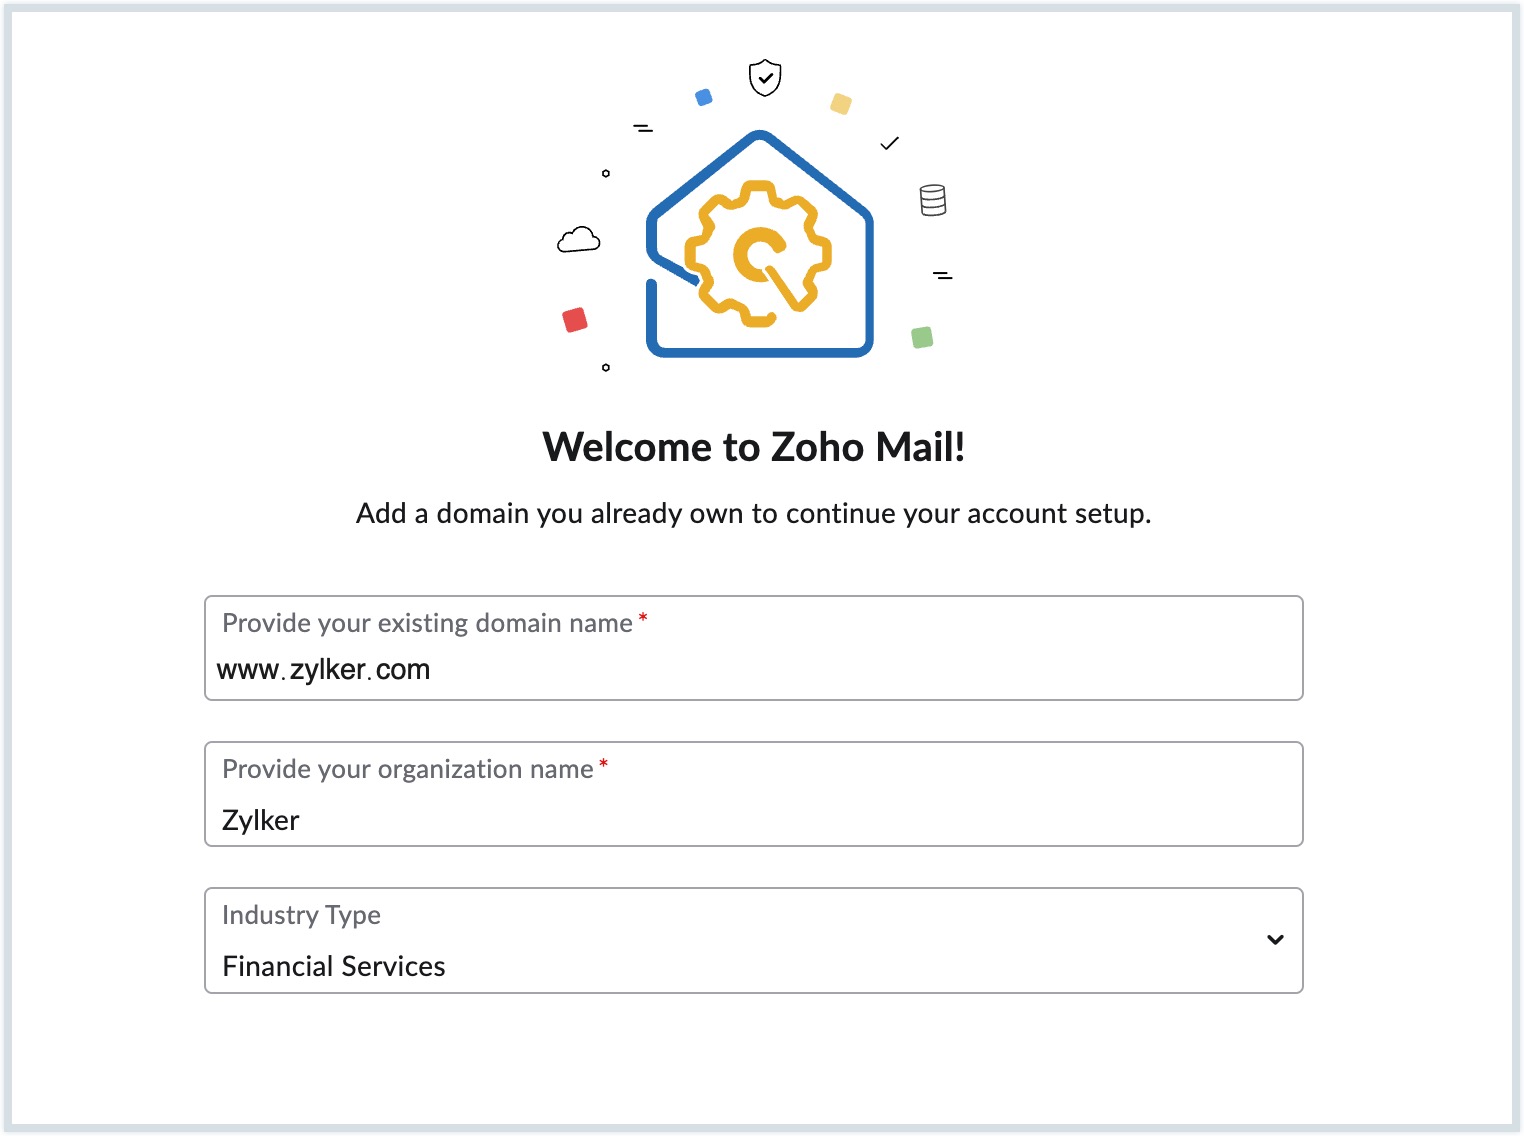
- Click Add Now to add your existing domain.
You can also buy a new domain through Zoho if you do not own one. - Enter your domain details in the Add Domain dialog and click Add.
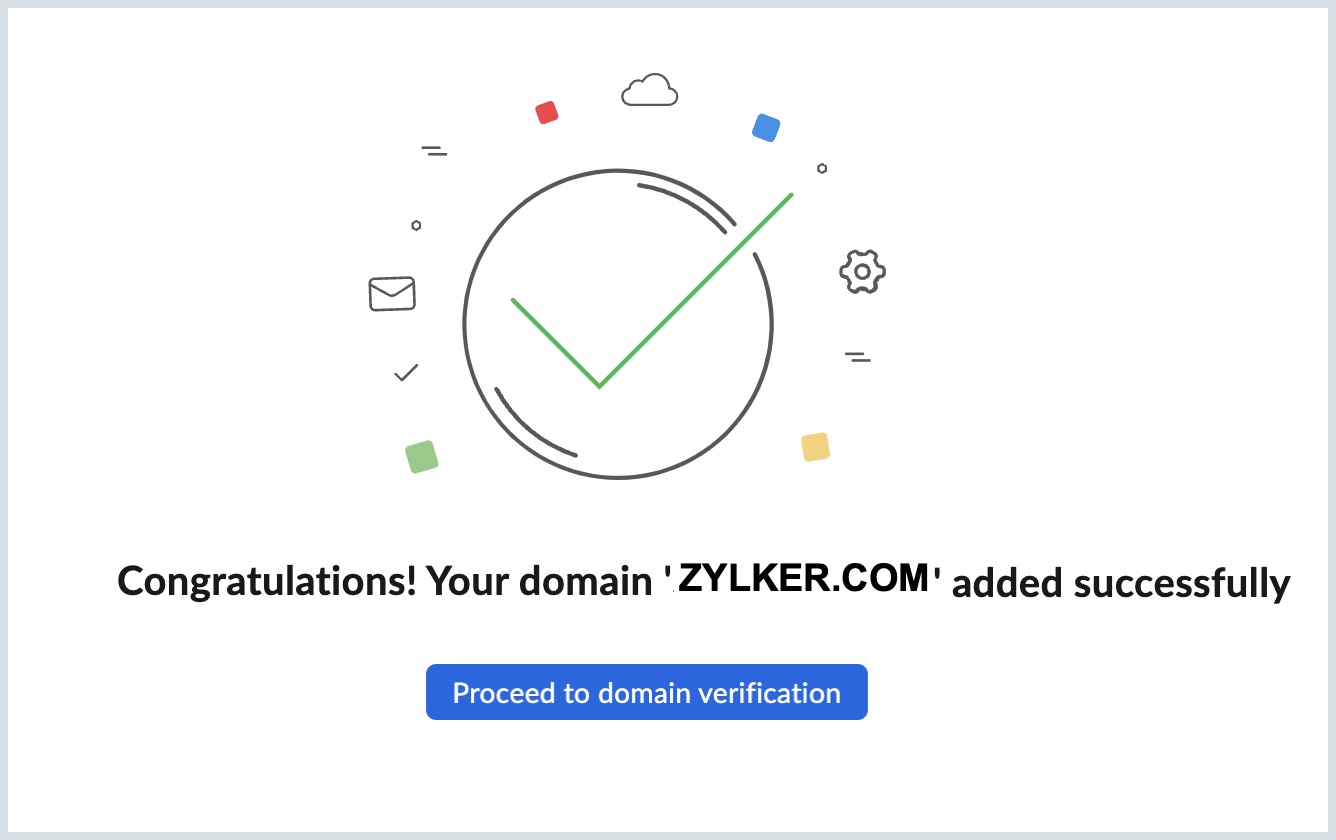
- You have successfully added your domain. Click Proceed to domain verification to start the domain verification process.


Verify domain
You should have ownership over the domain you add and have access to its DNS. Zoho has a verification process to ensure this. There are two ways through which you can verify your domain.
- One-click verification
- Manual verification
One-click verification:
To verify your domain through one-click verification, login to your DNS provider, authenticate with Zoho Mail to use your DNS provider and add the DNS record. Your domain will be now be verified. The one-click verification option is currently available for the below domain providers:
Manual verification:
If your domain provider is not GoDaddy or 1&1, you can verify the domain through any one of the following ways:
- CNAME method - Get a unique CNAME code generated and add it in your DNS Manager. You can view there the step-wise instructions to add the code for your specific provider. After adding the record, click Verify CNAME in the Domains page of the Admin Console.
- TXT Record method - Copy the auto-generated zb code from Admin Console and add it in the TXT Record in your DNS Manager. After adding the record, click Verify TXT in the Domains page of the Admin Console.
- HTML method - Upload the given HTML file to a folder called zohoverify that you should create in root of your website. Now when you click Verify, your domain will be verified based on this file.
If domain verification fails, refer to Domain Verification Failure - Possible Reasons to learn more.
Note:
Upon domain verification, you can navigate to Admin Console. However, it is recommended that you follow the step-by-step process in the Email Setup panel. The below procedure describes the set up process from the Email Setup panel.
Add Users and Groups
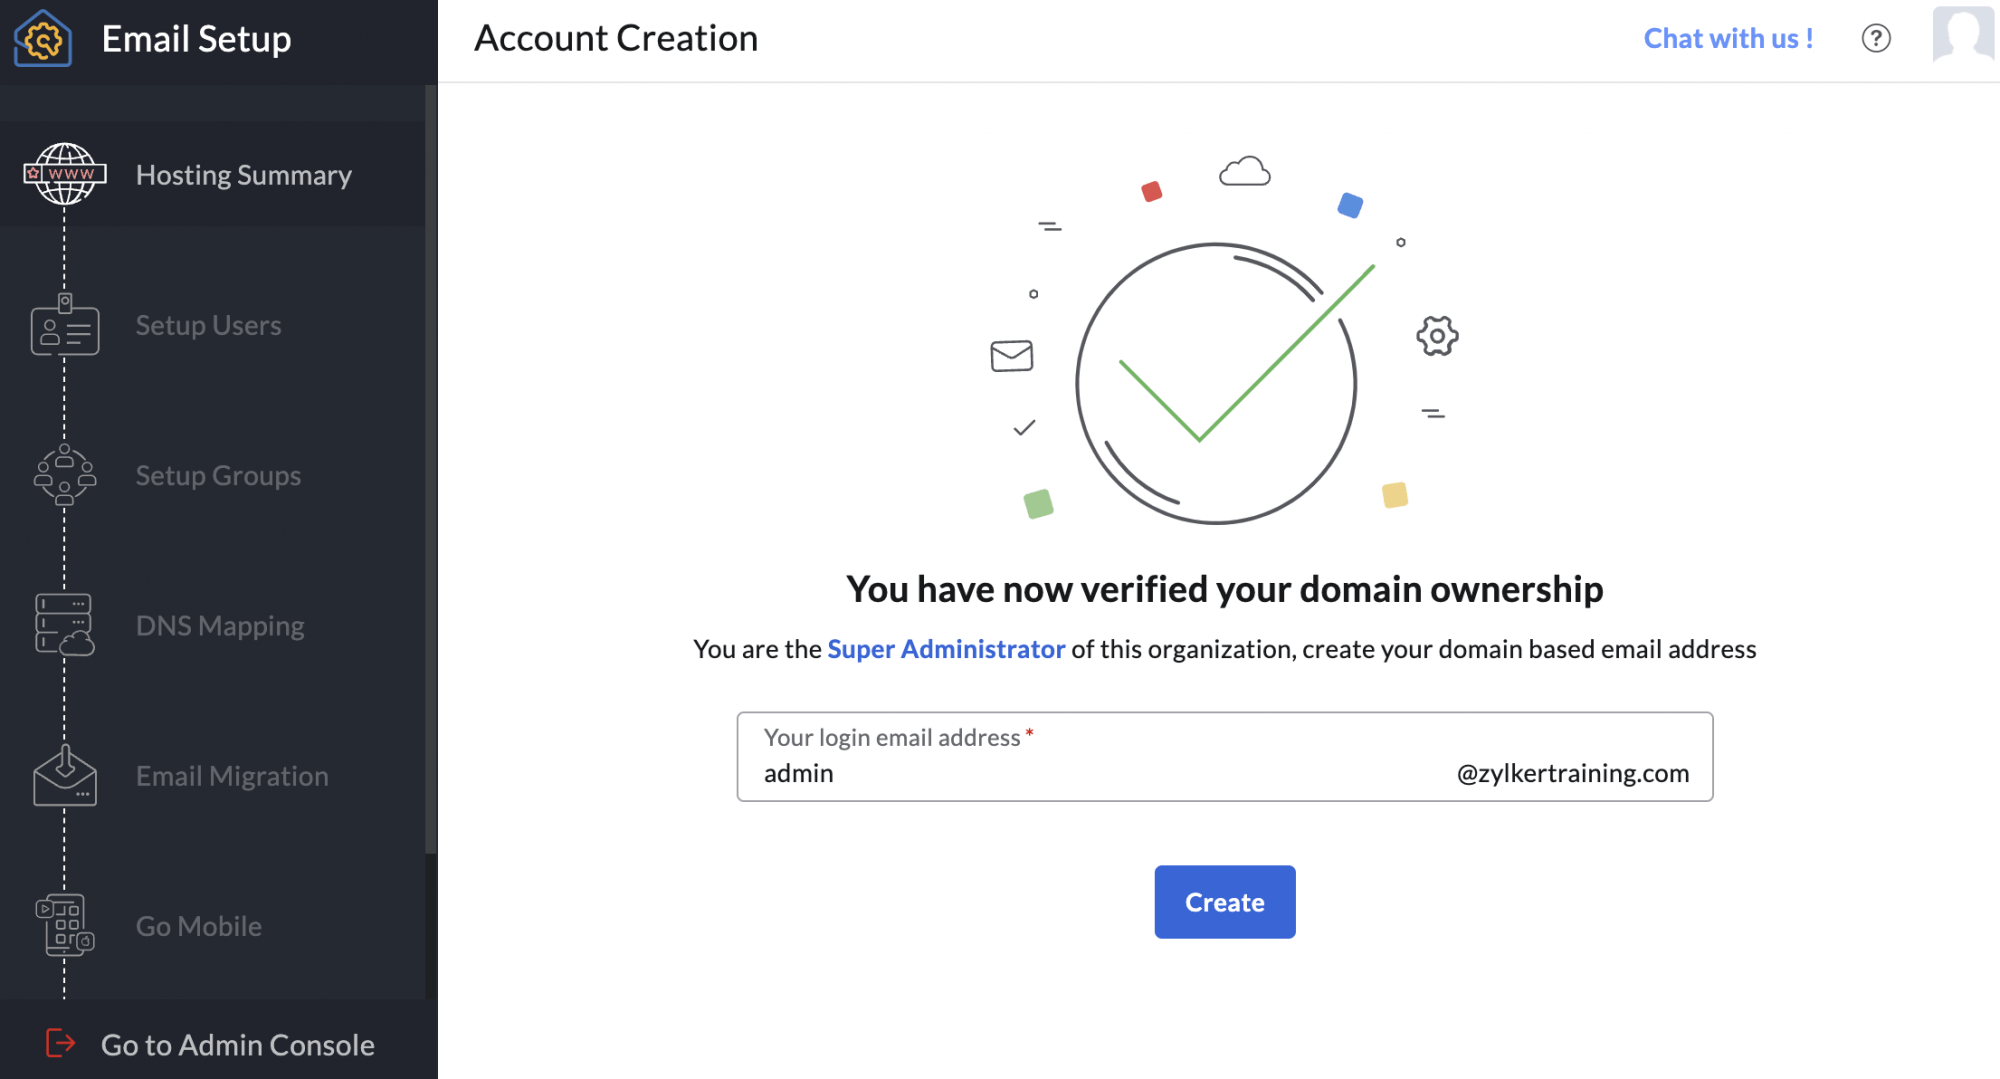
Immediately after domain verification, you should create a super administrator email address for your organization. Enter the preferred email address for the super admin and click Create.
You can add users in the following ways:
- Add one user at a time
- Add multiple users with the Import using CSV option
- Add multiple users with the Import from Google Workspace option
- Add an external user through Invite users option
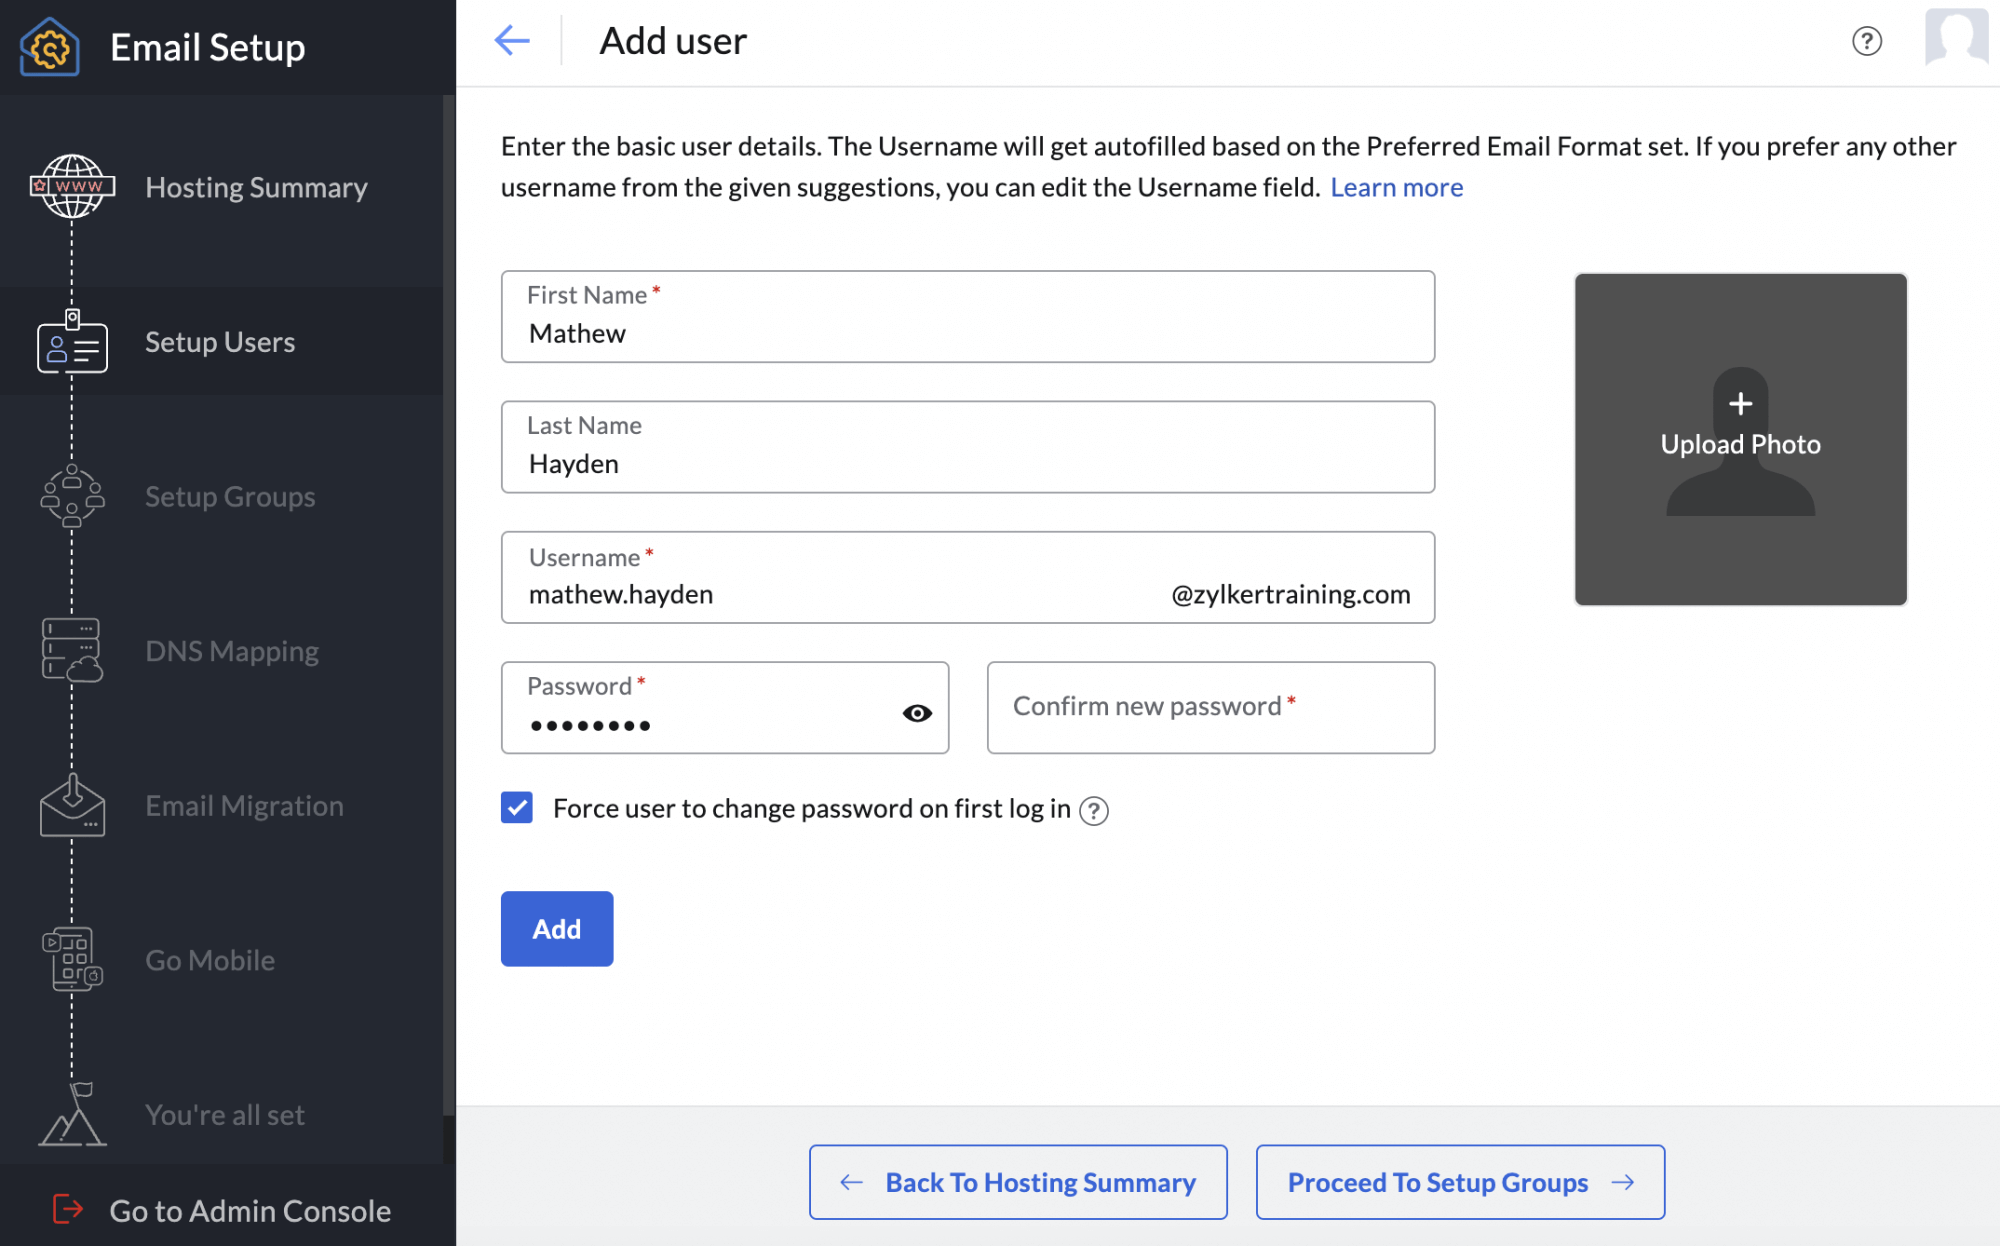
Add one user at a time
To add a user manually, do these steps:
- Click Add from the Users page, enter the user's basic details on the Add user page, and click Add.
If you want the user to reset the password at first login, select Force user to change password on first login.
Add multiple users - Import using CSV
Multiple users can be added at once using the Import using CSV file option. You can import up to 200 users in a single attempt.
- Click Import from the Users page and select Import using CSV file.
- Click Import and choose the domain you want the users in the CSV file to be associated with from the drop-down.
- Click Choose file to upload the CSV file with user details. Refer to the sample file attached in the Start user import using CSV page.

- In the Map headers page, drag the Unmapped Headers to the Headers Mapping or Custom Fields area based on your preference.

- Once done, click Proceed. All the users listed in your CSV file will be displayed for you to further scrutinize the users you want to add to your organization.
- Hover over the values that are in red and click the edit icon to enter the correct value. Once all the values are updated, select the users to import and click Proceed.

- Enter a name for the import for future reference.
- You can create an alias address to all imported users using any domain associated with your organization. To do this, select the Create alias for other domains column, select the desired domain from the available options.
- Choose the Email policy you want to apply to all selected users from the drop-down.
- You can also force users to change the password you set during their first login attempt by checking that option.
- After configuring your import preferences, click Start Import. select Force user to change password on next log in (if required) and click Start.
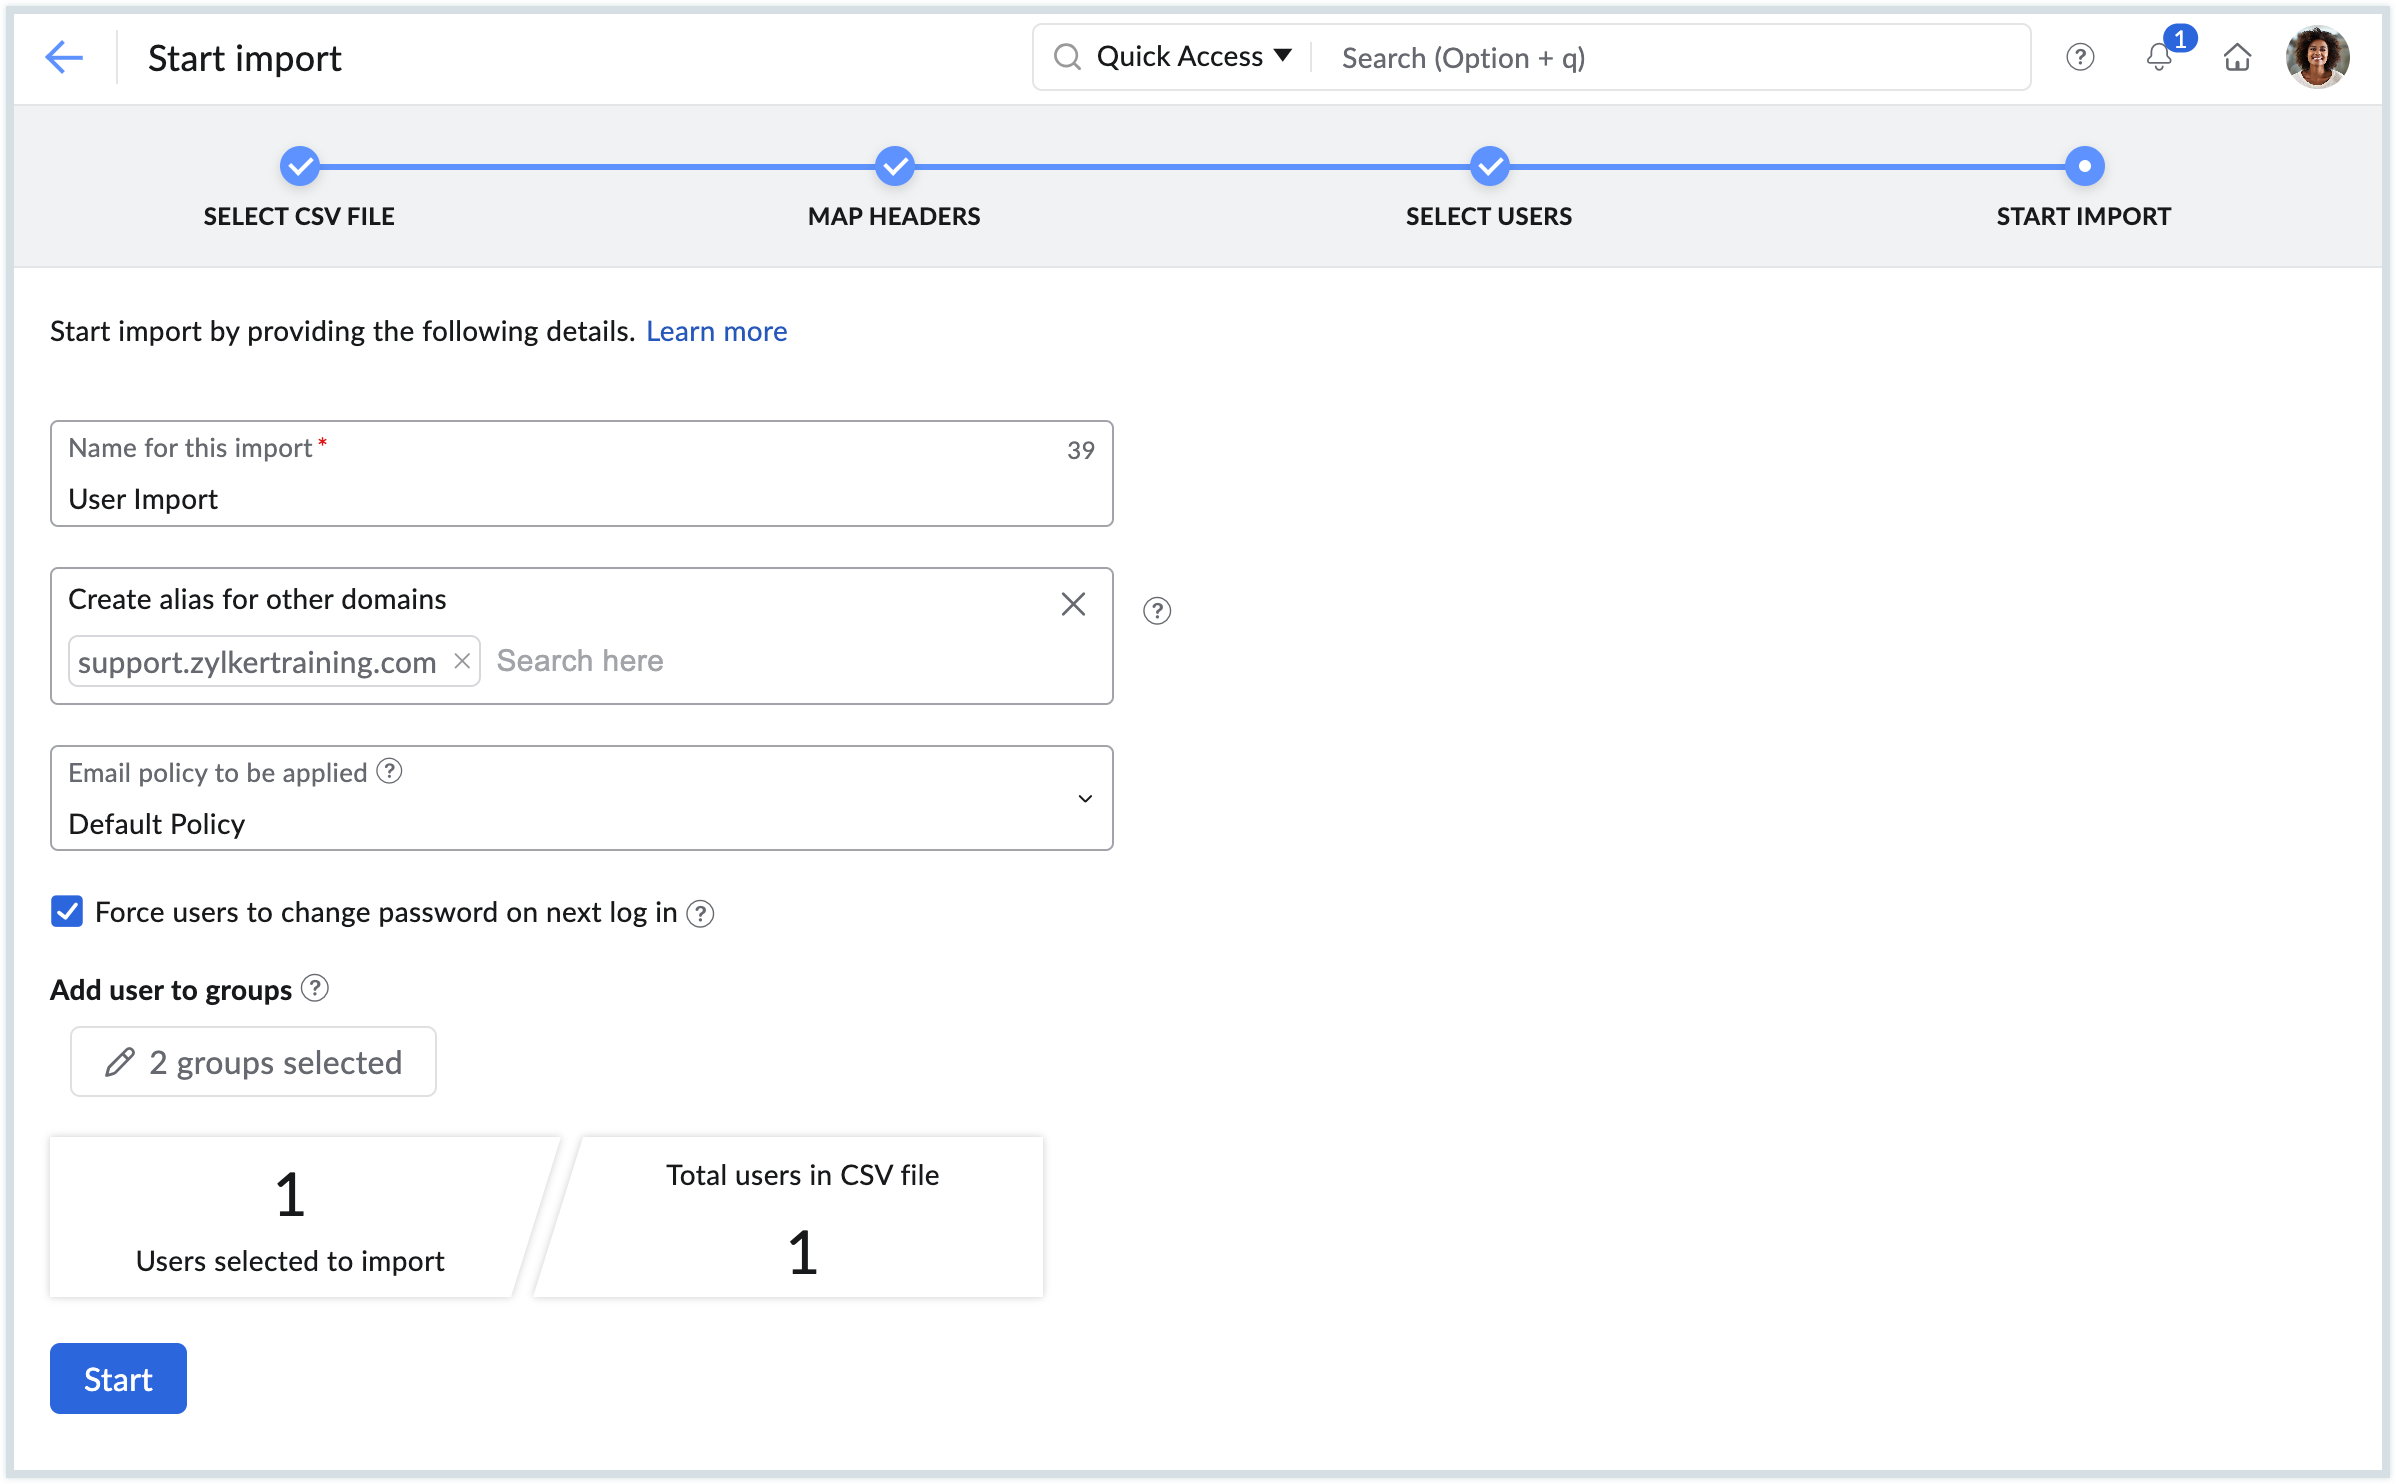
- You can view the status of the import from the Import users from CSV page.


Add multiple users - Import from Google Workspace
If you already have all your users in Google, you can import all of them in one go. However, this option is available only for organizations with a paid plan. You must do a one-time authentication in order to import users from Google Workspace. Refer to Import users from Google Workspace to learn more.
Add external users
External users can also be added to your organization by following the below steps:
- Click Invitees from the Users page.

- On the Invitees page, click Invite A User or click Invite to continue.

- In the Invite users pop-up, enter one or more email addresses separated by a comma.
- Once you've added the user's mail address and click Invite. An invitation will be sent to the user's email address. Once the user accepts the invite, the user will be added to your organization.


If you have completed adding users, click Proceed to Setup Groups.
Note:
The Invitees option is available only for organizations with a paid plan.
Create Groups
You can create multiple groups based on your preference. Refer to Creating Groups to learn more. After setting up groups, click Proceed to DNS Mapping to configure email delivery.
Configure Email Delivery
You should set your MX records in order to receive emails. The SPF and DKIM records should be added to ensure that the emails sent from your domain are not labelled as spam. These records must be added to your domain provider's DNS Manager.
You can do the one-click verification method if your domain provider is:
To manually add the MX, SPF and DKIM records, do these steps:
- Navigate to your domain provider's DNS Manager.
- Remove the existing entries from the MX records page and then click Add Record.
- Enter the MX records data from the DNS Mapping page to your domain provider's DNS Manager and click Add Record.
- Navigate to the TXT records tab in the DNS Manager, click Add TXT Record, enter the SPF value and click Add Record.
- Click Add TXT Record, enter the DKIM Host Name and Value in the respective fields and click Add Record.
- Click Verify All Records on the DNS Mapping page.

If you face any errors, refer to Troubleshoot MX Record Addition to learn more. Once you update your MX records in your DNS Manager, you can check if the change has reflected on the system using an MX lookup.
After verifying the records, click Proceed to Email Migration.
Email Migration
Zoho Mail provides an option to migrate data from Google Workspace, Office 365, and Microsoft Exchange Server or do a simple IMAP/POP migration.
To start a new data migration, do these steps:
- Click Start Data Migration, enter a name for the migration and select the desired migration protocol/application.
- If you choose IMAP/POP migration, enter the server detail, security information and click Add.
- Configure the migration settings such as Folders to migrate, Emails to migrate, Other preferences and so on and click Add.
- Enter the Maximum Connection Limit value and when to Pause migration if storage reaches near to full and click Create.
- Select the Users tab from the Migrations page, click Add, enter the source account details, choose the destination user's email address, priority for migration and click Add.
- Click Start Migration.
You can click the Refresh button to view the migration status.


Note:
- For IMAP/POP migration from Google, you must enable two-factor authentication, generate an App password and enter the App password in the Add account dialog.
- To migrate directly from Google Workspace, Office 365 and Microsoft Exchange, you must do a one-time authentication. Refer to Migration to Zoho Mail to learn more.
Your domain is now successfully set up with Zoho. You can download the Zoho Mail mobile application from the App Store or Google Play and use Zoho's mail services on-the-go.
Top Articles