Email groups or Distribution Lists
Groups or Distribution Lists are common email addresses, shared by a set of users for a specific purpose. When an email is sent to the group account, a copy of the email gets delivered to the mailbox of all the members of the Email Group. You can decide who can send emails to the group or streamline the emails that go through using Moderation Settings and Permissions.
Groups Overview
Groups are a set of users with a generic email address. A classic example can be the members of an organization's payroll team added to a single group with an email address associated with it (such as payroll@domain.com). An admin can decide who can send emails to the group or streamline the emails using the Moderation Settings and Permissions. Groups can be classified into two types:
Distribution Lists
A DL is a group of users with a single group email address. An user can be part of multiple groups, where each group will have a generic email address. The group members can post their messages through Streams if it is enabled by the admin. An admin can decide if a DL is with Streams or without Streams.
Not only the organization members, even external member's mail addresses can be added to a DL. When an email is sent to a DL, a copy of the email gets delivered to the mailbox of all the members of the group.
Note:
The option to add external members to Distribution Lists will be available only for organizations that are using one of our paid plans.
Shared Mailbox
Shared Mailbox is a group similar to a Distribution List (DL) that has a common email address shared by a set of users within your organization. Unlike DLs, external members cannot be added to a shared mailbox and it does not support streams. The emails sent to a shared mailbox do not appear in the individual user's mailbox thereby reducing email duplication.
Group Permissions
Zoho Mail offers different types of groups to fulfil different requirements of an organization. A group can have multiple members and moderators. After getting added by a Zoho Mail admin, the moderators of a group can add new members.
Public Email Groups (B2B/ B2C)
Public email groups are generic email addresses that can be accessed by anyone inside or outside the organization. When a group is set to Everyone, it allows anyone to send an email to the group address. This kind of group is ideal for roles that involve external communication like HR, PR, marketing, support, and so on where the group email address has to be exposed externally so that anyone can contact and communicate with the organization.
For example, say your company has a sales team where your prospects send their queries. Instead of giving out an email address of a single person, you can create a public group sales@zylker.com and add all your client team as members. Now, a copy of any emails sent to the group will be forwarded to all the members of the group.
Organization Email Groups (C2E / E2C)
Organization groups are ideal for internal communication between the employees within your organization. Only users who are part of your Zoho Mail organization can send emails to this group. You can use this group for functions like housekeeping, payroll management, or any other function that require organization-wide transmission.
For example, say you want your employees to communicate with anyone on the HR team for easier redressal management. You can create an organization group address redressal-hr@zylker.com. With it being an organization group, only emails from your employees will reach the group member's inbox.
Closed/ Private Email Groups (G2G)
Closed groups are meant for communication within the members of the group itself. If one is not a member of the group (even if they are part of the organization), then they can't send an email to this type of group. These groups are meant for communication within teams—for setting up alerts, brainstorming, etc. You can also choose to moderate/reject emails that were sent by non-members of the group.
For example, your company's marketing team might want to communicate within themselves to maintain a blog calendar and more. You can create a private group marketing@zylker.com and facilitate communication within the team without external disturbances.
Moderated/ Restricted Email Groups (C2E)
If you want the emails sent to a group to be monitored by someone before getting delivered to the group, you can create a Restricted group. You can customize these groups to directly accept emails from moderators/ certain members, whereas all other emails will be moderated. Zoho Mail Admins and group Moderators can check the emails received by the group and make sure only the legit emails are sent to the member's inbox.
You can have more customized Groups with permissions to send emails on behalf of the group email address, to allow certain members to send emails without moderation, add external members, and so on under the group's Advanced Settings.
Looking for a Shared Inbox solution for your team?
Try TeamInbox by Zoho Mail, to make collaboration with your team efficient with shared inboxes.
Creating Groups
- Log in to Zoho Mail Admin Console.
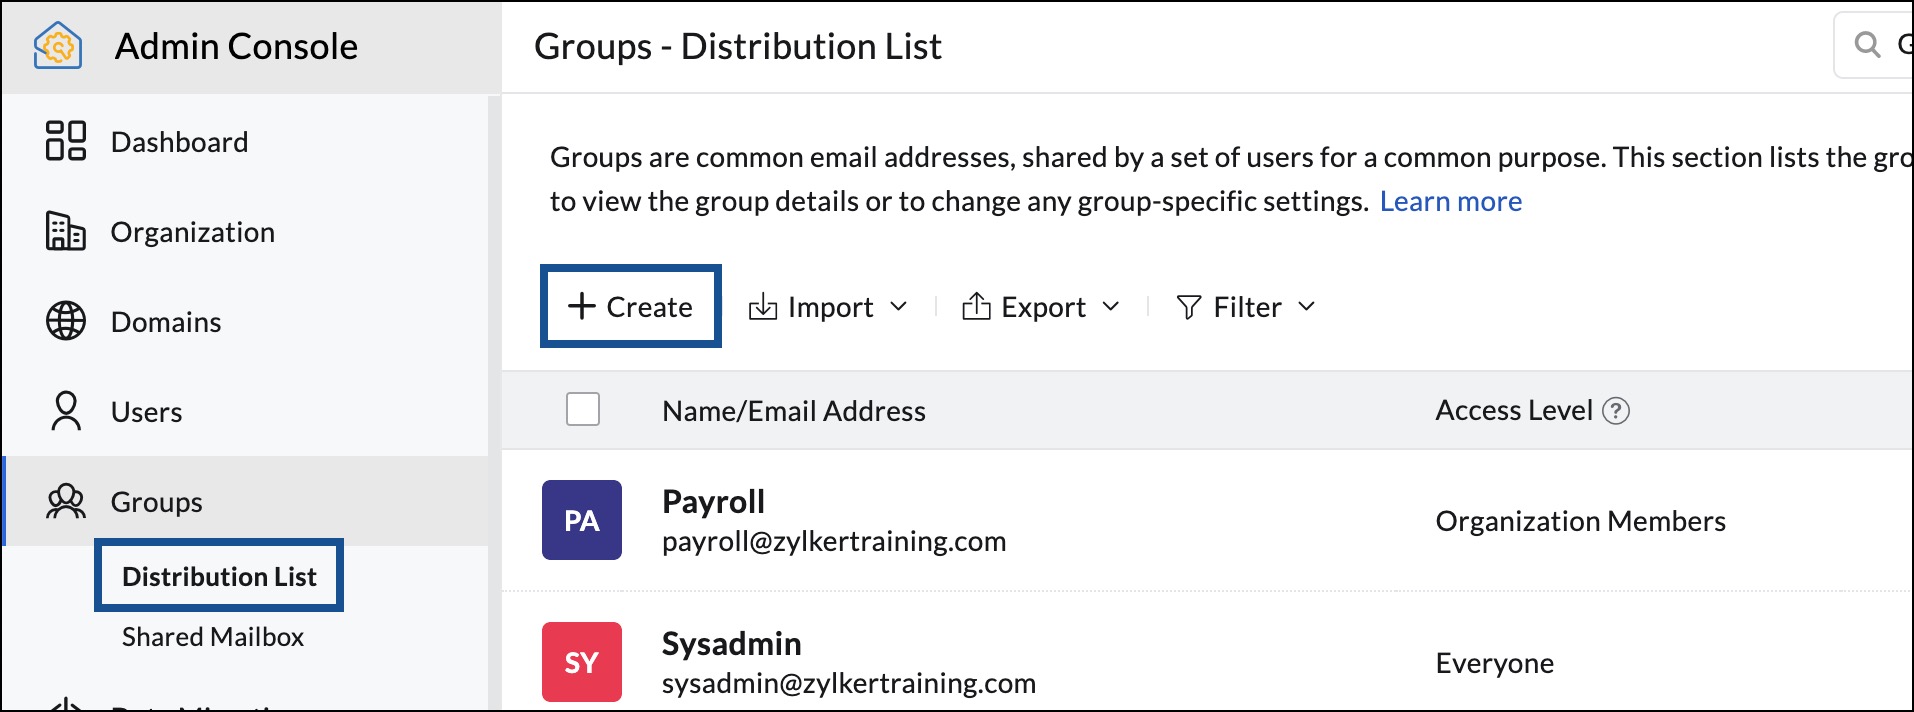
- Navigate to Groups in the left pane and select Distribution List.
- Click Create to add a new group. You will be taken to the Add Group page.
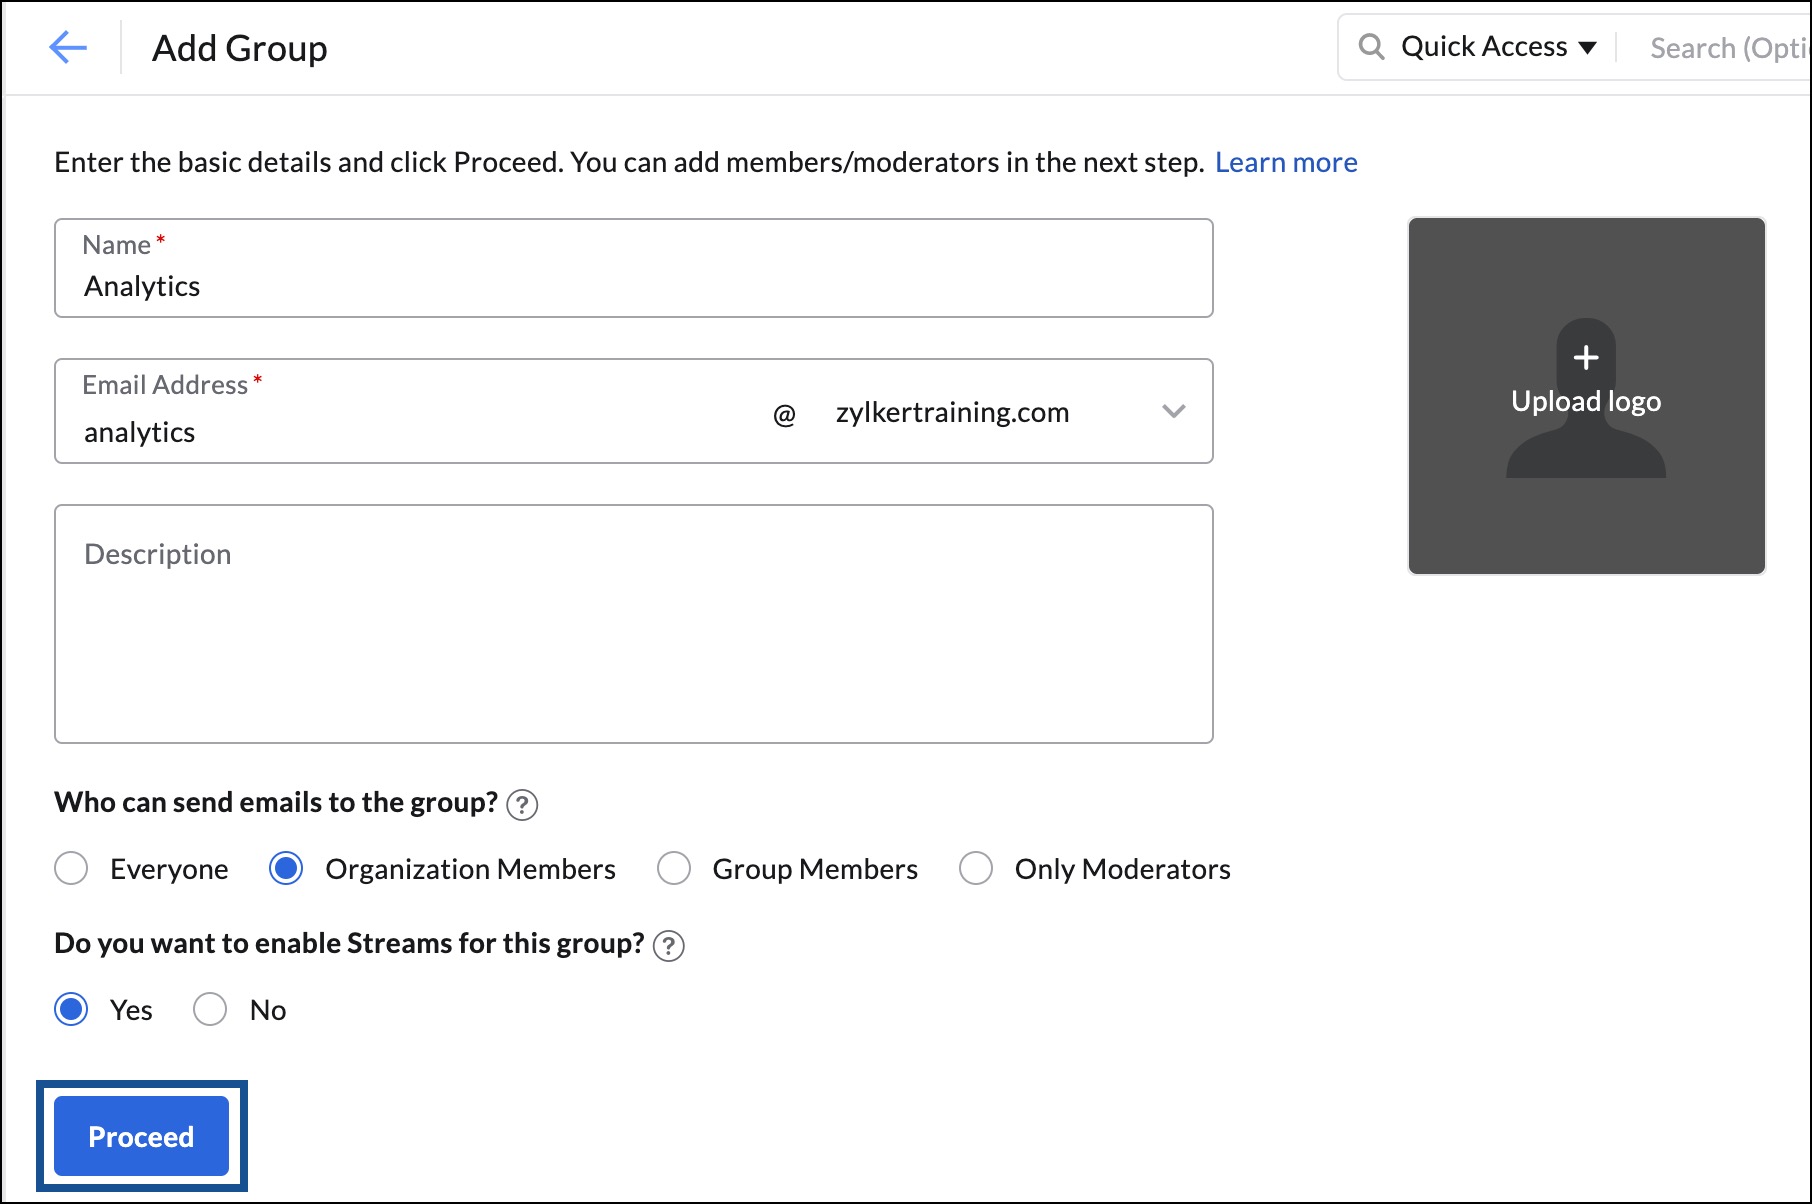
- Enter a group name and email address of your choice. You can also add a description and profile picture if you find it necessary.
- After giving in the necessary details, choose what kind of group you would like to create by picking Who can send emails to your group.
- Everyone — Public Group
- Anyone can send emails to the group.
- All the emails will be delivered to all the group members.
- Organization Members — Organization group
- Only the members of the same organization can send emails to the group.
- When others send emails to this group, the email can be moderated/ bounced to senders, based on the option chosen in the Email Moderation section.
- Group Members — Private Group
- Only the group members can send emails to the group.
- When others send emails to this group, the email can be moderated/ bounced to senders, based on the option chosen in the Email Moderation section.
- Only Moderators — Restricted Group
- Only the group moderators can send emails directly to the group.
- When others send emails to this group, the email will be moderated. However, the individual member/ moderator permissions can also be customized from the Members section. To learn more about moderators, click here
- Everyone — Public Group
- You can choose the option to enable or disable Streams for your group.
- Once done, click Proceed.
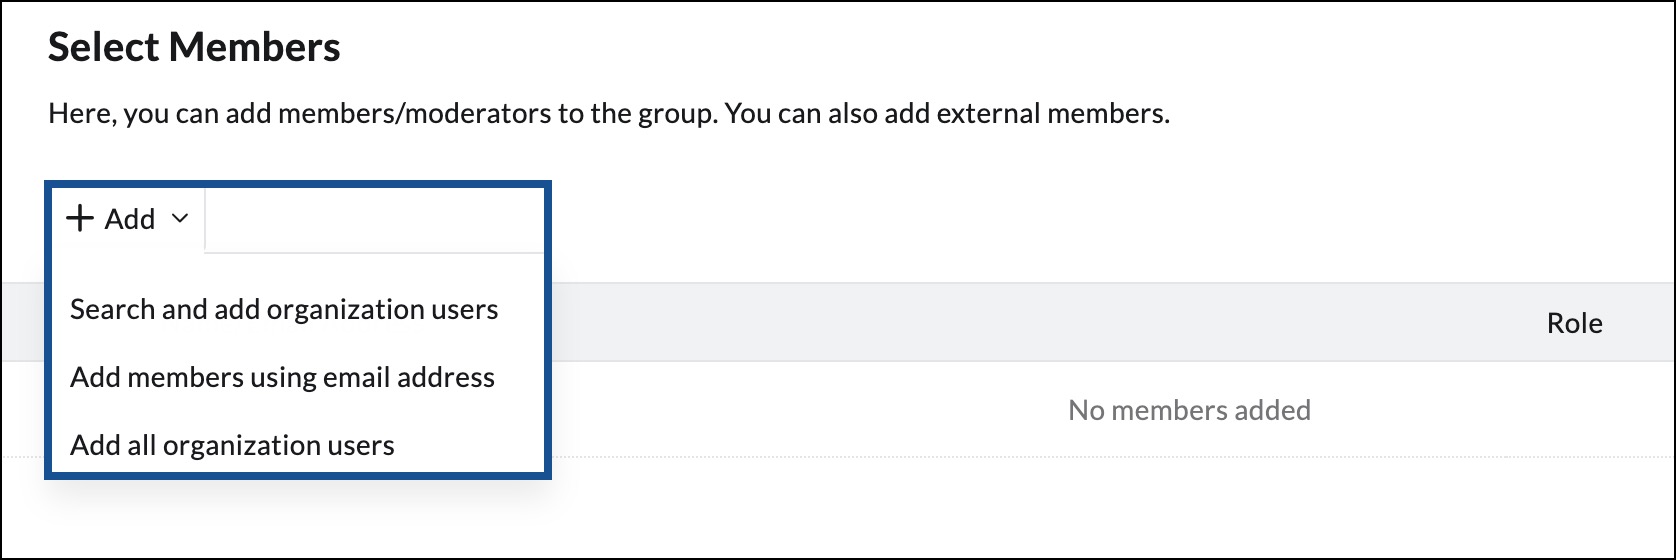
- You will be taken to the Add members page. Click + Add to select the members of your organization to be part of your group.
- Click the drop-down under the Role column and choose the Moderator for the group. There should be a minimum one moderator for each group.
- Once done, click Create.
- Click Proceed in the confirmation dialog box.
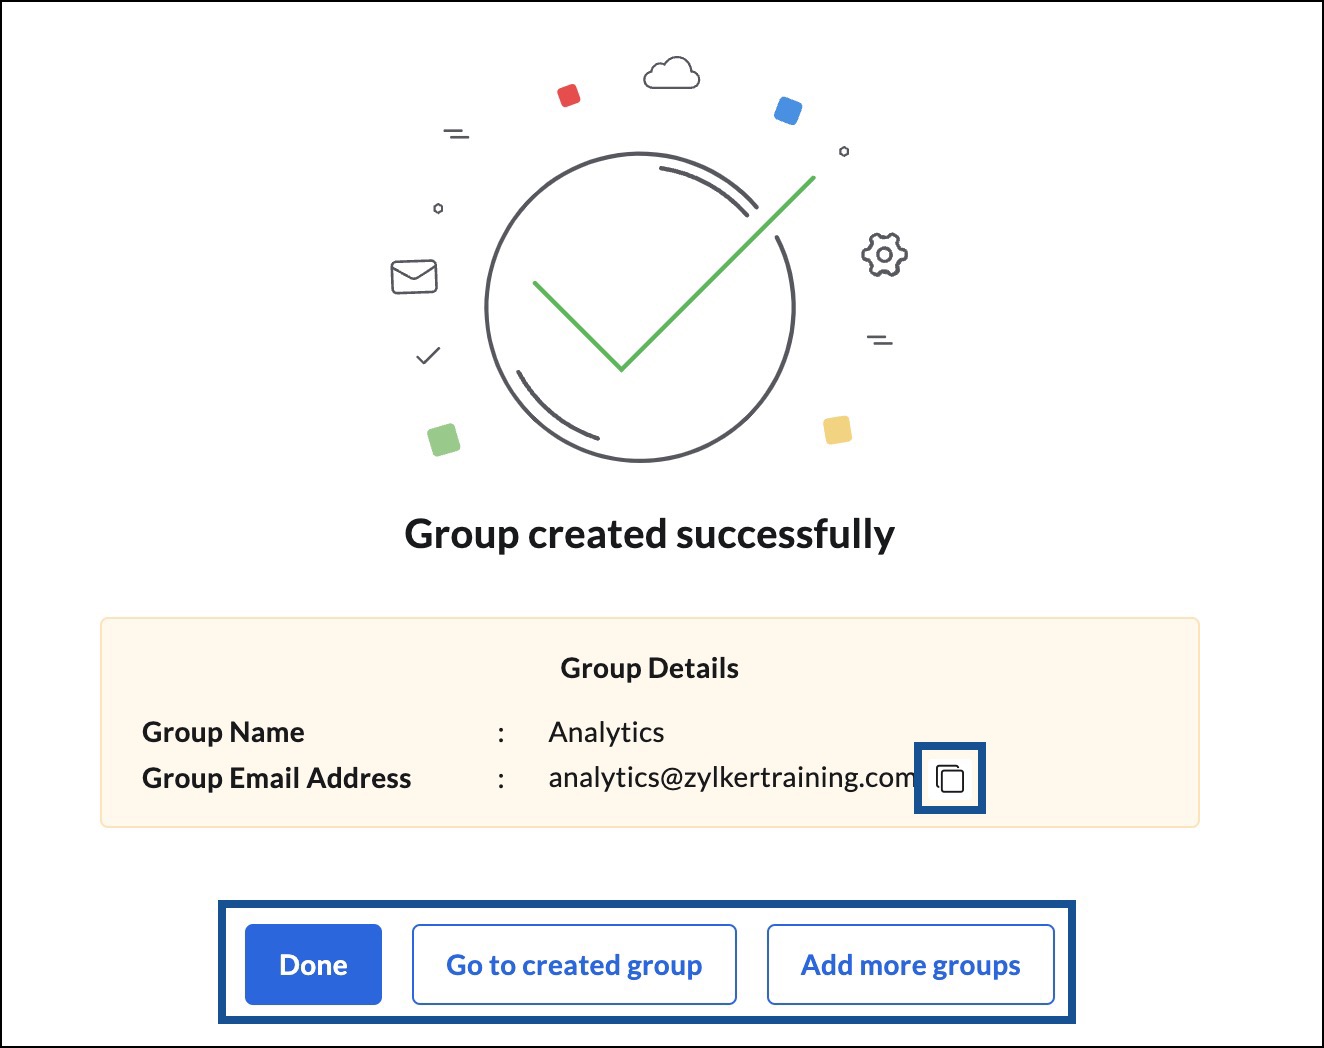
A confirmation page appears with the message Group created successfully. You can do the following actions from this page:
- Click the copy icon to share the group email address to desired team members
- Click Done to return to the Groups listing page
- Click Go to created group to edit the group details
- Click Add more groups to create a new group.
Import using CSV file
- Log in to Zoho Mail Admin Console.
- Navigate to Groups and select Distribution List in the left pane.
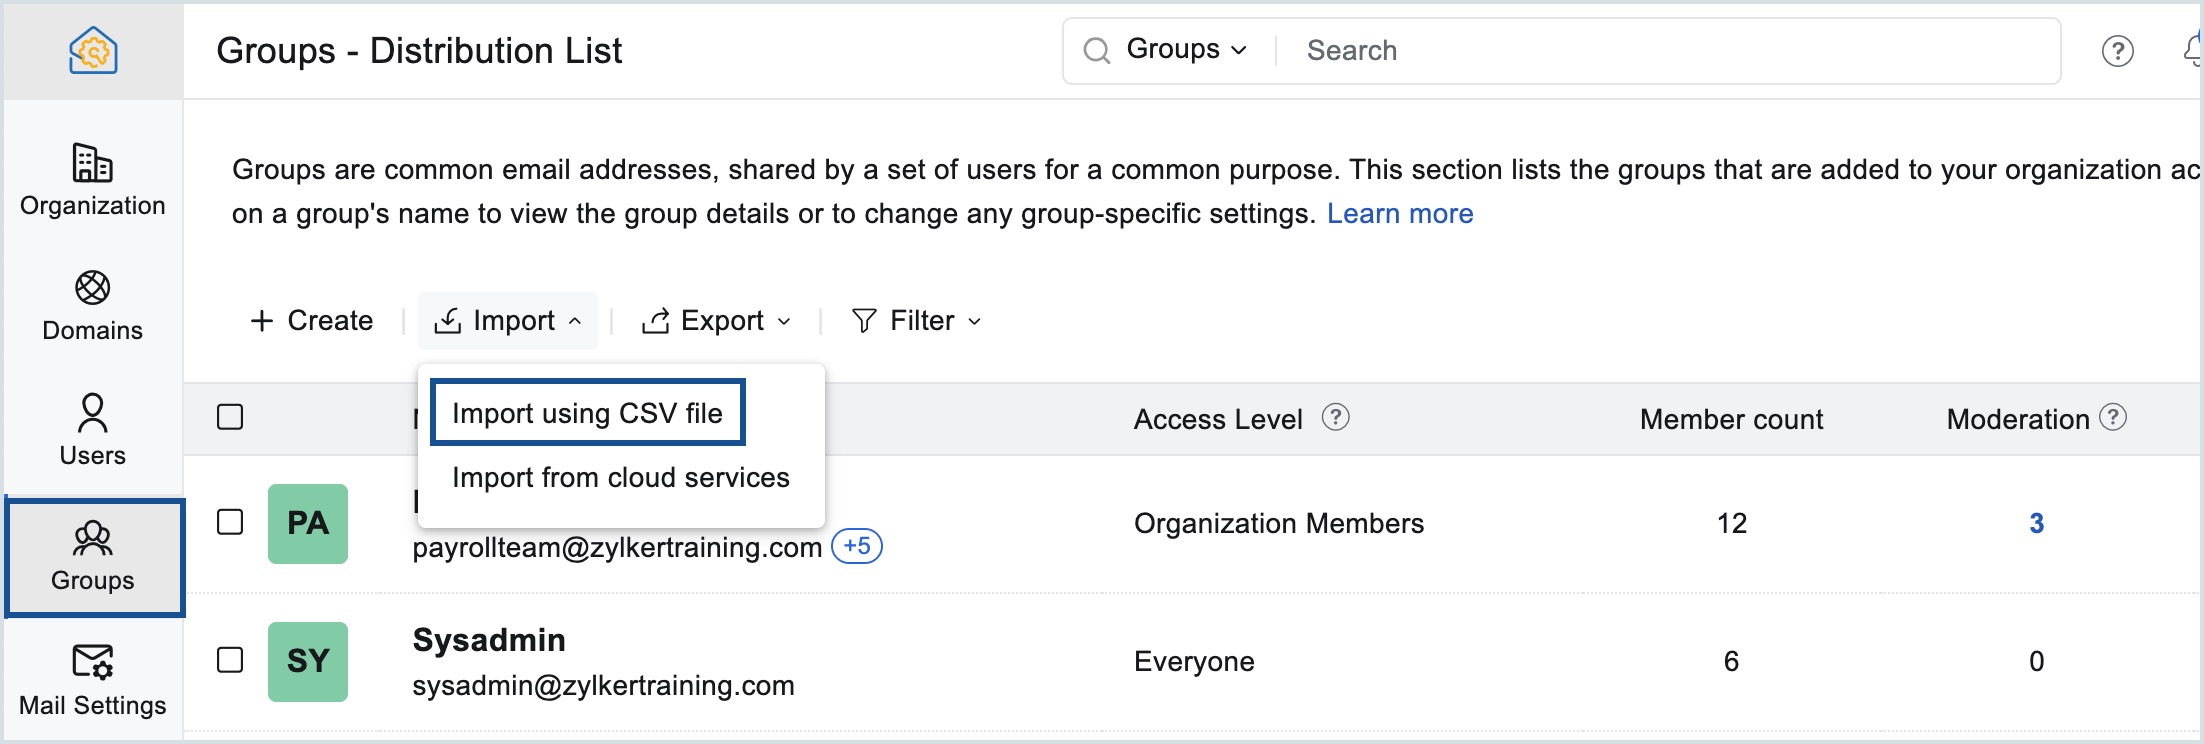
- Select the Import drop-down menu and choose Import using CSV file.
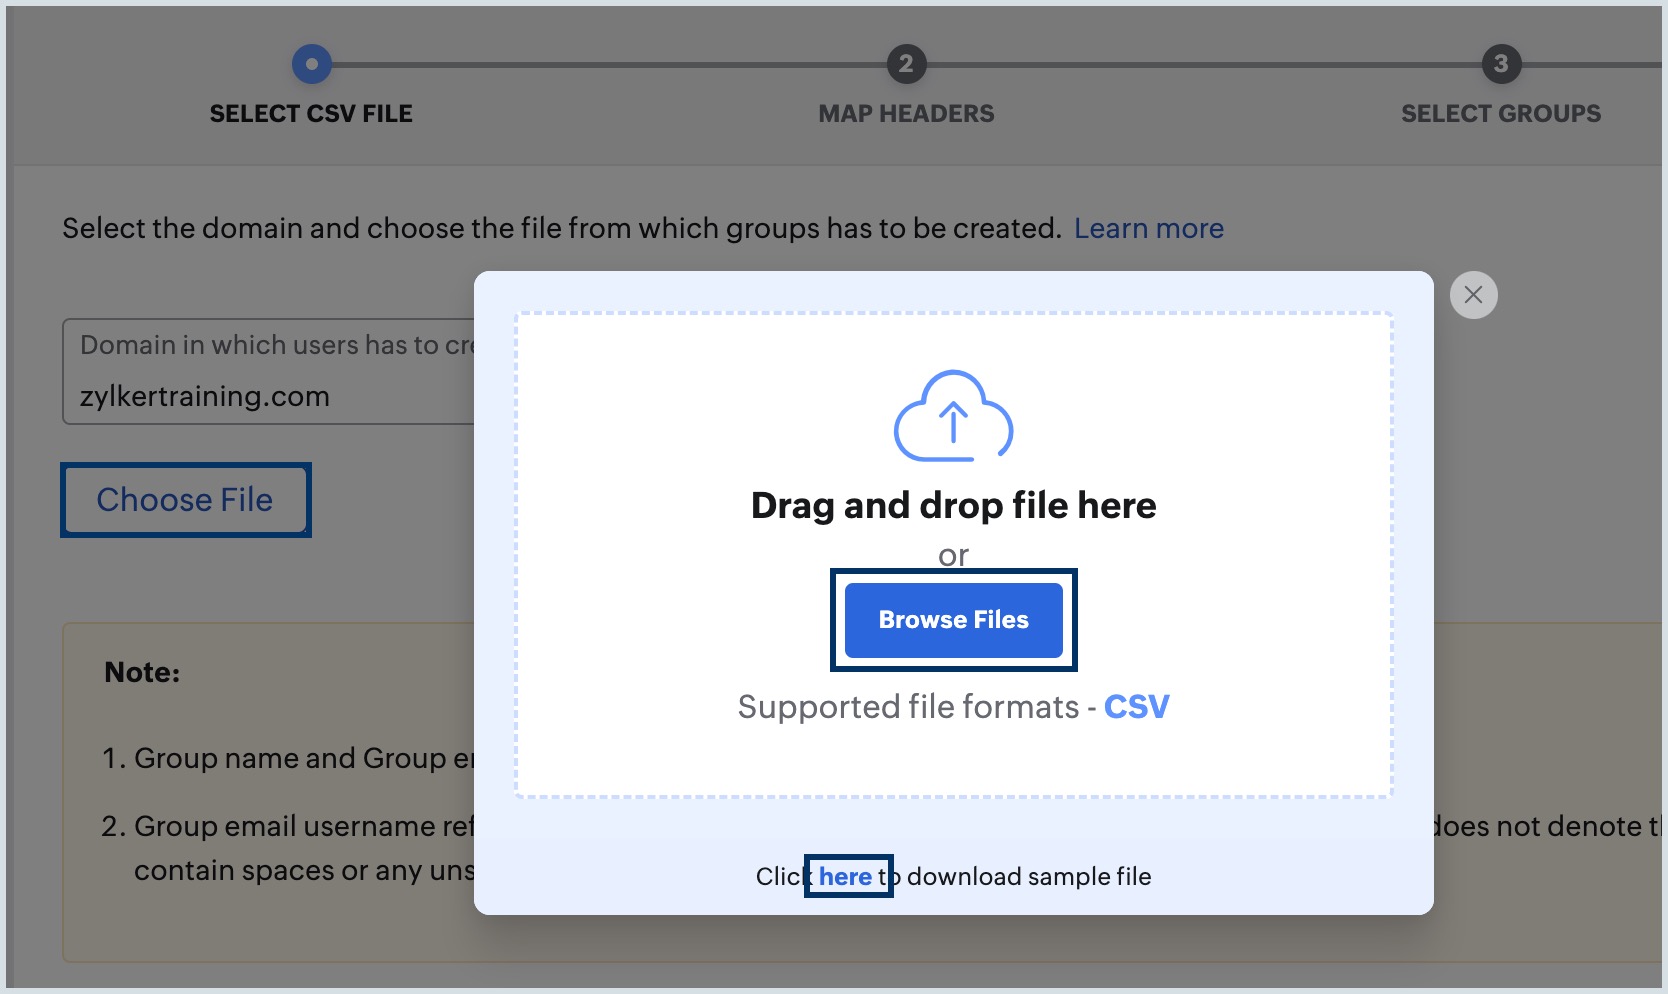
- Click Import and select the domain in which the groups are to be created and click Choose File.
- Click Browse Files to upload a CSV from your device. Alternatively, download the sample file from the pop-up and fill the group information.
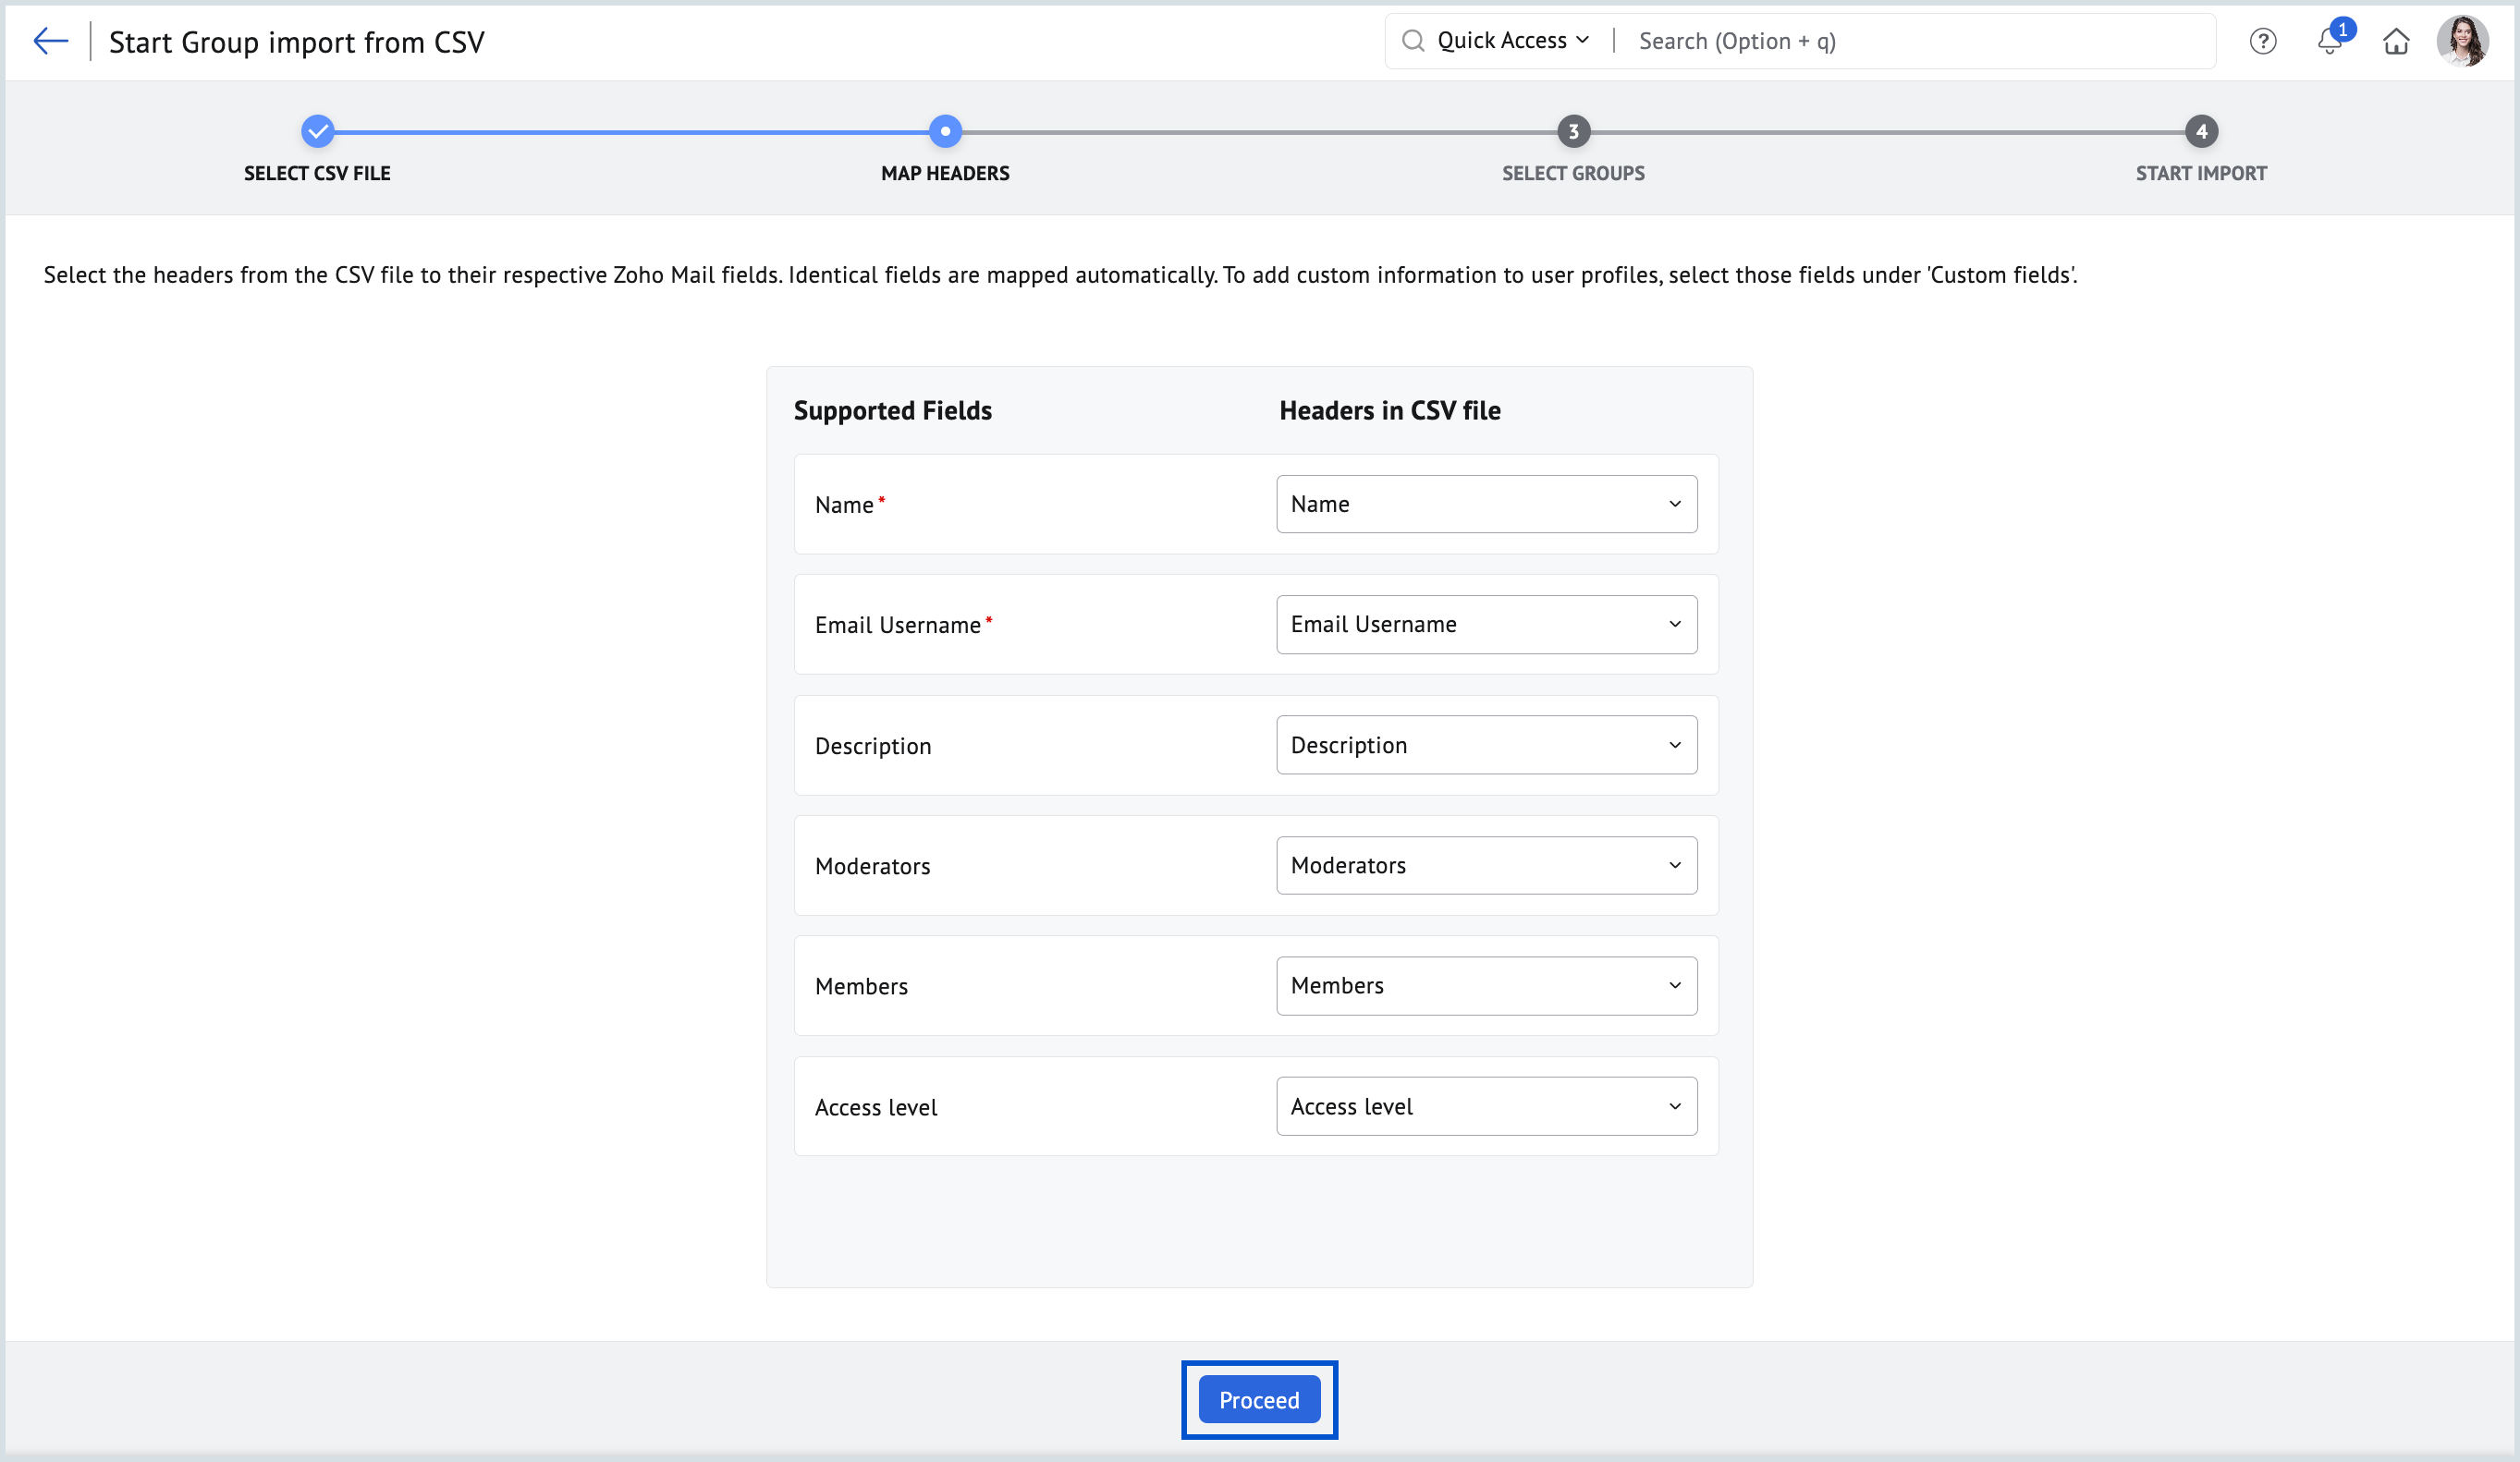
- Map headers as per your preference and click Proceed.
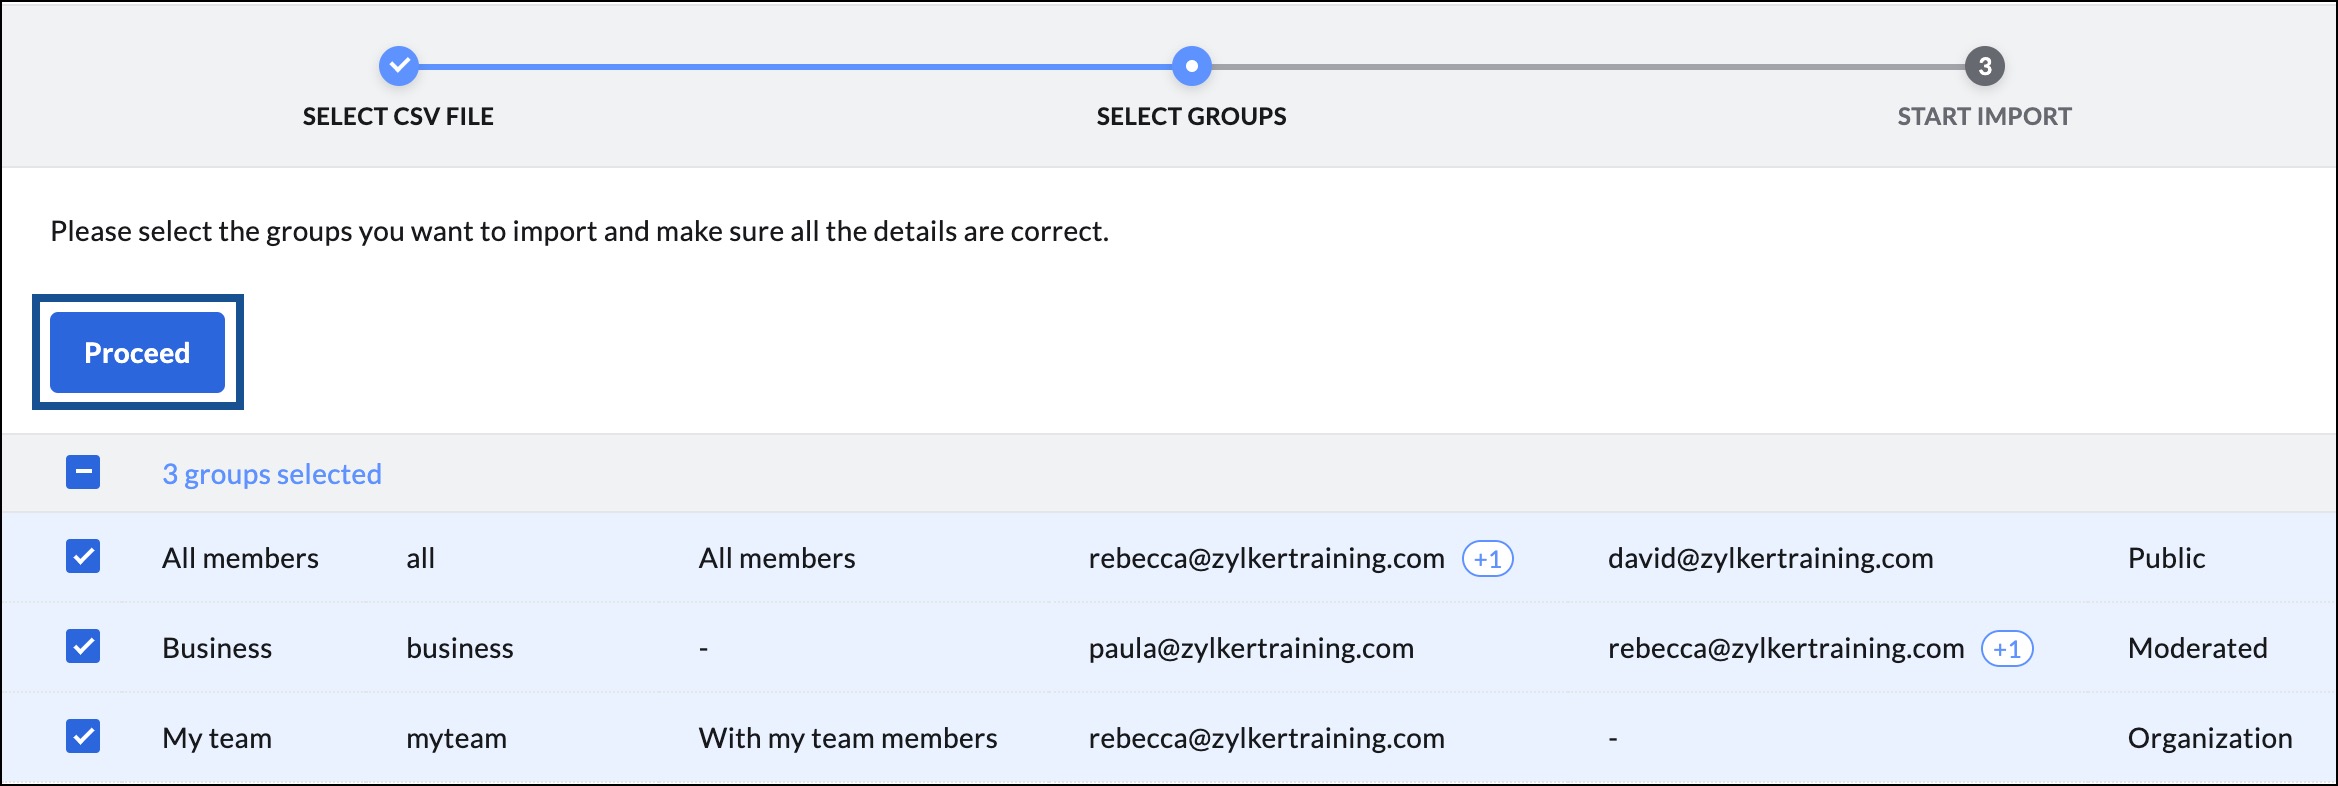
- Select the groups from the list and click Proceed.
- Enter a name for the import and click Start.
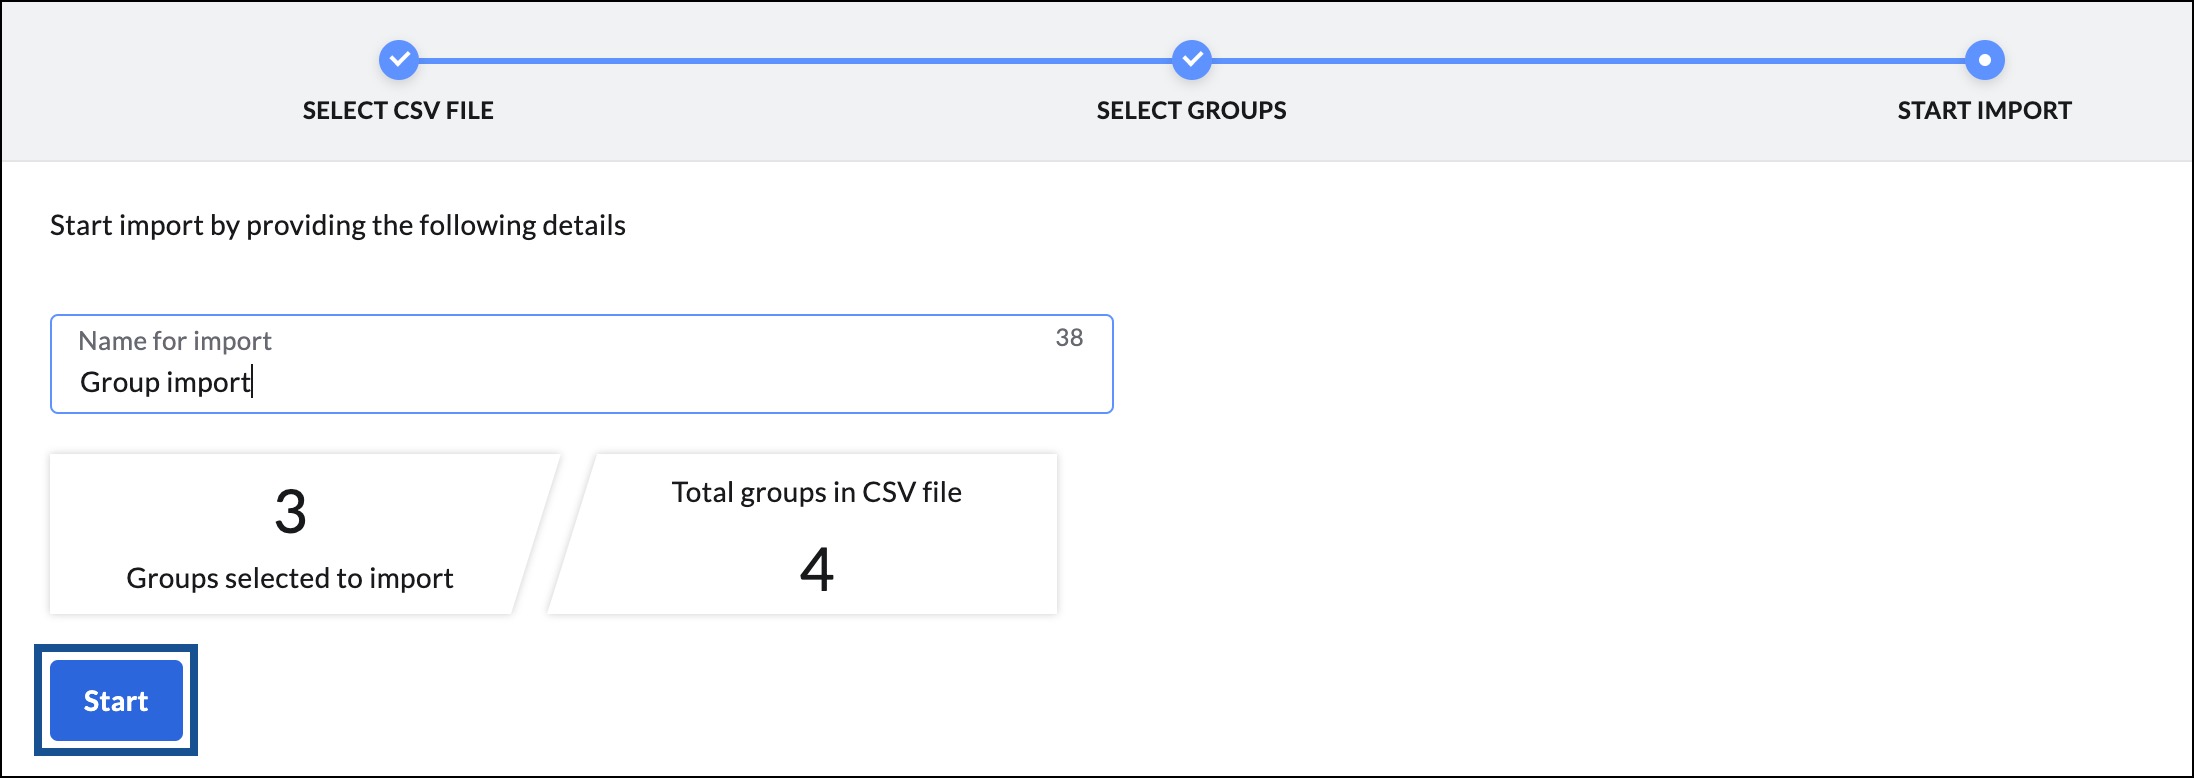
The group import status page appears. Click the refresh icon to update the progress of the import.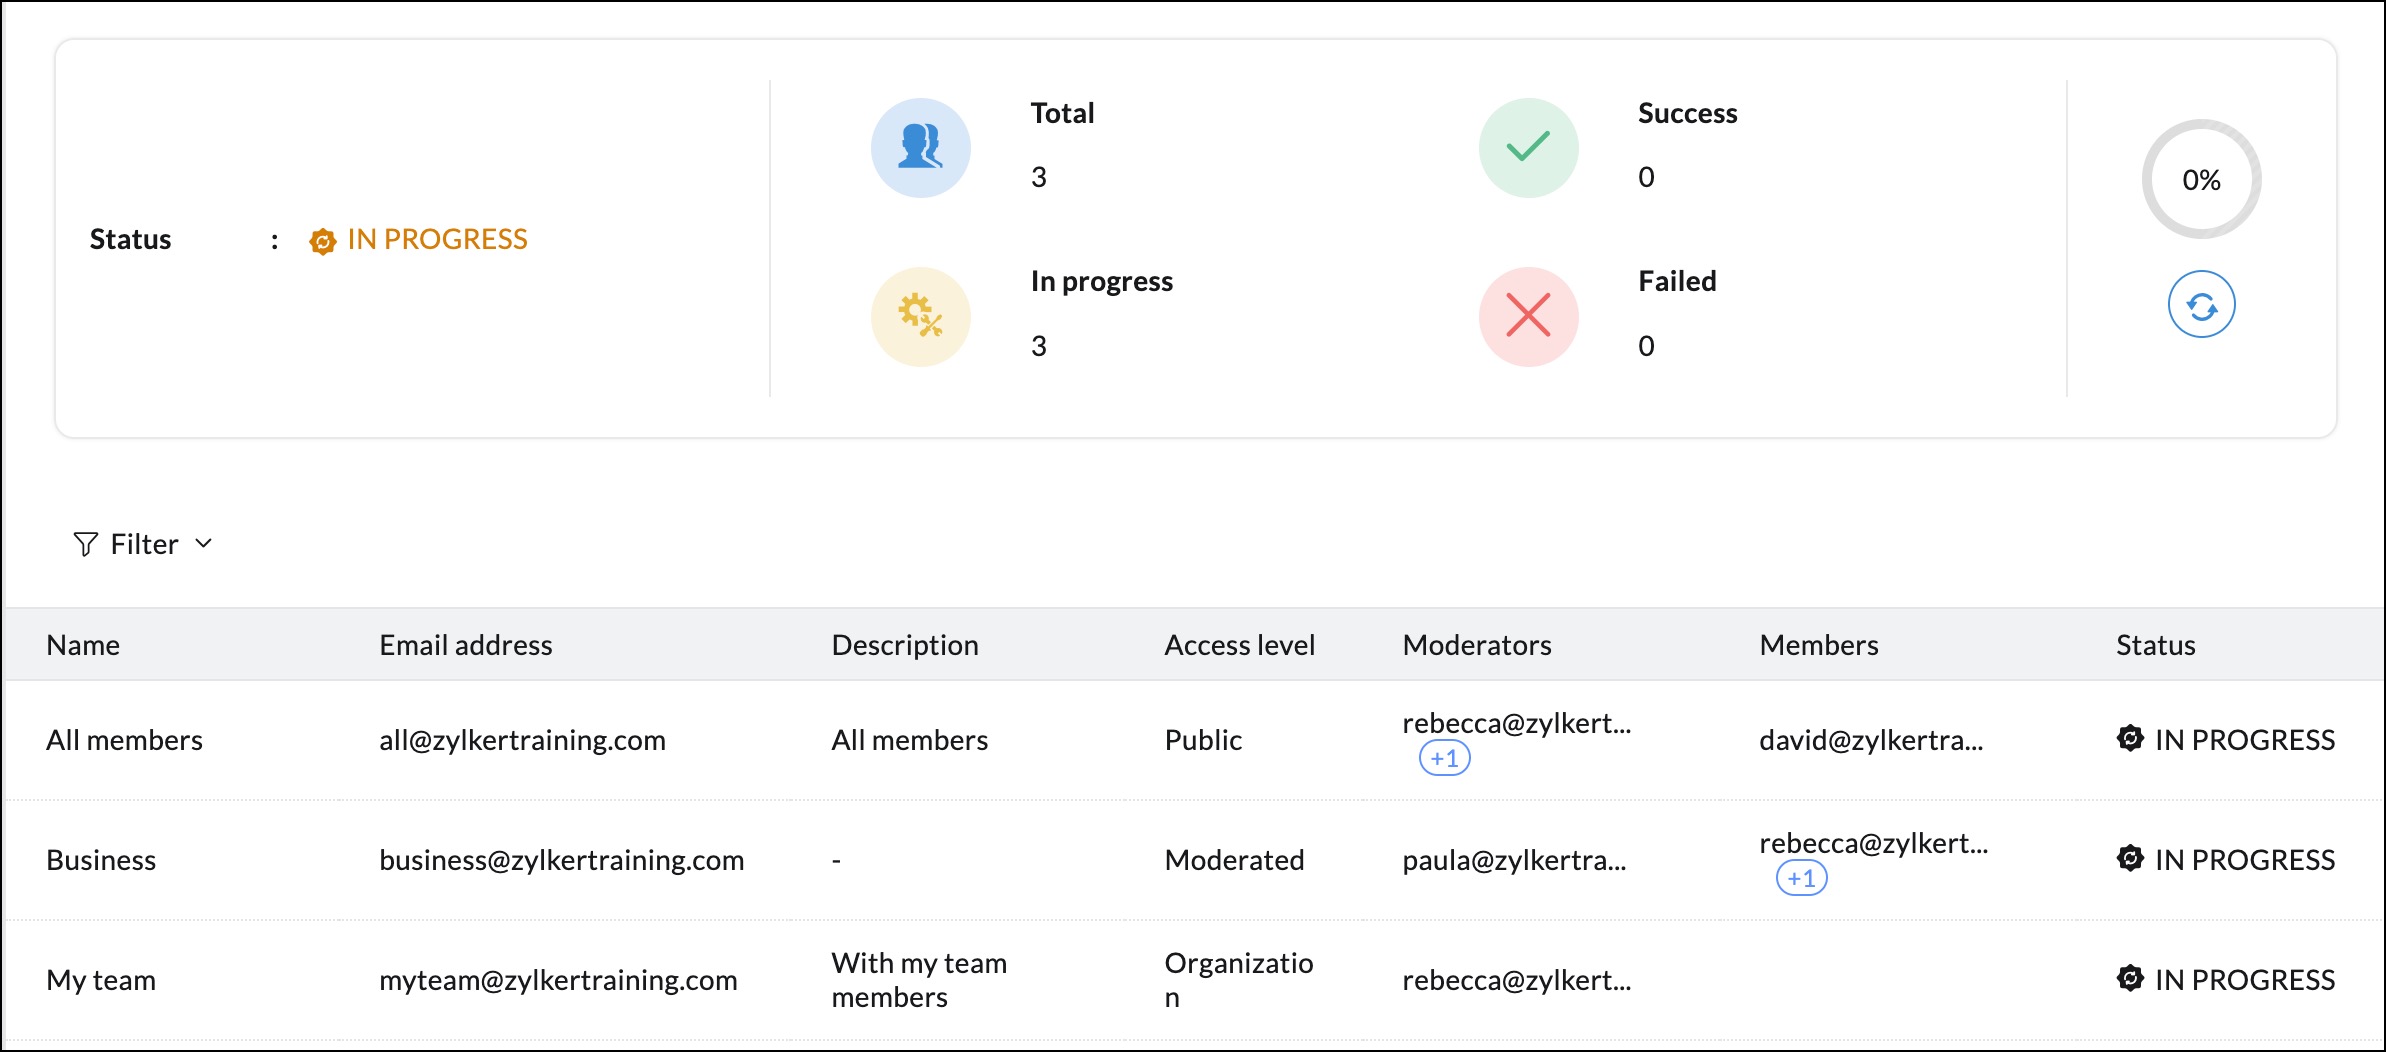
Select Groups on the left pane to view the import status for each group. Click Refresh to view the latest status. While importing multiple groups, you can use the Filter drop-down to narrow down the import status based on Completed, In Progress, or Failed.
Import Groups from Cloud Services
If your organization's groups are saved in a cloud service, you can directly import them to Zoho Mail. Select the cloud service in which your groups are stored:
Import from Google Workspace
- Log in to Zoho Mail Admin Console.
- Navigate to Groups and select Distribution List in the left pane.
- Click Import and choose Import from cloud services. The group import history (if any) appears.

- Select Google Workspace from the Add drop-down.
- If you have not authenticated your Zoho Mail account to access Google Workspace, follow the below steps:
- Sign in to your Google Workspace admin account, and follow the authentication details as given in the help page link.
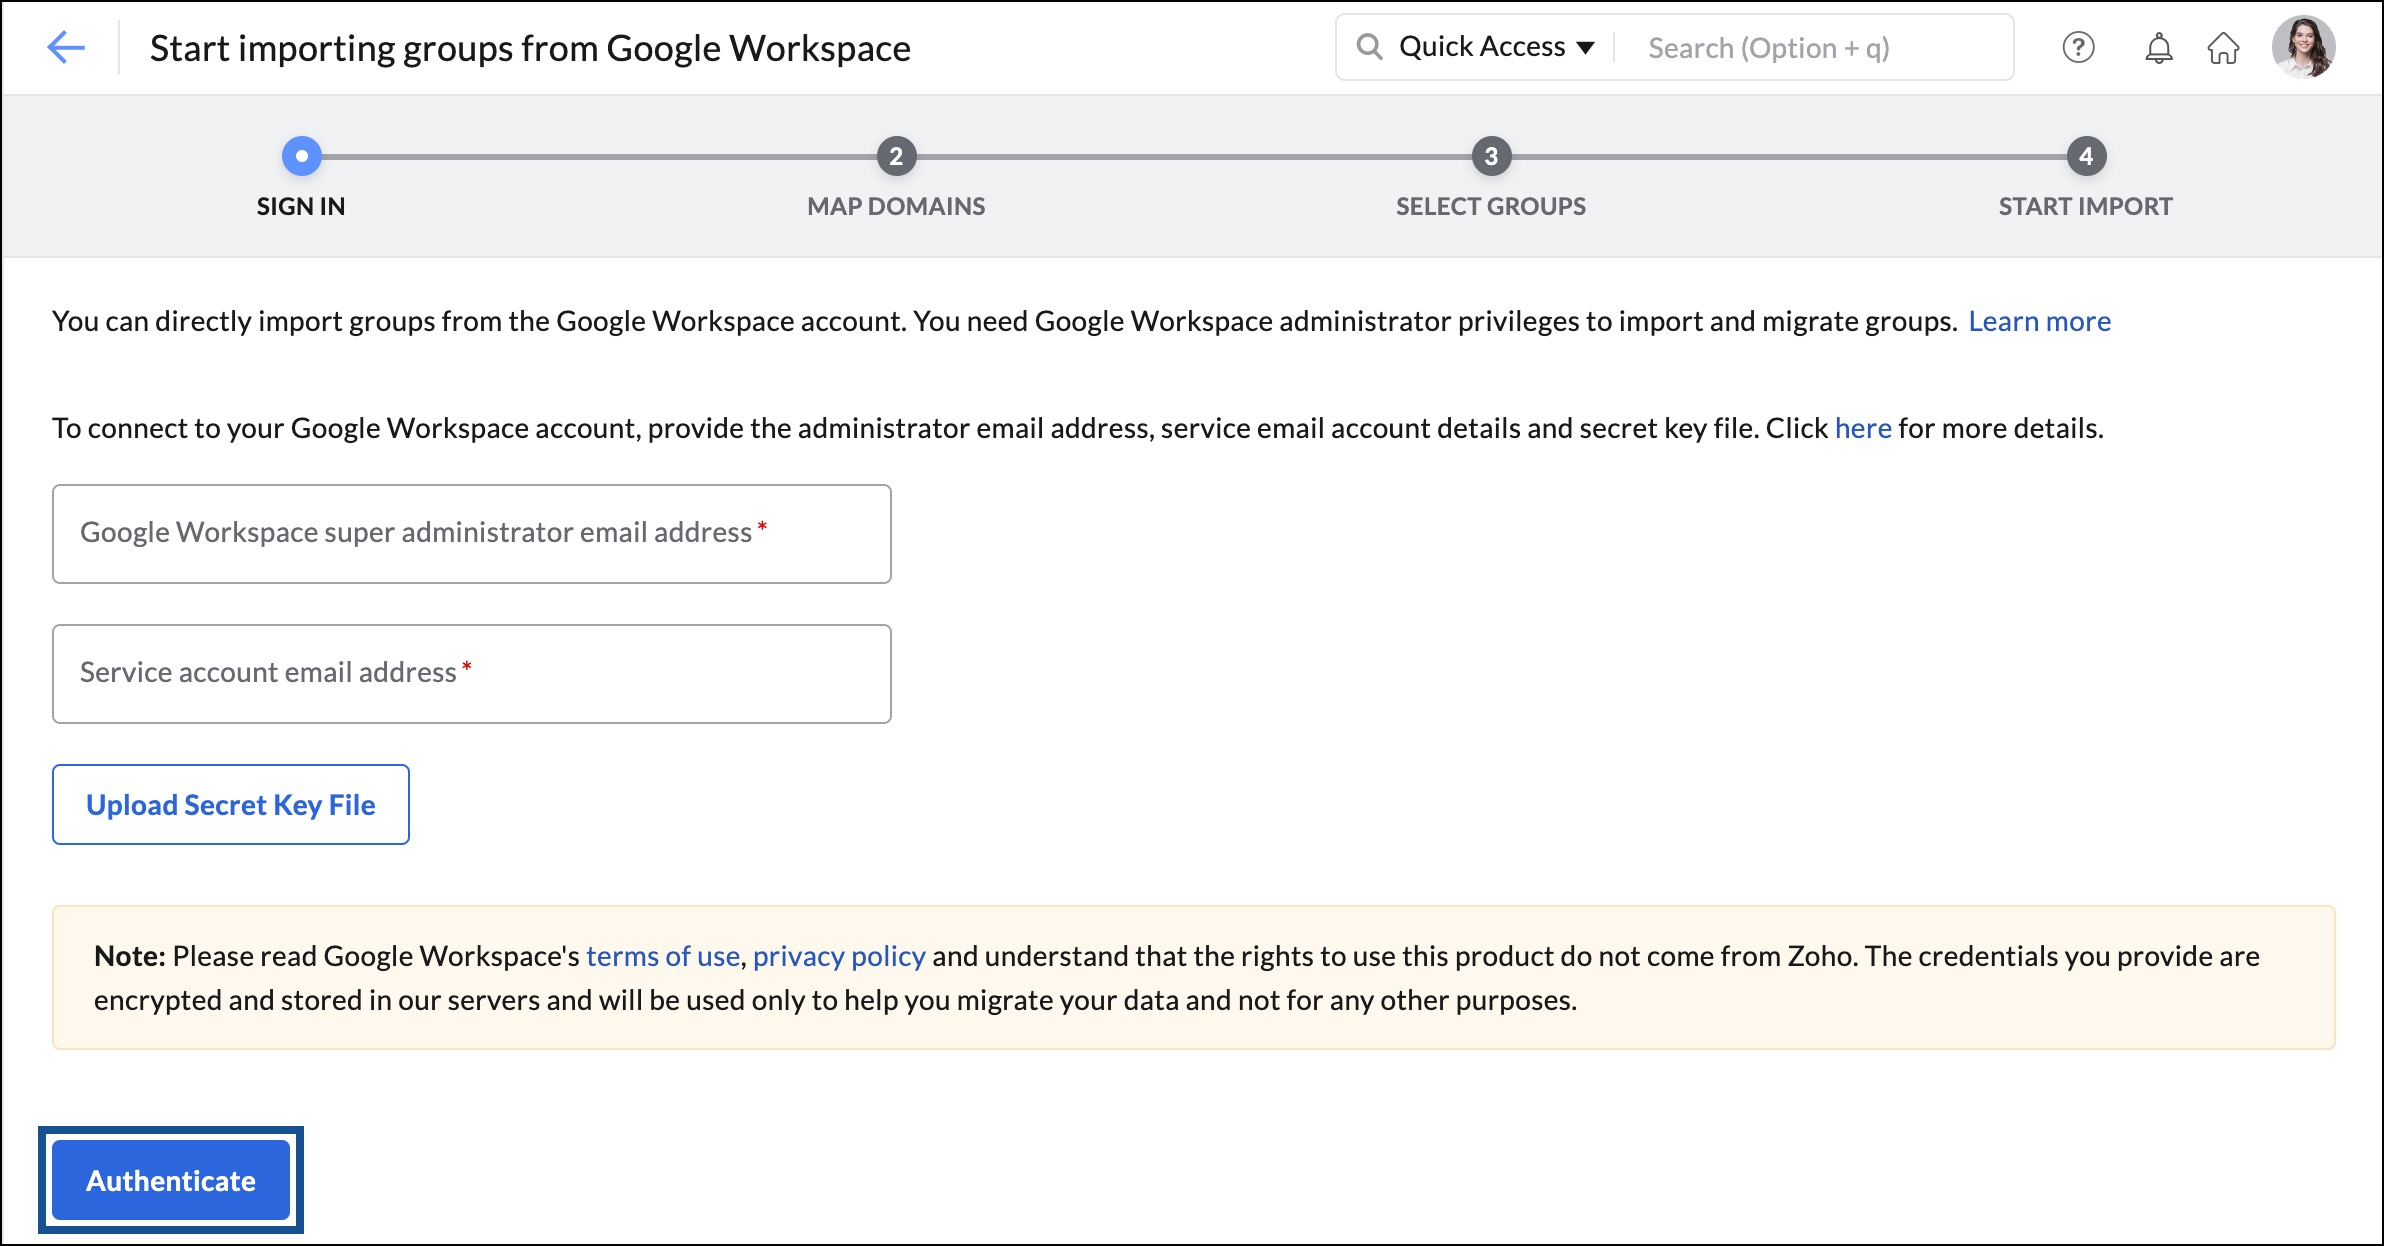
- Once the authentication is done, enter the Google Workspace super admin email address and the service account email address in the respective fields. Upload the file that was downloaded onto your system in the product key file field, and click Authenticate.
- If you have already authenticated your Google Workspace account with Zoho Mail, click the Add button.
- Select either All groups or Groups matching the criteria under Sync Groups section in CRITERIA step.
- If All groups is selected, click Proceed and navigate to the next step.
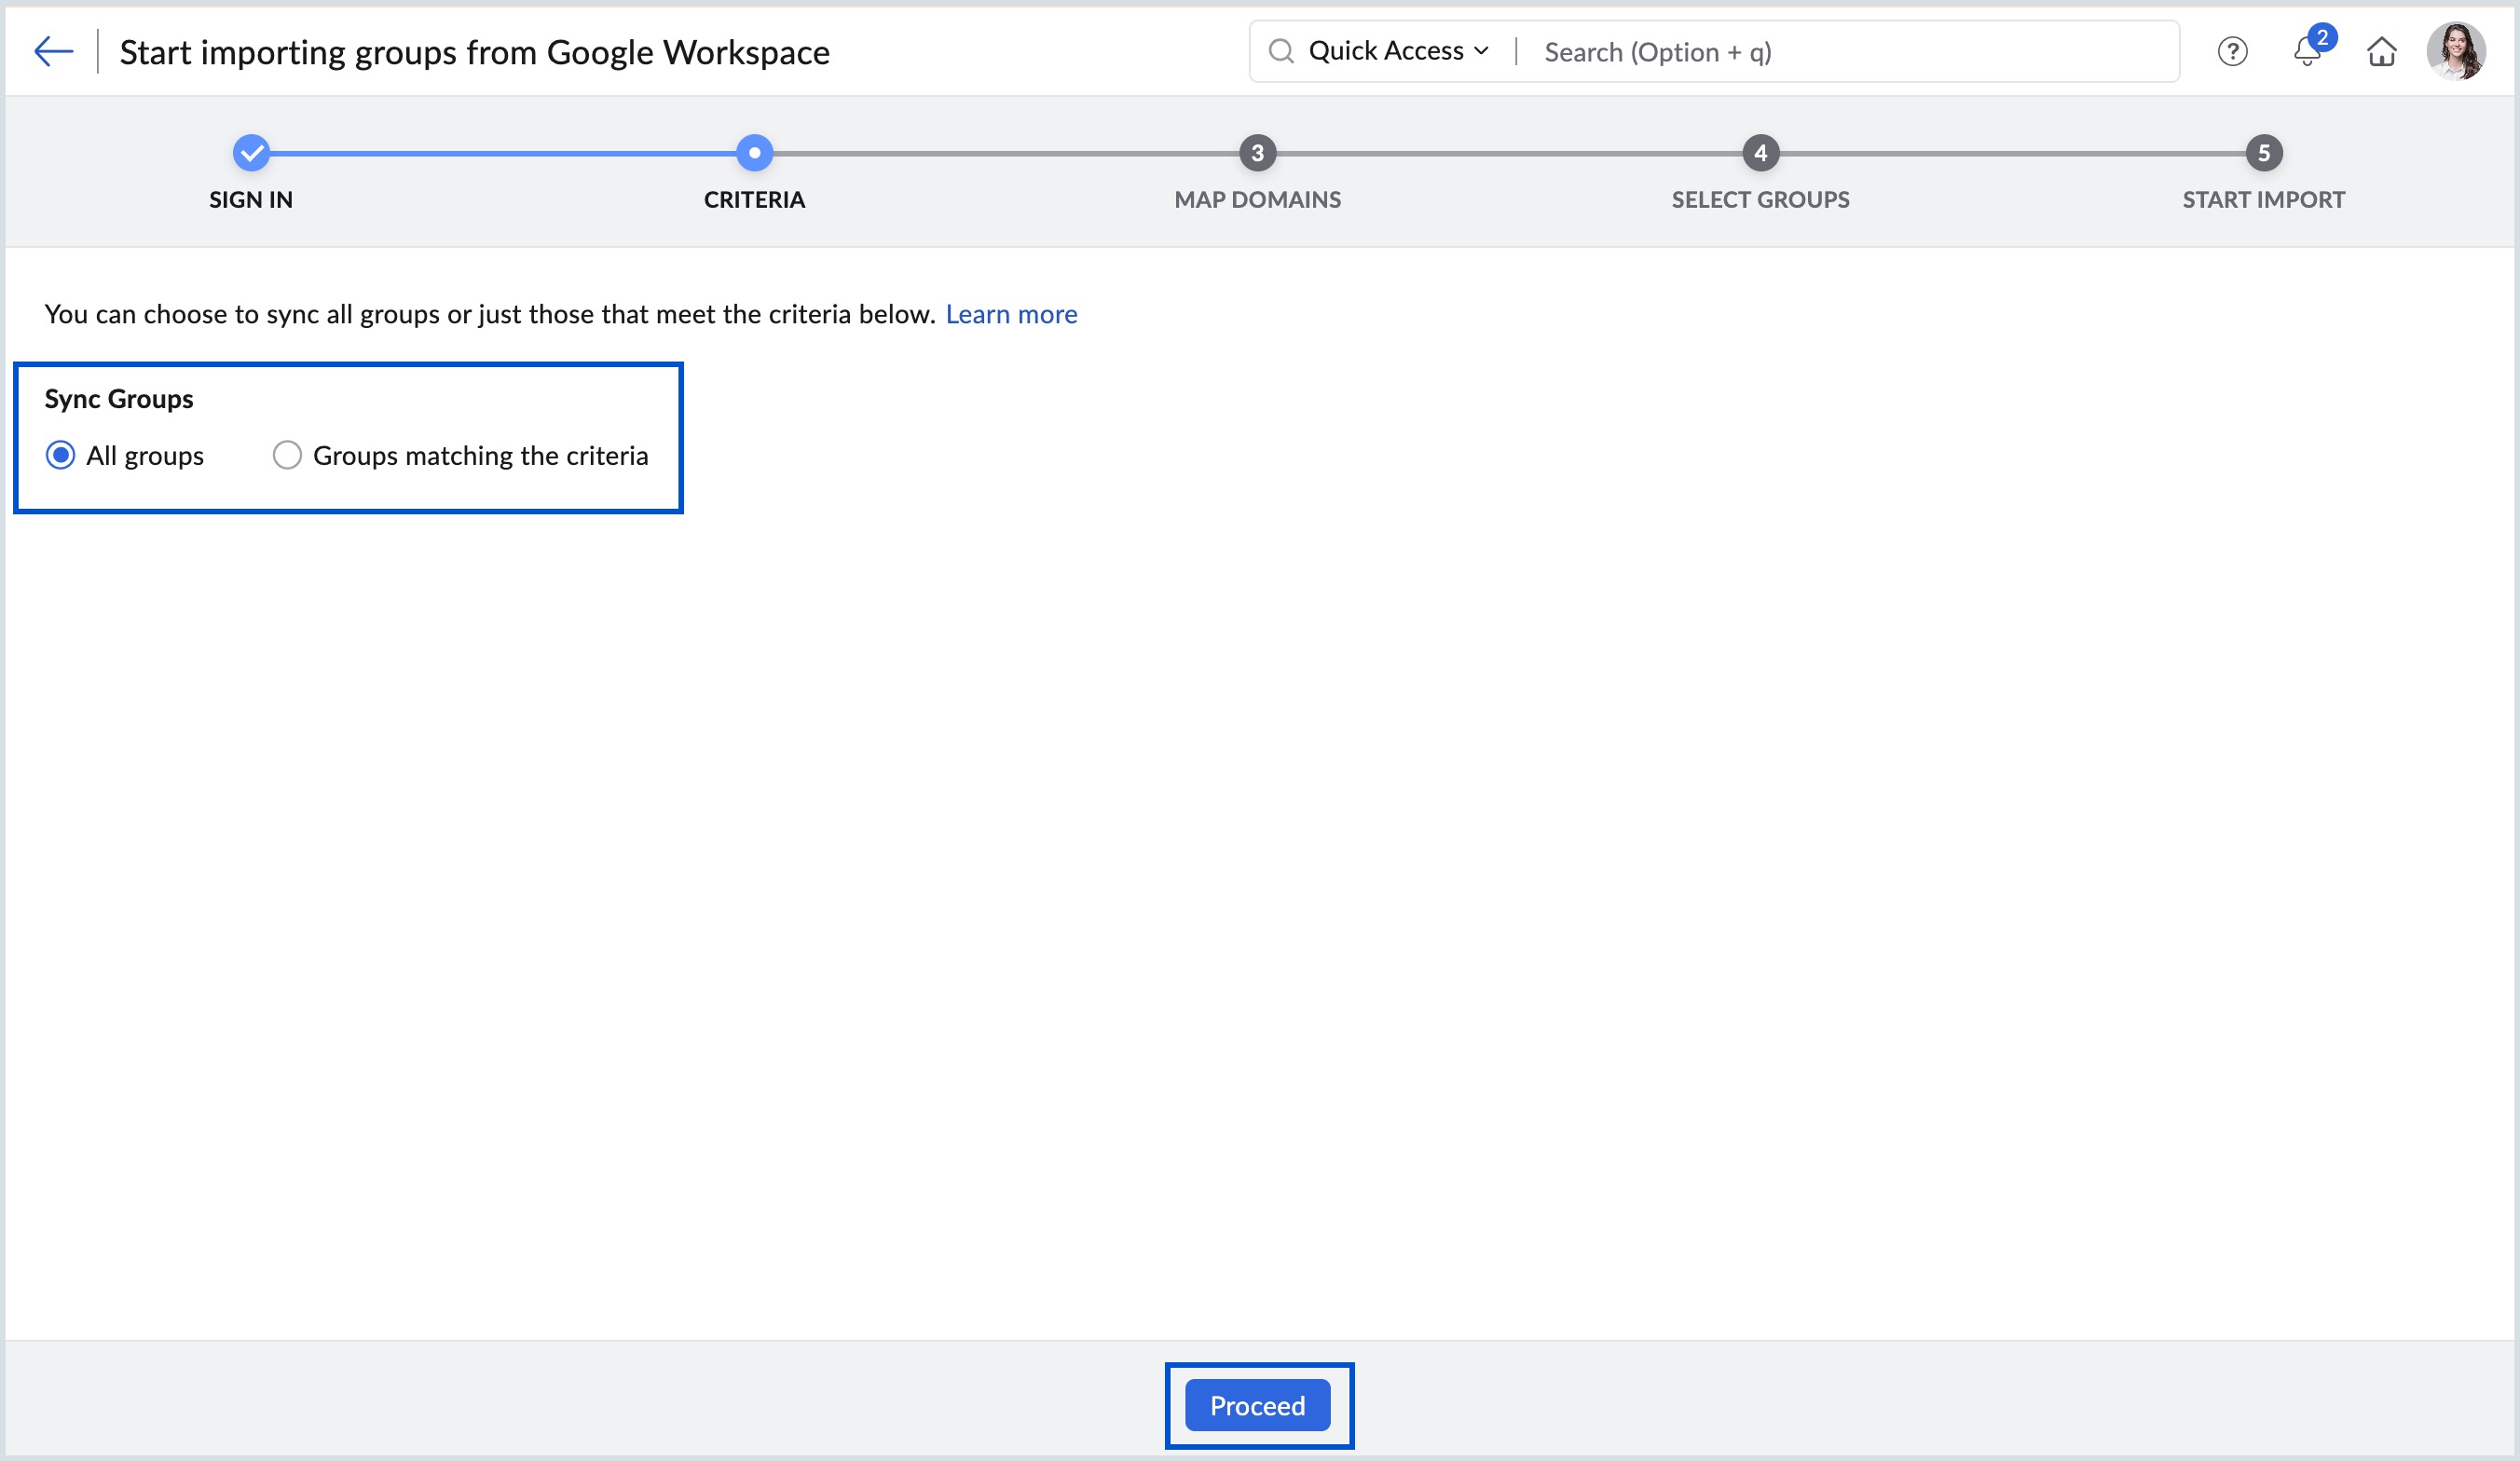
If Groups matching the criteria option is selected, enter all the conditions and operating parameters required and then click Proceed.
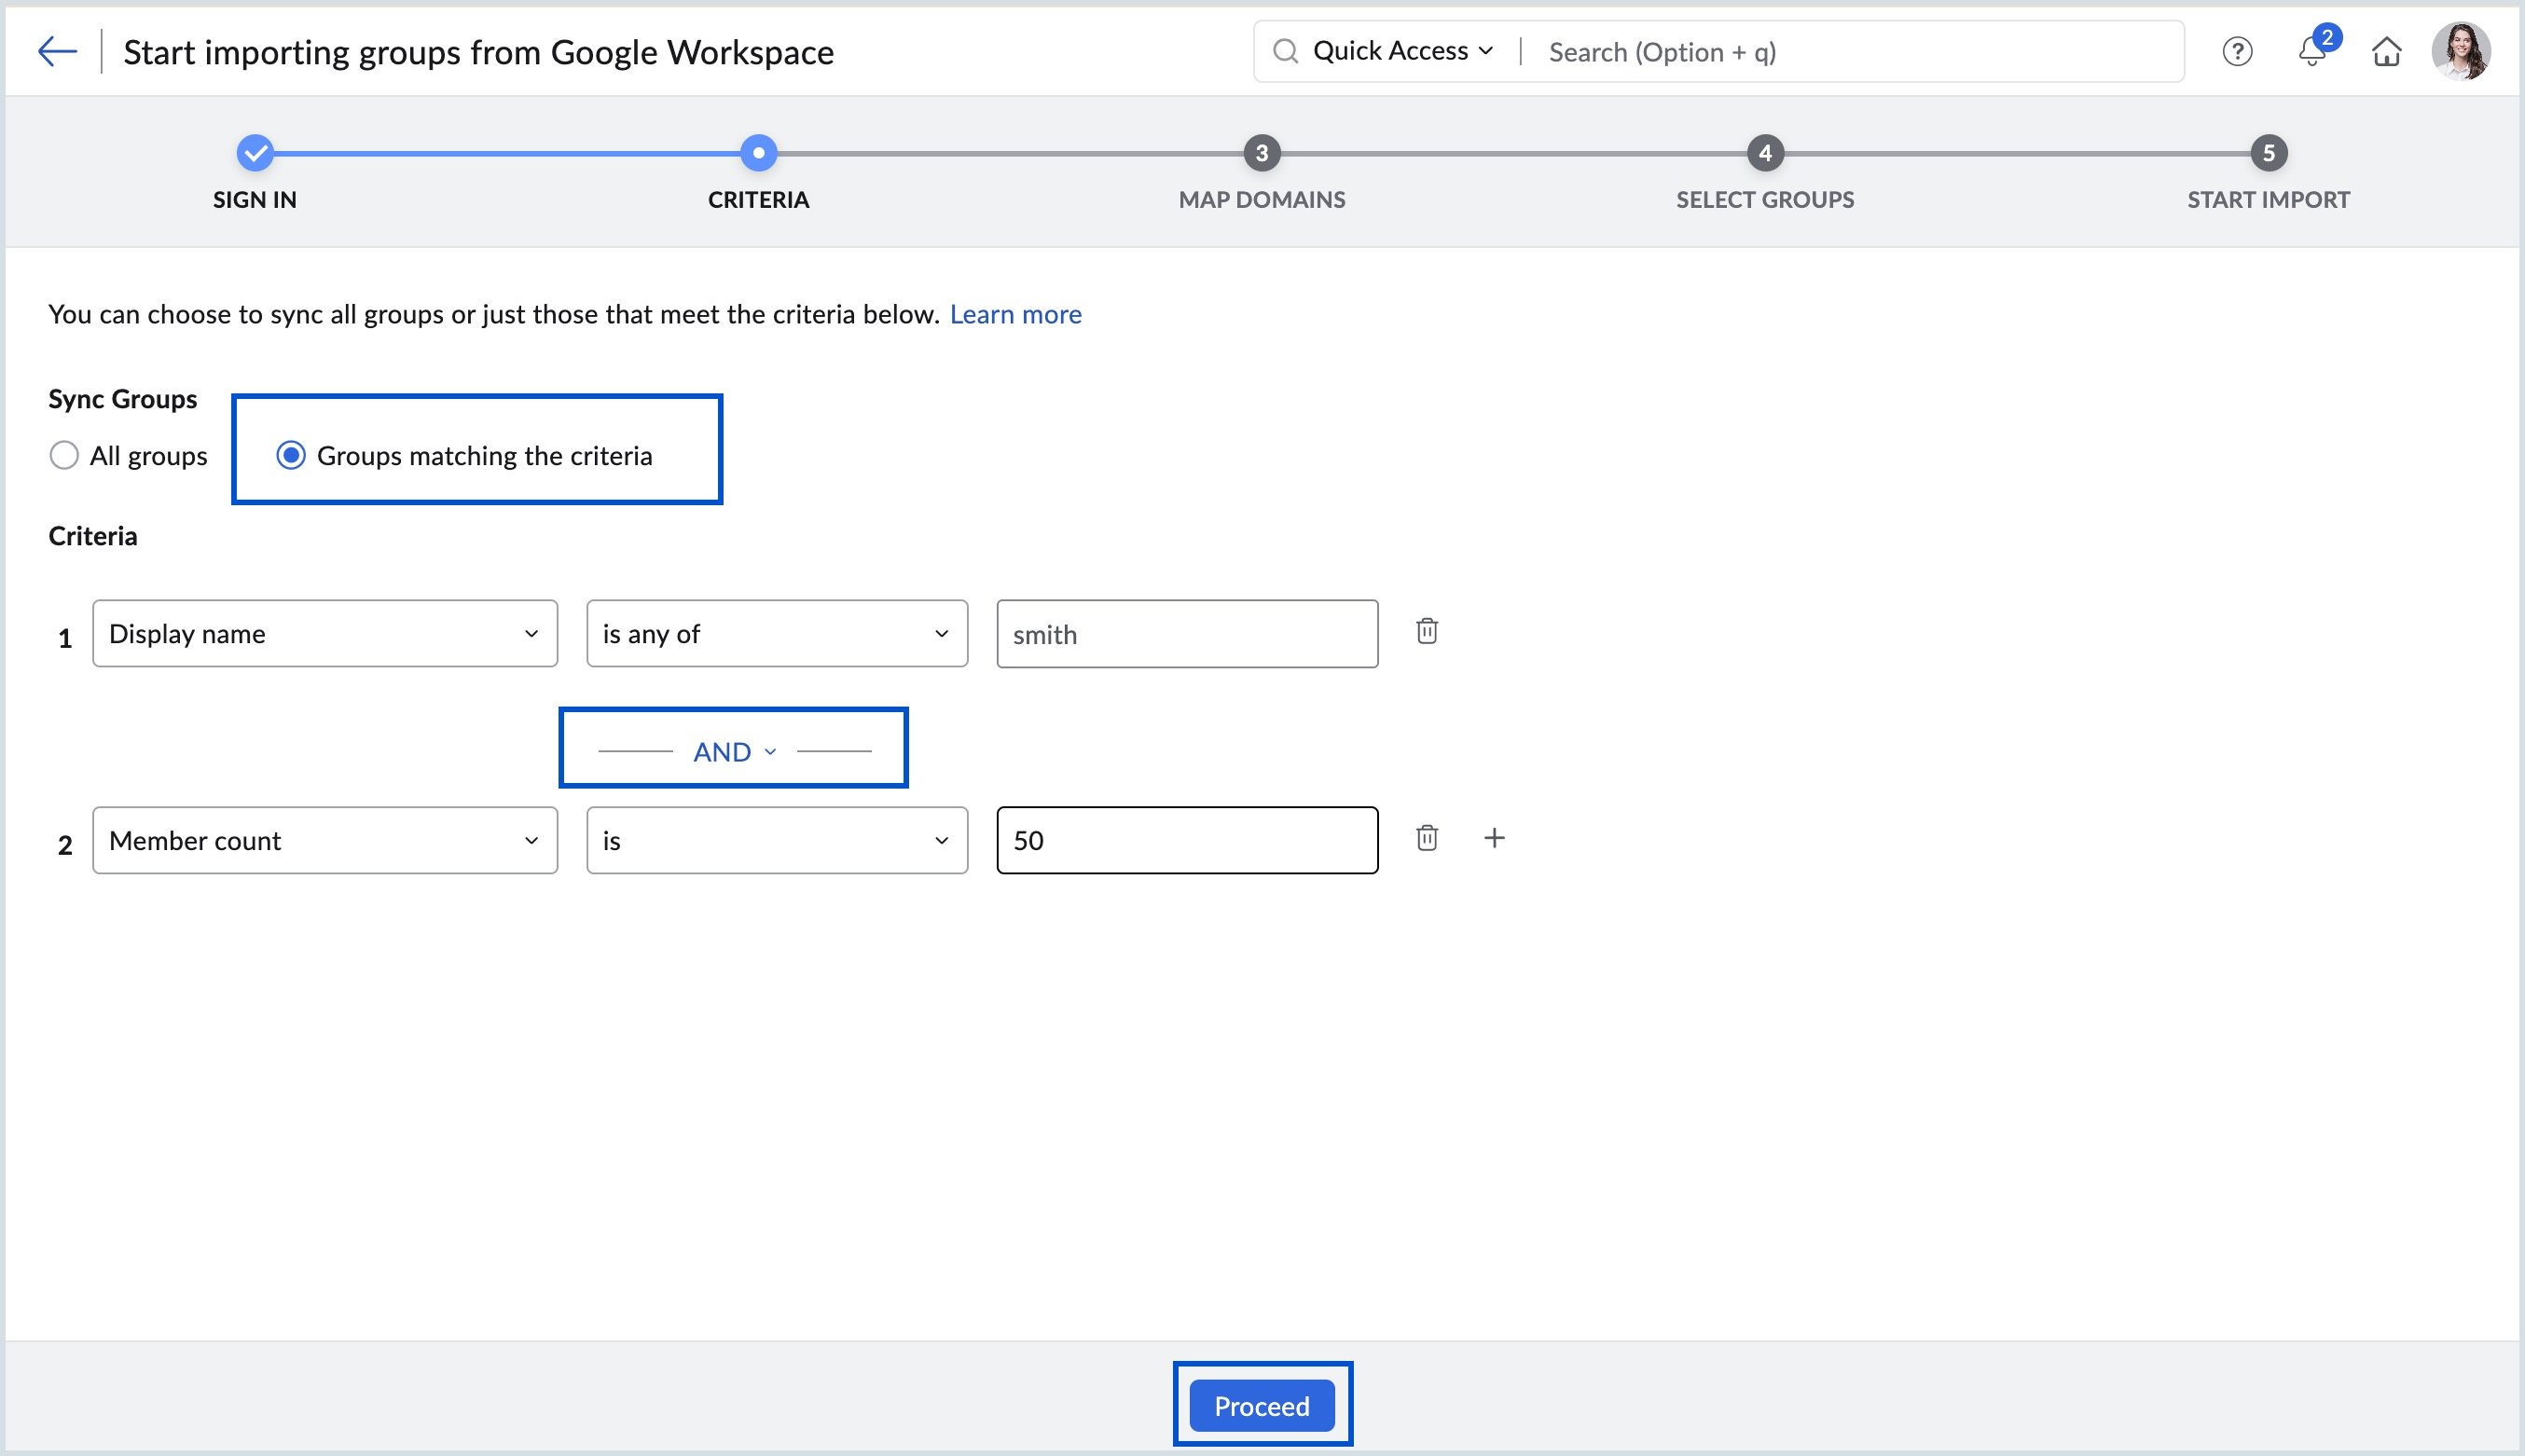
Note:
You can add a maximum of 20 conditions for the Groups matching the criteria option. You can select either AND or OR operator between the conditions.- Next, map the domains in Google Workspace to the verified domains in Zoho Mail and click Proceed. All the groups created with the verified domain under the Google Workspace account gets listed.
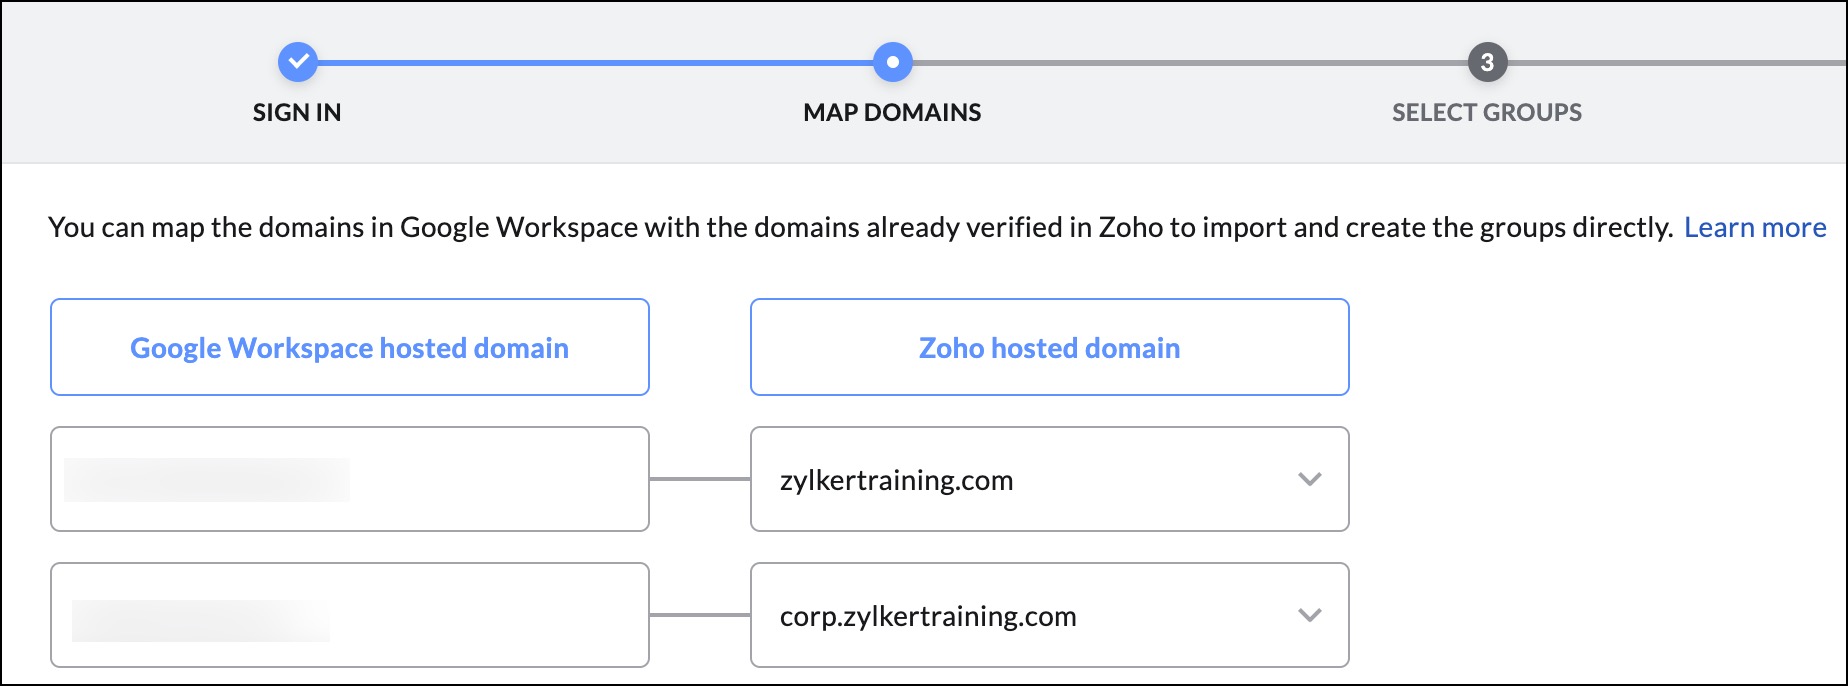
- Select the groups you wish to import and click Proceed.
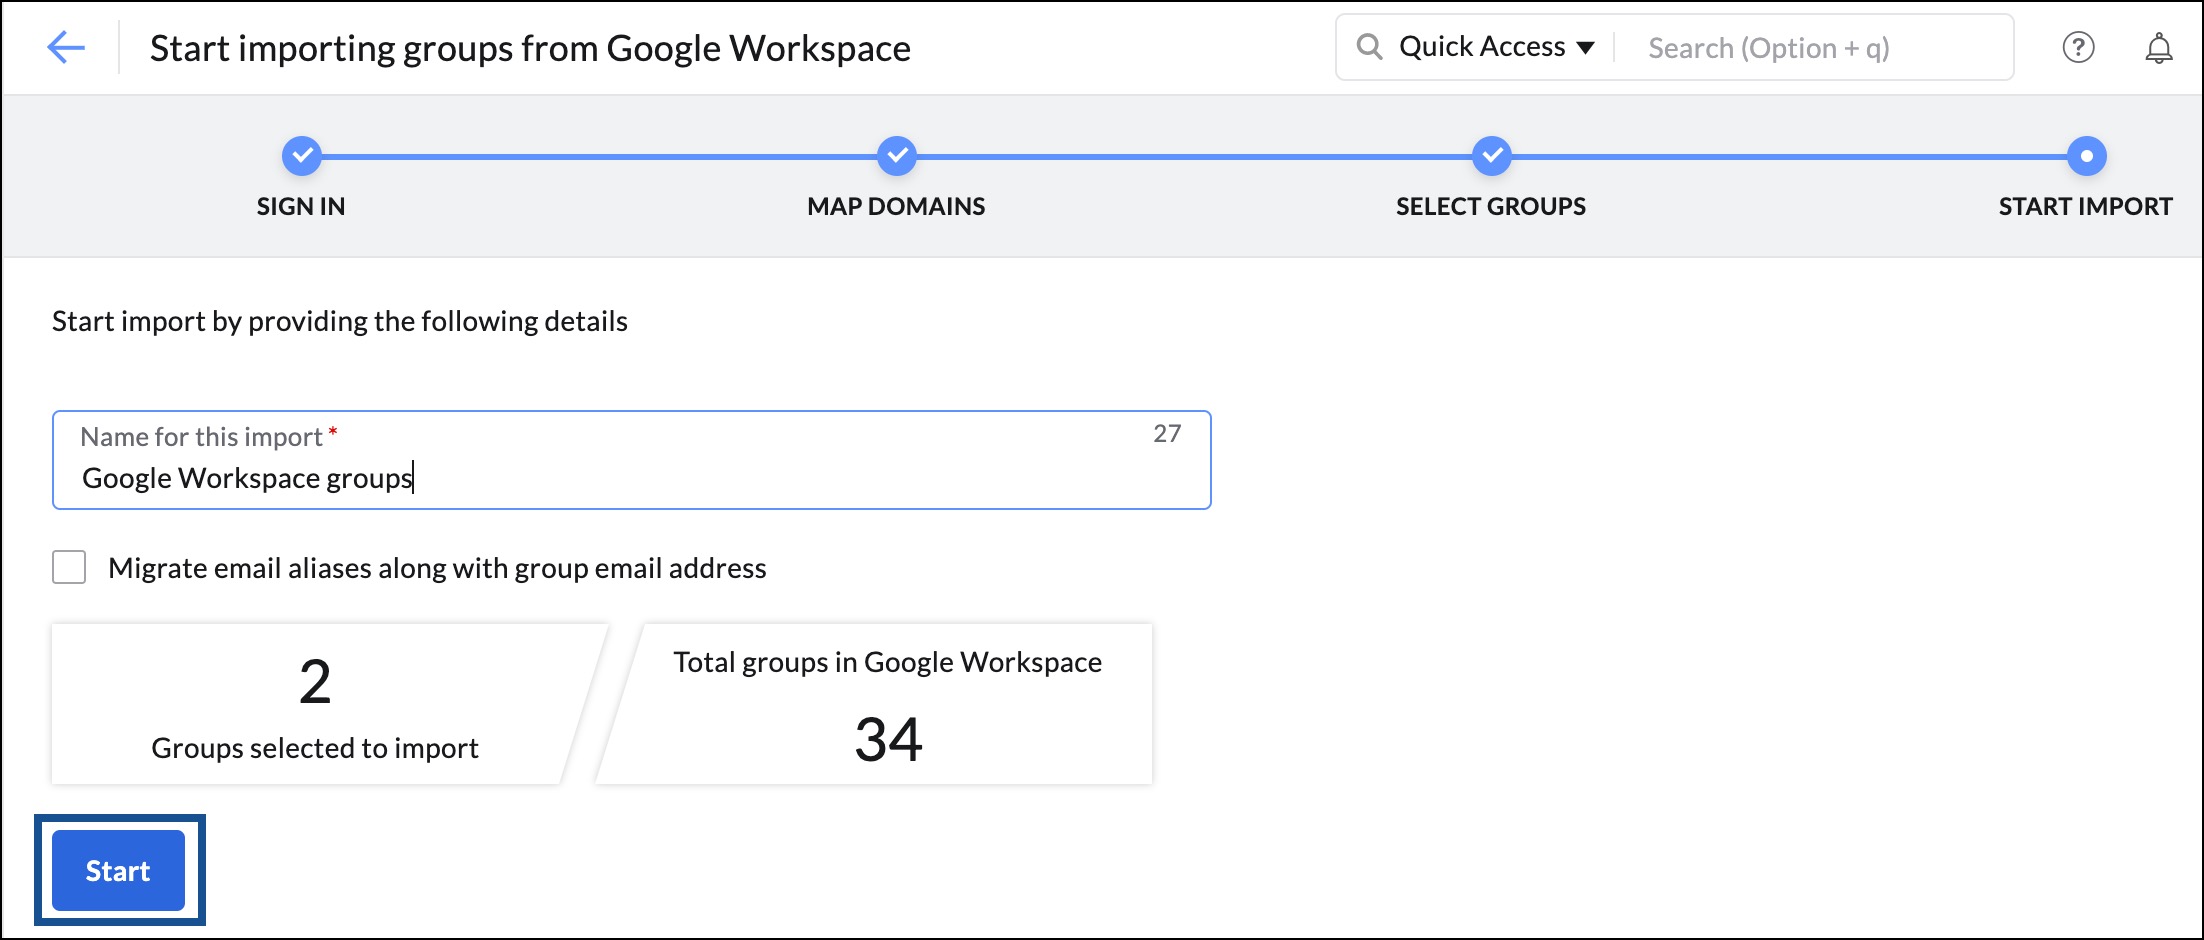
- Provide a name for the import.
- If required, select the Migrate email aliases along with group email address option and click Start.
Import Groups from Microsoft 365
Follow these steps to import groups from your Microsoft 365 account:
- Log in to Zoho Mail Admin Console.
- Navigate to Groups and select Distribution List in the left pane.
- Click Import and select Import from cloud services. The group import history (if any) appears.

- Select Microsoft 365 from the Import drop-down.
- Click Sign In and authenticate with your Microsoft 365 admin credentials.
- If you have already authenticated your Microsoft 365 account with Zoho, click Add.

- Select either All groups or Groups matching the criteria under Sync Groups section in CRITERIA step.
- If All groups is selected, click Proceed and navigate to the next step.
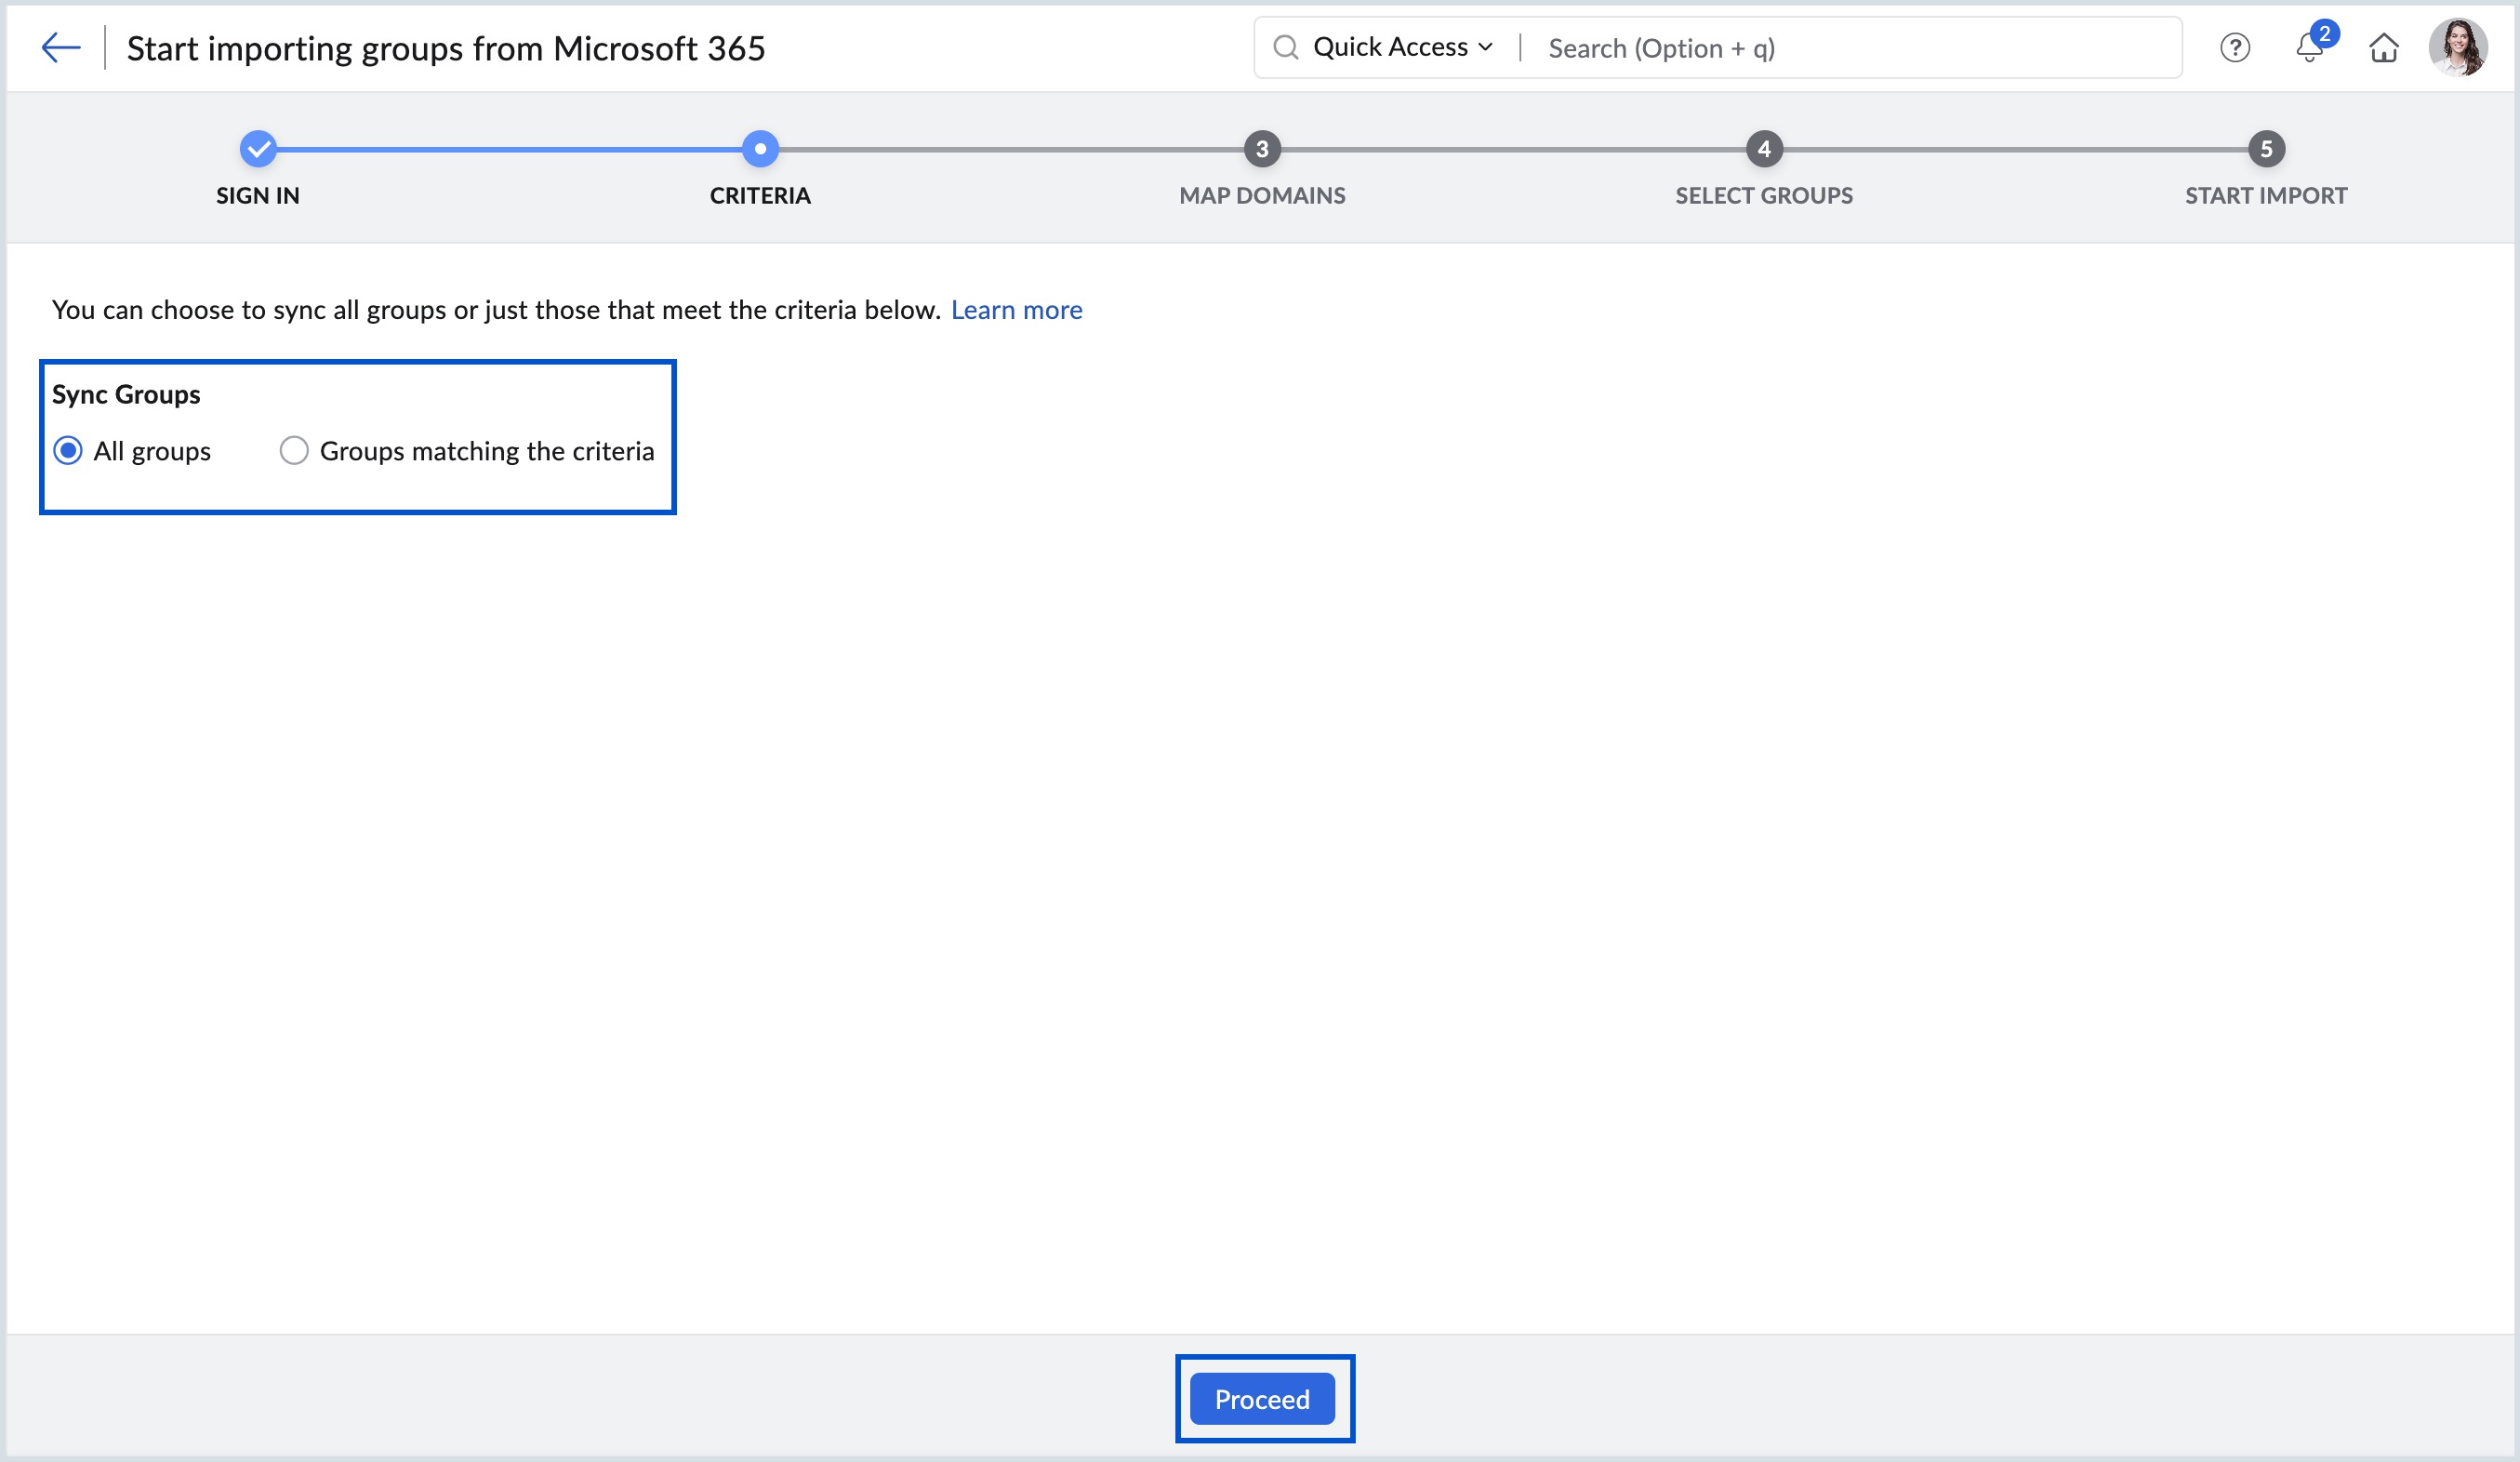
If Groups matching the criteria option is selected, enter all the conditions and operating parameters required and then click Proceed.
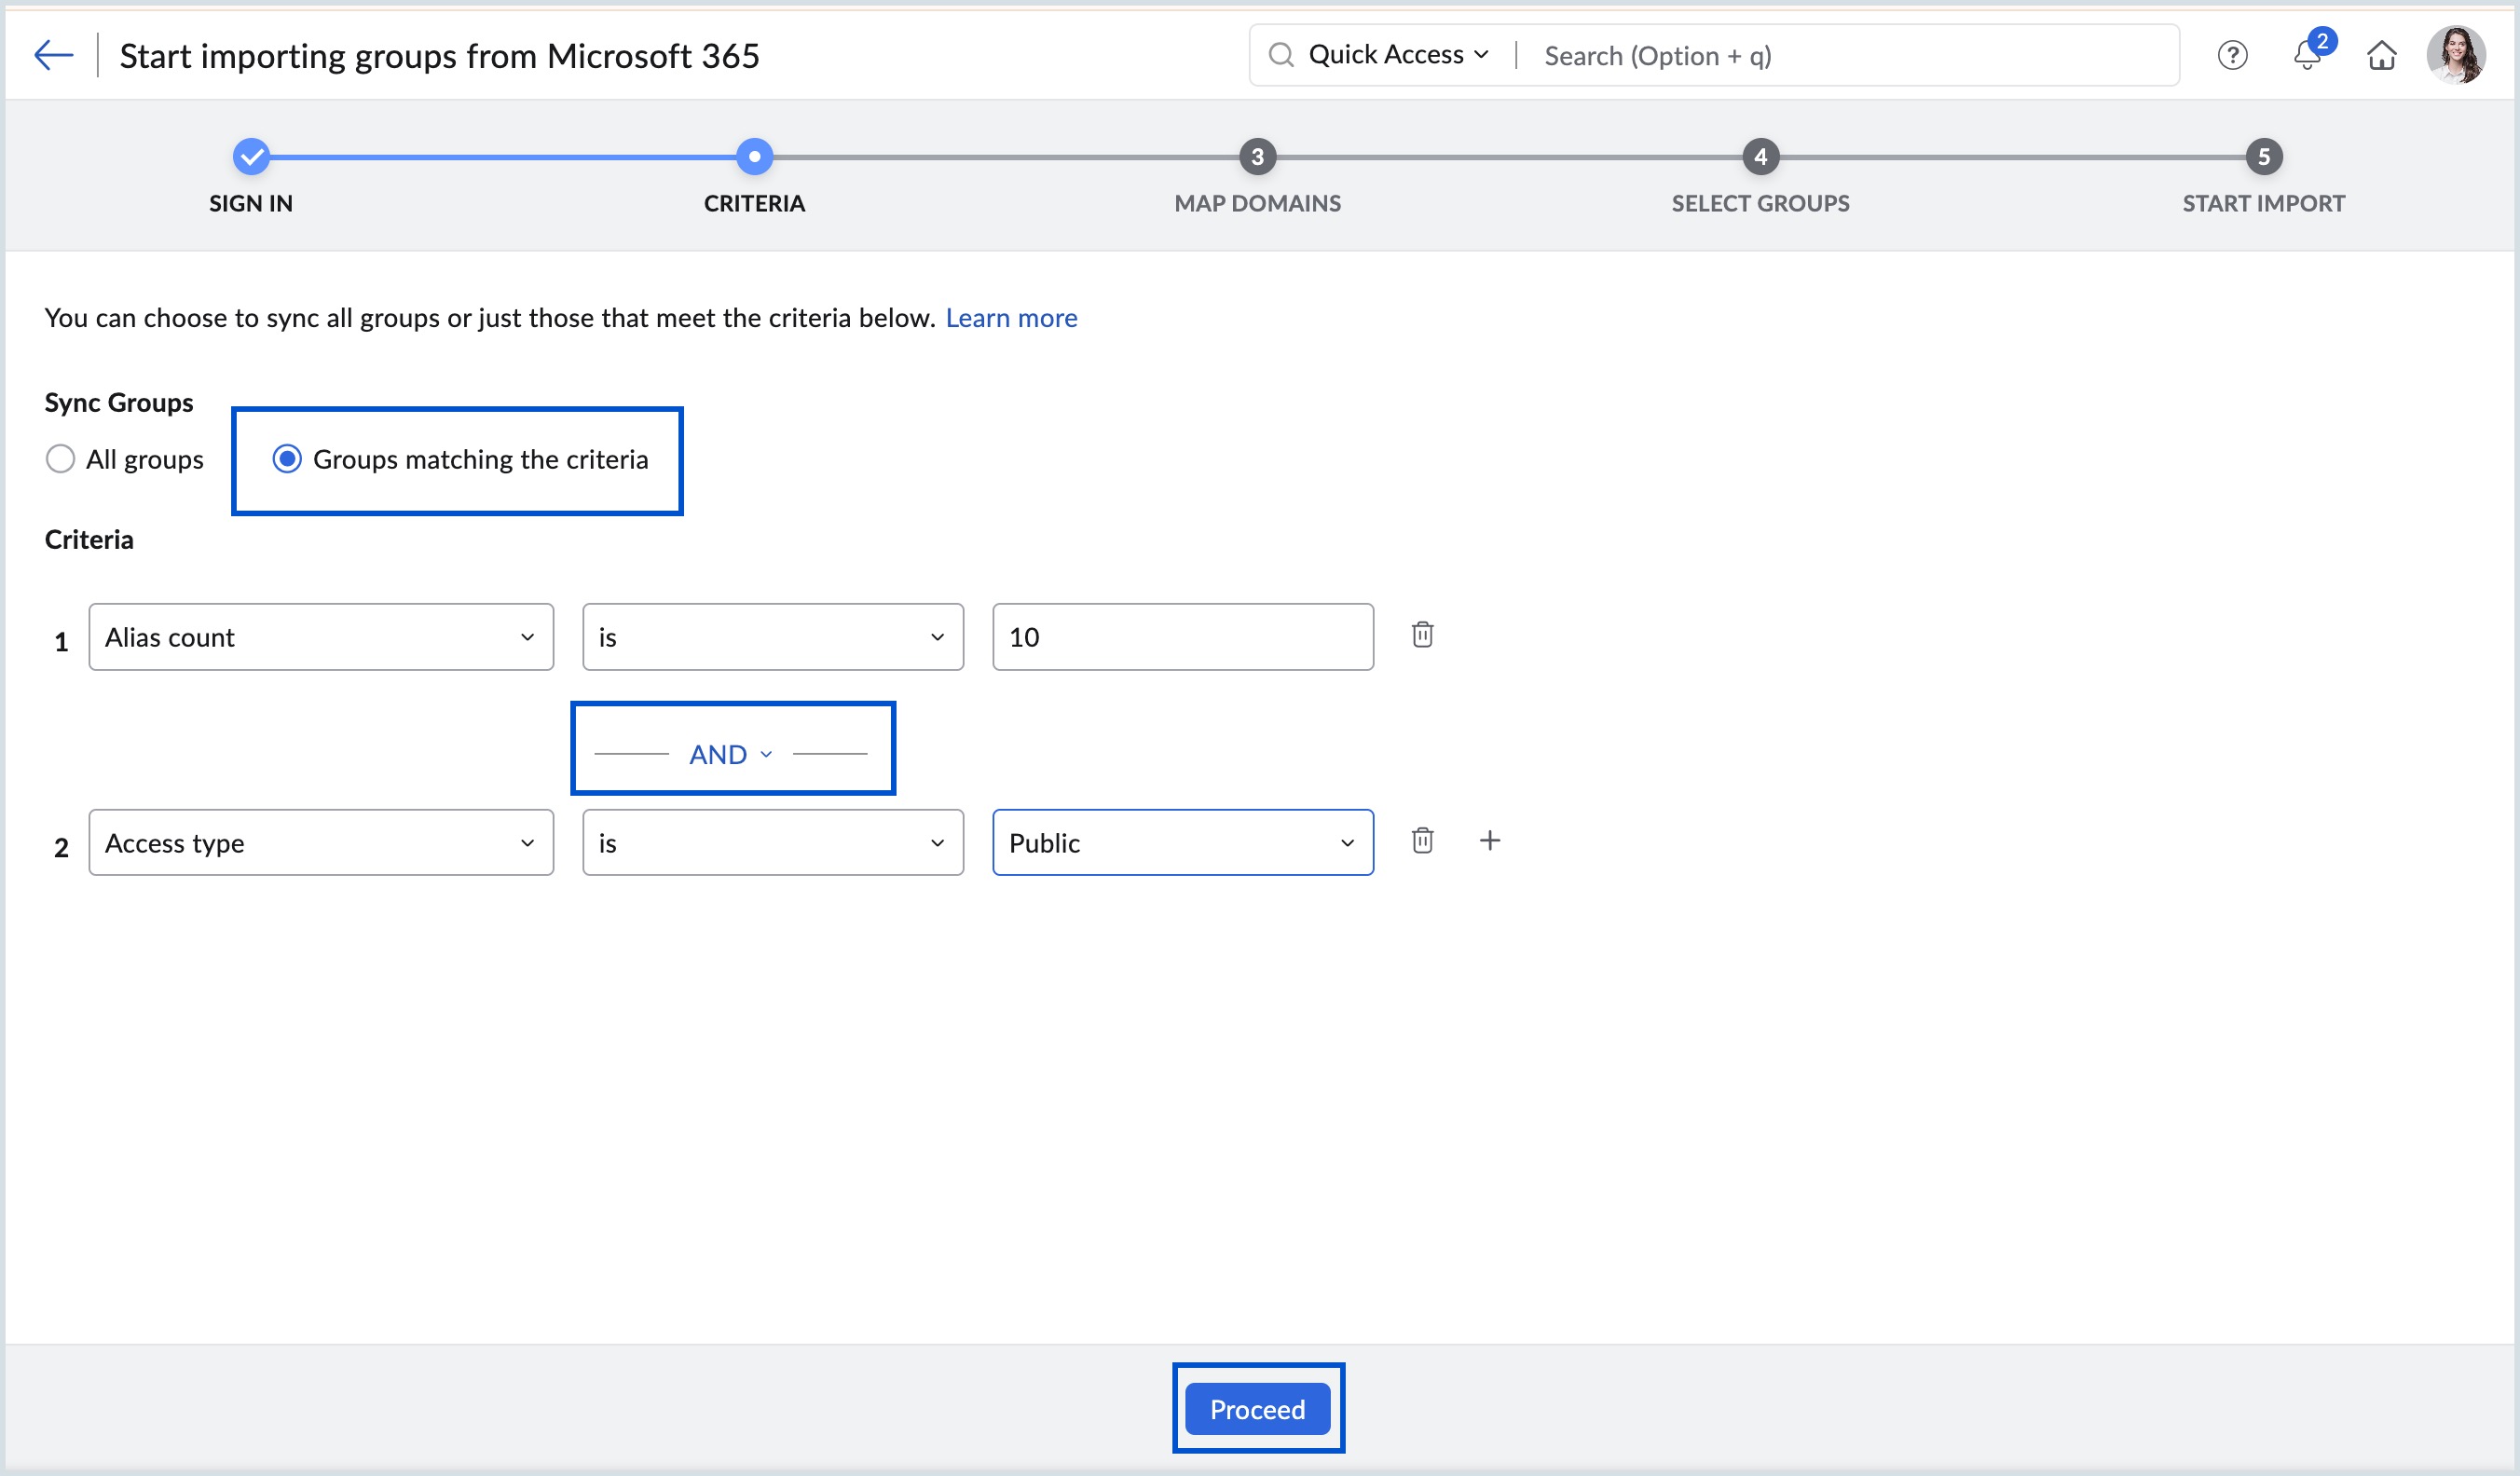
Note:
You can add a maximum of 20 conditions for the Groups matching the criteria option. You can select either AND or OR operator between the conditions.- Map the domains in Microsoft 365 hosted domain to the verified domains in Zoho Mail and click Proceed. All the groups created with the verified domain will be listed here.
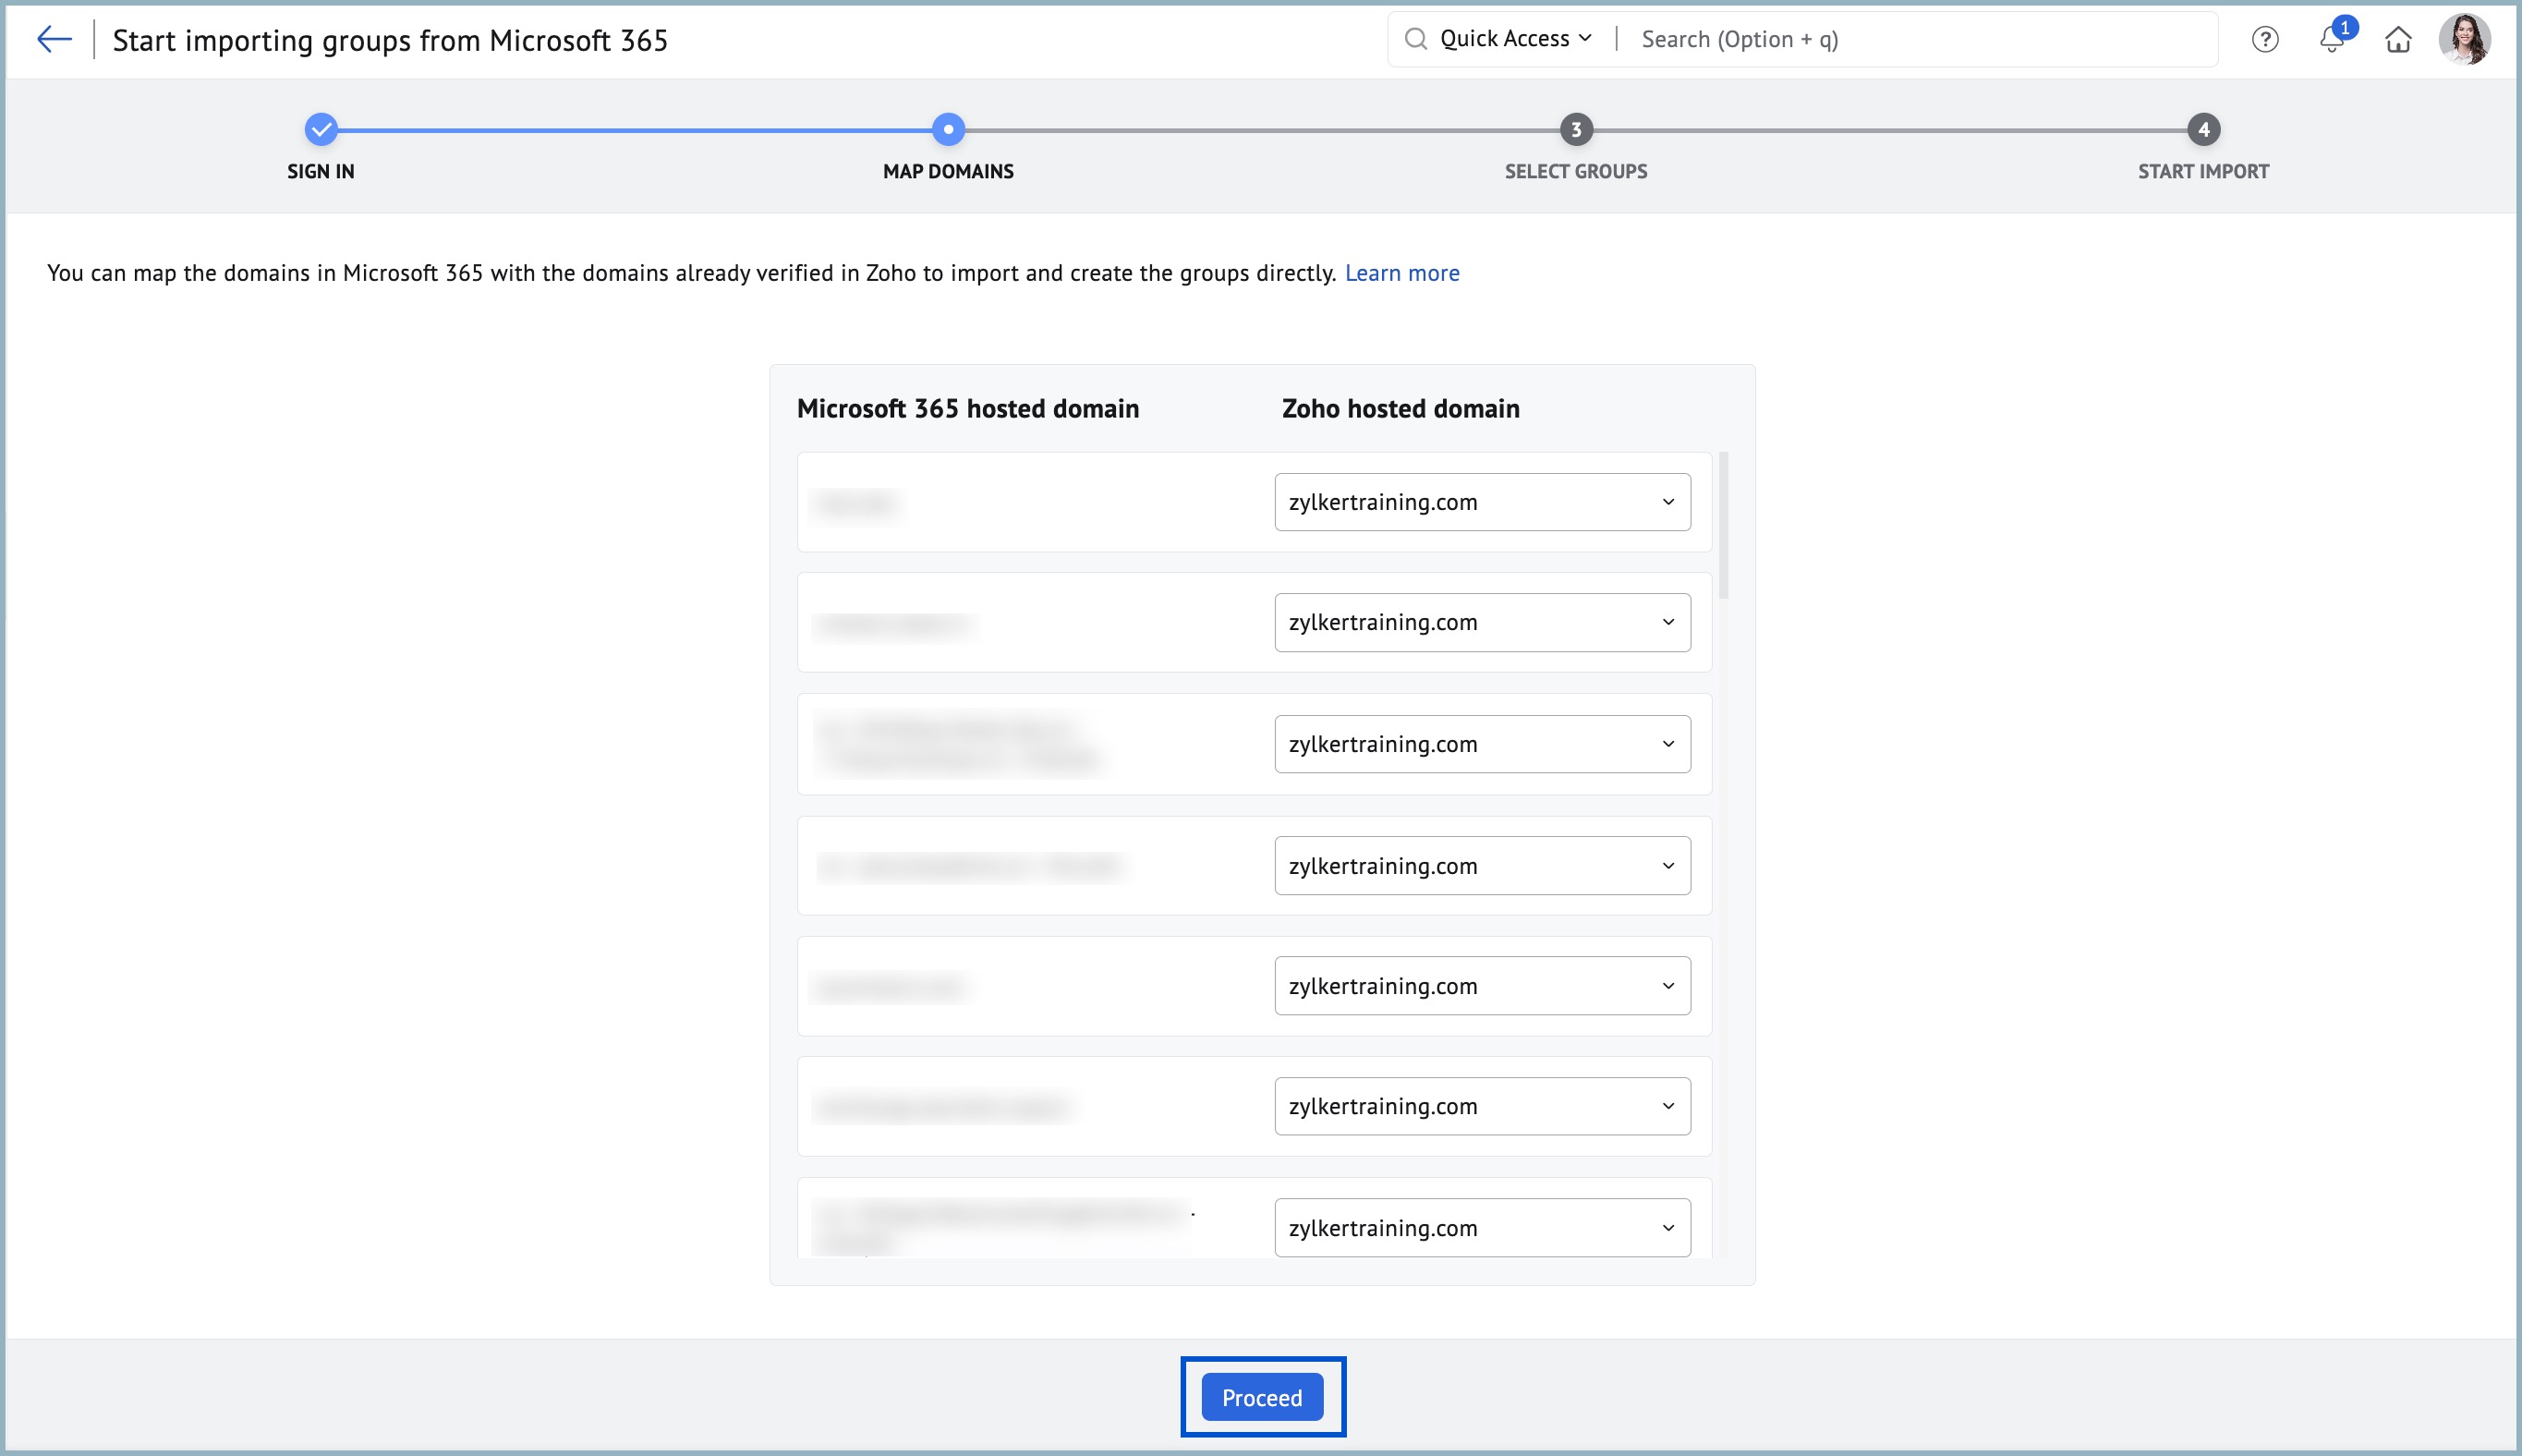
- Selected the groups you wish to import and click Proceed.
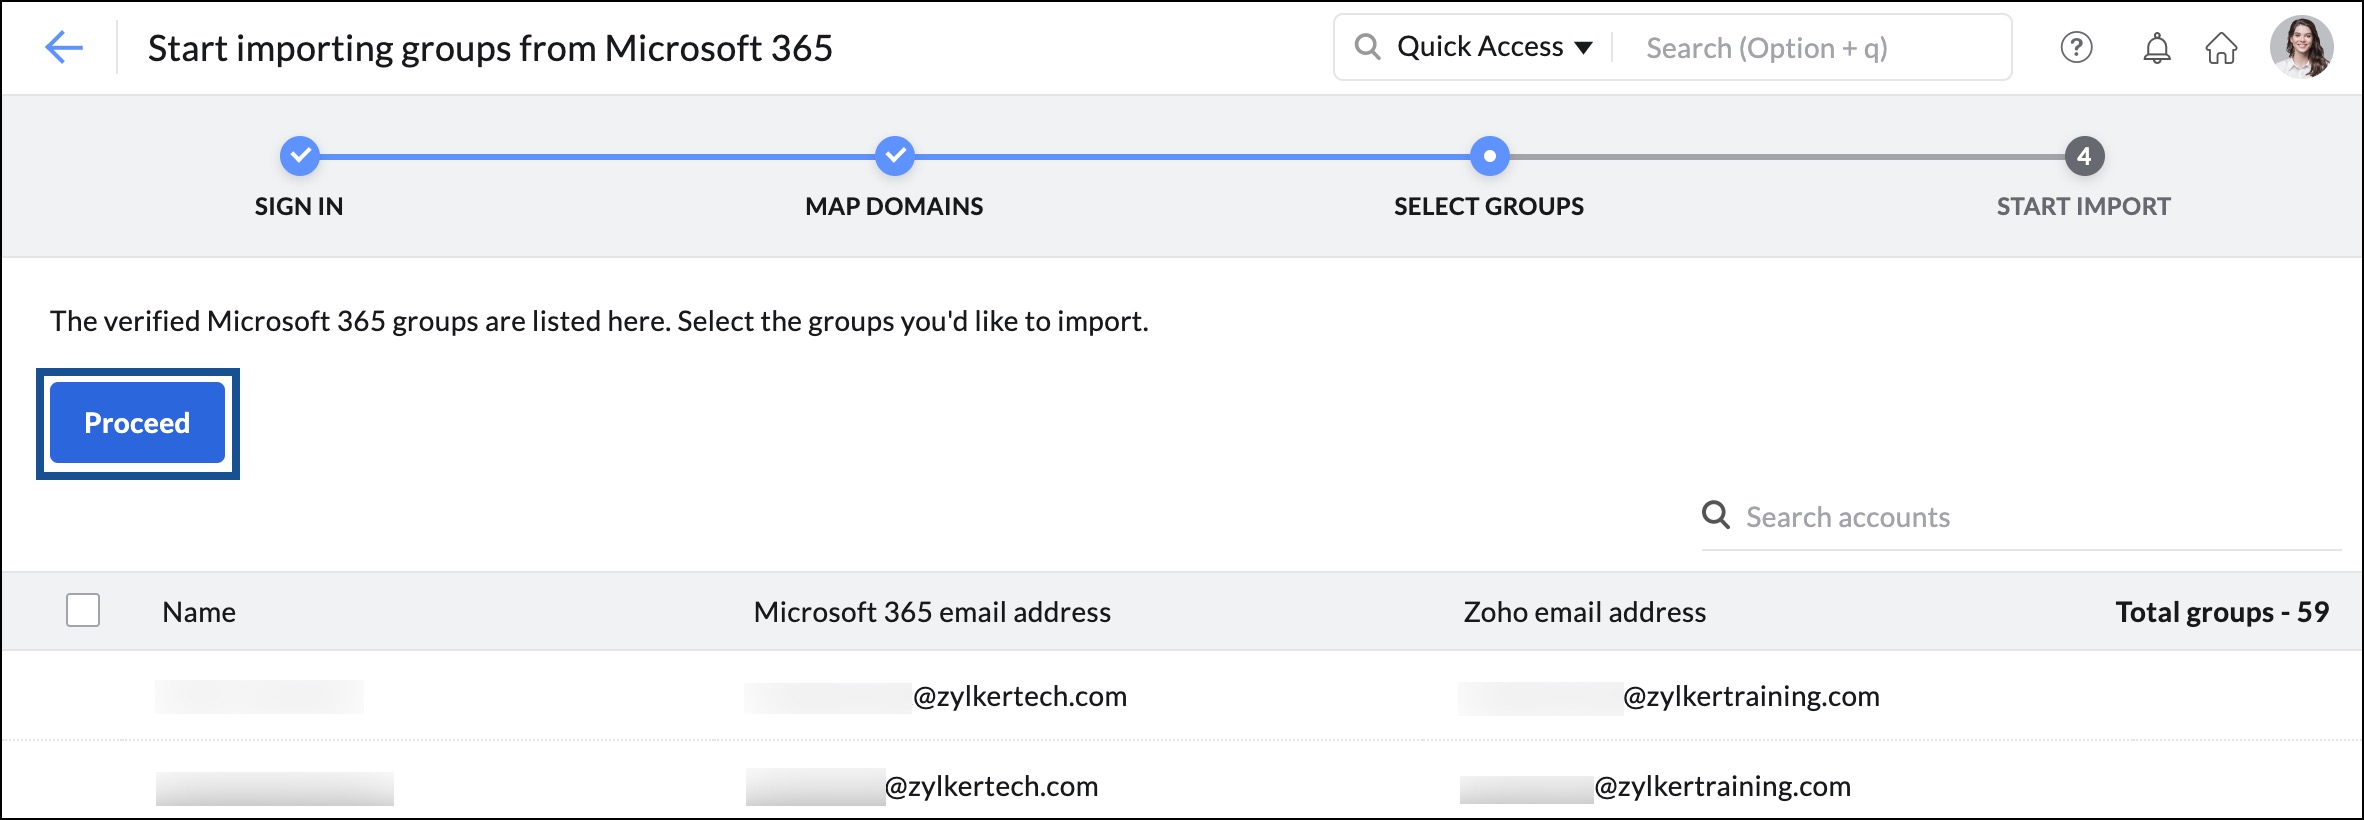
- Provide a name for the import and click Start.
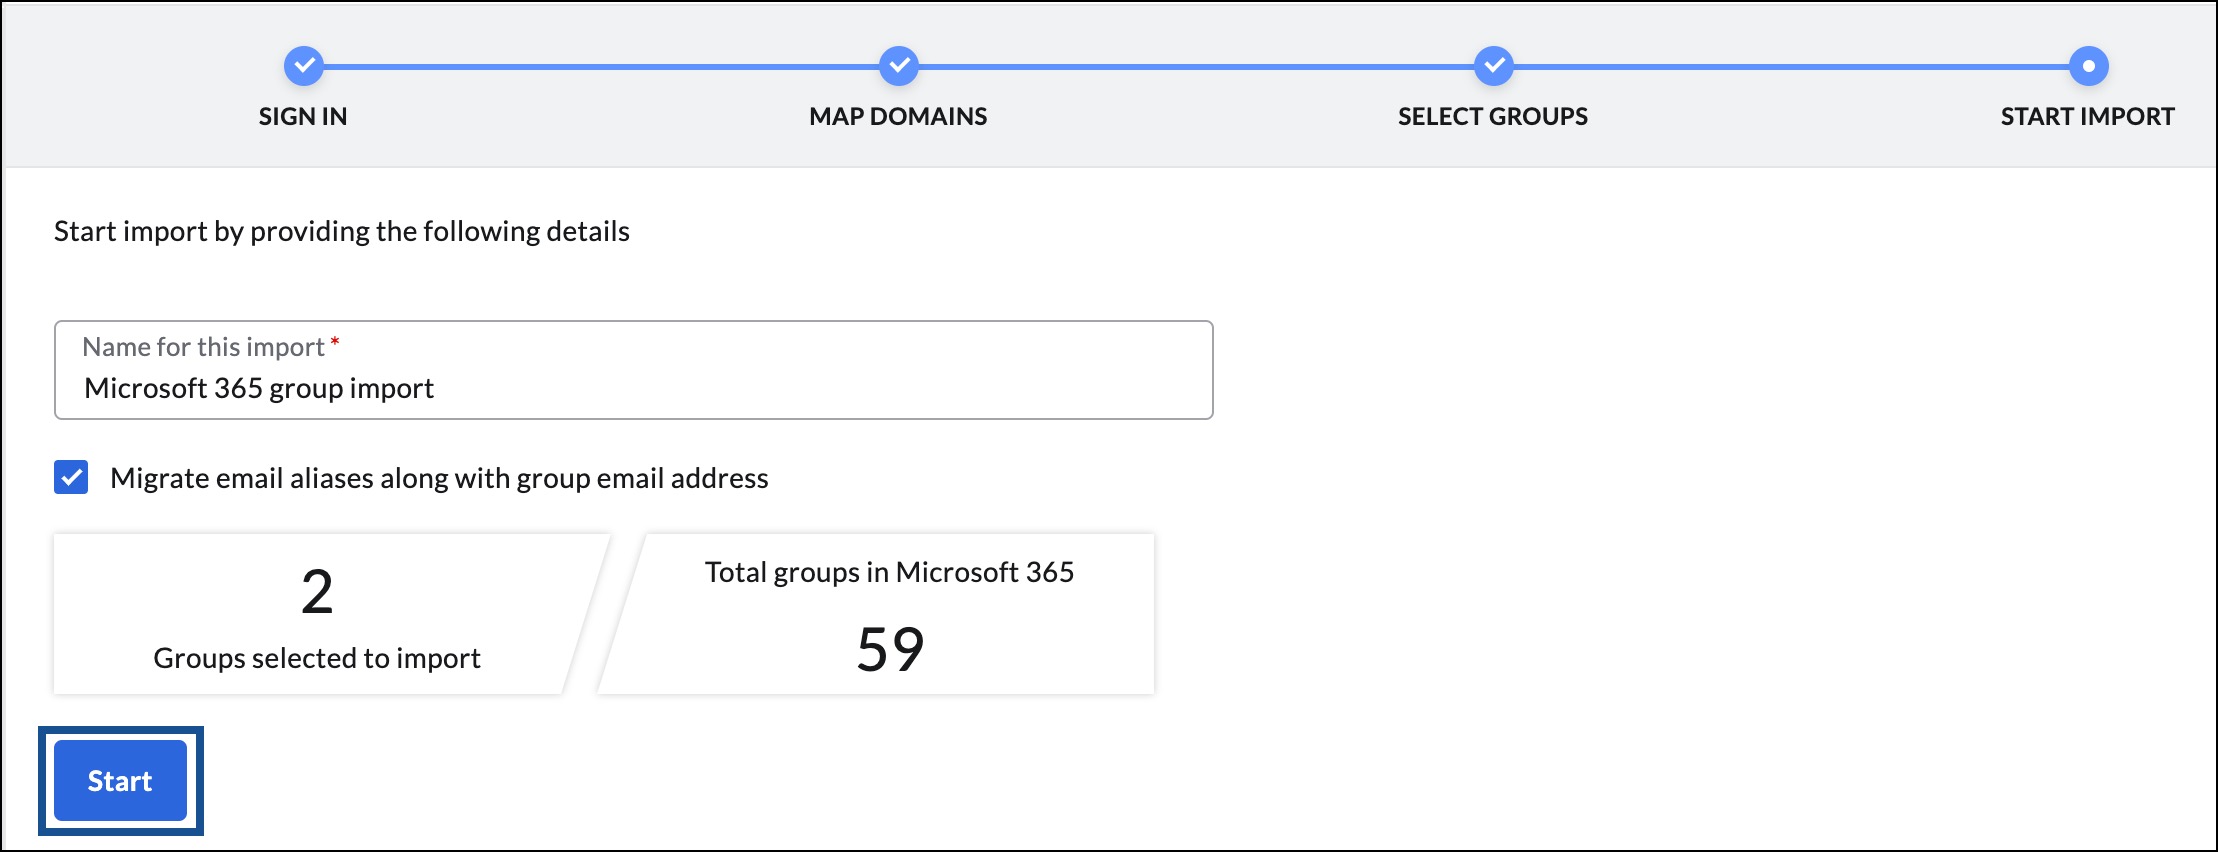
If required, you can choose to migrate the alias addresses of your group by selecting the Migrate email aliases along with group email address option.
Conditions and operating parameters
When you select the "Groups matching the criteria" option during Sync Groups process while importing groups from cloud services like Google Workspace or Microsoft 365, you can choose the values from the below available conditions and operating parameters.
| Parameter | Description | Value |
| Email Address | Denotes the email addresses of the group. | Click + Enter email addresses, enter the desired email addresses and click Add. |
| Display Name | The display name of the group. | Click + Add values, enter the desired display name and click Add. |
| Alias count | Validates the number of alias counts in the email. | Enter the desired count value. |
| Alias Addresses | Denotes the alias email addresses of the group. | Click + Enter email addresses, enter the desired alias email addresses and click Add. |
| Description | Validates the description of the group. | Click + Add values, enter the desired description and click Add. |
| Group ID | Checks for the group ID. | Click + Add values, enter the desired group ID and click Add. |
| Is created by admin | Validates if the group is created by admin or not. | Select Yes or No from the drop-down. |
| Member count | Validates the number of members in the group. | Enter the desired member count value. |
| Access type | Validates the access type. | Select the value as Organization or Public. |
Exporting Groups
- Log in to Zoho Mail Admin Console.
- Navigate to Groups and select Distribution List in the left pane.
- Select the Export drop-down menu and choose Export all groups.
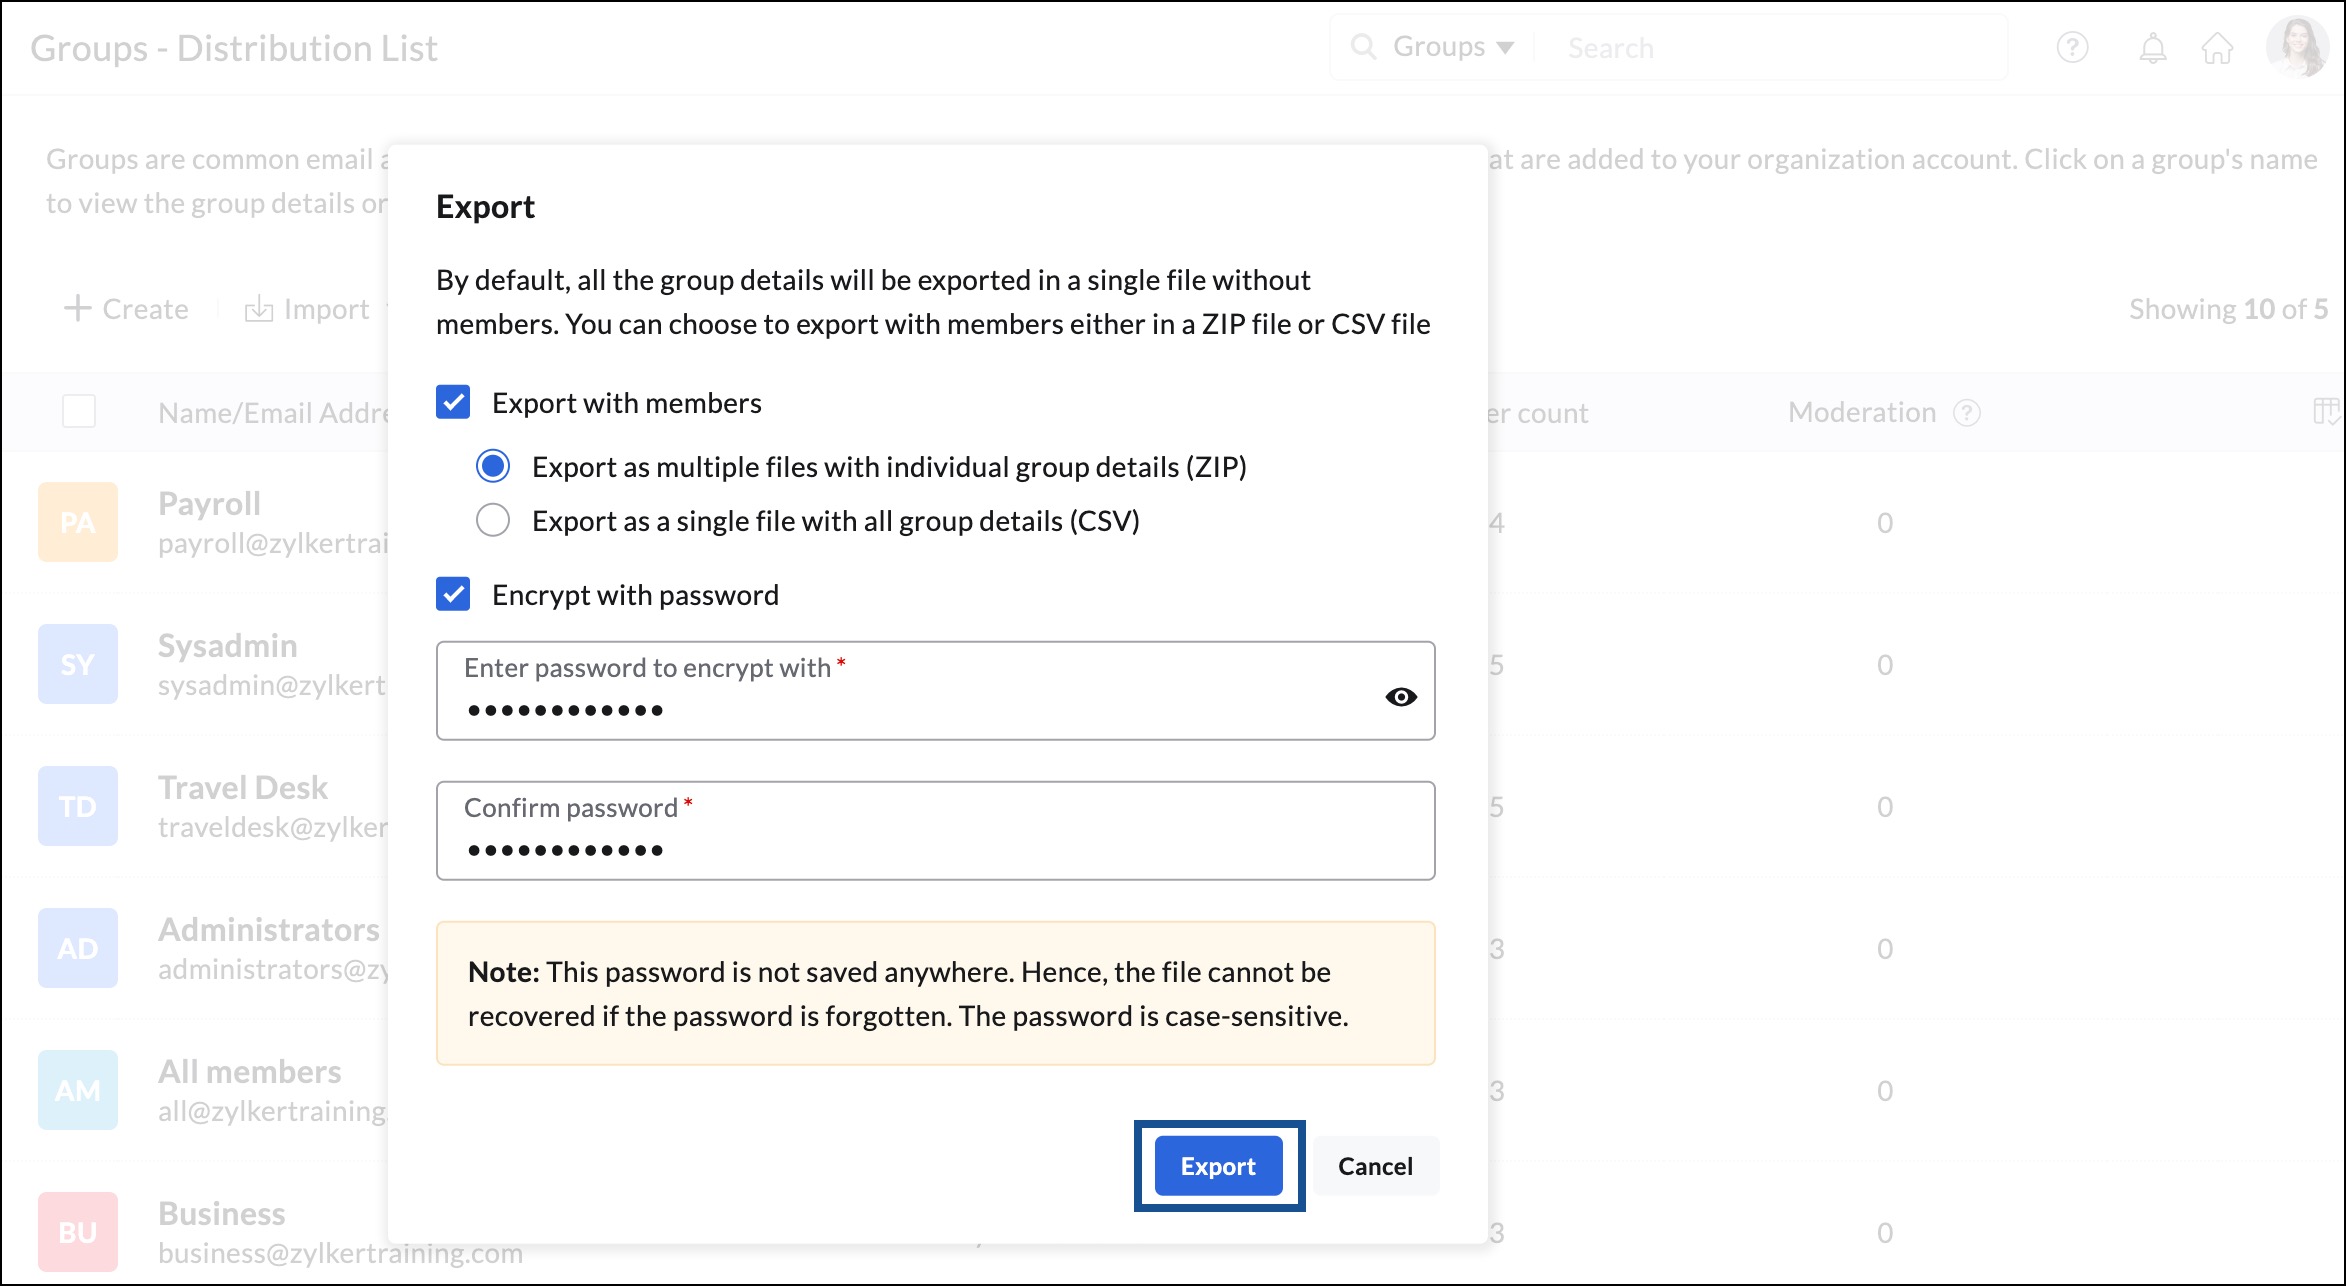
- By default, group details such as the name, description, email address, alias addresses, access level, the total number of members, and so on will be exported. Although, this does not include the email addresses of your group members.
- You can export your groups with members by checking the Export with members option. When you export with members, you can Export as multiple files with individual group details (ZIP) or Export as a single file with all group details (CSV).
- You can also encrypt your download file by checking the Encrypt with password option and entering the password you would like to use for encryption.
- After selecting the options of your choice, click Export.
- Alternatively, you can select the desired groups and select the Export selected groups option from the top menu.
Once done, your export will be scheduled. Upon completion, you will receive an email with the download link of the export file.
Other Options
Filter Groups
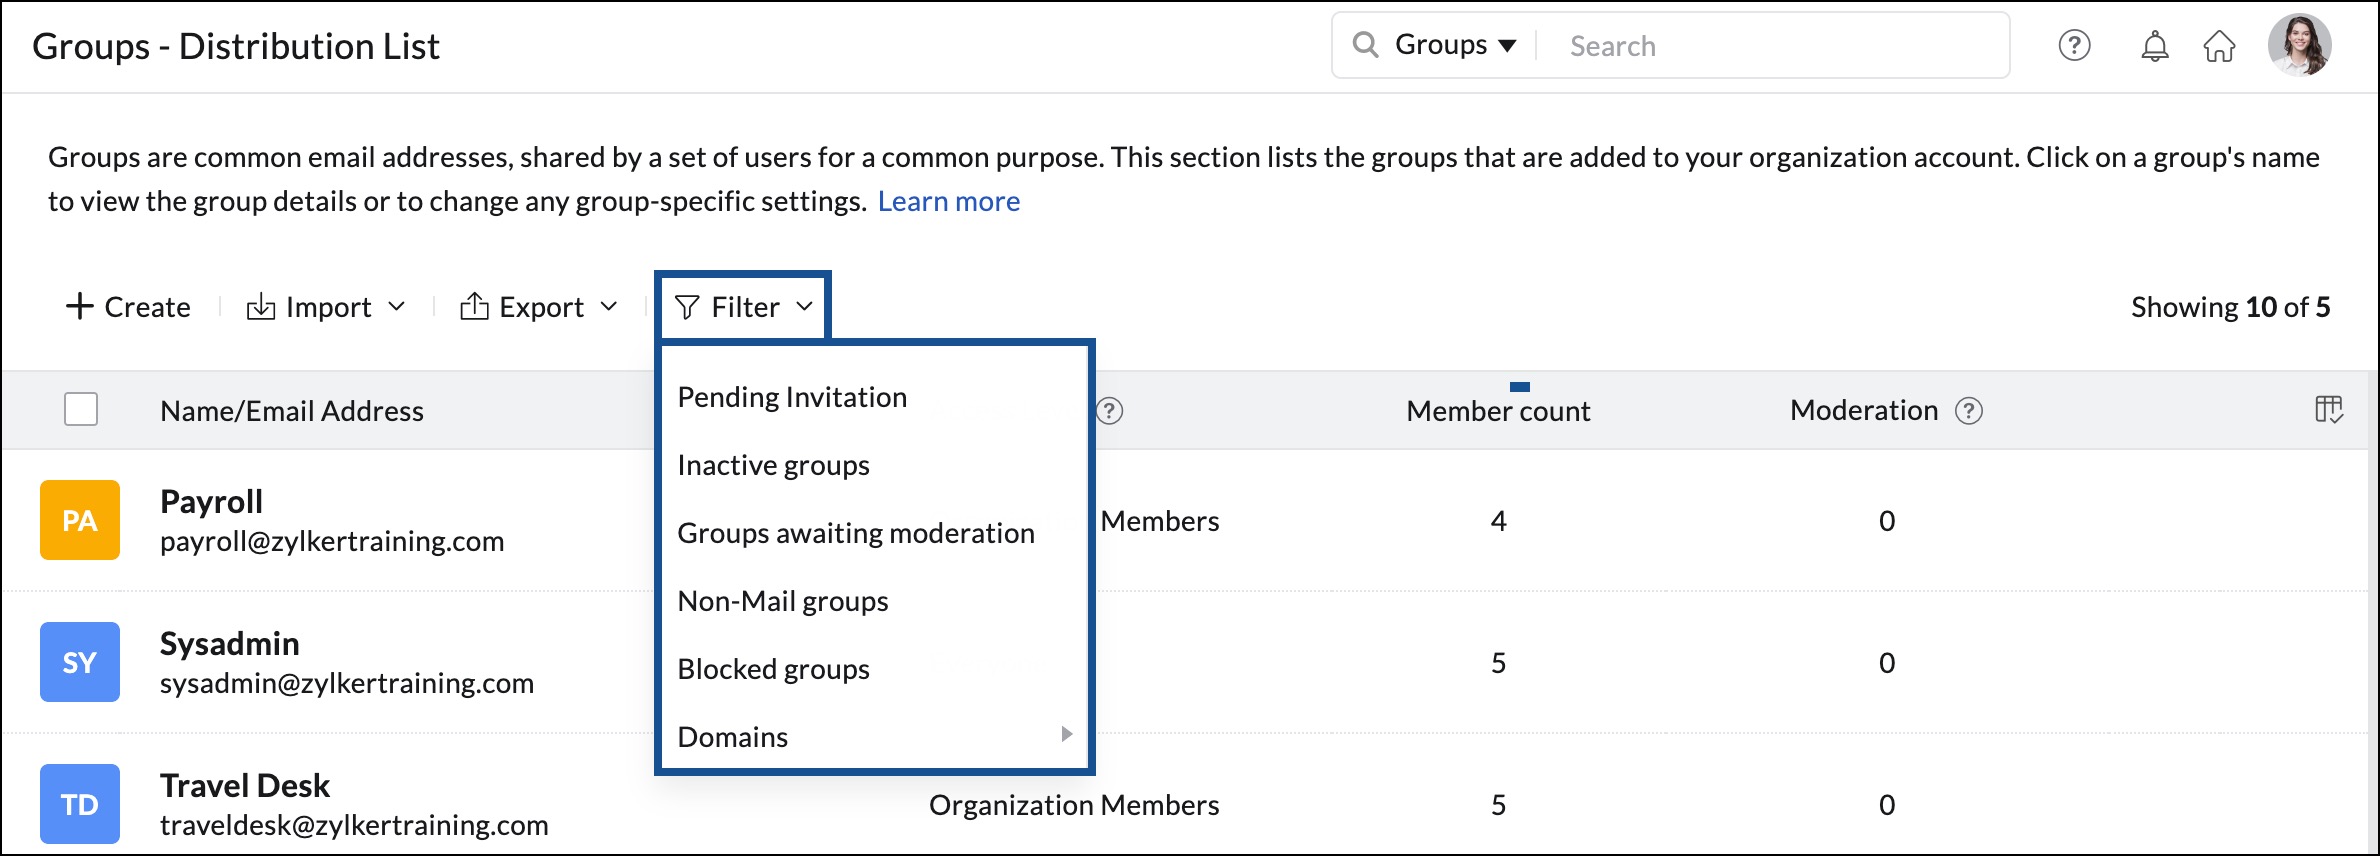
You can filter the email listing from the Groups page. Click on the Filter option from the top menu to narrow down the groups listing based on:
- Pending invitation (applicable only when external email accounts are added)
- Inactive groups
- Groups awaiting moderation
- Non-mail groups
- Blocked groups
- Domains
Delete Groups
You can either delete a single group or multiple groups from the Groups listing page. To delete a single group, hover over the group you want to delete and click the delete icon.
You can delete multiple groups by selecting them and clicking the Delete button from the top menu. You'll be redirected to re-authenticate your session and verify your identity before confirming the deletion.
Note:
- Whenever you want to delete a single group or multiple groups from your organization, it is mandatory to re-authenticate your session to ensure that only authorized users can perform this sensitive action.
- Re-authentication will be done using the MFA (Multi-Factor Authentication) method configured on your account for security purposes. If you do not have MFA configured for your account, you will be prompted to re-authenticate your session using your account password in a new tab or window, depending on your browser preference.
- Re-authentication is mandated every 5 minutes after you verify your identity. If you try to delete another group within this 5-minute window, you won’t need to verify your identity again. However, if you attempt to delete a group after the 5-minute period from your last re-authentication, you will be required to verify your identity again.
Note:
- When you delete a group (distribution list, personal group, streams group, or a shared mailbox) from Zoho Mail, it will be deleted from other associated applications such as Zoho Calendar, Connect, etc.
- Similarly, when an organization group is deleted from a Zoho application, it will also be deleted from Zoho Mail.
- To recover the data associated with the deleted group, please contact support at support@zohomail.com within 7 days of the deletion.
Block/ Unblock groups
You can block the incoming and outgoing permissions of a group by selecting them and clicking Block. Similarly, select the groups with blocked permissions (you can also use the filter option "Blocked") from the listing and click Unblock from the top menu to allow incoming and outgoing emails for the group.
Manage Columns
- You can customize the columns displayed in the Groups section using the Manage columns option. By default, the following columns cannot be removed from the display:
- Name & Email
- More actions
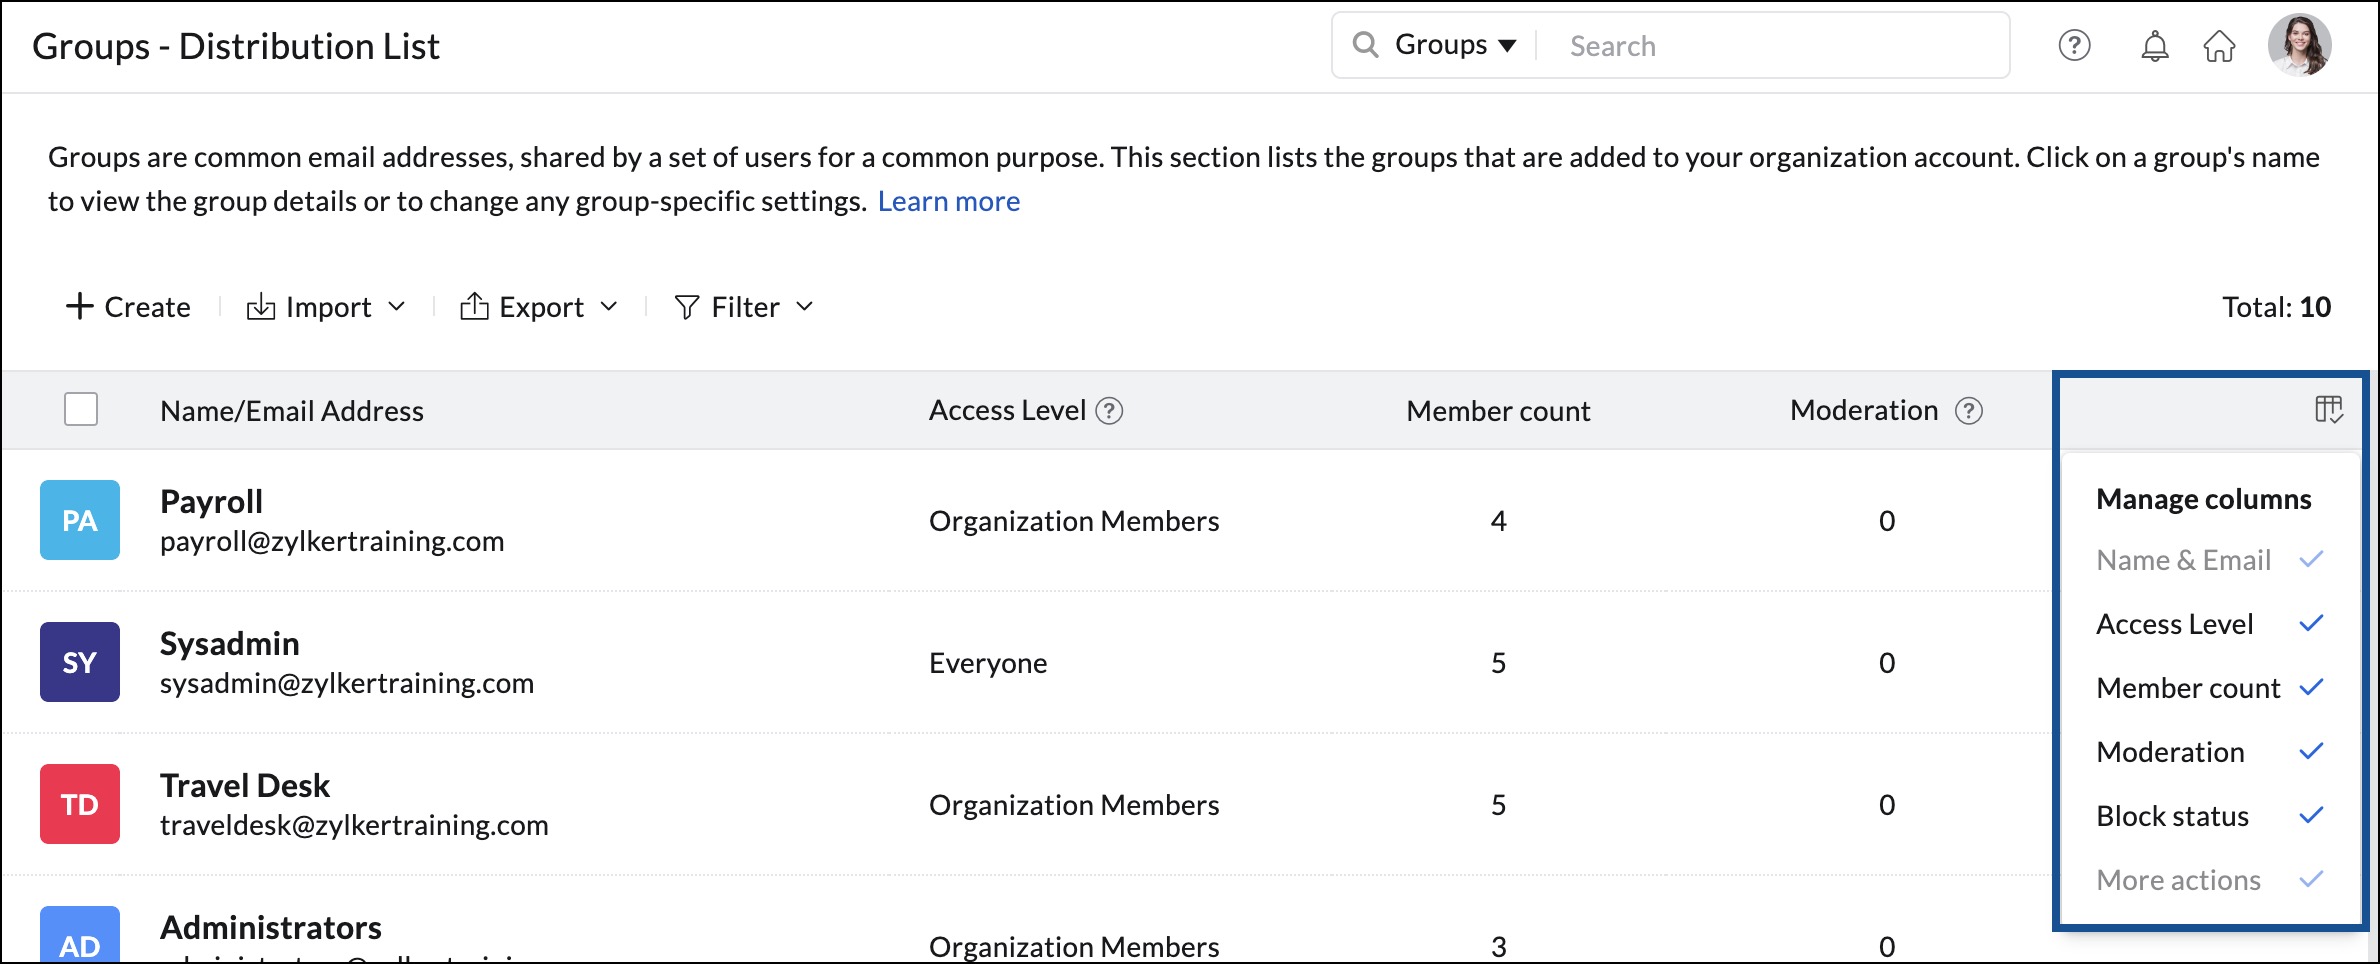
- To customize, click on the Manage column icon on the top right corner and select or deselect the columns from the list,
- Access Level
- Member Count
- Moderation
- Block status
Email Group settings
You can view, manage, and modify other preferences of your group from the Settings page. Refer to the Group Settings help page for detailed instructions.


