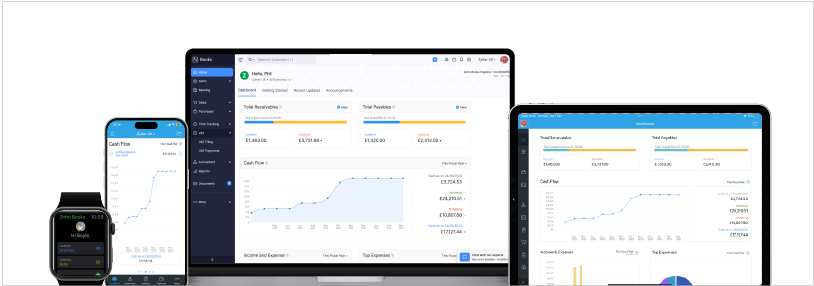
Before we get into the specifics, see where you'll find what.
1. The Navigation Panel on the left-hand side lists all the modules of Zoho Books.
2. Get into the Sales tab and the Purchases tab to manage Quotes, Invoices, Expenses, Bills, and more.
3. The Quick Create button by the respective modules is the shortcut to create new transactions.
4. The Quick Create option can be used to create a transaction on the fly from anywhere in Zoho Books.
5. Clicking on the Recent Activities option will display of list of most recent transactions you have carried out in your organization.
6. Use the Search bar to quickly find a specific transaction, contact, item or more.
7. The Notifications Section will notify you of any customer activity on the customer portal as well as announcements from the Zoho Books team.
8. Click on the Settings icon to manage your Organization Profile, Users, Subscriptions and more.
9. Drill further in Zoho Books using help and Webinars or contact support from the Help section.

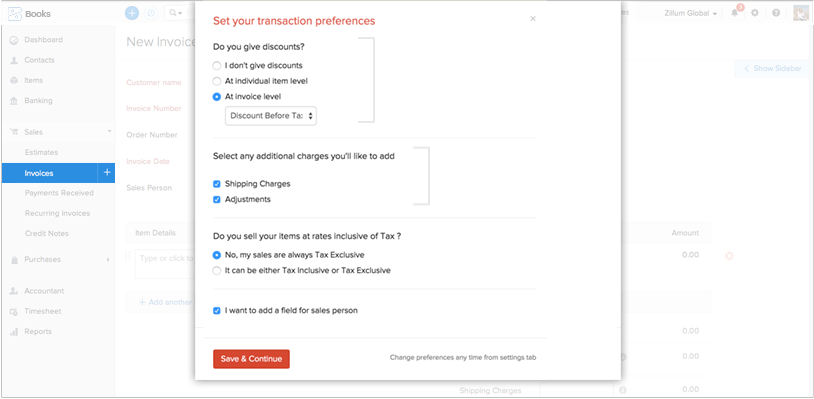
Tailor the invoices based on your needs
You can do the preliminary customization through the Invoice Preferences.
1. Click the Quick Create icon from the Invoices module (under Sales tab).
2. Choose your preferred Discount from the options.
3. Select additional charges like Shipping Address and Adjustments.
4. Choose your Tax Preferences for items while creating sales transactions.
5. Add a field for the Sales Person if you wish to include it in the invoice.
6. Click on Save & Continue.
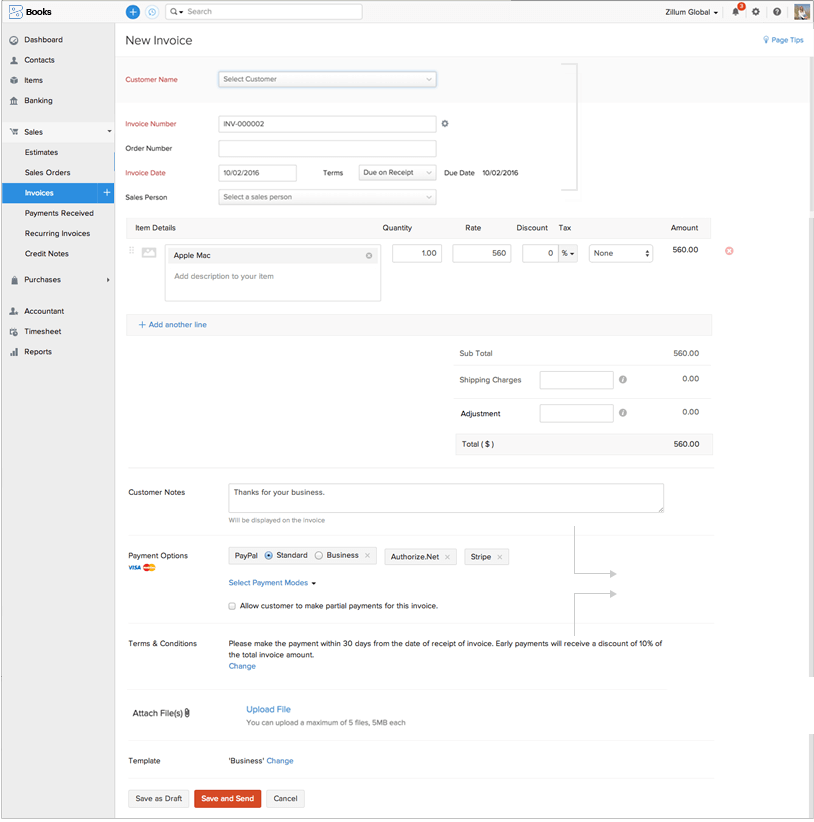
Create and Send an Invoice
Create Invoice
1. Click the Quick Create icon from the Invoices module (under Sales tab).
2. Fill the invoice fields in the New Invoice page.
Customer Name
Invoice Number
Invoice Date
3. Add or Select the Item(s) that you wish to invoice your clients.
4. Enter the Customer Notes & Terms & Conditions
5.Attach Files such as images or documents to your invoices and send it to your customers.
6. Click on Save and Send button.
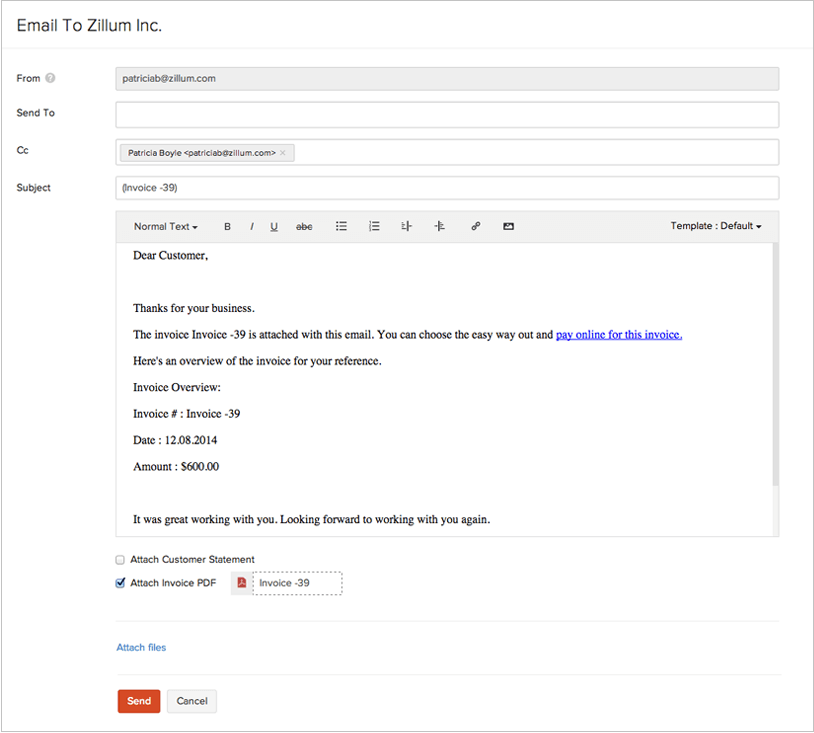
Email Invoice
1. The From field will have your organization's email address.
2. The Send To email address will be your customer's email address.
3. Email content will give an overview of the invoice.
4. If you wish, you can attach the Customer Statement and change the name of the Invoice PDF attachment.
5. Attach Files along with the invoice (File Size is up to 11MB).
6. Click on Send button to email the invoice.
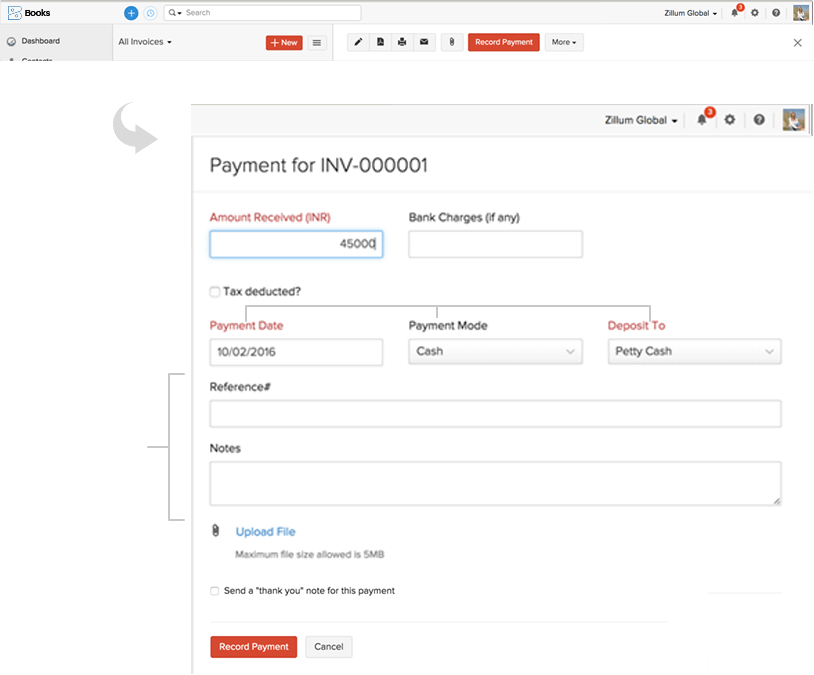
Record Payment
Invoice Payment
1. Click the Record Payment button from the invoice details page.
2. Enter the Amount Received from the customer.
3. Update payment details such as Payment Date, Payment Mode and Deposit To account.
4. Use the Reference# field and Notes fields to enter the payment information.
5. Attach Files such as images or documents to your payment receipts.
6. Enable the option to send a Payment Thank You email to the customer.
7. Click on Record Payment button.
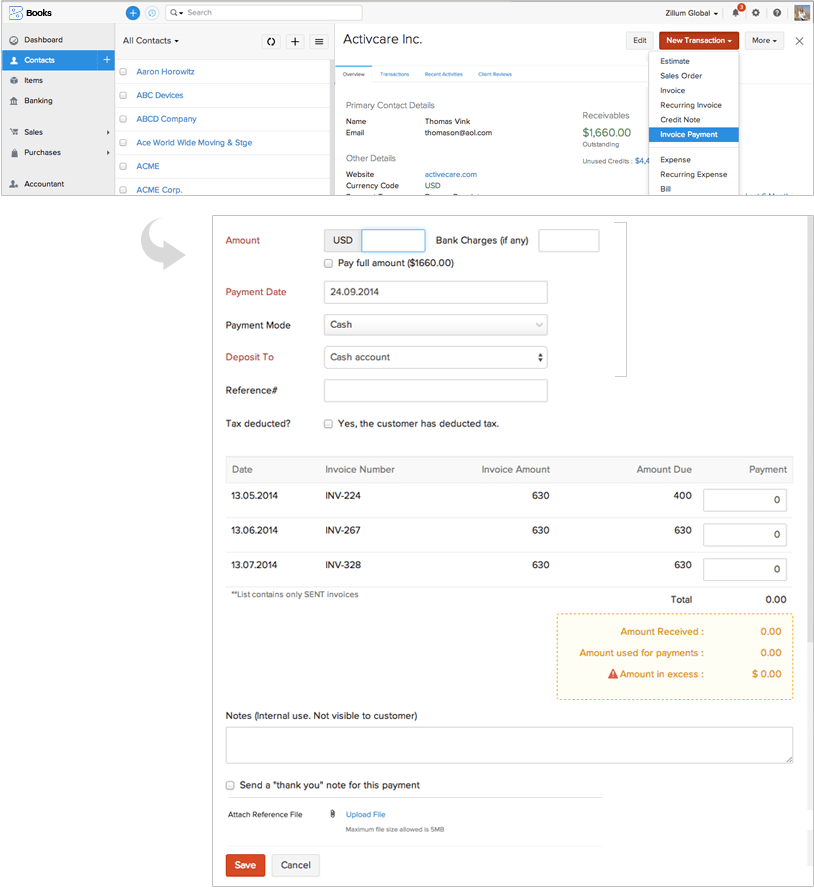
Customer Payment
1. Get into the Contacts tab and choose a contact from the list.
2. Click on New Transaction button.
3. Select Invoice Payment from the drop-down list.
4. Enter the payment details such as Amount, Payment Date, Payment Mode and Deposit To account.
5. Attach Files such as images or documents to your payment receipts.
6. Enable the option to send a Payment Thank You message to the customer.
7. Click on Save button.
Record Expenses and Bills
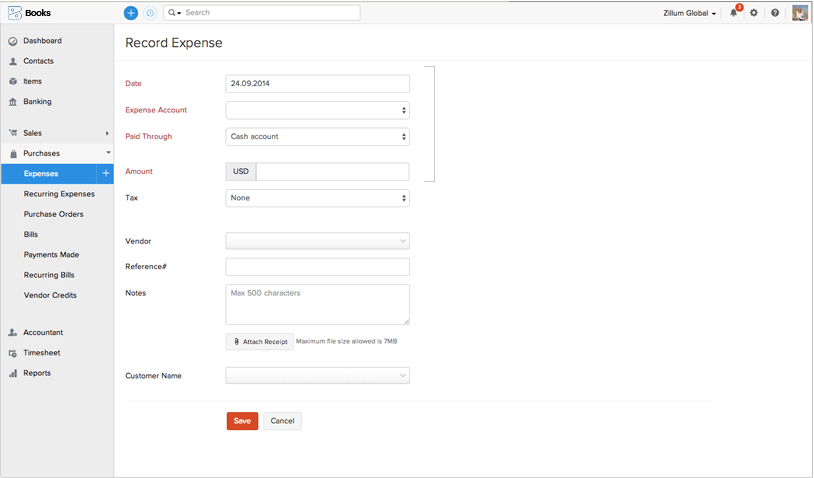
Record Expenses
1. Click the Quick Create icon from the Expenses module (under "Purchases" tab).
2. Enter the expense details such as Date, Expense Account, Paid Through account and Amount.
3. Attach Expense Receipt (Maximum file size allowed is 7MB).
4. Click on Save button.
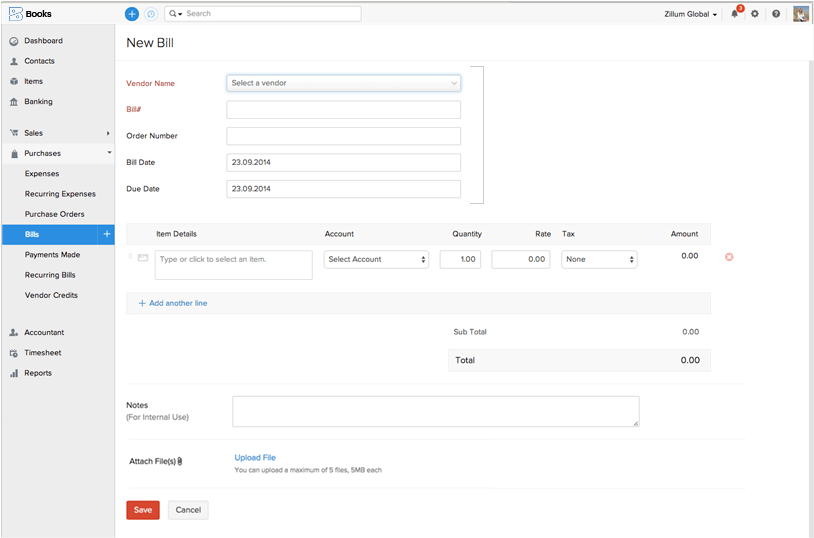
Record Bills
1. Click the Quick Create icon from the Bills module (under " Purchases" tab).
2. Enter the fields such as Vendor Name, Bill#, Bill Date, etc.,.
3. Select the Item(s) for which you've incurred the bill
4. Attach Files such as images or documents to your bills for your reference.
5. Click on Save button.
Manage your customers and vendors
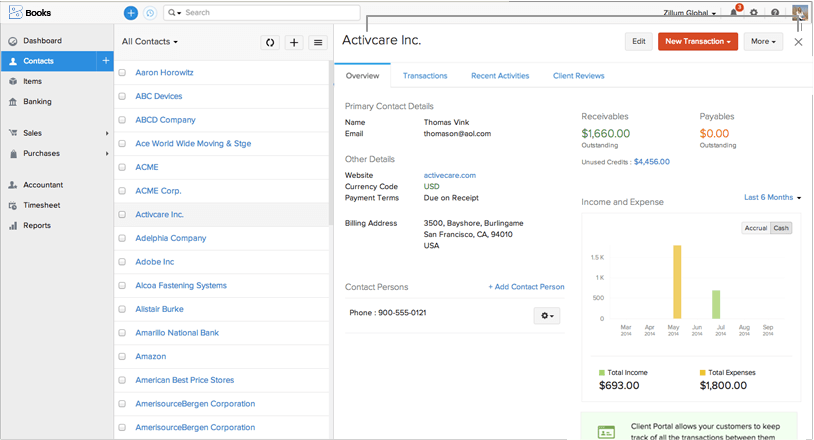
1. Click the Quick Create icon from the Contacts module to add new clients.
2. Filter the contacts and vendors by clicking the "All Contacts" drop-down field.
3. You can Sort the contacts and import the contacts by clicking on the options menu.
4. Click on the contact from the list-view to see the contact details.
5. The contact details section displays the transactions and gives an overview of a specific contact.
6. You can Add Contact Person from under a contact.
7. Click on Edit button to edit an existing contact.
8. The New Transaction button lets you create a sales or a purchase entry for the selected contact.
9. Click on More button to perform special actions.
Manage Projects and timesheets
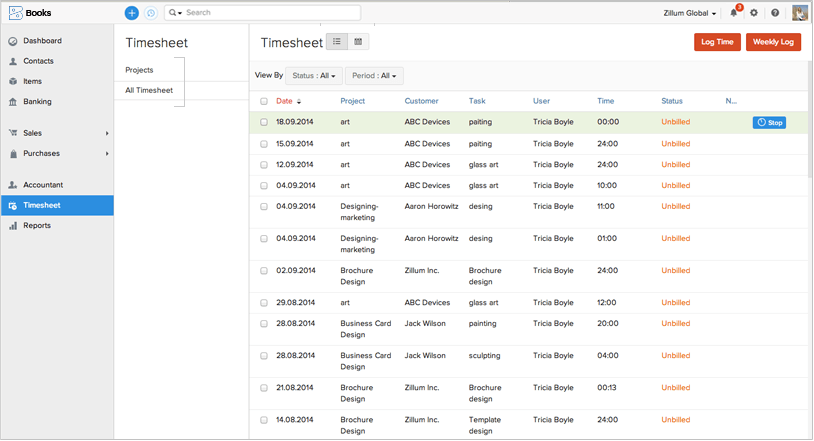
1. Click the Timesheet module from the navigation panel.
2. From the list-view, you can choose between Projects and Timesheets.
3. From the respective views, you can Create Projects and Log Time entries.
4. Choose between List View and Calendar View for the logged timesheets.
5. Perform the Bulk Action to delete the unbilled timesheet entries.
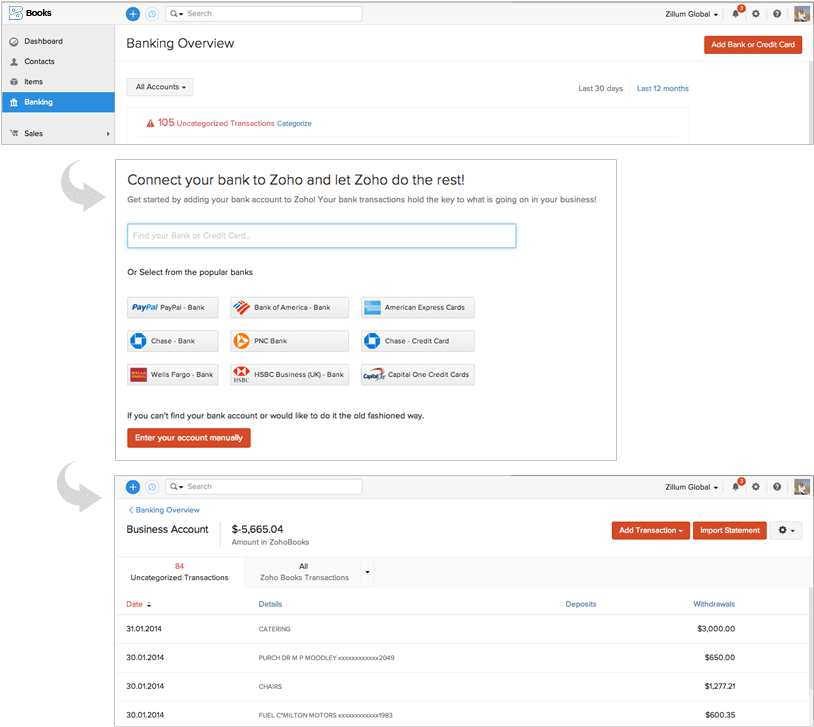
Link your bank accounts and credit cards
1. Click the Banking module to add and manage your banks and credit cards.
2. Add Bank or Credit Card button lets you connect your bank with Zoho Books.
3. Use the Search Bar to search for your bank or credit card.
4. If your bank isn't listed for automatic feeds, you can Enter your account manually.
5. You can categorize the transactions from the Uncategorized Transactions view.
6. If the bank is manually added, you can Import Statements.
7. Add Transaction button from the bank details section allows you to add entries such as:
Transfers, Deposits,
Record Expenses, Record Payments,
Owner Drawings, Owner's Contribution, etc.,.
8. The Settings icon lets you do some special actions such as:
Managing Rules
View Reconciliation History
Delete the account and more...
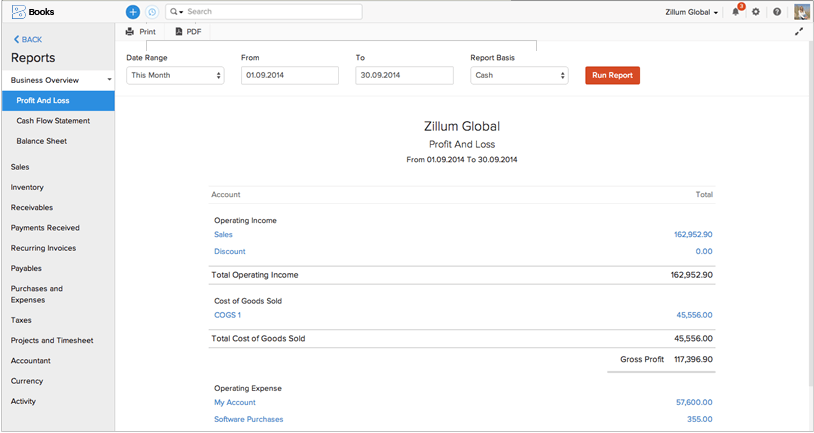
Generate reports and see how your business is doing
1. Click the Reports module from the navigation panel.
2. Select a report from the left pane.
3. You can choose your preferred Date Range.
4. Click on Run Report button.
5. Print or export the report as PDF.
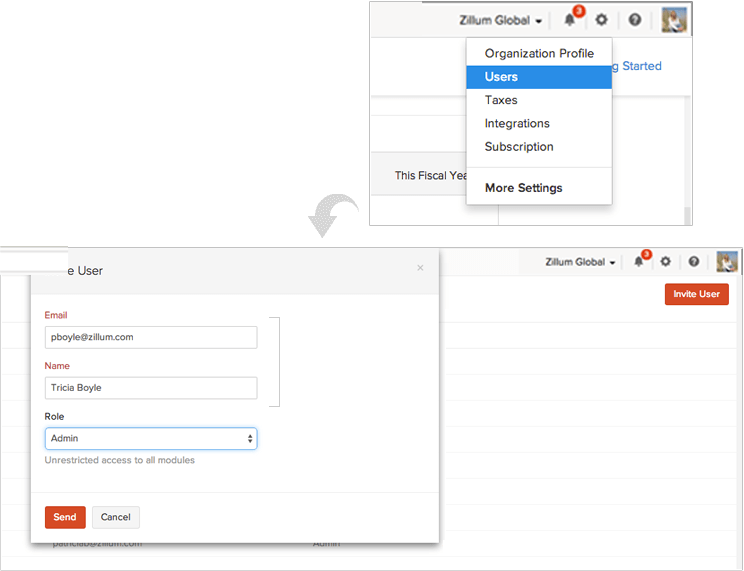
Connect and collaborate
Connect with your staffs, colleagues and accountants.
1. Click on Users from under the Settings icon.
2. Invite User button allows you to add more people to your Zoho Books account.
3. Enter the user's Name, Email address and select a user Role.
4. Click on Send button.
Collaborate with your clients
1. Enable the Customer Portal from the Organization Profile settings.
2. Click the Settings icon from the Contact Details section and Configure Customer Portal.
3. Get Feedback from your customers by requesting them to rate your products and services.
4. Add Comments from under the transaction history section and select Display in customer portal.

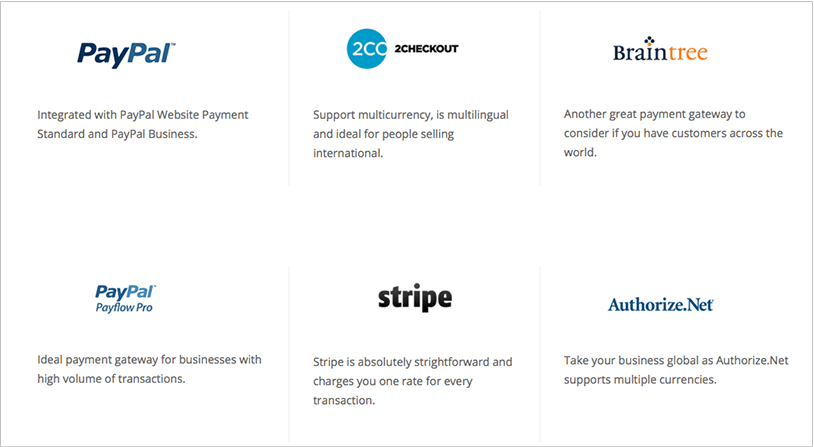
Online payment gateways
You can configure the online payment gateways in Zoho Books and can get paid from your clients faster and easier. For more information, visit this link.
Accounting on the go
Manage your invoices, quotes, track payments and upload expense receipts right from your phone at anytime, anywhere. For more information, visit this link.