Help

Employees

The Employees module in Zoho Payroll allows you to add and manage employees' personal and salary details.

Let’s see how you can:


Add Employees

To add an employee in Zoho Payroll,

  • Navigate to the Employees module on the left sidebar.
  • Click + Add New Employee.

Adding a new employee consists of 4 steps:


STEP 1: The Basics

Enter the employee’s basic details like Name, Employee ID, Date of Joining, Work Email Address and so on.
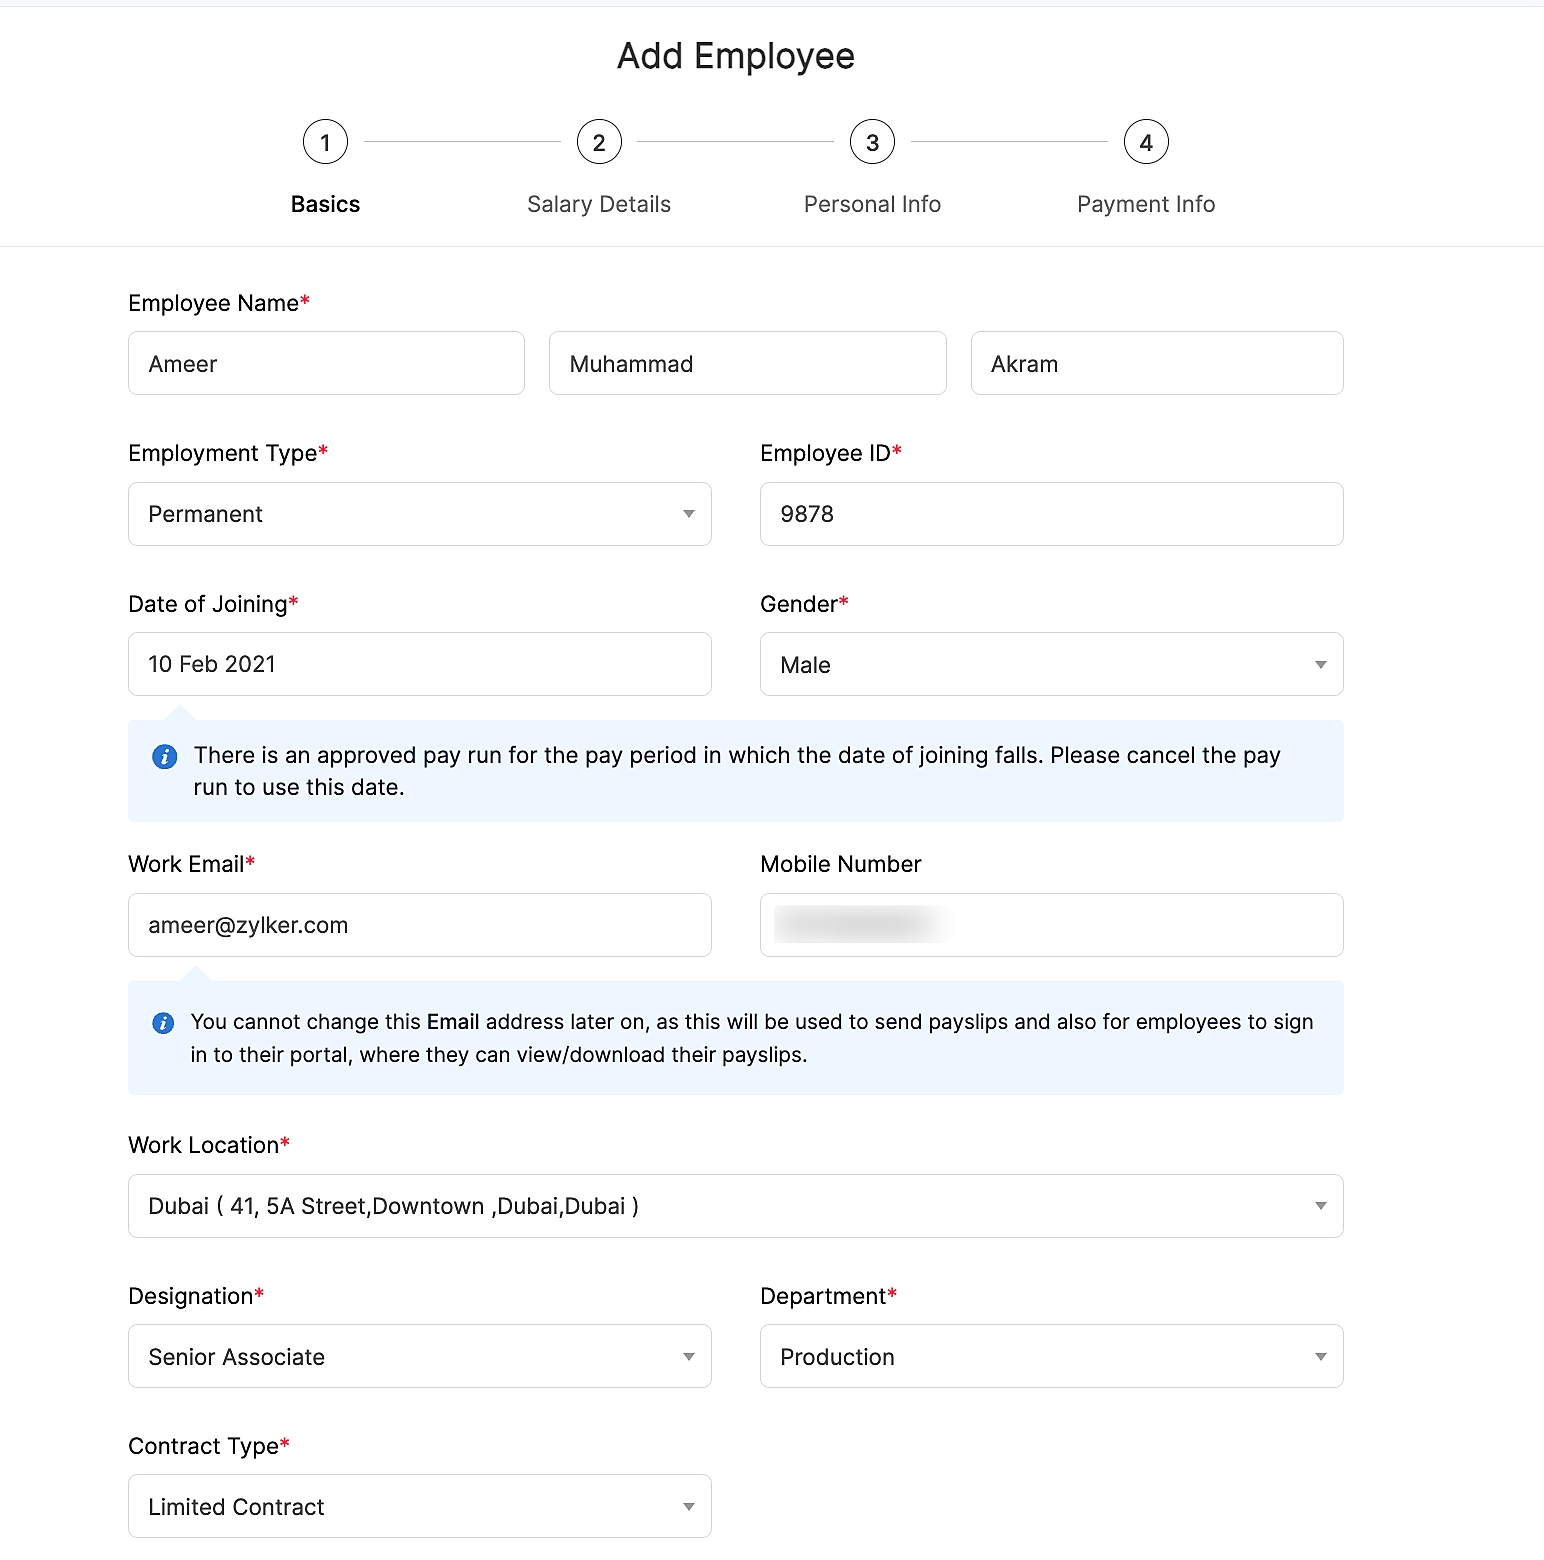
The Basics The Basics
Employee Name Enter your employee’s first and last names. Middle name is optional.
Employee ID Enter the employee’s organisational ID.
Gender Enter your employee’s gender.
Employment Type Select if your employee is permanent or is on probation.
Gender Enter your employee’s gender.
Date of Joining This is the day on which the employee started working for your organisation. For an existing employee, choose their original date of joining. If it is a new hire, you can choose a date in the future.
Designation Enter the employee’s designation in your organisation.
Director/Employee with substantial interest Enable this checkbox if the employee is a Director or is a beneficial owner of shares and owns at least 20% of the voting power. This helps us fill out Form 12BA for your employees.
Work Email Address The employee’s payslips are sent to this address. Also, employees will be able to log into their employee portal using this email address, if you enable it for them.
Department Enter or select the department under which the employee would be working.
Work Location Select which branch your employee works from, if your organisation has multiple work locations.
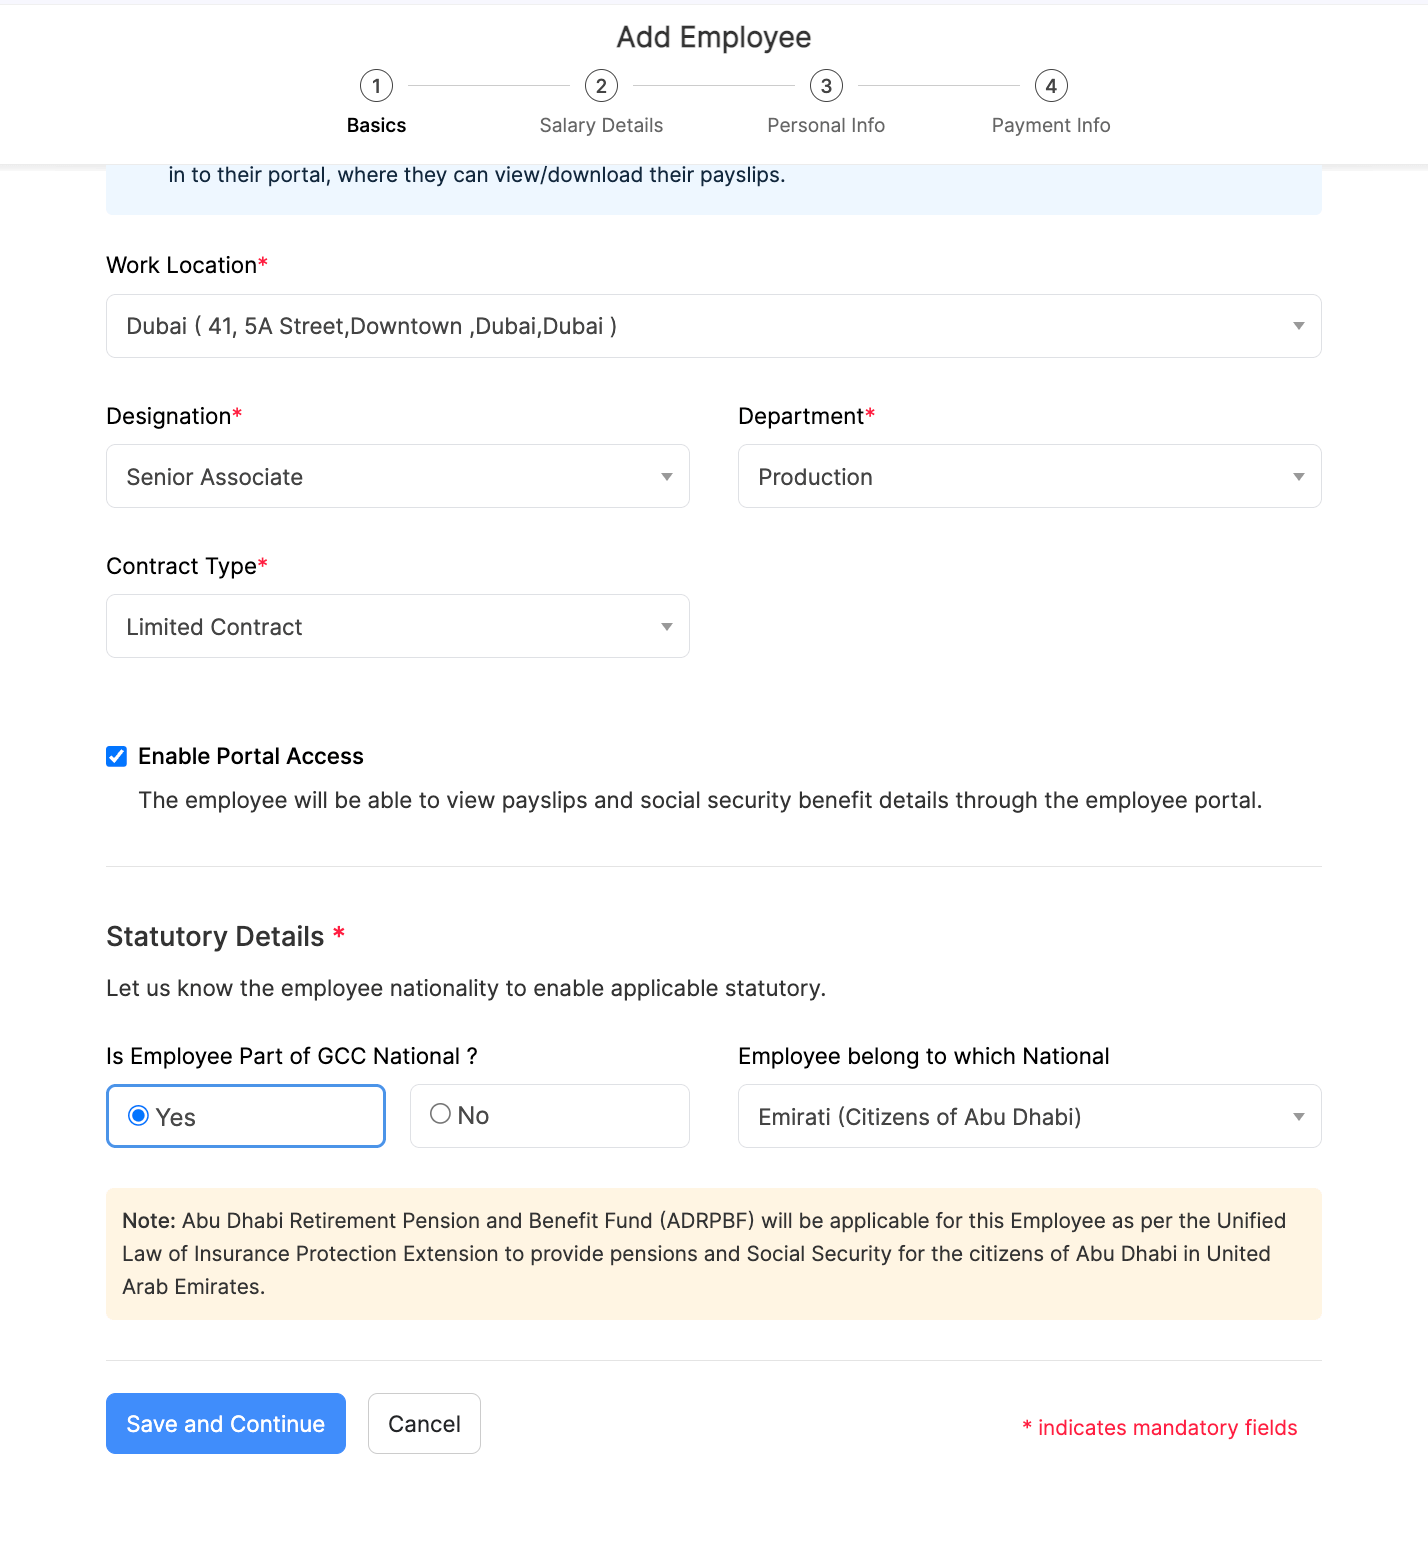
Contract Type Select the type of contract for the employee. A limited contract is a fixed-term employment contract with a specified start date and end date. An unlimited contract is an open-ended employment contract with a start date but no defined end date.
Enable Portal Access Choose whether you want to enable Employee Portal for this employee. The employee can access his details and from the portal.
Social Security Details If your employee is a GCC national, you can configure the respective social security provided by the GCC country in the Settings page. If the employee is an expat, they will be entitled to gratuity.
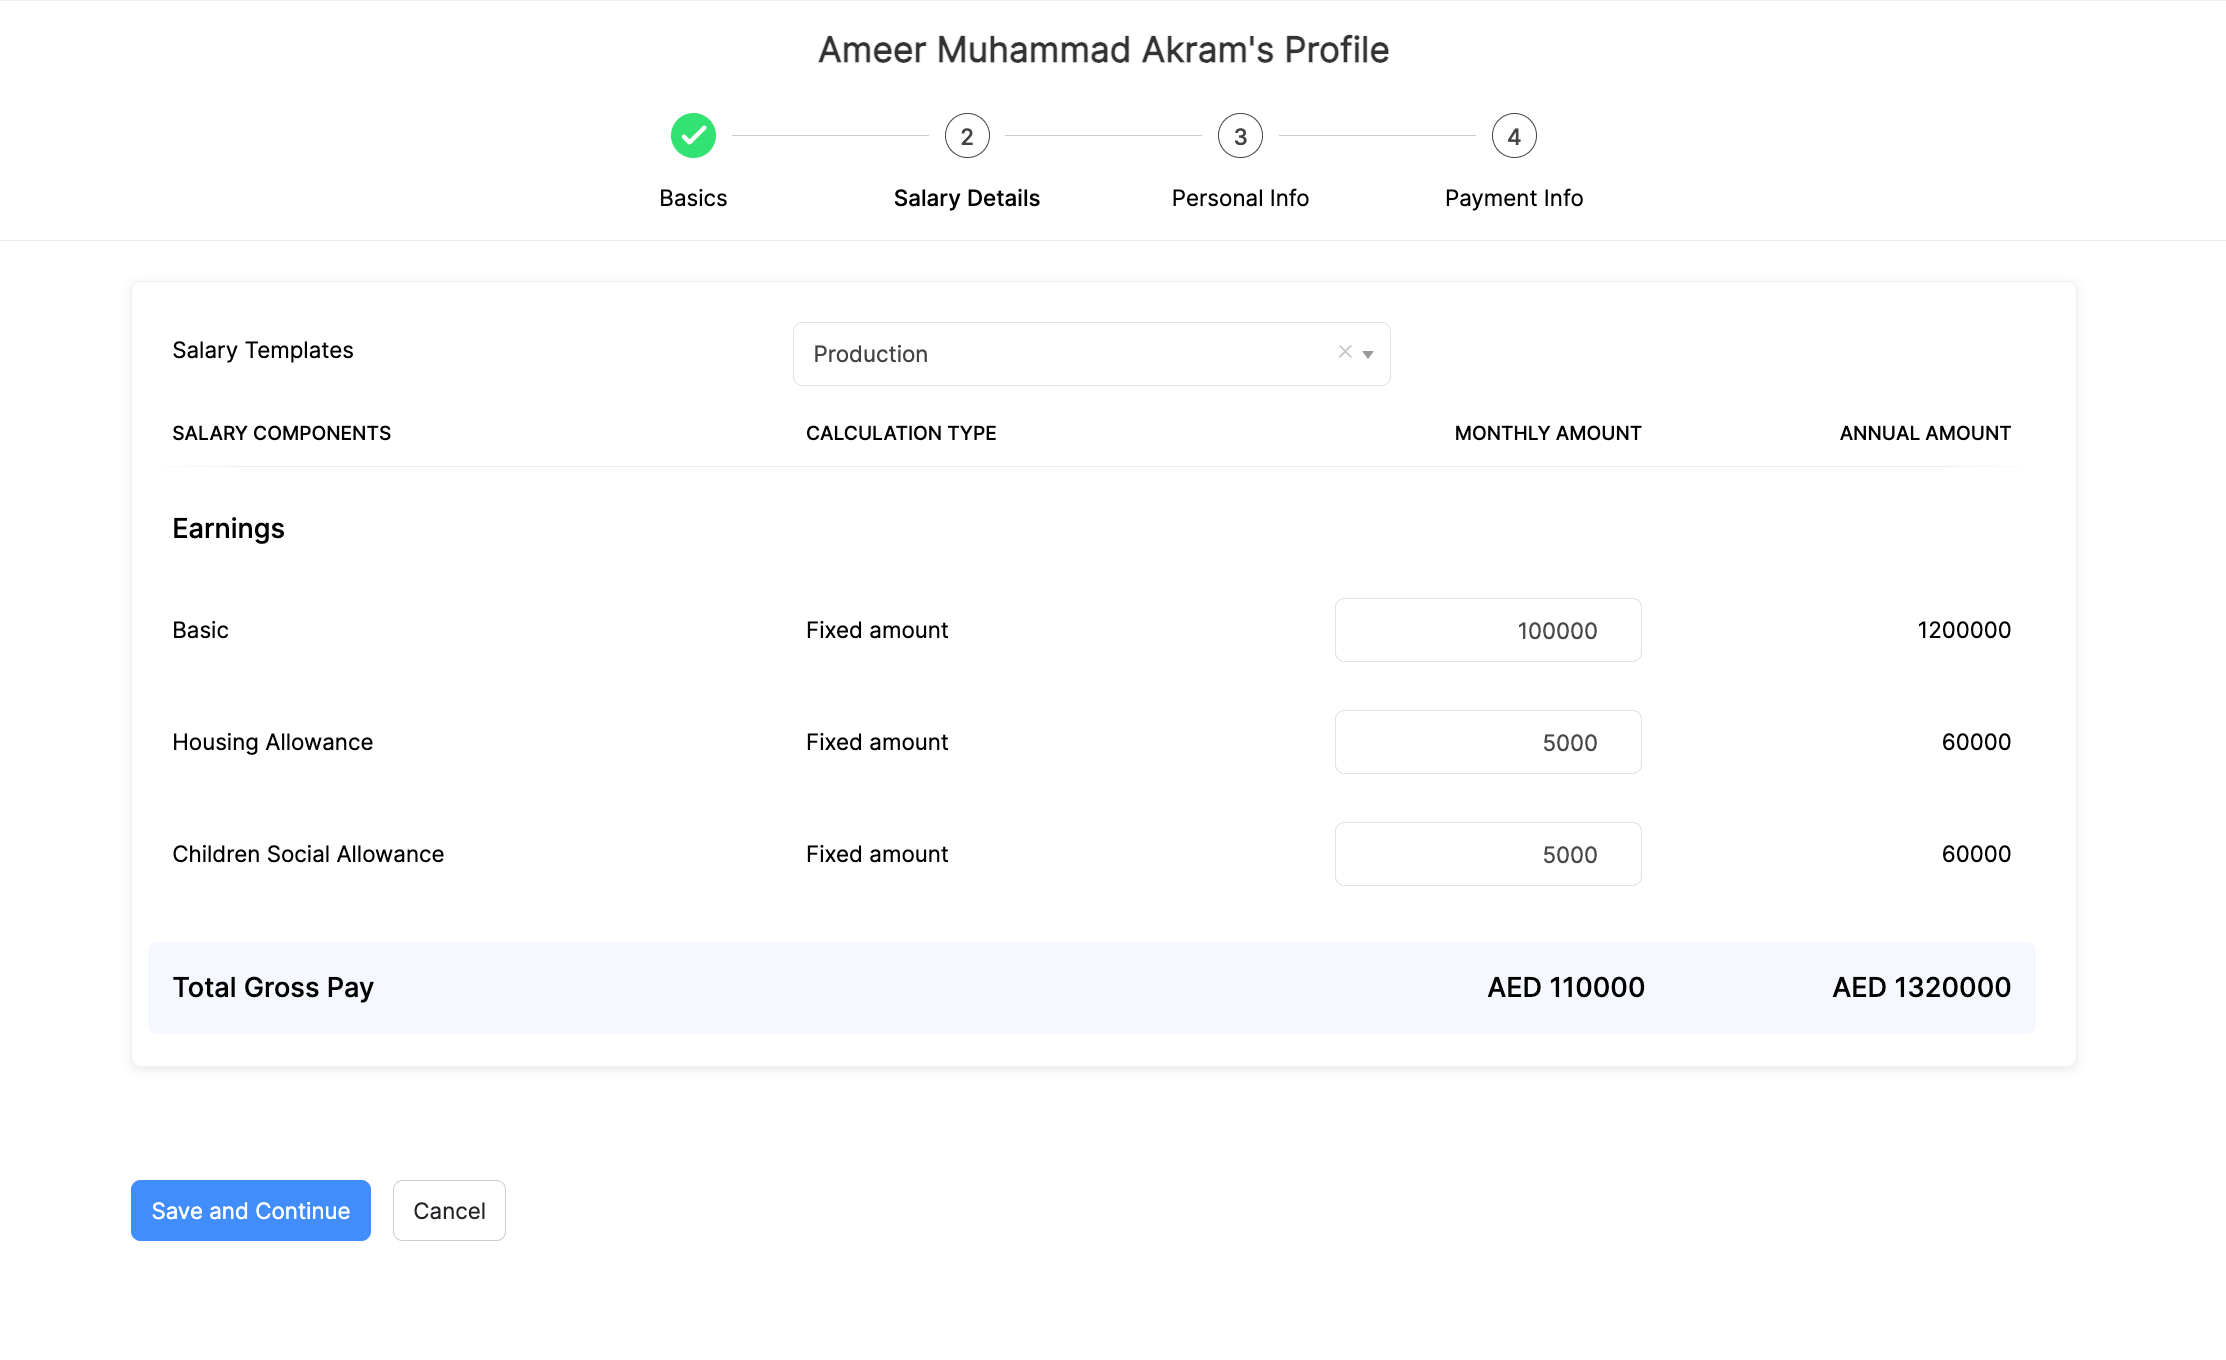
STEP 2: Salary Details

Enter the complete salary structure of your employee here.

  • Select a salary template if you have created one. If not, you can set salary templates for employees with pay structures.
  • Enter the employee’s earning details.
  • Click Save and Continue.
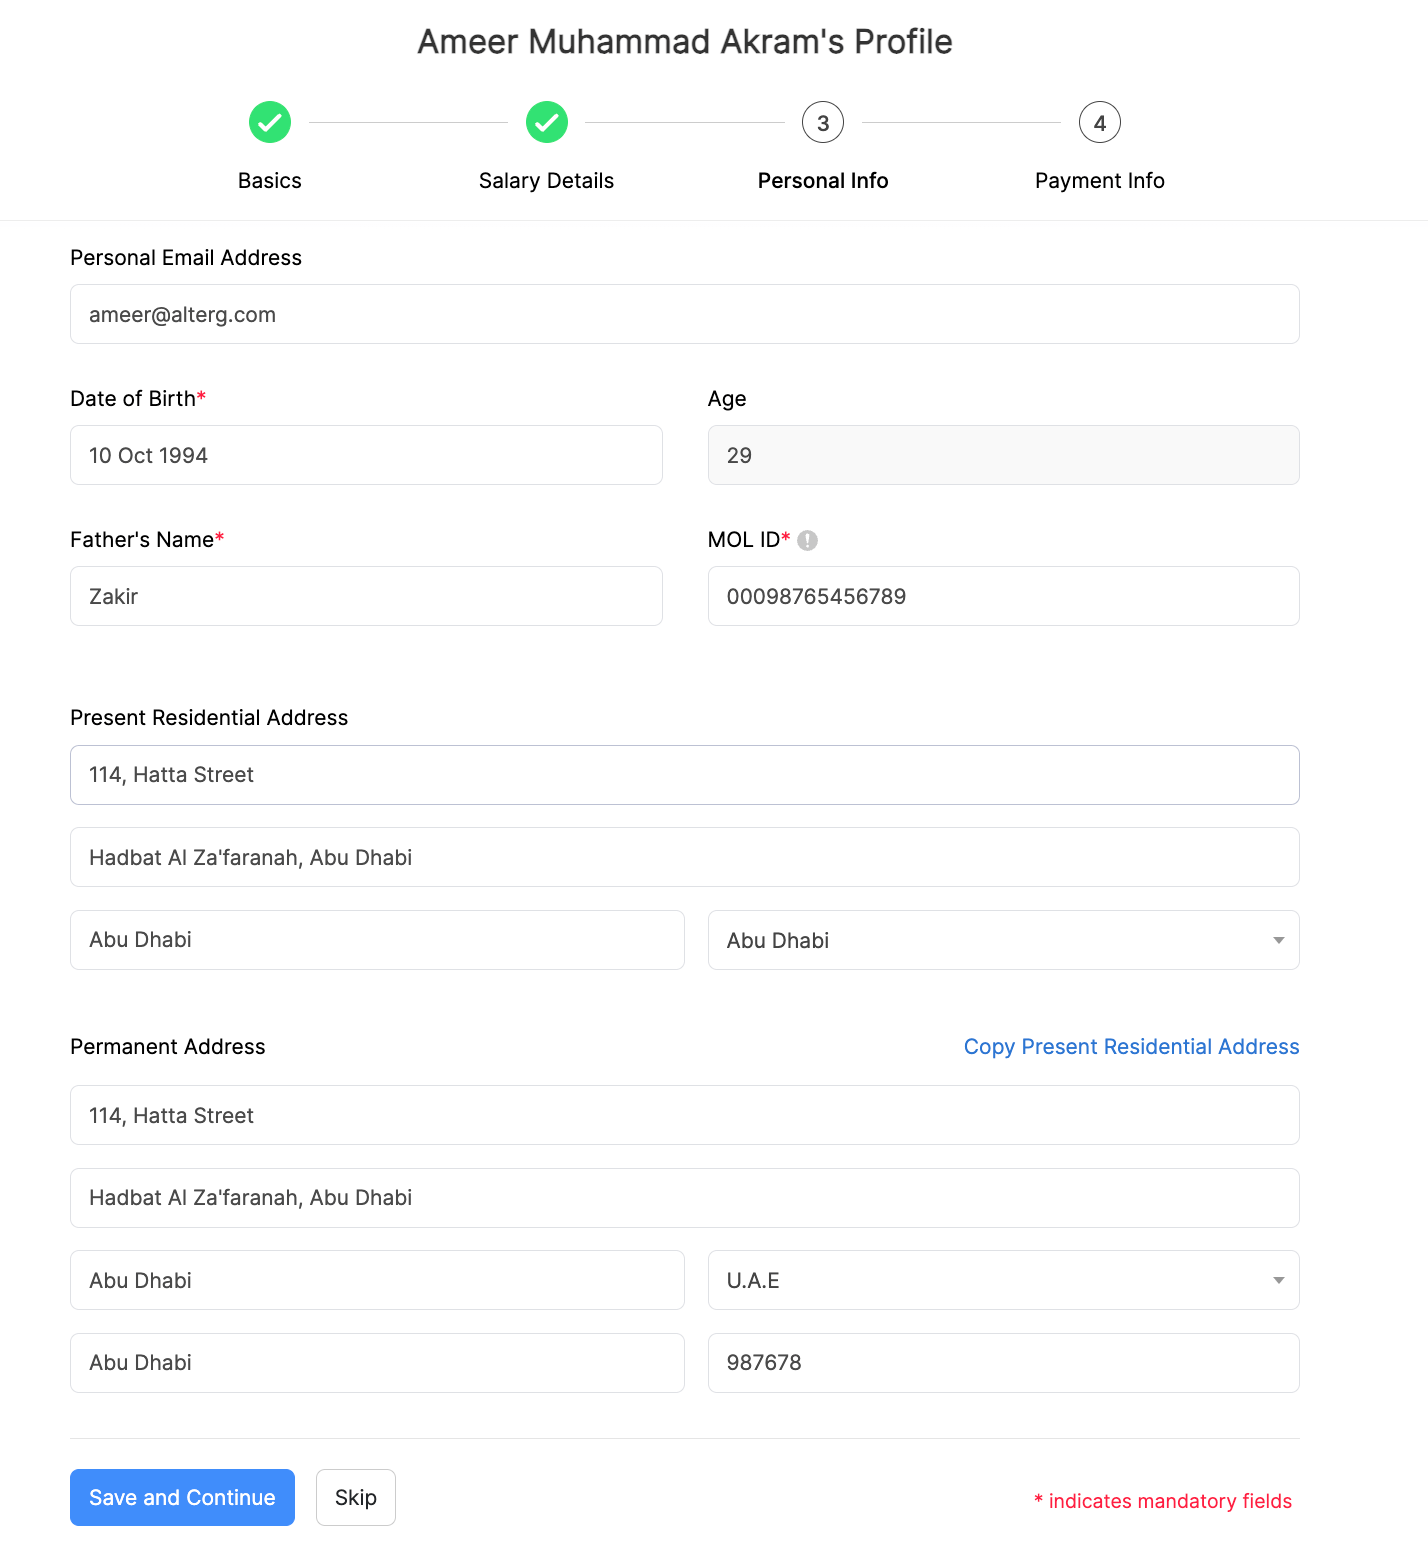
The Basics

STEP 3: Personal Info

In this step, you can enter the following personal details of the employee:

  • Personal Email Address
  • Date of Birth
  • Age
  • Father’s Name
  • MOL ID (14 digit identification provided by the Ministry of Labour in UAE)
  • Present Residential Address
  • Permanent Residential Address

Pro-tip: Click Copy Present Residential Address if the present residential address is same as the permanent residential address.

Click Save and Continue to move to the next step.

Note: All personal information about your employees will be encrypted and stored in our secure servers. Read our Security Policy.
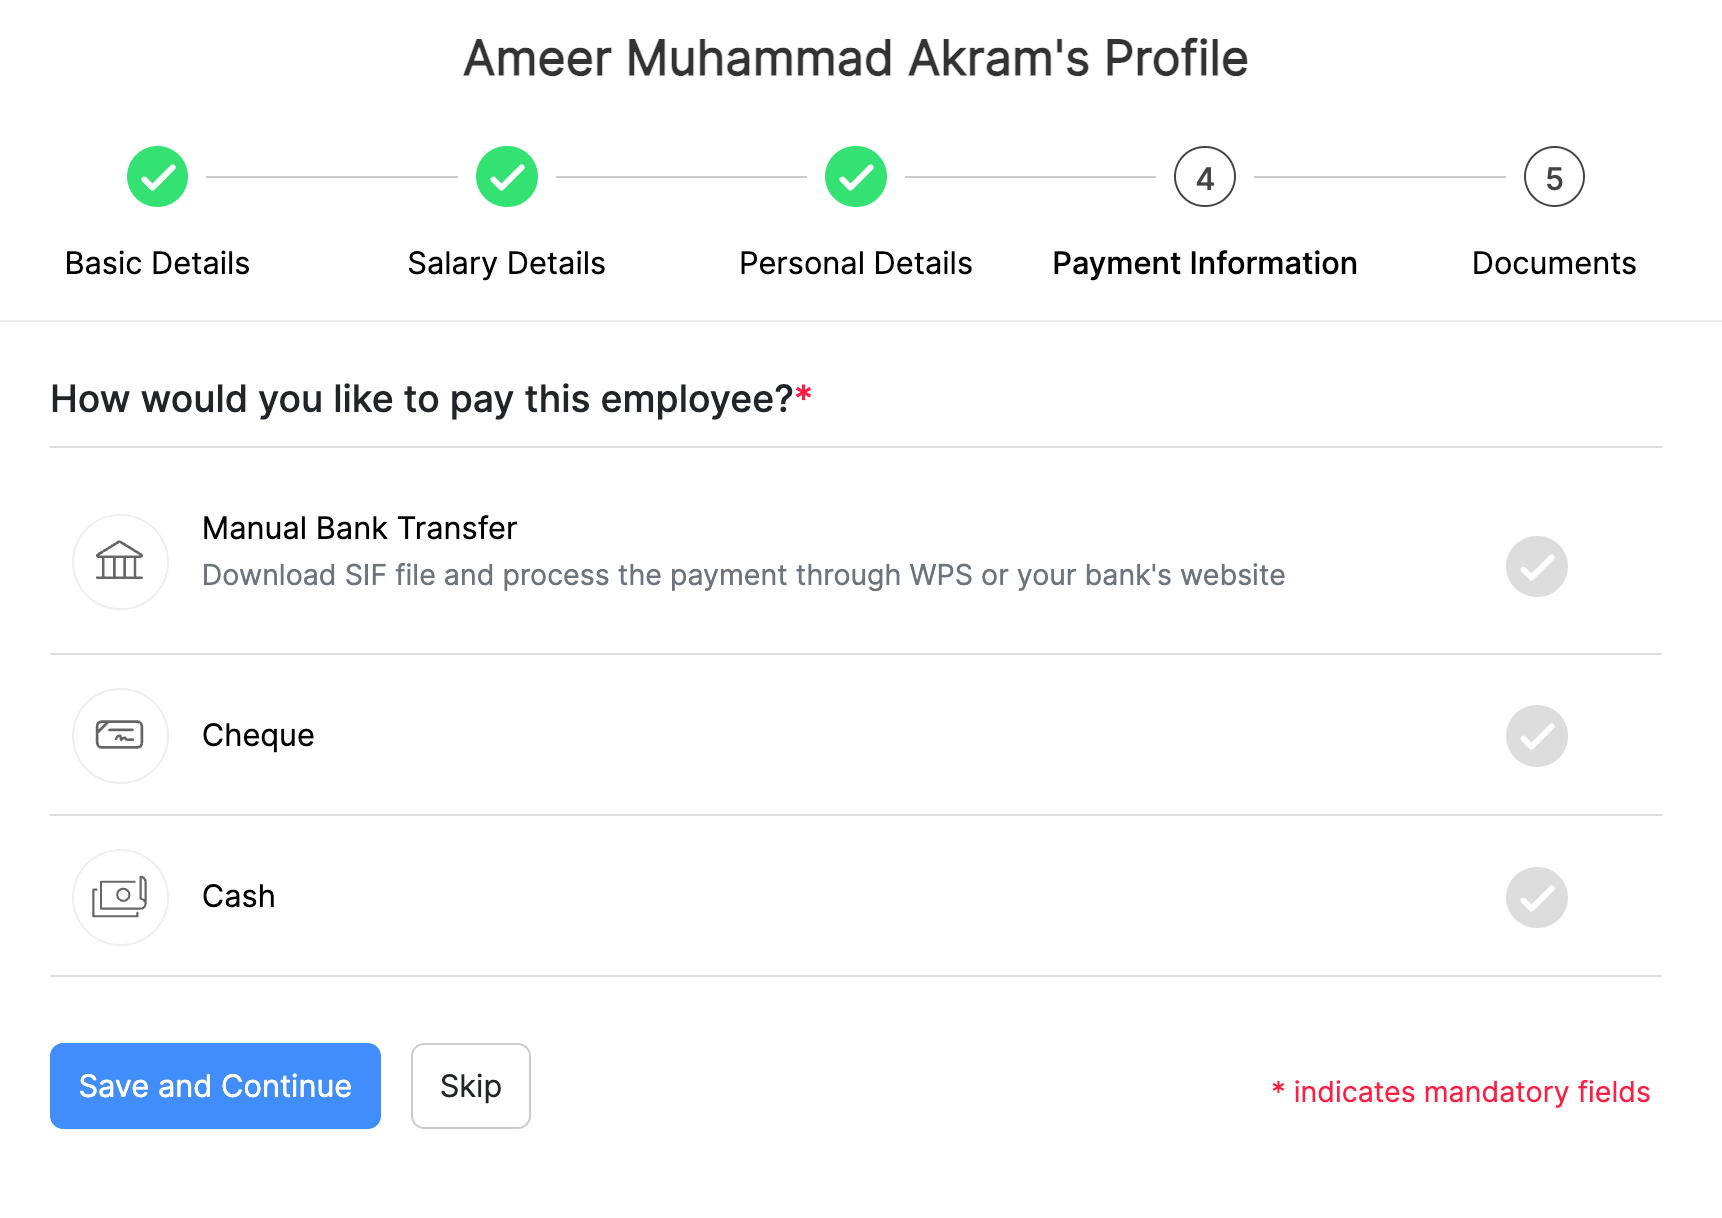
The Basics

STEP 4: Payment Info

Choose the payment method you would like to use to pay this employee.

  • Bank Transfer: Download SIF file and process the payment through WPS or your bank’s website.
  • Cheque: Manually send cheques to your employees and record it in Zoho Payroll.
  • Cash: Distribute cash salaries to your employees manually and record it in Zoho Payroll.
The Basics

Edit Employee

To update employee details such as mobile number, address or payment mode, you would have to edit the employee details.

To edit an employee:

  • Navigate to the Employees module on the left sidebar.
  • Select the employee whose details you want to edit.
  • Click the edit icon next to the section that you want to edit.
The Basics
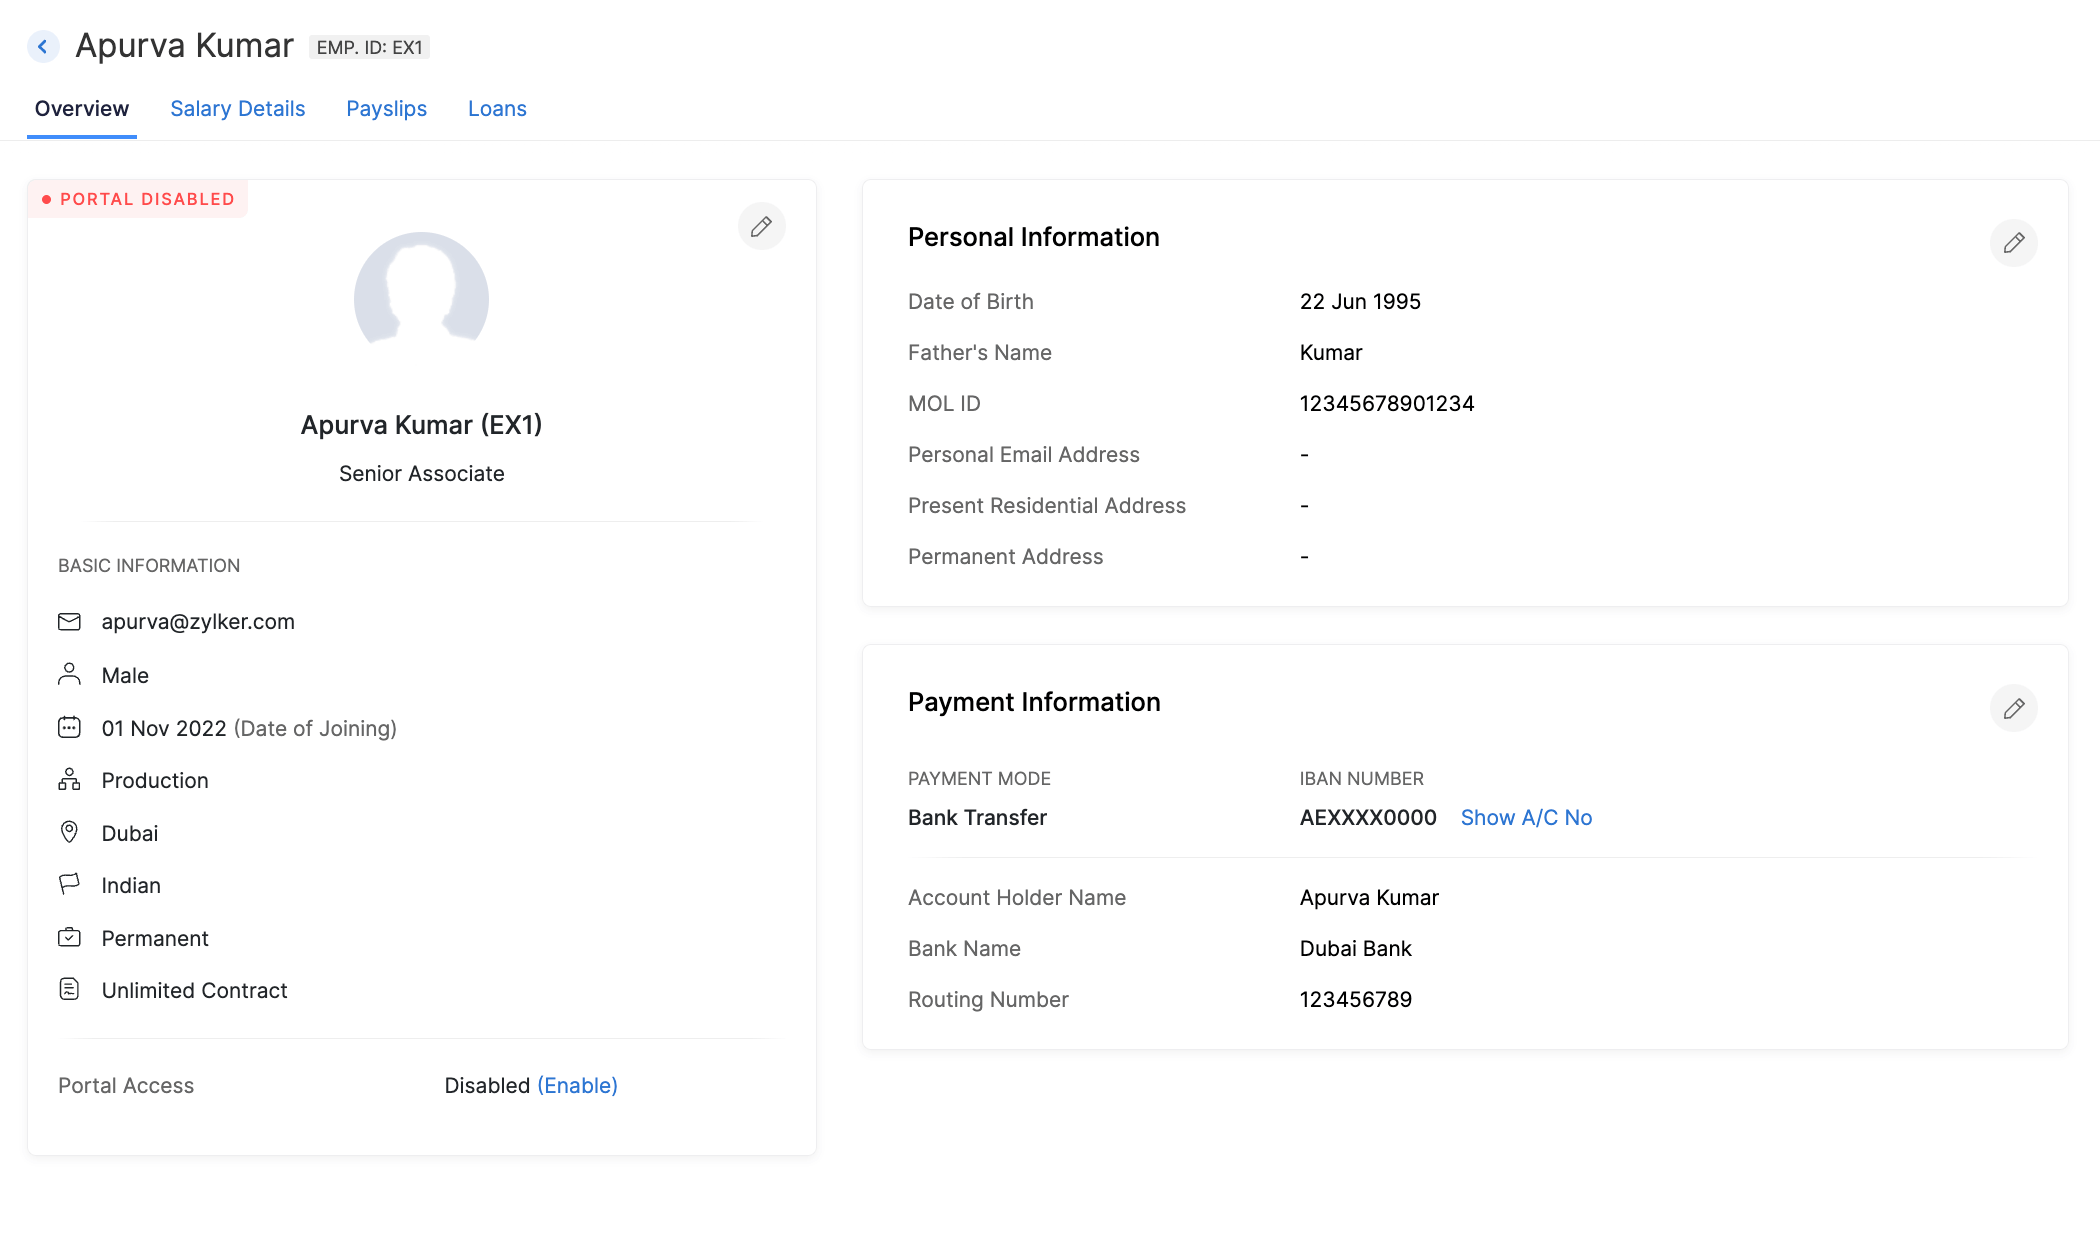
  • Click Save once you finish editing the details.

Delete Employee

If an employee is not a part of any current or completed pay runs, you can delete them from Zoho Payroll.

  • Navigate to the Employees module on the left sidebar.
  • Click the name of the employee whose details you want to delete.
  • Click More (three-doted icon) and select Delete Employee.

Employee Exit

If an employee exits from your organisation, whether it is due to termination by the employer, resignation, death, or due to some disabilities, you’ll have to Initiate Exit Process for that employee in Zoho Payroll.

To initiate exit process:

  • Go to Employees from the left sidebar and select the employee for whom you want to initiate the exit process.
  • Click More icon and select Initiate Exit Process.
The Basics
  • In the Employee Exit Details page, you’ll have to enter details regarding the exit.
The Basics
Field Description
Last Working Day Enter the last working day of the employee.
Reason for Exit Reason the employee is leaving the organisation.
Personal Email Address The employee’s personal email address in which you’ll be sending the full and final settlement payslip.
Notes Internal comment for initiating the exit process.
  • Click Proceed after entering all the details in the respective fields.

Process Final Settlement Payroll

Once you’ve entered the Exit details of the employee, you’ll be redirected to the Final Settlement Payroll page, where you can:

  • Enter the Organisation’s Payable Days and Employee’s Payable Days for that particular month.
  • Enter the LOP (Loss Of Pay) days, if any.
  • Enter Additional Earnings for the employee if any. Additional earning is an earning other than the employee’s regular salary.

Pro Tip: For employees who are working at the DIFC (Dubai International Financial Centre) work location, you have the option to include the gratuity amount and view how it is calculated. Once you have processed the full and final settlement for employees, you can access the gratuity-related data for these employees through the Gratuity Reports, specifically the DIFC-DEWS Summary and Gratuity Liability reports.

The Basics
  • If any amount has to be deducted from the employee’s salary, you can enter it under Deductions by clicking Add Deduction.
  • You can enable notice pay by checking the option under Notice Pay for the employees who are in their notice period.
  • If the organisation owes the employee, select Payable and if the employee owes the organisation, you can select Receivable.
  • Enter the amount in the Payable Amount or Receivable Amount field.
The Basics
  • If you want to enter any note in the final settlement slip, you can add them under Notes.
  • Click Save and Continue to proceed.
  • In the following page, click Submit to proceed with the exit. If you’re a user who has approve access then click the Submit and Approve button.

After getting the pay run approved, you’ll have to record payment in the Pay Runs page. Here’s how:

  • Go to Pay Runs and click View Details & Pay.
  • Click Record Payment on the top right corner of the page.
  • Select the payment date and check the Send payslip notification to exited employee option, if you want to send payslip notification to the employee.
  • Click Confirm to record the payment.
The Basics

Process Final Settlement For Multiple Employees At Once

If you’re looking to terminate multiple employees simultaneously, you have two methods to achieve this: importing data or manually adding employees to the final settlement payroll.

Method 1: Importing Data for Bulk Termination

Note: You can process bulk termination of employees by importing data in the correct format.

  • Go to Employees.

  • Click the More icon on the top right corner and select Import Data.

Bulk Settlement
  • Choose Employee Exit Details as the type of import.
Bulk Settlement

Pro-tip: Download a sample .csv or .xls file to understand the correct format.

  • Ensure your bulk termination file aligns with the correct format.
  • Click Next.
  • Ensure that Zoho Payroll Fields are correctly mapped with Import File Fields.
  • Click Import.

After importing the file, review the details in the bulk and final settlement payroll and proceed with processing it.

Method 2: Manually Adding Employees to Bulk Final Settlement Payroll

  • Go to Employees in the left sidebar.
  • Select the employee you wish to terminate.
  • Click the More icon and select Initiate Exit process.
Bulk Settlement
  • Enter the exit details and select pay as per pay schedule as the option for when you want to settle the final pay.
Bulk Settlement
  • A final settlement payroll will be created.

Note: Do not process the final settlement payroll until you’ve added all other employees to it for bulk termination.

To add other employees to the final settlement payroll:

  • Initiate the exit process for each additional employee.
  • Select pay as per pay schedule as the option.

Once done, these employees will be included in the final settlement payroll, which now becomes a bulk final settlement payroll.

Bulk Settlement

With these steps, you can efficiently handle bulk termination and streamline the final payroll process for multiple employees.

Filter Exited Employees

You can filter exited employees using the Exited Employees filter in the Employees page. To do that:

  • Go to Employees and click the filter dropdown on the top-left corner.
The Basics
  • Select Exited Employees from the dropdown and you’ll be able to view all the employees who exited from your organisation.

You can also filter employees based on their reason for exit. Here’s how:

  • Click the Reason for Exit dropdown on the top left corner.
  • Select the exit type.
The Basics

Revert Exit Process

There might be cases where you might rehire an employee. In such cases, you can revert the exit process. Here’s how:

  • Go to Employees and select the Exited Employees filter.
  • Select the employee for whom you want to revert the exit process.
  • In the Overview page, click the More icon and select Revert Exit Process.
  • In the following popup, enter the reason for reverting the exit process and click Proceed.
  • After clicking Proceed, you’ll be redirected to the Employee’s Profile. You’ll have to enter the salary details of the employee again in the Salary Details page.

Other information of the employee will be populated automatically as per the information entered earlier. You can edit those details if needed.


Salary Revision

If your employee reaches a predefined goal or has shown continued excellent performance, you can reward them by giving them a pay hike. You can do this by revising their salary from the Employees module.

  • Go to the employee details page.
  • Click the Salary Details tab.
  • Click Revise Salary. You can only revise your employee’s salary if they are involved in at least one completed pay run.
The Basics
  • Increase the employee’s revised earnings.
  • You can also change the amount allocated for each earning and reimbursement component.
  • Enter the Effective From month and Payout Month.
  • Effective From - The revised salary will be applied to the employee from this month.
  • Payout Month - The revised salary will be paid to the employee on this month.
The Basics
  • For example, if the Effective From month is May 2023 and the Payout Month is July 2023, the existing salary will be paid on May and June. However, the excess amount for those months will be kept aside and paid on July as arrears, along with the revised salary.
  • Click Save.

The salary revision will be applied in pay runs once it is approved from the Approvals module.


Request a demo

*
*
*
*
*
*
*
*

By clicking the "Submit" button, you agree to our Privacy Policy.