
Zoho Payroll - ICICI Bank Integration
NOTES
The integration is supported only in the India edition of Zoho Payroll created under the zoho.in domain.
Transaction charges, if any, will apply as per ICICI Bank’s Service Charges. These charges vary by account and customer profile. Zoho Payroll does not levy any additional fees.
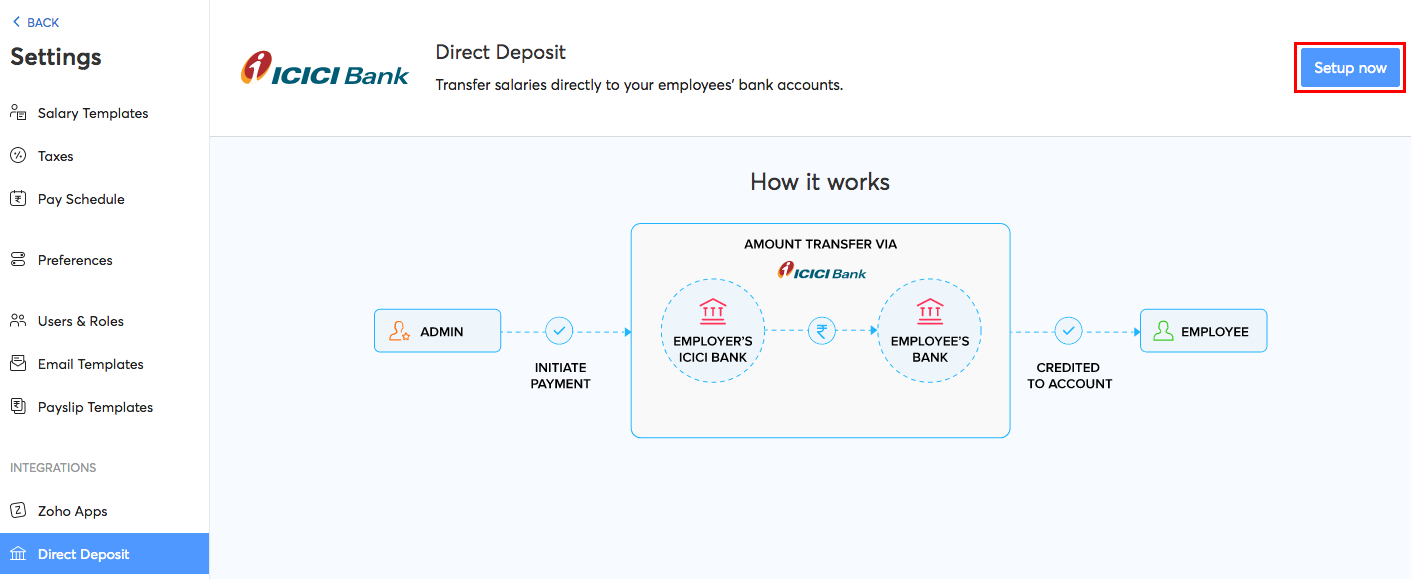
Integrate with ICICI Bank and deposit salaries directly from Zoho Payroll to your employees accounts. Let’s take a scenario to explain this better:
Scenario: Peter runs a medium scale cloud computing firm. At the end of each month, ensuring that all the employees get paid correctly and on time was manual and complicated. It involved preparing bank advice in the prescribed format, uploading it in the bank’s portal, ensuring the accuracy of account details and so on. Once he got to know about the automatic salary payments, he integrated his Zoho Payroll organisation with ICICI Bank. He’s now able to credit salaries directly to employees accounts automatically without even logging out of his application.
Connecting to ICICI Bank
PREREQUISITES You’ll need the following before setting up the integration:
- A corporate current account with ICICI Bank.
- An active paid subscription to any one of the Zoho Finance apps.
- Multi-Factor Authentication (MFA) enabled for your Zoho account (except Security Key and Passkey). Learn more about MFA.
Connect your ICICI Bank Corporate account to Zoho Payroll by following these simple steps:
Setup
- Go to Zoho Payroll > Settings > Integrations > Direct Deposit.
- Click the Setup Now button to begin setup.
You will be prompted to fill in the necessary details to complete your setup.
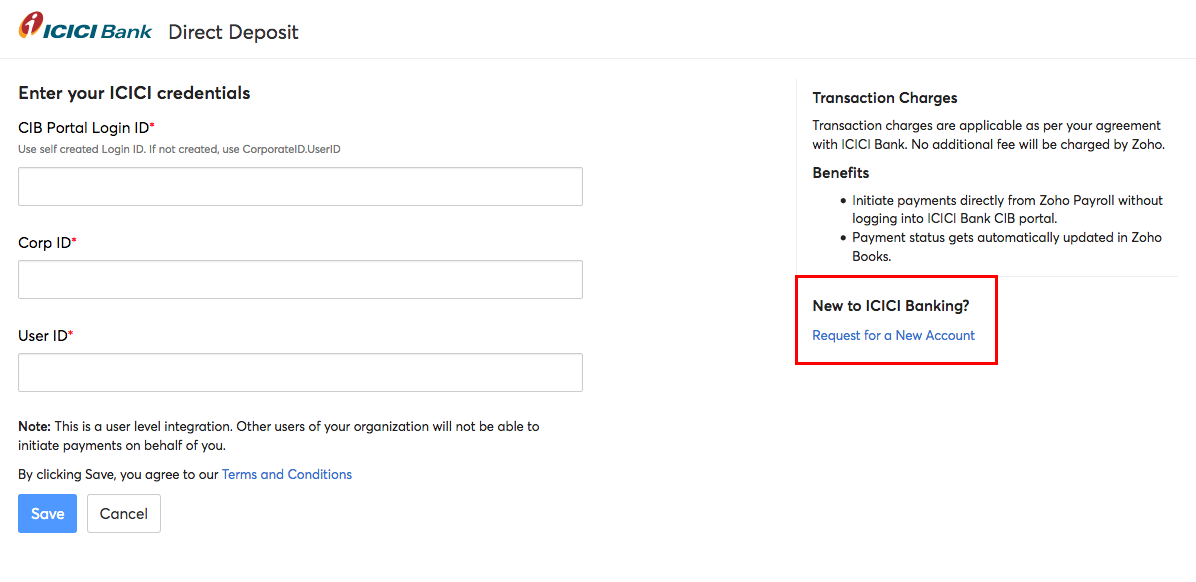
- If you are a new user to ICICI Bank
- If you are an existing user of ICICI Bank
If you are a new user to ICICI Bank:
- Request for a new bank current account by clicking Request for a New Account.
- Enter the required details in the screen that follows.
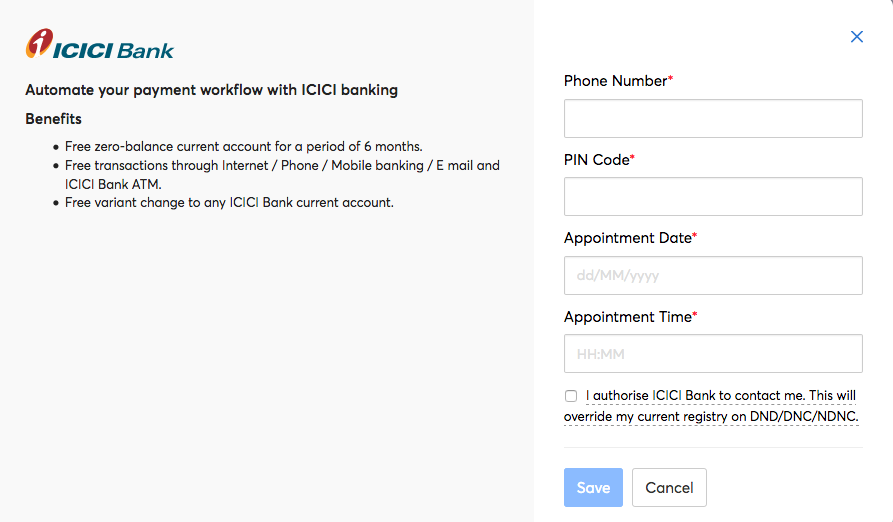
- Click Save.
The bank executives will get in touch with you and help you open a new account. Once you have received your User ID and Corp ID, you will be able to integrate your ICICI Bank account with Zoho Payroll.
If you are an existing user of ICICI Bank:
- Click the Setup Now button.
- Enter your CIB Portal Login ID if you’ve created one in the portal. If you haven’t created one earlier, type your CorporateID.UserID in the field.
- Enter your Corporate ID and User ID.
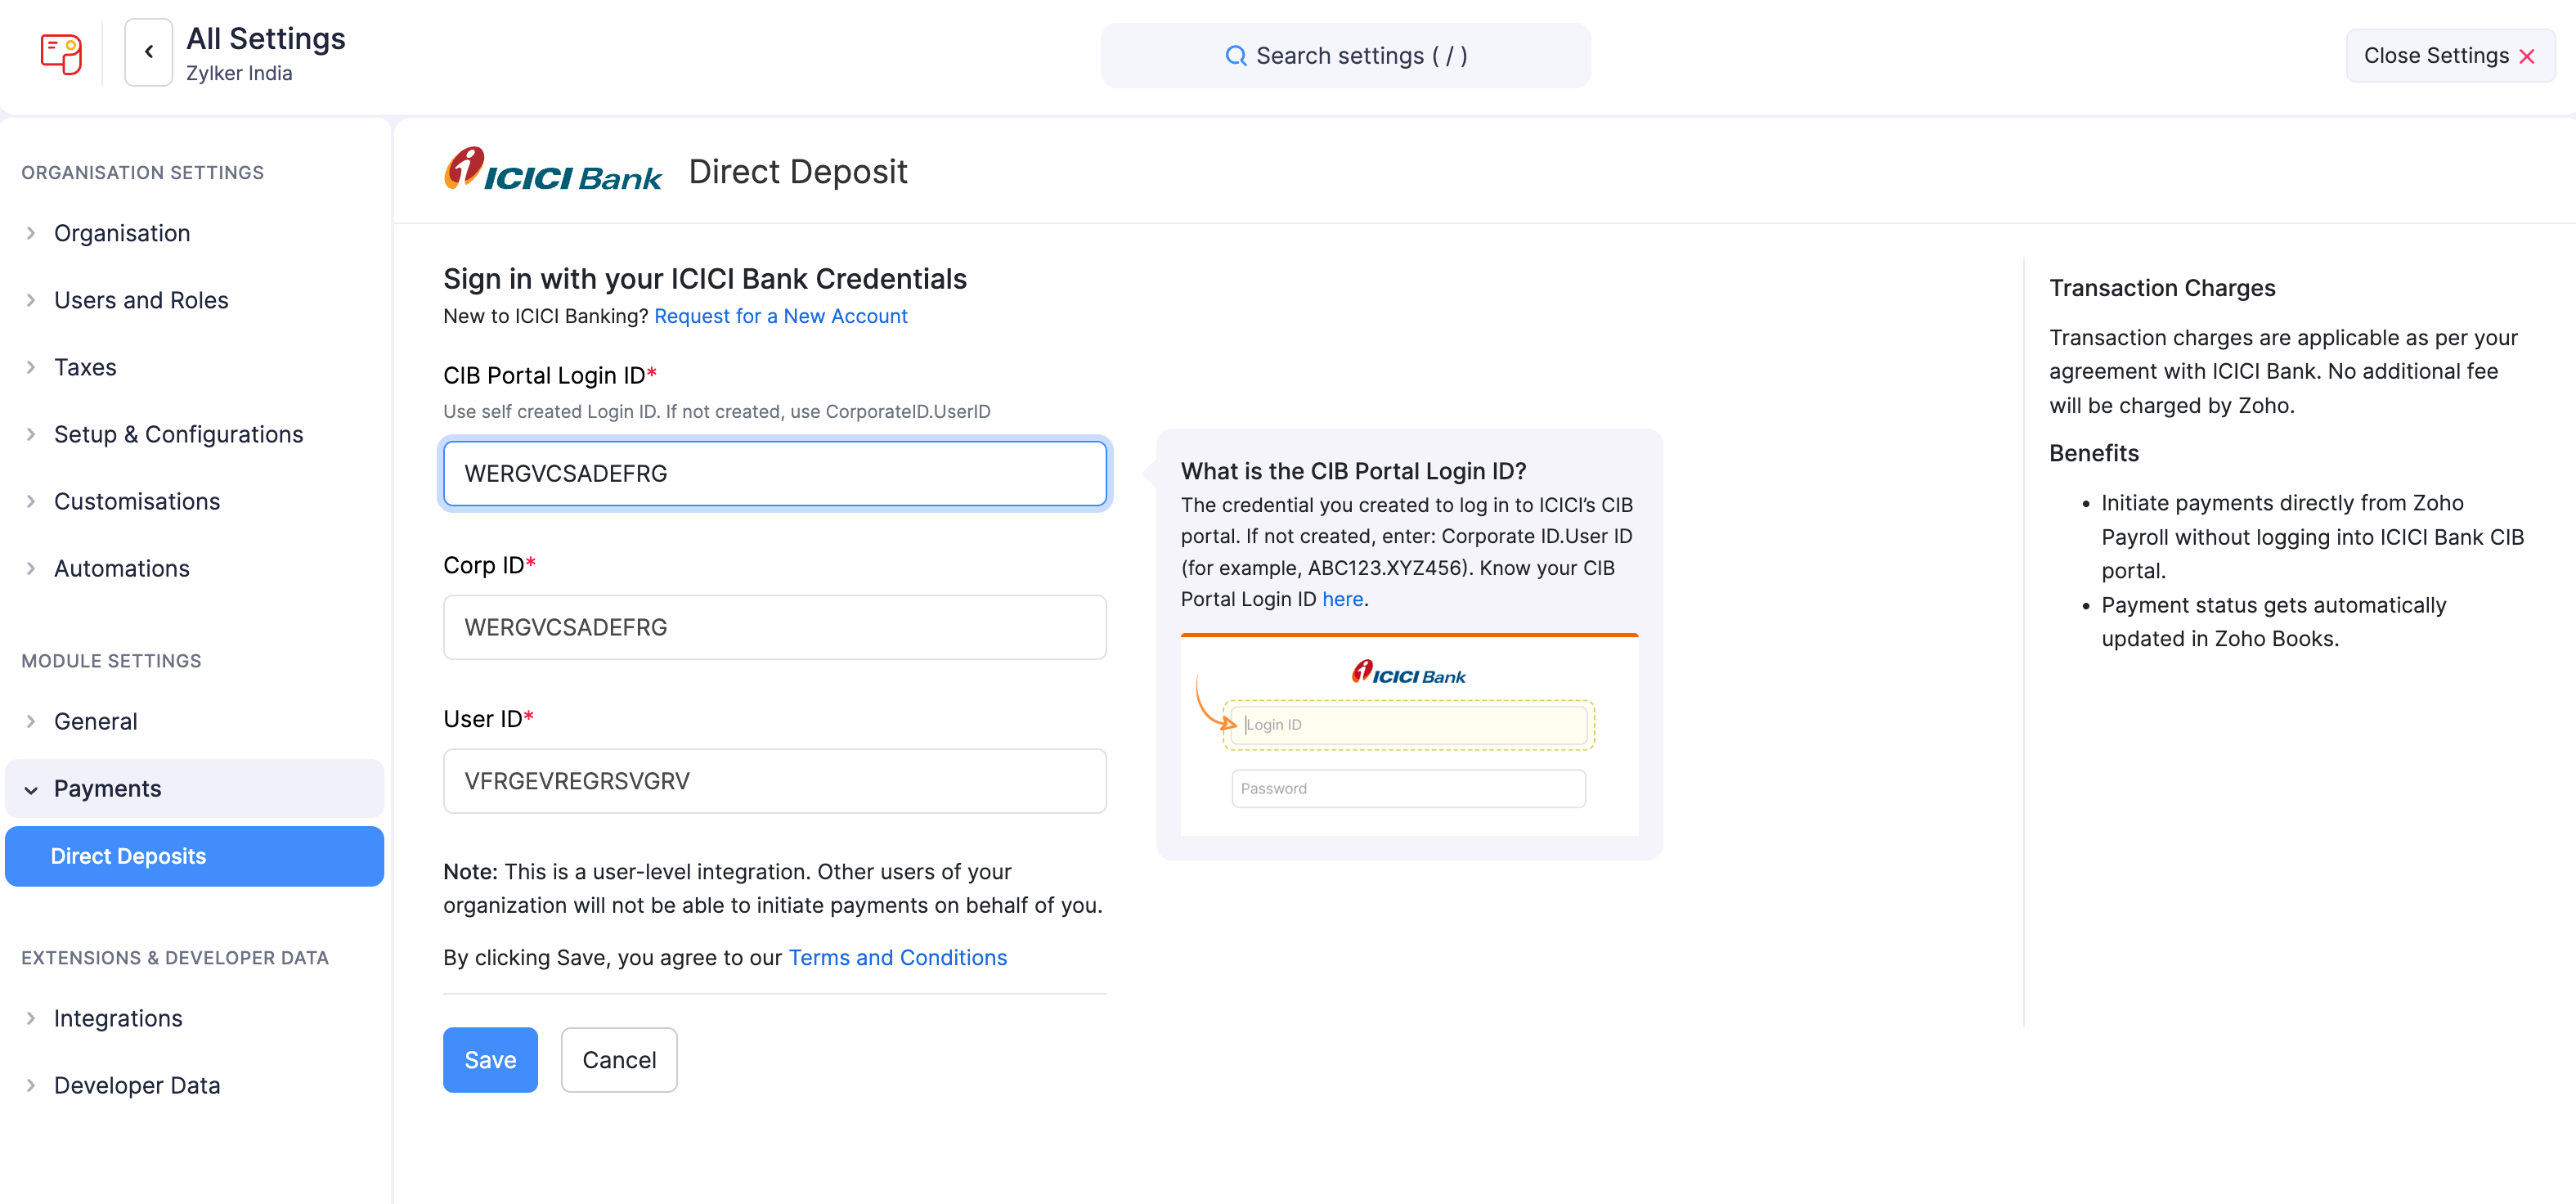
- Click Save.
Warning: Once you have set up the integration with these credentials, you will not be able to edit them in Zoho Payroll. You must disable the integration and set it up once again with the new credentials.
Document Verification
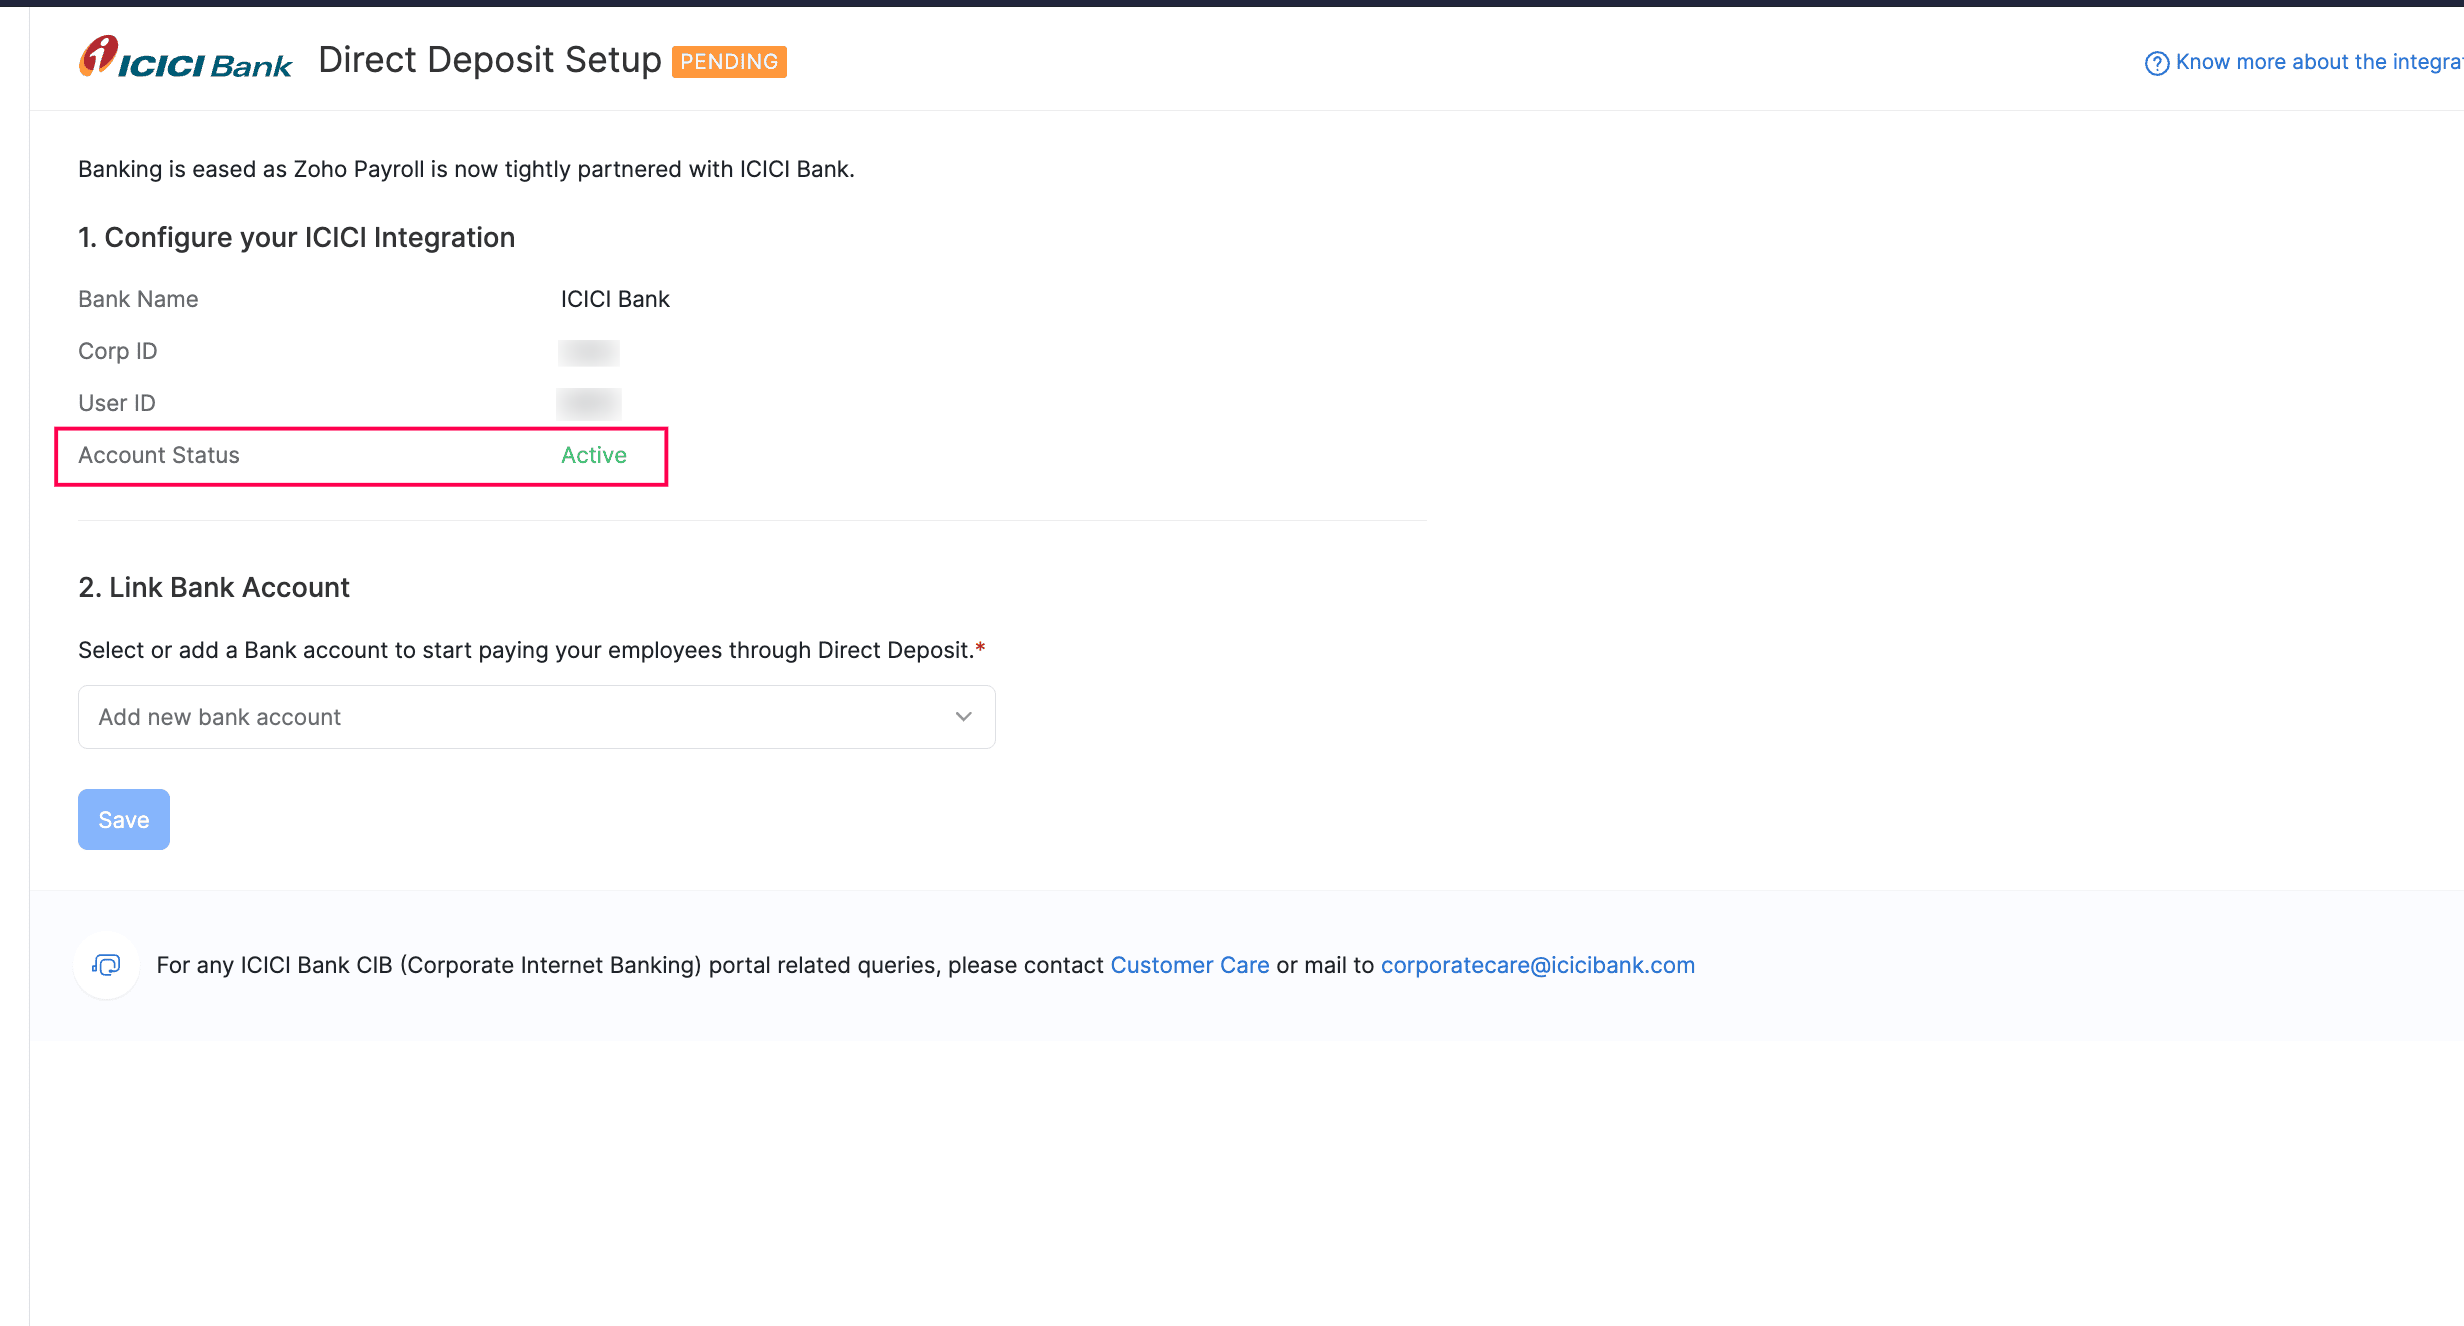
After setting up the integration in Zoho Payroll, you’ll need to contact your ICICI Bank representative or relationship manager to complete the document verification. Submit the documents they request for verification. Once the verification is complete, the Account Status will update to Active.
Note: ICICI Bank may charge a processing fee for the document verification process.
Approval
After initiating the integration, you need to approve it in the ICICI Bank CIB Portal to complete the integration. Until then, your Account Status will be Pending.
To approve the integration:
- Click the Approve Now button in the screen that appears after setting up the integration.
Or
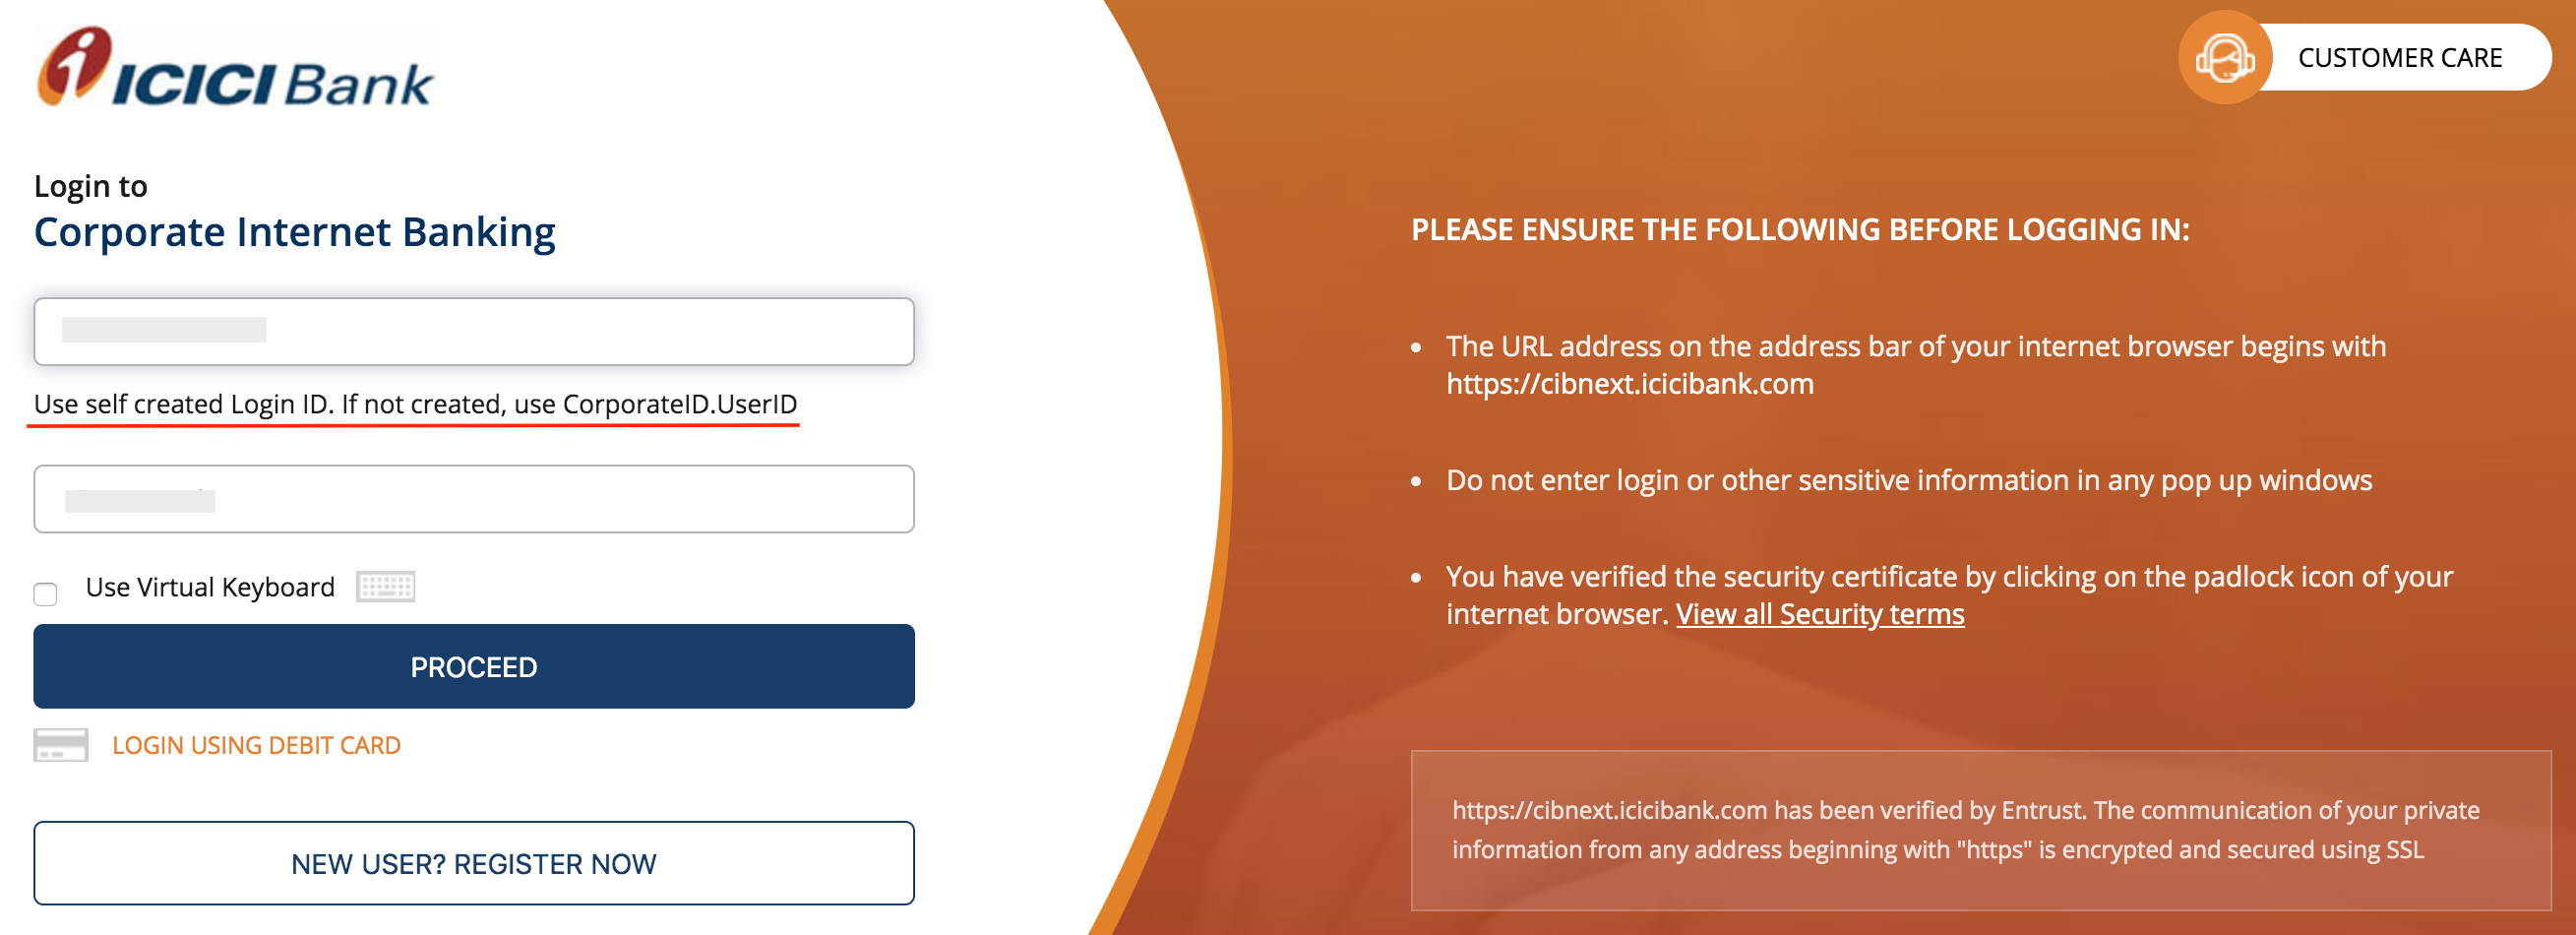
- Go to ICICI Bank CIB Portal.
- Enter your ICICI Bank CIB Login ID and Password.
Insight: If you haven’t created a Login ID for your CIB Portal, enter your CorporateID.UserID in the given field.
- Click Proceed to login.
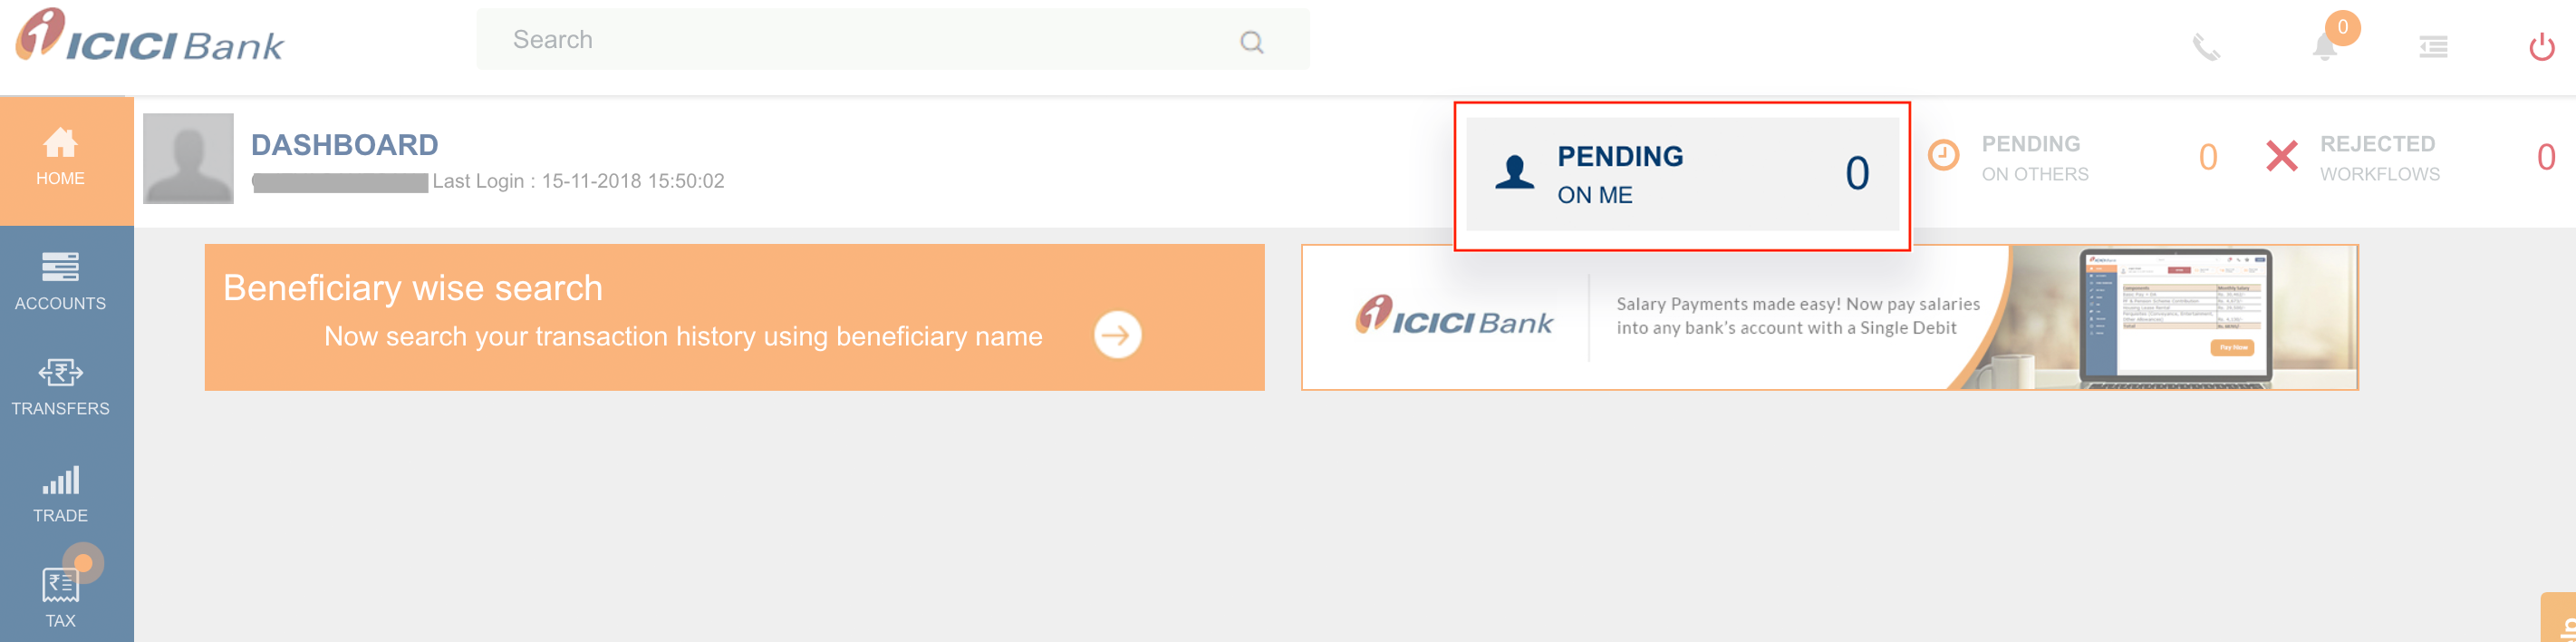
- Click Pending on Me from the top bar of the portal’s Dashboard.
- Go to the Connected Banking Approvals tab.
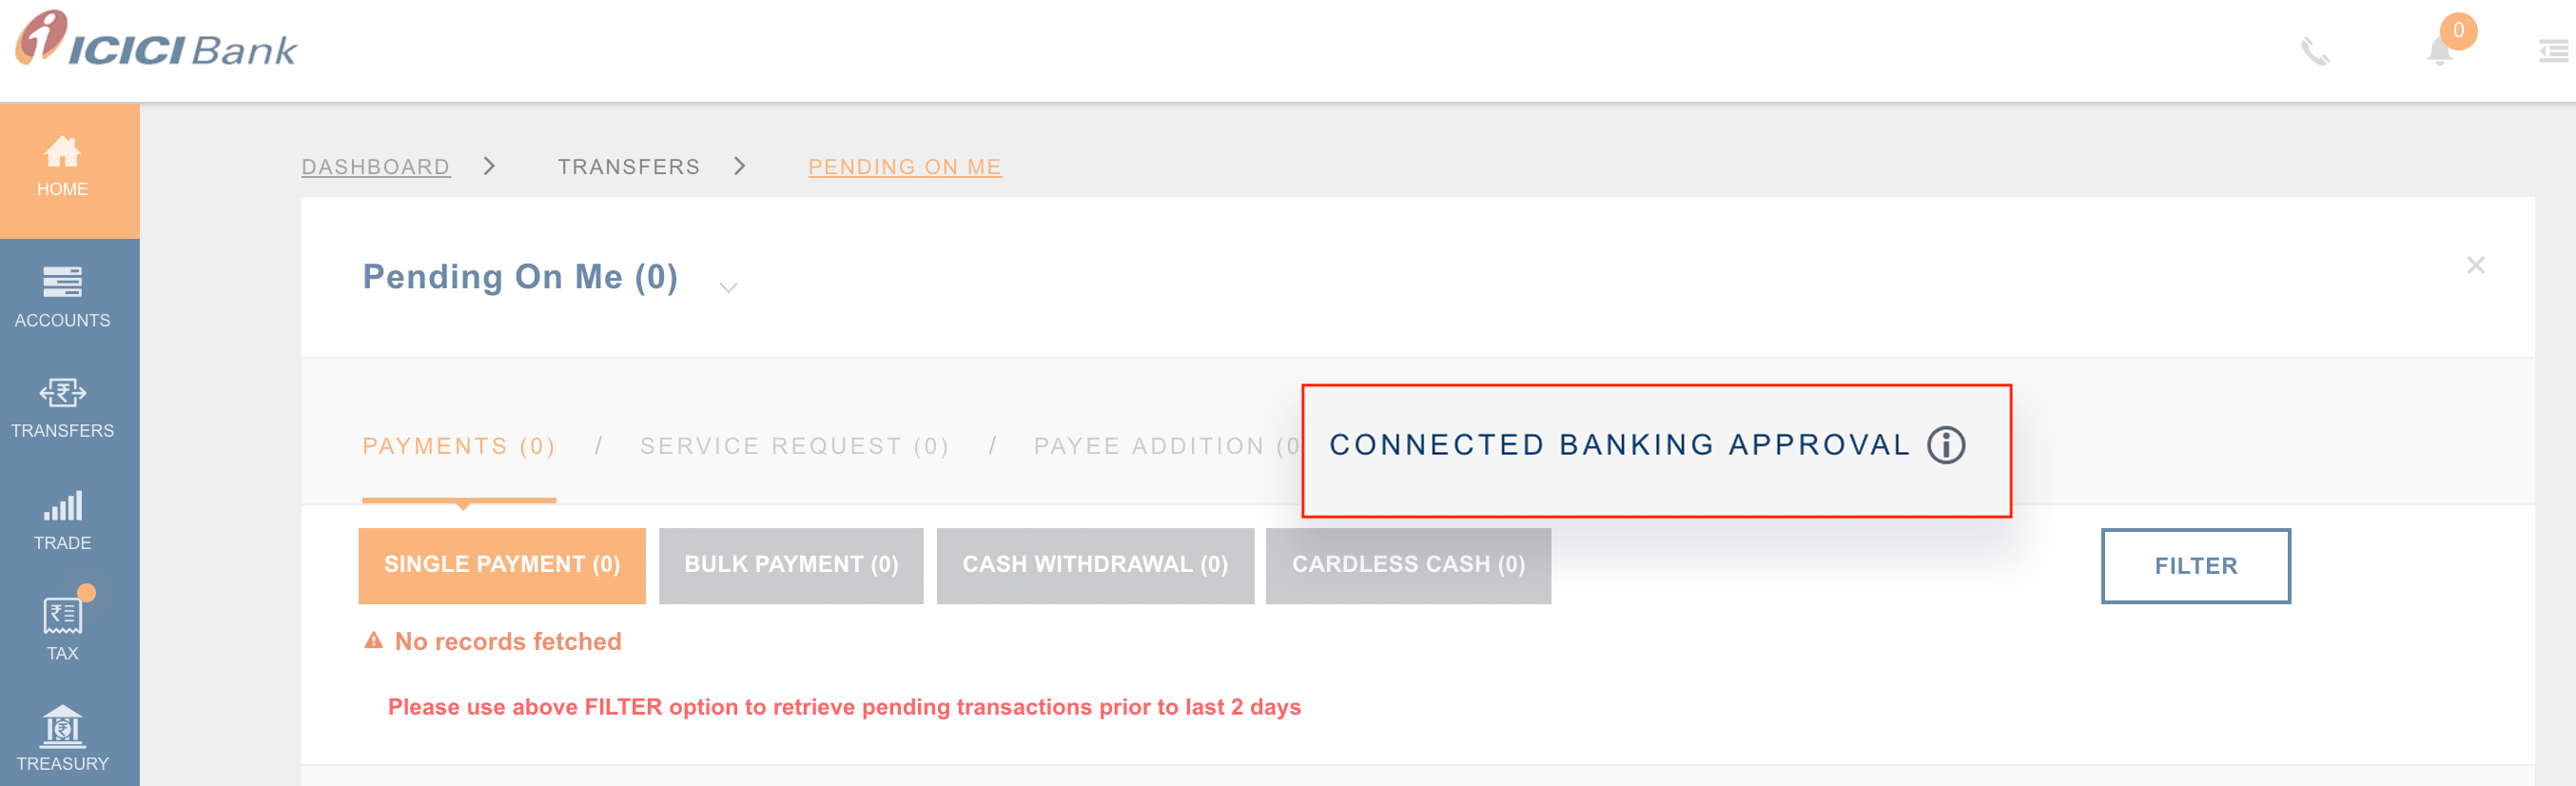
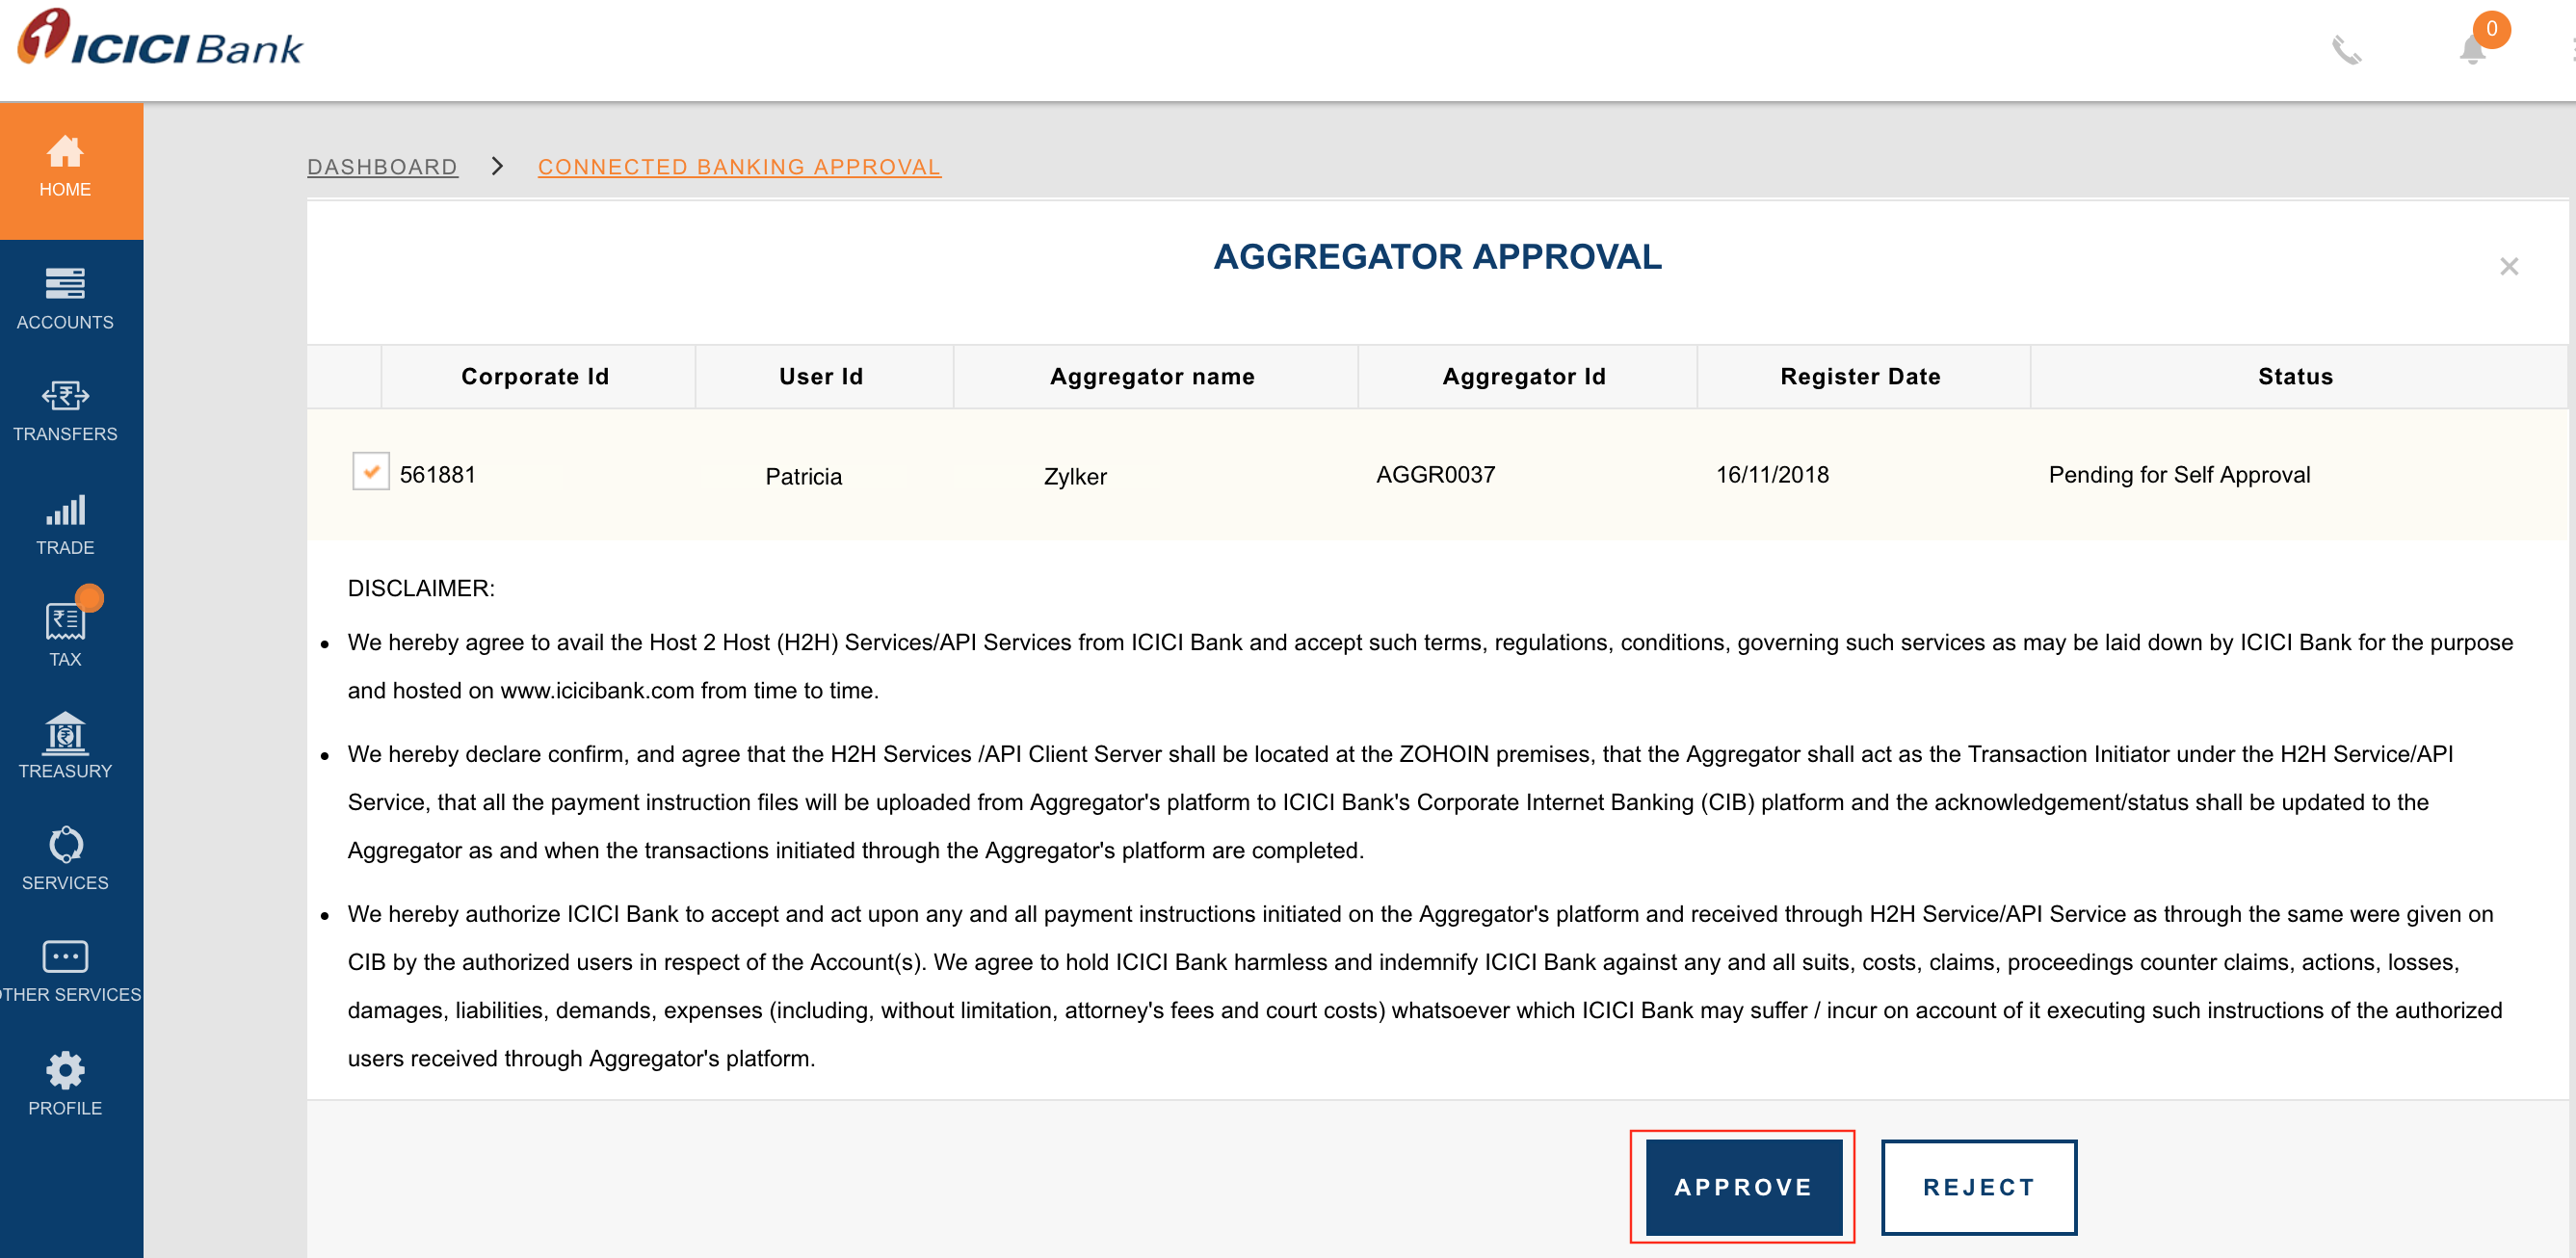
- Check the box near the Corporate ID that you would like to approve.
- Read the Terms and Conditions and click Approve.
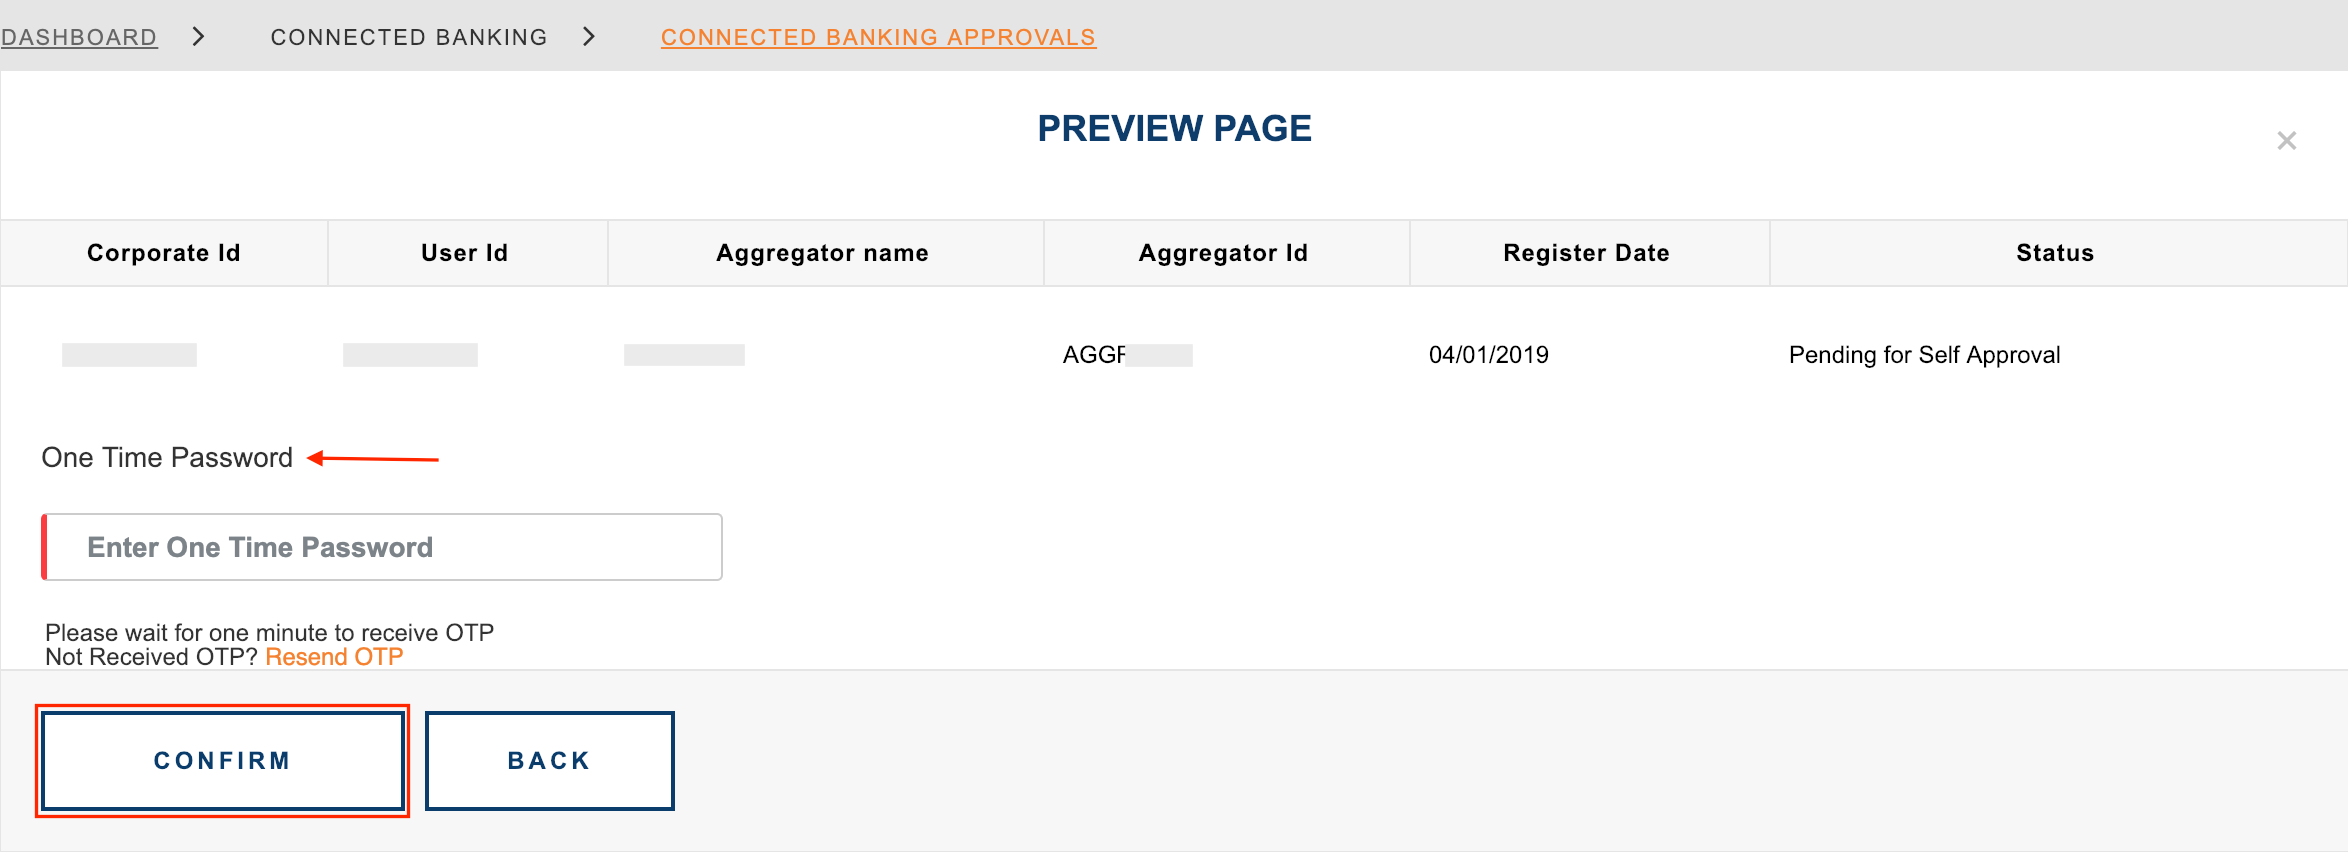
- In the screen that follows, enter the One Time Password sent to your registered mobile number.
- Complete the integration by clicking Confirm.
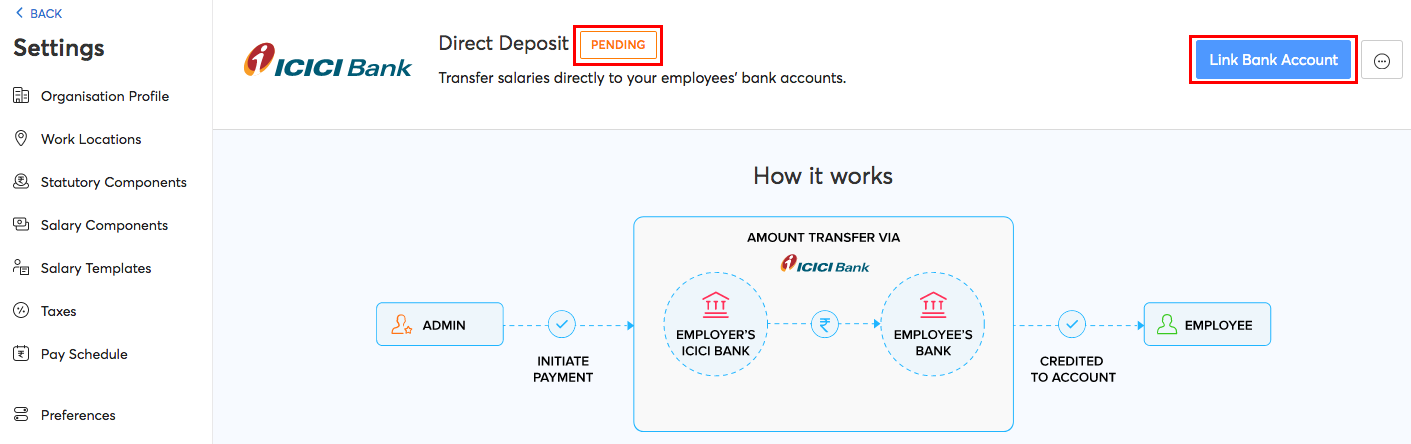
Your integration will be approved but your status will be Pending untill you Link your Bank Account.
Link Bank Account
- Go to Settings > Integrations > Direct Deposits.
- ICICI Bank will be listed there and the status will be pending.
- Click the Link Bank Account option.
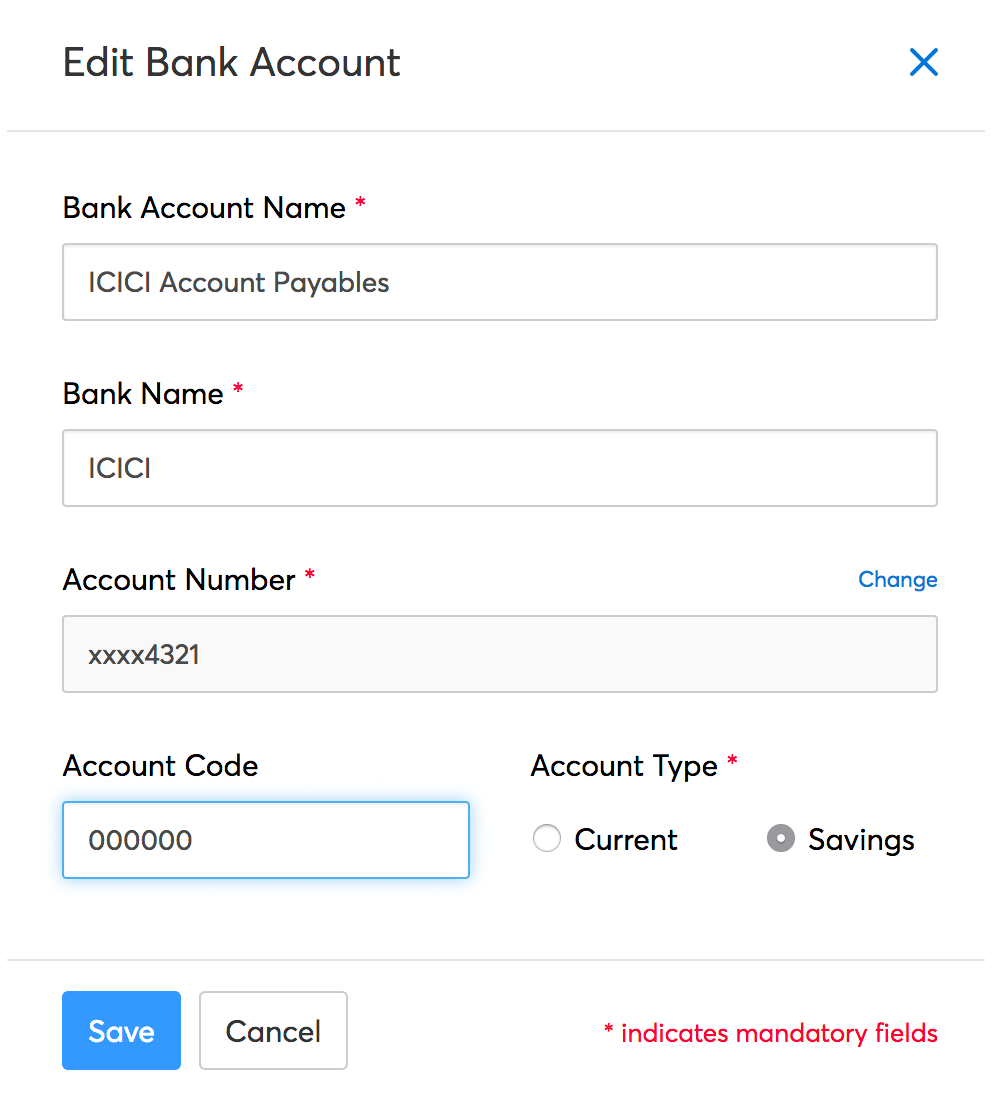
- Add a new bank account or select an account from the drop-down.
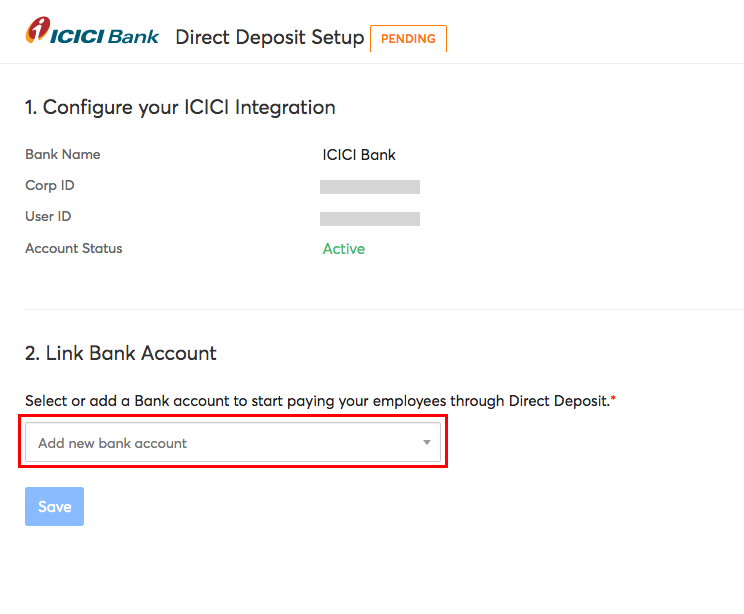
- Click + Add New Bank Account in the drop-down to create a new account.
- Enter your bank account details in the page that follows and click Add.
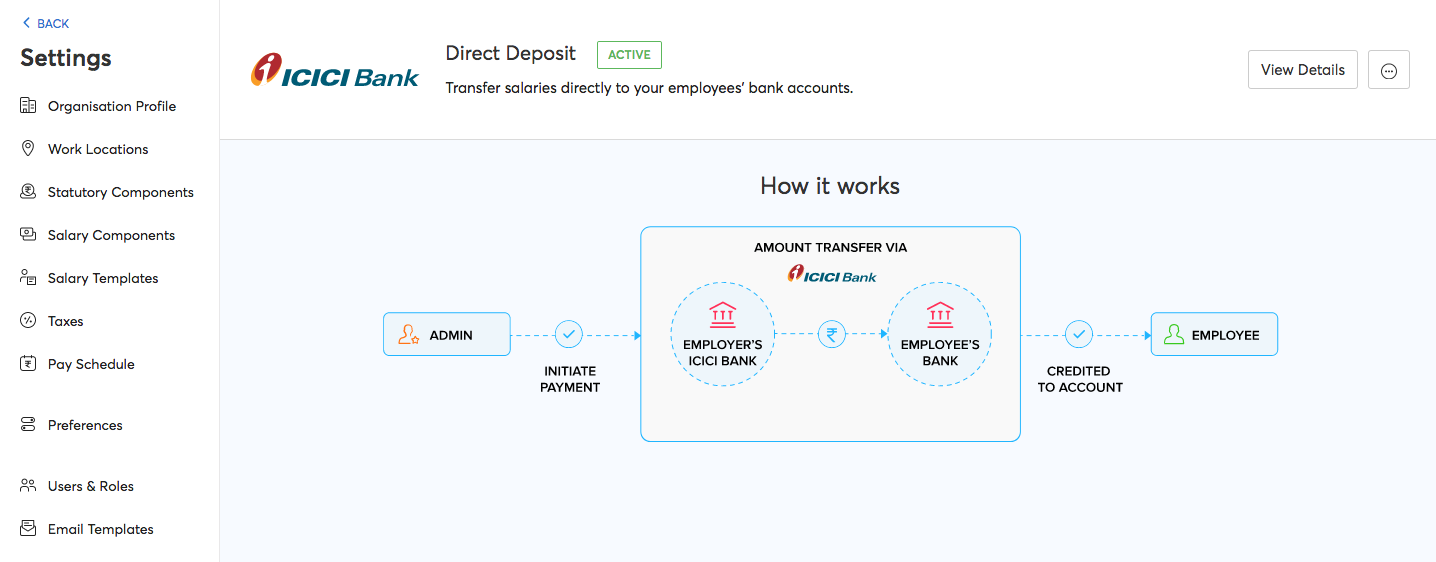
Once done, the status of your integration will be Active.
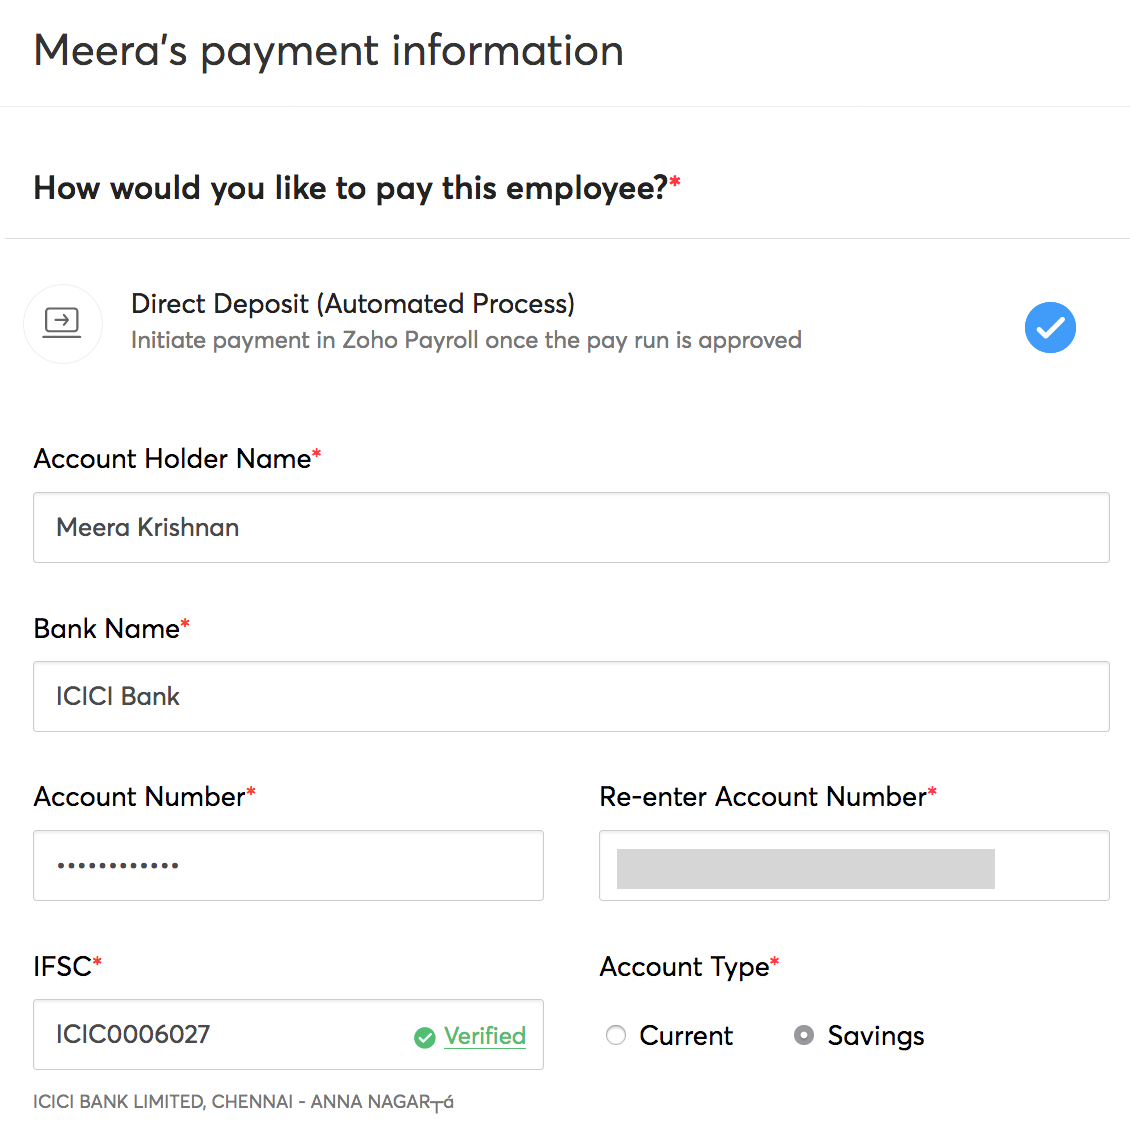
Adding employee’s bank account detail
Once you have integrated your ICICI Bank account, you can start making payments from Zoho Payroll. But you’ll have to ensure you’ve added all payment related details to the employee profile. To do so:
- Log in to Zoho Payroll.
- Navigate to the Employees module and select the particular employee or create a new employee.
- In case of a new employee, enter all the details in the employee profile such as Basics, Salary Details, Personal Info and mark the payment mode as Direct Deposit in Payment Info section.
- Enter the bank account details and click Save and Continue. The IFSC will be verified once you enter it.
In case of an existing employee, edit and update the payment mode to Direct Deposit.
Making payments via Zoho Payroll
Once you have added your employee’s bank account details, you can start crediting salaries to the employees’ accounts. Here’s how:
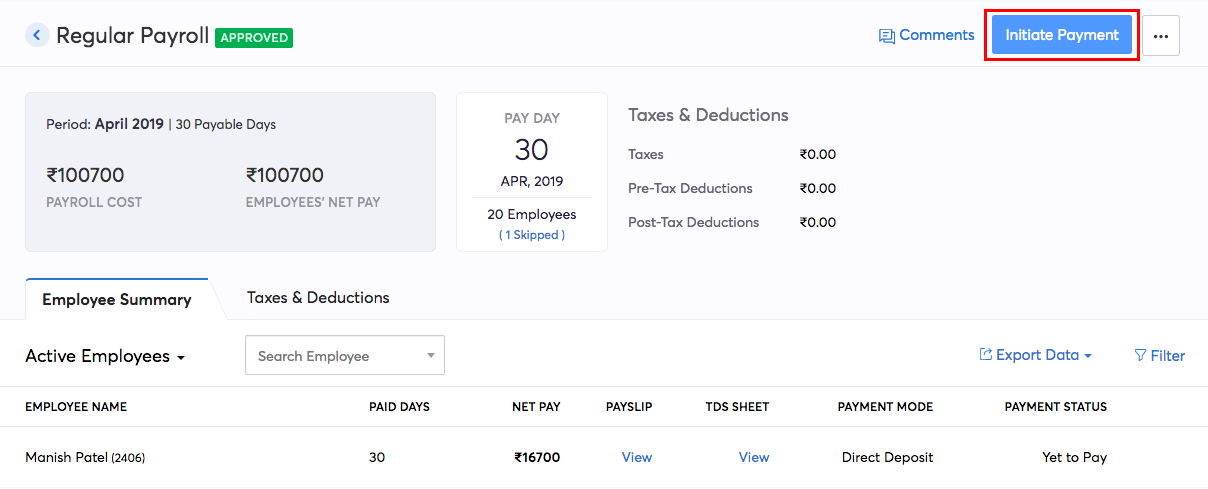
- Go to Zoho Payroll > Pay Runs.
- Generate a new pay run for the particular period and approve it.
- Click Initiate Payment in the top right side of the page. The Payment Status will be Yet to Pay.
Note: ICICI payments can only be initiated on business days between 01:00 AM and 06:30 PM.
The payment will be initiated only for the Direct Deposit enabled employees.
- Enter the One Time Password (OTP) sent to your registered mobile number in the pop-up that appears.
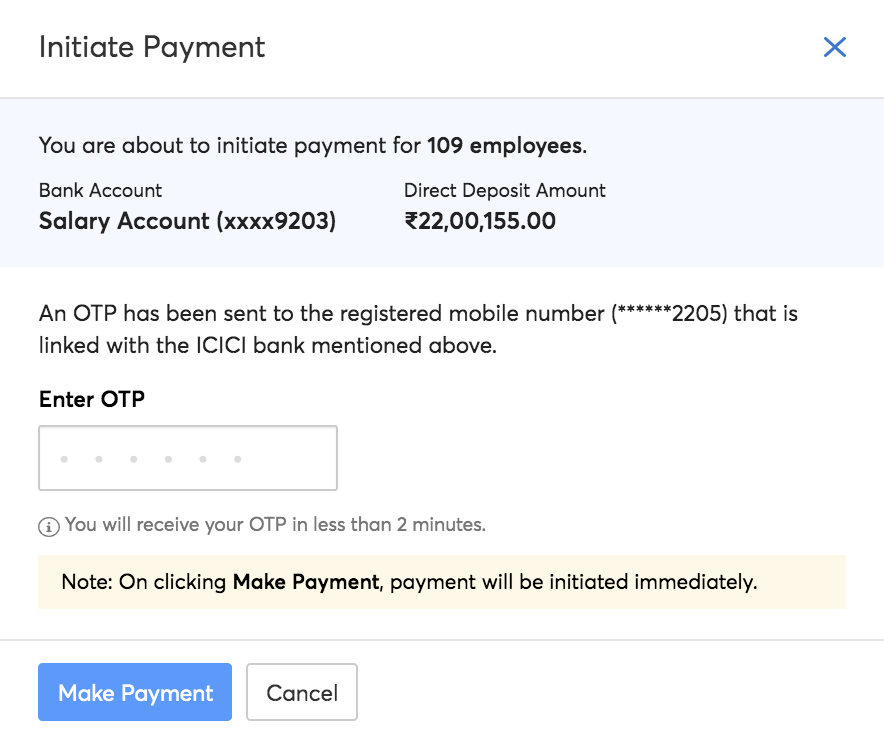
The default payment mode for the payments initiated from Zoho Payroll using the ICICI Bank integration will be NEFT.
- Click Make Payment to make the payment.
The status of the payment will be available 30 minutes after initiating the payment. If the payment is successful, the status will change to Paid and if the payment has failed, you’ll always be able to re-initiate the payment from Zoho Payroll. Alternatively, if payment fails, you can make the payment offline and record it in Zoho Payroll.
Approving Transactions In the CIB Portal
If you’ve enabled an approval workflow in your ICICI Bank CIB portal as a security measure, you will have to approve the payment in the portal for it to be initiated. To approve payments in the portal:
- Login to your ICICI Bank CIB Portal.
- Click the Pending on Me notification from the Dashboard. (or)
- Navigate to the Transfers module from the homepage and click Pending on Me.
- You will be able to find the transactions Pending for Approval listed under it.
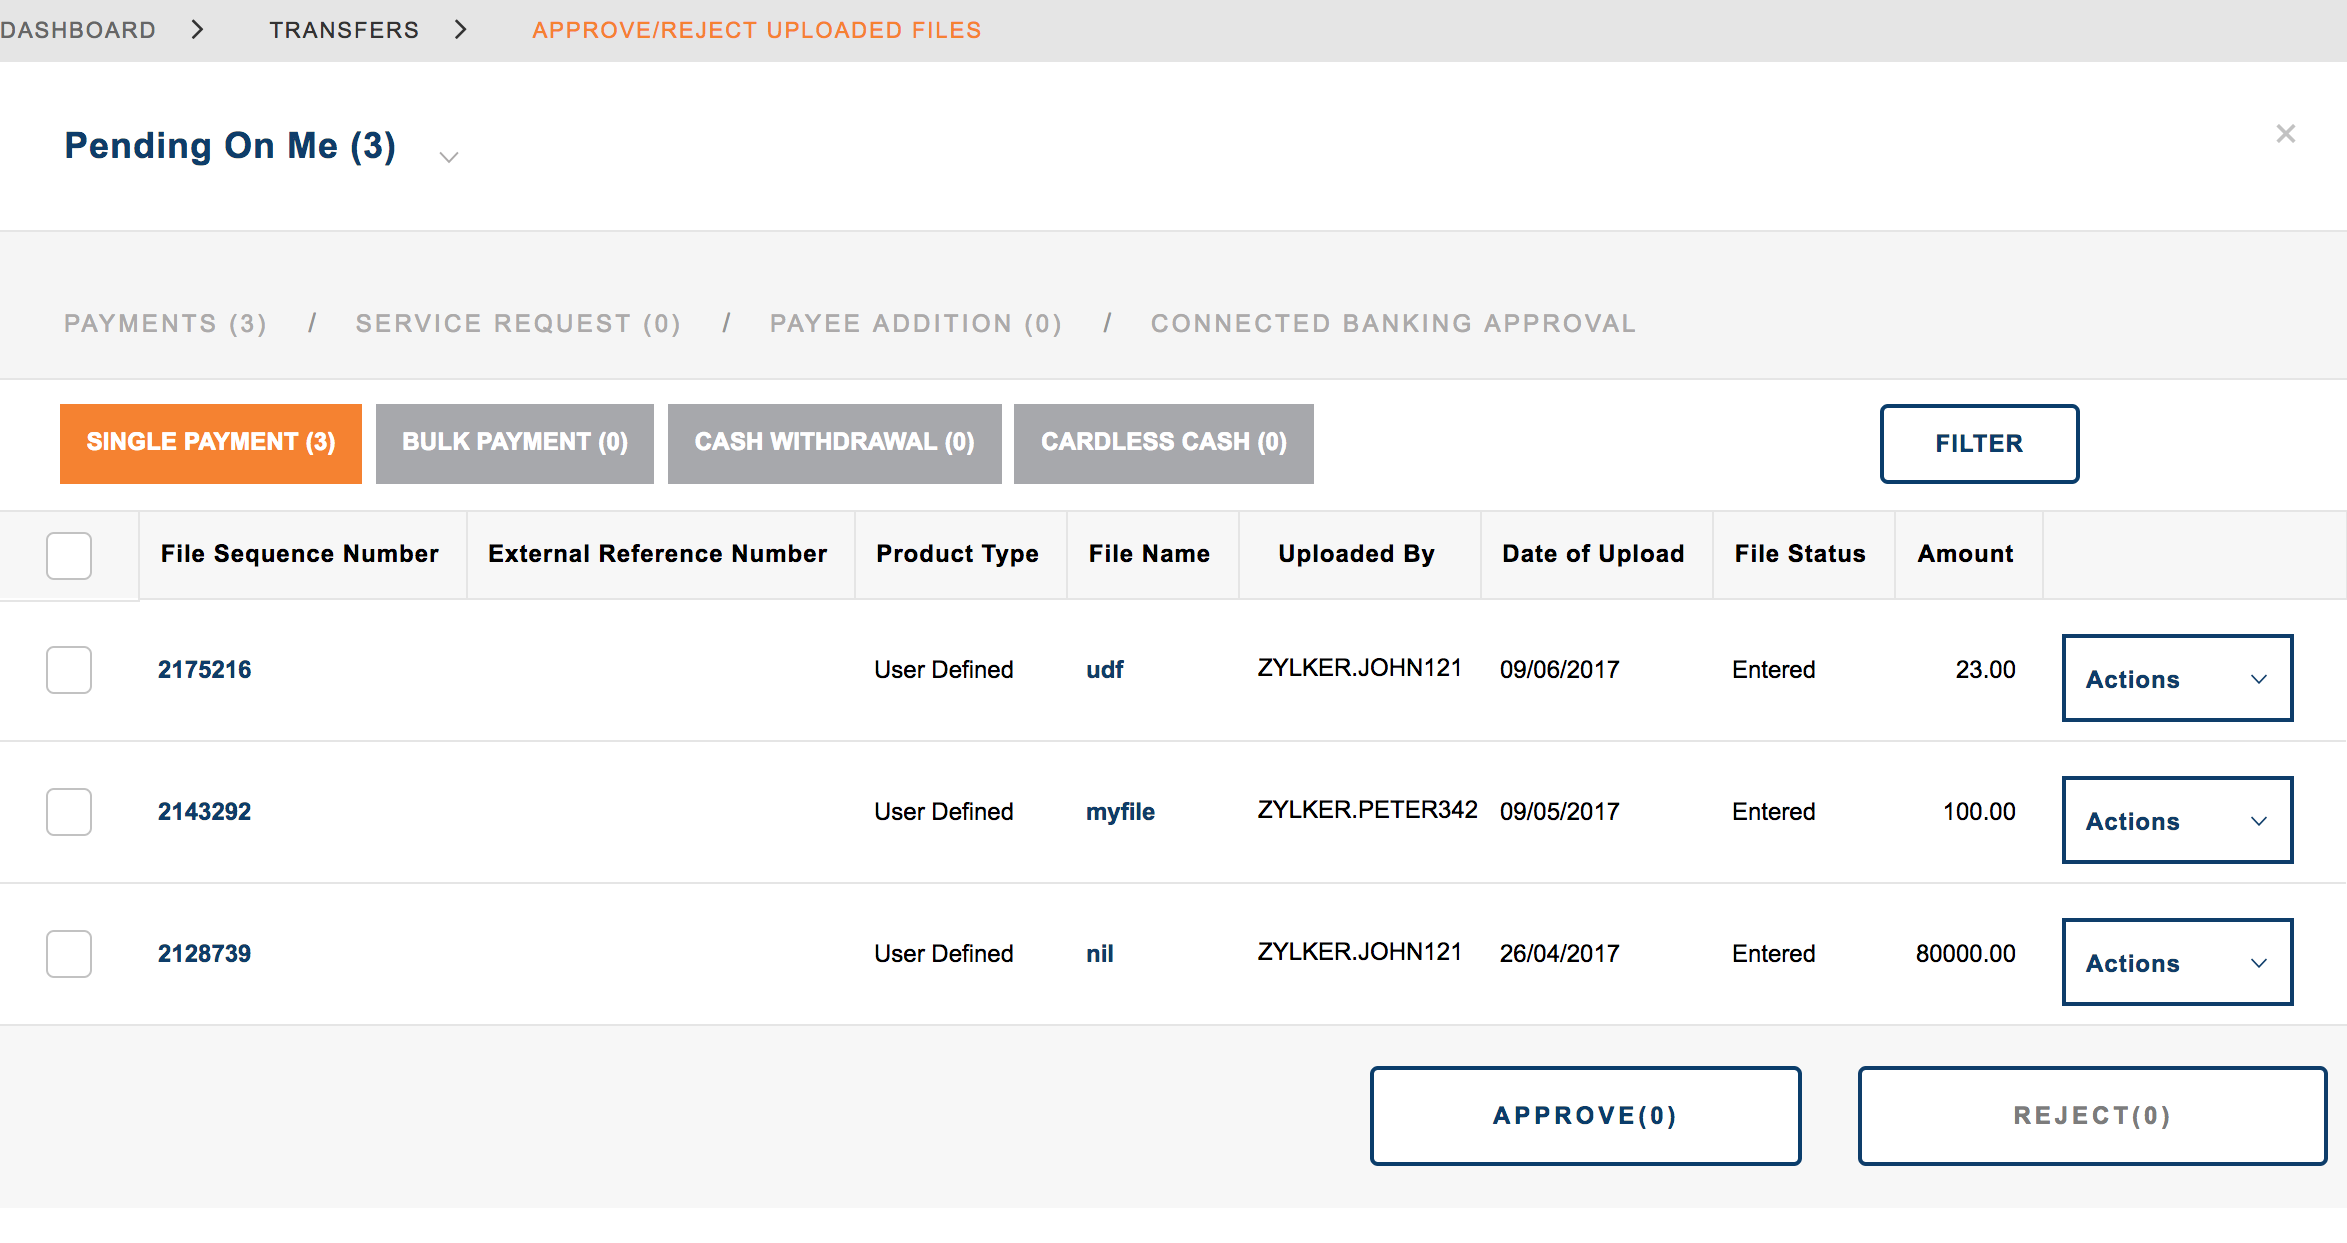
- Click the Actions drop down to Approve or Reject the transaction.
Deleting the Integration
If you ever want to stop making payments via your ICICI Bank account from Zoho Payroll or change your account details, you can delete the integration.
Warning: Disabling the integration in Zoho Payroll will disable it from other integrated Zoho Finance (Zoho Books, Expense, etc) applications as well. Once disabled, you will not be able to track the status of any transactions you’ve initiated.
To delete:
- Go to Settings > Integrations > Direct Deposits > ICICI Bank.
- Click the Overflow icon and click Delete Integration.
- Confirm your action by clicking Yes in the screen that follows.
