Online Payments
Zoho Invoice is integrated with major online payment gateways to help you receive payments for your invoices online. This ensures faster and hassle free receipt of payments and further automates your cash flow and its book keeping. To set up a payment gateway, click the gear icon on the top right and select Integrations. Now choose Online Payments. You’ll find the list of payment gateways that Zoho Invoice supports.
When you integrate a payment gateway with your Zoho Invoice organization, your merchant account information will be shared with the gateway. Zoho Invoice will store only the last four digits of your customer’s card details.
IN THIS PAGE…
Payment Gateways
Click on a payment gateway to find out how you can use it along with Zoho Invoice.
| Payment Gateway | Supported Countries |
|---|---|
| Stripe | View the list of countries supported by Stripe here.. |
| Authorize.net | United States, Europe, Australia, Canada. |
| Payflow Pro | United States, Canada, Australia, New Zealand. |
| Payments Pro | United States, United Kingdom, Canada. |
| 2Checkout | Supports all countries except North Korea, Iran, Sudan, Syria, Cuba and Myanmar (Burma). |
| Braintree | Works for United States, Canada, Europe, Singapore, Hong Kong, Malaysia, Australia, and New Zealand. |
| Forte | United States and Canada. |
| WePay | United States. |
| GoCardless | United Kingdom, Canada, New Zealand, Switzerland and Australia. |
| Mercado Pago | Argentina, Brazil, Colombia, Chile, Mexico, Peru, and Uruguay. |
Click on a payment gateway to find out how you can use it along with Zoho Invoice.
Insight: Zoho does not charge a fee for receiving online payments. However, the payment gateway does.
Stripe
Integrate with Stripe and receive payments from your customers through their credit card and bank account details.
You can set up Stripe and receive payments from your customers using two different methods:
1. Credit Cards
Integrate your organization with Stripe and charge your customer’s credit card to receive payments. Learn more.
You can view the list of countries supported by stripe in this page. The online transaction fees will depend upon the charges specified by Stripe.
2. Bank Accounts using Stripe ACH (Global and US editions)
With Stripe ACH, you can charge your customer’s bank account (only for US customers) to receive payments. Learn more.
PayPal
To setup PayPal as your preferred gateway for receiving payments,
-
Click on the gear icon on the top right hand side corner of the screen and select More Settings.
-
Go to Integrations and select Online Payments and click the Setup Now button adjacent to Paypal logo.
-
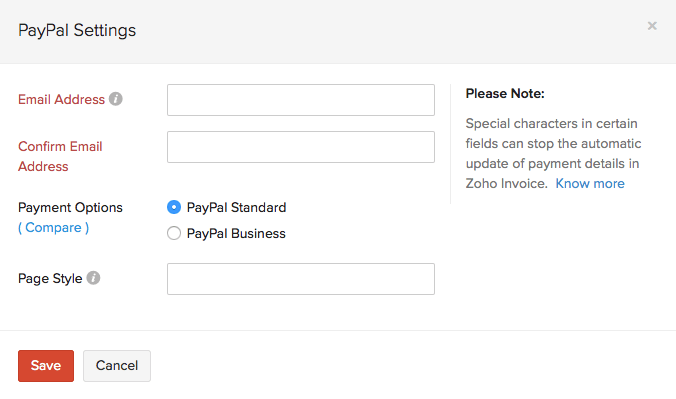
Enter the following information and click Save.
- Registered email Address: Enter the email address using which you registered in PayPal.
- Re-enter the email Address: Re-enter the email address for confirmation.
- Default Payment Option:
-
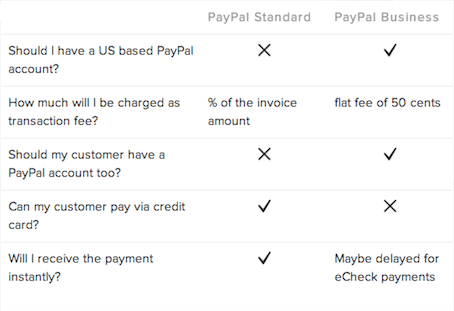
PayPal Standard: Choose this mode of payment to transact with your clients from across the globe. Your clients can pay you with a credit card even if they don’t have a PayPal account. You receive your payments instantly. In PayPal standard, a percentage is charged as the transaction fee.
-
PayPal Business Payments: Regardless of your invoice amount, the transaction fee charged by PayPal is just 50 cents. Your clients however can make payments only via an eCheck or PayPal balance. The payment may be delayed if the payment is received via eCheck. In this mode of payment, both you and your clients need to have a US PayPal account.
-
To help you decide which of the Payment Options work for you, click on the grey question mark icon next to the Default Payment Options field to see the comparison between the two.
-
Page Style: Enter the layout of the payment page, that your customers see. Please note that this option is available only for PayPal Standard users. Click here for more on PayPal’s page style option.
Authorize.Net
To configure Authorize.Net,
-
Click on the gear icon on the top right hand side corner of the screen and select More Settings.
-
Go to Integrations and select Online Payments and click the Setup Now button adjacent to Authorize.Net logo.
-
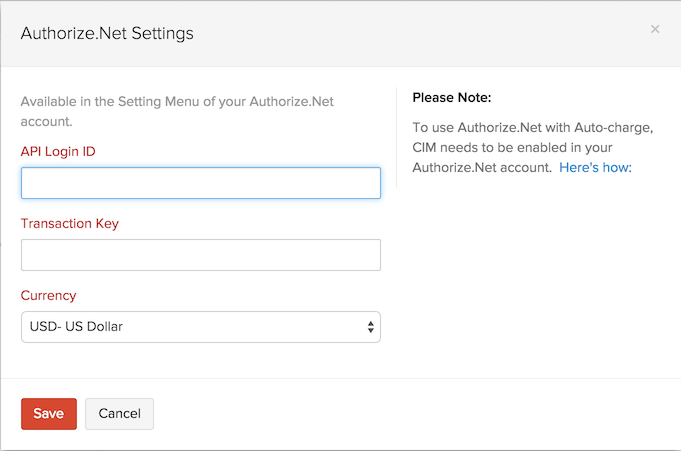
Enter the following information and click Save.
- API LoginID: Enter the API Login ID given to you by Authorize.Net.
- Transaction Key: Enter the Transaction Key given to you by Authorize.Net.
- Currency: Enter the currency of receipt. Currently Authorise.net supports transactions only in US Dollars (USD), Canadian Dollars (CAD), Euro (EUR), Pound Sterling (GBP).
-
More information on API Login ID and Transaction Key can be found by clicking here.
Prerequisites for using with Auto-charge in Zoho Invoice
- Customers should have an active Authorize.Net account.
- This account should have been selected with Card Not Present option during account creation.
- Only on the above criteria, the customer will be able to view the CIM (Customer Information Manager) feature in their merchant account.
- CIM needs to be enabled. Once enabled, it will take 24-48 hours for a transaction to happen.
- Do not enable ARB (Auto Recurring Billing) feature provided in Authorize.Net.
Configuring Auto-charge Settings
Payflow Pro
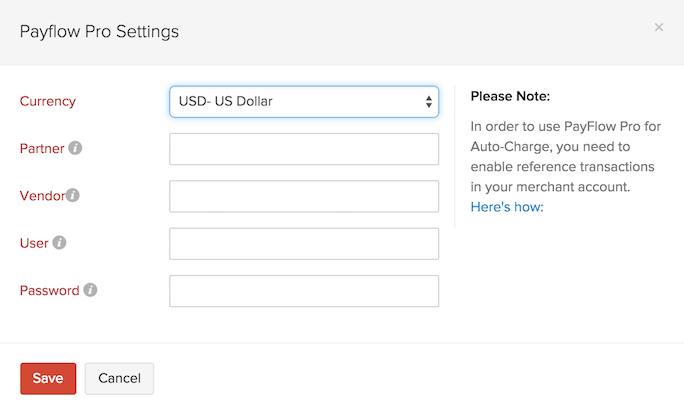
To set up Payflow Pro, click on the gear icon on the top right hand side corner of the screen and select More Settings. Go to Integrations and select Online Payments and click the Setup Now button adjacent to Payflow Pro logo. Enter the following information and click Save.
Insight: When you register for Payflow Pro, you will receive an email with information like your Partner ID and Vendor name. Please keep that email at hand while filling the details for Payflow Pro.
Then enter the following information and click Save.
- Currency: The currency you set up in your Payflow Pro account. Payflow currently supports transaction in 10 leading currencies.
- Partner: The partner ID as mentioned in your Payflow Pro account.
- Vendor: Your vendor name as mentioned in your Payflow Pro account.
- User: Enter your Payflow Pro username.
- Password: Enter your Payflow Pro password.
Payments Pro
To set up Payments Pro, click on the gear icon on the top right hand side corner of the screen and select More Settings. Go to Integrations and select Online Payments and click the Setup Now button adjacent to Payments Pro logo. Enter the following information and click Save.
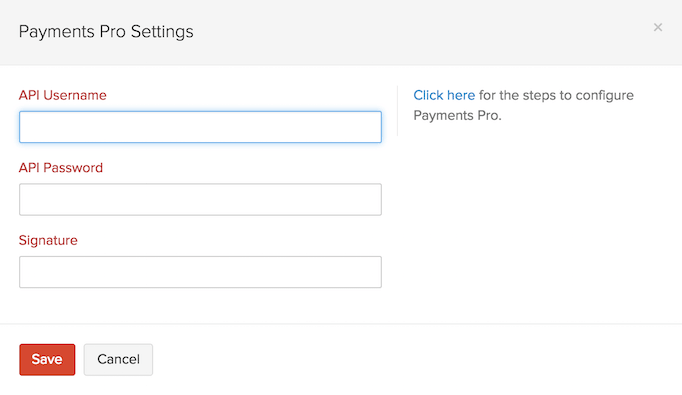
API Username, API Password and Signature
- Login to your PayPal account. Go to Profile and click Request API Credentials under Account Information.
- Choose Set up PayPal API Credentials and Permissions under Option 1.
- Click View API Signature under Option 2.
- Copy the API Username, API password and Signature into corresponding fields in Zoho Invoice.
Prerequisites for using with Auto-charge in Zoho Invoice
In order to use PayFlow Pro for Auto-charge, you need to enable Reference transactions in their merchant account.
- Login to your PayPal account.
- Navigate to Account Administrator.
- Navigate to Manage Security > Transaction Settings and enable Allow reference transactions.
Configuring Auto-charge Settings
2CheckOut
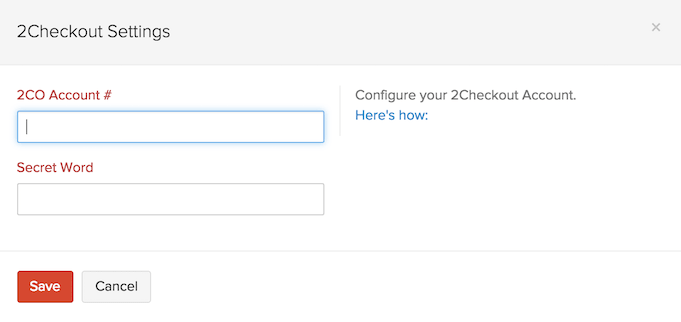
To configure 2CheckOut, click on the gear icon on the top right hand side corner of the screen and select More Settings. Go to Integrations and select Online Payments and click the Setup Now button adjacent to 2Checkout logo. Enter the following information and click Save.
-
2CO Account No: Enter your 2CO Account number provided to you. Ensure that you configure your 2CheckOut account by logging in to the 2CO control panel.
-
Secret Word: Enter the Secret word (Password) here.
If you haven’t created a 2Checkout merchant account yet, click here to sign up now.
Braintree
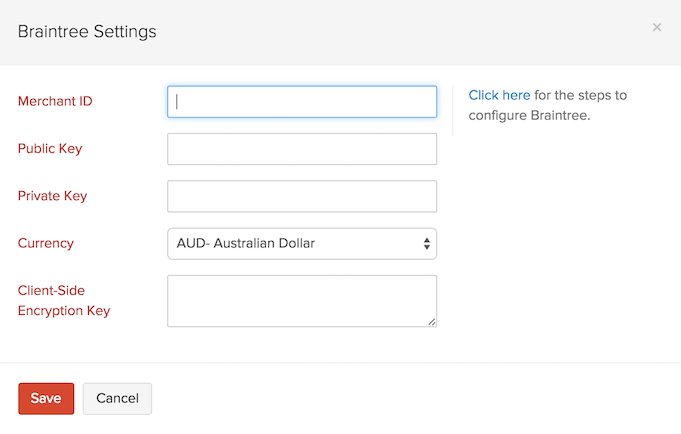
To configure BrainTree, click on the gear icon on the top right hand side corner of the screen and select More Settings. Go to Integrations and select Online Payments and click the Setup Now button adjacent to Braintree logo. Enter the following information and click Save.
- Merchant ID: Provide you Merchant ID here. Login to your BrainTree gateway account and find this detail in the API Keys section. You will also find the required following Key credentials
- Public Key: Enter the Public Key here.
- Private Key: Enter the Private Key here.
- Currency: Select the currency in use in your BrainTree account. BrainTree currently supports transaction in 8 leading currencies.
- Client Side Encryption Key: You will need to paste your Client side Encryption Key here. To find this, log into your BrainTree account and click on API Key section provided on the right pane.
Forte
To set up Forte, click on the gear icon on the top right hand side corner of the screen and select More Settings. Go to Integrations and select Online Payments and click the Setup Now button adjacent to Forte logo. Enter the following information and click Save..
Insight: Forte only supports the USD currency.
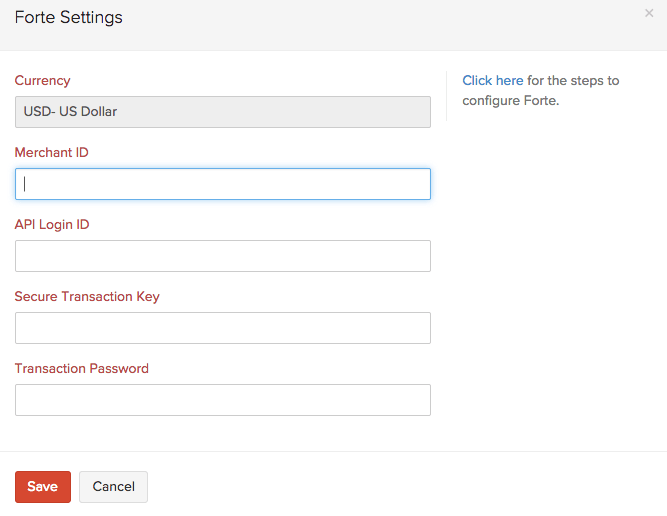
- Merchant ID: Enter your Forte Merchant ID.
- API Login ID and Secure Transaction Key should be the same as in the Forte Virtual Terminal. You can find your API Login ID and Secure Transaction Key by logging into your Forte Virtual Terminal and selecting Gateway Settings > Gateway Key.
- Transaction Password: Enter the transaction password provided to you by Forte.
- Click Save.
ACH Payments in Zoho Invoice
Zoho Invoice offers ACH payments via Authorize.net and Forte gateways, payment gateways that specializes in ACH payments.ACH is a secure payment transfer system that connects all US financial institutions. This facility will allow you to debit payments directly from a customer’s authorized bank account.
The following are the requirements for making ACH payments,
- You must be a US based merchant.
- You need a payment gateway that supports ACH payment.
To use ACH facility, you will need to setup authorize.net or Forte as the default payment gateway on Zoho Invoice.
Setting up a bank account for ACH Payments
Step 1:
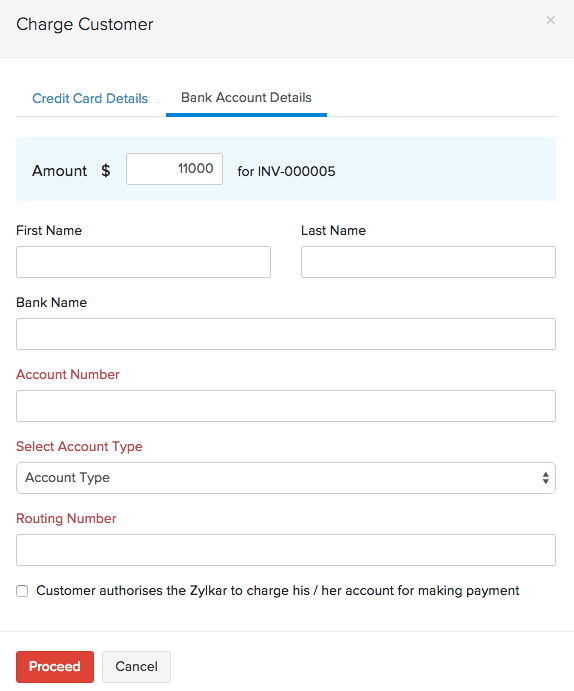
Go to the Invoices tab. Select the invoice for which a payment needs to be recorded. Click on the Record Payment drop-down and select Charge Customer. A Charge Customer screen will open up.
Step 2:
You will be asked to enter either Credit Card Details or Bank Account Details. In this case, select the tab Bank Account Details and enter the customer’s bank account details. Account number, Account type and Routing number are mandatory fields to configure the bank account.
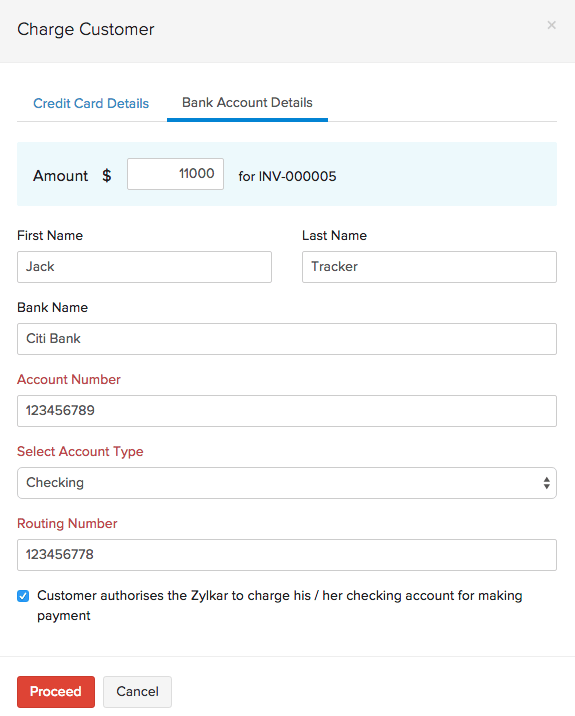
Select the check-box against Customer authorises “Org Name” to charge his / her checking account for making payment and click on Proceed.
Configuring number of retries and intervals
Zoho Invoice allows you to configure the number of retries necessary in case of a transaction failure. The various configurations available are shown below.

WePay
WePay is an online payment service provider whose integration with Zoho Invoice allows you to receive payments directly to your bank account. Some striking features of WePay’s integration include,
-
Have your merchant account created in minutes
-
Low processing fee
-
No setup fee
-
No hidden charges
-
Auto-charge feature
WePay Integration Overview:
- Things to remember
- Setting up WePay
- Have a WePay account already?
- How to connect my bank account if I skipped it the first time?
- Other actions
Things to remember
- As of now, WePay can only process transactions for businesses registered in United States and can only accept payments in USD.
- You can start receiving payments via WePay, as soon as you’ve verified your email address and filled in your business details. The confirmation link sent to your email will expire in 90 days.
- If your bank account is not connected with WePay, the payments received will not be transferred to your bank account. In times like this, the payments received will be withheld by WePay and will be transferred to your bank account once it is connected.
- The payments held by WePay will be refunded to the customers if the bank account is not setup in 30-days from the day of receiving the first payment.
Setting up WePay
To setup WePay,
1. Navigate to Gear icon > Integrations > Online Payments. Now, click on the Try WePay button under WePay to get started.

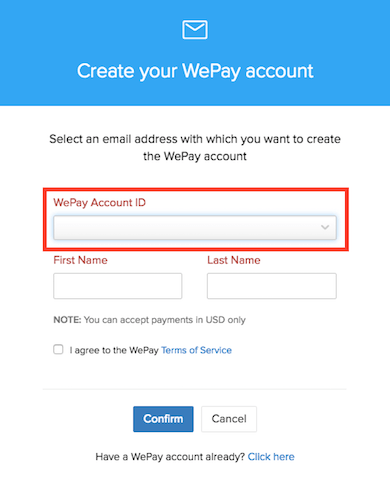
2. To signup, select the email address from the drop-down with which you want to create the WePay account with and click on Confirm.
Insight: Only the Admin Users' email addresses will be displayed in the drop-down. How to add an Admin User?
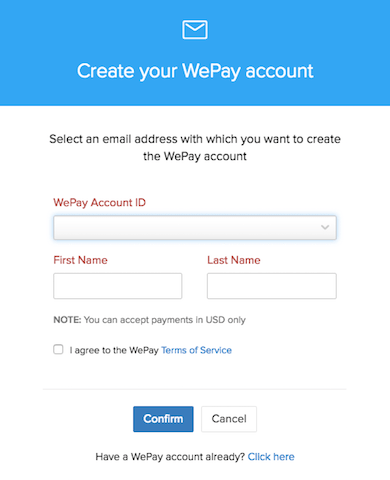
3. You’ve now successfully initiated the WePay setup process.
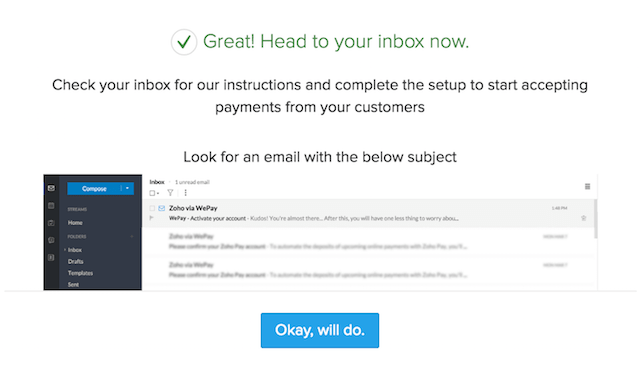
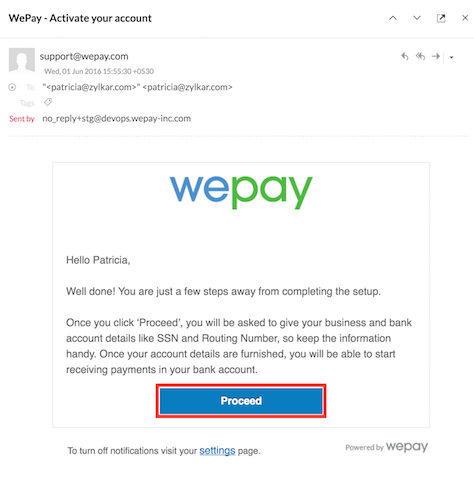
4. Now, login to the selected email account and click on the email with the subject WePay - Activate your account. In the email, click on the Proceed button to validate your account and you’ll be redirected to WePay to finish the setup.
If you do not receive the confirmation message within a few minutes, kindly check your Spam folder just in case the confirmation email got delivered there instead of your inbox. You can resend the verification email under More Settings > Integrations > WePay.
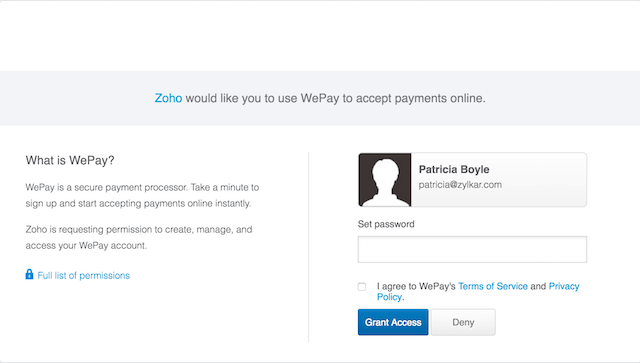
6. In the login page, enter a password for your WePay account and click on Grant Access.
Note: The password entered here is independent from your Zoho Invoice password.
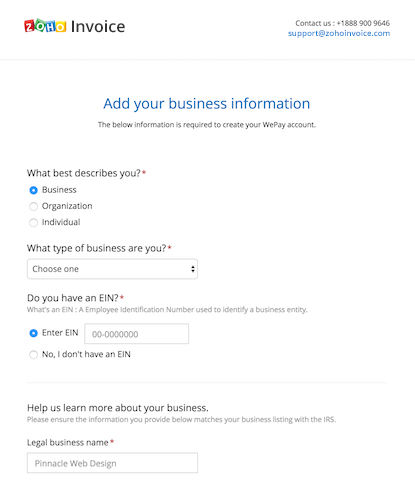
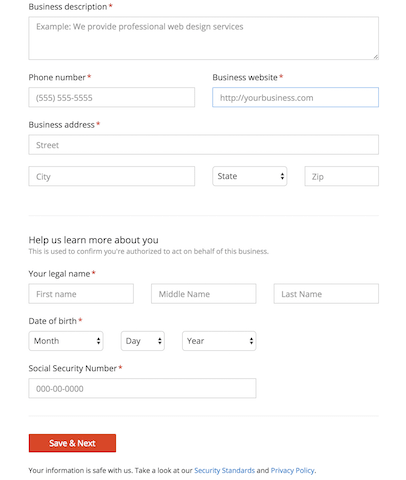
7. In the next screen, fill in your personal and business details and click on Save & Next.
After this step, you can start accepting payments.
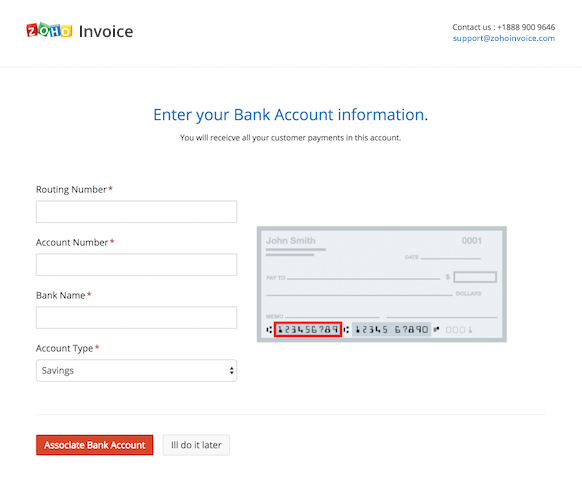
8. Enter the bank account details to which the payments are to be transferred and click on Associate Bank Account to complete your WePay setup.
Have a WePay account already?
If you are trying to use the email address which is already associated with WePay, follow the steps below:
-
Add the email address as an Admin User. Click here to learn how to add an Admin User? (If the email address is already an Admin User skip to the second step)
-
After adding, select the email address in the WePay setup popup from the drop-down list.
-
Click on the verification link sent to the email address and fill in the business and bank account details form and click on Associate Bank Account.
How to connect my bank account if I skipped it the first time?
If you’ve started the setup process but you’ve skipped entering your bank account details, you can very well add it later. To do so,
- Navigate to Gear icon > Integrations > Online Payments.
- Click on Manage account under WePay. You will be redirected to WePay to finish the process.
- Login to WePay and and click on Settings.
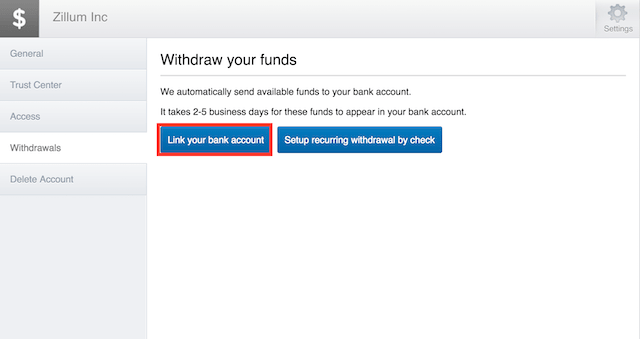
- Select Withdrawals from the left pane and click on Link your bank account.
- In the screen next, enter the bank account informations to which the funds has to be transferred and click on Continue to connect your bank account with WePay.
Other actions
To edit your WePay profile or to view transaction history,
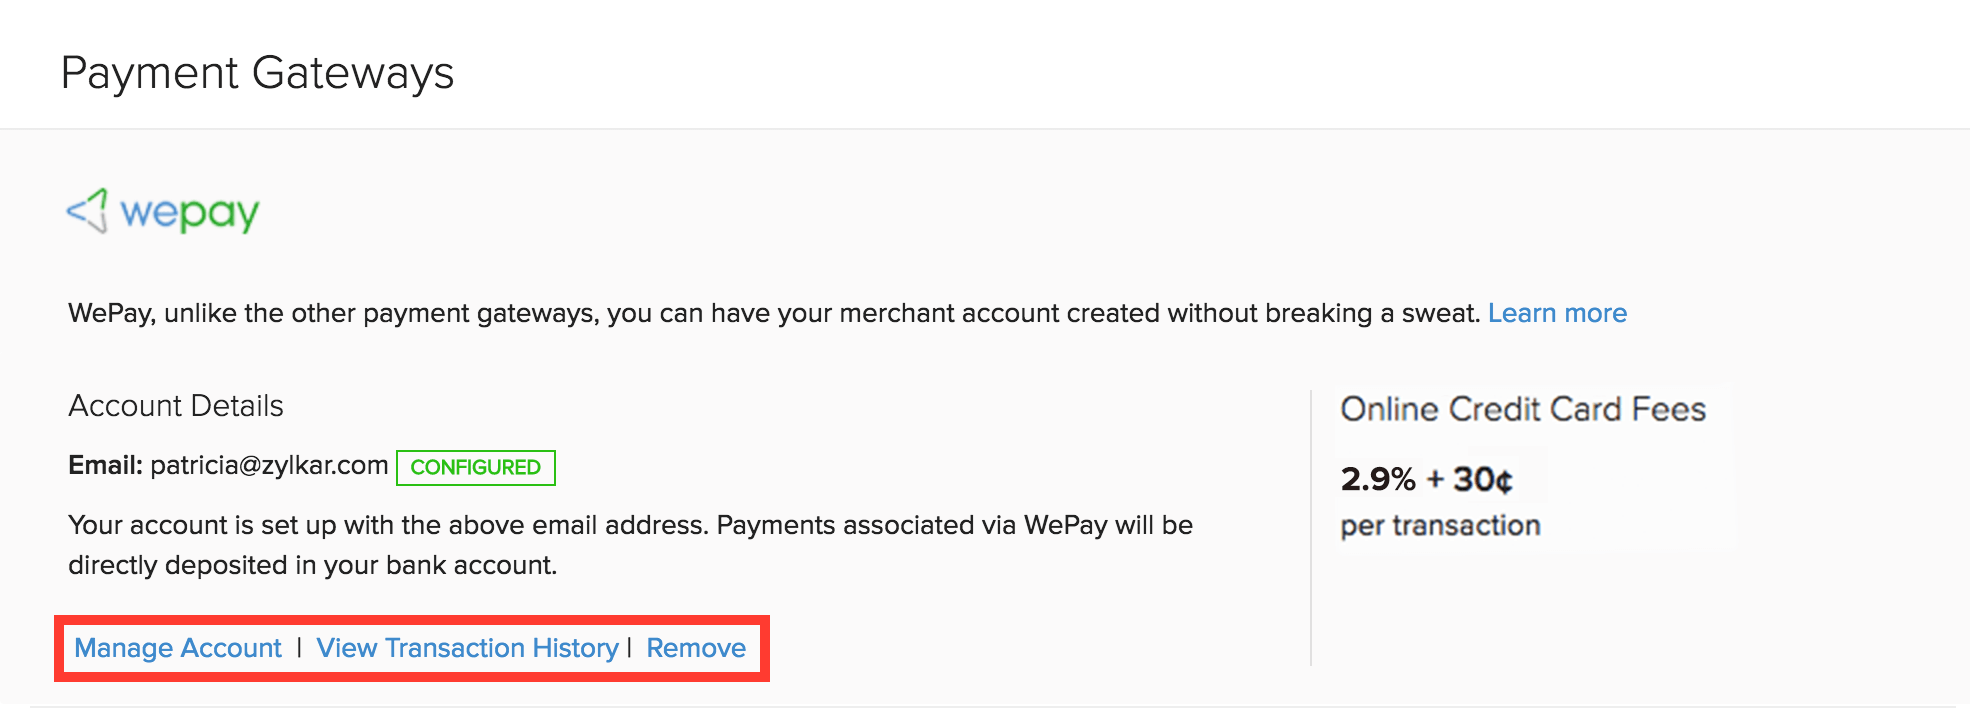
- Navigate to Gear icon > Integrations > Online Payments and click on Manage Accounts or Transaction history under WePay.
- You will be redirected to WePay to finish the action. To login, use the username and password entered in the step#6 of the setup process.
Card Verification Settings
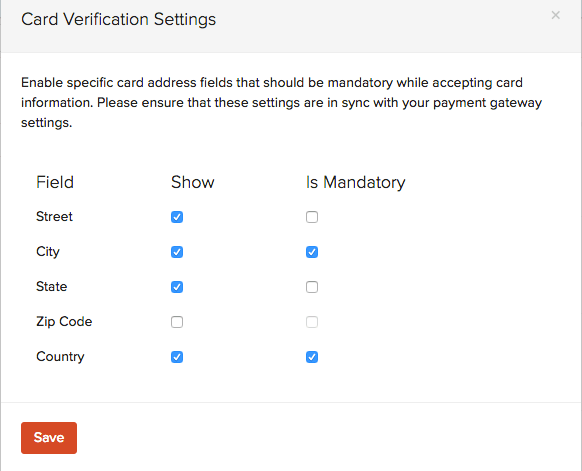
Initially card address was made mandatory in Zoho Invoice. This was initiated by us to avoid confusions with respect to various payment gateways as different payment gateways have different validations. But now you are given that option to decide on whether the card address needs to be shown or not.
Depending on your choice of gateway you can enable the necessary fields of the card address to be shown or to be made mandatory by making the preferences in Card Verification Settings.
Kindly follow the steps below to make card address related changes:
- Click the Gear icon present at the top right corner of the screen.
- Go to Integrations and select Online Payments and click the Card Verification Settings button.

- Here you can customize card address details accordingly.
Transaction Fee of All the Payment Gateways
- Stripe - 2.9% + 30¢
- PayPal - 2.5% + Fixed Fee
- Authorize.net - 2.9% + 30¢
- Payflow Pro - $25/month
- Payments Pro - 2.9% + $0.30
- 2 CheckOut - As per the chosen plan
- Braintree - 2.9% + $.30
- Forte - 2.75%(3.50% on American Express) + 25¢ per transaction
- WePay - 2.9%+0.30c
- Square - 2.9% + 30¢

 Thank you for your feedback!