Customers
The Customers module in Zoho Invoice is where you store all the details of your customers.
Understanding Customers
As a business or a freelancer, you’ll have customers buying goods (products) or services from you. As customers are very important to any business, it is expedient to save their contact information. It will help you to create transactions quickly and do business in an efficient manner. In Zoho Invoice, you can save the details of your customers such as name, email address, phone numbers, website information, billing and shipping addresses etc. in the Customers module. Apart from saving your customer’s information, there’s much more that you can do, such as, creating sales transactions for the customer, configuring customer portal, sending emails and viewing customer statements. In this page, we’ll learn more about how to make the most of the Customers module.
Insight: In this help guide, transactions refer to estimates, invoices, recurring invoices, credit notes etc. which you’ll be creating for a customer.
Adding Customers
Adding your business contacts to Zoho Invoice helps you to create transactions quickly and conduct business in an efficient manner. There are two ways of adding customers in Zoho Invoice. You can either create new customers or import customers from another system.
Creating a New Customer
To create a new customer:
- Go to the Customers module in the left navigation bar.
- Click the + New button present in the top-right corner of the window.
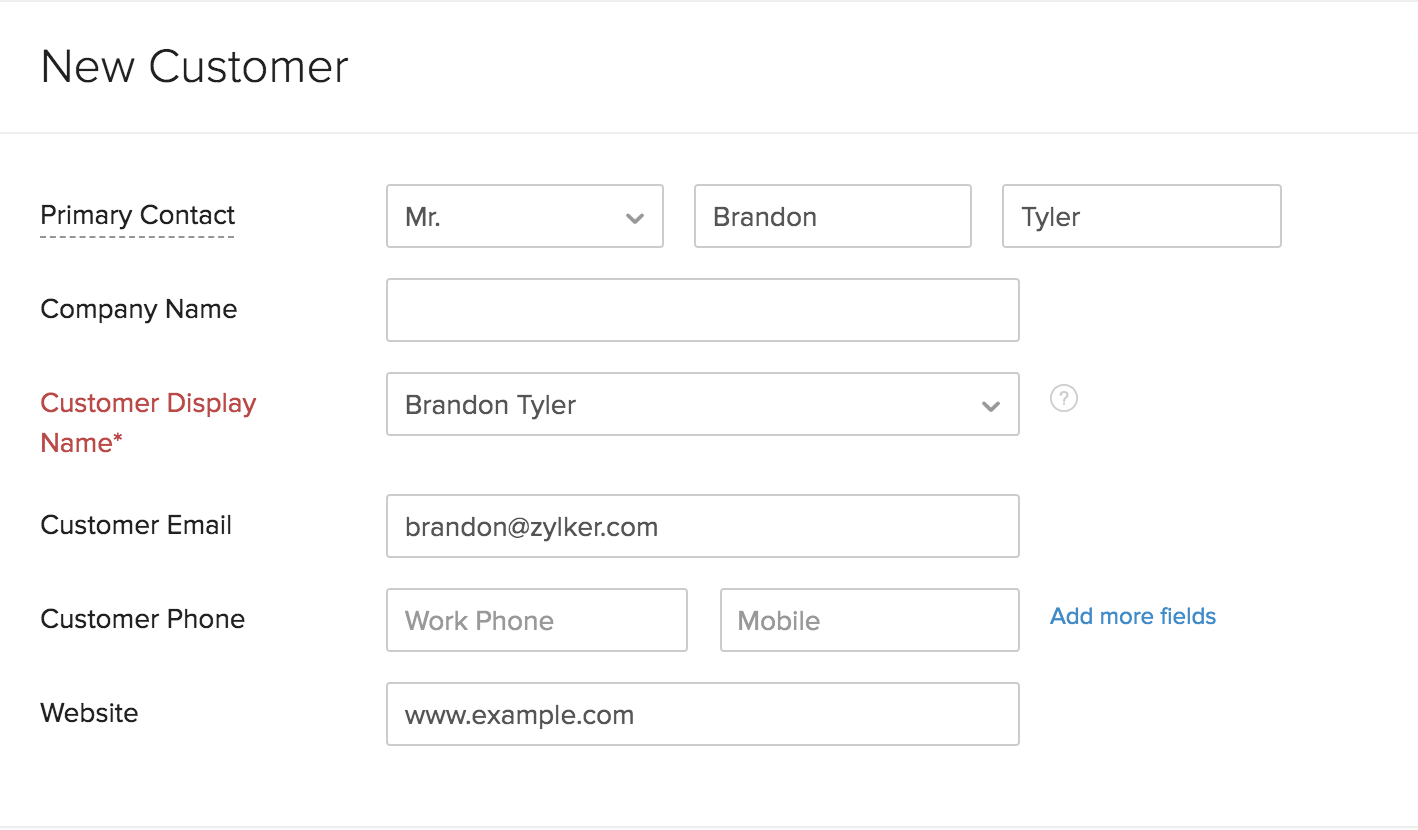
- Enter the basic information such as Primary Contact, Company Name, Customer Display Name, Customer Email, Customer Phone and Website information.
Insight: The Customer Display Name you select will be displayed in all the transactions that you create for this customer. All email correspondence will be sent to the email address you enter in Customer Email.
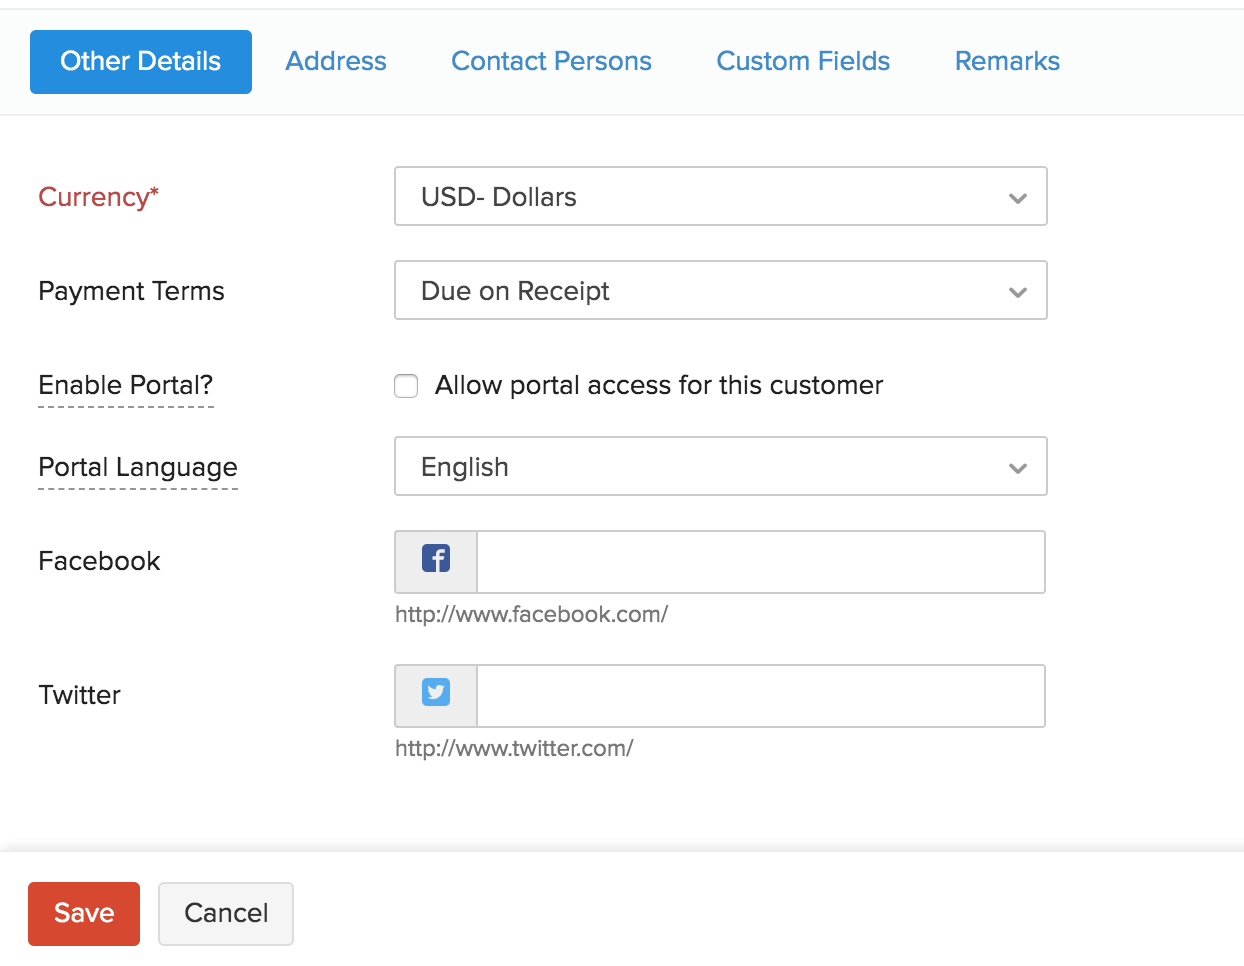
In the section below, you can add the Other Details of the customer.
- Select the customer’s currency from the Currency dropdown.
Pro Tip: If you have an overseas customer to whom you wish to invoice in foreign currency, you can select the customer’s currency from the dropdown. All the transactions created for the customer will be in their currency.
- Select a Payment Term which will be applied on the invoices that you create for this customer.
Insight: Payment Terms refers to the time period within which the payment for the invoice must be made. You can configure your own payment term by clicking the Configure Terms button.
- Check the Allow portal access for this customer option to enable Customer Portal for this customer.
Insight: Customer Portal is a unique online platform to connect with your customer. Learn more about Customer Portal.
-
Select a language from the Portal Language dropdown. This will help the customer view the Customer Portal in their language. The languages that are available in Zoho Invoice for Customer Portal are:
- Arabic
- Bulgarian
- Croatian
- Dutch
- English
- French
- German
- Italian
- Japanese
- Korean
- Mandarin
- Portuguese
- Spanish
- Swedish
-
Enter the Facebook and Twitter links of the customer, if you have them.
- Select the Address tab and enter your customer’s Billing and Shipping Address.
- Select the Contact Persons tab and enter their details.
Insight: If your customer is a large organization, it is possible that there are many contact persons from different departments in the organization who are in touch with you. You will be able to add their details to a customer as additional contact persons. A contact person is someone who is associated with the primary contact and can be reached out to for business related queries.
- Select the Custom Fields tab to enter information in your own custom fields.
Insight: Custom Fields are additional fields that you add to a customer to add more information regarding your them. Before you can add information here, you must create a custom field in the Preferences. Learn more about Custom Fields.
- Click the Remarks tab to add any specific remarks about the customer for internal use. Note: These remarks will be displayed along with the name details whenever you create an invoice for this customer.
- Click Save.
Now, you have sucessfully created a customer in Zoho Invoice.
Importing Customers
Instead of creating customers newly in Zoho Invoice, you can directly import your customer from another system. You can import them from:
Import from Any Other System
You can import customers and contact persons from any other system. The import file must be in CSV or TSV format.
To import customers or contact persons:
- Go to the Customers module.
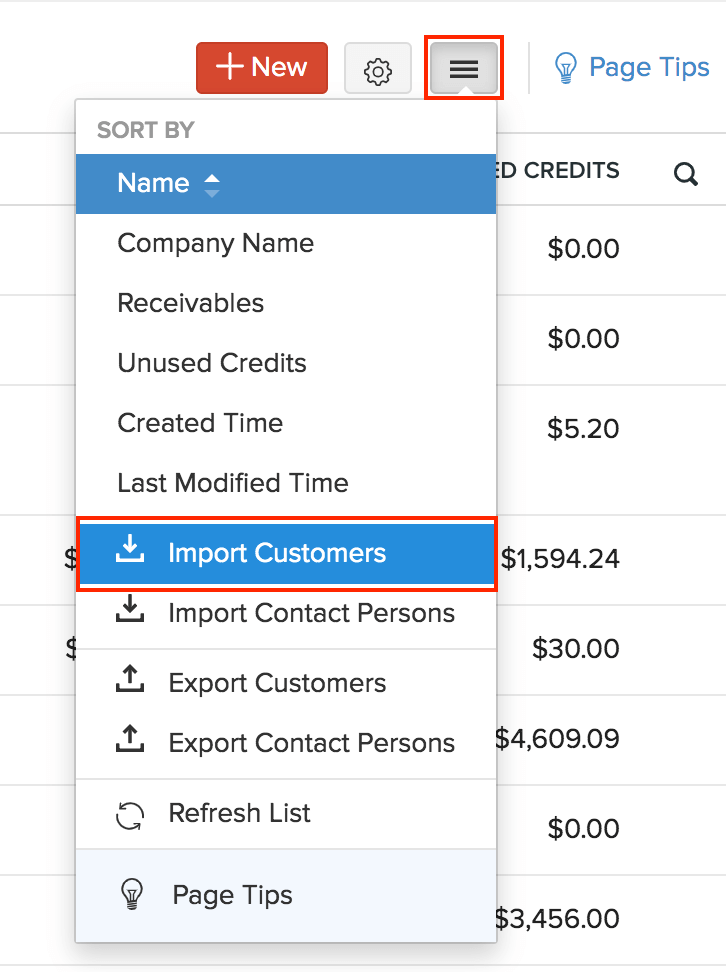
- Click the Hamburger icon in the top-right corner of the window and select Import Customers or Import Contact Persons.
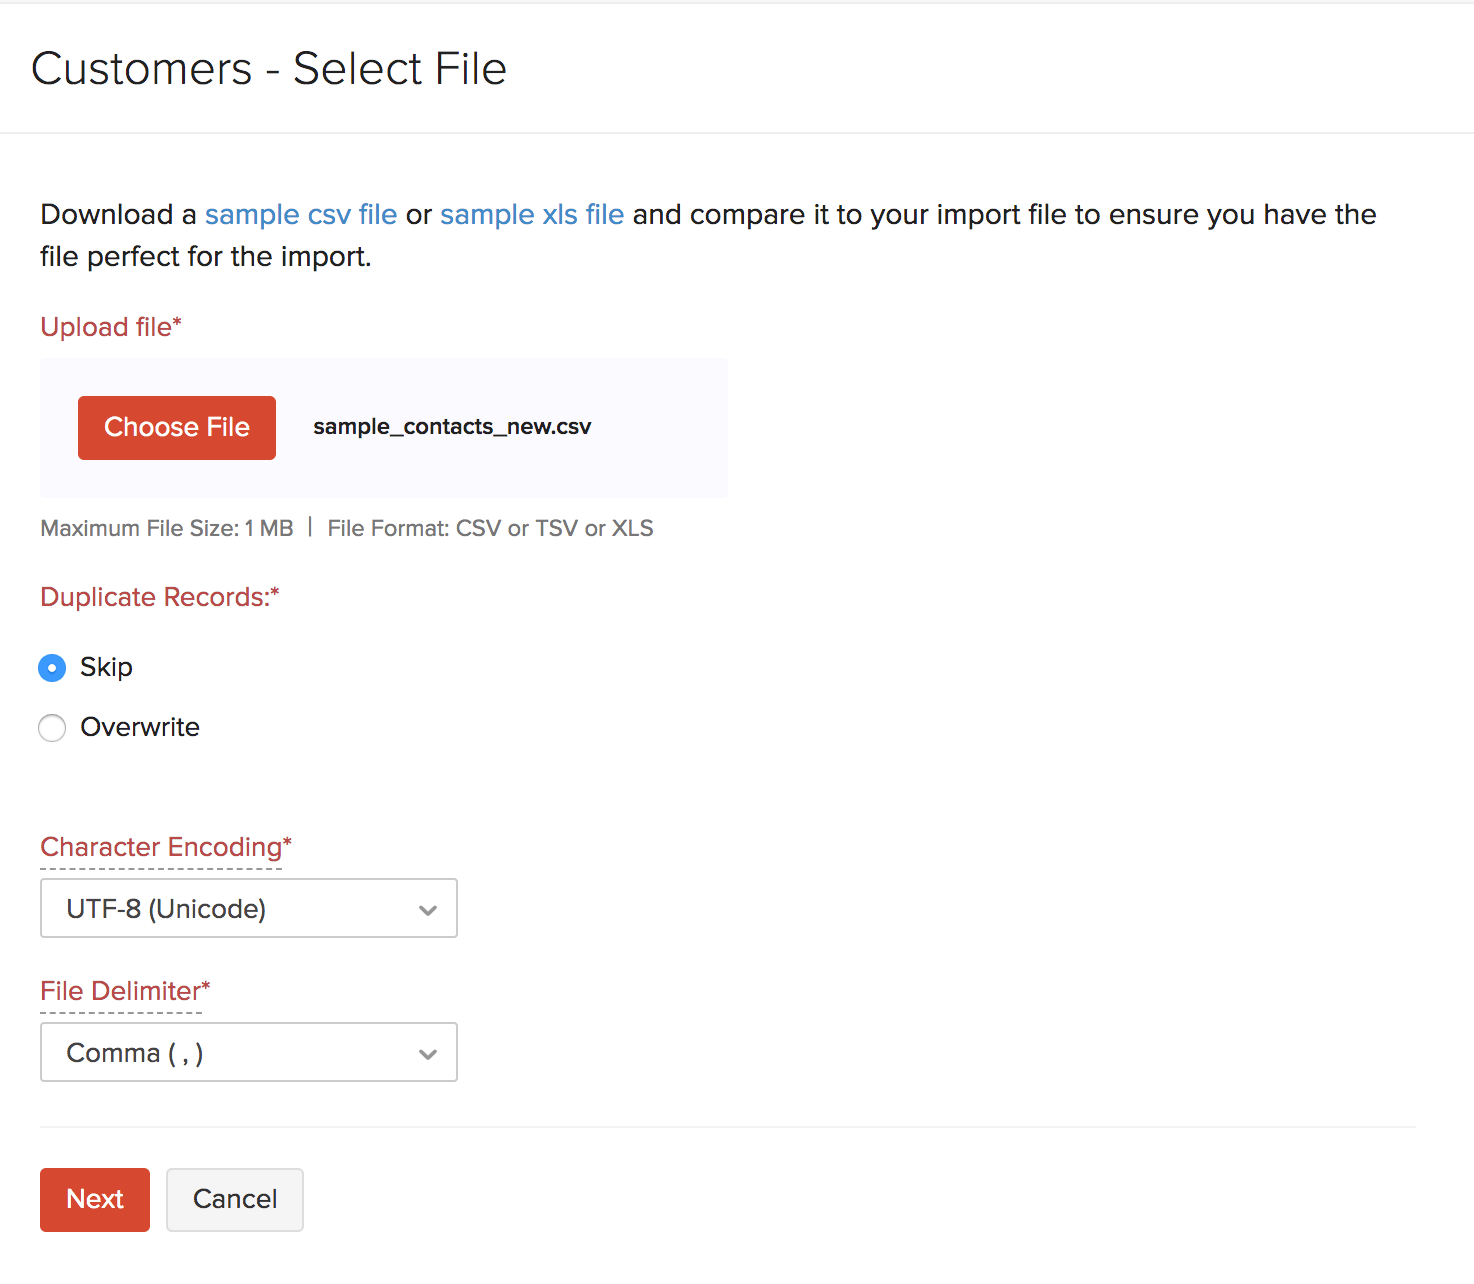
- Download the sample file and compare it with your file. Make sure that the format in your file is similar to the sample file.
- Click the Choose File button and select the import file from your device.
- Choose whether to skip or overwrite duplicate customers.
- Select the Character Encoding based on your import file. By default, UTF-8 (Unicode) is selected.
- Choose the appropriate File Delimiter.
Insight: File Delimiter refers to the character that is used to separate the values in the import file.
- Click Next.
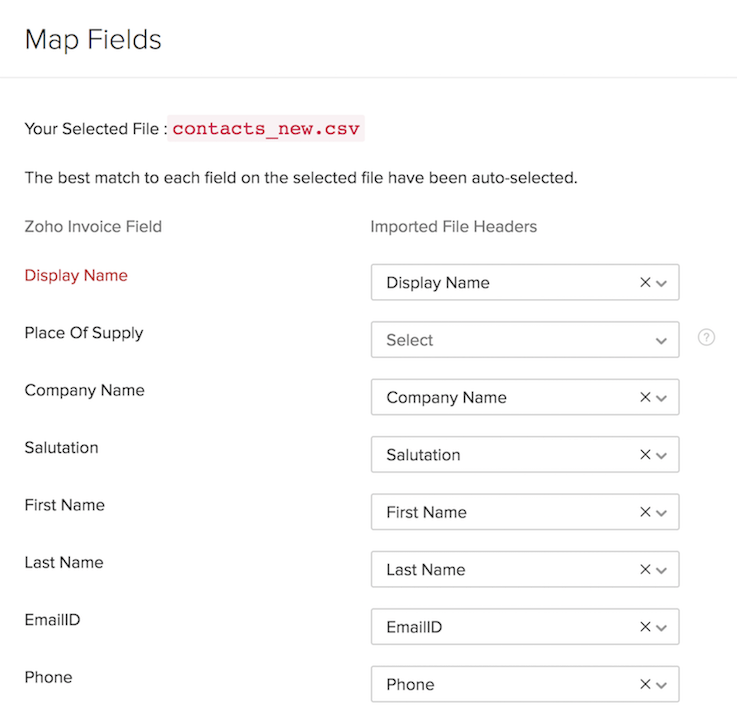
- The field names of Zoho Invoice are listed on the left side and the field names in the imported file are listed on the right side.
- Match the field names appropriately.
- Check the Save these selections for use during future imports. option if you wish to use the same mapping of fields in future imports.
- Click Next.
- You can see the status of all the customers that are ready to be imported, skipped and the Unmapped Fields. If there are customers that are being skipped, check the file again.
- Click Import.
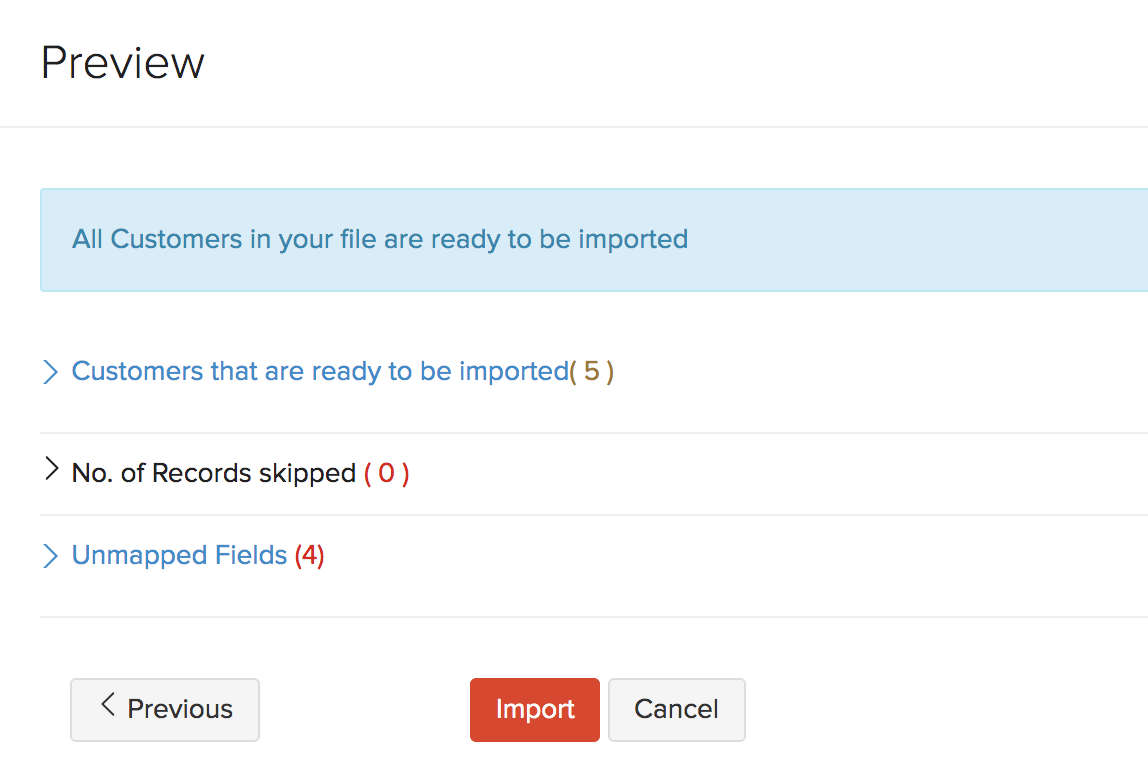
Now, the customers in the import file will be added to the Customers module of Zoho Invoice.
Import from Zoho CRM
Zoho CRM is an online Customer Relationship Management software to manage your customer relations in an efficient manner. If you have an account in Zoho CRM, you can import your customer information from Zoho CRM into Zoho Invoice.
Before you can import contacts from Zoho CRM, make sure that you’ve enabled Zoho Invoice - Zoho CRM integration. Once you complete the integration, you will be able to configure the synchronization and fetch your Zoho CRM contacts into Zoho Invoice. Learn more.
Import from G Suite
G Suite is Google’s suite of online apps to connect people in your company. If you have your customer information in G Suite, you can import them into Zoho Invoice easily.
Firstly, you need to set up the Zoho Invoice - G Suite Integration. After you’ve integrated G Suite with Zoho Invoice, you can import your Google contacts into Zoho Invoice. Learn more about importing contacts from G Suite.
Editing a Customer’s Details
Occasionally, you would want to edit a customer to add some missing information or to edit an incorrect information. You can do that easily in Zoho Invoice.
To edit a customer:
- Go to the Customers module.
- Select the customer that you want to edit.
- Click the Edit button in the top right corner of the window.
- Click Save after making the necessary changes.
