How to migrate your email from Google Workspace to Zoho
Unike other email services, Zoho Mail is an email service built with business users as the primary users and hence we offer you a better Inbox experience. Our simple and easy to use, lossless data migration ensures a smooth transition from Google Workspace (formerly G Suite).
Why choose Zoho Mail to migrate from Google Workspace?
- Better privacy and security
- Feature-rich Control Panel
- Fully equipped Notes, Tasks, and Calendar apps
- Abilty to mix and match plans
What data can be migrated from Google Workspace?
If you are the superadmin of the Google Workspace account, you can migrate the following data for all the users, from your Google Workspace to Zoho account:
- Calendar
- Contacts
Steps to migrate your domain to Zoho Mail:
Step 1: Add and Verify your domaim
Step 2: Authorize your Zoho Mail to access Google Service Account
Step 3: Import users from Google Workspace
Step 4: Configure email delivery for your domain - Update your domain's MX records
Step 5: Migrate your email, contact and calendar from Google Workspace to Zoho
Step 6: Download and use the Zoho Mobile apps.
Prerequisites and preparation
You have your domain verified in Zoho
You are using the same domain, that you have used in Google.
You have the admin credentials for the Google Workspace organization account. You do not need the individual usernames or passwords, for processing data migration, if you enable your Google Service account and authorize Zoho Mail from the SuperAdmin account.
Add and Verify your domain:
As the first step, you need to add and verify the domain you own and intend to use with Zoho Mail. If you are migrating from Google Workspace, it is recommended that you use the same domain to ensure a smooth migration. Refer here for detailed instructions about adding and verifying your custom domain in Zoho.
Authorize Zoho Mail to access Google Workspace
As the next step, you need to authorize Zoho Mail to access data from your Google Workspace service account. This is required to import users from google Workspace, and also to ensure a smooth migration of email, calendar and contacts data of the thesers. Refer here for step by step instructions to enable your Google Service account, and authorize Zoho Mail to access the account.
How to import users from Google Workspace?
Now once you have verified your domain and connected your Google account, you can proceed to import the users from the Google Workspace account.
- Login to Zoho Mail Admin Console
- Navigate to Users section in the left pane.
- In the user listing page, click Import and choose the Import from Google Workspace option.

- Once the authentication is done, enter the Google Workspace super admin email address and the service account email address in the respective fields. Upload the file that was downloaded onto your system in the product key file field, and click Authenticate.
- If you have already authenticated your Google Workspace account with Zoho Mail, you will see the Import Users page. Click the Migrate button.
- The Google Workspace account that has been authenticated with Zoho Mail will be displayed. Click Proceed.
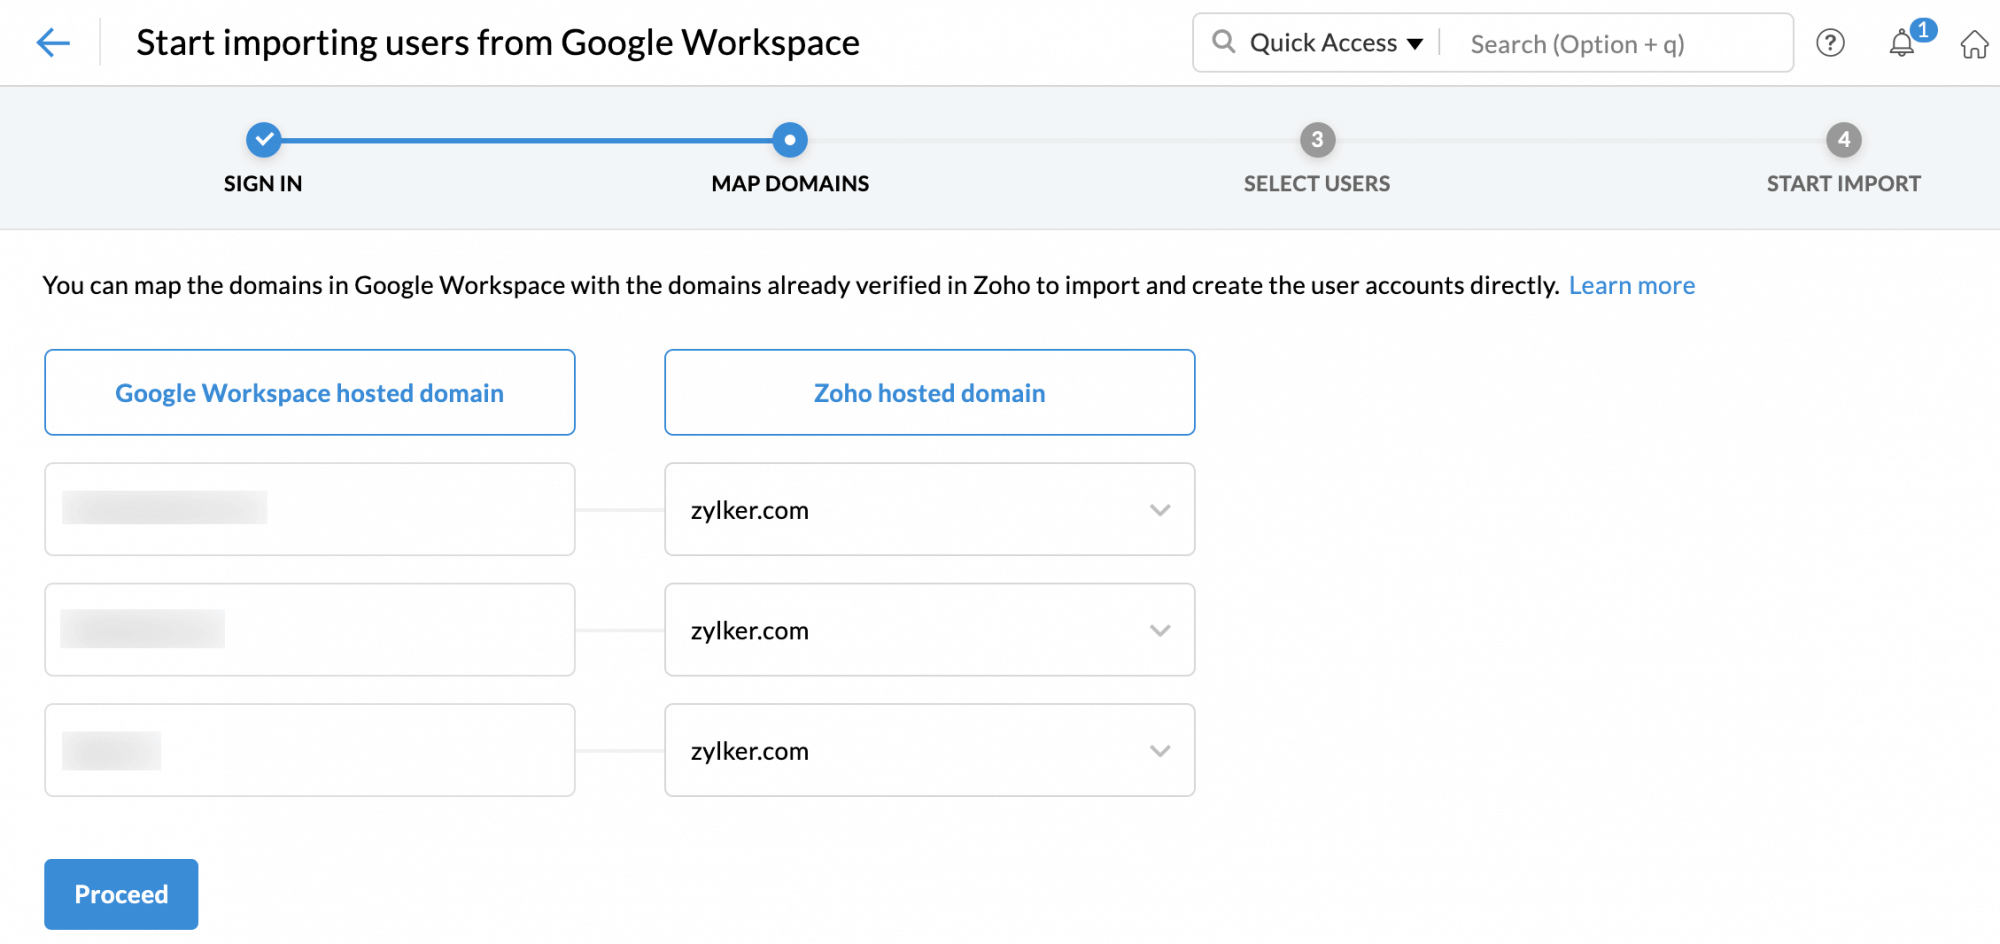
- If you have multiple domains configured, you'll be asked to choose the respective destination domains, where the users need to be created.
- After selecting the destination domains, click Proceed.
- All the users in your Google Workspace account will be listed. Select the checkboxes respective to the users that you would like to create in Zoho Mail, and click Proceed.
- Enter a name for the Import, for your reference.
- Enter a password for the users that you're importing.
- Select whether you want to force users to change their passwords during their first log in (recommended).
- Select whether you want to import user aliases and phone numbers, and click Start.
- You can continuously monitor the progress of the import from the Overview section


Configure email delivery for your domain - Change MX records for your domain:
Once you have added the users after adding and verifying your domain, you need to configure MX records for the domain to start receiving emails. Refer here for detailed instructions to configure the MX records for your domain.
SPF & DKIM Configuration for your domain:
To ensure that the emails from your domain are not marked as Spam, configure the SPF and DKIM records for your domain. The instructions to setup SPF, DKIM and DMARC are available in the respective links.
Migrating email and other data
Adding the Google Workspace Migration
- Log in to Zoho Mail Admin Console.
- Choose Data Migration from the left menu.
- Click Start data migration.
- In the Select Protocol/Application dropdown menu, choose Google Workspace.
- Enter a name for the server configuration, for your reference.
- Once the authentication is done, enter the Google Workspace super admin email address and the service account email address in the respective fields.
- Click on 'Upload secret key' file button to upload the file that was downloaded onto your system, and click Authenticate.
This will authenticate your Zoho account to access Google Workspace, and save this server configuration. The server details you added will be saved in the Saved Server Details page, and you can use it for performing other migrations just by picking it from the dropdown.
Adding the settings for migration from Google Workspace:
- In the next step, enter a name for the setting, for your reference.
- Select the checkboxes respective to the data that you'd like to migrate. You can migrate, mail, contacts and calendar data.
- When you select Contacts, all contacts from your previous account will be migrated to Zoho Mail under the relevant categories.
- Selecting the Calendar option under Data will create the respective calendars in Zoho Mail and migrate the data to each calendar. Ensure that the prerequisites are in check for Calendar migration from Google Workspace.
- There are multiple other customizations you can apply to your migration from the Other preferences section:
- Exclude Inbox Mails in case it has more than one label - If an email has multiple labels in the Inbox of your Gmail account, those emails will not be migrated to Zoho Mail.
- Mark Important as Tag - Emails that have been marked as important in Gmail will be added under the ZMImportant tag in Zoho Mail.
- Mark Starred as Tag - Emails that have been marked as important in Gmail will be added under the ZMStarred tag in Zoho Mail.
- Under Folders to migrate, you can choose either the All Folders or Specific Folders option.
- If you choose the All Folders option, you can choose to skip any folders during migration using the Exclude Folder List option.
- The skip folders option will be handy when the admin rerun migrations for the same set of users for some new emails or missed emails. Enter the names of the folders within double quotes ("Folder1"), in which case only that folder will be excluded. If you want all subfolders under a parent folder to be migrated enter the folder name followed by /* within double quotes ("Folder1/*"). For detailed information on the convention, refer here.
- If you choose the Folder Specific option, you can specify the folders that need to be included in the Include Folder List.
- In the Include Folder List, enter the names of the folders within double quotes ("Folder1"), in which case only that folder will be included. If you want all subfolders under a parent folder to be migrated enter the folder name followed by /* within double quotes ("Folder1/*"). For detailed information on the convention, refer here.
- Under Emails to migrate, select whether you want to migrate all the emails or the emails that you have received after a specific date.
- In Enable POP access for the migrated emails, select Yes if you want your users to view the migrated emails when the account is configured as POP in other email clients. Otherwise, select No.
- Finally, click Add.
The settings you added will be saved in the Saved Settings page, and you can use it for performing other migrations just by picking it from the dropdown.
Prerequisites for Calendar Migration from Google Workspace:
To ensure complete migration, all the users present in the respective Google Workspace account need to be created in Zoho Mail before calendar migration.
For the Calendar data to be migrated correctly, the domain name in Zoho Mail has to be the same as the domain name in Google Workspace. For example, if your domain in Google Workspace is abc.com, your domain name in Zoho Mail should be the same abc.com.
Creating a new migration:
After adding the settings, enter a name for the migration, for your reference.
Enter a Maximum Connection Limit. This refers to the maximum number of connections accepted by the server at a given time. For example, if you provide 5 as the maximum connection limit when the migration is started, the migration process will be started simultaneously for 5 users. The migration process will be faster when there are parallel migrations happening between the servers.
Select whether you would like to pause the migration when the storage reaches 80% or 95%, and finally click Create.
Adding user details for migration from Google Workspace:
You can populate the account details in Zoho Mail directly from the Google Workspace servers.
- From the Migration list, select the migration which you want to add the source and destination user account details.
- Click Fetch to directly populate user details.
- Select the Destination Domain if you have multiple domains configured.
- Select the users whose accounts need to be migrated.
- Finally, click Add selected users.
- A preview of all the users selected, along with details about whether they were added or not will be shown on screen.
Starting the migration process
Once you have added the user accounts for the migration, you can start the migration. Ensure that the source passwords are not changed after adding the users for migration. The password should be the same until the entire migration process is completed.
- Click the Start button after adding the users. If you have navigated out of the page where you added the users, select the migration that you want to start from this page, and click Start.
- You can view the progress and statistics regarding the migration on the same page.
- Detailed statistics regarding each user's migration can be viewed by clicking on their email address in the migration progress page.
- For mail migration, detailed reports along with folder information will be available.
- Click Mail Failures to view the detailed information about the folder-wise migration details.
- Similarly, you can also view the statistics for Contacts migration by going to the Contacts tab.
- The Calendar migration details can also be viewed from the same page. Go to the Calendar tab to view the details.
Common errors during migration:
Email Size Exceeded - If the size of the email in the source server exceeds the maximum size defined in the user's email policy, such emails will not be migrated.
Mail already present - If the email is a duplicate of an email already in the user's account in Zoho, the duplicate emails will not be migrated.
Too many addresses - If the number of To Addresses in an email exceeds the permitted limit in Zoho Mail, the email will not be migrated.
Invalid Message - If the email format is not as per the RFC definitions, with an incorrect header or email format, such emails will not be migrated.
Unable to Process - In case there are any internal processing errors during the migration of a particular email, such emails will be skipped during migration.
Unable to Retrieve - At times, there might be some problems while fetching certain emails from the source server. Emails that could not be retrieved from the source server will be categorized here.
Top Articles