Visitor Tracking with Zoho SalesIQ
Having an excellent website and great traffic to your website is not all. What adds value is: Knowing the actions performed by the visitors in the website, identifying the web pages they are spending more time in and analyzing their navigation style and the time spent in your website.
- If more than 10% of the visitors to your website spend more time on the Pricing page, then you can always offer help in choosing the right plan for them.
- If in spite of the traffic, not many people are signing up, then you know something needs to be fixed there.
- If a visitor often visits your site but is not a customer yet, you got a lead to follow up.
In similar cases, how visitors behave on your website can sometimes be very useful. You can also offer help via chat and engage with prospective customers. Along with this if you know who your website visitors are, you could do much more. If it is an existing customer, you can check their purchase history. In case of leads, you can know in advance the products they are interested in and be prepared to address their needs.
This combination of details on website visitors, chat widget and customer database is a product of our Zoho SalesIQ Integration with Zoho CRM (Visitor Tracking). This integration provides you the information about the visitors' engagement in your website, lets you embed a chat widget and pushes the data collected, to the Zoho CRM database.
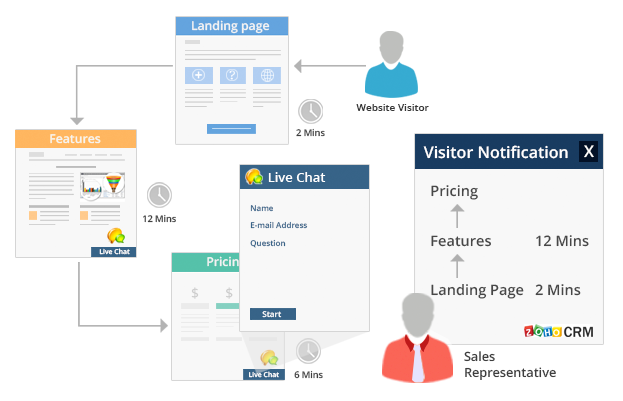
Say a prospect, Bob, spends quite some time on the product's Pricing page. You quickly chat with him to see if he needs help. Bob replies back with his doubts on the pricing and you clarify them. That need not be the end of the interaction. You can add Bob as a lead in Zoho CRM, attach the chat transcript for reference and keep a track of his future visits to your web page. Further, you can understand his actual requirements and offer him some deals on the product.
Availability
![]() Permission Required: Users need to have a Paid Edition in Zoho SalesIQ. Admin can set up this feature.
Permission Required: Users need to have a Paid Edition in Zoho SalesIQ. Admin can set up this feature.
Benefits
- Be proactive by knowing well in advance the interests of your customers and requirements of your leads.
- Engage more customers by chatting with them to address their concerns and clarify their doubts.
- Be notified whenever your customer or prospect visits your website in search of some information.
Understanding Zoho SalesIQ Integration
Having an easy way to gather the details about your website visitors and instant access to your comprehensive CRM database can be of great advantage for your business. With visitor tracking integration, you can also associate more than one portal in Zoho CRM and track multiple portals inside your CRM. Also, export visits data, export visits reports, and perform data migration and data backup for your visits. Additionally, with the Zoho SalesIQ's chat option, you can engage the visitors on your website too. Following details will help you get started with the integration setup.
- Integration Settings in Zoho SalesIQ - The first step is to enable the integration. If you are already using Zoho SalesIQ, you would probably have the code embedded in your website to track visitors. In that case, you just need to enable the Visitor Tracking feature to associate the details with the customer's data in Zoho CRM. If you are not using Zoho SalesIQ, then you need to enable and specify some details for the integration.
- SalesIQ Integration code in your website -In order to track the visitors and the actions performed by them, embed the Zoho SalesIQ code in your website. The data collected will be associated to the leads or contacts.
- Visits Tab - The Visits tab available in Zoho CRM lists all the available portals associated within your CRM. Choose the relevant portals to view the details of the visits and the visitors. Most importantly, it captures information that includes IP Address, the page that was visited, who visited, time spent on the page, past chats, actions performed in the web page, etc. Users need the Visits tab permission in profile to access the visit details.
- Notifications within Zoho CRM- You will get a popup notification whenever you have a visitor to your website. If required, the Administrator can disable the notifications option. If you get a lot of traffic to your website, it is not feasible to manage the overwhelming notifications. In such cases, Zoho SalesIQ, gives you the option to create a rule. Based on this rule, you will be notified only of the visitors who meet the rule criteria
There will be four categories under which the visitors will be categorized in the notifications. This categorization is done based on the name and email address provided by the visitor.- Customers - When the details match with that of the contacts.
- Customerswith Potentials in Pipeline - When the details match with that of the open potentials.
- Leads/Contacts- When the details match with that of the leads or contacts.
- Unknown Visitors - When you do not have any records saved in CRM, with the exact email address provided by the visitor.
- New Fields in Leads/Contacts Module - Some new fields will be added to the Leads/Contacts module. These fields will capture the information related to the lead's or contact's visits to the website. The fields are: Days Visited, Number Of Chats, Average Time Spent (Minutes), Last Visited Time, First Visited Time, First Visited URL, Referrer, Visitor Score.
- Related List (Visits – Zoho SalesIQ) - For leads/contacts, a new related list will be added. You can choose any of the associated portals from the drop down as per your requirements. Details on the IP Address, Visited Page, Time Spent (Minutes), Referrer, and Search Engine will be recorded under this related list.
- Attachments of Chat Transcripts - Chat transcripts, if any, will be attached to the leads or contacts who visit the web page and enquire about a product/service, ask for support, etc. via chat.