Setting up Portals
Table of Contents...
Portals, are designed to give customers access to part of the CRM. By creating portals, you can extend access to your Zoho CRM account to your customers. Through a portal, your customers can access the modules and some of the associated data such as products, invoices, and notes. They can also view, edit, or create records or add notes and attachments.
Let us consider a few scenarios that will help you understand how portals can help your business.
- In a franchise - Imagine you run a fast food business and have granted others the right to operate the franchise in a few locations. You use Zoho CRM to manage all the business details and to track outlets' performance. The franchise owners can request to view their outlets' performance and their customers' details. You can create exclusive portals for the franchise owners. They will be able to view and edit the relevant records right from the CRM.
- In the automobile industry - For example, you have an automobile shop and want to track your customers' details, your sold vehicles and servicing schedules. To do this, you can create a portal and share it with your clients. The customers can view and edit their details in the portal, and they will be updated in your CRM records. Similarly, if they want to get their vehicle serviced, they can fill in their details using the portal.
- In an educational institute - If you run a school, instead of manually entering every student's details, you can provide parents with access to the portal's. They can add, update, or view their child's details in the portal and share the students' grades and performance scores with the parents through the portal.
- For business partners - You run a software company and use CRM to follow up with your contacts and leads or to track multiple deals that are at different stages. There is a meeting with the partners and you want to discuss all the contacts and the deals that have the highest revenue. Imagine how tedious it would be to share this complex information with individual partners. You can easily manage this situation by creating a portal for the partners, where you give them access to the Contacts module and add a contact lookup in the Deals module in CRM. This will enable them to view the contacts and their associated deals and add or remove details in the modules based on their permissions.
Availability
![]() Permission Required: Users with Manage Portal profile permissions can create a portal and invite customers.
Permission Required: Users with Manage Portal profile permissions can create a portal and invite customers.
| Features | Free | Standard | Professional | Enterprise |
| Portals | - | - | - | 1 portal user type free for Contacts module. For 4 more portals user types, user license needs to be purchased. |
Note:
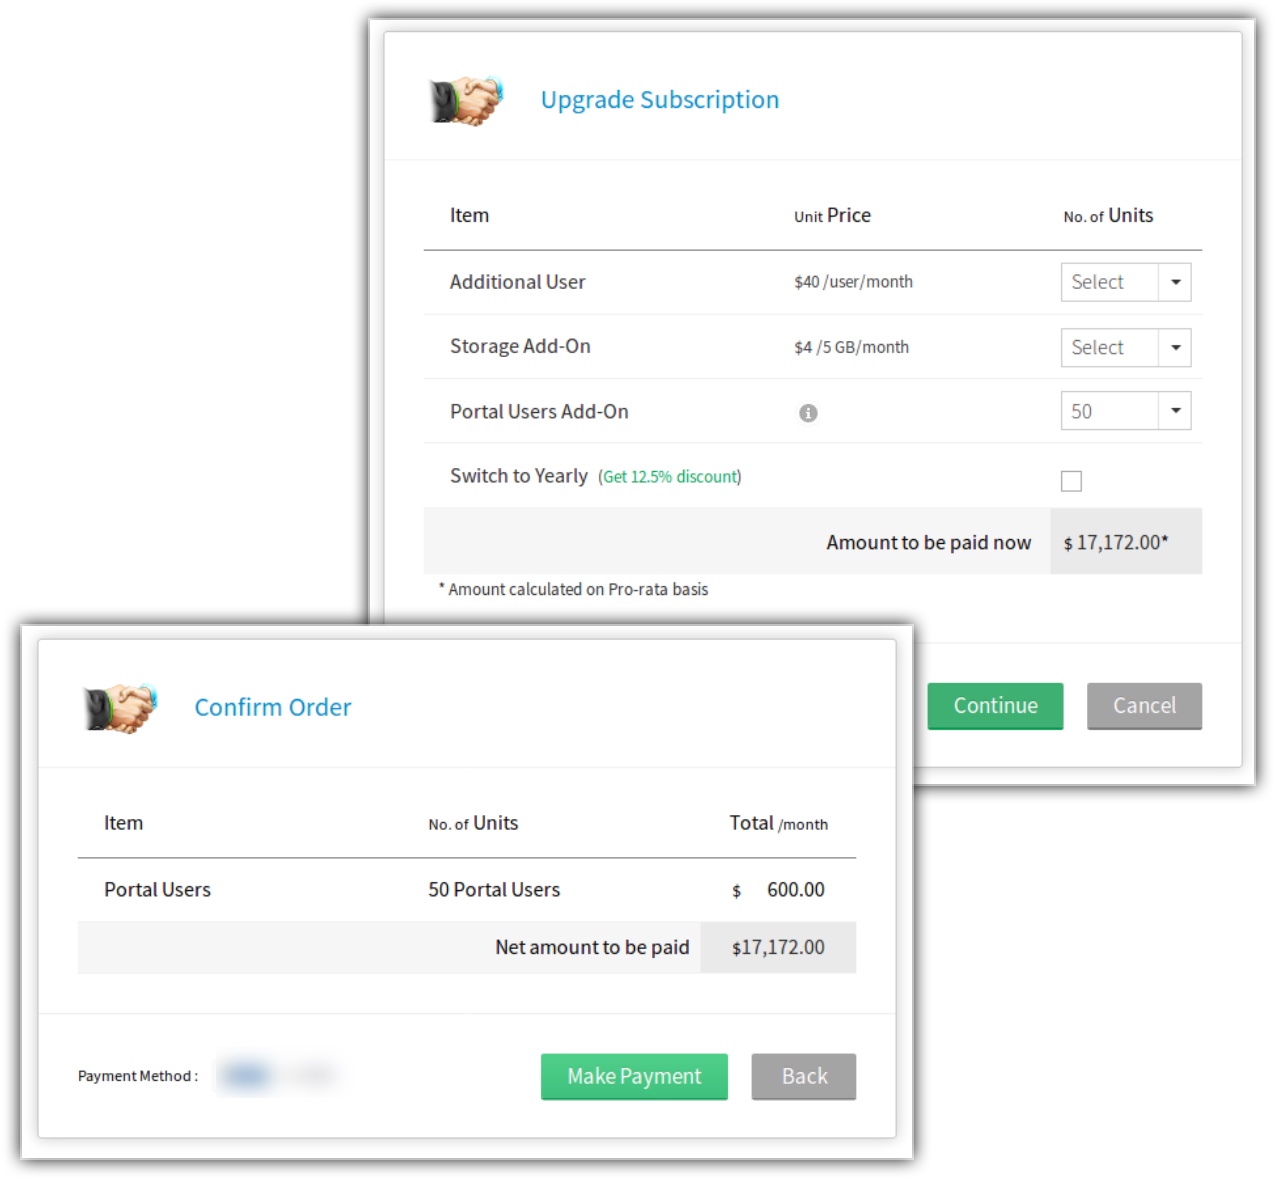
- You can configure up to five portal user types. The first user type is free and can be created only for the Contacts module. Four more portal user types can be created by purchasing the required number of user licenses that you will be adding to the portal. These additional portals can be created for Leads, Contacts and Custom modules.
- First portal user type - You can add the first user type and invite up to 10,000 users for free. Please contact us if you need to add more users.
- Four other portal user types- For these user types, you need to purchase user licenses to add users. The licenses purchased can be distributed among the additional portals that you create.
The pricing model for additional purchases:
50 users (minimum user count) - $600/month
51 to 100 users - $12/user/month
100 users up - $10/user/month
Create and Set up Portals
Creating and setting up a portal consists of the following steps:
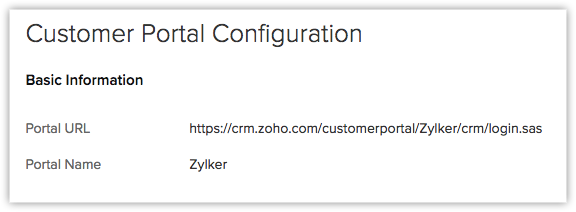
By default, the company's name will be the portal name and it will be used to generate a URL that customers will use to access the portal. However, you can choose to change the portal name while creating the portal. If the portal name is already in use, Zoho CRM will prompt you to change it.

Note:
- When you create a portal, a default portal user type called Client Portal will be created. This default portal user type will have the default settings and you cannot delete this portal user type from your CRM account. You can add up to 10,000 users to the default portal user type without payment. To add more users you need to purchase them. You can only add clients or customers to this portal user type, you will not be able to add users from the same domain, i.e., your employees or partners.

Step 2. Defining the Portal User Type
A user type in a portal is a label for the users who will be accessing the modules from your organization's CRM account. Permissions can be defined for the user types that will enable or restrict access to the data in the CRM account. These user types can be vendors, clients, consultants, customers, partners, or resellers.
Please note that the first portal user type must be customers.
Note:
- You can add more than one portal user types and additional portal users after making your payment. You can check the payment section by clicking on the Manage Subscription link in your CRM account.


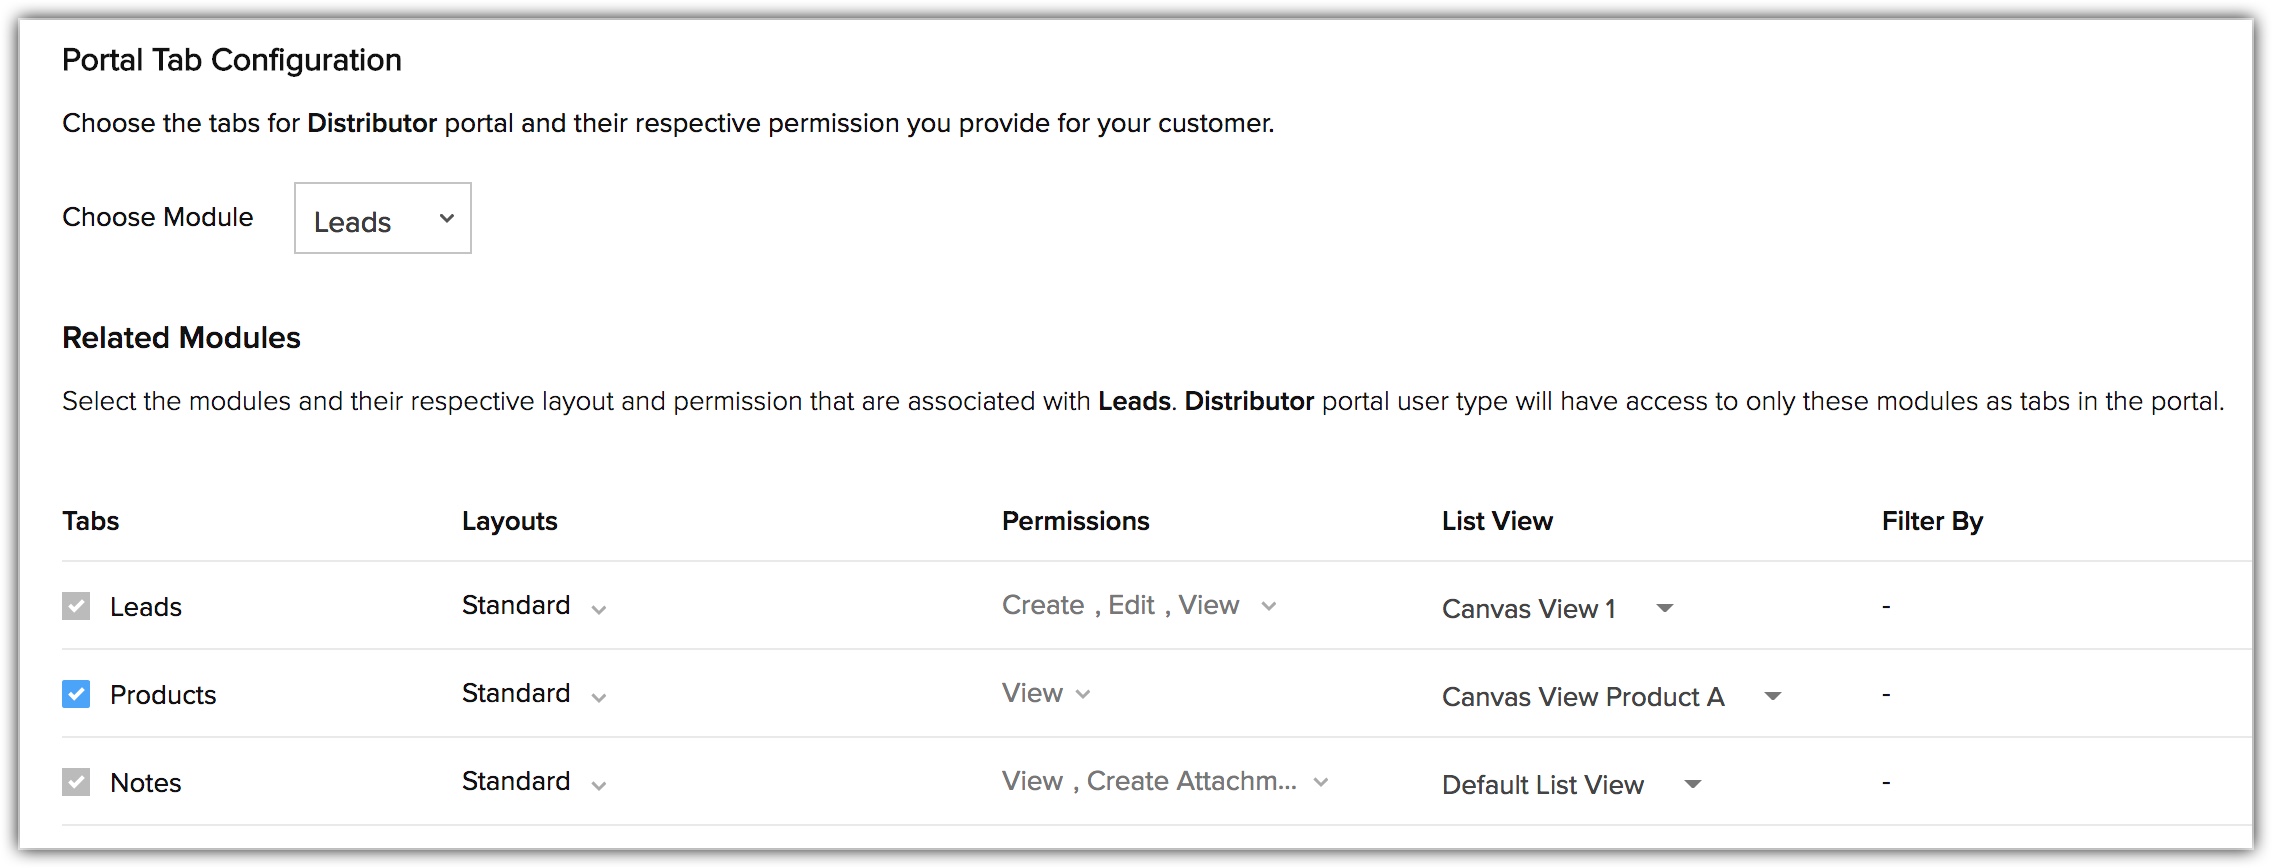
Step 3. Configuring the Portal Tab
In this step, you will choose the modules and the specific layouts that the portal user will be able to access and define permissions to either create, edit, view, or delete records. For example, you run a car company and want your clients to enter some information. You can configure a portal exclusively for these clients and give them access to the Leads module. The clients can enter their details in the portal to be added to their CRM record. Configuring the portal tab includes the following steps:
- Choose the module: You can choose to give the customers access to the Leads, Contacts, or custom modules. The customers will be able to view their own details in the module and based on their permissions, they may be able to add and edit records.
- Select the related modules: The modules that have a lead or contact lookup are listed under the related modules. You can choose the list of related modules that you want the customers to be able to access.
- Select the layouts of the related modules: You can choose more than one layout for each related module for the portal users to access.
- Define the module record permission: You can set the permission level for each record in a module. For example, you can allow the clients to view or edit their license number or mailing address, or give a vendor read-only permission to purchase orders.
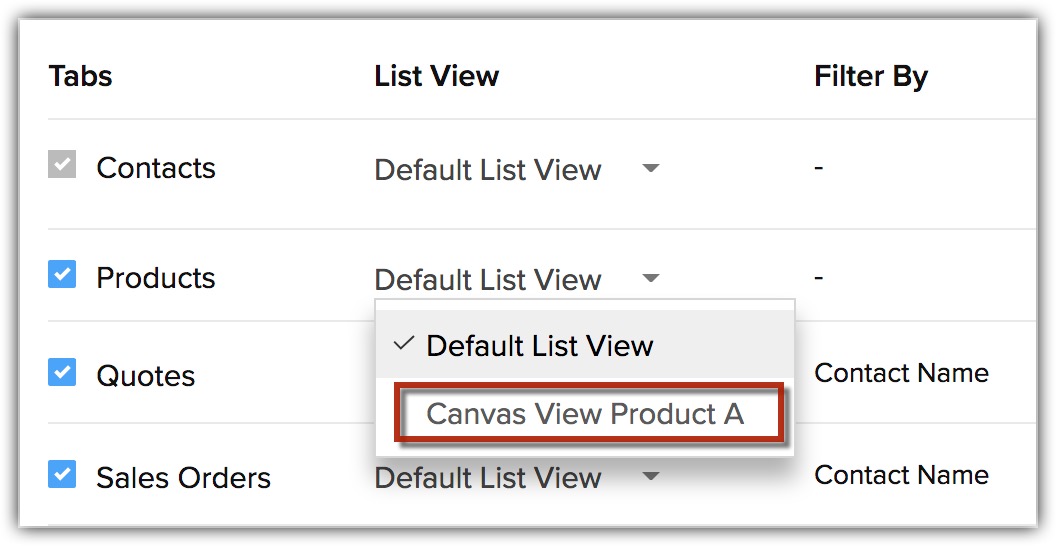
- Select list view:If you have created a canvas view for any CRM module, you can choose either List view or Canvas view to display a record. List view will be selected by default for all modules. Note that the custom buttons or custom links will not be displayed for the portal users if they are added to the Canvas view.
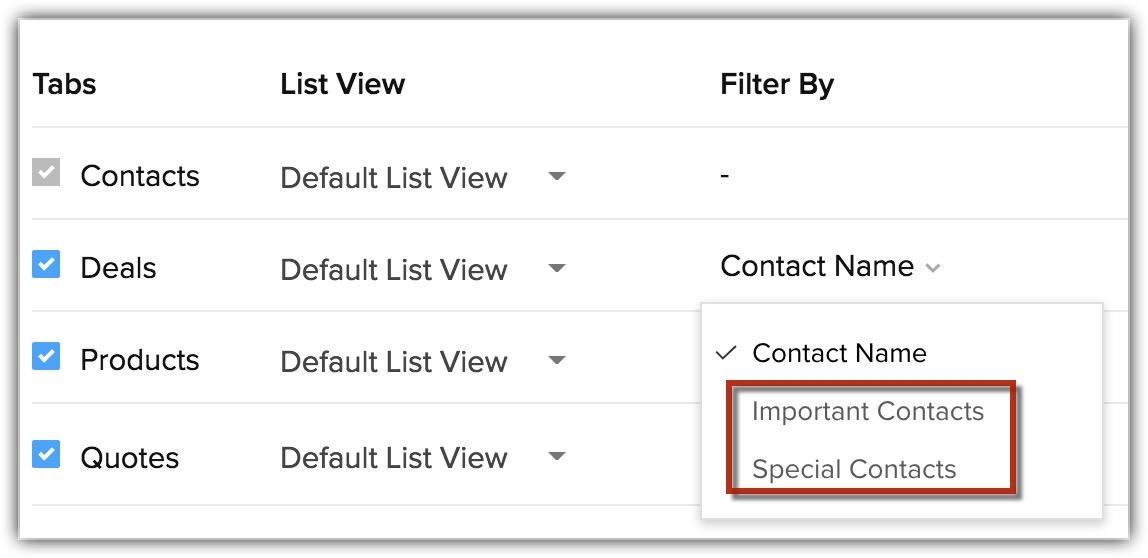
- Filter By: Select the records that the portal user will view by using the lookup filter. For example, if you have added two lookup fields in the Deals module, you can choose a lookup based on the records that you want the portal user to view. However, the lookup filter will only be available to the existing portal users if they edit the portal configurations.
Note:
The portal users can access the following records and perform actions based on the permissions defined for the portal's user type:
- Their own record - They can add or edit details for their own record.
- Other leads/contacts that they create - They can create, edit, and deleted other records as per the permissions defined.
- Other records associated with the leads/contacts (deals, invoices, quotes, etc.) - Records can be cloned.
- In Products - They can view all the records listed in the Products module.
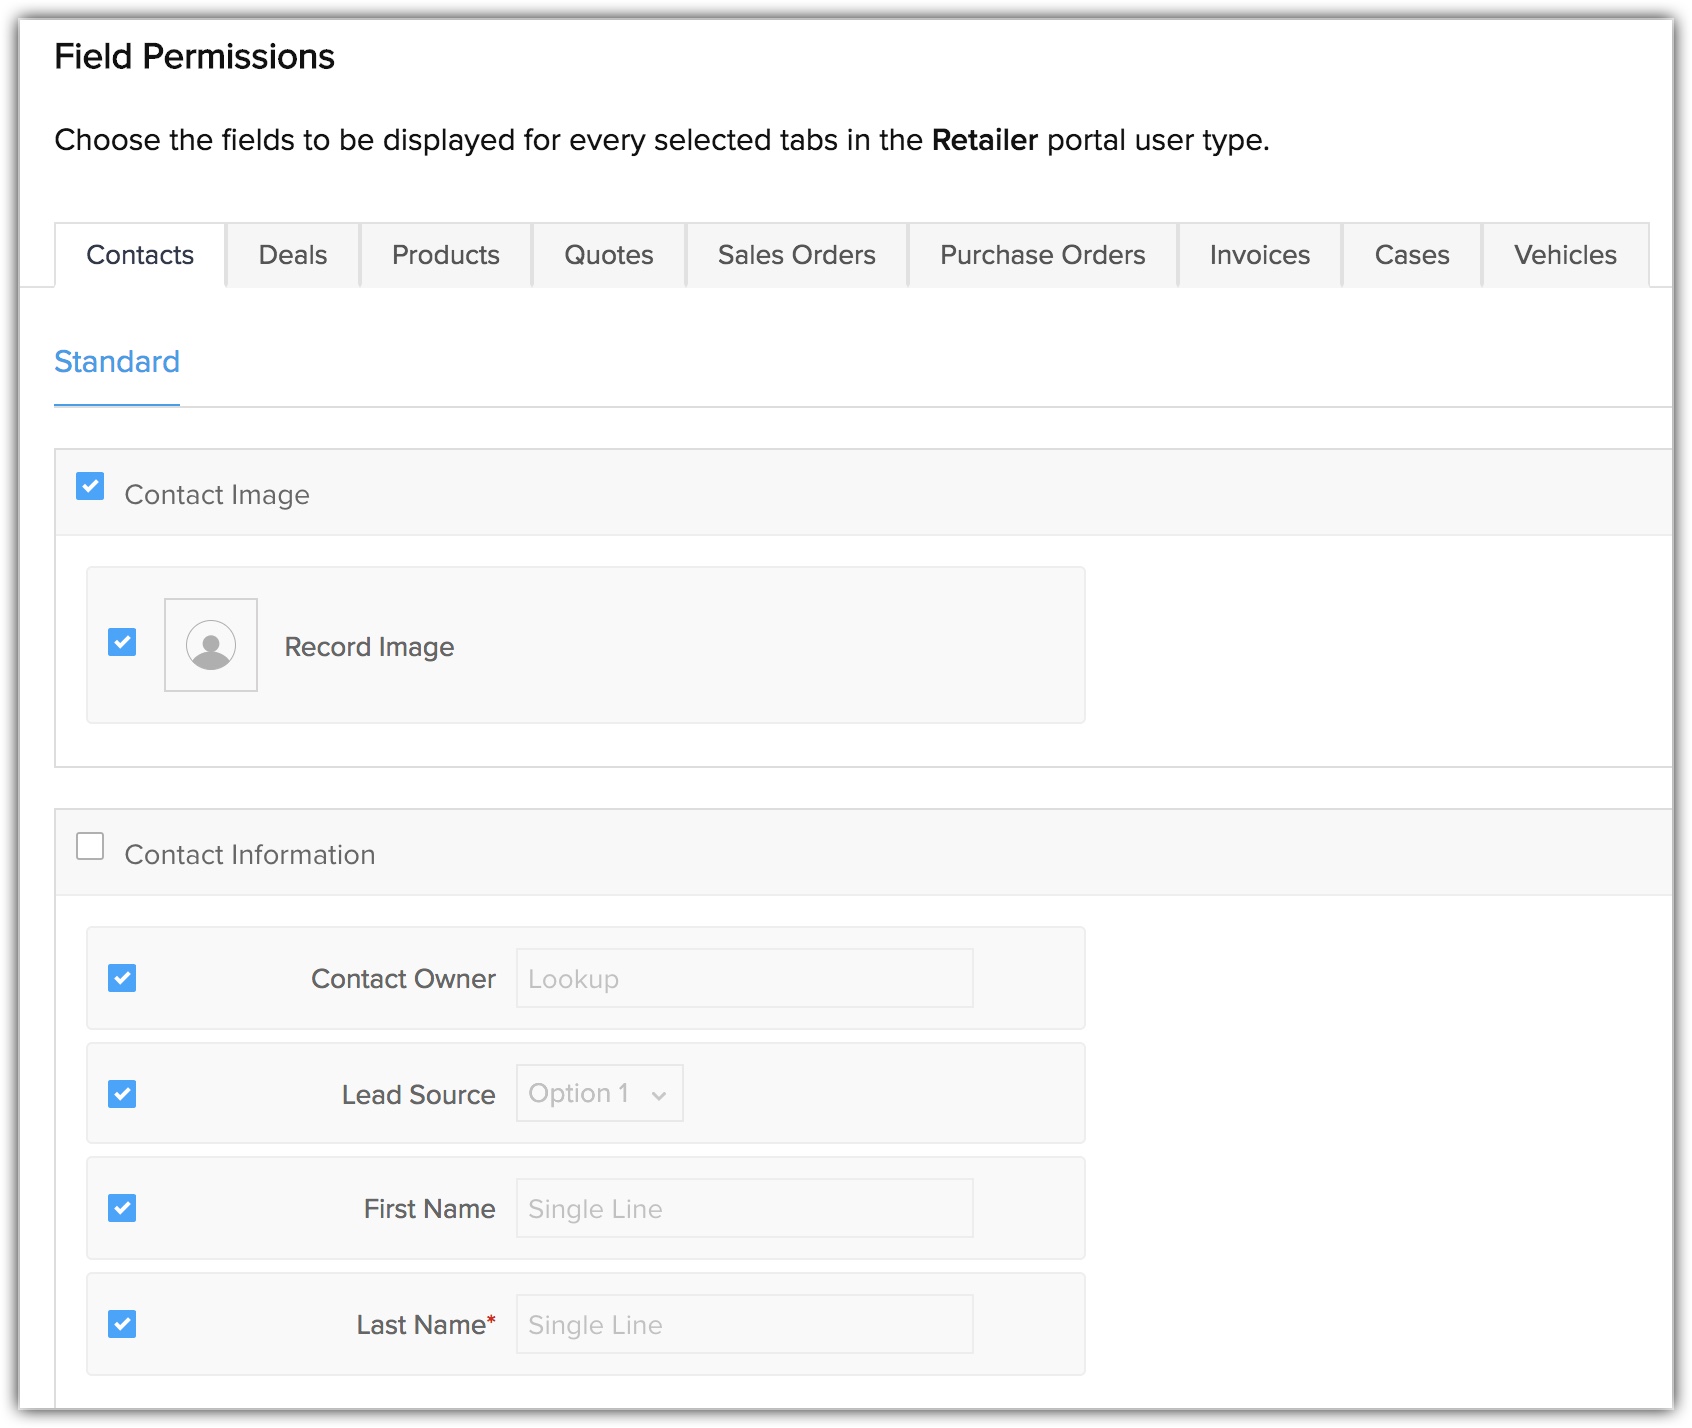
Step 4. Specifying Field Permissions
The related modules that you selected in the previous step (Portal Tab Configuration) will be listed under the Field Permission section. You can select the fields that you want the portal users to access. You can also mark the fields that you do not want the customer to edit as Read Only. The mandatory fields inside CRM will also be marked as mandatory in the portal.
Creating Portals
To create a portal
- Go to Setup > Channels > Portals.
- In the Portals page, click Get Started Now.
Your company's name will appear as the default portal name. - Edit the Portal name, if required.
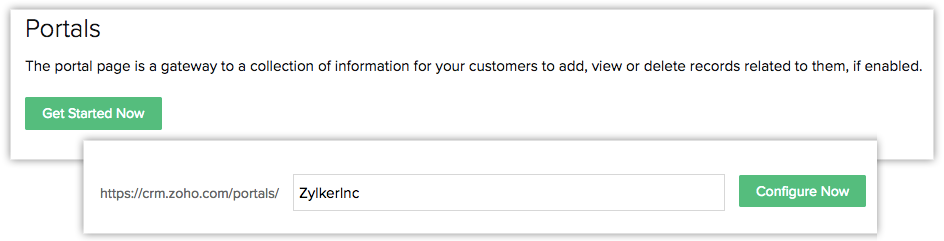
- Click Configure Now.
The customer portal URL will be generated and the portal name will be available. - Click Next to continue.
Next, define the portal user type, portal tab configuration, and field permissions.

Note:
- You will not be able to edit the portal name once it is created.
- Once a portal is configured you will not be able to delete it.
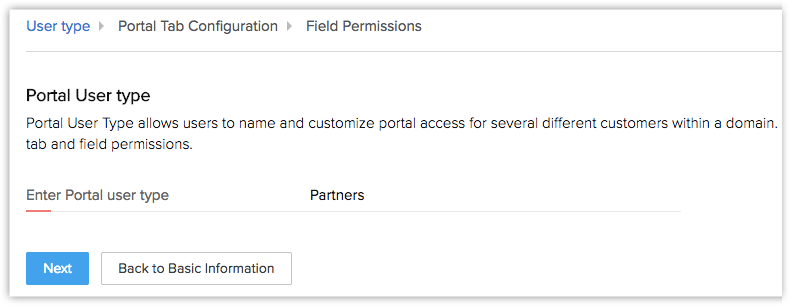
Defining Portal User Type
To define a portal user type
- Under Portal User Type enter a name e.g., parents, partners or vehicle service.
- Click Next.

Configure the Portal Tab
To configure the portal tab
- In the Portal Tab Configuration page, select a module from the Choose Module from the drop-down list.
- In the Related Modules section, do the following:
- Tabs - Select the checkboxes for the related modules that the portal users will be able to access.
- Layouts - Select one or more layouts that the users will have access to.
- Permissions - Choose create, edit, view, or delete permissions for the records in the module. Portal users will only be able to perform the defined actions for the records in the module that they own.
- List View - Select either List view or Canvas view for the records.
- Filter By - Select the filters from the drop-down list.
- Click Next.


Specify Field Permissions
To specify field permissions
- In the Field Permissions page, select the check boxes for the fields that need to be available for the portal users.
- Click the Read Only checkbox, if required.
- Click Save and Next to move to the next layout or module to define field permissions.
- Repeat the above steps for all the modules and layouts.
- Click Finish to save all the details.
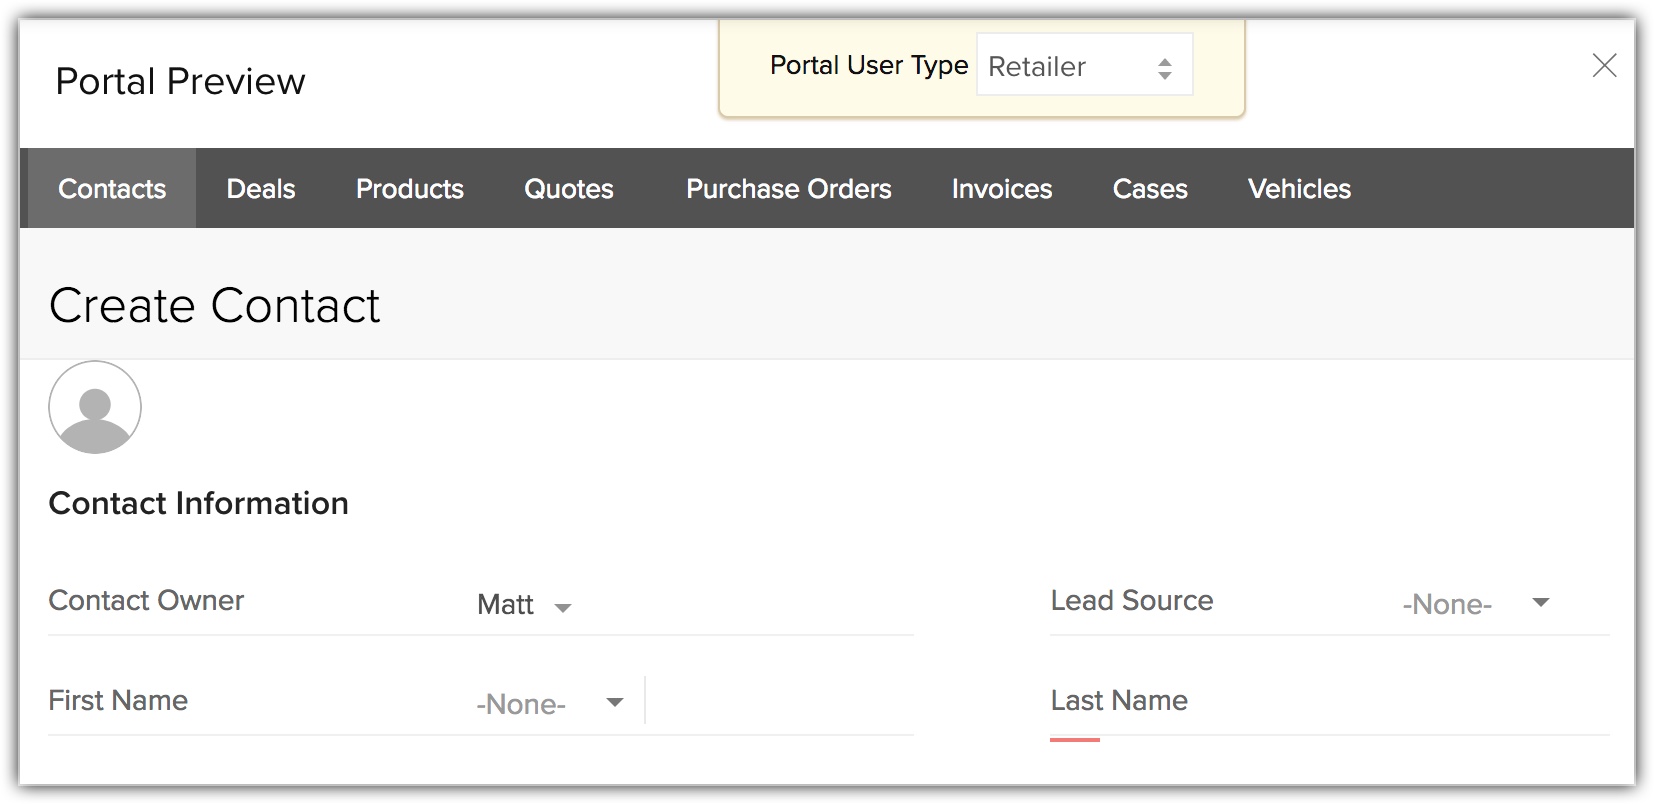
View the Portal Preview
Once the portal configuration is complete, you can preview the portal to see how the customers will see the records.
To view the portal preview
- Go to Setup > Channels > Portals.
- In the Customer Portal Configuration page, click Preview.
- Select the Portal User Type from the drop-down list to view the preview.
Note:
You can view the portal summary after the portal configuration is completed. You can edit the Field Permission and Portal Tab Configuration in the portal configuration details. You can also add a new portal user type, if required.
Send Invite to Users
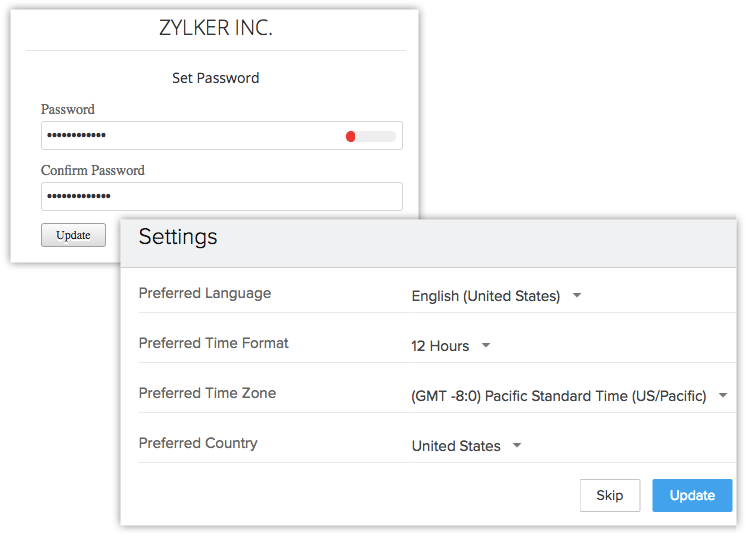
Once you have created the portal, you can start inviting the customers. The email invitations will contain the portal URL details. Once users accept their invitation, they will be prompted to set a password. Inside the portal, the customer must set basic information like their preferred language, time format, time zone, and country (the CRM settings will be displayed by default). They will then be directed to the module page they have access to.
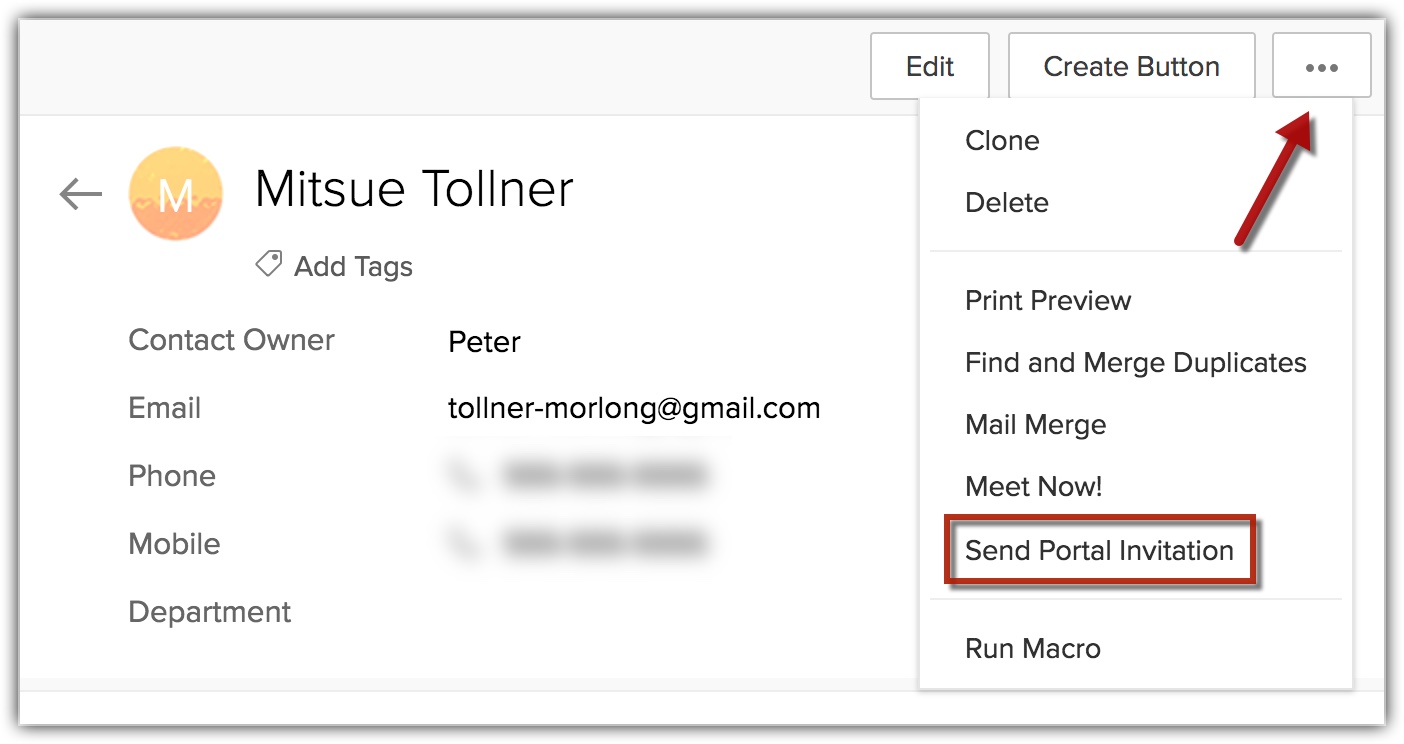
To send an invitation
- Choose a module.
- Select a User.
- In the User detail page, click the More icon > Send Portals Invitation.
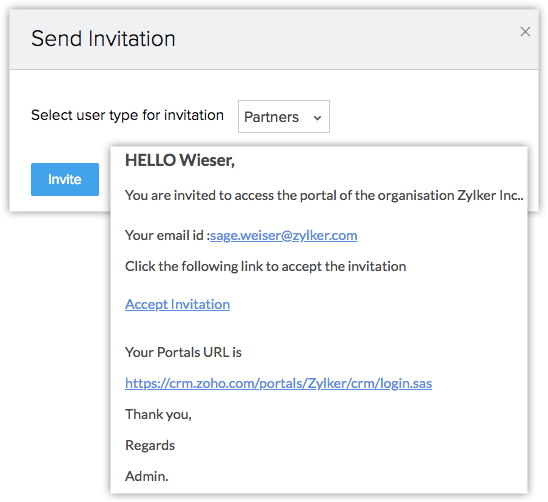


Note:
- You can send an email invitation to the customers from the User detail page in Zoho CRM. The send invite option is only available if the user's email address has been added.
- You can not send mass email invitation to your customers.
- For example: Russell is a CRM user who invites Sage to access the portal with the permissions to create contacts and deals. In this case, when Sage creates a contact through the portal, it will be added to the CRM database and Russell will be the owner of the new contact.

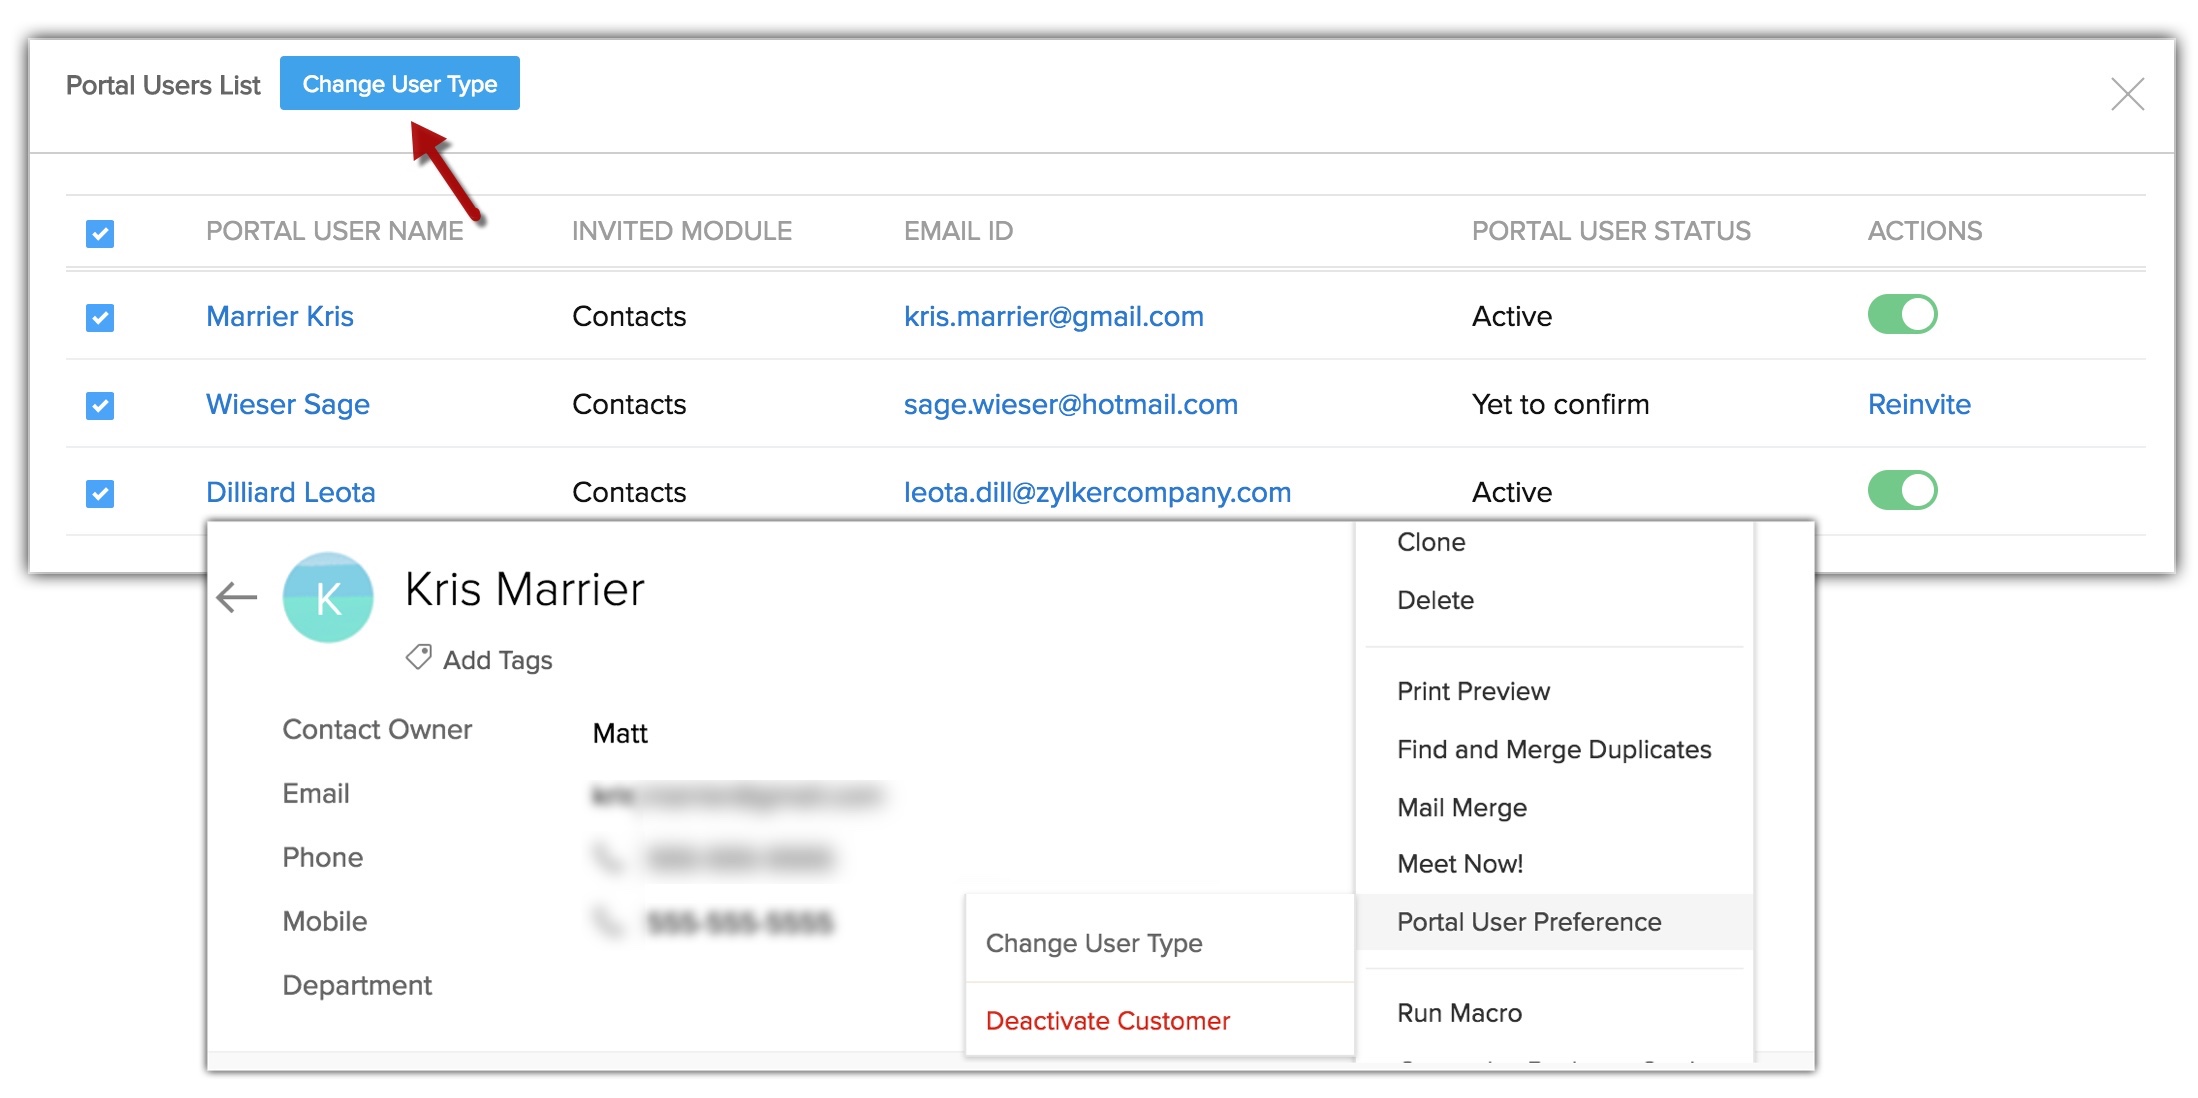
Change Portal User Type
There may be occasions when you have to move a user from one portal user type to another. For example, you have created two different portals for customers interested in Product A and Product B. If the customer is no longer interested in buying Product A and wants to buy Product B instead, you can easily move them to the Product B portal user type. You can transfer users from one portal user type to another from any of the following places:
- Record Detail Page - You can change the portal user type from the record's detail page.
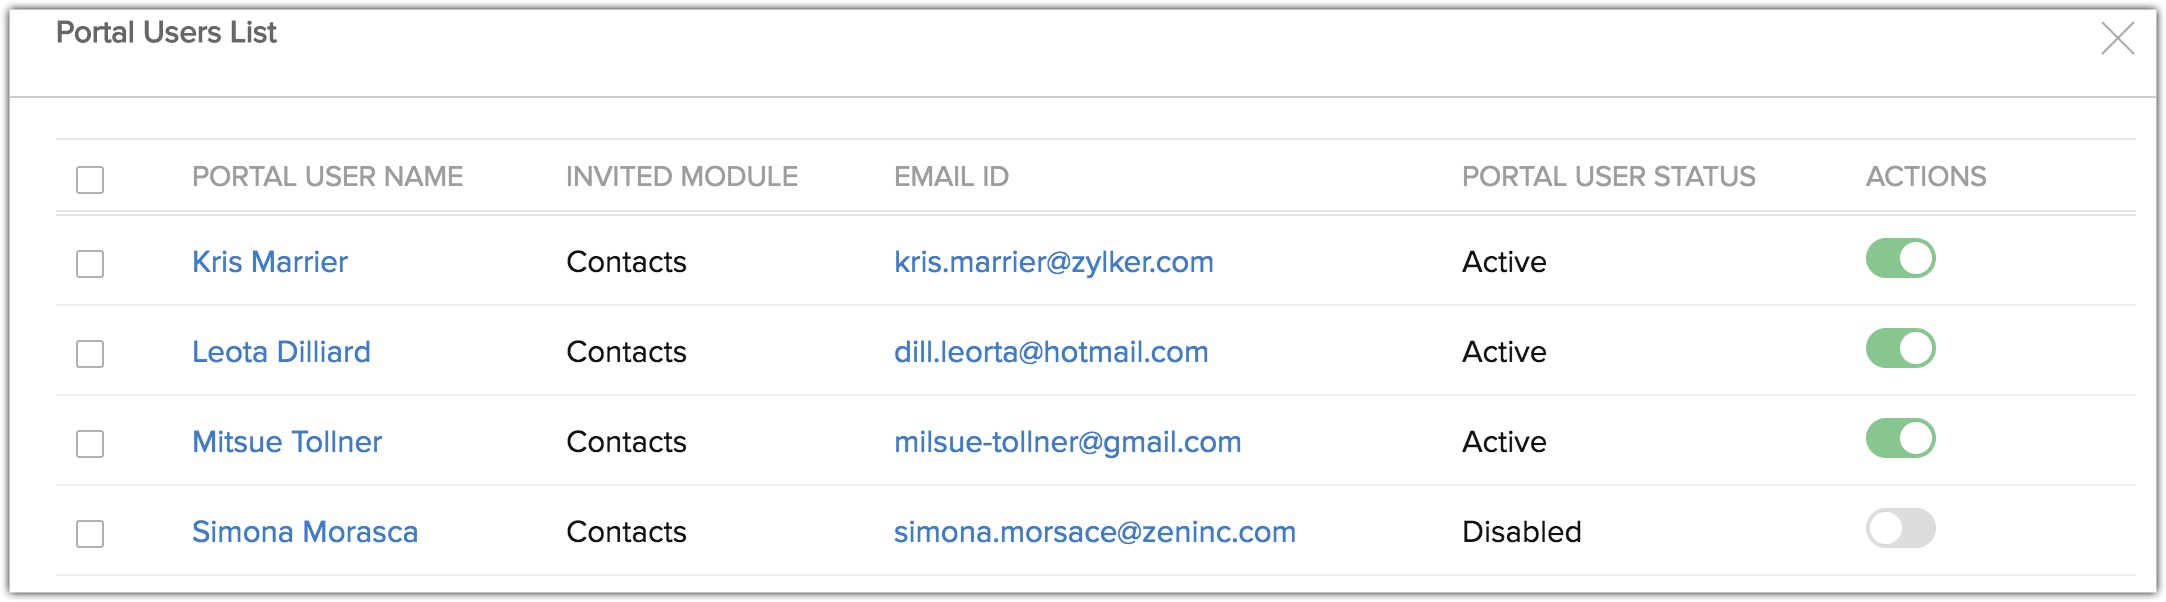
- Portal Users List - If you want to change multiple portal users to another portal user type at once, you can do so from the Portal Users List popup in the Portal Configuration page.

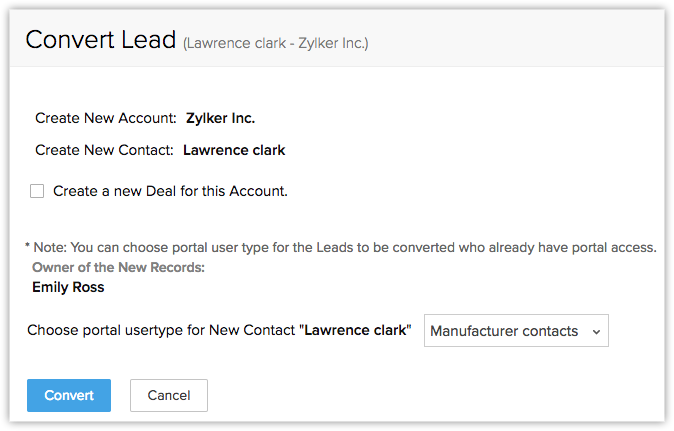
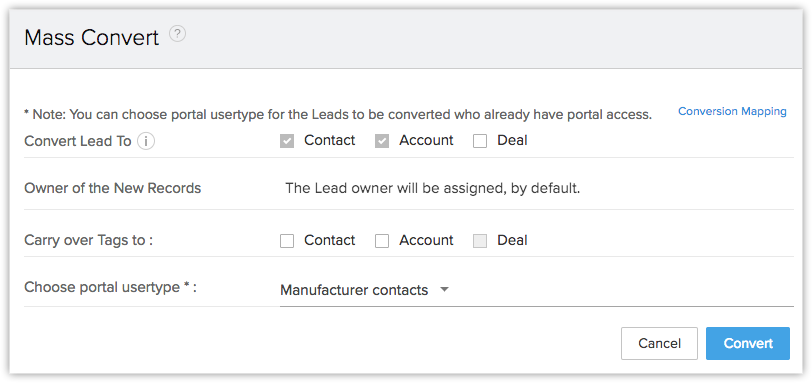
When You Convert a Lead to Contact
In Zoho CRM, you can convert qualified leads to contacts either manually or automatically using the workflow rules. If you have created one portal user type for leads and two types for contacts and added your CRM leads and contacts to the appropriate portals, you will be prompted to choose one of the portal user types under Contacts when you convert the leads to contacts in your CRM. For example, you have four leads A, B, C, and D in the Leads portal user type; and Contacts 1 and Contacts 2 as two portal user types in the Contacts modules. When you convert leads A, B, C, and D into contacts in CRM, you will be prompted to choose the Contacts portal user type (Contacts 1 or Contacts 2) to transfer the leads to.

Data Privacy for Portal Users
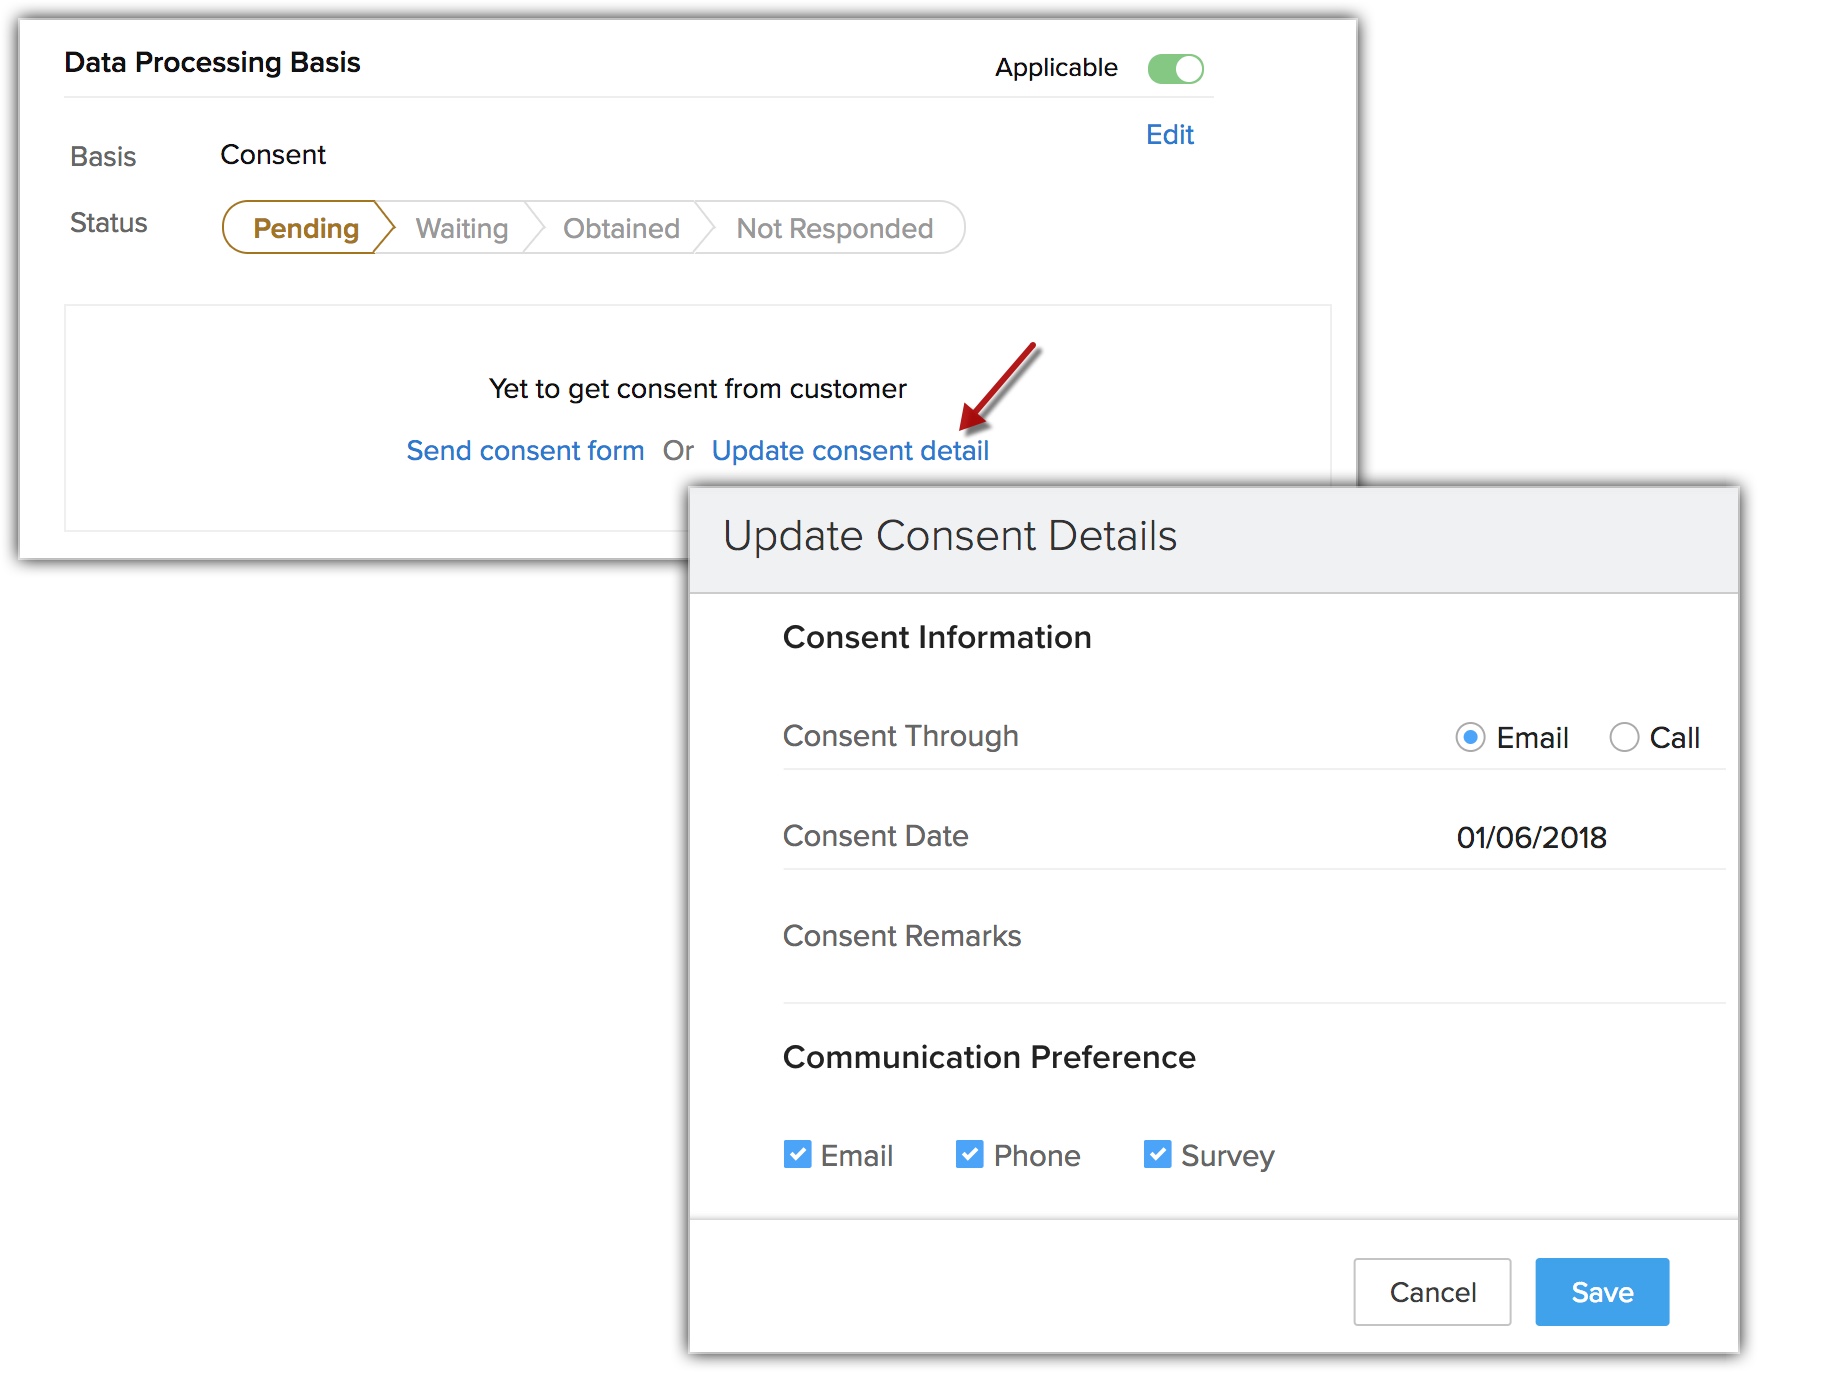
Data Processing Basis:
As a Data Controller, to be GDPR compliant you need to process data based on one of the lawful bases. Based on your business requirement and discretion you can choose a processing basis from the list of bases: legitimate interests, contract, legal obligation, vital interests, public interests, and consent. If consent is the lawful basis used to process data, Zoho CRM provides an option to allow portal users to access the details you store about them, and provide consent to process their personal data.
You must consider the below points when setting data privacy for the portal users:
- The data privacy tab will be displayed for a record only if the compliance settings are turned on.
- The portal user can view the data processing basis in their account only if the data processing basis is Consent.
- The portal user can also update the consent details of the leads or contacts that they have added.
- The portal user can update their consent details from within the portal.
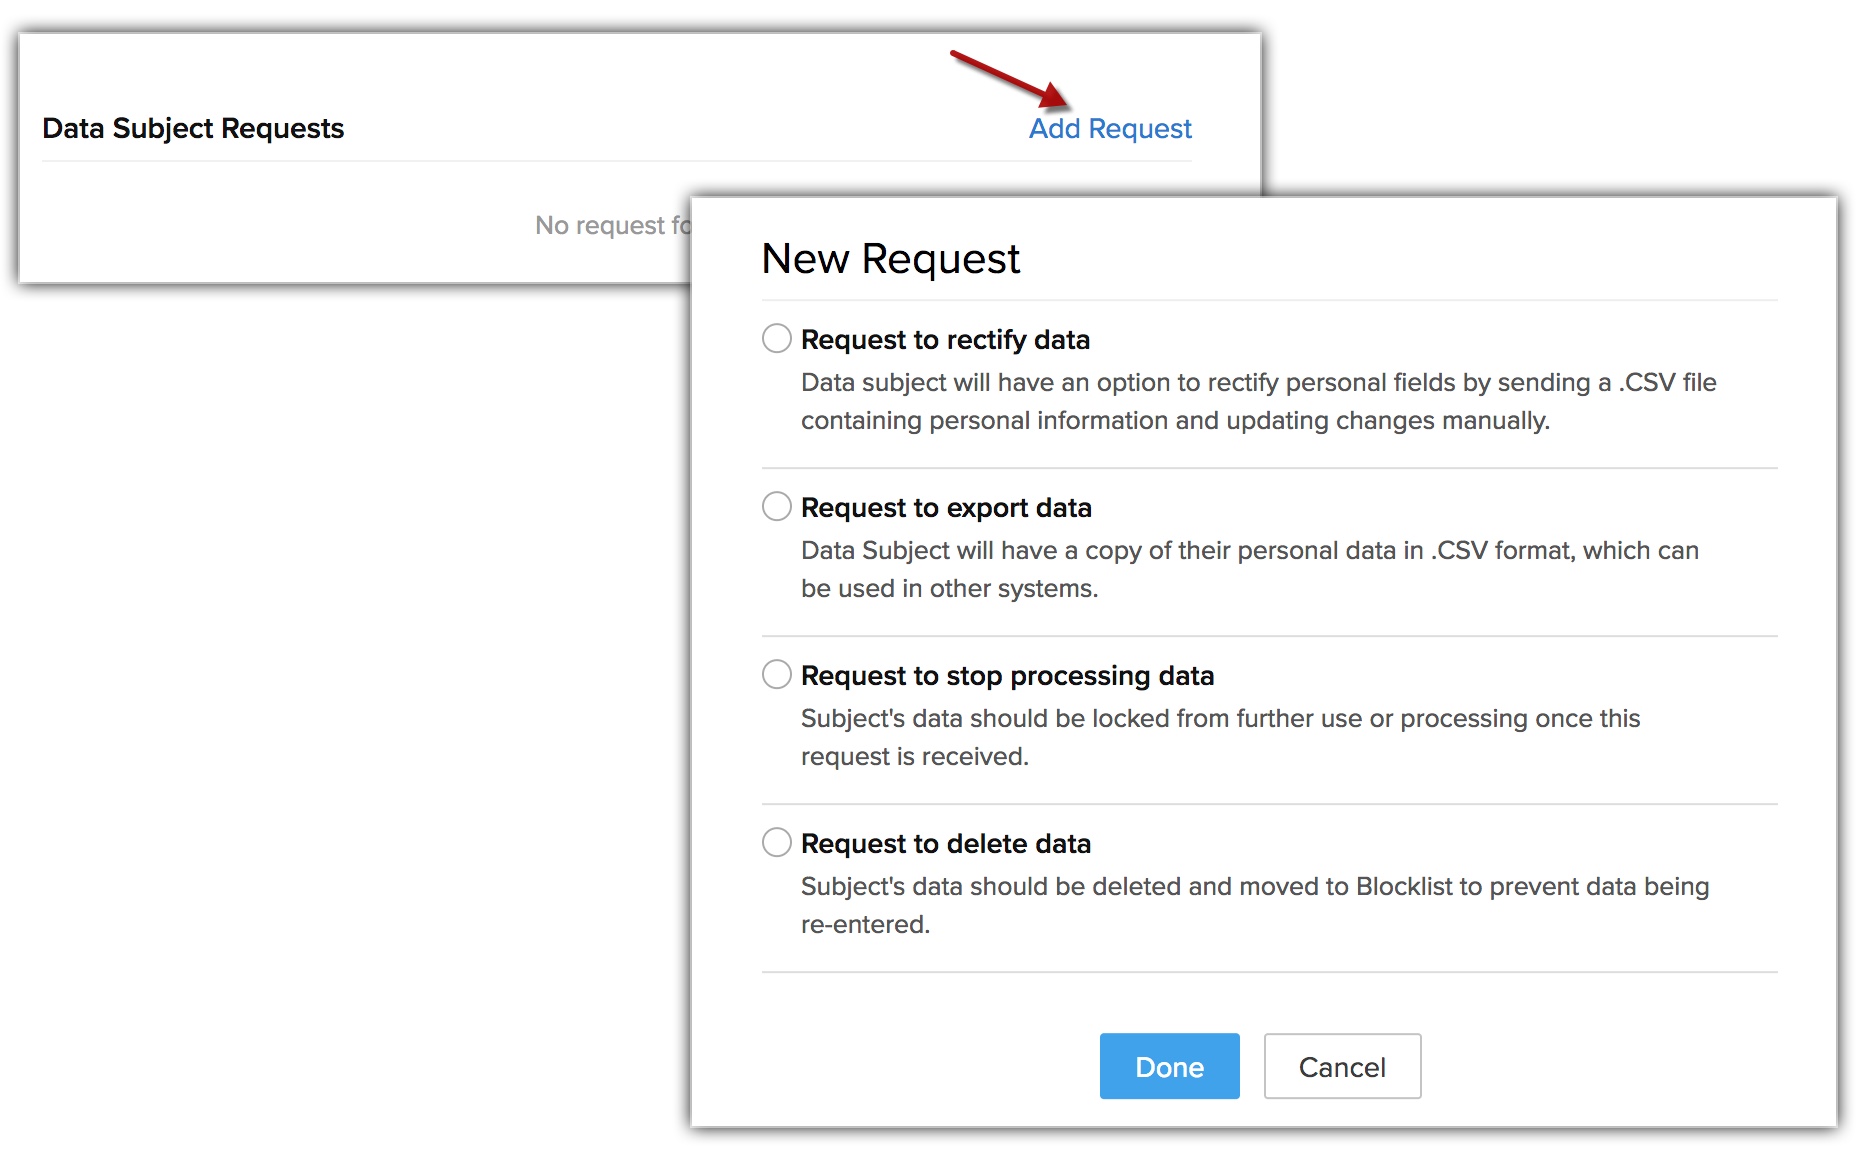
Data Subject Rights:
Under GDPR, the portal users have certain rights regarding their personal information. They can manually add a request from the data privacy section in the portal for the following rights:
- Right to delete
- Right to stop processing
- Right to export
- Right to rectify
They can also add requests in the portal on behalf of the contacts or leads that they add to the portal. See Also Data Subject Rights
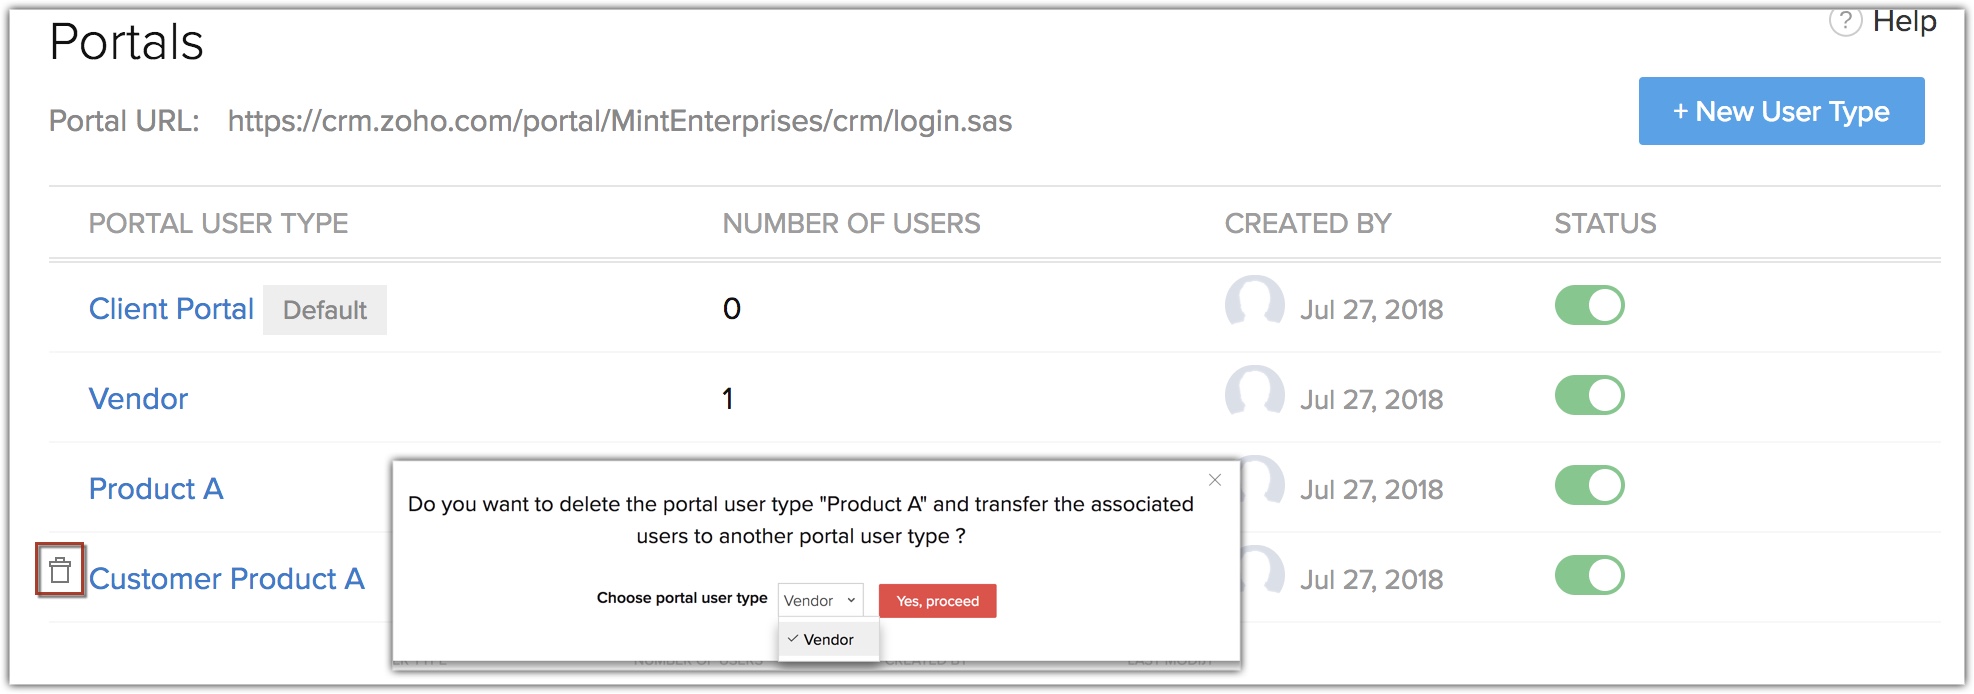
Delete a Portal User Type
There may be instances when you want to remove a particular portal user type. In that case, you will first have to transfer the users to another portal user type and then delete the portal user type. You can only transfer the users to another portal user type if you want to delete their original portal user type.
You can simply delete a portal user type if you have not yet associated any user.
To delete the portal and transfer portal user type
- Go to Setup > Channels > Portals.
- Select a portal and hover over it and then click Delete.
- In the pop-up, click Transfer and Delete.
- Choose a Portal User Type to transfer the user to from the drop-down list.
- Click Yes Proceed.

Note:
- If you want to rename a portal user type, click the Edit option in the Portal Configuration page.
- You can delete user(s) from a portal if you don't want them to be a part of it anymore. You can add another user instead, as deleted user won't count towards your user license.
Deactivate a Portal User
You can deactivate a portal user whenever you need to.
To deactivate a portal user
- Select a Portal User Type and click Portal Users.
- In the Portal User List popup, toggle off the status bar of the user.