Types of Custom Fields
Table of Contents...
In Zoho CRM, you can add different types of custom fields as per your requirements. These fields will be available to all the users added to your organization's CRM account.
- Customize Zoho Defined Fields: You can edit, delete and hide some of Zoho defined fields, but note that there are some fields that you cannot delete, remove, rename or change from mandatory settings. These Zoho defined fields are mandatory in Zoho CRM. For example, Last Name in Leads, Subject in Tasks etc.
- Set Field Access Permissions: You can hide the fields for users in a specific profile or mark the fields as Read Only.
Availability
![]()
Permission Required: Users with the Customize Zoho CRM permission in profile can access this feature.
| Features | Free | Standard | Professional | Enterprise |
| Custom Fields | - | 10 fields/module | 155 fields/module (Activities module has only 140 fields) | 310 fields/module (Activities module has only 230 fields) |
Note:
- The maximum number of fields that you can create in each Edition varies. Similarly, there is also a maximum limit for each type of field that you create. See Also Custom Field Limits
- You can rename the custom fields but you cannot change Field Type (eg. Text, Integer, Date, etc.) of the custom fields.
For instance, if you create a Text field, you cannot change the same to Integer field.
Create Currency Fields
The currency field allows you to define the decimal and the precision settings based on your selected currency locale. There are four rounding options available for a currency field in Zoho CRM:
To create currency type custom fields
- Log in to your Zoho CRM account with Administrative privileges.
- Go to Setup > Customization > Modules and Fields.
Module refers to the Leads, Accounts, Contacts, etc. tabs. - Click the required module from the module list view.
- Drag and drop the Currency field type onto the desired [Module] section on the right.
- In the Currency Properties popup, do the following:
- Enter a name in the Field Label field.
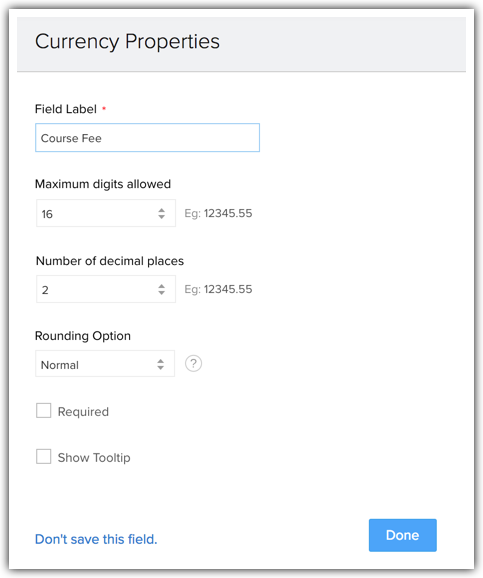
- Select the length of the field from the Maximum digits allowed drop-down list. Example, 9.
- Select the number of decimal places required from the Decimal Places drop-down list. Example, 2.
- Select the Rounding option from the drop-down list. Example, Normal.
- Select the Required checkbox if you want this to be a required field.
- In the case of Leads, Contacts, Accounts and Potentials module, you will see an additional option called "Also create for". Use this to create the same field for other three modules at one go. This option is not available for the Currency field in custom modules.
- Enter a name in the Field Label field.
- Click Done.

Add/Rename Pick List Values
By default, some of the industry standard pick list values are available in each module. You can add new pick list values as per your organization's business process or rename the existing values.
To add or rename pick list values
- Log in to your Zoho CRM account with Administrative privileges.
- Go to Setup > Customization > Modules and Fields.
Module refers to the Leads, Accounts, Contacts, etc. tabs. - Click the desired module from the Modules list view.
- Go to the required pick list field, click the Settings icon and select Edit Properties.
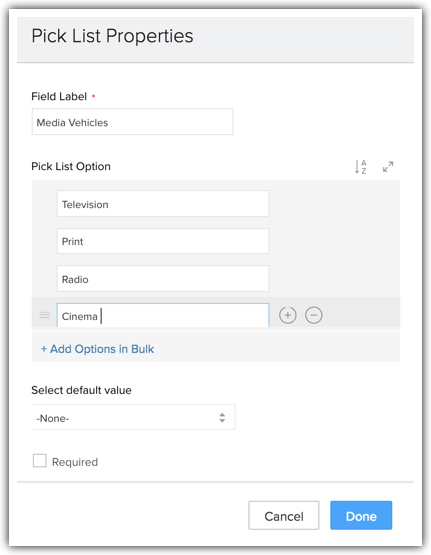
- In the Pick ListProperties popup, you can do the following:
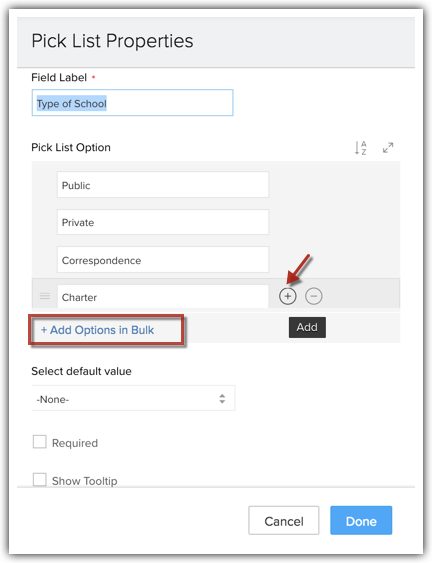
- To add a new value click the Plus icon against a value and add the value below it.
- To delete a value, click the Minus icon against the value.
- To rename an existing value, simply type the new name in the place of the existing value.
- To add the options all in one shot, click Add options in bulk.
In the Add Bulk Options text box, type one value below the other.
Click Add Choices. - To sort the values, click the Sort
 icon.
icon. - To import values, click the Import
 icon.
icon. - To maximize the popup, click the Maximize
 icon.
icon.
- Choose a value from the Select default value drop-down list.
When no value is selected, the chosen default value applies for this field. - If you wish to make this a required field, select the Required check box.
- Click Done.

 icon.
icon. icon.
icon. icon.
icon.Note:
- When you add/rename/delete the the value(s), they will not be automatically updated in the records where they have already been used. You need to manually select each record and update the pick list field.
- When you delete a pick list value, records that have the field value associated to it will not be deleted.
- You can choose to enable history tracking for a particular picklist value. The history tracking will let you view a record's progress over a period of time or different stages. See Also Picklist History Tracking
- When you choose to sort the picklist values in alphabetical order, the translated values will be displayed in the alphabetical order of the translated language.
Replace Pick List Values
When you wish to edit the values of a pick list field in such a way that the change is also reflected in the records to which they have been associated, you can replace the pick list values.
Note:
- Replacing pick list values is different from adding/renaming the pick list values.
- When you replace the value(s), the change will be automatically reflected in the records where they have been used. You need not individually select the records and update the pick list field.
- Whereas while adding/renaming values, the changes are not reflected in the existing records.
To replace pick list values
- Log in to your Zoho CRM account with Administrative privileges.
- Go to Setup > Customization > Modules and Fields.
Module refers to the Leads, Accounts, Contacts, etc. tabs. - Select the required module from the Modules list view.
- Go to the required pick list field, click the Settings icon and select Replace Values.
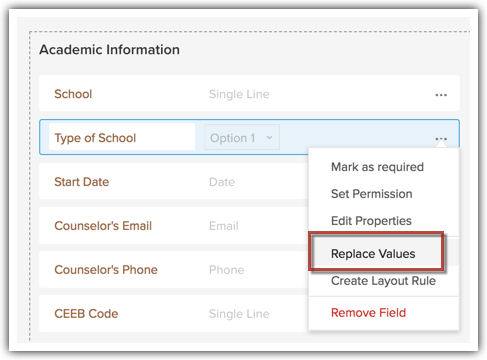
- In the Replace Pick List popup,do the following:
- In the Change value from field, select an existing value (that needs to be replaced).
- In the Change value to field, select the new value (that will replace the existing value).
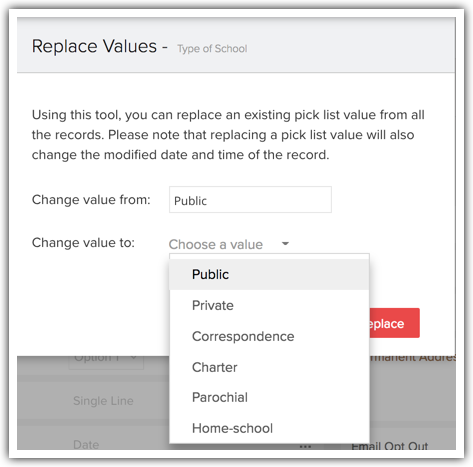
Click Replace.
- Click Save.
Once Zoho CRM completes replacing the values in the existing records, you will be duly notified.


Add Multi-Select Pick List Values
This option enables selecting multiple values while creating or editing record. For instance, your organization may be offering different services and some of your customers may be interested in multiple services. In this case you can use the multi-select pick list value instead of single pick list value while creating a potential. Periodically, you can modify the pick list values as per your organization's business process.
To add multi-select pick list values
- Log in to your Zoho CRM account with Administrative privileges.
- Go to Setup > Customization > Modules and Fields.
Module refers to the Leads, Accounts, Contacts, etc. tabs. - Select the required module from the Modules list view.
The Layout Editor appears. - Drag and drop the Multi Select field type from the New Fields tray into the desired [Module] section on the right.
- In the Pick List Properties section, do the following:
- Enter a name in the Field Label field.
- To add a new value click the Plus icon against a value and add the value below it.
- To delete a value, click the Minus icon against the value.
- To rename an existing value, simply type the new name in the place of the existing value.
- To add the options all in one shot, click Add options in bulk.
In the Add Bulk Options text box, type one value below the other.
Click Add Choices. - To sort the values, click the Sorticon.
- To import values, click the Importicon.
- To maximize the popup, click the Maximize icon.
- Enter a name in the Field Label field.
- Choose a value from the Select default value drop-down list.
When no value is selected, the chosen default value applies for this field. - If you wish to make this a required field, select the Required check box.
- Click Done.

Note:
- When you delete a pick list value, records that have the field value associated to it will not be deleted.
Create Lookup Field
The lookup field helps in establishing relationship between different modules (linking two different modules: Accounts with Contacts). For example, say some of your contacts refer more leads for your business. You want to know which contact referred a lead. So you have a field called "Referred By" in your Leads module, which lets you browse for and choose the correct contact. This association is established by creating a Lookup field. Note that lookup fields cannot be created for Tasks and Events.
To create lookup field
- Log in to your Zoho CRM account with Administrative privileges.
- Go to Setup > Customization > Modules and Fields.
Module refers to the Leads, Accounts, Contacts, etc. tabs. - Select the module from the Modules list view.
The Layout Editor appears. - Drag and drop the Lookup field type from the New Fields tray into the required [Module] Section on the right.
- In the Lookup Properties popup, do the following:
- Enter a name for the lookup field in the FieldLabel text box. (Eg. In the Students module, create a lookup field called Courses. This field now will be available while creating a student.)
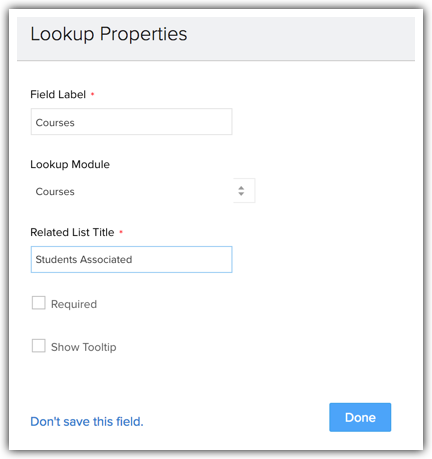
- Select a module from the Lookup Type drop-down. In the field, data from the module selected here, will be listed. (Eg. Courses. The lookup field will list all the courses)
- Enter the Related List Title. (Eg. Students Associated. A related list will be created for the records in the Courses module.)
- Enter a name for the lookup field in the FieldLabel text box. (Eg. In the Students module, create a lookup field called Courses. This field now will be available while creating a student.)
- Click Done.
- Click Save Layout.
The Courses Lookup field will be found while creating students.
The Students Associated Related List will be found in all records details pages of the Courses module.


Create Multi-Select Lookup Field
The Multi-Select Lookup Field enables you to establish what we call a many-to-many relationship between two modules in CRM.
For instance, consider the example an insurance company.
- A single policy may be held by many policy holders.
- Similarly, a single policy holder may hold many policies.
If you have two modules - Insurance Policies and PolicyHolders - there is a need to associate multiple records from each module to each other. This is not possible with a regular look-up field, as it allows only a one-to-many relationship.
In this case, you can use a Multi-select lookup field from the New Fields tray in the Layout Editor. This will let you associate multiple records from two modules to each other, thus establishing a many-to-many relationship in CRM.
To learn more about many-to-many relationship and creating a multi-select lookup field, click here.
Create Auto Number Field
The auto number type custom field helps classifying the records by unique numbers. Once the auto number field is added to the CRM module, the number is added sequentially to the new records. This can be used to update the existing records also. For instance, Invoice Number, Quote Number and Sales Order.
To create auto number fields
- Log in to your Zoho CRM account with Administrative privileges.
- Go to Setup > Customization > Modules and Fields.
Module refers to the Leads, Accounts, Contacts, etc. tabs. - Select the module from the Modules list view.
The Layout Editor appears. - Drag and drop the Auto Number field type from the New Fields tray.
- In the Auto Number Properties popup, do the following:
- Enter a name in the FieldLabel field.
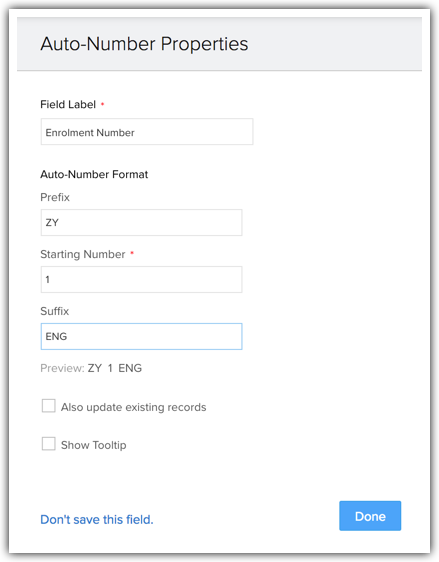
- Under the Auto Number Format section, enter the Prefix, Starting Number & the Suffix for the auto number value.
You can check the preview.
- Enter a name in the FieldLabel field.
- Click Done.
- Click Save Layout.

Create User Field
By default, a record owner is the primary owner of any record, but there can be instances when you want other users also to involve in a record action with ownership privileges. In such cases, you can use the User Field to provide multiple-ownership to a record. The co-owners of that record will be able to view the record's details and the related lists.
Adding more than one co-owner can be beneficial in instances such as,
- When a deal's negotiation requires the sales executive's approval.
- The sales manager wants to review the stage history or open activities of a deal.
Availability
![]() Permission Required: Users with manage customization access can create a user field.
Permission Required: Users with manage customization access can create a user field.
| Features | Free | Standard | Professional | Enterprise |
| User Field | - | - | - |  |
Configure User Field
Zoho CRM provides two types of user fields, you can choose either of them based on your requirement.
- Single User - You can add up to 3 single user fields in a module.
- Multiple Users - You can add only 1 multiuser field in a module that can include upto 10 users.
To configure user field
- Log in to your Zoho CRM account with Administrative privileges
- Go to Setup > Customization > Modules and Fields.
Module refers to the Leads, Accounts, Contacts, etc. - Select the module from the Modules list view.
The Layout Editor appears. - Drag and drop User Field from the New Fields tray.

- Enter a Field Name. (For example, secondary owner, sales manager, co-owner etc.)
- Choose the field type - Single User or Multiuser.
- Click Save.


Note:
- You can configure User Field for all the modules except Activities module.
- If you remove the User Field from a particular layout, the co-owners will not be able to view the record unless the field is added again to the layout.
Actions in Records Based on Profile Permission
Each member of an organization has a different role, based on which their profile permission is defined within the Zoho CRM account. For instance, a Sales manager can have administrative profile but a sales executive can have a standard profile. Depending on the profile a co-owner will be able to perform the actions in a record. See also (Profile permissions).
For example, Emily Ross is a Sales Manager in Zylker Inc. and has administrative privilege in CRM account. Hence, she can Edit or Close task in a record that she co-owns.

View related list of a Record Based on Role Hierarchy
The co-owner of a record will be able to view the related list of the record based on their role within the organization.
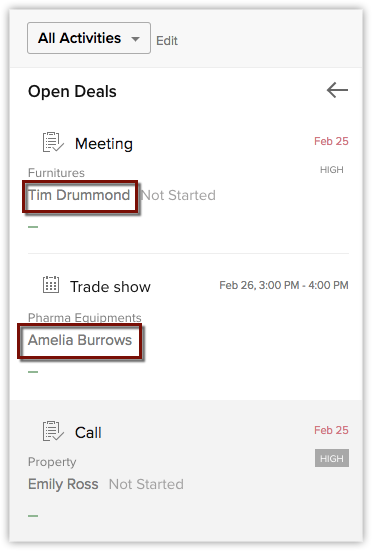
For example, Emily Ross is the Sales Manager in Zylker Inc., she can view the related activities of her subordinate co-owner (Sales Executive /Tim Drummond) right within her CRM account.
To view associated records
- Select a Module.
- In the Records page, view the list of Records.

Where Can You Use a User Field
The User Field in Zoho CRM can be associated with other features too. Below are the list of features where a you can use the User Field:
- Workflow Email Notifications - In Zoho CRM automation, while creating Email Notifications you can add the co-owners as the email recipients.

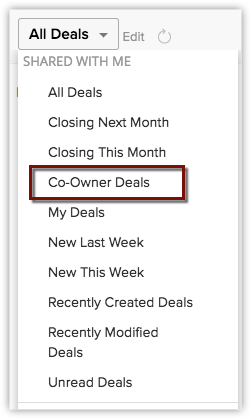
- List View - The co-owners can choose to create a Co-owner list view. For example, they can filter the deals as co-owner deals.
- Email Fields - You can use the co-owners email address in the to/from field in all the email related features of Zoho CRM. For example, while sending emails you can choose to send an email from a co-owner's email address. User field can be used in sending mass emails, running macros, in autoresponders, autoresponse rule, webform, and schedule mass emails.
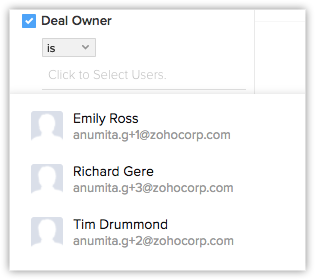
- Filters and Criteria - The records can be filtered using the user field. You can choose the co-owner from the record owners filter.
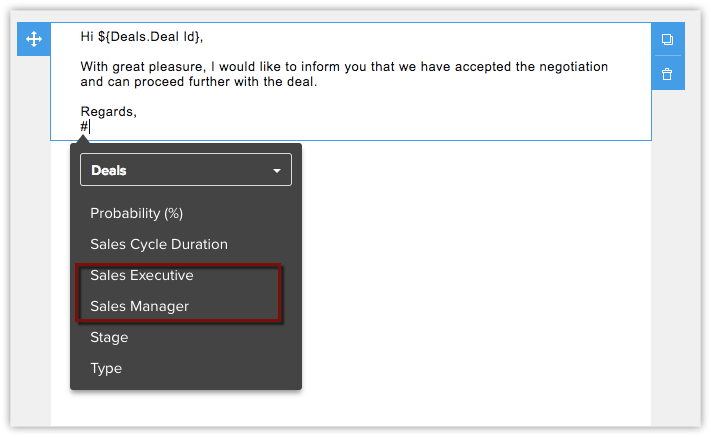
- Merge Fields in Email Templates - While creating an Email Template you can use the user field as merge fields.
- Reports - While generating reports, you can use the user field under columns and criteria.
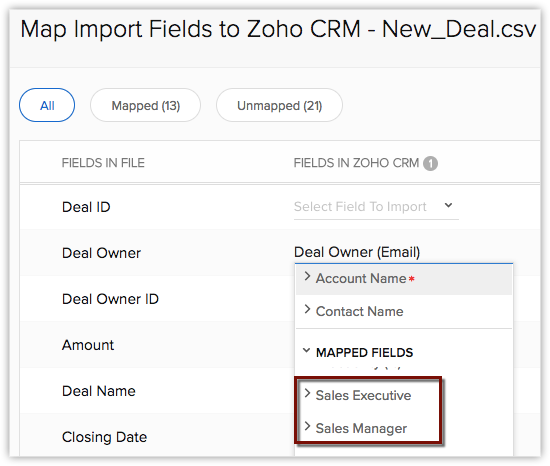
- Import and Data Migration - You can map the co-owners as the record owners while importing or migrating data in to your CRM account.


Note:
- The multiuser field can be used only in Filters and Reports.
Add Record Image Field
In Zoho CRM you can add image to the records in leads, contacts, accounts, deals, products, cases, solutions, vendors and custom modules. This will enable your customers and CRM users to view the record right within the detail page. For example, in real estate business the property image can be referred by both the buyer and the sales rep.
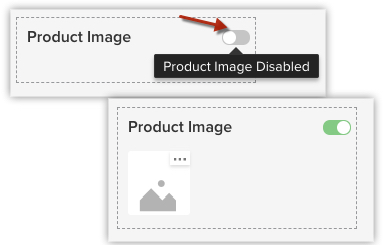
Note that, as a Zoho CRM administrator you can also choose to disable the record image field as and when required.
To enable record image field
- Log in to your Zoho CRM account with Administrative privileges.
- Go to Setup > Customization > Modules and Fields.
Module refers to the Leads, Accounts, Contacts, etc. tabs. - Select the Module from the Modules list view.
The Layout Editor appears. - In the Layout editor page, toggle on the Record Image button.

Note:
- The record image field can be used only when you choose to create Canvas view for a particular module.
- While creating email templates, you can use the record's image as a merge field that will retrieve the relevant image in the email output.
Add File Upload Field
In Zoho CRM, you can use the file upload field to add any file or document that is closely related to a record, right within the record. Let's say, your business requires you to transact a "service level agreement" or "financial statement" or "property layout" with your client. Documents like these are user specific and can thus be added to the client's record using a file upload field for further reference.
Availability
![]() Permission Required: Users with Manage Customization access in their profile can add a file upload field.
Permission Required: Users with Manage Customization access in their profile can add a file upload field.
| Features | Free | Standard | Professional | Enterprise |
| User Field | - | | | |
Add File Upload Field
You can upload files to a record from any of these sources - personal computer, documents, Zoho Docs or Google Drive.
To add file upload field
- Go to Setup > Customization > Modules and Fields.
Module refers to the Leads, Accounts, Contacts, etc. tabs. - Select the [Module] from the modules' list view.
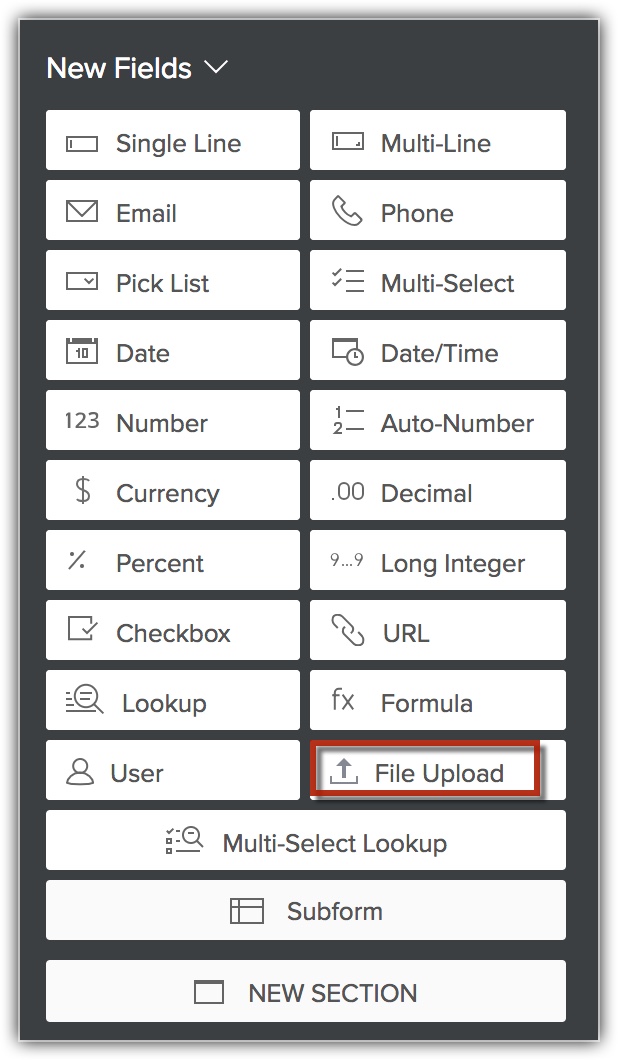
The Layout Editor appears. - From the New Field tray, drag and drop File Upload field in the module section.
- Click More icon > Edit Properties, to provide the option to add multiple files or to add the same field to other modules.
In case the GDPR Compliance Setting is turned on you can also select if the information contains any personal data.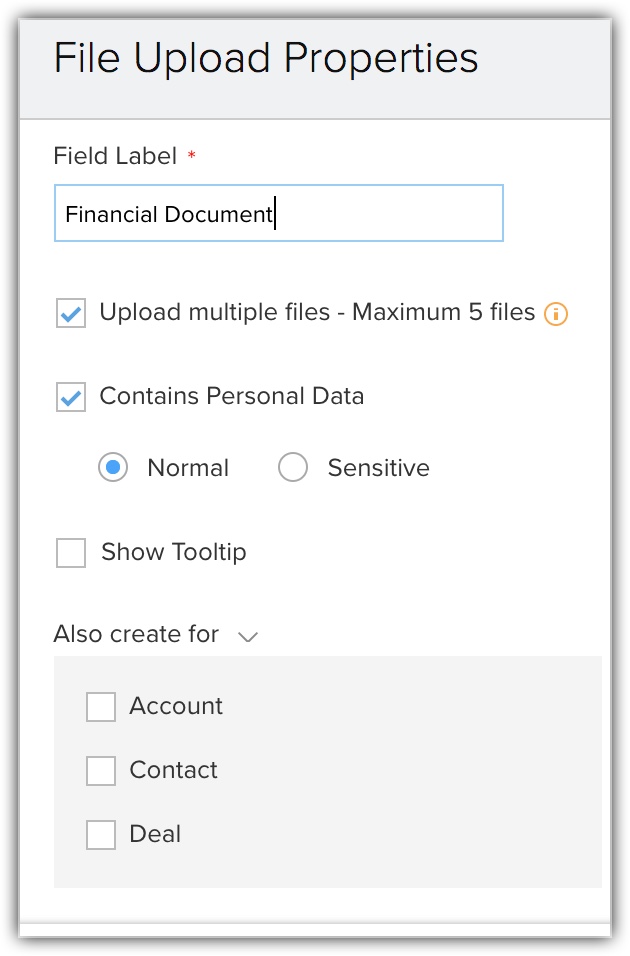
- Click Save.


Note:
- You can add upto 5 File Upload fields in a module.
- The file size must not exceed 20 MB.