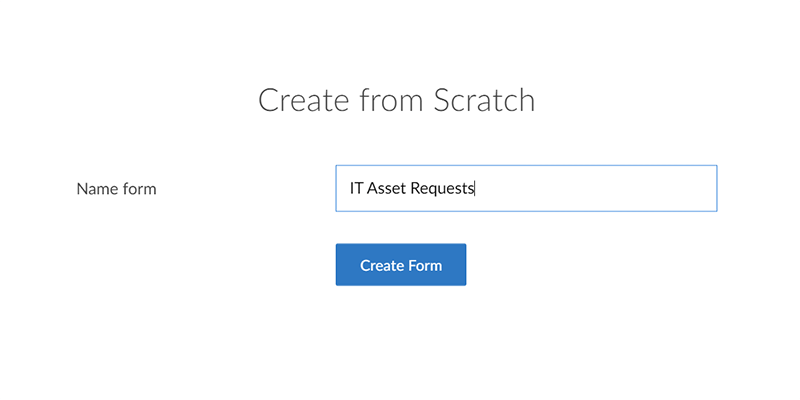
A Quickstart Guide to Zoho Creator
Getting started
Digitization, automation, and business data management are rendered 10x faster on the Creator low-code platform. In fact, 95% of our customers deploying full-fledged solutions in under 30 days!
This simple guide is put together with the intention of giving you a quick hands-on with the core tenets of the Creator low-code platform. This covers a small set of Creator's no-code features and is meant to act as a primer for users of all (or no) prior programming experience.
Let us dive right in and explore Creator from the context of digitizing IT asset management.
Solution overview
Managing IT asset requests over emails or online forms, and keeping track of them with excel sheets can be a hassle. This is particularly the case when you are a growing business with the majority of your workforce relying on IT assets (Laptops, phones, tablets, servers, routers, modems, fax machines, printers, etc.). to carry out their daily business activities.
Let us look at a simple IT asset management process and see how we can digitize it end-to-end on the Creator platform.
Use-cases
| Stage | Problem Statement | Solution on Creator |
| Manage business information | How do I maintain an online catalog of procured IT assets, and an online employee database? |
|
| Collect data online | How do I give access for new employees to add new IT asset requests?
|
|
| How do I ensure new IT asset requests are automatically triggered for approvals? |
| |
| Streamline processes | How do I ensure the count of inventory gets automatically deducted, and that users are alerted of unavailable assets? |
|
| How do I streamline the new asset allocation process and transition across ITAM, ITSM, and logistics teams? |
| |
| Monitor performance | How do I quickly monitor manager approval status for any custom actions? |
|
| How do I create a custom application screen that gives me quick access to different components? |
| |
| Analyze and Report | How do I create advanced real-time data visualizations on IT asset request data for MBRs? |
|
| Connect with other systems | How do I take a backup of IT asset requests for audit on a spreadsheet app? |
|
| Share your solution | How do I extend my solution to relevant stakeholders with appropriate roles and permissions? | You can use the Manage section to manage user access, roles, and permissions for each solution you build as well as for specific environments |
Manage business information
Here we will see how you can maintain an online catalog of your IT asset inventory, for your end-users to select from when making a new IT asset request.
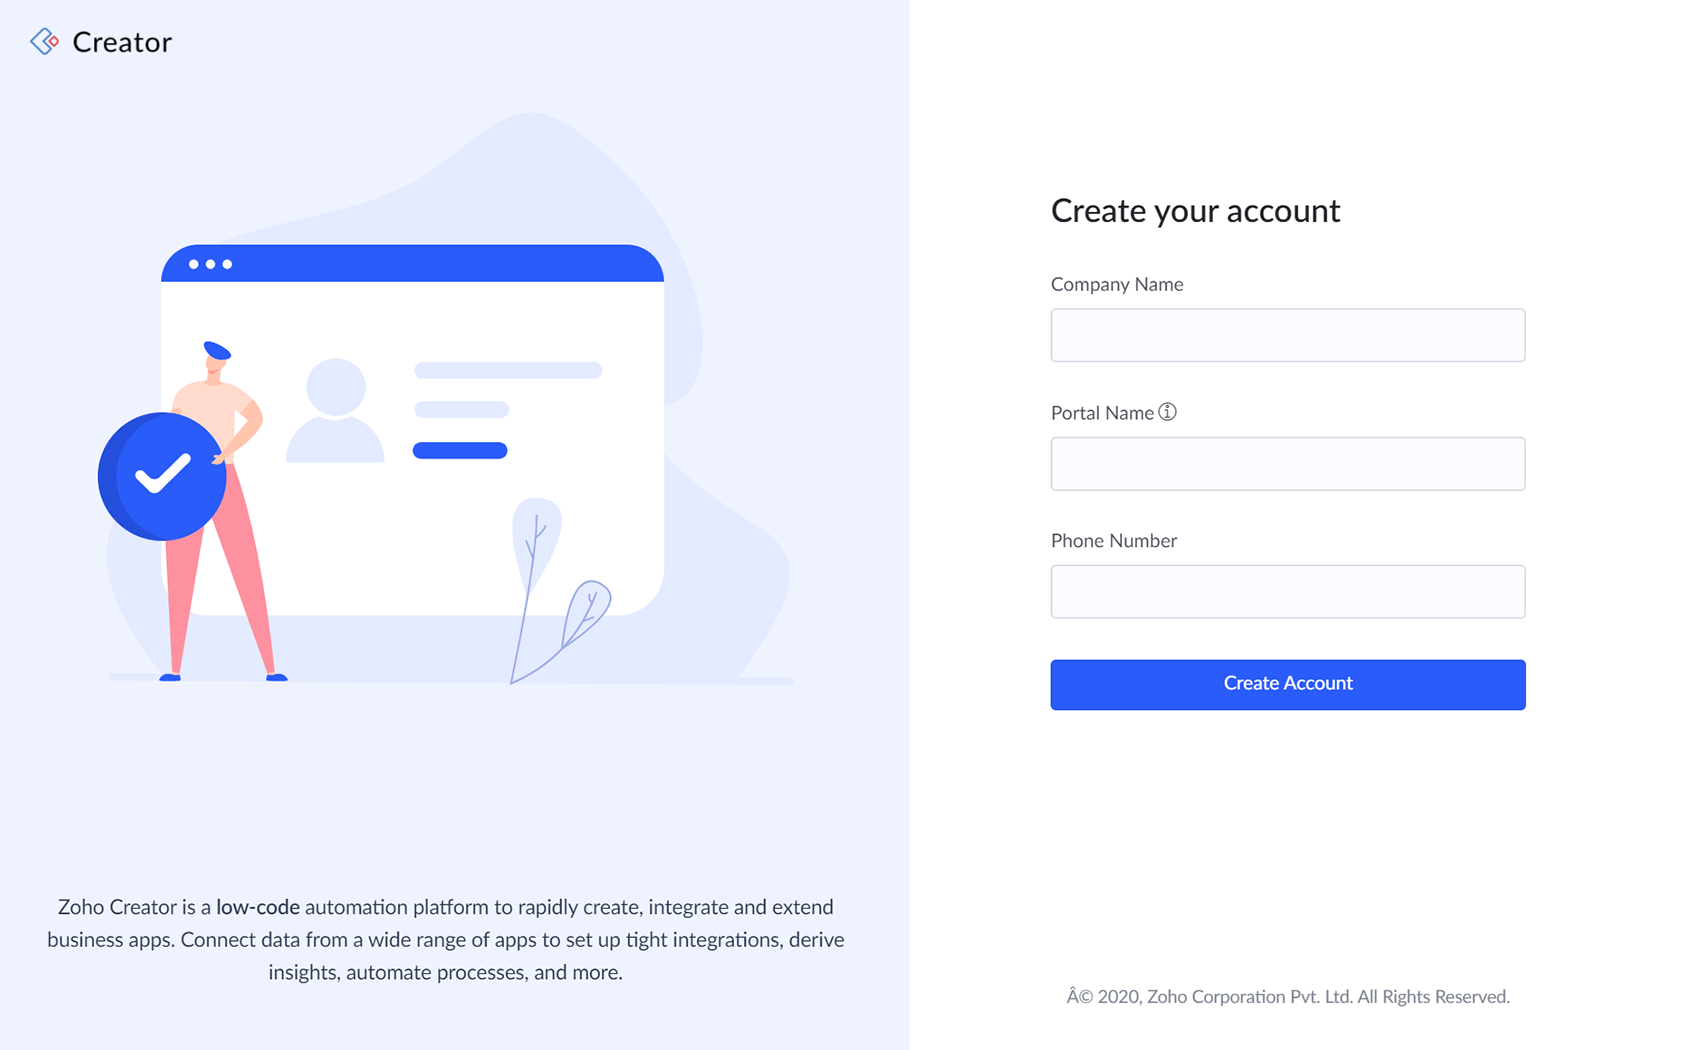
- Login to creator.zoho.com. Enter your company name, portal name, and phone number in the onboarding screen to get started.
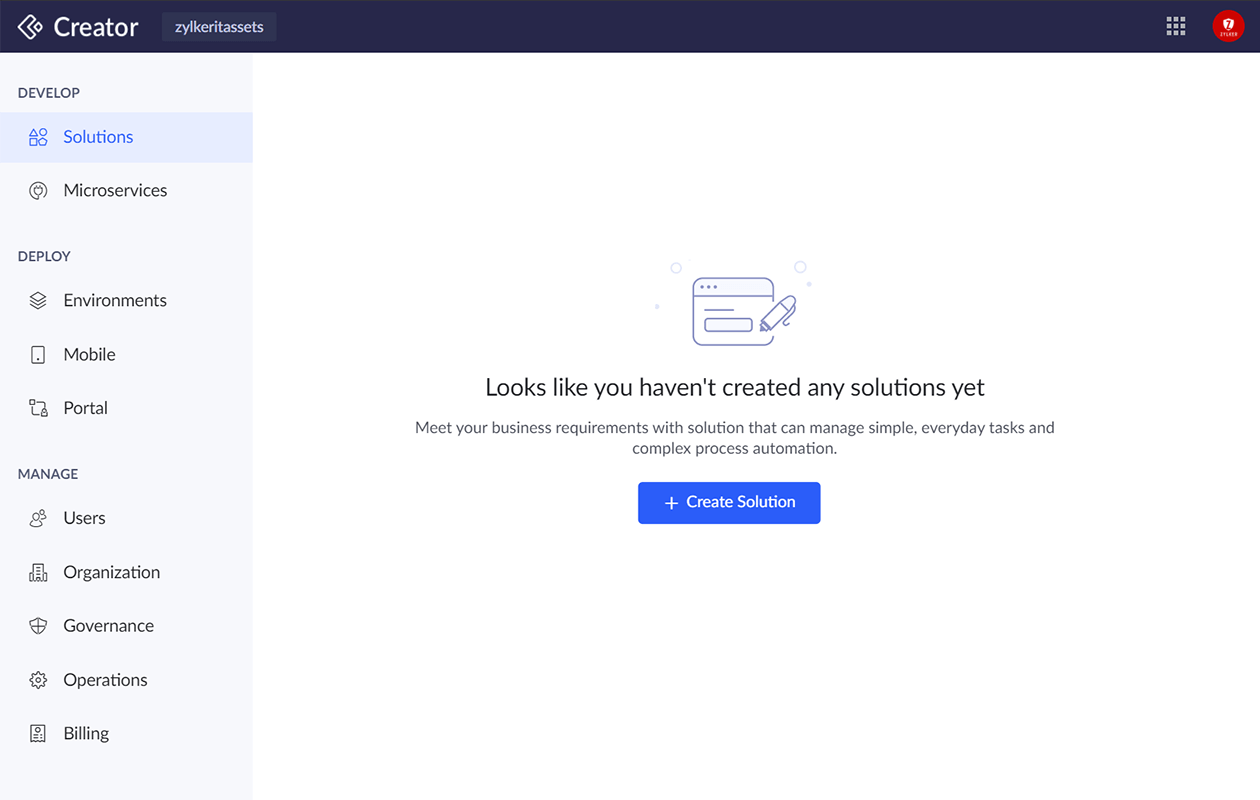
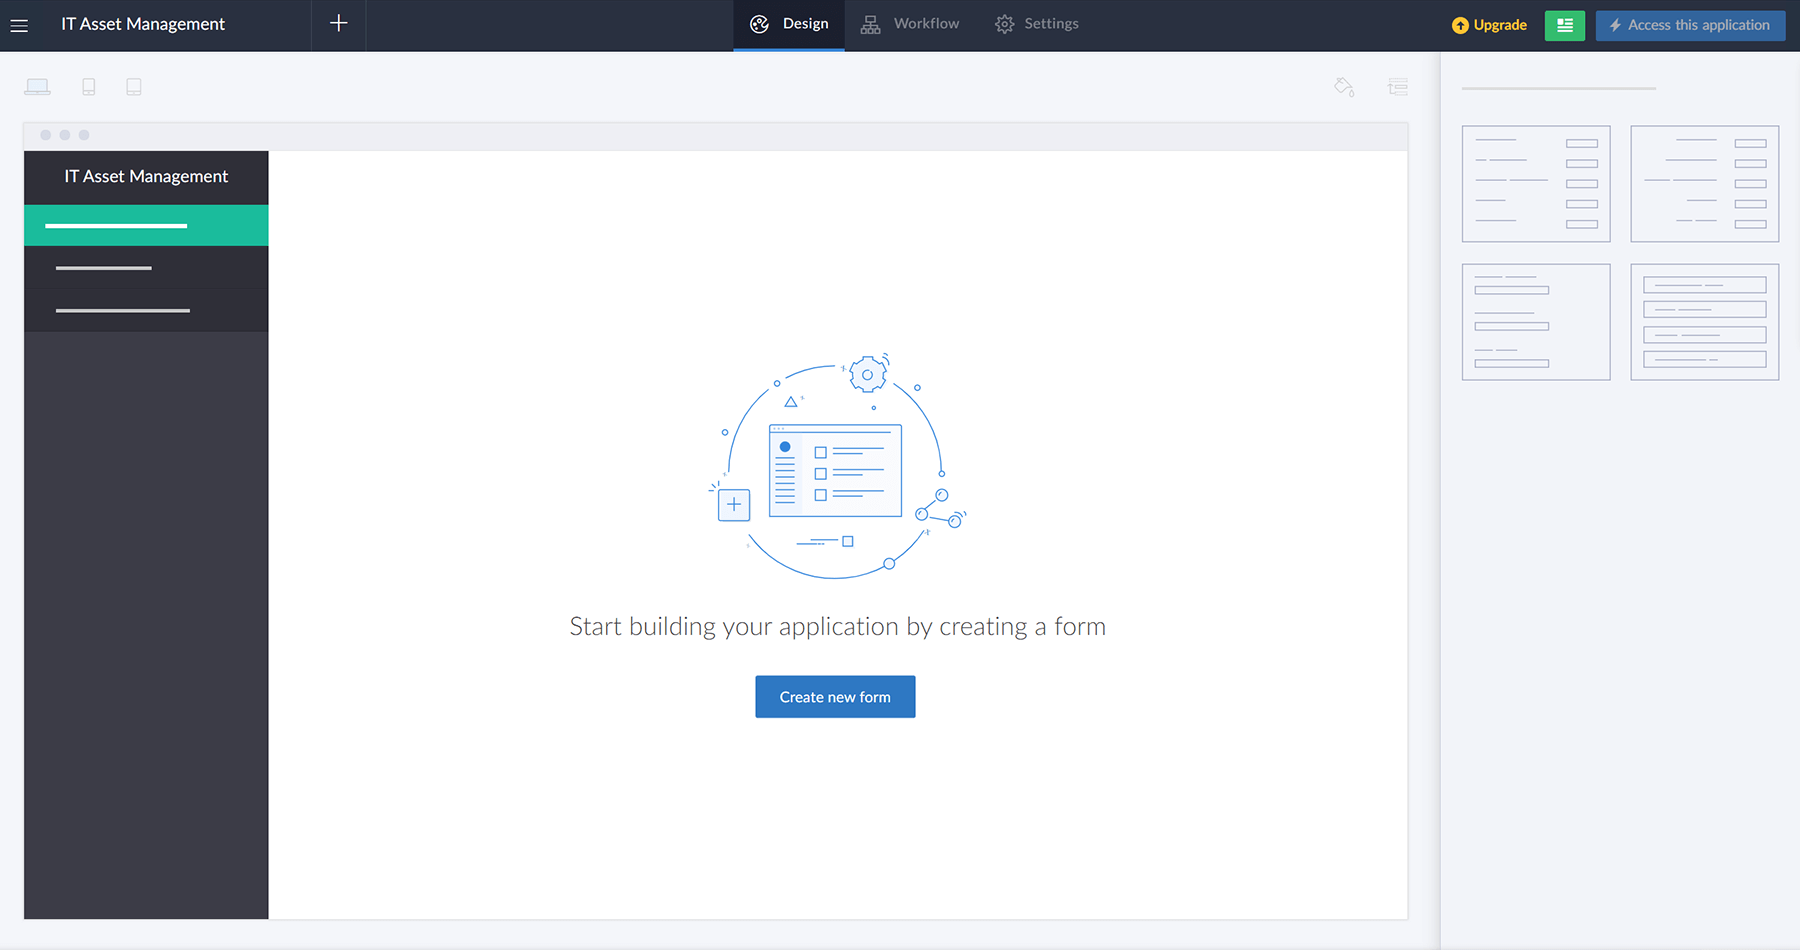
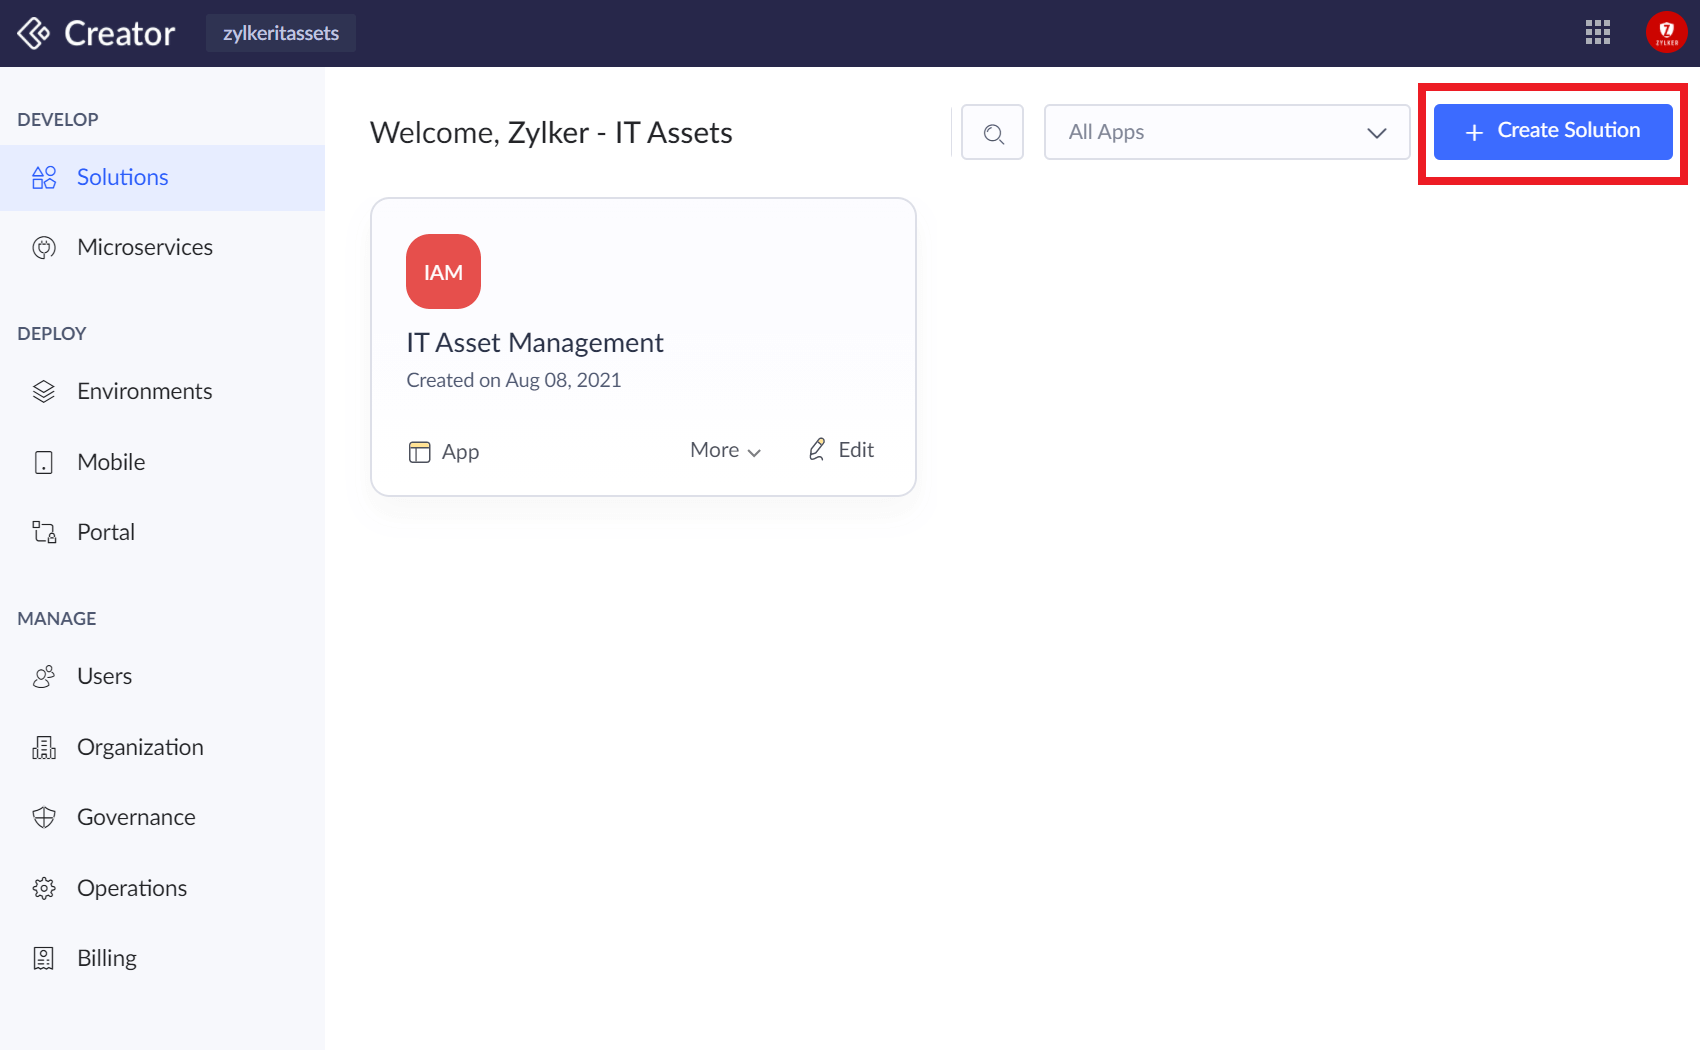
- Your Creator platform homepage is set to 'Develop' --> 'Solutions' by default. Here you can start creating new solutions while also monitoring all solutions you have built in the past.
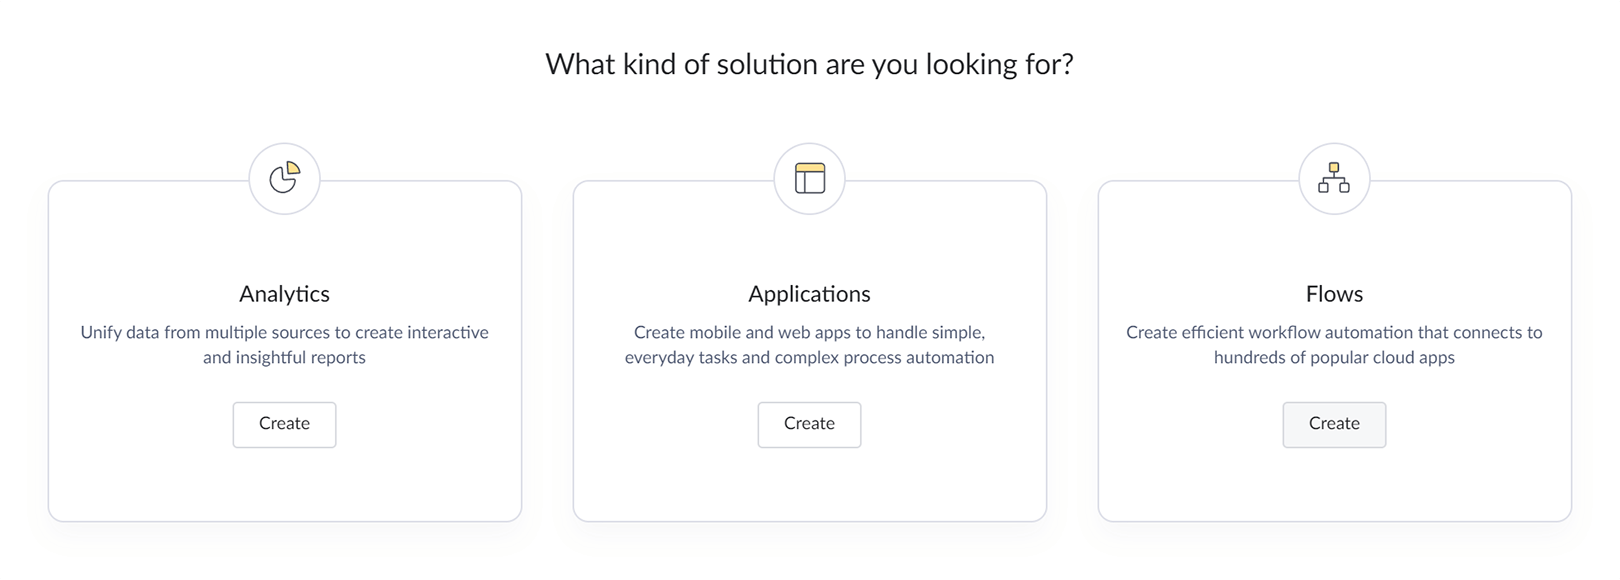
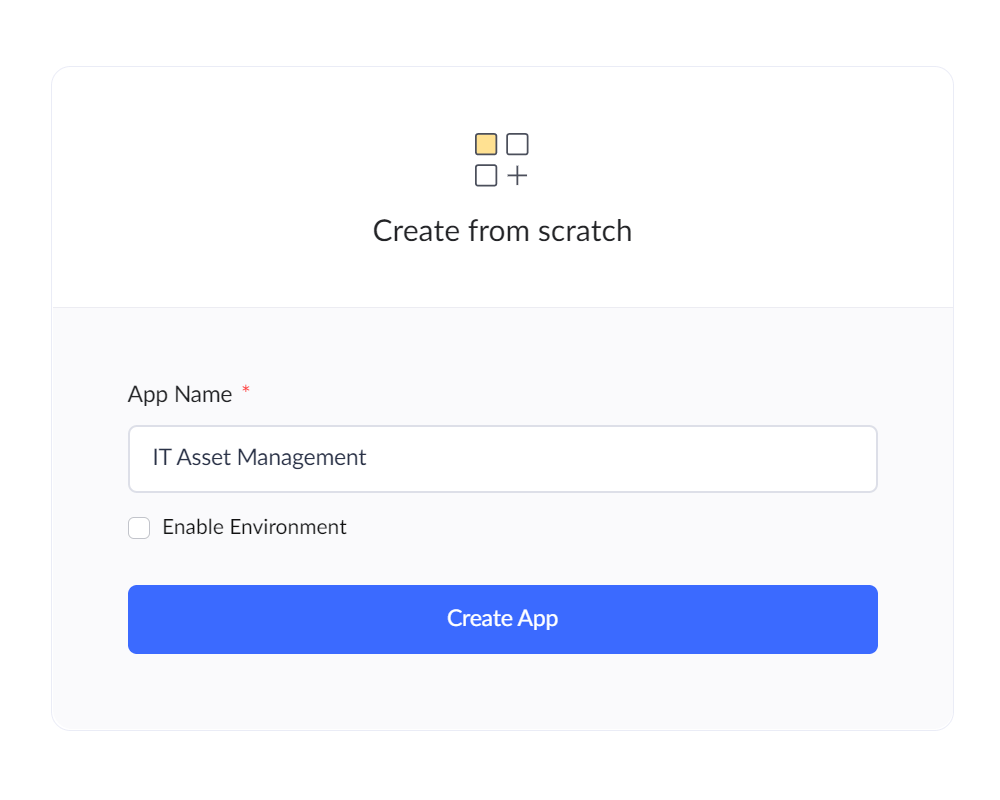
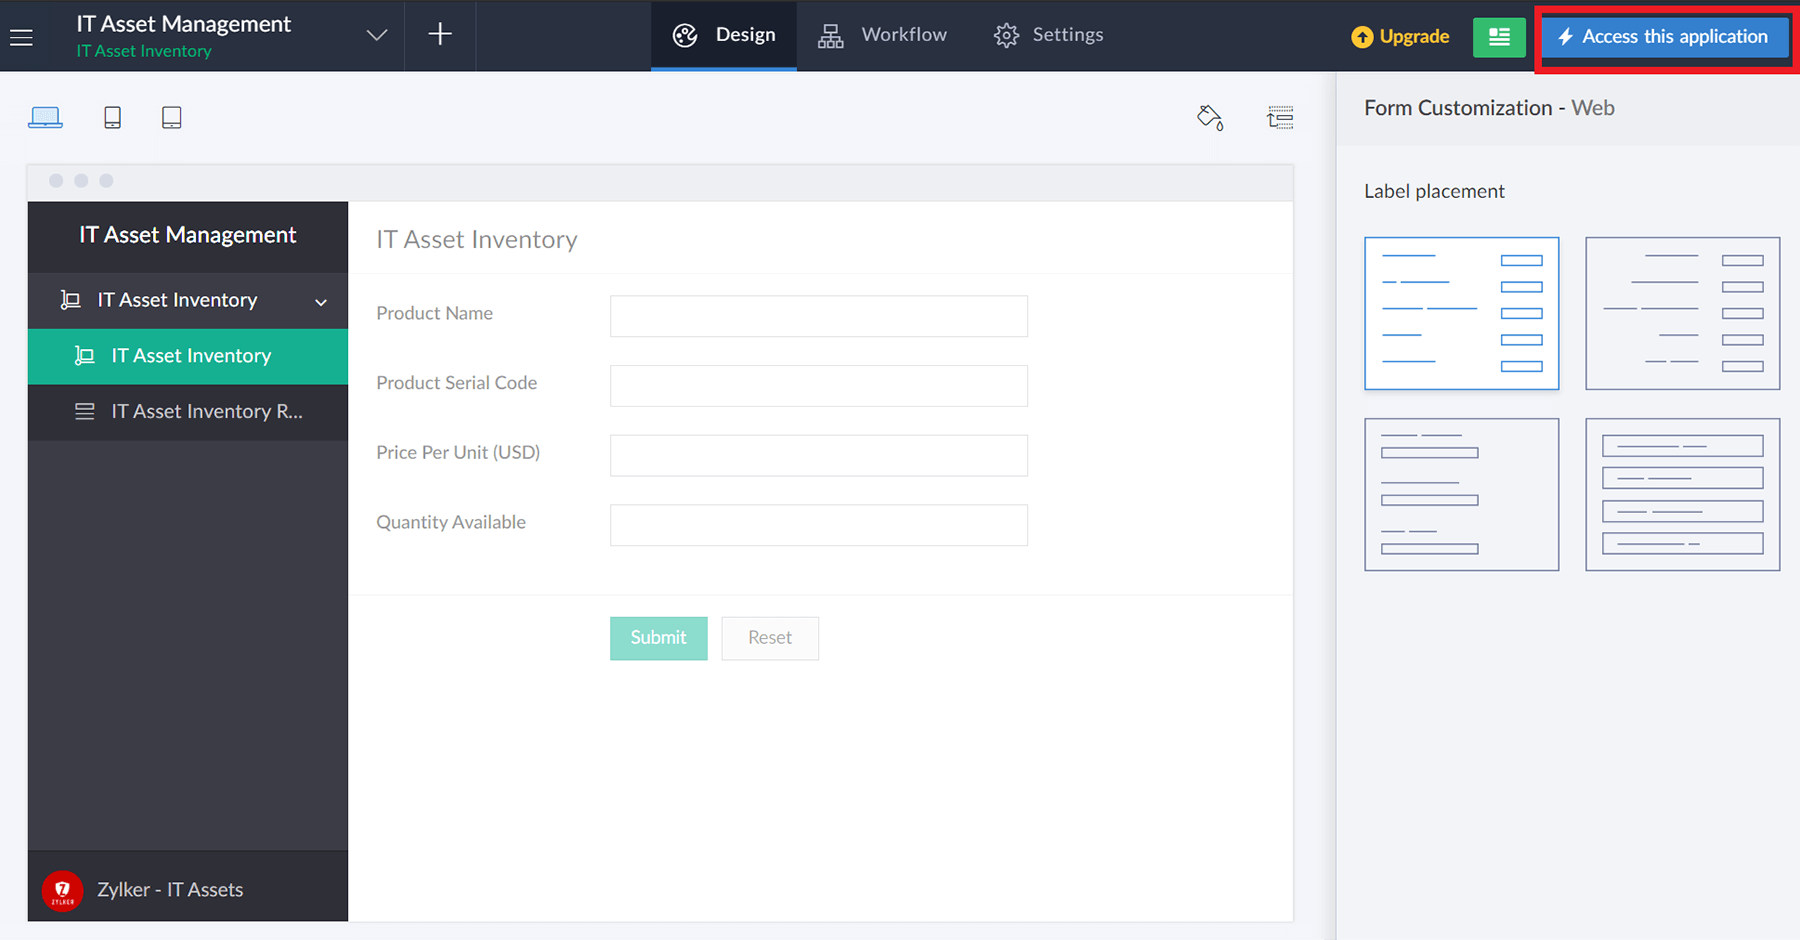
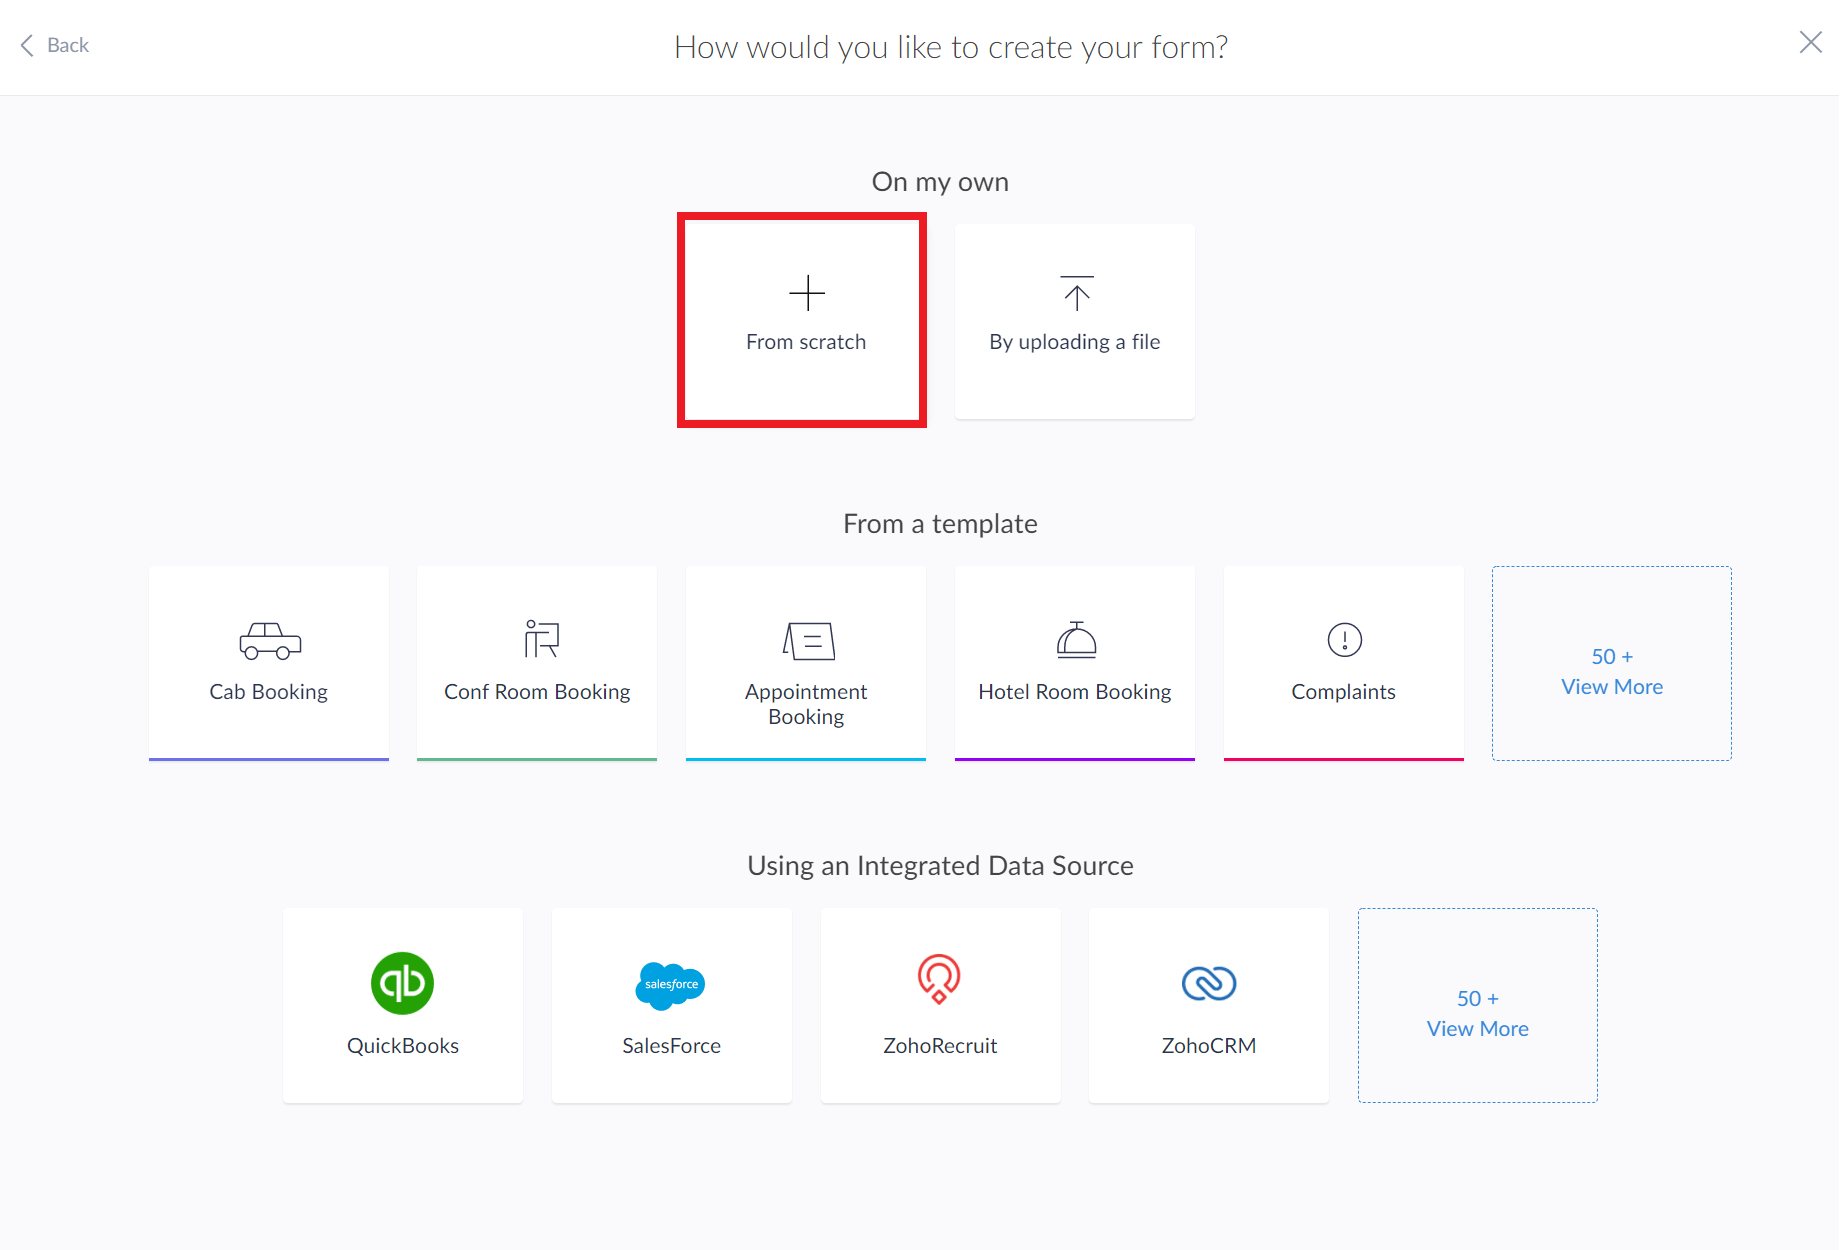
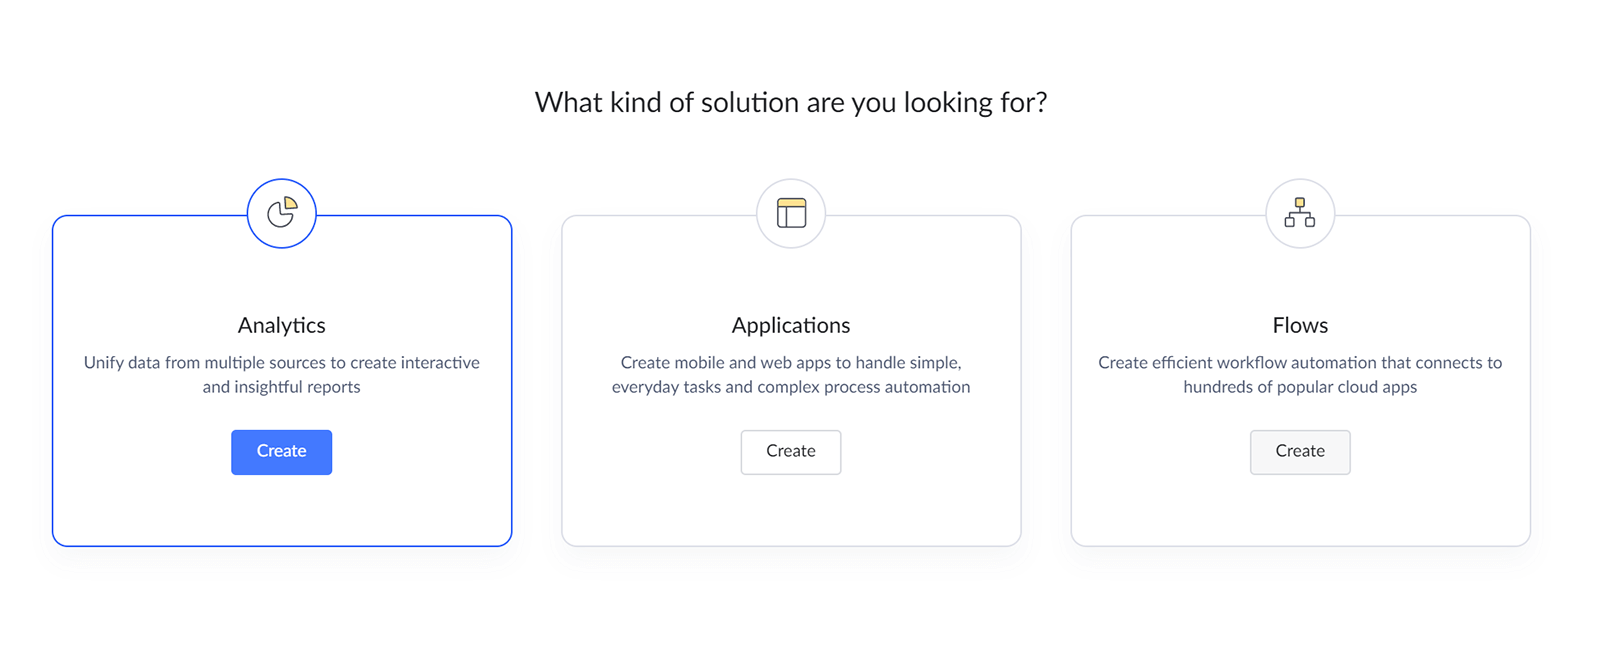
- Click 'Create Solution' --> 'Application' --> Create --> Create from scratch'. Name the application as 'IT Asset Management'. Do not check the 'Enable Environments' checkbox just yet. Click 'Create'.

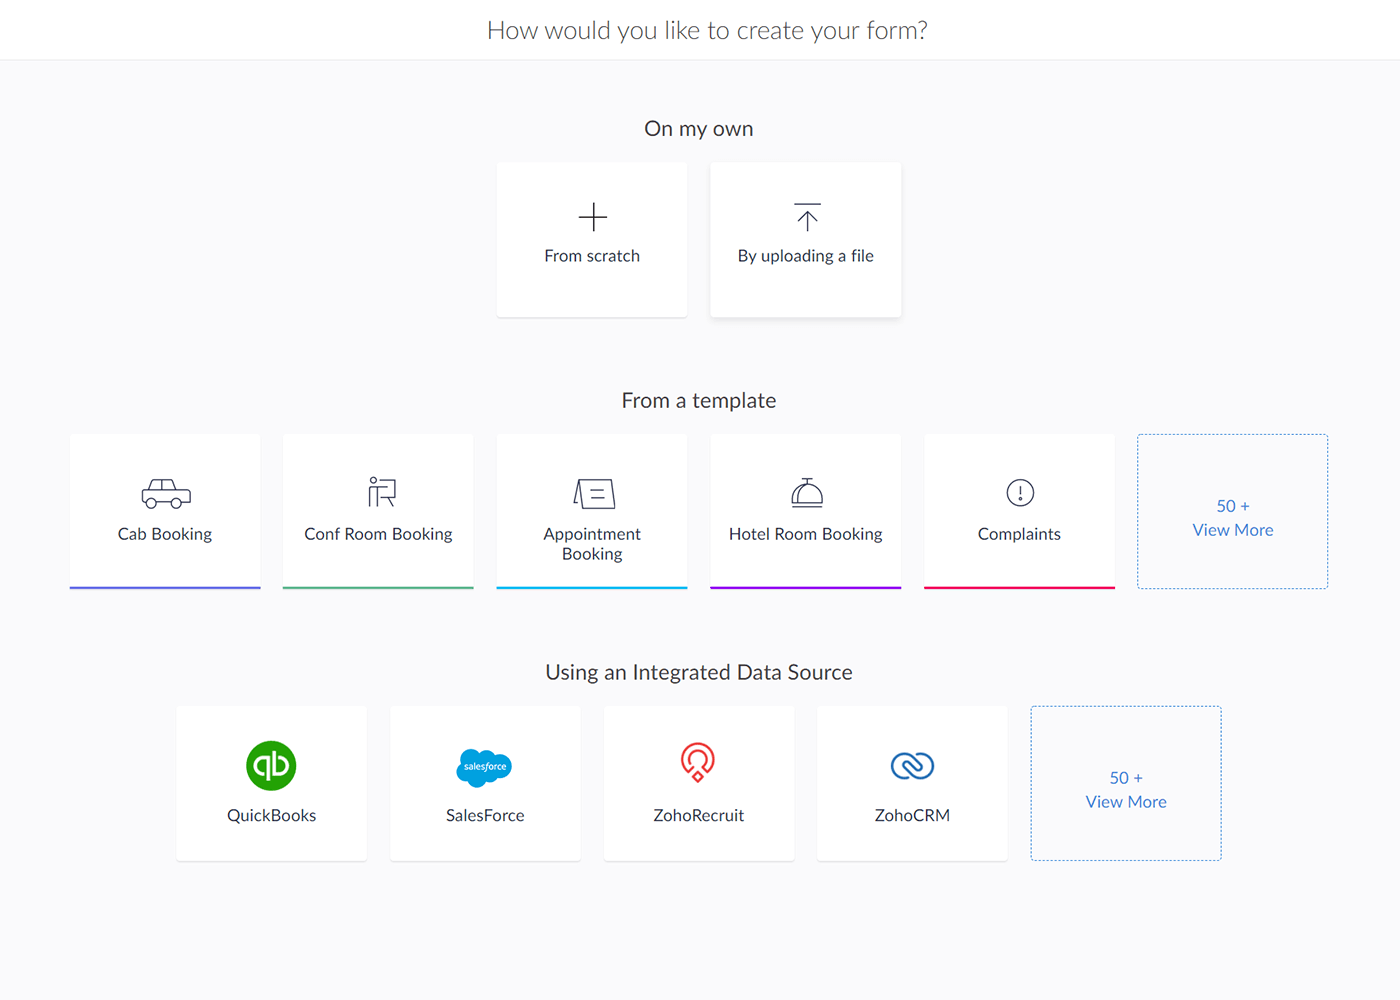
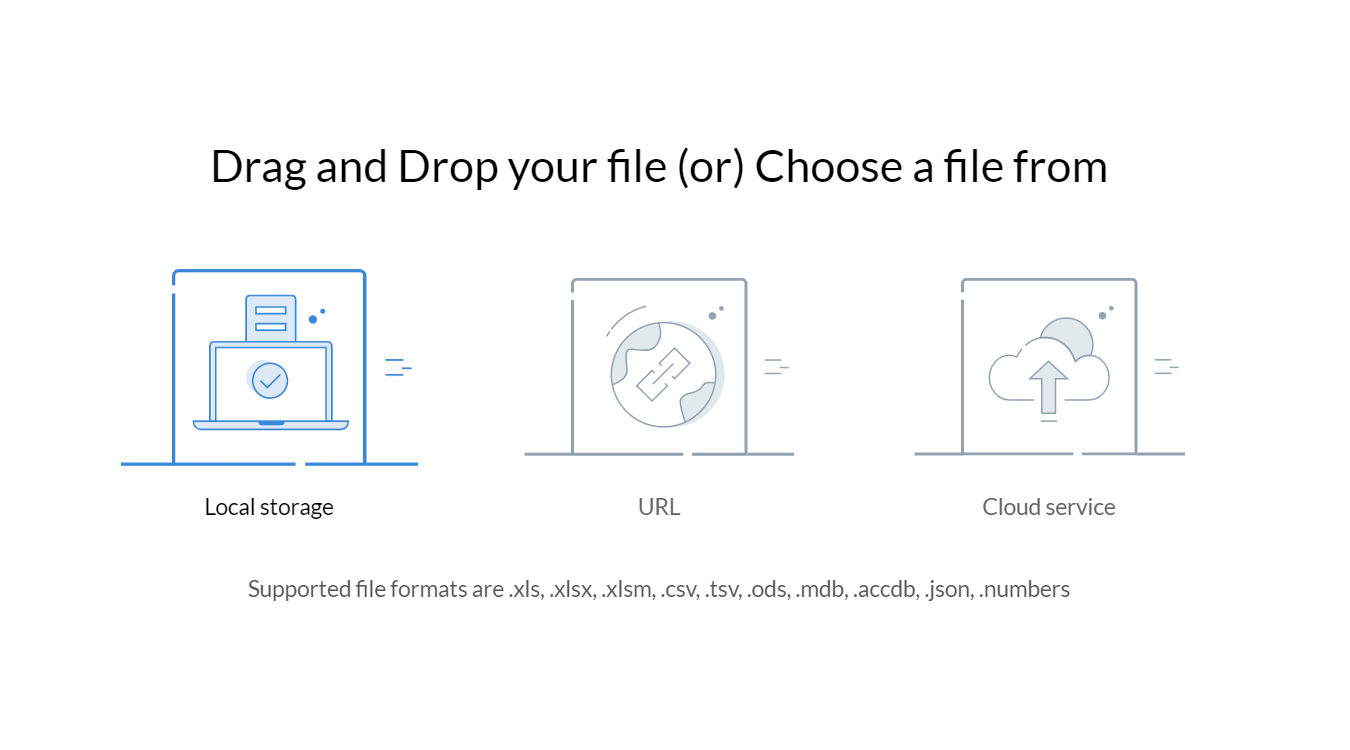
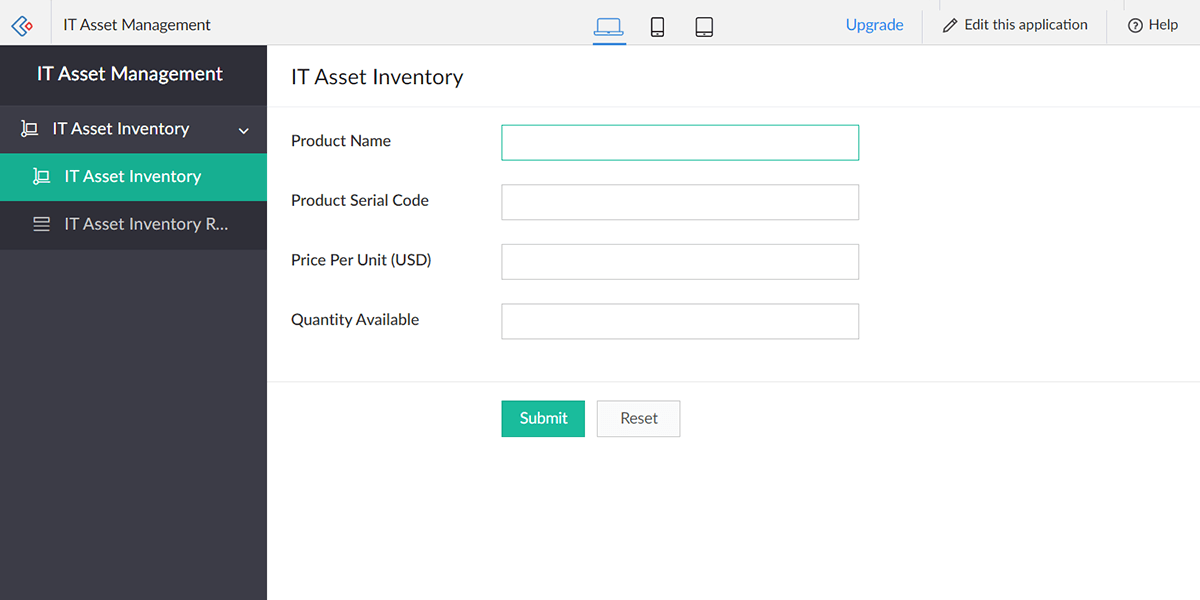
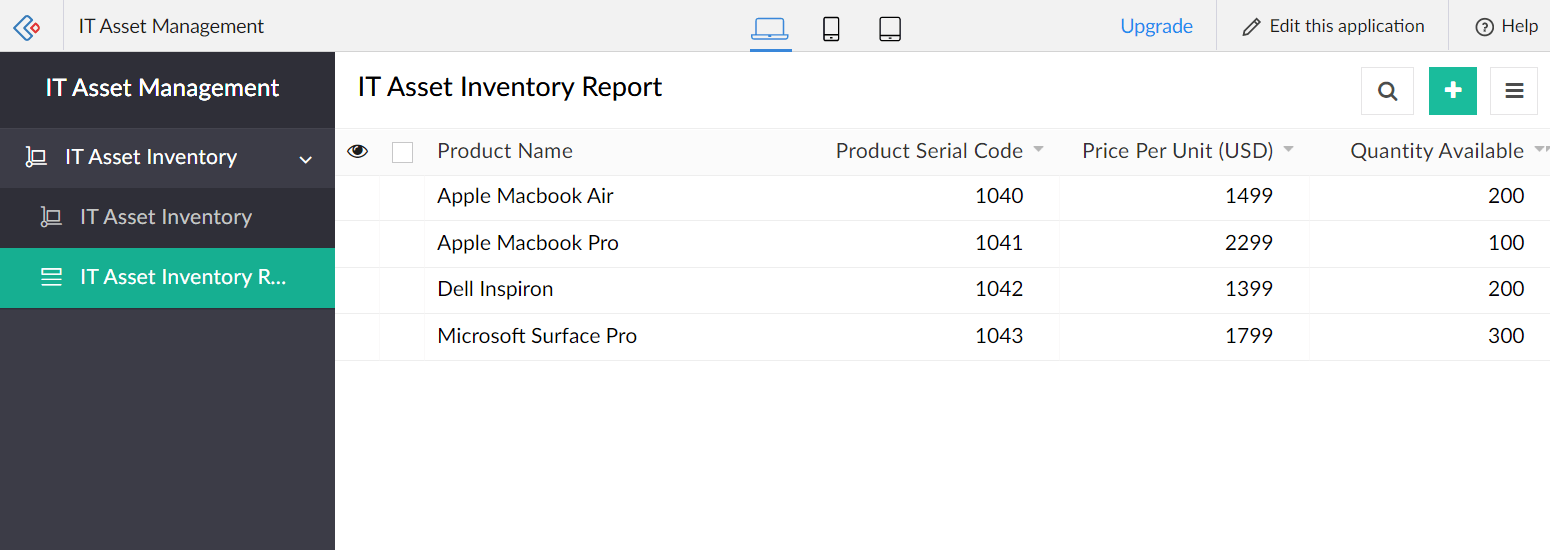
Once inside the application builder instance, click on 'Create new form' --> 'By uploading a file'. Download and upload this 'IT asset inventory' .xlsx file. This sample data file contains details of assets available, along with their count. Name this form as - 'IT Asset Inventory'.
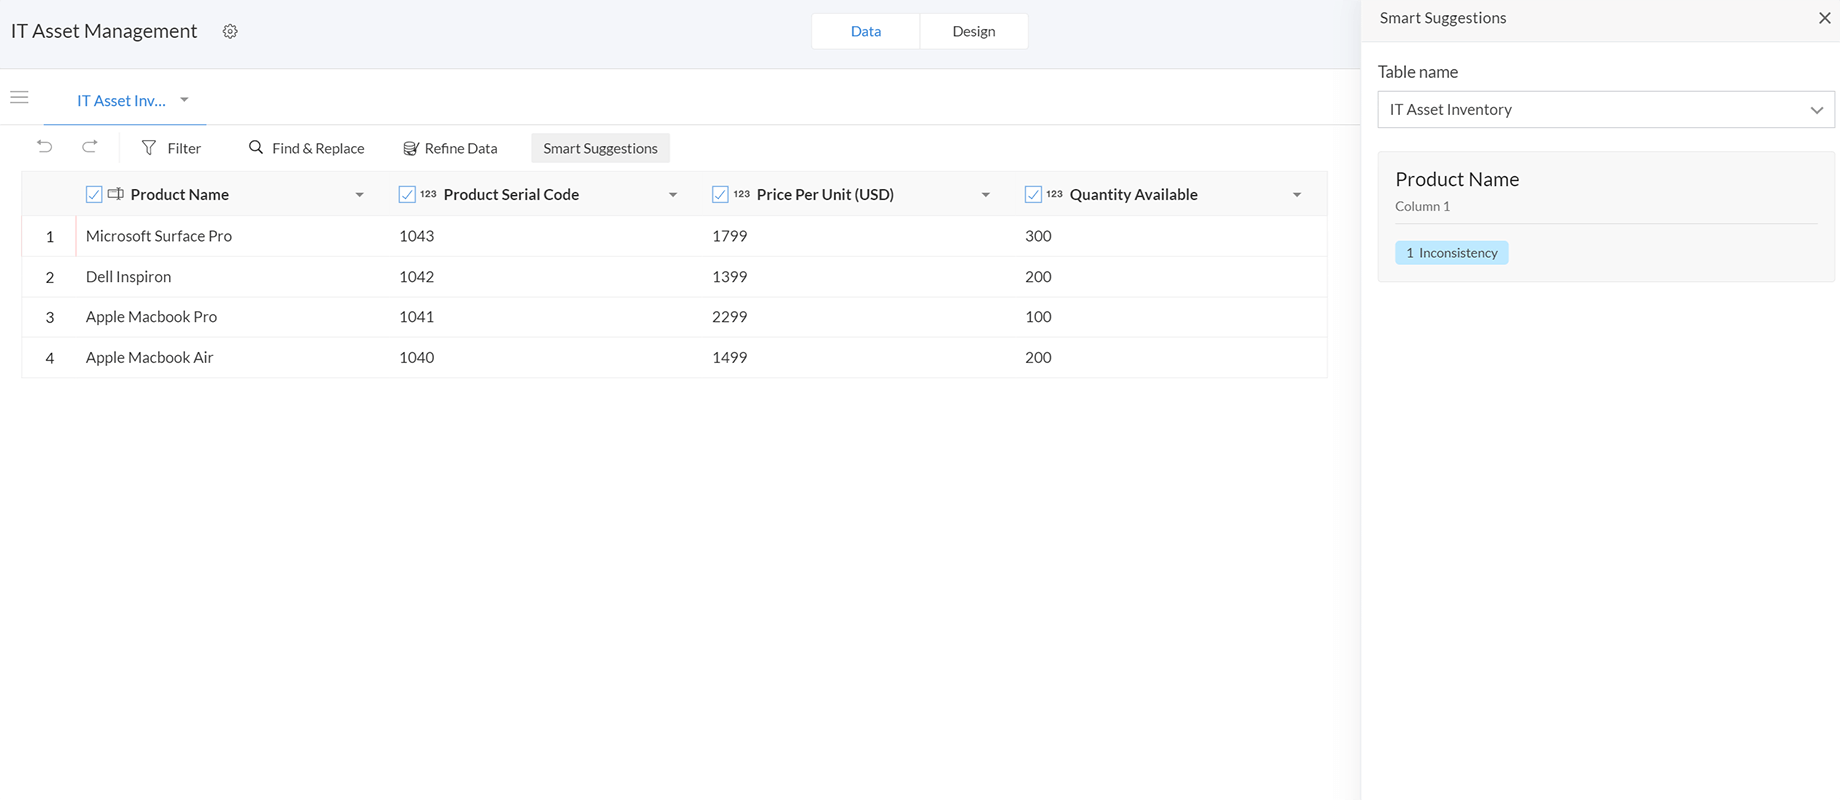
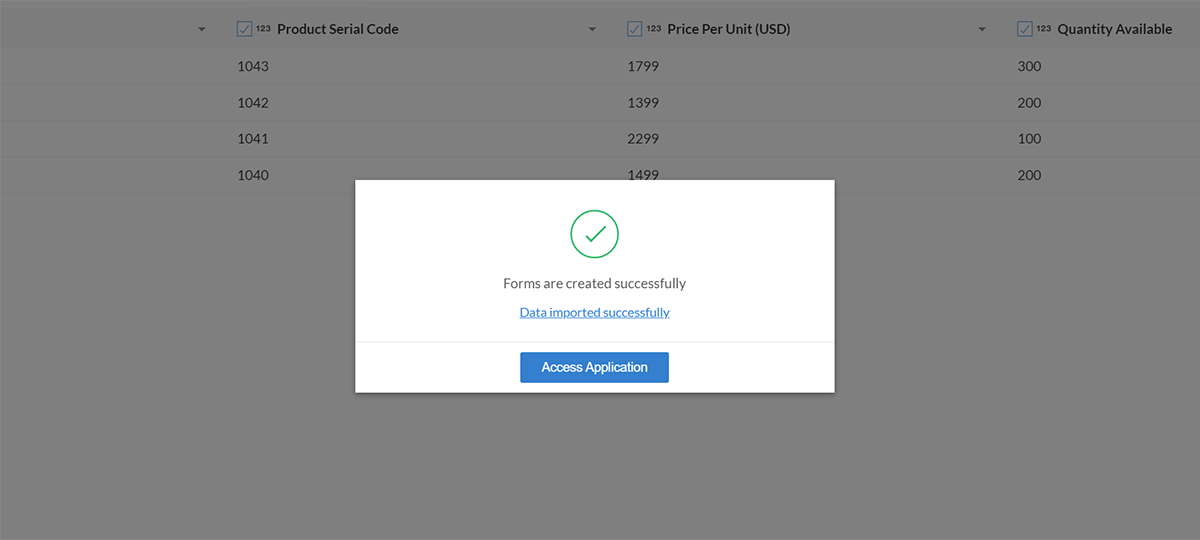
This not only creates an online form automatically (based on the source file structure and data types) to populate further data but also creates an associated report, based on the imported data. Reports allow you to view the form data online, from any device, in the format of your choice.
Repeat the steps and create another form, by downloading and uploading this sample employee data to your application. Start by clicking the '+' icon on your top left. Click 'Create new form' --> 'By uploading a file'. Name this form as 'Employees list'.
You now have two online forms, with associated data, covering your IT asset inventory and list of employees.


Collect data online
Here we will see how we can create an IT asset request form, that is related to the two form entities we created in the previous step.
Let's try building a simple IT request form with five fields:
- Employee ID (related to the Employee ID field from the Employees list form)
- Requested asset (related to the Asset Name field from the IT asset inventory form)
- Request urgency (denoting urgency of request)
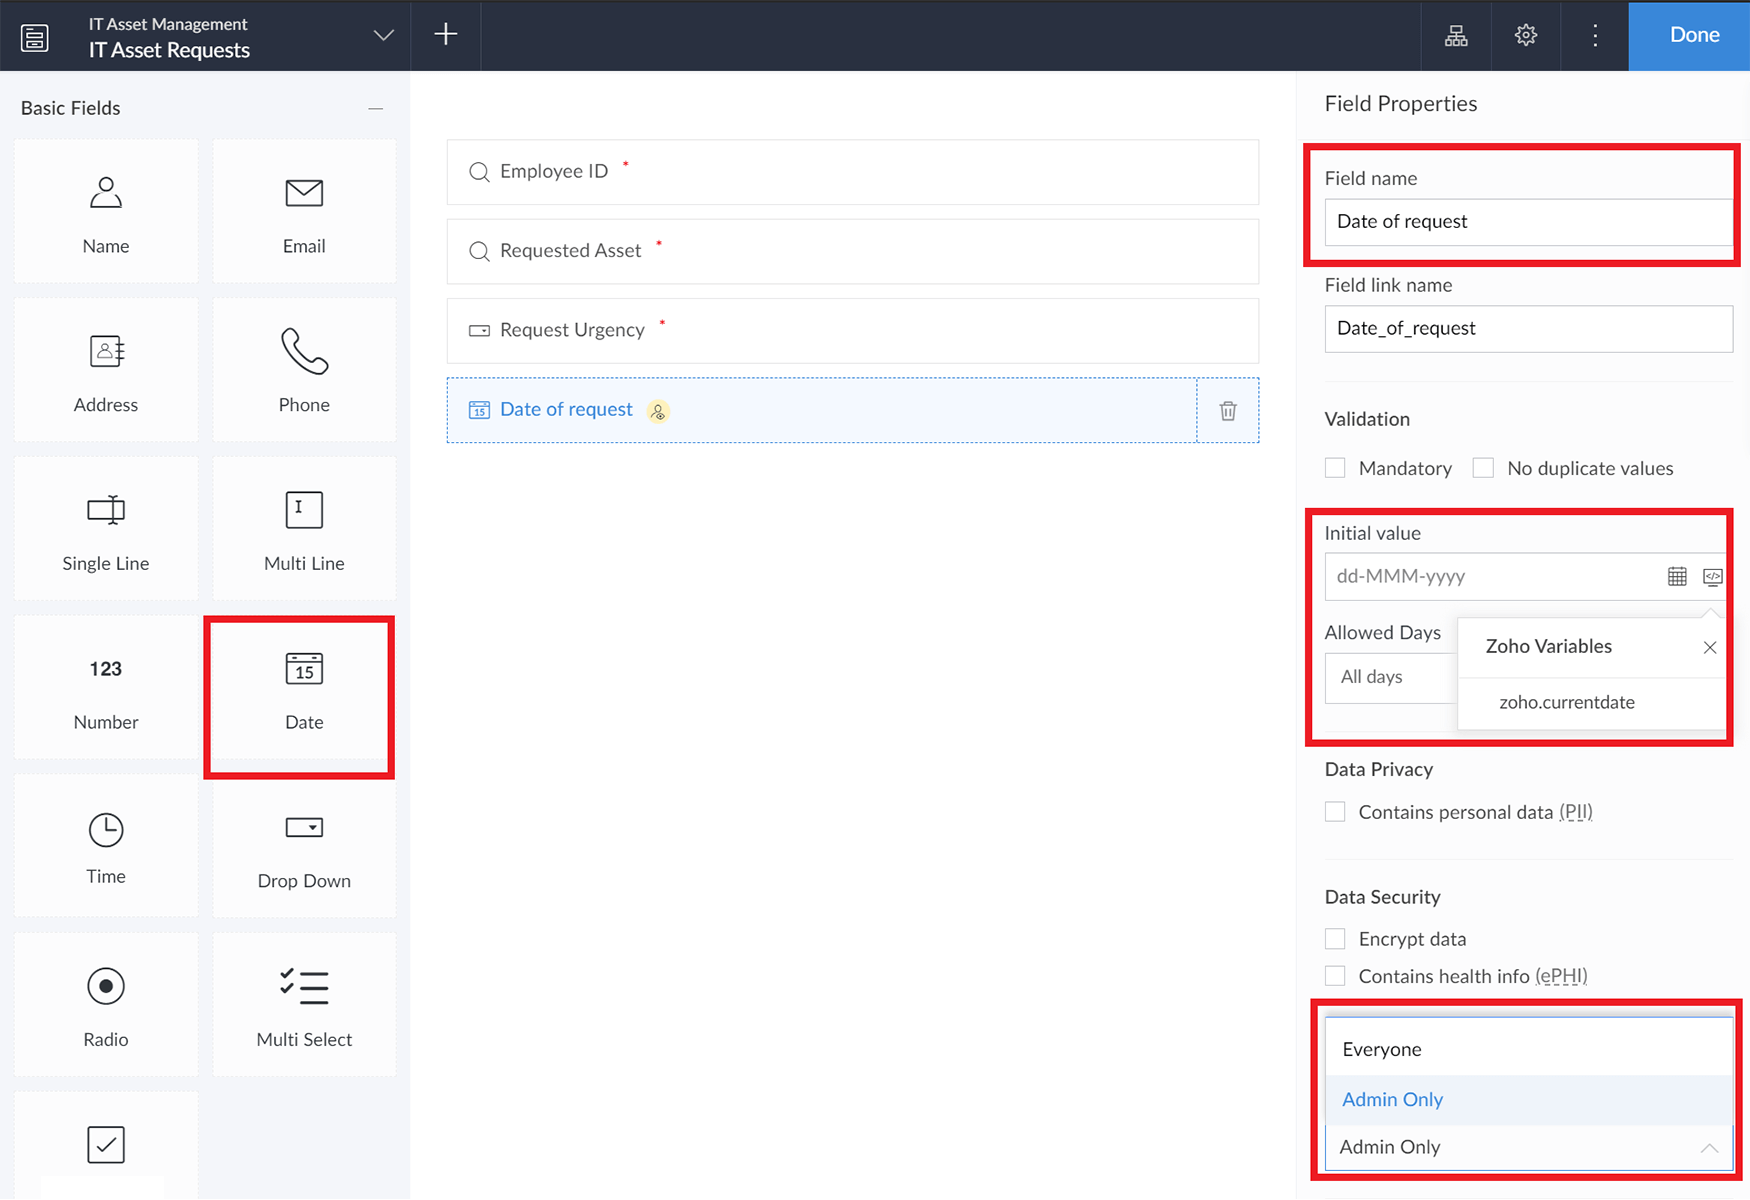
- Date of request (the date on which the IT asset request was raised)
- Manager approval status (denoting resp. manager's approval or rejection of the request)
We will see how we can automate Manager approvals and populate the status automatically in the fields of the new form we will be creating.
- Click on the '+' icon in the top-left corner and click Create from scratch. Name this form 'IT Asset Requests'.
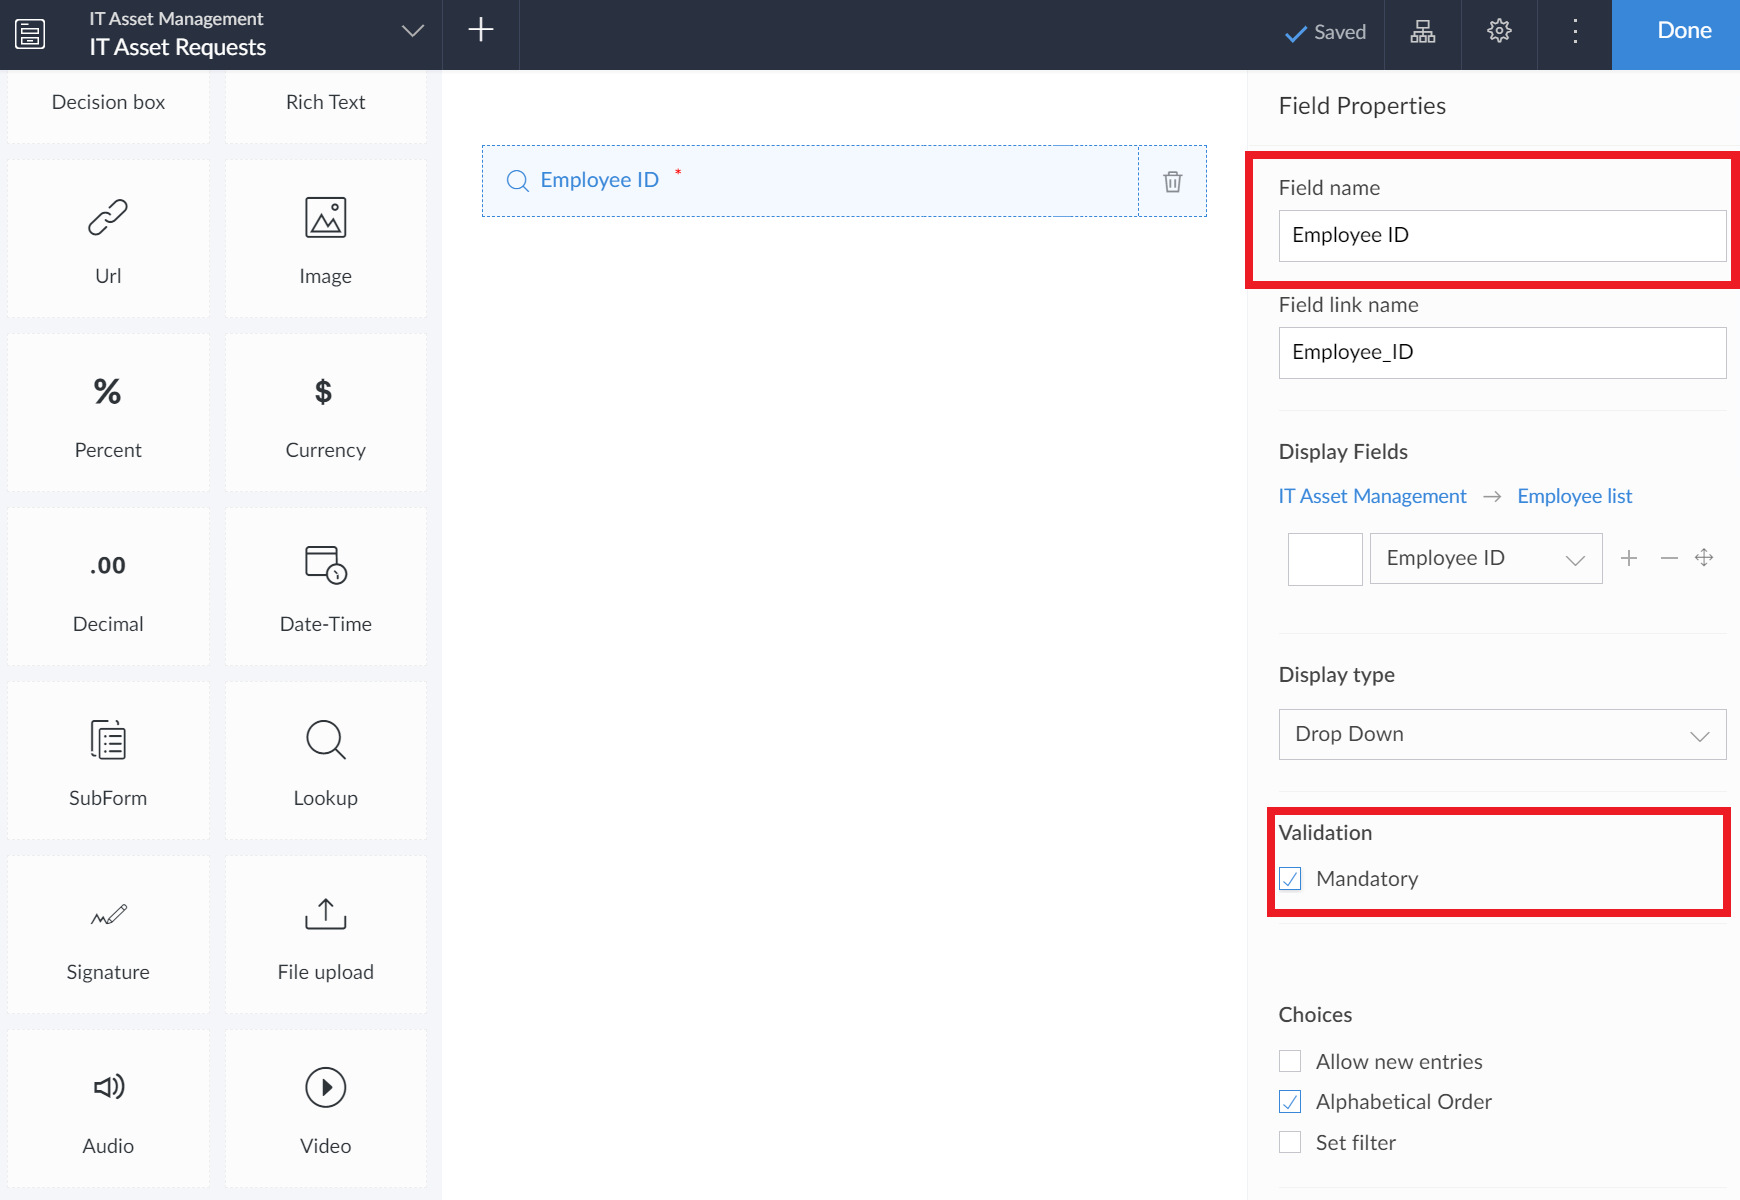
- Employee ID (Look-up, mandatory): Because we have employee details already stored in another form, we can simply use this as a look-up field, from the Employees list form we had added.
- Look-up fields are used in Creator to build relationships between form entities. Drag-and-drop a Look-up field from the left pane onto the builder. Select Application == 'IT Asset Management', Form == 'Employees list', Field == 'Employee ID'. Mode of display --> Drop-down.
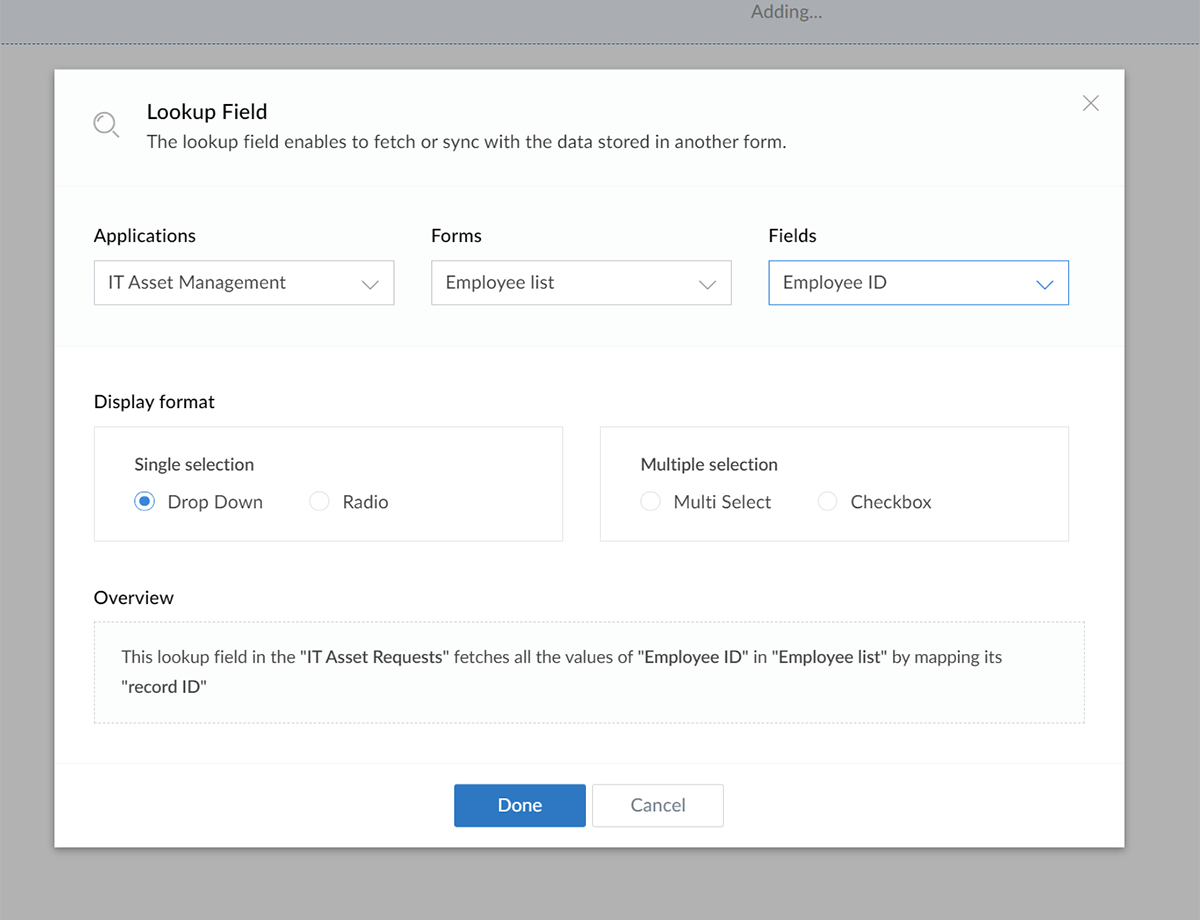
- Name this field as 'Employee ID'. Ensure the Mandatory checkbox is selected.
Requested asset: Repeat the steps to add the Requested asset field to the form. This look-up field would be based on the same app, but Form == IT asset inventory and Field == IT assets available. Ensure the Mandatory checkbox is selected.
This ensures that the field values are automatically updated every time you add or remove assets from your IT Asset Inventory form.

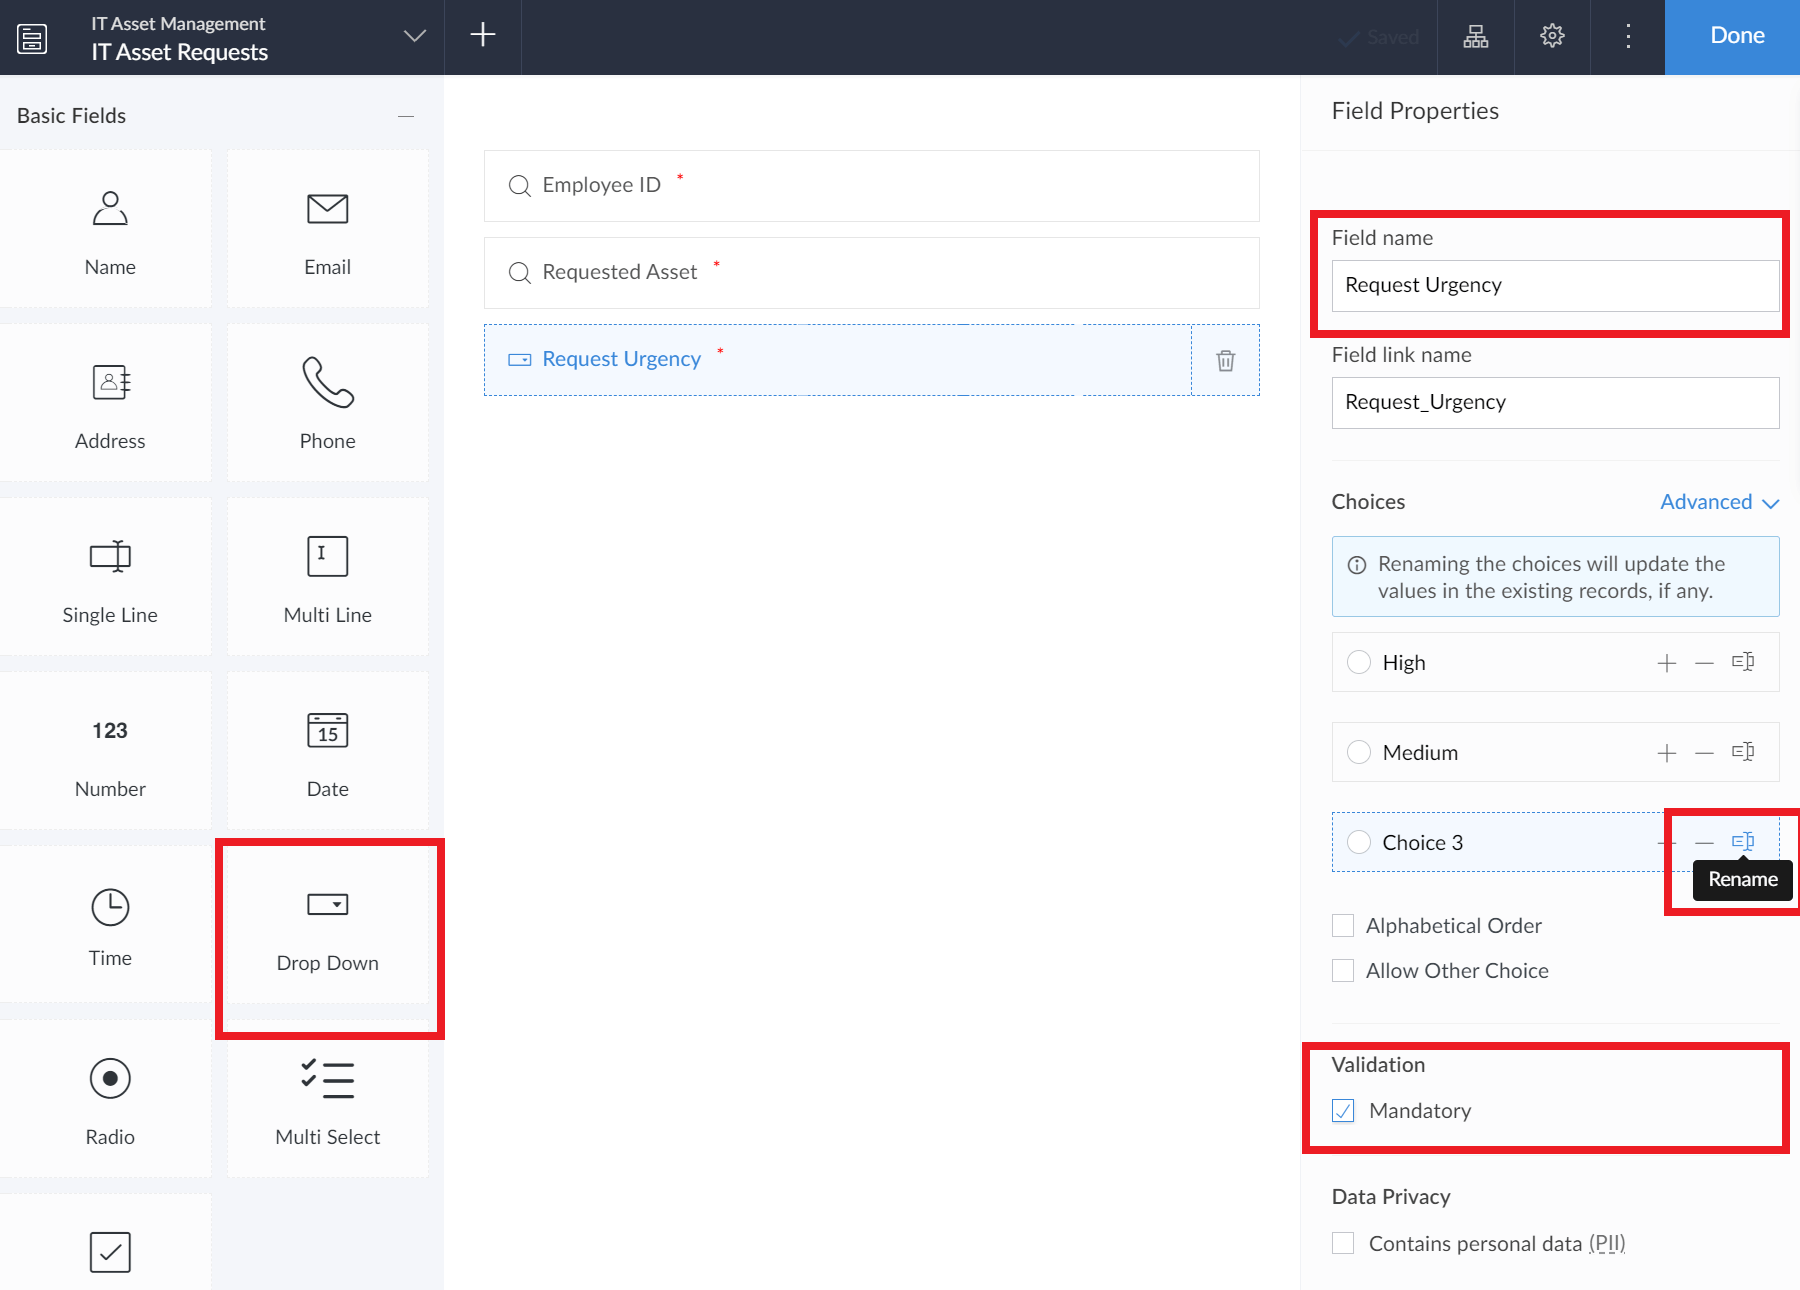
- Request Urgency: Add a drop-down field to the form builder and name it 'Request urgency'. Add the following options against the choices - "High", "Medium", "Low". Make this field mandatory.
- Date of request: You needn't add this as a separate field to your form, as the time of form submission is automatically captured and available as the Added Time field for you to use at any point.
- Set Permission --> Show field to --> Admin only. This ensures that this field is not visible to the end-user, but captures their date of request or form submission.
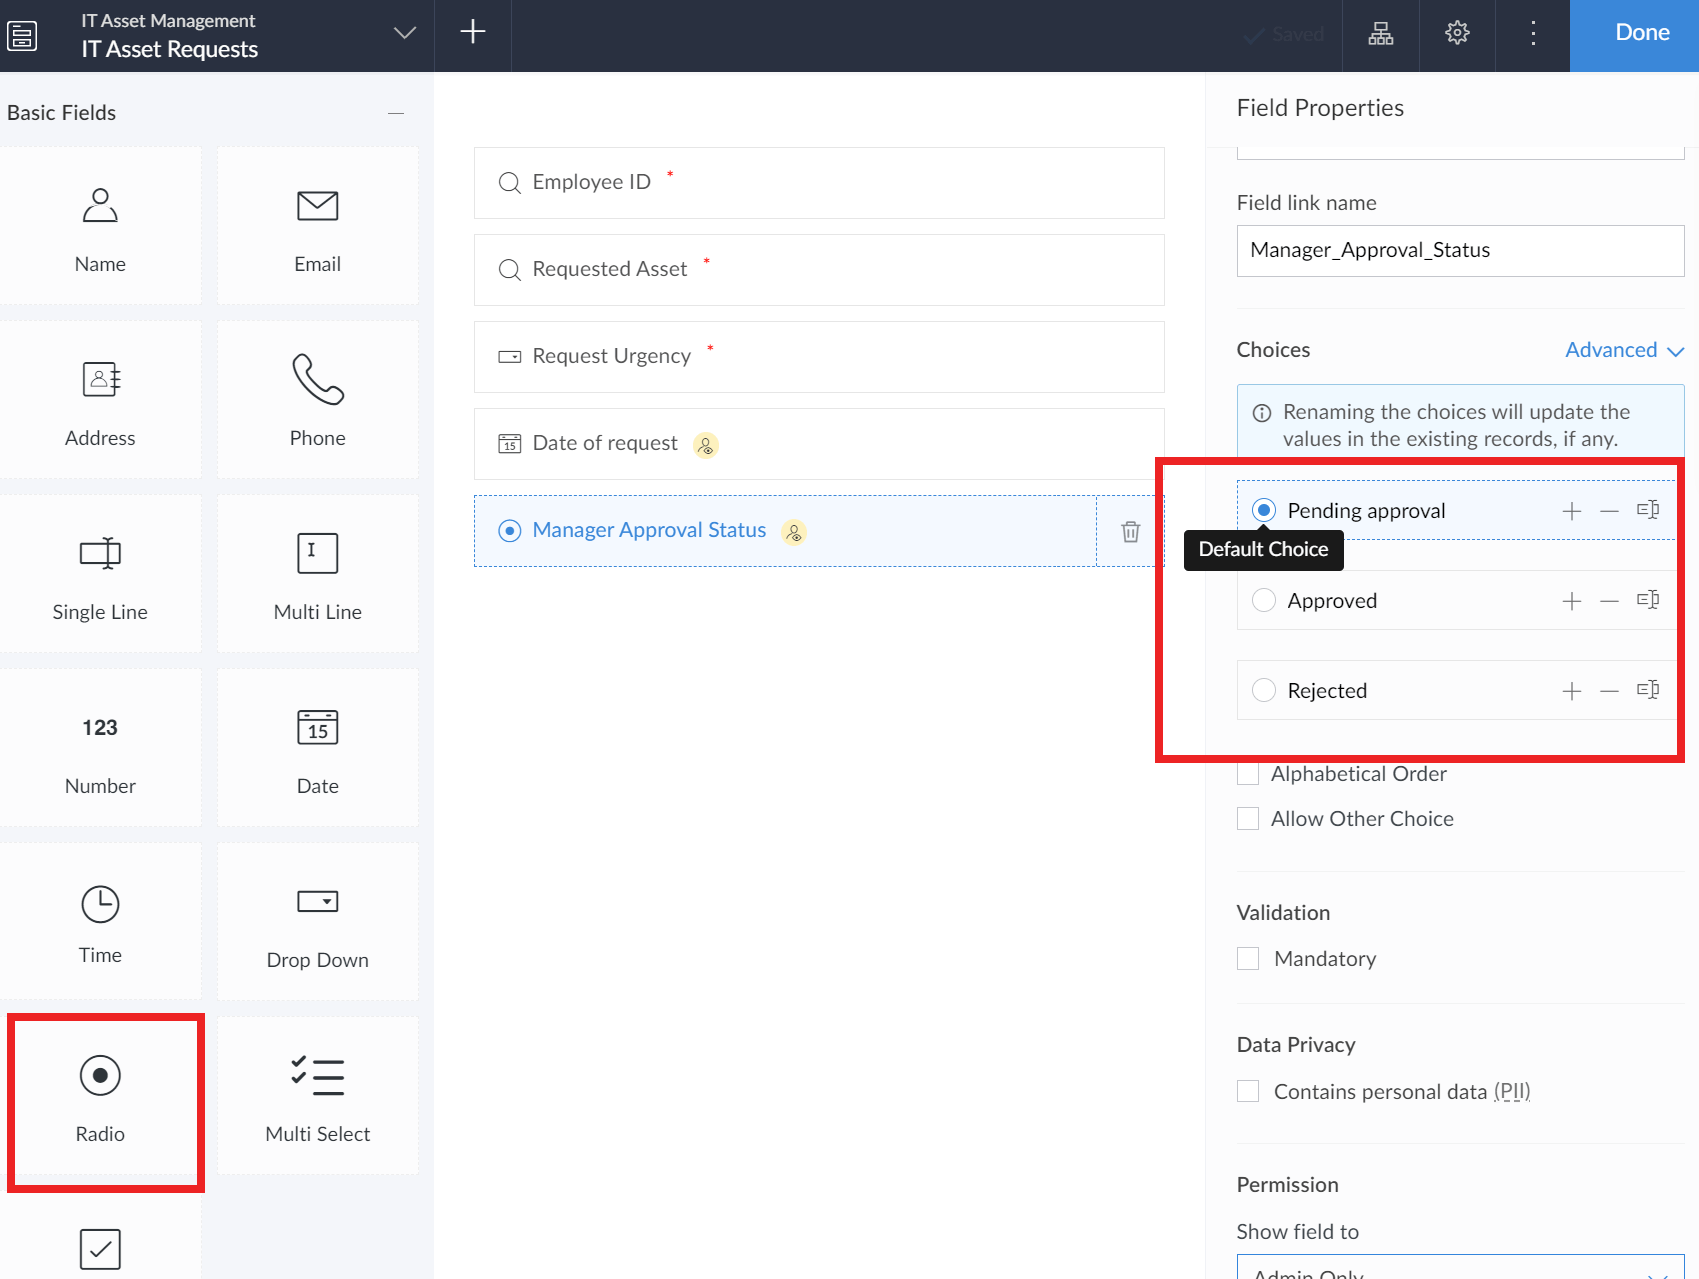
- Manager approval status: Field to track your manager's approval against each request.
- Add a radio field. Name it 'Manager approval status'. Set choices as "Approved", "Rejected" and "Pending approval". Set Permission --> Show field to --> Admin only. Click on the Pending approval choice to set it as the default value.
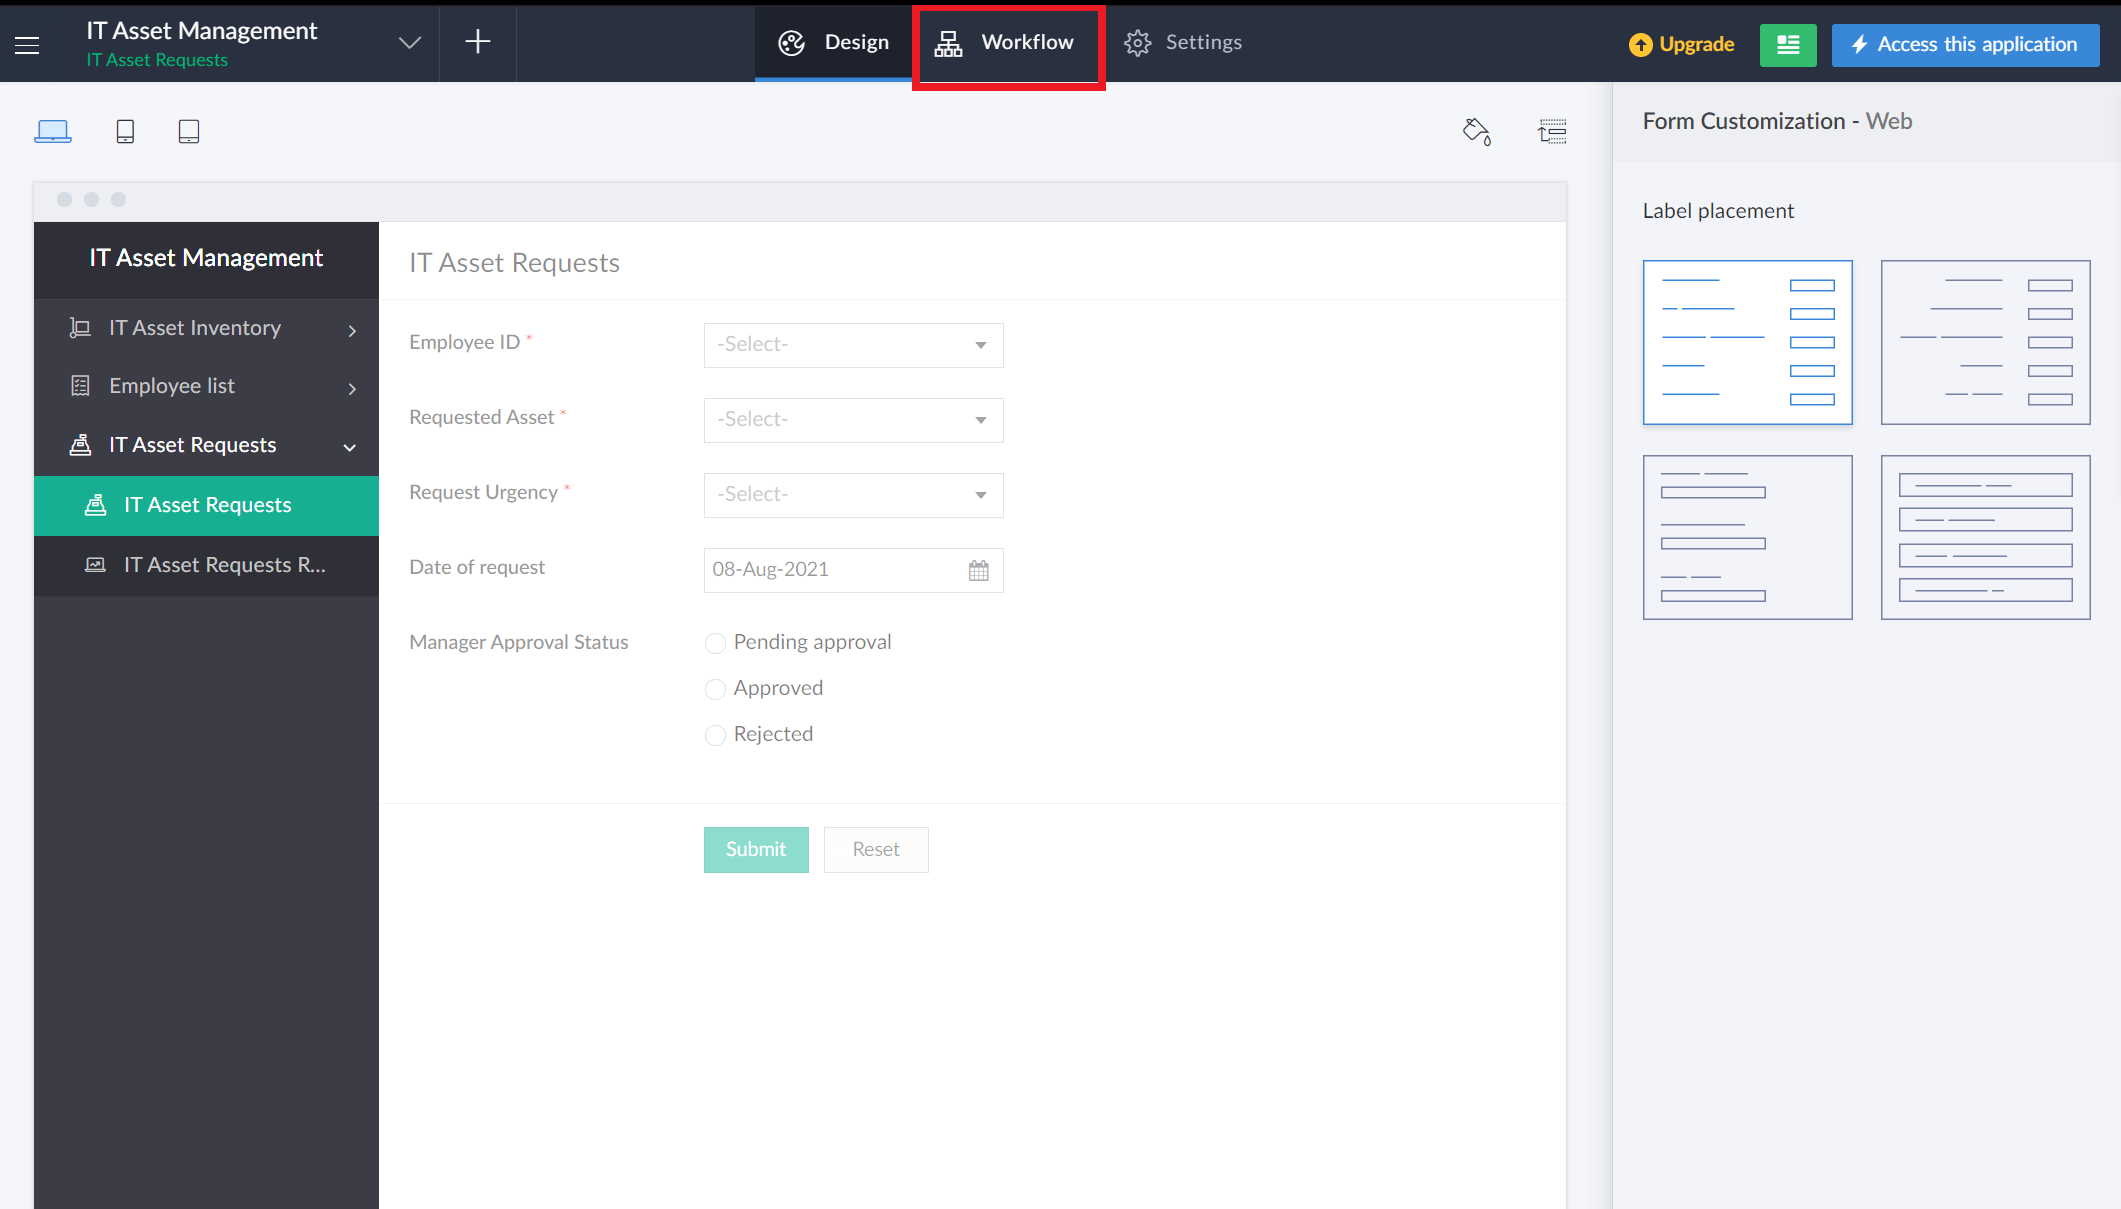
- Click Done in the top-right corner. Your IT asset request form is ready!
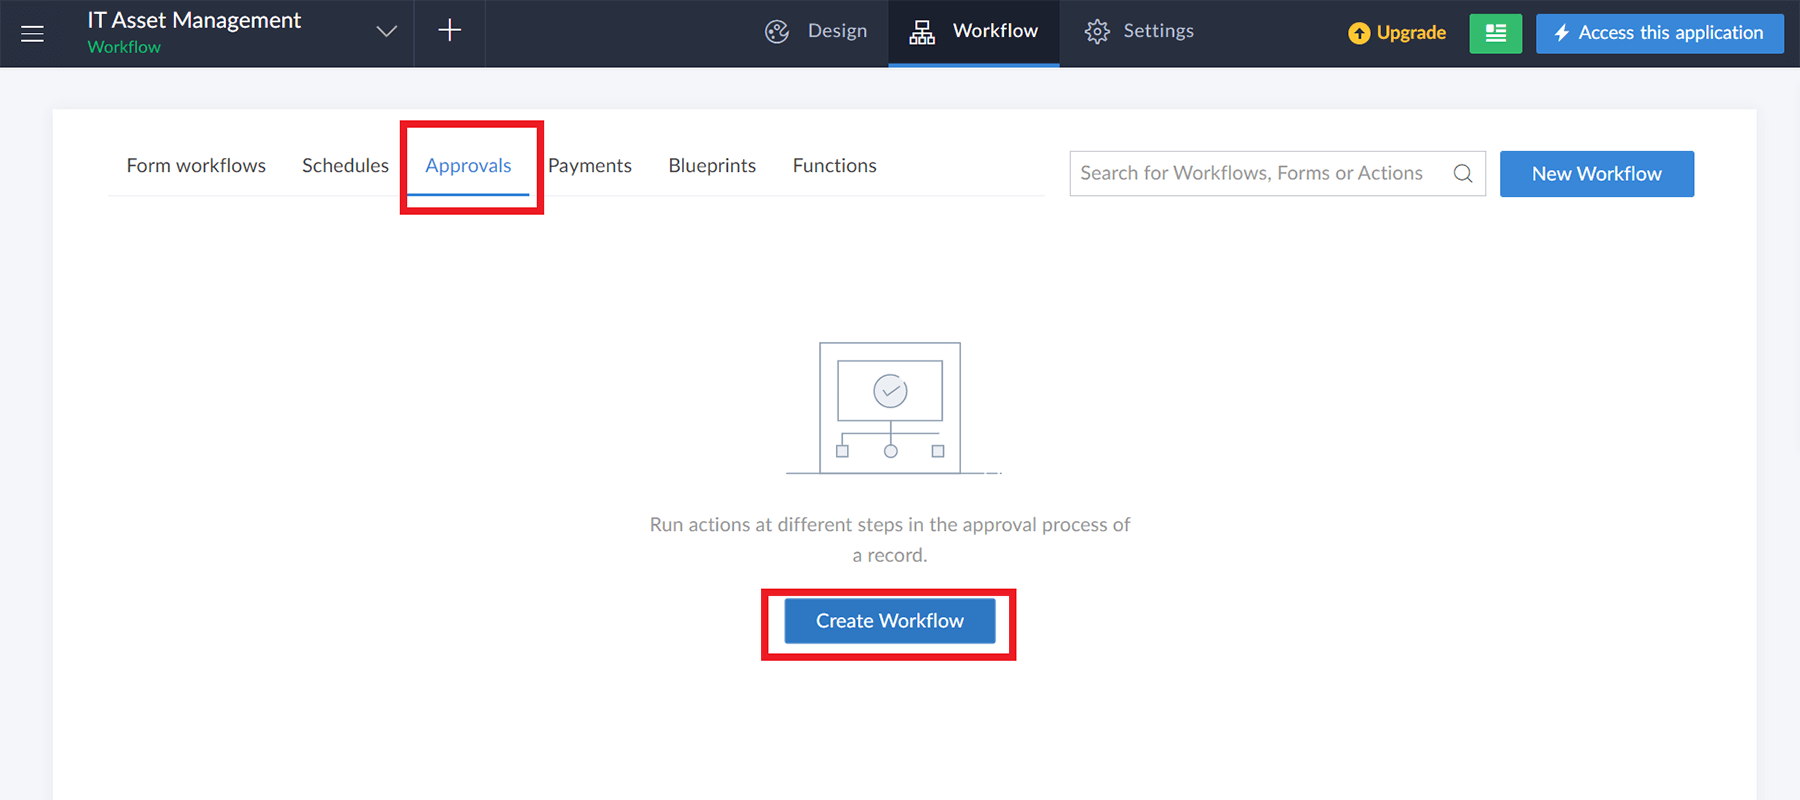
- If you would like to trigger a workflow to the respective employee's reporting manager every time a request is submitted, you can do so by simply navigating to Workflows (on the header of your app builder) --> Approval workflows --> Create workflow. Set Choose Form --> IT Asset Request. Name this workflow as 'Manager Approval'.
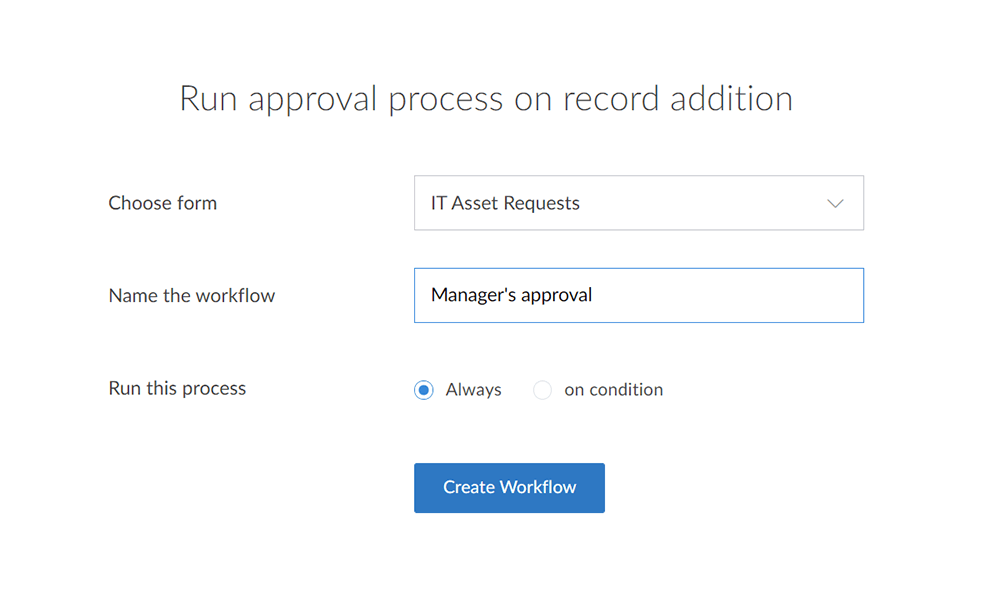
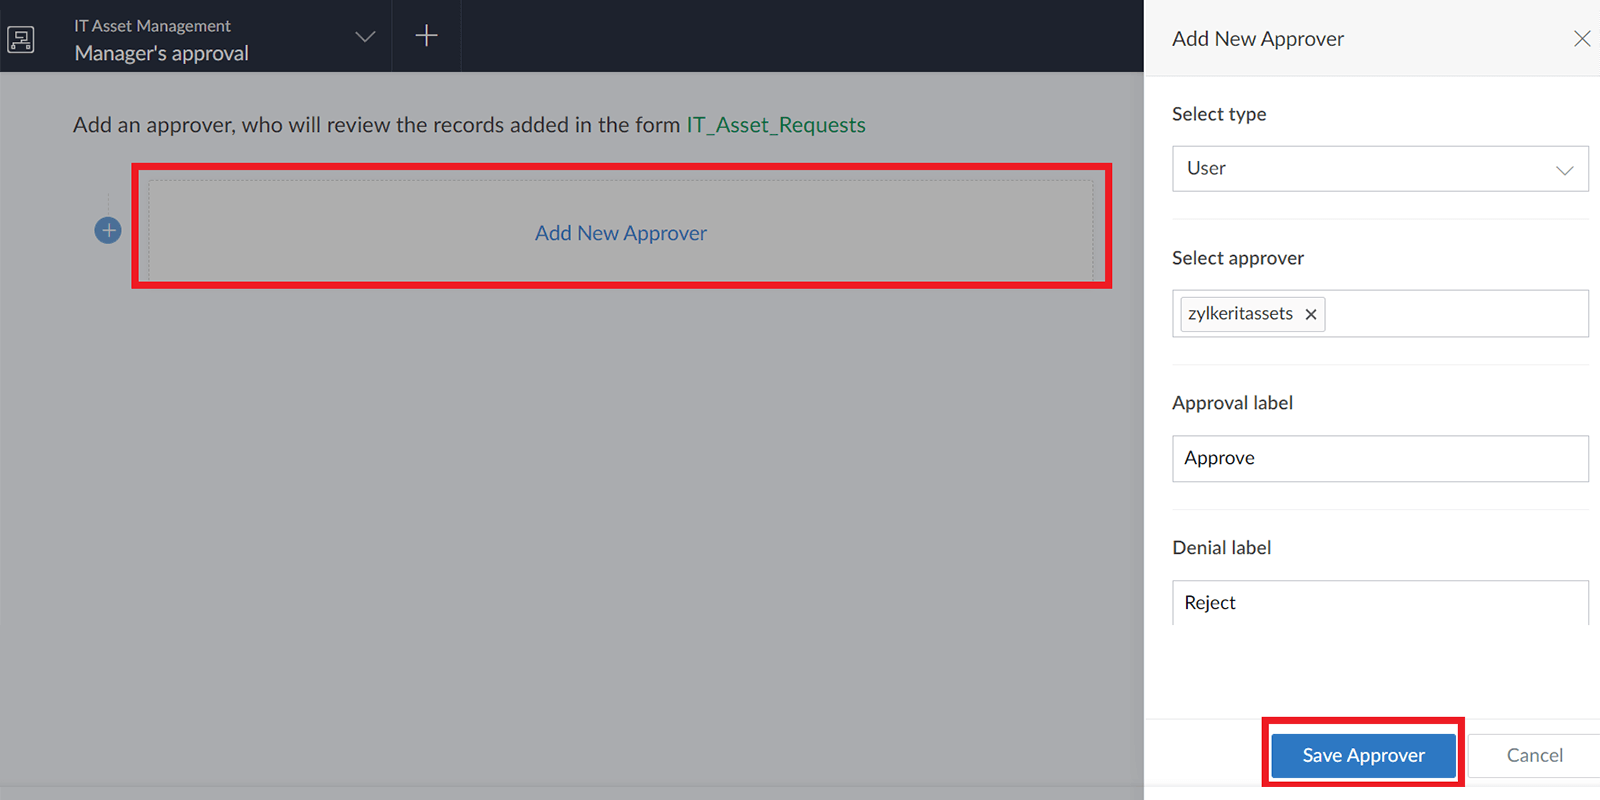
- Click Add Approver, Select type == User, Select approver == 'Yourself' (for now). Click Save Approver. Notifications to the employee upon Manager's approval or rejection will be automatically configured for you.
- Click Add new action under Level 1 approver --> Approve. Click Data access --> Update records. Select Form --> IT Asset Request. Set criteria --> Current record, Update fields --> 'Manager Approval Status' --> equals --> "Approved".
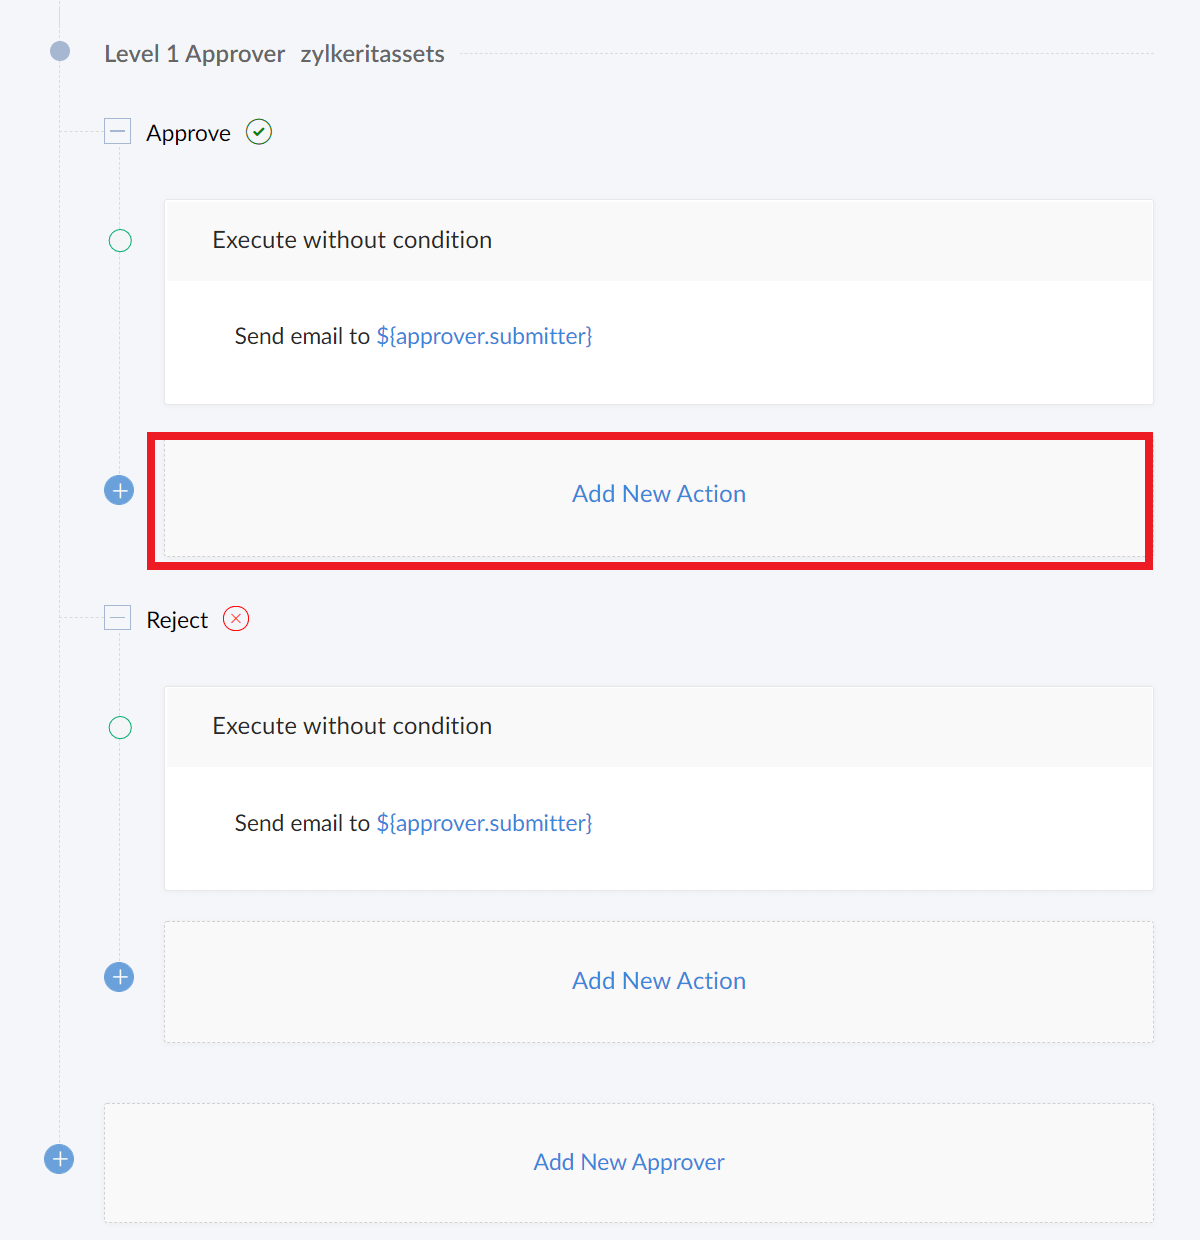
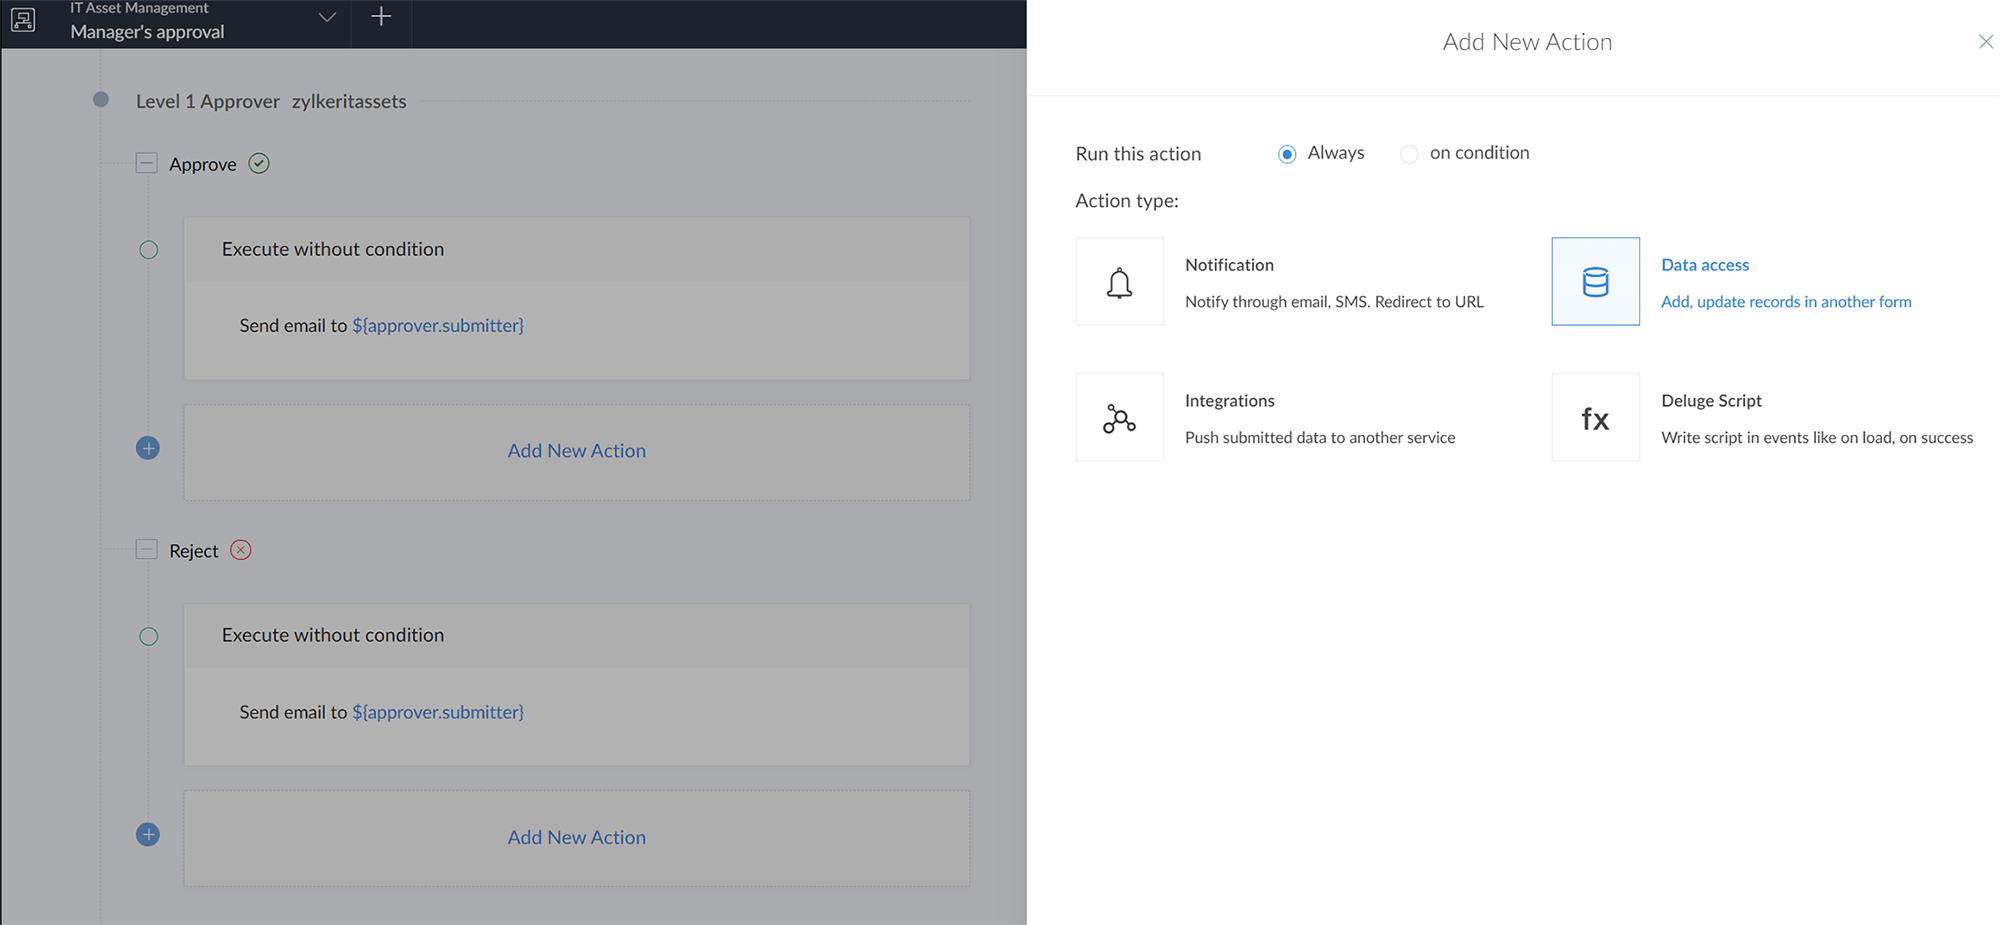
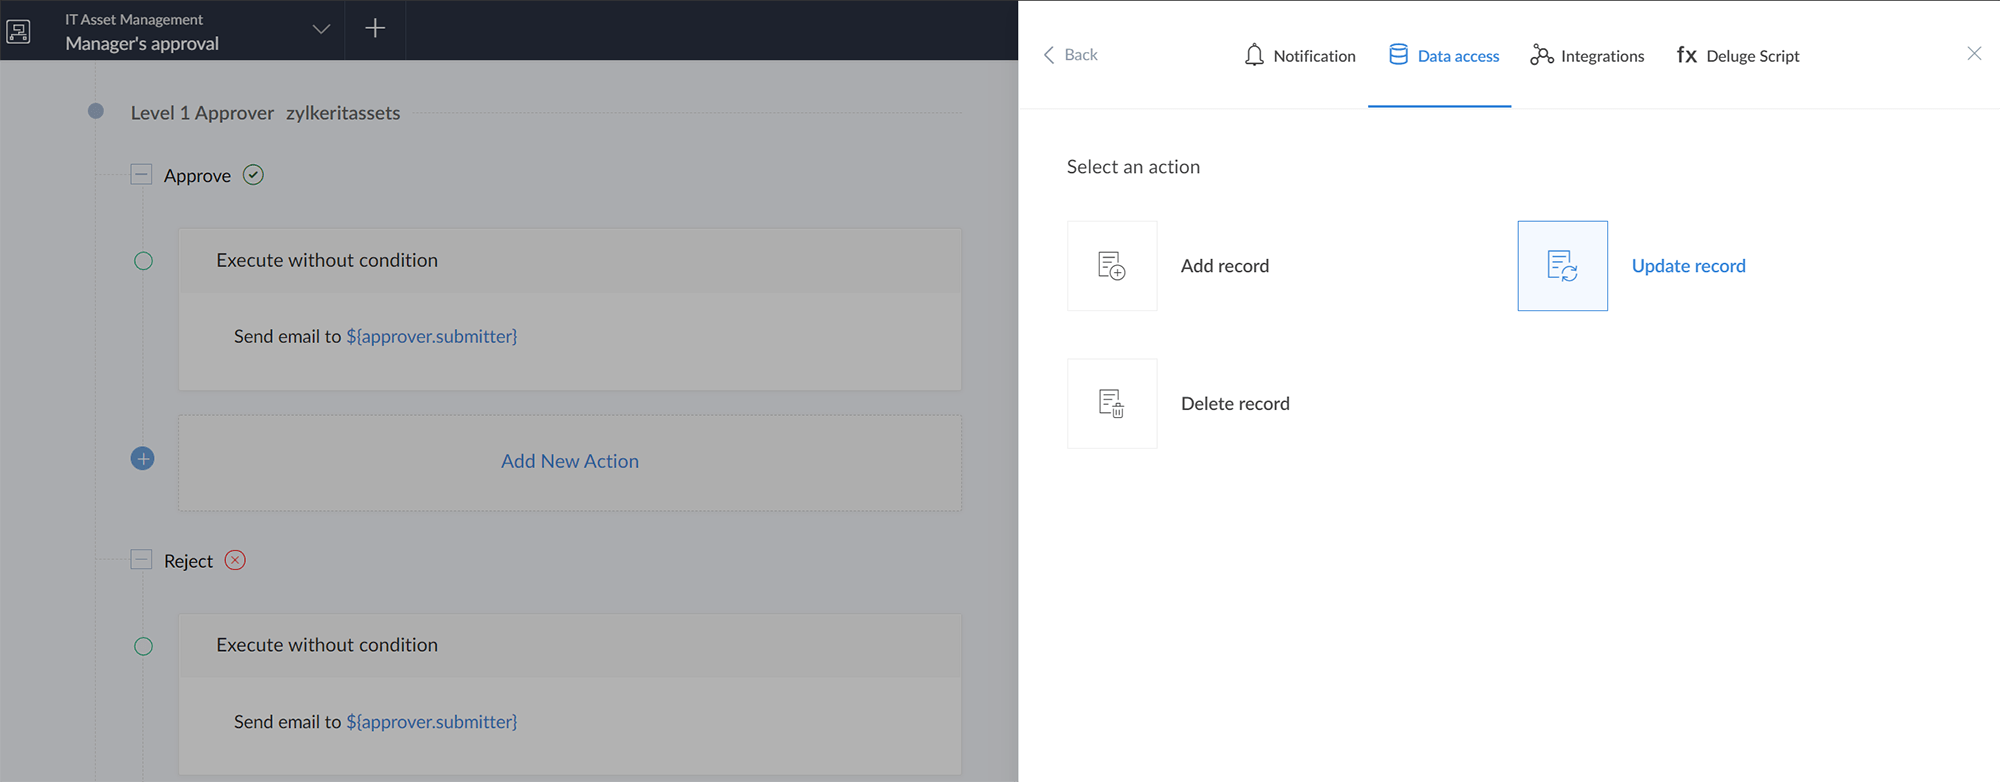
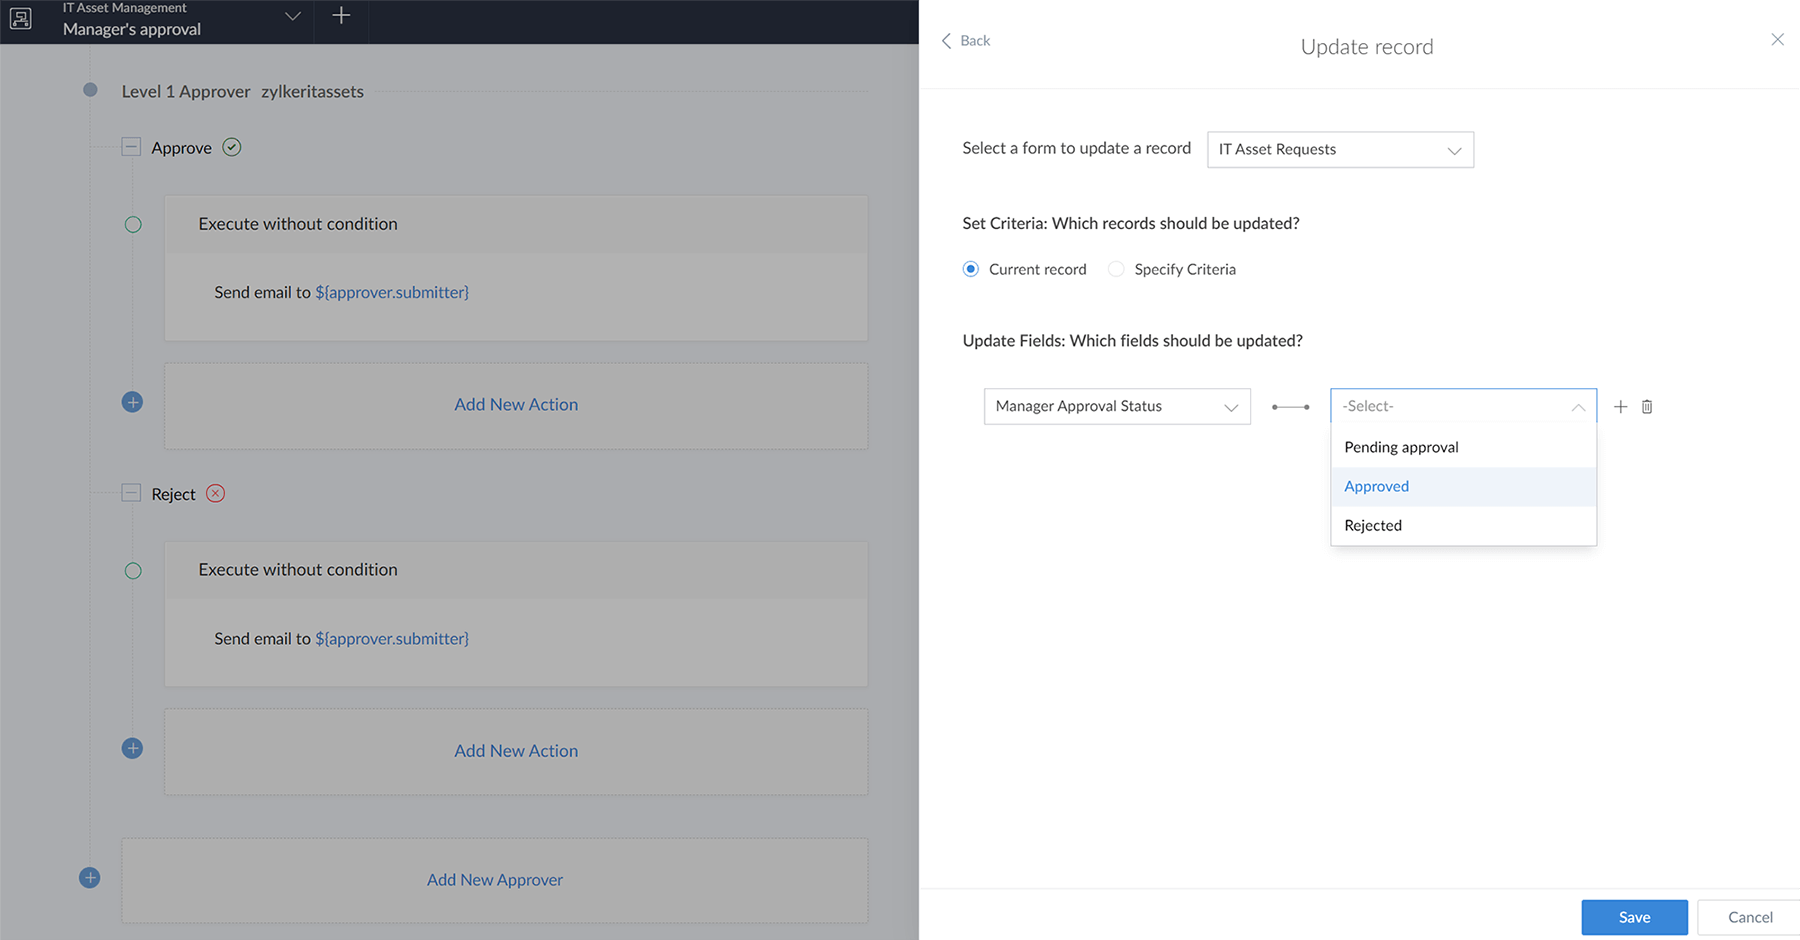
- Repeat this step by adding a new action under Level 1 approver --> Reject. Set Data access --> IT Asset Request --> Update fields --> 'Manager Approval Status' --> equals --> "Rejected". Click Done once you are finished.
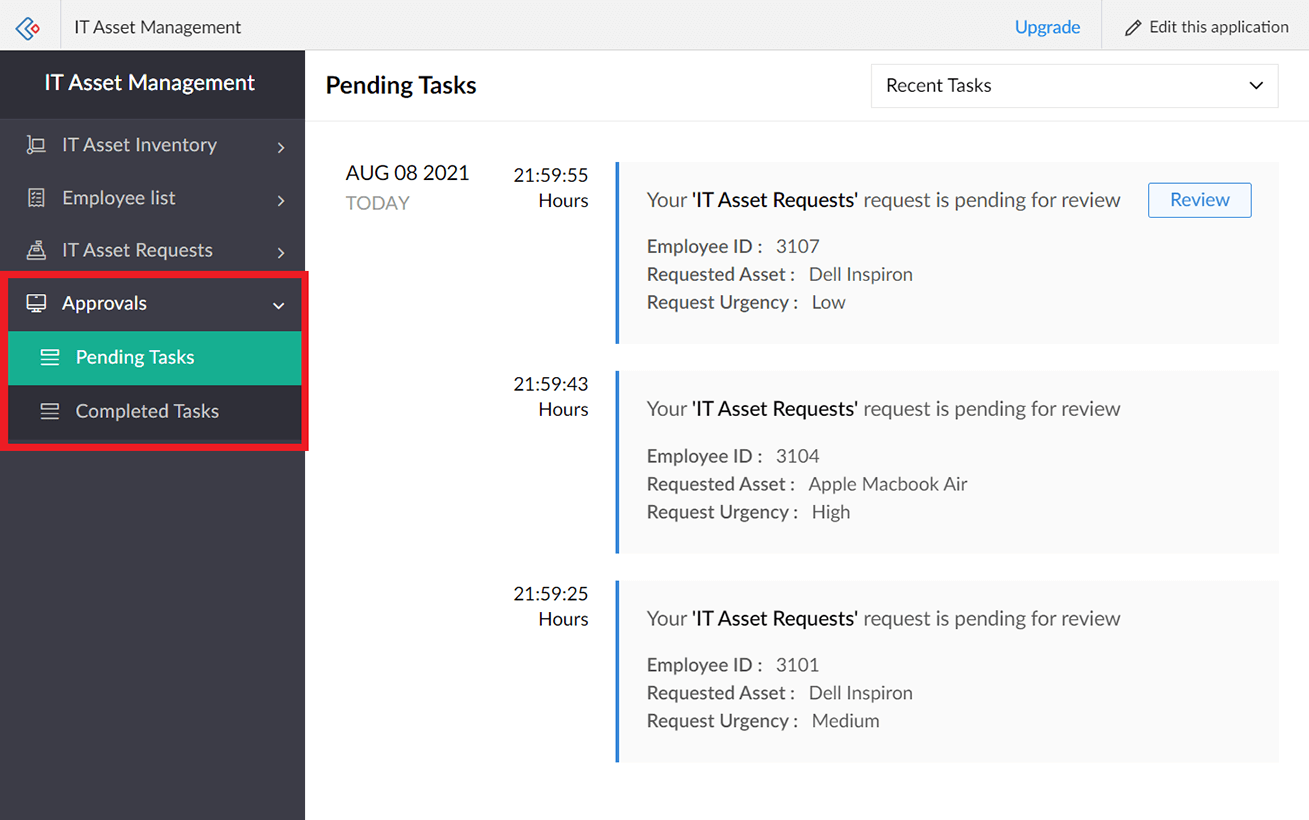
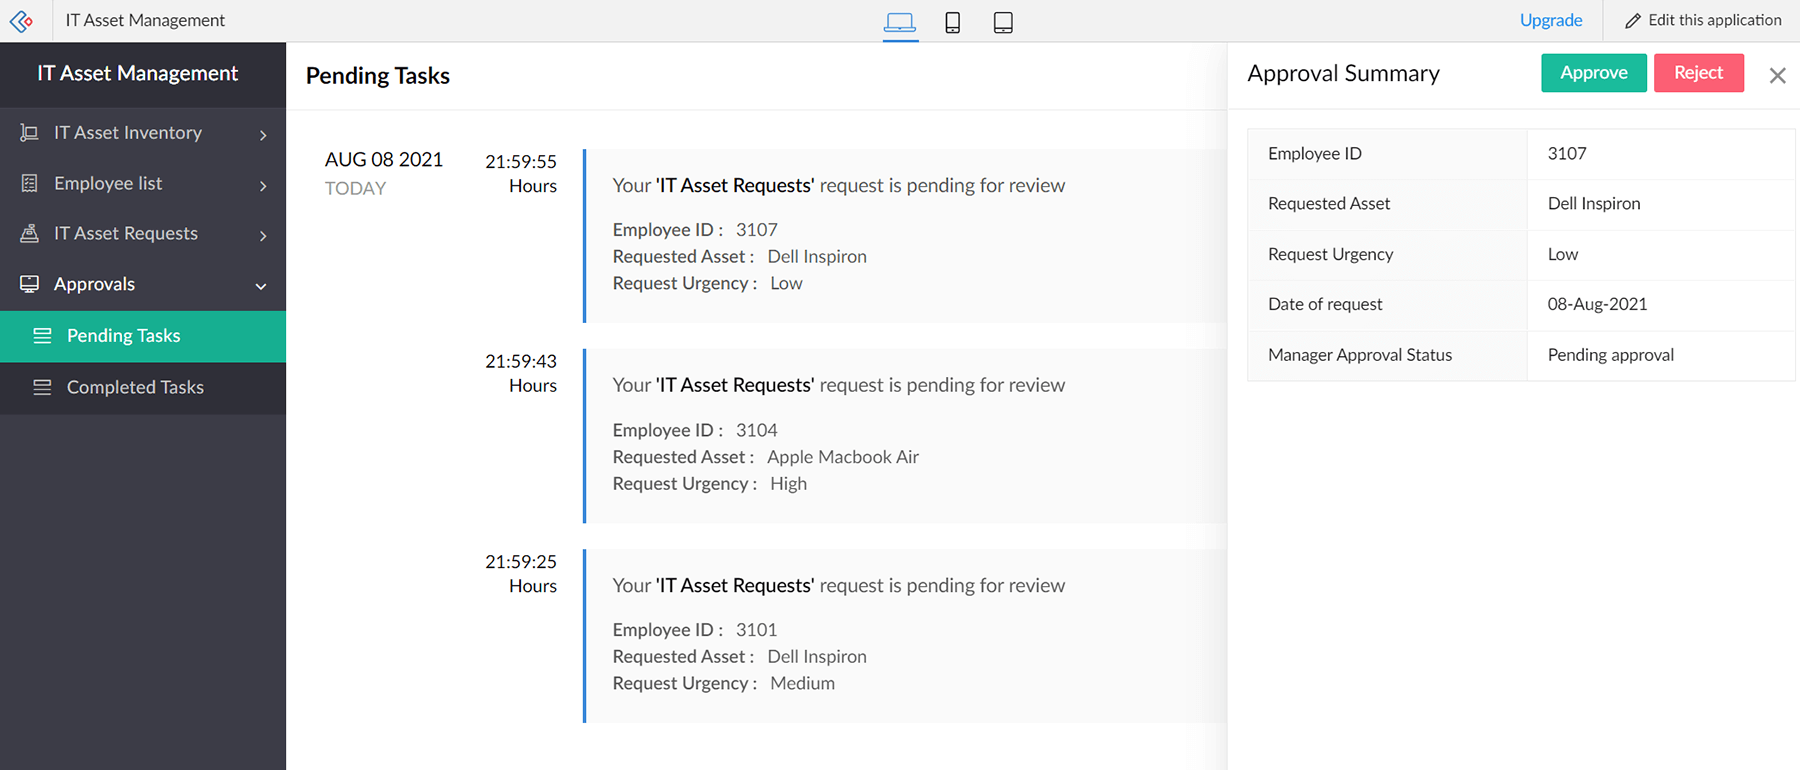
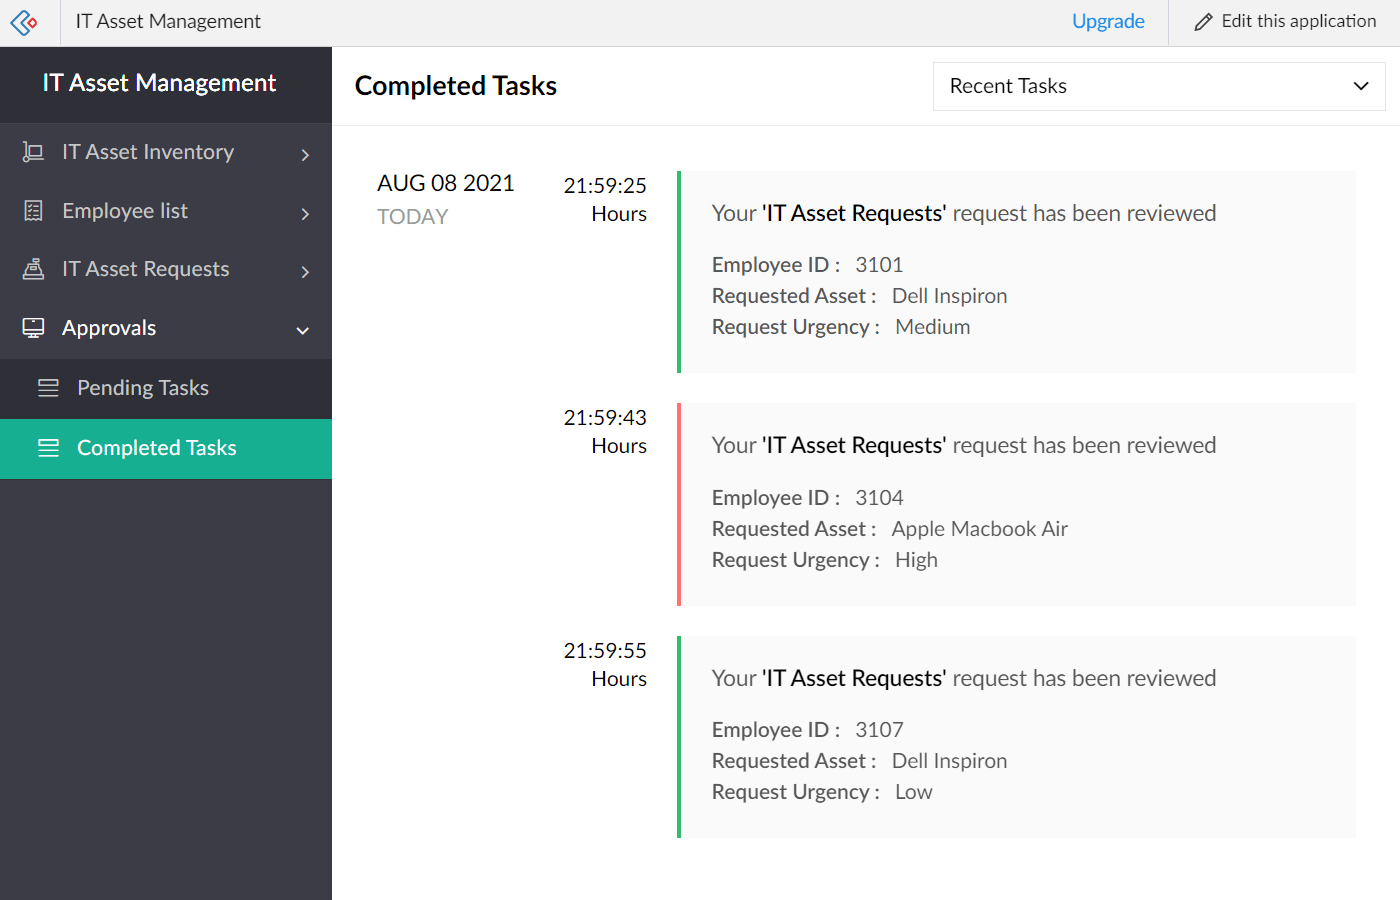
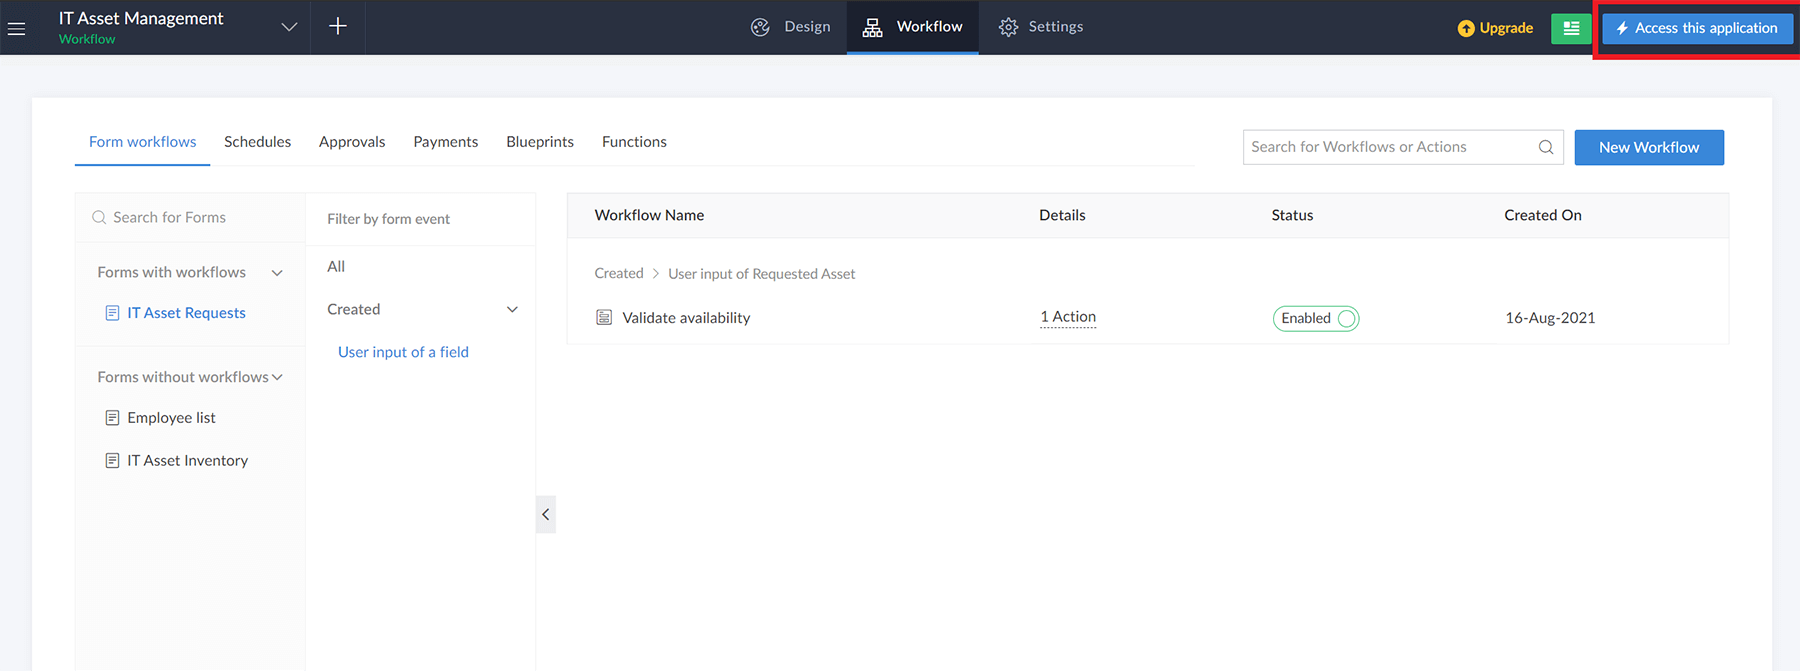
- Click Access the application in the top-right corner. Navigate to the IT Asset Request tab and fill out the form by selecting any ID. Since you are an approver, an 'Approval center' will automatically be created for you in the left pane.
- This center gives you a quick view of your past and pending approvals. Go ahead and approve or reject the test records you created. See how the status reflects in the IT Asset Request report that is automatically generated based on the form entity.


Streamline processes
In this section, we will configure a simple workflow that validates a field input based on values in another form. For example, every time a user selects a certain asset in the IT Asset Request form, this workflow validates the count in the IT Asset inventory form and alerts the user if the asset is unavailable.
We will also try mapping a business process flow that will trigger every time a new IT asset request is approved by the manager. We'll see how we can extend access of approved asset requests to relevant stakeholders from your IT asset management team (ITAM), IT service management team (ITSM), and admin teams for necessary action at each stage. Therefore the stages of your process would be:
| Step | Stage | Stage Description | Owner |
| 1 | Asset request accepted | Denotes acceptance of new request by ITAM | ITAM |
| 2 | Asset assigned | Denotes assignment of new asset | ITAM |
| 3 | OS installed | Denotes successful installment of OS by ITSM | ITSM |
| 4 | Asset ready for pick-up | Denotes completion of all the above stages | Admin |
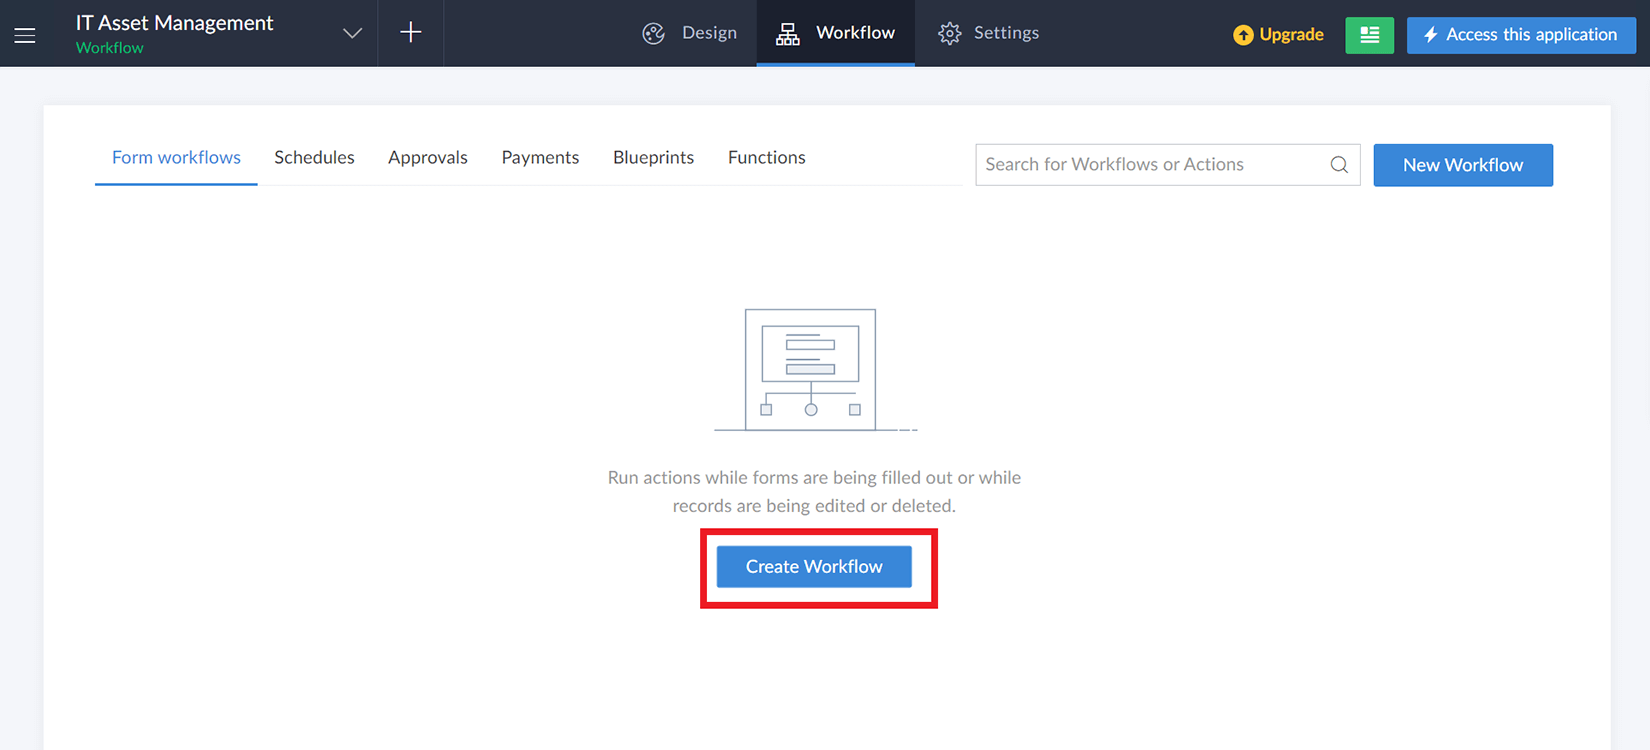
- Navigate to Workflows --> Form workflows and click Create workflow. Form workflows are triggered upon specific form events. These could be upon form load, when a user enters data against a specific field, or when editing or creating a form entry.
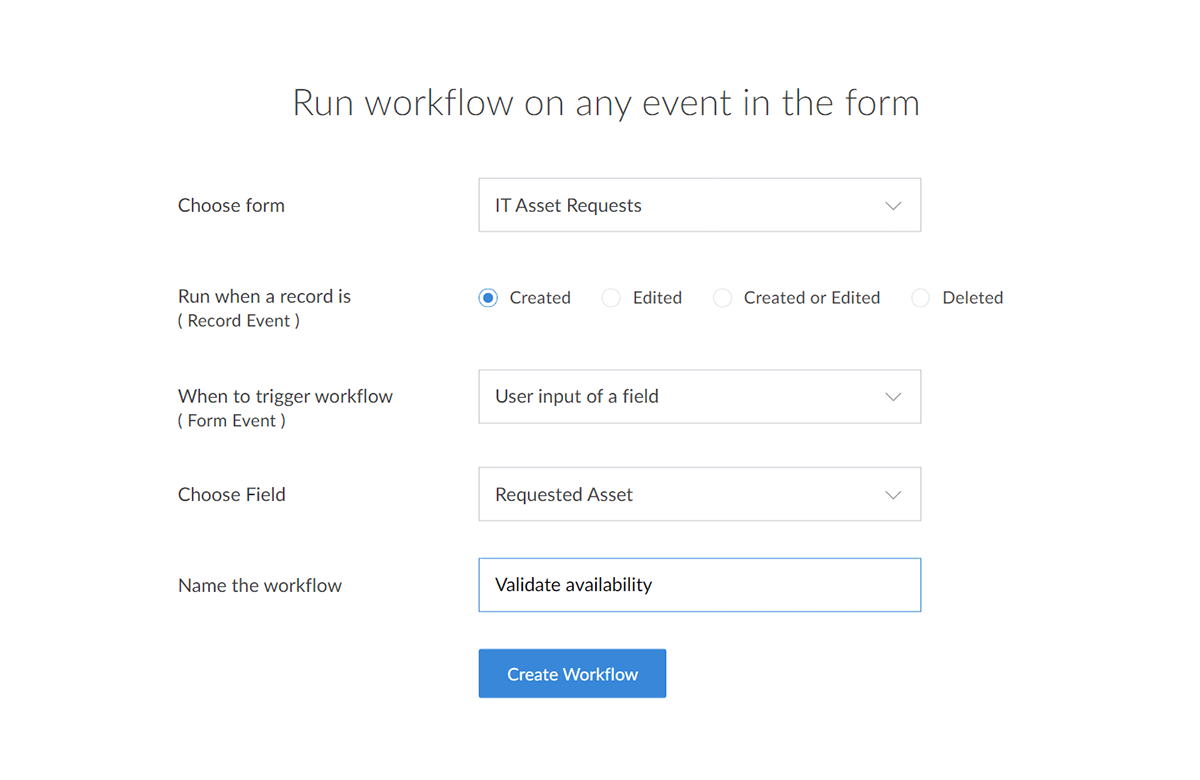
- We want a user to immediately get alerted the moment they select an asset that is not available. Configure the settings in the form workflow creation screen to the following:
- Choose form --> 'IT Asset Requests'
- Run when a record is --> Created
- When to trigger a flow --> User input of a field
- Choose field --> Requested asset
- Name the workflow --> "Validate availability"
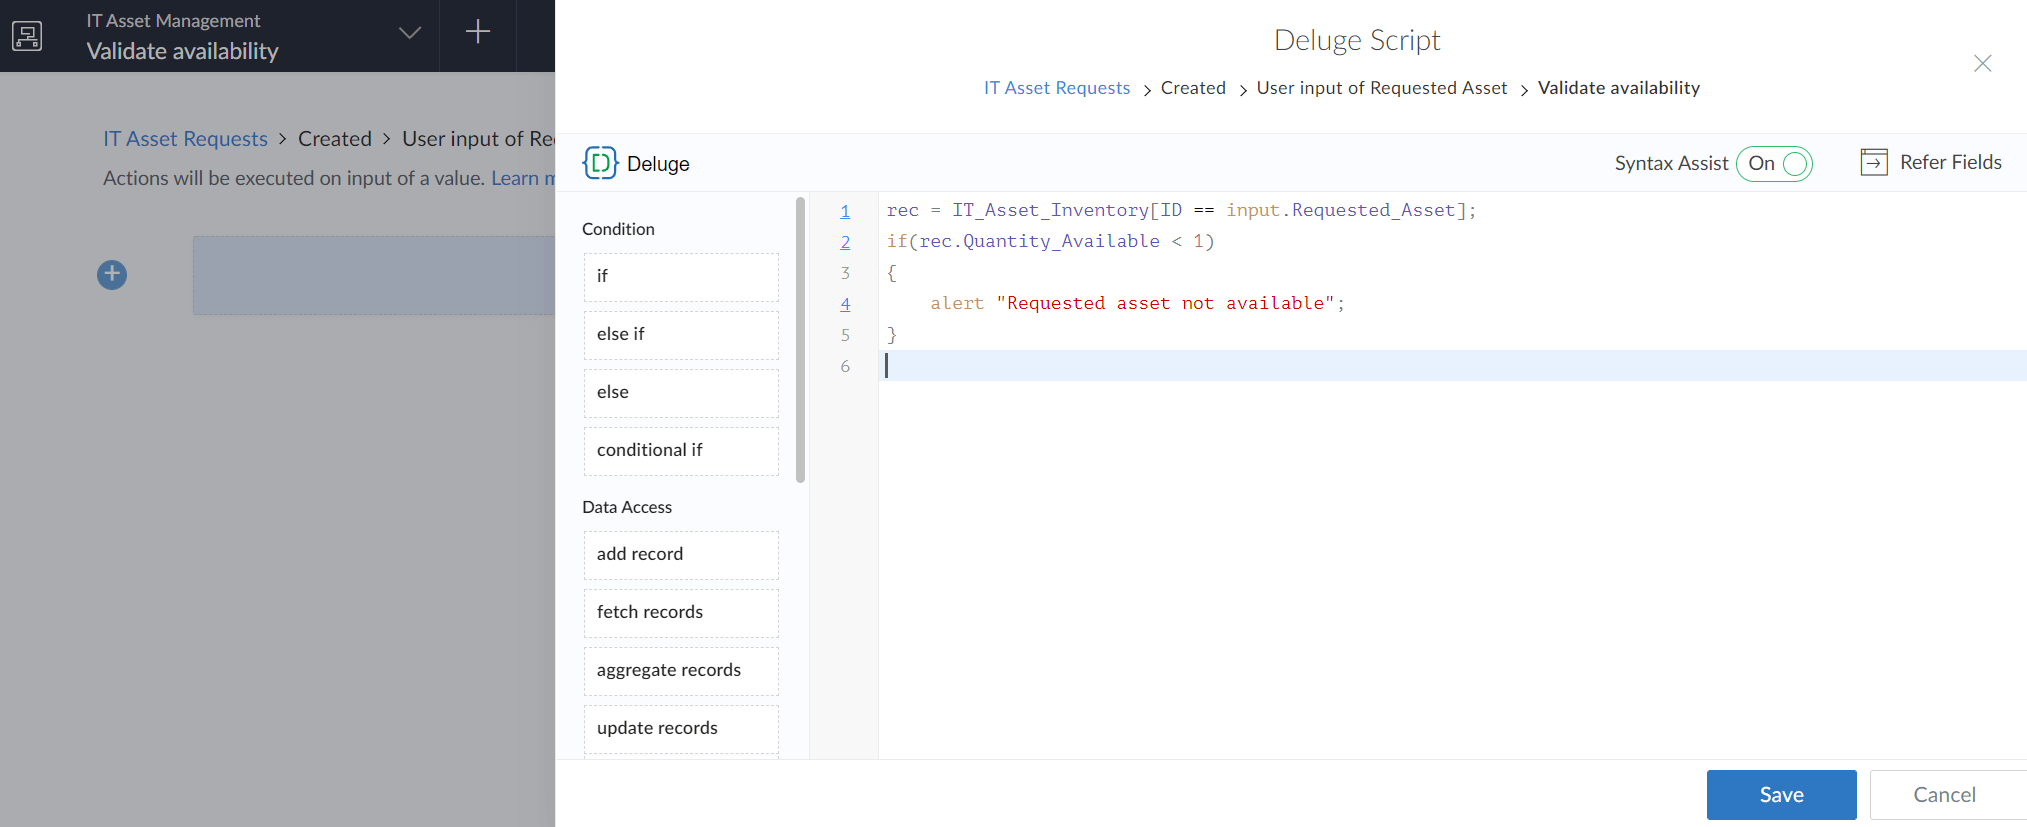
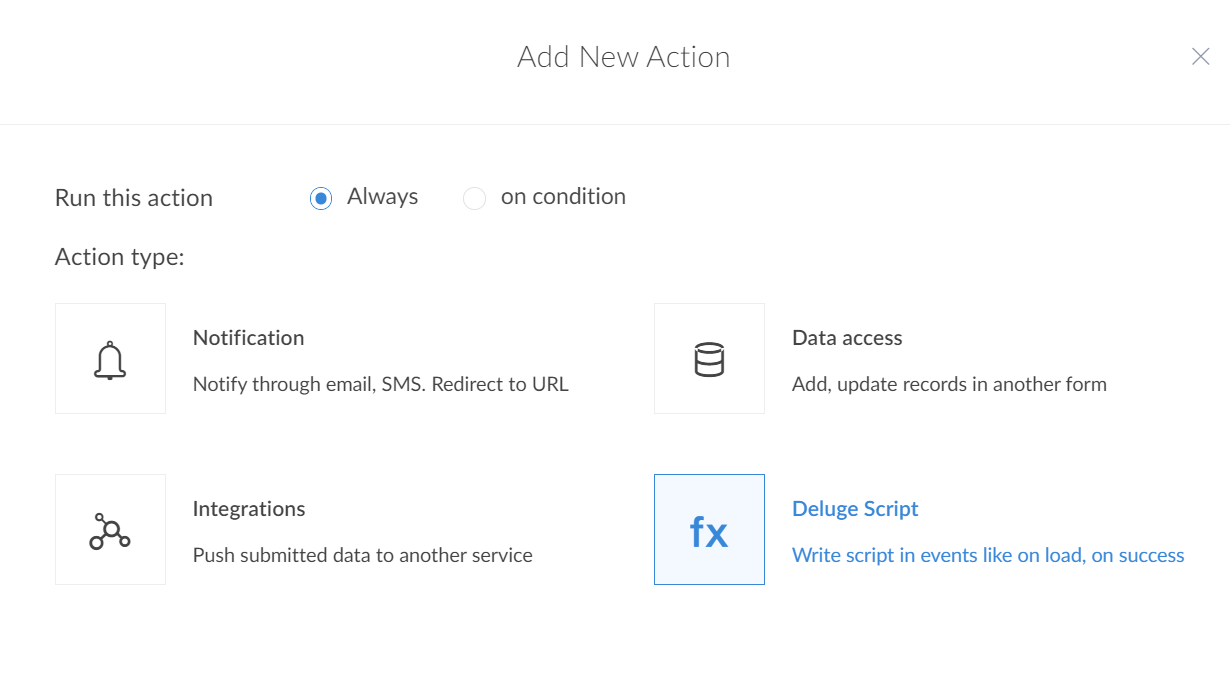
Click Add new action and copy and paste the below snippet in the function editor that opens. Click Save.
rec = IT_Asset_Inventory[ID == input.Requested_Asset];
if(rec.Quantity_Available < 1)
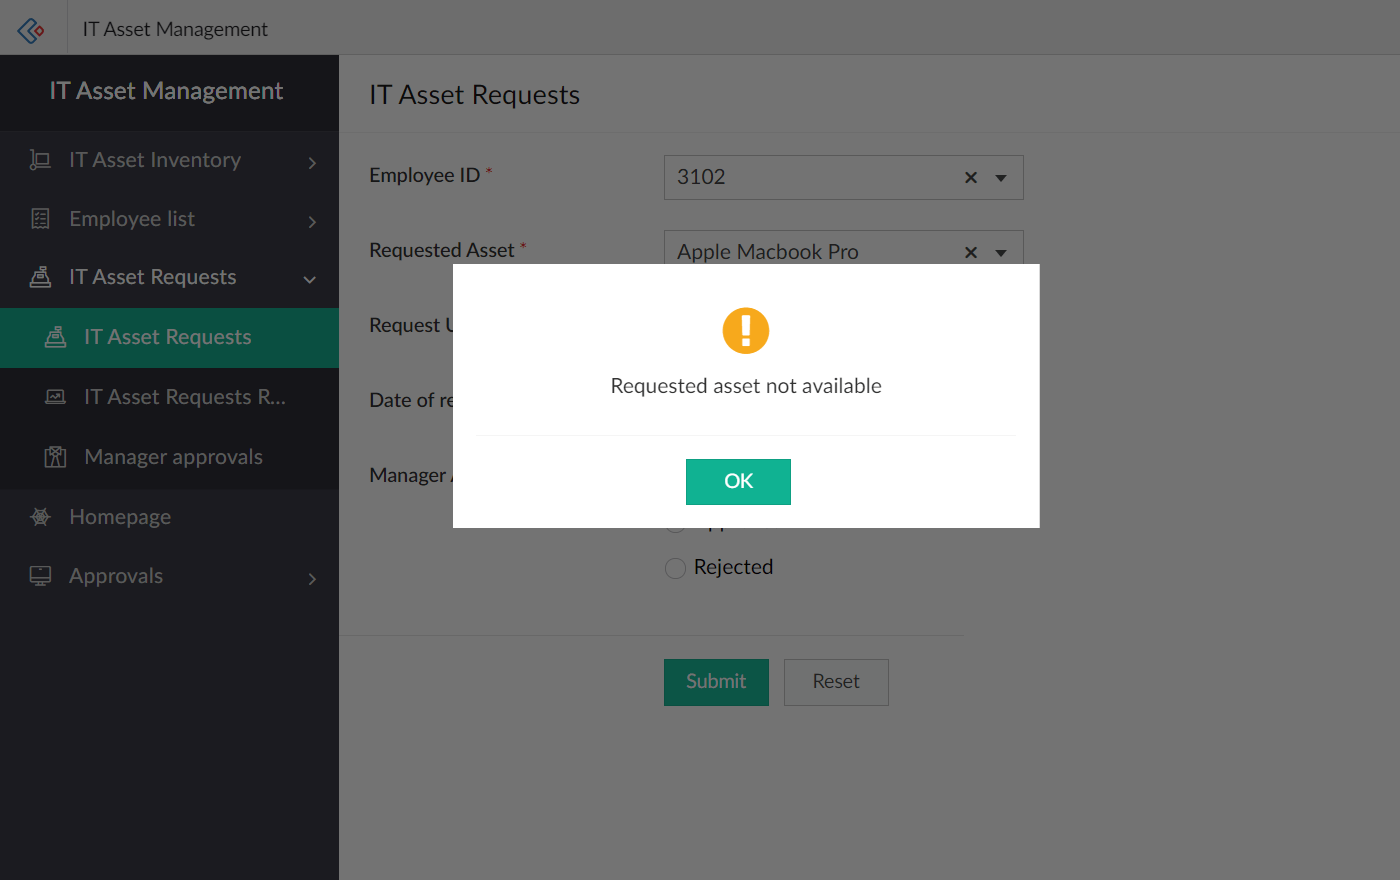
{ alert "Requested asset not available";
}
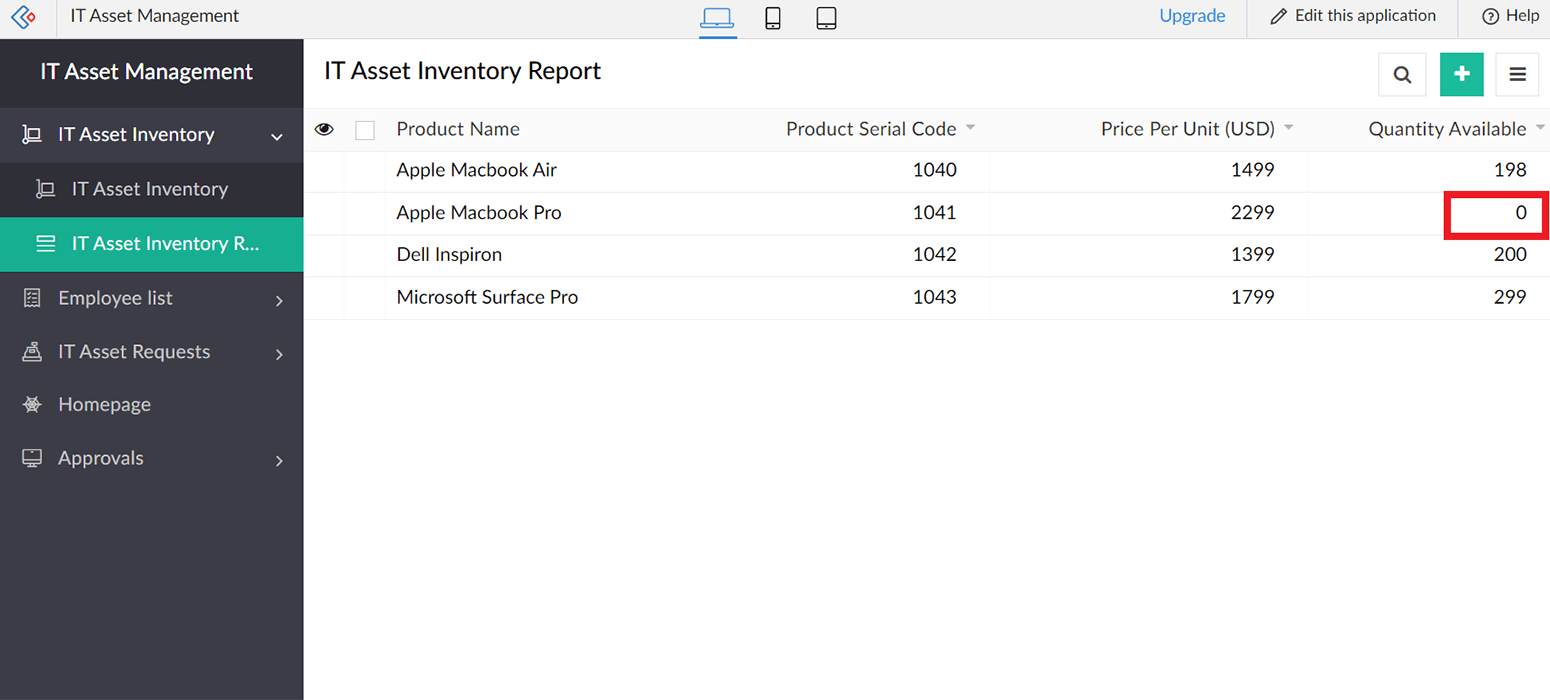
Try changing the available quantity of any of your assets to 0, then filling the IT Asset request form in the published version of the application by selecting that asset whose 'Quantity available' was set to 0.
As an optional exercise, you could also add a simple workflow that automatically updates the count of assets in your 'IT Asset Inventory' form, every time an asset request is accepted by your manager. Navigate to Workflows --> Approval workflows --> Manager approval. Add another action after the approval action. Select Execute on Always --> Deluge Script. Copy-paste the below code in the editor and click Save. Now try testing this on the published application.
rec = IT_Asset_Inventory[ID == input.Requested_Asset];
rec.Quantity_Available=rec.Quantity_Available - 1;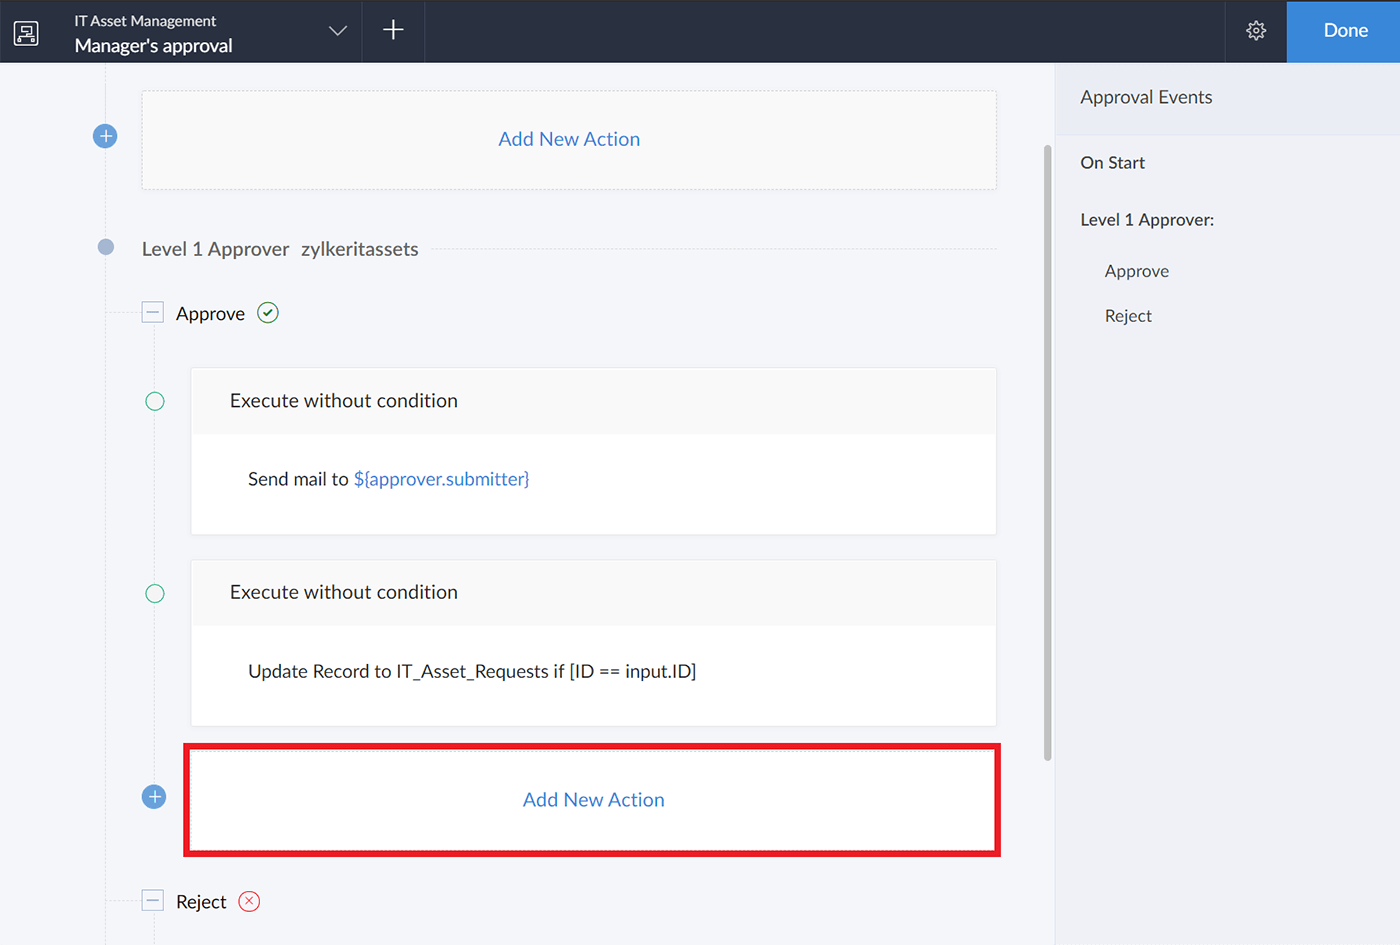

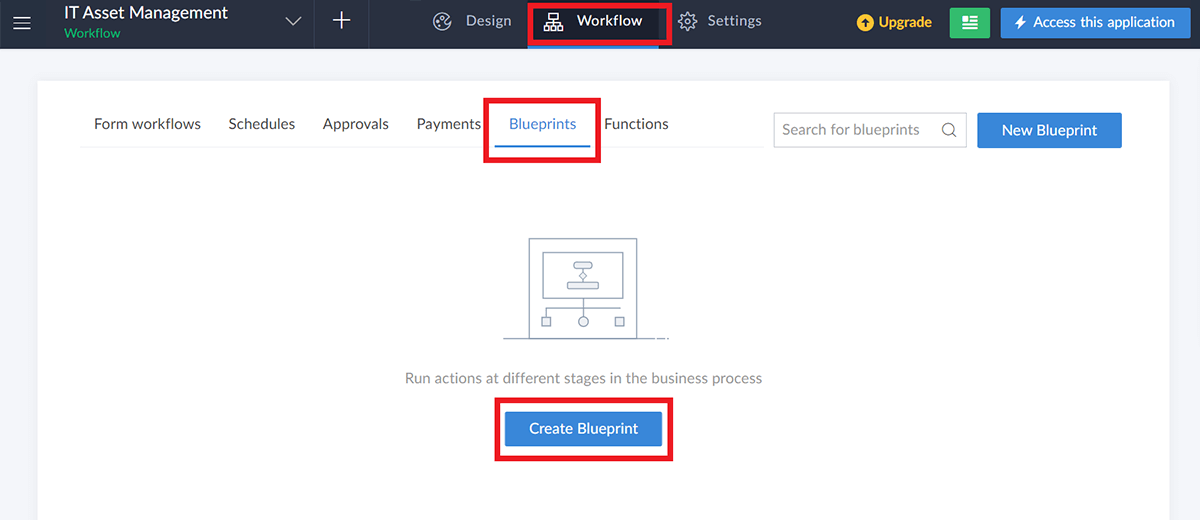
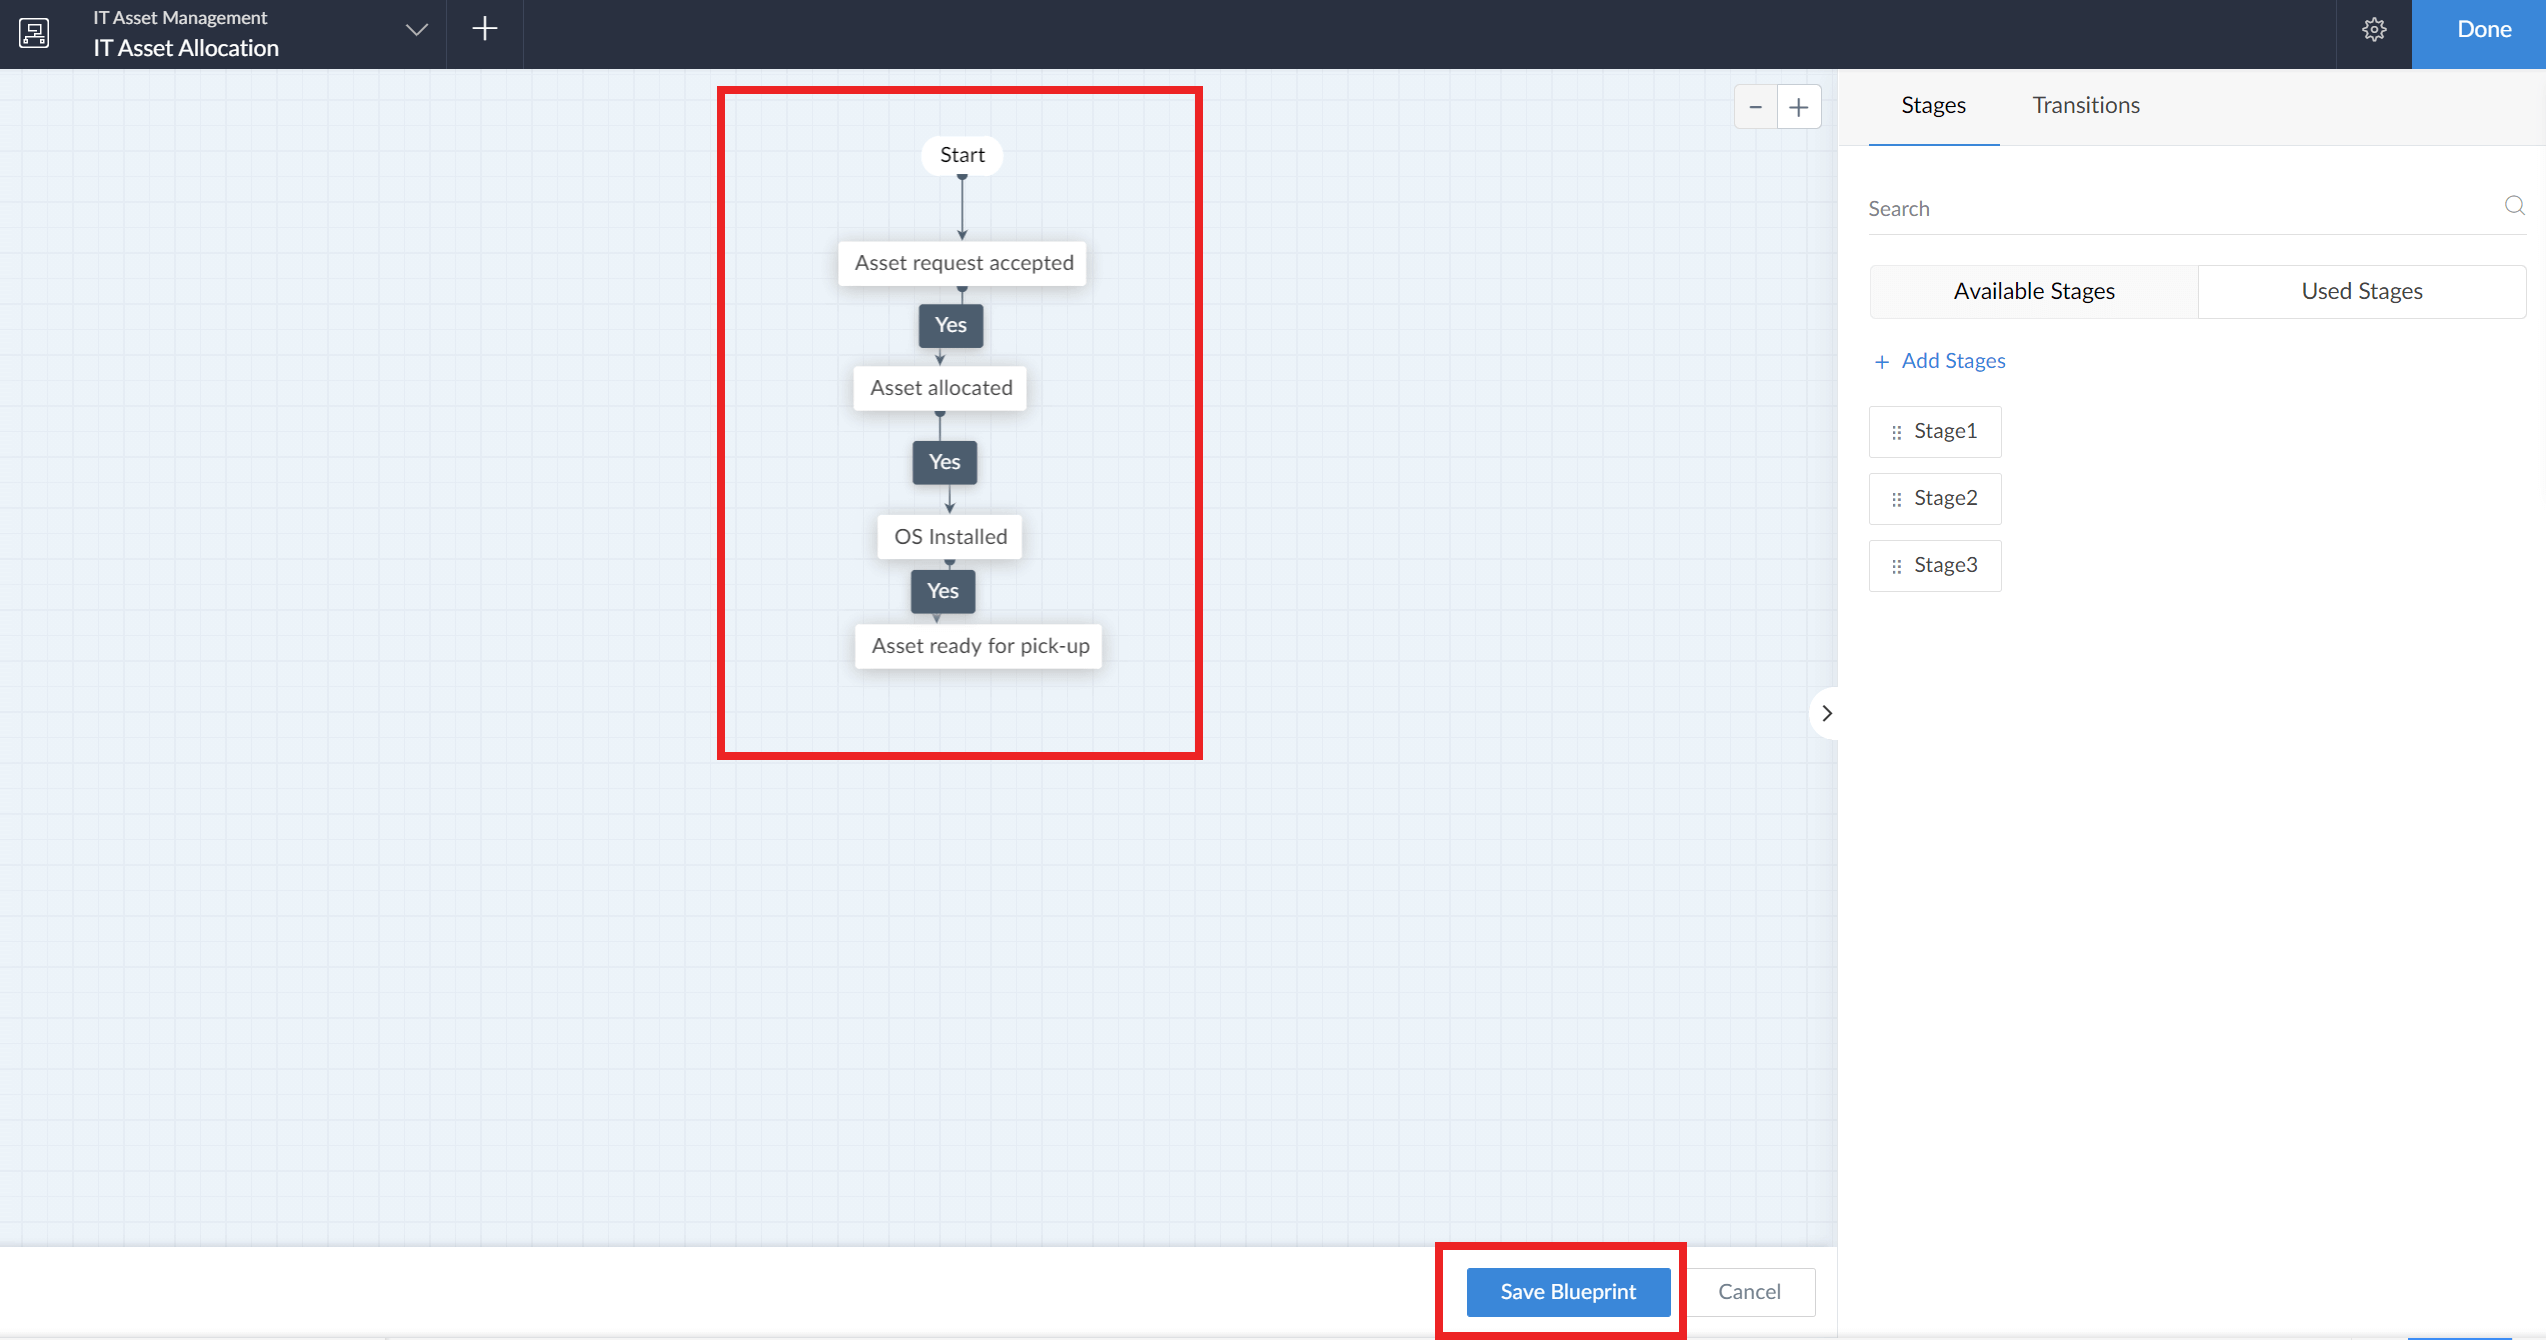
- Let's try mapping and automating the asset allocation process. Head to Workflows from the top center of your app builder interface. Navigate to Blueprints and select Create Blueprint.
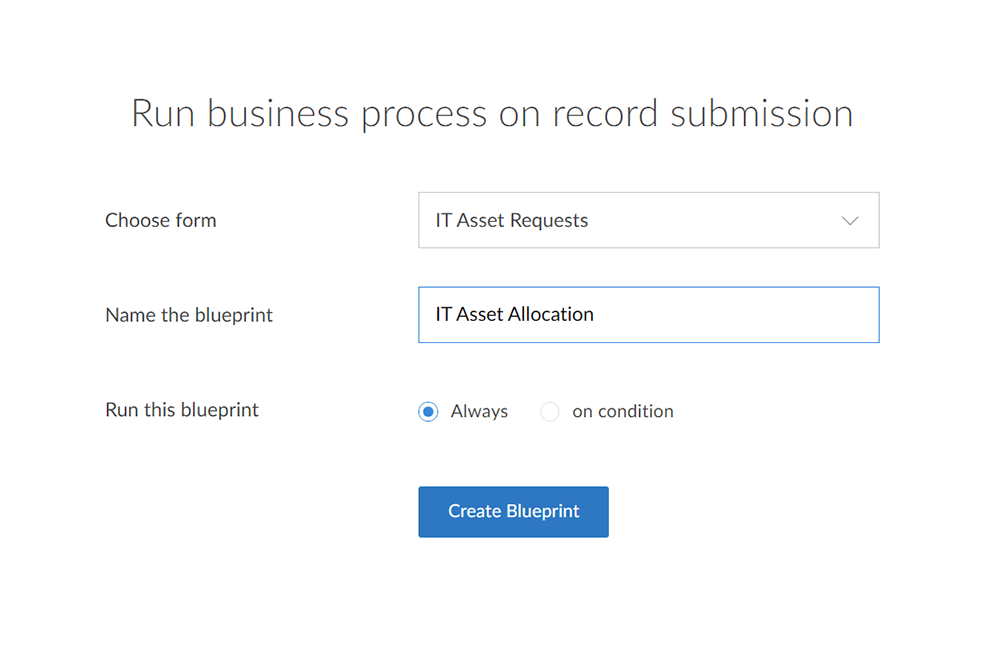
- Set 'Choose form' --> 'IT Asset Request', Name the Blueprint 'IT Asset Allocation'. 'Run this blueprint' --> 'Always'.
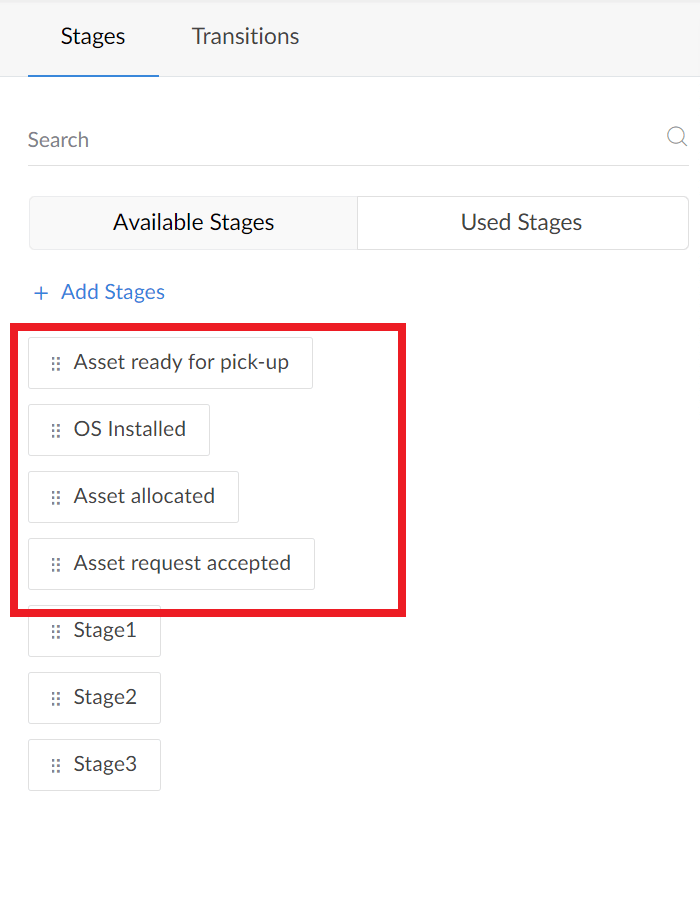
- Click Add stages --> Stage Name == "Asset request accepted". Click Add. Repeat this step to add the other stages: "Asset allocated", "OS installed", "Asset ready for pick-up".
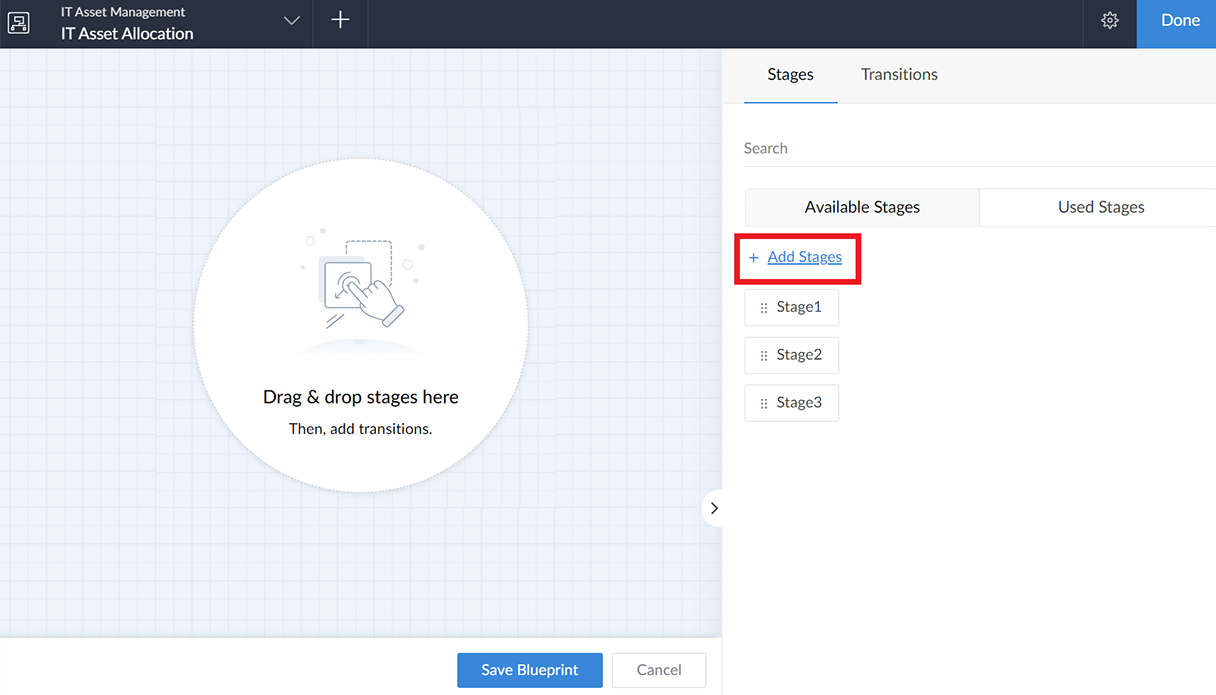
- Drag and drop the first stage, "Asset request accepted", to the builder. Similarly drag-and-drop the next stage "Asset allocated" as well. Now simply connect the two stages, as you would in an online flowchart builder, to configure the transition between the two stages.
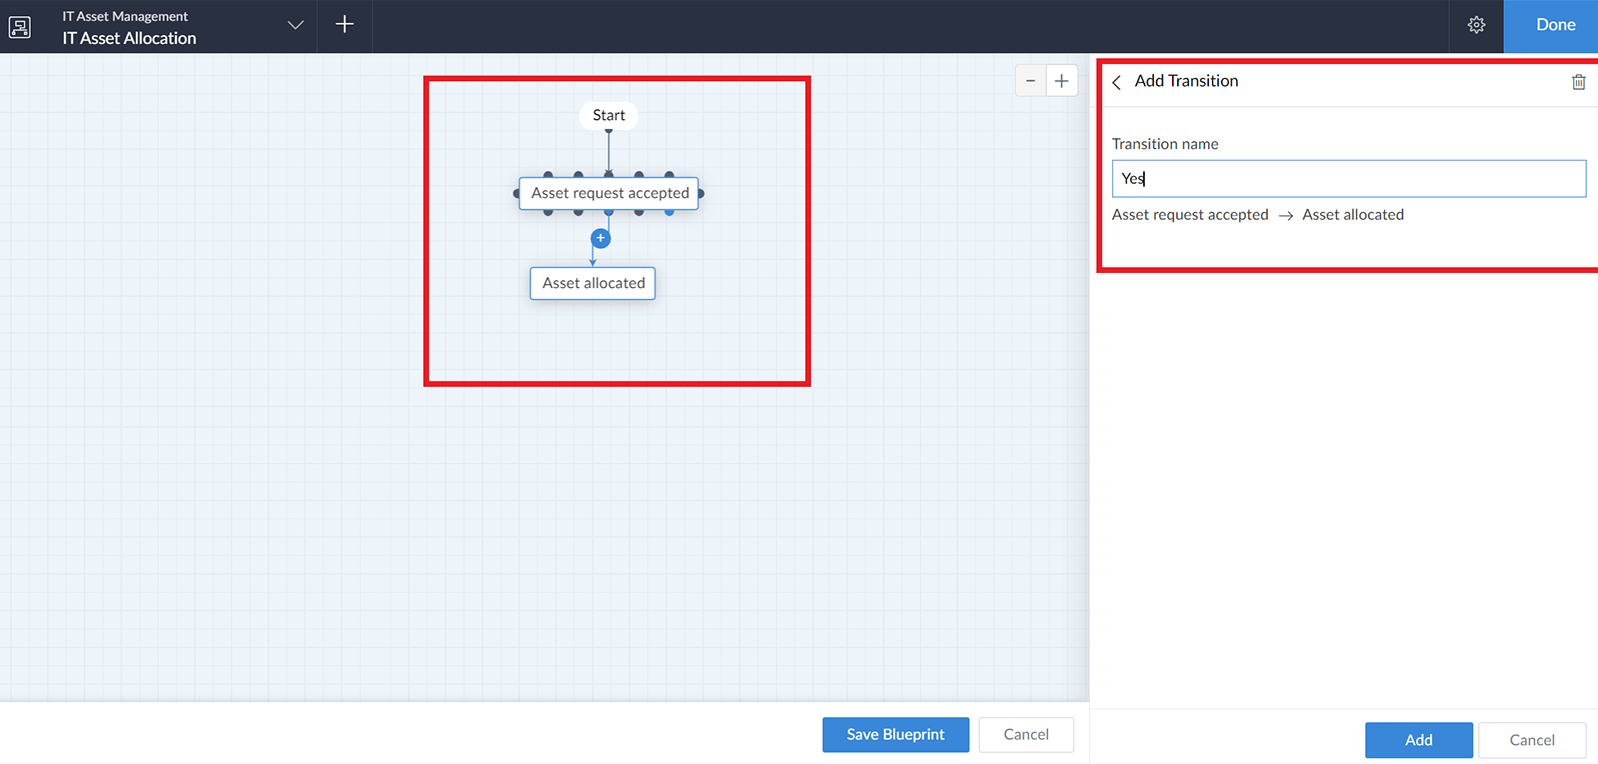
- Name this transition "Yes" and click Add. This opens the Transition Setup slider to your right. Navigate to Criteria --> Add Criteria, under the 'Before state' of the transition. Set Manager Approval Status equals "Approved" here.


Next let's try adding a transition owner, who is the only one who would be able to perform the transition at this stage, and move the request to the next. Select Transition owners --> Selected users --> Add owners. Add your email address or your Admin's address for now. You can test this by also using any other test email address of yours, by adding them as a User and then a transition owner here.
![]()
![]()
Click the back arrow in the top-left corner of the transition setup screen. Add the next stage: "OS installed". Add a transition between this and the previous stage, "Asset allocated". Name this transition "Yes". In the before state, click Criteria --> Add Criteria, 'Blueprint stage' equals 'Asset allocated'.
![]()
- Exit out and try adding the next set of stages to the Blueprint builder. Set the Before state --> Add Criteria --> 'Blueprint stage' equals the previous stage's name, as per our flow.
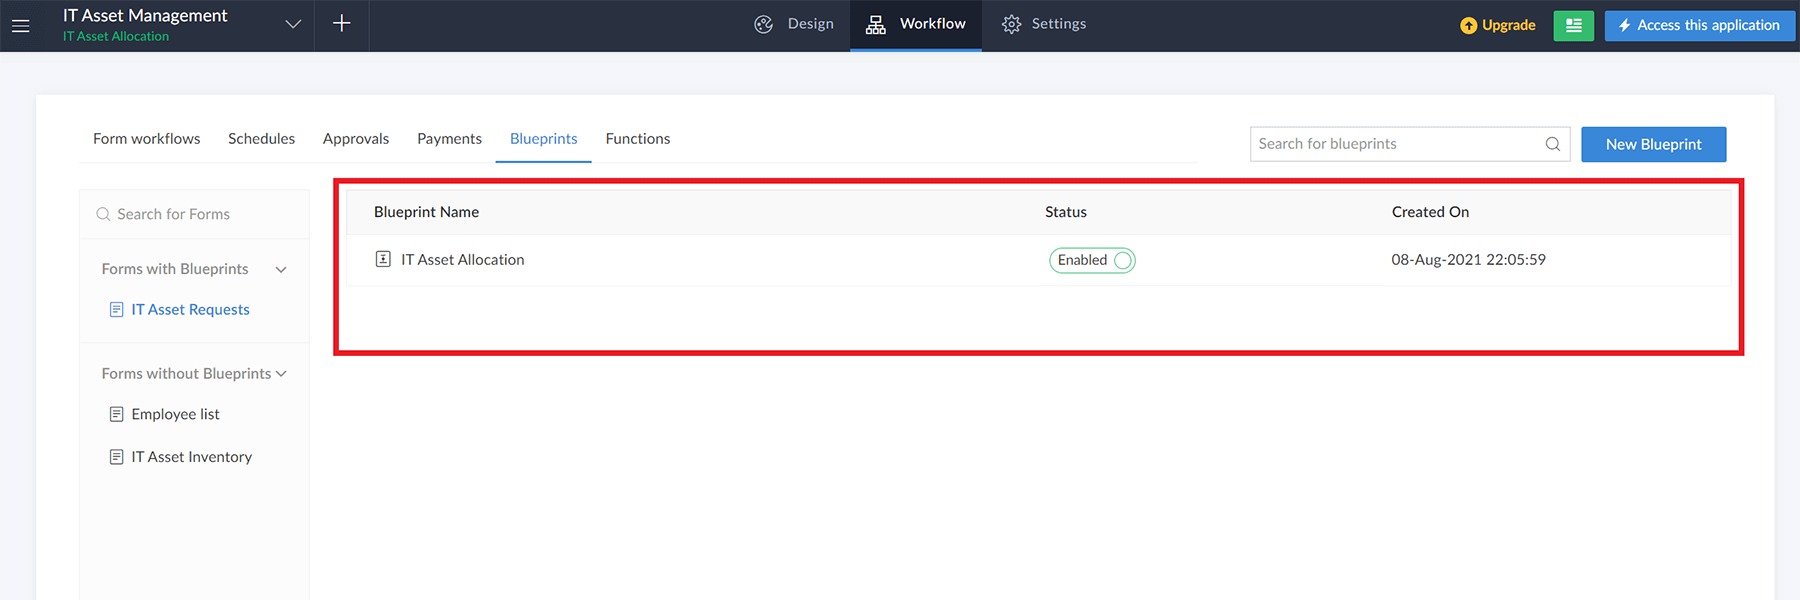
- Click Save the Blueprint, then click Done in the top-right corner. The status of the workflow will be enabled upon saving.
- Navigate to the published version of your application by clicking Access this application in the top-right corner.
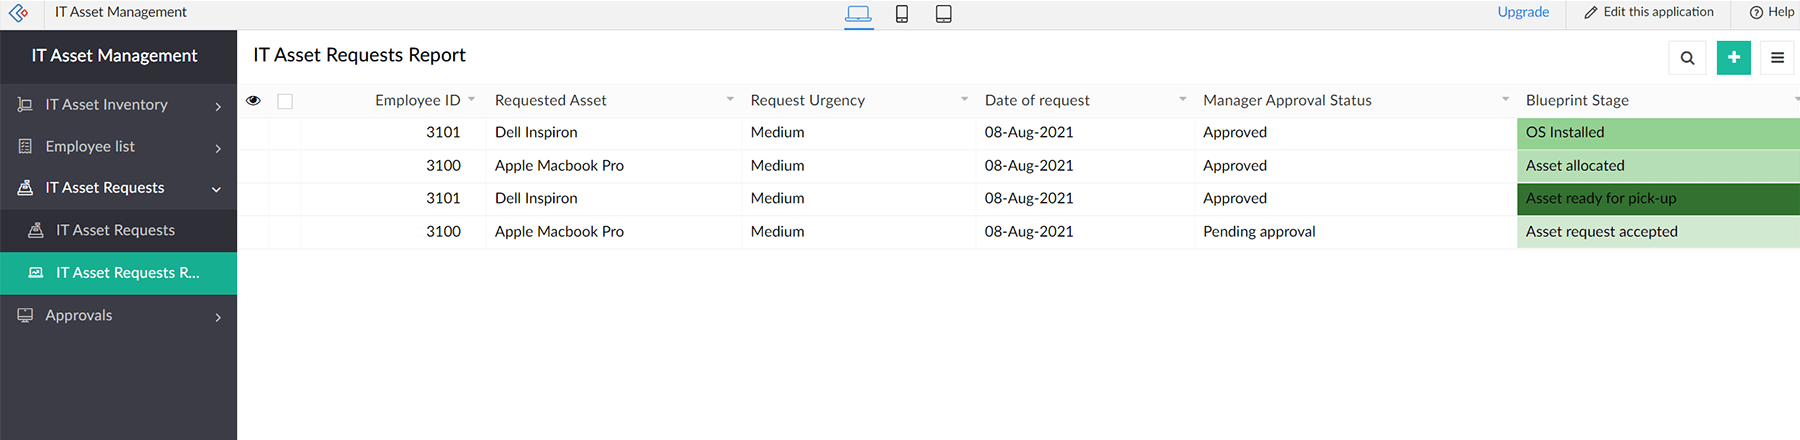
- Click IT Asset Request Report in the left pane. Click on any record that has been approved by the manager (Approved by you in the previous section).
- The Blueprint stage will appear in the header of the record, and the transition will appear as a button against each record. Because you have added yourself as the transition owner at each stage, try clicking Yes at each stage to see how the record transitions through each step you have defined in the Blueprint.
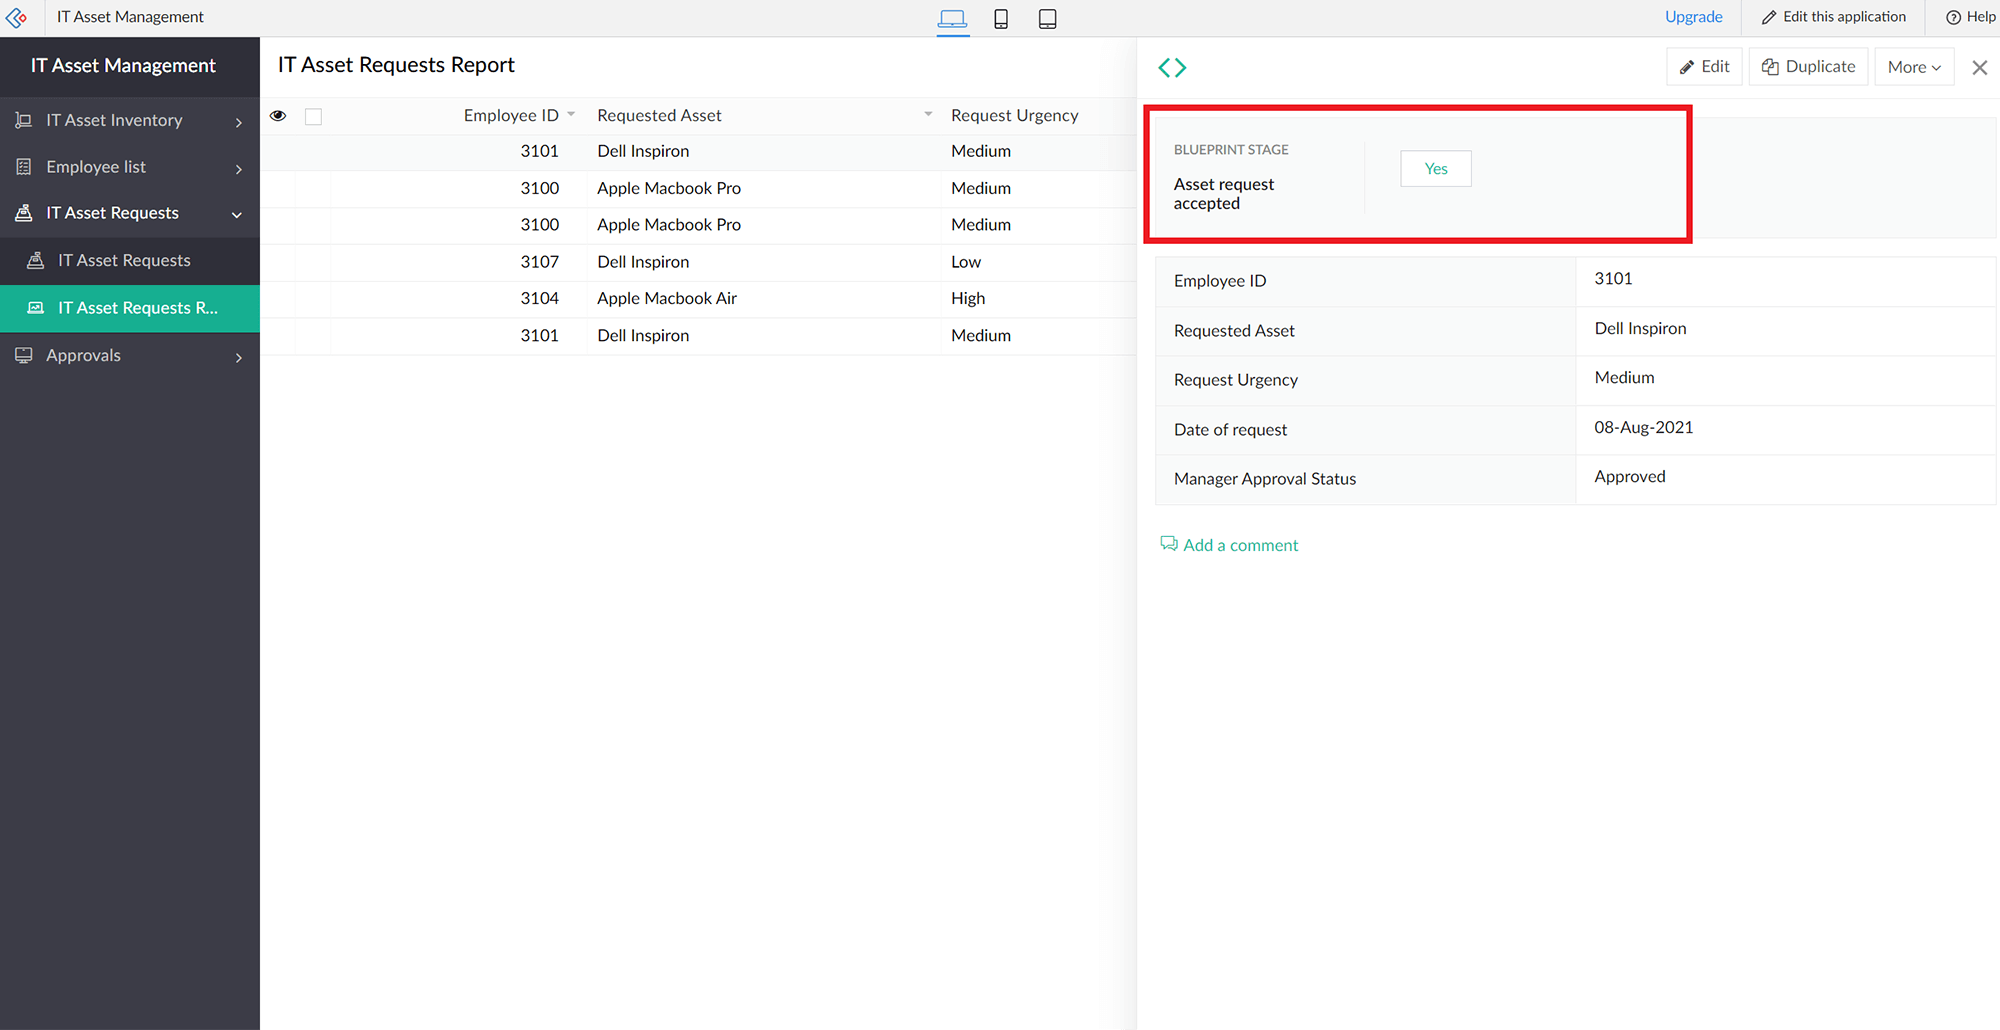
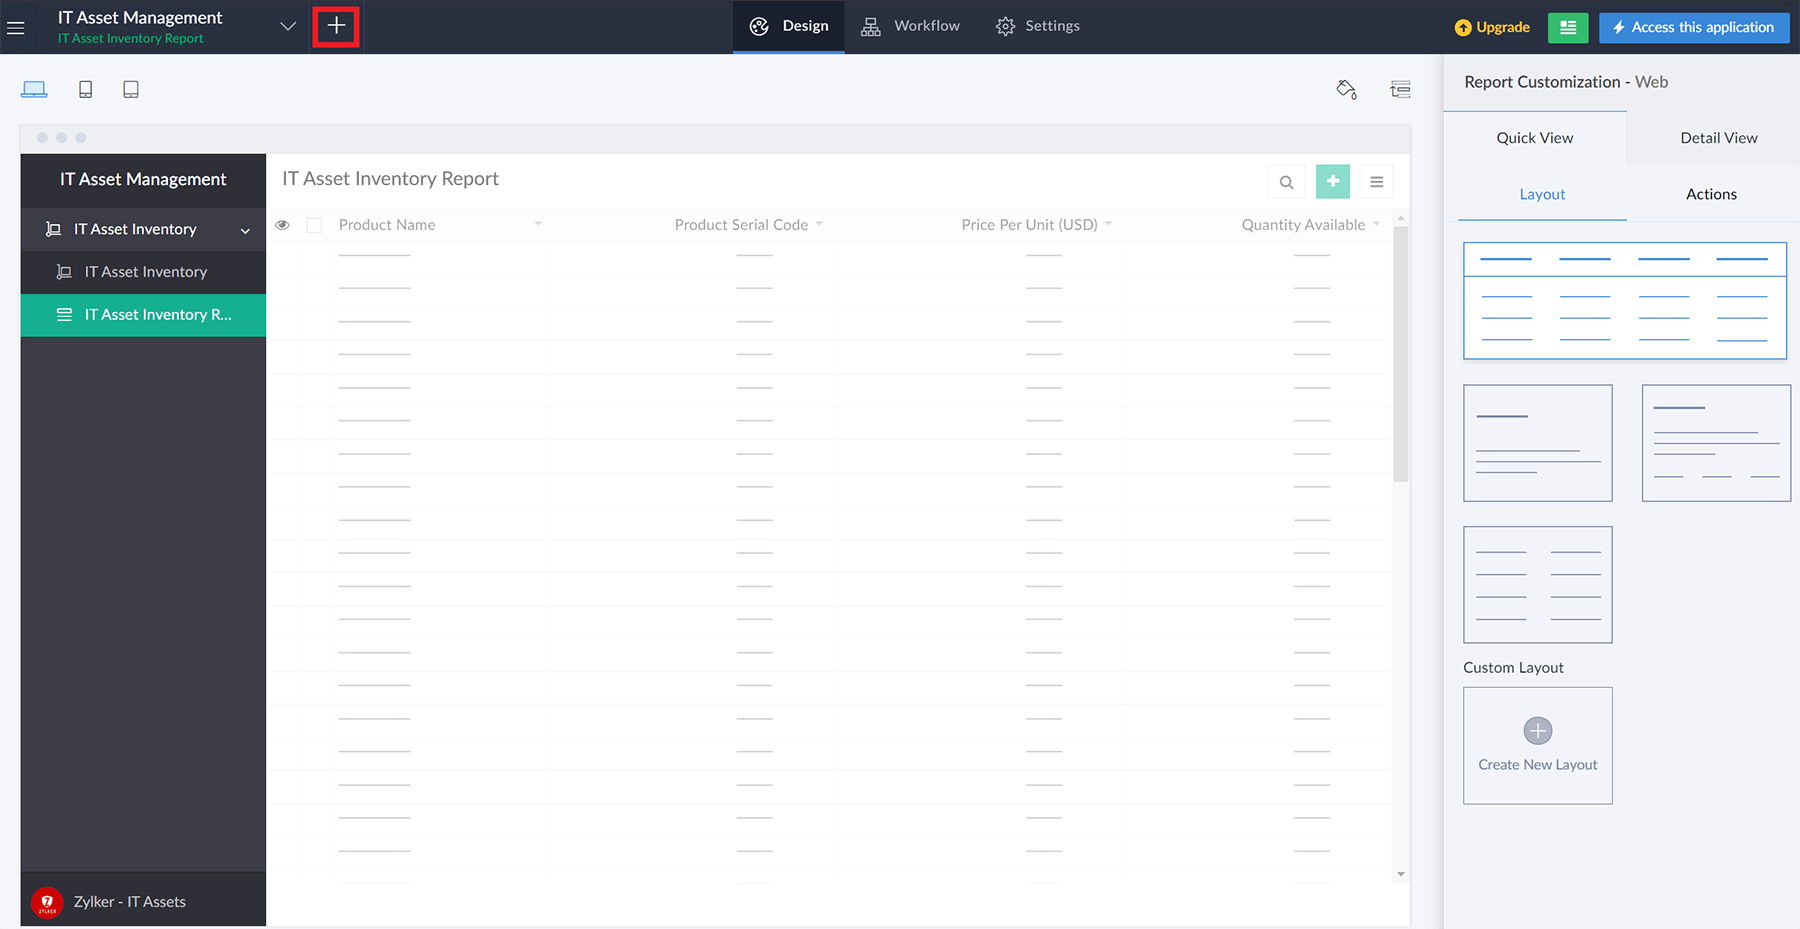
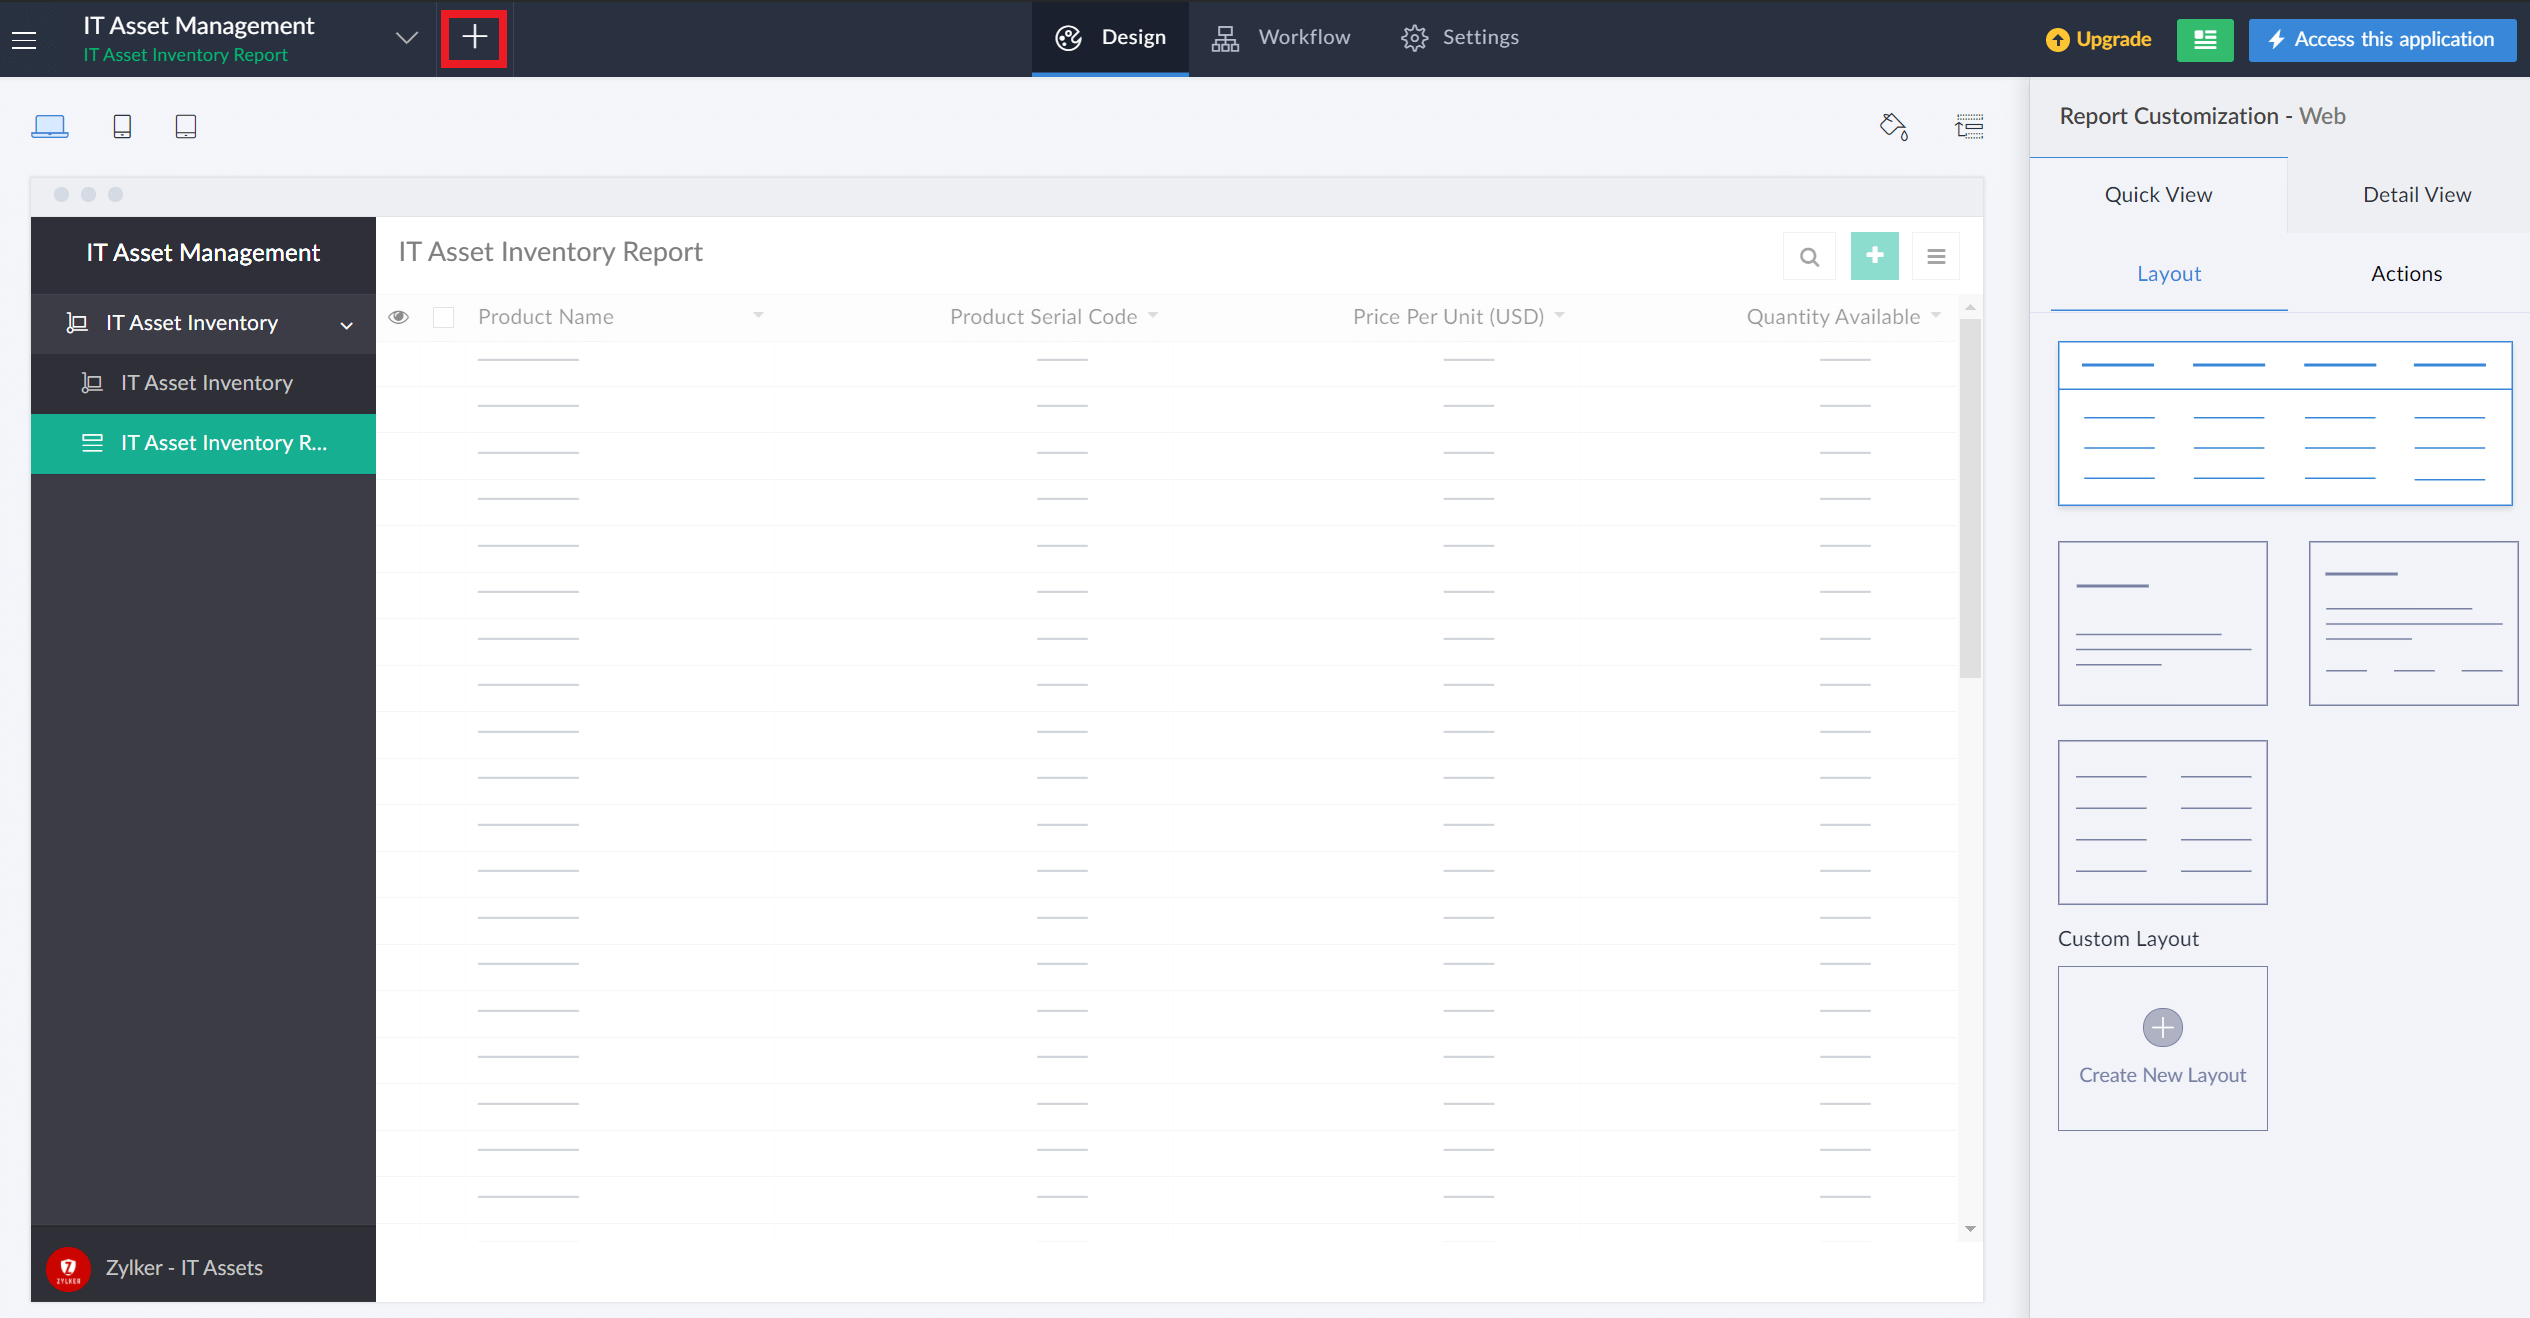
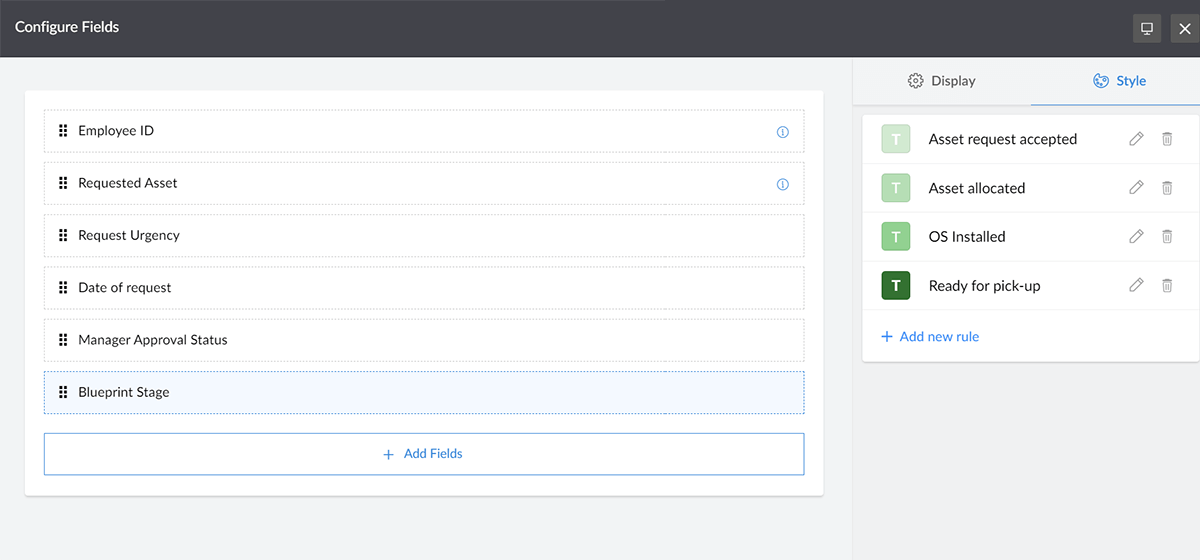
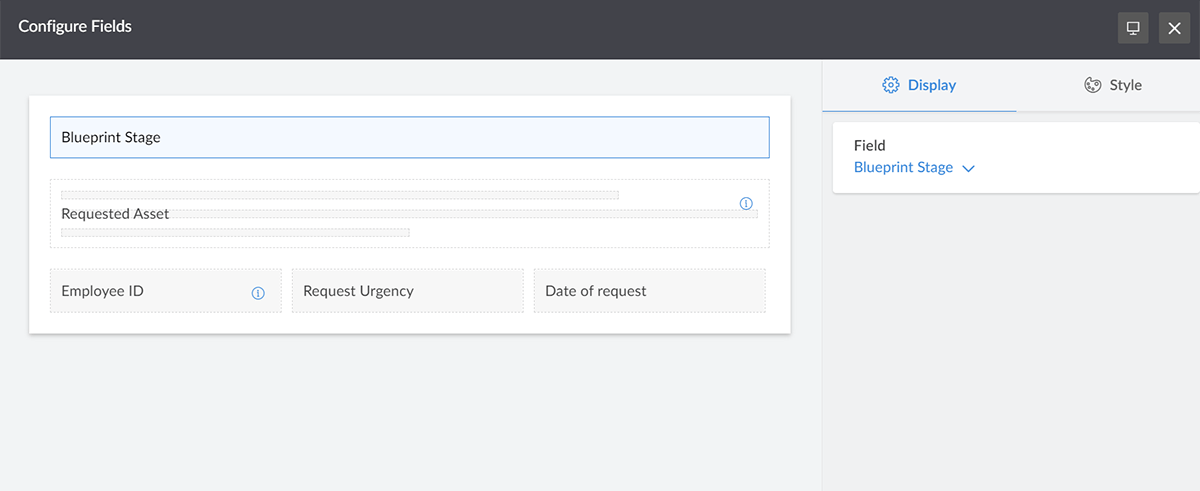
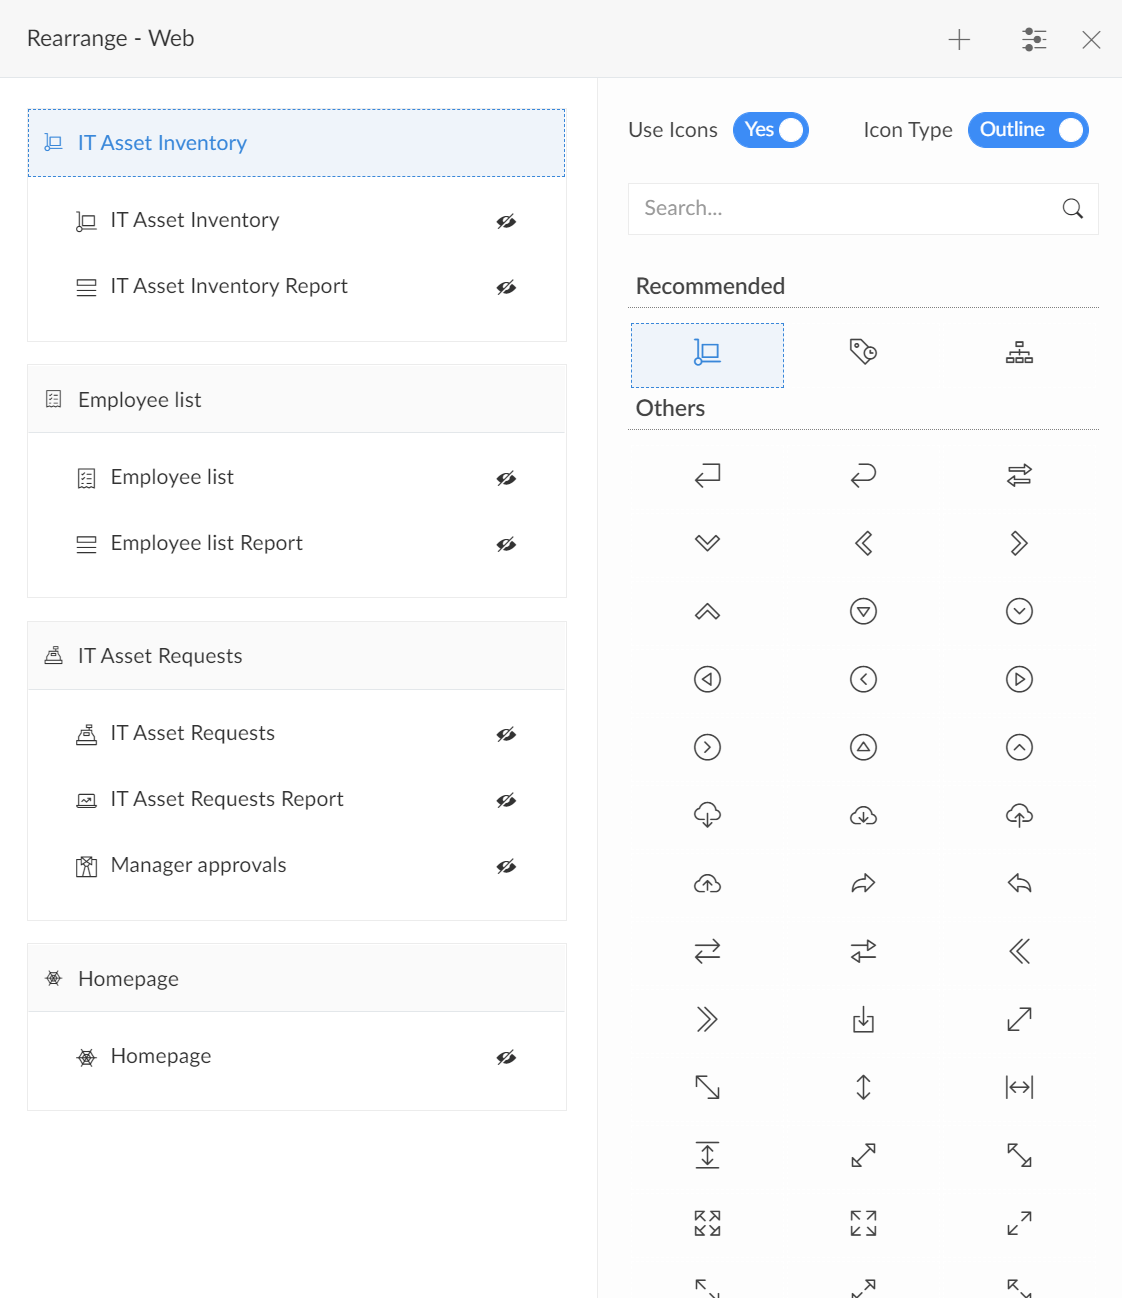
- You can quickly view the Blueprint stage against each record. You could also apply conditional formatting to visually highlight different blueprint stages in the record by clicking Edit application. Navigate to the IT Asset Requests Report tab in your designer. Click Configure Fields for Web.
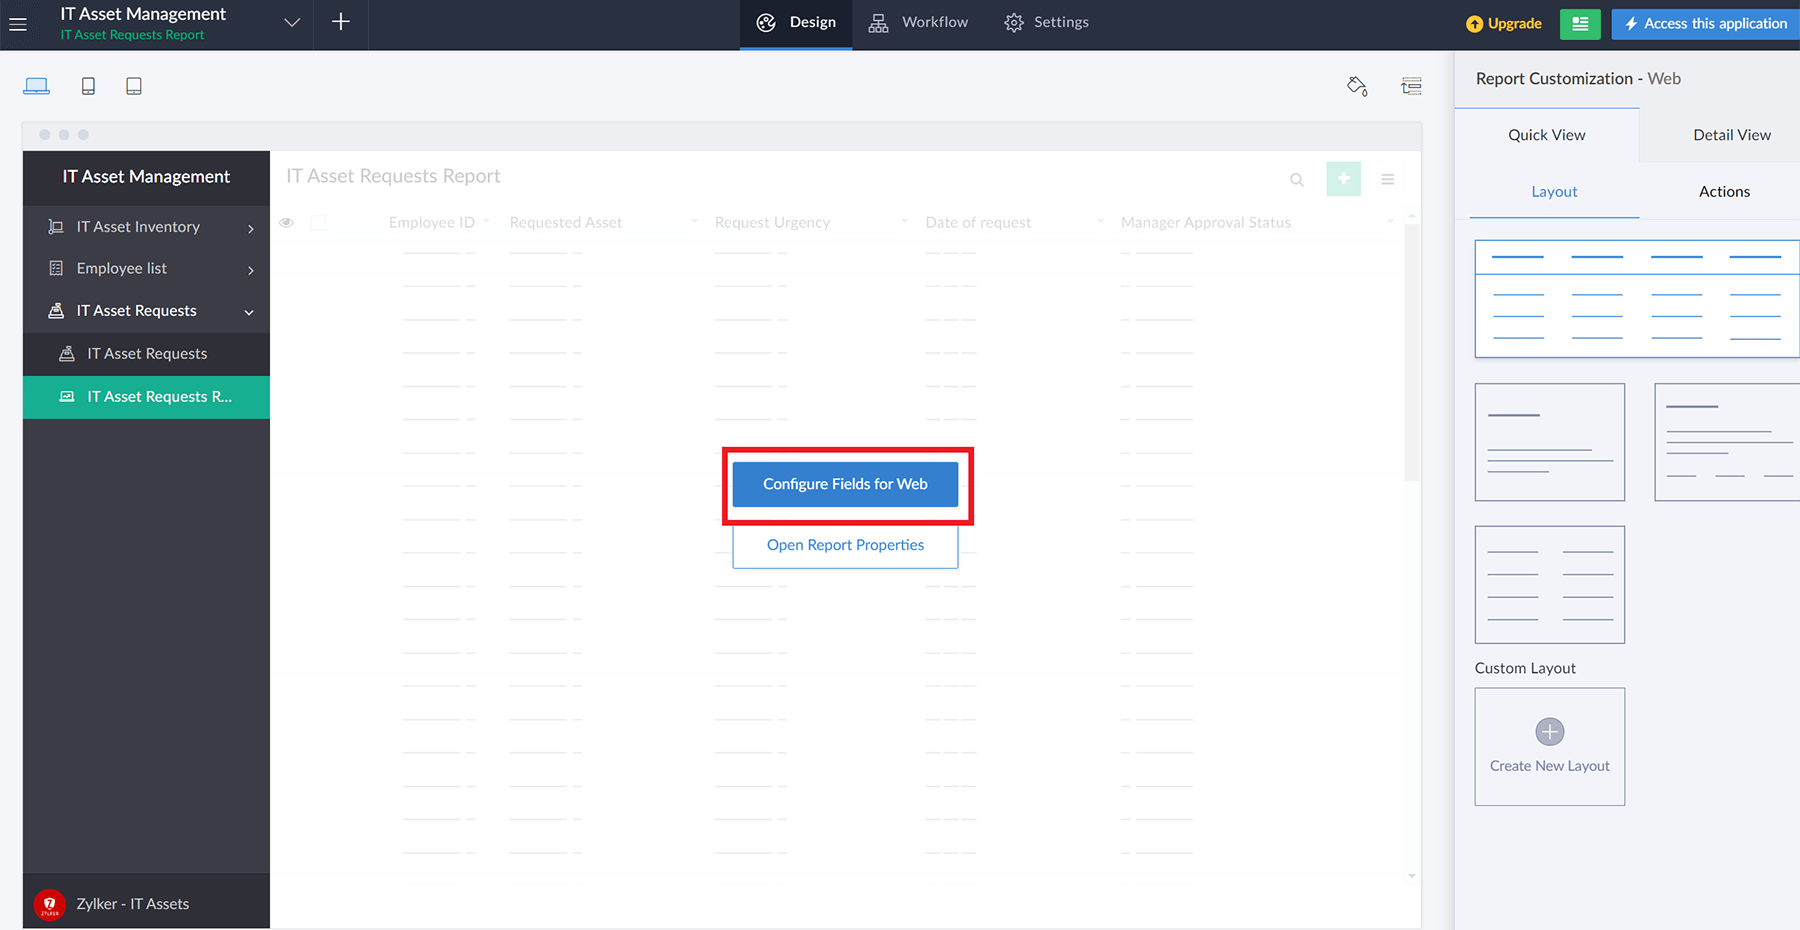
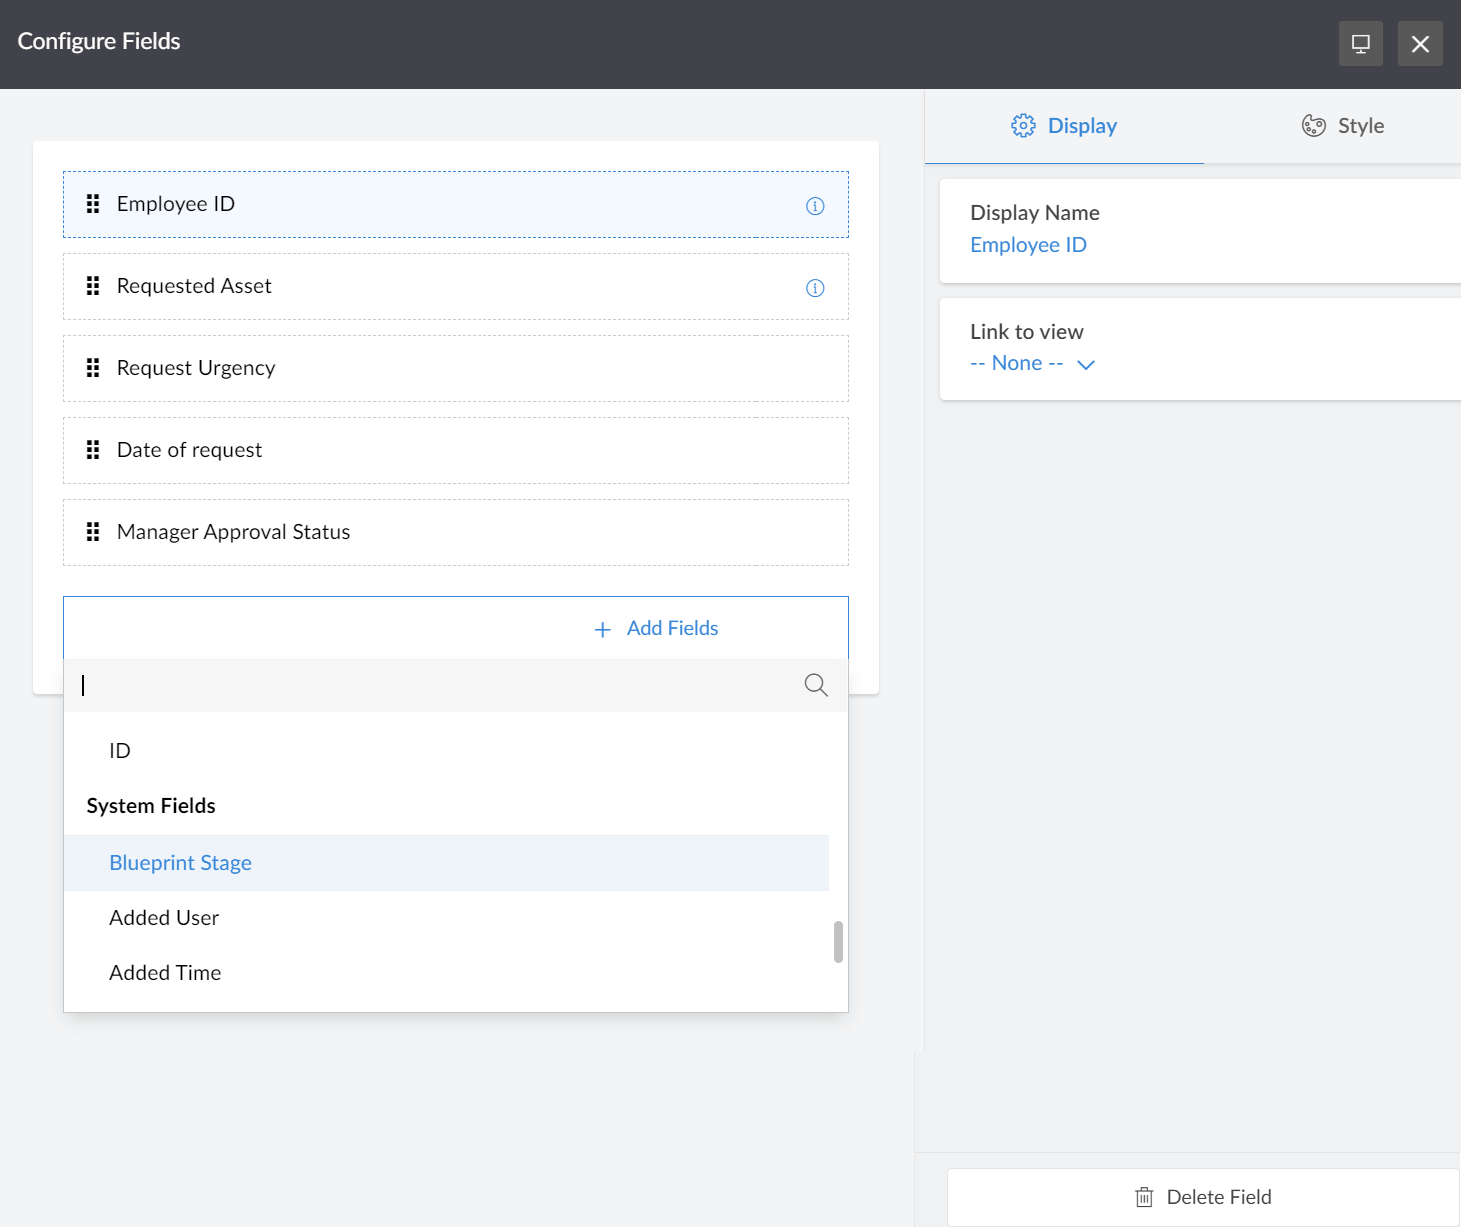
- Click Add fields --> Blueprint stage. Next click on the new 'Blueprint stage' field you have added to the report. Click Style --> Configure --> Custom.
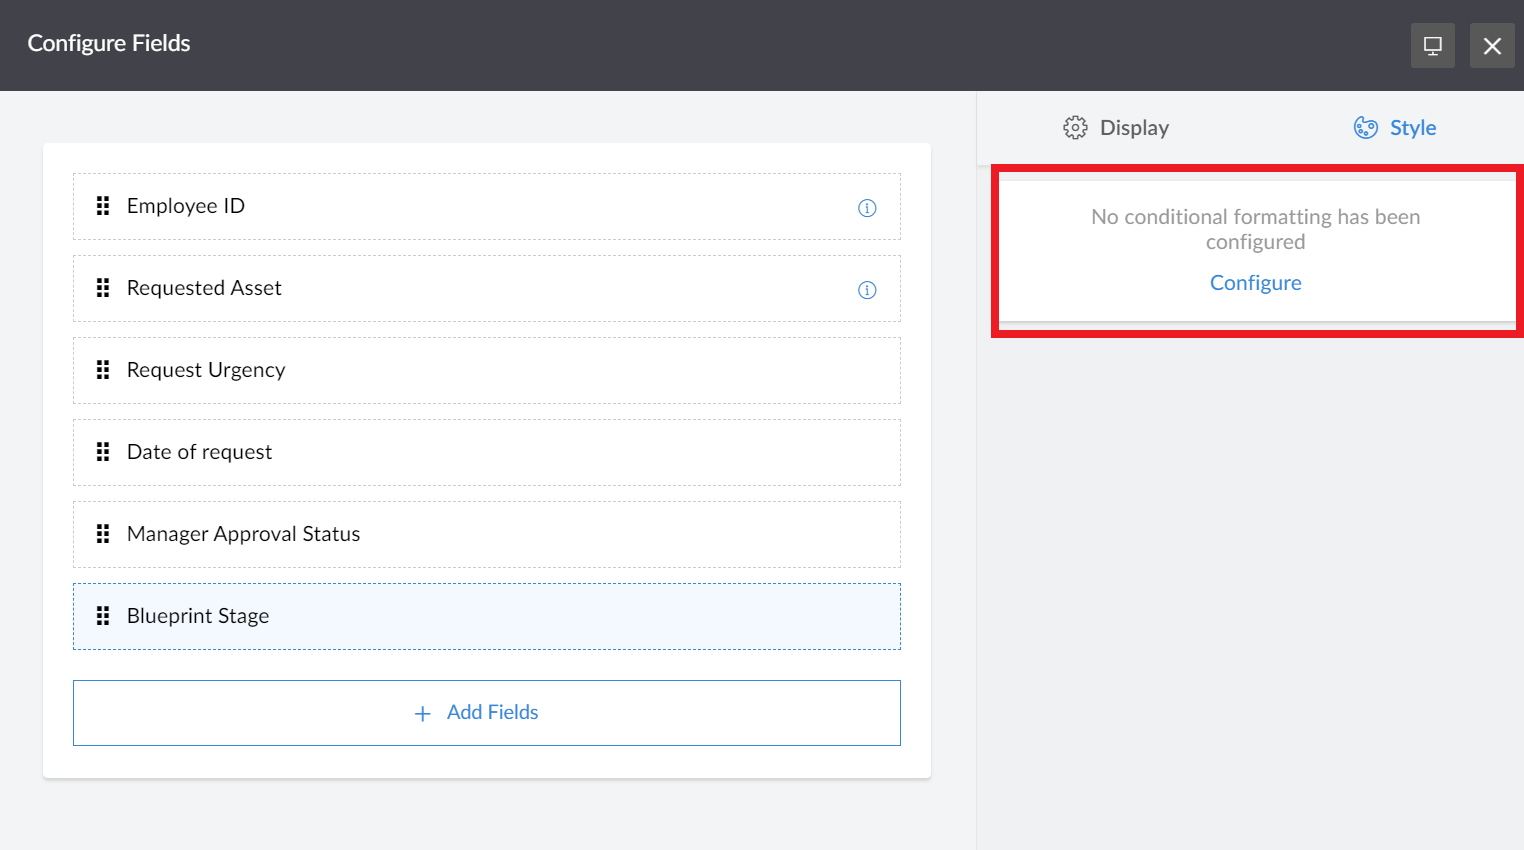
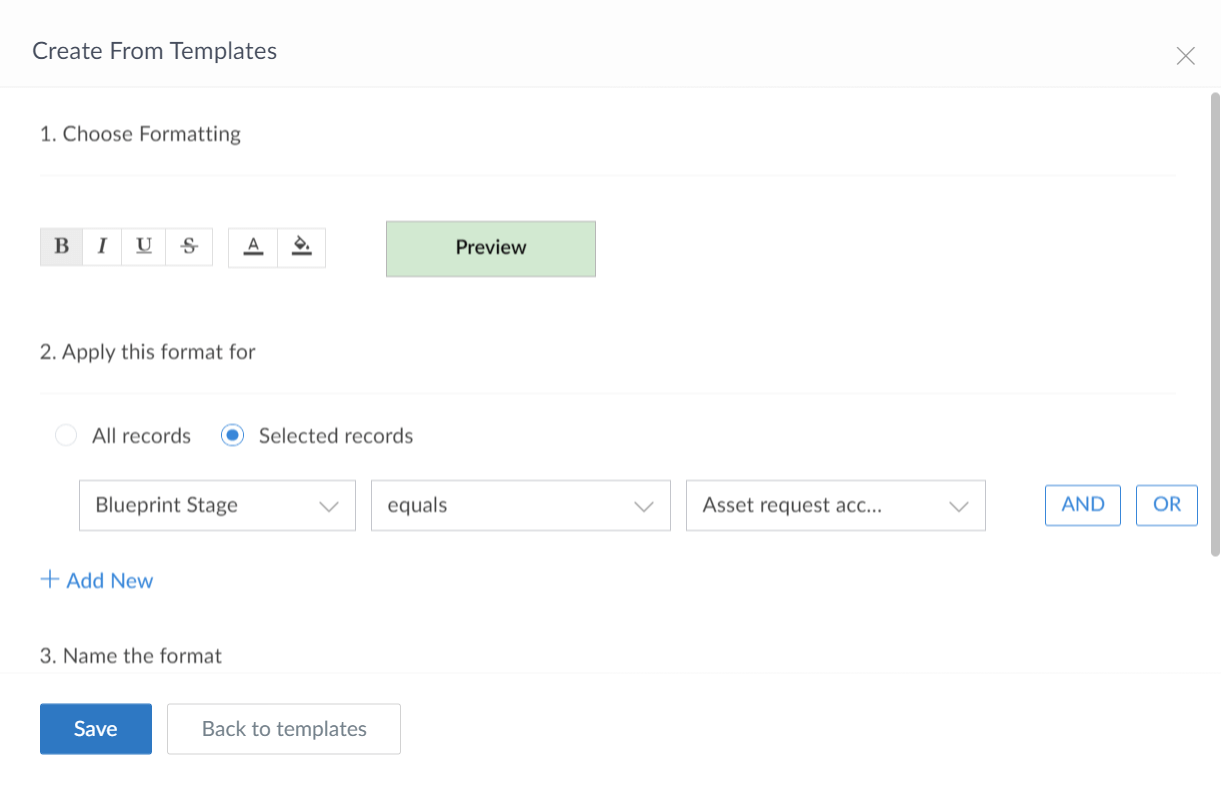
- Choose your formatting color, then set Apply this format for --> Selected records --> Blueprint stage equals "Asset request accepted". Name the format 'Asset request accepted' and click Save.
- All records in this stage will automatically reflect the conditional formatting. Repeat this for other stages.


Monitor performance
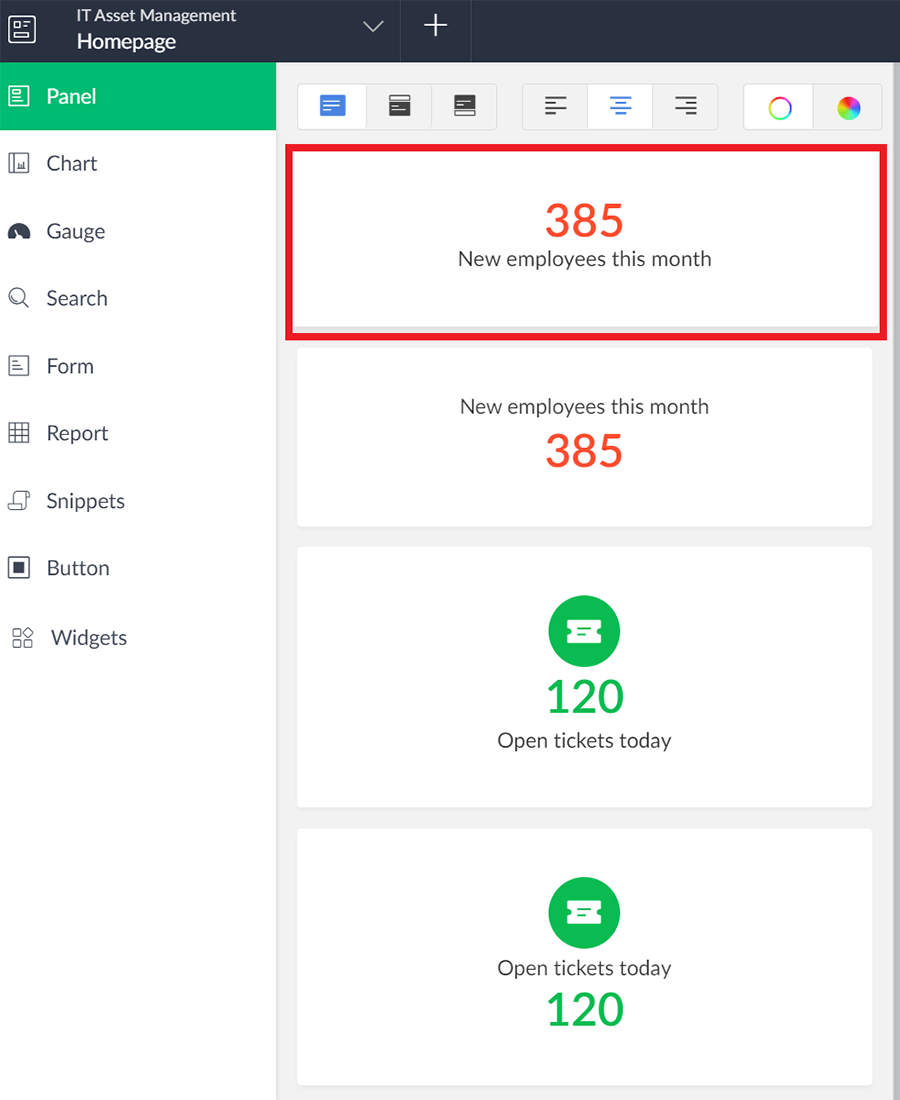
We will first look at building a simple Kanban report to monitor Manager's approval status, in case you would like to quickly follow up with the manager in case of rejections. We will also try creating a custom Homepage for your application, with a quick view of the following elements:
- A panel that captures total monthly asset requests.
- A simple bar chart that captures no: of requests by asset type
- Embedding the Kanban report for tracking manager approvals
- An embedded IT Asset Inventory form for quickly updating available assets
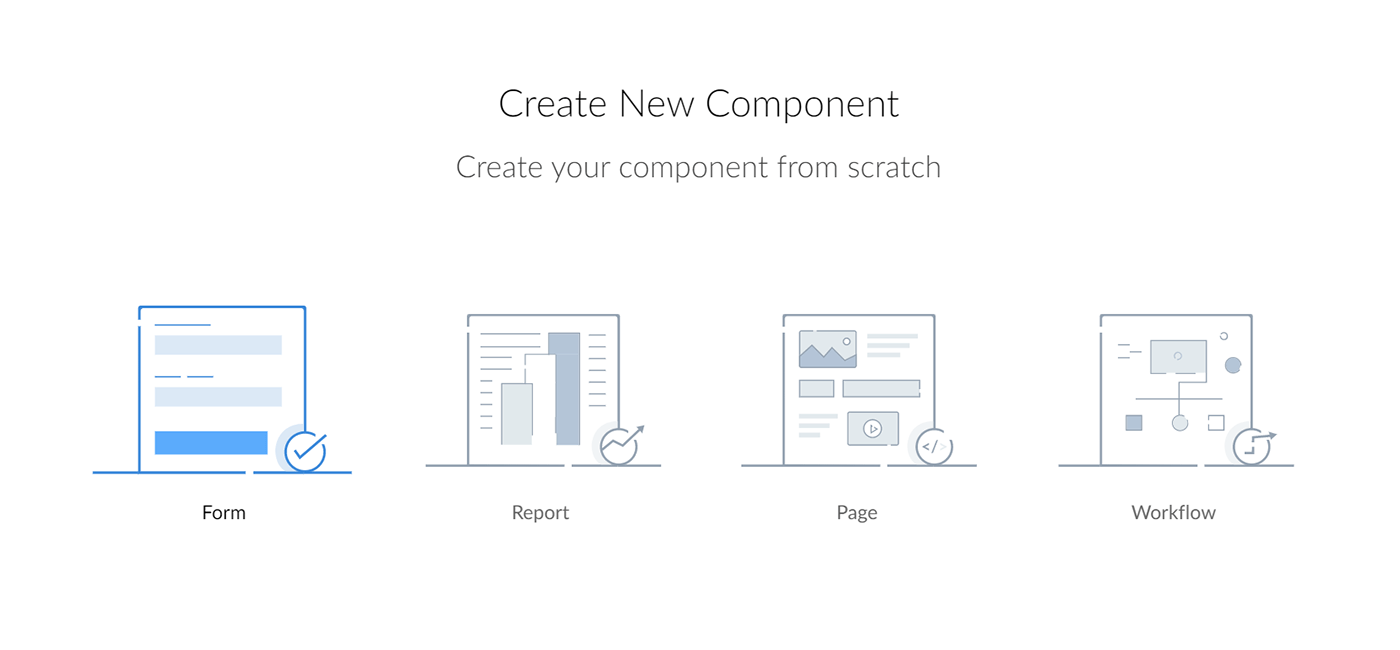
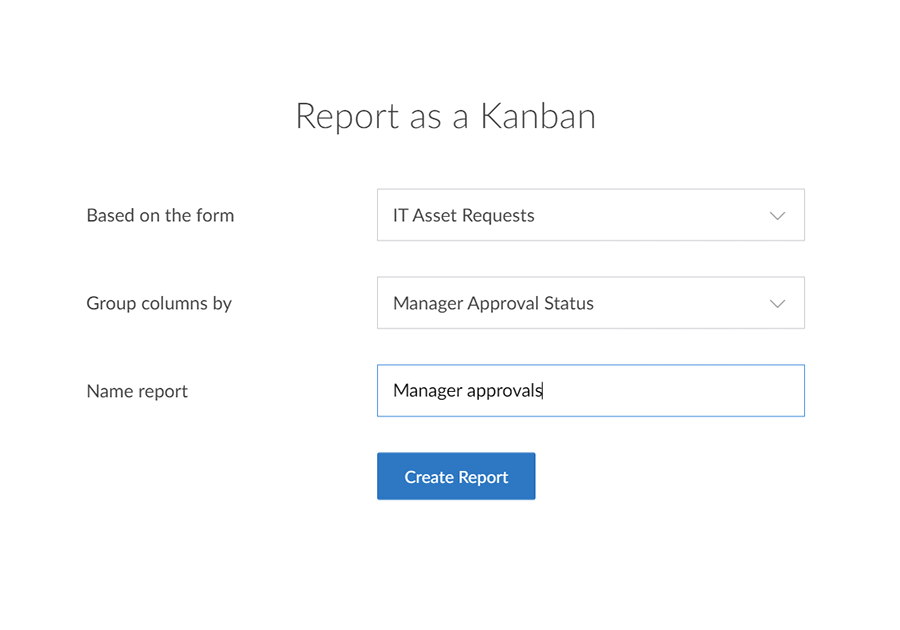
- Click the + icon in the top-left corner of your application builder, then select Create New Report --> Kanban.
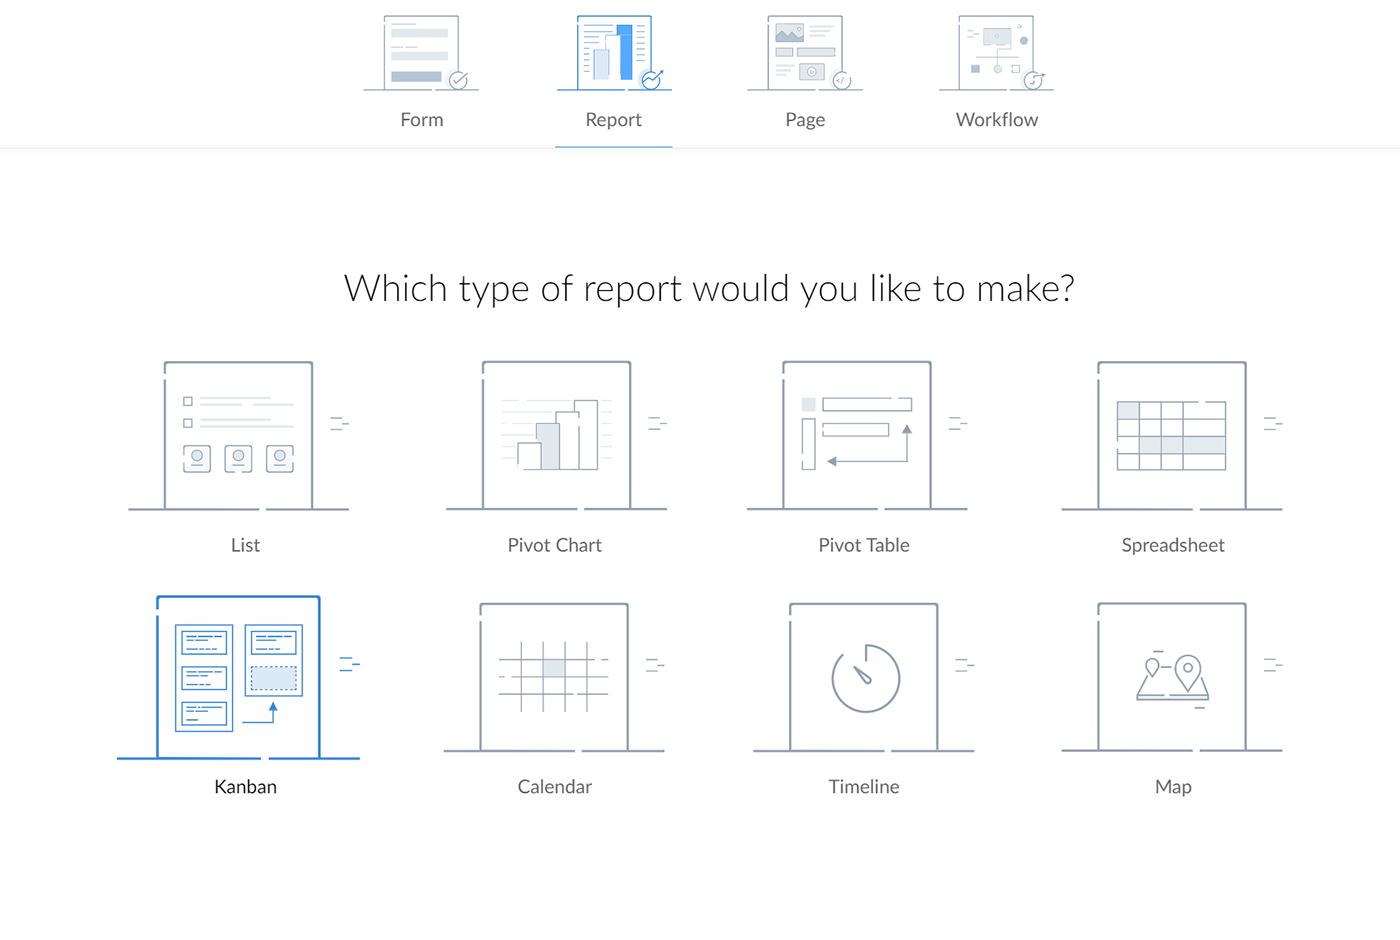
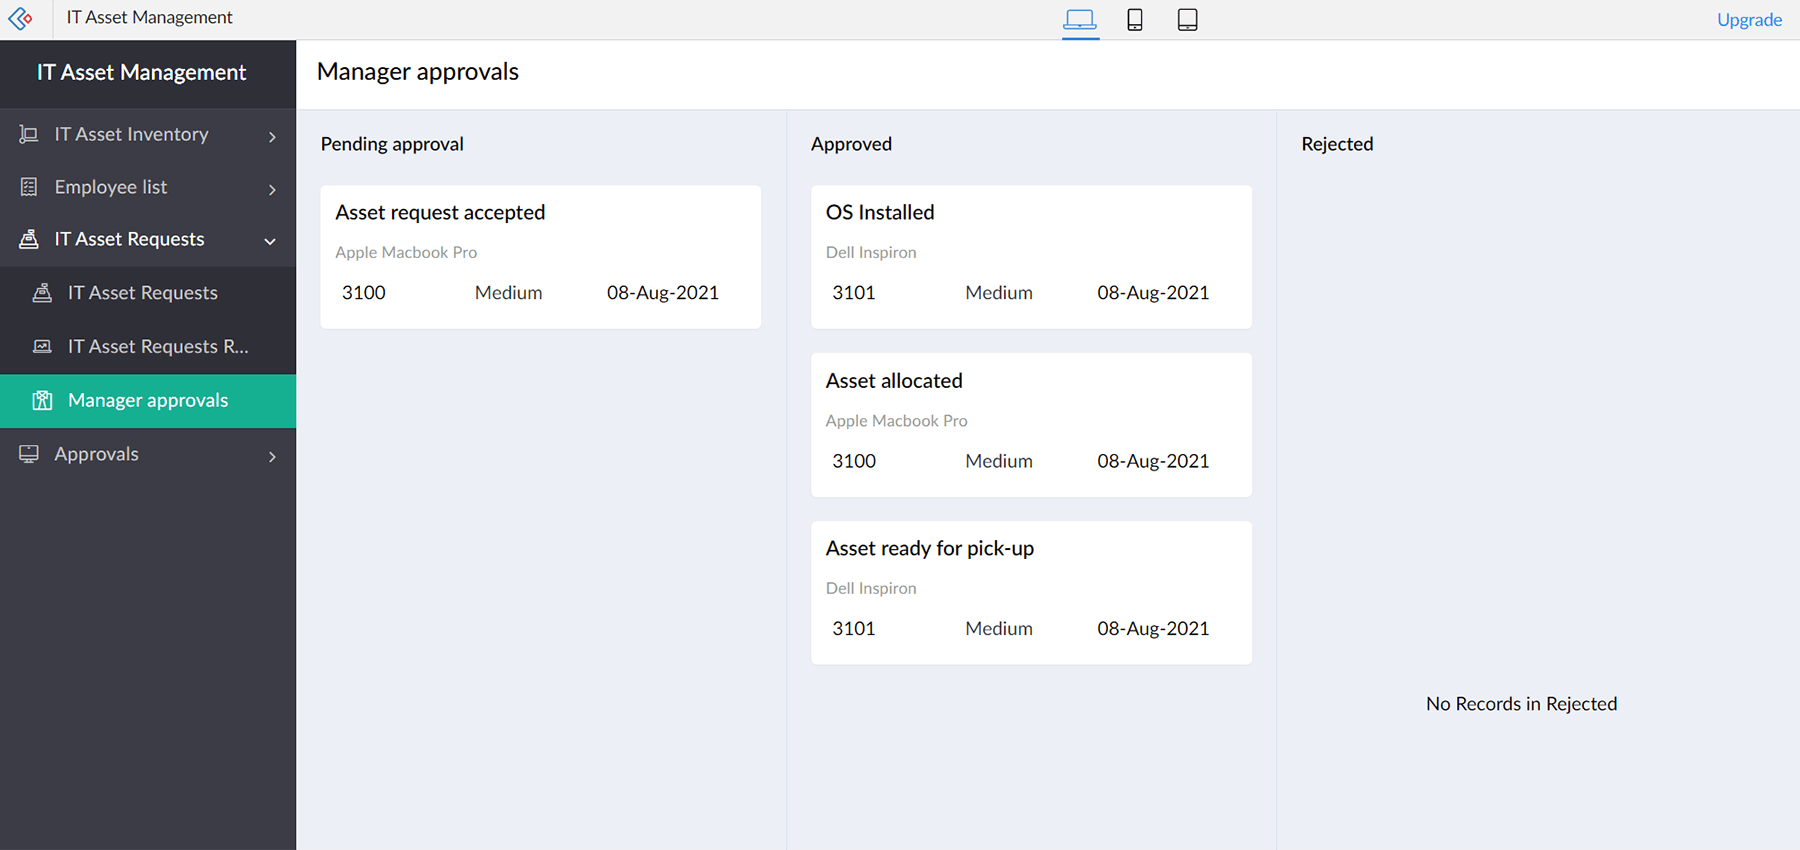
- Select Form --> IT Asset Request, set Columns to group by --> Manager Approval Status. Name this report 'Manager Approvals'.
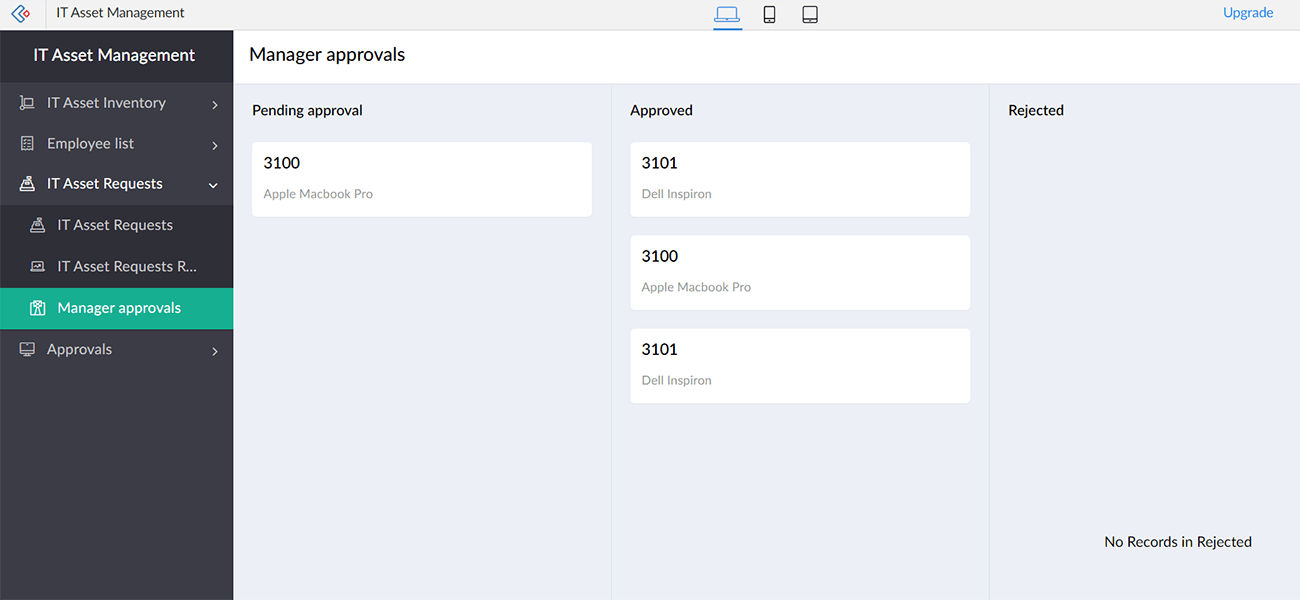
- Switch over to the live mode. You now have an intuitive Kanban report based on the three statuses: "Approved", "Rejected", and "Pending approval". Form entries and records from the IT Asset Request form automatically reflect here. You can simply drag and drop the cards from one column to the other in the Kanban view to update the status.
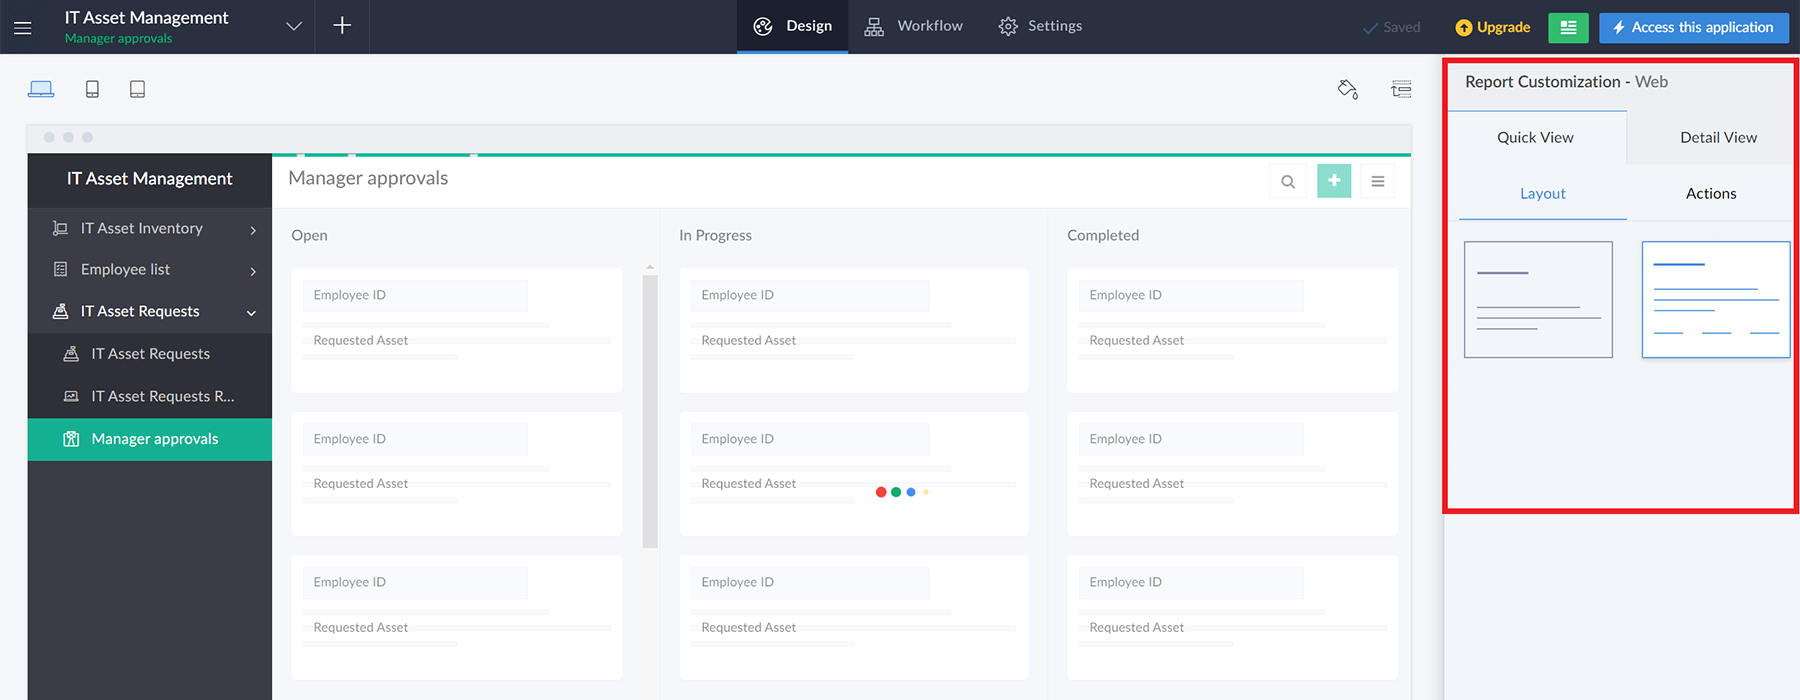
- You can swiftly customize how cards appear on your Kanban view by heading to the respective report in your edit mode under Design. Click Quick view. Select the respective placeholder fields in the cards to set them to the following fields: Blueprint stage, Requested asset, Urgency, Employee ID, and Date of request.
- Try updating the status through the Kanban report with test entries. Here is a sample data you can use to quickly try this. Simply go to the IT Asset Requests Report tab in your published application.
- Click on the burger icon in the top-right corner if you have already added test entries, or simply click Import Data. This will take you to a screen that allows you to map fields with your form fields. The Platform automatically recognizes the field names and does the mapping for you. Review and submit the mapping for a quick import!
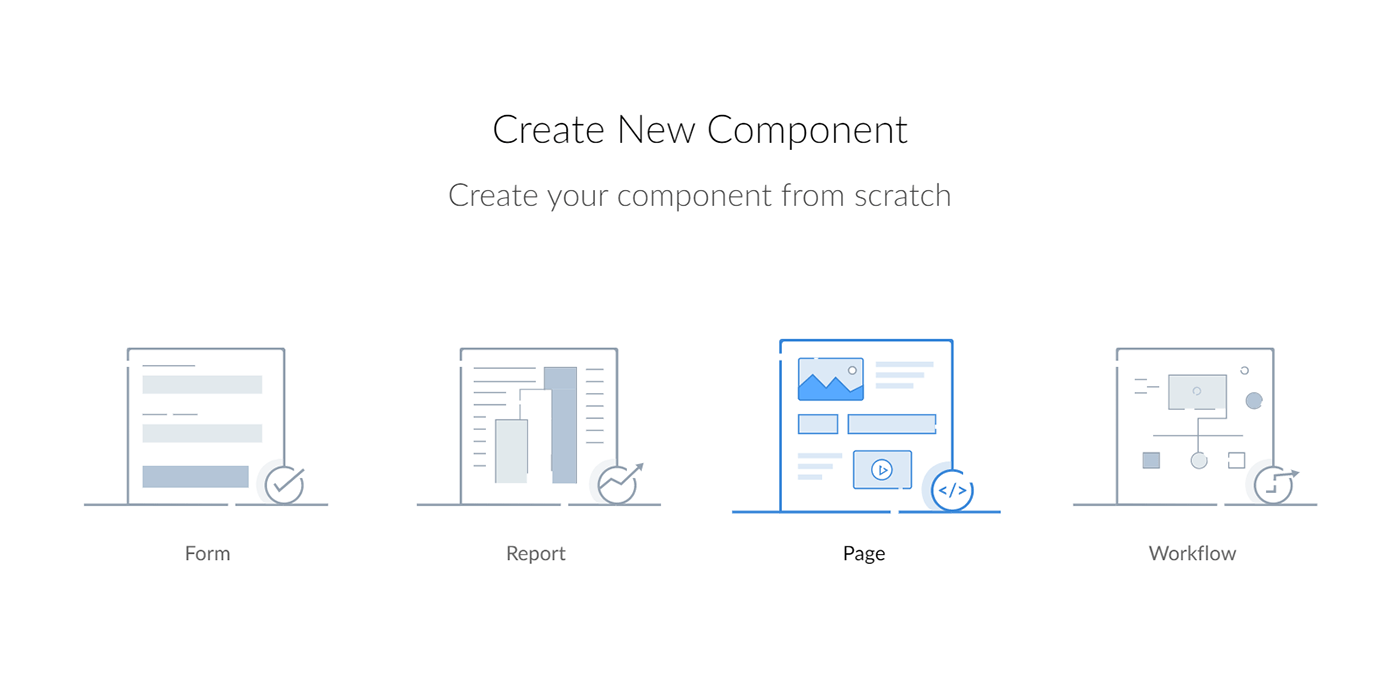
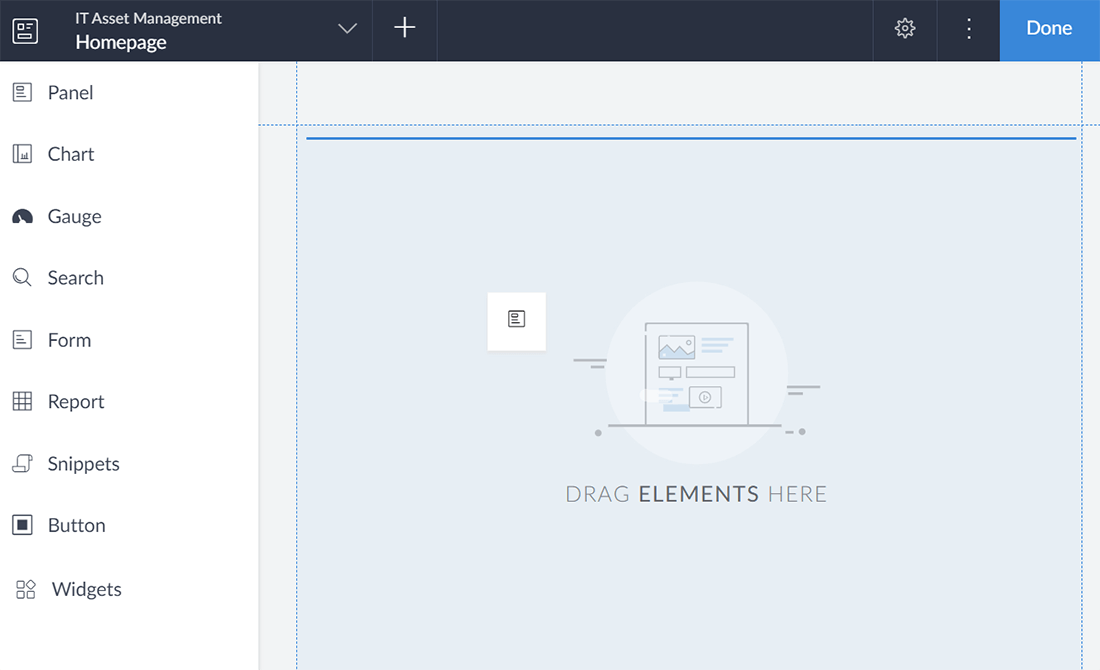
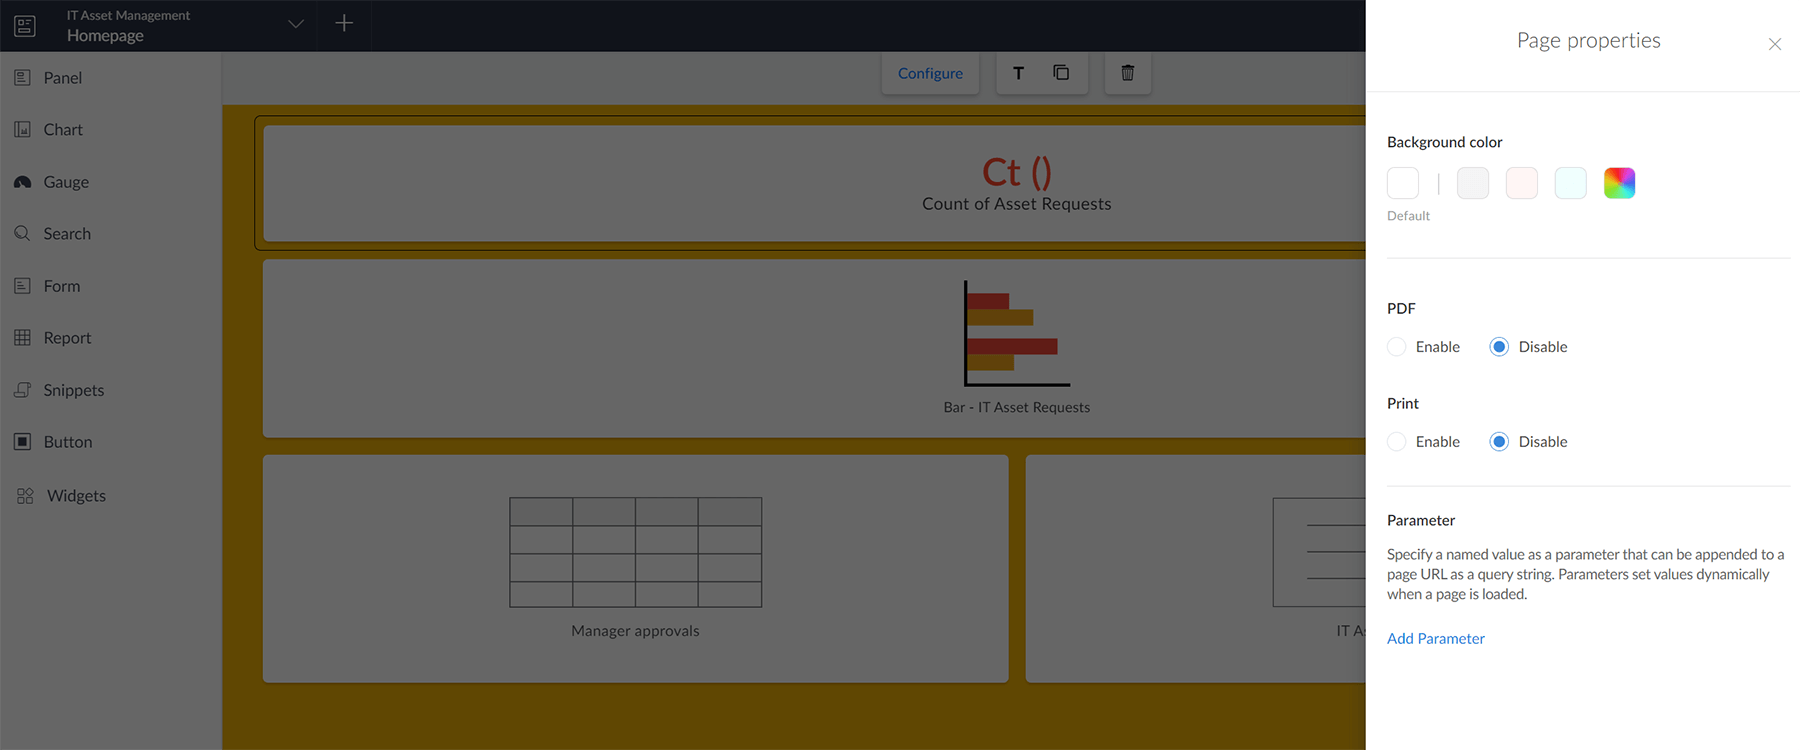
- You can also utilize Pages in the app builder to build custom screens for your application. The page builder is a highly fluid interface that supports drag and drop. Click on the + icon in the top-left corner of your app builder and click Create new --> "Page" --> Create from 'Blank'. Name this 'Homepage'.
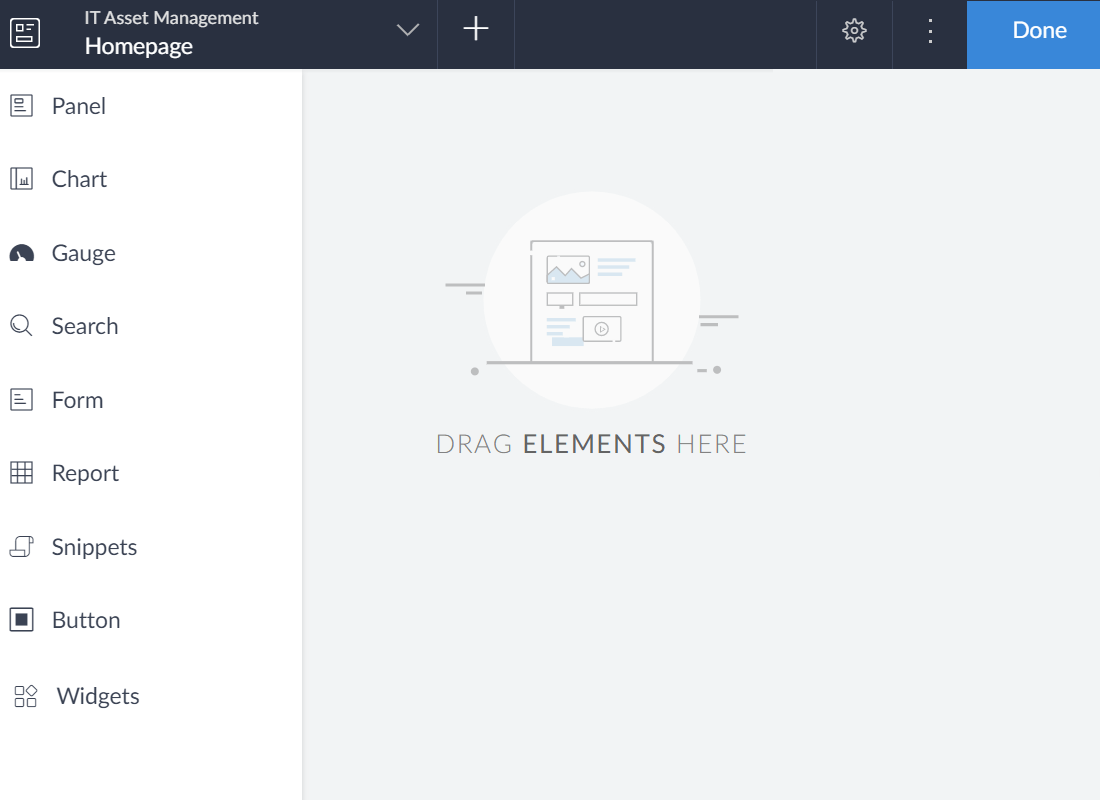
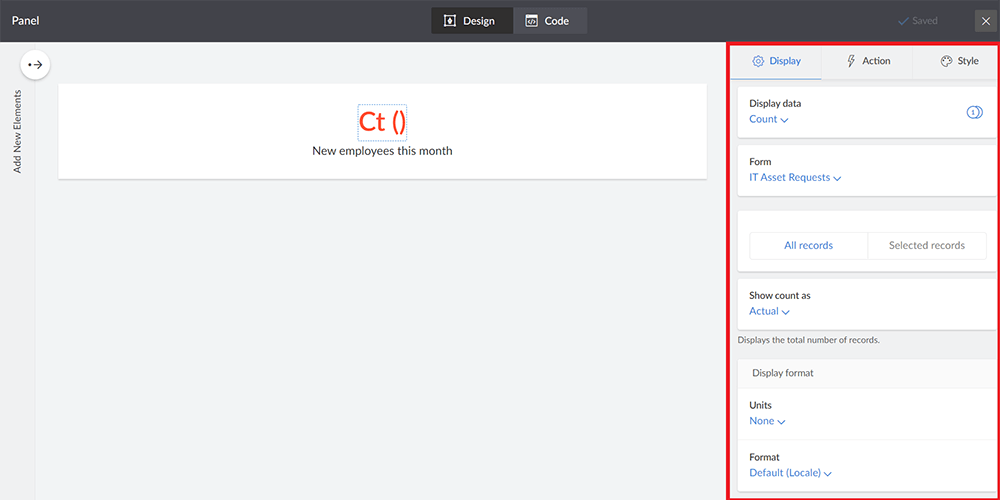
- Click Panels from your left pane, drag and drop the first option onto the page builder. In the panel setup screen, click on the placeholder for the Number. Set Display data --> Count, Form --> IT Asset Request.
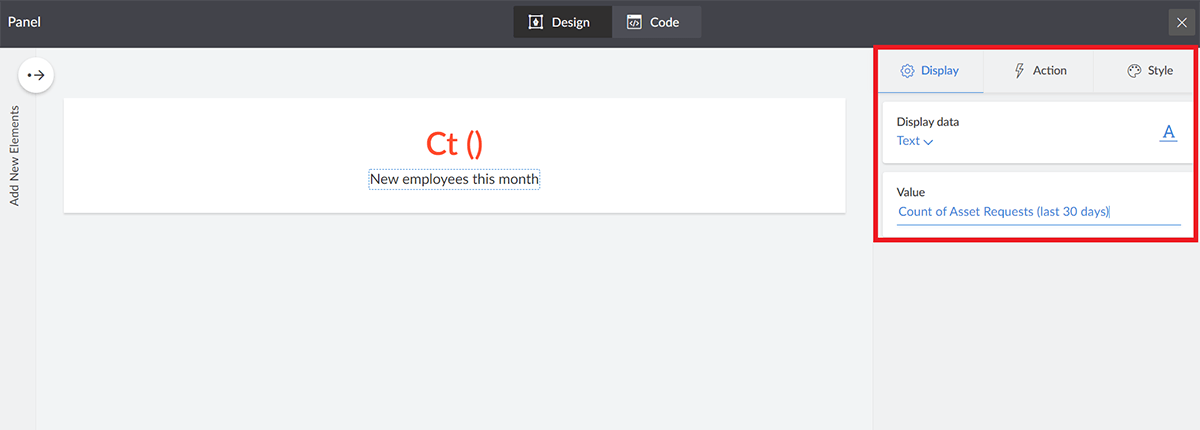
- Click the New employees per month placeholder in the panel. Change Value to Count of Asset requests. Your changes are auto-saved. Click Close in the top-right corner.
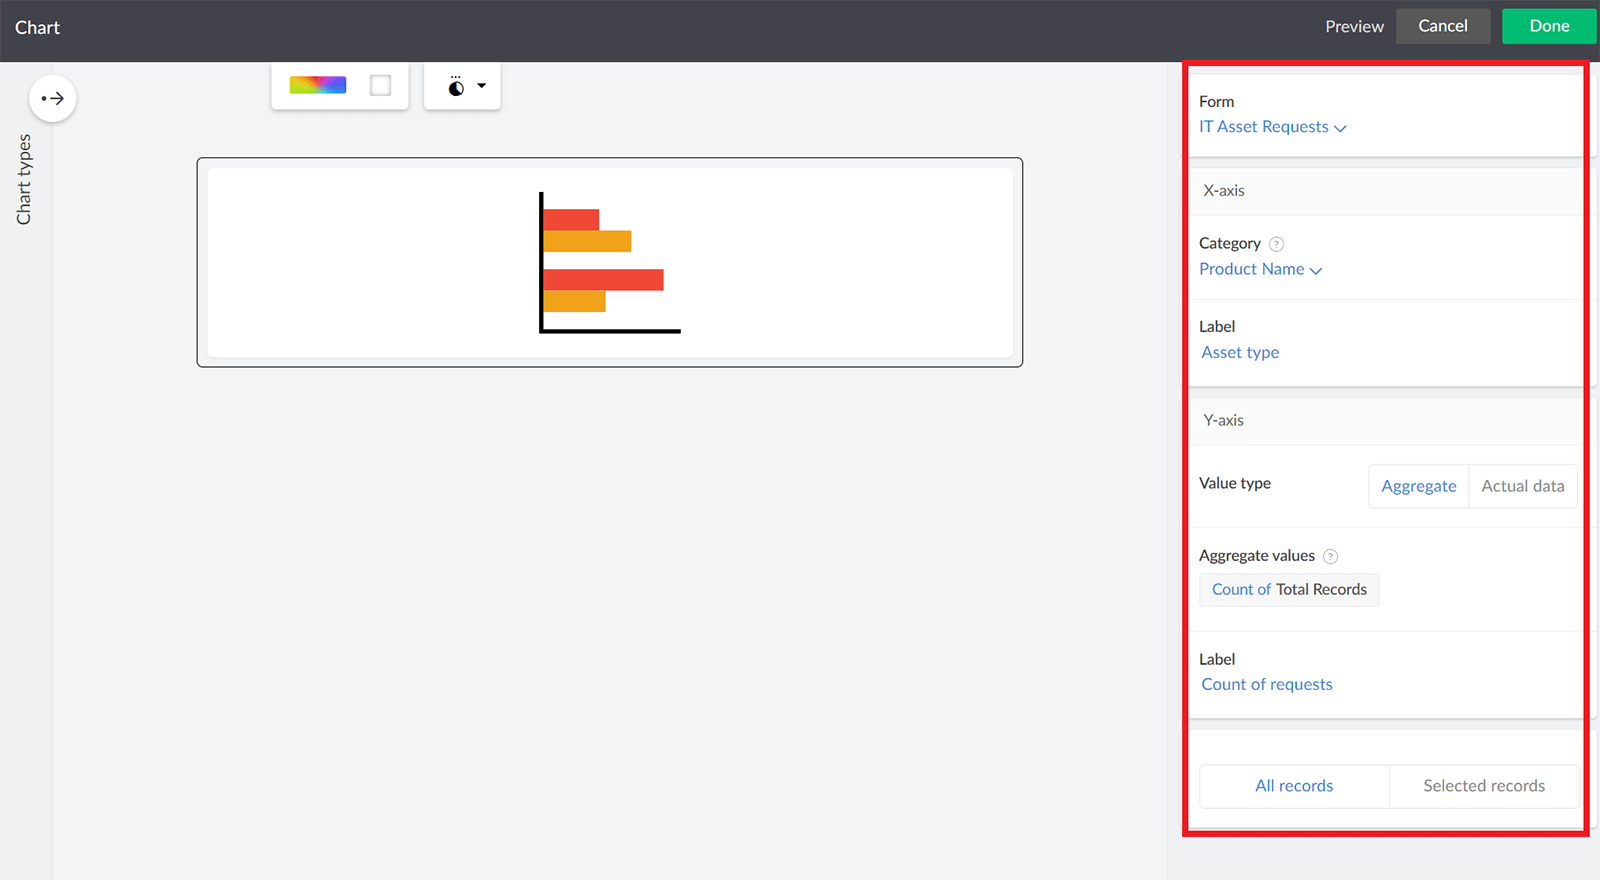
- Click on Charts. Drag and drop a 'Bar chart' onto the page builder. Select X axis --> Category --> Requested asset (--> Product Name). Label it 'Asset type'. Set Y-Axis --> Value type --> Aggregate. Set Aggregate Values --> Select data --> Total records. This is set to count of records by default. Label it 'Count of requests' and click Done. Your bar graph is now ready!
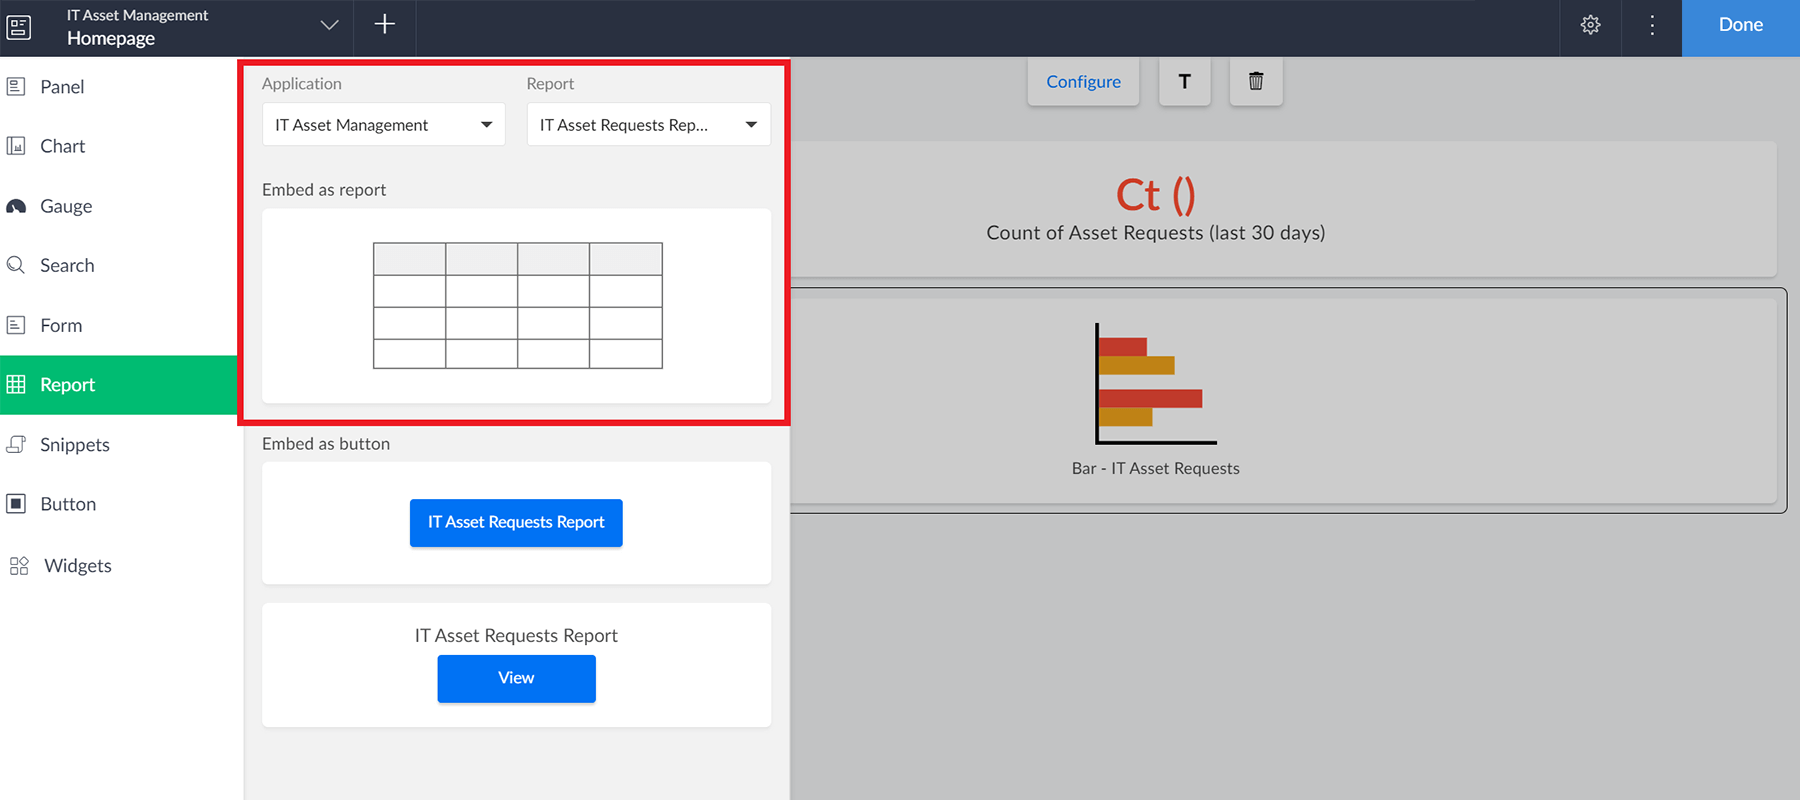
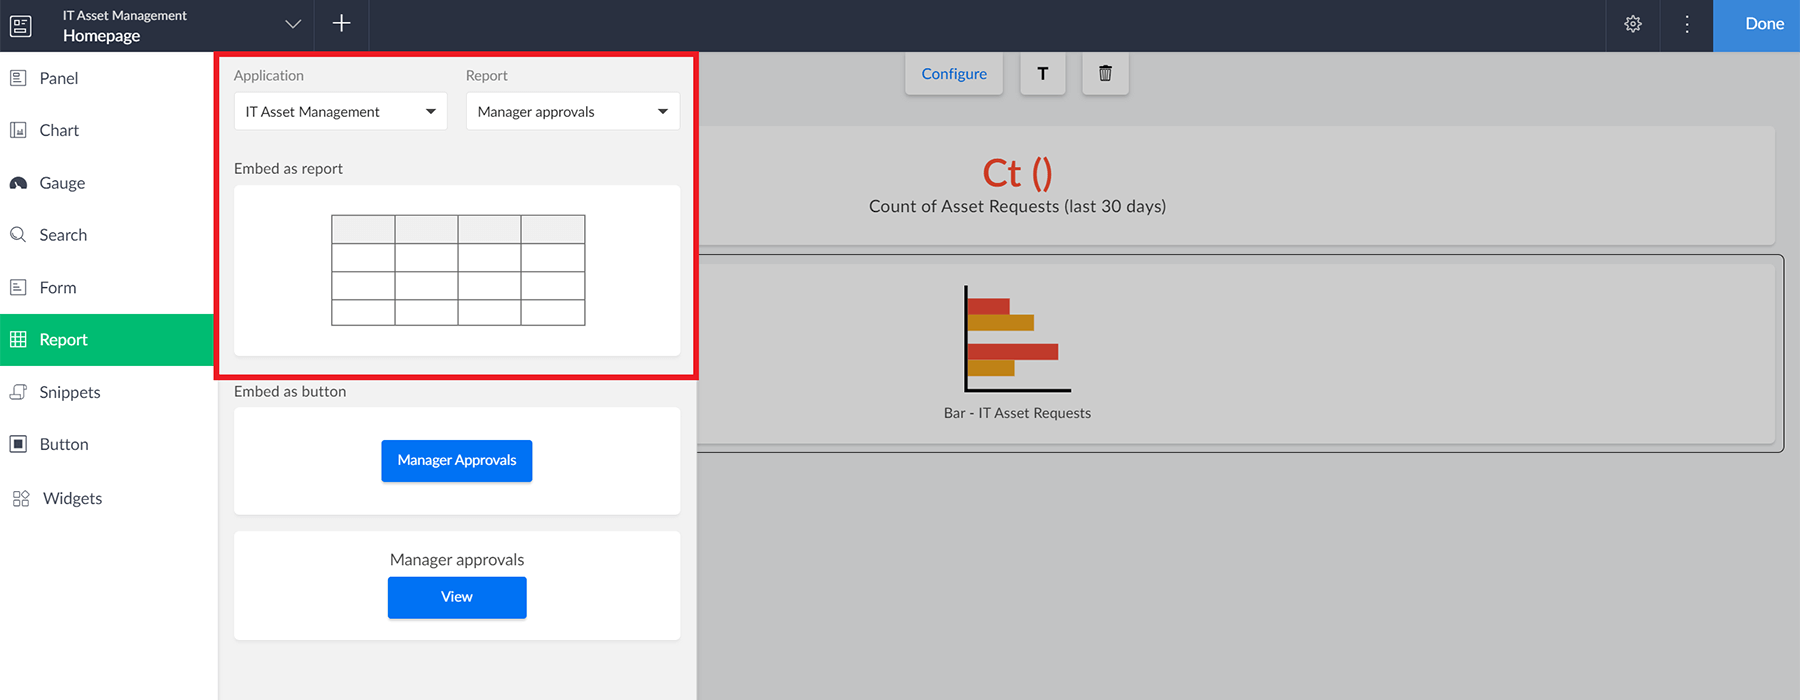
- Click Reports --> Select Application --> IT Asset Management and Reports --> Manager approvals report. Drag and drop this to the page builder. The Kanban report you created in the previous section (along with all associated actions), can now be accessed right from your homepage.
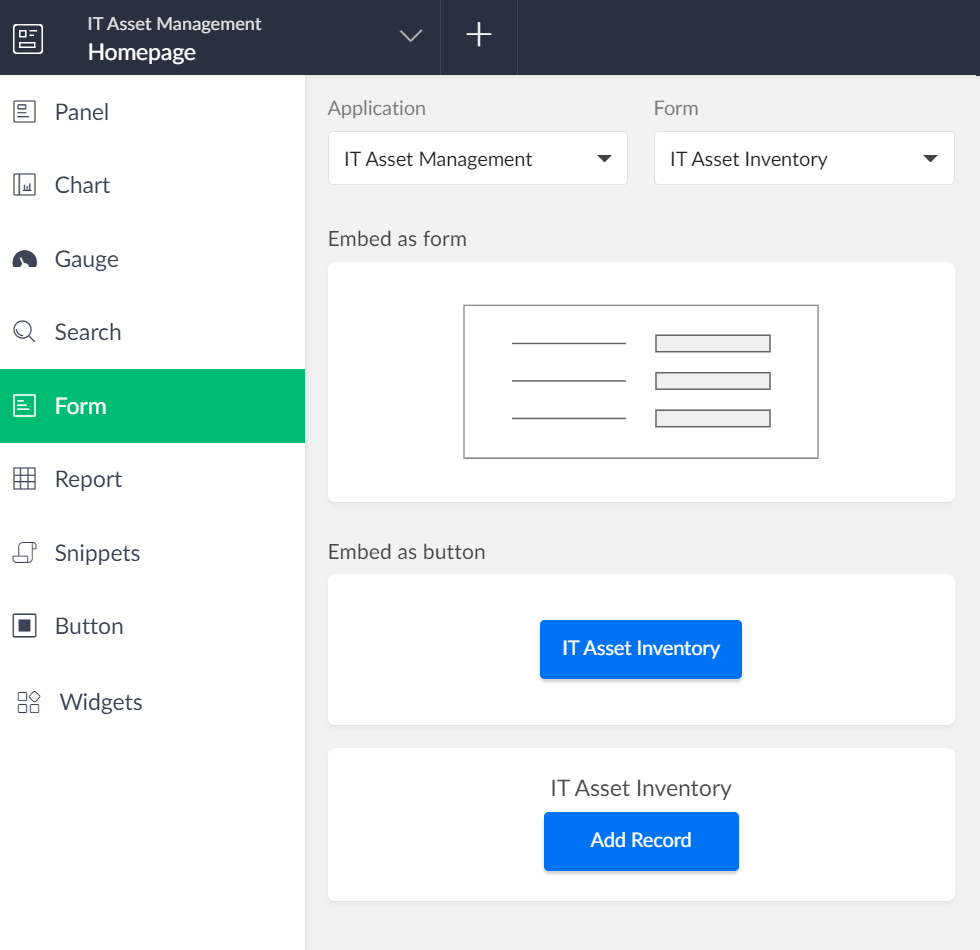
- Try dragging and dropping a Form component onto your Page. Click Forms --> Select Application --> IT Asset Management and Forms --> IT Asset Inventory.
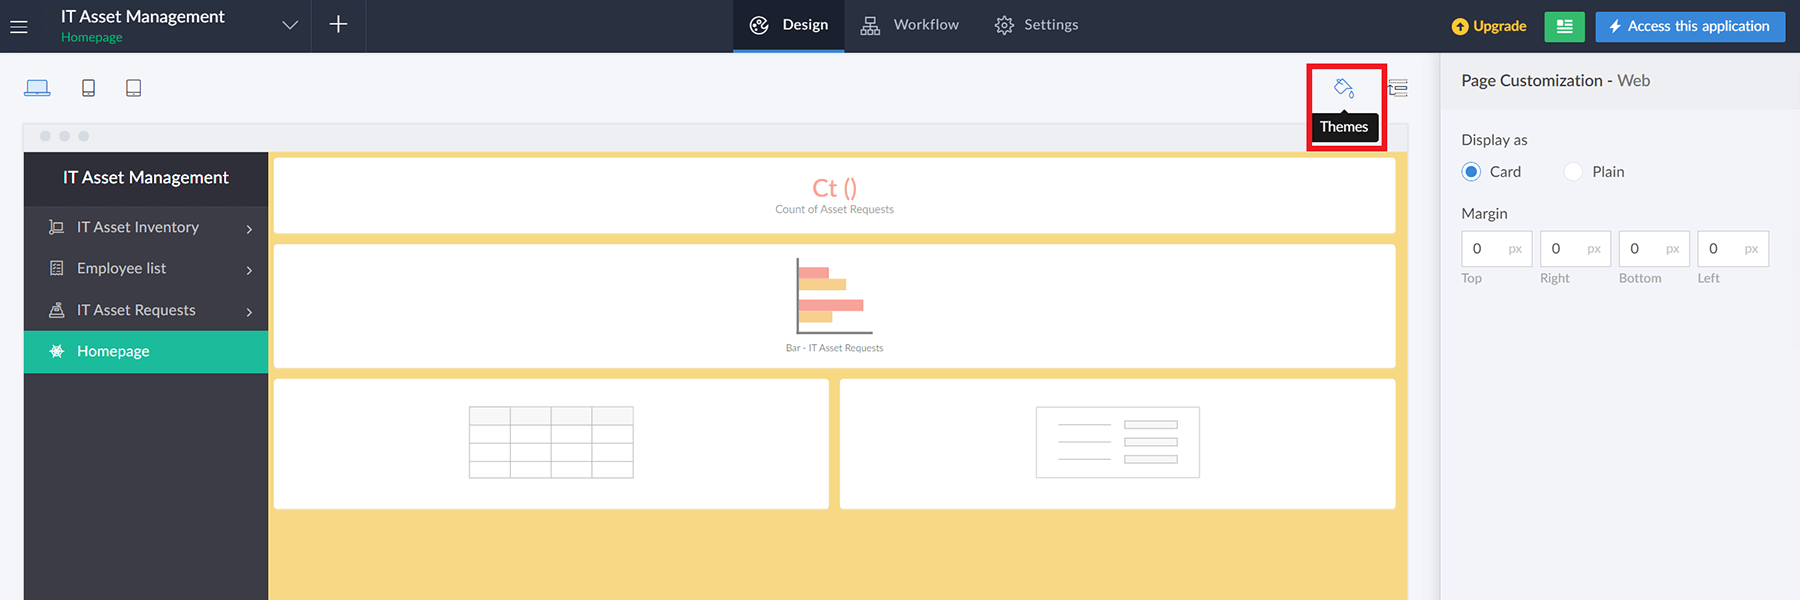
- Try resizing elements: click on the cogwheel in the top-right corner to customize background colors, add text elements from the Text option at the top of your page, and more.
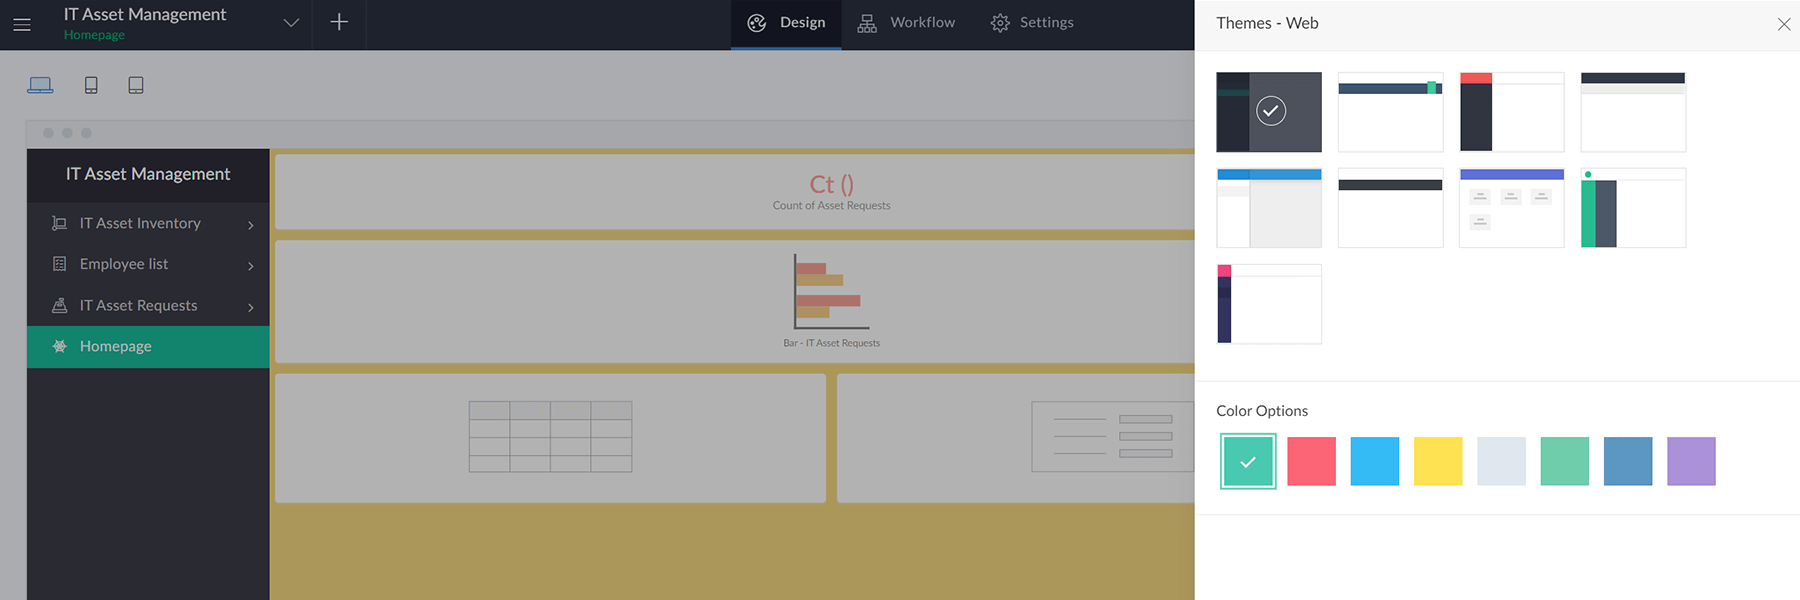
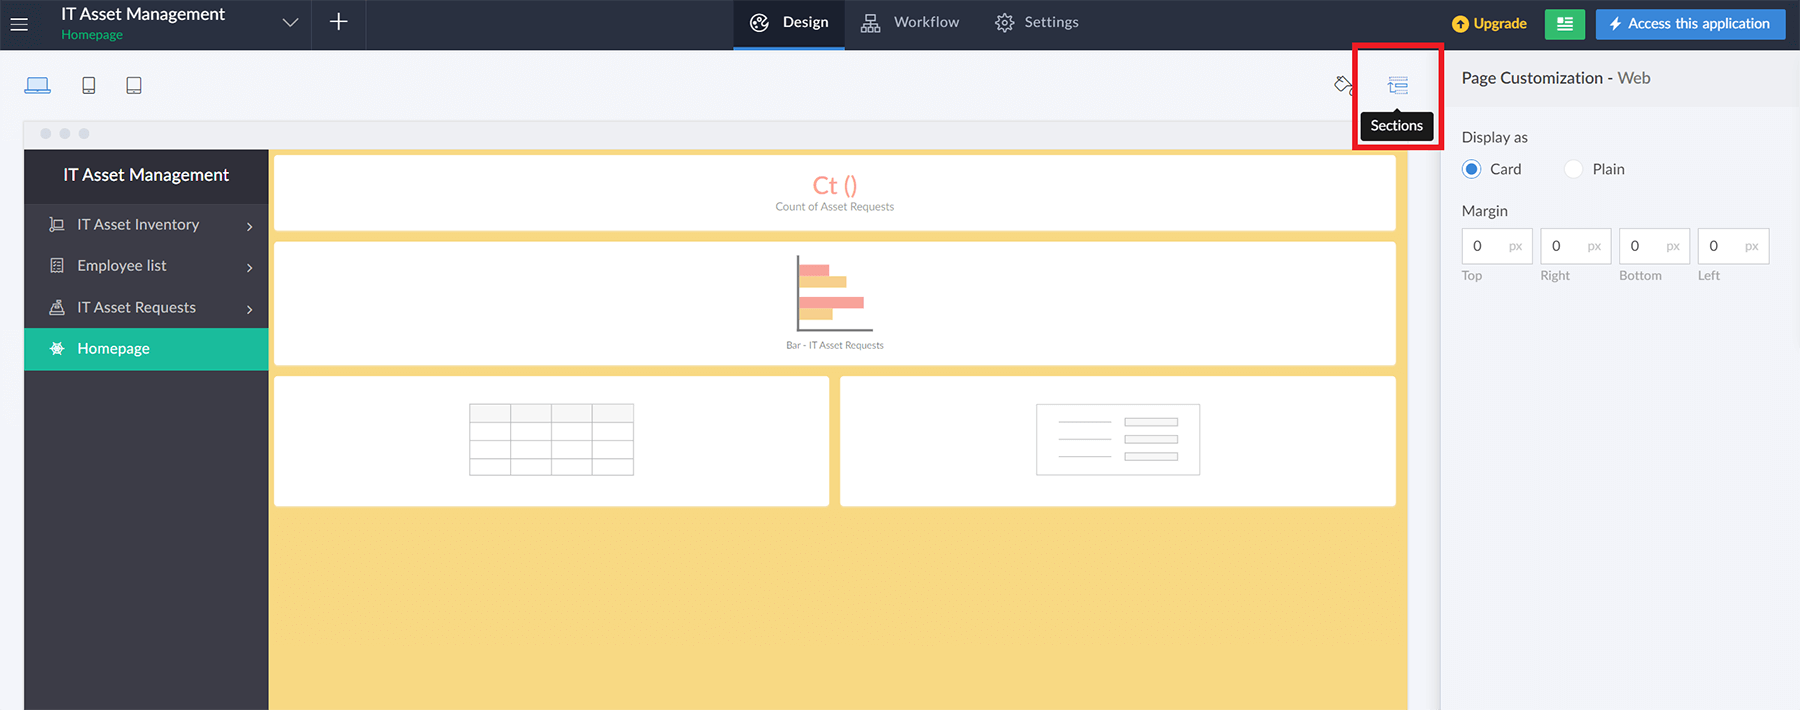
- You can also customize the overall feel of your application under Design --> Header --> Themes (in the top-right corner of the application designer interface). Pick a theme that you like. Head to Sections to the right of Themes. Here, you can quickly:
- Edit the names of your tabs
- Reorder your tabs and categorize them under new sections
- Show or hide sections
- Add custom icons against tabs


Analyze and Report
Now that you have large volumes of data, submitted IT assets, their criticality, and more, you can perform a range of data operations and churn out advanced, standalone data visualizations with Creator! We'll go over how to analyze your IT asset request and processing data using Analytics in this section.
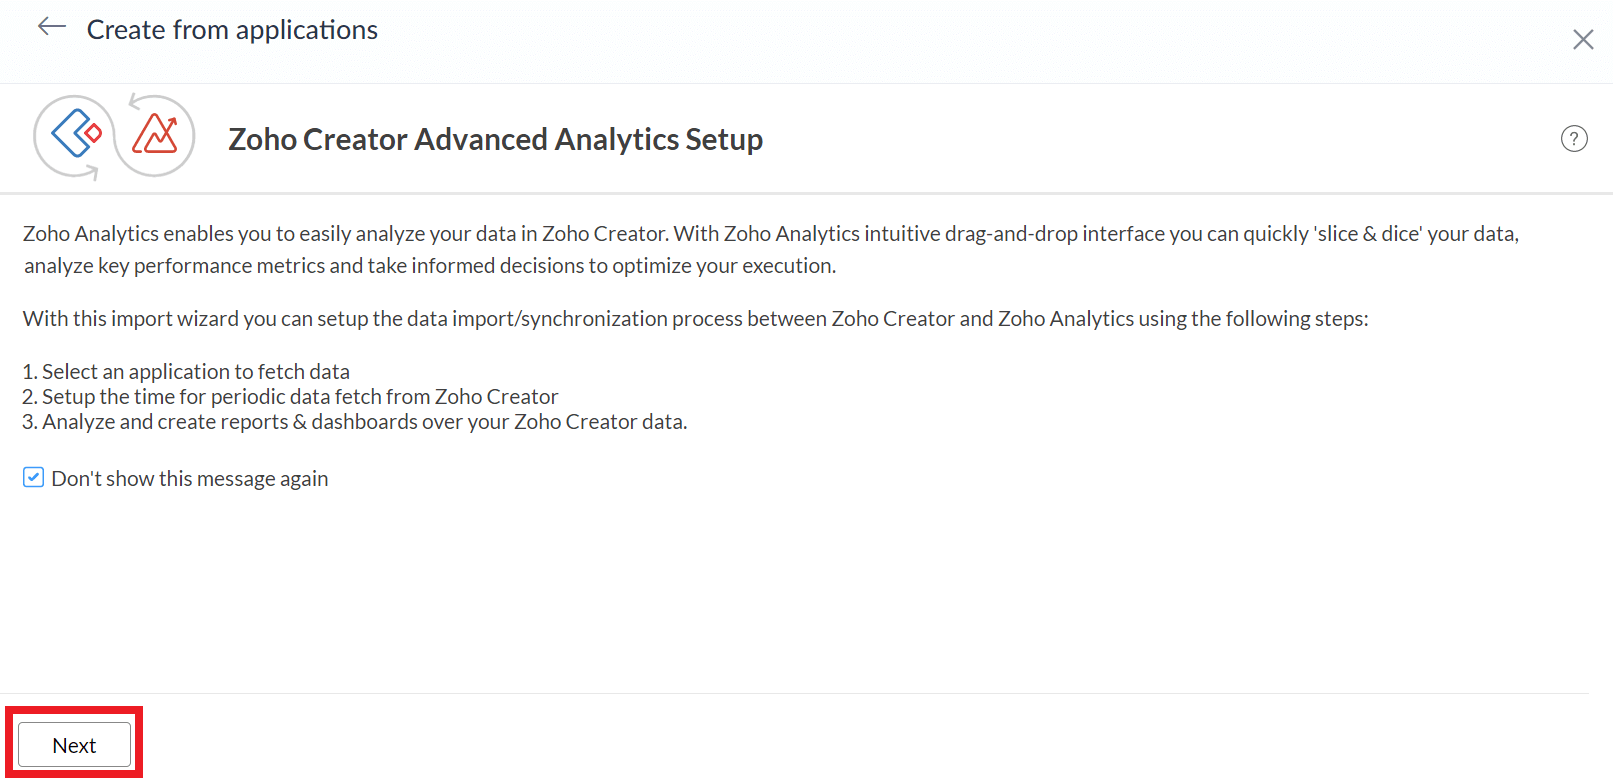
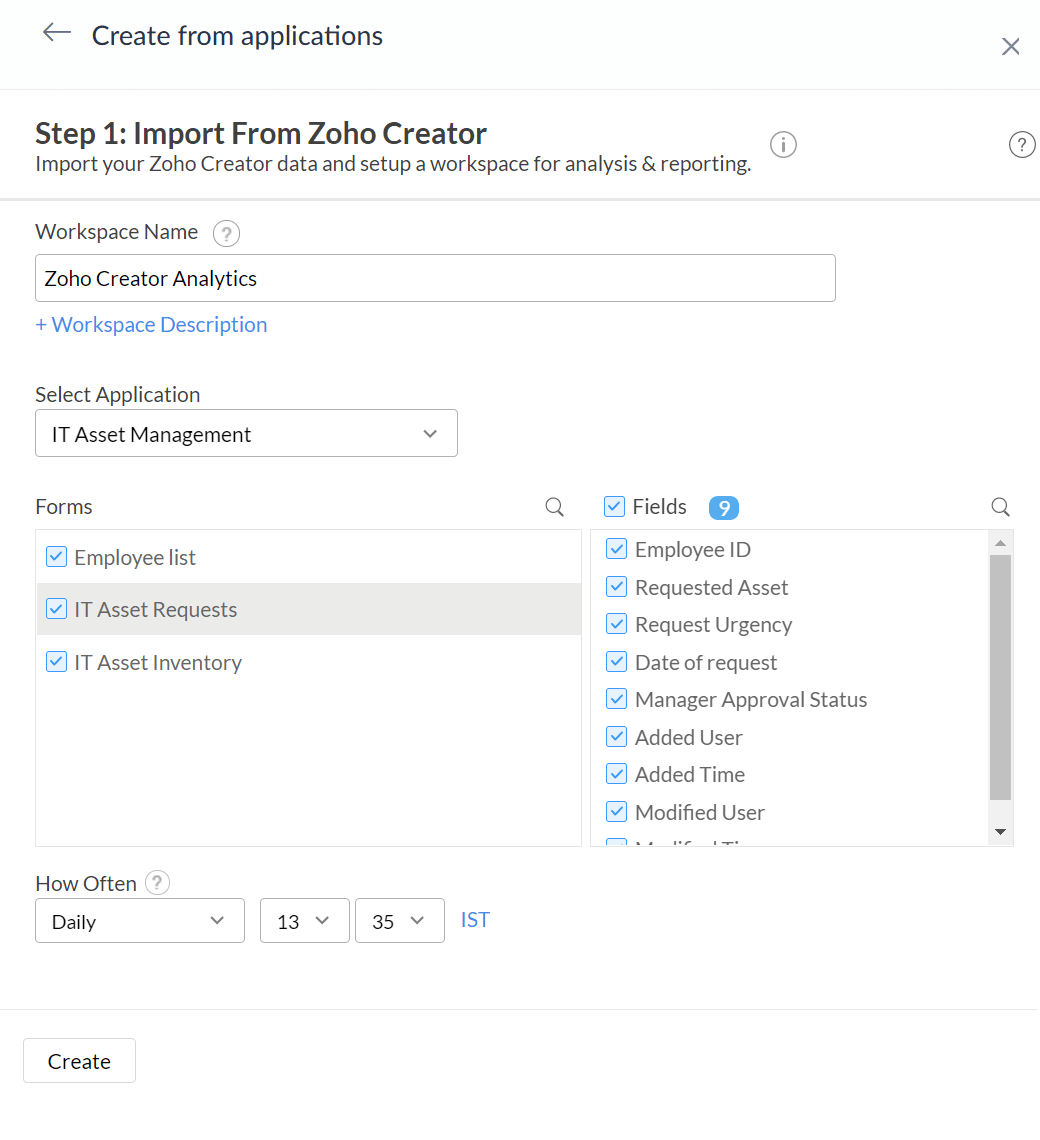
- Navigate to Develop --> Solutions (your Creator platform homepage). Click Create solution --> Analytics --> Create from Applications --> IT Asset Management.
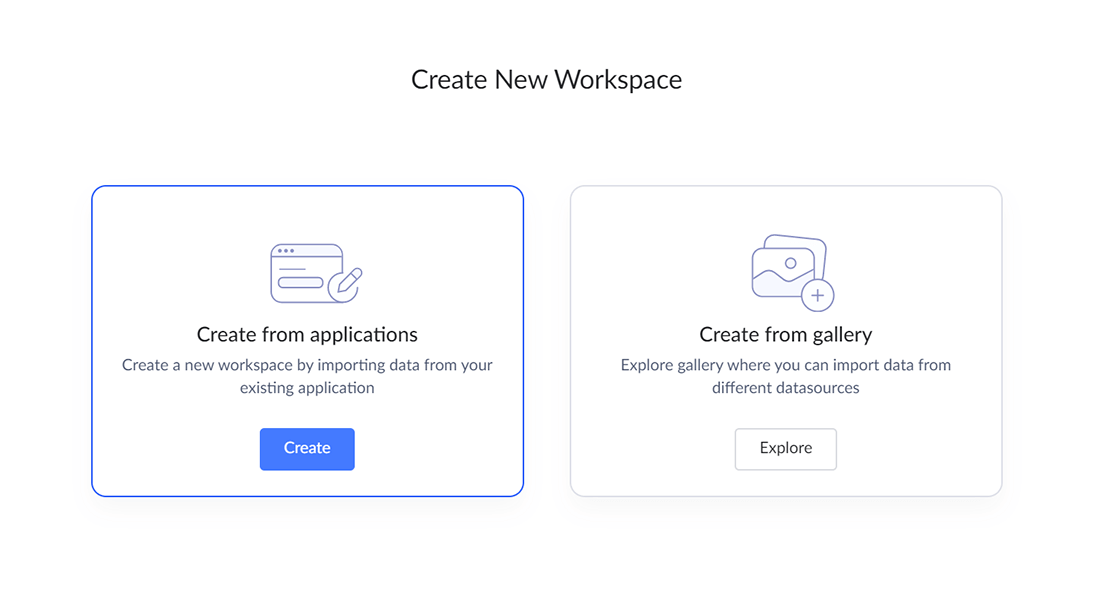
Click Next in the setup screen. The 'Zoho Creator Analytics' workspace will be created for you automatically. Set Select application --> IT Asset Management from the drop-down. Select all the associated forms and fields available within each. Set How often you would like to sync --> Daily.
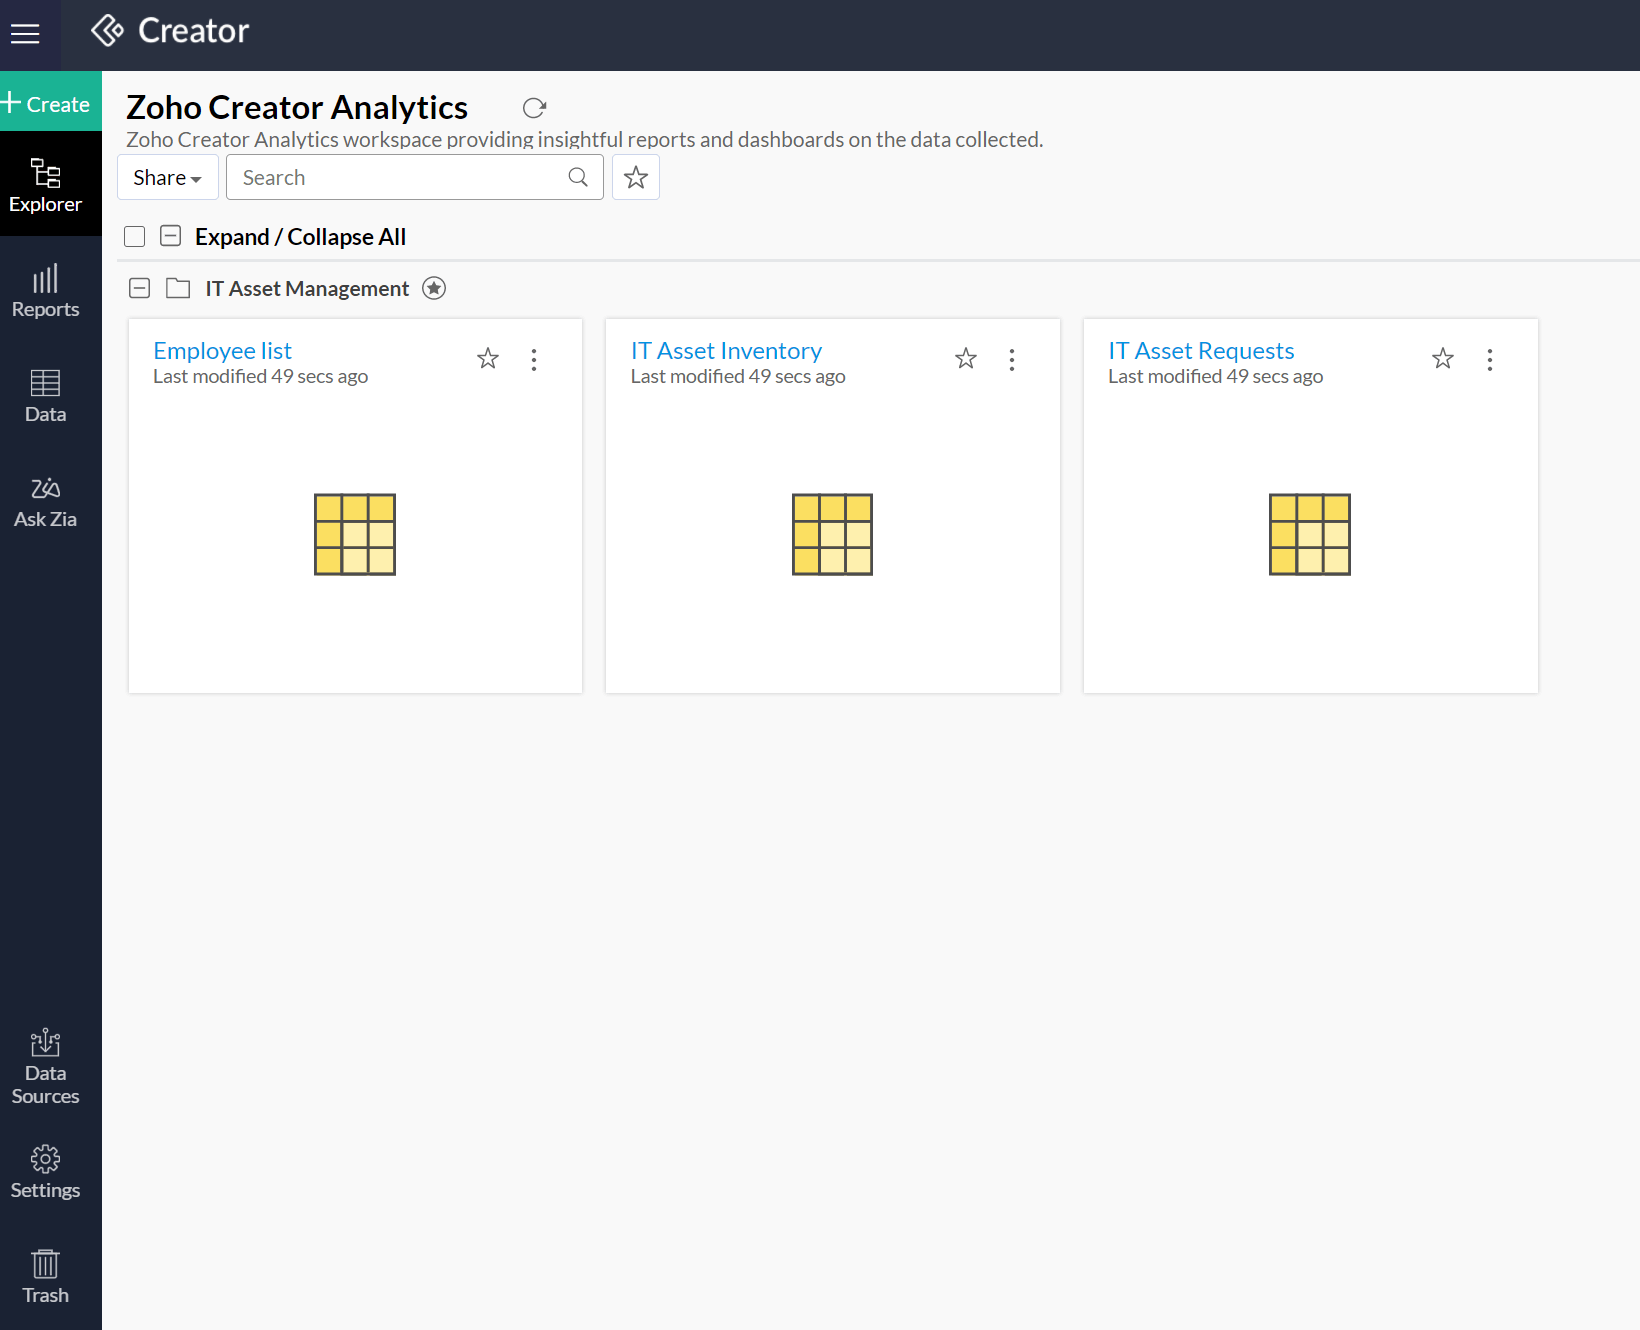
The datasets have been synchronized successfully and are available as data tables within the Analytics instance of Creator. This will get updated as per the daily schedule you've configured.
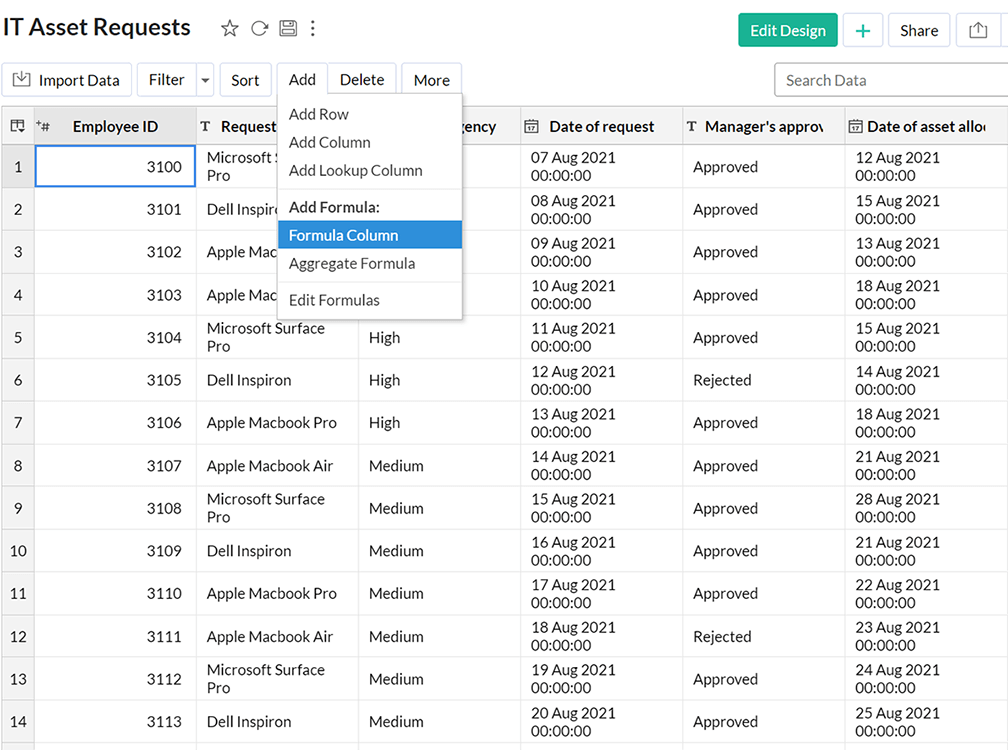
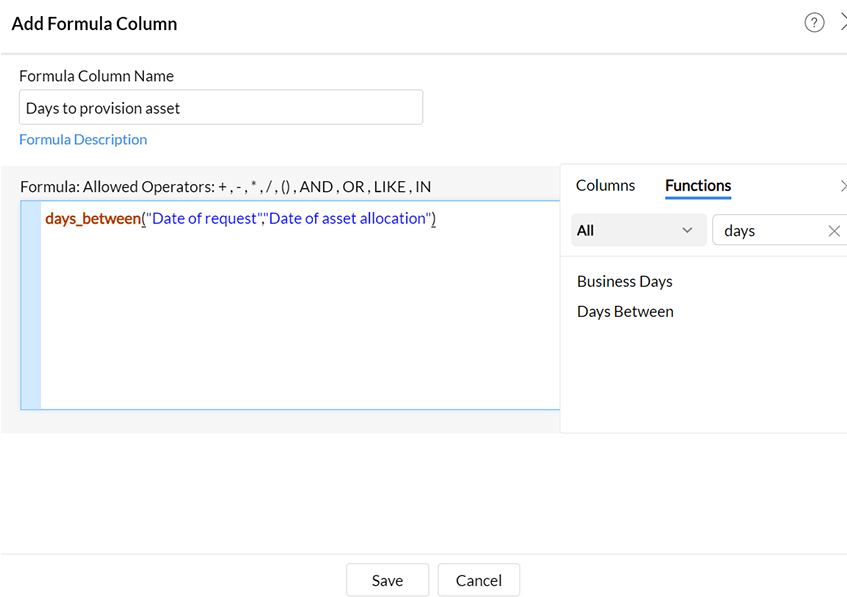
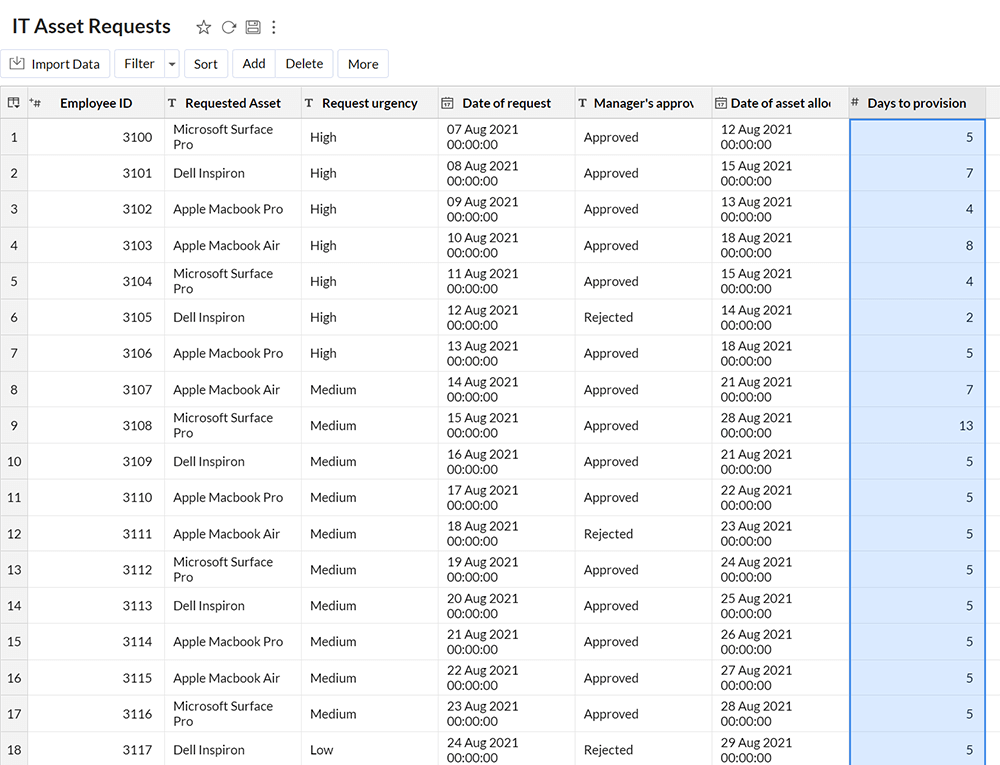
- Let's try creating a Formula (calculated column) that computes the time taken for asset provisioning for each record. Click the IT Asset Requests data table. Click Add --> Formula Column. Name it 'Days to provision asset'. Select the Days between function from the functions list. Next, add Date of request and Date of asset allocation between the brackets of the function. Save the formula. The column will be added and populated for you in the IT Asset Requests data table.
- You can compute the average days taken for provisioning by adding an Aggregate Formula. Click Add --> Aggregate Formula. Name the formula 'Avg. days for provisioning'. Select the Average function from the functions tab. Next, insert the 'Days to provision asset' column we created in the previous step, from the columns list. Click Save. This will be stored in the platform and you can bring it up at any time in any of Analytics' reports or dashboards.

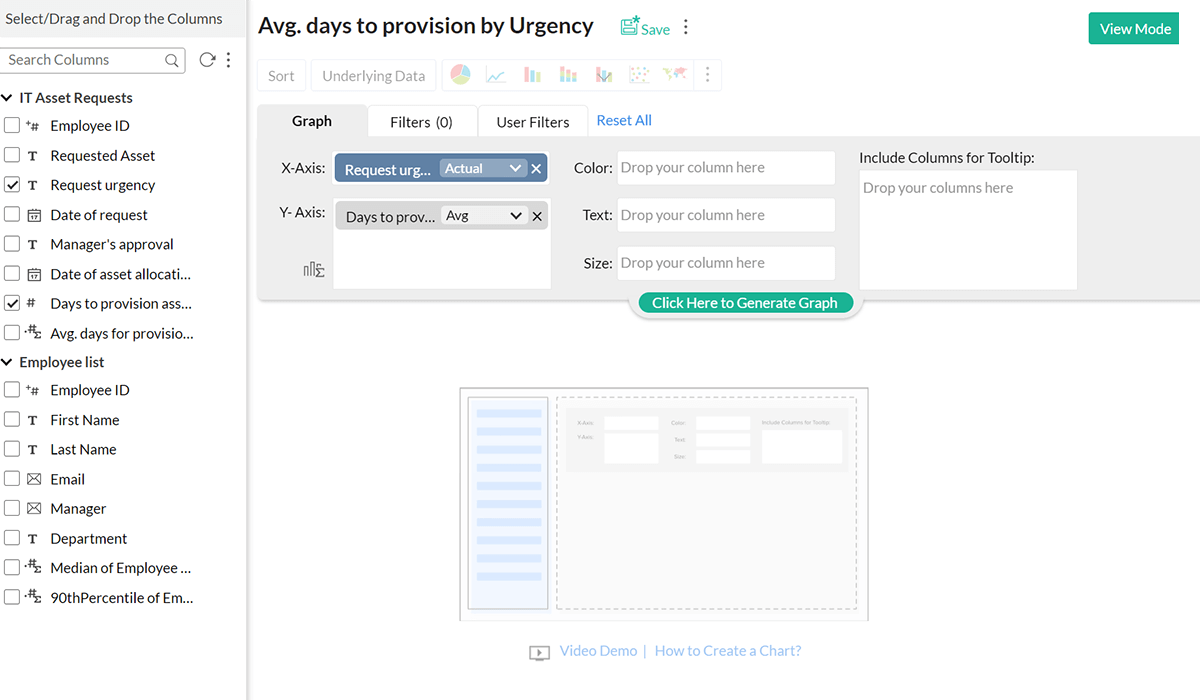
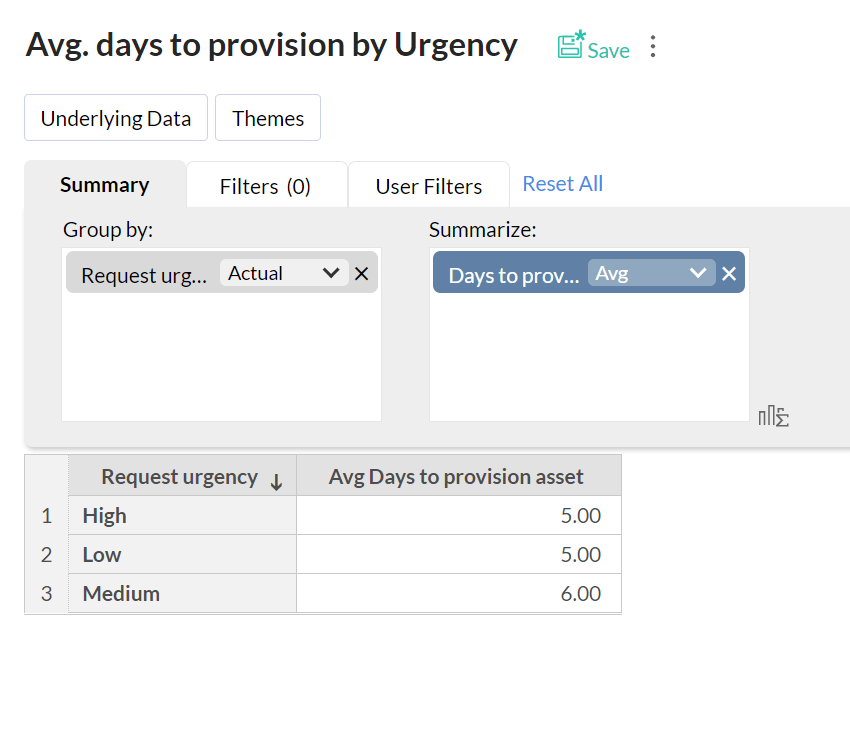
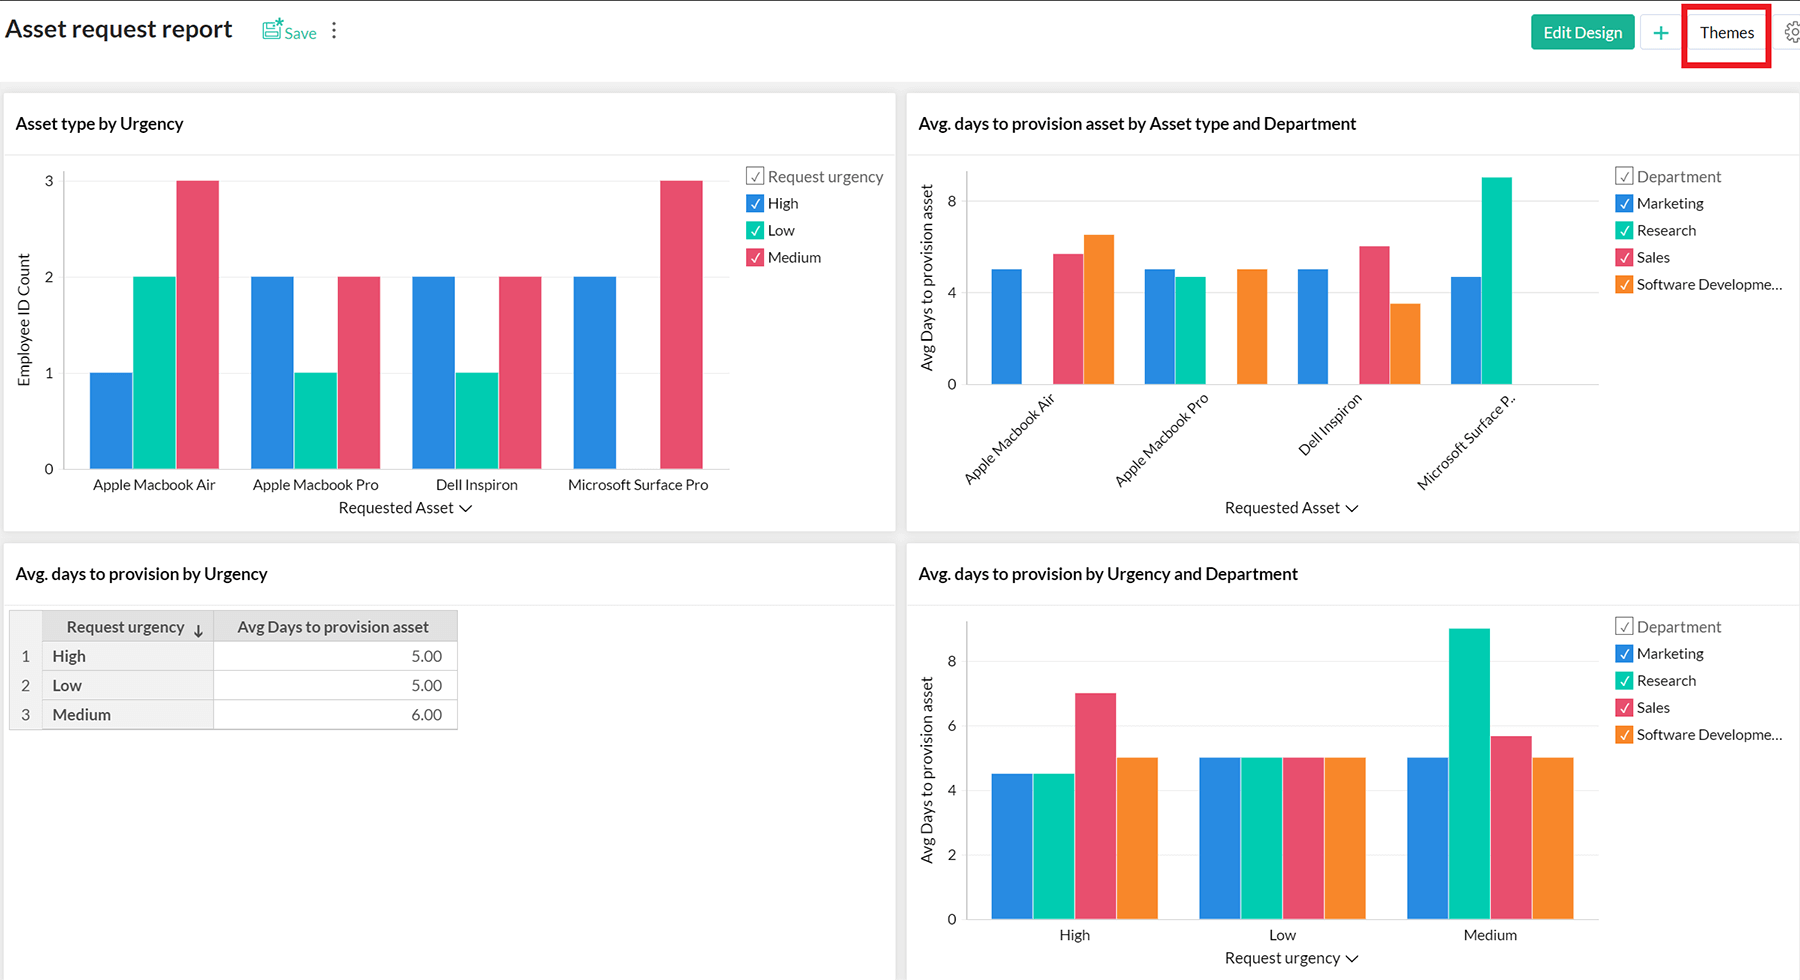
- You can create a range of reports in Analytics, including Charts, Pivots, Data summaries, and Tabular views. Let's try creating a chart that depicts the average duration for asset allocation by priority of the request. Click Create --> Chart --> Select table --> IT Asset Requests.
- Drag and drop Request Urgency to the x-axis field. It is set to Actual value by default, which you don't need to change. Drag and drop Days to provision asset to the y-axis field. Set its value type to Average --> Normal. Next drag-and-drop the 'Department name' column to the Color field. Select Click here to generate chart. Click on Save. You now have a chart that displays the average. days to provision assets by the urgency of the request and requester's department.
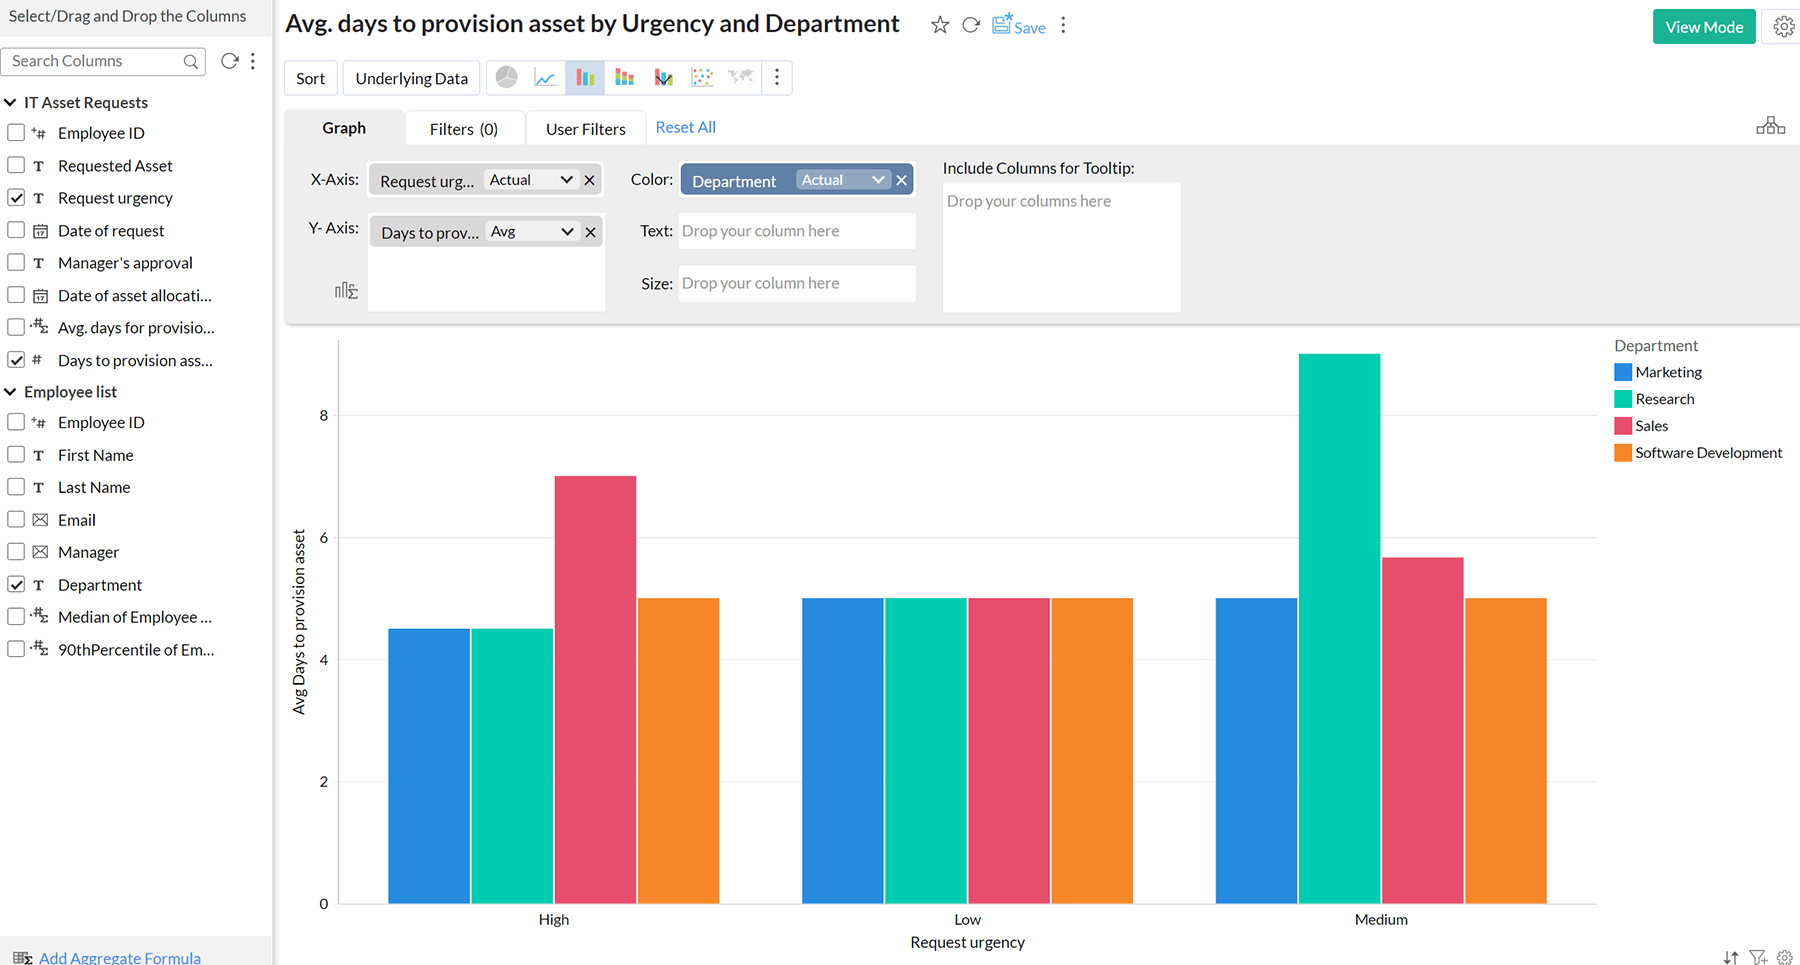
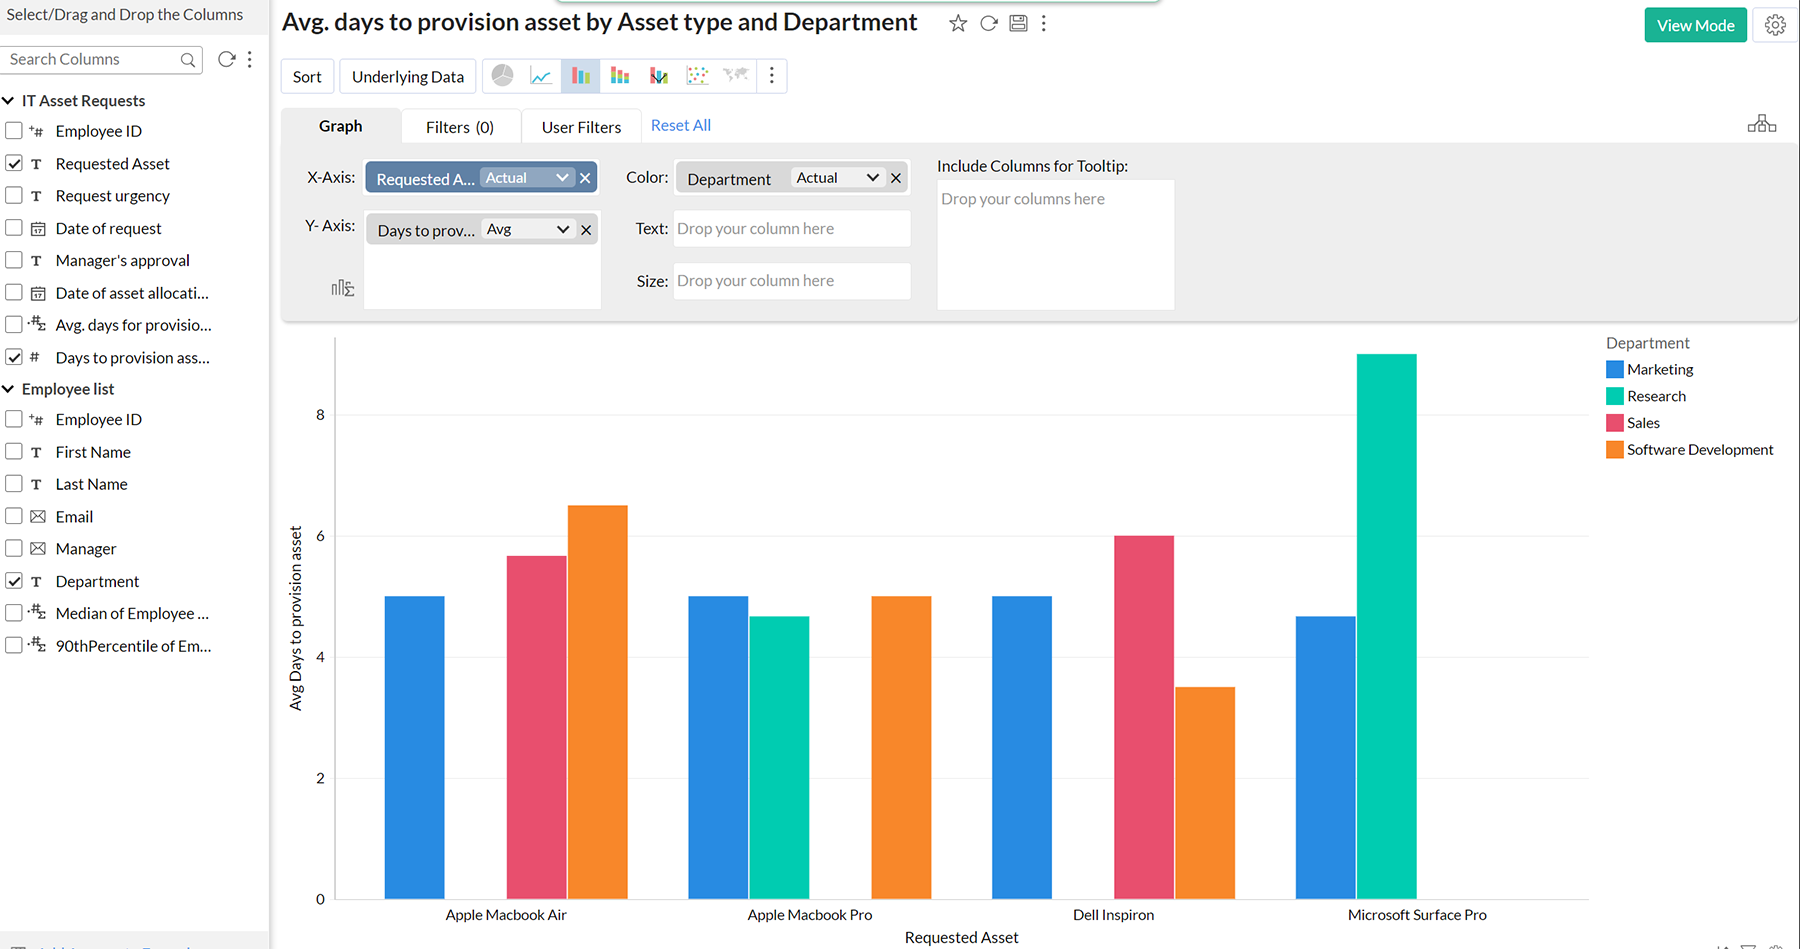
- Try creating more charts for average days to the provision by Asset type, request urgency by asset type, and others following the previous steps. You can also create tabular or summary reports to further simplify your data tables.
- Next, let's try creating a Dashboard, which is a collection of reports along with other custom elements. Click Create --> Dashboard. Name it Asset request report. Drag and drop the charts you have built from the left pane onto the dashboard builder.
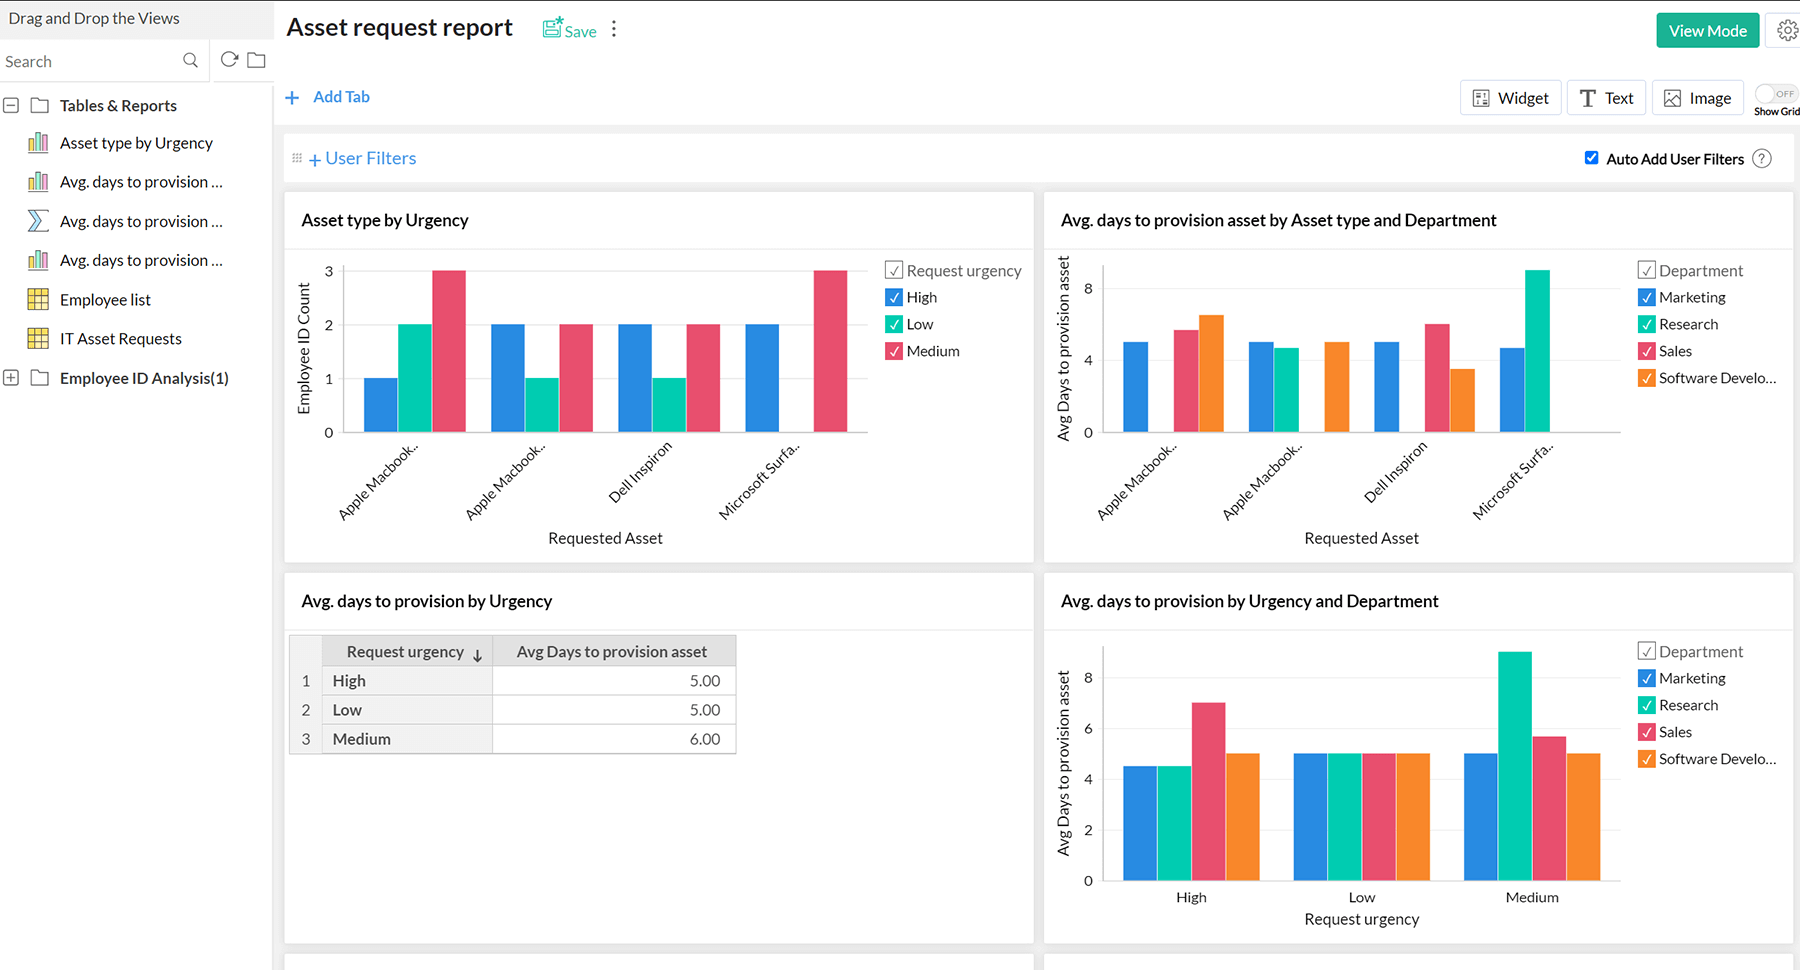
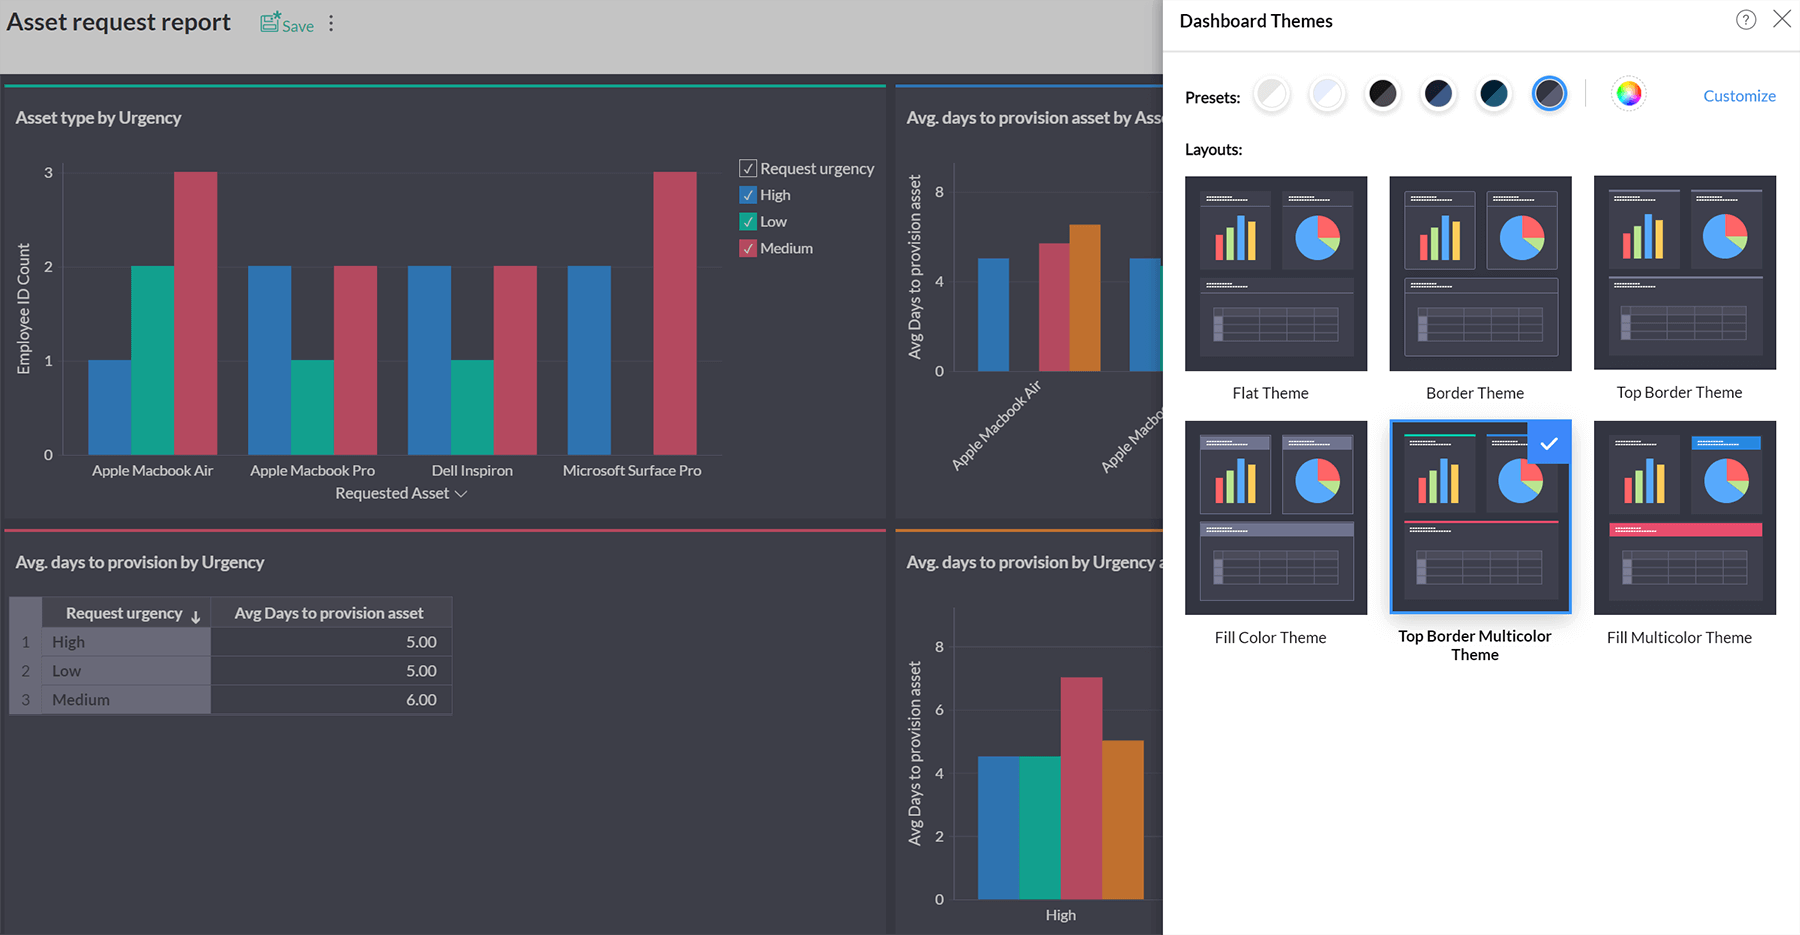
- Click View Mode in the top-right corner to view how the final dashboard will appear. Head over to Themes in the top-right corner in View Mode. Select a theme you like and see your dashboard come to life! Use the cog wheel to select or unselect other controls, such as the ability for users to view underlying data, use reports as filters for dashboards, and more.
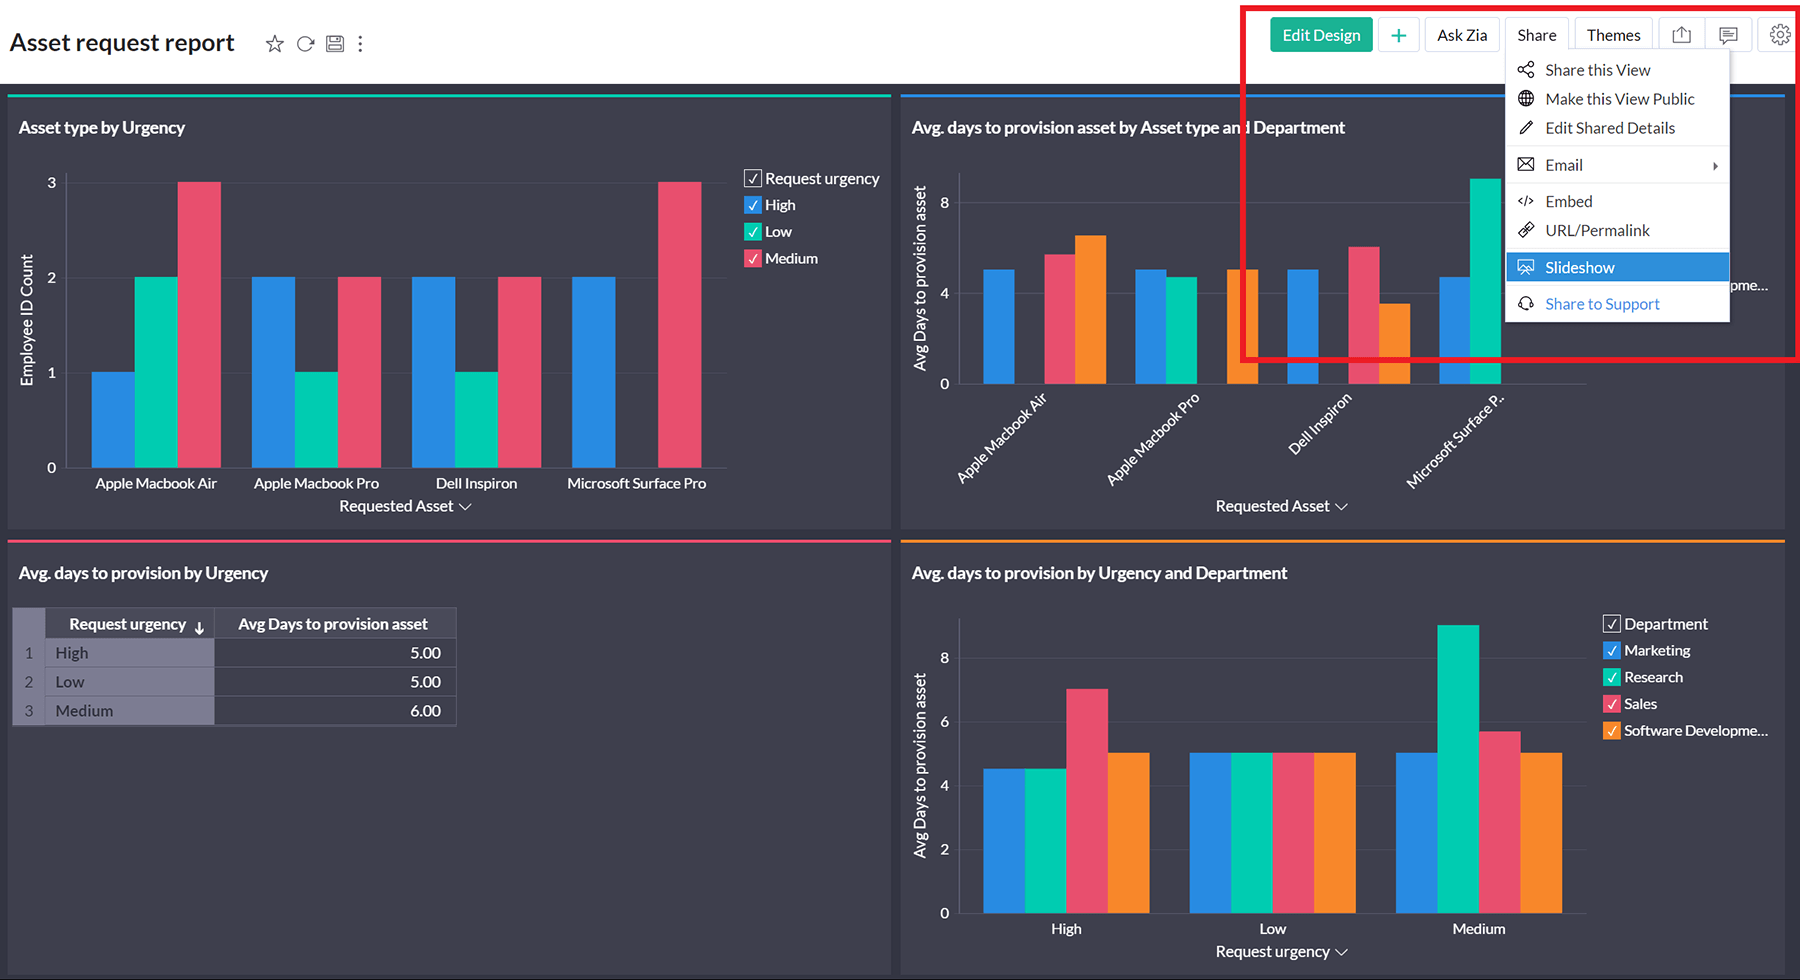
- Once you save the changes you've made, a Share option will appear in View Mode. You can use this to extend your dashboards as external shareable links or embed code for you to surface them in other digital realms, such as within your application.


Connect with other systems
In this section, we will take a quick look at how you can leverage Flows within the Creator platform to connect with an external application and orchestrate business process workflows visually. Flow has over 600 prebuilt integrations both within and outside the Zoho suite. Let's try making a quick backup of all the IT asset requests in Zoho Sheet (Zoho's online spreadsheet software) to archive request data in case of any quick audits or sharing.
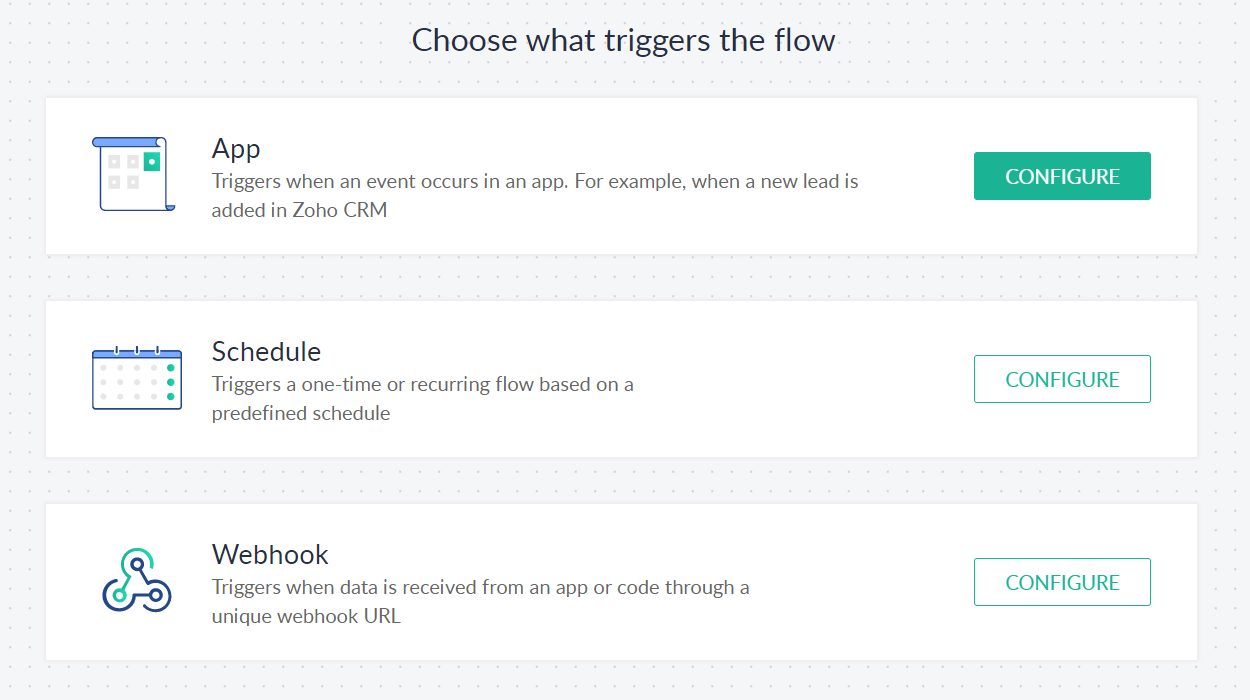
- Navigate to Develop --> Solutions. Click Create solution --> Flows --> Create from scratch.
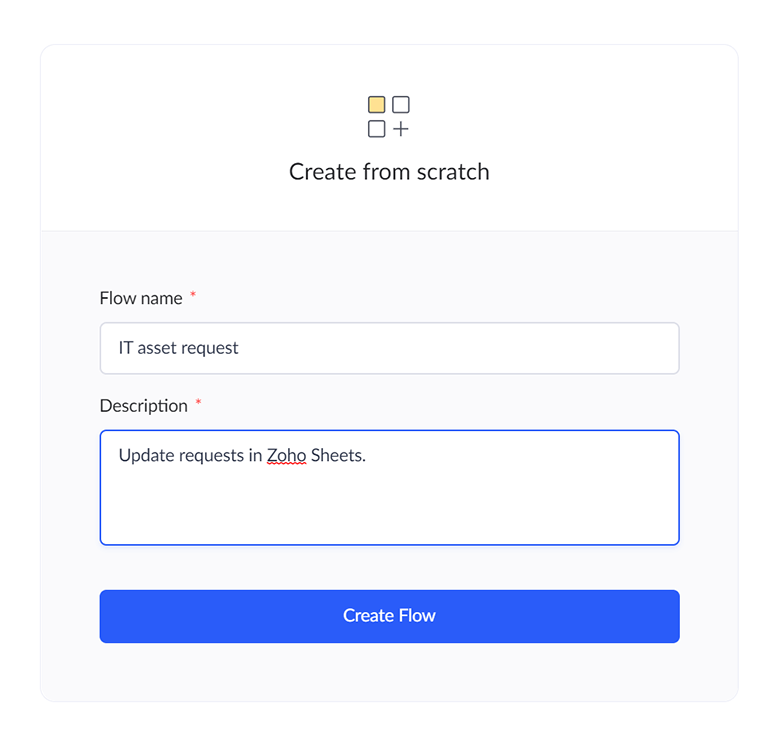
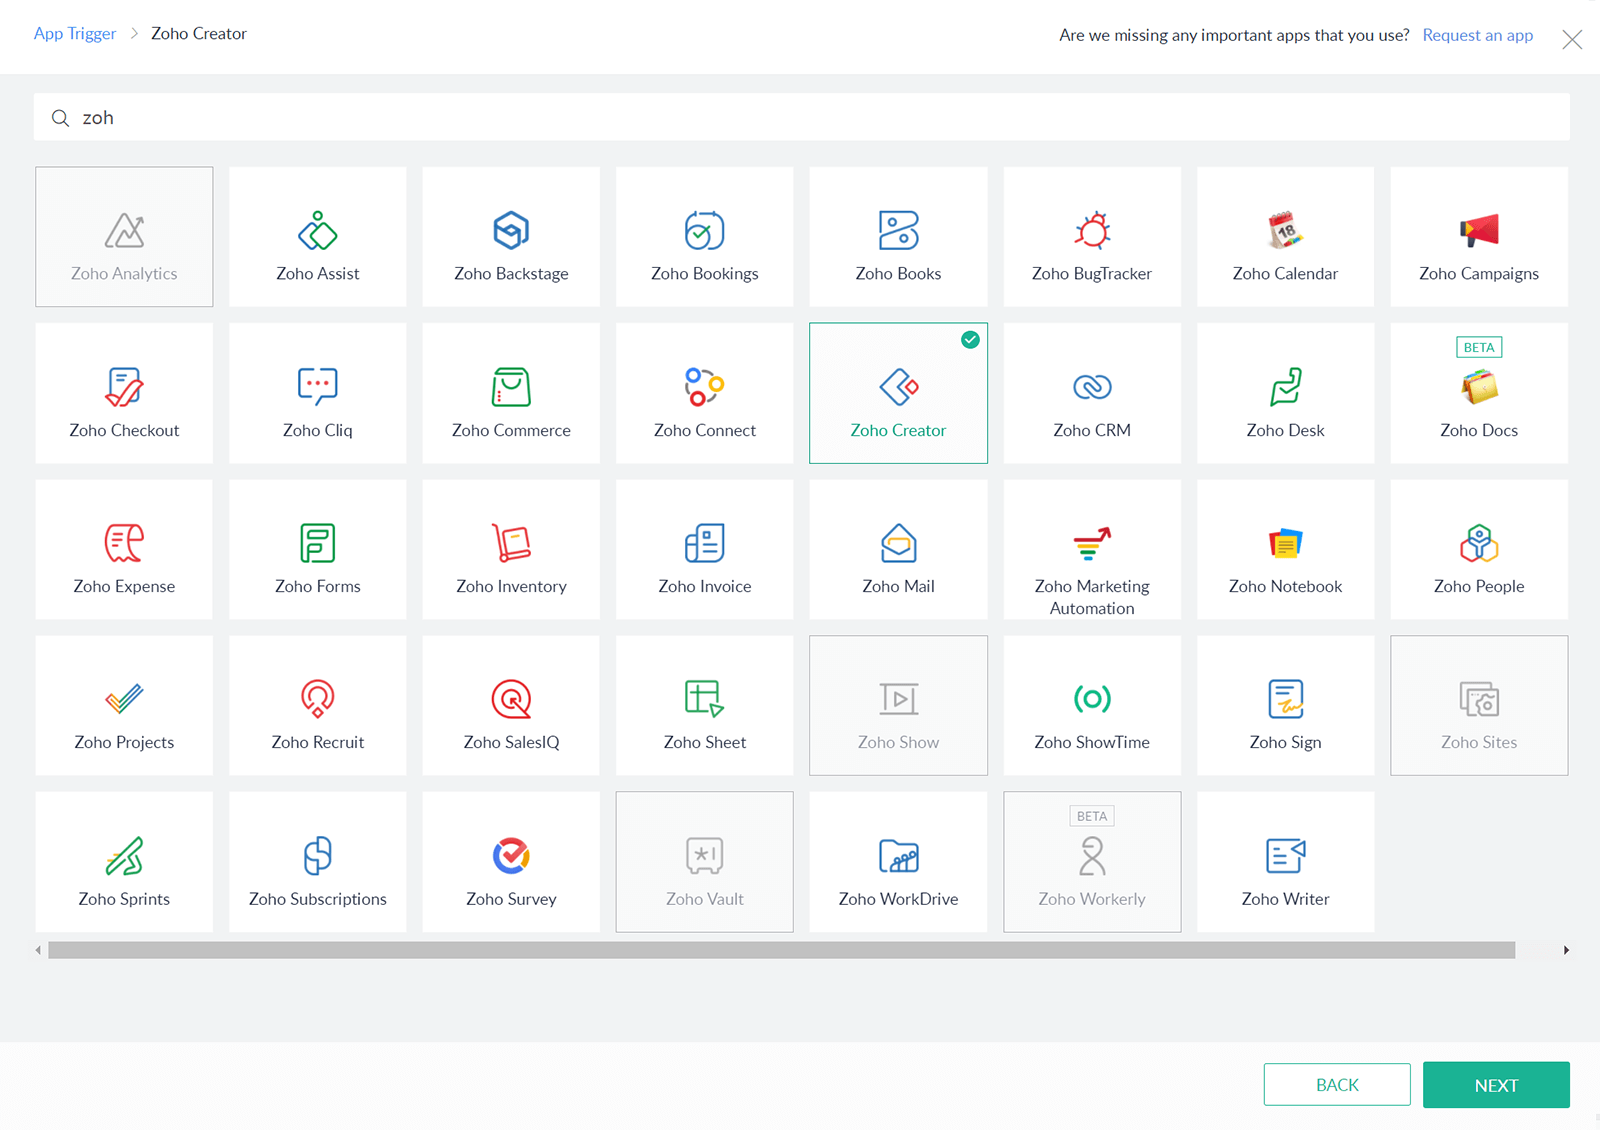
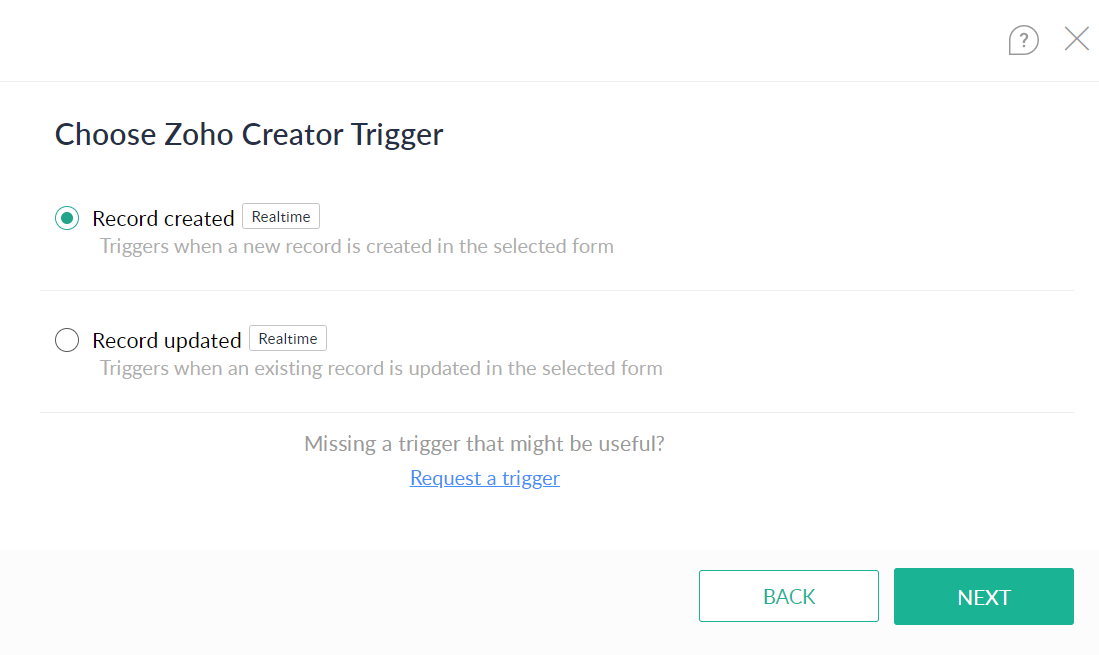
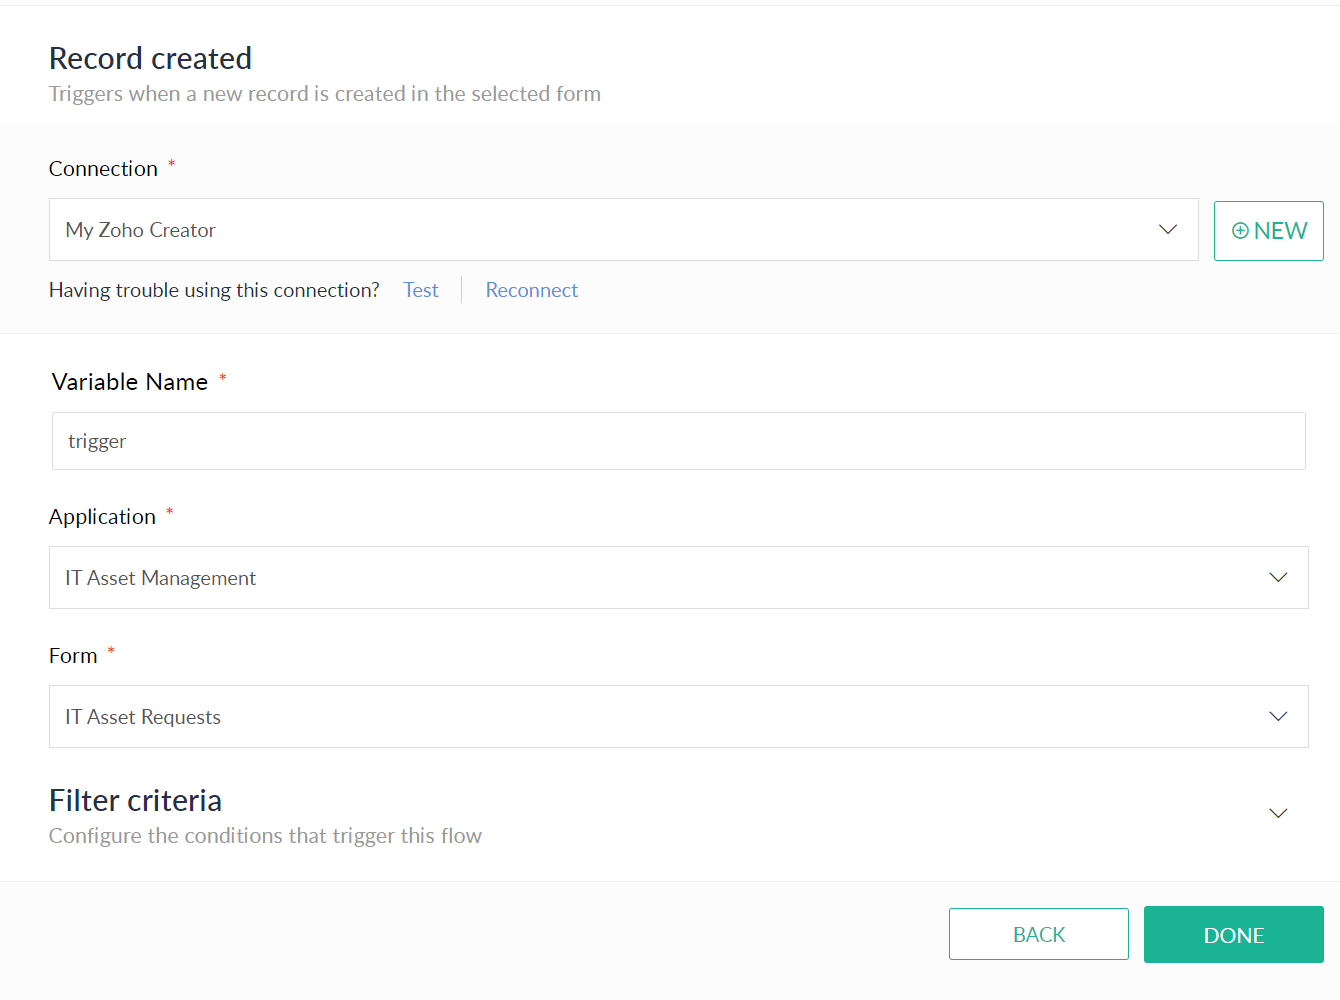
- Click App --> Configure and select Zoho Creator as the trigger from the list of integrations. Select When Record is created, then Save. This triggers this flow every time a new record is created in the IT Asset Requests form.
- Set Application Name --> IT Asset Management and Form to --> IT Asset Requests, then click Done.
- Head over to Zoho Sheet. Log in with the account you have created for Zoho Creator. Create a new spreadsheet. Name it IT Asset requests - Back-up. Add four column headers: Asset requested, Employee ID, Urgency, and Date of request, respectively.


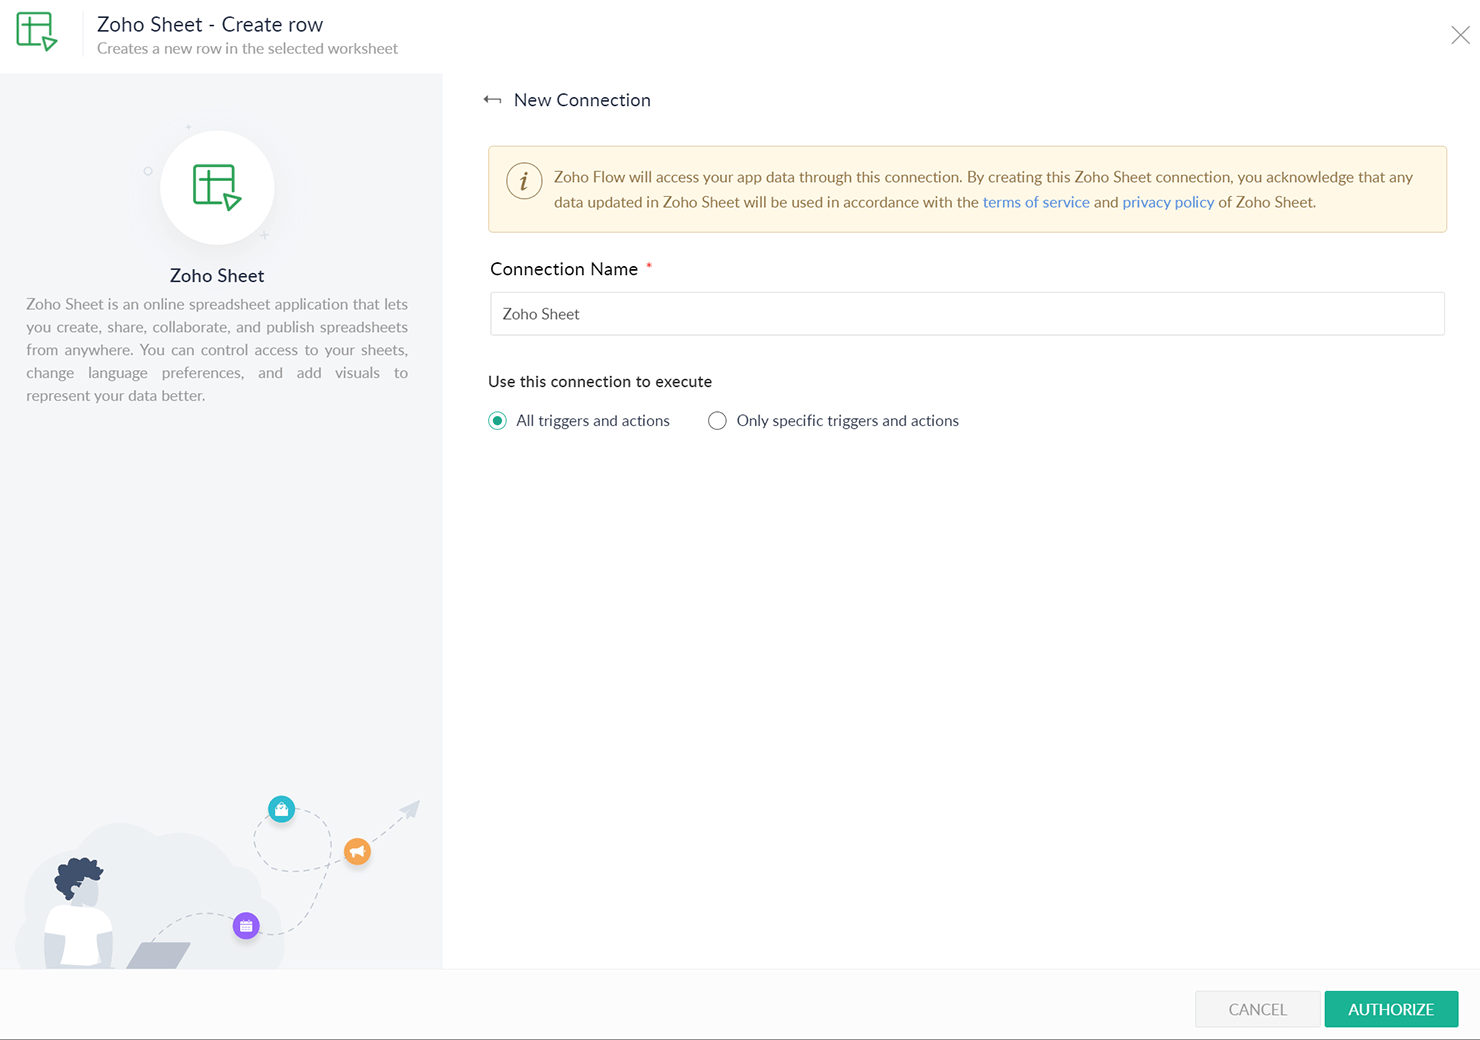
- Head back to the Creator platform. In the Flow designer, search for Zoho Sheet integration in your left pane. Drag and drop Create a new row as an action onto the Flow builder. Authorize the Zoho Sheet connection.
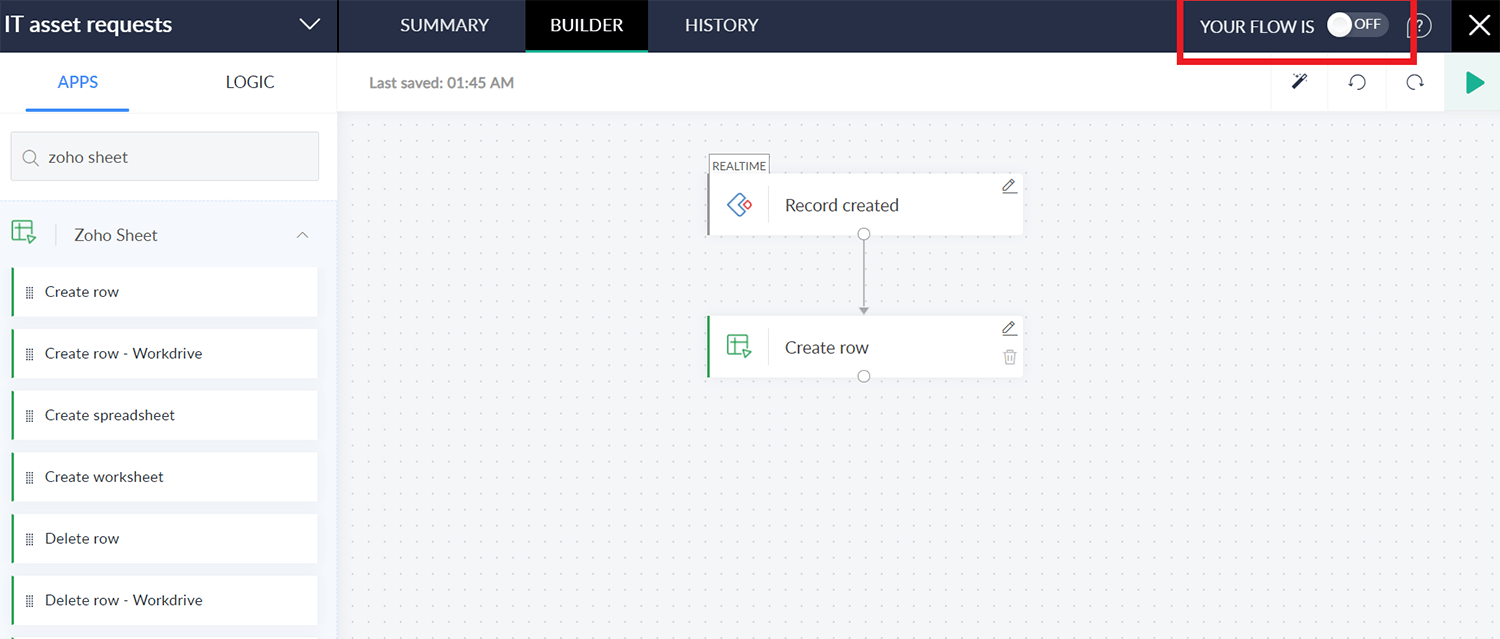
- In the action setup screen, simply set Spreadsheet --> IT Asset requests - Back-up and Worksheet --> Sheet1. For the four-column headers, you have added to the Sheet, drag and drop their corresponding fields from the Columns list in the pane to the right. Click Done once completed. Use the toggle in the top-right corner to activate the Flow.

- Try adding a new record in your IT Asset Request form in your app. A new row item is created in your sheet the moment the form is submitted!


Share your solutions
If you are on one of our paid or trial plans, you can add up to three users of the following types: Admins, Users, and Developers. As the owner, you would be assigned the role of a Super Admin by default.
While Admins have access to all your solutions, Users and Developers only have access to the solutions you wish to give them access to. Developers have access to edit the solution, add other users, and publish components, and Users are largely end-users of the who are within your Organization.
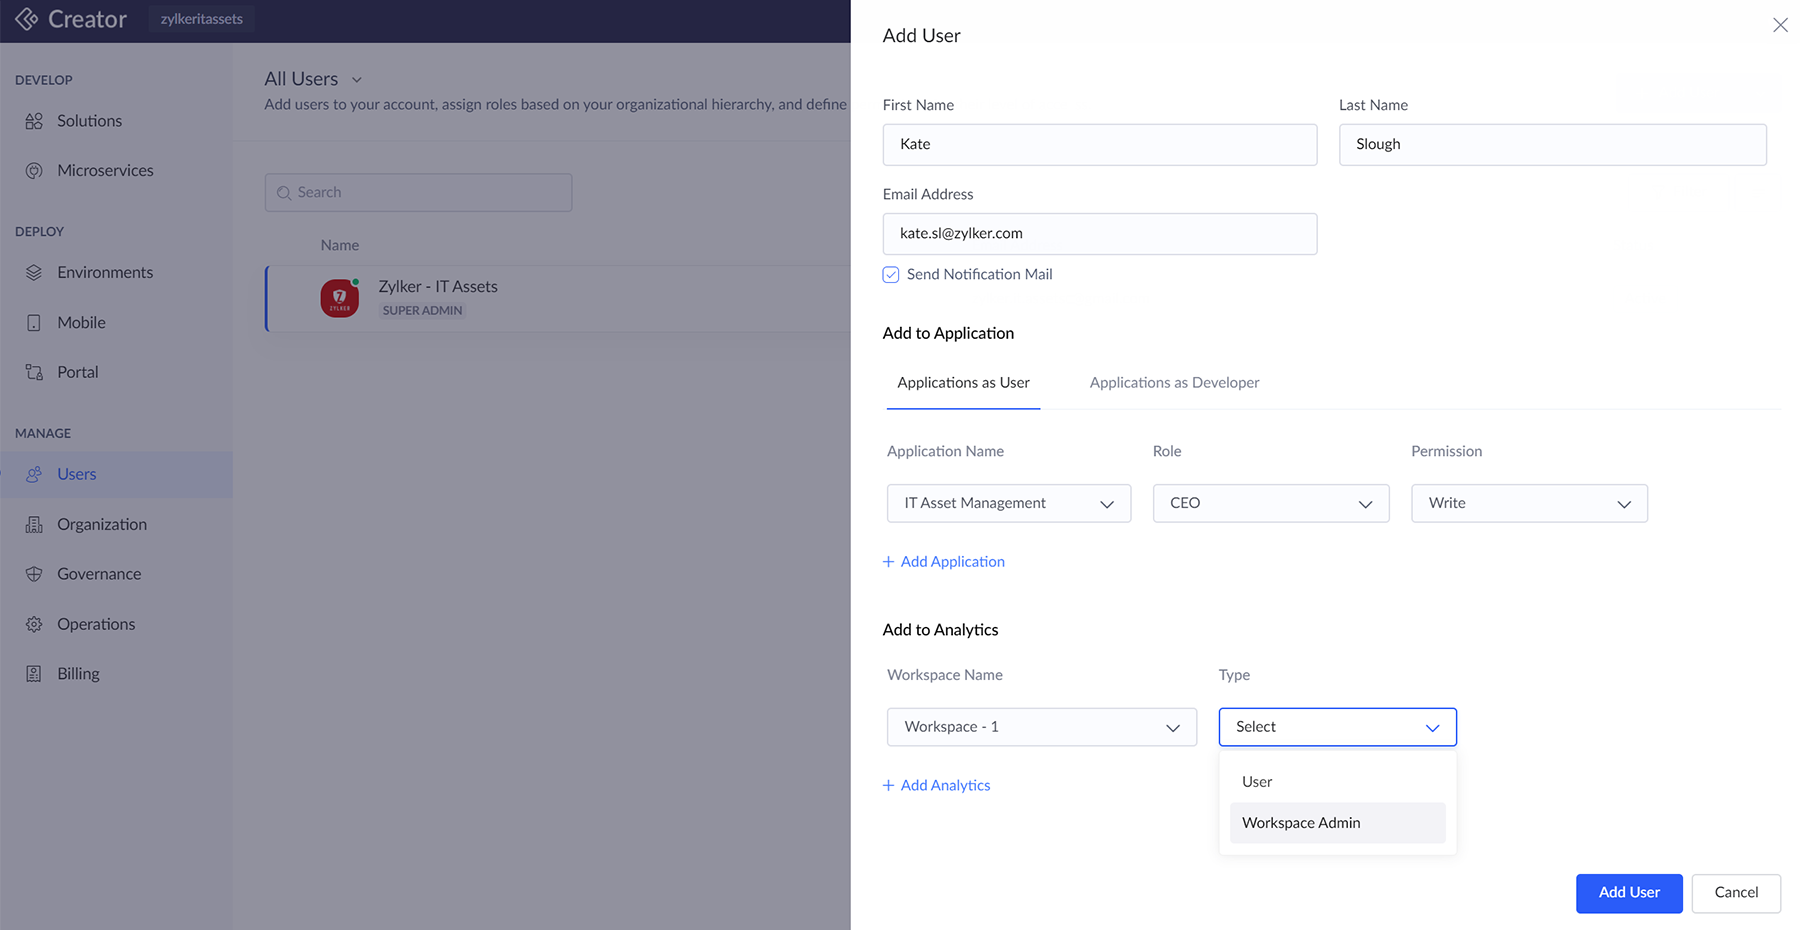
- Navigate to Manage --> Users. Click on Add user.
- Add user information and assign user roles and privileges for select or all solutions you have built, based on your choice.


Monetize
Now that your app is up and running, how about turning your hard work into earnings? With Zoho Creator, you have the chance to monetize your app and convert it into a lucrative asset by publishing it to millions of users on Zoho Marketplace.
Zoho Developer is a free platform for developers to create ready-to-deploy cloud applications, while Zoho Marketplace is a one-stop shop to find tools that can be integrated with Zoho applications to fulfill your business needs.
To monetize your app:
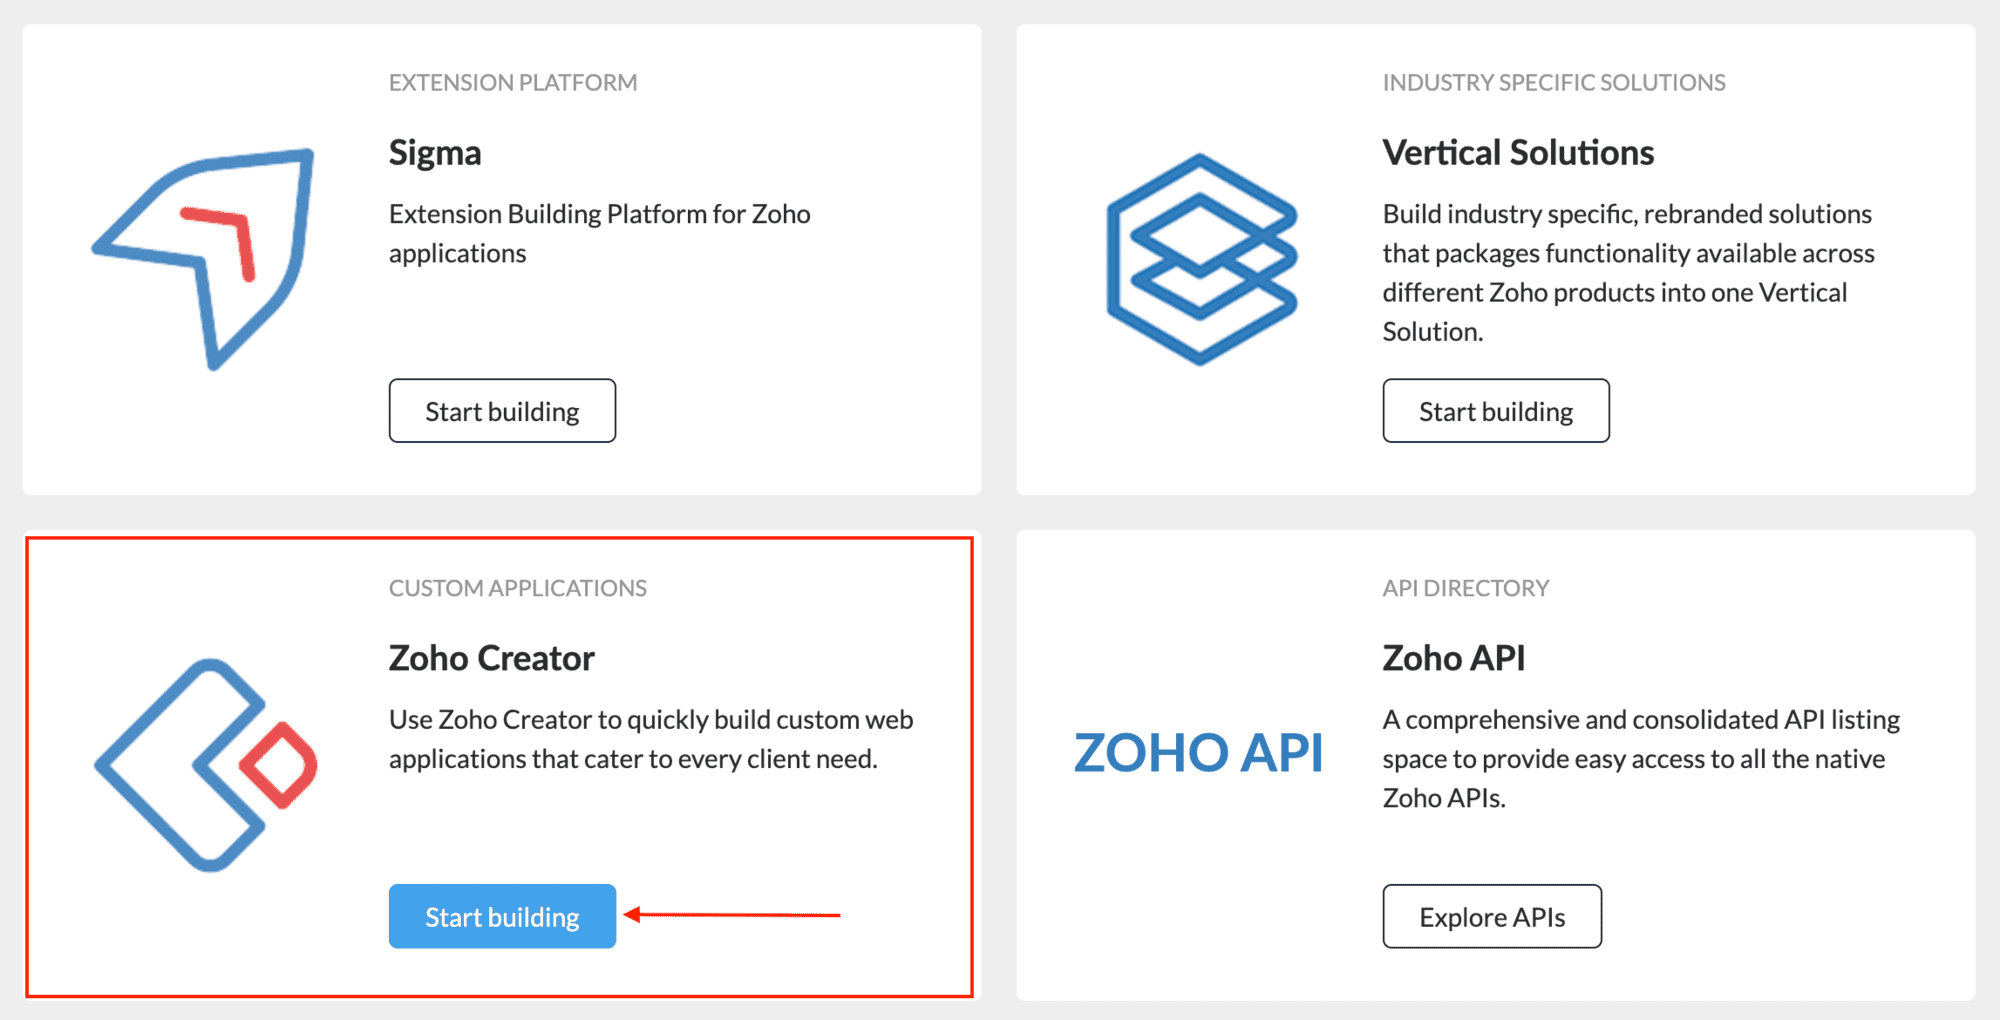
- Navigate to developer.zoho.com and choose the Zoho Creator card.
- As we've already built the IT Asset Management app, we can export the .ds file of the app from creator.zoho.com and create a new app here at the Creator Developer Zone account by importing the .ds file. Learn how to Export a DS file and create an application by importing a .ds file.
Additionally, you also have the option to build a new application from scratch or create an app by importing files.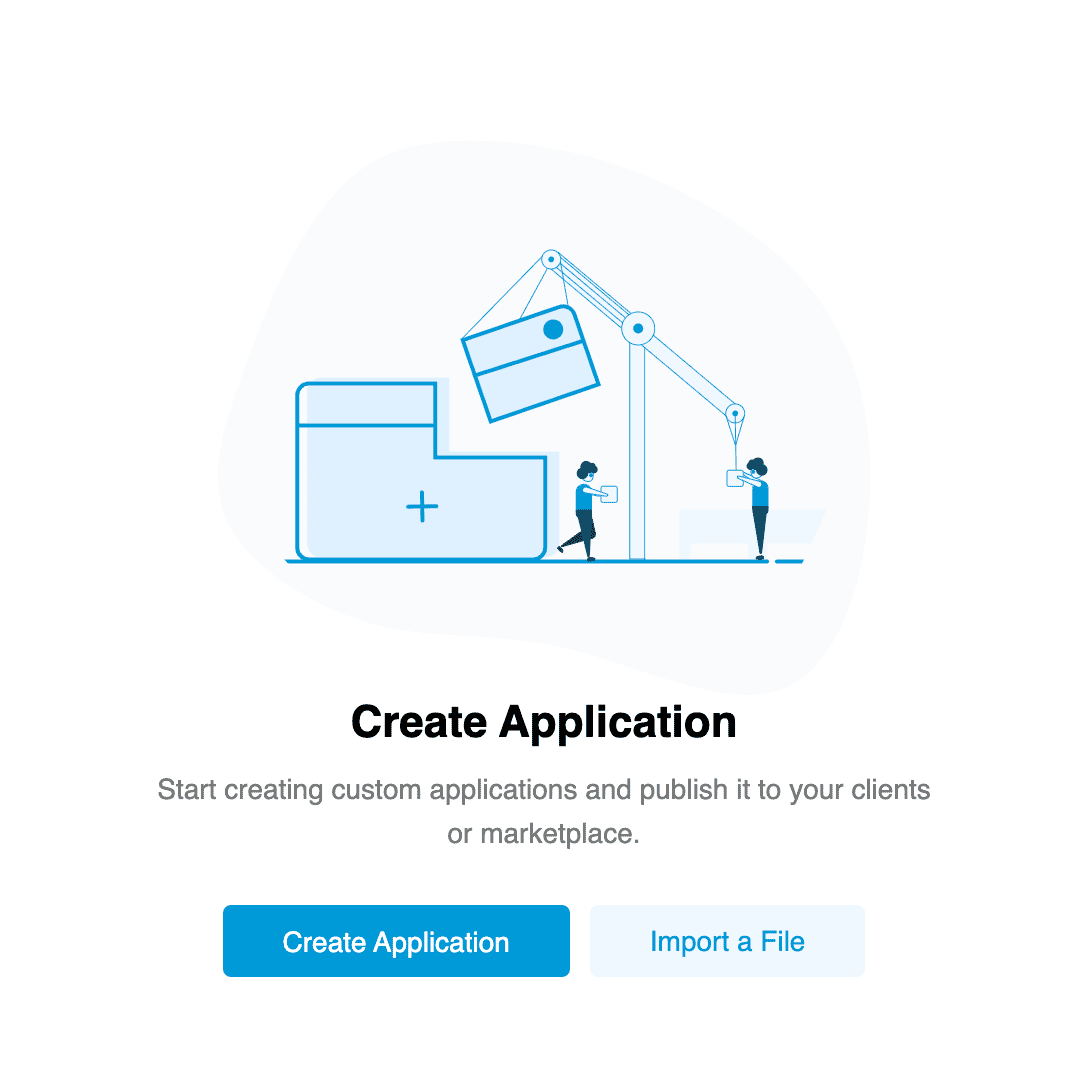
- Once you've completed app development, you can move on to publishing your app publicly, to all users on Zoho Marketplace. For more information, visit the Publishing Applications help doc.
However, before submission, you'll be required to furnish essential details, such as pricing, version name, and description. Once the app is submitted, our compliance team will review it before making it available on the Marketplace. For more information, visit the Review process for Zoho Marketplace help doc.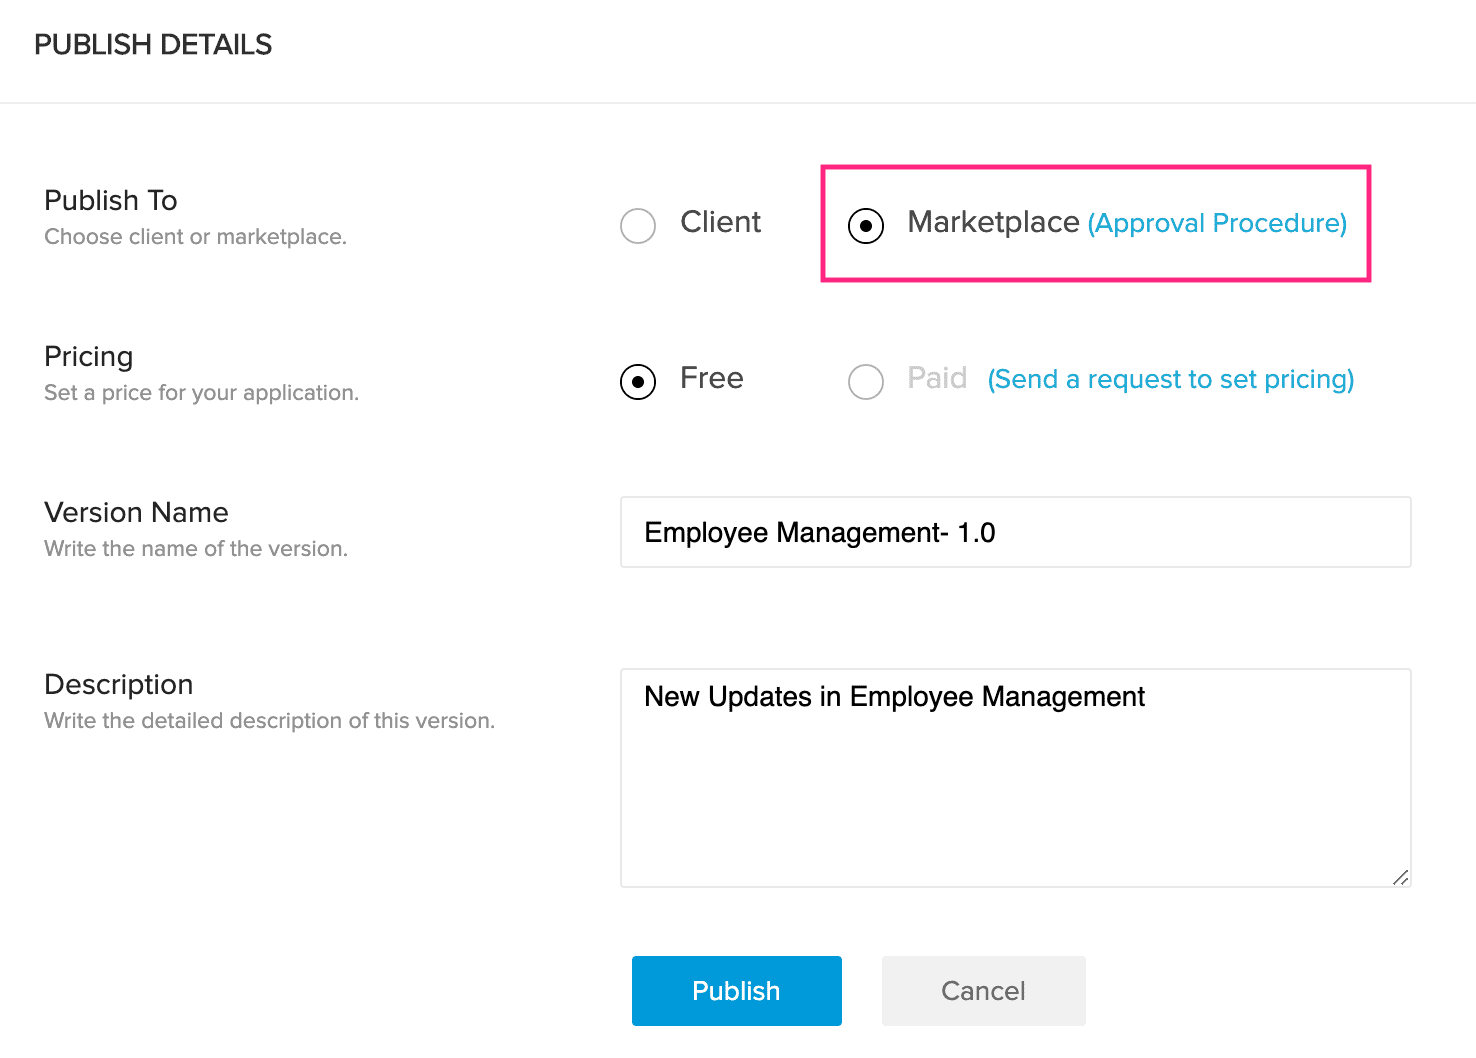
Additionally, you also have the option to share it privately with your client by using their email address. To share privately, select the Client option under the Publish To section.
It's crucial to note that the review process does not apply to private sharing. For more information, visit the Publishing to Client help doc.


And it gets even better!
The monetizing possibilities for developers expand, as Creator enables you to transform your widgets into extensions and publish them on the Marketplace. For more information, visit our extensions help docs.
What we've learned
We have successfully built a powerful online IT asset management solution that helps automate the routine while improving stakeholder and end-user experience.
Here's a summary of all the features of the Creator platform that we touched upon in this quick-start guide. Feel free to browse the quick links for more information on the facets we have glimpsed upon.
Manage business information
Collect data online
Streamline processes
- Blueprints and business process mapping
- Stages, transitions and transition owners
- Complementing blueprints with workflows
- How stakeholders can effect transitions
Monitor performance
Analyze and Report
- About Analytics
- Importing your app data into Analytics
- Data preparation and cleansing
- Joining tables and building data relationships
- Data transformations with Formula column and aggregated formula
- Create and customize chart-types
- Building and customizing a dashboard
- Sharing reports and dashboards