Deluge in Zoho Writer
Zoho Writer features that support Deluge
Zoho Writer supports Deluge in the following three areas (workflows):
- Sign template: Execute a Deluge function after a document is signed by all recipients
- Merge template: Execute a Deluge function on creation of documents from merge templates
- Fillable documents: Execute a Deluge function on submit of a fillable template
Workflow 1: Execute a Deluge function after a document is signed by all recipients
Zoho Writer offers a sign templates feature to let users send documents to recipients to sign while in the document. Deluge enables users to write custom business logic that will be triggered once a document is signed by all the assigned signers.
Navigation to Deluge
- Under Automate, click Edit in the Sign template card.
- Now, click the Configure Sign Collection button.
- In the pop-up that appears, go to the Advance settings tab, check the Execute a custom function checkbox and click Configure.
Let's imagine a client onboarding scenario. For easy maintenance, your organization's security team maintains Zoho Sign URLs of Terms and Conditions documents signed by all your clients in a Zoho Sheet document. Instead of manually entering the document URL in Zoho Sheet every time your organization closes a client, Deluge can help automate this process.
Follow the steps below to achieve this automation:
Create a Terms and Conditions document template and add sign configurations.
- Under Automate, click Edit in the Sign template card.
- Click the Configure Sign Collection button.
- In the pop-up that appears, go to the Advance settings tab, check the Execute a custom function checkbox and click Configure.
Click Connections at the top-right corner of the pop-up window and create a Zoho Sheet connection with scopes ZohoSheet.dataAPI.READ and ZohoSheet.dataAPI.UPDATE. Name the connection zohosheet.
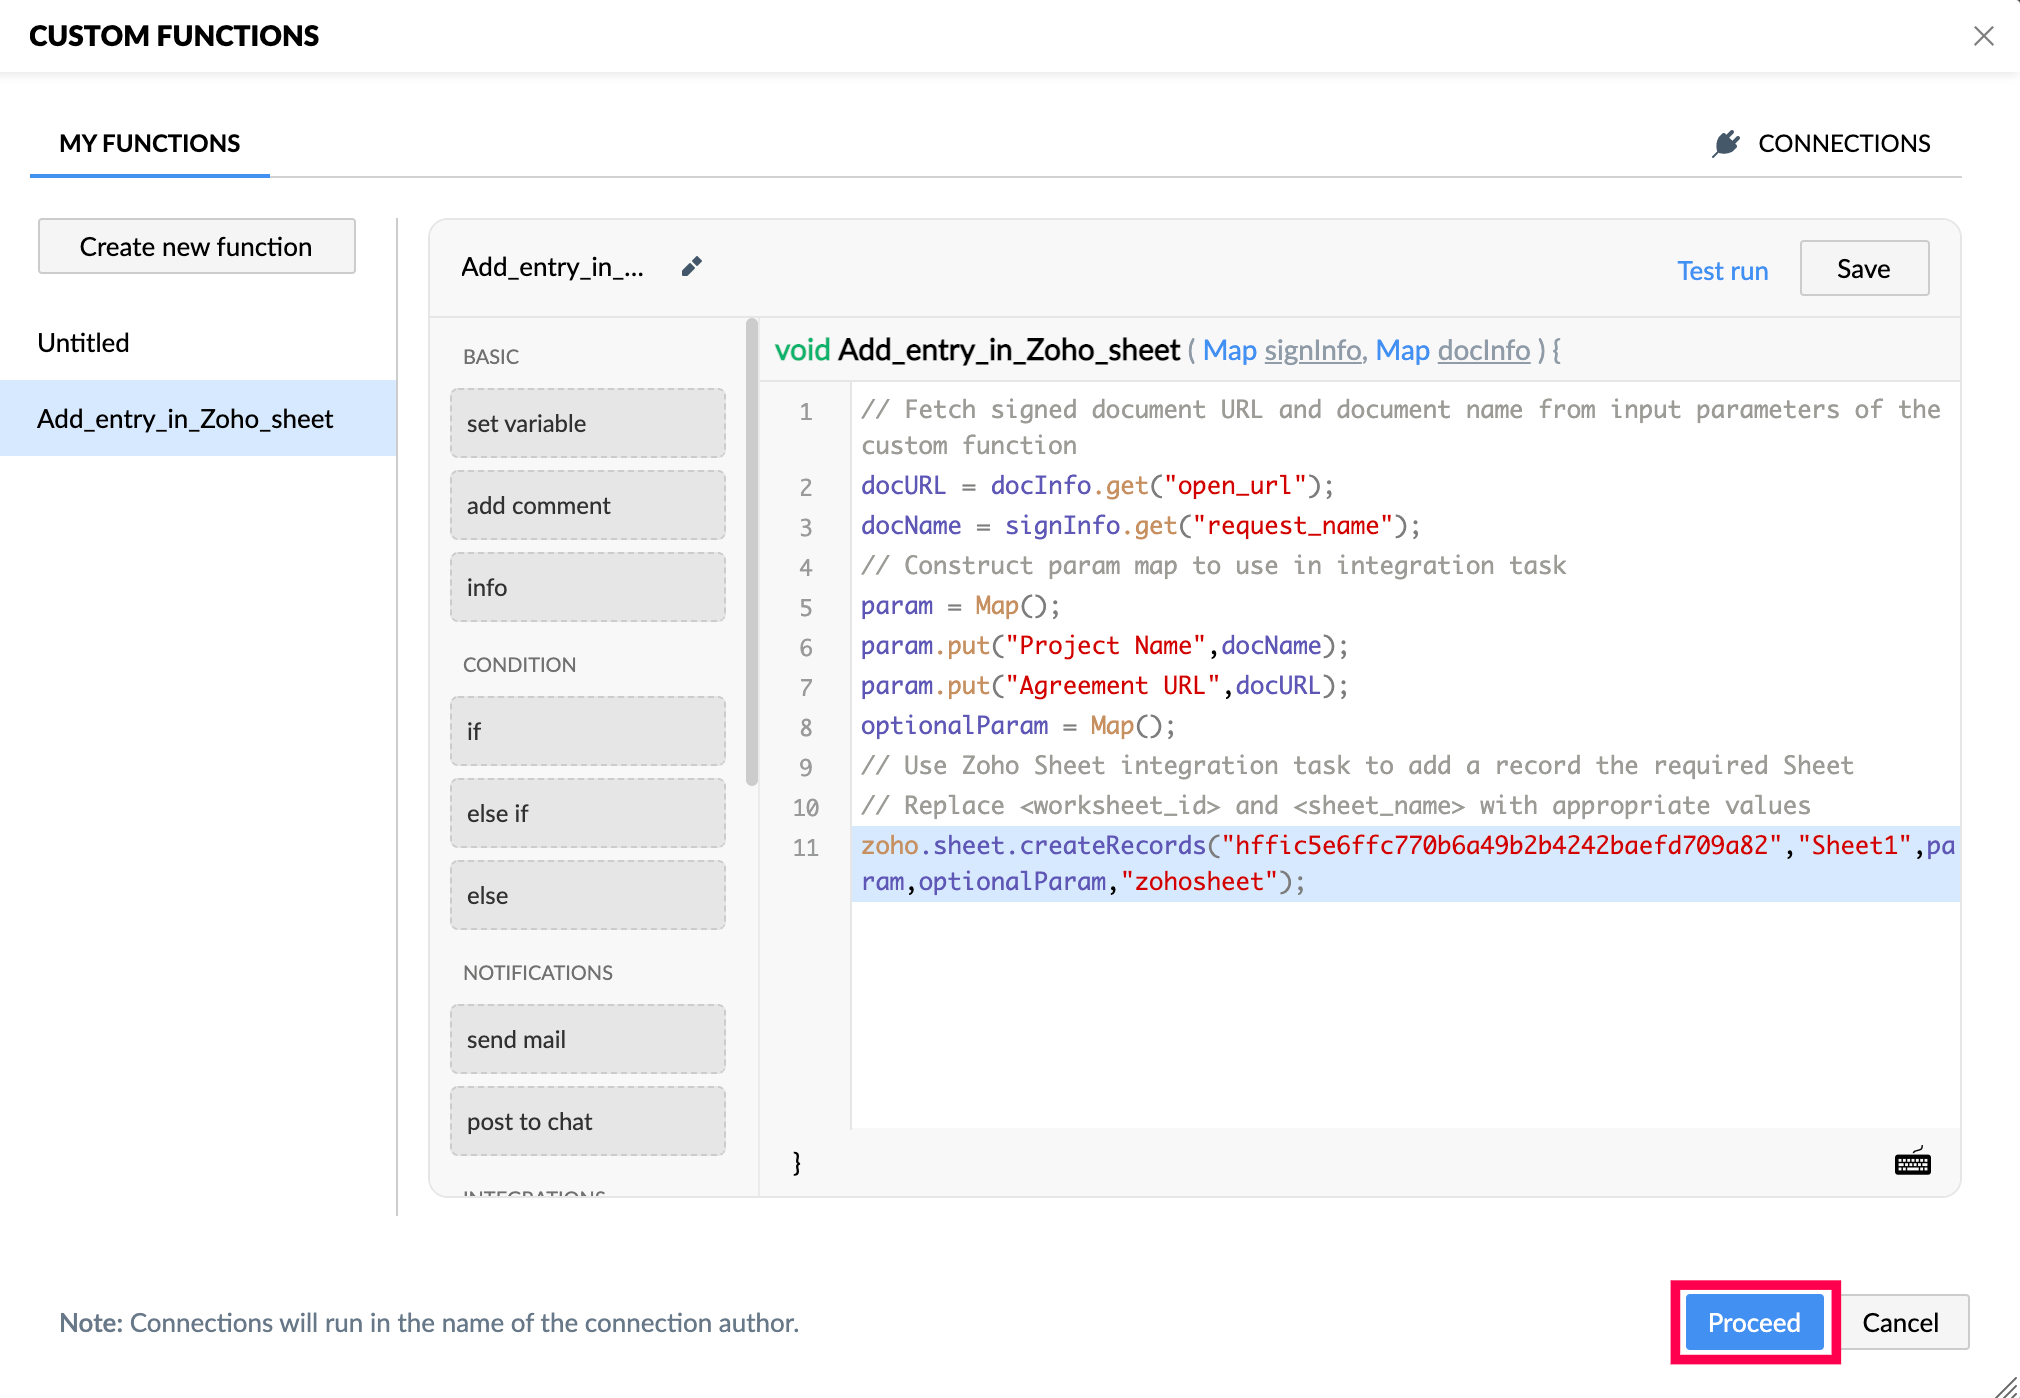
Note: This connection is used to authenticate the Zoho Sheet account in which the URLs will be maintained.In the Deluge editor, write the following script and click Save. You can use the Test Run button to test your script with dummy values.
// Get signed document URL and document name from the input parameters of the custom function
docURL = docInfo.get("open_url");
requestId = signInfo.get("request_id");

//Construct the request URL in Zoho Sign
signUrl = "https://sign.zoho.com/zs#/request/details/"+requestId;

// Construct a map with the titles from Zoho Sheet as keys, and the details fetched from input param as values
param = Map();
param.put("Project Name", docName);
param.put("Agreement URL in Zoho Sign", signUrl);
optionalParam = Map();

// Use a Zoho Sheet integration task to add a record the required sheet
zoho.sheet.createRecords("<worksheet_id>", "<sheet_name>", param, optionalParam, "zohosheet");
// Replace <worksheet_id> and <sheet_name> with appropriate values
- Click Proceed to link the custom function with the sign workflow.
- Step 4: Click Configure on the setup sign workflow pop-up, and send the document for signing.

Now, an entry will be automatically updated in the Zoho Sheet document as your client successfully signs the Terms and Conditions document.
Workflow 2: Execute a Deluge function on creation of documents from merge templates
Zoho Writer's merge templates can help create multiple documents from a single template based on a data source. You can learn about them here. In this workflow, custom automation using Deluge can be achieved on successful creation of merge documents.
Navigation to Deluge
- Under Automate, click Edit in the Merge template card.
- Now, click Configure next to the Save a copy to a folder output settings.
- In the pop-up that appears, check the Execute a custom function checkbox and click Configure.
Let's consider an interview scenario. The interviewer records candidate validation in a Zoho Sheet. At the end of the interview process, the validation results of all the candidates needs to be converted into individual documents (using Zoho Writer's merge templates) and attached in their respective records in Zoho Recruit.
The validation sheet is in the following format:
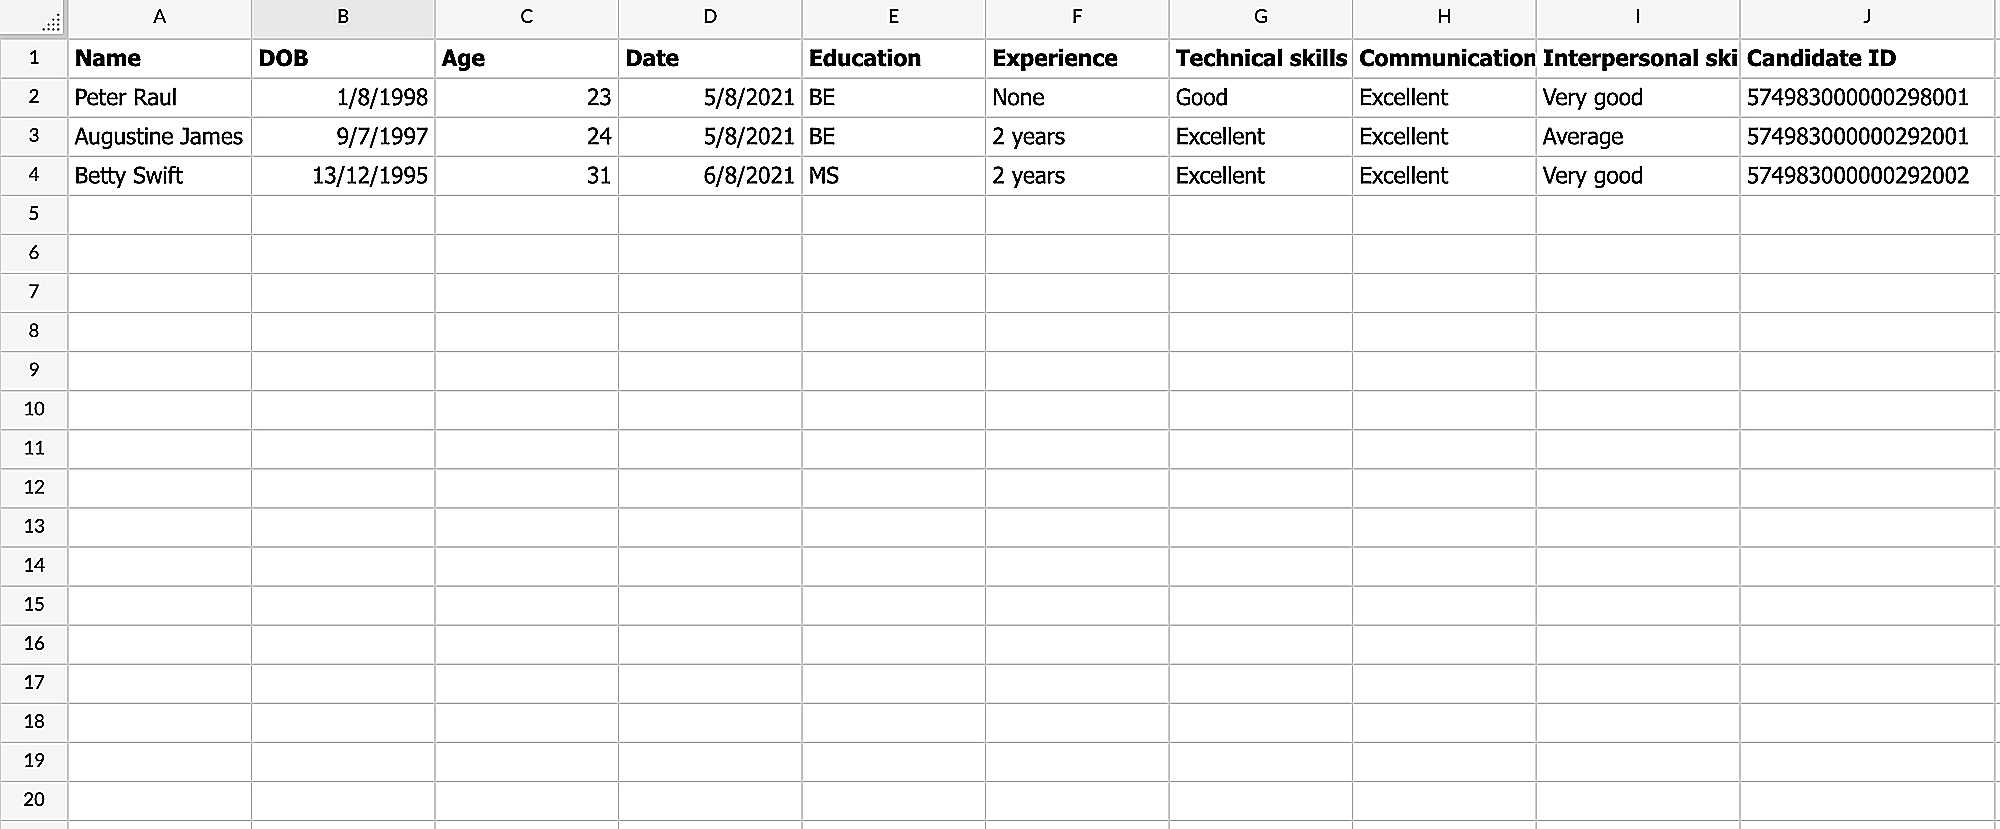
In the above template, the Candidate ID in the J column is the candidate's record ID in Zoho Recruit. Deluge can be employed to attach the new merged documents into the respective candidate records in Zoho Recruit automatically.
Follow the steps below to achieve this automation:
Create a template by including all the required merge fields and choose the candidate validation Zoho Sheet document as a data source.
- Under Automate, click Edit in the Merge template card.
- Now, click Configure next to the Save a copy to a folder output settings.
- In the pop-up that appears, check the Execute a custom function checkbox and click Configure.
Click Connections at the top-right corner of the pop-up window and create the following two connections:
i. A Zoho Workdrive connection named zohoworkdrive with scopes WorkDrive.files.ALL, WorkDrive.team.ALL, and WorkDrive.workspace.ALL.
ii. Zoho Recruit connection named zohorecruit with scopes ZohoRecruit.modules.all.
Note: These connections are used to authenticate the Zoho Workdrive account from which the merged document will be downloaded and Zoho Recruit account in which the candidate validation report will be uploaded.In the Deluge editor, write the following script:
// Get the required merged document details from the input parameter of the custom function
response = mergeEventObj.get("response");
mergedDocs = response.get("mergedDocInfo");
format = mergeEventObj.get("request").get("templateInfo").get("settings").get("output_format");

// Iterate through the collection of merged documents to individually upload in the respective Zoho Recruit records
for eachmergedDocinmergedDocs
{
    doc_id = mergedDoc.get("merged_document_id");
    merge_data = mergedDoc.get("data");
    record_id = merge_data.getJSON("Candidate ID");
    downloadurl = "https://workdrive.zoho.com/api/v1/download/"+doc_id;

// Download the merged file using Zoho WorkDrive API in invokeUrl task
    file_mergedDoc = invokeurl
    [
    url:downloadurl
    type:get
    connection:"zohoworkdrive"
    ];

// Uploaded the downloaded merge files in Recruit using Zoho Recruit API in invokeUrl task
    param = Map();
    param.put("id", record_id);
    param.put("content", file_mergedDoc);
    param.put("type", "Others");
    param.put("version", "2");
    response = invokeurl
    [
        url: "https://recruit.zoho.com/recruit/private/json/Candidates/uploadFile"
        type: POST
        parameters: param
        connection: "zohorecruit"
        content-type: "multipart/form-data"
    ];
}
- Click the Save & Link function button to link the function with the merge template workflow.
Workflow 3: Execute a Deluge function on submit of a fillable template
Deluge can be used to customize actions after submitting a Zoho Writer fillable template.
Navigation to Deluge
- Under Automate, check the Trigger webhook & custom function checkbox in the On submission card.
- In the pop-up that appears, check the Execute Custom Function checkbox and click Configure.
Let's assume you send a fillable document to your customers to get their feedback. You can use Deluge to automatically notify your support team about any feedback with a rating lower than 3.
Follow the steps below to achieve this automation:
- Under Automate, check the Trigger webhook & custom function checkbox in the On submission card.
- In the pop-up that appears, check the Execute Custom Function checkbox and click Configure.
In the Deluge editor, write the following script and click Save:
// Get signed document URL and document name from input parameters of the custom function
filledData=fillInfo.get("filled_data");
rating=filledData.get("Rating");
email=filledData.get("Email");
feedback=filledData.get("Feedback");
name=filledData.get("Name");

// Construct a text to send as an email
messageText="<p>Team, let's look into this feedback.</p><p><b>Customer Email:</b> "+email+"</p><p><b>Customer Name:</b> "+name+"</p><p><b>Feedback:</b> "+feedback;

// If the rating is lower than 3, send an email to the support team
if(rating<3)
{
sendmail
    [
    from:zoho.loginuserid
    to:"support@zyllker.com"
    subject:"Unhappy customer"
    message:messageText
    contenttype:HTML
    ]
}
- Click Proceed to link the workflow with the On submission action of the fillable field.
Now that the configuration is set, the support team will be automatically notified about feedback when it has a rating lower than 3!