Using Custom Buttons
How Can I...
In addition to modules, fields, pages, links, and a lot of other elements, Zoho Developer also allows you to create new button actions with the help of a feature called Custom Buttons. These buttons can help your subscribers perform predefined actions with a single click.
Zoho Developer has some standard buttons that are used to execute various predefined actions. For example, Convert is a standard button used to convert a Lead to Contact, Account or Potential. Similarly, Clone is another standard button that is used to clone any record within your CRM account. By default, these buttons will be available to your Vertical CRM application. Likewise, you can create new buttons and define a set of actions based on your requirements.However, you cannot add a custom button in the activities module. Custom Buttons can be used to connect your CRM with third party applications, connect different CRM modules or connect with other Zoho applications.
Create Custom Button
To create a custom button
- Log in to Zoho Developer Console and click CRM for Verticals
- In the Vertical CRM page, select the application in which the field has to be added.
- Click Customize in the left pane and select Buttons tab at the top of the page.
- In the Buttons page, click Create New Button.
- In the Create Your Button page, do the following:
- Choose the module where you want to create a custom button.
- For easy identification, name your button.
The button name should not exceed 30 characters. - Click the Add Description link and specify the details of your custom button.
The description should not exceed 250 characters. - Choose the location of your custom button from the drop-down list.
Custom buttons can be placed in 5 different places in your CRM - Create/Clone page, Edit page, View page, List View page and next to each record in the list view.
Note that you can add a maximum of 2 buttons in each of these locations.
- Choose an action to be executed when a user clicks the custom button. You can either define your own action by writing a custom function or invoking a URL based on your needs.
It is mandatory to choose the button action.
- Select the profiles that will be able to acess this button.
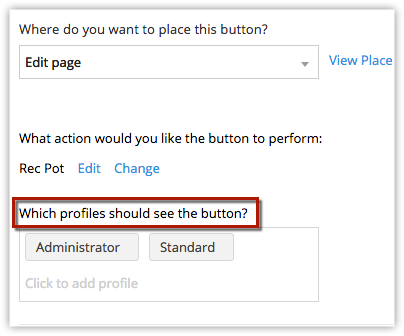
- Click Save.


Define Button Action
Every custom button should be associated with an action when a user clicks the button. You can choose the button action in any of the following ways:
- Write your own custom functions (powered by Deluge Script Editor)
- Invoke a URL.
Write your own custom function
Using our Deluge Script Editor, you can start defining your own button action by writing a new custom function. See Also Deluge Script - Reference Guide .
To write your own custom function
- Create a custom button and choose your button action as Writing Custom Function from the drop-down list.
- In the Deluge Script page, do the following:
- Specify your Function Name.
- Write your required function in Deluge Script Editor. See Also Program Custom Functions
- Click Save and Execute Script to validate your code.
If there are no errors, your script is ready to associate with the custom button.
- Click Save.
The script will be associated with the custom button. Choose different user profiles to check who can access the custom button and click Save in the Create Your Button page. Whenever you click on the custom button, the associated function will be triggered and the required action will be performed in one click.

Response Tracking
You can create an alert or show a pop-up notification whenever users click on the custom button. This response should be configured while writing the custom function using the deluge script editor. If any open URL tasks are configured in custom function, the last open URL task will be opened as per your configuration either in a new tab or a new window or a pop-up window. By default, empty string will be returned for every custom function that you associate with your custom button.
Custom Functions Limits:
The overall custom functions usage limits is shown below. This limit is applicable for the custom functions used for workflow automation, custom buttons and custom related lists.
Integration Tasks - 25000 API calls/day using deluge.
Get Data - 25000 calls/day
Post Data - 25000 calls/day
Send Email - 1000 emails/day
Note
- Workflow rules can also be triggered through the custom function executed from custom button by using the CRM API integration tasks inside Deluge Scripting.
Invoke a URL
Using Invoke a URL, you can allow your users to open a URL in a click of a button. This will open a desired action either on a new window, on the existing window itself or on a new tab.
Here is an example that shows how you can invoke a URL using a custom button.
Visit Company profiles of Leads in CRM: You can include a custom field in your contacts module, where your subscribers can specify the Company Name. By creating a URL that is associated with a particular company, they can directly go to the account's company profile by just clicking the custom button (This custom button can be placed while creating, cloning or viewing a record based on your requirements). For example: The link can be: http://techcrunch.com/topic/company/${Accounts.Company}
Note
- The content of the URL can be dynamic and you can merge the URL with module fields. In case of List view, the merge fields should be comma separated.
To invoke a URL in a click of a button
- Create a custom button and choose your button action as Invoking a URL from the drop-down list.

- Enter the value to construct the URL.s
The URL length should not exceed 3000 characters. - Select the Fields from the drop-down list. This will insert the field variable as part of the URL.

- Choose where you want to show the button action.
- Select the profile to which the custom button needs to be accessible.
- Click Save.


Edit Custom Button
You can edit the existing custom buttons whenever required.
To edit a custom button
- In your application's homepage, clickCustomize in the left pane and select Buttons tab at the top of the page.
In the Buttons page, all the existing custom buttons will be listed. - Choose the required button that you want to edit and click the Edit icon.
- In the Edit Your Button page, edit the button name, button action, etc. as per your requirements.
Delete Custom Button
You can delete the custom button anytime.
To delete a custom button
- In your application's homepage, clickCustomize in the left pane and select Buttons tab at the top of the page.
In the Buttons page, all the existing custom buttons will be listed. - Choose the required button that you want to delete and click the Delete icon.