Creating Custom Fields
How Can I...
In Zoho Developer, you can add new fields as per your requirements. These fields will be available to all subscribers of your vertical CRM.
Custom Fields
For almost all of the fields that you create, you need to specify the following:
- Label: Specify a name for the field.
- Section Name: Choose a section under which the field should be listed. Whenever required, you can change the placement of the field in any other section.
Other specifications required for each type of field:
| Field Type | Other Details |
| Text | Length: Maximum 255 characters are allowed. |
| Integer | Length: Maximum 9 digits are allowed. |
| Decimal | Length: Maximum 16 digits (including decimal places) are allowed. |
| Percent | Label: Specify the field name |
| Currency | Length: Maximum 16 digits are allowed. Rounding Option: Specify the rounding option Decimal Places: Specify the number of decimal places Precision: Specify the rounding precision |
| Date | Format: YYYY/MM/DD Note:Date format will be changed according to user's time zone settings. |
| Date & Time | Format: YYYY/MM/DD HH:MM Note:Date format will be changed according to user's time zone settings. |
| Specify a valid email address | |
| Phone | Specify a valid phone number |
| Pick list | Pick List Values: Specify the pick list values |
| Multi-select Pick list | Pick List Values: Specify the pick list values |
| URL | - |
| Text Area | Specify the Character limit: Small is 2000 characters, Large is 32000 characters. Text Area Large will not be available while adding criteria in any feature. Both Text Area Large and Small cannot be used for sorting records in ascending or descending order. |
| Checkbox | - |
| Auto Number | Prefix: Specify the prefix of the auto-number sequence Starting Number: Specify the starting number of the sequence Suffix: Specify the suffix of the auto-number sequence Existing Records: Select the checkbox to apply auto-number to existing records. |
| Lookup | Lookup Type: Select the module for which you like to establish relationship Related List Label: It is the name you give to the entity that will be created under the record's details. For example, Attachments, Contact Roles etc. (Available in Paid Editions of Zoho CRM except the Standard Edition) |
| Long Integer | Maximum 18 characters are allowed (Available in Paid Editions of Zoho CRM except the Standard Edition) |
Custom Field Limits
There is a limit to the total number of fields that you can create in you account and also a limit to the type of fields that you create. The maximum number of fields that you can create is 500 per module. Similarly, there is also a maximum limit for each type of field that you create that is provided in the table below.
| Field type | Maximum Limit |
| String fields (Text, Pick List, Multi-select Pick List, Email, Phone, Text Area, URL, and Auto Number) Maximum 10 Text Area fields | 200 |
| Integer Fields (digits without decimal) | 40 |
| Number fields (Decimal, Percentage, and Currency) | 40 |
| Date Fields | 50 |
| DateTime Fields | 50 |
| Boolean (Check box) | 80 |
| Long Integer Fields | 35 |
| Lookup Fields | 5 |
| Auto-number Fields (Included in the total no. of Text fields) | 1 |
| Formula Fields (Included in the total no. of custom fields) | 15 fields/module |
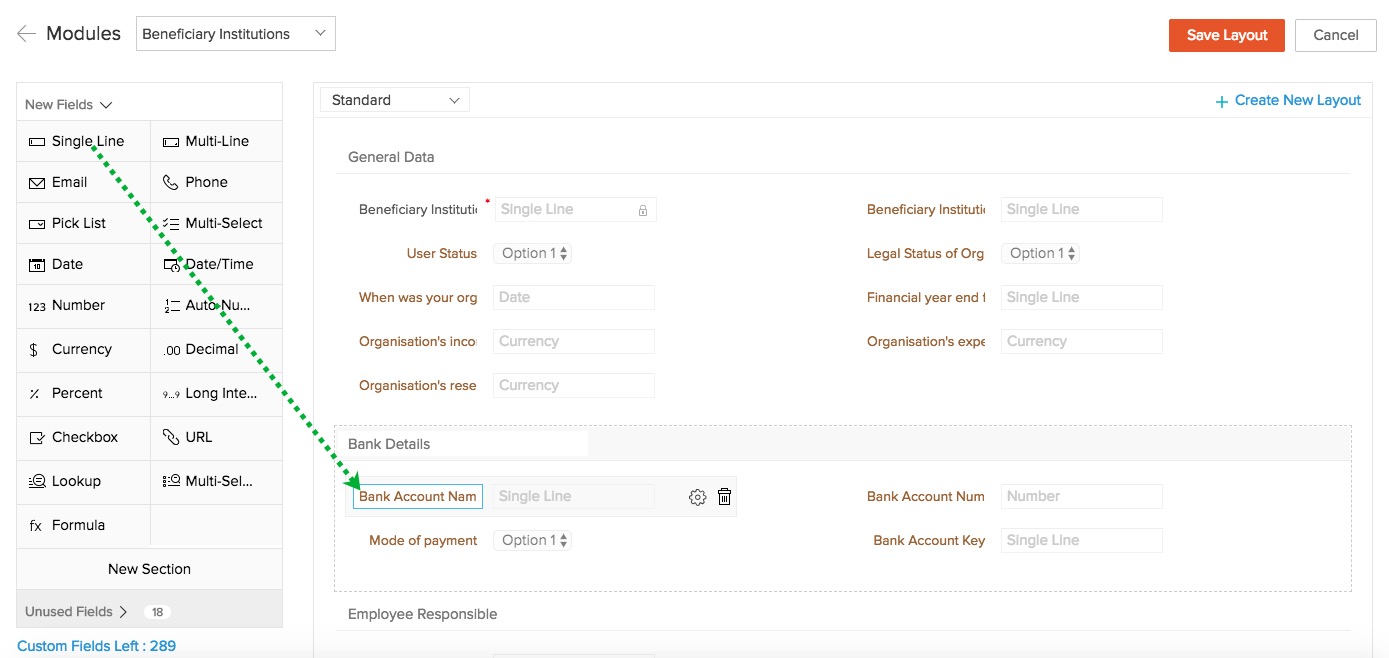
Add Custom Fields
In each module, you can add custom fields to capture important data specific to your business requirements by specifying some field-related information. You can also add custom fields to the custom modules that you create.
To add custom fields
- Log in to Zoho Developer Console and click Vertical Solutions
- In the Vertical CRM page, select the application in which the field has to be added.
- In the App Details page, click Modules in the left pane.
- In the Modules page, click the name of the module in which you want to add the custom field.
- Drag-and-drop the required field type from the New Fields panel and enter a label for the field.
- Click Save Layout.

Note
- The Also create for Accounts, Contacts, Potentials option will be available only while creating fields for Leads.
- The Also create for Sales Orders, Invoices option will be available only while creating fields for Quotes.
- Once the field is created, you cannot change the 'data type' of the field. For example, an Integer (digits) field cannot be changed into a Currency field.
- You can edit the custom fields to change the length of the following types of fields. - Currency, Text, Number (Integer), Decimal, Phone, Long Integer and URL.
- You cannot add custom fields in the Log a Call page. However, you can customize the existing fields using page layout customization.
Edit Custom Fields
To edit custom fields
- Log in to Zoho Developer Console and click Vertical Solutions
- In the Vertical CRM page, select the application that contains the field to be edited.
- Click Customize in the left pane and select Fields tab at the top of the page.
- Select the module from the drop-down list.
All the existing fields in the selected module will be listed. - Click the
 [Edit icon] for the corresponding field that you want to edit.
Note
- You can edit only the custom modules created by you not the default modules. However you can edit a standard field if it is a Picklist field. You can add new Picklist values to such fields
Delete Custom Fields
The fields that you have created can be deleted, in case you do not need them. Please note that standard fields cannot be deleted and when you delete a custom field, the associated data will also be deleted from Zoho CRM. If you do not want to delete the field, you can also hide it so that it is not used by users.
To delete custom fields
- Log in to Zoho Developer Console and click Vertical Solutions
- In the Vertical CRM page, select the application that contains the field to be deleted.
- Click Customize in the left pane and select Fields tab at the top of the page.
- Select the module from the drop-down list.
All the existing fields in the selected module will be listed. - Click the
 [Delete icon] for the corresponding field that you want to delete.
 - Make sure to read the instructions in the pop-up box and then click Yes, Delete now to delete the field.
Note
- You can delete only the custom modules created by you not the default modules. However you can delete a standard field if it is a Picklist field.
Create Currency Fields
The currency field allows you to define the decimal and the precision settings based on your selected currency locale. There are four rounding options available for a currency field in Zoho Developer:

To create currency custom fields
- Log in to Zoho Developer Console and click Vertical Solutions.
- In the Vertical CRM page, select the application in which the field has to be added.
- In the App Details page, click Modules in the left pane.
- In the Modules page, click the name of the module in which you want to add the currency field.
- Drag-and-drop the Currency field from the New Fields panel and enter a label for the field.
- In the Currency Properties pop-up, do the following:
- Enter a name in the Field Label field.
- In the Maximum digits allowed field, type the desired length of the total number of digits.
- In the Number of decimal places, type the number of decimal places you require.
- Select the Rounding option from the drop-down list.
- Specify the rounding precision in the Precision field.
- Click Done.
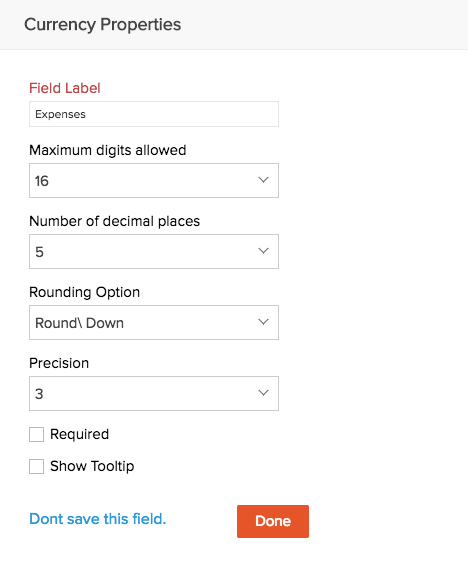
- Click Save Layout.

Add Pick List Values
By default, some of the industry standard pick list values are available in each module. You can modify the pick list values as per your business process that your Vertical CRM deals with and replace the existing value with new values so that the records are associated correctly.
To add or modify pick list values
- Log in to Zoho Developer Console and click Vertical Solutions
- In the Vertical CRM page, select the application in which the field has to be added.
- In the App Details page, click Modules in the left pane.
- In the Modules page, click the name of the module in which you want to add the pick list field.
- Drag-and-drop the Pick List field from the New Fields panel and enter a label for the field.
- In the Pick List Properties pop-up, you can do the following:
- Enter a name in the Field Label text field.
- Add the values for the pick list in the Pick List Option section. Click
 to add values and
  to remove values.
 - Select a value from Select default value dropdown to set a default value for the pick list.
- Click Done.
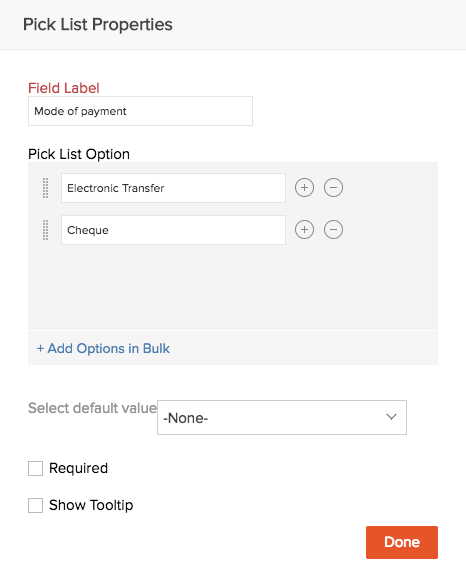
- Click Save Layout.

Add Multi-Select Pick List Values
This option enables selecting multiple values while creating or editing record. For instance, your organization may be offering different services and some of your customers may be interested in multiple services. In this case you can use the multi-select pick list value instead of single pick list value while creating a potential. Periodically, you can modify the pick list values as per your organization's business process.
To add multi-select pick list values
- Log in to Zoho Developer Console and click Vertical Solutions
- In the Vertical CRM page, select the application in which the field has to be added.
- Click Customize in the left pane and select Fields tab at the top of the page.
- Select the module from the drop-down list and click New Custom Field.
- In the [Module]: Create Custom Field page, select Multi-select Pick List from the field type list.
- In the Field Details section, do the following:
- Enter a name in the Label field.
- Select the Section Name from the drop down list where the field should be displayed.
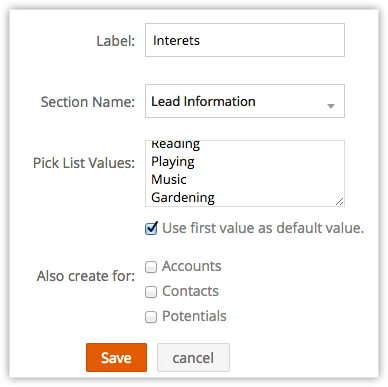
- Specify the pick list values.
- Select the checkbox to use first value as default value.

- Click Save.
Create Lookup Field
The lookup field helps in establishing relationship between different modules (linking two different modules: Accounts with Contacts) or establishing parent-child relationship with a module. Note that lookup fields cannot be created for Tasks and Events.
Examples of Parent-Child Relationship:
- Parent Account - Member Accounts (Doing business with Head Quarter Company and multiple divisions within the company)
- Contact - Member Contacts
- Case - Sub Case
- Potential - Part Payment
- Product - Part Products
- Solution - Related Solutions
To create lookup field
- Log in to Zoho Developer Console and click Vertical Solutions
- In the Vertical CRM page, select the application in which the field has to be added.
- Click Customize in the left pane and select Fields tab at the top of the page.
- Select the module from the drop-down list and click New Custom Field.
- In [Module]: Create Custom Field page, select Lookup from the Field Type list.
- In the Field Details section, do the following:
- Enter a name for the lookup field in the Label text box. (Eg. Interested Products. This field will be available while creating a lead.)
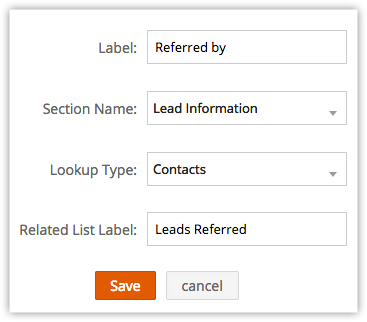
- Select the Section Name from the drop-down list where the field should be displayed. (Eg. LeadInformation)
- Select a module from the Lookup Type drop-down. In the field, data from the module selected here, will be listed. (Eg. Products. The lookup field will list all the products)
- Enter the Related List Label. (Eg. Interested Leads. A related list will be created for the records in the Products module.)

- Click Save.
Create Auto Number Field
The auto number type custom field helps classifying the records by unique numbers. Once the auto number field is added to the CRM module, the number is added sequentially to the new records. This can be used to update the existing records also. For instance, Invoice Number, Quote Number and Sales Order.
To create auto number fields
- Log in to Zoho Developer Console and click Vertical Solutions
- In the Vertical CRM page, select the application in which the field has to be added.
- Click Customize in the left pane and select Fields tab at the top of the page.
- Select the module from the drop-down list and click New Custom Field.
- In [Module]: Create Custom Field page, select Auto Number from the Field Type list.
- In the Field Details section, do the following:
- Enter a name in the Label field.
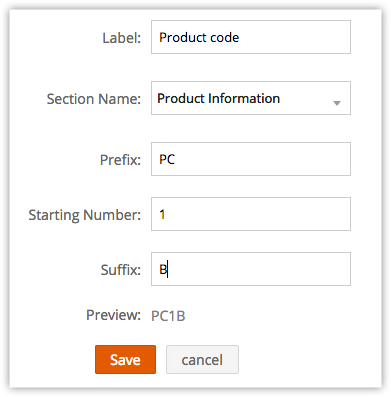
- Select the Section Name from the drop-down list where the field should be displayed.
- Select the Lookup Type i.e. the data that should be listed in the lookup.
- Enter the Prefix, Starting Number and the Suffix for the auto number value.
- Enter a name in the Label field.
- Click Save.

Map Dependency Fields
There are certain fields whose values depend on another field's value. For example, the values in the State field will depend on the country that you select from the Country field. Similarly, the values for the Sub-Department field will depend on the Department field that you select. You can define this parent-child relationship in two drop down fields.
To map field dependencies
- In the Application's homepage, click Customize > Fields.
- Select the module from the drop-down list and click Map Dependency Fields.
- In the Map Dependency Fields page, click New.
- Select the Parent Field from the drop-down list.
- Select the Child Field from the drop-down list.
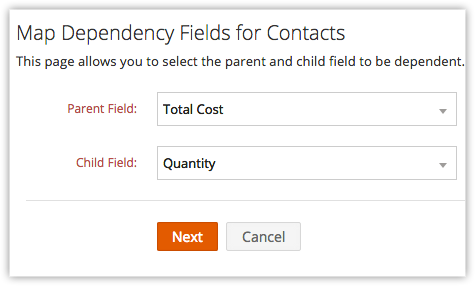
- Click Next.
- Select the values for each parent field value.
- For example, if the parent field is Country, then, select the States for the selected country.
- Click the Previous or Next links, if required, to map the all the Parent field values to the Child field values.

- Click Save.