Working with Custom Modules
How Can I...
Zoho Developer offers more than 10 standard modules for Sales, Marketing, Customer Support and Inventory management that will be available for your Vertical CRM application. You can include all or some or none of these modules in your application at the time of creation based on your needs. These modules have predefined business logic, including page layout, reports, and workflow automation, which cannot be completely modified to accommodate your other business processes. Every business has a set of requirements that may not fit into these standard modules. You may require modules that are unique to your organization; that would cater to the needs of your organization, store data that is relevant to your business process and most importantly, be linked with the other standard modules in your account.
For example, if you are creating a vertical application for real-estate industry, your subscribers would like to track not only leads, contacts and prospects but would also want to tightly link with properties, buildings, etc.
To address these unique business requirements, you can create your own modules. With the Custom Modules functionality in Zoho Developer, you can develop new modules using built-in tools that need no programming skills. These custom modules can seamlessly integrate with core CRM modules and need not be stand-alone modules. What more, you can:
- Add fields and modify the page layout as per your needs.
- Use roles and profiles to define access controls for the custom modules and its fields.
- Create workflow rules to automate your business process.
- Build module relationship by linking custom module with standard modules.
Add Custom Modules
To add custom modules
- Log in to Zoho Developer Console and click Vertical Solutions.
- In the Vertical CRM page, select the application in which the custom module has to be created.
- In the App Details page, click Modules in the left pane.
- In the Modules page, click Create New Module.
- Click the edit symbol [
 ] to enter the module name.
 - Enter the singular and plural form of the module name in the respective text boxes and click Save.
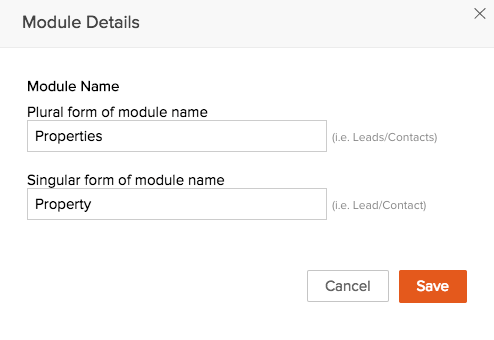
- Add custom fields and sections (if necessary) and click Save Layout.
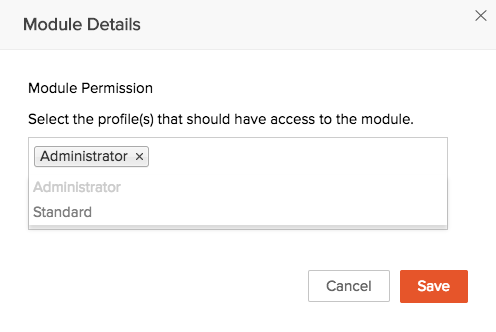
- Select the profile(s) and click Save. Users in the selected profiles will have access to the custom module.
On creating the module, Record Name, Record Owner, Currency, Exchange Rate, Last Activity time, Email and Secondary Email fields will be automatically added. You can further create fields for the custom module and customize the page layout. See Also Add Custom Fields .


Edit Custom Modules
To edit custom modules
- In the App Details page, click Modules.
- In the List of Modules page, hover over the module that has to be edited and click Edit icon.
- In the Edit Module page, make the necessary changes and click Save.
Link Custom Modules With Other Modules
By linking a custom module with a standard or another custom module, you can build module relationship and help your customers connect their data easily. This is very useful in creating a variety of reports based on the data in your custom module. This cross module linking can be done using Lookup Fields. Similarly, you can also link standard modules with custom modules but creating a lookup field in the standard module.
To create lookup field in custom module and link it to another module
- Log in to Zoho Developer Console and click Vertical Solutions.
- In the Vertical CRM page, select the application in which the field has to be added.
- In the App Details page, click Modules in the left pane.
- In the Modules page, click the name of the module you want to link with other module.
- Drag and drop a Lookup field from the New Fields panel.
- In the Lookup Properties pop-up, enter the following details:
- Enter the name of the lookup field in the Field Label text box.
- Select a module from the Field Label in Related Module drop-down. In the field, data from the module selected here, will be listed. (Eg. Contacts. The lookup field will list all the contacts)
- Enter the Related List Title.
A related list will be created for the records in the Contacts module.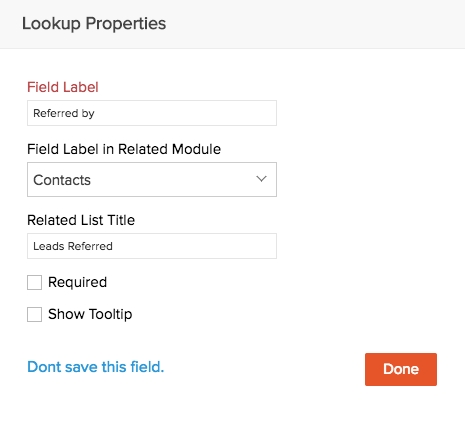

Manage Modules
- Log in to Zoho Developer Console and click Vertical Solutions
- In the Vertical CRM page, select the application you want to edit.
- In the App Details page, click Modules.
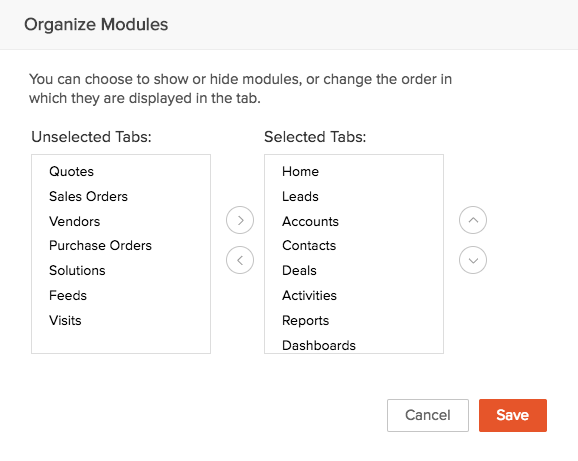
- In the Modules page, click Organize Modules.
- Use the horizontal arrows to move the tabs from the Unselected Tabs list to the Selected Tabs list and vice versa.
- Click Save.

Note
- The Home tab cannot be hidden.
- Irrespective of the profiles, hidden modules are not displayed to any user.
Delete Custom Modules
When there is a need to delete a custom modules make sure that it is not linked to another module. Before deleting make sure you have checked the following:
- The module is not liked with any other custom or standard modules.
- Workflow rules that are configured for the custom module are deleted.
To delete custom modules
- In the App Details page, click Modules.
- In the List of Modules page, hover over the module that has to be edited and click Edit icon.
- In the Edit Module page, make the necessary changes and click Save.
Make sure to read the instructions in the pop-up box and then click Yes, Delete now to delete the module.