

- HOME
- Ecommerce business
- A guide to managing your Zoho Commerce store
A guide to managing your Zoho Commerce store
So, your store is published on Zoho Commerce. Congratulations! Of course, now comes the difficult part—setting up operations so you can seamlessly receive and ship orders, get paid, and track everything from one place. Here is a step-by-step guide to help you learn everything about managing your store with Zoho Commerce. Let's dive right in!
Managing products
As your ecommerce website begins to gain traction, it's important to efficiently manage your products if you want to avoid customer dissatisfaction and order disruption.
With Zoho Commerce, you can manage products listed on your website, including sorting, searching, deleting, filtering, and editing them. To do any of this, navigate to the Products module on the left side of the dashboard.
Sort and edit products
Sort products
After clicking Products on the dashboard, you will see a page listing all your products.
Click the Sort By icon to sort the products by Name or Modified Time.
On the same page, next to the Sort By icon, is View, which offers Grid View and List View options to display the products.
The Show button on the same band allows you to select from a drop-down box the number of products to be displayed on the page. This can be 10, 20, 30, or 40 products per page.
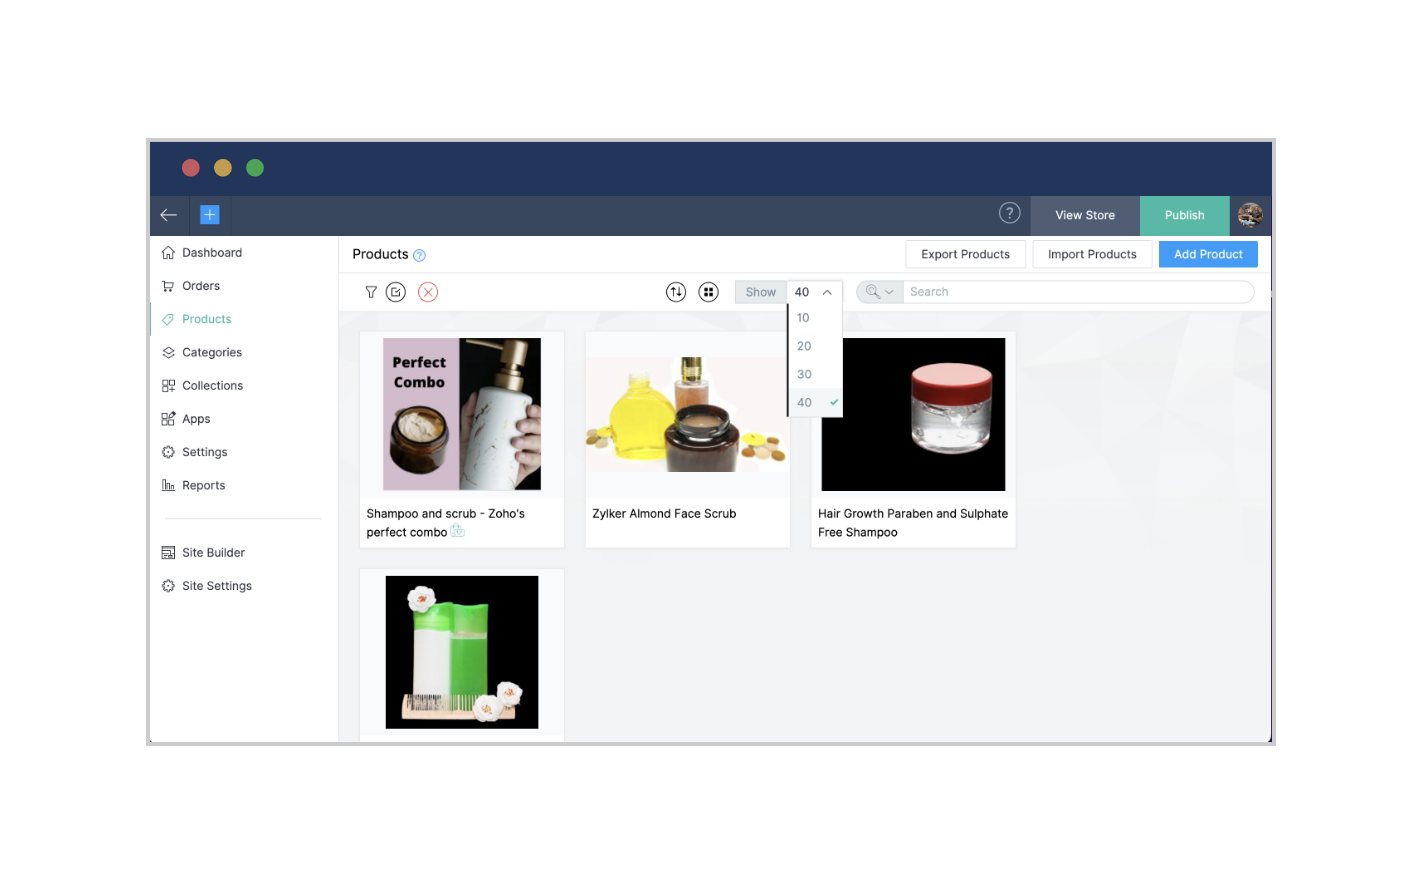
The Search bar on the top right, next to Show, is used to search for products across product fields. Type in the search term and hit enter to search across all product fields, or using product name or product SKU. If you wish to delete or edit information about products belonging to a specific tag, this is the best way to do it.
As you add new products to your website, these options can help you reorganize your website to display products and product information in a better way.
Edit products
To edit product details, hover the pointer on a product tile and click on the Edit icon.
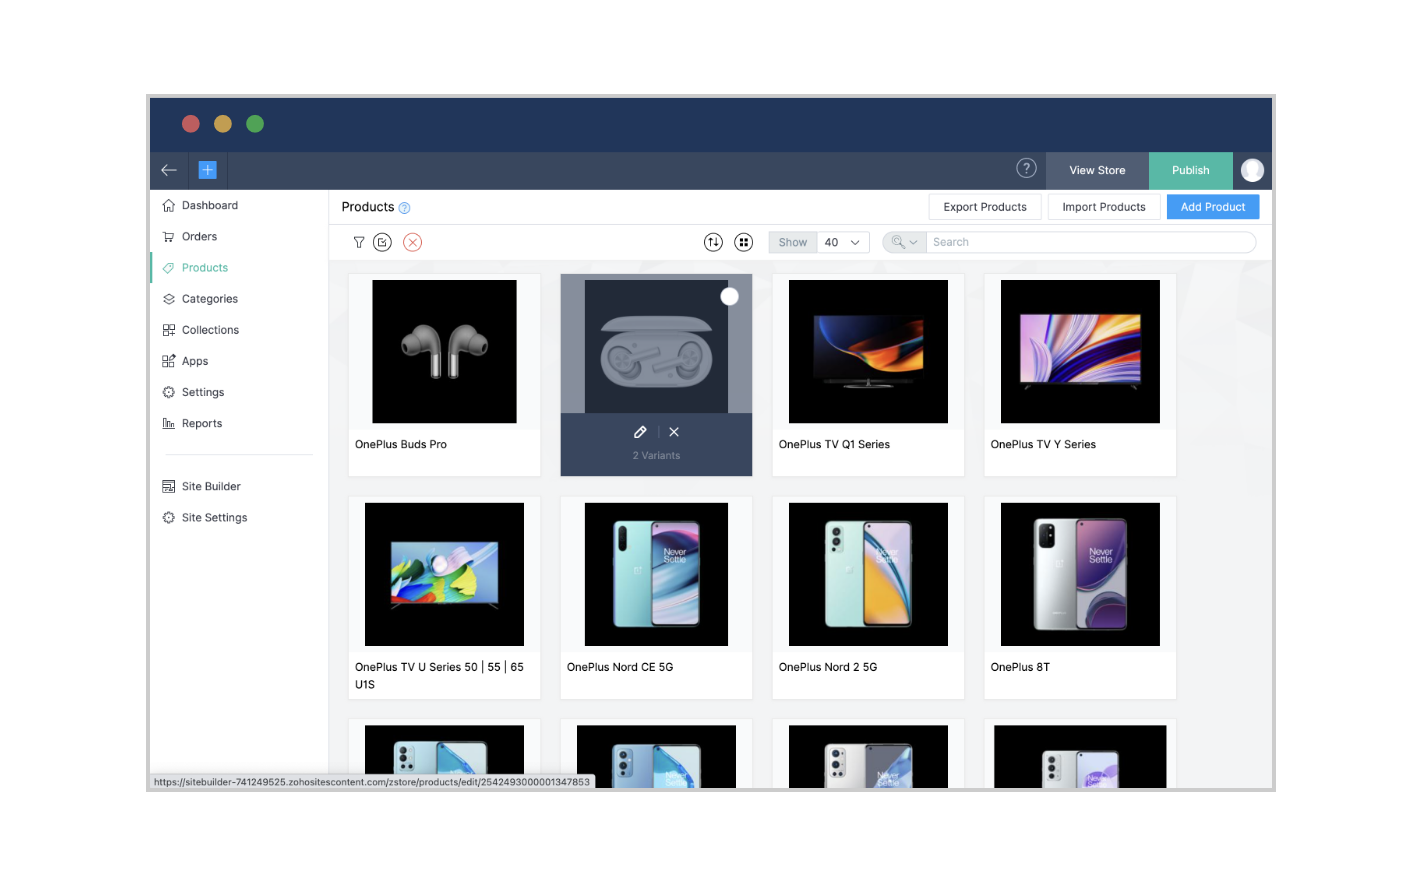
You'll be taken to the product details page, where any of the product information can be changed—selling price, retail price, SKU (Stock Keeping Unit), images, and more. Once edited, click on Save before returning to the dashboard.
Bulk product management
You can upload products in bulk by selecting the Import Products option if you wish to import the products with a CSV or XLS file (as discussed in our previous guide to creating an online store). Remember, to upload images in bulk for imported products, you'll require the help of the Zoho support team, as uploading images in bulk is a backend process.
Email the CSV file that was exported from the old store to support@zohocommerce.com or presales@zohocommerce.com. Create a zip folder with the images assembled in the following file path: SKU/imagefile.
Choose the designated email address for your Data Center (DC), which is the country where the store account was created. Add this email address as store user (Settings > Store Settings > Users > Add User) and assign them the role of Admin.
Email us at presales@zohocommerce.com, and we will verify your data and upload the images to your store.
Update categories and collections
You don't want to have a spring and summer collection splashed across your website in the middle of October. To update your collections, select Collections from the dashboard. Your existing collections will be displayed. Hover over a specific collection, and wait for the "x" button to appear on the right side of the band. Click on it to delete a collection. To add a new one, choose Add Collection at the top right of the Collection page.
The Categories button will be right above the Collection option. Click on it to view your current product categories.You can rearrange them by dragging and dropping. To create sub-categories, drag categories to the right side of the page. Select the edit icon or delete icon to edit or delete an entire category.
Create product bundles and clone products
Composite products
As you diversify your offerings to include new products or create new ranges, you may choose to bundle different products and sell them as a kit or a gift basket. You can manage products in this fashion by creating Composite Products.
On the Product page, click on Add Product (in the top-right corner) and choose the Add Composite Product option.
Select Enable from the confirmation pop-up and, on the next screen, enable the Composite Products toggle under Product Settings, and click Save.
Go back to the Product page, and click on Add Composite Product again. Enter all the required information, such as title (of the bundle), URL, images, specifications, and SEO details.
You must select the products you wish to add to your bundle from the products listed.
The chosen products will be listed, along with the quantity, selling price, and retail price you have set. Click Copy from Total to calculate the total cost of the products.
Check Enable Bundling to create bundles from existing stock. This will result in a decrease in the quantity of individual products in your inventory.
Clone products
When you add similar products to your website, you don't have to repeat the process of adding product details. You can choose Clone Product to replicate an existing product's details, and edit them as necessary.
On the Product page, click the Edit icon; you'll be directed to the Product Description page.
Choose the Clone Product option under More Options. In the pop-up window that appears, enter the name of the new product.
On the Clone Product page, enter the SKU and product quantity (These are mandatory fields).
Modify any other details as needed, and click Save.
Update SEO
We mentioned earlier (under Adding products and categories) how you can add SEO titles, keywords, and an SEO description (different from the product description) to help your product page rank higher on Google SERPs. Zoho Commerce users can easily incorporate SEO best practices owing to built-in tools, such as the SEO keywords field on the product description page. Be sure you integrate Zoho Commerce with Google Analytics to help the crawlers discover your page, index it, and rank it.
Tip: You can choose to edit the Product page and tweak the SEO section every time you feel a product page is not performing well. Google Analytics can be used to track website traffic and give you an idea of pages that need to be overhauled.
There are other elements of SEO that can be managed on Zoho Commerce as well.
301 Redirect
When you scrap category or collection pages from your website, you will need to redirect customers to another page. This helps them discover a new product or category, instead of being disappointed at the unavailability of the original product.

Select Settings > SEO > 301 Redirect.
Click Add 301 Redirect in the pop-up.
Enter the URL of your destination page in the Request URL box.
In the box below, choose the type of destination page (category, collection, or product).
From the options listed in the Destination menu, choose the exact page that viewers will be redirected to, and click OK.
Sitemap XML
A sitemap is a file that lists all your important pages and metadata to make it easier for web spiders to learn about the content of your page. To upload your sitemap:
Go to Settings > SEO > Sitemap > Toggle on Upload sitemap.xml.
Click Upload File and select a file from your computer.
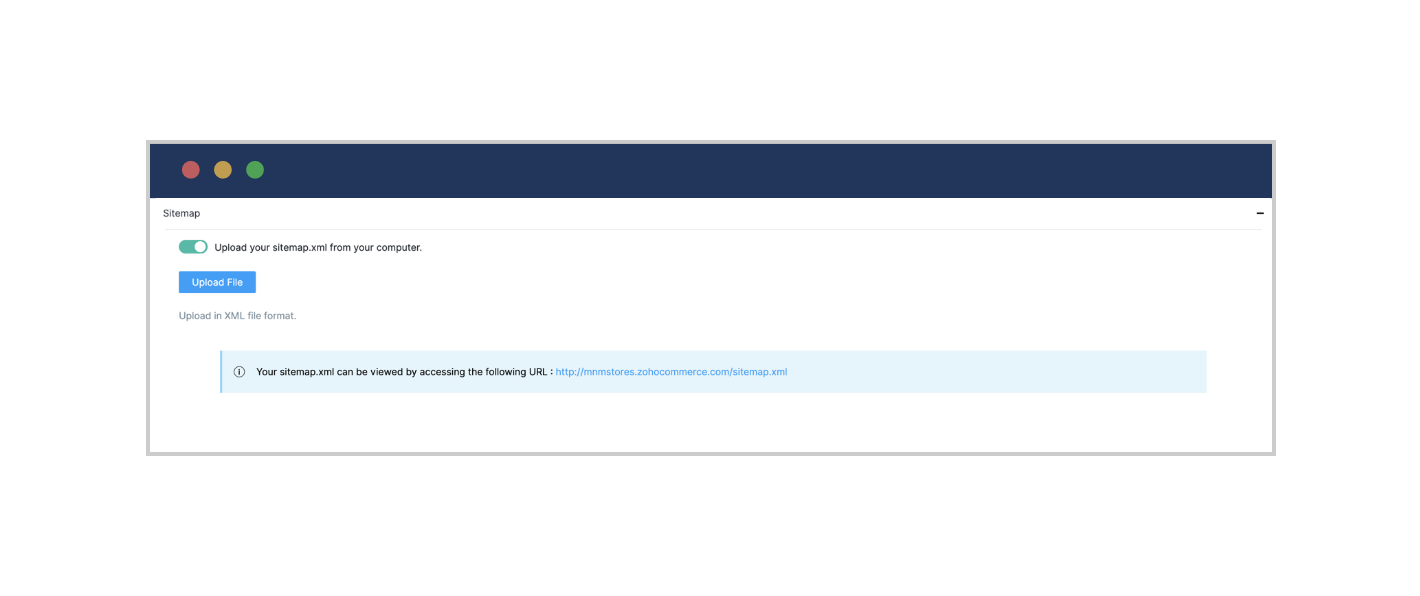
Select the updated link at the bottom of the Sitemap section to view your sitemap.
If you do not want your page to be crawled:
Go to Settings > SEO > Robots Text.
Copy and paste Disallow: /PageName into the Robots text box.
Replace "Page Name" with the name of the page you do not want crawled, such as "Home" or "About Us."
Click Save.
Managing orders
Order management is a critical component of enhancing a customer's shopping experience, and in the process, paving the way for your ecommerce business to grow. Ecommerce order management involves accepting/rejecting orders, initiating returns, processing payments, managing shipments, and collecting feedback. Zoho Commerce has built-in tools for managing these, and all other, aspects of the fulfillment process.
Process orders
Once the customer purchases a product, an order is created, and will be listed on your Orders dashboard. The Orders dashboard displays the details of all orders received, such as the order ID, date and time of the order, the customer's name and email address, order status, payment and shipping status, and quantity of products purchased. Click an order ID to view and process the order details.
The three key elements of an order displayed on this page include order status, shipping status, and payment status.
Order status
Review the order details associated with the purchase.
Depending on stock availability, select Confirm Order or Cancel Order.
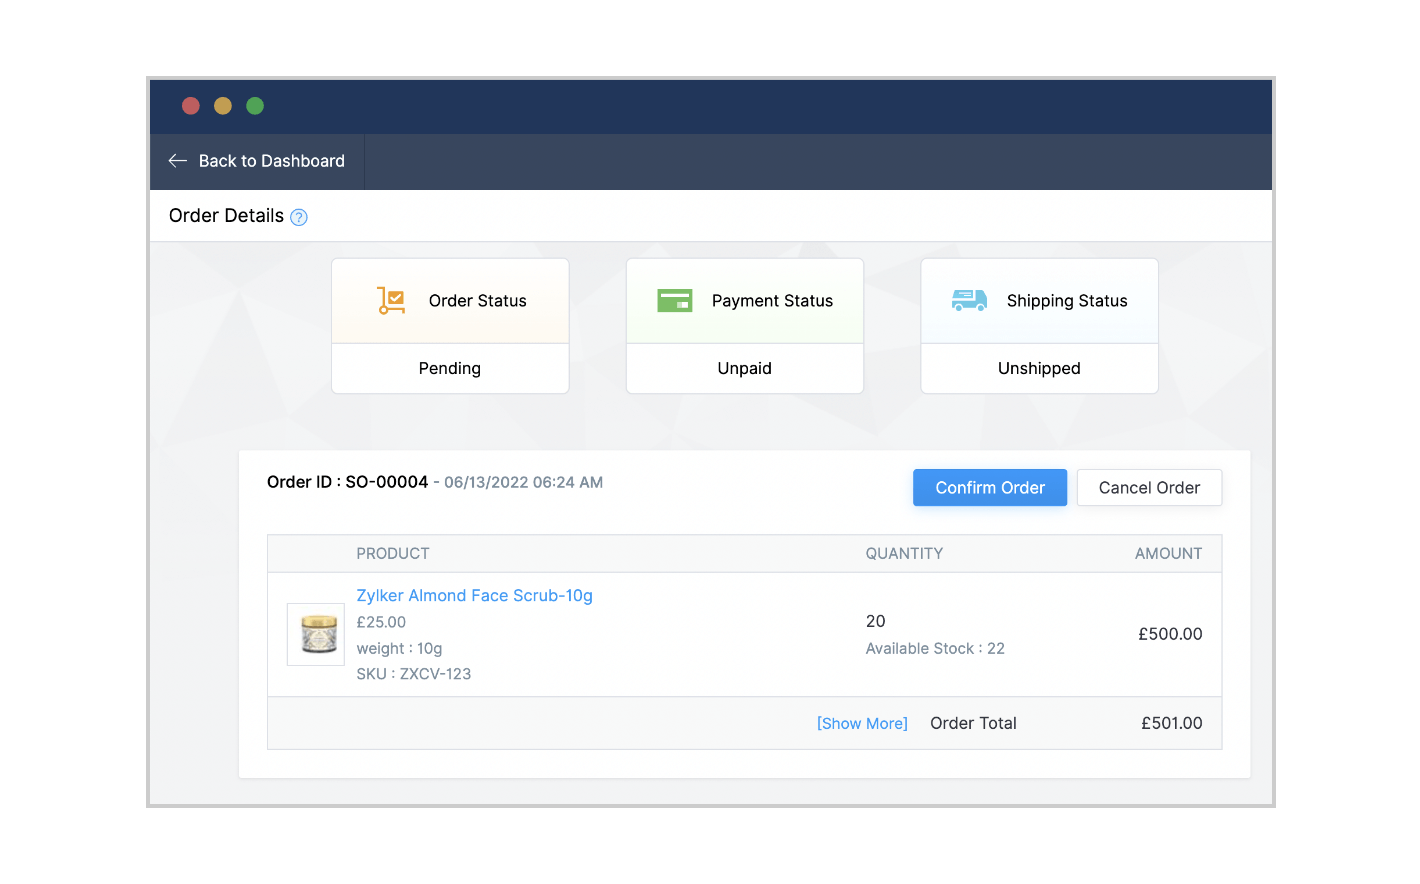
Tip: Zoho Commerce has fraud analysis capabilities too. The Fraud Analysis box on the right side of the page will indicate the IP address from which the order was placed, among other details. This helps store owners like you to check for spam orders before confirming.Upon order confirmation, a confirmation email will be automatically sent to customers.
Tip: This is a pre-configured email template that can be tweaked. Under Email Notifications (Settings > Store Settings), click on Edit Template next to Order Confirmed to modify the order confirmation email.After an order is confirmed, the Print Invoice option becomes available.
The order status displayed at the top of the page will change from "pending" to "confirmed."
Tip: You can modify the order ID, prefix, suffix, and invoice ID to serialize your orders and invoices in the desired manner. Go to Settings > Preferences under Store Settings to do so.
Shipping status
On the Order Details page, you are given the option to ship your order manually or through a carrier. You can make your choice from the Shipping tab displayed in the middle of the page.
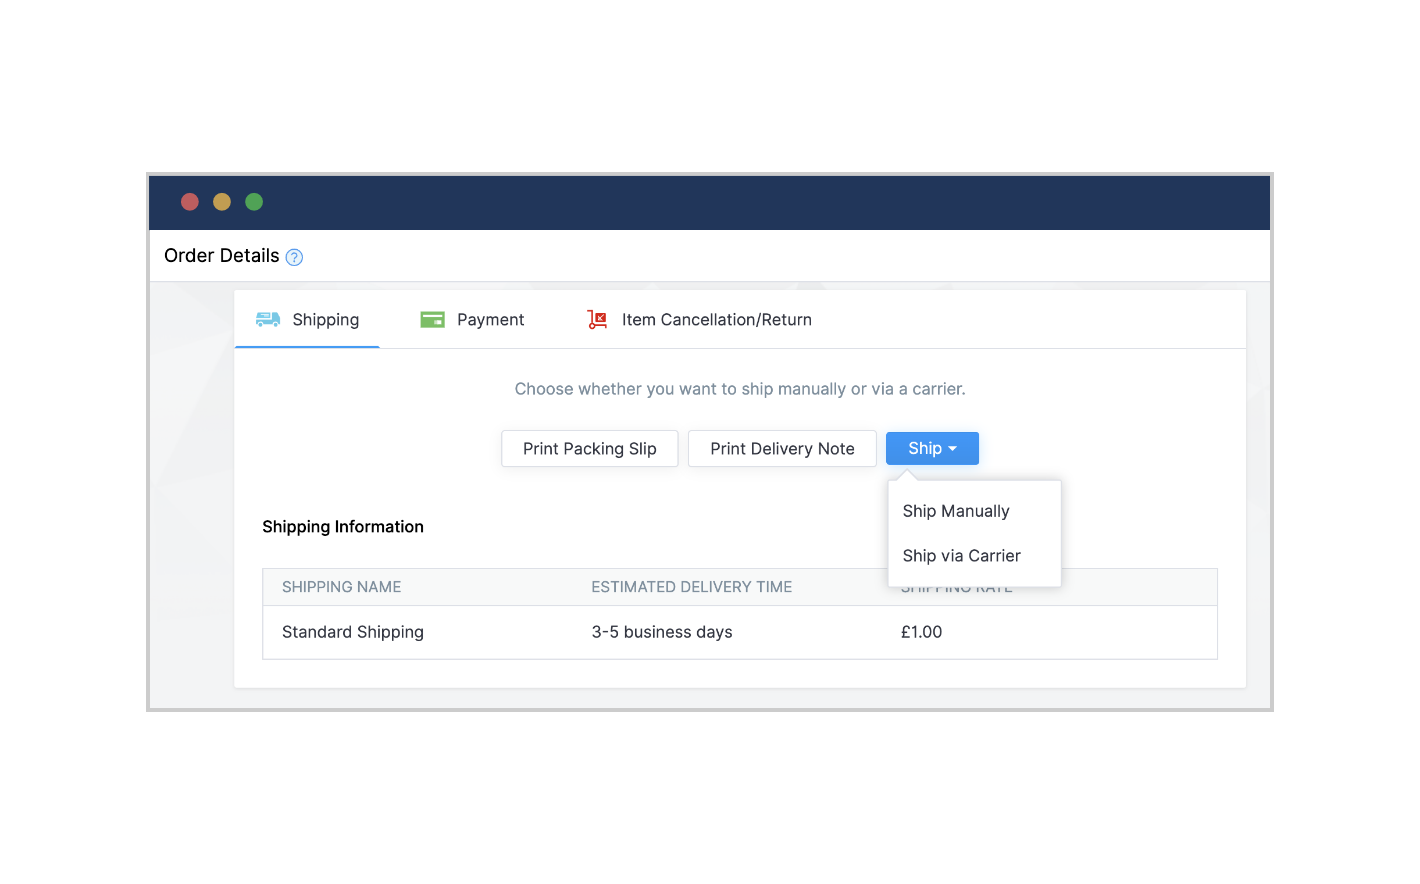
When you choose to ship manually, you take up the responsibility of shipping the product yourself through a local carrier or delivery app.
Choose Ship Manually from the drop-down.
You will be prompted to confirm if you wish to change the order status from "shipping" to "shipped." Click on Change Status to confirm your selection.
Select a carrier from the drop-down menu. If your carrier is not listed, select Others.
Key in the service name, tracking number, and dispatched date, and click OK.
As a part of your store creation process, discussed in our previous guide on building a Zoho Commerce Store, you may have integrated your store with a shipping carrier. If you have, on the Order Details page, you can choose the Ship via Carrier option instead of Ship Manually. When you choose to ship through a carrier, you hand over the responsibility of your order deliveries to a third-party shipping service.
Choose Ship via Carrier from the drop-down. You will be taken to the Shipment Details page to complete a three-step process.
From the Validate Address tab, check that the shipping address is correct, and click Save and Continue
To create your shipment, enter the parcel type, shipment date, package weight, delivery options (like cash on delivery, Saturday delivery, etc.), and then click on Get Rate. Shipping methods will be displayed along with their prices. Select a method, and then click Create Shipment.
On the Print Label page, review the generated shipping label to ensure that it includes the right sender, receiver, shipping date, etc. and click Back to Order Details
Under the Shipping tab, you can view shipping information, such as the type of shipping, estimated time of delivery, and shipping rate. The shipping status will now be changed to Shipped. After the product is delivered, click on Mark as Delivered. In the pop-up that appears, enter the delivery date, and click OK. Now, the shipping status will be Delivered.
Payment Status
If the customer has already paid for the order, the payment status will change from "unpaid" to "paid." If a customer has opted for offline payment, you can:
Go to the Payment tab (next to the Shipping tab), and click Mark as Paid.
In the pop-up, choose Change Payment Status to Paid.
In the Payment Details window, enter the amount paid, payment mode, reference number, payment date, and any other necessary details, and click OK.
Under the Payment tab, you can now see the payment information, including transaction ID, payment gateway, and amount.
Cancel orders and initiate returns and refunds
Cancel orders
If you need to cancel orders due to limited stock, damaged stock, or any other reason, Zoho Commerce allows you to do so easily. With Zoho Commerce, you can choose to cancel select items of an order without having to cancel the entire order.
Click Confirm Order (top right) and cancel the items you can't deliver.
Under the Item Cancellation/Return tab (next to the Payment tab), click on Cancel Item.
From the order items on display, select the ones you want to cancel, and enter the quantity and reason. Click OK.
Returns and refunds
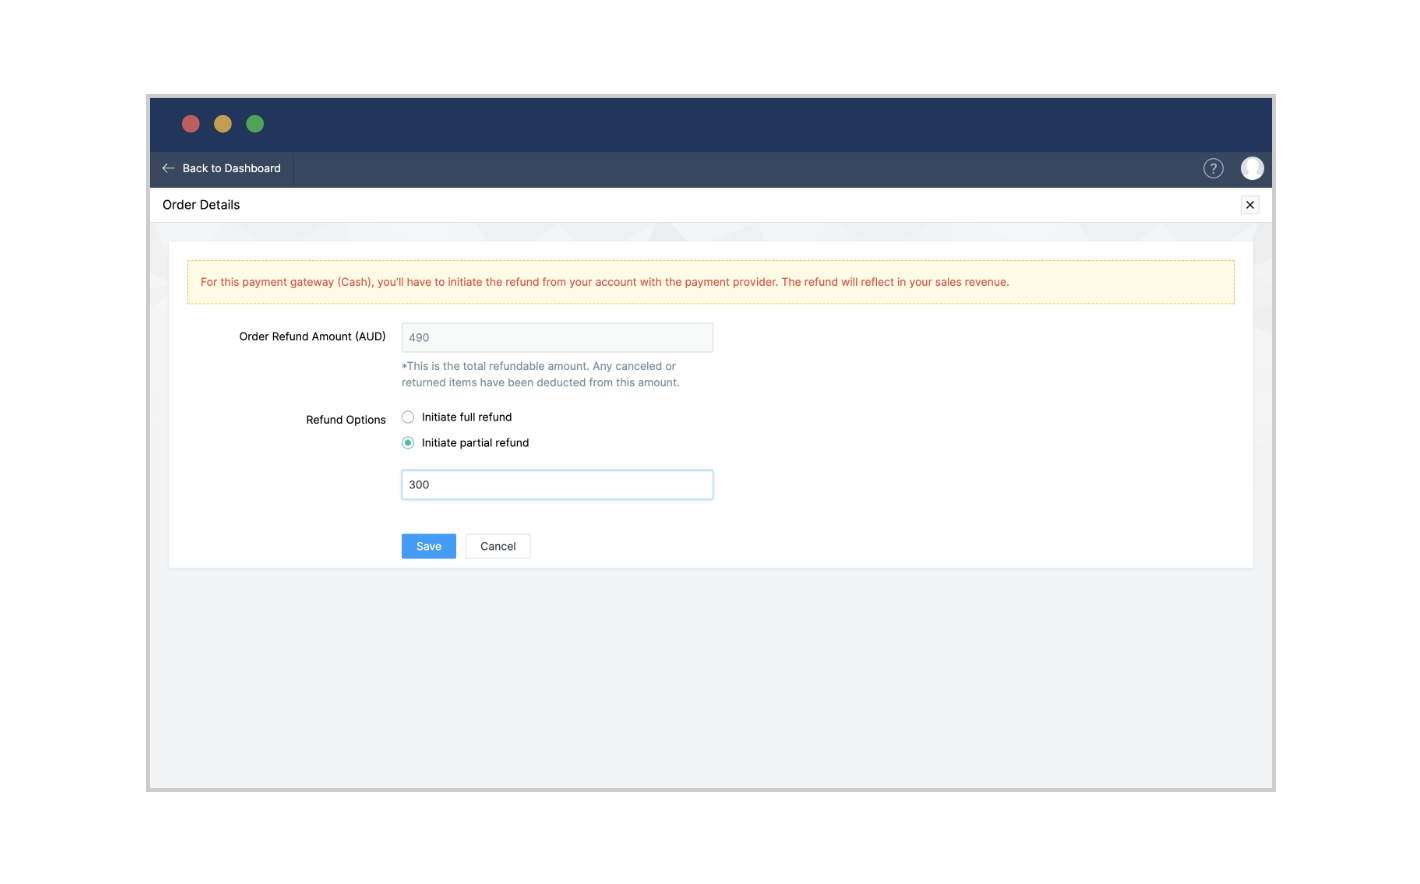
If the order was delivered, but a return has been initiated, click the Item Cancellation/Return tab, and click on Return Item. Select the item and enter the required details. You can then choose Initiate Refund under the Payment tab.

When you confirm the refund in the pop-up window, customers will receive an email informing them that their refund is underway. On the next page, you can choose to fully or partially refund the purchase by selecting the corresponding option. If you are partially refunding, enter the amount to be refunded and press Save.
Managing inventory
As you manage products and orders, you will have to monitor your inventory levels. Inventory management helps you meet customer demands, and it is the only way to avoid being understocked or overstocked. Either scenario can cause you to lose customers and money. Inventory management for your online store in Zoho Commerce is a simple, automated, and hassle-free process.
Track product inventory
Start tracking each of your product's inventory in Zoho Commerce. Here's how you can do that:
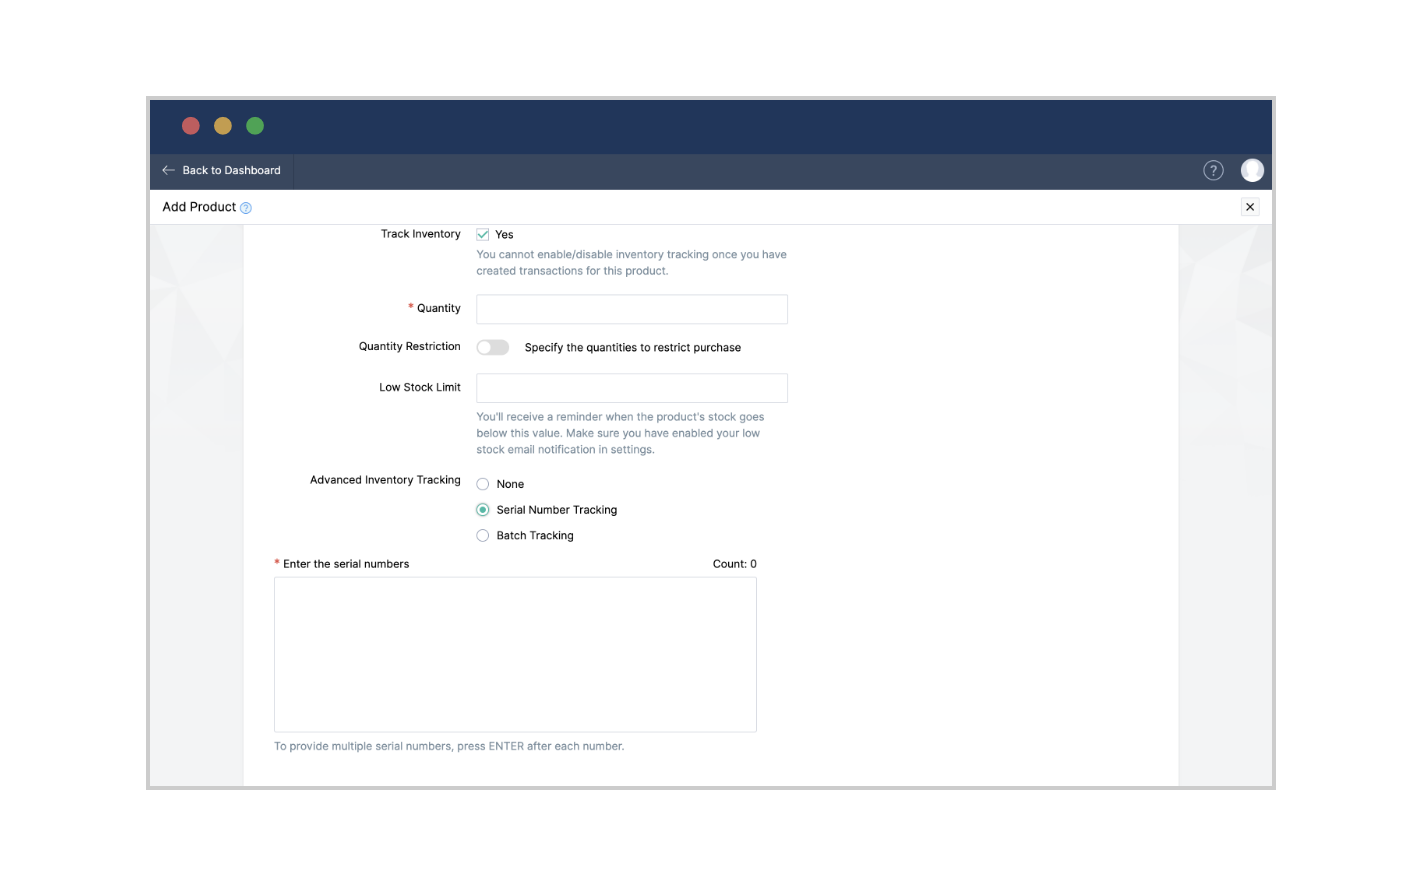
Navigate to the Add Product page, which prompts for information, such as product title and selling price. Scroll down to the Inventory Tracking section.
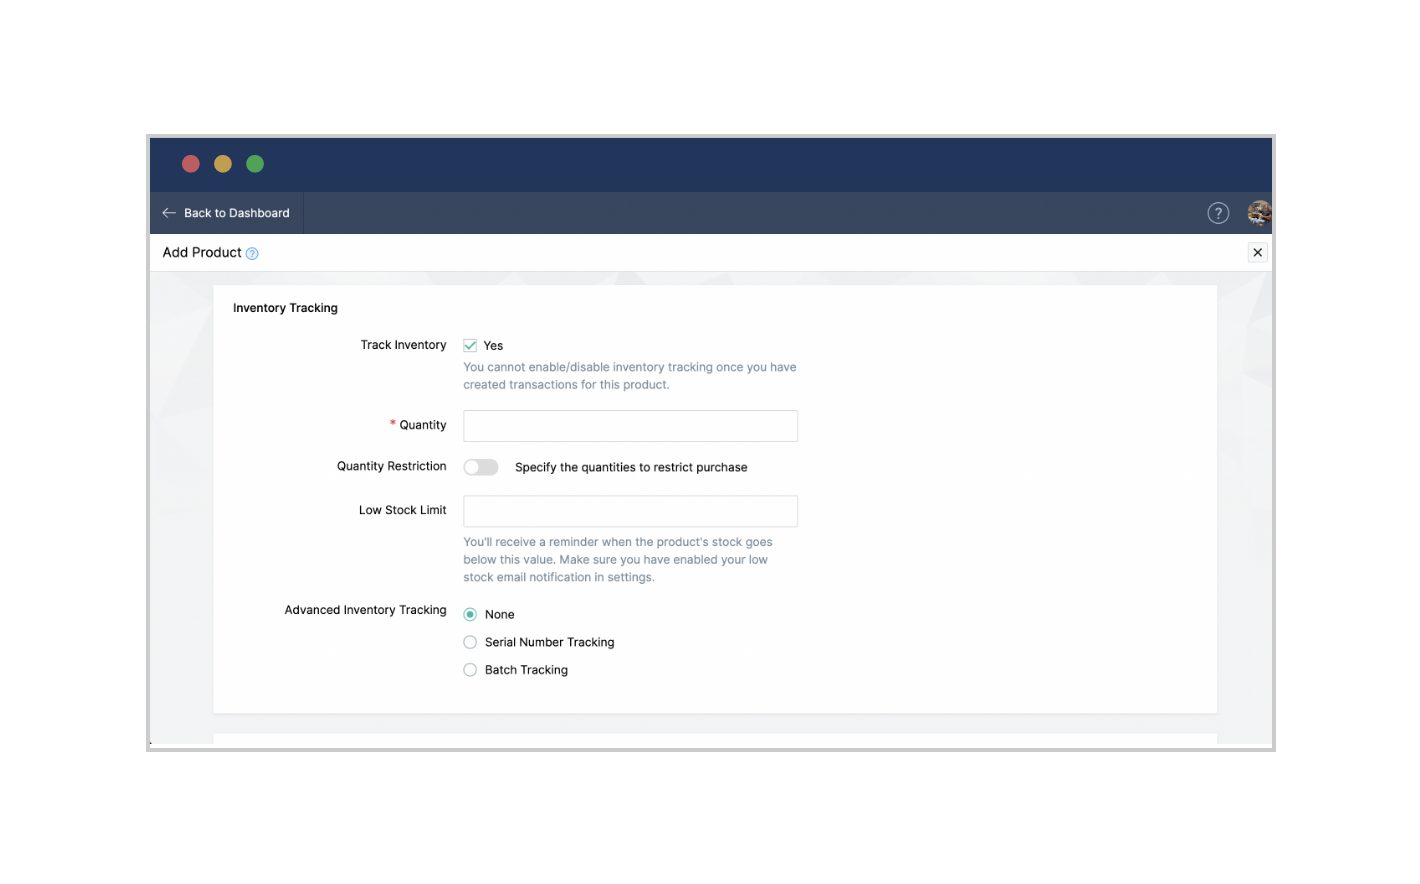
Check the Yes box beside Track Inventory. You should only disable this option in cases where stock is unlimited, or if you run a refurbished business with high reliance on external factors (i.e. reliance on customers to purchase used goods from).
Note: Once you create transactions for a product, you cannot change your decision to enable/disable inventory tracking.Enter the opening stock number (the initial quantity of the product that you have at the beginning of an accounting period) in the Quantity box.
In the Quantity Restrictionfield, set a number to restrict your shoppers from buying less or more of your goods.
Tip: Analyze how your business functions before setting these numbers. A B2C ecommerce dealing with limited stock focuses on a maximum number to limit purchase orders, so that one customer does not clean out the entire stock. B2B organizations, on the other hand, set minimum order amounts to increase profits and ensure the long-term viability of the online business.Set a Low Stock Limit to receive automated emails alerting you when your product's stock has gone below a certain threshold. To enable these emails, click Settings>Store Settings>Email Notifications, and on the Email Notifications page, scroll down to the Emails to Owner section and toggle on Low Stock and Out of Stock Products.
You can create variants of your product in Zoho Commerce. The Add Attribute option on the Add Product page lets you add the same product in different colors or sizes. Once you create your variants, you can feed in the quantity of the particular variant to enable inventory tracking for your product variants too.
Serial and batch tracking
Tracking batch numbers (a number assigned to a group of products manufactured in the same production run) and serial numbers (a unique identification number for every product) is integral to your quality management efforts. This task improves traceability, which is particularly useful when a customer calls to share feedback. Products manufactured in batches, as well as those with serial numbers, can be effortlessly tracked in Zoho Commerce. Follow these steps:
Choose Settings > Store Settings > Preferences.
On the Preferences page, scroll to the Product Settings section and toggle on Enable serial number tracking and Enable batch number tracking, and click Save.
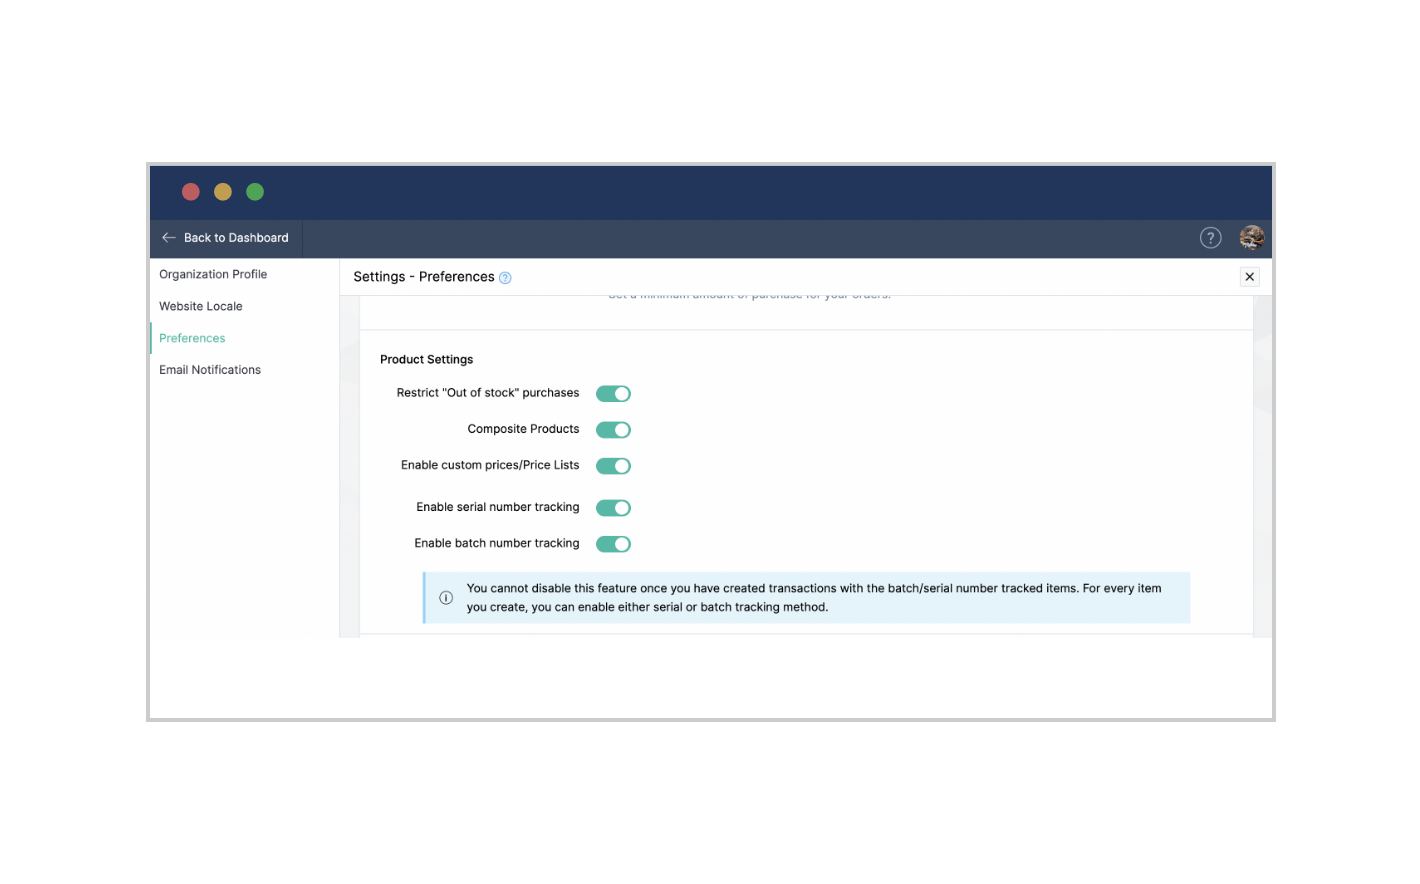
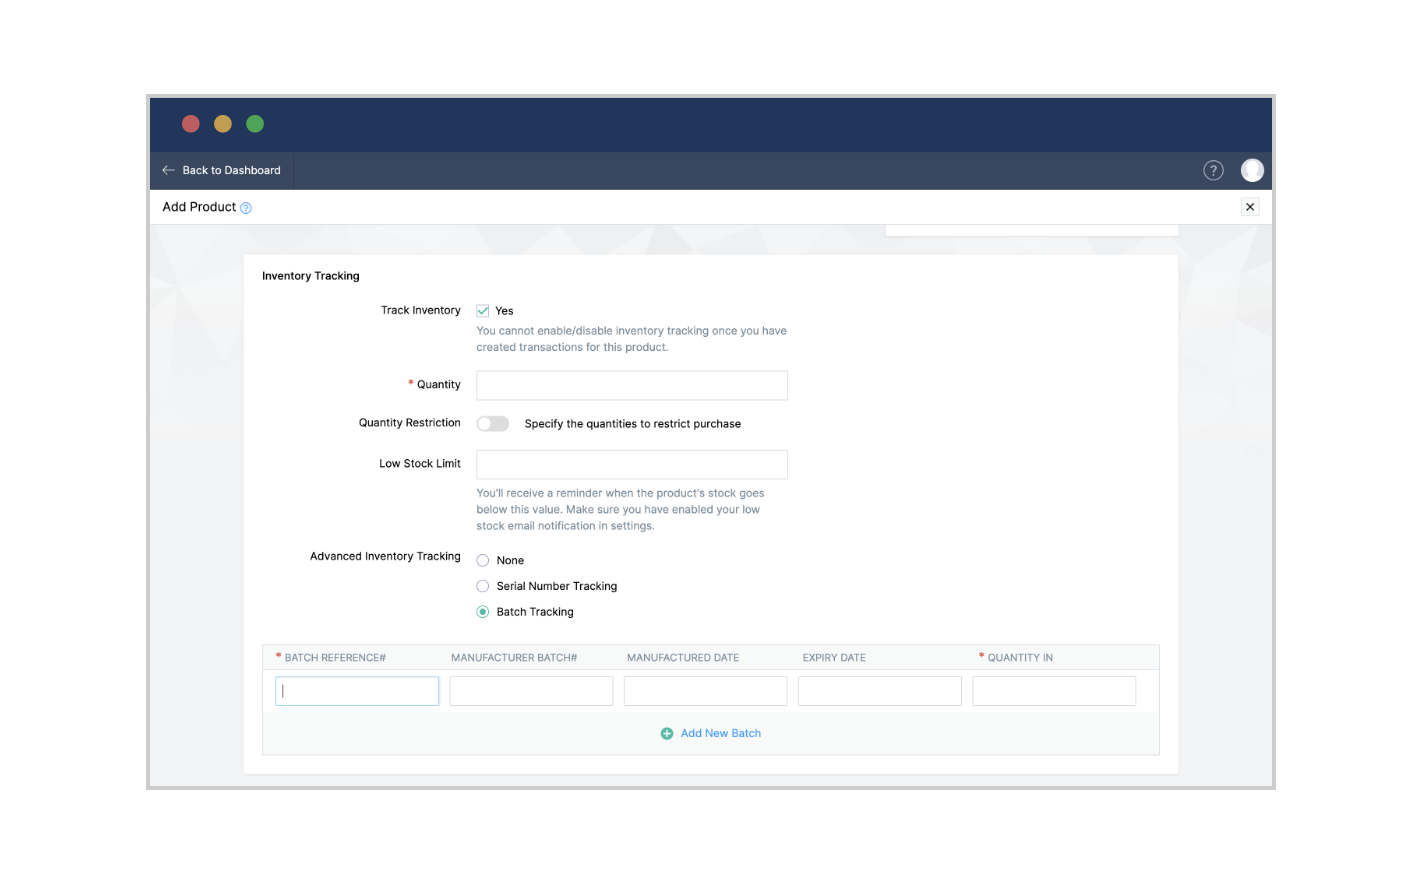
Tip: Serial number tracking offers a transparent view of items transacted, and is helpful for warranty and repair purposes. Batch number tracking can help you keep track of item expiration, and also trace defective items back to their original batch.Navigate to Add Product > Inventory Tracking > Advanced Inventory Tracking and select Serial Number Tracking or Batch Tracking. You can track either serial number or batch number—not both.
If you select Serial Number Tracking, enter the serial numbers. After each serial number, hit enter to add another number.
For Batch Tracking, enter the batch reference number, manufactured date, expiry date, quantity of products in batch, and other details. You can add more batch rows by clicking Add New Batch. Note that when you activate batch tracking, on the Order Details dashboard, you have to choose the batch numbers from which you ship out the product. This quantity on the order page can't be more than the quantity entered under the Batch Tracking details.
Manage Stock
Go to Settings > General > Manage Stock
On the Manage Stock page, you will see the product title, current stock of the product, and other details.

Under Action, you can choose from the drop-down to increase, decrease, or reset the inventory level of the product.
In the Quantity field, choose the number of products that need to be increased or decreased. The Total Quantity field will reflect the number of products after increasing/decreasing the stock.
Choose Reset if you wish to edit the inventory details of the product. Enter the quantity that you want to assign in the Quantity box.
Integration with Zoho Inventory
Zoho Commerce and Zoho Inventory are tightly integrated to provide you with a seamless inventory management platform. If you have a Zoho Commerce store, you will automatically have access to Zoho Inventory. To integrate your online store with Zoho Inventory:
Click Settings > Integrations > Zoho Inventory
In the new Zoho Inventory window, you will have the option to Join your Existing Organizations.
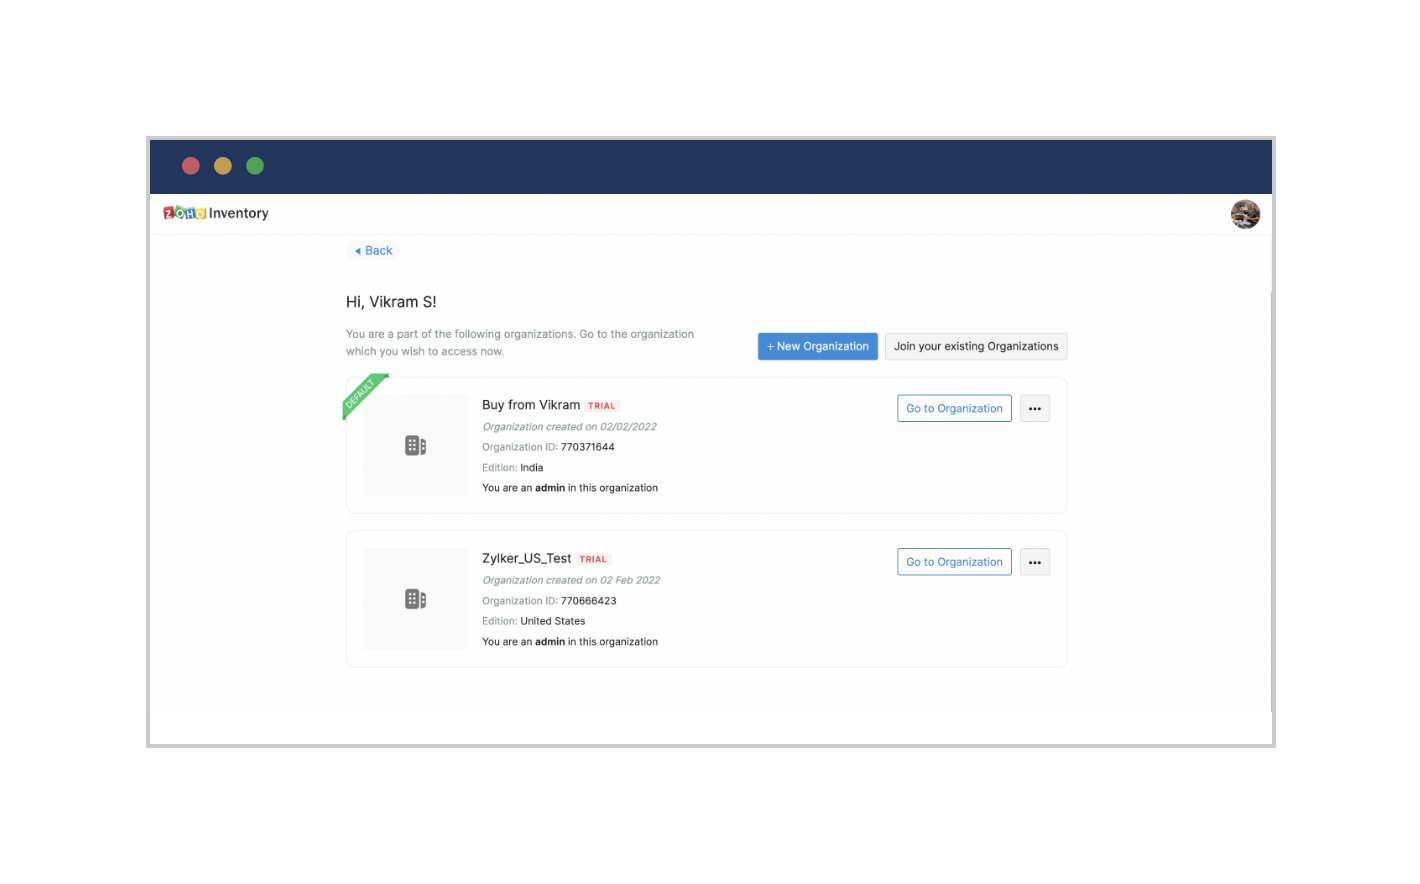
Choose the online store you wish to integrate by checking the name and organization ID, and click Join.
You will be directed to the Inventory dashboard, which will offer you a view of your entire inventory in one place.
Every product that you add, every sale you make, every return or refund, and other crucial data added in Zoho Commerce will automatically reflect in Zoho Inventory, and vice versa.
You can choose to add your products through Zoho Inventory. However, adding products through Zoho Commerce means you can key in SEO, among other details. It is also easier to display a product, along with its variants, together as a group (referred to as "item groups" in Zoho Inventory) in Zoho Commerce.
Managing taxes
As a store owner, you have to make sure that taxes are set up according to national and state laws. In Zoho Commerce, you can configure taxes down to every granular detail—add, edit, or delete them, choose tax exemptions, add tax groups, set up tax overrides, and more.
Choose Settings > General > Taxes
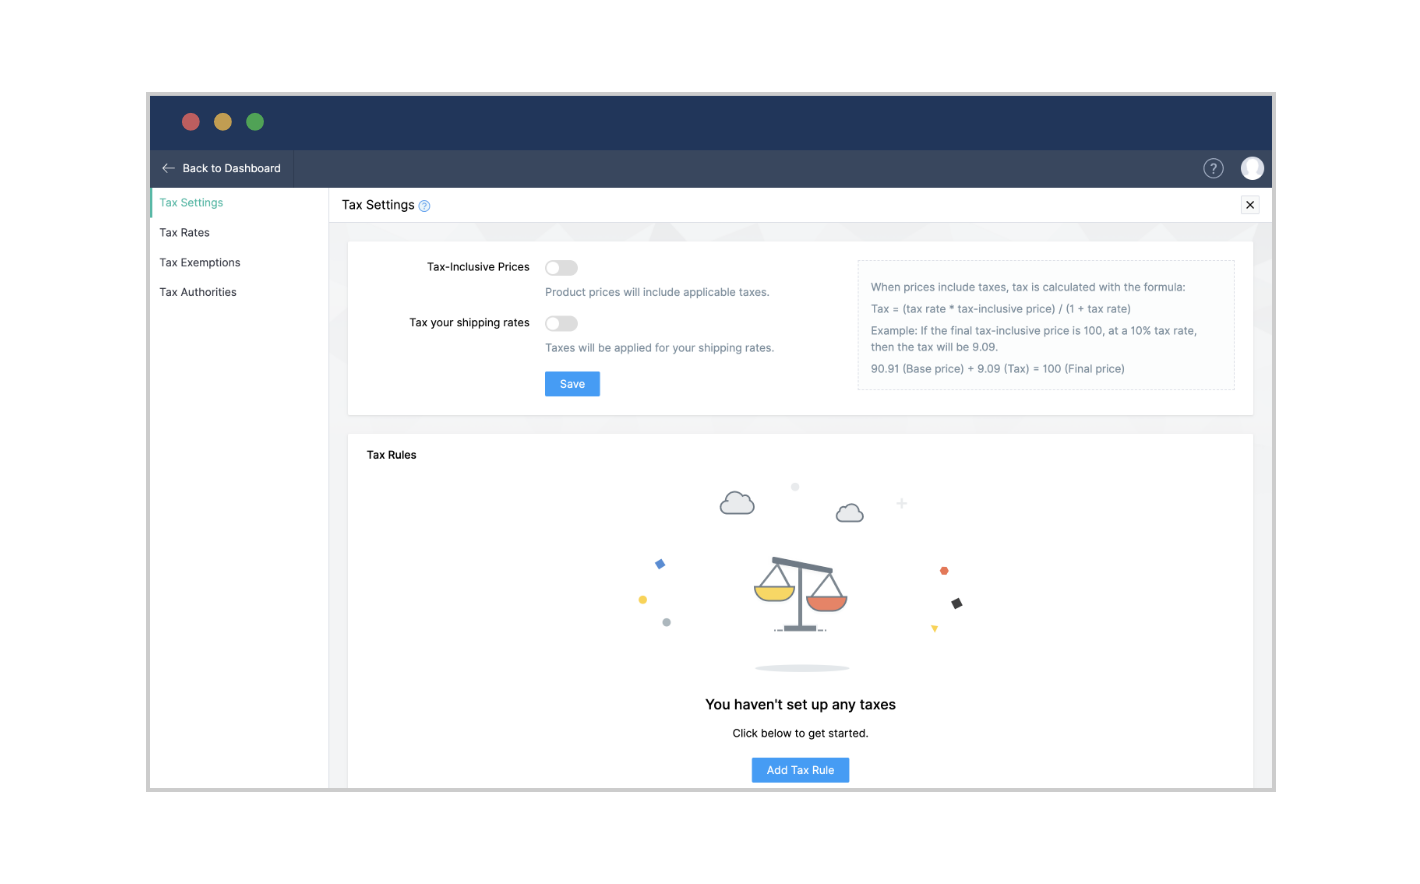
On the Tax Settings page, you can choose to turn on Tax-Inclusive Prices if you want to include taxes in your product prices.
Note: The tax calculation will be: (tax rate * tax-inclusive price)/(1 + tax rate).Toggle Tax your Shipping Rates to include taxes for shipping rates and press Save.
Based on the store you have set up (where you key in the country details at the beginning of the store creation process), country-based tax will be on display by default. For instance, VAT number will be on display for UAE stores, while GST identification numbers are displayed for Indian stores.
Key in the tax ID number that's applicable to your region.
In the Tax Rules section below, select Add Tax Rule.
Enter the details, which will include your country and the country's tax rate.
Note: You can create one tax rule per country.
Category tax override
Turn on the Category Tax Override option if you have different tax rates for different product categories.
From the drop-down, select the category name, and also fill in the location, tax rate, and tax type, and click Save.
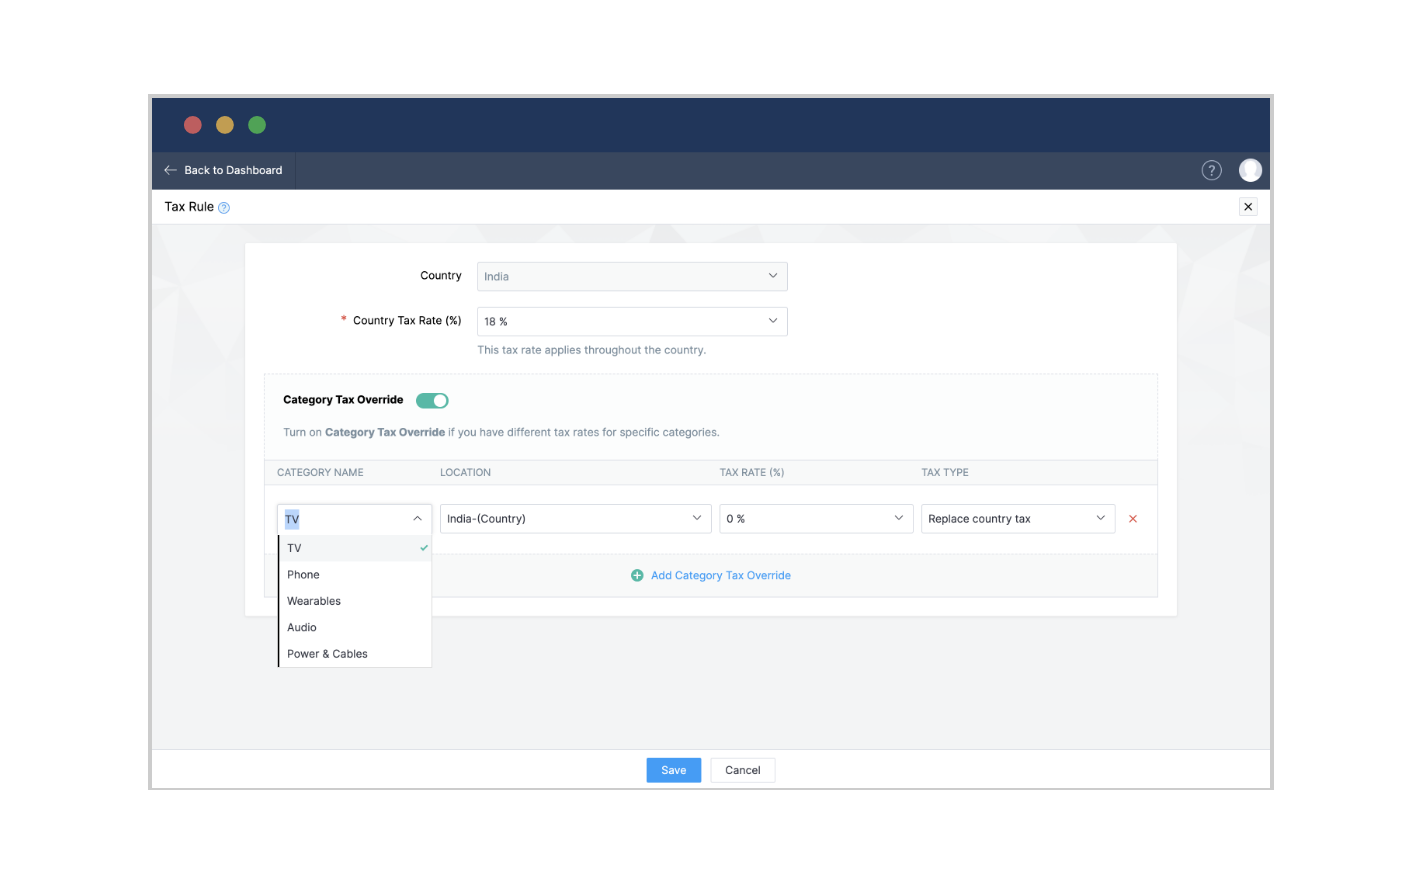
You can keep adding more rows to the table by clicking the Add Category Tax Override option at the bottom of the section.
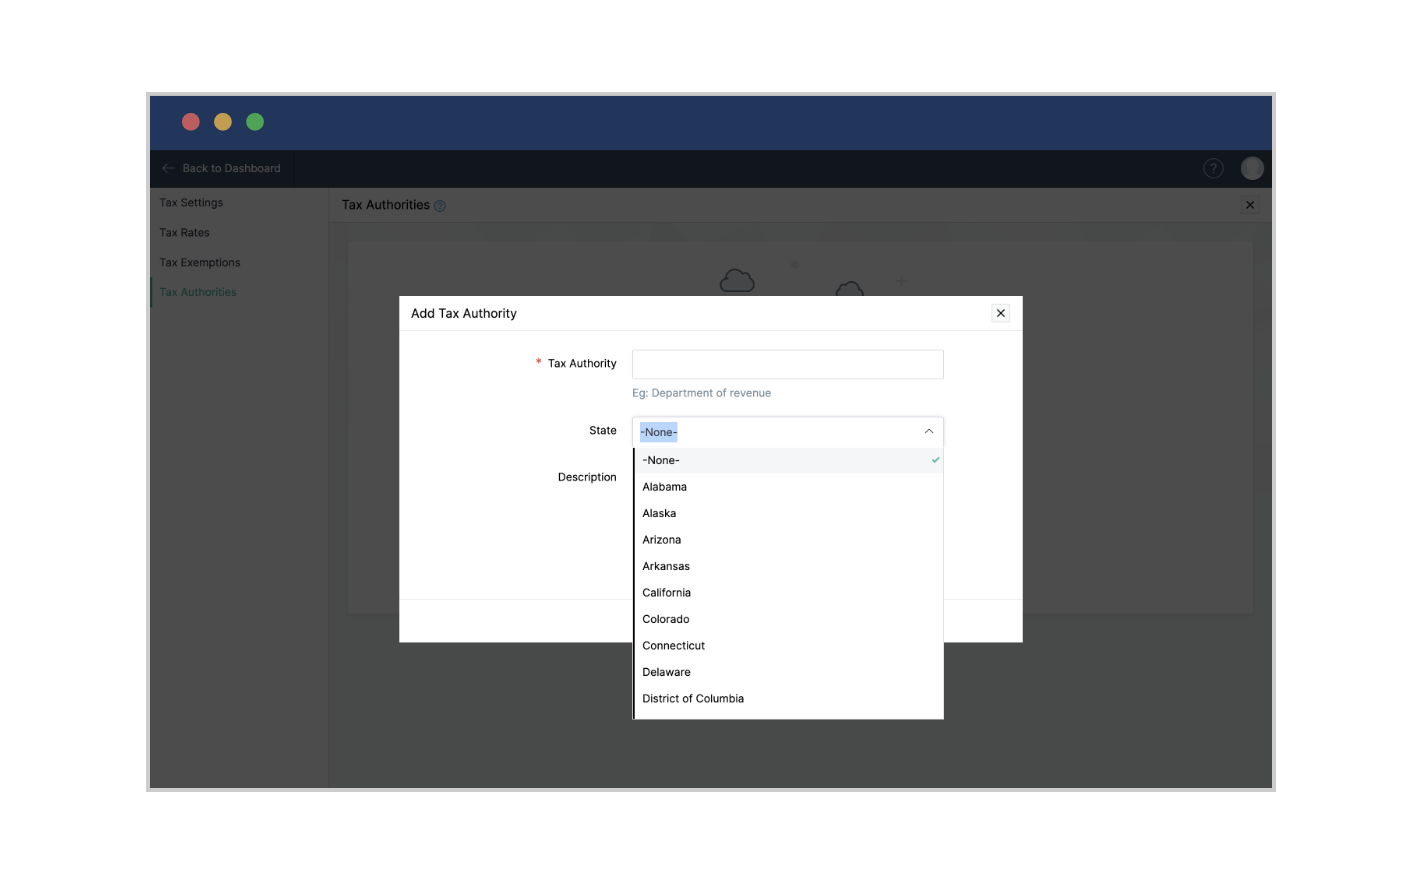
You can similarly set up a state tax override. Before we come to that, we will need to follow a few steps.
Set up tax authorities by clicking on Tax Authorities on the left panel. Enter the tax authority, state, and description, and click Save. Remember, you can make multiple entries (which can be edited or deleted), and they will be listed under the Tax Authorities section.
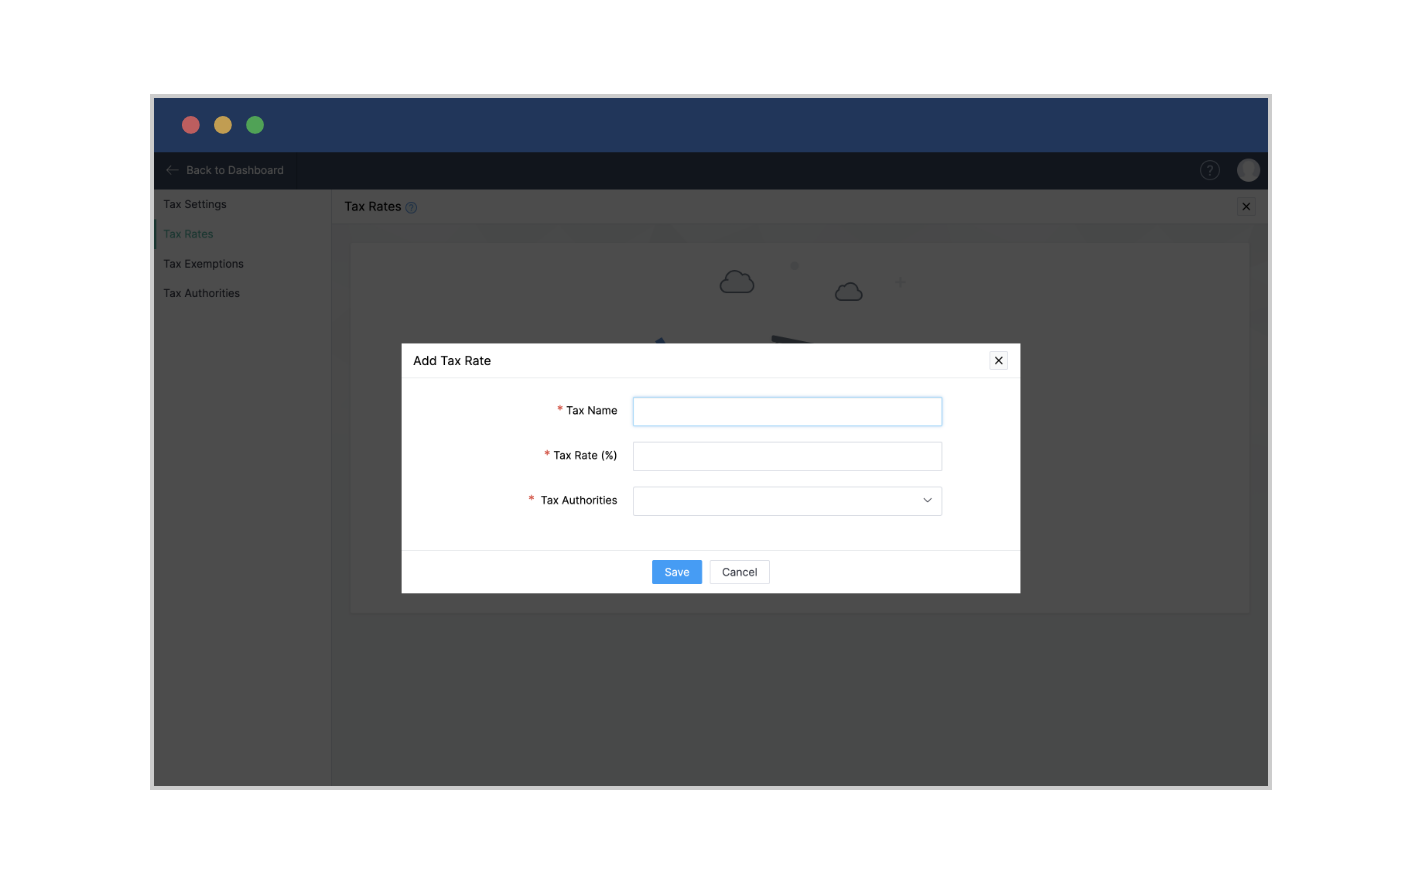
Next, add tax rates by clicking on Tax Rates (second option on the left panel). Enter the name of your tax rate and the rate, and choose the applicable tax authority from the list created in the previous step. Then, click Save. Multiple tax rates, which can be edited or removed, can be created here as well.
Create a tax group when you have more than one tax rule (i.e. if a product's tax includes both country and state tax). Click the Add Tax Group button at the top right, enter the name of your tax group, and check the taxes you want to group together. Then, save.
Now, the State Tax Override option will be available on the Tax Rule page, which can be accessed under Tax Settings (first option on the left panel).
State tax override
Choose State Tax Override if different states have different tax rates.
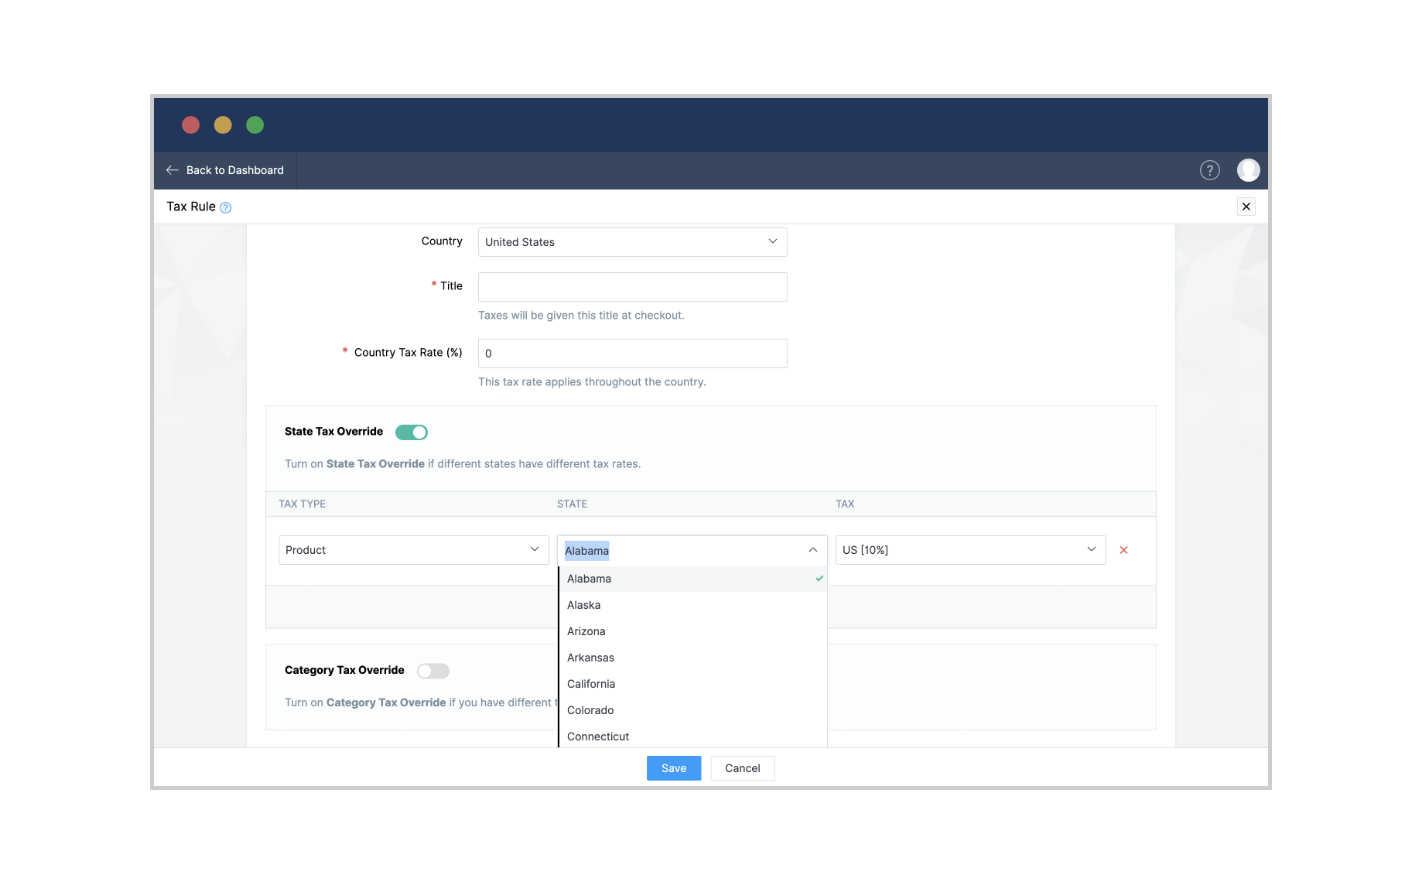
Select the tax type, state, and tax rate, and click Save.
You can keep adding more rows to the table by clicking on the Add State Tax Override option at the bottom of the section.
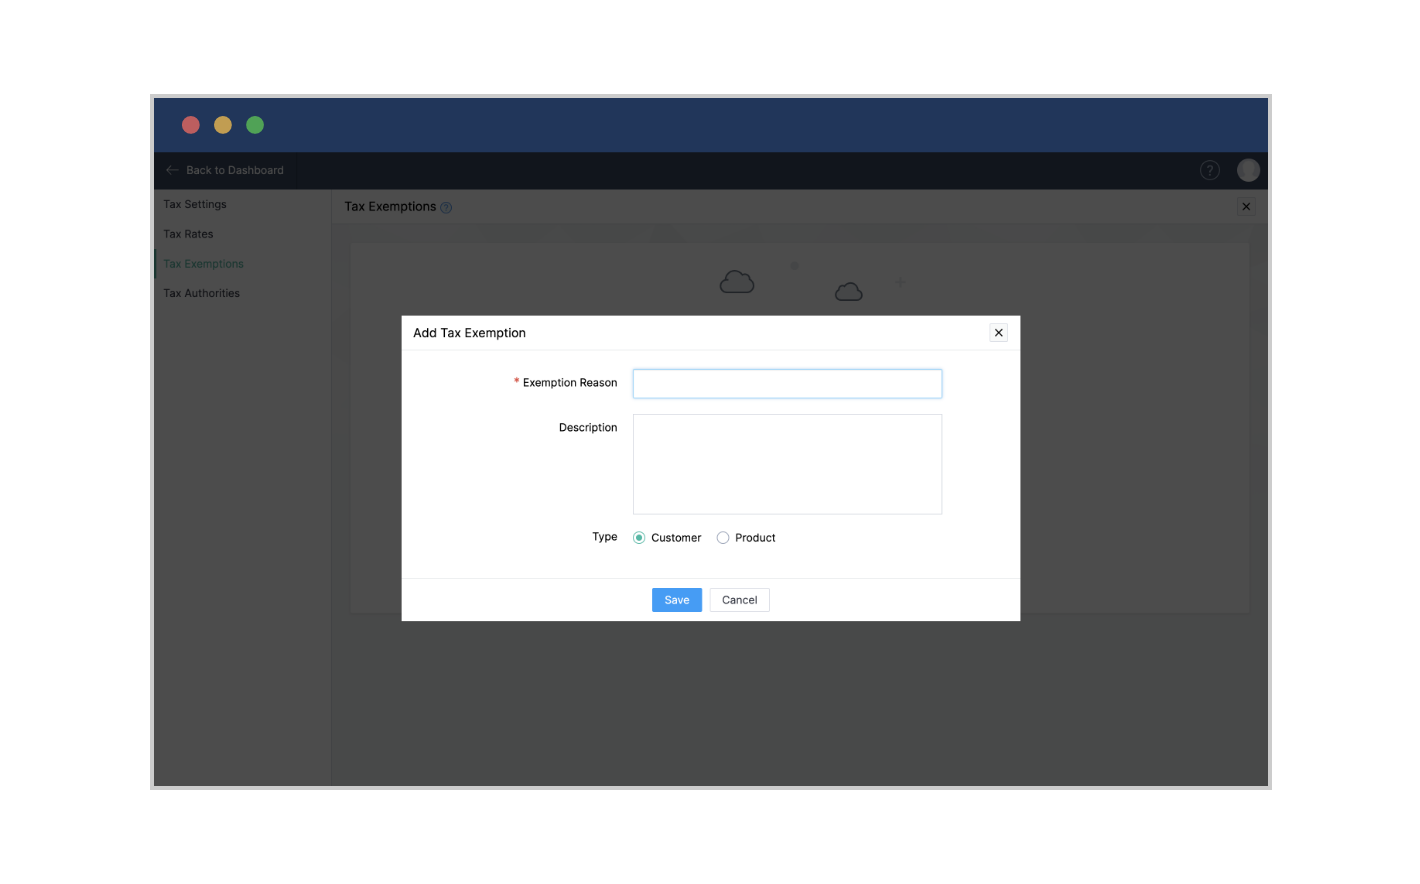
You can also check out the Tax Exemptions option (third option on the left panel) to Add Tax Exemption. In the window, you will be prompted to indicate the reason for exemption, add a description, and define whether the exemption is applicable at a customer level or a product level.
You can edit or delete taxes by choosing Taxes from the General menu under the Settings tab. You can click on the edit (pencil icon) or delete (cross icon) options to make changes to or delete taxes. Confirm and save your choice.
Managing customers
While you devote time to managing the critical functions of your online business, such as inventory, orders, or taxes, your focus must never waver when it comes to the most important part of any business—your customers. Managing customers well means you streamline their orders, give them access to their order history, and reward them with special prices, among other things. Let's learn how to do that in Zoho Commerce.
Member portal
The Member portal allows your visitors to create a user account for your store. Customers with an account can access:
Past orders.
Current orders, with details like item ordered, date of order, order ID, order status, and value of order. They also have the option to cancel an order (Once the item is shipped, this option won't be available).
Shipping address. New addresses can be added and existing addresses can be edited.
Customer profile. They can edit their name, phone number, or email address, and also reset their password.
By delivering a transparent, personalized, and smooth shopping experience to your customers, your chances of winning their repeat business will be high. There are three easy ways to ensure a high-quality shopping experience:
Customers can choose to go to your website and create an account, or log in through their social media profiles. To set up these options, go to Site Settings > General > Member Portal and click on Add Member Portal. Turn on Enable Member Portal and Enable Sign Up in the Social Login section. Turn on Facebook or Google and provide the requested information. Click Save.

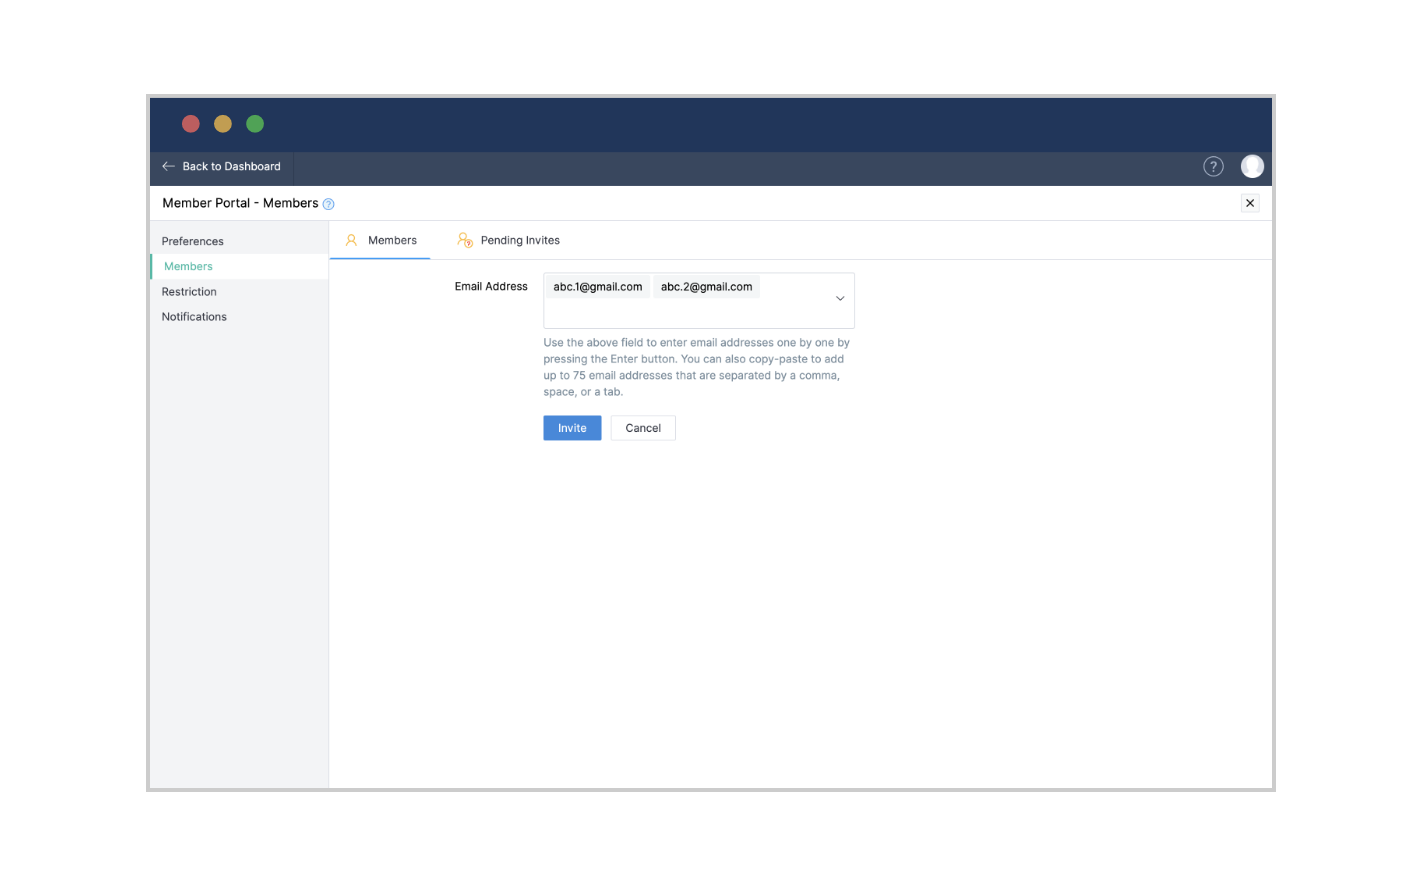
You can send customers an email invitation with a sign-up link. On the Member Portal page, choose Members from the left panel, enter the customer's email address, and select Invite User. In the next window, enter the email address again to complete the invite. You can visit the Pending Invites tab to review customers who have chosen to sign up.
You can also go ahead and set up a profile on behalf of your customer. Go to Settings > General > Customers and click on Create New Customer. Feed in all the required information, including the customer name, store display name, customer email address, and customer phone number. Then, enable member portal access.
Access to order information is not the only benefit customers receive when they create an account with your store. Regular customers can be rewarded with discounts and special prices—without any coupon codes. To set up rewards, business owners can create price lists.
Price lists
Go to Settings > Preferences, and scroll to the Product Settings section to enable custom price lists. Select Price List under General Settings. Click on Add Price List and provide a name for your list. Now, you are ready to create price lists in three different ways.
1. Mark up or mark down the prices
This will be particularly useful when you wish to change the prices of all the products by a specific percentage. To do so:
Select Mark Up or Mark Down the Product Prices by a Percentage. You will find this option next to the Item Rate field.
Choose from the drop-down whether you want to Mark Down or Mark Up along with the percentage by which you wish to slash or hike the price.

Round off the prices, if you wish, by filling in the requested details.
Click Save.
Unit pricing
When you choose the option to Enter the Price Individually for Each Product, you will have two different ways to do it. Unit Pricing gives you the flexibility to pick products individually and revise their prices.
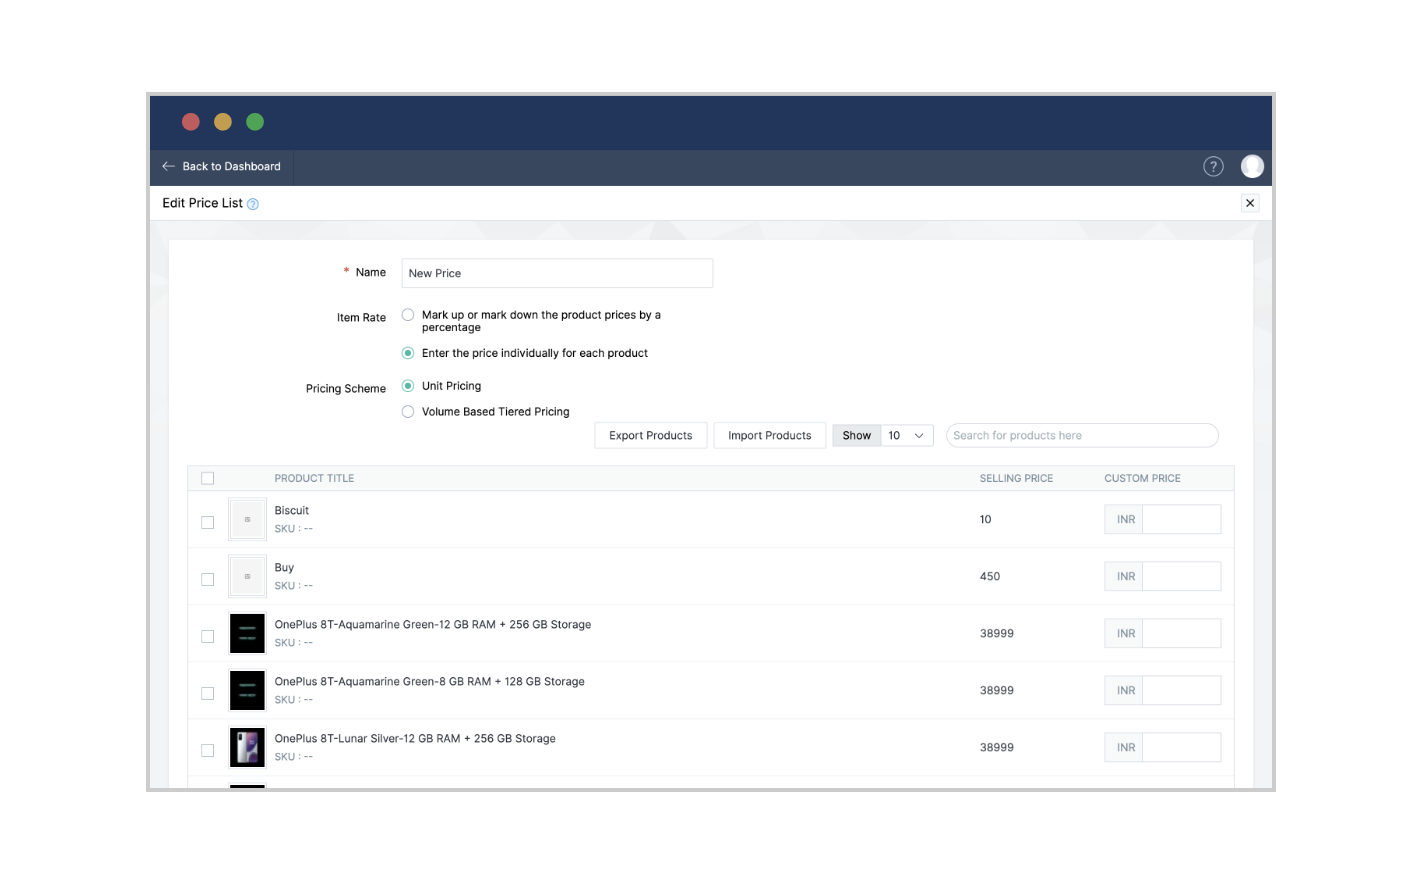
You will see a table below the Pricing Scheme section enumerating all the products, their respective selling prices, and a field called Custom Price. Check the products you wish to customize the price for and enter the price in the Custom Price box. Add notes if necessary, and press Save.
Volume-based tiered pricing
Particularly useful for B2B businesses where the business volumes are high, this method allows you to set prices based on the number of products being purchased. The more one purchases, the less they pay for each unit of that product.
Select the Volume-Based Tiered Pricing option listed next to Pricing Scheme.
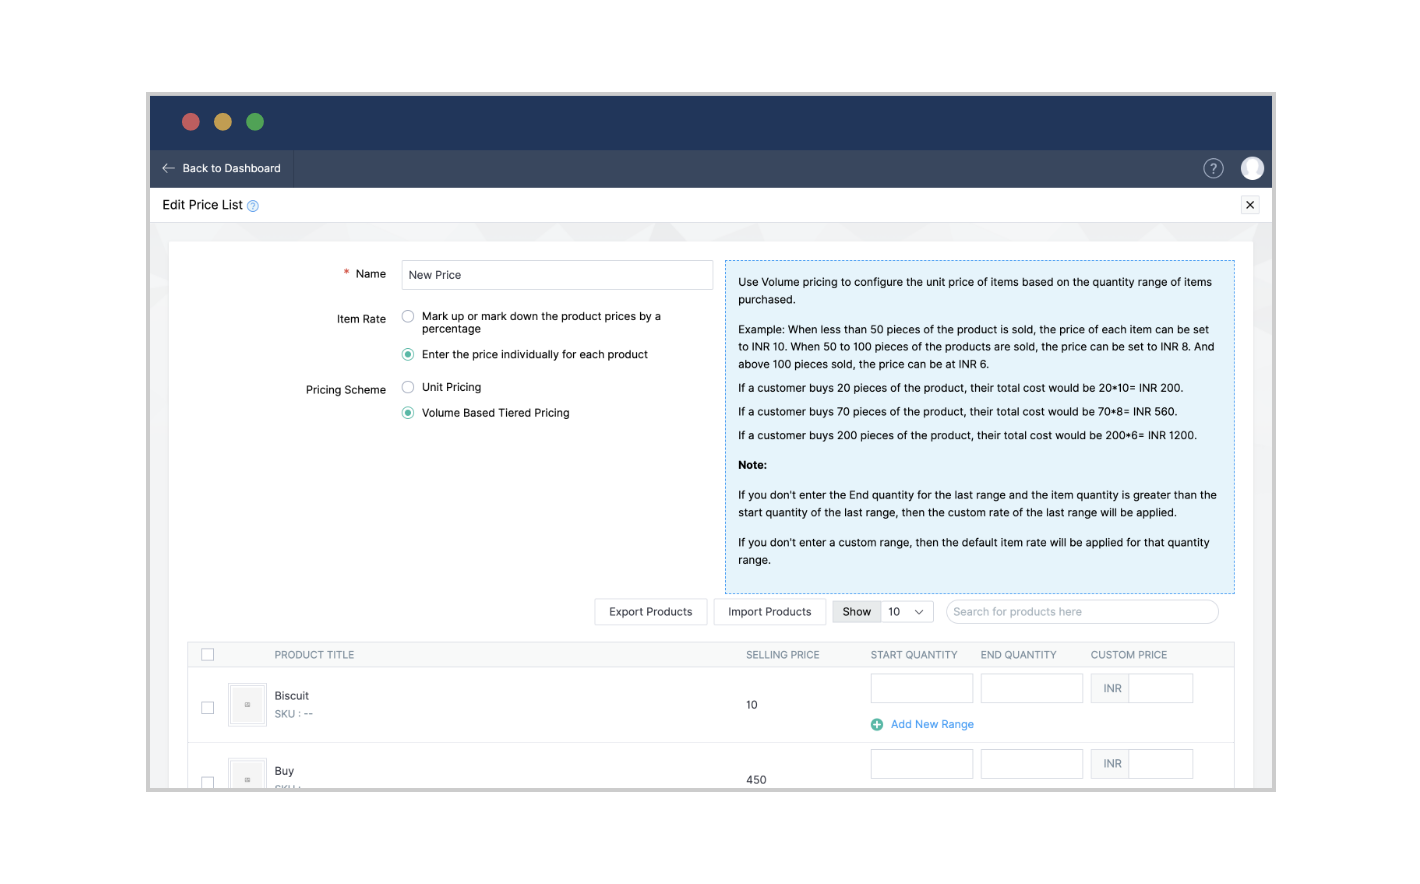
From the table, choose the product that you wish to edit, chose the quantity range, and enter the price details.
For instance, if you key in Start Quantity as 10 and End Quantity as 20 for Product A, and price it 10% less than the original selling price, you are rewarding those buying 10 - 20 units of Product A with a 10% discount.
Learn how you can best utilize the Price List feature in Zoho Commerce.
Managing store admins
As your business scales up, you will need additional help to run the store. You may need to give certain employees access to inventory data that they didn't need before. Adding Admins to your ecommerce store helps you get more people involved in your business to run day-to-day operations.
By setting up user roles, you can give specific employees access to the areas of the store that are relevant to their jobs, and restrict them from areas that are not relevant.
The store owner can give employees two kinds of control to manage the store:
Admin
Admins have the same control over the ecommerce store as the owner. They can add and remove products, change prices, and run promotions. They also have access to the store's data, including sales reports and customer information. Plus, they can access the Site Builder to edit the design and layout of the website.
To add an Admin to your store:
Go to Settings > Store Settings > Users.
Click Add User in the top right.
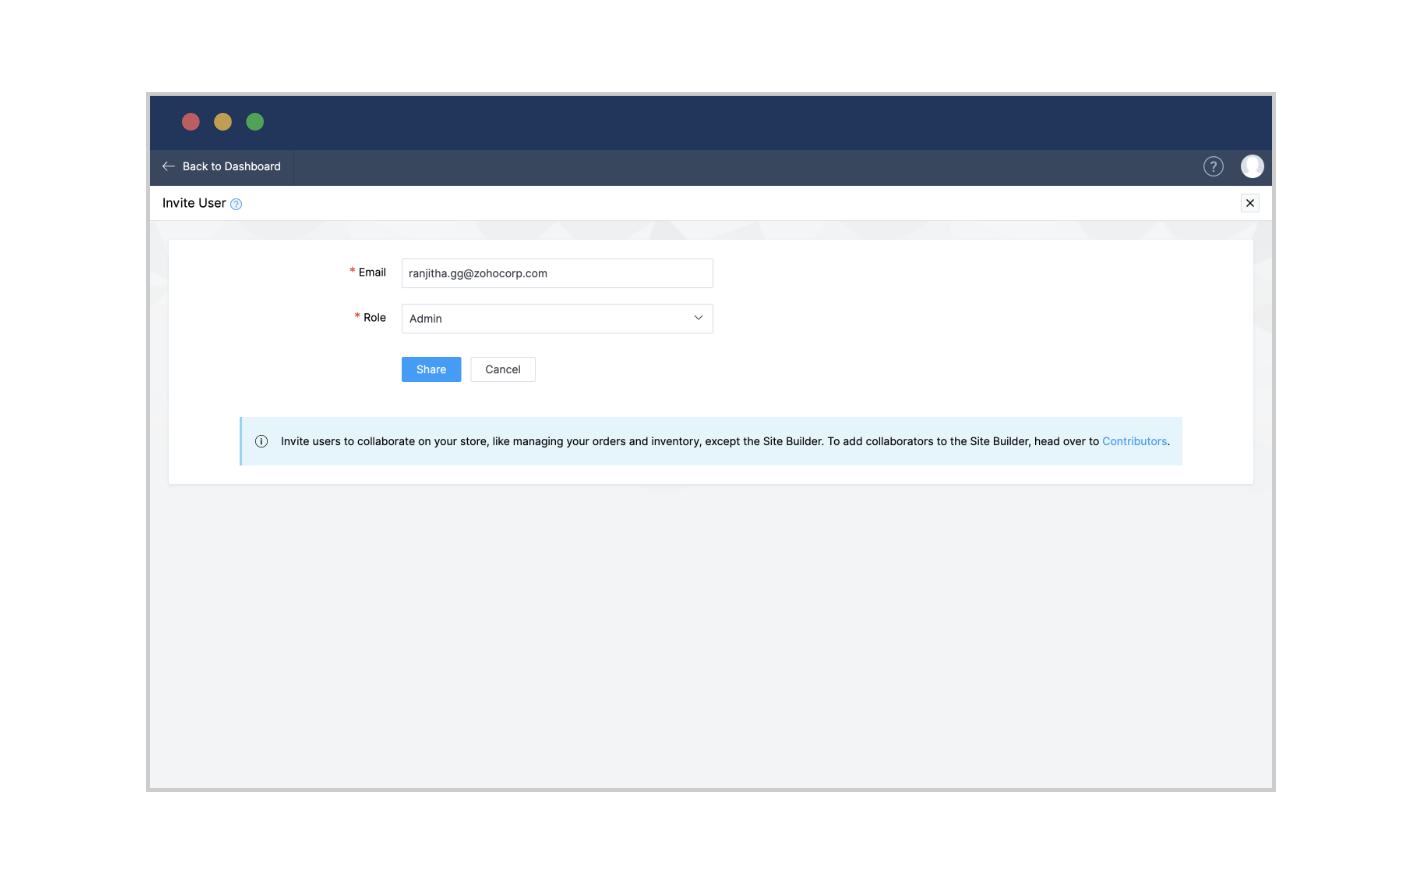
Enter the user's email address and next to Role, select Admin from the drop-down menu.
Click Share.
An invitation to join as an Admin will be sent to the provided email address. You can view their status from the Users dashboard.
Staff
The second kind of user in an ecommerce store is Staff. Staff have access only to the relevant modules, as permitted by the store owner. This ensures that sensitive information remains secure, and your business runs smoothly and efficiently.
To add Staff to your store, repeat the first two steps mentioned in the section above. In the third step, next to Role, select Staff from the drop-down menu, and click Share.
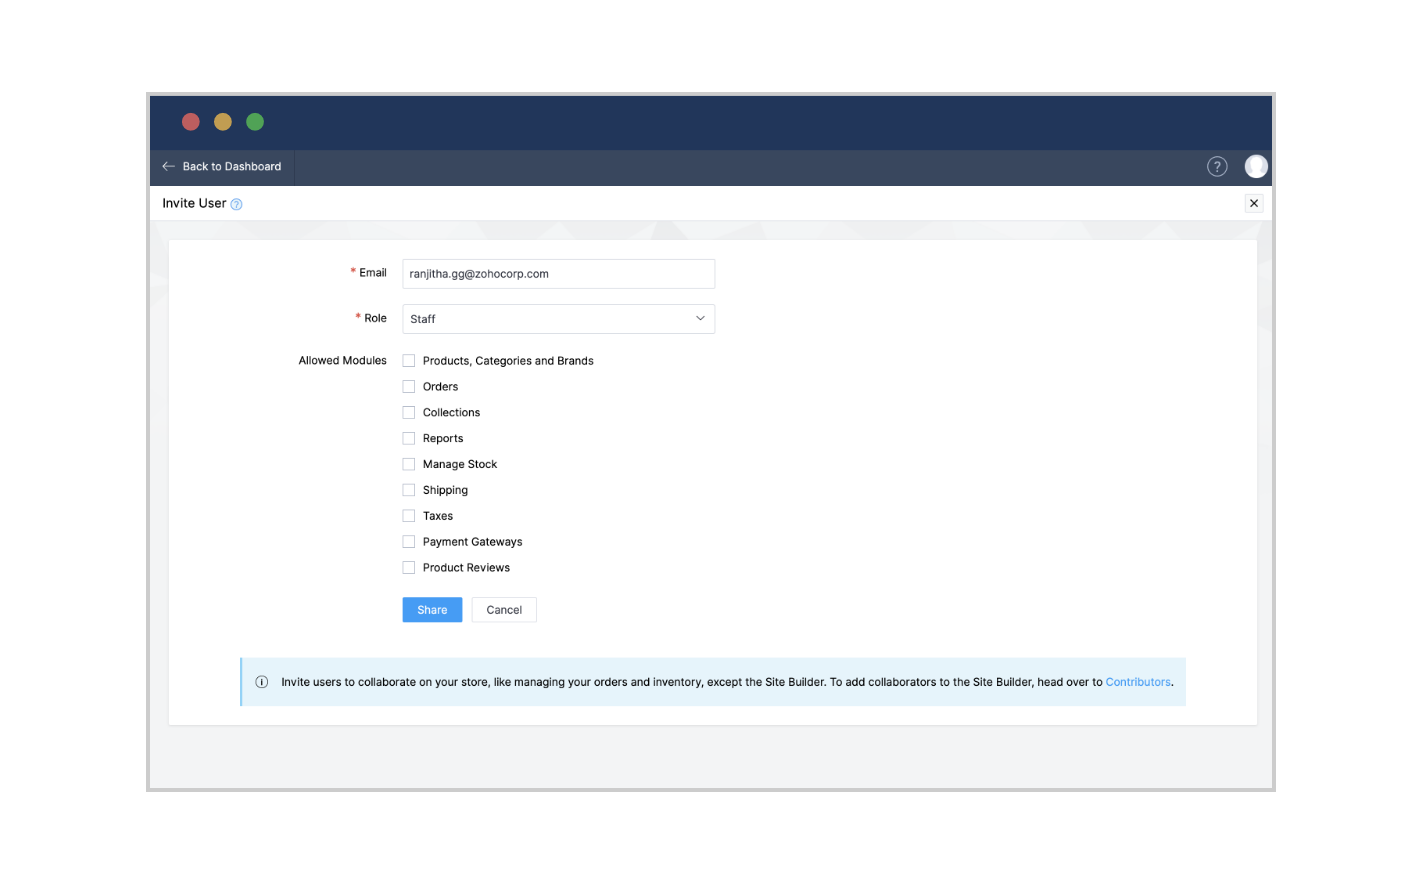
An invitation to join as Staff will be sent to the provided email address. You can view their status from the Users dashboard. On the same dashboard, for each user, you can choose to:
Re-invite the user.
Mark them Inactive to temporarily revoke their access to your store functionalities.
Mark them Active to restore privileges.
Delete a user role
As an ecommerce business, you may come to a point where you need to delete a user role in your store. Deleting a user role is a relatively simple process in Zoho Commerce, which can be completed using the steps below:
Go to Settings > Store Settings > Users
Hover over the user and click the Delete [X] icon
Tip: There are a few things to keep in mind when adding users to your ecommerce store. First, make sure that you select people who are a good fit for your business and who will be able to add value. Second, clearly communicate what you expect from your store admins.
Managing user roles: Why it's critical for your business
Store Admin is a powerful role that grants a user visibility into, and control of, the workings of the store. It is important to manage this role diligently. When you manage user roles, you can:
Control what users can see and do on your site, especially when it entails sensitive data, or if you want to limit certain features to certain users.
Keep your site organized and run it smoothly.
Delegate tasks and easily keep track of progress by assigning specific roles to users. This way, you can ensure that everyone has access to the information and tools they need to do their job.
Reduce confusion and duplication of effort.
A well-managed user role can help improve the overall security of your ecommerce store. Make sure you review and update your contributor role permissions on a regular basis.
We hope the contents of this guide have included everything crucial to managing your day-to-day business operations. We have covered:
Product management and product SEO
Order, shipping, and payment management
Inventory and stock management
Setting up taxes
Delivering customer experience
This should give you a comprehensive understanding of how to run your online store and manage its operations efficiently with Zoho Commerce. We wish you success in your business journey. If you think we can help you in any way, please drop an email to marketing@zohocommerce.com.