Advanced Analytics for SendGrid
The Advanced Analytics connector for SendGrid streamlines the integration of your email delivery data, offering deep insights into email performance, deliverability, recipient engagement, and sender reputation. By unifying metrics like delivery rates, opens, clicks, bounces, and spam reports into interactive dashboards, marketing and operations teams can monitor the health and effectiveness of their email program in real time.
- Setting up the Integration
- Handling Data Synchronization Failure
- Managing Data Sources
- Data Modeling & Preparation
- Data Blending
- How can you visualize and analyze SendGrid data?
- Sharing & Collaboration
- Help & Support
Setting up the Integration
A user with administrator privileges (Account Admin and Organization Admin) can configure the integration.
Get your SendGrid API key
Before setting up the connector in Zoho Analytics, generate an API key from your SendGrid account:
- Sign in to your SendGrid account.
- From the left pane, click Settings > API Keys. The page lists your existing API keys, if any.
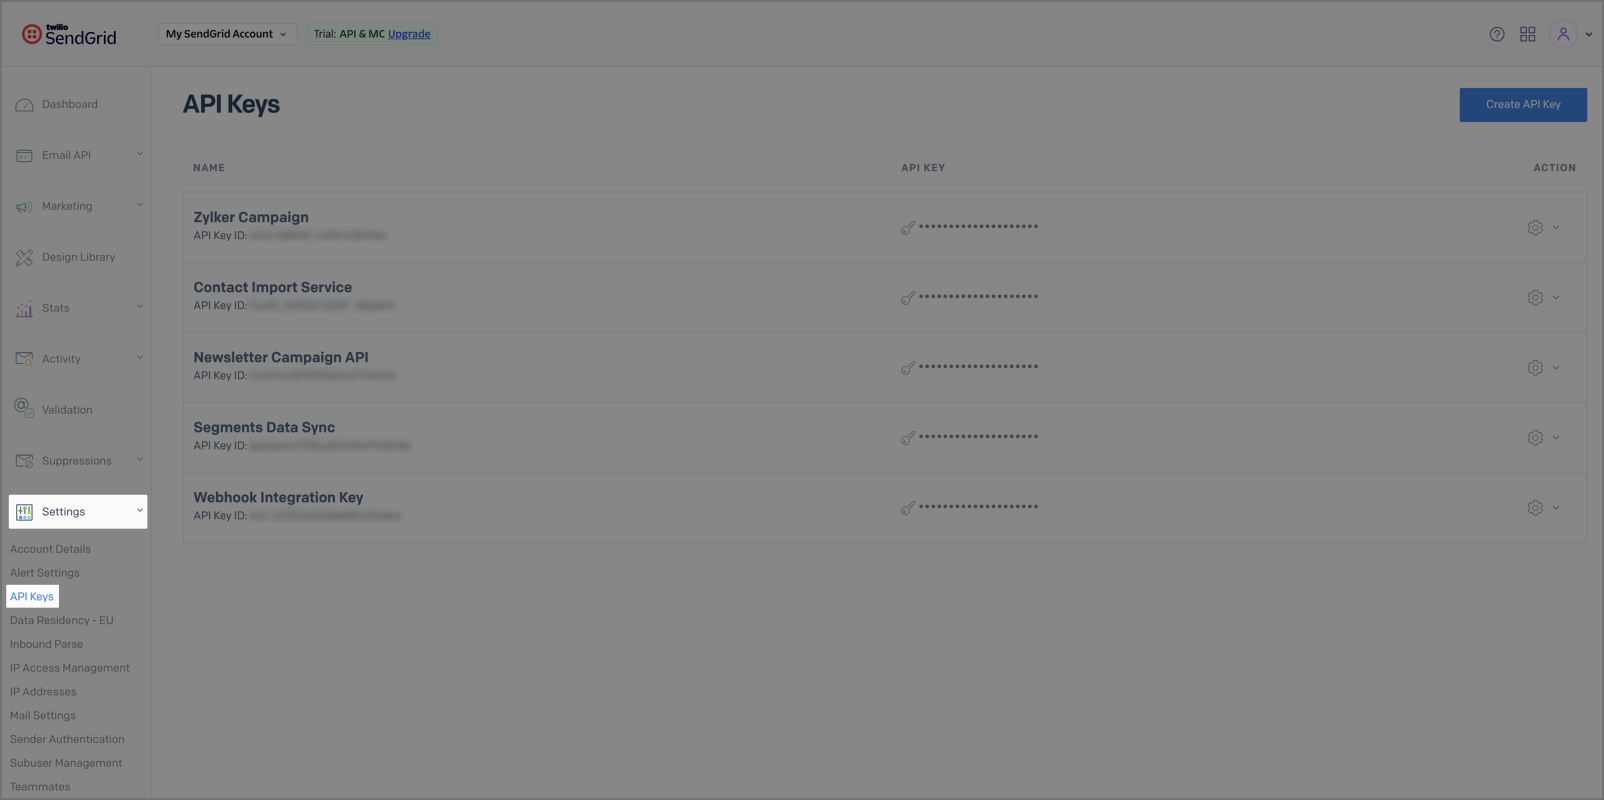
- Click Create API Key.
- Enter an API Key Name and select the API Key Permissions (Full Access, Custom Access, or Billing Access).
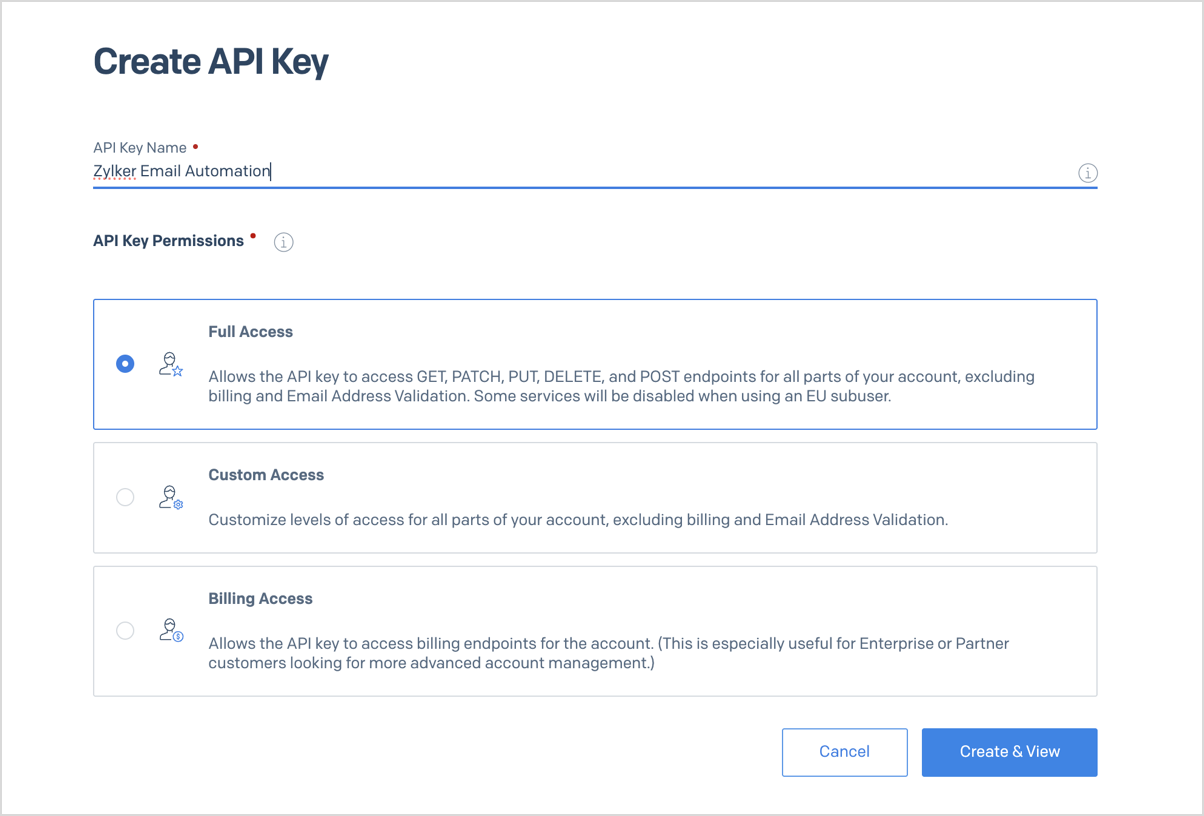
- Click Create & View.
- Copy the generated API key .
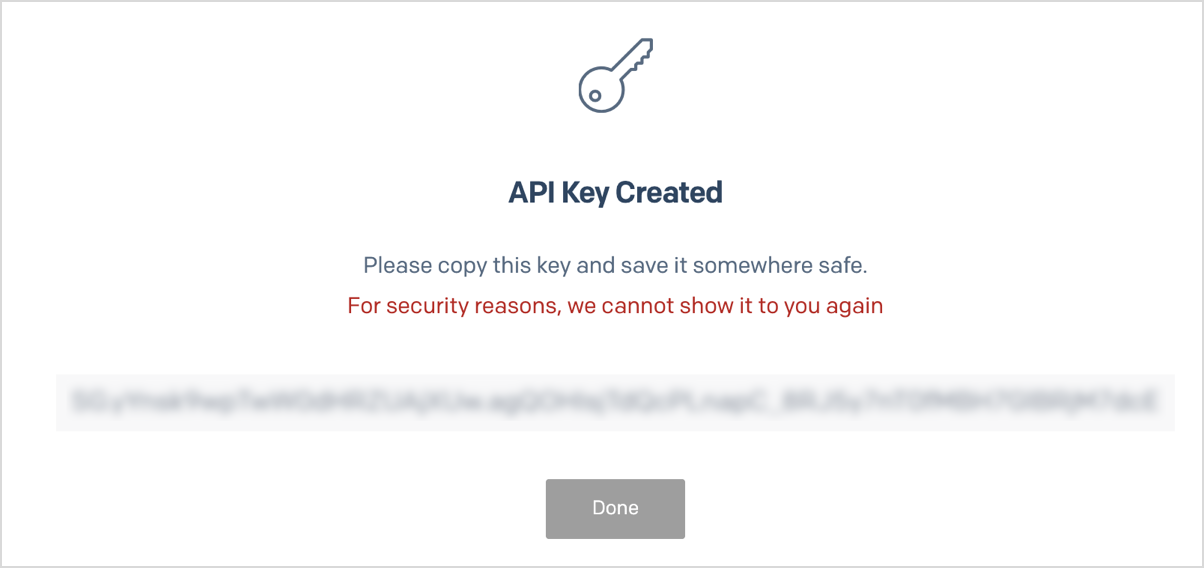
Note: For security reasons, SendGrid displays the API key only once. Make sure you copy and save it before closing the page.
Import your SendGrid data into Zoho Analytics
Follow the below steps to import your SendGrid data into Zoho Analytics seamlessly:
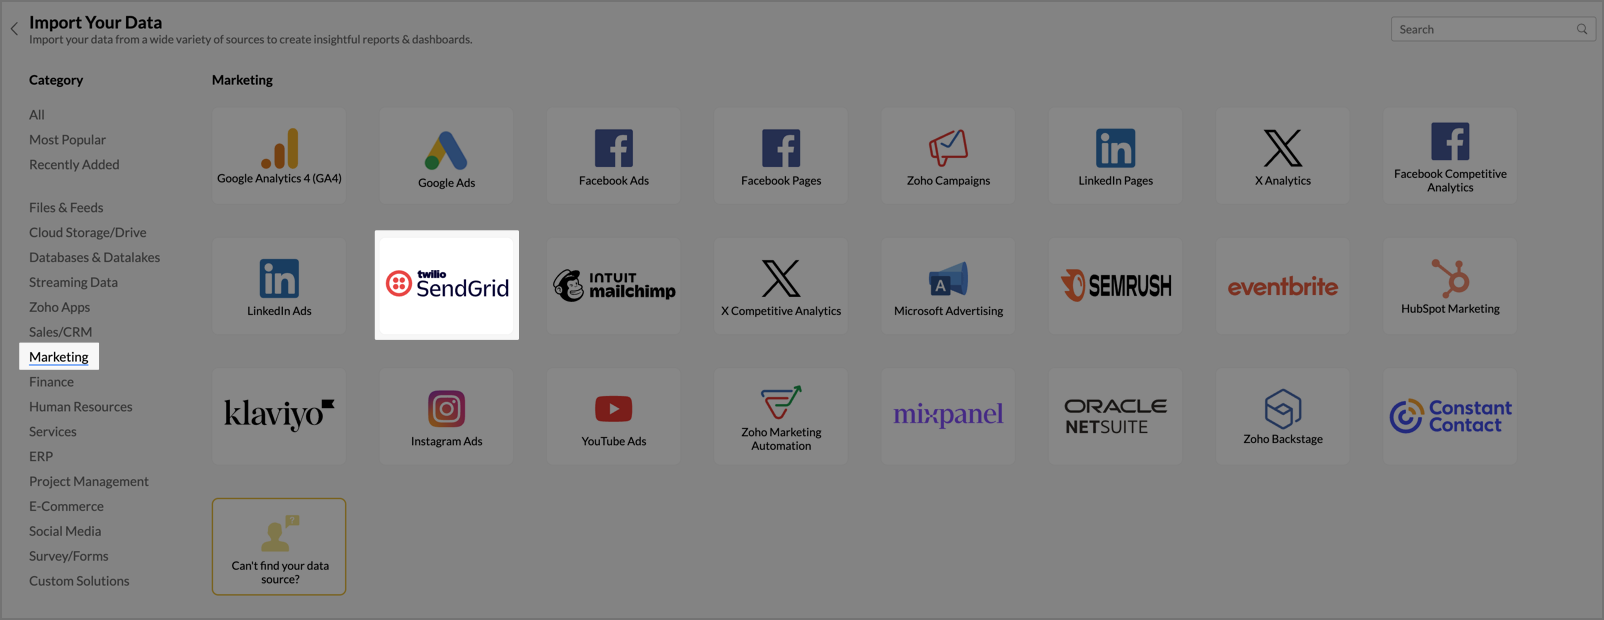
- On the Zoho Analytics home page, click Import Your Data.
- Navigate to the Marketing tab and select SendGrid from the available data sources.
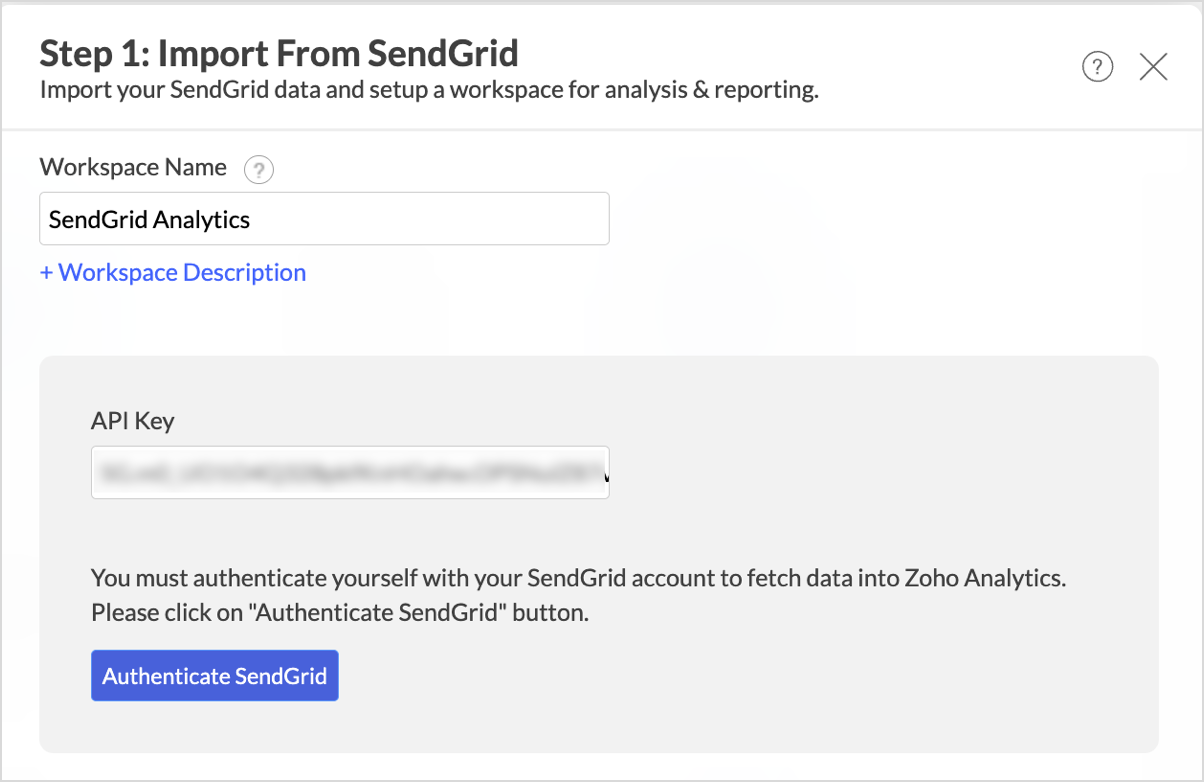
- In the Step 1: Import From SendGrid dialog, enter the Workspace Name and Workspace Description (optional).
- Enter the API Key you copied from your SendGrid account.
- Click Authenticate SendGrid to validate the API key.
- In the Step 2: Import From SendGrid dialog, select the Single Sends and Automations you want to analyze. To import campaigns added in the future automatically, select Import new Campaigns automatically.
- Select the Modules and Fields you want to analyze.
- From the Cleanup dropdown, choose whether to periodically remove older data during sync. By default, Don't cleanup retains all data.
- Select the Data Timezone in which the date and time values should be interpreted.
- From the How Often section, choose the interval in which the data should be synced. Refer to the <<Data Sync Frequency>> section to learn more.
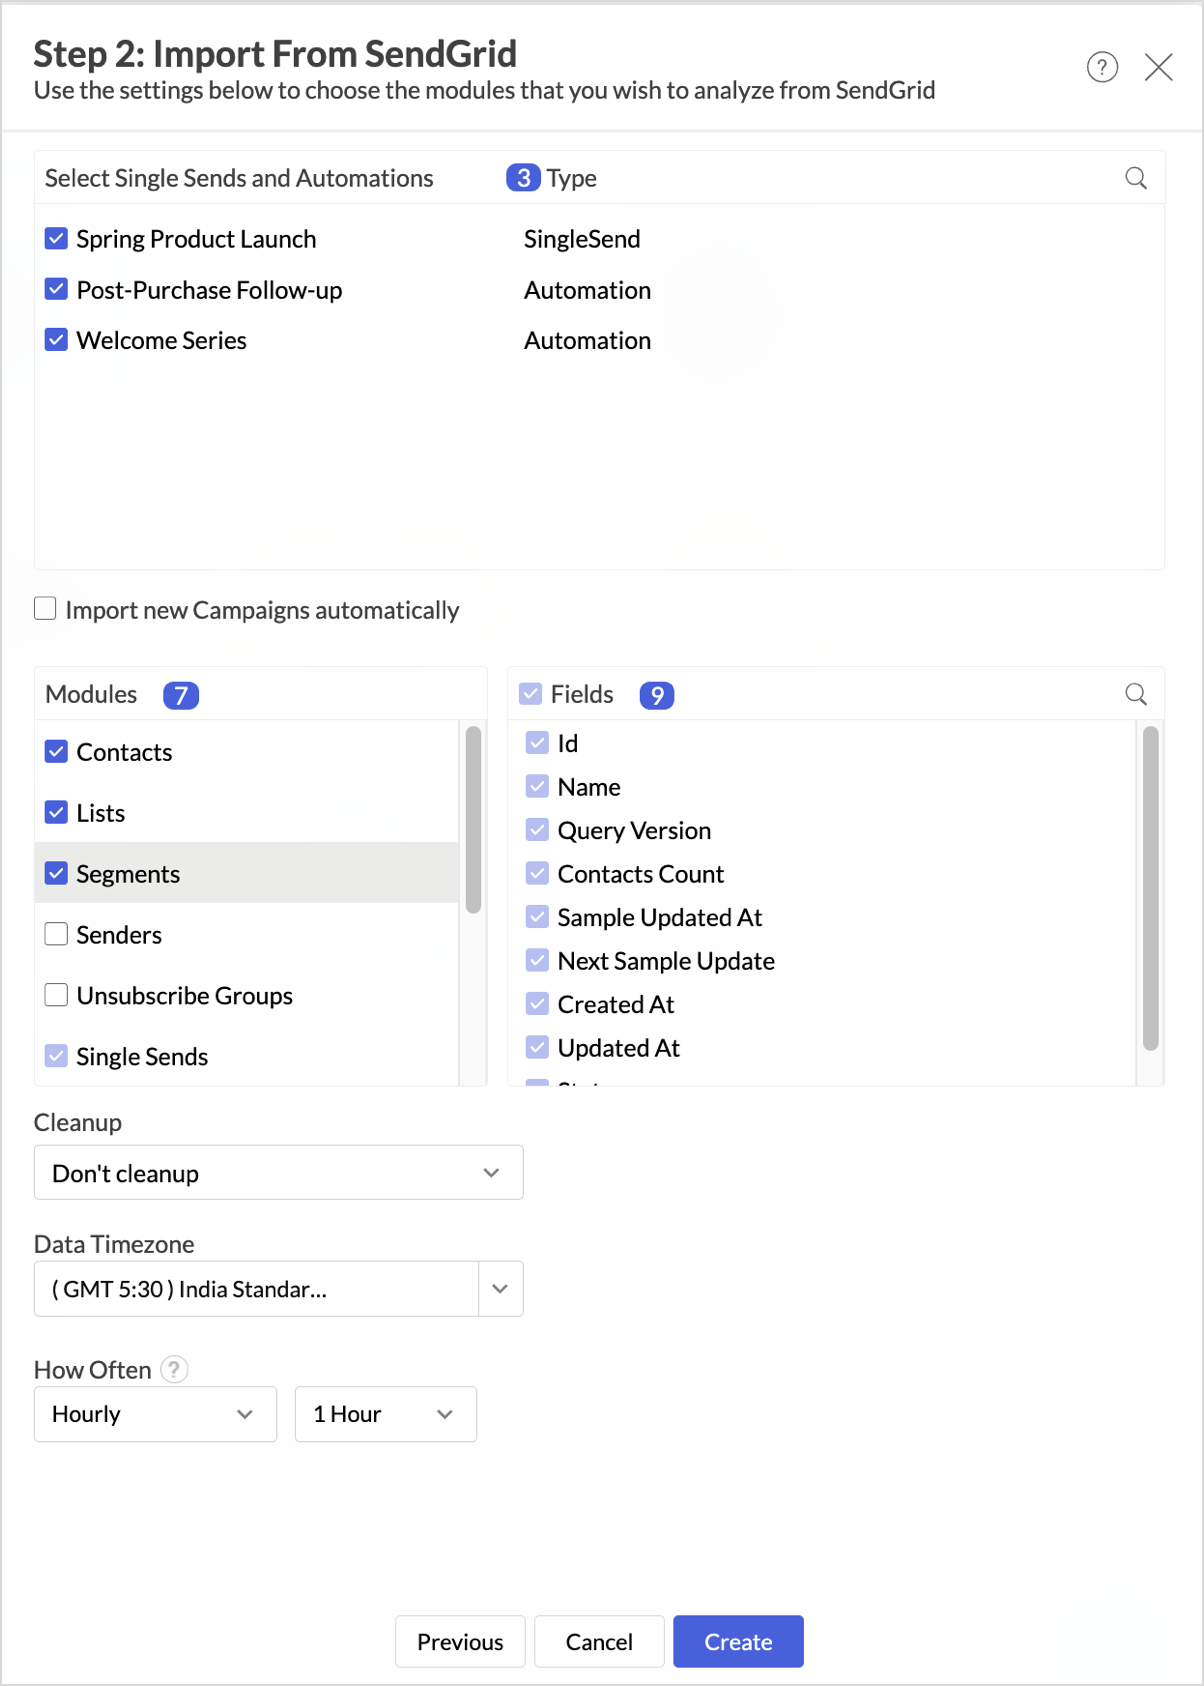
- Click Create. Import will be initiated.
Note:
- The initial fetch might take a few minutes depending on the volume of the data to be imported. An email and an in-app notification will be sent once the initial fetch is complete.
- The setup process can sometimes fail for a variety of reasons. In this case, we request you to access the Data Sources tab and click the Retry link to import again. If the issue persists, write to us at support@zohoanalytics.com.
Modules & Fields
The below table lists the modules and fields that will be synced to Zoho Analytics.
| Modules | Fields |
| Contacts | Contact Id, Email, First Name, Last Name, Unique Name, Phone Number, External Id, Address Line 1, Address Line 2, City, State/Province/Region, Country, Postal Code, Created At, Updated At, Age |
| Lists | Id, Name, Contact Count |
| Segments | Id, Name, Query Version, Contacts Count, Sample Updated At, Next Sample Update, Created At, Updated At, Status |
| Senders | Id, Nickname, From Email, From Name, Reply To Email, Reply To Name, Address, Address 2, City, State, Zip, Country, Verified Status, Verified Reason, Updated At, Created At, Locked |
| Unsubscribe Groups | Id, Name, Is Default, Description, Unsubscribes |
| Single Sends | Id, Status, Name, Generate Plain Content, Editor, Suppression Group ID, Custom Unsubscribe URL, Sender ID, IP Pool, Created At, Updated At, Send At, Subject, Is All Contacts, Plain Content |
| Single Sends Vs Lists | Single Send ID, List ID |
| Single Sends Vs Segments | Single Send ID, Segment ID |
| Single Sends Stats | Date, Single Send ID, Bounce Drops, Bounces, Clicks, Unique Clicks, Delivered, Invalid Emails, Opens, Unique Opens, Requests, Spam Report Drops, Spam Reports, Unsubscribes |
| Automations | Id, Status, Name, Type, Entrance Criteria Occurs, List ID, Segment ID, Entrance Criteria Type, Exit Criteria, Suppression Group ID, Custom Unsubscribe URL, IP Pool, Live At |
| Automations Stats | Date, Automation ID, Step ID, Bounce Drops, Bounces, Clicks, Unique Clicks, Delivered, Invalid Emails, Opens, Unique Opens, Requests, Spam Report Drops, Spam Reports, Unsubscribes |
Data Sync Frequency
Zoho Analytics offers flexible sync schedules to ensure that your data is always up-to-date for effective analysis. These schedules allow you to automate the process of updating your data, ensuring that your analyses are based on the latest information.
- 1 Hour (Enterprise plan)
- 3 Hours (Standard plan and above)
- 6 Hours (Standard plan and above)
- 12 Hours (Standard plan and above)
- Daily (Basic plan and above)
Handling Data Synchronization Failure
Data synchronization can fail if,
- Authentication to the SendGrid account has expired or was revoked.
- The data type of a field is changed in the SendGrid application.
- The Modules and Fields selected for analysis are deleted in the source application.
- The user who configured the integration no longer has permission to access the modules.
In any of the above mentioned cases, the data sync will be paused. You will be notified via email and in-app notification with the exact reason for failure along with the solution.
To resolve the sync failure, delete or restructure the views, or restore the specific modules and fields from the source application. Refer to Data Sync failure and solutions article for more details.
Once you have made the changes, click the Sync now option to resume the data sync. If the issue persists, mail us at support@zohoanalytics.com.
Managing Data Sources
The Data Sources tab provides essential information to monitor and manage the integration setup. It also allows you to edit the settings as needed. Users with administrator privileges will be able to view and modify the connection settings.
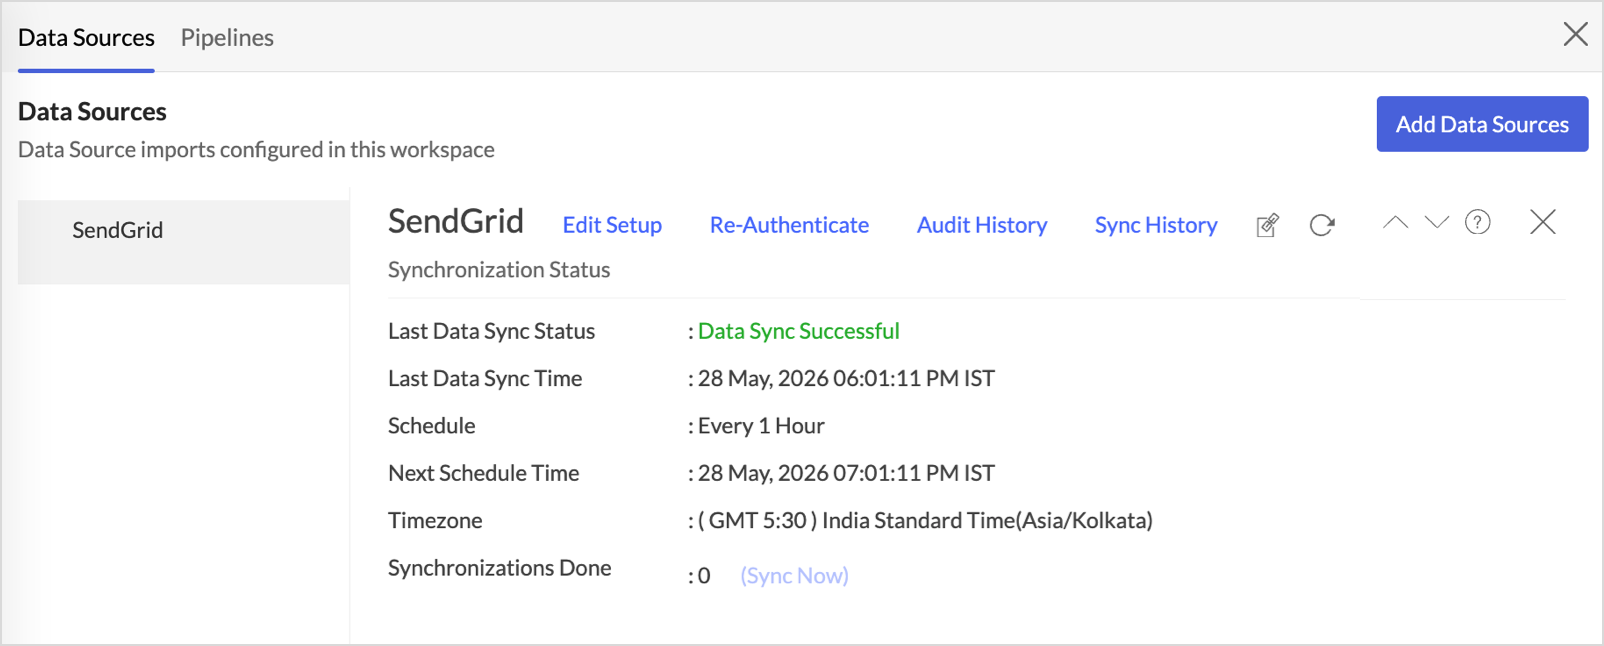
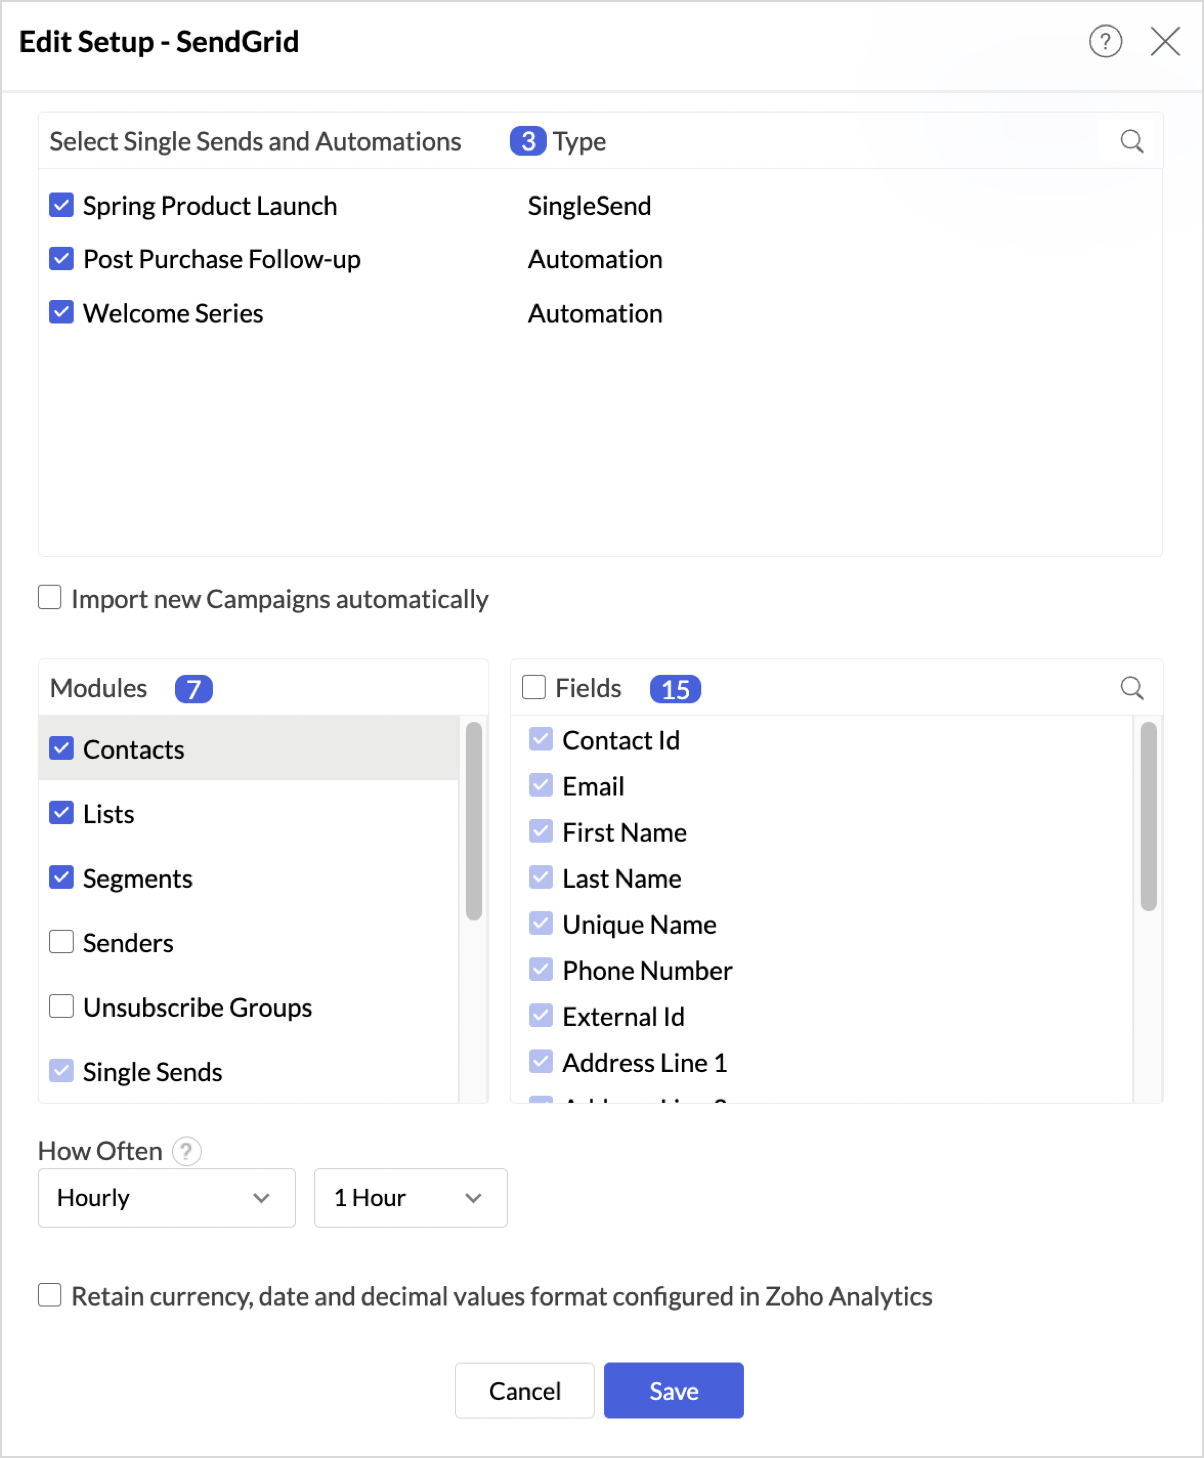
- Edit Setup: The Edit Setup tab allows you to add or delete modules or fields, change the schedule interval, and modify other settings specific to the business application.
To modify the settings,
Click Data Sources > Edit Setup.- The Edit Setup - SendGrid dialog will open.
- Modify the settings as needed and click Save.
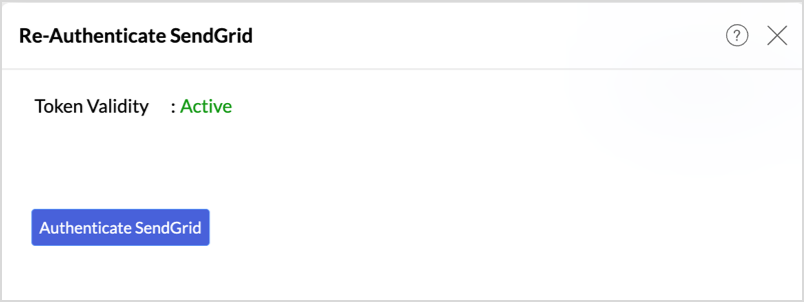
- Re-Authenticate: Re-authentication will be helpful when the API key or credentials are changed. In this case, the data sync will be paused, and the administrator who configured the connector must re-authenticate to resume the data sync.
To re-authenticate,- Click Data Sources > Re-Authenticate.
- The Re-Authenticate SendGrid dialog will open. Enter the credentials and click Authenticate SendGrid.
- Audit History: Use Audit History to review user actions and system events recorded for the SendGrid data source. Learn more.
- Sync History: Use Sync History to review data sync activity for the last 45 days, including sync time, status, and failure details. Learn more.
- Data Source URL: Use the Data Source URL to open the Data Sources tab and view sync status, last sync time, and next scheduled sync. Learn more.
- Remove Data Source: Use Remove Data Source to stop sync and delete the SendGrid tables, reports, and dashboards associated with the integration. Learn more.
Transferring SendGrid Connector to Another Admin
If the user who configured the SendGrid connector leaves the organization or hands over administration responsibilities, ownership of the connector can be transferred to another administrator. This ensures uninterrupted data sync and continued access to the workspace.
For detailed steps on transferring connector ownership, refer here.
Data Modeling & Preparation
Zoho Analytics lets you prepare and model your SendGrid data for analysis. Join tables using lookup columns or query tables, create formulas, and clean or transform data as needed. For more context on data modeling and preparation, see Data Modeling & Preparation.
Formulas
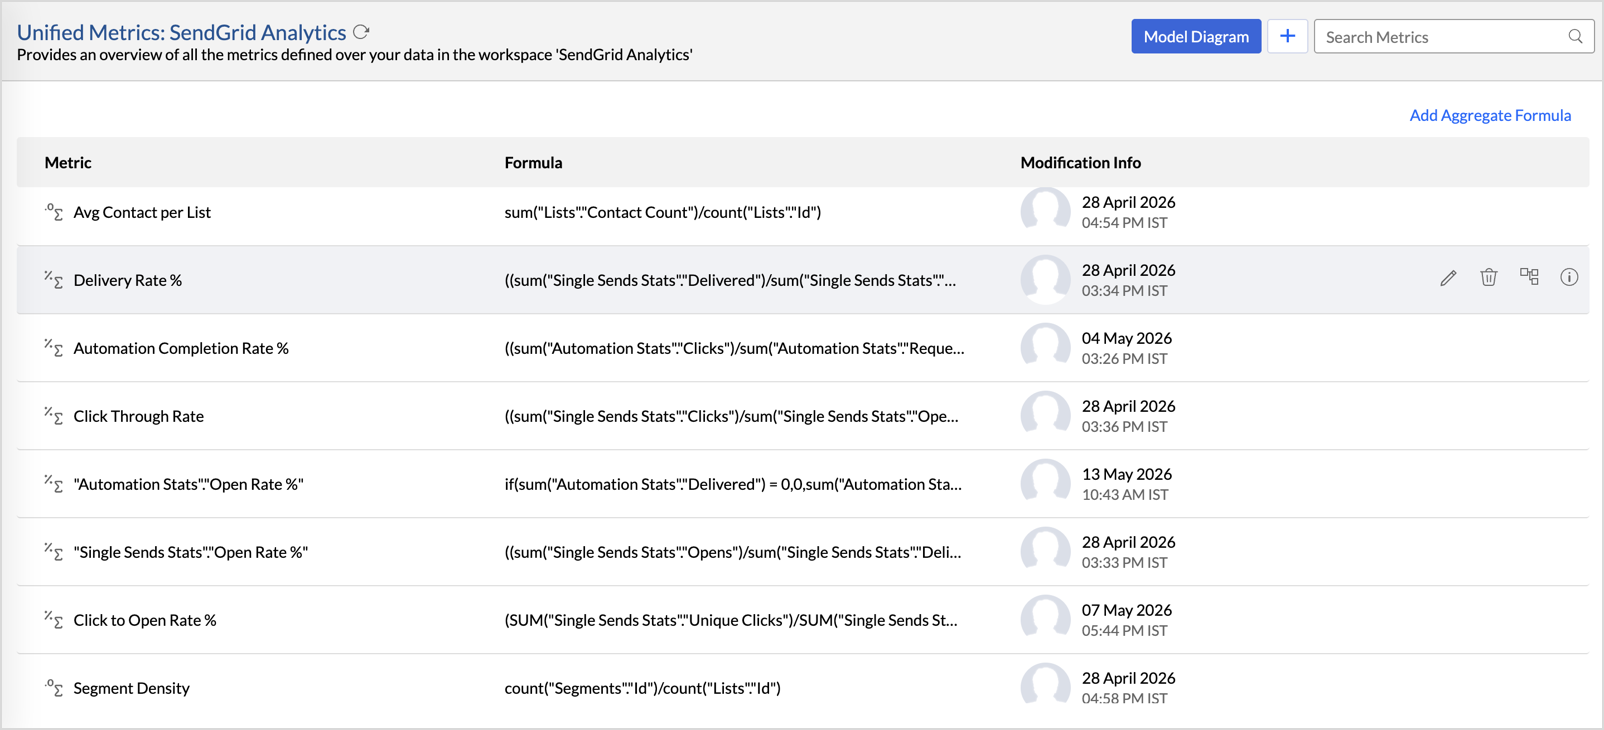
Zoho Analytics provides a set of pre-built formulas along with the connector. To access these formulas, open your SendGrid Advanced Analytics workspace, click Data from the side panel, and click Unified Metrics. This lists all the prebuilt formulas and other formulas available across the workspace.
You can also create your own custom formulas in Zoho Analytics. To know how to create your own formulas, refer to Formulas (Calculations).
Data Blending
Data Blending combines data from SendGrid with data from other data sources to create correlation reports and dashboards. When you import multiple data sources into the same workspace, Zoho Analytics identifies the relationships between them and blends the data using lookup columns and query tables.
For the complete steps on blending data across sources, see Data Blending.
How can you visualize and analyze SendGrid data?
Zoho Analytics allows you to create a wide range of visualizations to analyze SendGrid data and gain actionable insights into your email program. You can build reports and dashboards to track delivery and bounce rates, monitor open and click engagement, analyze spam reports and unsubscribes, evaluate sender reputation, and measure overall email performance across campaigns and recipients.
- Zoho Analytics offers a wide range of visualization types to conduct your analysis. Refer to the Creating Reports section to learn more. The chart type primer lists all the viz types available in Zoho Analytics.
- With Predictive analytics, forecast future trends, detect anomalies, and segment data using Cluster analysis.
- Find the What, Why, and How behind any outcome with Zia Insights.
Sharing & Collaboration
- Use fine-grained permission control over your shared data and reports, while collaborating with your colleagues & friends.
- Efficiently collaborate with your users by setting up real-time commenting on a shared view.
- Publish reports for wider consumption. Embed reports/dashboards within your websites, web applications, and blogs.
- Export, email, and print reports in a variety of formats.
- Use Zoho Analytics mobile apps (optimized for both iOS and Android platforms) and access data, reports, and dashboards on the go.
Help & Support
We offer 24x5 technical support (Monday to Friday). In case if you need our assistance, kindly do mail us your questions to support@zohoanalytics.com.
You can also reach out to us on our toll-free numbers.
United States: +1 (888) 900 9646
United Kingdom: +44 (20) 35647890
Australia: +61-2-80662898
India: +91 44 6965 6060