Projects
- Creating Projects
- Associating Projects
- Importing and Exporting Projects
- Deleting Projects
- Project Dashboard
Creating Projects
Projects are assignments that employees work on. Follow the steps given below to create a Project.
- From your home page, go to Timesheet > Projects/Jobs > Projects
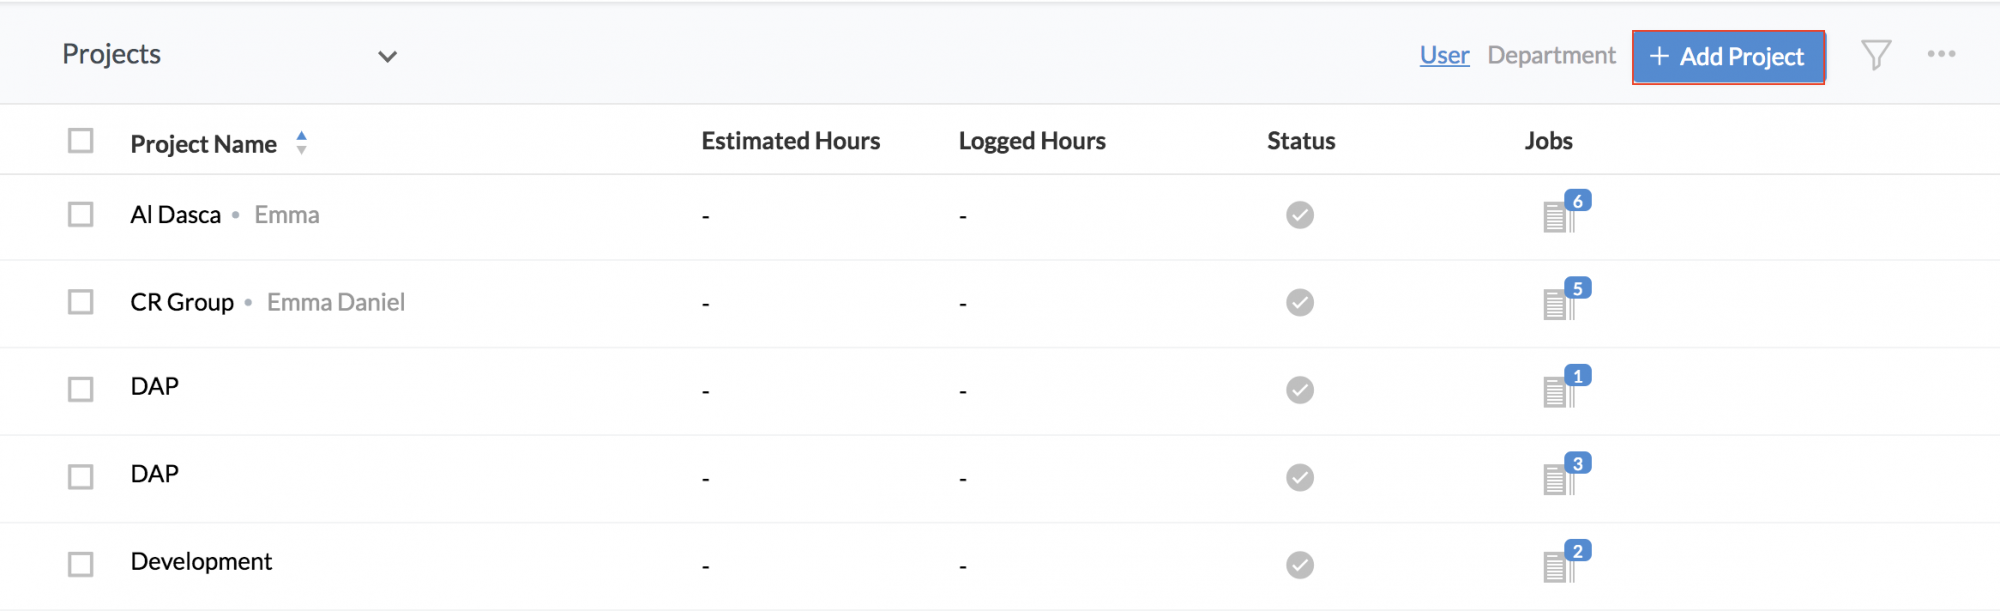
- Click Add Project
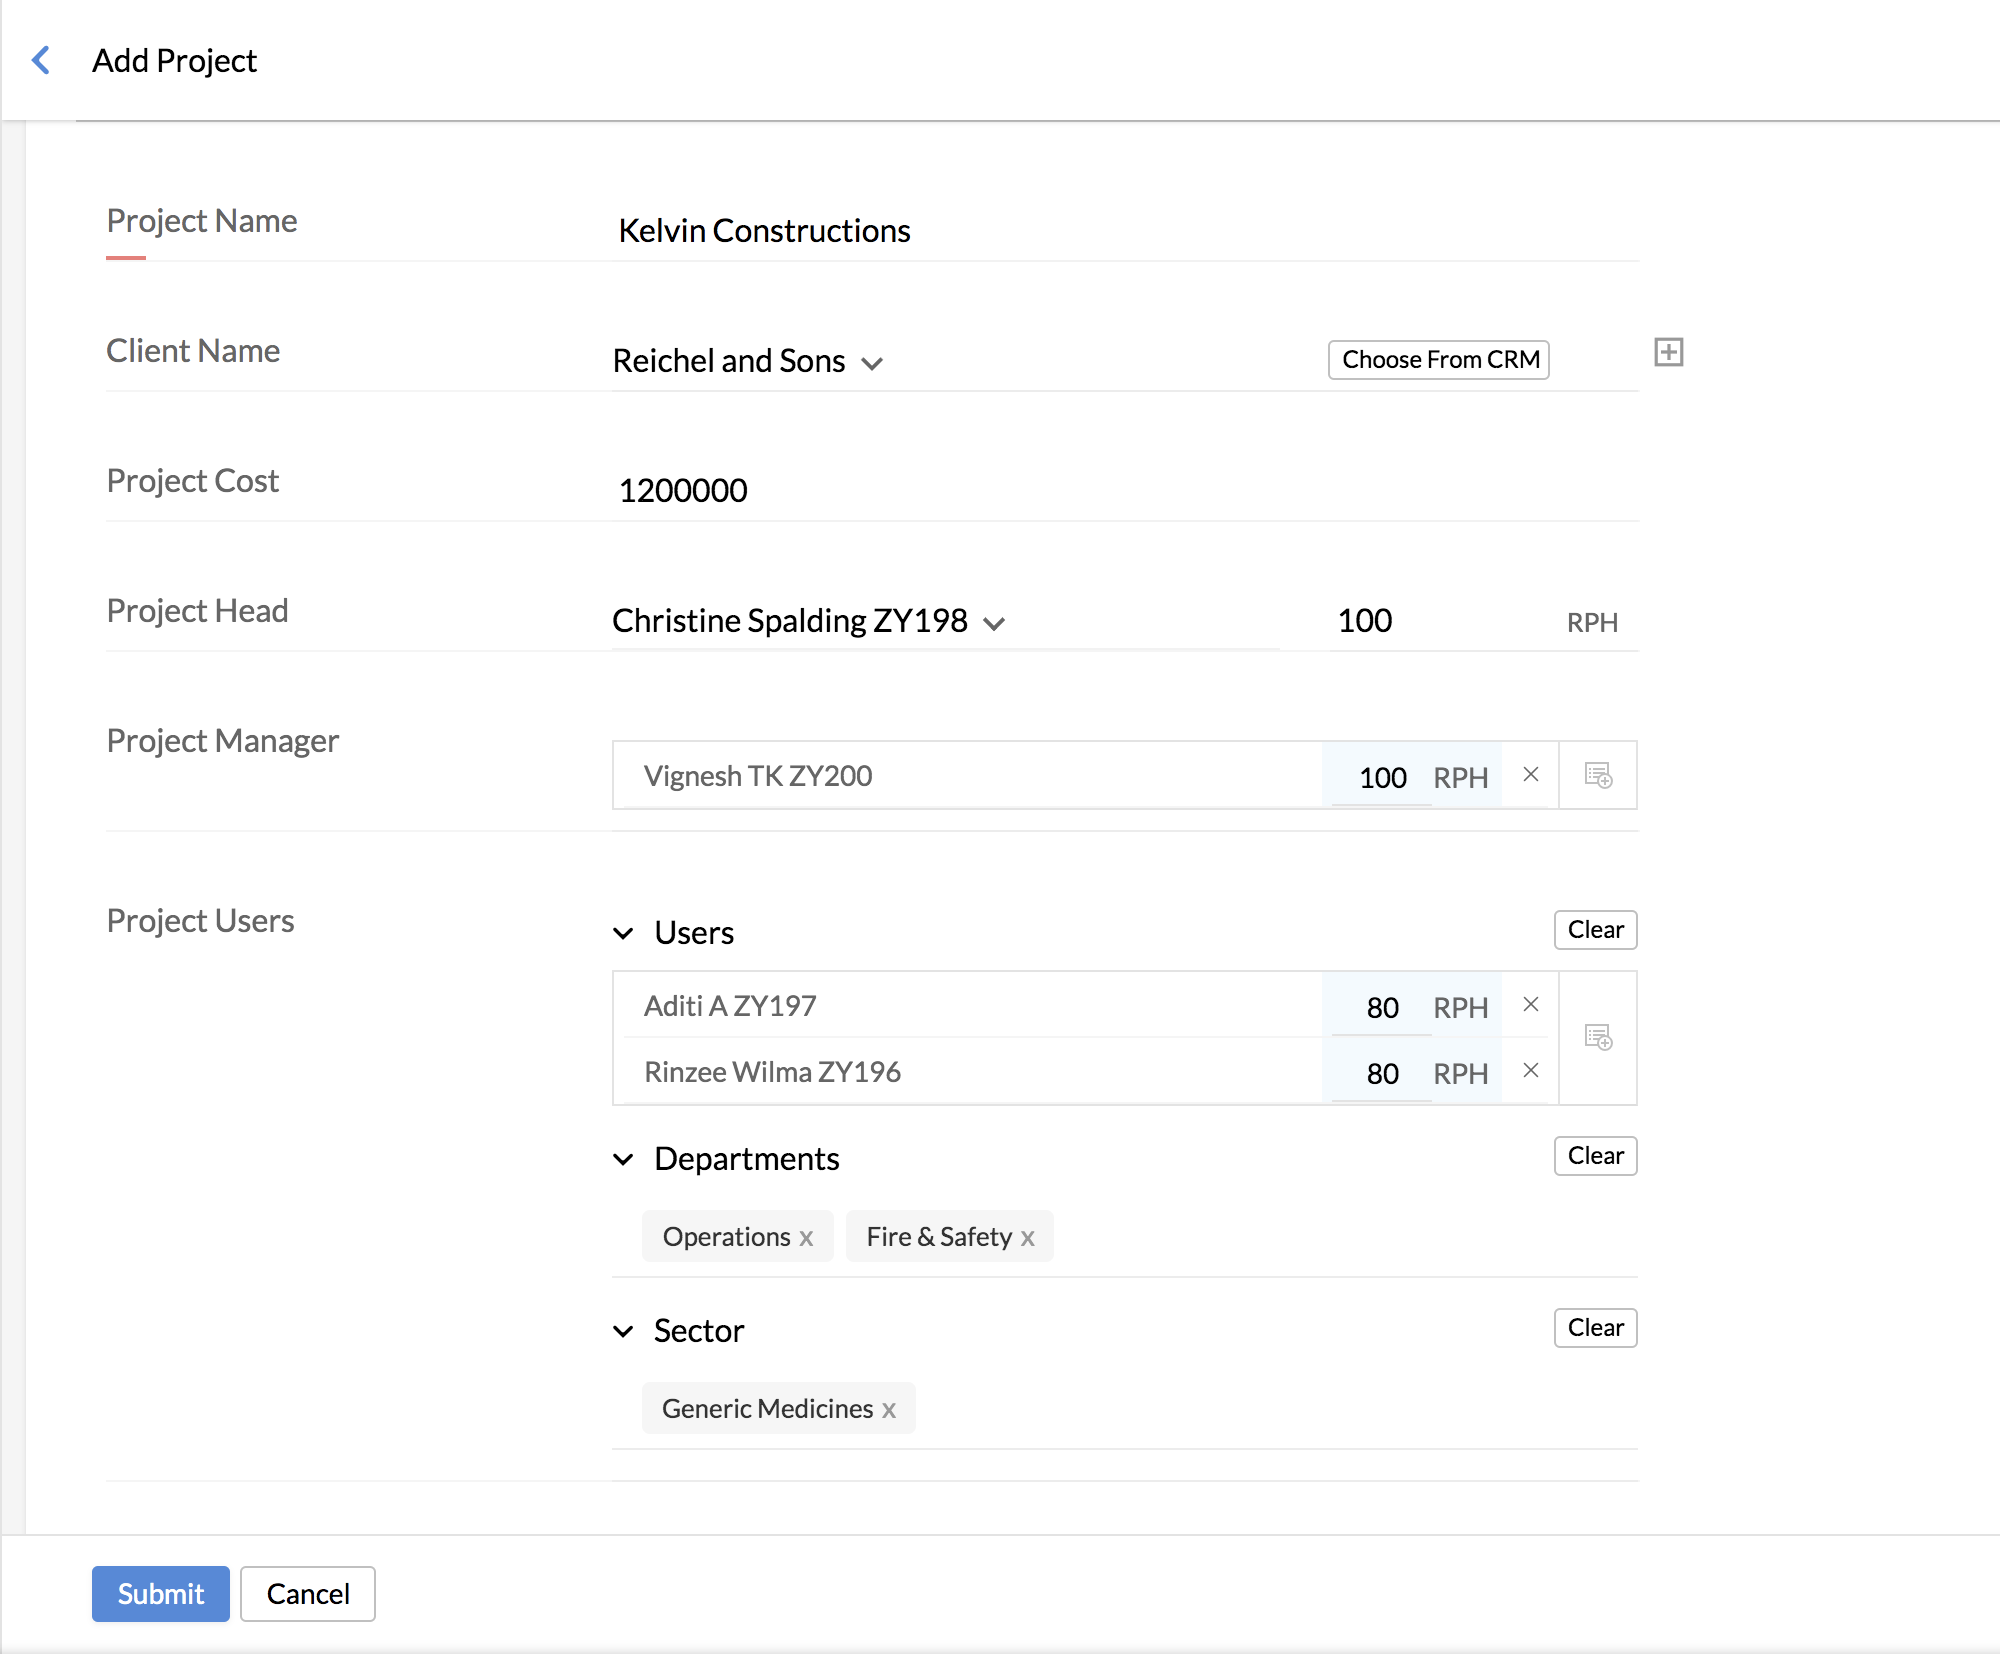
- Enter Project name.
- Select the Client name from the drop own.
![]() Tip: Click here to know how to add a Client
Tip: Click here to know how to add a Client
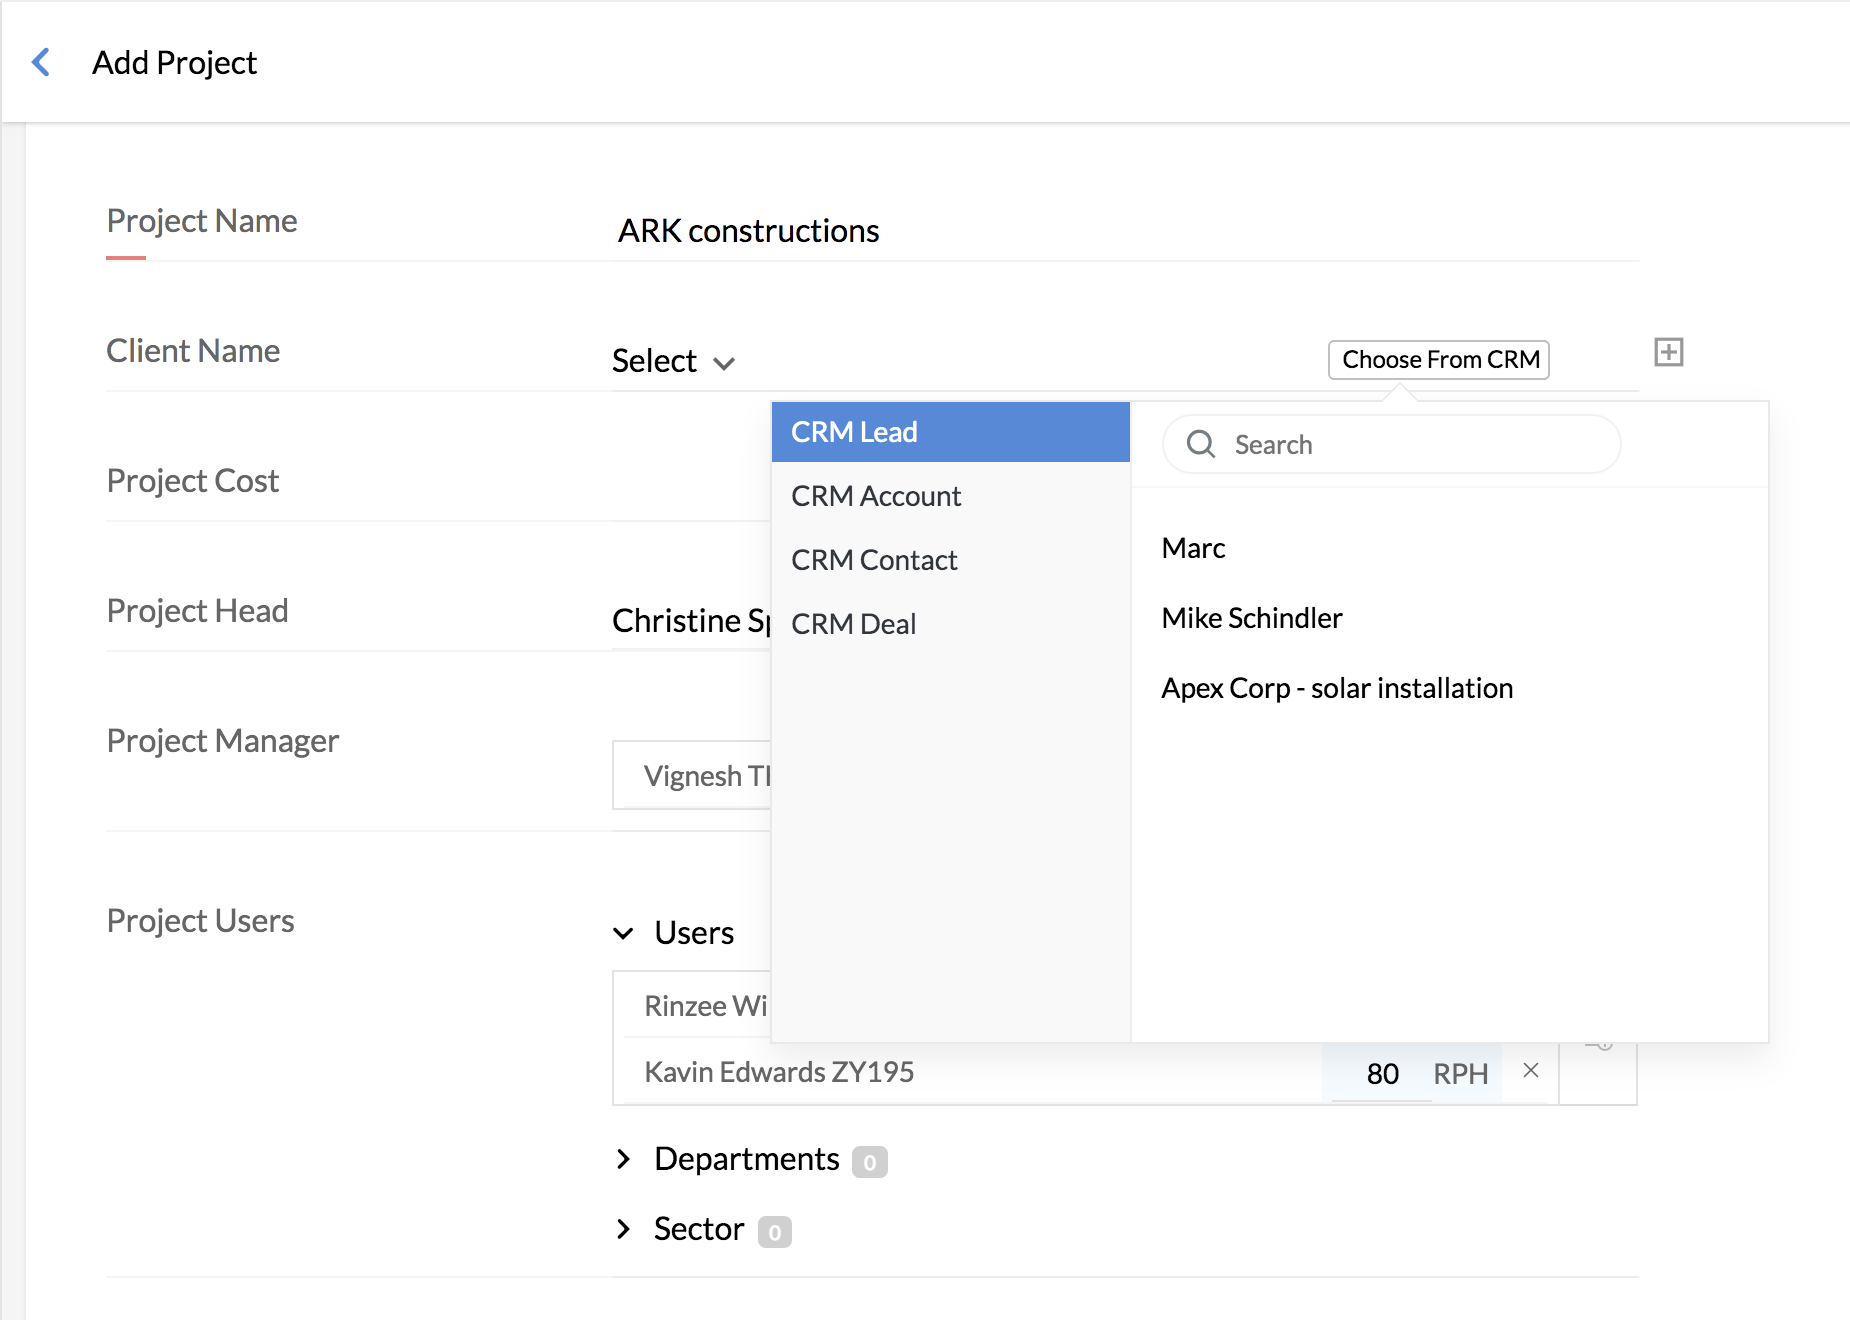
- Click Choose from CRM if you would like to pick a client from your list of clients in CRM.
- If you are picking a client from CRM, select from the options like Lead, Accounts, Contact, and Deal.
![]() There is an option to Add a CRM client directly here. Click Add, Enter the details and click Submit. The CRM client that you have added here will get pushed to CRM automatically.
There is an option to Add a CRM client directly here. Click Add, Enter the details and click Submit. The CRM client that you have added here will get pushed to CRM automatically.
- Select Project Users and define their Rate Per Hour (RPH).
- Enter other details as required.
- Click Submit
![]() You can add a Project while logging time. Click on the 'Add Project' option in the Select Project drop down when you log time (Timesheet > Time Logs), enter the required details and have the Project added.
You can add a Project while logging time. Click on the 'Add Project' option in the Select Project drop down when you log time (Timesheet > Time Logs), enter the required details and have the Project added.
Associating Projects
To associate a job to a Project directly,
You can associate a Project to a job directly from the Projects tab.
- From your home page, go to Timesheet > Projects/Jobs > Projects.
- Under Jobs click Add Jobs.
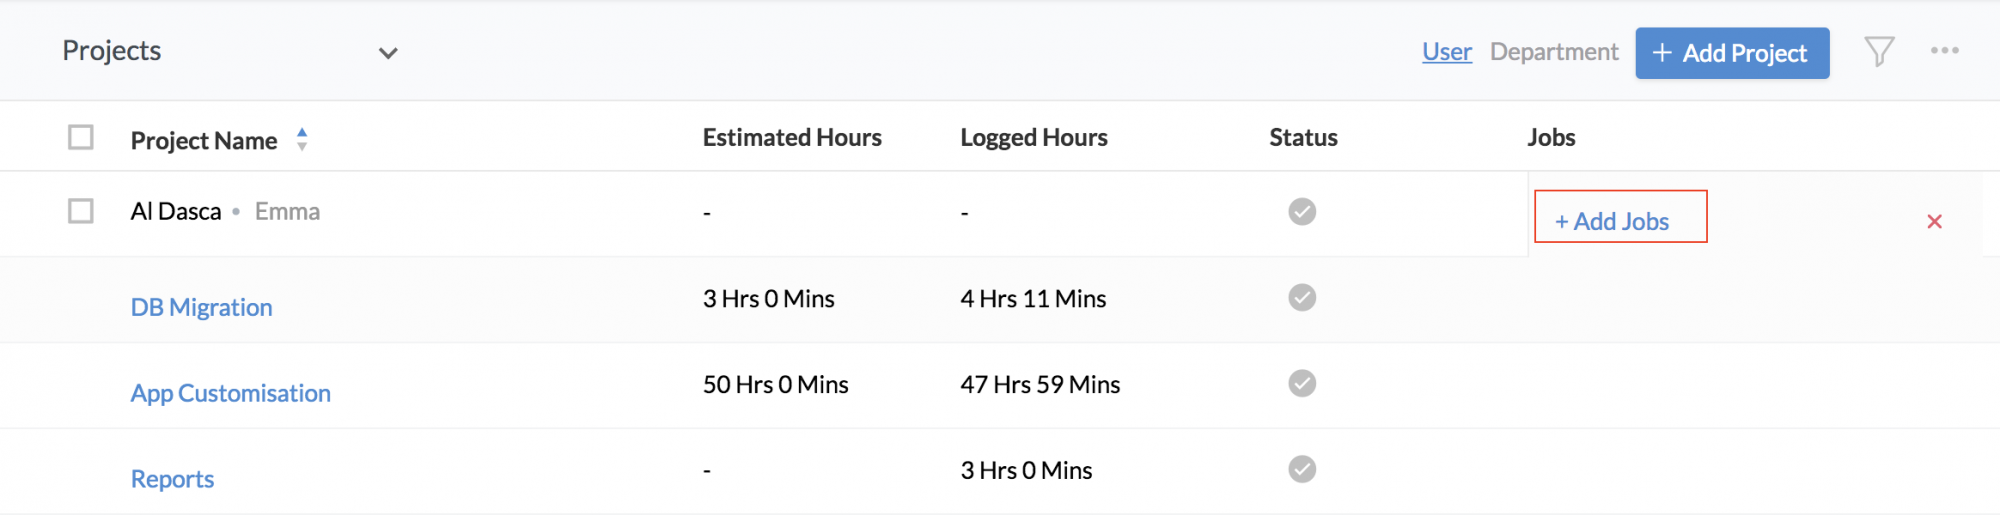
- Enter the details and click Save
Note: If there are no jobs associated with this Project already, you will be able to see a + icon. Clicking on this icon will provide you the 'Add Job' option, using which you can add a job to the Project.
Assigning a Project to a department:
To assign a Project to a Department,
- From your home page, go to Timesheet > Projects/Jobs > Projects
- Click Add Project.
- Under Project Users, go to Users, select the Project Users and under Department, select the Departments.
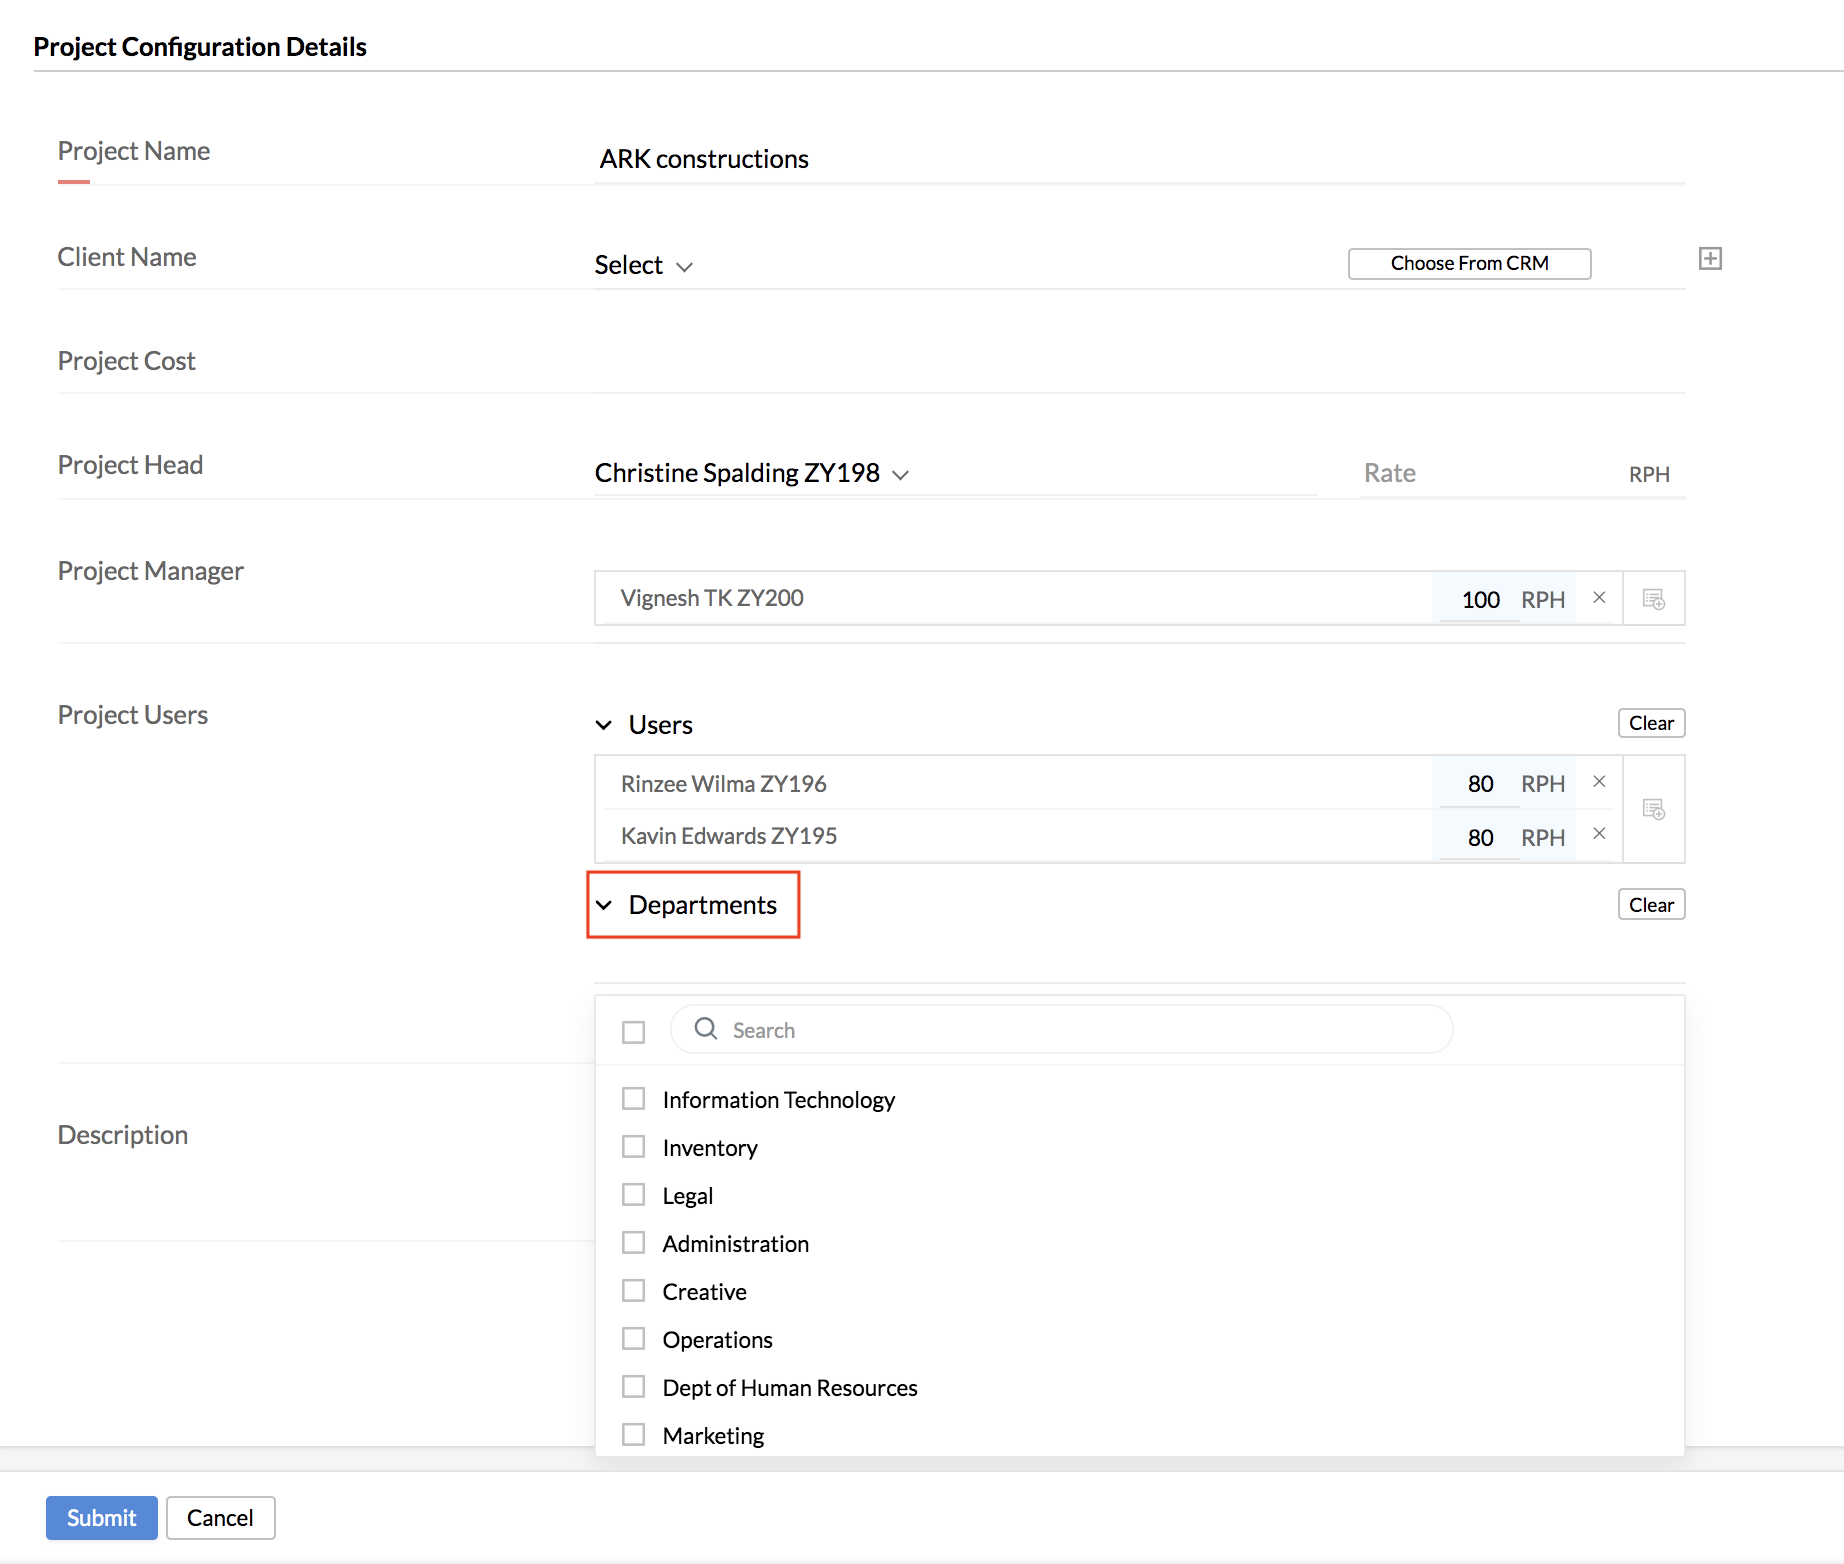
- Enter other details as required and click Submit.

If there are jobs mapped with Projects, then the Users and Departments that are mapped to the Project will only be shown as Assignees for the Jobs, from which you can make the selection if needed.
Let us look into a use case to understand this better.
Scenario I:
Consider this scenario for a better understanding. Assume you are adding a Project - 'Customer Training' and tagging the Departments called 'User Education' and 'Technical Support'. So, it means that any member who belongs to the User Education team and the Technical Support team can log time for this Project's jobs. However, if you want to specifically assign this job to a couple of members of the User Education team and the Technical Support team, then you can select them as Project Users. Assume that you are selecting A, B, and C from User Education Team and D, E from the Technical Support team as users for this Project.
Now assume you have two jobs to be added. 1. To provide in premise training 2. To provide training at the client's location.
While adding these jobs, under Department, you will be able to see User Education and Technical Support listed already because the Project is already mapped to these Departments. Under Users, you will see the Project Users (i.e - Users A, B, C, D, and E). You can decide to select A and D for job1 and other three users B, C and E while adding job 2.
Scenario II:
Consider the same scenario with some change. Assume you are adding a Project - 'Customer Training' to the Department 'User Education' and 'Technical Support'. When you add a job to this Project, you can have the User Education team mapped to the job. However, if you want only a couple of members of the Technical Support team to be mapped to the job, then you do not have to select them under the Department. You have already added Technical Support team members as users for the Project. So, the same list of users will be displayed as Users of the Job. You can simply pick the ones who you want to be assigned to this job.
In a nutshell, the Departments and Users chosen while adding a Project will reflect while adding Jobs for that Project. If you need to assign a Job to a Department, then the Project (if any) should also be assigned to that Department.
Note:
- When a member logs time for a job, he/she automatically becomes an Assignee for the job and becomes a User for the Project
- The permission to add a Job or a Project will be based on the permission given for these forms - for eg, if the permission to add a job (for self and subordinates) is restricted to a reporting manager, then under Users, the Reporting Manager will be able to see only his/her name along with the subordinates name(s)
- The permission to add Departments to Jobs/Projects will be with the Administrator(s) and the all-locations admin assigned for the data part of time tracker module under Admin Operations tab. (Settings > User Access Control > Permissions > Admin Operations)
Assigning any number of projects to a department or departments is also a possibility.
To map multiple Projects to department(s),
- Go to Timesheet > Projects/Jobs > Projects
- Select the Projects that need to be assigned
- Click on Assign Departments
- Select the Departments to be assigned
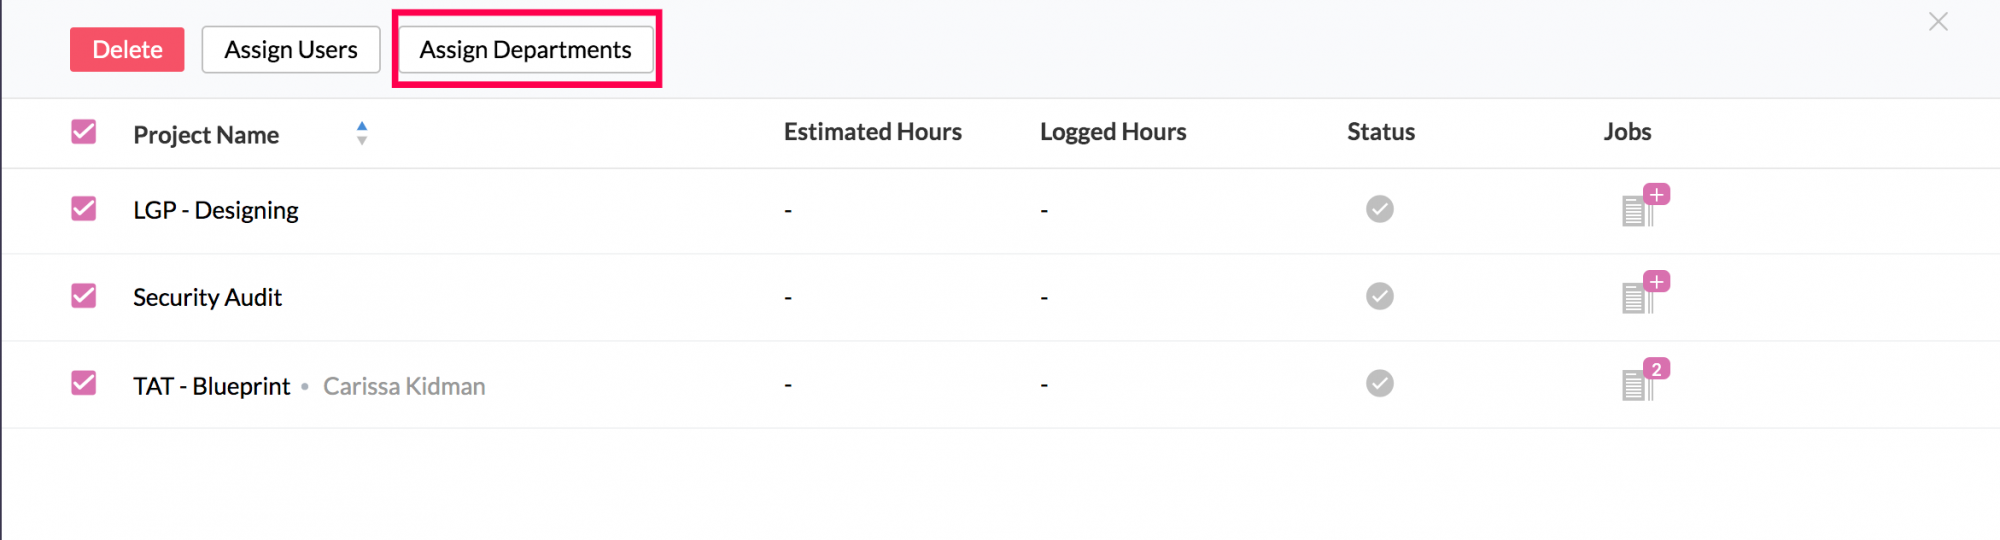
- Click on Assign Departments.
The selected projects will get assigned to the chosen departments.
Any organization dealing with a varied workforce and work items is not uncommon. You can make employees work on a variety of Projects as you can map multiple projects to many users and track them all.
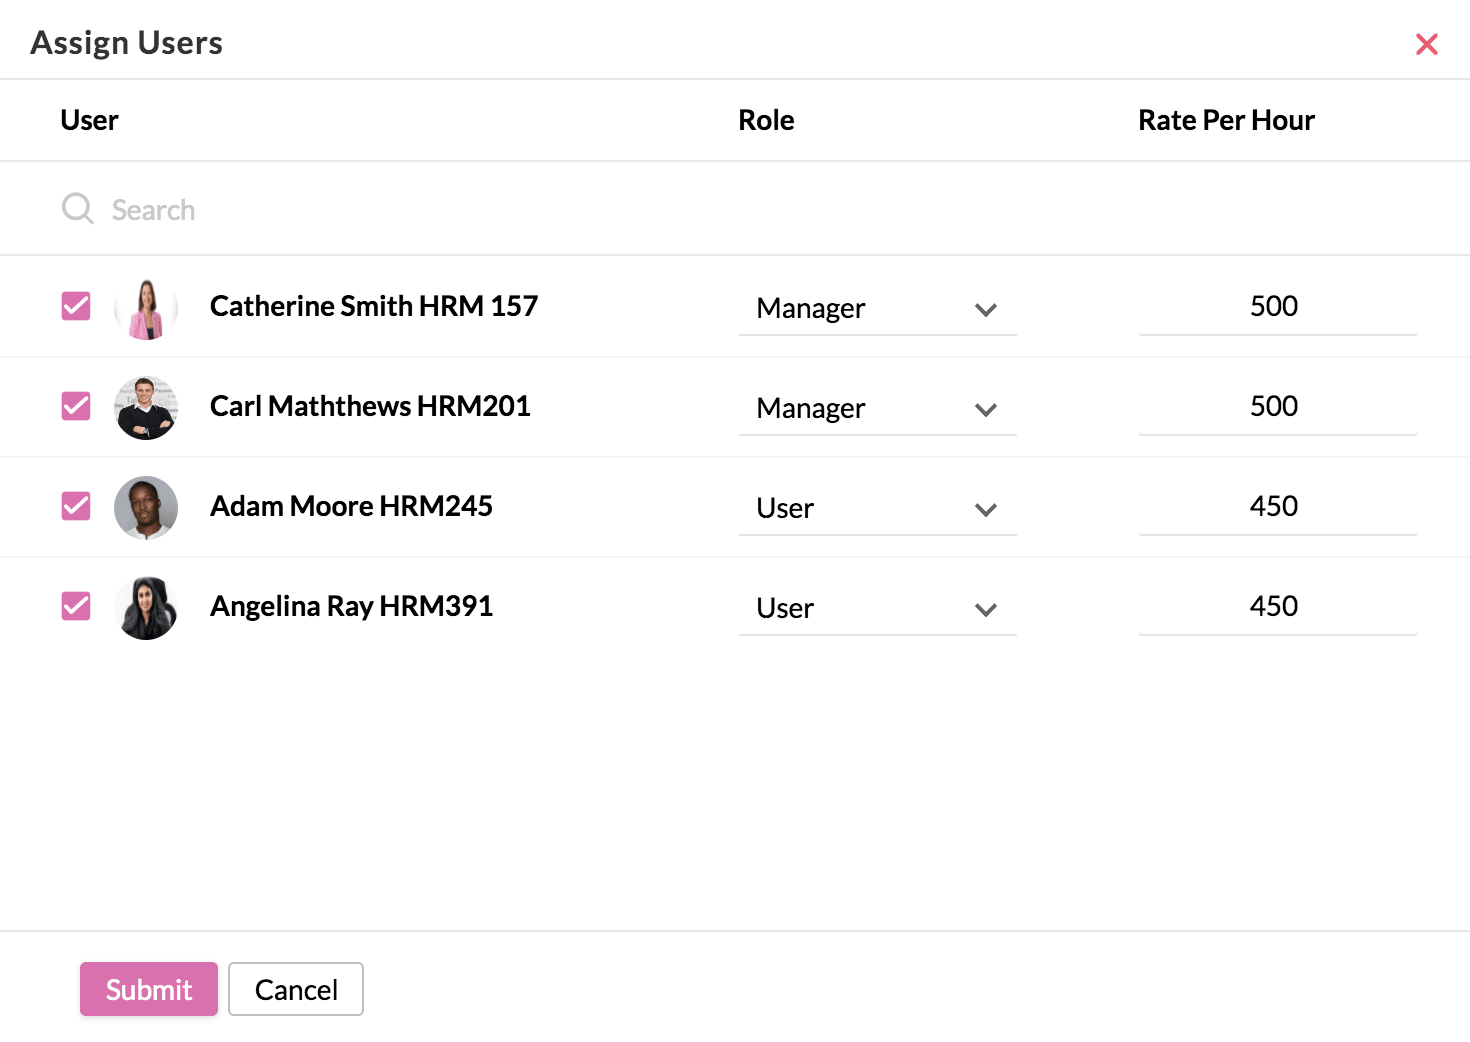
In cases where you have to map many users to many projects, follow the steps listed below.
- From your home page, go to Timesheet > Projects/Jobs.
- Select the Projects that you would like to assign.
- Click Assign Users.
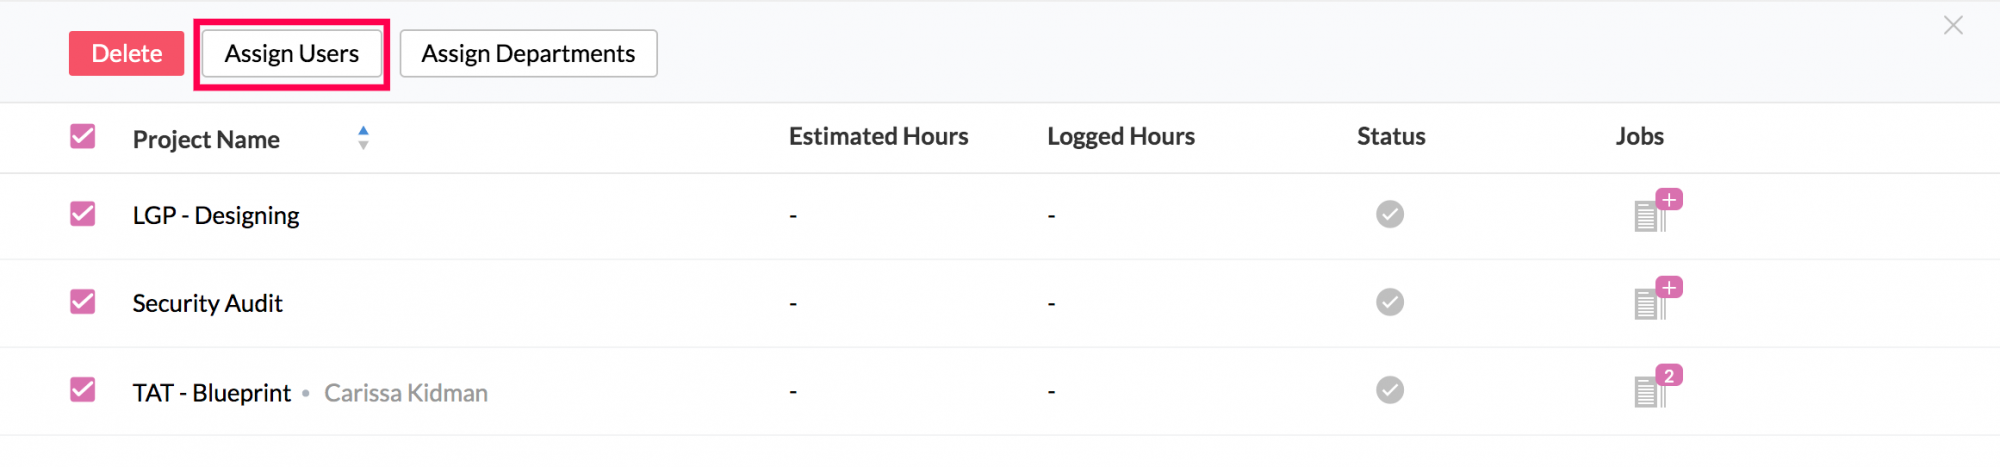
- Select the users who you would like to assign and click Submit.
Importing and Exporting Projects
Zoho People's Time Tracker offers import and export options for a smooth flow of data when it comes to Projects.
To import projects with multiple users,
Follow the steps given below to import projects that have many users assigned.
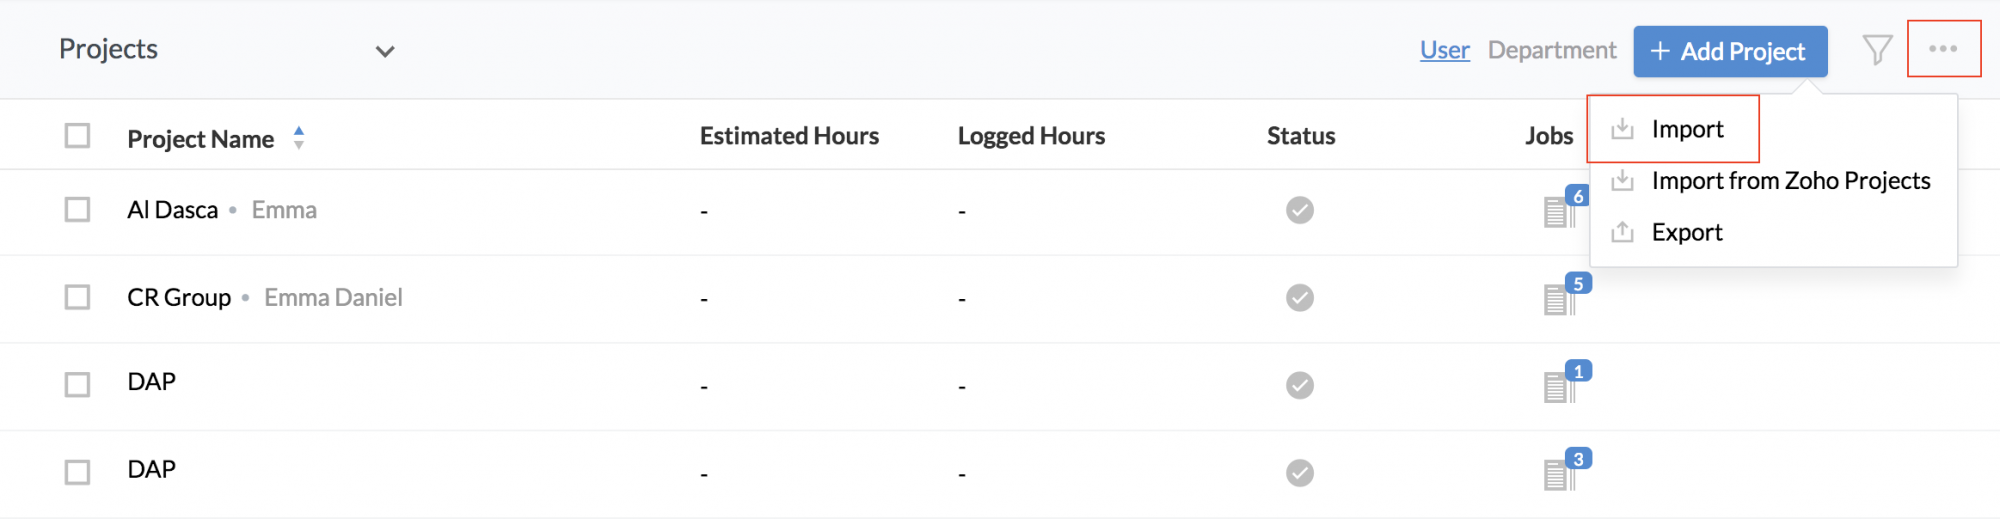
- From your home page, go to Timesheet > Projects/Jobs > Projects.
- Click the Import icon at the right corner of the page.
- Click Upload File to upload the file from your system.
Note: Your file should be in .xls or .xlsx or .csv format
![]()
- Map the fields and click Next.
Now, you will be able to see all your projects imported into the system when you go to Projects/Jobs > Projects.
![]() Tip: Permissions should be configured in the Projects form for Importing data. Click here to know how to set permissions.
Tip: Permissions should be configured in the Projects form for Importing data. Click here to know how to set permissions.
Note:
- The file which you import should have the employee id and not the employee name for the users who are assigned to the projects
- Employee ids should be separated by a semi-colon
To export Projects from Zoho People to an external source,
Follow the steps given below.
- From your home page, go to Timesheet > Projects/Jobs > Projects.
- Click on the Export icon and check Include Tabular Section Data if required.
- Click Export.
The list of Projects will get exported.
Note:
- Export can be done only in .xls/.csv/.tsv formats
- Projects exported from the default system view will only contain system fields. To include custom fields, export from a custom view.
- Export will be done based on the values in the filter
Deleting Projects
To delete multiple Projects,
Follow the steps given below when you want to delete more than one job at one go.
- From your home page, go to Timesheet > Projects/Jobs > Projects.
- Select the Projects that need to be deleted.
- Click Delete.
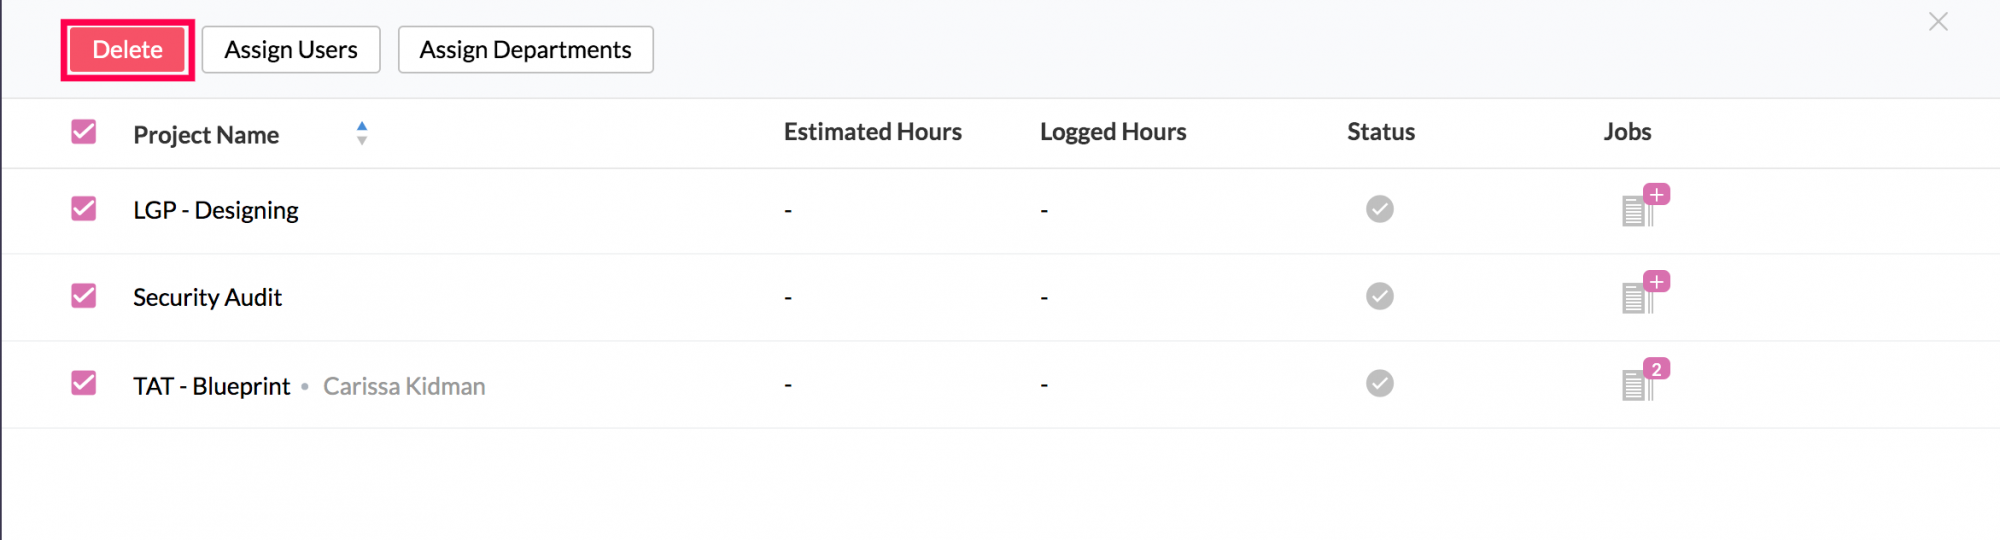
The selected Projects will get deleted.
Note: Projects can be deleted only by the Administrator, Project Owner (Creator of the Project), or Project Head.
Project Dashboard
The Project Dashboard is a comprehensive space to directly manage all actions related to any specific project including jobs, users, attachments and related feeds. You can use a variety of widgets to gain insightful data and draw inferences.
To view the project dashboard and perform related actions,
- Go to Timesheet > Projects/Jobs > Projects.
- Click on the specific project name.
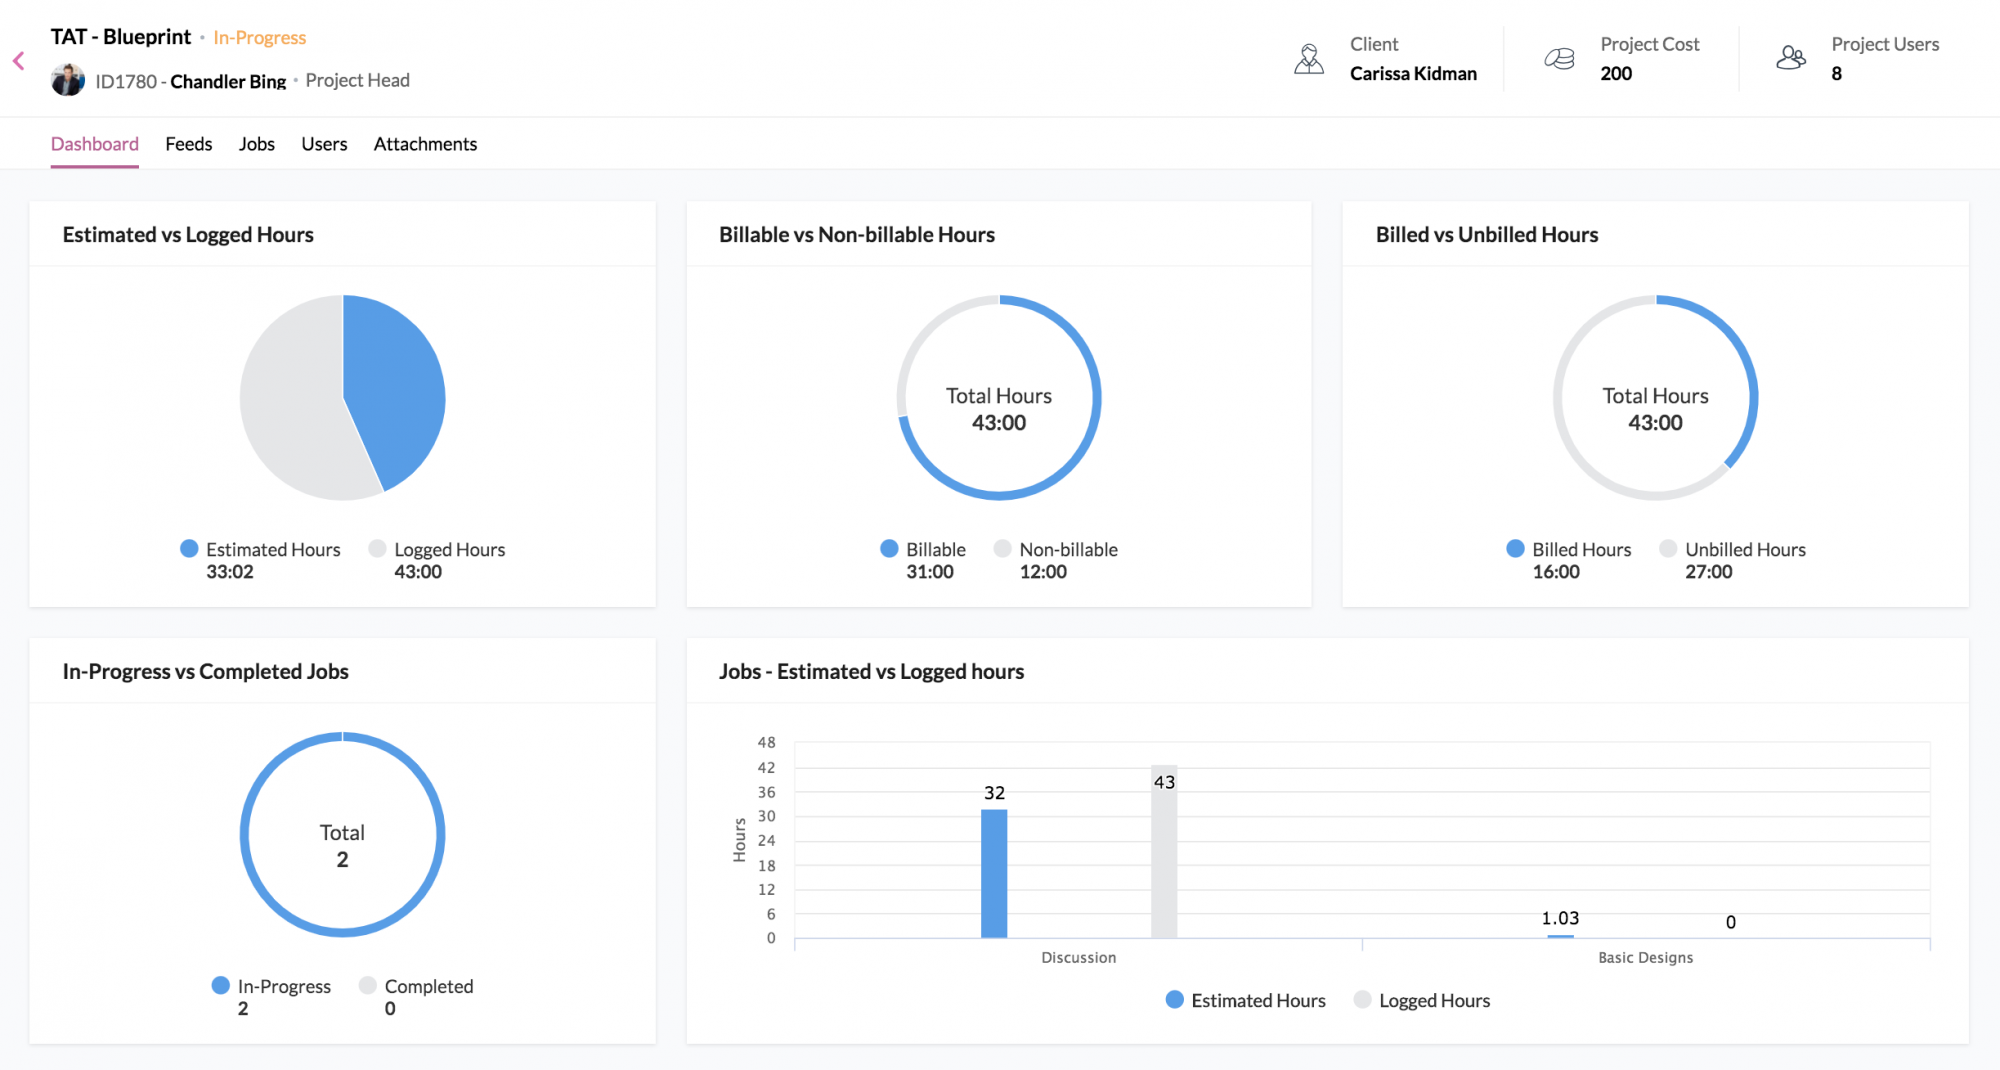
The dashboard for that project will be visible. These are the widgets available in the dashboard:
- Description: If you gave a description while you were adding a project, it will be displayed here. If no description has been given you can add one directly from the dashboard. This description is extremely useful to summarize the key aspects of the project.
- Estimated vs Logged Hours : Displays the overall estimated and logged hours for the project as a whole.
- Jobs - Estimated vs Logged hours : Breaks up the estimated and logged hours for each job in the project.
- In-progress vs completed jobs : Displays the overall jobs in the project that are in-progress and completed.
- Billable vs non-billable hours: Displays the overall billable and non-billable hours in the project.
- Billed vs unbilled hours : Displays the overall billed and unbilled hours for this project.
- Overdue jobs: Displays the in-progress jobs that are past their set date of completion.

- User- Job status: Displays the job status for each user.
- User - Estimated vs Logged hours: Displays the estimated and logged hours for each user.
- Top 5 active jobs: Lists the top five jobs with the maximum logged hours.
- Top 5 contributors : Lists the top five employees who have the maximum logged hours.
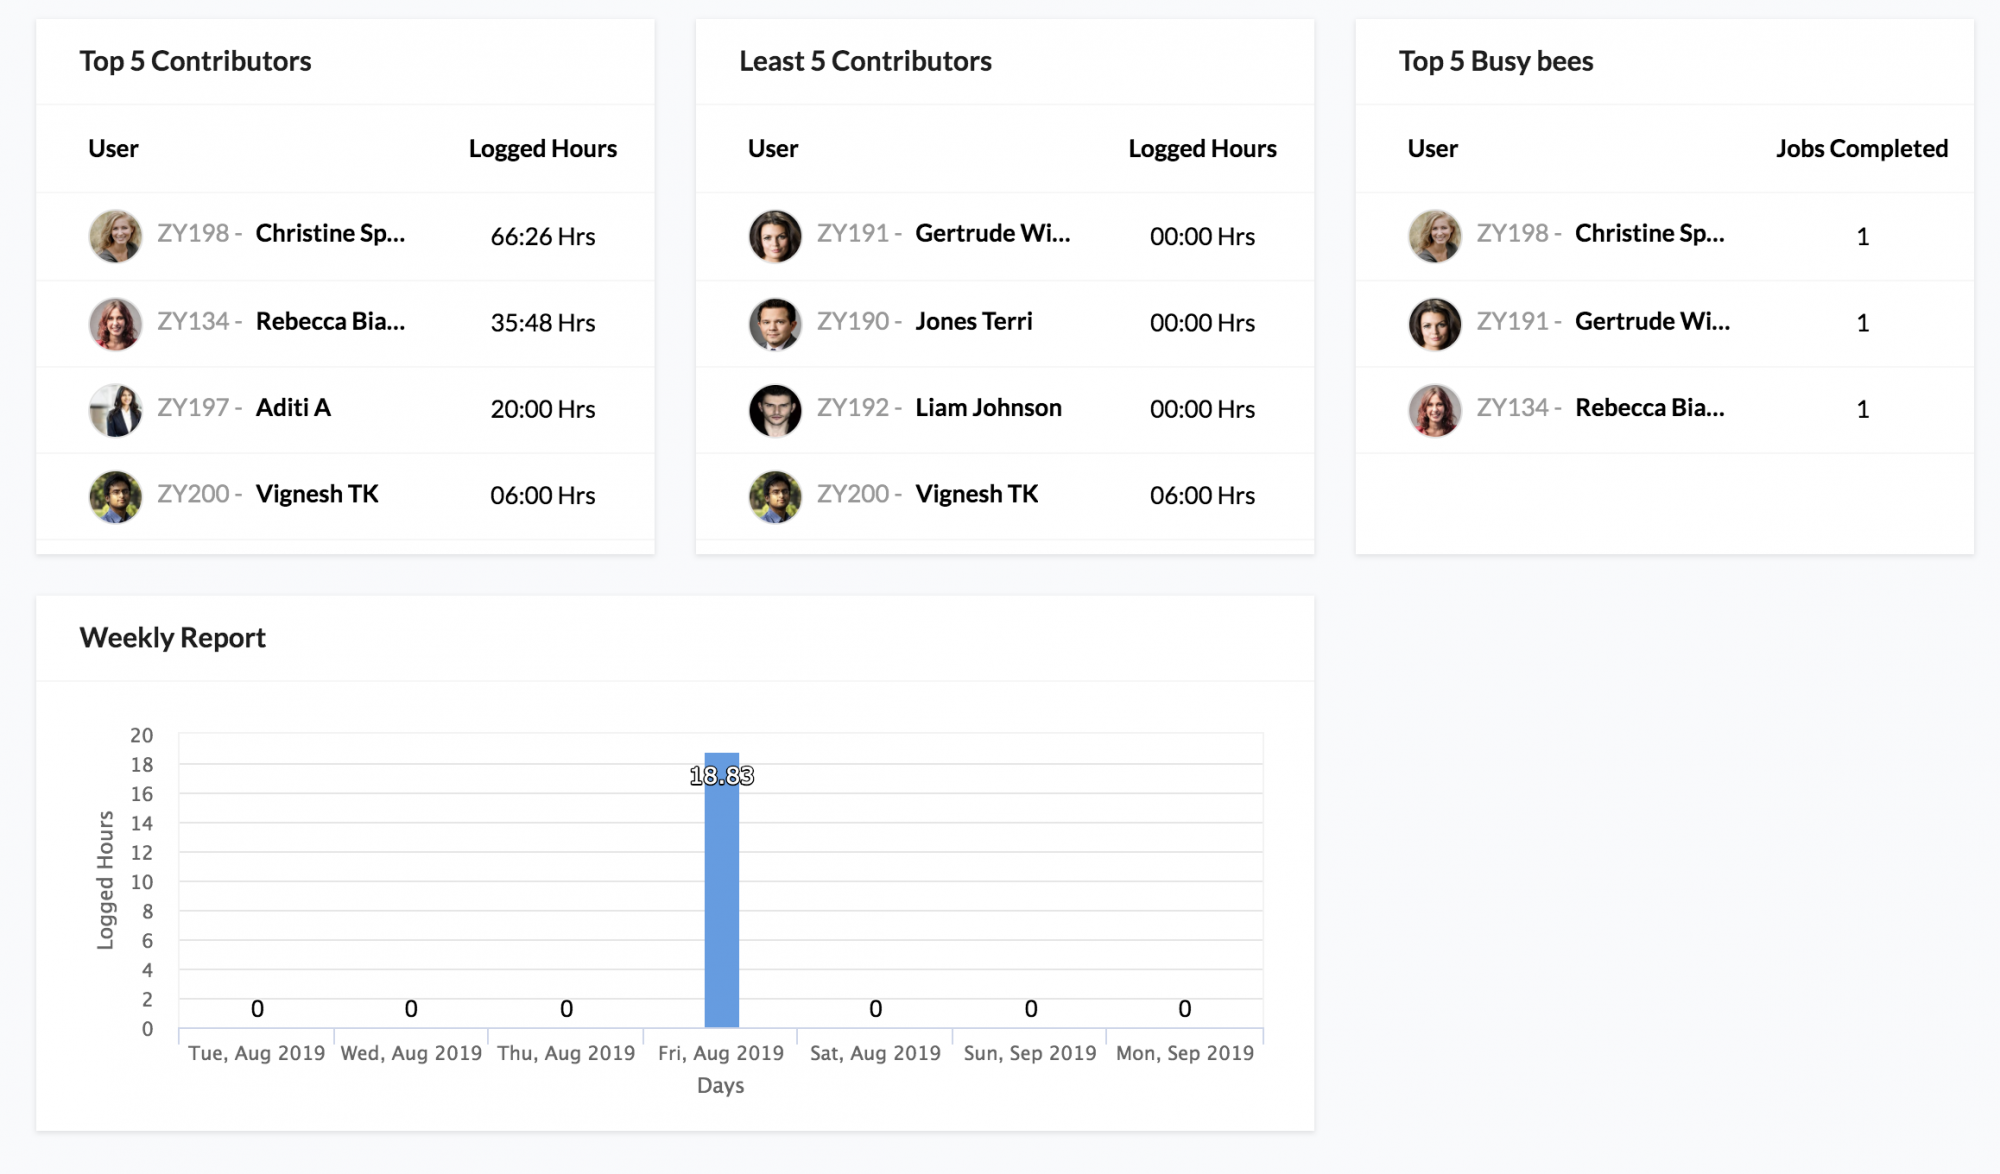
- Least 5 contributors: Lists the bottom five employees who have the least number of logged hours.
- Top 5 busy bees: Lists the five busiest employees with the maximum number of completed jobs.
- Weekly report : Displays the day-by-day comparison of the hours logged for the project for the current week.
Note:
- Admins, Project Head and Project Managers will be able to view all the data in all the widgets
- Project Users will be able to view their data and that of their reportees'
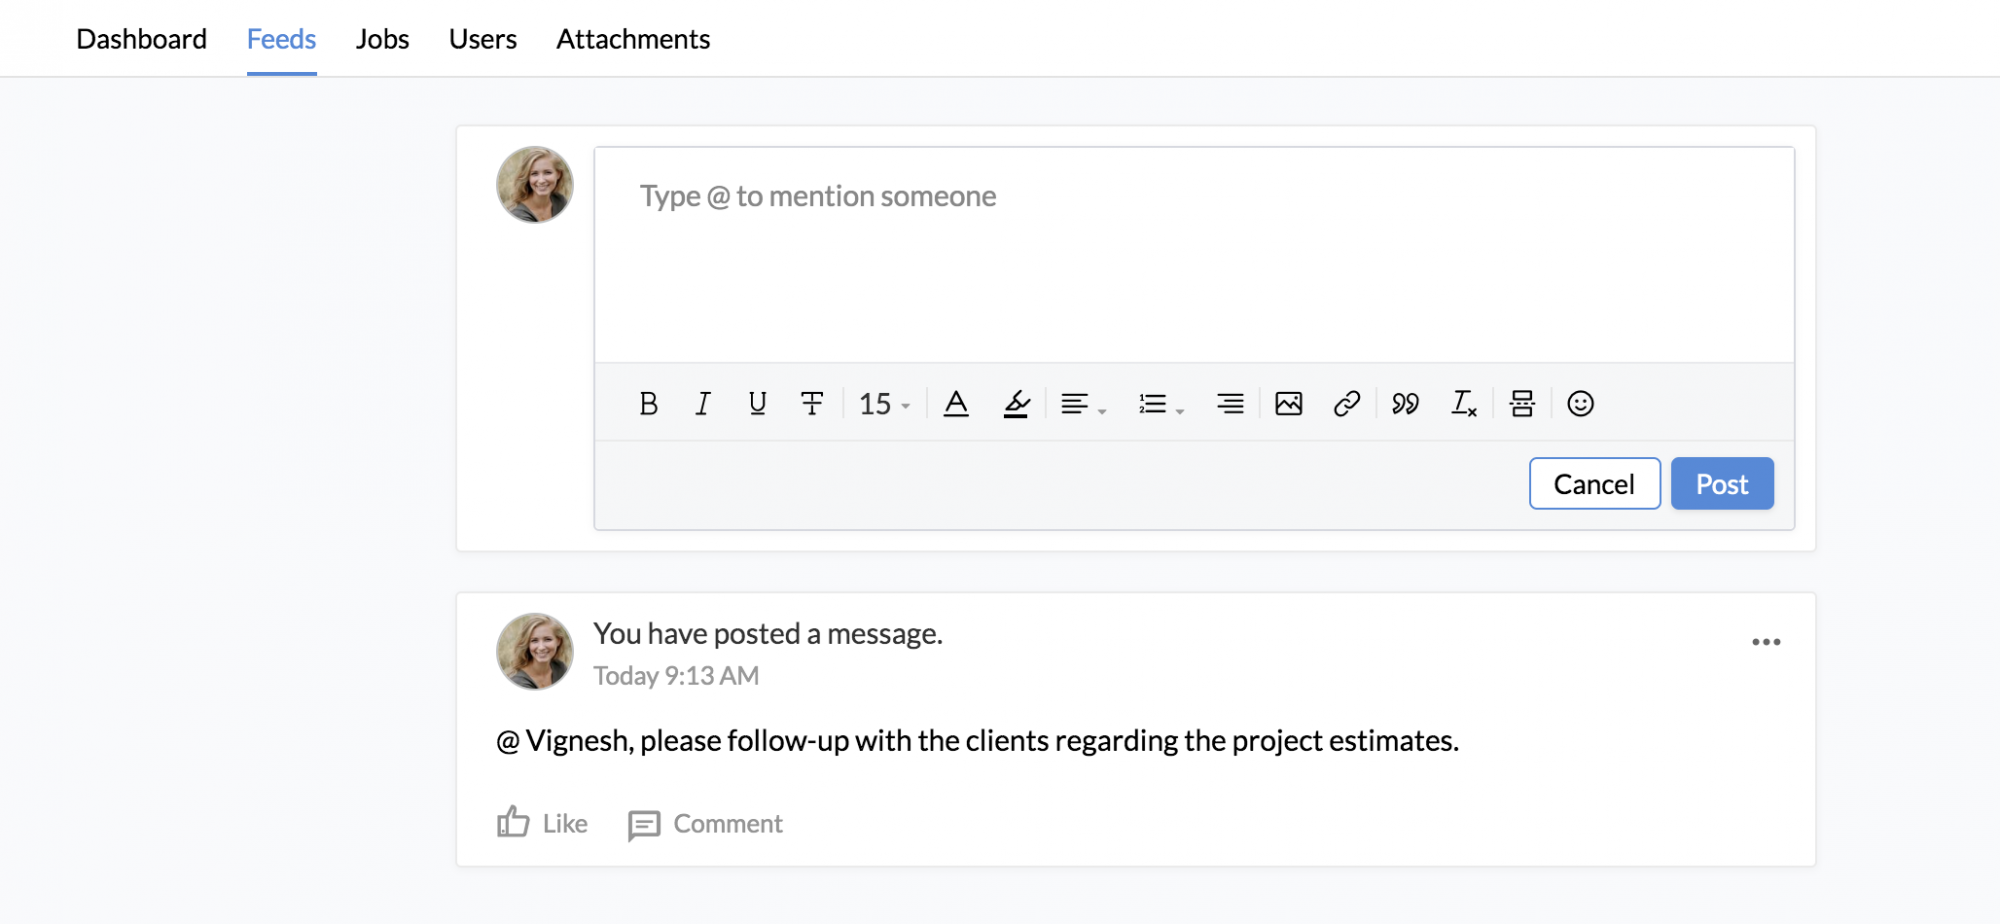
Feeds
All feeds related to the specific project will be displayed here. This space can be used by all users of the project to collaborate and communicate with each other.
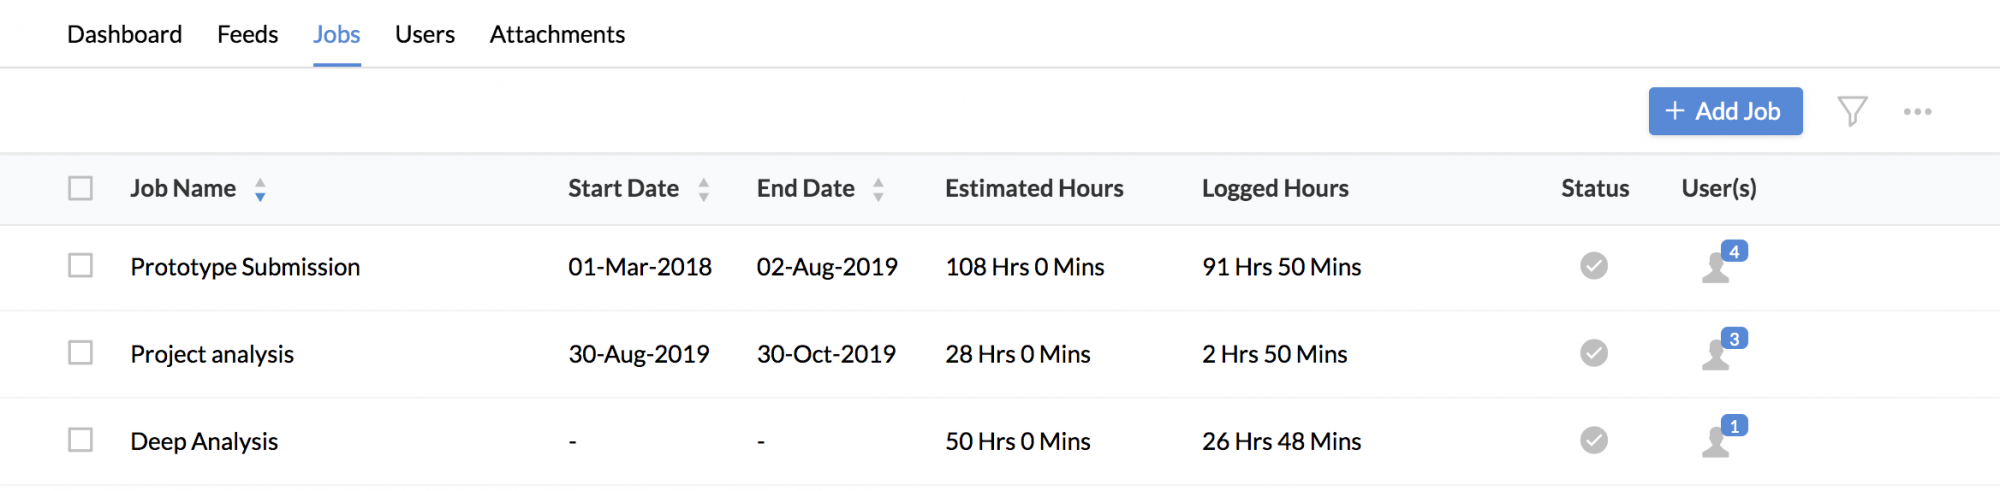
Jobs
All the jobs part of the project will be listed here. You can perform a host of functions related to the job based on the permissions set: add, edit, delete, import, export, and change of status.
Users
All Users assigned to the project including the project head, project manager and the departments can be viewed here.
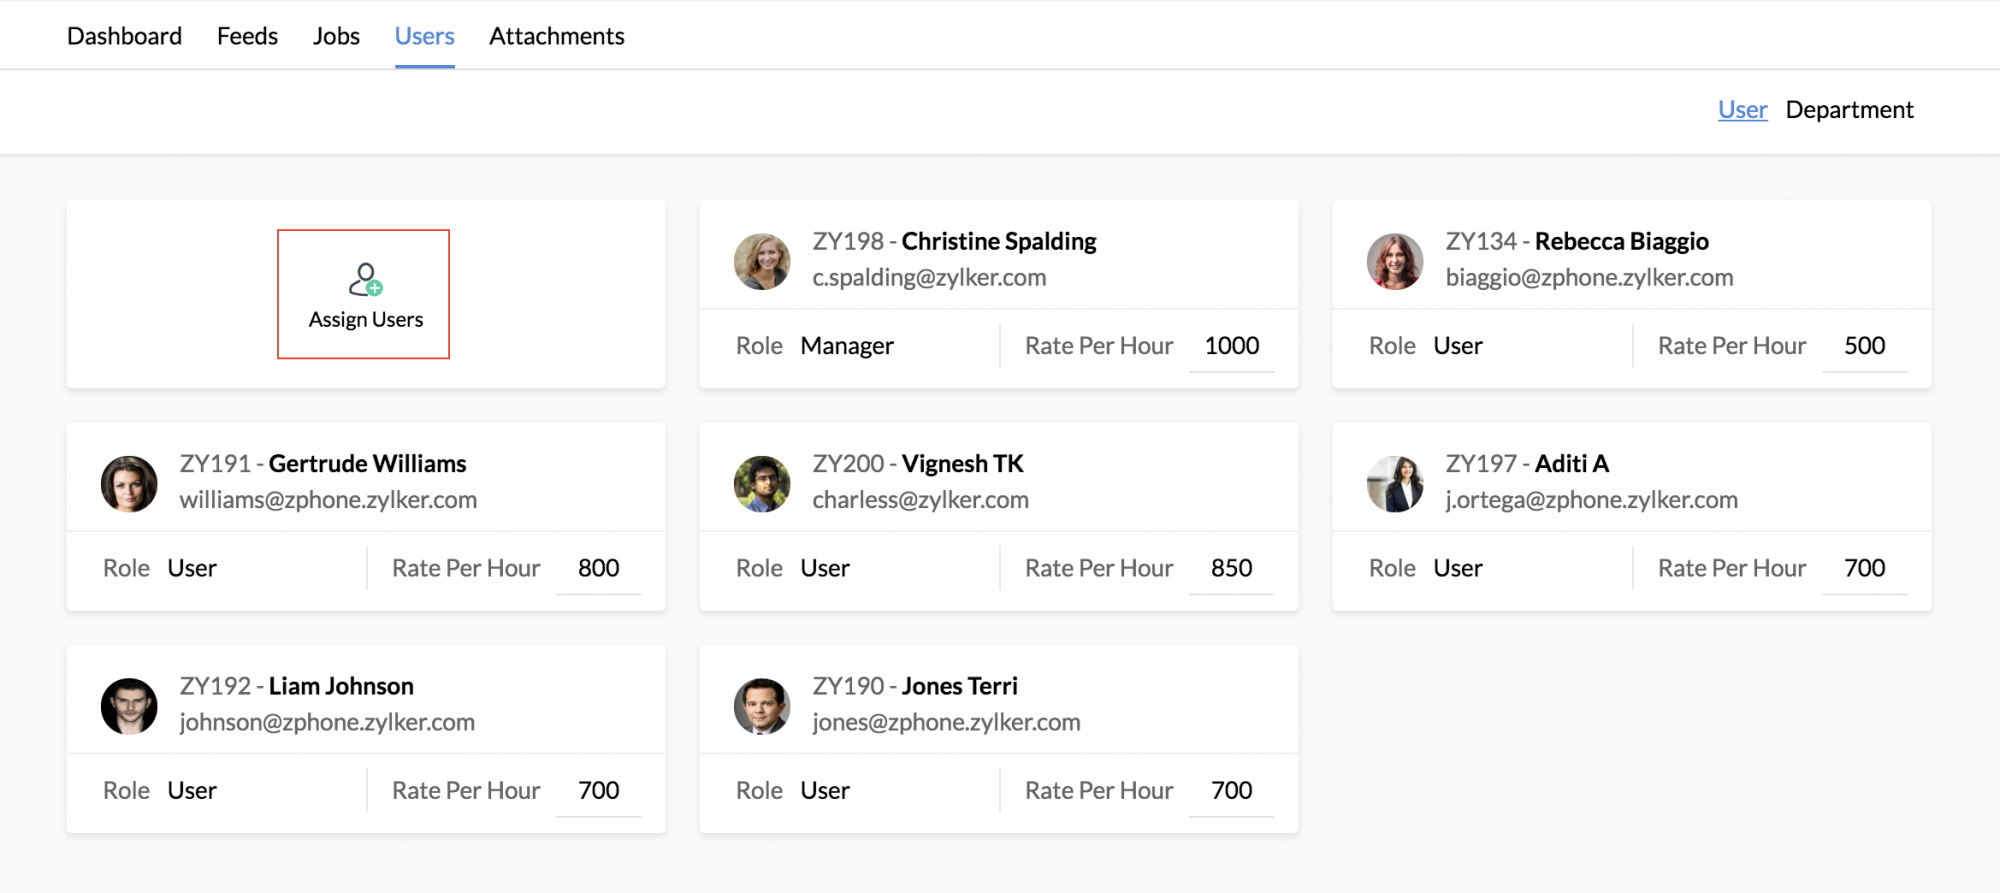
You can also perform these actions:
- Assign new Users to the project
- Edit rate per hour of project users
- Remove any Users from the project
- Assign and remove departments from the project
Attachments
A project may involve blueprints, estimates and other important documents. All the attachments related to the specific project can be viewed here. You can download, upload, preview and delete project attachments from here.
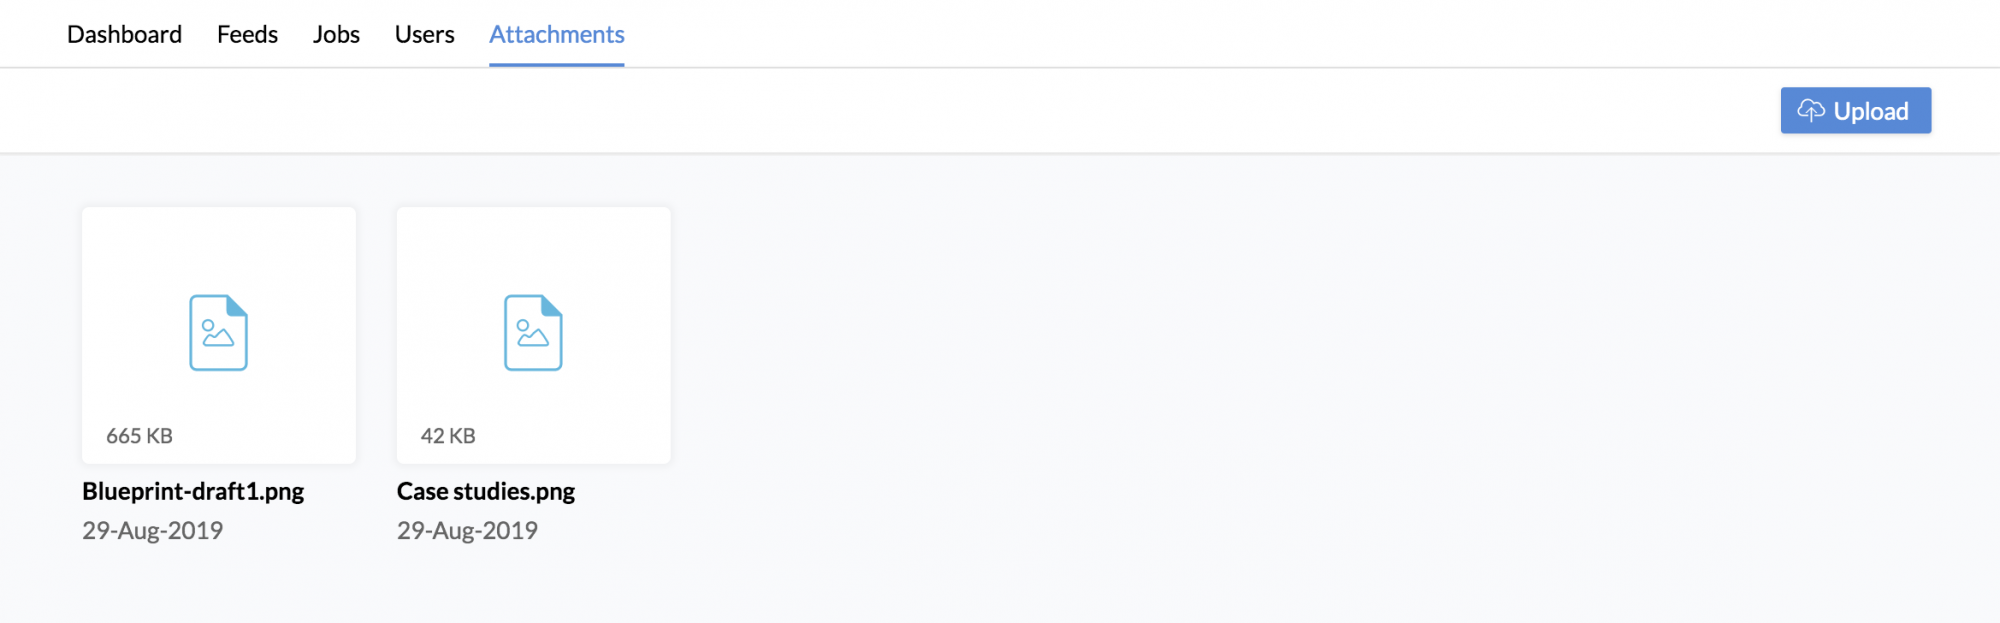
Note:
- Only five documents can be uploaded at a time.
- Only 50 documents can be uploaded for a project.
- A file can be a maximum of 5 MB.