Permissions
You can have various permissions set for a particular form for actions like viewing the data of a form, editing and deleting a form, importing and exporting form data as [er your organizational norms and needs. You can also set various permissions for a field in a form.
- Settings permissions for a Form
- Setting permissions for a field of a Form
- Settings permissions for a field while adding the field
- Encrypting Fields of a Form
- Setting permissions to Import and Export data from a Form
- Setting admin permissions for a non-admin
- Customizing permissions for a non-admin
Settings permissions for a Form
To set view, add, edit and delete record permissions for a particular form,
- From your home page, go to Settings > Customization > Forms.
- Go to the form for which you would like to set permissions.
- Click on the ellipsis icon and select User Access Control.
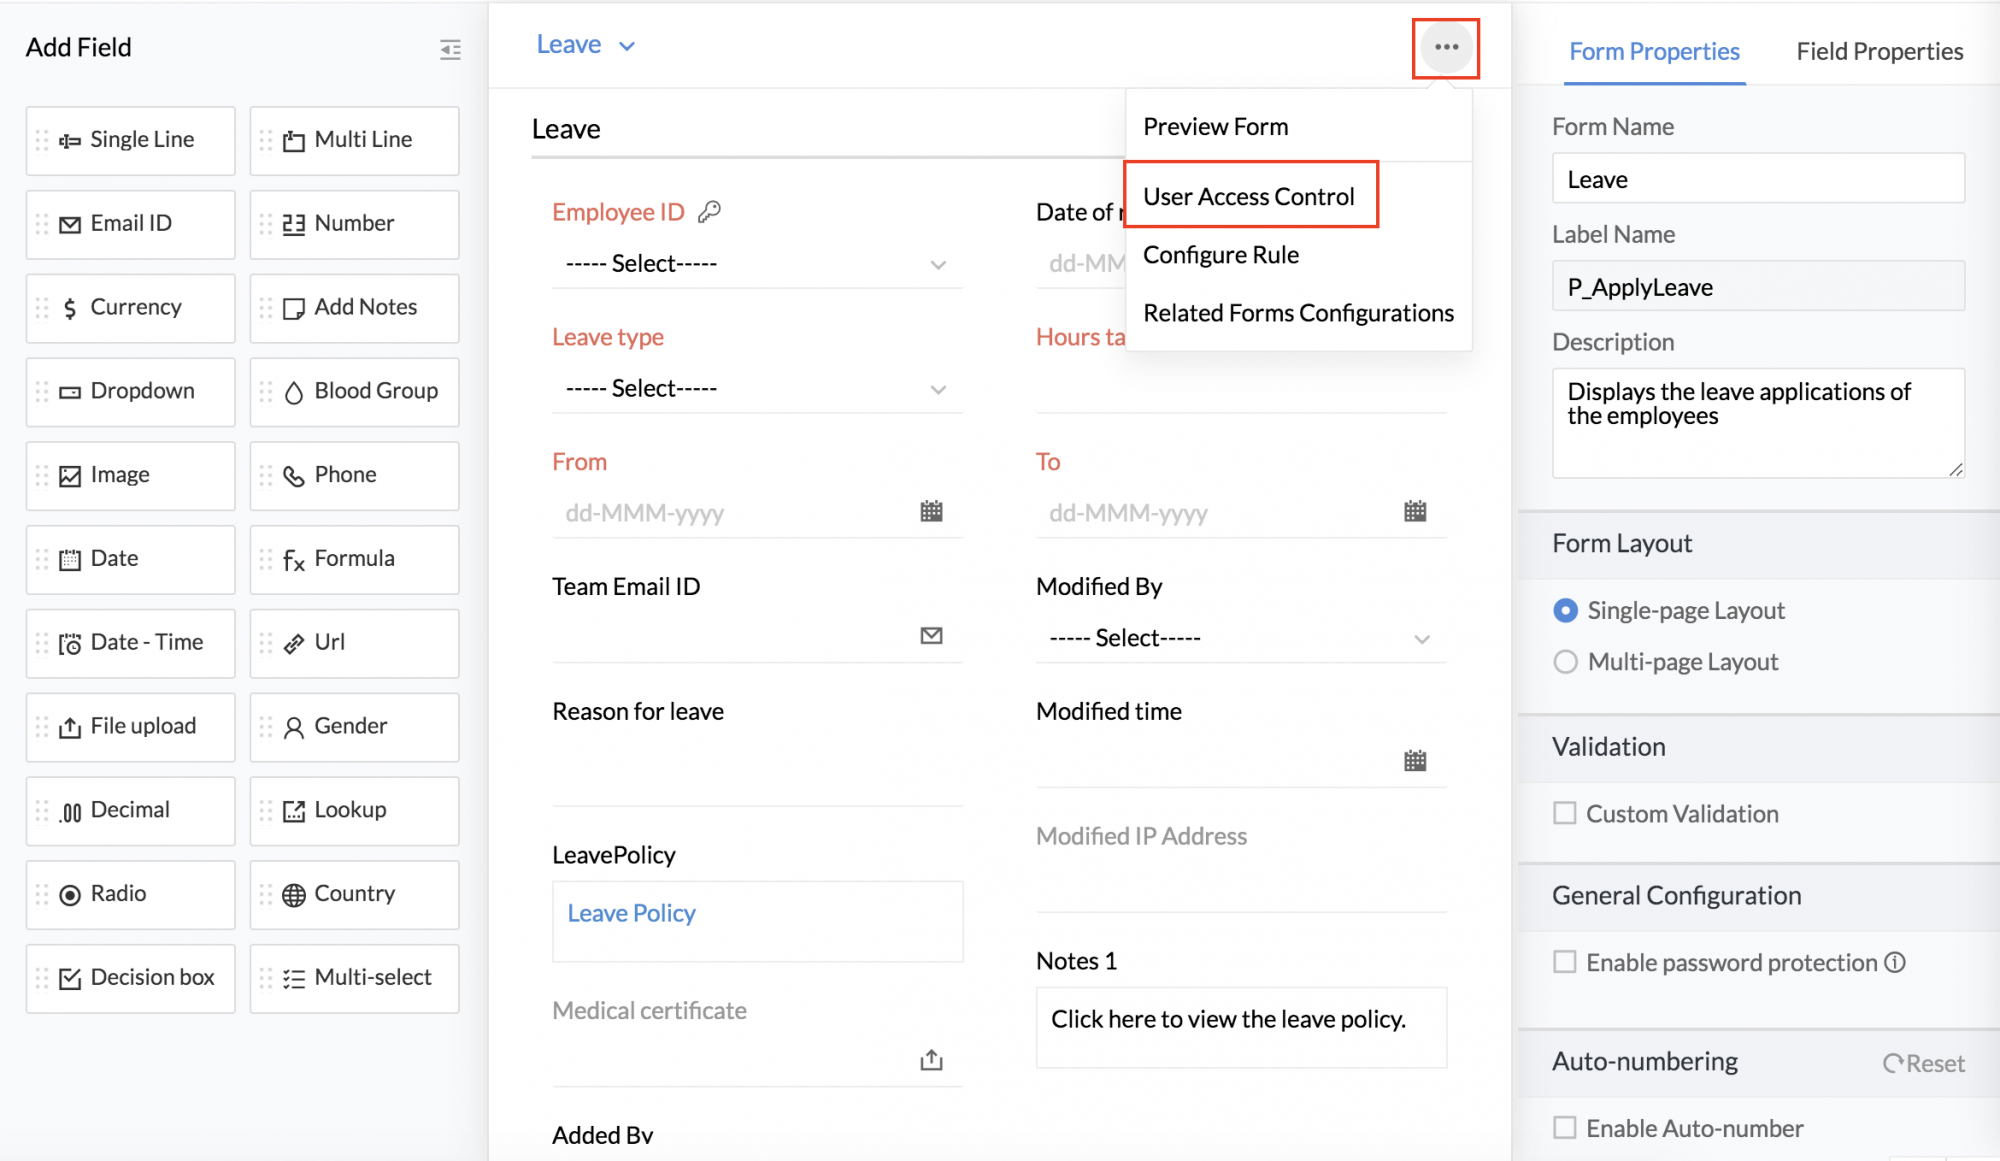
- Select the Role from the drop down and set permissions for View/Edit/Add/Delete.
- Under 'Record Permissions' you can define view, add, edit and delete permissions for the form.
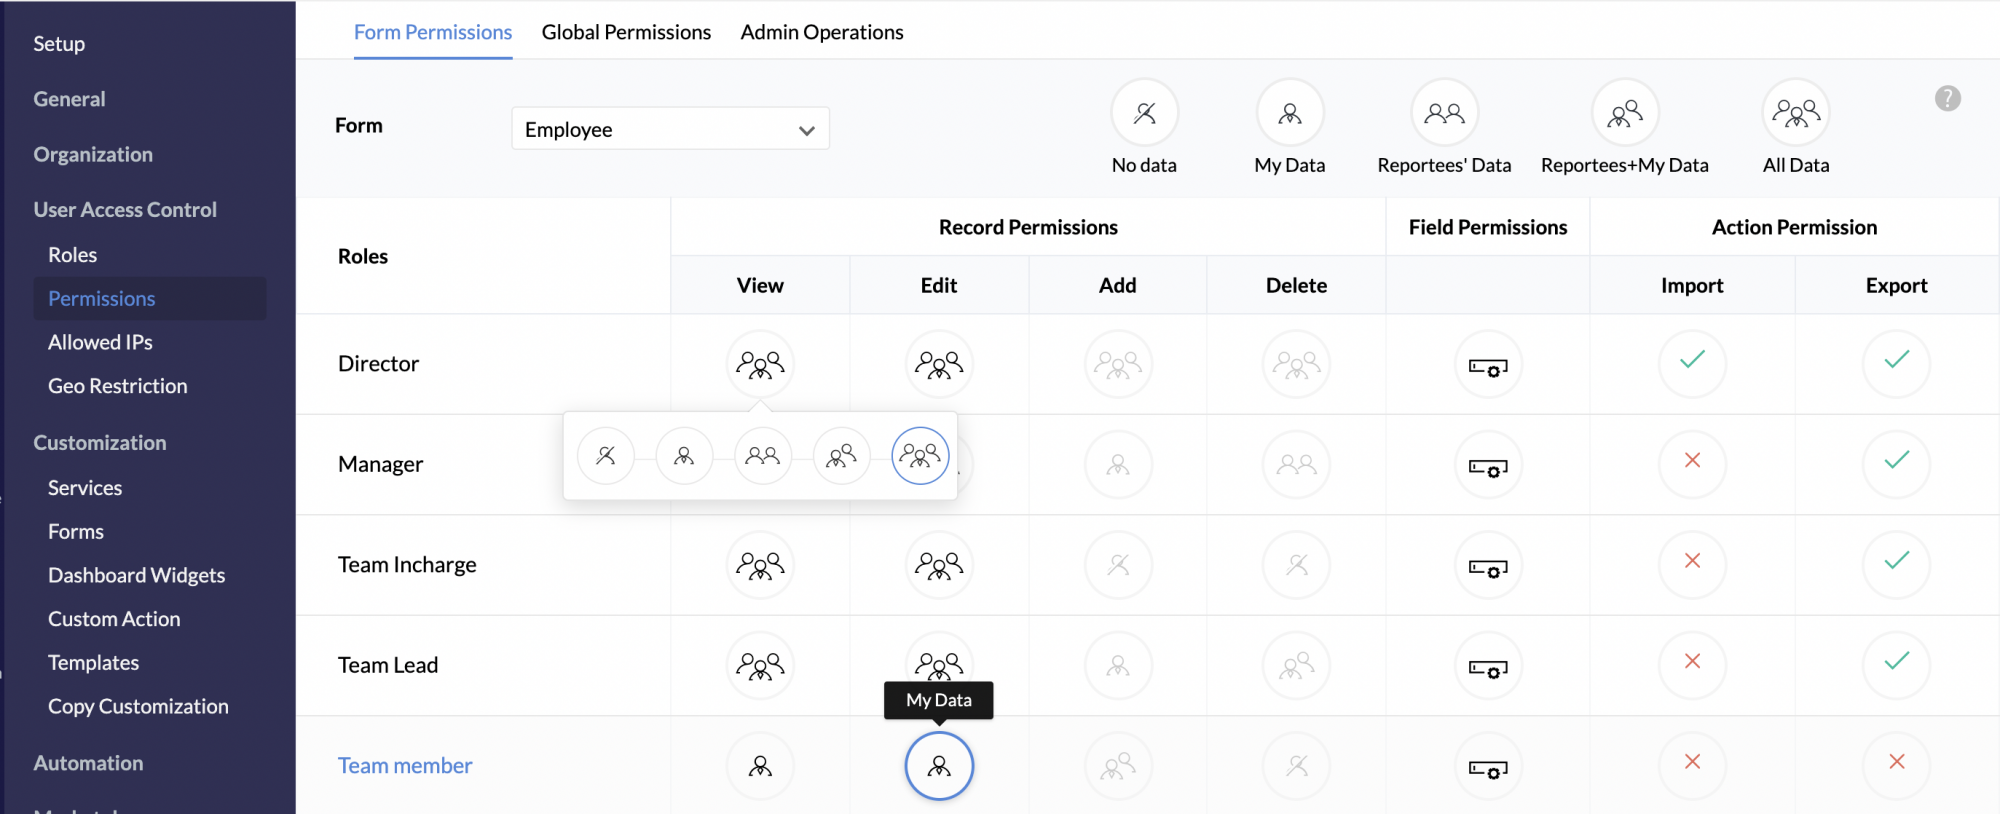
Under View and Edit, you also have the option to control whether the data that is viewed or edited is one's one data, reportees' data , own data plus reportees' data , all data or no data.
Setting Permissions for a field of a Form
You will be able to set view, edit, add and delete permissions for each field in a form.
The permission to view, edit, add or delete a particular field can be set for forms. To do this,
- From your home page, go to Settings > Customization > Forms.
- Click on the form so you can set permissions for its fields.
- Click on the ellipsis icon(right top corner) and click User Access Control.
- Click on the field permissions icon for the specific role under Field Permissions.
- Select the relevant field permissions you want to give to the role for the fields in the form.

Settings permissions for a field while adding the field
Once you have added a field, you have the option to configure permission for that specific field.
- Hover the mouse over the field for which you need to set permission.
- Click on the Permission icon.
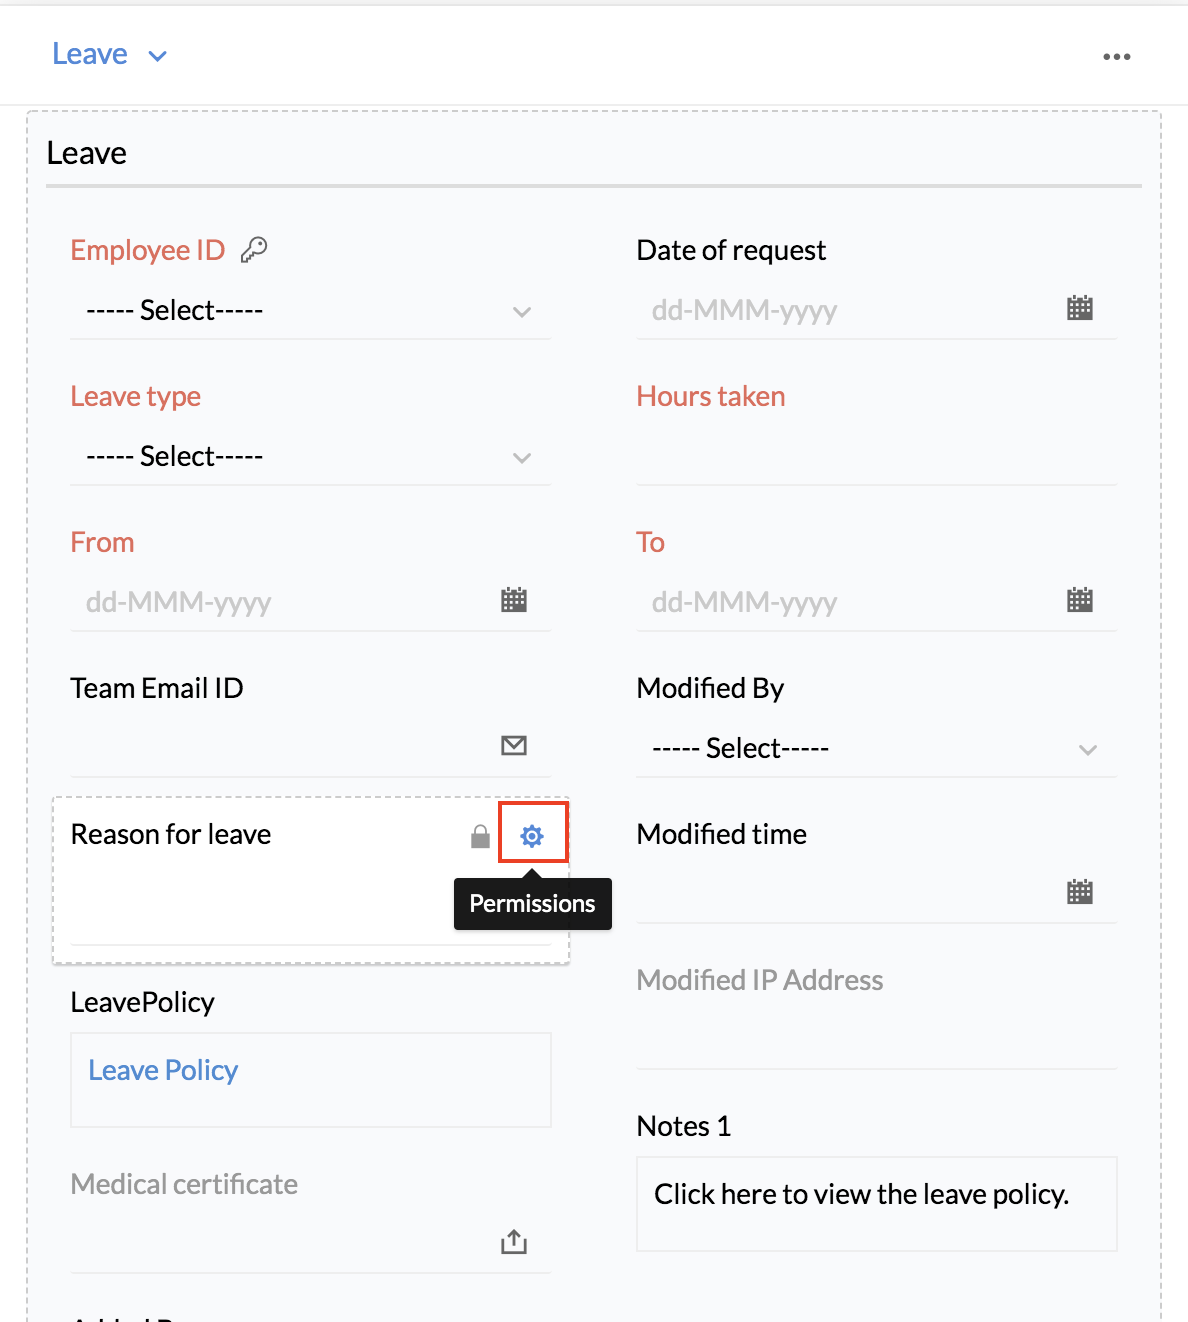
- Go to the role for which you would like to set field permission.
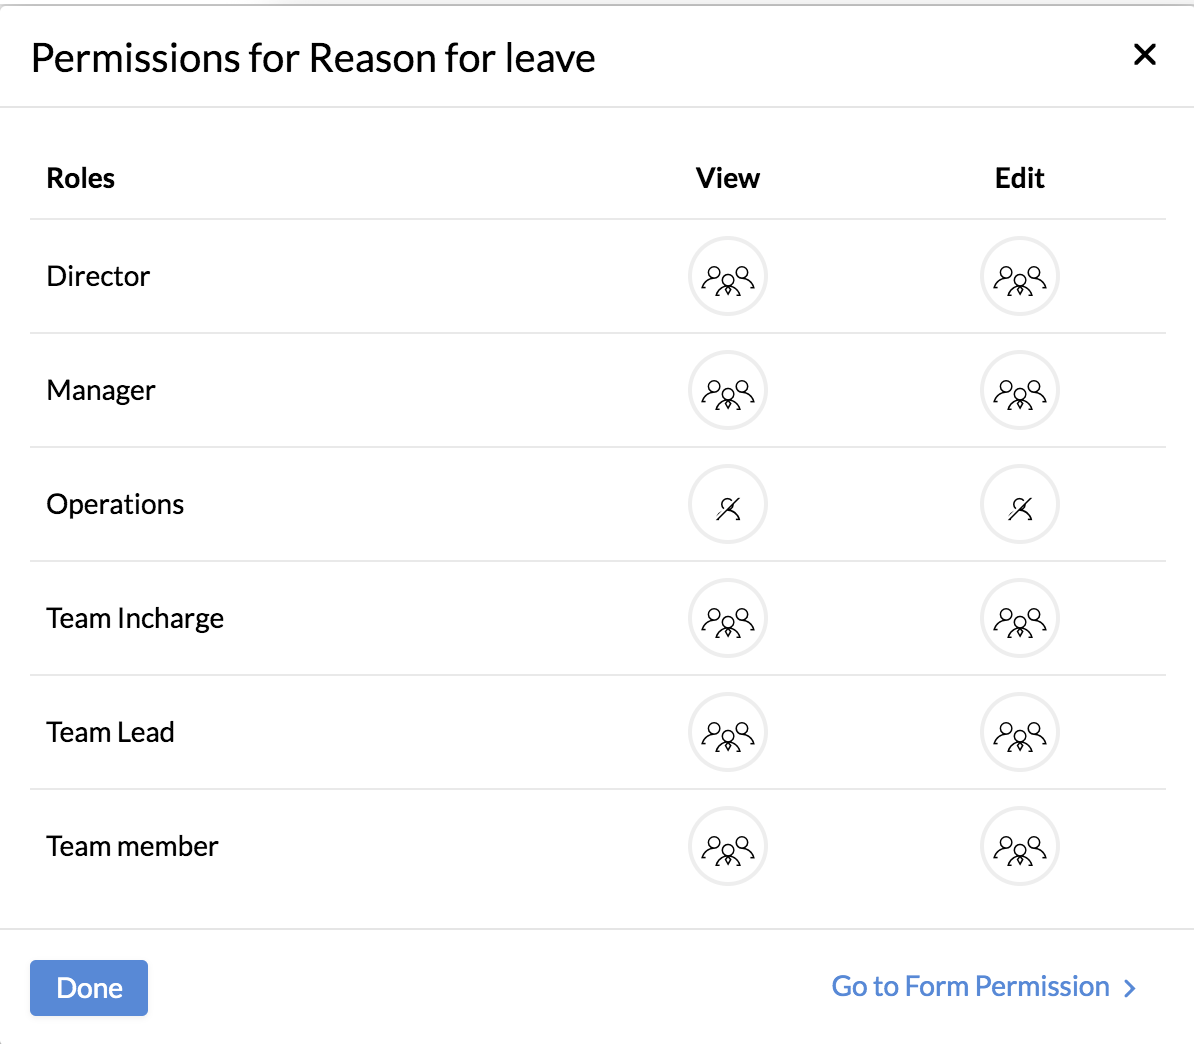
- Based on your need, select View/Edit permission for the list of data types.
- Click Done.
You have now set permission for the particular field that you added.
You can also click Go to Form permissions to configure the permissions.
Encrypting Fields of a Form
Certain information of employees like aadhar number, bank account number etc. are sensitive , which need to stay private. You can encrypt fields containing such sensitive data and keep them secure.
Let us consider a use case. If you consider the bank account number of your employees to be sensitive, you can secure it. You can encrypt the particular field containing the bank account number in the respective form. Similarly, you can encrypt fields in cases of Aadhaar number, SSN number, salary data etc.
To encrypt fields in a form,
- From your home page, go to Settings (gear icon) > Customization > Forms.
- Select the respective form, in this case, the Employee form.
- Click on the field that you would like to encrypt, in this case, the 'Bank account number'.
Note:
- Encryption is available for System and Custom Fields. However, it can't be disabled for System Fields.
- Encryption can be done only for Single Line,Multi-Line and Number Field.
- Click on Field Properties (right top corner)
- Under General Configuration, enable Encryption.
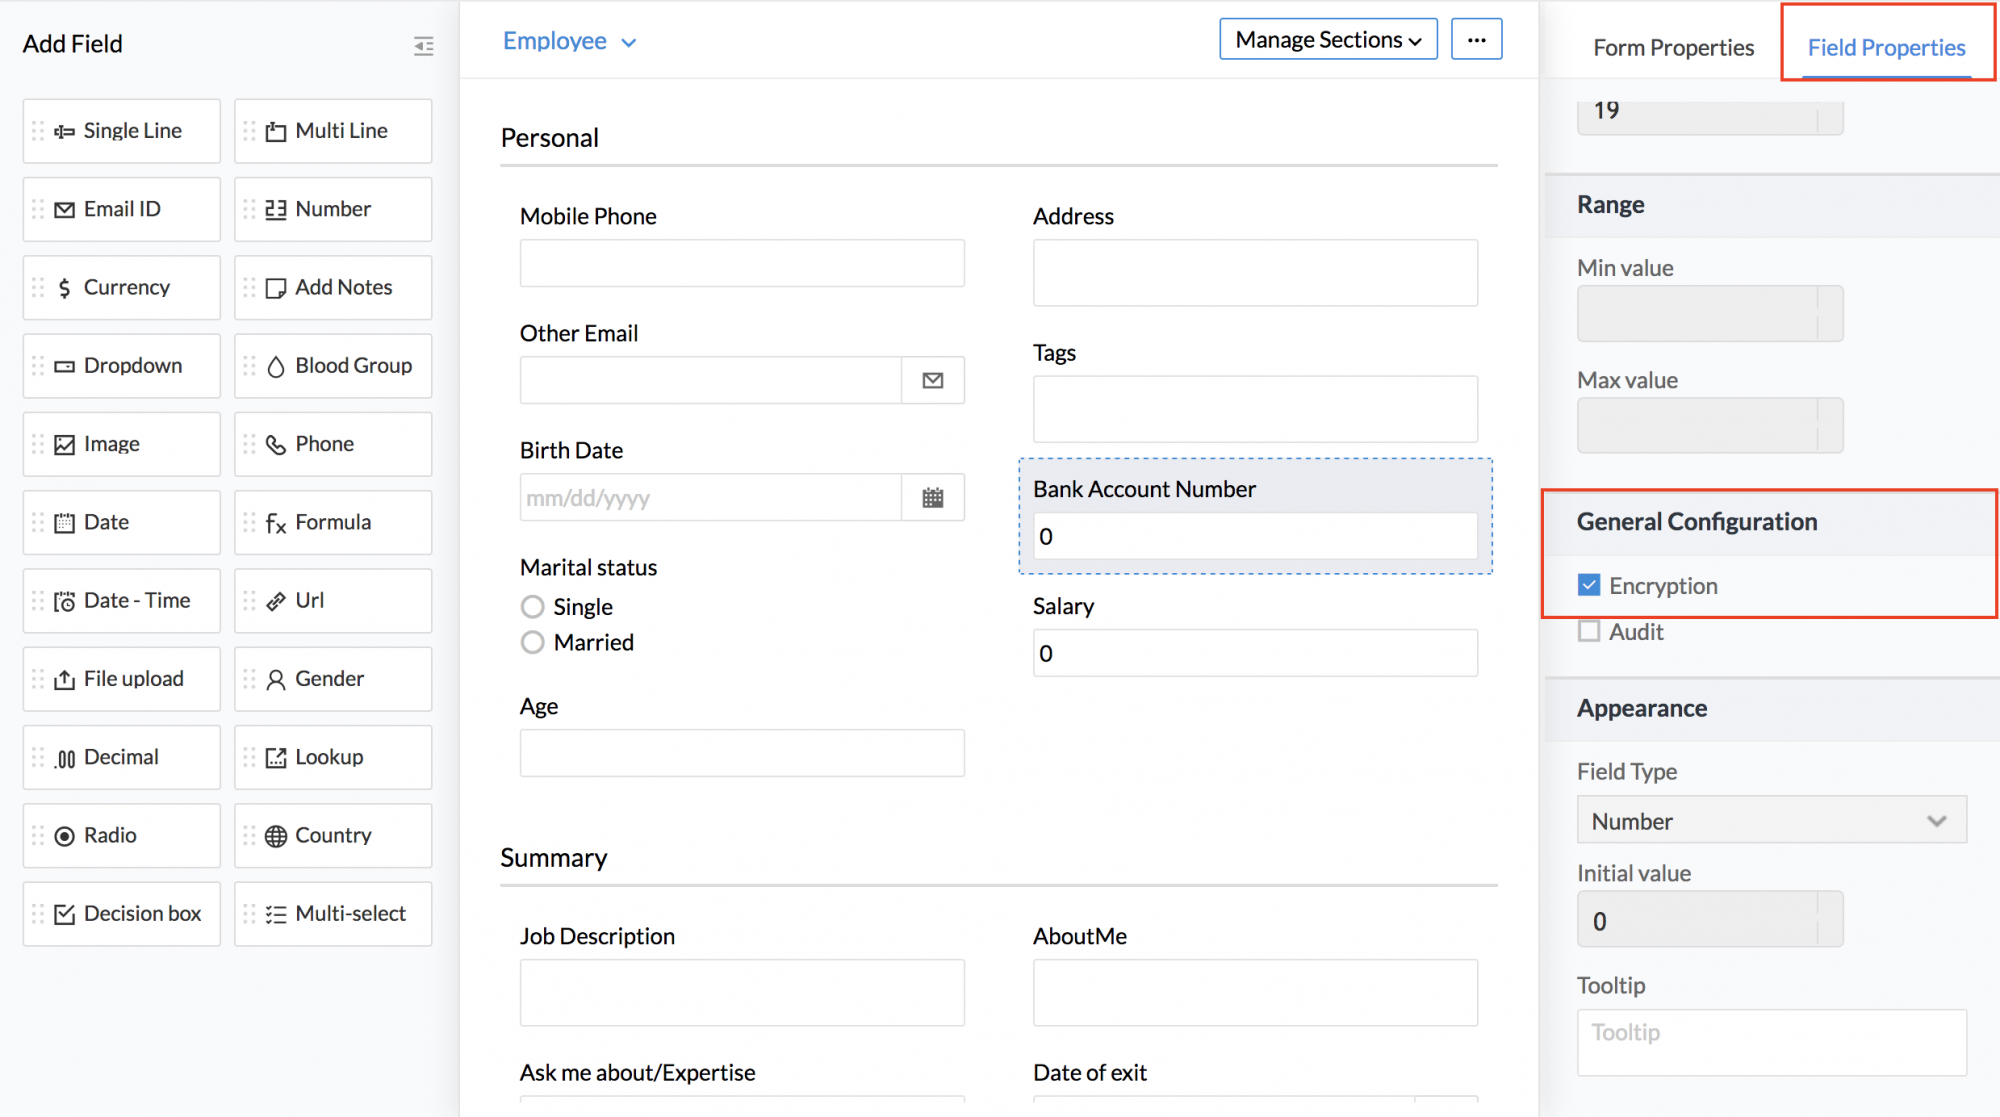
Now the field will remain encrypted in all records and workflows.
Note:
- You can encrypt a maximum of 5 fields for linear sections in a form.
- In case of Tabular sections, you can encrypt 5 fields per tabular section.
- The Employee Form can have a maximum of 10 fields to be encrypted.
- In 'List View' search, the operations allowed are 'Equal', 'Not Equal', 'Empty' and 'Not Empty'
Setting permissions to Import and Export data from a Form
By default, administrators will be able to Export and Import data. However, other employees can do these actions only if permissions are configured. Follow the steps given below to define permissions for Import and Export.
- From Home, go to Settings (gear icon) > User Access Control > Permissions.
- Under the Form drop-down, select the Form for which the Import/export permission needs to be set.
- Under Action Permission, enable the Import or Export column for the role for which you would like to add permissions.
The users who fall into the chosen role will be able to Import data into a form or Export data for the form that is selected.
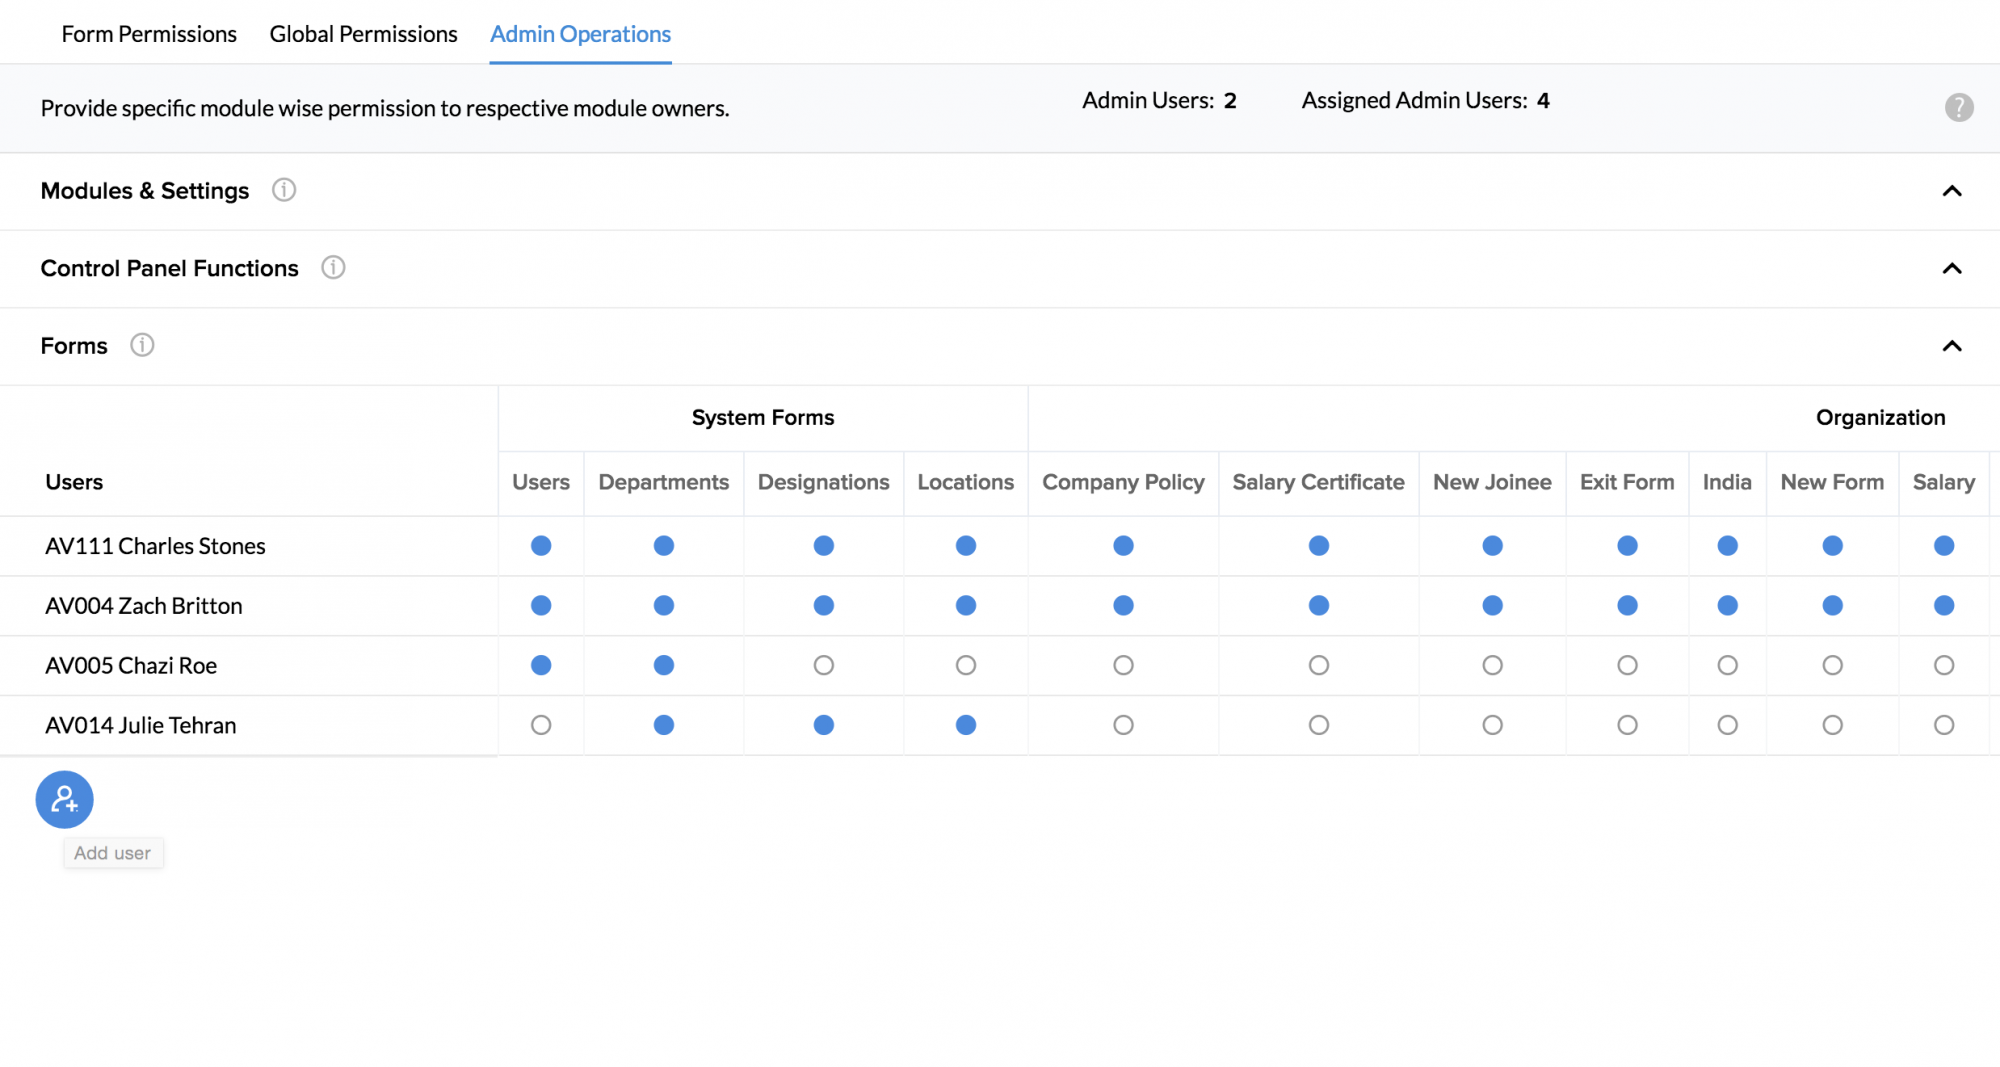
Setting admin permissions for a non-admin
This is possible under User Access Control. Follow the steps given below to do this.
- From your home page, go to Settings (gear icon) > User Access Control > Permissions >Admin Operations.
- Click the add user icon and select the user.
- Go to forms and select the forms for which the admin permissions should be given for the user.
Now, the selected user will have the same permissions as the administrator.
Customizing permissions for a non-admin
There are scenarios where you may need to give access to an employee who is a non-administrator the permission to customize a form. This is possible under User access control.
- From your home page, go to Settings (gear icon) >User Access Control > Form permissions > Admin Operations.
- Click Forms.
- Click Add User and pick the user from the drop-down.
- Select the Services and Forms customization under Control Panel Functions.
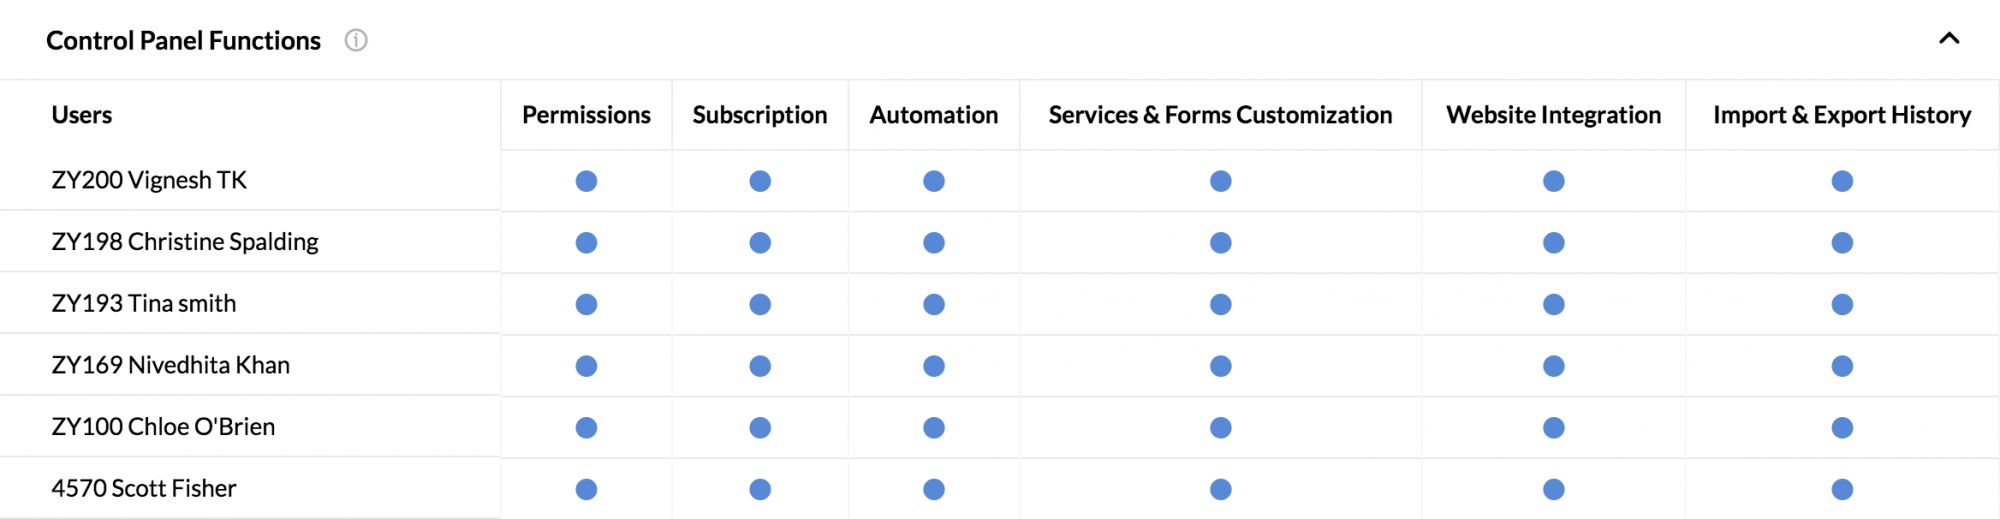
The selected user will be able to do form customization.