Jobs:
- Adding Jobs
- Importing and Exporting Jobs
- Editing a Job
- Assigning Jobs
- Job Status
- Job Views
- Deleting Job(s)
Generally, jobs are associated with Projects which are in turn associated with Clients of the organization. Having said that, it is also possible to add a job without associating it with a Project.
Adding Jobs
In order to log time, Jobs should be added in the first place.
Given below are the steps to add a job.
- From your home page, go to Timesheet > Projects/Jobs > Jobs
![]() Tip : Click here to know how to add a Project.
Tip : Click here to know how to add a Project.
- Click Add Job
- Enter the Job name.
- Select a Project if required.
- Give a start date and end date for the job.
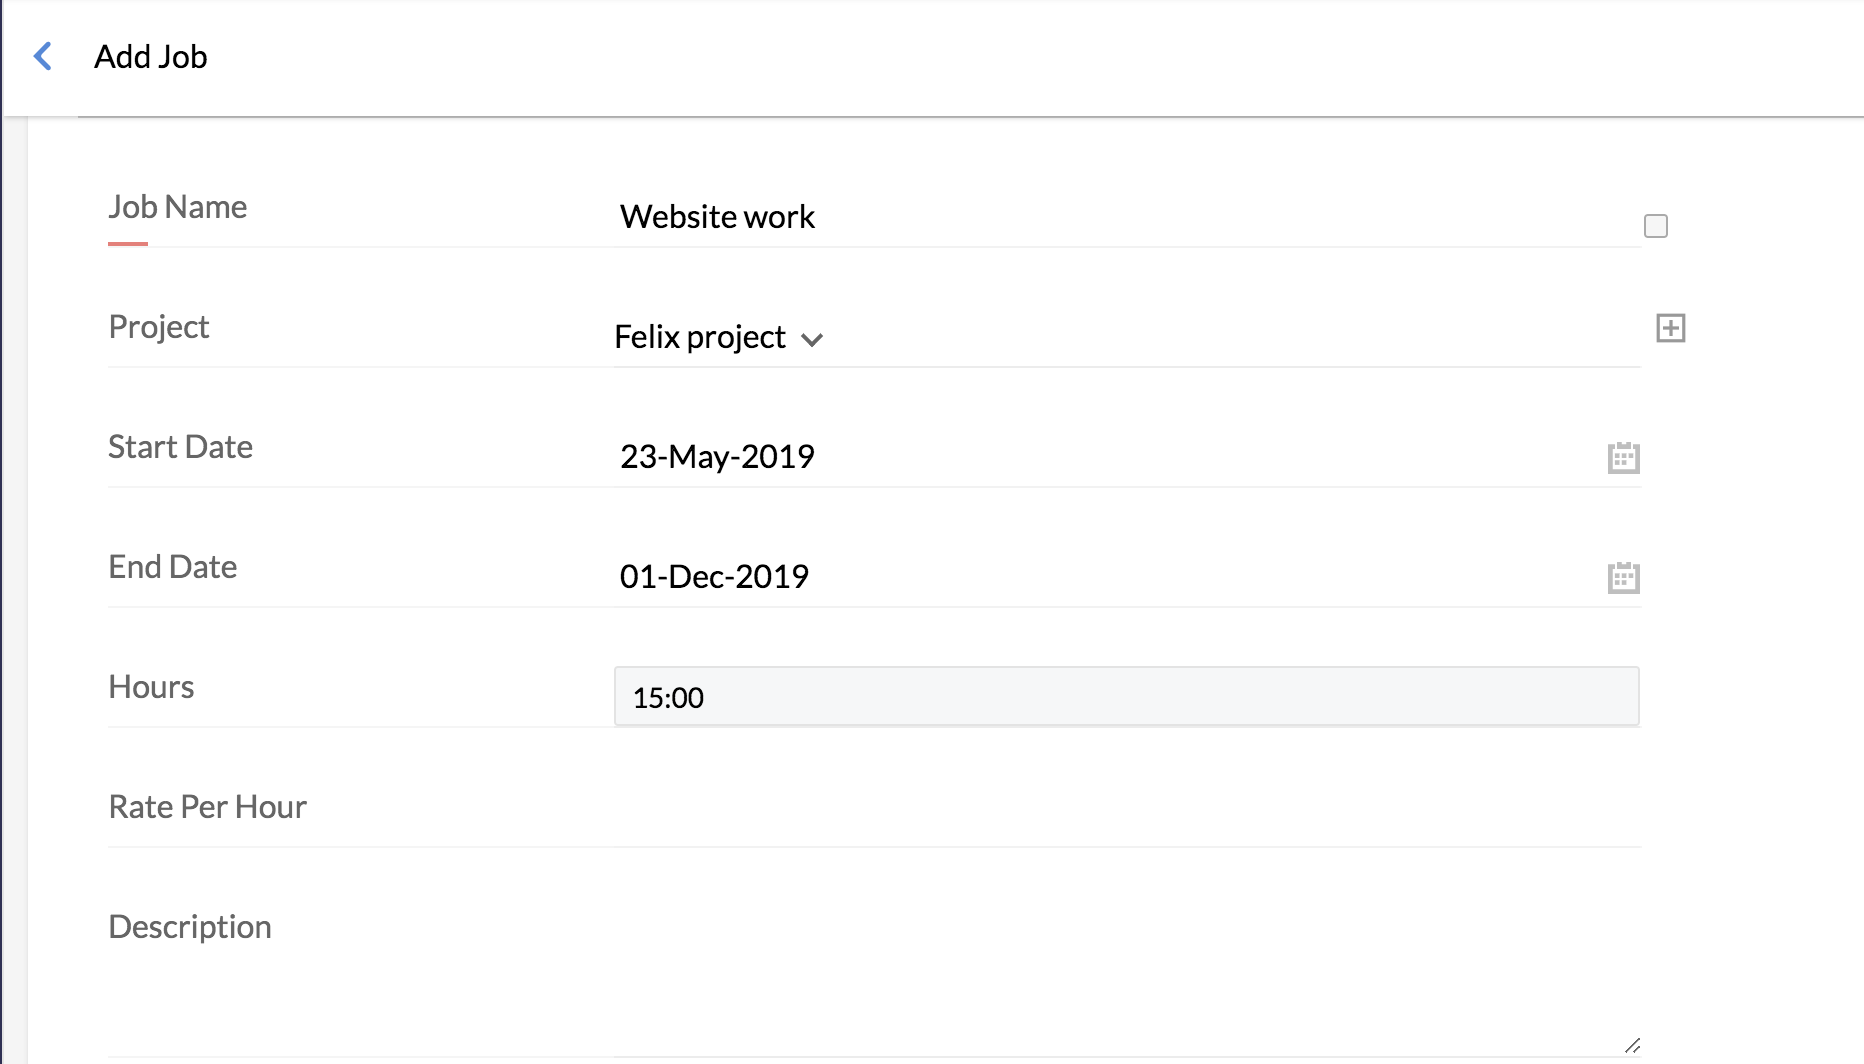
- Under Assignees, select the assignees for the particular job.
- Enter the hours in Hours and the Rate per hour (RPH) in Rate that appears against the assignee.
- Under Hours, you will be able to see the total number of hours getting populated automatically.
Note: Hours is the sum of the individual estimated hours that you have given for each assignee.
- Give a Rate per hour.
- Attach any files that you would like to add pertaining to the job. You can either add a file from your desktop or from the Cloud.
Note: The list of supported services are given below.
- Zoho Docs
- GDrive
- Dropbox
- One Drive
- Box
- Evernote
- Check the Reminder box, if you would like a reminder to be set for the job.
Note: When you check the Reminder box, you will have an email automatically sent to you due to the workflows that are configured. You can see this workflow under Setup (gear icon) > Automation > Workflows under the name 'Job Reminder'.
![]() Tip: You have to ensure that the status of this workflow is enabled.
Tip: You have to ensure that the status of this workflow is enabled.
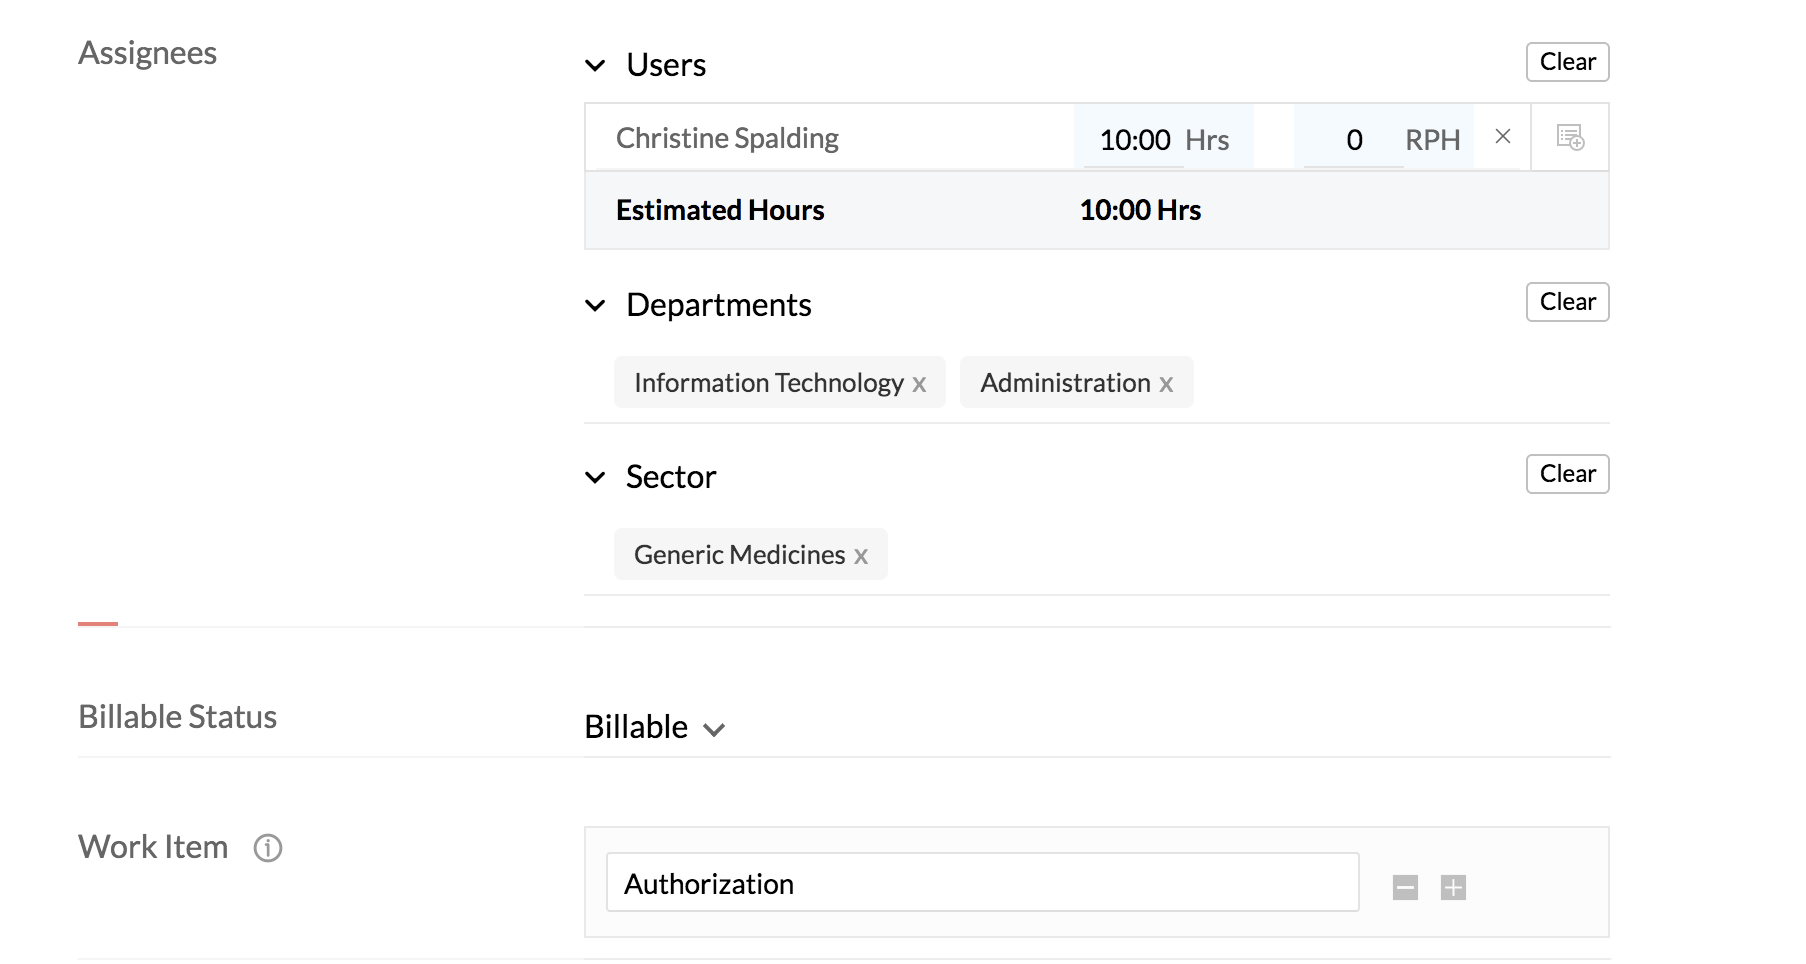
- Under Billable status, select Billable or Non-Billable depending on the nature of the job.
- Enter work items. These will be listed as drop down options while logging time for this job. Default work items will be listed along with these work items.
- Click Submit.
You have now created a job and you can see it when you click Timesheet > Projects/Jobs > Jobs.
![]() You can also add job while you log time.
You can also add job while you log time.
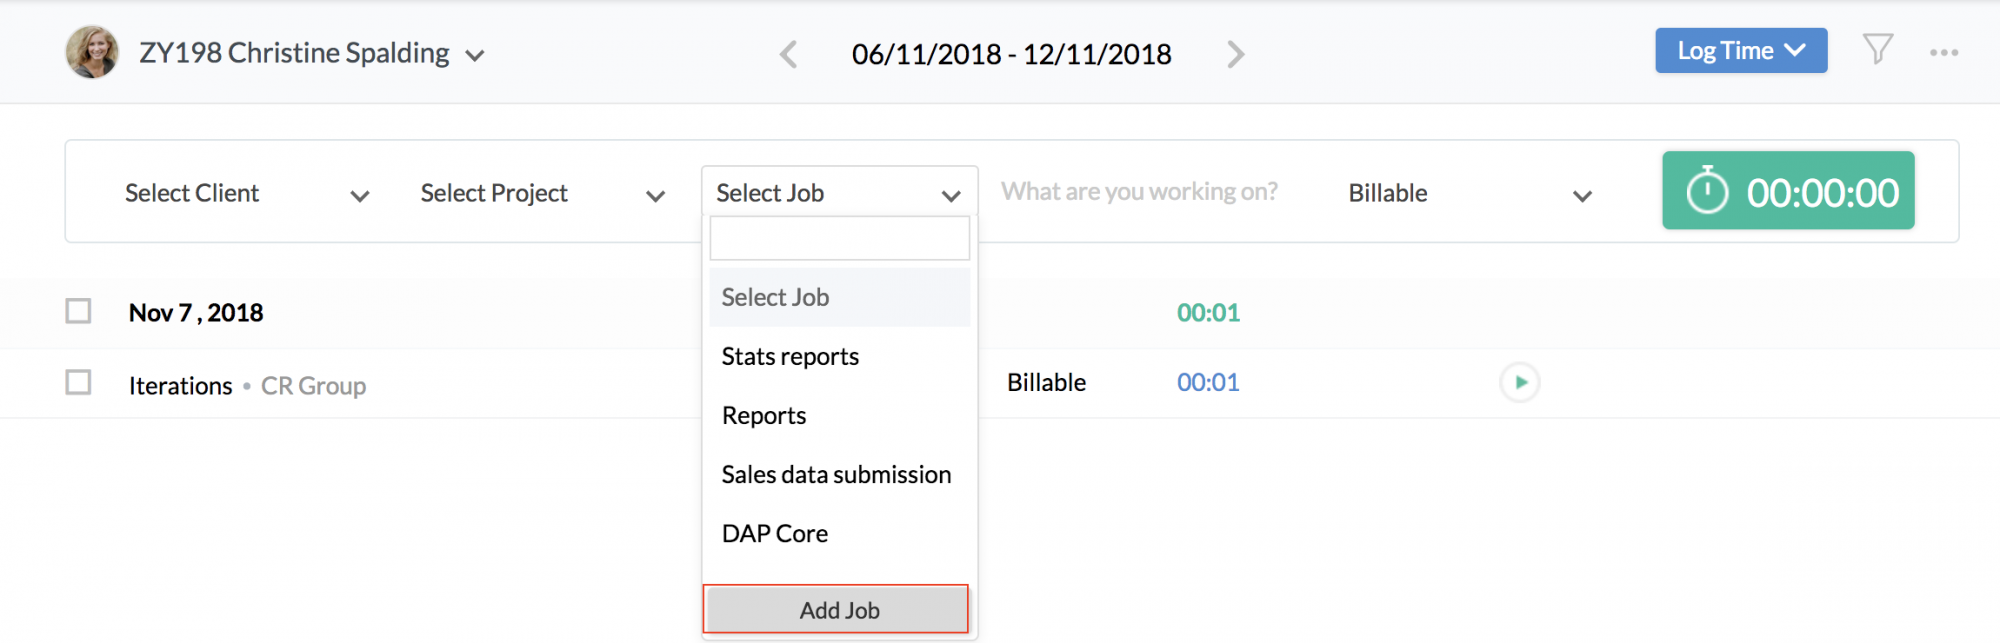
If you have not created your Job on the system, you can also add jobs straight away, while time logging is done.
To add Jobs while logging Time,
- From your home page, go to Timesheet > Time Logs
- Select the Project from the drop-down
- From the Select Job drop-down, click on Add Jobs
- Enter the Job name and other details
The Job gets added now.
Alternatively, Jobs can also be added without being associated to any Project.
Importing and Exporting Jobs
Importing jobs is an easier method of getting all your jobs onto the system. This helps you save time spent by adding each and every job manually.
You can also import jobs that are assigned to multiple users. Follow the steps given below.
- From your home page, go to Timesheet > Project/Jobs > Jobs
- Click on the ellipsis icon at the right corner of the page
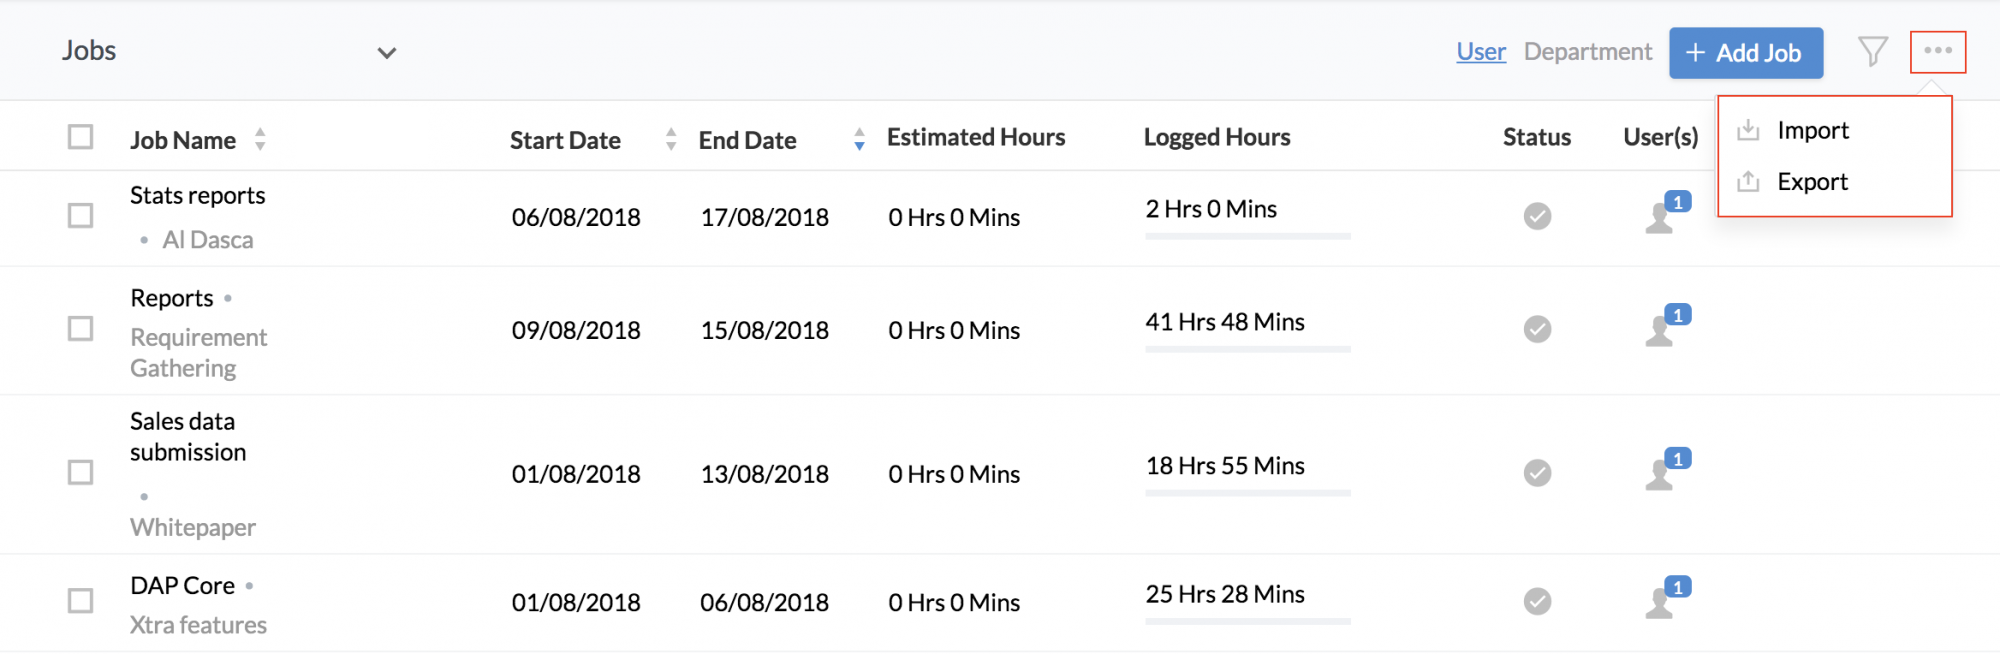
- Click upload file
- Browse the file from your system and get it uploaded
Note: The file should be in .xls or .xlsx .csv format for the upload to be done.
![]()
- Map the fields and click Next.
Your jobs will now get imported into the system and you will be able to see them along with the users assigned if you go to Projects/Jobs > Jobs.
![]() Tip: Permissions should be configured in the Jobs form to Import data. Click here to know how to set permissions.
Tip: Permissions should be configured in the Jobs form to Import data. Click here to know how to set permissions.
- The file that you upload should have the employee id and not the employee name
- The employee ids should be separated with a semi-colon
- "Hours" should be separated with a semi-colon - the hours thus added will get mapped with the corresponding assignee. I.e - the first value under Hours will be mapped to the first assignee. If the hour's column (in the file that is imported) is empty, then the hours will be taken as zero automatically.
- Jobs can be mapped to projects through project name or project ID fields. If the file contains both the project name and project ID values, then the project ID will be considered.
To export a Job to an external source,
Follow the steps given below to export jobs.
- From your home page, go to Timesheet > Projects/Jobs > Jobs.
- Click on the Export icon and Check Include Tabular Section Data if required.
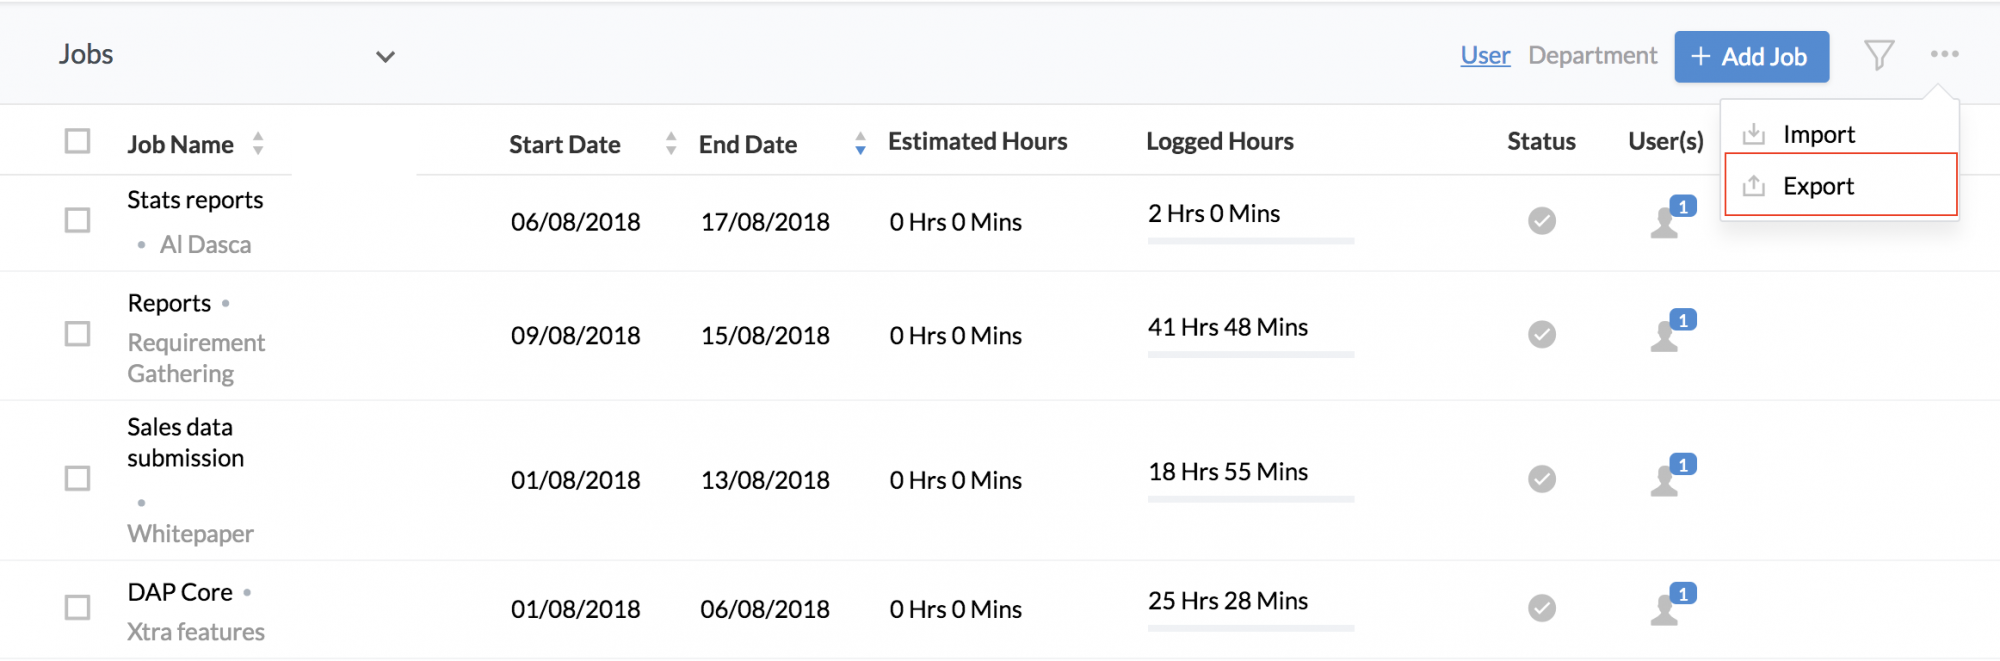
- Click Export.
The list of jobs will get exported.
Note:
- Export can be done only in .xls/.csv/.tsv formats
- All the fields of the form including custom fields will be exported
- Export will be based on the values in the filter
Editing a Job
Sometimes, you may come across the need to edit a Job that has been created.
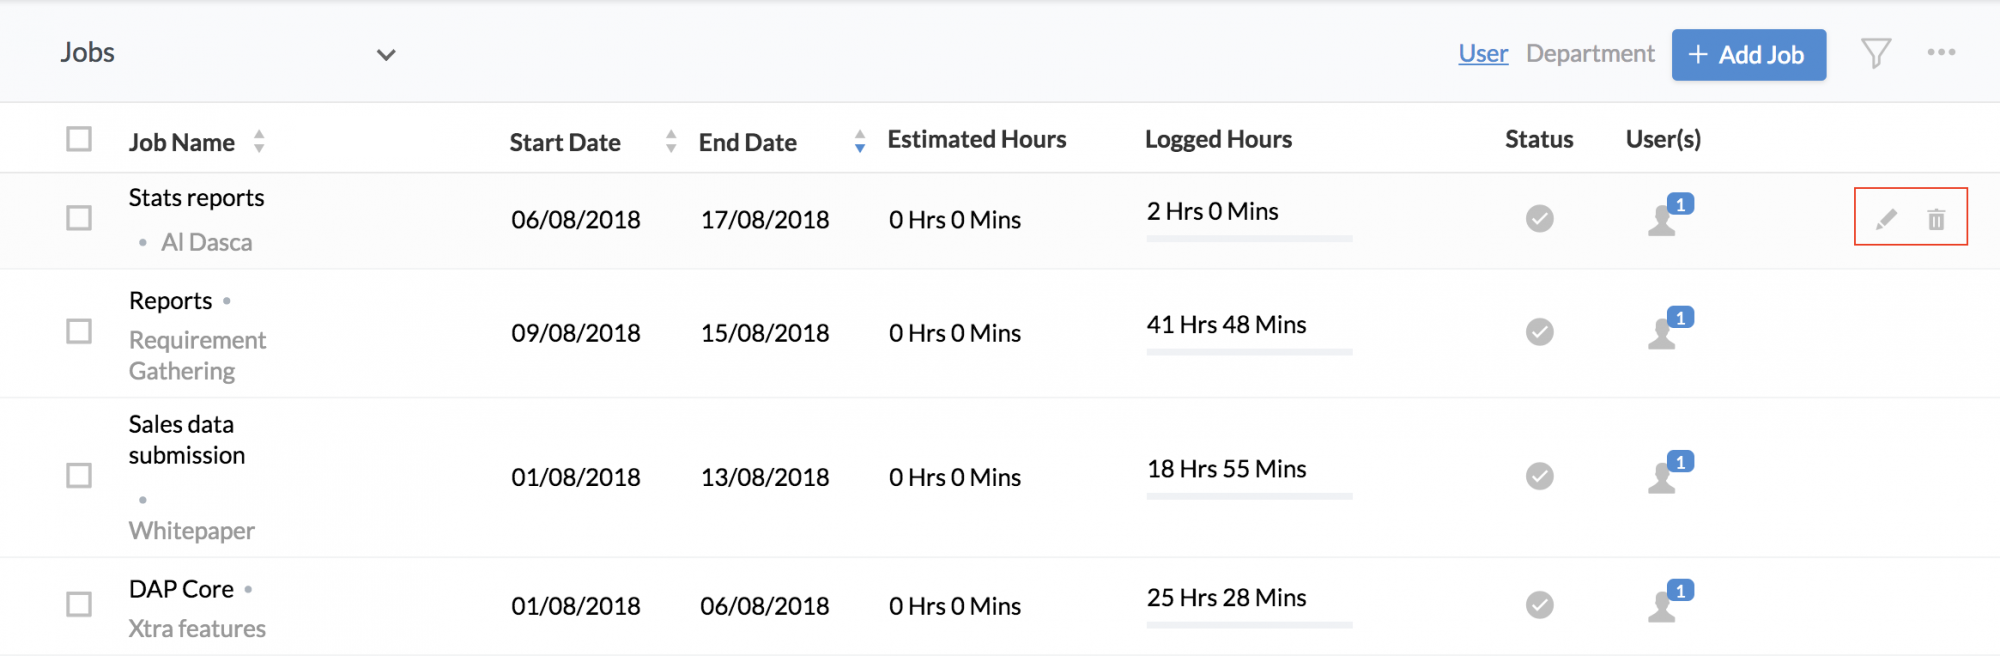
To edit a created Job,
- From your home page, go to Timesheet > Projects/Jobs > Jobs.
- Hover your mouse over the job and click on the edit icon(pencil icon).
- Edit the job as required and click Save.
![]() Tip: Get to know about conditions under which edit job works. Find more on this below.
Tip: Get to know about conditions under which edit job works. Find more on this below.
Editing a job is possible only under two conditions
- The one who is trying to edit the job should either be the administrator or job owner (creator of the job)
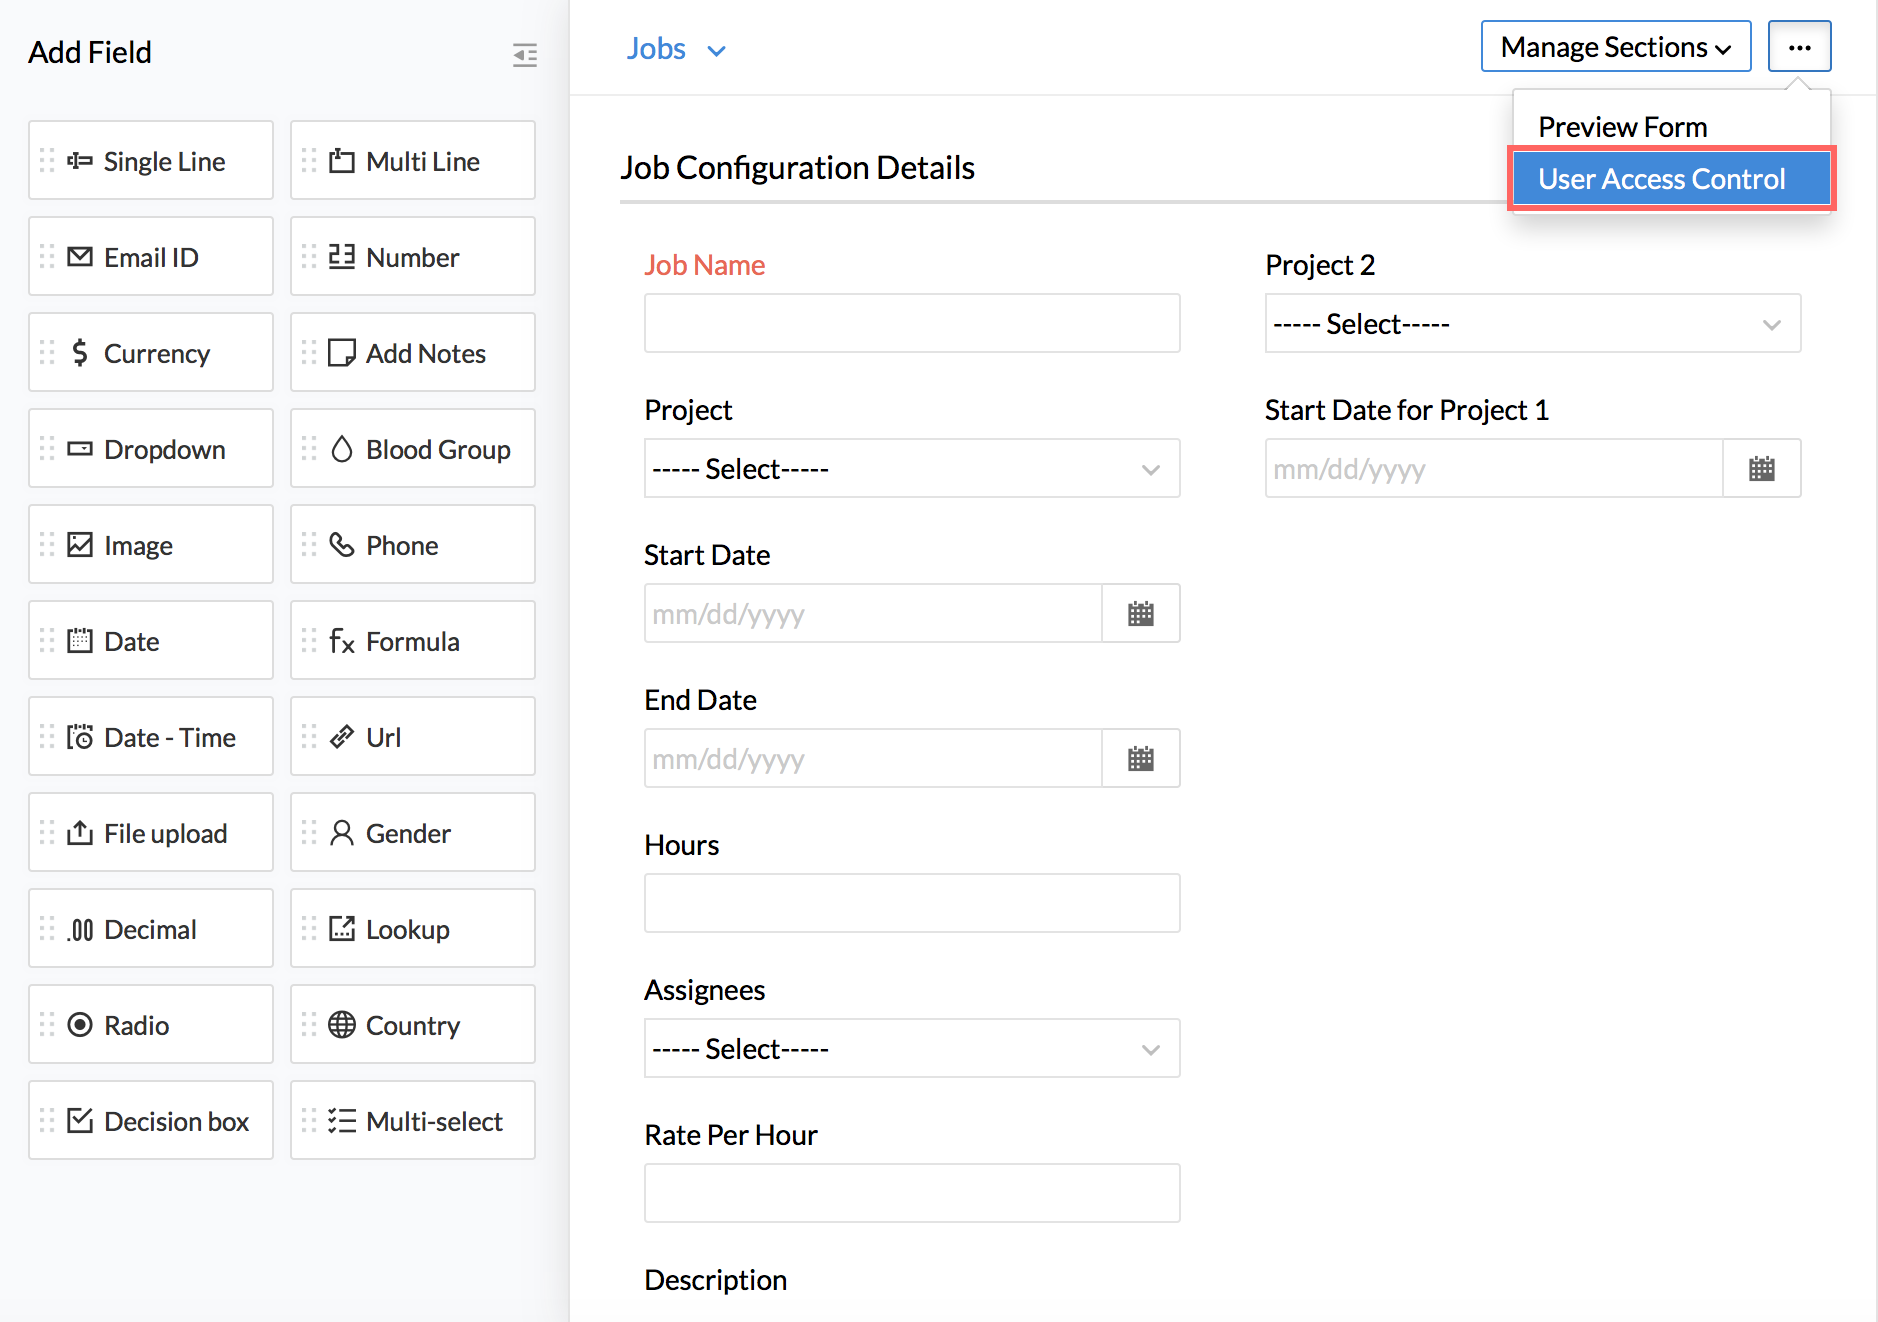
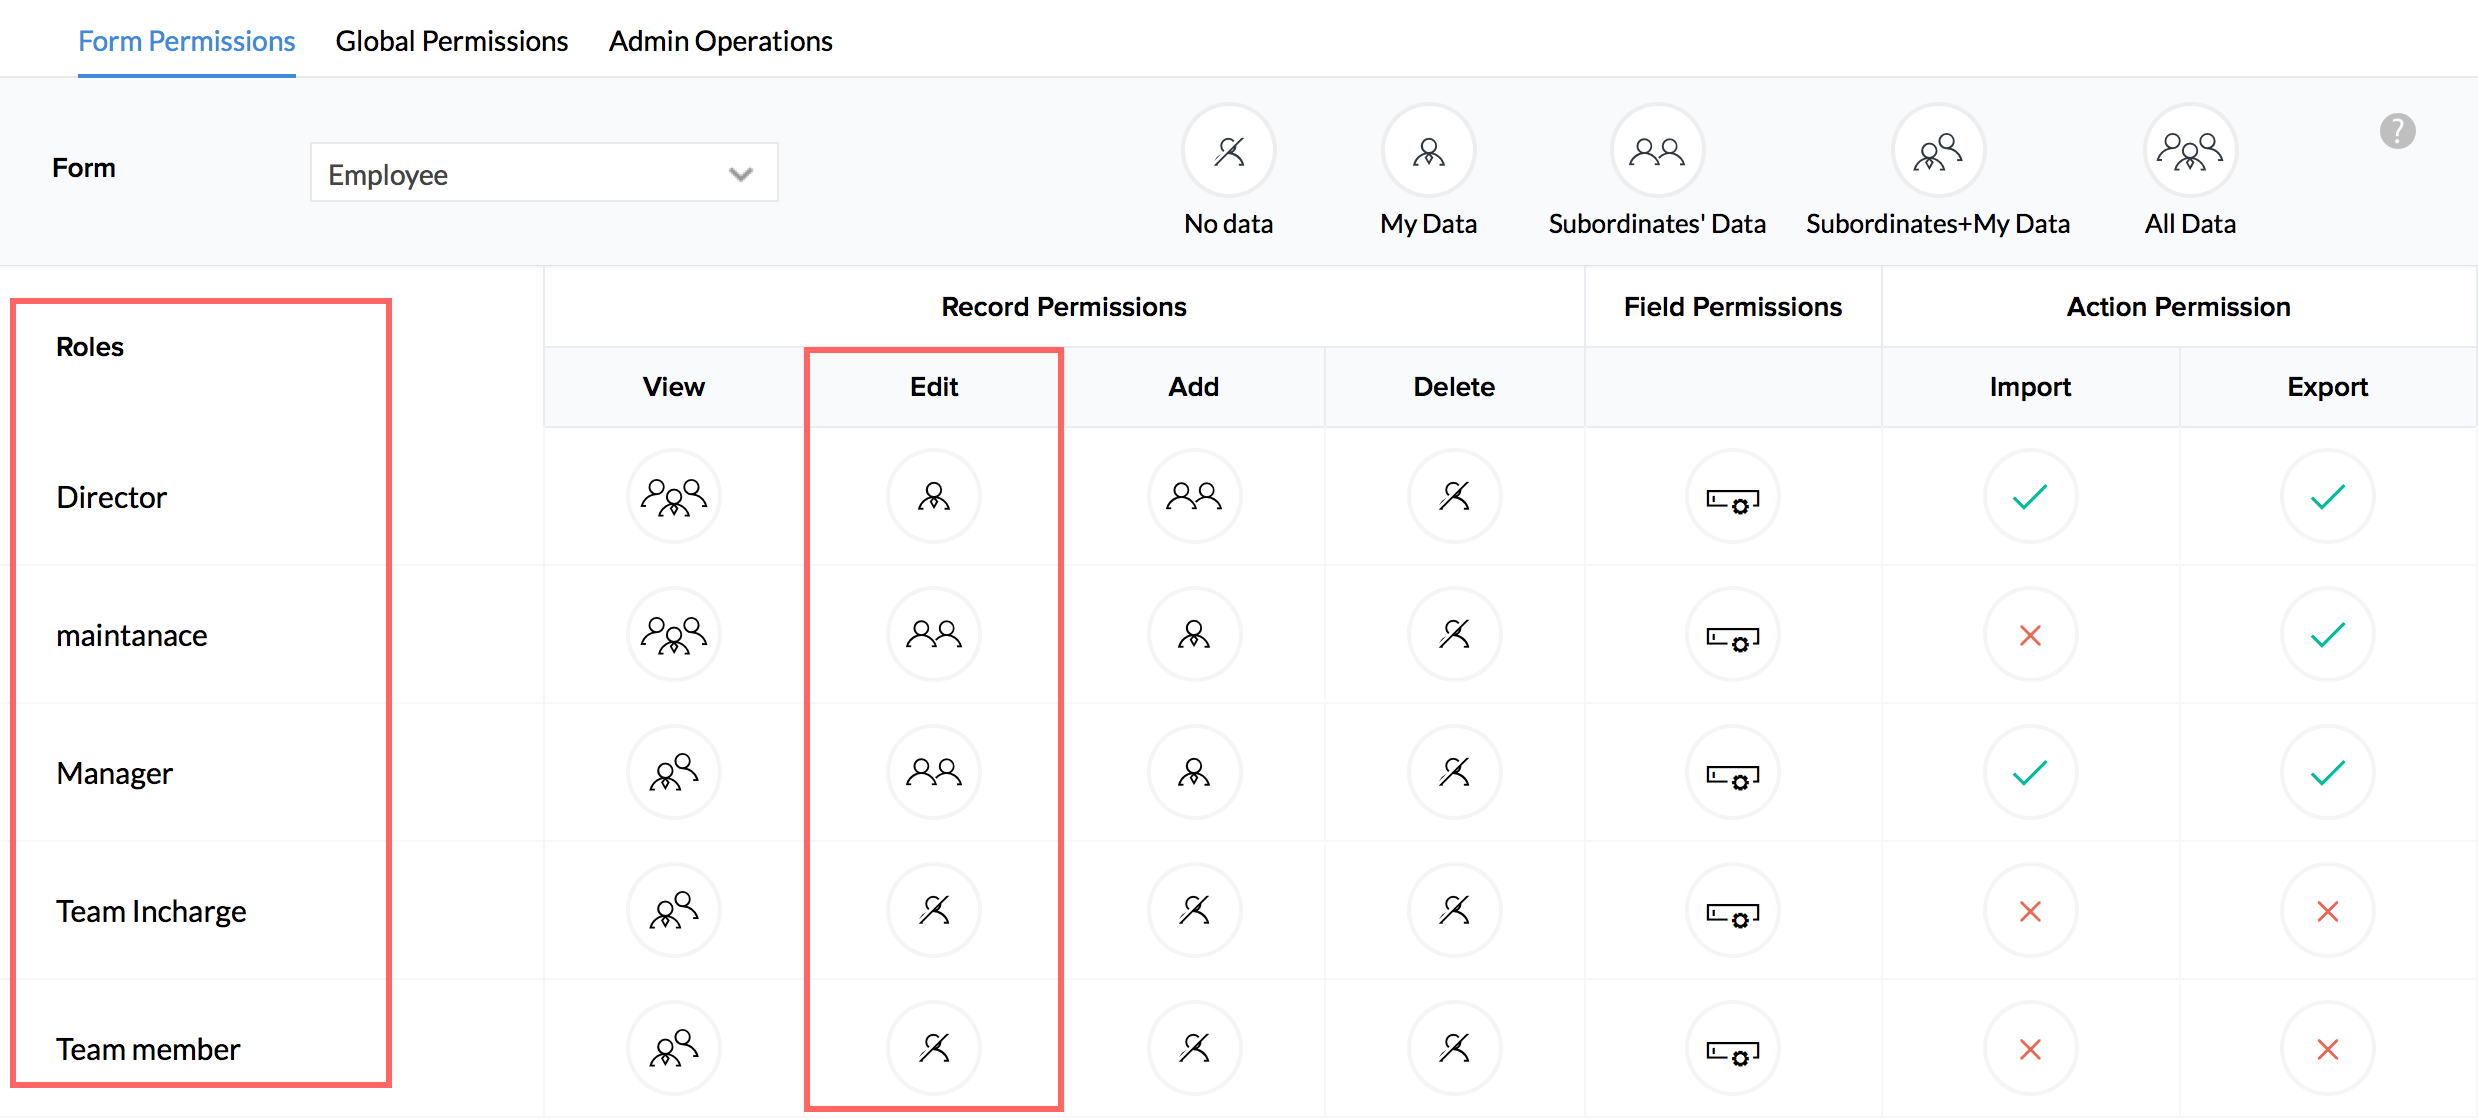
- In the Job form (Settings (gear icon) > Forms and Tabs > Forms > Jobs), edit permissions should have been configured for the particular role as shown in the images below
Assigning Jobs
While adding a job, under Assignees, you can select more than one employee using the checkbox. After a job is added, you may have the necessity to assign more users to that job. In this scenario, you can assign jobs to multiple assignees.
Here, you can search for employees and map them to the job
- From your home page, go to Timesheet > Projects/Jobs.
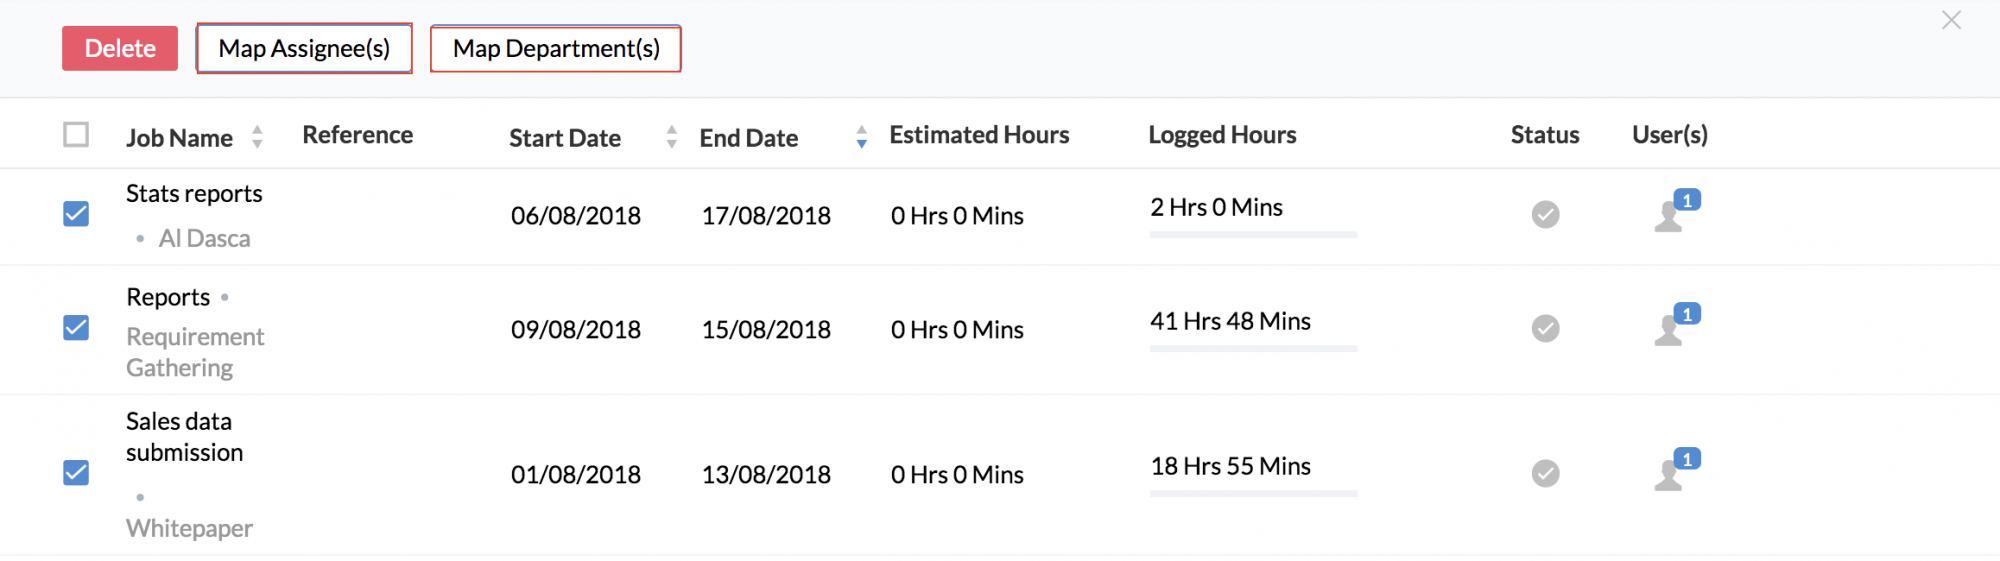
- Check the job that you would like to assign.
- Click the Users icon of the job for which you want to assign more users.
- Click Assign users.
- Use the search option to add the users and click Map.

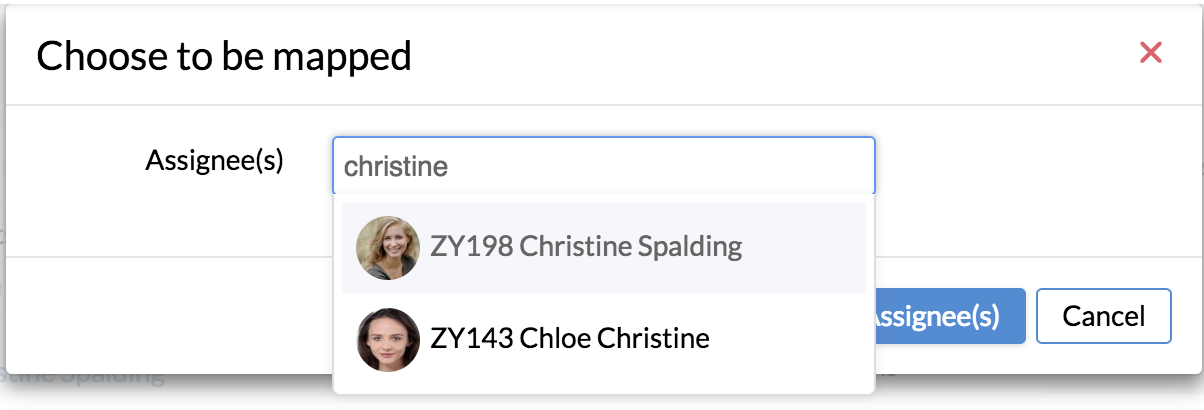
This option also works when you would like to map more than one job to one or more assignees.
Check the jobs that need to be mapped and click on Map Assignees
Note: If the job selected is associated with a Project, then only the Project Users can be assigned to the job. The mapping of other users will be skipped
Assigning job(s) to departments
You can also create a job and assign it to a particular department to get work done with order and efficiency.
To assign a Job to a department,
- From your home page, go to Timesheet > Projects/Jobs > Job.
- Click Add Job.
- Under 'Assignees', go to users and select the Users and under Department, select the Department.
- Enter other details like Rate per hour, Billable Status, if needed.
- Click Submit.
Now the job has been assigned to the Department. Anyone who is tagged to the Department will be able to log time for this job and the ones who log time for the job will become assignees for that job.
Note:
- When a member logs time for a job, he/she automatically becomes an Assignee for the job and becomes a User for the Project
- The permission to add a Job or a Project will be based on the permission given for these forms - for eg, if the permission to add a job (for self and subordinates) is restricted to a reporting manager, then under Users, the Reporting Manager will be able to see only his/her name along with the subordinates name(s)
- The permission to add Departments to Jobs/Projects will be with the Administrator(s) and the all-locations admin assigned for the data part of time tracker module under Admin Operations tab. (Settings > User Access Control > Permissions > Admin Operations)
To map multiple jobs to departments,
- From your home page, go to Timesheet > Projects/Jobs > Jobs.
- Select the Jobs that you would like to assign to Departments.
- Click Map Departments at the top.
- Select the department names that you would like to map.
- Click Map Departments.
The selected jobs have been mapped to the departments.
You can have a new joiner assigned to a job automatically, this way. This means that when a new joiner becomes a member of the Department, he/she gets automatically assigned to the job. The members of the Department can choose the job and log time for it. Once the member starts logging time for the job, he/she becomes the assignee for the job.
Job Status
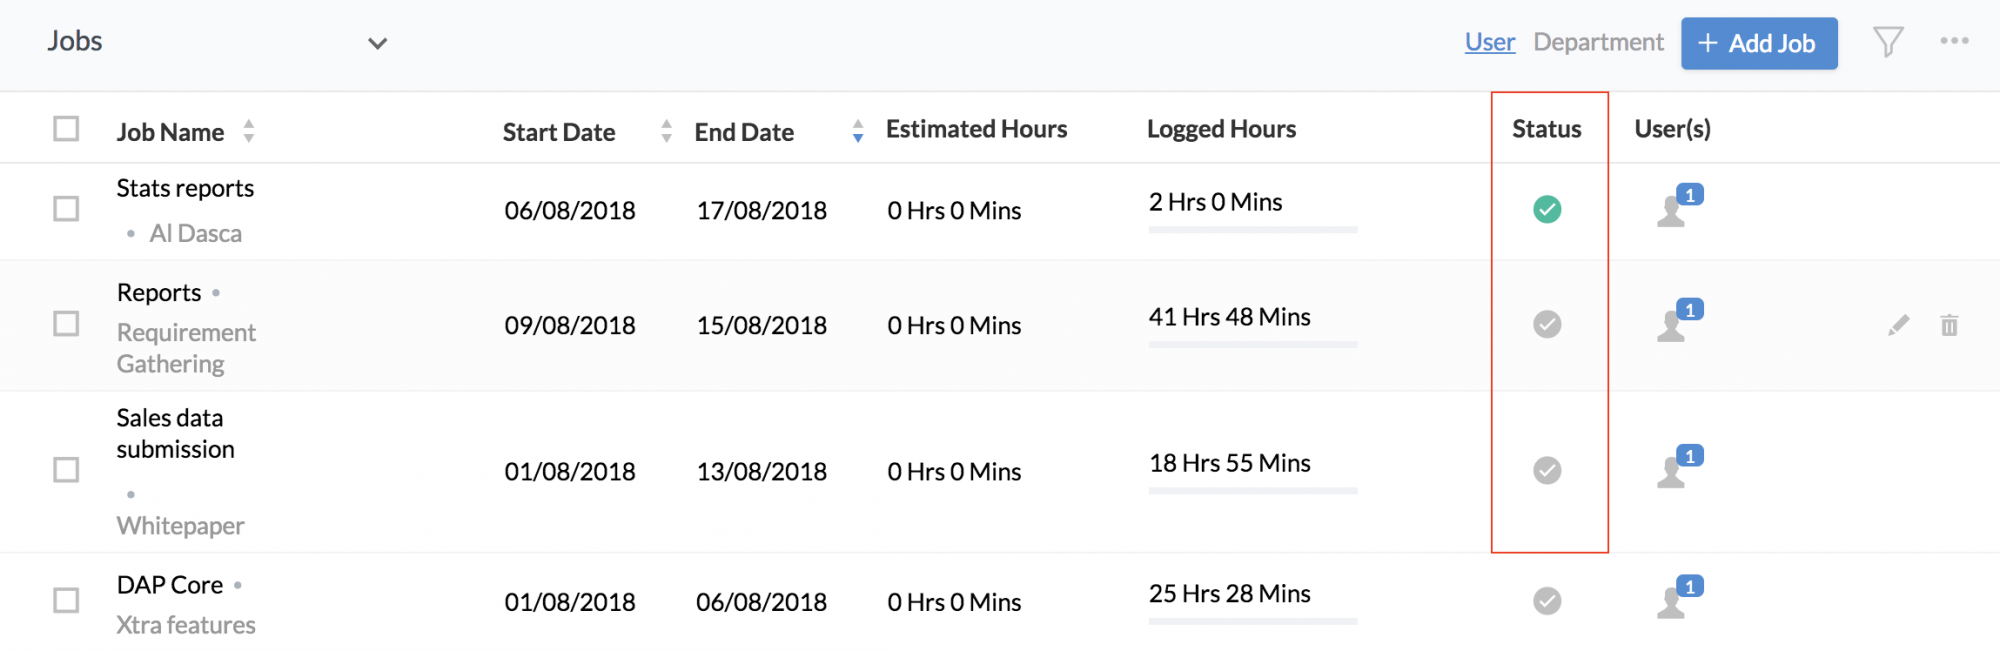
After completion of the Job, the Job's status can be changed manually.
Your jobs will be listed under the Jobs tab. When you want to change the status of a job, go to the Status column of the job and click the tick icon. The status will get changed from In-Progress to Completed.
![]() Tip: If you would like to re-open a completed job, use the filter at the right corner, select 'Completed' from the Job Status dropdown and hit search. You will be able to the completed jobs and the status can be changed.
Tip: If you would like to re-open a completed job, use the filter at the right corner, select 'Completed' from the Job Status dropdown and hit search. You will be able to the completed jobs and the status can be changed.
Other than the Job status to be completed or in-progress we also have billable and non-billable statuses for Jobs.
While adding Jobs, we select the billable status of the Job which will be reflected in Timesheets and pay settings as well. However, This is not a mandatory field. You can create a job even without having a billable status.

To change the status of a Job, from Billable to Non-Billable,
- From your home page, go to Timesheet > Projects/Jobs > Jobs.
- Hover your mouse over the job and click on the edit icon(pencil icon).
- Under the Billable Status, select Billable or Non-Billable as required.
- Click Save.
The time logs that were already created will retain the billable status as they were while time was logged.
The time logs that were created using Timers will be impacted as explained below:
- Scenario 1 - When a user resumes the timer of a job, (the Billable status of which is changed later on) the Billable status change will not get reflected. In this case, the Billable status should be changed manually while editing the log.
- Scenario 2 - When a user logs time using Timer for a job (the Billable status of which is changed later on), as a new log then the Billable status will be as per the changed status.
However, you can also restrict the User from changing the Billable status of the Time Log
You can create the job with the billable status as Billable so that the time logs created for this job will be created only as Billable time logs. The billable status of the job will change only when you edit the job and change the billable status again. In other words, the user will not be able to change the billable status of the job while logging time.
Job Views
To view the jobs that are currently in-progress for a particular Project,
You can make use of the filter to view jobs in-progress. Follow the steps given below.
- From your home page, go to Timesheet > Projects/Job > Job.
- Click on the filter.
- Under 'Projects', select the Project and under 'Job Status', select 'In-Progress.
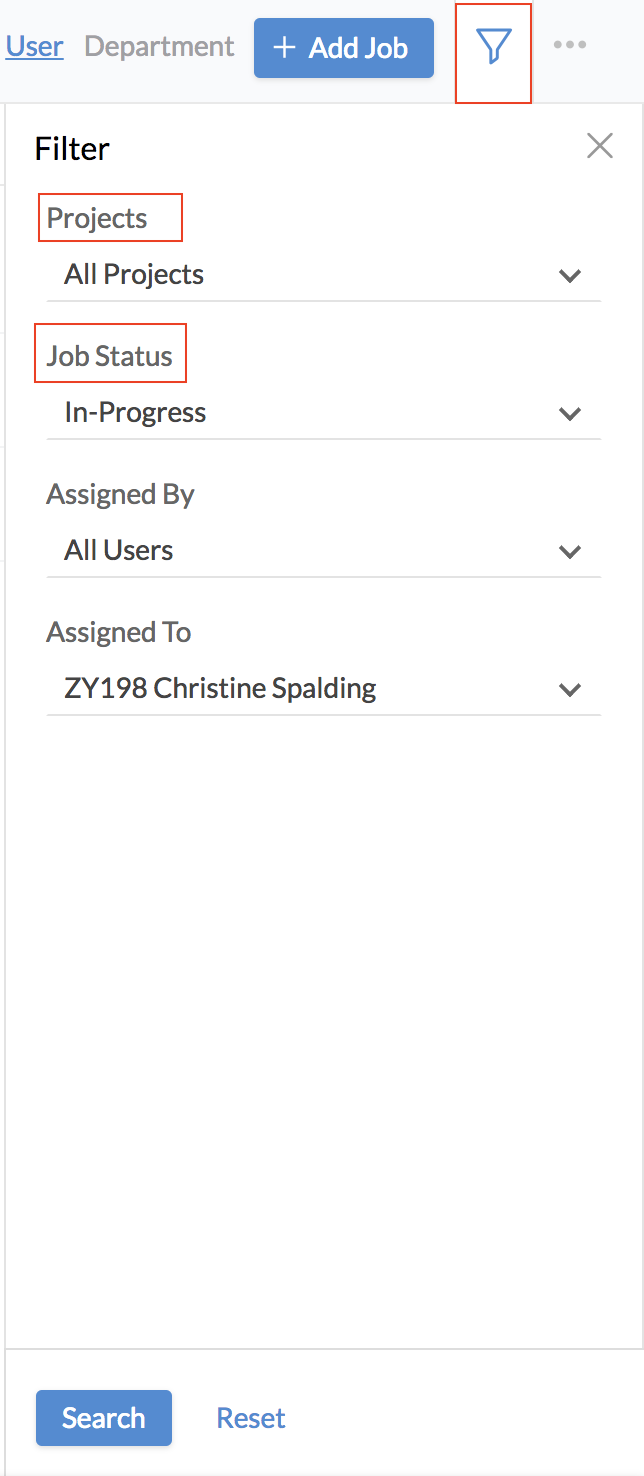
- Under Assigned to, select All Users and hit Search.
You will be able to see the jobs that are in-progress for the selected Project.
Time Tracker features options to view the jobs listed, based on date. You will be able to sort jobs based on their Start and End date.
To view jobs based on their start and end dates,
- From your home page, go to Timesheet > Projects/Jobs > Jobs
- Use the Up arrow and the Down arrow under Start Date and End date to sort the Jobs in ascending or descending order
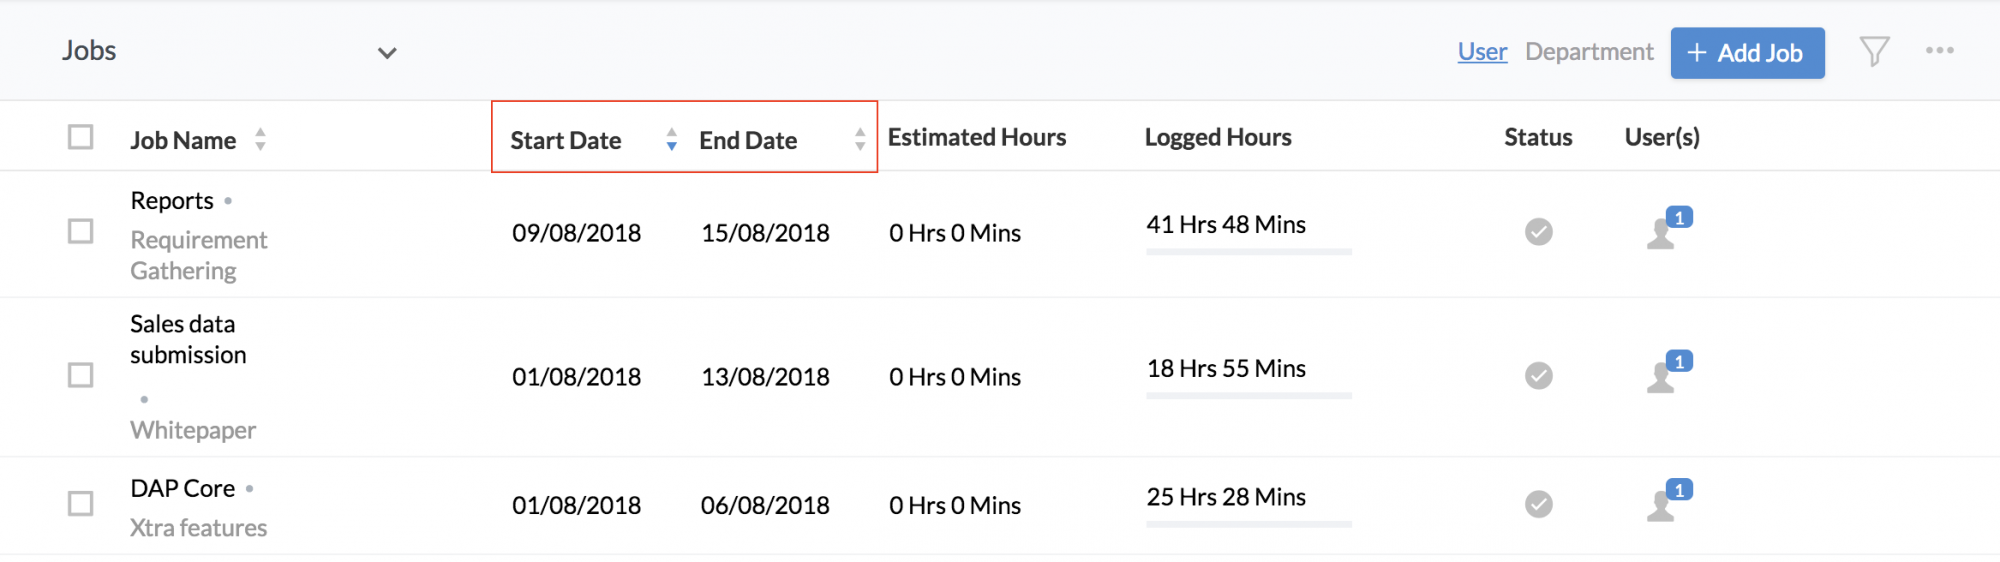
You can also sort Jobs, Projects, and Clients in Ascending or descending order using the Up arrow and the down arrow in the Job Name, Project Name, and the Client Name column.
Intuitively, you can create custom views as per your needs to view the list of Jobs, your workforce has been working on.
For instance, you can create a custom view the job list based on the custom fields that you have created in the Jobs' form.
Follow the steps given below to do this.
- From your home page, go to Timesheet > Projects/Job > Job.
- Click on the Job drop down and select Create View.
- Give a name for the view and set permissions as required.
- Under 'Select Columns', select the fields that you need and use the arrow to drop the selected fields in the next box for the view to be created.
- Under 'Criteria', you can create criteria using the fields of the job form and its related forms.
For eg. If your view should include only Jobs which are in the in-progress status in your view, you can set the condition here.
- Under the Field Name in Criteria, select Status from the list
- Under 'Condition', select In-Progress
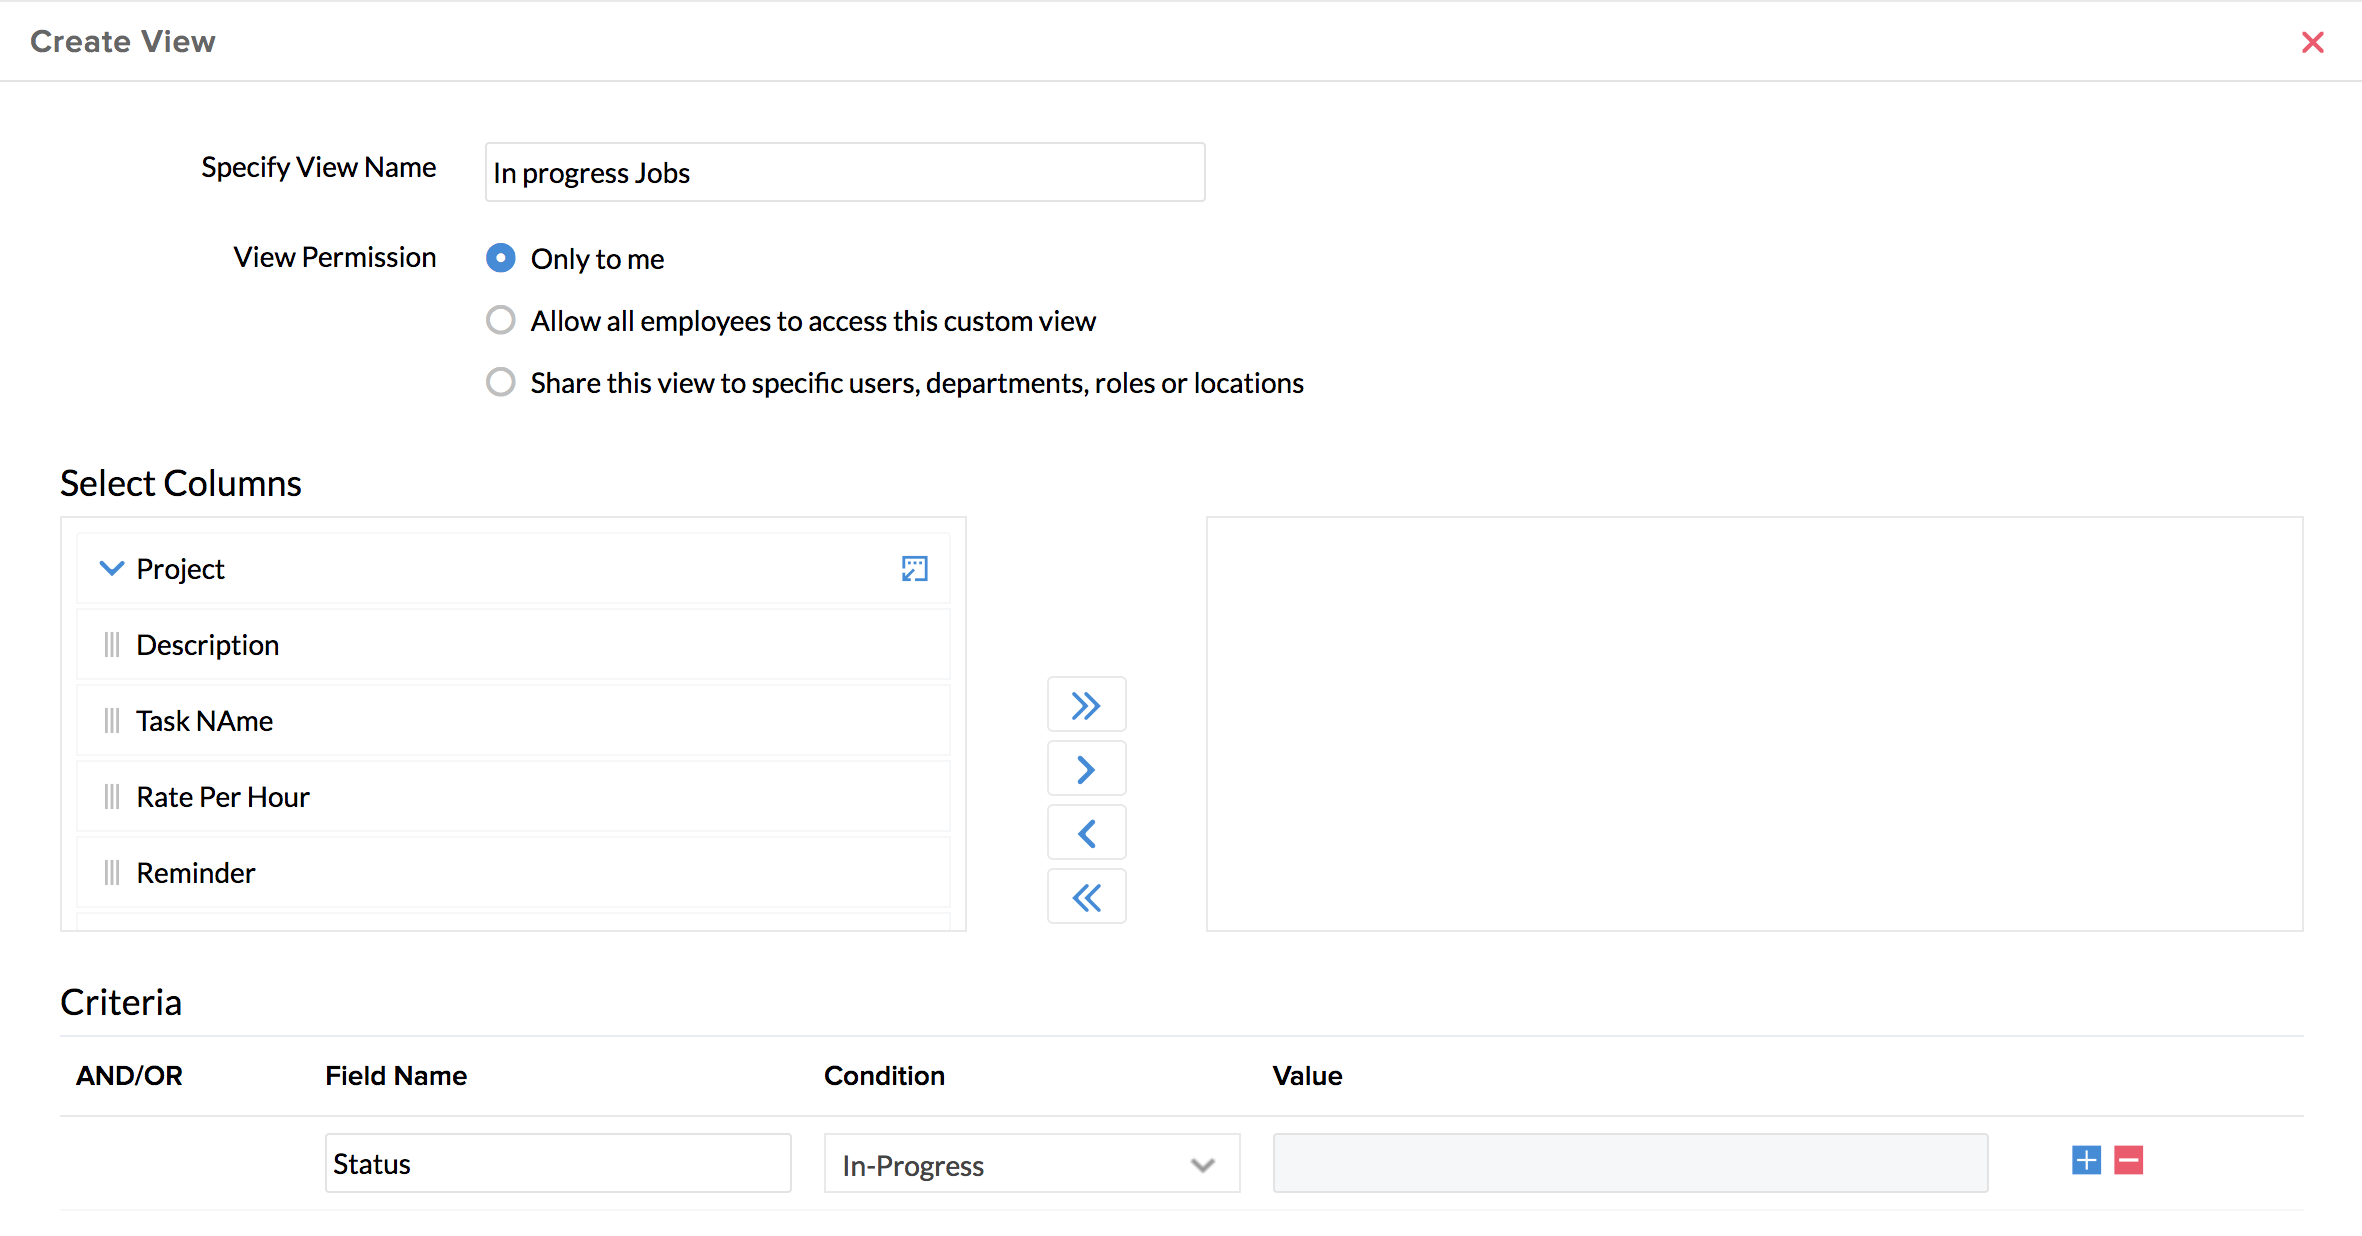
This way the view will show only the jobs that are in the In-Progress status.
- Click Save
Now, you have created a view to display the jobs based on the fields that you have chosen.
Deleting Job(s)
To delete a Job,
- From your home page go to, Timesheet > Projects/Job > Job.
- Hover near the right end of the job and click the dustbin icon.
- Click Confirm.
The Job has been deleted.
To delete multiple Jobs, follow the steps given below.
- From your home page, go to Time Tracker > Projects/Jobs.
- Select the Jobs that need to be deleted.
- Click Delete.
You have now deleted the selected jobs in one go.
Note: Jobs can be deleted only by the Administrator or the Job owner (Creator of the Job)