Appraisal Process
- Starting an appraisal process
- Self Appraisal
- Multi-rater feedback
- Salary Hike
- Salary hike status
- Reviewer process
- Review Extension
- Normalization
- Employee Review Feedback
- Completing an appraisal process
- Unpublish a Review
- Exporting appraisal cycle data
Starting an appraisal process
- To begin the appraisal cycle, go to Performance > Settings > Appraisal Cycle > Add.
- Give a name and enter the period for which the appraisal is applicable.
- Give a description if needed.

- Upload any guideline documents if necessary.

- Enter the process period.
- Enable Self-appraisal if required and enter self-appraisal period. A self-appraisal template can also be uploaded if needed.
- Enable Multi-rater feedback if required and enter the selection and feedback period for multi-rater feedback.
- Enable Salary Hike if you want it as part of the process. (Salary hike can happen independently too, without being part of an appraisal cycle)
- Enable Add reportees as Raters by default if you want to auto-populate all the reportees as multi-raters for the Multi-rater feedback. If you want to categorize the reportees under a multi-rater type, choose one under Select Multi-rater type for reportees.
- Select if the Reporting Manager and Employee or only the Reporting Manager can select the raters. Reviewers will be able to select multi raters by default.
- Select the minimum and maximum number of raters that can be selected for multi-rater feedback.
- If you want the raters selected by the reporting manager to be shown as anonymous, select Hide.
- If you want to raters to view the self appraisal of the employee they are rating, check Allow Raters to view Self Appraisal.
- Enter the review and normalization period.
Note:
- Process period is the time taken for the appraisal cycle to get completed.
- Self-appraisal period is the time within which employees should complete their self-appraisal.
- Review Period is the time frame for the review to get completed.
- Normalization period refers to the period within which the feedback, summary etc should be collated.
- Enable module selection for multi-rater type, if needed. Using this option, you can select modules for each multi-rater type and only those modules will be available to the assessors in that type during multi-rater feedback. This option can be used in addition to the module selection for multi-rater review to further refine the feedback you want to receive.
- By default, reviewers can provide ratings and add their comments during review. However, if you do not wish to facilitate ratings and comments, disable the corresponding checkboxes within the respective review sections.


- Define the target set of employees under Applicable For based on date of joining, location, role, designation or a custom date field.
Note: You can either do the performance review by the KRAs/Goals added or have Goals mapped to the KRAs and give a rating for them.
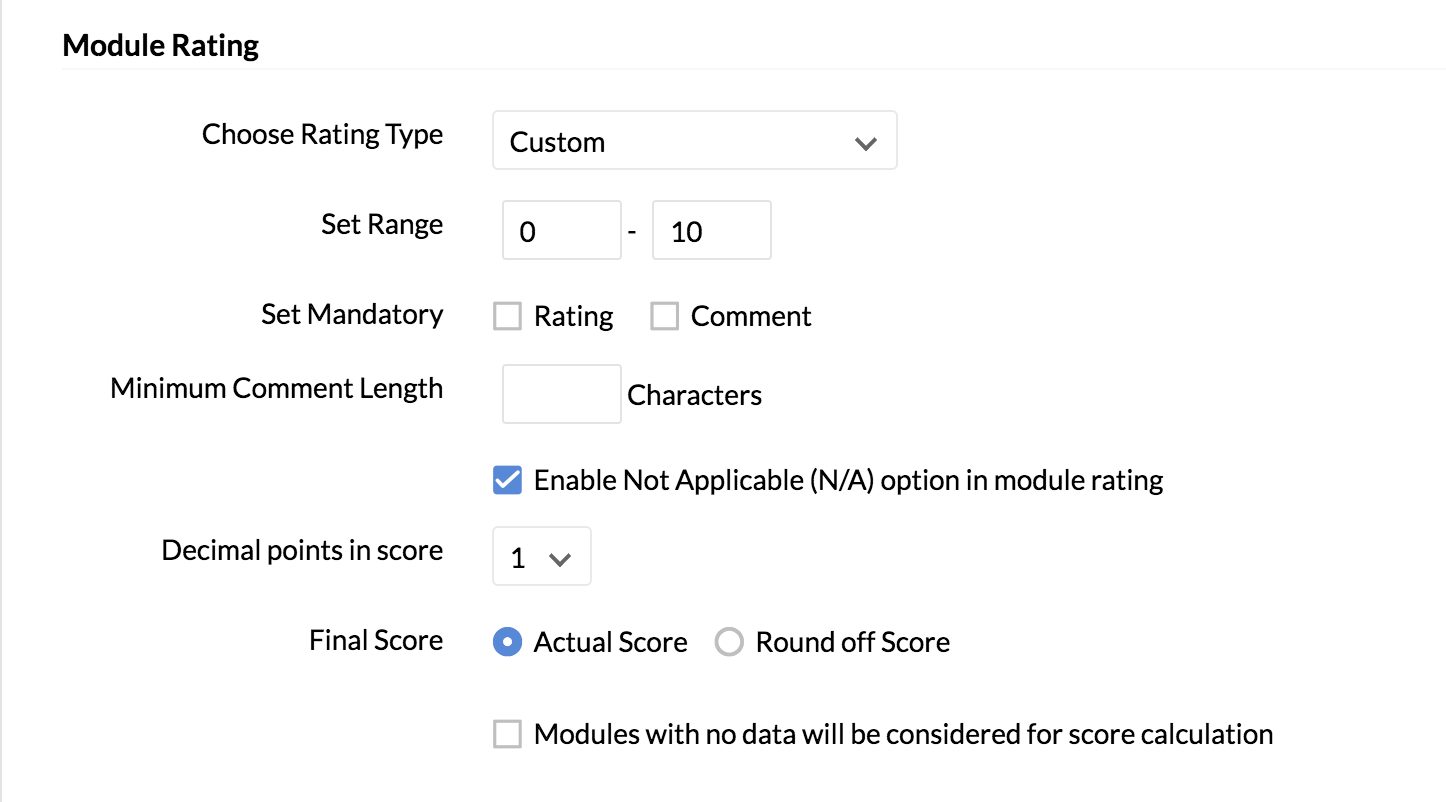
- Under Module Rating you can set the following:
- Choose Rating type – select if you want the performance ratings to be given as Stars, Numbers, Text or Custom. If Custom is selected, enter the range you want to apply under Set Range.
- Set Mandatory – define if you want the ratings, comments or both to be mandatorily provided.
- Minimum Comment Length – if you want to impose a minimum comment length, enable the box and enter the minimum number of characters that must be entered during review.
- Enable Not Applicable ( NA) option in module rating: if you want the reviewers to be able to give NA and not comment, then tick the box.
- Decimal points in score – define if you want the scores to be given with 1 or 2 decimal points. For example, if 2 is chosen, then the score would be shown as 2.24. If 1 is selected, it would be shown as 2.2.
- Final Score – define if you want the final score to be given as it is ( Actual Score) or be rounded off ( Round off score).
- Modules with no data will be considered for score calculation – Although some modules are included to be part of the review, some employees may not have some modules applied to them. For example, even if the Goals module is included as part of an appraisal cycle, an employee may not have any goals set. Check the setting to include, else uncheck it.

- Enter and customize the rating field names and score range if required. Check Lock Rating if you do not want the reviewer make manual changes to the ratings.
- Select the reviewers and configure approvals with multiple levels. For example, you can include the reporting manager, department head, or any selected employees as reviewers. If any reviewers are unavailable, they can be skipped or replaced with someone else.

- Under Review approval configuration, Enable Review Approval to enable approvals for final level review. When this option is enabled, on submitting the review, the approver will be notified to approve the submitted review. After the review is approved, the review is considered complete. The review approval template can be customized as well, with options for changing the approver, email, etc.

- Under Publish Configuration, We can choose to either publish the review manually, or automatically on a specific date. When choosing to publish manually, a date range is to be provided.If no date range is configured then review can be published anytime once review is completed. Additionally, we can select the fields that are to be shared to the employee and also select publishers, only the selected publishers can publish the review results.

- Enable Allow Employee to share Appraisal Feedback if you want the employees to give feedback on the concluded appraisal cycle.
- Click Submit.
- Click Start to begin the process. If you want to add or remove any specific employees from the appraisal process before the initiating the process, click Manage Appraisee in the list view.

- To include an employee outside of the applicable list of employees, click Include Employee on the top right corner.

- Select the employees you want to include from the Not Applicable Employees' list.

- Once you click Start, you will get to view your configuration a final time to ensure all settings are correct.
- Click Initiate the process as the final step to begin the appraisal cycle.

There are some email alerts that are already configured to notify employees when the appraisal cycle starts, to remind reviewers to complete their review etc. You can customize these mail alerts or also add new email alerts as required.
![]() Tip : To customize the already configured email alerts, go to Settings > Automation > Workflow. Click on the respective workflow to edit it. Click here to know how to create new email alerts.
Tip : To customize the already configured email alerts, go to Settings > Automation > Workflow. Click on the respective workflow to edit it. Click here to know how to create new email alerts.
Once the appraisal cycle is started, all the configurations will be reflected accordingly.
Self Appraisal
Self Appraisal is critical feedback of one's own performance. It is an opportunity for an employee to evaluate their own performance on the job. It also gives the manager a different perspective apart from their own evaluation of their reportees on the job.
Self Appraisal can be enabled while configuring an appraisal cycle.
- Go to Settings > Appraisal Cycle > + Add
- Check Self-Appraisal under Appraisal Process Configuration Details
- Give a time period within which the self-appraisal is to be completed
The period chosen must be within the overall appraisal process period. Click here to know more about self-appraisal settings while configuring an appraisal cycle.
Once self appraisal is enabled, an employee can go to My Review and submit their self-appraisal for the current appraisal cycle under the Self Appraisal tab

If an employee has missed the deadline for self appraisal submission, they can request to extend the review period, and if approved, can submit their self appraisal.

Once a self appraisal review has been submitted by the reviewer, the employee cannot add or edit their self appraisal even if the self appraisal period has not expired. However, if the reviewer wants to make an exception and allow the employee to submit Self Appraisal review even after review period has started, they can do so using this option (refer screenshot below).

Multi-rater feedback
Multi-rater feedback is another useful method by which a manager can assess the performance of their reportees by considering feedback from other teams with whom their reportee has worked with. For example, if an employee is working on a project with some other employees, then their rating is taken for the multi-rater feedback.
The Multi-rater review is done by making use of a form. So, as the first step, you need to first enable the Multi-rater Review form. To do this
- From your home page, go to Settings > Customization > Forms
- Select Performance under Service Name
- Ensure that the Multi-rater Review form is enabled
This form can be customized with fields as per your needs. In case you are not using KRA or Goals to assess performance, you can add some fields based on which you would like to have the feedback given by the Multi-raters. You can also use this in addition to the KRAs or Goals.
Once you have enabled this form, you will be able to see the Multi-rater feedback section in the Appraisal Cycle.
There are many ways of selecting Multi-raters.
1. Employees can select the multi-raters themselves. In this case, if Approvals are configured, then the Reporting Manager gets to approve/reject the multi-raters who are chosen by the employee.
2. Reporting Manager/Admin selects the multi-raters. in this case, it does not go for approval as the manager is making the selection directly.
3. Reviewers can select the multi raters by default.
Multi-rater feedback can be enabled while configuring an appraisal cycle.
- Go to Settings > Appraisal Cycle > + Add
- Check Multi-rater under Appraisal Process Configuration Details
- Give a time period within which the multi-rater feedback is to be completed
- Define if the only the Reporting Manager or the Employee/Reporting Manager both select the Assessors
- Define the minimum and maximum number of appraisers that can be selected
The period chosen must be within the overall appraisal process period. Click here to know more about multi-rater related settings while configuring an appraisal cycle.
Multi-rater feedback process:
- An employee must go to Performance > My Reviews and select their multi-raters under the Multi-Rater Selection tab. Once the employee selects, it will be sent for approval.

- Admins, managers and reviewers can select Multi-raters by going to Performance > Multi-Rater Selection. Managers will be able to select multi-raters for their reportees alone.

- Once an employee sends their selection for approval, the manager/admin can approve or reject under Performance > Multi-Rater Approvals

- Once approved, the chosen multi-rater will be requested to give their rating under Performance > Multi-Rater Feedback

- The approver can click Rate to give their feedback. If they do not want to give feedback, they can click Decline.
Note: Approvals should have been configured for this.
When a manager is giving their review, they will be able to use the multi-rater feedback to make a more informed decision about the rating they are going to give their reportees.
Salary Hike
During an appraisal cycle, every organization will review and rate employees' performance and revise the salaries. Usually, a budget is allocated for each team and a percentage of the budget is decided for each employee. At the end of the cycle, employees will receive their salaries along with the hike.
In Zoho People, a salary increase or "hike" can happen independently or as part of an appraisal cycle. Before you enable salary hike, you must first update all employee salary information under Employee Salary.
Here is the overall flow of the salary hike process:

To initiate the salary hike process, ensure all employees' salary information are updated under Employee Salary.
To enter the salary information of an employee,
- Go to Performance and then Employee Salary.
- Click Add Record.
- Select the employee's name and enter their salary.
To view the salary history of an employee, click the audit icon under Salary History.

To enable salary hikes,
- Go to Performance > Settings > Appraisal cycle > Add > Add Salary Hike Cycle or enable Salary Hike within the appraisal cycle you are adding.

- Select the Hike Appraiser.
- Set a Hike Period if you want to restrict the hike process to a specific period of time.
- Select a Hike Push Date. The salary hike data will be pushed to the salary form on this date.
- Configure Hike Approvals if needed.
- Enable Proposed Promotion if you want to include a column for the appraiser to select the change in designation that they are proposing for the employee.
Salary hike process
- After enabling a salary hike in an appraisal cycle or adding an independent salary hike cycle, you will be directed to define the salary hike percentage at the end of the process. Select one of the following options to define a salary hike percentage.
- A common hike percentage to all employees: Select this option to define a standard hike percentage to all applicable employees.
- Hike based on customized rules: Select this option to define a hike percentage for employees based on customized rules and to define a default hike percentage for employees who are exempt from these rules.

- Click Save.
- To Initiate the appraisal cycle, select Performance > Settings > Appraisal Cycle and click Start > Initiate the Process at the required appraisal cycle.
- The Hike Appraiser navigates to Teammates and then Salary Hike and enters the Proposed Hike and Proposed Promotion for all their employees. The proposed promotion selected here is only for reference and won't be reflected in the employee form.

- If Hike approval is not enabled, the proposed hike is automatically approved and is used as the final hike. If hike approval is enabled, the proposed hike is sent for approval.

- The Hike Approver navigates to Teammates and then Hike Approvals and approves, rejects or makes changes to the proposed hikes.
Proposed hikes that are rejected are returned to the Hike Appraiser to re-evaluate and resubmit another proposed hike to be approved.
Pushing salary hikes to the employee salary form
Once the salary hike is fixed, the data must be pushed to the employee salary form so that the employees' salaries can be revised.
If the Salary hike push date is entered while enabling Salary hike in the appraisal cycle, then the Salary hike data is pushed automatically to the Employee Salary form on the selected Hike Push Date, once all salary hikes have been approved.

If the salary hike is not completed for some employees, that data can also be pushed manually. To push the data manually,
- Go to Appraisal Cycle list view.
- Click the Review Status icon for the corresponding appraisal cycle.
![]()

Salary hike status
To view the current status of the salary hike process completion, go to Reports > Performance > Salary hike status.

Exporting and Importing salary hike data
To export the Hike Status report,
- Go to Performance > Reports > Salary hike status.
- Click the ellipsis icon in the top right corner.
- Click Export.
Details of salary hikes can also be exported from the Salary Hike tab.
To import hike percentage and justification details,
- Go to Performance > Settings > Import data.
- Select Salary Hike from the drop-down.
- Select the Appraisal Cycle you want to import data to under Appraisal Name.
- Click Submit.
Salary hike notifications and other automated actions
Workflows, mail alerts and other automated actions can be configured for the salary hike process.
Use case
For example, if you want to create a mail alert to remind the hike appraiser to enter the proposed hike for their team, you can do this using a workflow.
To create a workflow,
- Go to Settings > Automation > Workflow
- Select the Salary Hike form
- Click + Add Workflow
- Enter a name for the workflow

- Select Create from the Trigger Process section.
- Select Mail Alert under Actions. Click the + icon beside Mail Alert to create one.
- Enter a name for the mail alert and select Hike Appraiser you want to send it to.

- Create the email template

- Click Save
Now the workflow has been configured successfully and the email alert will be triggered once the appraisal cycle is initiated.
Reviewer Process
The final stage of an appraisal cycle is the reviewer's rating. While configuring the appraisal process, the reviewers will be selected.
The selected reviewer take into account all inputs from self appraisal, multi-rater and other selected modules to enter a final rating for an employee.
To give the final review,
- Go to Performance > Teammates > Appraisee View

- Click on the employee for whom you want to give your final review and rating.
- Go to the Review tab and click on Review in the box below or use the copy icon to use the same review data as any other reviewer in the chain.
Note: In case of multiple reviewers, click the View icon to see their review on the employee. Additionally, you can also use the copy icon to use the same review data as another reviewer

The above screenshot shows the various options available on this screen.
If one of the reviewers is unavailable to complete the review within the specified timeframe, you can skip the reviewer. (You can undo skip until the next level review is completed). If the final review level is skipped then the previous level will now become the final review level.
Additionally, You can use the Change Reviewer option to change current reviewer.
- Enter your evaluations alongside the listed items under each module.

The type of feedback that can be entered is based on what options are selected while configuring the appraisal process.
The score will get auto-calculated based on the entered evaluations.
- Enter other details, as required under the Performance card.

- You will now see a consolidated final score card.

- Click Save Draft if you are going to make further changes. Else, click Submit.
This score will be considered as the final score and the final rating(based on your configuration) will be interpreted from this score.
The manager can now publish the appraisal outcomes to the employee. The details that are published are based on the Publish Configuration set while creating the appraisal cycle.

Review Extension
When a manager is unable to complete the performance review within timelines, they can request for the review period to be extended. To extend the review period,
- Go to Performance > Teammates > Appraisee View.
- Click on the banner.

- Give the reason for the extension and click Send Request.
- Once the manager sends the request, an Admin can view the request under Performance > Activities > Review Extension and accept or reject the request.

Once the extended review request has been accepted by the Admin, the manager will be able to give their rating or make any changes within the extended time.
Requests to extend self appraisal, continuous reviews, multi-rater reviews can also be sent for approval to the Admin and those will also be listed in this space.
Normalization
..
What is Normalization?
Normalization is a process of adjusting employee ratings according to the overall defined ideal rating distribution in the organization. It is part of an appraisal cycle.
..
Why is it useful?
Normalization aims to provide overall objectivity when managers provide ratings to their employees. It also helps identify the top, mediocre and low performers in the organization.
Configuring Normalization
Normalization can be enabled as part of creating a new cycle.
- Go to Performance > Settings > Appraisal Cycle.
- Click Add and enable Normalization.

- Enter the Normalization Period. This period must occur after the review period.
- Enter the Ideal Rating Distribution beside each rating. The numbers entered indicate percentage.
- Configure the rest of the cycle and click Submit.
After all appraisers have submitted their ratings during the review period, admins will be able to see the final level ratings which fall within the defined ideal percentages and those that deviate under Performance > Normalization.

Note:Once a cycle has begun, the normalization tab will be visible to all admins and appraisers. They can, however, make changes only once the all ratings have been submitted by all appraisers.
Administrators can normalize the ratings that are not ideal by either normalizing it themselves by clicking the name of the respective appraiser.

Or they can click Request to Normalize so that the appraiser can normalize the ratings.

The review will automatically be unlocked once the request to normalize is sent.
Note: During the normalization process, the appraisal can be manually locked and unlocked for each appraiser by clicking the lock icon under the Lock Review column.This option helps control the changes that are made during normalization.
The respective appraiser will be notified of this request through an email that can also be customized. The appraiser will be able to alter the ratings that they have given under Performance >Appraisee View > Normalization option on the top right corner.

By clicking Normalization, the appraiser can change the rating directly on the same page.

Alternatively, they can make changes in the review page by clicking Go to Review Page.

If deviations still exist after normalizing a rating, admins can once again request for normalization until they are satisfied with the rating given by the appraiser.
The same link can also be referred to understand the changes of an appraisal cycle after normalization is complete.
The progress of the normalization process can be checked by clicking View Graph on the top left of the screen.

The normalization curve for each appraisal cycle represents the alignment between the ideal and actual ratings. The more similar they are, the closer the actual ratings are to the ideal ratings.
A similar graph will be viewable for every appraiser in the form of a bar graph to view their Actual vs Ideal ratings.
Employee Review Feedback
Once an appraisal has been completed and the manager has given their rating to the employee, the employee can use the Share Feedback option to give feedback on their rating.
To use Share Feedback,
- Navigate to Performance > My Review.
- Select the appraisal cycle that you want to give your feedback for.
- Click Share Feedback.

- The employees can select their feedback from the options given and also give comments.

- The manager can then view the comments given by the employee and also respond to the comments.
If the manager wants to re-evaluate the employee's rating based on feedback shared, then the manager can send a request to extend the review to the Admin ( if review extension has been enabled).
To request for the review period to be extended, click on the banner.
Learn more on how to customize the option for the review feedback and automate review extension.
Completing an appraisal process
Once all employee appraisals are completed, or to ensure no further changes are made to an appraisal, you can manually mark an appraisal as completed.
To complete an appraisal, click the Review Status icon beside the appraisal you want to complete.

Click Complete appraisal in the side toggle to complete the appraisal process. It is important to note that once the appraisal process is completed, changes are not permitted to any published reviews. Read the next topic on Unpublishing a review to learn more.

To share module ratings to employees individually via email you can use mail merge templates. Learn more
Unpublish a Review
If a review is already published but there is a need for a correction, then the review can be unpublished by clicking on Click here to unpublish review. (refer screenshot above) link.
Note: Once the appraisal cycle is complete, i.e, user has already clicked on Complete Appraisal, then, the reviews cannot be unpublished.
Once the necessary changes are completed ,publish the review again and click Complete Appraisal to complete the review. You will be alerted if there are pending employee appraisals that are yet to completed when completing an appraisal. If you still want to complete the appraisal click Confirm.
To view data of all completed appraisals go to the Reports section.
If you want to reopen a completed appraisal, click the Review status icon beside the appraisal.

Click Restart Appraisal.
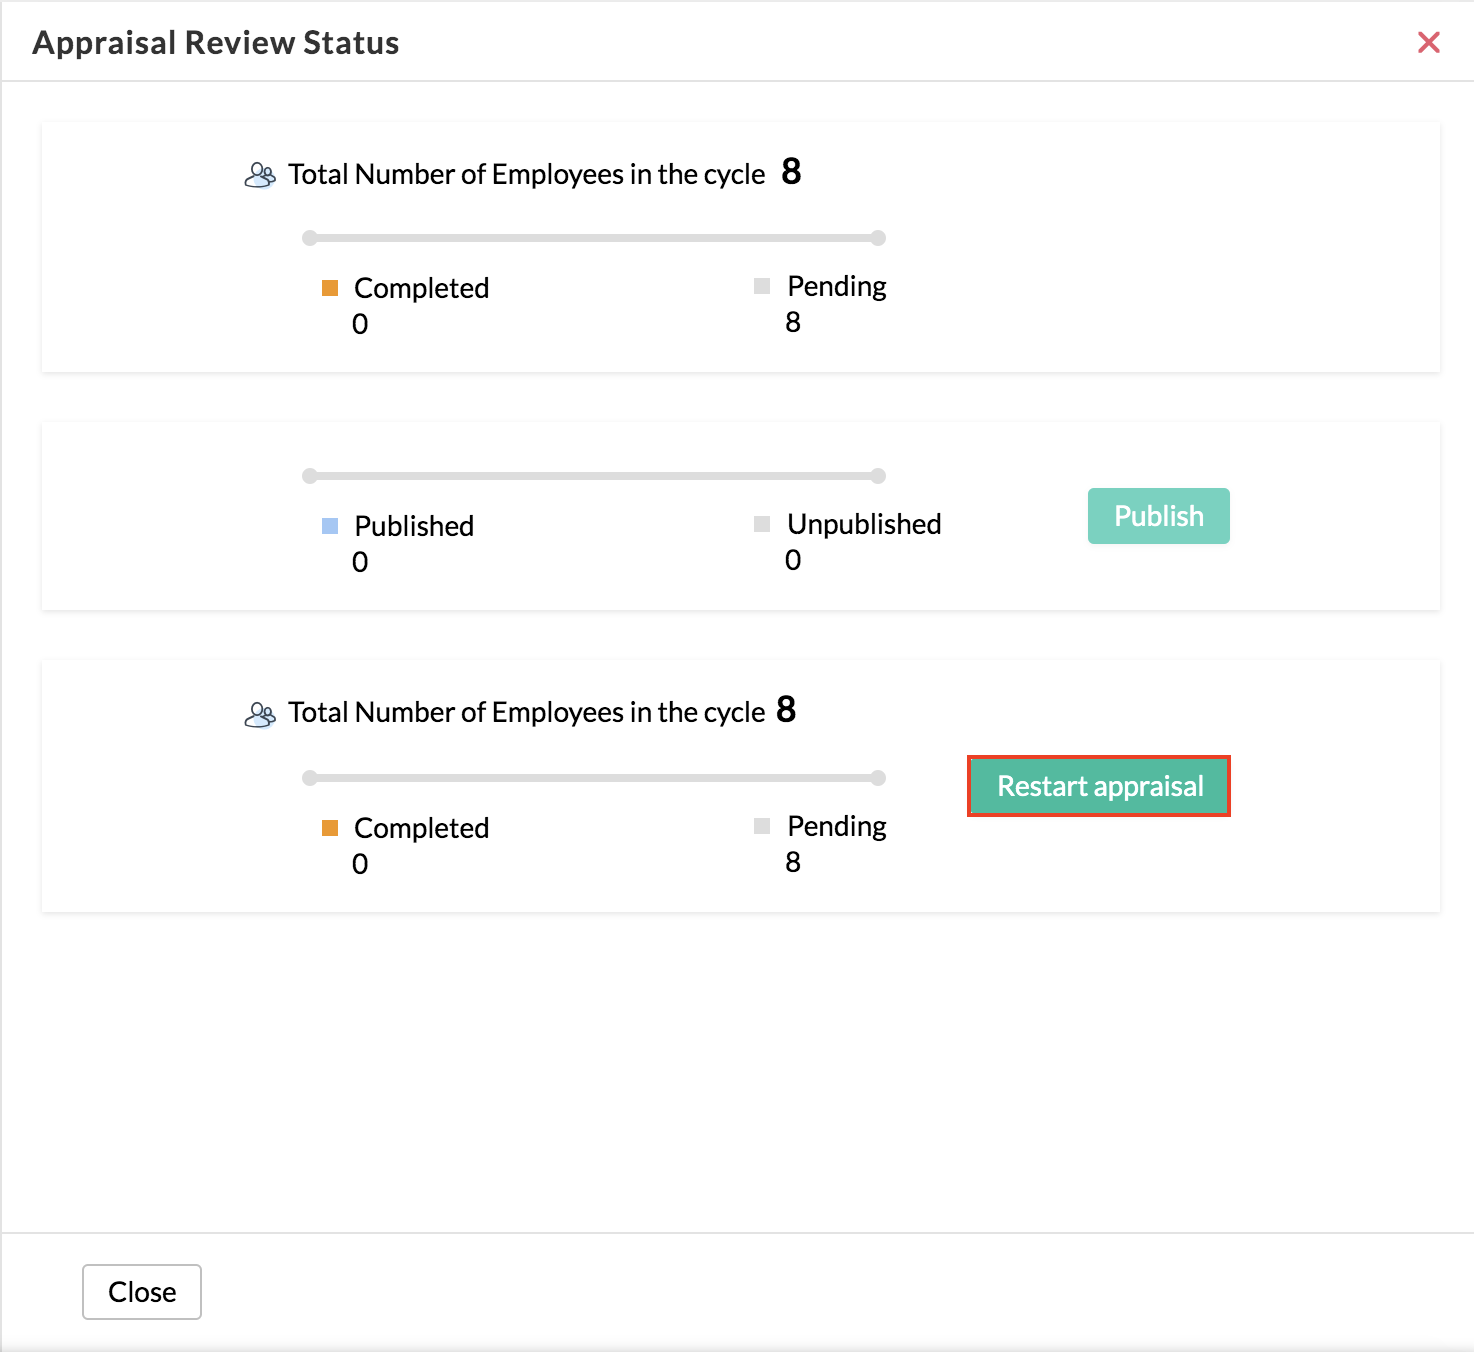
You will now be able to make changes to this appraisal.
Exporting appraisal cycle data
This option can be used to export all data of an appraisal cycle. When an appraisal is restarted or when an employee is removed from an appraisal, there will be irretrievable data loss.
To prevent any data loss, you can use this export option before such actions.
