General Settings
This section deals with topics on setting your company's general working hours, two prime modes of capturing attendance, paydays/hours settings, permissions and regularization.
- General
- Working Hours
- Pay Days/Hours Calculation
- Late Night Work Hours Tracking
- Permissions
- Facial Recognition
- Shift Settings and Notifications
- Shift Reminders
- Regularization
- Export settings
General
You can define your default shift/work hours here.
To set your basic work hours,
- From Home, go to Attendance > Settings > General Settings.
- Set the date on which you would like to make your work hours come into effect, under 'Effective From'. The attendance settings will be effective based on the date selected.
- Select the default shift timing for your organization.
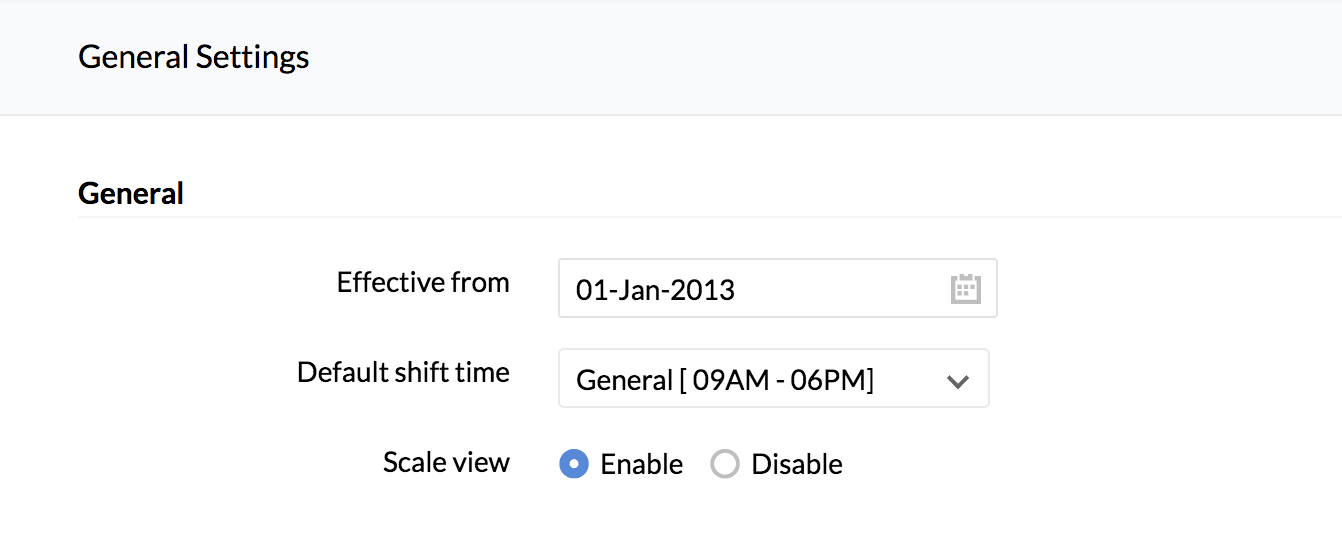
Your default shift timing has been set.
Zoho People offers two prime modes to capture attendance effectively. You can choose from 'Strict Mode' and 'Lenient Mode' as per your organizational requirements.
To set your mode of attendance,
Working hours are assigned according to the selected modes.
Lenient mode: It applies in a norm, where the organization doesn't have a rigid mode as the employee needs to mark his attendance at one fixed time every day. In this mode, a valid check-in or check-out in the system itself means that the employee will be marked as Present for the day.
Strict mode: This goes with the system, where an employee should have completed a fixed no of hours to be marked as present for half-day and full day. This is a preferred mode of attendance marking if the organization does not want flexible hours of work.
Working hours:
Total Hours Calculation
While calculating total working hours, you can either set First Check-in & Last Check-out mode or Every Valid Check-in & Check-out mode depending on your organization's working style.
First Check-in & Last Check-out
This option calculates the time you first check-in and your last check-out time. In the intervening time, you can check-in and check-out multiple times which will not be taken into consideration.
Every Valid Check-in & Check-out:
This option calculates only the valid check-in & check-out entries. For example, if you check-in at 9:00 AM and check-out at 11:00 AM and again check-in at 12:00 PM, the system will calculate only the hours you were in the office (i.e., between 9:00 AM-11:00 AM) and will not calculate the hours from the time you check-out (11:00 AM-12:00 PM).
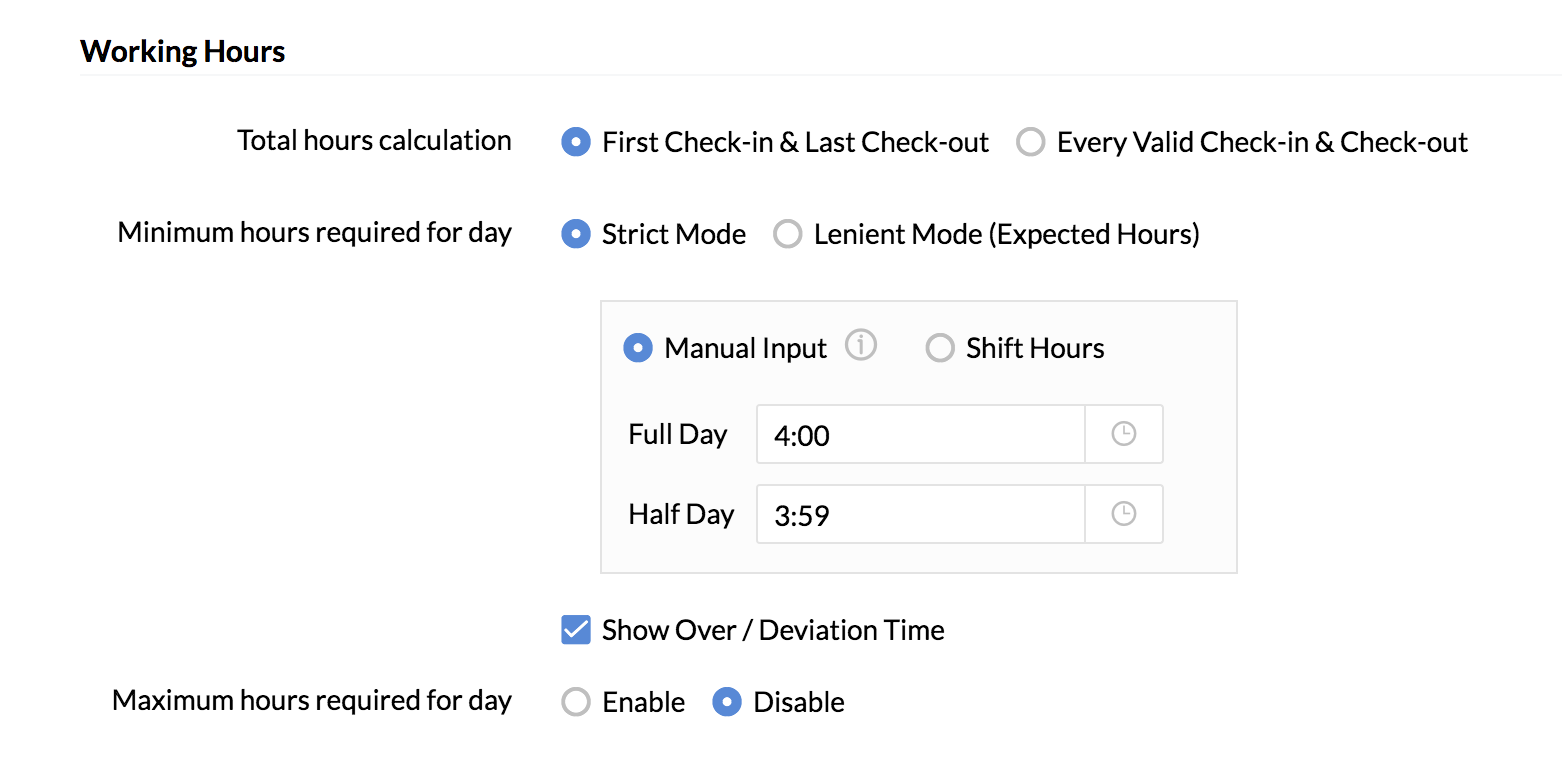
In both these modes, you can have the minimum hours calculated based on the manual input that you give or based on the duration of the shift. If you choose to have the minimum hours calculated based on the shift hours, then the entire duration of the shift will be taken as the input for a full day and half of the duration of the shift will be taken as the input for half a day.
Show Over/Deviation Time
You can select this check box to show employees' overtime and deviation time.
In the Strict Mode, if you have fixed 4 hours as half- day and 8 hours as a full-day requirement, then if someone is present only for 7 hours, then the system will capture it as a half-day present and half-day absent. Showing the 1-hour deficit under deviation time. If someone is present for 5 hours, then it will be shown as half-day present and half-day absent with the deficit 3 hours shown under deviation time. On the other hand, if someone has worked 10hours, then it will be shown as full-day present with an over-time of 2hours.
In the lenient mode, if you have fixed 8 hours as minimum working hours required for a day, when an employee works for more than 8 hours, then it is calculated as overtime and anything less than 8 hours is calculated as a deviation.
Maximum Hours required for a day
This is used to set maximum working hours for the employees. The maximum working hours can be fixed for both half and full working days. This option is very helpful when you need to set a limit for the working hours. By default, Maximum Hours is disabled. Click Enable to use this option.
Note: If you have enabled over-time for your organization and also enabled Maximum working hours, then over-time exceeding the maximum working hours fixed, will not be considered as over-time.
This setting enables you to round -off attendance check-in and check-out entries to simplify payroll calculations. It can also provide some flexibility for employees when arriving late to or leaving early from work.
The organization can set minutes for:
- First check-in: An employee's first check-in entry will be rounded-off to the start of the shift time, if it falls within the set minutes.
- Last check-out: An employee's last check-out entry will be rounded-off to the end of the shift time if , it falls within the set minutes.
- Total worked hours: An employee's total worked hours will be rounded-off to the expected working hours set by the organization if it falls within the set minutes.
Let's look at a use case to understand this better.
Say an employee belongs to the general shift: (9:00 am - 6:00 pm) and the expected working hours in the organization are 8 hours.
These are the configurations set under round-off:
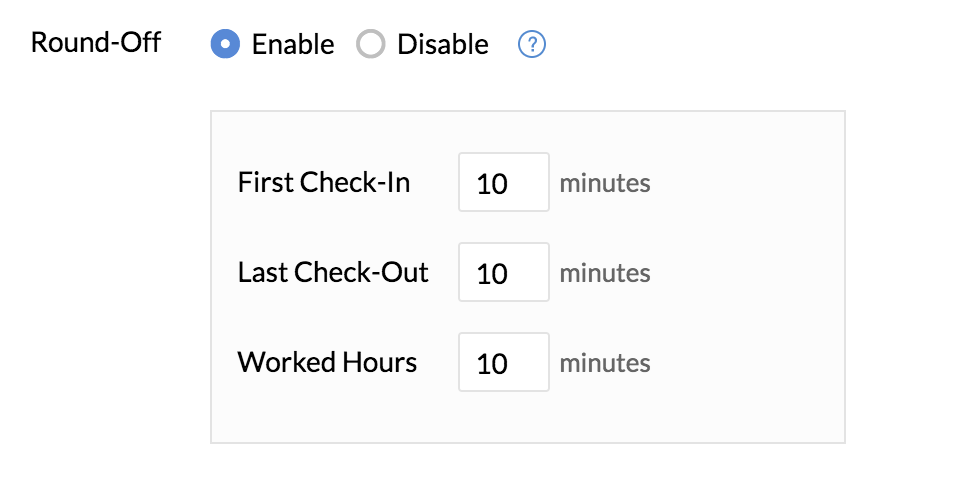
Based on the above configurations,
- If an employee's first check-in entry is anywhere from 9:01 am - 9:10 am, it will be rounded-off to 9:00 am. If the employee's first check-in entry is anytime after 9:10 am, it will not be rounded-off.
- If an employee's last check-out entry is anywhere from 5:50 PM - 5:59 pm, it will be rounded-off to 6:00 pm. If the employee's last check-out is anytime before 5:50 pm, it will not be rounded-off.
- If an employee's recorded working hours are anywhere between 7 hours and 50 minutes to 7 hours and 59 minutes, it will be rounded off to 8 hours. If the employee's recorded working hours are less than 7 hours and 50 minutes, it will not be rounded-off.
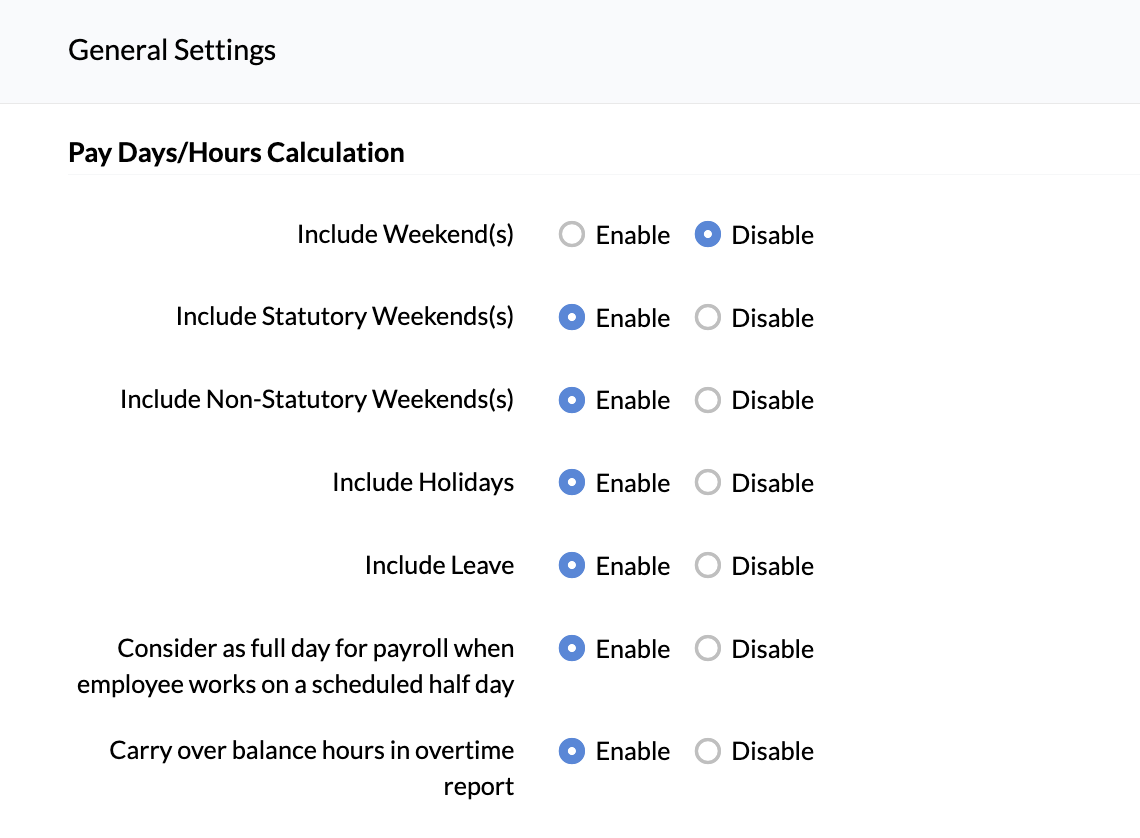
Pay Days/Hours Calculation
This Setting helps you define whether you would like to include Weekends/Holidays and Leave while calculating the Days/Hours for Pay calculation.
If you select to Include Weekends/Holidays/Leave, then the 'Payable Hours/Payable Days' will be inclusive of the Weekends, Holidays and Leave in the period.
To learn more about Statutory Weekend settings, click here.
The 'Payable Days/Hours' will reflect under 'Expected Payable Days/Hours'. Consider that your total working days in a week is 5 days. Then, the total expected payable days for a month will be 4 x 5. If you include Weekends, it means that your total expected payable days for a month will be the total number of days in the month. If you include Leave also here, then the leave applied to 'Paid' leave type category for the month will also be included for pay calculation. However, the Pay will be made according to the days worked. Hence, the Payable Days will be the total of Worked Days and the Paid Off (Weekends/Holidays/Leave).
Consider that your total working hours per day is 8 hours. In this case, if you have included Weekends, then it means your total expected payable hours for a month will be 30 x 8. In other words, the Organization expects to pay for 30 x 8 hours. However, the Pay will be made according to the hours worked. Hence, the Payable hours will be the total of Worked Hours (clocked in hours) and the Paid off (Weekends/Holidays/Leave)
The Consider as full day for payroll when employees work on a scheduled half day feature ensures that when an employee has worked half day (for example on a half weekday) it is considered as a full payable day for payroll calculation.
Carry over balance hours in overtime report: If you want the overtime hours from the previous pay period to be reflected and added to the current pay period's overtime hours, then enable this option. The previous pay period's overtime hours will be reflected under the previous balance column in the current overtime report.
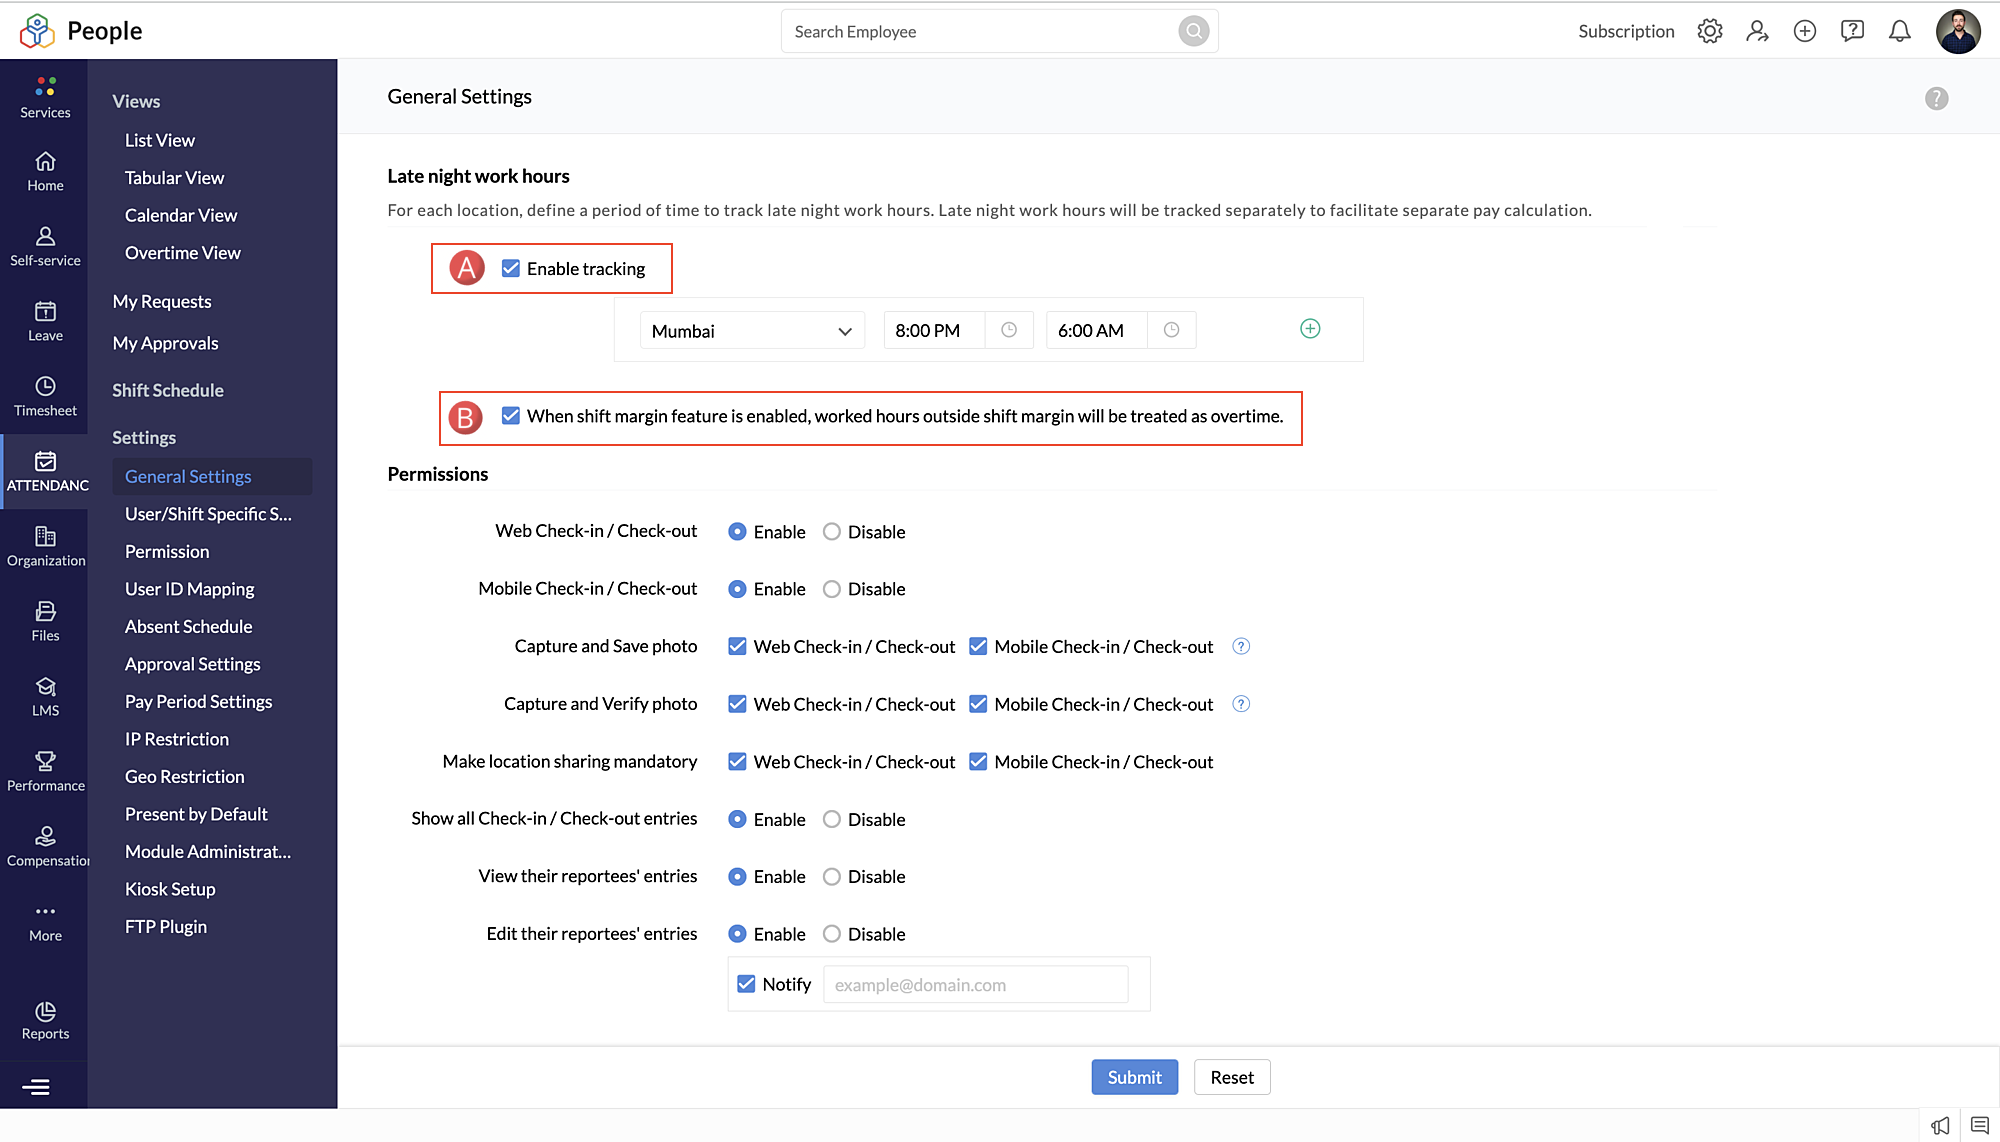
Late Night Work Hours Tracking
If your organization has employees that may also work through the night, exceeding regular work hours, it is essential that their work hours are logged.
To enable tracking late night work hours and to facilitate separate pay calculations for the same, the following option can be used.
Navigate to Attendance > Settings > General Settings and Enable Tracking option under Late night work hours (checkbox A in screenshot below)
Note that, for each location, a different time range can be configured. Any work hours logged between the mentioned time will be logged as late-night work hours.
If your organization uses the shift margin feature, then checkbox B can be enabled if necessary. On enabling, the worked hours outside shift margin will be considered as overtime (only if the minimum hours required for a day condition is met).
Use Case:
Let us take an example a scenario that employes the feature discussed above
Permissions:
Web Check-in/Check-out: You can make use of this option to enable or disable the option of check-in and check-out on the web.
Mobile Check-in/Check-out: You can make use of this option to enable or disable the option of check-in and check-out through mobile devices.
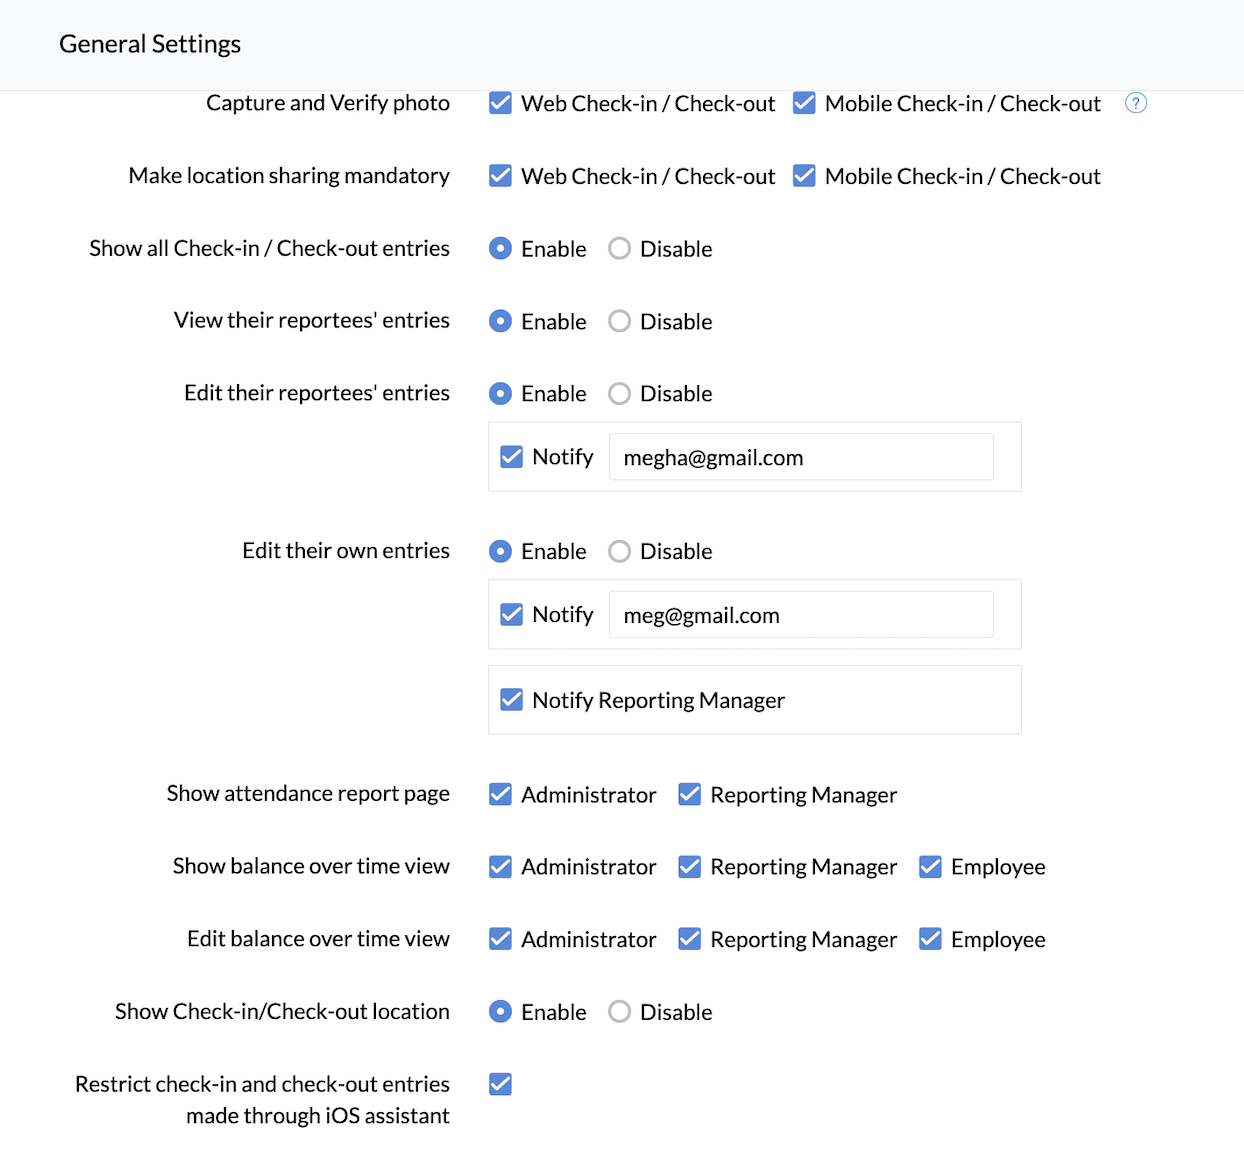
Capture and save photo when employee checks-in or checks-out using mobile app and Capture and verify photo when employee checks-in or checks-out using mobile app : Enabling this feature lets you capture user image to validate user identity while checking-in or out. Read more about facial recognition here.
Make location sharing mandatory: Enabling this option allows employees to check-in or check-out only after they allow access to their location. You can enable this option for mobile,web or both.
Some important points to note while location sharing is enabled in web:
- When the accuracy returned by the browser is below 1000 meters, the location shown is based on available longitude and latitude.
- When the accuracy returned by the browser is between 1000 and 3000 meters, the location shown is based on available latitude and longitude, along with the current accuracy level.
- When the accuracy returned by the browser is above 3000 meters, the location shown is based on IP address, along with the current accuracy level.
- When location couldn't be captured, the location shown is based on IP address.
View their reportees' entries: Enabling this option helps managers to view the attendance entries of their reportees.
Edit their reportees' entries: Enabling this option helps managers to view and edit the attendance entries of their reportees. If you click 'Notify', you can also add someone who needs to be notified when reportee entries are edited.
Edit own entries: By enabling this, you give access to your employees to edit their own entries. The Reporting Manager can be sent a notification if you check the 'Notify reporting manager' option. Anyone else who should be notified can be added by checking the 'Notify' option. Apart from this, you can also have an approval configured when attendance entries are edited. Click here to know how to create this approval.
Show attendance report page: Here, if you select the 'Reporting Manager' option, then managers can access all the attendance reports.
Show balance overtime view: Select who should have access to see the balance over time - Admin, Reporting Manager , Employee.
Edit balance overtime view: The permissions to edit the balance overtime can be set here for Admin, Reporting Manager and Employee.
Show Check-in/Check-out location: By enabling this you can view and track the check-in/check-out location details of the user.
Restrict check-in and check-out made through iOS assistant: This options lets you restrict attendance entries made through iOS virtual assistant Siri, other iOS automation or shortcuts app.
Shift Settings and Notifications
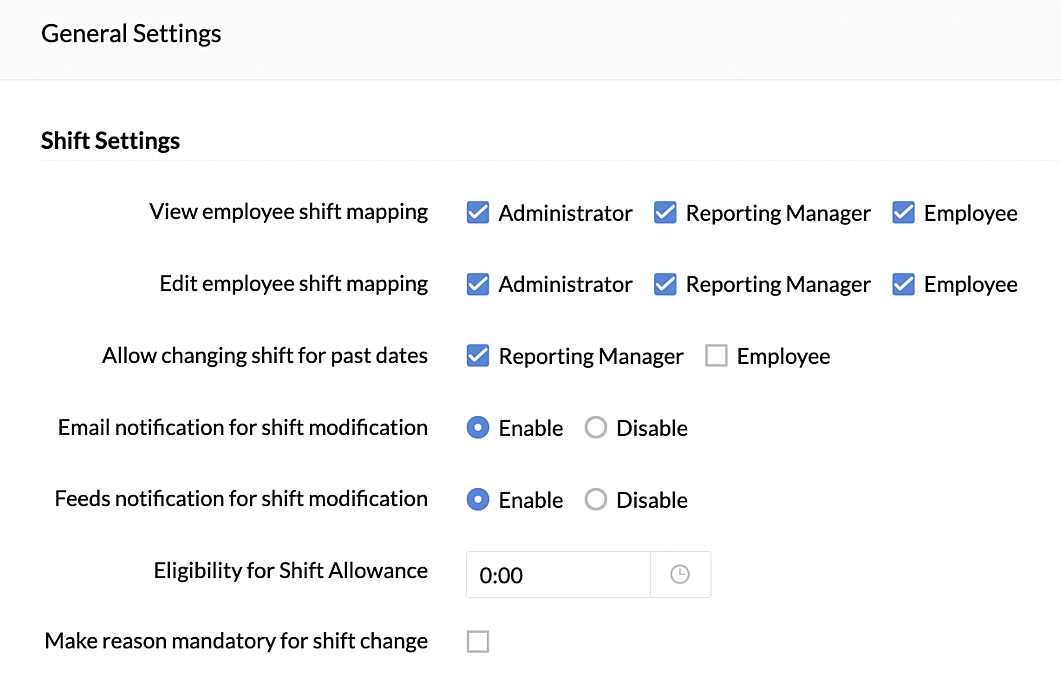
- View employee shift mapping: Here you can set as to who needs to view employee shift mapping.
- Edit employee shift mapping: Permissions to edit employee shift mapping can be set here.
- Allow changing shift for past dates: Define who can alter the shifts for past dates.
- Email notification for shift modification: You can decide whether to enable or disable the email notification that will be sent to employees.
- Feeds notification for shift modification: Here, you can set whether to enable or disable feeds notification sent to employees about any modifications to their shifts.
- Eligibility for shift allowance: Here, you can specify the minimum hours that an employee should have clocked-in for the day to be eligible for shift allowance.
- Make reason mandatory for shift change: When requesting shift change, employees are required to share a reason for shift change.
Shift Reminders
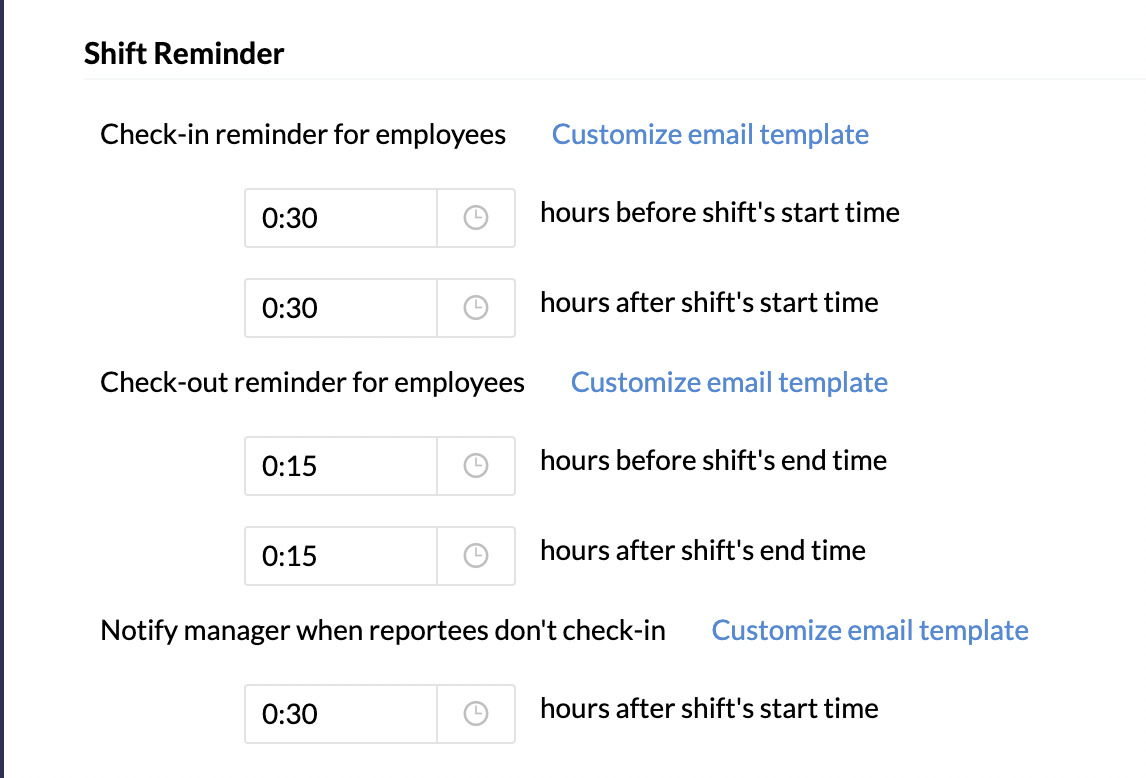
- Set check-in, check-out reminders for employees to remind them before and after the shift starts and ends. Click Customize email template to edit the default email template.
- A notification can also be sent to the reporting manager when an employee fails to check-in at their shift timing. Click Customize email template to edit the default email template.
- The time zones in which the reminders will be sent will be based on the time zones mapped to the locations or the organization's default time zone.
Note: To turn off any reminder, ensure there is no input given. Even 0:00 is considered as an input.
Regularization
Regularization for future dates - Here you can enable or disable regularization for future dates.
Regularization can be raised (x) day(s) from the date to be regularized.
Regularization can be raised (x) day(s) a week/month/pay period.
In this setting, there are two restrictions:
- The number of days within which the regularization request can be raised from the date to be regularized is specified here. For example, let us assume that the number of days is specified as three. If a request needs to be raised for regularizing the entry on the 1st of September, then the request is to be raised on or before the 4th of September.
- The number of days that the regularization request (within the time period chosen) can be raised can be specified. For example, you can set the time period as 'Week' and the days as '2'. This will mean that a maximum of two days can be raised in a week. This restriction does not apply while Admins are making regularizations.
Note: The drop-down for time period will only be enabled when a value is entered in the preceding (x) number of times field. If value entered is 0, this will block any regularization requests from being raised. If Pay Period is chosen as the time period, but no Pay Period settings have been configured, then the restrictions set will not apply.
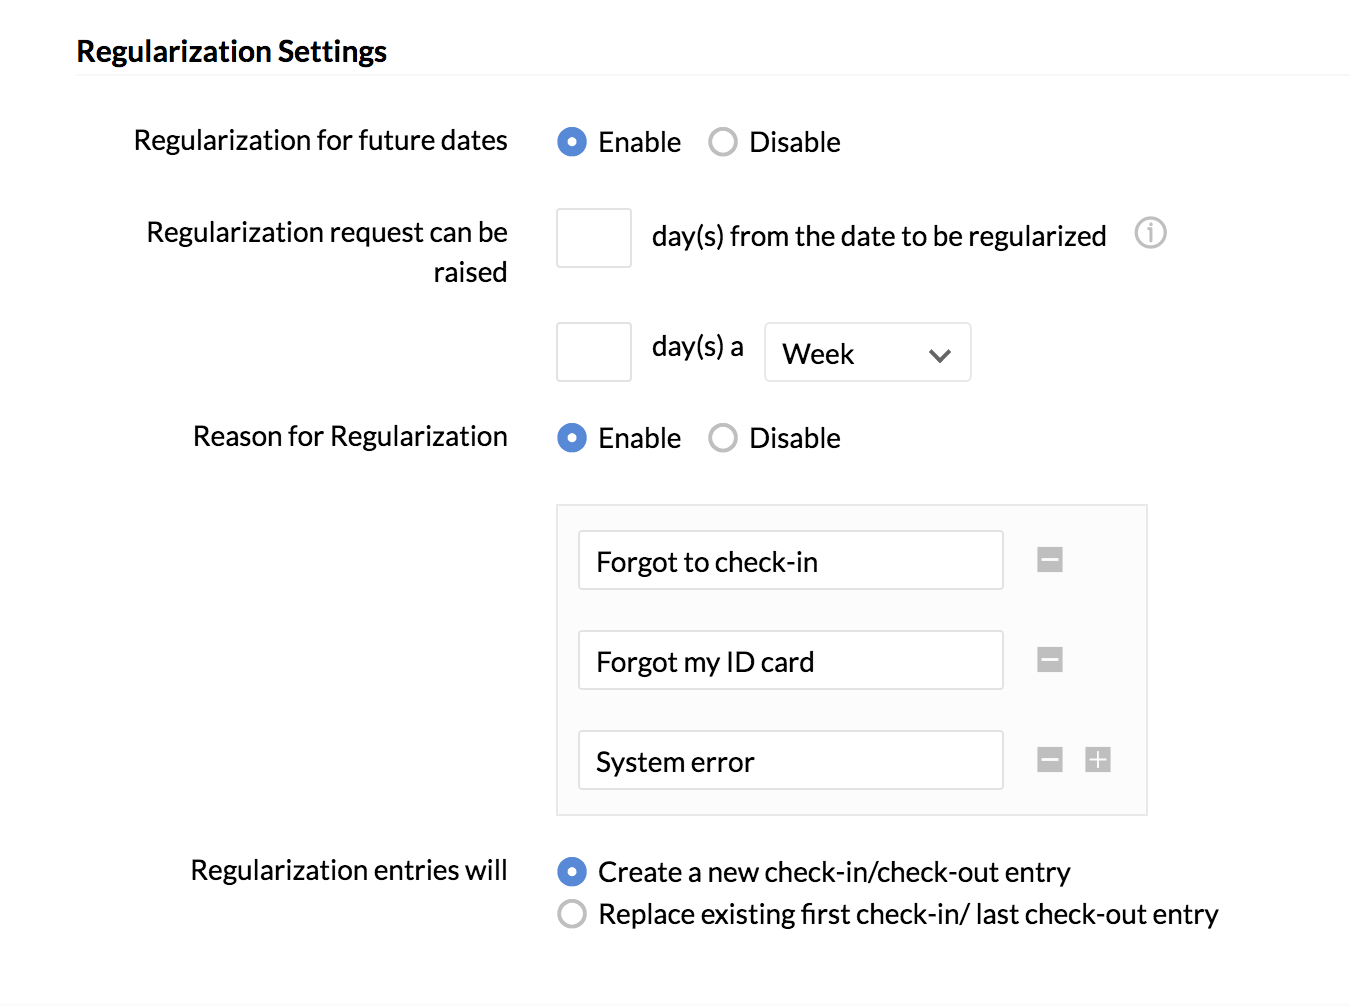
Reason for Regularization - Configure default reasons for regularization from which the user can choose one. The user is therefore restricted to use one of the available options during regularization.
Regularization entries will :
- Create a new check-in/check entry : When raising a request, the system will allow the user to add a new check-in and check-out entry. The existing entry and the regularized entry will be shown in attendance.
- Replace existing first check-in/ check-out entry: When raising a request, the system will allow the user to edit the existing attendance entries.The regularized updated entry alone will be shown in attendance.
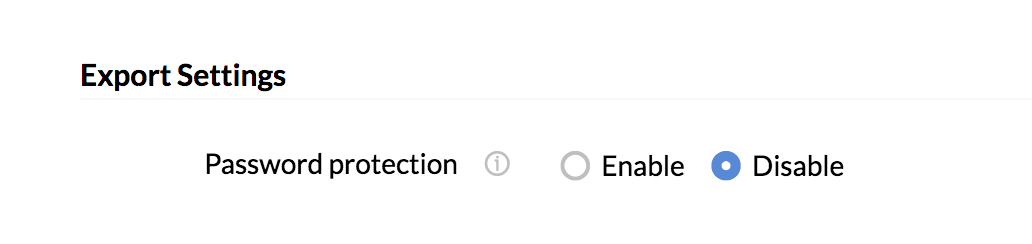
Export Settings
While exporting attendance data, if you want the information to be password protected, you can enable it here.